Contents
About Kaspersky Threat Feed App
Kaspersky Threat Feed App is a QRadar application that gives you access to Kaspersky threat intelligence (TI). It provides the following features:
- Search within the feeds database
- Charts that contain information about detections
- Lists of most popular indicators of compromise (IoC) detected by Feed Service
- Information about Feed Service health
This information is displayed in the Service events table. The
KL_ALERT_OutdatedFeedevents are marked with the Outdated feed icon ( ).
). - Last 10 events from Feed Service
Some custom event properties are provided together with Kaspersky Threat Feed App. These event properties are the fields of detection events sent by Feed Service.
Page topUsing Kaspersky Threat Feed App
This section describes how you can use Kaspersky Threat Feed App.
Search for data in feeds
You can search feeds for a file hash, IP address, or URL. For this purpose, in the search box type the data you want to search for, and then press Enter.

Search box
Kaspersky Threat Feed App will display the feed records that contain the data you specified.
Configuring charts
You can configure a chart so that it will display data accumulated during a specified period: 15 minutes, an hour, a day, a week, or a month.
Also, you can turn on or off regular automatic updating of charts.
Filtering by categories
The Detection events by category chart displays only data that relates to categories that are enabled. To disable a category or to enable a disabled category, select it in the list.
Page topUninstalling Kaspersky Threat Feed App
This section describes how to uninstall Kaspersky Threat Feed App.
To uninstall Kaspersky Threat Feed App:
- In QRadar, select Admin > Extensions Management.
- In the Extensions Management form, select the INSTALLED tab.
- Select the
Kaspersky Threat Feed Appitem and click Uninstall.
After Kaspersky Threat Feed App is uninstalled, the Kaspersky Data Feeds tab disappears from QRadar Console. However, the custom event properties that were added during the Threat Feed Service App installation remain. You can remove them manually.
To remove custom event properties manually:
- In QRadar, select the Admin tab and under Data sources, in the Events section, select Custom Event Properties.
The Custom Event Properties window opens.
- Select the custom event properties that you want to remove.
The list of the custom event properties that were added during the installation of Kaspersky Threat Feed App is provided in the section about installing Kaspersky Threat Feed App.
- Click Delete.
If you have created a token for Kaspersky Threat Feed App using Authorized services, you can remove it.
To remove a token for Kaspersky Threat Feed App:
- In QRadar Console, select the Admin tab.
- In the left navigation pane, click System Configuration.
- In the right pane, under User Management click Authorized Services.
The Manage Authorized Services window opens.
- In the displayed list of services, select the service that was created for Kaspersky Threat Feed App.
As an example, in the figure below the service is called "kaspersky app".
- Click the Delete Authorized Service button.

Removing a token for Kaspersky Threat Feed App
Authorized services
Kaspersky Threat Feed App uses the QRadar RESTful API to interact with QRadar. To authenticate API calls to QRadar Console, the QRadar RESTful API uses either authorized services or QRadar users. This section describes how to add an authorized service and receive an authorization token associated with it.
The main difference between using a QRadar user login and password and using a token is the following: when you create a new user, it exists until you explicitly remove it, while a token is usually assigned a period during which it is valid.
To add an authorized service:
- In QRadar Console, select the Admin tab.
- In the left navigation pane, click System Configuration.
- In the right pane, under User Management click Authorized Services.
The Manage Authorized Services window opens.
- Click the Add Authorized Service button.
The Add Authorized Service window opens.
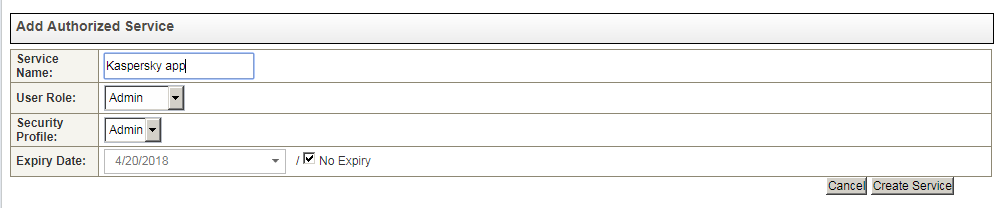
Add Authorized Service window
- In the Service Name field, type a name for this authorized service (for example,
Kaspersky Data Feeds App).The name can be up to 255 characters in length.
- From the User Role drop-down list, select the Admin user role to assign to this authorized service.
The user roles that are assigned to an authorized service determine the functions to which this service can gain access through the QRadar user interface.
- From the Security Profile drop-down list, select the Admin security profile to assign to this authorized service.
The security profile determines the networks and log sources that this service can access through the QRadar user interface.
- In the Expiry Date field, type or select a date of expiration for this service. If a date of expiration is not required, select No Expiry.
- Click Create Service.
A confirmation message appears containing a token field that you must copy into your vendor software to authenticate with QRadar.
More information about authorized services is available at https://www.ibm.com/support/knowledgecenter/SS42VS_7.3.0/com.ibm.qradar.doc/t_qradar_adm_add_auth_serv.html.
After you add an authorized service, QRadar notifies you whether the changes must be deployed.
To deploy the changes:
- In QRadar Console, select the Admin tab.
- Click Deploy Changes.