Separate installation of Kaspersky CyberTrace Service and Feed Utility (Linux)
You can install Kaspersky CyberTrace Service and Feed Utility on separate computers. This allows you to isolate the computer, on which event data is matched against feeds, from the internet.
Do not delete the dmz directory from the distribution kit of Kaspersky CyberTrace, even if you are not going to use Kaspersky CyberTrace Service and Feed Utility on separate computers.
You can install Feed Utility on a Windows computer. For this you must have the distribution package for Windows, which also contains instructions on how to perform the installation.
How Kaspersky CyberTrace Service and Feed Utility work in the DMZ
The following diagram describes how Kaspersky CyberTrace Service and Feed Utility work in the DMZ.
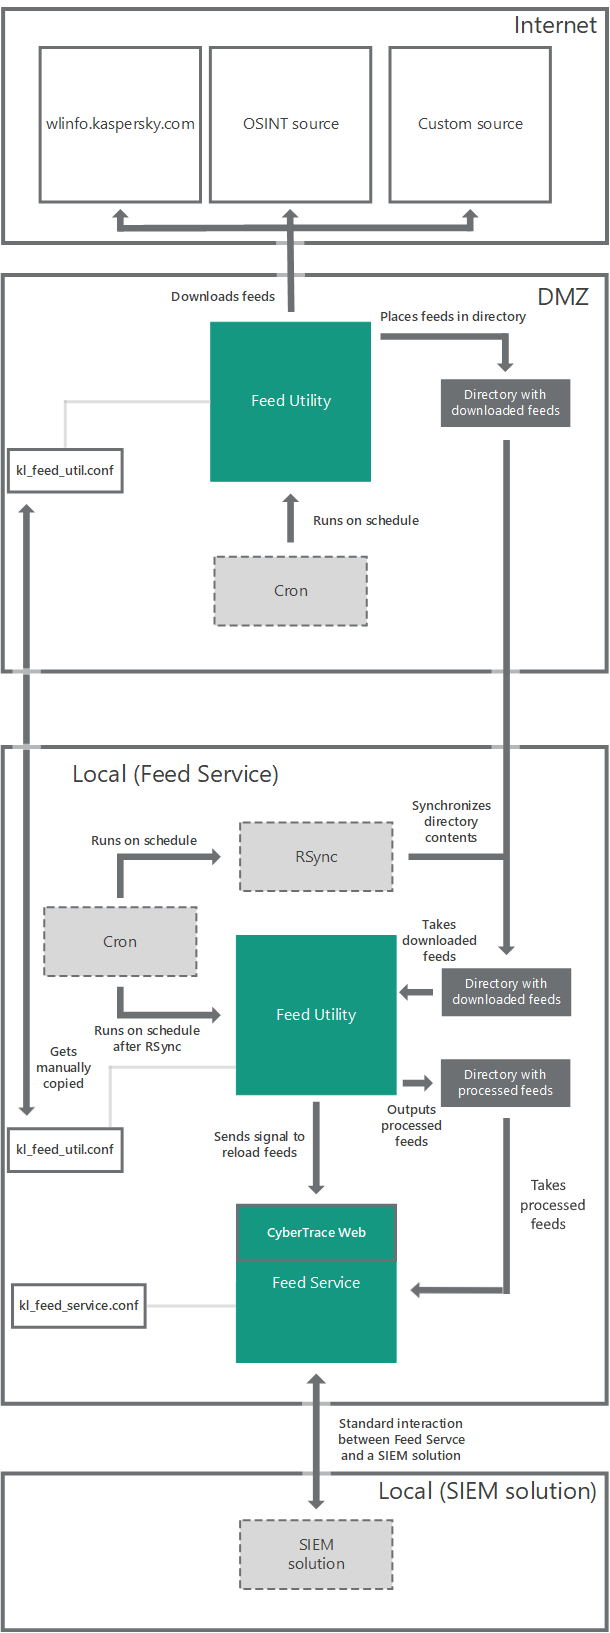
Workflow when Kaspersky CyberTrace Service and Feed Utility are installed on separate computers
Kaspersky CyberTrace limitations when operating in an isolated environment
Since Kaspersky CyberTrace will be running on a host without direct internet access, the following Kaspersky CyberTrace operation limitations will apply:
- No possibility of graph enrichment from third-party sources on the Kaspersky CyberTrace local host.
- For adding feeds, the Kaspersky CyberTrace settings should be transferred from the local host to the DMZ host, changed, and then moved back to the local host. For more information, see section "Changing feed settings after installing Kaspersky CyberTrace Service and Feed Utility on separate computers".
Installing Kaspersky CyberTrace Service and Feed Utility on separate computers
The following procedure describes how to configure the DMZ host and the local host for installing Kaspersky CyberTrace Service on one computer (in this section, referred to as local) and Feed Utility on another computer (in this section, referred to as DMZ).
Configuring a DMZ host
To configure a DMZ host, do the following:
- Install Kaspersky CyberTrace on the DMZ host, for easy configuration of the feeds that are supposed to be loaded to Kaspersky CyberTrace in an isolated environment.
- In the Initial Setup Wizard, specify the required SIEM settings (name, connection details).
These settings will be used for the local host.
Also, add the PEM-formatted certificate for configuring Kaspersky feeds that will be used. It is not necessary to add the Kaspersky CyberTrace license key on the DMZ host, since the Community edition allows the configuration of all supported feed types. Adding a license key is obligatory on the local host.
- If necessary, add or additionally configure the feeds on the Settings > Feeds page after specifying settings in the Initial Setup Wizard.
Ensure that the feeds are configured correctly by running a feeds update in Kaspersky CyberTrace at least once.
- Export the settings from Kaspersky CyberTrace by clicking the Export configuration files button on the Settings > Service page.
If custom feeds had been earlier configured in Kaspersky CyberTrace, also save the
httpsrv/etc/custom_feed_list.conffile for further use. - Copy the
%service_dir%/dmzdirectory to a location other than the%service_dir%directory (for example, to the/optor/usr/local/etcdirectory).Hereafter, the path to this directory will be referred as
%dmz_fu%. - Remove Kaspersky CyberTrace.
If you have to add new feeds, install Kaspersky CyberTrace on the DMZ host again.
- Move sections
Settings>FeedsandSettings>ProxySettingsfrom the exportedkl_feed_util.conffile (see Step 4) to the%dmz_fu%/kl_feed_util.conffileDo not remove the instance of the
kl_feed_util.conffile exported from Kaspersky CyberTrace, as well as thekl_feed_service.conf. These files will be used on local host. - Specify
acceptedin theSettings>EULAtag of the%dmz_fu%/kl_feed_util.conffile. - Specify
<WorkDir>tmp_download</WorkDir>in theSettings/WorkDirof the%dmz_fu%/kl_feed_util.conffile. - Add
%dmz_fu%/cron_dmz.shto the list of the cron tasks.The
cron_dmz.shscript enables downloading feeds on the DMZ host.For example, specify the following line in the cron configuration file:
*/30 * * * * %dmz_fu%/cron_dmz.shIn the example above, the
cron_dmz.shscript runs once in 30 minutes. You can set your own schedule to run the script.Make sure that a cron user has access for running the
%dmz_fu%/cron_dmz.shfile.
Configuring a local host
To configure a local host, do the following:
- Check if the DMZ host is accessible for the local host, by using the RSync utility (to do this, perform the steps from section "Synchronizing directories that contain feeds").
- On the local host, install the same version as Kaspersky CyberTrace that was previously installed on the DMZ host.
- Stop Kaspersky CyberTrace after installation by running the
systemctl stop cybertrace.servicecommand. - Remove the
%service_dir%/bin/.need_run_wizardfile.This action disables the initial configuration wizard, since configuration was previously completed on the DMZ host.
- Replace the
%service_dir%/etc/kl_feed_util.confand%service_dir%/etc/kl_feed_service.conffiles with the files that were obtained in Step 4 of section "Configuring a DMZ host".If custom feeds had been earlier configured in Kaspersky CyberTrace, replace or add (if the file was not present) the
httpsrv/etc/custom_feed_list.conffile. - Open the
%service_dir%/etc/kl_feed_util.conffile and specify the following parameters:<NotifyKTFS path="../bin">true</NotifyKTFS><WorkDir>output</WorkDir><FeedsDir>../feeds/download</FeedsDir>
- Configure the following in the
%service_dir%/etc/kl_feed_service.conffile:- Specify settings in:
Configuration>InputSettings>ConnectionStringConfiguration>GUISettings>HTTPServer>ConnectionStringConfiguration>GUISettings>HTTPServer>ResourcesIP
Set 0in theupdate_frequencyattribute.This customization is applied, since the feeds files loaded on the DMZ host will be periodically synchronized by cron, not Kaspersky CyberTrace.
- Specify settings in:
- (Recommended) Rename the
%service_dir%/dmz/feeds.pemfile tofeeds.pem.0to avoid incorrect feeds updating when clicking the Launch update now button.You will need to rename this file back to
feeds.pemfor upgrading Kaspersky CyberTrace from a previous version. - Open the
%service_dir%/scripts/cron_cybertrace.shfile, and specify the following:RSYNC_USER(user name on the DMZ host for authorization).RSYNC_HOST(host name/IP address of the DMZ host).PATH_TO_FEEDS(path to the%dmz_fu%/downloaddirectory on the DMZ host).DOWNLOAD_DIR("output").SSH_KEY(make sure that you specified the same RSA key file path as described in Step 1 of section "Synchronizing directories that contain feeds").
- Add
%service_dir%/scripts/cron_cybertrace.shto the list of the cron tasks.The
cron_cybertrace.shscript starts synchronizing the feeds files from the DMZ host. The example below shows that thecron_cybertrace.shfile is launched once in 30 minutes and is started with five-minute delay relative to the cron_dmz.sh script on the DMZ host:5-59/30 * * * * /opt/kaspersky/ktfs/scripts/cron_cybertrace.shYou can set your own schedule to run the script.
Make sure that the cron user has access for running the
%service_dir%/scripts/cron_cybertrace.shfile. - Start Kaspersky CyberTrace.
Run the
systemctl start cybertrace.servicecommand. - Open Kaspersky CyberTrace Web in a browser, by using the details specified in Step 7 in
Configuration>GUISettings>HTTPServer>ConnectionString. - Make sure that the settings for the feeds on the Settings>Feeds page are similar to the settings on the DMZ host.
- On the Settings>Feeds page, set
Neverfor theUpdate frequencyparameter. - On the Settings>Licensing page, add a license key.
- Configure other settings that are not related to feeds updating.
Changing feed settings after installing Kaspersky CyberTrace Service and Feed Utility on separate computers
Since the DMZ host is only for feeds downloading, you can configure the below settings for the previously enabled feeds in Kaspersky CyberTrace on the local host. You can change the following feeds parameters:
- Feed
confidencevalue (except for Kaspersky feeds) - Limit number of feed entries being processed
- Retention period (except for Kaspersky feeds)
- Available fields for a feed
- Filtering rules
- Actionable fields
You can also disable any feed that had been enabled before (in this case, the disabled feeds will continue to be downloaded on the DMZ host and transferred to the local host, until you disable them in %dmz_fu%/kl_feed_util.conf).
You can configure the proxy server settings directly in the %dmz_fu%/kl_feed_util.conf file on the DMZ host.
If necessary, you can add a new feed as described below.
If any feed had been previously disabled on the local host, the actions below will stop the download of this feed on the DMZ host.
To add a new feed, do the following:
- On the local host:
- Export the current settings from Kaspersky CyberTrace by clicking the Export configuration files button on the Settings>Service page.
If custom feeds had been earlier configured in Kaspersky CyberTrace, also save the
httpsrv/etc/custom_feed_list.conffile for further use. - Stop the Kaspersky CyberTrace service.
Run the
systemctl stop cybertrace.servicecommand.
- Export the current settings from Kaspersky CyberTrace by clicking the Export configuration files button on the Settings>Service page.
- On the DMZ host:
- Install the same Kaspersky CyberTrace version as on the local host.
If you did not remove Kaspersky CyberTrace on the DMZ host during initial setup, skip this step.
- Stop the Kaspersky CyberTrace service.
Run the
systemctl stop cybertrace.servicecommand. - Remove the
%service_dir%/bin/.need_run_wizardfile.If you did not remove Kaspersky CyberTrace on the DMZ host during initial setup, skip this step.
- Replace the
%service_dir%/etc/kl_feed_service.confand%service_dir%/etc/kl_feed_util.conffiles with the files exported from the local host in Step 1 above.If custom feeds had been earlier configured in Kaspersky CyberTrace, also replace or add (if the file was not present) the
httpsrv/etc/custom_feed_list.conffile.Specify the proper
Configuration>GUISettings>HTTPServer>ConnectionStringto open Kaspersky CyberTrace Web in a browser. - Start the Kaspersky CyberTrace service.
Run the
systemctl start cybertrace.servicecommand. - Add and configure new feeds using Kaspersky CyberTrace Web at the address specified in
Configuration/GUISettings/HTTPServer/ConnectionStringof the%service_dir%/etc/kl_feed_service.conffile.Ensure that the feed is configured correctly by running a feeds update in Kaspersky CyberTrace at least once.
- Export the updated settings from Kaspersky CyberTrace by clicking the Export configuration files button on the Settings>Service page.
If custom feeds had been earlier configured in Kaspersky CyberTrace, also save the
httpsrv/etc/custom_feed_list.conffile for further use. - Remove Kaspersky CyberTrace.
- Move (replace) the sections
Settings>FeedsandSettings>ProxySettingsfrom thekl_feed_util.confexported file to the%dmz_fu%/kl_feed_util.conffile.Do not remove the instance of the
kl_feed_util.conffile exported from Kaspersky CyberTrace, as well as thekl_feed_service.conf. These files will be also used on the local host.
- Install the same Kaspersky CyberTrace version as on the local host.
- On the local host:
- Replace the
%service_dir%/etc/kl_feed_service.confand%service_dir%/etc/kl_feed_util.conffiles with the files exported from the DMZ host.If custom feeds had been earlier configured in Kaspersky CyberTrace, also replace or add (if the file was not present) the
httpsrv/etc/custom_feed_list.conffile.Specify a proper
Configuration>GUISettings>HTTPServer>ConnectionStringto open Kaspersky CyberTrace Web in browser. - Start the Kaspersky CyberTrace service.
Run the
systemctl start cybertrace.servicecommand. - Using the address specified in
Configuration>GUISettings>HTTPServer>ConnectionString, open Kaspersky CyberTrace Web and make sure that the Settings>Feeds page contains the new feed, and its settings are similar to settings on the DMZ host. Also, make sure that all other feeds are configured correctly. - On the Settings>Feeds page, set
Neverin theUpdate frequencyparameter.
- Replace the
Synchronizing directories that contain feeds
For synchronizing feeds on both the local and DMZ hosts, you can use the RSync utility.
If the DMZ host is a Windows computer, the RSync utility can be run by using Cygwin. See how to install Cygwin in section "Separate installation of Kaspersky CyberTrace Service and Feed Utility (Windows)".
To configure synchronization on the DMZ host:
- On the DMZ host, configure the OpenSSH components as follows:
- Run the following command as root:
ssh-host-configYou can answer
"Yes"every time. The main point is to run the sshd daemon as a service. - Run the following command:
net start sshd
- Run the following command as root:
The sshd daemon will start automatically.
To configure synchronization on the local host:
- Create a private key and a corresponding public key.
For this purpose, run the following command on the local host:
ssh-keygen -t rsa -q -N '' -f /home/<user>/.ssh/dmz_rsa_keySpecify the user login instead of
<user>. The keys will be created without a password. - Copy the public key from the local host to the DMZ host by running the following command:
ssh-copy-id -i /home/<user>/.ssh/dmz_rsa_key <DMZ_user>@<DMZ_host>When you run this command, you will be asked for the password to
<DMZ_user>@<DMZ_host>. - Test the synchronization of the contents of directories that contain feeds by running the following command on the local host:
rsync -a --delete-before --delay-updates -e "ssh -i /home/<user>/.ssh/dmz_rsa_key" <DMZ_user>@<DMZ_host>:/<Path_to_feeds>/ /<Path_to_feeds_on_Local>/In this command,
<Path_to_feeds_on_Local>is the path to the directory containing feeds on the local host (namely,%service_dir%/feeds), and<Path_to_feeds>is the path to the directory on which updated feeds are stored on the DMZ host.To pass the synchronization test, the contents of the
<Path_to_feeds_on_Local>directory on the local host must be the same as the contents of the<Path_to_feeds>directory on the DMZ host.
Upgrading Kaspersky CyberTrace from a previous version
Before upgrading, if you had previously renamed the feeds.pem file to feeds.pem.0, rename it back to feeds.pem.
To upgrade Kaspersky CyberTrace and Feed Utility to newer versions, do the following:
- On the local host, upgrade Kaspersky CyberTrace as described in section "Upgrading automatically on Linux".
- From the
%service_dir%/dmzdirectory on the local host, move thekl_feed_utilfile to%dmz_fu%on the DMZ host. - (Optional) Rename the
%service_dir%/dmz/feeds.pemfile tofeeds.pem.0to avoid incorrect feeds updating when clicking the Launch update now button.