Adding a custom or third-party feed of email type
This section explains how to add a custom or third-party feed of the email type and change its settings.
This feature can be disabled due to restrictions imposed by the licensing level.
To add a custom feed:
- On the Settings → Feeds page, click Add custom feed.
- Select the email feed type.
The window for adding a custom feed of email type opens:
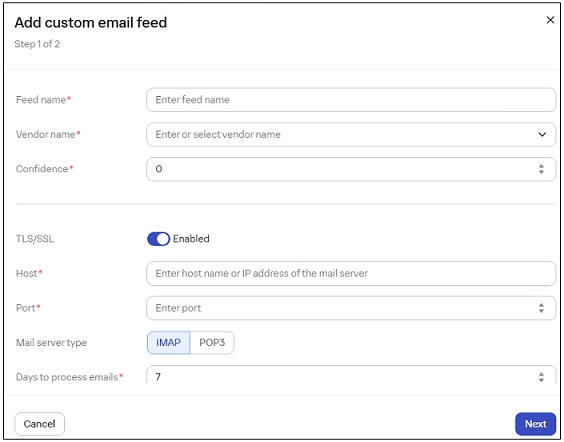
Adding a feed of email type
- For the feed of email type, specify the following information:
- Feed name
In the feed name, you can use Latin letters, digits, underscores, and hyphens. The name must differ from other feed names that are already used.
Do not use FalsePositive or InternalTI as the feed name, since they are reserved for the built-in supplier names of Kaspersky CyberTrace.
Do not use the @ character in the feed name if basic authentication is used, and the user name or password contains @.
- Vendor name
From the drop-down list, select or enter the name of the feed vendor.
- Confidence
The level of confidence of the feed. This field cannot be empty. The range of possible values is from 1 to 100.
The preset values are
100for feeds from Kaspersky,50for OSINT feeds, and50for third-party feeds. You can change these values. - TLS/SSL
Enable TLS/SSL to interact with the mail server by using TLS/SSL certificates.
TLS/SSL is enabled by default. Disable it if the mail server does not use TLS/SSL.
- Host
Host name or IP address of the mail server to connect to. This field cannot be empty.
- Port
Mail server port to connect to. This field cannot be empty.
- Mail server type
Protocol for interaction with the mail server. Select either POP3 or IMAP. By default, IMAP is selected.
- Days to process emails
Number of days needed for processing messages from the mail server.
Specify an integer positive number. The maximum value is 365. The preset value is 7.
- Login
User account for connecting to the mail server. This field cannot be empty.
- Password
Account password for connecting to the mail server. This field cannot be empty.
- Check connection
Click the Check connection button to connect to the mail server. The result will be displayed in the pop-up window.
- Feed name
After you fill in the fields above, click Next to continue to another settings window, and then specify filtering rules for email messages and parsing rules for the message body and message attachment.
After adding an email feed, update the Retention period value (preset value is 365 days).
Configuring filtering and parsing rules for feeds of email type
The window below contains the fields for configuring filtering and parsing rules:
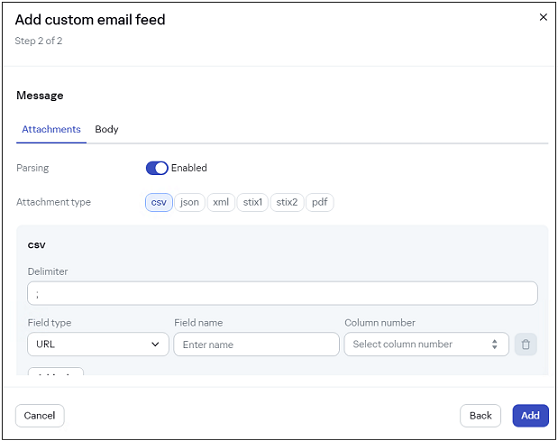
Filtering and parsing rules
Adding message filters
Message filters set the rules for selecting emails for parsing. You can select emails by subject and sender. All rules use the AND condition.
To add message filters:
- In the Email filtering rules section, click the Add rule button.
You can add one or more rules. If no rules are added, parsing will be applied to all emails from the server.
- For every field, specify the following information:
- Field
Filtering rules can be applied to one of the following fields from an email message:
- From
The sender of the email message.
- Subject
The subject of the email message.
- From
- Condition
Select one of the following values:
- Contains (by default)
The value from the email message must contain the value from this field.
This value is default.
- Does not contain
The value from the email message must not contain the value from this field.
- Matches
The value from the email message must be equal to the value from this field.
- Does not match
The value from the email message must not be equal to the value from this field.
- Contains (by default)
- Value
Criterion that is used to filter email messages from the mail server.
This field cannot be empty.
- Field
The email server forms the From field in two variants: sender@mail.ru or sender<sender@mail.ru>.
If Field has From, and Condition has Matches, the Value will be compared with the sender@mail.ru value (if the From field has sender@mail.ru), or will be compared with the value in parentheses (if the From field has sender<sender@mail.ru>).
Configuring parsing rules for the message attachment
These rules contain settings for attachment types, as well as regular expressions for parsing indicators and attachment context.
To specify parsing rules for the message attachment:
- Go to Message section, and then select Attachments.
The message attachment parsing is active by default. You can apply one or several types of attachment. The attachment of one type can be applied only once.
- Specify the fields that depend on the type of the attachment you select.
- Attachment type
Select the type of the attachment. You can use one or several following values as the attachment types:
- csv
For a CSV attachment, specify a delimiter to split the columns. The delimiter length cannot exceed one character, except
\nand\t. By default, a semicolon (;) is used as a delimiter.The fields for specifying are: Field type, Field name, Column number.
- json
The fields for specifying are: Field type, Field name, Root element.
- stix1
If parsing rules for stix1 and xml are simultaneously specified in the email feed settings, the stix1 file will be parsed first.
If the stix1 file has been parsed without errors, it is no longer processed as a regular xml file.
- stix2
If parsing rules for stix2 and json are simultaneously specified in the email feed settings, the stix2 file will be parsed first.
If the stix2 file has been parsed without errors, it is no longer processed as a regular json file.
- pdf
The fields for specifying in the Attachments section are: Field type, Field name, Regular expression.
In the Regular expression field you can choose the preset regular expressions, or correct them, if necessary.
For URL and IP indicators, the preset regular expression is configured for receiving indicators, the value of which has a dot enclosed in brackets (for example: badurl[.].com).
In Kaspersky CyberTrace starting from version 4.2, the regular expressions for MD5, SHA1, and SHA256 can extract the value fragments from longer indicators (such as longer hashes or URLs, if they consist of the
a-fcharacters and numbers). It is recommended to replace default regular expressions for MD5, SHA1, and SHA256 with more specific ones. For example, for MD5 you can use[^\da-fA-F]([\da-fA-F]{32})[^\da-fA-F]instead of([\da-fA-F]{32}). - xml
For an XML attachment, specify the root element. This allows you to use the names of feed elements relative to the root element. Which element to specify as the root depends on the level of nesting in a given feed. See the example of the root element for an XML feed in Step 4 of section "Adding a custom or third-party feed".
The fields for specifying in the Attachments section are: Field type, Field name, Element.
- csv
- Field type
Select an indicator type.
This field is not available for stix1 and stix2.
- Field name
This name will be referred to in the matching process.
In the field name, you can use Latin letters, numbers, underscores, and hyphens. The name must contain at least one Latin letter.
This field is not available for stix1 and stix2.
- Root element
Specify the root element for the json and xml attachment type. You can specify a root element value with any nesting level. Define the limits of the nesting level with a "
/" character.The root element parameter can be empty. If it is not empty, the value of the root element should not contain empty nesting levels (substring "
//"), and should not start or end with a "/" character.You cannot use wildcards in the root element for JSON feeds.
- Attachment type
- Use regular expressions if you want to apply exclusion rules in the Exclusions section.
- Click Check parsing to check the parsing settings for attachments.
The first 50 strings of the result feed will be displayed including indicators of the processed messages bodies and their attachments.
- Click Add.
Configuring parsing rules for the message body
These rules contain regular expressions for parsing indicators and message body context.
To specify parsing rules for the message body:
- Go to the Message section, and then select the Body tab.
- Specify the following fields:
- Field type
Select an indicator type.
- Field name
This name will be referred to in the matching process.
In the field name, you can use Latin letters, numbers, underscores, and hyphens. The name must contain at least one Latin letter.
- Regular expression
In the Regular expression field, you can choose the preset regular expressions or correct them, if necessary.
For URL and IP indicators, the preset regular expression is configured for receiving indicators, the value of which has a dot enclosed in brackets (for example: badurl[.].com).
In Kaspersky CyberTrace starting from version 4.2, the regular expressions for MD5, SHA1, and SHA256 can extract the value fragments from longer indicators (such as longer hashes or URLs, if they consist of the
a-fcharacters and numbers). It is recommended to replace default regular expressions for MD5, SHA1, and SHA256 with more specific ones. For example, for MD5 you can use[^\da-fA-F]([\da-fA-F]{32})[^\da-fA-F]instead of([\da-fA-F]{32}).Click Add rule to apply one more regular expression.
- Exclusions
Use regular expressions, if you want to apply exclusion rules.
In the Exclusions section, add exclusions by clicking the Add exclusion button.
- Field type
- Click Check parsing to check the parsing settings for the message body.
The first 50 strings of the result feed will be displayed, including indicators of the bodies of the processed messages and their attachments.
- Click Add.