The user now can create their own local trusted zone for a specific computer. This way, the user can create their own local lists of scan exclusions and trusted applications in addition to the general trusted zone in a policy. An administrator can allow or block the use of local exclusions or local trusted applications in policy settings. To do so, use the Allow use of local exclusions and Allow use of local trusted applications check boxes in the Exclusions section of the policy.
If creating a local trusted zone is allowed by an administrator, the user can add their own scan exclusions and trusted applications in the user interface of the application. At the same time, the user does not have permissions to modify or delete objects from the trusted zone configured in the policy. The administrator can also view, add, modify, or delete list items in the Kaspersky Security Center console if exclusions need to be added for an individual computer.
Kaspersky Endpoint Security hides the lists of scan exclusions and trusted applications in the user interface of the application if configuration of the trusted zone is blocked by the administrator in the console ("closed lock" symbol) and local scan exclusions and trusted applications are prohibited.
Open the Kaspersky Security Center Administration Console.
In the Managed devices folder in the Administration Console tree, open the folder with the name of the administration group to which the relevant client computers belong.
In the workspace, select the Devices tab.
Double-click to open the computer properties window.
In the computer properties window, select the Applications section.
In the list of Kaspersky applications installed on the computer, select Kaspersky Endpoint Security for Windows and double-click to open the application properties.
In the application settings window, select General settings → Exclusions and object types.
In the Scan exclusions and trusted applications → Local scan exclusions block, click the Settings button.
This opens a window containing a list of local exclusions.
Trusted zone settings
Make a list of local scan exclusions.
The rules for creating local scan exclusions are the same as for general exclusions. Kaspersky Endpoint Security supports environment variables and the * and ? characters when entering a mask.
In the Scan exclusions and trusted applications → Local trusted applications block, click the Settings button.
This opens a window containing a list of local trusted applications.
Make a list of local trusted applications.
Rules for adding applications to the list of local trusted applications are the same as the rules for adding them to the general list. Kaspersky Endpoint Security supports environment variables and the * and ? characters when entering a mask.
In the main window of the Web Console, select Assets (Devices) → Managed devices.
Click the name of the computer on which you want to allow a user to perform a blocked action.
Select the Applications tab.
Click Kaspersky Endpoint Security for Windows.
This opens the local application settings.
Select the Application settings tab.
In the application settings window, select General settings → Exclusions and types of detected objects.
In the Scan exclusions and trusted applications block, click the Local scan exclusions link.
Make a list of local scan exclusions.
Rules for creating local exclusions are the same as the rules for creating general exclusions. Kaspersky Endpoint Security supports environment variables and the * and ? characters when entering a mask.
In the Scan exclusions and trusted applications block, click the Local trusted applications link.
Make a list of local trusted applications.
Rules for adding applications to the list of local trusted applications are the same as the rules for adding them to the general list. Kaspersky Endpoint Security supports environment variables and the * and ? characters when entering a mask.
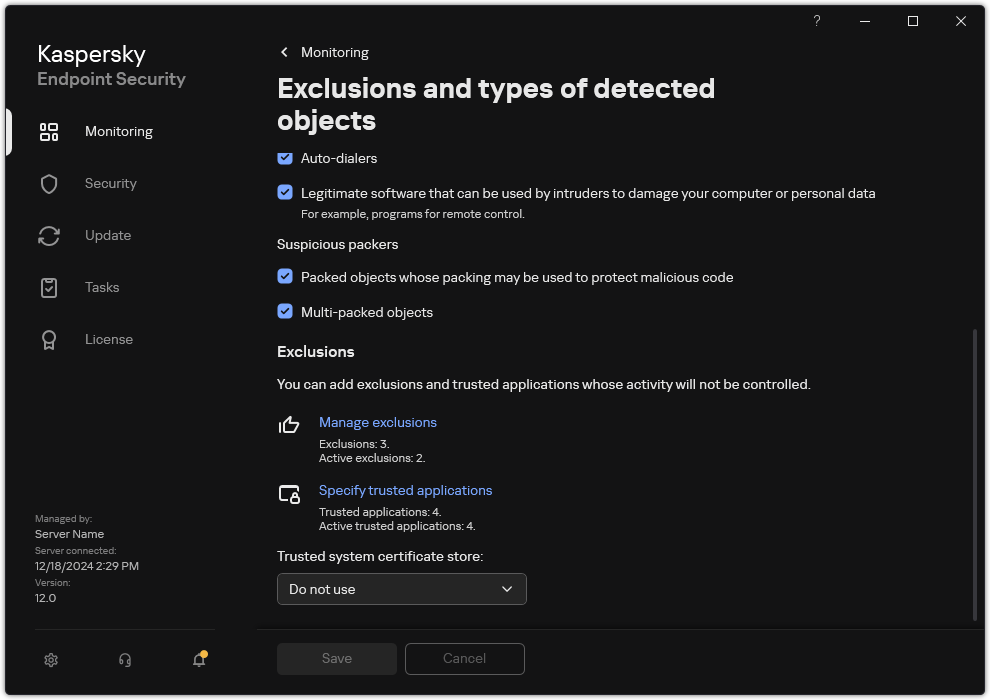
In the application settings window, select General settings → Exclusions and types of detected objects.
In the Exclusions block, click the Manage exclusions link.
Kaspersky Endpoint Security hides the list of scan exclusions in the user interface of the application if configuration of scan exclusions is blocked by the administrator in the console ("closed lock" symbol) and local scan exclusions are prohibited (the Allow use of local exclusions check box is cleared).
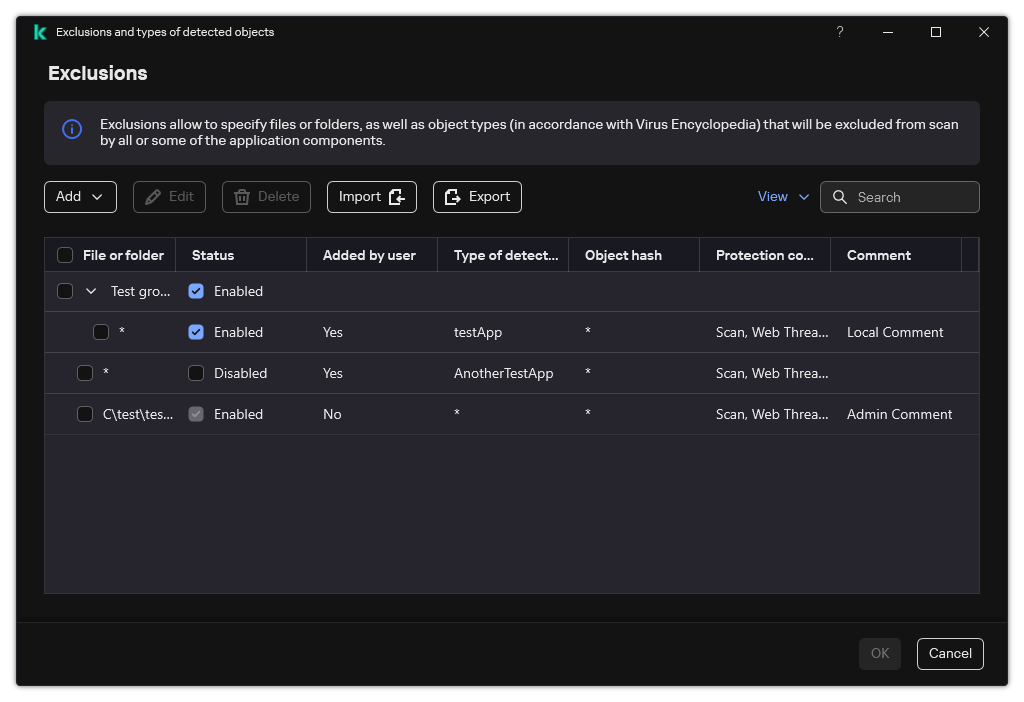
Settings of exclusions
Click Add and select an action:
Category. You can group scan exclusions into separate categories. To create a new category, enter the name of the category and add at least one scan exclusion to the category.
New exclusion. Kaspersky Endpoint Security adds a new scan exclusion to the root of the list.
Select exclusion from list. To quickly configure Kaspersky Endpoint Security on SQL servers, Microsoft Exchange servers, and System Center Configuration Manager, the application includes predefined scan exclusions. Also predefined scan exclusions have been added to support application set-up in Citrix and VMware virtual environments. You must select predefined scan exclusions depending on the purpose of the protected server.
To add a new scan exclusion to a specific category, select the check box next to that category and select the New exclusion option.
If you want to exclude a file or folder from scans, select the file or folder by clicking the Browse button.
You can also enter the path manually. Kaspersky Endpoint Security supports environment variables and the * and ? characters when entering a mask:
The * (asterisk) character, which takes the place of any set of characters, except the \ and / characters (delimiters of the names of files and folders in paths to files and folders). For example, the mask C:\*\*.txt will include all paths to files with the TXT extension located in folders on the C: drive, but not in subfolders.
Two consecutive * characters take the place of any set of characters (including an empty set) in the file or folder name, including the \ and / characters (delimiters of the names of files and folders in paths to files and folders). For example, the mask C:\Folder\**\*.txt will include all paths to files with the TXT extension located in folders nested within the Folder, except the Folder itself. The mask must include at least one nesting level. The mask C:\**\*.txt is not a valid mask.
The ? (question mark) character, which takes the place of any single character, except the \ and / characters (delimiters of the names of files and folders in paths to files and folders). For example, the mask C:\Folder\???.txt will include paths to all files residing in the folder named Folder that have the TXT extension and a name consisting of three characters.
You can use masks at the beginning, in the middle or at the end of the file path. For example, if you want to add a folder for all users to exclusions, enter the ?:\Users\*\Folder\ mask.
You can exclude network folders. To do this, enter the path to the network folder manually (for example, \\Network Share\*).
If you want to exclude a specific type of object from scans, in the Type of detected object field enter the name of the object type according to the classification of the Kaspersky Encyclopedia (for example, Email-Worm, Rootkit or RemoteAdmin).
You can use masks with the ? character (replaces any single character) and the * character (replaces any number of characters). For example, if the Client* mask is specified, Kaspersky Endpoint Security excludes Client-IRC, Client-P2P and Client-SMTP objects from scans.
If you want to exclude an individual file from scans, enter the file hash in the Object hash field.
If the file is modified, the file hash will also be modified. If this happens, the modified file will not be added to exclusions.
In the Protection components block, select the components that you want the scan exclusion to apply to.
If necessary, in the Comment field, enter a brief comment on the scan exclusion that you are creating.
Select the Active status for the exclusion.
Click Add.
The new exclusion will be added to the list. You can disable the exclusion at any time using the check box in the Status column.
In the application settings window, select General settings → Exclusions and types of detected objects.
In the Exclusions block, click the Specify trusted applications link.
Kaspersky Endpoint Security hides the consolidated list of trusted applications in the user interface of the application if configuration of trusted applications is blocked by the administrator in the console ("closed lock" symbol) and local trusted applications are prohibited (the Allow use of local trusted applications check box is cleared).
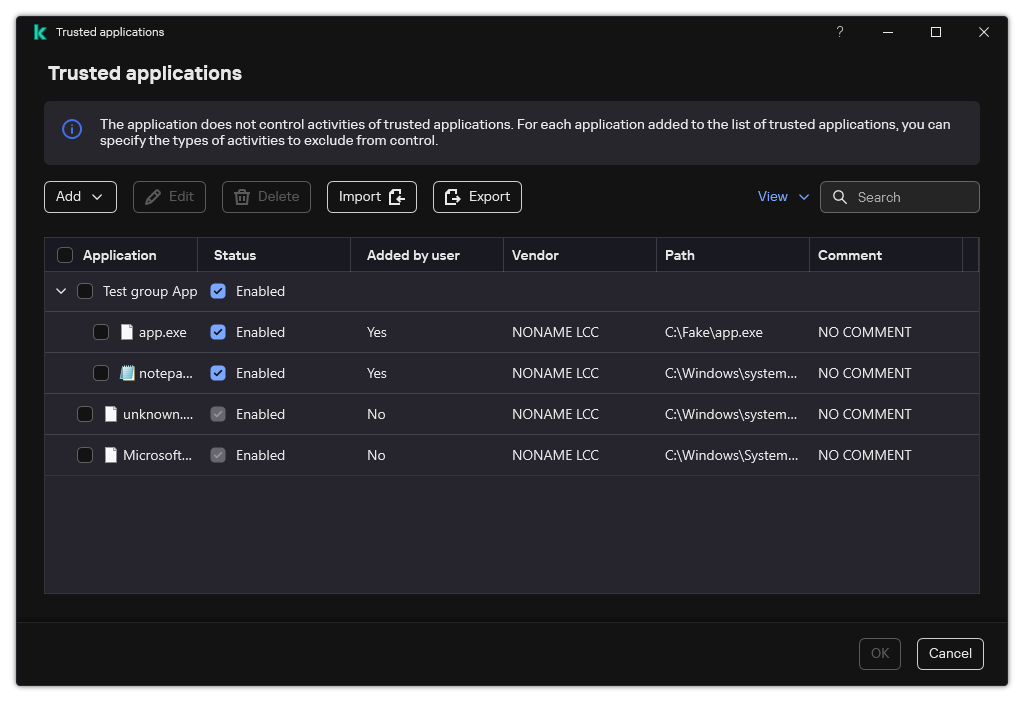
Settings of exclusions
Click Add and select an action:
Category. You can group trusted applications into separate categories. To create a new category, enter the name of the category and add at least one trusted application to the category.
New exclusion. Kaspersky Endpoint Security adds a new trusted application to the root of the list.
Select exclusion from list. To quickly configure Kaspersky Endpoint Security on SQL servers, Microsoft Exchange servers, and System Center Configuration Manager, the application includes predefined trusted applications. Also predefined trusted applications have been added to support application set-up in Citrix and VMware virtual environments. You must select predefined trusted applications depending on the purpose of the protected server.
To add a new trusted application to a specific category, select the check box next to that category and select the New exclusion option.
In the window that opens, enter the path to the executable file of the trusted application (see the figure below).
Kaspersky Endpoint Security supports environment variables and the * and ? characters when entering a mask.
Kaspersky Endpoint Security supports environment variables and converts the path in the local interface of the application. In other words, if you enter the file path %userprofile%\Documents\File.exe, a C:\Users\Fred123\Documents\File.exe record is added in local interface of the application for user Fred123. Accordingly, Kaspersky Endpoint Security ignores the File.exe trusted program for other users. To apply the entry to all user accounts, you can use the * character (for example, C:\Users\*\Documents\File.exe).
Whenever you add a new environment variable, you need to restart the application.
In the trusted application properties window, configure the advanced settings.
Click OK.
The new trusted application will be added to the list. You can exclude an application from the trusted zone at any time using the check box in the Status column.