Application installation and setup
These instructions describe the process of installing and setting up the application on a virtual machine that uses a BIOS boot loader. For virtual machines with UEFI, the pseudographic interface can be different.
To install and configure the application:
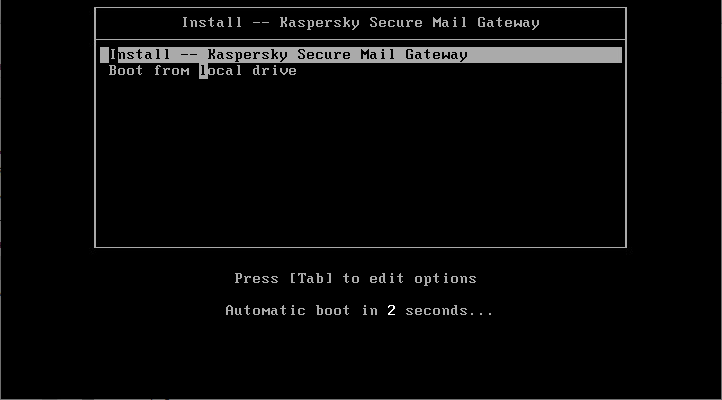
- Start the prepared virtual machine or physical server and choose to load it from the CD.
It will begin loading from the ISO disk image.
- In the next window, select Install -- Kaspersky Secure Mail Gateway or wait for the operating system to load and the Setup Wizard to start automatically.
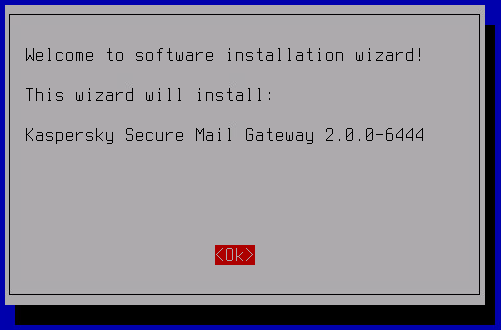
- In the welcome window of the Setup Wizard, click OK.
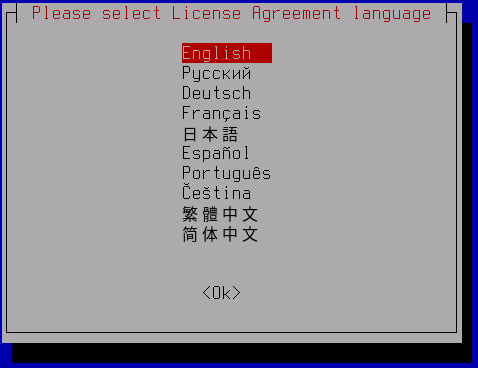
- Select the language to display the End User License Agreement and the Privacy Policy in.
- Carefully read the End User License Agreement and express your consent or disagreement:
- If you want to accept the terms of the End User License Agreement, click I accept.
- If you want to reject the terms of the End User License Agreement, click I decline.
Use the up/down or Page up/Page down keys to view the text of the End User License Agreement. You can switch between buttons by using the Tab key.
If you decline the terms of the End User License Agreement, application setup is canceled.
- Accept or decline the Privacy Policy:
- If you want to accept the terms of the Privacy Policy, click I accept.
- If you want to reject the terms of the Privacy Policy, click I decline.
If you decline the terms of the Privacy Policy, application setup is canceled.
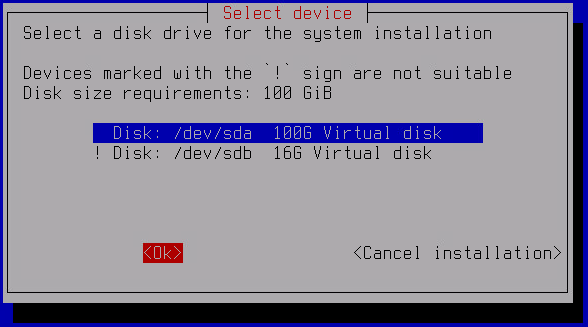
- Select a disk to install the application to and in the confirmation window, click Yes.

Wait until the data is copied from the ISO disk image to the virtual disk. After the copy operation is completed, the virtual machine will be restarted and the Initial Configuration Wizard for the application will start.
- This opens the Hostname window; in that window, in the Hostname field, enter the fully qualified domain name of the server hosting Kaspersky Secure Mail Gateway as indicated on the DNS server, and click OK.
This opens a window containing a list of available network adapters.
- Select the network adapter that you want to configure and press ENTER.
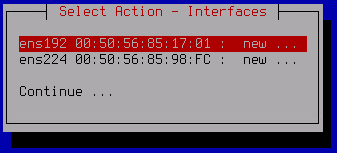
To start using the network adapter, you must initialize it. If the adapter has not been initialized before, an initialization confirmation window will open.
- In the confirmation window, click Yes. The status of the adapter is changed from new to on. Select the adapter from the list and press ENTER.
The adapter properties window opens.
- Configure an IPv4 address for the network adapter. To do so, move the cursor to the Use DHCP line and press ENTER.
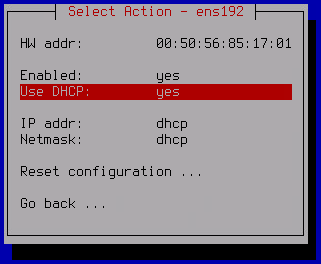
- In the opened window, select the appropriate mode:
- If you want to use a static IP address for the server hosting the application, click Yes.
- If you want to receive network adapter settings via DHCP, click No.
DHCP is used by default. This mode will be suitable for installing the application for testing or demonstration purposes. It is recommended to use a static configuration to ensure proper operation of a cluster in a real-world infrastructure.
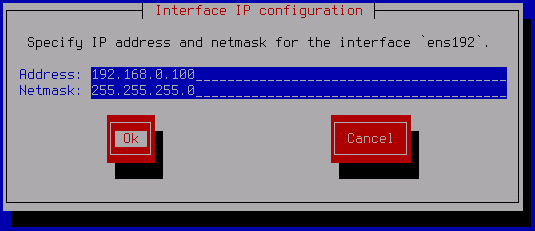
- If you selected a static configuration at the previous step, do the following in the opened Interface IP configuration window:
- In the Addresses field, enter the IP address of the network adapter.
- In the Netmask field, enter the network mask.
- Click OK to save changes.
- Click the Go back button at the bottom of the window after network adapter configuration is complete.
This opens a window containing a list of all available network adapters. If necessary, you can repeat the configuration steps for another network interface controller.
- After configuring all network adapters, select Continue at the bottom of the list.
The Select Action – Routing window opens.
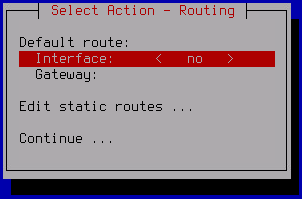
- To configure the default route:
- Select Interface and press ENTER.
- In the opened Select gateway device window, select the network adapter that should be used for the default route and press ENTER.
- If you selected a network adapter using DHCP at the previous step, the dhcp value will be automatically defined in the Gateway field. If you selected a network adapter with a static configuration, the dhcp option will be unavailable for the default gateway.
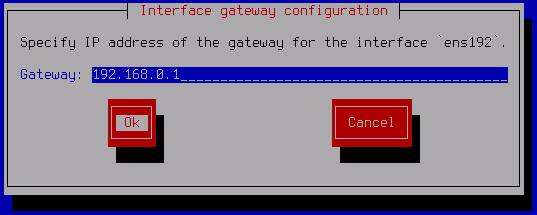
- To assign a static IP address for the default gateway:
- Select Gateway and press ENTER.
- For adapters that use DHCP, click Yes in the opened Use static configuration window.
The Interface gateway configuration window opens.
- In the Gateway field, enter a static address for the default gateway and click OK.
- If necessary, you can configure a static route. To do so:
- In the Select Action – Routing window, select Edit static routes and press ENTER.
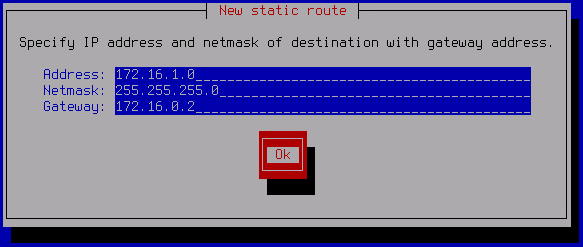
- In the opened Select Action – Routes window, click New route.
The New static route window opens.
- In the Address field, enter the IP address of the network adapter.
- In the Netmask field, enter the network mask.
- In the Gateway field, enter the IP address of the gateway.
- Click OK.
- In the opened window, select the network adapter that will be used for the static route, and press ENTER.
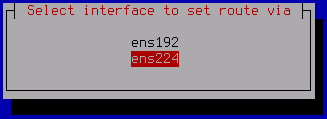
The added static route will be displayed in the Select Action – Routes window.
If necessary, you can repeat steps b – g to add another static route.
- After configuration is complete, click Go back in the lower part of the Select Action – Routes window.
- Click Continue in the lower part of the Select Action – Routing window.
The Select Action – Resolver window opens.
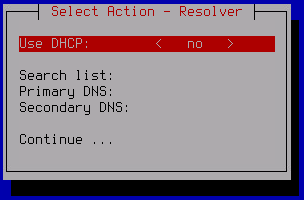
- If you want to receive the addresses of DNS servers and a search list of DNS suffixes over the DHCP protocol:
- In the Use DHCP field, press ENTER.
The Obtain DNS addresses over DHCP window opens.
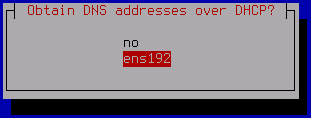
- Select the network interface of the DHCP service.
The values of the Search list, Primary DNS and Secondary DNS fields will be filled in automatically.
- In the Select Action – Resolver window, click Continue.
- In the Use DHCP field, press ENTER.
- If you want to manually configure the DNS service settings:
- Make sure that the no option is defined for the Use DHCP field.
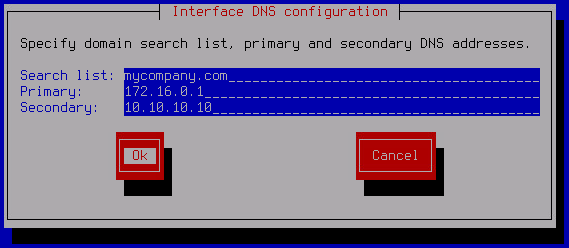
- In the Search list field, press ENTER.
The Interface DNS configuration window opens.
- In the Search list field, enter the domain search DNS suffixes separated by a space.
- In the Primary field, enter the address of the primary DNS server.
- In the Secondary field, enter the address of the secondary DNS server.
- Click OK.
- In the Select Action – Resolver window, click Continue.
This opens the next window of the Initial Configuration Wizard.
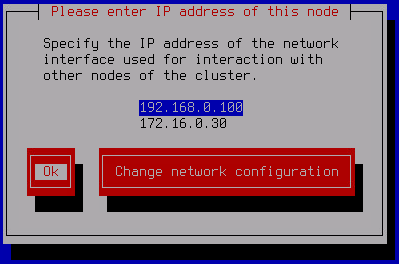
- Select the IP address of the network interface to be used for inbound connections while interacting with other cluster nodes. Click OK.
- Enter a port for the interaction with the other cluster nodes and click OK.
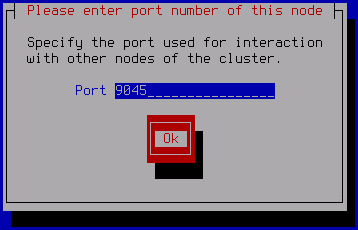
We recommend using the default value of 9045.
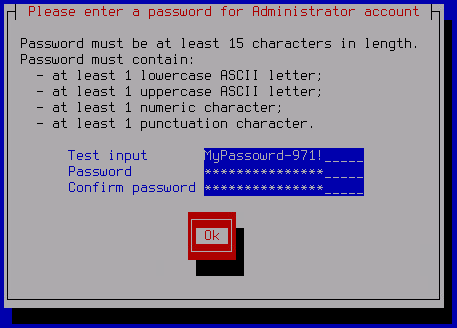
- Enter a Local administrator password.
The password must contain:
- At least 15 characters
- Only ASCII characters (A-Z, a-z), numeric characters and special characters
- Characters of the following types:
- Uppercase character (A-Z).
- Lowercase character (a-z)
- Number.
- Special character.
- Use any appropriate method to save the certificate fingerprint of the server that is displayed in the final window of the Setup Wizard.

When adding a server to the cluster using the application web interface, you need to match this fingerprint against the fingerprint that is displayed in the web interface.
Application installation and setup is complete. After this you are able to use a browser to connect to the application web interface to configure the application.
After initial configuration is completed, it is recommended to open the virtual machine properties and disable loading from the disk containing the ISO image.
Page top