Kaspersky Security Integrations for MSP
- What's new
- Kaspersky Security Plug-in for ConnectWise Automate
- Deployment schemas of Kaspersky Security Plug-in for ConnectWise Automate
- Installing and removing Kaspersky Security Plug-in for ConnectWise Automate
- Getting started with Kaspersky Security Plug-in for ConnectWise Automate
- Prerequisites
- Getting started if Kaspersky Security Center Administration Server is used
- Getting started if Kaspersky Endpoint Security Cloud is used
- Accessing the Kaspersky Security Plug-in for ConnectWise Automate dashboard
- Connecting to Kaspersky solutions
- Viewing information on Kaspersky dashboard
- Running Kaspersky management commands
- Monitoring and alerting
- Deploying Kaspersky security applications from the Control Center
- Plug-in modifications to ConnectWise Automate configuration
- Enabling and disabling tracing
- Information about third-party code
- Kaspersky Security Integration with ConnectWise Manage
- Deployment schemas of Kaspersky Security Integration with ConnectWise Manage
- Integration scenario
- Installing and removing Kaspersky Security Integration with ConnectWise Manage
- Updating Kaspersky Security Integration with ConnectWise Manage
- Interface of Kaspersky Security Integration with ConnectWise Manage
- Getting started
- Managing integrations
- Configuring integration in Kaspersky Security Integration with ConnectWise Manage
- Configuring integration by using the registry
- Managing administrators
- Enabling and disabling tracing
- Reporting
- Custom fields in ConnectWise Manage
- Information about third-party code
- Kaspersky Security Integration with Autotask
- Deployment schemas of Kaspersky Security Integration with Autotask
- Integration scenario
- Installing and removing Kaspersky Security Integration with Autotask
- Updating Kaspersky Security Integration with Autotask
- Interface of Kaspersky Security Integration with Autotask
- Getting started
- Managing integrations
- Configuring integration in Kaspersky Security Integration with Autotask
- Configuring integration by using the registry
- Managing administrators
- Enabling and disabling tracing
- Reporting
- User-defined fields in Autotask
- Information about third-party code
- Kaspersky Security Integration with Tigerpaw
- Integration scenario
- Installing and removing Kaspersky Security Integration with Tigerpaw
- Interface of Kaspersky Security Integration with Tigerpaw
- Getting started
- Managing integrations
- Configuring integration in Kaspersky Security Integration with Tigerpaw
- Mapping accounts and enabling automatic billing
- Setting up service order creation
- Mapping Tigerpaw price book items to security applications
- Viewing accounts not integrated with Kaspersky security applications
- Configuring integration by using the registry
- Managing administrators
- Enabling and disabling tracing
- Custom fields in Tigerpaw
- Information about third-party code
- Kaspersky Security Integration with SolarWinds N-central
- Prerequisites
- Integration scenario
- Deploying Kaspersky Security Integration with SolarWinds N-central
- Running an automation policy
- Viewing the anti-virus protection status of a device
- Adding a dashboard
- Scenario: Deploying Kaspersky security applications from SolarWinds N-central
- Creating a stand-alone installation package
- Deploying a Kaspersky security application
- Upgrading Kaspersky Security Integration with SolarWinds N-central
- Kaspersky Lab End User License Agreement
- Kaspersky Security Integration with SolarWinds RMM
- Prerequisites
- Scenario: Integrating Kaspersky security applications into SolarWinds RMM
- Deploying Kaspersky Security Integration with SolarWinds RMM
- Running an automated task
- Viewing the anti-virus protection status of a device
- Scenario: Deploying Kaspersky security applications from SolarWinds RMM
- Creating a stand-alone installation package
- Deploying a Kaspersky security application
- Kaspersky Lab End User License Agreement
- Contact Technical Support
- Glossary
- Trademark notices
Integration scenario
This section describes the overall sequence of actions that you perform to integrate your Kaspersky solution (Kaspersky Security Center or Kaspersky Business Hub) with Tigerpaw by means of Kaspersky Security Integration with Tigerpaw.
- Installing Kaspersky Security Integration with Tigerpaw.
Download Kaspersky Security Integration with Tigerpaw from the Kaspersky web site and install it by using a standard Windows installation procedure.
- Preparing information for setting up integration.
Check the connection settings and additional prerequisites to successfully integrate your Kaspersky solution with Tigerpaw. You will have to provide these parameters in the next steps of this scenario.
- Connecting Kaspersky Security Integration with Tigerpaw to your Kaspersky solution.
Provide the parameters to connect Kaspersky Security Integration with Tigerpaw to your Kaspersky solution:
- For Kaspersky Security Center, provide user credentials and server parameters.
- For Kaspersky Business Hub, provide the account credentials.
- Creating integration with Tigerpaw.
Provide the parameters for the new integration with Tigerpaw that is created during initial configuration. The integration parameters are the same for Kaspersky Security Center and for Kaspersky Business Hub.
- Adding virtual servers or companies to your integration.
Select virtual servers or companies to be integrated with Tigerpaw:
- For Kaspersky Security Center, select virtual servers to be mapped to Tigerpaw accounts.
- For Kaspersky Business Hub, select companies to be mapped to Tigerpaw accounts.
- Checking integration.
After you perform step 1 through step 5, Kaspersky Security Integration with Tigerpaw will be installed and configured. To verify the installation, open the Accounts tab and make sure that your virtual servers / companies are displayed in the first column and that your Tigerpaw accounts are available for selection in the second column.
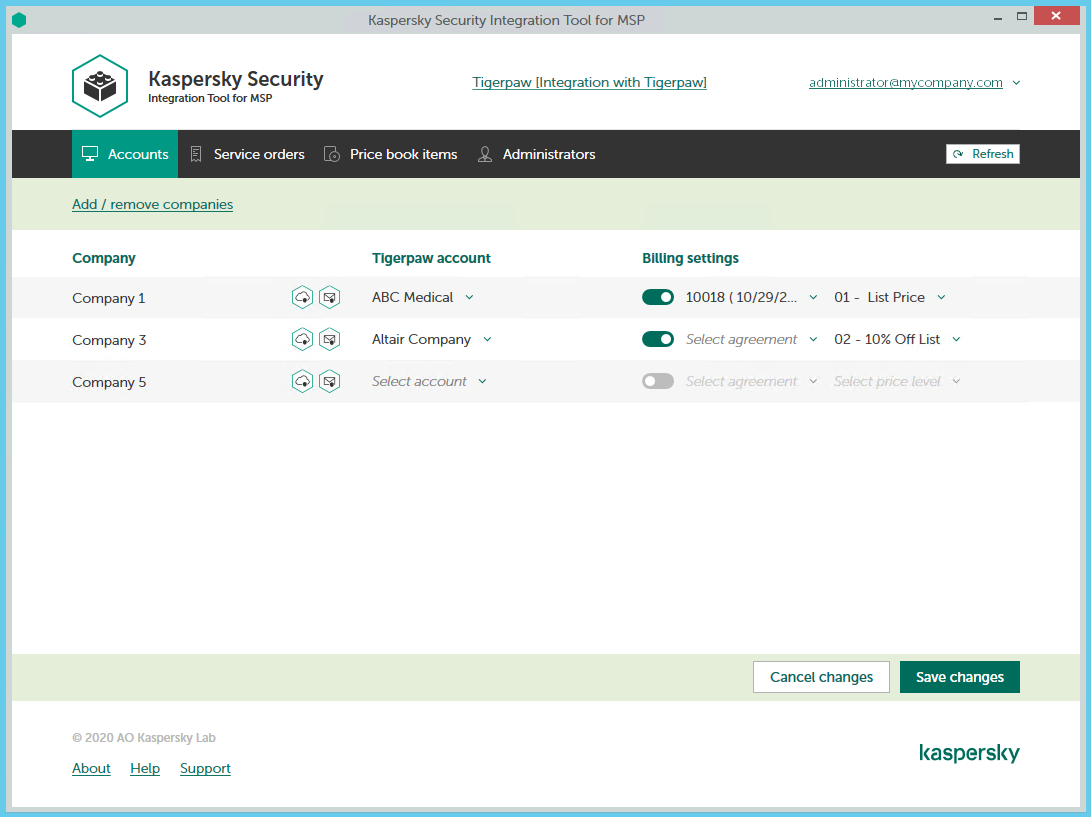
Kaspersky Security Integration Tool for MSP main window
See also |