Using Kaspersky Scan Engine with F5 BIG-IP Application Security Manager
You can configure Kaspersky Scan Engine to work with F5 BIG-IP® Application Security Manager™ (hereinafter ASM). For convenience, this process is separated into several steps.
Step I. Configuring Kaspersky Scan Engine
To configure Kaspersky Scan Engine, do one of the following:
- In the ICAP mode configuration file, set the value of the
VirusNameICAPHeaderelement toX-Virus-ID. - In the Service page of Kaspersky Scan Engine GUI, set the value of the Detected object name HTTP header field to
X-Virus-ID.
Step II. Configuring ASM
To configure ASM:
- Log in to the Configuration utility.
- Go to Security > Options > Application Security > Integrated Services > Anti-Virus Protection.
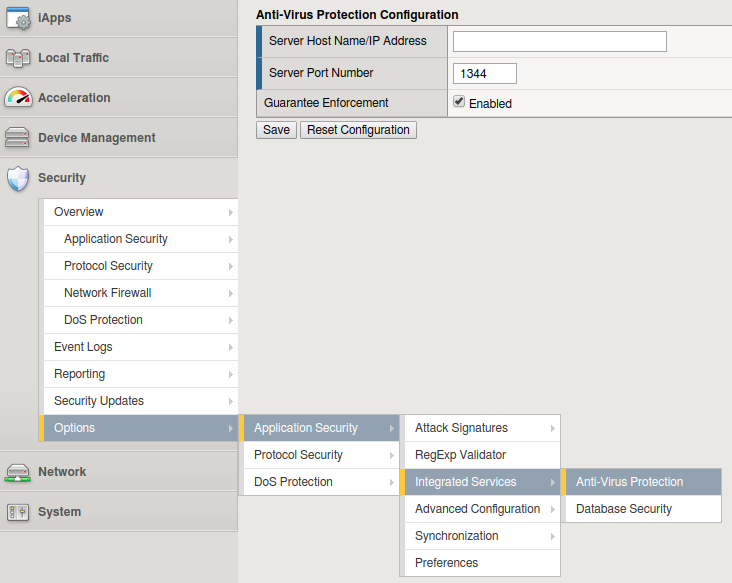
Anti-Virus Protection
- In the Server Host Name/IP Address field, specify the IP address of the Kaspersky Scan Engine ICAP server.
- In the Server Port Number field, specify the port of the Kaspersky Scan Engine ICAP server in or leave the default value of
1344. - Select the Guarantee Enforcement check box if you want the system to perform virus checking even if this may slow your web application.
- Click Save.
- To apply the security policy changes immediately, click Apply Policy.
- Go to Security > Options > Application Security > Advanced Configuration > System Variables.
- Configure the internal variables:
- In ASM 13.1.X - 16.X:
- For the icap_uri setting, enter
/reqin the Parameter Value setting. This is the default value inReqModeAddress. - For the virus_header_name setting, enter
X-Virus-IDin the Parameter Value setting. - Select Update.
- For the icap_uri setting, enter
- In ASM 11.X - 13.0.X:
- For the icap_uri setting, enter
/reqin the Parameter Value setting. This is the default value inReqModeAddress. - For the virus_header_name setting, enter
X-Virus-ID. - Select Save.
- For the icap_uri setting, enter
- In ASM 13.1.X - 16.X:
Configuring blocking of detected objects
To configure blocking of detected objects:
- In ASM 13.1.X - 16.X:
- Log in to the Configuration utility.
- Go to Security > Application Security > Policy Building > Learning and Blocking Settings.
- Set the view to Advanced.
- Expand Antivirus (expand Antivirus Protection in versions earlier than 14.X) and select either or both of the Alarm and Block check boxes for the Virus Detected violation.
- Click Save.
- To activate the security policy changes immediately, select Apply Policy.
- In ASM 12.X:
- Log in to the Configuration utility.
- Go to Security > Application Security > Policy Building > Learning and Blocking Settings.
- Set the view to Advanced.
- Expand Policy General Features and select either or both of the Alarm and Block check boxes for the Virus Detected violation.
- Click Save.
- To apply the security policy changes immediately, click Apply Policy.
- In ASM 11.X:
- Log in to the Configuration utility.
- Go to Security > Application Security > Blocking.
- Under Violations List, for Negative Security Violations select either or both of the Alarm and Block check boxes for the Virus Detected violation.
- Click Save.
- To activate the security policy changes immediately, click Apply Policy.
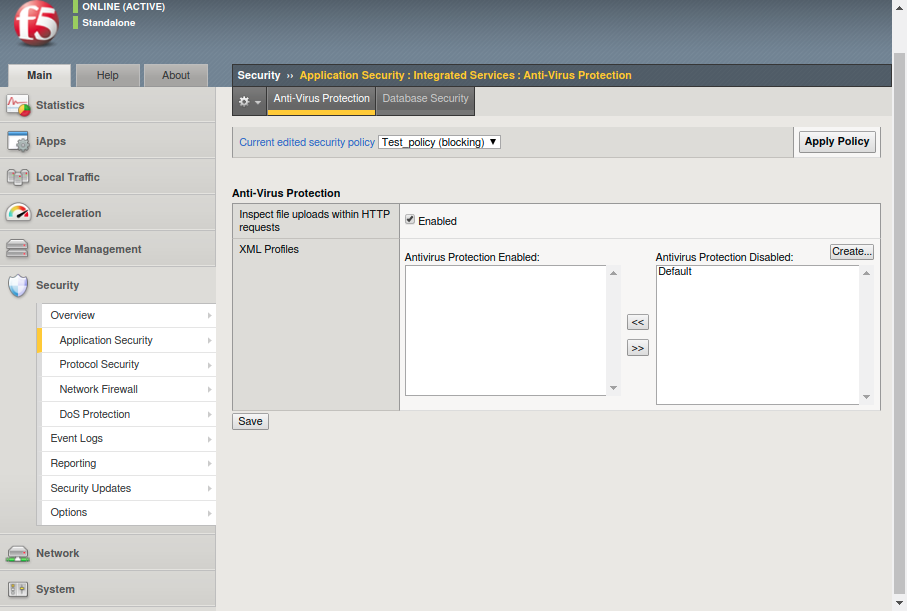
Configuring scanning of uploaded files and email attachments
To configure scanning of uploaded files and email attachments:
- Go to Security > Application Security > Integrated Services > Anti-Virus Protection.
- Select the relevant security policy from the list.
- Select the Inspect file uploads within HTTP requests check box.
- To scan SOAP attachments, move the relevant XML profiles from the Antivirus Protection Disabled list to the Antivirus Protection Enabled list.
- Click Save.
- To apply the security policy changes immediately, click Apply Policy.
Apply Policy
Reviewing the detect objects
To view reports on detected objects:
- Log in to the Configuration utility.
- Go to Security > Reporting > Application > Charts.
- Select Top Viruses Detected in the charts list.
The system will display the detected viruses over time.