adc_hello example
This example demonstrates use of the Sensor driver to test the functionality of an analog-to-digital converter (ADC) on the Radxa ROCK 3A hardware platform in KasperskyOS.
Example directory in the SDK
The code of the example and build scripts are available at the following path:
/opt/KasperskyOS-Community-Edition-<platform>-<version>/examples/adc_hello
List of programs
AdcHellois an application that checks the functionality of ADC channels.Sensoris a driver that provides an interface for working with ADC channels.DCM– system program that lets you dynamically create IPC channels.
Initialization description
The solution initialization description file named init.yaml is generated during the solution build process based on the ./einit/src/init.yaml.in template. Macros in @INIT_*@ format contained in the template are automatically expanded in the resulting init.yaml file. For more details, refer to init.yaml.in template.
Security policy description
The ./einit/src/security.psl file contains description of the solution security policy. The declarations in the PSL file are provided with comments that explain the purpose of these declarations.
Resources
The directory ./resources/xdl/adc_hello contains the EDL description for the AdcHello program.
Operating scenario
The AdcHello program performs the following actions:
- Initializes the Sensor driver for working with ADC channels.
- Requests a list of all available channels in the system and prints it to standard error. The channels named
SARADC_VIN6andSARADC_VIN7are displayed in the output but are not available for operation. - Opens the channel with the number defined by the
ADC_CHAN_NUMmacro. - Requests the parameters of an open channel (sensor type and scaling factor) and prints them to standard error.
- Calculates the voltage supplied to the channel, normalizes it, and prints it to standard error.
- Closes the channel, deinitializes the driver, and terminates the program with the
EXIT_SUCCESScode if there are no errors. Otherwise it shows theEXIT_FAILUREcode.
Building and running the example
The CMake system, which is included with KasperskyOS Community Edition, is used to build and run the example.
This example is intended to run only on Radxa ROCK 3A.
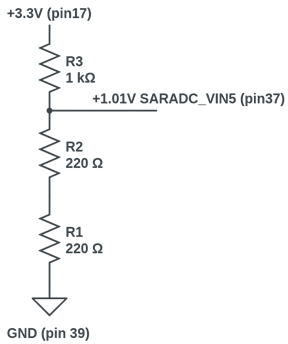
For the example to work correctly, you must connect a 1 V voltage source to the analog input SARADC_VIN5 (pin 37) of the Radxa ROCK 3A board according to the connection diagram below:
See Building and running examples section.
Page top