Preparing Raspberry Pi 4 B to run examples
Connecting a computer and Raspberry Pi 4 B
To see the output from Raspberry Pi 4 B on a computer and to have debug capabilities, do the following:
- Connect the pins of the FT232 USB-UART converters to the corresponding GPIO pins of Raspberry Pi 4 B (see the figure below). If debugging is not necessary, all you need to do is connect one USB-UART converter for output.
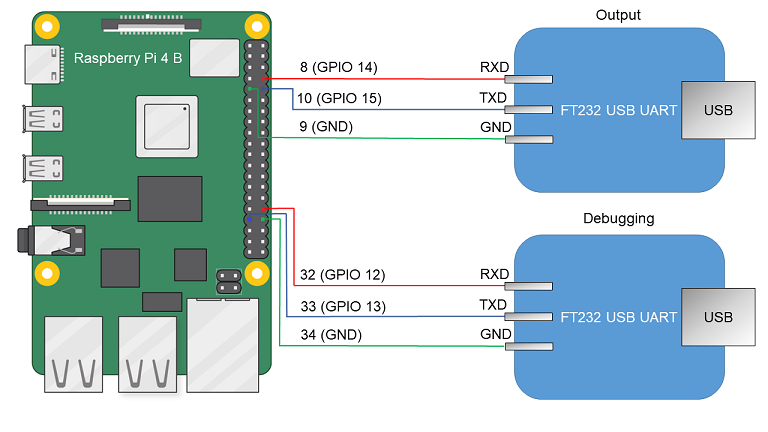
Diagram for connecting USB-UART converters and Raspberry Pi 4 B
- Connect the computer's USB ports and the USB-UART converters.
- Install PuTTY or another equivalent program. Configure the settings as follows:
bps = 115200,data bits = 8,stop bits = 1,parity = none,flow control = none. Define the USB port connected to the USB-UART converter used for receiving output from Raspberry Pi 4 B.
To allow a computer and Raspberry Pi 4 B to interact through Ethernet:
- Connect the network cards of the computer and Raspberry Pi 4 B to a switch or to each other.
- Configure the computer's network card so that its IP address is in the same subnet as the IP address of the Raspberry Pi 4 B network card (the settings of the Raspberry Pi 4 B network card are defined in the
dhcpcd.conffile, which is found at the path<example name>/resources/...).
Preparing a bootable SD card for Raspberry Pi 4 B
If the hdd.img image was created when building the example, all you have to do is write the resulting image to the SD card. To do this, connect the SD card to the computer and run the following command:
# In the following command, path_to_img is the path to the image file
# [X] is the final character in the name of the SD card block device.
$ sudo dd of=/dev/sd[X] if=path_to_img status=progress bs=64K conv=fsync
If kos-image was created when building the example, the SD card requires additional preparations before you can write the image to it. After preparing the SD card, you must copy the kos-image file from the directory <example name>/build/einit to the bootable area (FAT32 partition) of the prepared SD card. To prepare the bootable SD card, connect the SD card to the computer and run the following commands:
# To create a bootable drive image file (*.img),
# run the script:
$ sudo /opt/KasperskyOS-Community-Edition-<platform>-<version>/common/rpi4_prepare_sdcard_image.sh
# In the following command, path_to_img is the path to the image file
# of the bootable drive (this path is displayed upon completion
# of the previous command), [X] is the final character
# in the name of the SD card block device.
$ sudo dd of=/dev/sd[X] if=path_to_img status=progress bs=64K conv=fsync
Page top