Contents
- KSWS to KES Migration Guide
- Correspondence of KSWS and KES components
- Correspondence of KSWS and KES settings
- Migrating KSWS components
- Migrating KSWS tasks and policies
- Migrating the KSWS trusted zone
- Installing KES instead of KSWS
- Migrating the [KSWS+KEA] configuration to [KES+built-in agent] configuration
- Making sure Kaspersky Security for Windows Server was successfully removed
- Activating KES with a KSWS key
- Special considerations for migrating high-load servers
- Managing the application on a server in Server Core mode
- Migrating from [KSWS+KEA] to [KES+built-in agent]
KSWS to KES Migration Guide
|
Starting with version 11.8.0, Kaspersky Endpoint Security for Windows supports the basic functionality of the Kaspersky Security for Windows Server (KSWS) solution. Kaspersky Security for Windows Server protects servers running Microsoft Windows operating systems and network attached storages against viruses and other computer security threats which servers and network attached storages are exposed to while exchanging files. For detailed information about how the solution works, please refer to the Kaspersky Security for Windows Server Help. Starting with Kaspersky Endpoint Security 11.8.0, you can migrate from Kaspersky Security for Windows Server to Kaspersky Endpoint Security for Windows and use the same solution for protecting workstations and servers. |
Software requirements
Before you begin the migration from KSWS to KES, make sure your server satisfies the hardware and software requirements of Kaspersky Endpoint Security for Windows. The lists of supported operating system versions are different for KES and KSWS. For example, KES does not support servers running Windows Server 2003.
Minimum software requirements for migrating from KSWS to KES:
- Kaspersky Endpoint Security for Windows 12.0.
- Kaspersky Security 11.0.1 for Windows Server.
If you have an earlier version of Kaspersky Security for Windows Server installed, we recommend upgrading the application to the latest version. The Policies and tasks conversion wizard does not support earlier versions of Kaspersky Security for Windows Server.
- Kaspersky Security Center 14.2
If you have an earlier version of Kaspersky Security Center installed, update it to 14.2 or later. In this version of Kaspersky Security Center, the Policies and tasks batch conversion wizard lets you migrate policies into a profile rather than into a policy. In this version of Kaspersky Security Center, the Policies and tasks batch conversion wizard also lets you migrate a broader range of policy settings.
- Kaspersky Endpoint Agent 3.10.
If you have an earlier version of Kaspersky Endpoint Agent installed, we recommend upgrading the application to the latest version. Kaspersky Endpoint Security supports migrating a [KSWS+KEA] configuration to [KES+built-in agent] starting with Kaspersky Endpoint Agent 3.10.
Migration recommendations
When migrating from KSWS to KES, observe the following recommendations:
- Plan the KSWS to KES migration time in advance. Choose a time when servers are operating under the lightest load, for example, during the weekend.
- After the migration, turn on application components gradually. That is, for example, start by enabling the File Threat Protection component alone, then enable other protection components, then enable control components, and so on. At each step, you must make sure the application is working correctly, and monitor the performance of the server. The architecture of KES differs from KSWS, therefore the operating system may also behave differently.
- Carry out the migration gradually. First migrate a single server, then multiple servers, then carry out the migration on all servers of the organization.
- Migrate different types of servers separately. That is, for example, first migrate database servers, then mail servers, and so on.
- Migration on high-load servers involves some special considerations.
Migration steps
Migration from KSWS to KES is performed semi-automatically. This is necessary because of differing architectures of the applications. To migrate policy settings, you must run the Policies and tasks batch conversion wizard (the migration wizard). After migrating policy settings, you must manually configure settings that the migration wizard cannot migrate automatically (for example, Password protection settings). After the migration, it is also recommended to check if the migration wizard correctly migrated all settings.
Migrate from KSWS to KES in the following order:
- Migrate KSWS tasks and policies
After migrating the policies and tasks, you must perform additional configuration steps. We also recommend to make sure that Kaspersky Endpoint Security provides the necessary level of security after migration from KSWS.
The Policies and tasks batch conversion wizard for Kaspersky Security for Windows Server is only available in the Administration Console (MMC). Policy and task settings cannot be migrated in the Web Console and Kaspersky Security Center Cloud Console.
- Install Kaspersky Endpoint Security
You can install Kaspersky Endpoint Security in the following ways:
- Installing KES after removing KSWS (recommended).
- Installing KES on top of KSWS.
- Activate KES with a KSWS key
- Confirm that the application is in working order after migration
After migrating from KSWS to KES, make sure that the application is operating correctly. Check the status of the server in the console (should be OK). Make sure no errors are reported for the application, also check the time of the last connection to the Administration Server, the time of the last database update and the server protection status.
Pay special attention to the migration of exclusion lists, trusted applications, trusted web addresses, Application Control rules.
Correspondence of KSWS and KES components
When migrating from KSWS to KES, the set of components is migrated only when the application is being installed locally.
Correspondence of Kaspersky Security for Windows Server and Kaspersky Endpoint Security for Windows components
Kaspersky Security for Windows Server component |
Kaspersky Endpoint Security for Windows component |
|---|---|
Basic functionality |
Application kernel |
Log Inspection |
Log Inspection |
Device Control |
Device Control |
Firewall Management |
(not supported) KSWS Firewall functions are performed by the system-level Firewall. In KES, a separate component is responsible for the Firewall functionality. After migration, you can configure the Kaspersky Endpoint Security Firewall. |
File Integrity Monitor |
System Integrity Monitoring |
Exploit Prevention |
Exploit Prevention |
System Tray Icon |
(not supported) You can configure user interaction in the application interface settings. |
Integration with Kaspersky Security Center |
Network Agent Connector |
Endpoint Agent |
(not supported) In Kaspersky Endpoint Security 11.9.0 the Kaspersky Endpoint Agent distribution package is no longer part of the Kaspersky Endpoint Security distribution kit. You must download the Kaspersky Endpoint Agent distribution package separately. |
Network Threat Protection |
Network Threat Protection |
Anti-Cryptor |
Behavior Detection |
Anti-Cryptor for NetApp |
(not supported) |
Traffic Security |
Web Threat Protection Mail Threat Protection Web Control |
On-Demand Scan |
Application kernel |
ICAP Network Storage Protection |
(not supported) Kaspersky Endpoint Security does not support Network-Attached Storages Protection components. If you need these components, you can continue using Kaspersky Security for Windows Server. |
RPC Network Storage Protection |
(not supported) Kaspersky Endpoint Security does not support Network-Attached Storages Protection components. If you need these components, you can continue using Kaspersky Security for Windows Server. |
Real-Time File Protection |
File Threat Protection |
Script Monitoring |
(not supported) Script Monitoring is handled by other components, for example, AMSI Protection. |
KSN Usage |
Kaspersky Security Network |
Applications Launch Control |
Application Control |
Performance counters |
(not supported) |
Correspondence of KSWS and KES settings
When migrating policies and tasks, KES is configured in accordance with KSWS settings. Settings of application components that KSWS does not have are set to default values.
Application settings
Scalability, interface and scanning settings
Supplementary
User permissions for application management
User access permissions for Kaspersky Security Service management
Real-time server protection
Local activity control
Network-Attached Storages Protection
RPC Network Storage Protection
ICAP Network Storage Protection
Network activity control
System Inspection
Logs and notifications
Interaction with Administration Server
Tasks
Baseline File Integrity Monitor
Rollback of Application Database Update
Rule Generator for Applications Launch Control
Rule Generator for Device Control
Page topMigrating KSWS components
Prior to the local installation, Kaspersky Endpoint Security checks the computer for the presence of Kaspersky applications. If Kaspersky Security for Windows Server is installed on the computer, KES detects the set of KSWS components that are installed and selects the same components for installation.
KES components that KSWS does not have are installed as follows:
- AMSI Protection, Host Intrusion Prevention, Remediation Engine are installed with default settings.
- BadUSB Attack Prevention, Adaptive Anomaly Control, Data Encryption, Detection and Response components are ignored.
When installed remotely, the KES application ignores the set of installed KSWS components. The installer installs components that you select in properties of the installation package. After installing Kaspersky Endpoint Security and migrating policies and tasks, KES settings are configured in accordance with KSWS settings.
Page topMigrating KSWS tasks and policies
You can migrate KSWS policy and task settings in the following ways:
- Using the Policies and Tasks Batch Conversion Wizard (hereinafter also referred to as the Migration Wizard).
The Migration Wizard for KSWS is available only in the Administration Console (MMC). Policy and task settings cannot be migrated in the Web Console and Cloud Console.
The batch conversion wizard works differently for different versions of Kaspersky Security Center. We recommend upgrading the solution to version 14.2 or higher. In this version of Kaspersky Security Center, the Policies and tasks batch conversion wizard lets you migrate policies into a profile rather than into a policy. In this version of Kaspersky Security Center, the Policies and tasks batch conversion wizard also lets you migrate a broader range of policy settings.
- Using the New Policy Wizard for Kaspersky Endpoint Security for Windows.
The New Policy Wizard lets you create a KES policy based on a KSWS policy.
KSWS policy migration procedures are different when using Migration Wizard and the New Policy Wizard.
Policies and tasks batch conversion wizard
The migration wizard transfers KSWS policy settings into the policy profile instead of KES policy settings. The policy profile is a set of policy settings that is activated on a computer if the computer satisfies the configured activation rules. The UpgradedFromKSWS device tag is selected as the triggering criterion of the policy profile. Kaspersky Security Center automatically adds the UpgradedFromKSWS tag to all computers on which you install KES on top of KSWS using the remote installation task. If you chose a different installation method, you can assign the tag to devices manually.
To add a tag to a device:
- Create a new tag for servers —
UpgradedFromKSWS.For more details about creating tags for devices, refer to the Kaspersky Security Center Help.
- Create a new administration group in the Kaspersky Security Center console and add servers to which you want to assign the tag to this group.
You can group servers using the selection tool. For more details about working with selections, refer to the Kaspersky Security Center Help.
- Select all servers of the administration group in the Kaspersky Security Center console, open the properties of the selected servers and assign the tag.
If you are migrating multiple KSWS policies, each policy is converted to a profile within one overarching policy. If the KSWS policy already contains profiles, these profiles are also migrated as profiles. As a result you will get a single policy that includes profiles corresponding to all KSWS policies.
How to use the Policies and Tasks Batch Conversion Wizard to migrate KSWS policy settings
The new policy profile with KSWS settings will be named UpgradedFromKSWS <Name of the Kaspersky Security for Windows Server policy>. In profile properties, the migration wizard automatically selects the UpgradedFromKSWS device tag as the triggering criterion. Thus the settings from the policy profile are applied to servers automatically.
Wizard for creating a policy based on a KSWS policy
When a KES policy is created based on a KSWS policy, the wizard transfers settings to the new policy accordingly. That is, one KES policy will correspond to one KSWS policy. The wizard does not convert the policy to a profile.
How to use the New Policy Wizard to migrate KSWS policy settings
Additional configuration of policies and tasks after migration
KSWS and KES have different sets of components and policy settings, so after migration you must verify that policy settings satisfy your corporate security requirements.
Check the following basic policy settings:
- Password protection. KSWS Password protection settings are not migrated. Kaspersky Endpoint Security has a built-in Password protection feature. If necessary, turn on Password protection and set a password.
- Trusted zone. The methods used by KSWS and KES for selecting objects differ. When migrating, KES supports exclusions defined as individual files or paths to file / folder. If KSWS has exclusions configured as a predefined area or a script URL, such exclusions are not migrated. After migration, you must add such exclusions manually.
To make sure Kaspersky Endpoint Security works correctly on servers, it is recommended to add files important for the server's functioning to the trusted zone. For SQL servers, you must add MDF and LDF database files. For Microsoft Exchange servers, you must add CHK, EDB, JRS, LOG, and JSL files. You may use masks, for example,
C:\Program Files (x86)\Microsoft SQL Server\*.mdf.Starting with Kaspersky Endpoint Security 12.6 for Windows, scan exclusions and trusted applications are added to the trusted zone. Predefined scan exclusions and trusted applications help quickly configure Kaspersky Endpoint Security on SQL servers, Microsoft Exchange servers, and System Center Configuration Manager. This means you do not need to manually set up a trusted zone for the application on servers.
- Firewall. KSWS Firewall functions are performed by the system-level Firewall. In KES, a separate component is responsible for the Firewall functionality. After migration, you can configure the Kaspersky Endpoint Security Firewall.
- Kaspersky Security Network. Kaspersky Endpoint Security does not support configuring KSN for individual components. Kaspersky Endpoint Security uses KSN for all application components. To use KSN, you must accept the new terms and conditions of the Kaspersky Security Network Statement.
- Web Control. Blocking rules for web traffic category control are migrated to a single blocking rule in Kaspersky Endpoint Security. Kaspersky Endpoint Security ignores allowing rules for category control. Kaspersky Endpoint Security does not support all categories of Kaspersky Security for Windows Server. Categories that do not exist in Kaspersky Endpoint Security are not migrated. Therefore, web resource classification rules with unsupported categories are not migrated. If necessary, add Web Control rules.
- Proxy server. The proxy server connection password is not migrated. Enter the password to be used for connecting to the proxy server manually.
- Schedules of individual components. Kaspersky Endpoint Security does not support configuring schedules for individual components. The components are always on while Kaspersky Endpoint Security is operational.
- Set of components. The set of available Kaspersky Endpoint Security features depends on the type of operating system: workstation or server. For example, out of encryption tools, only BitLocker Drive Encryption is available on servers.
 attribute. The state of the attribute is not migrated. The attribute will have the default value. By default, almost all settings in the new policy have a prohibition applied on modifying settings in child policies and in the local application interface. The attribute has the
  value for policy settings in the Managed Detection and Response section and in the User support group of settings (Interface section). If necessary, configure the inheritance of settings from the parent policy.
- Working with active threats. Advanced Disinfection works differently for workstations and servers. You can configure advanced disinfection in Malware Scan task settings and in application settings.
- Upgrading the application. To install major updates and patches without restarting, you must change the application upgrade mode. By default, the Install application updates without restart feature is disabled.
- Kaspersky Endpoint Agent. Kaspersky Endpoint Security has a built-in agent for working with Detection and Response solutions. If necessary, transfer Kaspersky Endpoint Agent policy settings to the Kaspersky Endpoint Security policy.
- Update of databases and application modules tasks. Make sure that the settings of the Update of databases and application modules task were migrated correctly. Instead of KSWS's three tasks, KES uses a single KES task. You may optimize the Update of databases and application modules tasks and remove superfluous tasks.
- Other tasks. Application Control, Device Control, and File Integrity Monitor components work differently in KSWS and KES. KES does not use Baseline File Integrity Monitor, Applications Launch Control Generator, Rule Generator for Device Control tasks. Therefore these tasks are not migrated. After migration, you can configure the File Integrity Monitor, Application Control, Device Control components.
Migrating the KSWS trusted zone
A trusted zone is a system administrator-configured list of objects and applications that Kaspersky Endpoint Security does not monitor when active. You can migrate trusted zone objects from KSWS to KES using the Policies and Tasks Batch Conversion Wizard or the wizard for creating a new KES policy based on the KSWS policy. KSWS and KES have different sets of components and features, so after migration you must verify that exclusions satisfy your corporate security requirements. The methods of adding exclusions to the trusted zone are also different for KES and KSWS. The Migration Wizard does not have tools to migrate all KSWS exclusions. This means that after the migration, you must manually add some of the KSWS exclusions.
To make sure Kaspersky Endpoint Security works correctly on servers, it is recommended to add files important for the server's functioning to the trusted zone. For SQL servers, you must add MDF and LDF database files. For Microsoft Exchange servers, you must add CHK, EDB, JRS, LOG, and JSL files. You may use masks, for example, C:\Program Files (x86)\Microsoft SQL Server\*.mdf.
Starting with Kaspersky Endpoint Security 12.6 for Windows, scan exclusions and trusted applications are added to the trusted zone. Predefined scan exclusions and trusted applications help quickly configure Kaspersky Endpoint Security on SQL servers, Microsoft Exchange servers, and System Center Configuration Manager. This means you do not need to manually set up a trusted zone for the application on servers.
KES and KSWS trusted zone creation methods.
KSWS |
|
KES |
|---|---|---|
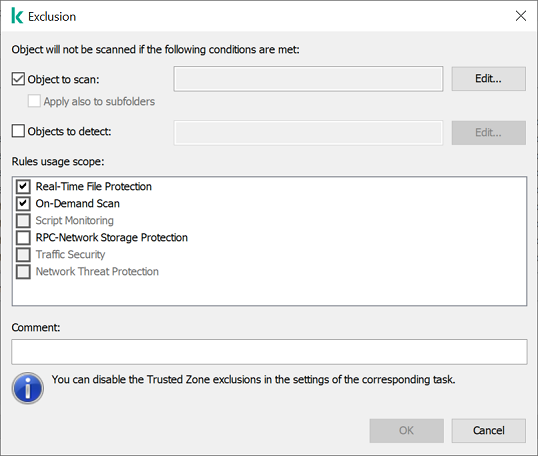
Object to scan |
|
|
|
(does not migrate) |
|
|
→ |
File or folder |
|
→ |
File or folder |
|
(does not migrate) |
|
Detected object |
→ |
Object name |
Trusted processes |
→ |
Trusted applications |
Migration of scanned objects
KSWS exclusions that have the Object to scan method selected in their properties are migrated to KES exclusions that have the File or folder method selected in their properties, with some limitations. The migration of an exclusion depends on the object selection method:
- Predefined scope – does not migrate.
After migration, you must add such exclusions manually. Exclusions as predefined areas must be configured in the Malware Scan task settings.
- Disk, folder or network location – migrate to KES exclusions that have the "File or folder" method selected in properties.
- File – migrate to KES exclusions that have the "File or folder" method selected in properties.
- Script file or web address – does not migrate.
After migration, you must add such exclusions manually. Exclusions as script web addresses must be added to trusted web addresses for Web Threat Protection.
If the Apply also to subfolders check box is selected for the scanned object, this setting is migrated to KES exclusions (the Include subfolders check box).

KES exclusion settings
KSWS exclusion settings
Migration of detected objects
KSWS exclusions that have the Detected object method selected in their properties are migrated to KES exclusions that have the Object name method selected in their properties. The name of the detected object corresponds to the classification of the Kaspersky Encyclopedia (for example, Email-Worm, Rootkit, or RemoteAdmin). Kaspersky Endpoint Security supports masks with the question mark ? (matches any single character) and the asterisk * (matches any sequence of characters).
Migration of exclusion usage scope
The usage scope of an exclusion is a set of components to which the exclusion applies. KES and KSWS have different sets of components so the Migration Wizard cannot migrate the exclusion usage scope. Therefore, if at least one component is selected in the KSWS usage scope, KES applies the exclusion to all application components.
You can configure the KSWS usage scope in trusted zone settings and also in the settings of KSWS protection components. To do so, you can select or clear the Apply Trusted Zone check box in the corresponding section of the policy. The settings of KES protection components do not include such a check box. This means the trusted zone status in individual component settings is lost upon migration. After completing the migration, select components to which the exclusion applies in trusted zone settings in the KES policy.
Migrating comments
Comments from the KSWS trusted zone are migrated to KES exclusion comments without modification.
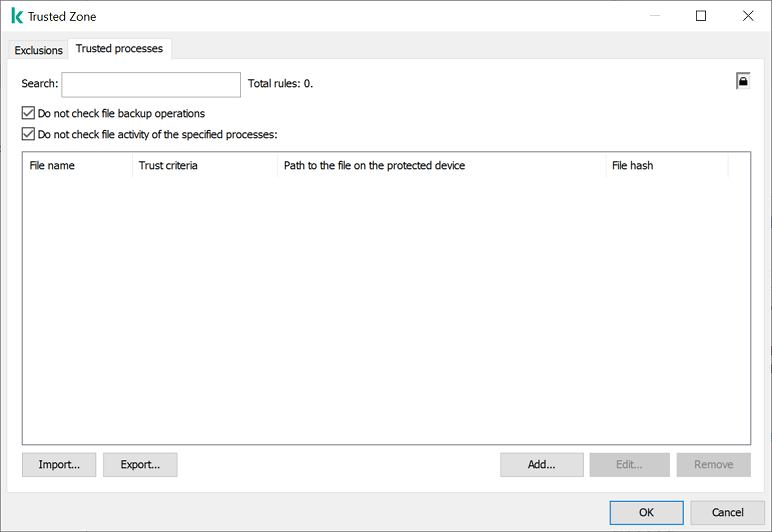
Migrating trusted processes
KSWS trusted processes are migrated to KES trusted processes with some limitations. Migrating trusted processes depends on the object selection method:
- Path to the file on the protected device – migrates to KES trusted applications.
- File hash – does not migrate.
If KSWS has trusted processes configured as a file has, such trusted processes are not migrated. After migration, you must add such trusted processes manually.
If the Do not check file backup operations check box is selected in trusted process settings, this setting is migrated to KES trusted applications (the Do not monitor application activity check box).
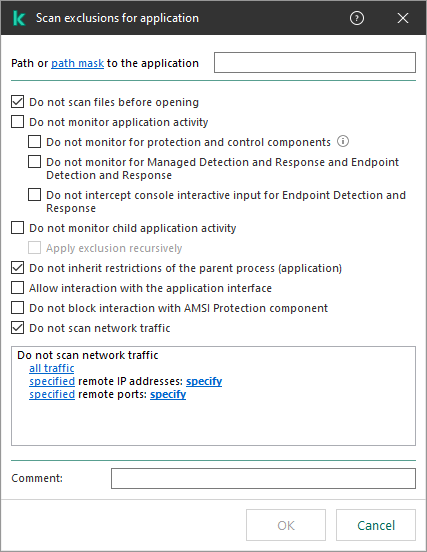
KES trusted application settings
KSWS trusted process settings
Page topInstalling KES instead of KSWS
You can install Kaspersky Endpoint Security in the following ways:
- Installing KES after removing KSWS (recommended).
- Installing KES on top of KSWS.
Removing Kaspersky Security for Windows Server
You can remove the application remotely using the Uninstall application remotely task or locally on the server. You may need to restart the server after removing KSWS. If you want to install Kaspersky Endpoint Security without a restart, please make sure that Kaspersky Security for Windows Server is completely removed. If the application is not completely removed, installing Kaspersky Endpoint Security may cause faulty operation of the server. Making sure that the application is completely removed is also recommended if you have used the kavremover utility. The kavremover utility does not support managing KSWS.
If Password Protection is enabled to restrict access to KSWS, enter the uninstallation password in the settings fo the KES installation package.
After removing KSWS, install Kaspersky Endpoint Security for Windows using any available method.
Installing Kaspersky Endpoint Security
When you install KES remotely, components that you have selected in installation package properties are installed on the server. We recommend selecting default components in installation package properties. A restart is not necessary when installing KES on top of KSWS.
Prior to the local installation, Kaspersky Endpoint Security checks the computer for the presence of Kaspersky applications. If Kaspersky Security for Windows Server is installed on the computer, KES detects the set of KSWS components that are installed and selects the same components for installation. A restart is not necessary when installing KES on top of KSWS.
If installing KES on top of KSWS failed, you can roll back the installation. After rolling back the installation, it is recommended to restart the server and try again.
KSWS settings and tasks are not migrated when Kaspersky Endpoint Security for Windows is installed. To migrate settings and tasks, run the Policies and tasks batch conversion wizard.
You can check the list of installed components in the Security section of the application interface, using the status command, or in the Kaspersky Security Center console in computer properties. You can change the set of components after installation by using the Change application components.
Migrating the [KSWS+KEA] configuration to [KES+built-in agent] configuration
To support using Kaspersky Endpoint Security for Windows as part of EDR (KATA), EDR Optimum, EDR Expert, Kaspersky Sandbox, and MDR, a built-in agent has been added to the application. You no longer need a separate Kaspersky Endpoint Agent application to work with these solutions.
When migrating from KSWS to KES, the EDR (KATA), EDR Optimum, EDR Expert, Kaspersky Sandbox, and MDR solutions continue to work with Kaspersky Endpoint Security. In addition, Kaspersky Endpoint Agent will be removed from the computer.
Migrating the [KSWS+KEA] configuration to [KES+built-in agent] involves the following steps:
- Migrating from KSWS to KES
Migrating from KSWS to KES involves installing Kaspersky Endpoint Security instead of Kaspersky Security for Windows Server.
Administrators typically enable Password protection to restrict access to KSWS and KEA. Starting with Kaspersky Security Center Linux 15.1, you can enter the application uninstallation password in the Install application remotely task settings. The task allows entering only one uninstallation password. That is, if the same password is set for KSWS and KEA, the KSWS and KEA applications are removed successfully. If the passwords are different, removal of one of the applications fails with an access error. To complete the migration, you must disable Password Protection for the application whose password you could not enter in the settings of the Install application remotely task.
To carry out the migration, you must select the components needed to support Detection and Response solutions as part of Kaspersky Endpoint Security. After installing the application, Kaspersky Endpoint Security switches to using the built-in agent and removes Kaspersky Endpoint Agent.
- Migrating the policy and tasks
Migrating [KSWS+KEA] policies and tasks to [KES+built-in agent] involves the following steps:
- Migrating policies and tasks from KSWS to KES using the Policies and Tasks Batch Conversion Wizard (only available on the Administration Console (MMC)).
As a result, a policy profile with the UpgradedFromKSWS <Name of the Kaspersky Security for Windows Server policy> name is added to the KES policy. New KES tasks are also created with <KSWS task name> (converted) names.
- Migrating policies and tasks from KEA to KES using the wizard for migration from Kaspersky Endpoint Agent (only available in Web Console and Cloud Console).
As a result, a new policy is created with the name <Name of the Kaspersky Endpoint Security policy> & <Name of the Kaspersky Endpoint Agent policy>. New tasks and KES tasks are also created.
- Migrating policies and tasks from KSWS to KES using the Policies and Tasks Batch Conversion Wizard (only available on the Administration Console (MMC)).
- Licensing functionality
If you use a common Kaspersky Endpoint Detection and Response Optimum or Kaspersky Optimum Security license to activate Kaspersky Endpoint Security for Windows and Kaspersky Endpoint Agent, EDR Optimum functionality will be activated automatically after upgrading the application to version 11.7.0. You do not need to do anything else.
If you use a stand-alone Kaspersky Endpoint Detection and Response Optimum Add-on license to activate EDR Optimum functionality, you must make sure that the EDR Optimum key is added to the Kaspersky Security Center repository and the automatic license key distribution functionality is enabled. After you upgrade the application to version 11.7.0, EDR Optimum functionality is activated automatically.
If you use a Kaspersky Endpoint Detection and Response Optimum or Kaspersky Optimum Security license to activate Kaspersky Endpoint Agent, and a different license to activate Kaspersky Endpoint Security for Windows, you must replace the Kaspersky Endpoint Security for Windows key with the common Kaspersky Endpoint Detection and Response Optimum or Kaspersky Optimum Security key. You can replace the key using the Add key task.
You do not need to activate Kaspersky Sandbox functionality. Kaspersky Sandbox functionality will be available immediately after upgrading and activating Kaspersky Endpoint Security for Windows.
Only the Kaspersky Anti Targeted Attack Platform license can be used to activate Kaspersky Endpoint Security as part of the Kaspersky Anti Targeted Attack Platform solution. After you upgrade the application to version 12.1, EDR (KATA) functionality is activated automatically. You do not need to do anything else.
- Checking the health of Kaspersky Endpoint Detection and Response Optimum and Kaspersky Sandbox
If after the upgrade, the computer has the Critical status in the Kaspersky Security Center console:
- Make sure that the computer has Network Agent version 13.2 or higher installed.
- Check the operating status of the built-in agent by viewing the Application components status report. If a component has the Not installed status, install the component using the Change application components task.
- Make sure you accept the Kaspersky Security Network Statement in the new policy of Kaspersky Endpoint Security for Windows.
Make sure EDR Optimum functionality is activated using the Application components status report. If a component has the Not covered by license status, make sure that the automatic license key distribution functionality of EDR Optimum is turned on.
Making sure Kaspersky Security for Windows Server was successfully removed
Make sure Kaspersky Security for Windows Server is completely removed:
- The
%ProgramFiles%\Kaspersky Lab\Kaspersky Security for Windows Server\folder does not exist. - The following services are not present:
- Kaspersky Security Service (KAVFS)
- Kaspersky Security Management (KAVFSGT)
- Kaspersky Security Exploit Prevention (KAVFSSLP)
- Kaspersky Security Script Checker (KAVFSSCS)
You can check running services in Task Manager or by issuing the
sc querycommand (see figure below). - The following drivers are not present:
- klam.sys
- klflt.sys
- klramdisk.sys
- klelaml.sys
- klfltdev.sys
- klips.sys
- klids.sys
- klwtpee
You can check installed drivers in the
C:\Windows\System32\driversfolder or by issuing thesc querycommand. If a service or driver are missing, you will get the following response: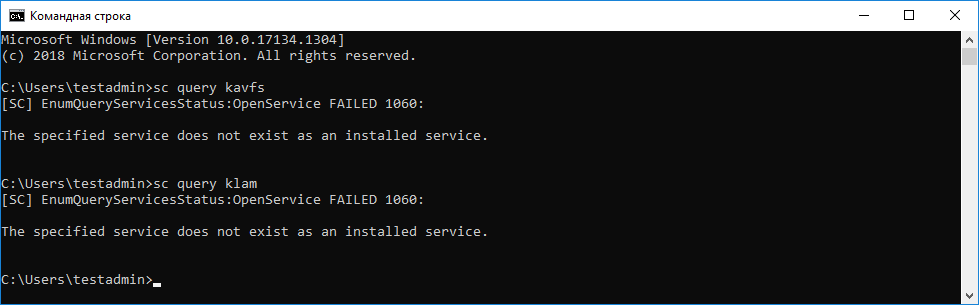
Making sure Kaspersky Security for Windows Server services and drivers were successfully removed
If application or driver files remain on the server, delete the relevant files manually. If Kaspersky Security for Windows Server services are still running on the server, stop (sc stop) and delete (sc delete) the services manually. To stop the klam.sys driver, use the fltmc unload klam command.
Activating KES with a KSWS key
After installing the application, you can activate Kaspersky Endpoint Security for Windows (KES) using a Kaspersky Security for Windows Server (KSWS) license key. The activation process after migration depends on the KSWS activation method (see the table below).
Kaspersky Endpoint Security does not support the Kaspersky Security for Storage license. To work with this license, you need to use Kaspersky Security for Windows Server.
To activate KES with the KSWS key you can use only the activation code. If you are using a key file to activate the application, you need to contact Technical Support for a Kaspersky Endpoint Security key file.
Activating Kaspersky Endpoint Security for Windows with a Kaspersky Security for Windows Server key
Kaspersky Security for Windows Server activation method |
Migrating the key to Kaspersky Endpoint Security for Windows. |
|---|---|
Automatic distribution of the KSWS license key to computers. |
If automatic key distribution is enabled in KSWS license key properties, KES is automatically activated with the KSWS key. |
The KSWS key is added by a task. |
If your KSWS is activated using the task, the KSWS license key is deleted during migration from KSWS. You must activate the application again. For example, you can add a license key to the Kaspersky Endpoint Security for Windows installation package. |
The KSWS key is added locally in the application interface. |
If your KSWS is activated locally using the Application Activation Wizard, the KSWS license key is deleted during migration from KSWS. You must activate the application again. For example, you can add a license key to the Kaspersky Endpoint Security for Windows installation package. |
The KSWS key is added to the installation package. |
If your KSWS is activated using the key from the installation package, the KSWS license key is deleted during migration from KSWS. You must activate the application again. For example, you can add a license key to the Kaspersky Endpoint Security for Windows installation package. |
Paid virtual machine image (Amazon Machine Image – AMI) in Amazon Web Services (AWS). |
If you purchased Kaspersky Security Center as a paid virtual machine image (Amazon Machine Image – AMI) in Amazon Web Services (AWS), activating KES is not required. In this case, Kaspersky Security Center uses the AWS subscription that is already added to the application. |
Ready-made free-of-charge Kaspersky Security Center image with your own license (Bring Your Own License – BYOL model). |
If you are using an out-of-the-box free Kaspersky Security Center image with your own license in a cloud environment (the Bring Your Own License – BYOL model), you must activate the application using any available method. You will need a Kaspersky Hybrid Cloud Security license. |
Special considerations for migrating high-load servers
On high-load servers, it is important to monitor performance and avoid faults. After migration to Kaspersky Endpoint Security for Windows, we recommend temporarily disabling application components that use substantial server resources relative to other components. After you make sure that the server is performing as normal, you can turn the application components back on.
We recommend migrating high-load servers as follows:
- Create a Kaspersky Endpoint Security policy with default settings.
Default settings are considered optimal. This settings are recommended by Kaspersky experts. Default settings provide recommended protection level and optimal resource use.
- In policy settings, turn off the following components: Network Threat Protection, Behavior Detection, Exploit Prevention, Remediation Engine, Application Control.
If your organization has the Kaspersky Managed Detection and Response (MDR) solution deployed, upload the BLOB configuration file to the Kaspersky Endpoint Security policy.
- Remove Kaspersky Security for Windows Server from the server.
- Install Kaspersky Endpoint Security for Windows with the default set of components.
If your organization has Detection and Response solutions deployed, select the relevant components in the properties of the installation package.
- Check the settings of the application:
- The application is activated with the KSWS license key.
- The new policy is applied. Previously selected components are disabled.
- Make sure the server is working. Make sure that Kaspersky Endpoint Security for Windows is not using more than 1% of the server's resources.
- If necessary, create scan exclusions, add trusted applications, create a list of trusted web addresses.
- Turn on Behavior Detection, Exploit Prevention, Remediation Engine components. Make sure that Kaspersky Endpoint Security for Windows is not using more than 1% of the server's resources.
- Turn on the Network Threat Protection component. Make sure that Kaspersky Endpoint Security for Windows is not using more than 2% of the server's resources.
- Turn on the Application Control component in rule testing mode.
- Make sure Application Control is working. If necessary, add new Application Control rules and turn off rule testing mode after confirming that Application Control is working.
After migrating from KSWS to KES, make sure that the application is operating correctly. Check the status of the server in the console (should be OK). Make sure no errors are reported for the application, also check the time of the last connection to the Administration Server, the time of the last database update and the server protection status.
Page topManaging the application on a server in Server Core mode
A server in Server Core mode does not have a GUI. Therefore you can only manage the application remotely using the Kaspersky Security Center console or locally on the command line.
Managing the application using the Kaspersky Security Center console
Installing the application using the Kaspersky Security Center console is not different from installing it the normal way. When creating an installation package, you can add a license key to activate the application. You can use a Kaspersky Endpoint Security for Windows key or a Kaspersky Security for Windows Server key.
On a server in Server Core mode, the following application components are not available: Web Threat Protection, Mail Threat Protection, Web Control, BadUSB Attack Prevention, File Level Encryption (FLE), Kaspersky Disk Encryption (FDE).
Restart is not required when installing Kaspersky Endpoint Security. Restart is required only if you have to remove incompatible applications prior to installation. Restart may also be required when updating the application version. The application cannot display a window to prompt the user to restart the server. You can learn about the need to restart the server from reports in the Kaspersky Security Center console.
Managing the application on a server in Server Core mode is not different from managing a computer. You can use policies and tasks to configure the application.
Managing the application on a server in Server Core mode involves the following special considerations:
- The server in Server Core mode does not have a GUI, therefore Kaspersky Endpoint Security does not display a warning telling the user that Advanced Disinfection is needed. To disinfect a threat, you need to enable Advanced Disinfection technology in application settings and enable immediate Advanced Disinfection in Malware Scan task settings. Then you need to start a Malware Scan task.
- BitLocker Drive Encryption is only available with a Trusted Platform Module (TPM). A PIN / password cannot be used for encryption because the application is unable to display the password prompt window for preboot authentication. If the operating system has Federal Information Processing standard (FIPS) compatibility mode enabled, connect a removable drive for saving the encryption key before you begin encrypting the drive.
Managing the application from the command line
When you cannot use a GUI, you can manage Kaspersky Endpoint Security from the command line.
To install the application on a server in Server Core mode, run the following command:
setup_kes.exe /pEULA=1 /pPRIVACYPOLICY=1 /s
To activate the application, run the following command:
avp.com license /add <activation code or key file>
To check application profile statuses, run the following command:
avp.com status
To view the list of application management commands, run the following command:
avp.com help
Migrating from [KSWS+KEA] to [KES+built-in agent]
When migrating from Kaspersky Security for Windows Server (KSWS) to Kaspersky Endpoint Security (KES), you can use the follow recommendations to configure server protection and optimize performance. Here we will look at an example of migration for a single organization.
Infrastructure of the organization
The company has the following equipment installed:
- Kaspersky Security Center 14.2
The administrator manages Kaspersky solutions using the Administration Console (MMC). Kaspersky Endpoint Detection and Response Optimum (EDR Optimum) is also deployed
In Kaspersky Security Center, three administration groups are created, containing servers of the organization: two administration groups for SQL servers and an administration group for Microsoft Exchange servers. Each administration group is managed by its own policy. Database Update and On-demand scan tasks are created for all servers in the organization.
The KSWS activation key is added to Kaspersky Security Center. Automatic key distribution is enabled.
- SQL servers with Kaspersky Security for Windows Server 11.0.1 and Kaspersky Endpoint Agent 3.11 installed. The SQL servers are combined into two clusters.
KSWS is managed by SQL_Policy(1) and SQL_Policy(2) policies. Database Update, On-demand scan tasks are also created.
- A Microsoft Exchange server with Kaspersky Security for Windows Server 11.0.1 and Kaspersky Endpoint Agent 3.11 installed.
KSWS is managed by the Exchange_Policy policy. Database Update, On-demand scan tasks are also created.
Planning the migration
The migration involves the following steps:
- Migrating KSWS tasks and policies using the Policies and Tasks Batch Conversion Wizard.
- Migrating the Kaspersky Endpoint Agent policy using the Policies and Tasks Batch Conversion Wizard.
- Using tags to activate policy profiles in the properties of the new policy.
- Installing KES instead of KSWS.
- Activating EDR Optimum.
- Confirming that KES is working.
The migration scenario is initially performed on one of the cluster of SQL servers. Then the migration scenario is performed on the other cluster of SQL servers. Then the migration scenario is performed on the Microsoft Exchange.
Migrating KSWS tasks and policies using the Policies and Tasks Batch Conversion Wizard
To migrate KSWS tasks, you can use the Policies and Tasks Batch Conversion Wizard (the migration wizard). As a result, instead of the SQL_Policy(1), SQL_Policy(2), and Exchange_Policy policies, you will get a single policy with three profiles for SQL and Microsoft Exchange servers respectively. The new policy profile with KSWS settings will be named UpgradedFromKSWS <Name of the Kaspersky Security for Windows Server policy>. In profile properties, the migration wizard automatically selects the UpgradedFromKSWS device tag as the triggering criterion. Thus the settings from the policy profile are applied to servers automatically.
Migrating the Kaspersky Endpoint Agent policy using the Policies and Tasks Batch Conversion Wizard
To migrate Kaspersky Endpoint Agent policies, you can use the Policies and Tasks Batch Conversion Wizard. The Policy and Task Migration Wizard for Kaspersky Endpoint Agent is only available in the Web Console.
Using tags to activate policy profiles in the properties of the new policy
Select the device tag that you assigned earlier as the profile activation condition. Open policy properties and select General rules for policy profile activation as the profile activation condition.
Installing KES instead of KSWS
Before installing KES, you must disable Password protection in KSWS policy properties.
Installing KES involves the following steps:
- Prepare the installation package. In installation package properties, select the Kaspersky Endpoint Security for Windows 12.0 distribution kit and select the default set of components.
- Create a Install application remotely task for one of the SQL server administration groups.
- In task properties, select the installation package and the license key file.
- Wait until the task successfully completes.
- Repeat KES installation for remaining administration groups.
Kaspersky Security Center automatically adds the UpgradedFromKSWS tag to names of computers on the console after the KES installation is complete.
To check the KES installation, you can use the Report on protection deployment. You can also check the device status. To confirm application activation, you can use the Report on usage of license keys.
Activating EDR Optimum
You can activate EDR Optimum functionality using a stand-alone Kaspersky Endpoint Detection and Response Optimum Add-on license. You must confirm that the EDR Optimum key is added to the Kaspersky Security Center repository and the automatic license key distribution functionality is enabled.
To check EDR Optimum activation, you can use the Report on status of application components.
Confirming that KES is working
To confirm that KES is working, you can check and see that no errors are reported. The device status must be OK. Update and malware scan tasks and successfully completed.
Page top