Removing the application
Removing Kaspersky Endpoint Security leaves the computer and user data unprotected against threats.
When installing, updating or uninstalling Kaspersky Endpoint Security, errors may occur. For more information about solving these errors, please refer to the Technical Support Knowledge Base.
Removing the application remotely using Kaspersky Security Center
You can remotely uninstall the application by using the Uninstall application remotely task. When performing the task, Kaspersky Endpoint Security downloads the application uninstall utility to the user's computer. After completing uninstallation of the application, the utility will be automatically removed.
How to remove the application through the Administration Console (MMC)
- Open the Kaspersky Security Center Administration Console.
- In the console tree, select Tasks.
The list of tasks opens.
- Click New task.
The Task Wizard starts. Follow the instructions of the Wizard.
Step 1. Selecting task type
Select Kaspersky Security Center Administration Server → Advanced → Uninstall application remotely.
Step 2. Selecting the application to be removed
Select Uninstall application supported by Kaspersky Security Center.
Step 3. Task settings for application uninstallation
Select Kaspersky Endpoint Security for Windows (12.7).
Step 4. Uninstall utility settings
Configure the following additional application settings:
- Force download of the uninstallation utility. Select the utility delivery method:
- Using Network Agent. If Network Agent has not been installed on the computer, first Network Agent will be installed using the tools of the operating system. Kaspersky Endpoint Security is then uninstalled by the tools of Network Agent.
- Using operating system resources through Administration Server. The utility will be delivered to client computers by using operating system resources through the Administration Server. You can select this option if Network Agent is not installed on the client computer, but the client computer is in the same network as the Administration Server.
- Using operating system resources through distribution points. The utility is delivered to client computers using operating system resources via distribution points. You can select this option if there is at least one distribution point in the network. For more details about distribution points, refer to the Kaspersky Security Center Help.
- Verify operating system type before downloading. If necessary, clear this check box. This lets you avoid downloading the uninstall utility if the operating system of the computer does not meet the software requirements. If you are sure that the operating system of the computer meets the software requirements, you can skip this verification.
If the application uninstallation operation is password protected, do the following:
- Select the Use uninstallation password check box.
- Click the Edit button.
- Enter the KLAdmin account password.
Step 5. Selecting the operating system restart setting
After uninstalling the application, a restart is required. Select the action that will be performed to restart the computer.
Step 6. Selecting the devices to which the task will be assigned
Select the computers on which the task will be performed. The following options are available:
- Assign the task to an administration group. In this case, the task is assigned to computers included in a previously created administration group.
- Select computers detected by the Administration Server in the network: unassigned devices. The specific devices can include devices in administration groups as well as unassigned devices.
- Specify device addresses manually, or import addresses from a list. You can specify NetBIOS names, IP addresses, and IP subnets of devices to which you want to assign the task.
Step 7. Selecting the account to run the task
Select the account for installing Network Agent using the tools of the operating system. In this case, administrator rights are required for computer access. You can add multiple accounts. If an account does not have sufficient rights, the Installation Wizard uses the next account. If you uninstall Kaspersky Endpoint Security using Network Agent tools, you do not have to select an account.
Step 8. Configuring a task start schedule
Configure a schedule for starting a task, for example, manually or when the computer is idle.
Step 9. Defining the task name
Enter a name for the task, such as Remove Kaspersky Endpoint Security 12.7.
Step 10. Finishing task creation
Exit the Wizard. If necessary, select the Run the task after the wizard finishes check box. You can monitor the progress of the task in the task properties.
The application will be uninstalled in silent mode.
How to remove the application through the Web Console and Cloud Console
- In the main window of the Web Console, select Devices → Tasks.
The list of tasks opens.
- Click Add.
The Task Wizard starts. Follow the instructions of the Wizard.
Step 1. Configuring general task settings
Configure the general task settings:
- In the Application drop-down list, select Kaspersky Security Center.
- In the Task type drop-down list, select Uninstall application remotely.
- In the Task name field, enter a brief description, for example, Uninstall Kaspersky Endpoint Security from Technical Support computers.
- In the Select devices to which the task will be assigned block, select the task scope.
Step 2. Selecting the devices to which the task will be assigned
Select the computers on which the task will be performed. For example, select a separate administration group or build a selection.
Step 3. Configuring application uninstallation settings
At this step, configure the application uninstallation settings:
- Select the Uninstall managed application type.
- Select Kaspersky Endpoint Security for Windows (12.7).
- Force download of the uninstallation utility. Select the utility delivery method:
- Using Network Agent. If Network Agent has not been installed on the computer, first Network Agent will be installed using the tools of the operating system. Kaspersky Endpoint Security is then uninstalled by the tools of Network Agent.
- Using operating system resources through Administration Server. The utility will be delivered to client computers by using operating system resources through the Administration Server. You can select this option if Network Agent is not installed on the client computer, but the client computer is in the same network as the Administration Server.
- Using operating system resources through distribution points. The utility is delivered to client computers using operating system resources via distribution points. You can select this option if there is at least one distribution point in the network. For more details about distribution points, refer to the Kaspersky Security Center Help.
- In the Maximum number of concurrent downloads field, set a limit on the number of requests sent to the Administration Server to download the application uninstall utility. A limit on the number of requests will help prevent the network from being overload.
- In the Maximum number of uninstallation attempts field, set a limit on the number of attempts to uninstall the application. If uninstallation of Kaspersky Endpoint Security ends with an error, the task will automatically start the uninstallation again.
- If necessary, clear the Verify operating system type before downloading check box. This lets you avoid downloading the uninstall utility if the operating system of the computer does not meet the software requirements. If you are sure that the operating system of the computer meets the software requirements, you can skip this verification.
Step 4. Selecting the account to run the task
Select the account for installing Network Agent using the tools of the operating system. In this case, administrator rights are required for computer access. You can add multiple accounts. If an account does not have sufficient rights, the Installation Wizard uses the next account. If you uninstall Kaspersky Endpoint Security using Network Agent tools, you do not have to select an account.
Step 5. Completing task creation
Finish the wizard by clicking the Finish button. A new task will be displayed in the list of tasks.
To run a task, select the check box opposite the task and click the Start button. The application will be uninstalled in silent mode. After uninstallation is complete, Kaspersky Endpoint Security shows a prompt to restart the computer.
If the application uninstallation operation is password protected, enter the KLAdmin account password in the properties of the Uninstall application remotely task. Without the password, the task will not be performed.
To use the KLAdmin account password in the Uninstall application remotely task:
- In the main window of the Web Console, select Devices → Tasks.
The list of tasks opens.
- Click the Uninstall application remotely task of Kaspersky Security Center.
The task properties window opens.
- Select the Application settings tab.
- Select the Use uninstallation password check box.
- Enter the KLAdmin account password.
- Save your changes.
Restart the computer to complete the uninstallation. To do so, Network Agent displays a pop-up window.
Removing the application remotely using Active Directory
You can remotely uninstall the application using a Microsoft Windows group policy. To uninstall the application, you need to open the Group Policy Management Console (gpmc.msc) and use the Group Policy Editor to create an application removal task (for more details, please visit the Microsoft Technical Support website).
If the application uninstallation operation is password protected, you need to do the following:
- Create a BAT file with the following contents:
msiexec.exe /x<GUID> KLLOGIN=<user name> KLPASSWD=<password> /qn
<GUID> is the unique ID of the application. You can find out the GUID of the application by using the following command:
wmic product where "Name like '%Kaspersky Endpoint Security%'" get Name, IdentifyingNumber
Example:
msiexec.exe /x{6BB76C8F-365E-4345-83ED-6D7AD612AF76} KLLOGIN=KLAdmin KLPASSWD=samplePassword /qn
|
- Create a new Microsoft Windows policy for the computers in the Group Policy Management Console (gpmc.msc).
- Use the new policy to run the created BAT file on the computers.
Removing the application locally
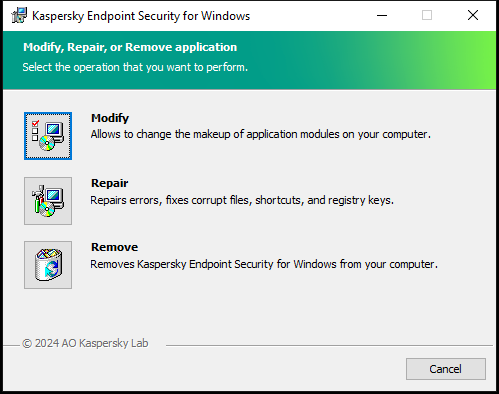
You can remove the application locally using the Setup Wizard. Kaspersky Endpoint Security is removed using the normal method for a Windows operating system, which is through the Control Panel. The Setup Wizard starts. Follow the instructions on the screen.

Selecting the application removal operation
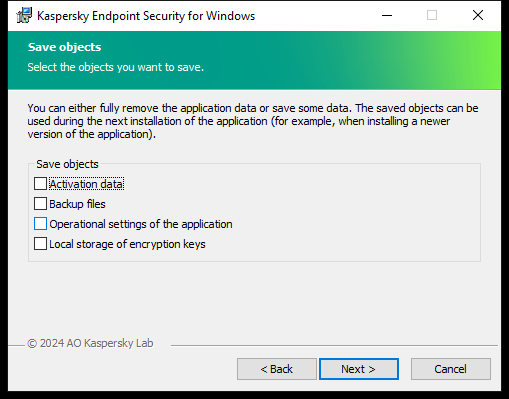
You can specify which of the data that is used by the application you want to save for future use, during the next installation of the application (such as when upgrading to a newer version of the application). If you do not specify any data, the application will be completely removed (see the figure below).

Saving data after removal
You can save the following data:
- Activation data, which lets you avoid having to activate the application again. Kaspersky Endpoint Security automatically adds a license key if the license term has not expired prior to installation.
- Backup files – files that are scanned by the application and placed in Backup.
Backup files that are saved after removal of the application can be accessed only from the same version of the application that was used to save those files.
If you plan to use Backup objects after removal of the application, you must restore those objects before removing the application. However, Kaspersky experts do not recommend restoring objects from Backup because this may harm the computer.
- Operational settings of the application – values of application settings that are selected during application configuration.
- Local storage of encryption keys – data that provides access to files and drives that were encrypted before removal of the application. To ensure access to encrypted files and drives, make sure that you selected data encryption functionality when reinstalling Kaspersky Endpoint Security. No further action is required for access to previously encrypted files and drives.
You can also delete the application locally using the command line.
Page top

