Step 3. Event parsing
This is a required step of the Installation Wizard. On the Event parsing tab of the Installation Wizard, select or create a normalizer whose settings will define the rules for converting raw events into normalized events. You can add multiple event parsing rules to the normalizer to implement complex event processing logic.
When creating a new normalizer in the Installation Wizard, by default it is saved in the set of resources for the collector and cannot be used in other collectors. You can use the Save normalizer check box to create a normalizer as a separate resource.
If, when changing the settings of a collector resource set, you change or delete conversions in a normalizer connected to it, the edits will not be saved, and the normalizer itself may be corrupted. If you need to modify conversions in a normalizer that is already part of a service, the changes must be made directly to the normalizer under Resources → Normalizers in the web interface.
Adding a normalizer
To add an existing normalizer to a resource set:
- Click the Add event parsing button.
The Event parsing window will open with the normalizer settings and an active Normalization scheme tab.
- In the Normalizer drop-down list, select the required normalizer.
The Event parsing window will display the parameters of the selected normalizer. You can open the selected normalizer for editing in a new browser tab using the  button.
- Click OK.
The normalizer is displayed as a dark circle on the Event parsing tab of the Installation Wizard. Clicking on the circle will open the normalizer options for editing. When you hover over the circle, a plus sign is displayed: click on it to add more normalizers (see below).
To create a new normalizer:
- Select Create new from the Normalizer drop-down list.
The Event parsing window will open with the normalizer settings and an active Normalization scheme tab.
- If you want to keep the normalizer as a separate resource, select the Save normalizer check box. This check box is cleared by default.
- In the Name field, enter a unique name for the normalizer. The name must contain 1 to 128 Unicode characters.
- In the Parsing method drop-down list, select the type of events to receive. Depending on your choice, you can use the preconfigured rules for matching event fields or set your own rules. When you select some parsing methods, additional parameter fields required for filling in may become available.
Available parsing methods:
- json
This parsing method is used to process JSON data where each object, including its nested objects, occupies a single line in a file.
When processing files with hierarchically arranged data, you can access the fields of nested objects by specifying the names of the parameters dividing them by a period. For example, the username parameter from the string "user": {"username": "system: node: example-01"} can be accessed by using the user.username query.
Files are processed line by line. Multi-line objects with nested structures may be normalized incorrectly.
In complex normalization schemes where additional normalizers are used, all nested objects are processed at the first normalization level, except for cases when the extra normalization conditions are not specified and, therefore, the event being processed is passed to the additional normalizer in its entirety.
Newline characters can be \n and \r\n. Strings must be UTF-8 encoded.
- cef
This parsing method is used to process CEF data.
When choosing this method, you can use the preconfigured rules for converting events to the KUMA format by clicking the Apply default mapping button.
- regexp
This parsing method is used to create custom rules for processing data in a format using regular expressions.
In the Normalization parameter block field, add a regular expression (RE2 syntax) with named capture groups. The name of a group and its value will be interpreted as the field and the value of the raw event, which can be converted into an event field in KUMA format.
To add event handling rules:
- Copy an example of the data you want to process to the Event examples field. This is an optional but recommended step.
- In the Normalization parameter block field add a regular expression with named capture groups in RE2 syntax, for example "(?P<name>regexp)". The regular expression added to the Normalization parameter must exactly match the event. Also, when developing the regular expression, it is recommended to use special characters that match the starting and ending positions of the text: ^, $.
You can add multiple regular expressions by using the Add regular expression button. If you need to remove the regular expression, use the  button.
- Click the Copy field names to the mapping table button.
Capture group names are displayed in the KUMA field column of the Mapping table. Now you can select the corresponding KUMA field in the column next to each capture group. Otherwise, if you named the capture groups in accordance with the CEF format, you can use the automatic CEF mapping by selecting the Use CEF syntax for normalization check box.
Event handling rules were added.
- syslog
This parsing method is used to process data in syslog format.
When choosing this method, you can use the preconfigured rules for converting events to the KUMA format by clicking the Apply default mapping button.
- csv
This parsing method is used to create custom rules for processing CSV data.
When choosing this method, you must specify the separator of values in the string in the Delimiter field. Any single-byte ASCII character can be used as a delimiter.
- kv
This parsing method is used to process data in key-value pair format.
If you select this method, you must provide values in the following required fields:
- Pair delimiter—specify a character that will serve as a delimiter for key-value pairs. You can specify any one-character (1 byte) value, provided that the character does not match the value delimiter.
- Value delimiter—specify a character that will serve as a delimiter between the key and the value. You can specify any one-character (1 byte) value, provided that the character does not match the delimiter of key-value pairs.
- xml
This parsing method is used to process XML data in which each object, including its nested objects, occupies a single line in a file. Files are processed line by line.
When this method is selected in the parameter block XML attributes you can specify the key attributes to be extracted from tags. If an XML structure has several attributes with different values in the same tag, you can indicate the necessary value by specifying its key in the Source column of the Mapping table.
To add key XML attributes,
Click the Add field button, and in the window that appears, specify the path to the required attribute.
You can add more than one attribute. Attributes can be removed one at a time using the cross icon or all at once using the Reset button.
If XML key attributes are not specified, then in the course of field mapping the unique path to the XML value will be represented by a sequence of tags.
Tag numbering
Tag numbering is available as of KUMA 2.1.3. This functionality allows automatically numbering tags in XML events, which lets you parse an event with identical tags or unnamed tags, such as <Data>.
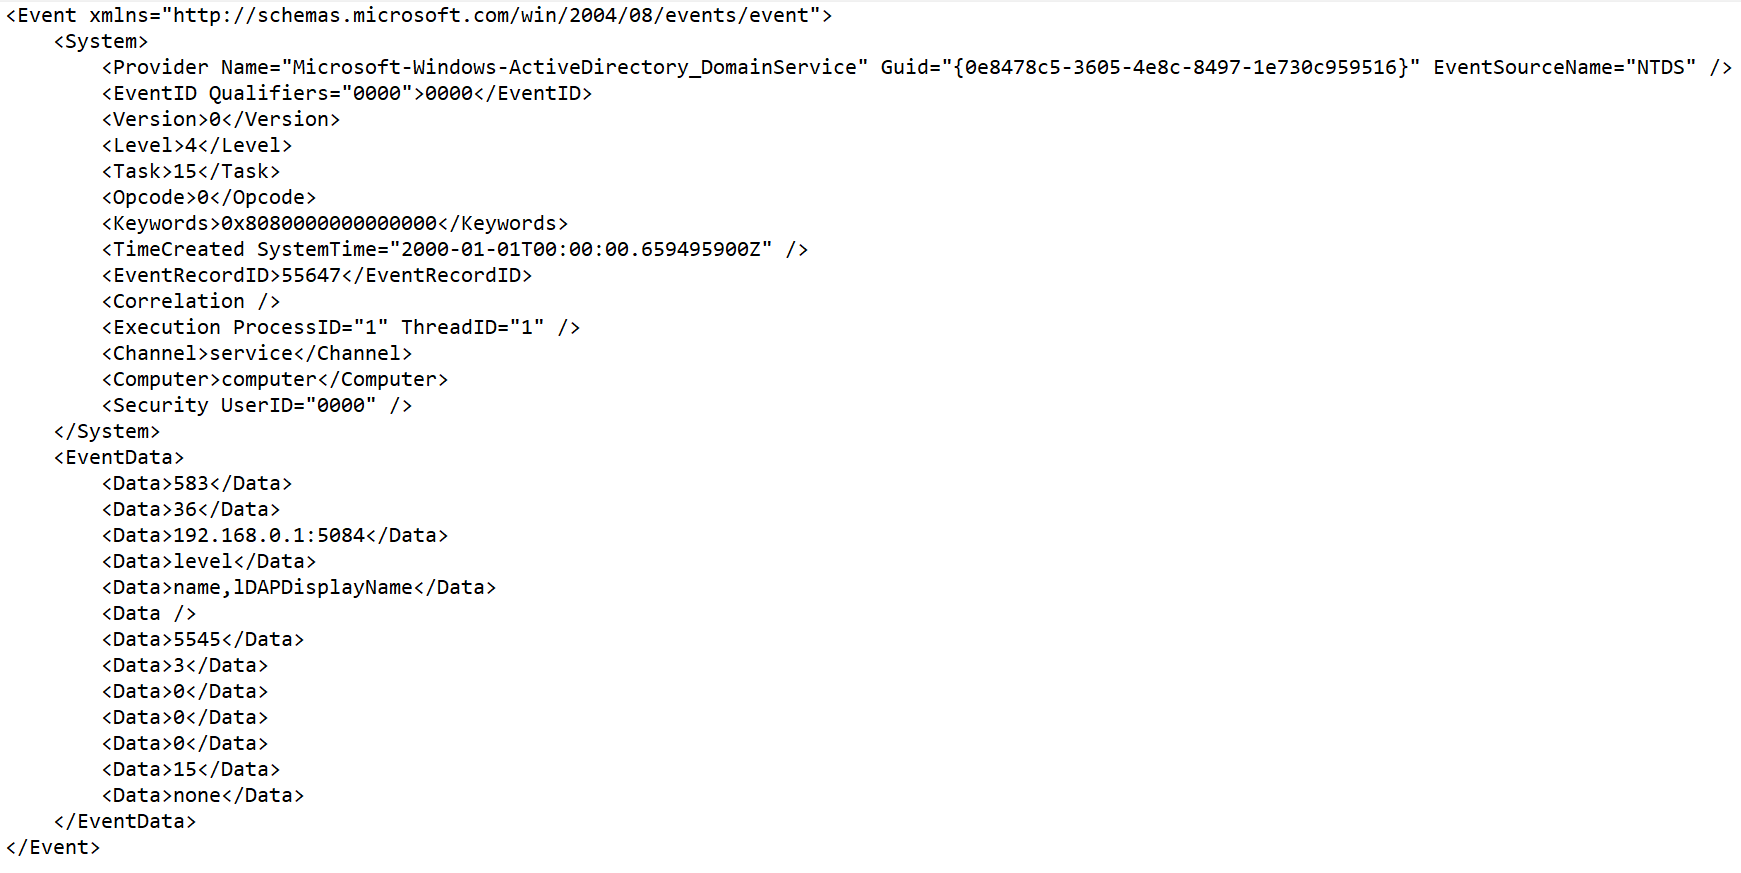
As an example, we will use the Tag numbering functionality to number the tags of the EventData attribute of Microsoft Windows PowerShell event ID 800.
To parse such events, you must:
- Configure tag numbering.
- Configure data mapping for numbered tags with KUMA event fields.
Simultaneous use of XML attributes and Tag numbering leads to incorrect operation of the normalizer. If an attribute contains unnamed tags or the identical tags, we recommend using the Tag numbering functionality. If the attribute contains only named tags, use XML attributes.
To configure parsing of events with identically named or unnamed tags:
- Create a new normalizer or open an existing normalizer for editing.
- In the Basic event parsing window of the normalizer, in the Parsing method drop-down list, select 'xml' and in the Tag numbering field, click Add field.
In the displayed field, enter the full path to the tag to whose elements you want to assign a number. For example, Event.EventData.Data. The first number to be assigned to a tag is 0. If the tag is empty, for example, <Data />, it is also assigned a number.
- To configure data mapping, under Mapping, click Add row and do the following:
- In the new row, in the Source field, enter the full path to the tag and its index. For the Microsoft Windows event from the example above, the full path with indices look like this:
- Event.EventData.Data.0
- Event.EventData.Data.1
- Event.EventData.Data.2 and so on
- In the KUMA field drop-down list, select the field in the KUMA event that will receive the value from the numbered tag after parsing.
- To save changes:
- If you created a new normalizer, click Save.
- If you edited an existing normalizer, click Update configuration in the collector to which the normalizer is linked.
Parsing is configured.
- netflow5
This parsing method is used to process data in the NetFlow v5 format.
When choosing this method, you can use the preconfigured rules for converting events to the KUMA format by clicking the Apply default mapping button.
In mapping rules, the protocol type for netflow5 is not indicated in the fields of KUMA events by default. When parsing data in NetFlow format on the Enrichment normalizer tab, you should create a constant data enrichment rule that adds the netflow value to the DeviceProduct target field.
- netflow9
This parsing method is used to process data in the NetFlow v9 format.
When choosing this method, you can use the preconfigured rules for converting events to the KUMA format by clicking the Apply default mapping button.
In mapping rules, the protocol type for netflow9 is not indicated in the fields of KUMA events by default. When parsing data in NetFlow format on the Enrichment normalizer tab, you should create a constant data enrichment rule that adds the netflow value to the DeviceProduct target field.
- sflow5
This parsing method is used to process data in sFlow5 format.
When choosing this method, you can use the preconfigured rules for converting events to the KUMA format by clicking the Apply default mapping button.
- ipfix
This parsing method is used to process IPFIX data.
When choosing this method, you can use the preconfigured rules for converting events to the KUMA format by clicking the Apply default mapping button.
In mapping rules, the protocol type for ipfix is not indicated in the fields of KUMA events by default. When parsing data in NetFlow format on the Enrichment normalizer tab, you should create a constant data enrichment rule that adds the netflow value to the DeviceProduct target field.
- sql—this method becomes available only when using a sql type connector.
The normalizer uses this method to process data obtained by making a selection from the database.
- In the Keep raw event drop-down list, specify whether to store the original raw event in the newly created normalized event. Available values:
- Don't save—do not save the raw event. This is the default setting.
- Only errors—save the raw event in the
Raw field of the normalized event if errors occurred when parsing it. This value is convenient to use when debugging a service. In this case, every time an event has a non-empty Raw field, you know there was a problem. - Always—always save the raw event in the
Raw field of the normalized event.
- In the Keep extra fields drop-down list, choose whether you want to store the raw event fields in the normalized event if no mapping rules have been configured for them (see below). The data is stored in the Extra event field. By default, fields are not saved.
- Copy an example of the data you want to process to the Event examples field. This is an optional but recommended step.
- Configure the mapping of the raw event fields to event fields in KUMA format In the Mapping table:
- In the Source column, provide the name of the raw event field that you want to convert into the KUMA event field.
Clicking the  button next to the field names in the Source column opens the Conversion window, in which you can use the Add conversion button to create rules for modifying the original data before they are written to the KUMA event fields.
Available conversions
Conversions are changes that can be applied to a value before it gets written to the event field. The conversion type is selected from a drop-down list.
Available conversions:
- lower—is used to make all characters of the value lowercase
- upper—is used to make all characters of the value uppercase
- regexp – used to convert a value using the regular expression RE2. When this conversion type is selected, the field appears where regular expression should be added.
- substring—is used to extract characters in the position range specified in the Start and End fields. These fields appear when this conversion type is selected.
- replace—is used to replace specified character sequence with the other character sequence. When this type of conversion is selected, new fields appear:
- Replace chars—in this field you can specify the character sequence that should be replaced.
- With chars—in this field you can specify the characters sequence should be used instead of replaced characters.
- trim—used to simultaneously remove the characters specified in the Chars field from the leading and end positions of the value. The field appears when this type of conversion is selected. For example, a trim conversion with the
Micromon value applied to Microsoft-Windows-Sysmon results in soft-Windows-Sys. - append is used to add the characters specified in the Constant field to the end of the event field value. The field appears when this type of conversion is selected.
- prepend—used to prepend the characters specified in the Constant field to the start of the event field value. The field appears when this type of conversion is selected.
- replace with regexp—is used to replace RE2 regular expression results with the character sequence.
- Expression—in this field you can specify the regular expression which results that should be replaced.
- With chars—in this field you can specify the characters sequence should be used instead of replaced characters.
- Converting encoded strings to text:
- decodeHexString—used to convert a HEX string to text.
- decodeBase64String—used to convert a Base64 string to text.
- decodeBase64URLString—used to convert a Base64url string to text.
When converting a corrupted string or if conversion error occur, corrupted data may be written to the event field.
During event enrichment, if the length of the encoded string exceeds the size of the field of the normalized event, the string is truncated and is not decoded.
If the length of the decoded string exceeds the size of the event field into which the decoded value is to be written, such a string is truncated to fit the size of the event field.
In the Conversion window, you can swap the added rules by dragging them by the  icon; you can also delete them using the
  icon.
icon.
- In the KUMA field column, select the required KUMA event field from the drop-down list. You can search for fields by entering their names in the field.
- If the name of the KUMA event field selected at the previous step begins with
DeviceCustom* or Flex*, you can add a unique custom label in the Label field.
New table rows can be added by using the Add row button. Rows can be deleted individually using the button or all at once using the Clear all button.
If you have loaded data into the Event examples field, the table will have an Examples column containing examples of values carried over from the raw event field to the KUMA event field.
- Click OK.
The normalizer is displayed as a dark circle on the Event parsing tab of the Installation Wizard. Clicking the circle opens its settings for editing. When you hover the mouse over the circle, a plus sign is displayed. Click it to add event parsing rules (see below).
Enriching normalized events with additional data
You can add additional data to newly created normalized events by creating enrichment rules in the normalizer. These enrichment rules are stored in the normalizer where they were created. There can be more than one enrichment rule.
To add enrichment rules to the normalizer:
- Select the main or additional normalization rule, and in the window that opens click the Enrichment tab.
- Click the Add enrichment button.
The enrichment rule parameter block appears. You can delete the group of settings using the button.
- Select the enrichment type from the Source kind drop-down list. Depending on the selected type, you may see advanced settings that will also need to be completed.
Available Enrichment rule source types:
- constant
This type of enrichment is used when a constant needs to be added to an event field. Settings of this type of enrichment:
- In the Constant field, specify the value that should be added to the event field. The value may not be longer than 255 Unicode characters. If you leave this field blank, the existing event field value will be cleared.
- In the Target field drop-down list, select the KUMA event field to which you want to write the data.
- dictionary
This type of enrichment is used if you need to add a value from the dictionary of the Dictionary type.
When this type is selected in the Dictionary name drop-down list, you must select the dictionary that will provide the values. In the Key fields settings block, you must use the Add field button to select the event fields whose values will be used for dictionary entry selection.
- table
This type of enrichment is used if you need to add a value from the dictionary of the Table type.
When this enrichment type is selected in the Dictionary name drop-down list, select the dictionary for providing the values. In the Key fields group of settings, use the Add field button to select the event fields whose values are used for dictionary entry selection.
In the Mapping table, configure the dictionary fields to provide data and the event fields to receive data:
- In the Dictionary field column, select the dictionary field. The available fields depend on the selected dictionary resource.
- In the KUMA field column, select the event field to which the value is written. For some of the selected fields (
*custom* and *flex*), in the Label column, you can specify a name for the data written to them.
New table rows can be added by using the Add new element button. Columns can be deleted using the button.
- event
This type of enrichment is used when you need to write a value from another event field to the current event field. Settings of this type of enrichment:
- In the Target field drop-down list, select the KUMA event field to which you want to write the data.
- In the Source field drop-down list, select the event field whose value will be written to the target field.
- Clicking the button opens the Conversion window in which you can, using the Add conversion button, create rules for modifying the original data before writing them to the KUMA event fields.
Available conversions
Conversions are changes that can be applied to a value before it gets written to the event field. The conversion type is selected from a drop-down list.
Available conversions:
- lower—is used to make all characters of the value lowercase
- upper—is used to make all characters of the value uppercase
- regexp – used to convert a value using the regular expression RE2. When this conversion type is selected, the field appears where regular expression should be added.
- substring—is used to extract characters in the position range specified in the Start and End fields. These fields appear when this conversion type is selected.
- replace—is used to replace specified character sequence with the other character sequence. When this type of conversion is selected, new fields appear:
- Replace chars—in this field you can specify the character sequence that should be replaced.
- With chars—in this field you can specify the characters sequence should be used instead of replaced characters.
- trim—used to simultaneously remove the characters specified in the Chars field from the leading and end positions of the value. The field appears when this type of conversion is selected. For example, a trim conversion with the
Micromon value applied to Microsoft-Windows-Sysmon results in soft-Windows-Sys. - append is used to add the characters specified in the Constant field to the end of the event field value. The field appears when this type of conversion is selected.
- prepend—used to prepend the characters specified in the Constant field to the start of the event field value. The field appears when this type of conversion is selected.
- replace with regexp—is used to replace RE2 regular expression results with the character sequence.
- Expression—in this field you can specify the regular expression which results that should be replaced.
- With chars—in this field you can specify the characters sequence should be used instead of replaced characters.
- Converting encoded strings to text:
- decodeHexString—used to convert a HEX string to text.
- decodeBase64String—used to convert a Base64 string to text.
- decodeBase64URLString—used to convert a Base64url string to text.
When converting a corrupted string or if conversion error occur, corrupted data may be written to the event field.
During event enrichment, if the length of the encoded string exceeds the size of the field of the normalized event, the string is truncated and is not decoded.
If the length of the decoded string exceeds the size of the event field into which the decoded value is to be written, such a string is truncated to fit the size of the event field.
- template
This type of enrichment is used when you need to write a value obtained by processing Go templates into the event field. Settings of this type of enrichment:
- Put the Go template into the Template field.
Event field names are passed in the {{.EventField}} format, where EventField is the name of the event field from which the value must be passed to the script.
Example: Attack on {{.DestinationAddress}} from {{.SourceAddress}}.
- In the Target field drop-down list, select the KUMA event field to which you want to write the data.
- In the Target field drop-down list, select the KUMA event field to which you want to write the data.
This setting is not available for the enrichment source of the Table type.
- Click OK.
Event enrichment rules with the additional data are added to the normalizer, to the selected parsing rule.
Creating a structure of event normalization rules
To implement a complex event processing logic, you can add multiple event parsing rules to the normalizer. Events are transmitted between the parsing rules depending on the specified conditions. The sequence of creating parsing rules is important. The event is processed sequentially, and its path is shown using arrows.
To create an additional parsing rule:
- Create a normalizer (see above).
The created normalizer will be displayed in the window as a dark circle.
- Hover the mouse over the circle and click the plus sign button that appears.
- In the Additional event parsing window that opens, specify the parameters of the additional event parsing rule:
- Extra normalization conditions tab:
To send only the events with a specific field to the additional normalizer, specify this field in the Field to pass into normalizer field.
On this tab, you can also define other conditions. When these conditions are met, the event is sent for additional parsing.
- Normalization scheme tab:
On this tab, you can configure event processing rules, similar to the main normalizer settings (see above). The Keep raw event setting is not available. The Event examples field displays the values specified when the initial normalizer was created.
- Enrichment tab:
On this tab, you can configure event enrichment rules (see above).
- Click OK.
The additional parsing rule is added to the normalizer. It is displayed as a dark block with the conditions under which this rule is triggered. You can change the settings of the additional parsing rule by clicking it. If you hover the mouse over the additional parsing rule, a plus button appears. You can use this button to create a new additional parsing rule. To delete a normalizer, use the button with the trash icon.
The upper right corner of the window contains a search window where you can search parsing rules by name.
Proceed to the next step of the Installation Wizard.
Page top