Kaspersky Endpoint Security 12.1 for Windows
- Čeština (Česká republika)
- Deutsch
- Español (España)
- Español (México)
- Français
- Italiano
- Magyar (Magyarország)
- Nederlands (Nederland)
- Polski (Polska)
- Português (Brasil)
- Português (Portugal)
- Română (România)
- Tiếng Việt (Việt Nam)
- Türkçe (Türkiye)
- Русский
- العربية (الإمارات العربية المتحدة)
- 한국어 (대한민국)
- 简体中文
- 繁體中文
- 日本語(日本)
- Kaspersky Endpoint Security for Windows Help
- Kaspersky Endpoint Security for Windows
- Installing and removing the application
- Deployment through Kaspersky Security Center
- Installing the application locally using the Wizard
- Remotely installing the application using System Center Configuration Manager
- Description of setup.ini file installation settings
- Change application components
- Upgrading from a previous version of the application
- Remove the application
- Application licensing
- About the End User License Agreement
- About the license
- About the license certificate
- About subscription
- About license key
- About activation code
- About the key file
- Comparison of application functionality depending on license type for workstations
- Comparison of application functionality depending on license type for servers
- Activating the application
- Viewing license information
- Purchasing a license
- Renewing subscription
- Data provision
- Getting started
- About the Kaspersky Endpoint Security for Windows Management Plug-in
- Special considerations when working with different versions of management plug-ins
- Special considerations when using encrypted protocols for interacting with external services
- Application interface
- Getting started
- Managing policies
- Task management
- Configuring local application settings
- Starting and stopping Kaspersky Endpoint Security
- Pausing and resuming computer protection and control
- Creating and using a configuration file
- Restoring the default application settings
- Malware Scan
- Updating databases and application software modules
- Database and application module update scenarios
- Starting and stopping an update task
- Starting an update task under the rights of a different user account
- Selecting the update task run mode
- Adding an update source
- Configuring updates from a shared folder
- Updating application modules
- Using a proxy server for updates
- Last update rollback
- Working with active threats
- Computer protection
- File Threat Protection
- Enabling and disabling File Threat Protection
- Automatic pausing of File Threat Protection
- Changing the action taken on infected files by the File Threat Protection component
- Forming the protection scope of the File Threat Protection component
- Using scan methods
- Using scan technologies in the operation of the File Threat Protection component
- Optimizing file scanning
- Scanning compound files
- Changing the scan mode
- Web Threat Protection
- Mail Threat Protection
- Enabling and disabling Mail Threat Protection
- Changing the action to take on infected email messages
- Forming the protection scope of the Mail Threat Protection component
- Scanning compound files attached to email messages
- Email messages attachment filtering
- Exporting and importing extensions for attachment filtering
- Scanning emails in Microsoft Office Outlook
- Network Threat Protection
- Firewall
- BadUSB Attack Prevention
- AMSI Protection
- Exploit Prevention
- Behavior Detection
- Enabling and disabling Behavior Detection
- Selecting the action to take on detecting malware activity
- Protection of shared folders against external encryption
- Enabling and disabling protection of shared folders against external encryption
- Selecting the action to take on detection of external encryption of shared folders
- Creating an exclusion for protection of shared folders against external encryption
- Configuring addresses of exclusions from protection of shared folders against external encryption
- Exporting and importing a list of exclusions from protection of shared folders against external encryption
- Host Intrusion Prevention
- Remediation Engine
- Kaspersky Security Network
- Encrypted connections scan
- Wipe Data
- File Threat Protection
- Computer control
- Web Control
- Device Control
- Enabling and disabling Device Control
- About access rules
- Editing a device access rule
- Editing a connection bus access rule
- Managing access to mobile devices
- Control of printing
- Control of Wi-Fi connections
- Monitoring usage of removable drives
- Changing the caching duration
- Actions with trusted devices
- Obtaining access to a blocked device
- Editing templates of Device Control messages
- Anti-Bridging
- Adaptive Anomaly Control
- Enabling and disabling Adaptive Anomaly Control
- Enabling and disabling an Adaptive Anomaly Control rule
- Modifying the action taken when an Adaptive Anomaly Control rule is triggered
- Creating an exclusion for an Adaptive Anomaly Control rule
- Exporting and importing exclusions for Adaptive Anomaly Control rules
- Applying updates for Adaptive Anomaly Control rules
- Editing Adaptive Anomaly Control message templates
- Viewing Adaptive Anomaly Control reports
- Application Control
- Application Control functionality limitations
- Receiving information about the applications that are installed on users' computers
- Enabling and disabling Application Control
- Selecting the Application Control mode
- Managing Application Control rules
- Adding a trigger condition for the Application Control rule
- Adding executable files from the Executable files folder to the application category
- Adding event-related executable files to the application category
- Adding an Application Control rule
- Changing the status of an Application Control rule via Kaspersky Security Center
- Exporting and importing Application Control rules
- Viewing events resulting from operation of the Application Control component
- Viewing a report on blocked applications
- Testing Application Control rules
- Application activity monitor
- Rules for creating name masks for files or folders
- Editing Application Control message templates
- Best practices for implementing a list of allowed applications
- Network ports monitoring
- Log Inspection
- File Integrity Monitor
- Password protection
- Trusted zone
- Managing Backup
- Notification service
- Managing reports
- Kaspersky Endpoint Security Self-Defense
- Kaspersky Endpoint Security performance and compatibility with other applications
- Data Encryption
- Encryption functionality limitations
- Changing the length of the encryption key (AES56 / AES256)
- Kaspersky Disk Encryption
- Special features of SSD drive encryption
- Starting Kaspersky Disk Encryption
- Creating a list of hard drives excluded from encryption
- Exporting and importing a list of hard drives excluded from encryption
- Enabling Single Sign-On (SSO) technology
- Managing Authentication Agent accounts
- Using a token and smart card with Authentication Agent
- Hard drive decryption
- Restoring access to a drive protected by Kaspersky Disk Encryption technology
- Signing in with the Authentication Agent service account
- Updating the operating system
- Eliminating errors of encryption functionality update
- Selecting the Authentication Agent tracing level
- Editing Authentication Agent help texts
- Removing leftover objects and data after testing the operation of Authentication Agent
- BitLocker Management
- File Level Encryption on local computer drives
- Encrypting files on local computer drives
- Forming encrypted file access rules for applications
- Encrypting files that are created or modified by specific applications
- Generating a decryption rule
- Decrypting files on local computer drives
- Creating encrypted packages
- Restoring access to encrypted files
- Restoring access to encrypted data after operating system failure
- Editing templates of encrypted file access messages
- Encryption of removable drives
- Viewing data encryption details
- Working with encrypted devices when there is no access to them
- Detection and Response solutions
- KSWS to KES Migration Guide
- Correspondence of KSWS and KES components
- Correspondence of KSWS and KES settings
- Migrating KSWS components
- Migrating KSWS tasks and policies
- Installing KES instead of KSWS
- Migrating the [KSWS+KEA] configuration to [KES+built-in agent] configuration
- Making sure Kaspersky Security for Windows Server was successfully removed
- Activating KES with a KSWS key
- Special considerations for migrating high-load servers
- Example of migration from [KSWS+KEA] to KES
- Managing the application on a Core Mode server
- Managing the application from the command line
- Installing the application
- Activating the application
- Remove the application
- AVP commands
- SCAN. Malware Scan
- UPDATE. Updating databases and application software modules
- ROLLBACK. Last update rollback
- TRACES. Tracing
- START. Start the profile
- STOP. Stopping a profile
- STATUS. Profile status
- STATISTICS. Profile operation statistics
- RESTORE. Restoring files from Backup
- EXPORT. Exporting application settings
- IMPORT. Importing application settings
- ADDKEY. Applying a key file
- LICENSE. Licensing
- RENEW. Purchasing a license
- PBATESTRESET. Reset the disk check results before encrypting the disk
- EXIT. Exit the application
- EXITPOLICY. Disabling policy
- STARTPOLICY. Enabling policy
- DISABLE. Disabling protection
- SPYWARE. Spyware detection
- KSN. Switching between KSN / KPSN
- KESCLI commands
- Scan. Malware Scan
- GetScanState. Scan completion status
- GetLastScanTime. Determining the scan completion time
- GetThreats. Obtaining data on detected threats
- UpdateDefinitions. Updating databases and application software modules
- GetDefinitionState. Determining the update completion time
- EnableRTP. Enabling protection
- GetRealTimeProtectionState. File Threat Protection status
- Version. Identifying the application version
- Detection and Response management commands
- Error codes
- Appendix. Application profiles
- Managing the application through the REST API
- Sources of information about the application
- Contacting Technical Support
- Limitations and warnings
- Glossary
- Active key
- Additional key
- Administration group
- Anti-virus databases
- Archive
- Authentication Agent
- Certificate issuer
- Database of malicious web addresses
- Database of phishing web addresses
- Disinfection
- False alarm
- Infectable file
- Infected file
- IOC
- IOC file
- License certificate
- Mask
- Network Agent
- Normalized form of the address of a web resource
- OLE object
- OpenIOC
- Portable File Manager
- Protection scope
- Scan scope
- Task
- Trusted Platform Module
- Appendices
- Appendix 1. Application settings
- File Threat Protection
- Web Threat Protection
- Mail Threat Protection
- Network Threat Protection
- Firewall
- BadUSB Attack Prevention
- AMSI Protection
- Exploit Prevention
- Behavior Detection
- Host Intrusion Prevention
- Remediation Engine
- Kaspersky Security Network
- Log Inspection
- Web Control
- Device Control
- Application Control
- Adaptive Anomaly Control
- File Integrity Monitor
- Endpoint Sensor
- Kaspersky Sandbox
- Endpoint Detection and Response
- Endpoint Detection and Response (KATA)
- Full Disk Encryption
- File Level Encryption
- Encryption of removable drives
- Templates (data encryption)
- Exclusions
- Application settings
- Reports and storage
- Network settings
- Interface
- Manage Settings
- Updating databases and application software modules
- Appendix 2. Application trust groups
- Appendix 3. File extensions for quick removable drives scan
- Appendix 4. File Types for the Mail Threat Protection attachment filter
- Appendix 5. Network settings for interaction with external services
- Appendix 6. Application events
- Appendix 7. Supported file extensions for Execution prevention
- Appendix 8. Supported script interpreters for Execution prevention
- Appendix 9. IOC scan scope in the registry (RegistryItem)
- Appendix 10. IOC file requirements
- Appendix 1. Application settings
- Information about third-party code
- Trademark notices
Control of printing
You can use Control of printing to configure user access to local and network printers.
Local printer control
Kaspersky Endpoint Security allows configuring access to local printers on two levels: connecting and printing.
Kaspersky Endpoint Security controls local printer connection over the following buses: USB, Serial Port (COM), Parallel Port (LPT).
Kaspersky Endpoint Security controls the connection of local printers to COM and LPT ports only on the level of the bus. That is, to prevent the connection of printers to COM and LPT ports, you must prohibit the connection of all device types to COM and LPT buses. For printers connected to USB, the application exercises control on two levels: device type (local printers) and connection bus (USB). Therefore you can allow all device types except local printers to connect to USB.
You can select one of the following access modes to local printers via USB:
- Allow
. Kaspersky Endpoint Security grants full access to local printers to all users. Users can connect printers and print documents using the means that the operating system provides.
- Block
. Kaspersky Endpoint Security blocks the connection of local printers. The application allows connecting only trusted printers.
- Depends on connection bus
. Kaspersky Endpoint Security allows connecting to local printers in accordance with the USB bus connection status (Allow
or Block
).
- By rules
. To control printing, you must add printing rules. In the rules, you can select users or a group of users for which you want to allow or block access to printing documents on local printers.
Network printer control
Kaspersky Endpoint Security allows configuring access to printing on network printers. You can select one of the following access modes to network printers:
- Allow and do not log. Kaspersky Endpoint Security does not control printing on network printers. The application allows access to printing on network printers to all users and does not save printing information in the event log.
- Allow
. Kaspersky Endpoint Security grants access to printing on network printers to all users.
- Block
. Kaspersky Endpoint Security restricts access to network printers for all users. The application allows access only to trusted printers.
- By rules
. Kaspersky Endpoint Security grants access to printing in accordance with printing rules. In the rules, you can select users or a group of users that will be allowed or prevented from printing documents on network printer.
Adding printing rules for printers
How to add printing rules in the Administration Console (MMC)
- Open the Kaspersky Security Center Administration Console.
- In the console tree, select Policies.
- Select the necessary policy and double-click to open the policy properties.
- In the policy window, select Security Controls → Device Control.
- Under Device Control settings, select the Types of devices tab.
The table lists access rules for all devices that are present in the classification of the Device Control component.
- In the context menu for the Local printers and Network printers device types, configure the access mode for the relevant printers: Allow
, Block
, Allow and do not log (for network printers only) or Depends on connection bus
(for local printers only).
- To configure printing rules on local and network printers, double-click the rule lists to open them.
- Select By rules as the printer access mode.
- Select the users or groups of users to which you want to apply the printing rule.
- Click Add.
This opens a window for adding a new printing rule.
- Assign a priority to the rule entry. A rule entry includes the following attributes: user account, action (allow/block), and priority.
A rule has a specific priority. If a user has been added to multiple groups, Kaspersky Endpoint Security regulates device access based on the rule with the highest priority. Kaspersky Endpoint Security allows to assign priority from 0 to 10,000. The higher the value, the higher the priority. In other words, an entry with the value of 0 has the lowest priority.
For example, you can grant read-only permissions to the Everyone group and grant read/write permissions to the administrators group. To do so, assign a priority of 1 for the administrators group and assign a priority of 0 for the Everyone group.
The priority of a block rule is higher than the priority of an allow rule. In other words, if a user has been added to multiple groups and the priority of all rules are the same, Kaspersky Endpoint Security regulates device access based on any existing block rule.
- Under Action, configure user access to printing on the printer.
- Click Users and groups and select users or groups of users for access to printing.
- Click OK.
- Click Add.
- Save your changes.
How to add printing rules in Web Console and Cloud Console
- In the main window of the Web Console, select Devices → Policies & Profiles.
- Click the name of the Kaspersky Endpoint Security policy.
The policy properties window opens.
- Select the Application settings tab.
- Go to Security Controls → Device Control.
- In the Device Control Settings block, click the Access rules for devices and Wi-Fi networks link.
The table lists access rules for all devices that are present in the classification of the Device Control component.
- Select the Local printers or Network printers device type.
This opens the printer access rules.
- Configure the access mode for the relevant printers: Allow, Block, Allow and do not log (for network printers only), Depends on connection bus (for local printers only) or By rules.
- If you select the By rules mode, you must add printing rules for local or network printers. To do so, click the Add button in the printing rules table.
This opens the settings of the new printing rule.
- Assign a priority to the rule entry. A rule entry includes the following attributes: user account, action (allow/block), and priority.
A rule has a specific priority. If a user has been added to multiple groups, Kaspersky Endpoint Security regulates device access based on the rule with the highest priority. Kaspersky Endpoint Security allows to assign priority from 0 to 10,000. The higher the value, the higher the priority. In other words, an entry with the value of 0 has the lowest priority.
For example, you can grant read-only permissions to the Everyone group and grant read/write permissions to the administrators group. To do so, assign a priority of 1 for the administrators group and assign a priority of 0 for the Everyone group.
The priority of a block rule is higher than the priority of an allow rule. In other words, if a user has been added to multiple groups and the priority of all rules are the same, Kaspersky Endpoint Security regulates device access based on any existing block rule.
- Under Action, configure user access to printing on the printer.
- Under Users and groups, select users or groups of users for access to printing.
- Save your changes.
How to add printing rules in the application interface
- In the main application window, click the
button.
- In the application settings window, select Security Controls → Device Control.
- In the Access settings block, click the Devices and Wi-Fi networks button.
The opened window shows access rules for all devices that are included in the Device Control component classification.
Types of devices in the Device Control component
- Under Access To External Devices, click Local printers or Network printers.
This opens a window with printer access rules.
- Under Access to local printers or Access to network printers configure the access mode for printers: Allow, Block, Allow and do not log (for network printers only), Depends on connection bus (for local printers only) or By rules.
- If you select the By rules mode, you must add printing rules for printers. Select the users or groups of users to which you want to apply the printing rule.
- Click Add.
This opens a window for adding a new printing rule.
- Assign a priority to the rule entry. A rule entry includes the following attributes: user account, permissions (allow/block), and priority.
A rule has a specific priority. If a user has been added to multiple groups, Kaspersky Endpoint Security regulates device access based on the rule with the highest priority. Kaspersky Endpoint Security allows to assign priority from 0 to 10,000. The higher the value, the higher the priority. In other words, an entry with the value of 0 has the lowest priority.
For example, you can grant read-only permissions to the Everyone group and grant read/write permissions to the administrators group. To do so, assign a priority of 1 for the administrators group and assign a priority of 0 for the Everyone group.
The priority of a block rule is higher than the priority of an allow rule. In other words, if a user has been added to multiple groups and the priority of all rules are the same, Kaspersky Endpoint Security regulates device access based on any existing block rule.
- Under Action, configure user permissions for access to printing.
- Under Users and groups, select users or groups of users for access to printing.
- Click Add.
- Save your changes.
Trusted printers
Trusted devices are devices to which users that are specified in the trusted device settings have full access at all times.
The procedure for adding trusted printers is exactly the same as for other types of trusted devices. You can add local printers by ID or device model. You can only add network printers by device ID.
To add a trusted local printer by ID, you will need a unique ID (Hardware ID – HWID). You can find the ID in device properties by using operating system tools (see figure below). The Device Manager tool lets you do this. The ID of a local printer may look like this: 6&2D09F5AF&1&C000
. Adding devices by ID is convenient if you want to add several specific devices. You can also use masks.
To add a trusted local printer by device model, you will need its Vendor ID (VID) and Product ID (PID). You can find the IDs in device properties by using operating system tools (see figure below). Template for entering the VID and PID: VID_04A9&PID_27FD
. Adding devices by model is convenient if you use devices of a certain model in your organization. This way, you can add all devices of this model.
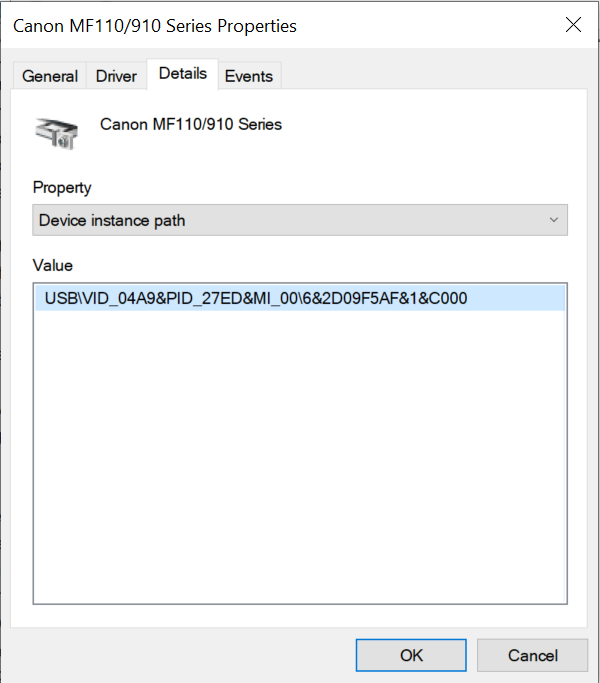
Device ID in Device Manager
To add a trusted network printer, you will need its device ID. For network printers, the device ID can be the network name of the printer (name of the shared printer), the IP address of the printer, or the URL of the printer.