Kaspersky Endpoint Security 12.1 for Windows
- Čeština (Česká republika)
- Deutsch
- Español (España)
- Español (México)
- Français
- Italiano
- Magyar (Magyarország)
- Nederlands (Nederland)
- Polski (Polska)
- Português (Brasil)
- Português (Portugal)
- Română (România)
- Tiếng Việt (Việt Nam)
- Türkçe (Türkiye)
- Русский
- العربية (الإمارات العربية المتحدة)
- 한국어 (대한민국)
- 简体中文
- 繁體中文
- 日本語(日本)
- Kaspersky Endpoint Security for Windows Help
- Kaspersky Endpoint Security for Windows
- Installing and removing the application
- Deployment through Kaspersky Security Center
- Installing the application locally using the Wizard
- Remotely installing the application using System Center Configuration Manager
- Description of setup.ini file installation settings
- Change application components
- Upgrading from a previous version of the application
- Remove the application
- Application licensing
- About the End User License Agreement
- About the license
- About the license certificate
- About subscription
- About license key
- About activation code
- About the key file
- Comparison of application functionality depending on license type for workstations
- Comparison of application functionality depending on license type for servers
- Activating the application
- Viewing license information
- Purchasing a license
- Renewing subscription
- Data provision
- Getting started
- About the Kaspersky Endpoint Security for Windows Management Plug-in
- Special considerations when working with different versions of management plug-ins
- Special considerations when using encrypted protocols for interacting with external services
- Application interface
- Getting started
- Managing policies
- Task management
- Configuring local application settings
- Starting and stopping Kaspersky Endpoint Security
- Pausing and resuming computer protection and control
- Creating and using a configuration file
- Restoring the default application settings
- Malware Scan
- Updating databases and application software modules
- Database and application module update scenarios
- Starting and stopping an update task
- Starting an update task under the rights of a different user account
- Selecting the update task run mode
- Adding an update source
- Configuring updates from a shared folder
- Updating application modules
- Using a proxy server for updates
- Last update rollback
- Working with active threats
- Computer protection
- File Threat Protection
- Enabling and disabling File Threat Protection
- Automatic pausing of File Threat Protection
- Changing the action taken on infected files by the File Threat Protection component
- Forming the protection scope of the File Threat Protection component
- Using scan methods
- Using scan technologies in the operation of the File Threat Protection component
- Optimizing file scanning
- Scanning compound files
- Changing the scan mode
- Web Threat Protection
- Mail Threat Protection
- Enabling and disabling Mail Threat Protection
- Changing the action to take on infected email messages
- Forming the protection scope of the Mail Threat Protection component
- Scanning compound files attached to email messages
- Email messages attachment filtering
- Exporting and importing extensions for attachment filtering
- Scanning emails in Microsoft Office Outlook
- Network Threat Protection
- Firewall
- BadUSB Attack Prevention
- AMSI Protection
- Exploit Prevention
- Behavior Detection
- Enabling and disabling Behavior Detection
- Selecting the action to take on detecting malware activity
- Protection of shared folders against external encryption
- Enabling and disabling protection of shared folders against external encryption
- Selecting the action to take on detection of external encryption of shared folders
- Creating an exclusion for protection of shared folders against external encryption
- Configuring addresses of exclusions from protection of shared folders against external encryption
- Exporting and importing a list of exclusions from protection of shared folders against external encryption
- Host Intrusion Prevention
- Remediation Engine
- Kaspersky Security Network
- Encrypted connections scan
- Wipe Data
- File Threat Protection
- Computer control
- Web Control
- Device Control
- Enabling and disabling Device Control
- About access rules
- Editing a device access rule
- Editing a connection bus access rule
- Managing access to mobile devices
- Control of printing
- Control of Wi-Fi connections
- Monitoring usage of removable drives
- Changing the caching duration
- Actions with trusted devices
- Obtaining access to a blocked device
- Editing templates of Device Control messages
- Anti-Bridging
- Adaptive Anomaly Control
- Enabling and disabling Adaptive Anomaly Control
- Enabling and disabling an Adaptive Anomaly Control rule
- Modifying the action taken when an Adaptive Anomaly Control rule is triggered
- Creating an exclusion for an Adaptive Anomaly Control rule
- Exporting and importing exclusions for Adaptive Anomaly Control rules
- Applying updates for Adaptive Anomaly Control rules
- Editing Adaptive Anomaly Control message templates
- Viewing Adaptive Anomaly Control reports
- Application Control
- Application Control functionality limitations
- Receiving information about the applications that are installed on users' computers
- Enabling and disabling Application Control
- Selecting the Application Control mode
- Managing Application Control rules
- Adding a trigger condition for the Application Control rule
- Adding executable files from the Executable files folder to the application category
- Adding event-related executable files to the application category
- Adding an Application Control rule
- Changing the status of an Application Control rule via Kaspersky Security Center
- Exporting and importing Application Control rules
- Viewing events resulting from operation of the Application Control component
- Viewing a report on blocked applications
- Testing Application Control rules
- Application activity monitor
- Rules for creating name masks for files or folders
- Editing Application Control message templates
- Best practices for implementing a list of allowed applications
- Network ports monitoring
- Log Inspection
- File Integrity Monitor
- Password protection
- Trusted zone
- Managing Backup
- Notification service
- Managing reports
- Kaspersky Endpoint Security Self-Defense
- Kaspersky Endpoint Security performance and compatibility with other applications
- Data Encryption
- Encryption functionality limitations
- Changing the length of the encryption key (AES56 / AES256)
- Kaspersky Disk Encryption
- Special features of SSD drive encryption
- Starting Kaspersky Disk Encryption
- Creating a list of hard drives excluded from encryption
- Exporting and importing a list of hard drives excluded from encryption
- Enabling Single Sign-On (SSO) technology
- Managing Authentication Agent accounts
- Using a token and smart card with Authentication Agent
- Hard drive decryption
- Restoring access to a drive protected by Kaspersky Disk Encryption technology
- Signing in with the Authentication Agent service account
- Updating the operating system
- Eliminating errors of encryption functionality update
- Selecting the Authentication Agent tracing level
- Editing Authentication Agent help texts
- Removing leftover objects and data after testing the operation of Authentication Agent
- BitLocker Management
- File Level Encryption on local computer drives
- Encrypting files on local computer drives
- Forming encrypted file access rules for applications
- Encrypting files that are created or modified by specific applications
- Generating a decryption rule
- Decrypting files on local computer drives
- Creating encrypted packages
- Restoring access to encrypted files
- Restoring access to encrypted data after operating system failure
- Editing templates of encrypted file access messages
- Encryption of removable drives
- Viewing data encryption details
- Working with encrypted devices when there is no access to them
- Detection and Response solutions
- KSWS to KES Migration Guide
- Correspondence of KSWS and KES components
- Correspondence of KSWS and KES settings
- Migrating KSWS components
- Migrating KSWS tasks and policies
- Installing KES instead of KSWS
- Migrating the [KSWS+KEA] configuration to [KES+built-in agent] configuration
- Making sure Kaspersky Security for Windows Server was successfully removed
- Activating KES with a KSWS key
- Special considerations for migrating high-load servers
- Example of migration from [KSWS+KEA] to KES
- Managing the application on a Core Mode server
- Managing the application from the command line
- Installing the application
- Activating the application
- Remove the application
- AVP commands
- SCAN. Malware Scan
- UPDATE. Updating databases and application software modules
- ROLLBACK. Last update rollback
- TRACES. Tracing
- START. Start the profile
- STOP. Stopping a profile
- STATUS. Profile status
- STATISTICS. Profile operation statistics
- RESTORE. Restoring files from Backup
- EXPORT. Exporting application settings
- IMPORT. Importing application settings
- ADDKEY. Applying a key file
- LICENSE. Licensing
- RENEW. Purchasing a license
- PBATESTRESET. Reset the disk check results before encrypting the disk
- EXIT. Exit the application
- EXITPOLICY. Disabling policy
- STARTPOLICY. Enabling policy
- DISABLE. Disabling protection
- SPYWARE. Spyware detection
- KSN. Switching between KSN / KPSN
- KESCLI commands
- Scan. Malware Scan
- GetScanState. Scan completion status
- GetLastScanTime. Determining the scan completion time
- GetThreats. Obtaining data on detected threats
- UpdateDefinitions. Updating databases and application software modules
- GetDefinitionState. Determining the update completion time
- EnableRTP. Enabling protection
- GetRealTimeProtectionState. File Threat Protection status
- Version. Identifying the application version
- Detection and Response management commands
- Error codes
- Appendix. Application profiles
- Managing the application through the REST API
- Sources of information about the application
- Contacting Technical Support
- Limitations and warnings
- Glossary
- Active key
- Additional key
- Administration group
- Anti-virus databases
- Archive
- Authentication Agent
- Certificate issuer
- Database of malicious web addresses
- Database of phishing web addresses
- Disinfection
- False alarm
- Infectable file
- Infected file
- IOC
- IOC file
- License certificate
- Mask
- Network Agent
- Normalized form of the address of a web resource
- OLE object
- OpenIOC
- Portable File Manager
- Protection scope
- Scan scope
- Task
- Trusted Platform Module
- Appendices
- Appendix 1. Application settings
- File Threat Protection
- Web Threat Protection
- Mail Threat Protection
- Network Threat Protection
- Firewall
- BadUSB Attack Prevention
- AMSI Protection
- Exploit Prevention
- Behavior Detection
- Host Intrusion Prevention
- Remediation Engine
- Kaspersky Security Network
- Log Inspection
- Web Control
- Device Control
- Application Control
- Adaptive Anomaly Control
- File Integrity Monitor
- Endpoint Sensor
- Kaspersky Sandbox
- Endpoint Detection and Response
- Endpoint Detection and Response (KATA)
- Full Disk Encryption
- File Level Encryption
- Encryption of removable drives
- Templates (data encryption)
- Exclusions
- Application settings
- Reports and storage
- Network settings
- Interface
- Manage Settings
- Updating databases and application software modules
- Appendix 2. Application trust groups
- Appendix 3. File extensions for quick removable drives scan
- Appendix 4. File Types for the Mail Threat Protection attachment filter
- Appendix 5. Network settings for interaction with external services
- Appendix 6. Application events
- Appendix 7. Supported file extensions for Execution prevention
- Appendix 8. Supported script interpreters for Execution prevention
- Appendix 9. IOC scan scope in the registry (RegistryItem)
- Appendix 10. IOC file requirements
- Appendix 1. Application settings
- Information about third-party code
- Trademark notices
Remove the application
Removing Kaspersky Endpoint Security leaves the computer and user data unprotected against threats.
Removing the application remotely using Kaspersky Security Center
You can remotely uninstall the application by using the Uninstall application remotely task. When performing the task, Kaspersky Endpoint Security downloads the application uninstall utility to the user's computer. After completing uninstallation of the application, the utility will be automatically removed.
How to remove the application through the Administration Console (MMC)
- In the Administration Console, go to the folder Administration Server → Tasks.
The list of tasks opens.
- Click the New task button.
The Task Wizard starts. Follow the instructions of the Wizard.
Step 1. Selecting task type
Select Kaspersky Security Center Administration Server → Additional → Uninstall application remotely.
Step 2. Selecting the application to be removed
Select Uninstall application supported by Kaspersky Security Center.
Step 3. Task settings for application uninstallation
Select Kaspersky Endpoint Security for Windows (12.1).
Step 4. Uninstall utility settings
Configure the following additional application settings:
- Force download of the uninstallation utility. Select the utility delivery method:
- Using Network Agent. If Network Agent has not been installed on the computer, first Network Agent will be installed using the tools of the operating system. Kaspersky Endpoint Security is then uninstalled by the tools of Network Agent.
- Using operating system resources through Administration Server. The utility will be delivered to client computers by using operating system resources through the Administration Server. You can select this option if Network Agent is not installed on the client computer, but the client computer is in the same network as the Administration Server.
- Using operating system resources through distribution points. The utility is delivered to client computers using operating system resources via distribution points. You can select this option if there is at least one distribution point in the network. For more details about distribution points, refer to the Kaspersky Security Center Help.
- Verify operating system type before downloading. If necessary, clear this check box. This lets you avoid downloading the uninstall utility if the operating system of the computer does not meet the software requirements. If you are sure that the operating system of the computer meets the software requirements, you can skip this verification.
If the application uninstallation operation is password protected, do the following:
- Select the Use uninstallation password check box.
- Click the Edit button.
- Enter the KLAdmin account password.
Step 5. Selecting the operating system restart setting
After uninstalling the application, a restart is required. Select the action that will be performed to restart the computer.
Step 6. Selecting the devices to which the task will be assigned
Select the computers on which the task will be performed. The following options are available:
- Assign the task to an administration group. In this case, the task is assigned to computers included in a previously created administration group.
- Select computers detected by the Administration Server in the network: unassigned devices. The specific devices can include devices in administration groups as well as unassigned devices.
- Specify device addresses manually, or import addresses from a list. You can specify NetBIOS names, IP addresses, and IP subnets of devices to which you want to assign the task.
Step 7. Selecting the account to run the task
Select the account for installing Network Agent using the tools of the operating system. In this case, administrator rights are required for computer access. You can add multiple accounts. If an account does not have sufficient rights, the Installation Wizard uses the next account. If you uninstall Kaspersky Endpoint Security using Network Agent tools, you do not have to select an account.
Step 8. Configuring a task start schedule
Configure a schedule for starting a task, for example, manually or when the computer is idle.
Step 9. Defining the task name
Enter a name for the task, such as Remove Kaspersky Endpoint Security 12.1.
Step 10. Finishing task creation
Exit the Wizard. If necessary, select the Run the task after the Wizard finishes check box. You can monitor the progress of the task in the task properties.
The application will be uninstalled in silent mode.
How to remove the application through the Web Console and Cloud Console
- In the main window of the Web Console, select Devices → Tasks.
The list of tasks opens.
- Click the Add button.
The Task Wizard starts. Follow the instructions of the Wizard.
Step 1. Configuring general task settings
Configure the general task settings:
- In the Application drop-down list, select Kaspersky Security Center.
- In the Task type drop-down list, select Uninstall application remotely.
- In the Task name field, enter a brief description, for example, Uninstall Kaspersky Endpoint Security from Technical Support computers.
- In the Select devices to which the task will be assigned block, select the task scope.
Step 2. Selecting the devices to which the task will be assigned
Select the computers on which the task will be performed. For example, select a separate administration group or build a selection.
Step 3. Configuring application uninstallation settings
At this step, configure the application uninstallation settings:
- Select Uninstall managed application.
- Select Kaspersky Endpoint Security for Windows (12.1).
- Force download of the uninstallation utility. Select the utility delivery method:
- Using Network Agent. If Network Agent has not been installed on the computer, first Network Agent will be installed using the tools of the operating system. Kaspersky Endpoint Security is then uninstalled by the tools of Network Agent.
- Using operating system resources through Administration Server. The utility will be delivered to client computers by using operating system resources through the Administration Server. You can select this option if Network Agent is not installed on the client computer, but the client computer is in the same network as the Administration Server.
- Using operating system resources through distribution points. The utility is delivered to client computers using operating system resources via distribution points. You can select this option if there is at least one distribution point in the network. For more details about distribution points, refer to the Kaspersky Security Center Help.
- In the Maximum number of concurrent downloads field, set a limit on the number of requests sent to the Administration Server to download the application uninstall utility. A limit on the number of requests will help prevent the network from being overload.
- In the Maximum number of uninstallation attempts field, set a limit on the number of attempts to uninstall the application. If uninstallation of Kaspersky Endpoint Security ends with an error, the task will automatically start the uninstallation again.
- If necessary, clear the Verify operating system type before downloading check box. This lets you avoid downloading the uninstall utility if the operating system of the computer does not meet the software requirements. If you are sure that the operating system of the computer meets the software requirements, you can skip this verification.
Step 4. Selecting the account to run the task
Select the account for installing Network Agent using the tools of the operating system. In this case, administrator rights are required for computer access. You can add multiple accounts. If an account does not have sufficient rights, the Installation Wizard uses the next account. If you uninstall Kaspersky Endpoint Security using Network Agent tools, you do not have to select an account.
Step 5. Completing task creation
Finish the wizard by clicking the Finish button. A new task will be displayed in the list of tasks.
To run a task, select the check box opposite the task and click the Start button. The application will be uninstalled in silent mode. After uninstallation is complete, Kaspersky Endpoint Security shows a prompt to restart the computer.
If the application uninstallation operation is password protected, enter the KLAdmin account password in the properties of the Uninstall application remotely task. Without the password, the task will not be performed.
To use the KLAdmin account password in the Uninstall application remotely task:
- In the main window of the Web Console, select Devices → Tasks.
The list of tasks opens.
- Click the Kaspersky Security Center task Uninstall application remotely.
The task properties window opens.
- Select the Application settings tab.
- Select the Use uninstallation password check box.
- Enter the KLAdmin account password.
- Save your changes.
Restart the computer to complete the uninstallation. To do so, Network Agent displays a pop-up window.
Removing the application remotely using Active Directory
You can remotely uninstall the application using a Microsoft Windows group policy. To uninstall the application, you need to open the Group Policy Management Console (gpmc.msc) and use the Group Policy Editor to create an application removal task (for more details, please visit the Microsoft Technical Support website).
If the application uninstallation operation is password protected, you need to do the following:
- Create a BAT file with the following contents:
msiexec.exe /x<GUID> KLLOGIN=<user name> KLPASSWD=<password> /qn
<GUID>
is the unique ID of the application. You can find out the GUID of the application by using the following command:wmic product where "Name like '%Kaspersky Endpoint Security%'" get Name, IdentifyingNumber
Example:
msiexec.exe /x{6BB76C8F-365E-4345-83ED-6D7AD612AF76} KLLOGIN=KLAdmin KLPASSWD=!Password1 /qn
- Create a new Microsoft Windows policy for the computers in the Group Policy Management Console (gpmc.msc).
- Use the new policy to run the created BAT file on the computers.
Removing the application locally
You can remove the application locally using the Setup Wizard. Kaspersky Endpoint Security is removed using the normal method for a Windows operating system, which is through the Control Panel. The Setup Wizard starts. Follow the instructions on the screen.
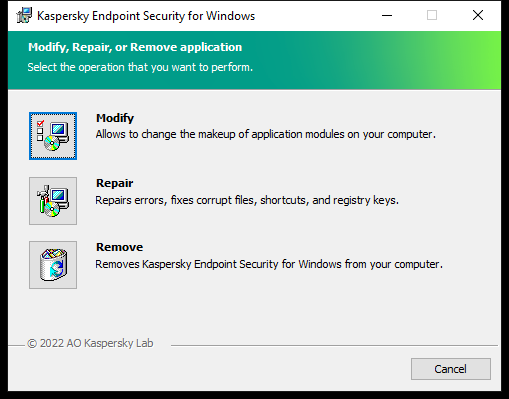
Selecting the application removal operation
You can specify which of the data that is used by the application you want to save for future use, during the next installation of the application (such as when upgrading to a newer version of the application). If you do not specify any data, the application will be completely removed (see the figure below).
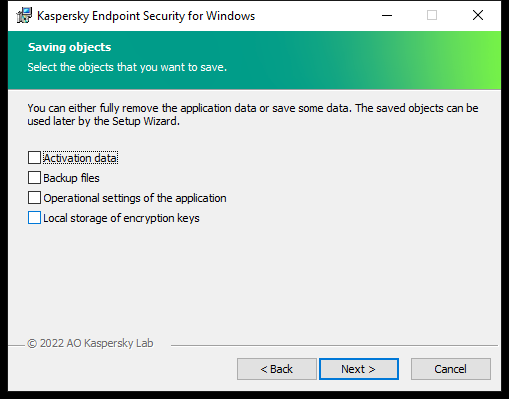
Saving data after removal
You can save the following data:
- Activation data, which lets you avoid having to activate the application again. Kaspersky Endpoint Security automatically adds a license key if the license term has not expired prior to installation.
- Backup files – files that are scanned by the application and placed in Backup.
Backup files that are saved after removal of the application can be accessed only from the same version of the application that was used to save those files.
If you plan to use Backup objects after removal of the application, you must restore those objects before removing the application. However, Kaspersky experts do not recommend restoring objects from Backup because this may harm the computer.
- Operational settings of the application – values of application settings that are selected during application configuration.
- Local storage of encryption keys – data that provides access to files and drives that were encrypted before removal of the application. To ensure access to encrypted files and drives, make sure that you selected data encryption functionality when reinstalling Kaspersky Endpoint Security. No further action is required for access to previously encrypted files and drives.
You can also delete the application locally using the command line.