hello example
In the software development world, learning a new technology traditionally starts with using that technology to greet the world. We will keep that tradition with KasperskyOS, so we begin with an example that displays Hello world! on the screen.
KasperskyOS lets you develop solutions in the C and C++ languages. However, all examples in KasperskyOS Education Kit are written in C.
The hello.c code looks familiar and simple to a developer that uses C, and is fully compatible with POSIX:
hello.c
#include <stdio.h>
#include <stdlib.h>
int main(void)
{
fprintf(stderr, "Hello world!\n");
return EXIT_SUCCESS;
}
Compile this code using x86_64-pc-kos-gcc – it is included in the development tools of KasperskyOS Starter Kit:
x86_64-pc-kos-gcc -o hello hello.c
To run the resulting hello file in KasperskyOS, multiple additional actions are required.
Development of applications for KasperskyOS has the following special features:
First of all, each entity (the term used to refer to applications and their associated processes in KasperskyOS) must be statically described. A description is contained in files with the EDL, CDL and IDL extensions, which are used for building a solution. The minimum possible description of an entity is an edl file that indicates the name of the entity. All entities developed in the first part of the Guide have a minimum static description (only an edl file with the entity name).
Secondly, all entities to be started must be contained in the KasperskyOS image being loaded. For this reason, each example in this Guide presents not just an individual entity but a ready-to-use KasperskyOS-based solution that includes an image of the kernel that initializes the entity and auxiliary entities, such as drivers.
EDL description of the hello entity
A static description of the hello entity consists of a single file named hello.edl that must indicate the entity name:
hello.edl
/* The entity name follows the reserved word "entity". */
entity hello
The second part of the Guide shows examples of more complex EDL descriptions, and also presents CDL and IDL descriptions.
Creating the einit initializing entity
When KasperskyOS is loaded, the kernel starts an entity named einit. The einit entity normally starts all other entities included in the solution, which means that it serves as the initializing entity.
KasperskyOS Starter Kit toolkit includes the einit tool, which lets you generate the code of the initializing entity (einit.c) based on a special file named init.yaml.
If you want the hello entity to start after the operating system is loaded, all you need to do is specify its name in the init.yaml file and build an einit entity from it.
init.yaml
entities:
# Start the "hello" entity.
- name: hello
An einit entity is built as follows:
nk-gen-c -I $SDK/sysroot-x86_64-pc-kos/include hello.edl
einit -I $SDK/sysroot-x86_64-pc-kos/include -I . init.yaml -o einit.c
x86_64-pc-kos-gcc -I . -o einit einit.c
(Here the SDK variable has the value /opt/KasperskyOS-StarterKit-<version>).
The purpose of the NK compiler (nk-gen-c) is examined in the second part of the Guide.
Building a solution image
All that remains now is to build a solution image containing the KasperskyOS kernel image (kos-qemu), and the hello and einit entities.
The makeimg script is used to build an image:
makeimg --target=x86_64-pc-kos \
--sys-root=$SDK/sysroot-x86_64-pc-kos \
--with-toolchain=$SDK/toolchain \
--ldscript=$SDK/libexec/x86_64-pc-kos/kos-qemu.ld \
--img-src=$SDK/libexec/x86_64-pc-kos/kos-qemu \
--img-dst=kos-qemu-image \
hello
Here, the SDK variable has the value /opt/KasperskyOS-StarterKit-<version>. The einit entity does not need to be indicated because it will be automatically included in the solution image.
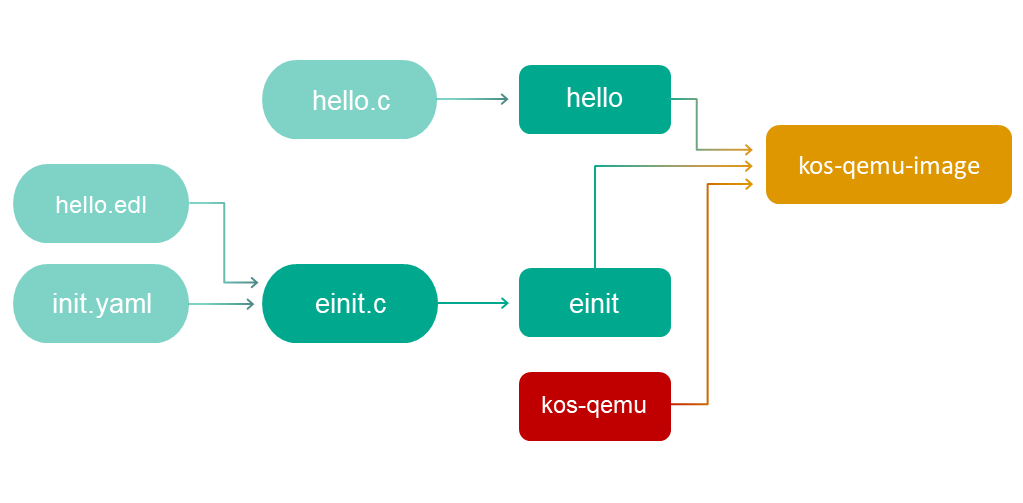
Build scheme for the hello example
The general build scheme for the hello example looks as follows:
Running the hello example
To run the built solution image under QEMU, run the following command:
qemu-system-x86_64 -m 1024 -serial stdio -kernel kos-qemu-image
Building and running a hello example using the build.sh script containing all of the above commands
Page top