Step 11 (optional). Configuring Kaspersky Threat Feed App
You can configure Kaspersky Threat Feed App by selecting the Settings link in QRadar Console.

Settings link
You specify the settings in a form that appears after you select the Settings link.
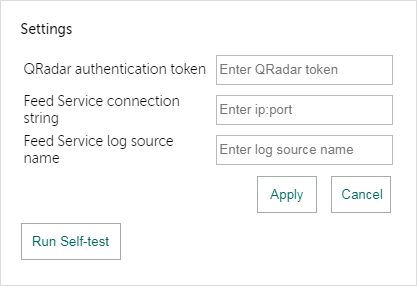
Settings form
The following settings fields are available:
- QRadar authentication token
The authentication token to access QRadar RestApi.
You can specify an existing token or create a new token.
- Feed Service connection string
The IP address and port that Feed Service listens on for incoming events.
If you have installed Kaspersky CyberTrace on the same computer on which QRadar is installed, Kaspersky Threat Feed App will not be able to connect to QRadar because the iptables rules forbid the communication of a Docker container, in which Kaspersky Threat Feed App is running, and the QRadar computer.
To make Kaspersky Threat Feed App work on the QRadar computer, connect to the QRadar computer using the SSH protocol and run the following command:
iptables -I INPUT -i <D_interface> -p tcp --destination-port <FS_port> -j ACCEPTThis command includes:
-
<D_interface>—Interface of the Docker container that contains Kaspersky Threat Feed App for QRadar.To find the
<D_interface>name, perform the following:- Find the identifier of Kaspersky Threat Feed App by running the following command:
psql -U qradar -c "select id, name from installed_application;"A table appears. Find the value for the identifier of Kaspersky Threat Feed App (hereinafter
<app_id>) from theidcolumn. - Find the identifier of the Docker container in which Kaspersky Threat Feed App is contained by running the following command:
docker psIn the output result, find the image with the
.../qapp/<app_id>:x.x.xname, wherex.x.xis the installed version of Kaspersky Threat Feed App, and find itsCONTAINER IDvalue (hereinafter<container_id>). - Find the interface name for the Docker image that contains Kaspersky Threat Feed App, by running the following command:
docker inspect <container_id> | grep NetworkModeThe output result appears, in the format
"NetworkMode": "<D_interface>". Substitute this result for<D_interface>in the command above.
- Find the identifier of Kaspersky Threat Feed App by running the following command:
<FS_port>—Port that Feed Service listens on for incoming events.
If you run the above command, the added rule will be present in iptables only until iptables is restarted, or the QRadar computer is restarted. To add this rule permanently, add it to the
/etc/sysconfig/iptablesfile (the path to the iptables file depends on the environment configuration).Also note that you cannot specify the
127.0.0.1IP address even if Kaspersky Threat Feed App is installed on the QRadar computer. Specify the external IP address of the QRadar computer instead. -
- Feed Service log source name
The log source name of Feed Service as it is registered in QRadar. This name is displayed in the Name column of the window that opens after Admin > Log Sources is selected in QRadar Console.
If the Feed Service log source was added automatically when you sent the initial set of Feed Service events to QRadar, the log source name is
Kaspersky Threat Feed Service @ [id], where[id]is the identifier of Feed Service events. (By default,[id]isKL_Threat_Feed_Service_v2). If you had to add Feed Service to QRadar as a log source manually because you did not have the latest QRadar updates, the log source name is[id];that is,KL_Threat_Feed_Service_v2by default.It takes some time to visualize the requested data after you have changed the log source name or the installed Kaspersky Threat Feed App. While the data is being loaded, a progress bar is displayed. The time required for getting all the data depends on the selected period over which the data is visualized.
After you configure Kaspersky Threat Feed App, you can run the verification test by clicking the Run self-test button.
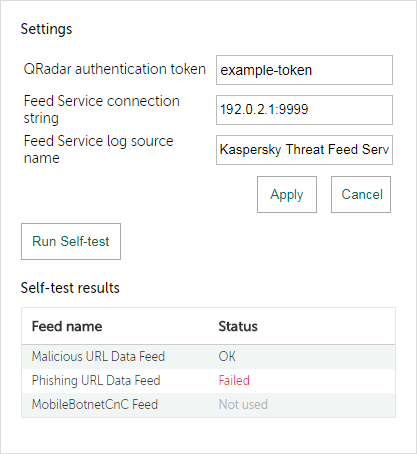
Self-test results
A test result of Failed for any feed means that a tested object is assigned to an incorrect category. The error can originate, for example, in an incorrect configuration file.