Step 9 (optional). Installing Kaspersky CyberTrace App for QRadar
This section describes how to install Kaspersky CyberTrace App for QRadar.
Only a user account that has the System Administrator role can manage Kaspersky CyberTrace App for QRadar.
Getting Kaspersky CyberTrace App for QRadar
You can get the Kaspersky CyberTrace App for QRadar installation package from your Technical Account Manager (TAM).
Installing Kaspersky CyberTrace App for QRadar
To install Kaspersky CyberTrace App for QRadar:
- In QRadar, select Admin and then Extensions Management.
- In the Extensions Management form, click the Add button.

Extensions Management form
- Select the application file archive.
- Select the Install immediately check box.
- Click Add.
- Click Install.
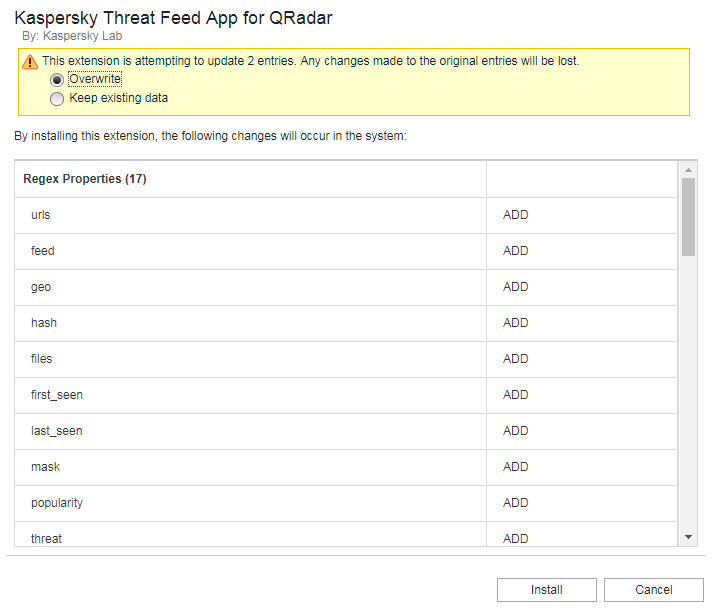
A list of changes to be made is displayed. In particular, the custom event properties that will be added are displayed.

Custom event properties to be added
The following custom event properties are added when the app is installed:
urlsfeedgeohashfilesfirst_seenlast_seenmaskpopularitythreatwhoisURLSHA1 HashSHA256 HashMD5 Hashiprecords_count
You will use these properties to enable the indexes of the added custom event properties and to specify the log source type.
If you use Kaspersky CyberTrace App for QRadar, you can remove the fields added to QRadar when retrieving custom event properties. These fields duplicate the fields used in Kaspersky CyberTrace App for QRadar. If instead you remove the fields added during the Kaspersky CyberTrace App for QRadar installation, the application may not work correctly.
- Click Install again.
Kaspersky Threat Feed App appears in the Extensions Management form after it is installed.
- Refresh the browser window before you use the app.
After Kaspersky CyberTrace App for QRadar is installed, its name will appear as a tab—Kaspersky Data Feeds—in QRadar Console.

Kaspersky Data Feeds tab
- In QRadar Console, select Kaspersky Data Feeds tab.
The Configuration required form will appear.

Configuration required form
- In the Configuration required form:
- In the QRadar authentication token field, specify an authentication token to access QRadar REST API.
You can specify an existing token or create a new token.
If the specified token expires, the Configuration required form will appear again the next time you select Kaspersky Data Feeds. In this case, you must specify a new token.
- In the Kaspersky CyberTrace Service connection string field, specify the IP address and port that Kaspersky CyberTrace Service listens on for incoming events.
You cannot specify the
127.0.0.1IP address, even if Kaspersky Threat Feed App is installed on the QRadar computer. Instead, specify the external IP address of the QRadar computer. - In the Kaspersky CyberTrace Service log source name field, specify the log source name of Kaspersky CyberTrace Service as it is registered in QRadar.
This name is displayed in the Name column of the window that opens after Admin > Log Sources is selected in QRadar Console. For example,
KL_Threat_Feed_Service_v2.For more information about specifying log sources, see the section about configuring Kaspersky CyberTrace App for QRadar.
- In the QRadar authentication token field, specify an authentication token to access QRadar REST API.