Preparing to install Kaspersky IoT Secure Gateway
Preparing to install Kaspersky IoT Secure Gateway
Prior to installing Kaspersky IoT Secure Gateway, you need to configure the Advantech UTX-3117FS-S6A1N.
To configure the Advantech UTX-3117FS-S6A1N:
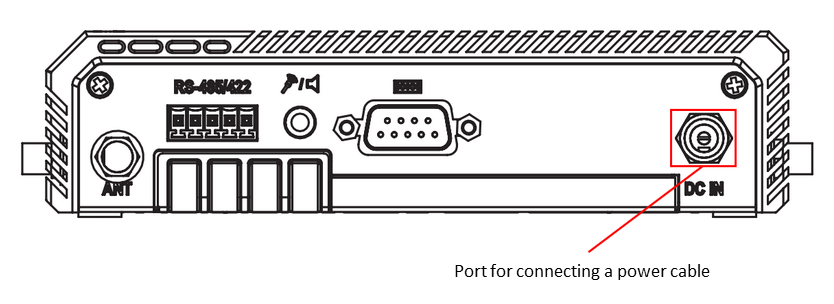
- Connect a power cable to the port on the back panel of the Advantech UTX-3117FS-S6A1N (see the figure below).

Back panel of the Advantech UTX-3117FS-S6A1N
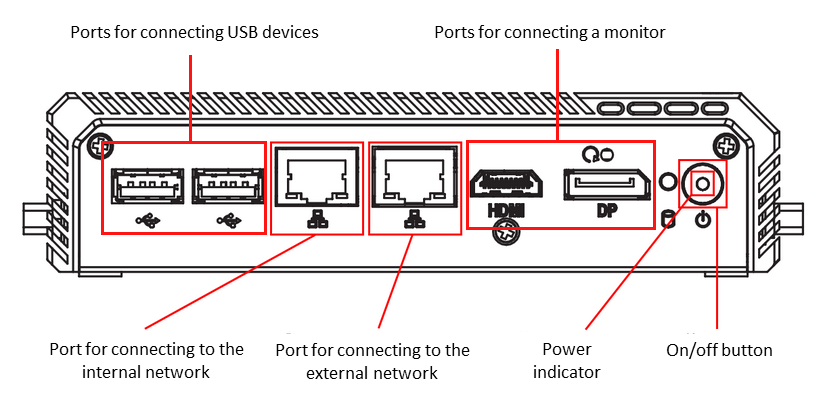
- Connect the network cable for the external network to the port on the front panel of the Advantech UTX-3117FS-S6A1N (see the figure below).

Front panel of the Advantech UTX-3117
- Connect a monitor and keyboard to the appropriate ports on the front panel of the Advantech UTX-3117FS-S6A1N.
- Click the on/off button in the right part of the front panel of the Advantech UTX-3117.
The power indicator will light up on the front panel of the Advantech UTX-3117 and the system will start running.
- Press the DELETE key.
The main BIOS menu opens.
- Restore the default settings:
- Select the Save & Exit tab.
- In the Default Options menu, select Restore Defaults.
- Exit the Save & Exit tab.
- Check the Secure Boot settings:
- Select the Security tab.
- Select Secure Boot.
- Make sure that the Secure Boot setting is Not Active:
- If Secure Boot is Not Active, proceed to the next step.
- If Secure Boot is Active, change it to Not Active and restart the Advantech UTX-3117FS-S6A1N.
- Exit the Security tab.
- Configure the southbridge:
- Select the Chipset tab.
- In the opened menu, select South Bridge.
- Select Intel Linux for the OS Selection setting.
- Exit the Chipset tab.
- Configure the advanced settings:
- Select the Advanced tab.
- In the opened menu, select CSM Configuration.
- Select Enabled for the CSM Support setting.
- For the Network and Other PCI devices Support settings, select Do not launch.
- Return to the Advanced tab.
- In the opened menu, select CPU Configuration. Select Enabled for the VT-d setting.
- Return to the Advanced tab.
- In the opened menu, select Serial Port Console Redirection.
- Select Enabled for the Console Redirection setting.
- Select Console Redirection Settings.
- Select VT100+ for the Terminal Type setting.
- Exit the Advanced tab.
- Configure the boot settings:
- Select the Boot tab.
- Select UEFI: Build-in EFI shell for the Boot Option #1 setting.
- Exit the Boot tab.
- Exit BIOS while saving the changes:
- Select the Save & Exit tab.
- On the Save & Exit tab, select Save Changes & Exit.
Did you find this article helpful?
What can we do better?
Thank you for your feedback! You're helping us improve.
Thank you for your feedback! You're helping us improve.
