How to protect against file-encrypting malware in Kaspersky Endpoint Security 11 for Windows
Show applications and versions that this article concerns
- Kaspersky Endpoint Security 12.5 for Windows (version 12.5.0.539)
- Kaspersky Endpoint Security 12.4 for Windows (version 12.4.0.467)
- Kaspersky Endpoint Security 12.3 for Windows (version 12.3.0.493)
- Kaspersky Endpoint Security 12.2 for Windows (version 12.2.0.462)
- Kaspersky Endpoint Security 12.1 for Windows (version 12.1.0.506)
- Kaspersky Endpoint Security 12 for Windows (version 12.0.0.465)
- Kaspersky Endpoint Security 11.11.0 for Windows (version 11.11.0.452)
- Kaspersky Endpoint Security 11.10.0 for Windows (version 11.10.0.399)
- Kaspersky Endpoint Security 11.9.0 for Windows (version 11.9.0.351)
- Kaspersky Endpoint Security 11.8.0 for Windows (version 11.8.0.384)
- Kaspersky Endpoint Security 11.7.0 for Windows (version 11.7.0.669)
To reduce the risk of being infected by cryptoviruses (malware that encrypts your files and demand a ransom), we recommend that you enable the following protection components:
- Behavior Detection
- Remediation Engine
- Automatic Exploit Prevention
- Host Intrusion Prevention
- Kaspersky Security Network
The instructions described in this article cannot be used to protect resources located in the network. No matter if the file location is specified as a mapped drive or a UNC path, files on network shares will not be protected. To protect files located in the network, use special solutions. For example, Kaspersky Security for Windows Server.
How to configure protection against file-encrypting malware locally in Kaspersky Endpoint Security for Windows versions 11.7.0–12.1.0
Make sure the Behavior Detection, Remediation Engine and Automatic Exploit Prevention components are enabled in the settings.
- Open Kaspersky Endpoint Security 11 for Windows.
- Enable the Host Intrusion Prevention component. For instructions, see this article.
- Click Manage resources in the the Host Intrusion Prevention component settings.
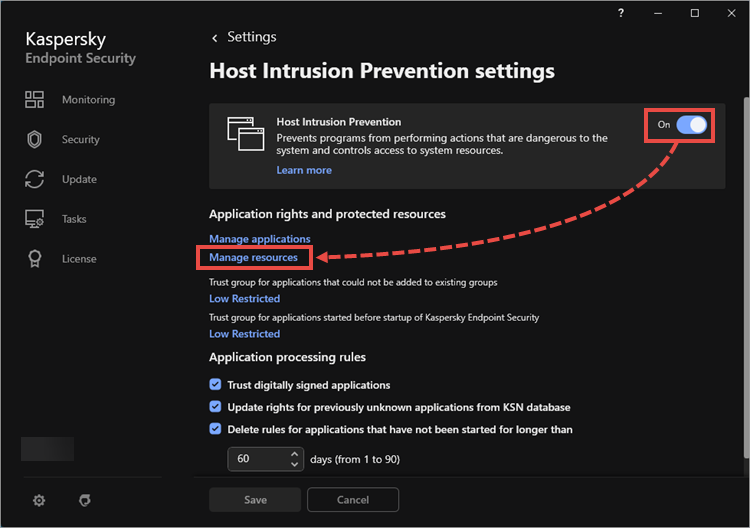
- Select the Personal data category and click Add → Category.
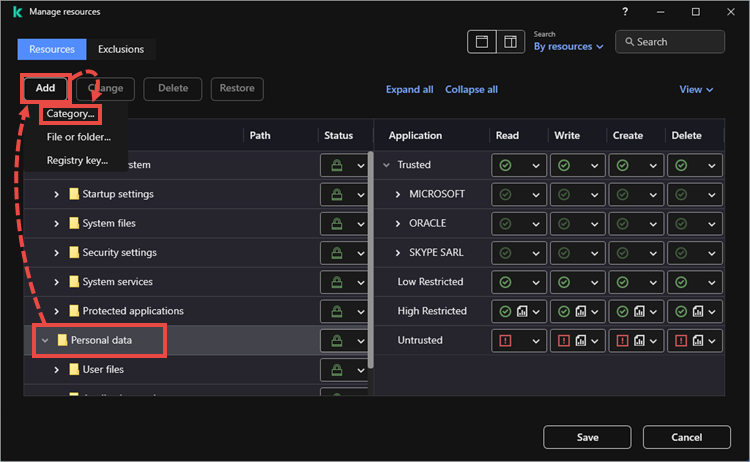
- Type the name for the category, for example, Protected file types. Click Add.
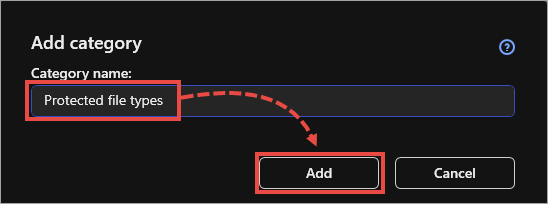
- Select Protected file types and create subcategories in it, for example, Documents. Repeat steps 4-5.
- Select the category for the file type. For example, for DOC or DOCX extension select Documents and click Add → File or folder.
- Enter the name and specify the mask in the *.<extension> format in the Path field. ClickAdd.
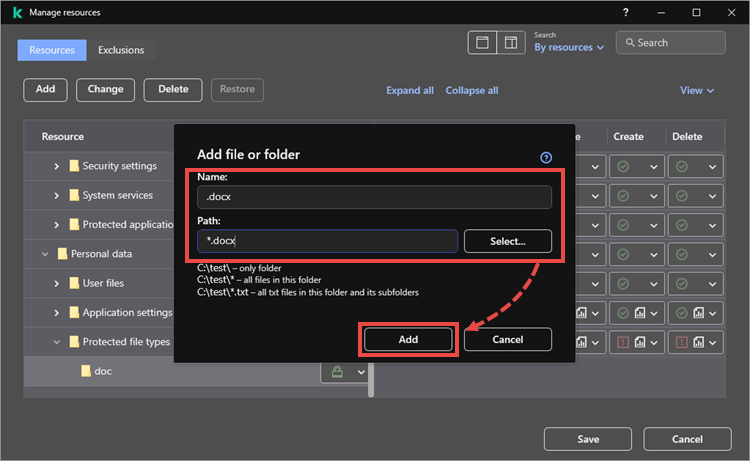
- Add other file types by repeating steps 7-8.
- Set the rules for the High restricted and Low restricted categories. To do this:
- Select the created category.
- For Low restricted and High restricted categories, set write, create and delete rights to Deny and select Log events.
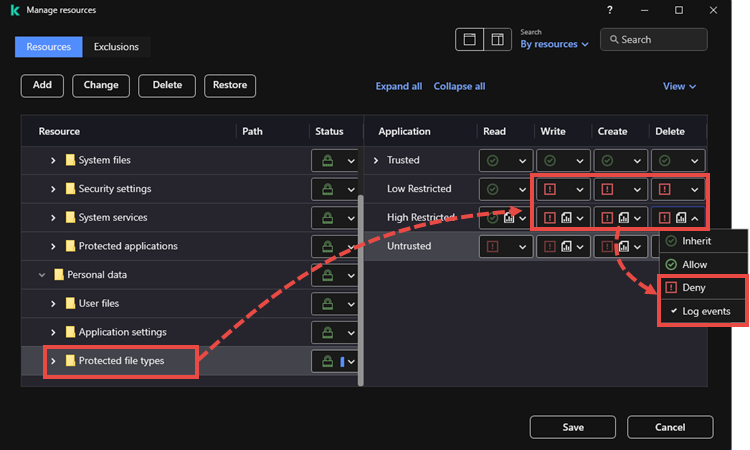
- Make sure that the applications you often use with protected file types are in the Trusted group. Click Save.
The Host Intrusion Prevention has been set up for protection against file-encrypting malware.
Before installing patches for Kaspersky Lab solutions, it is necessary to temporarily restore initial settings. If your browser is located in a group with high or low restrictions it will not be possible to download protected files.
How to configure protection against file-encrypting malware locally in Kaspersky Endpoint Security for Windows versions 11.5.0–11.6.0
Make sure the Behavior Detection, Remediation Engine and Automatic Exploit Prevention components are enabled in the settings.
- Open Kaspersky Endpoint Security 11 for Windows.
- Enable the Host Intrusion Prevention component. See this article for instructions.
- Click Manage resources in the Host Intrusion Prevention settings window.
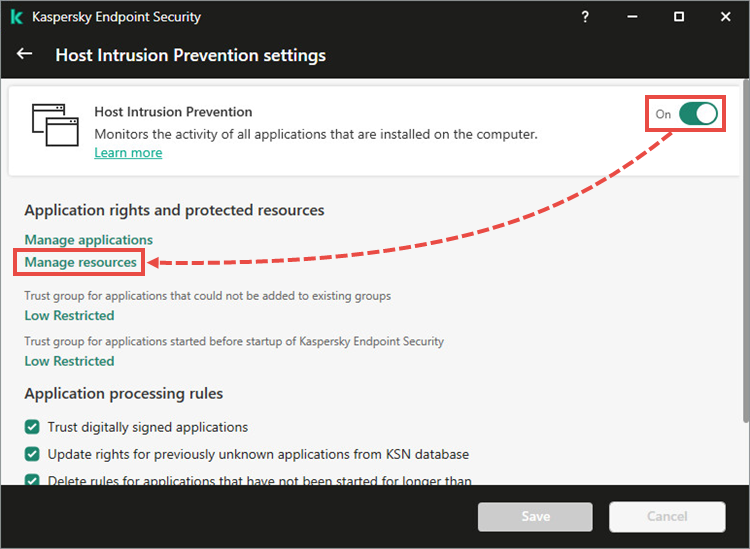
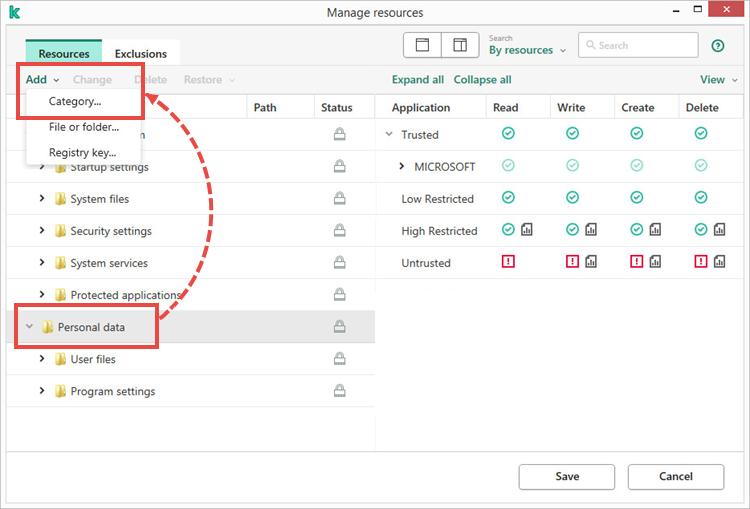
- Select Personal data and click Add → Category.
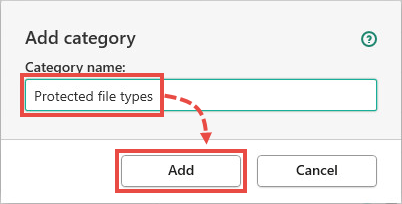
- Enter the name for the new category, e.g. Protected file types. Click Add.
- Select Protected file types and create subcategories, e.g. Documents or Images. To create subcategories, repeat steps 4–5.
- Select the category to add a type of protected files. E.g. Documents for files with the DOC or DOCX extension. Click Add → File or folder.
- Enter the name for the category, and specify the mask for the file type in the format *.<extension> in the Path field. Click Add.
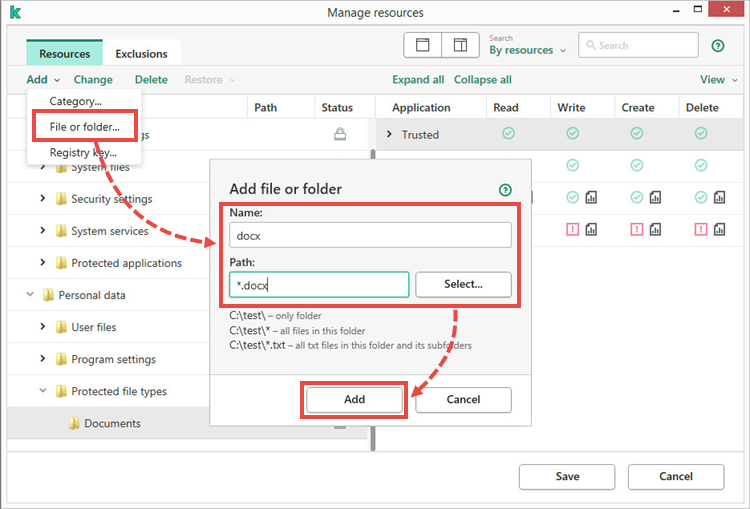
- Add other file types. To add other file types, repeat steps 7–8.
- Set the rules for the High restricted and Low restricted categories. To do this:
- Select the created category.
- For Low restricted and High restricted categories, set write, create and delete rights to Deny and select Log events.
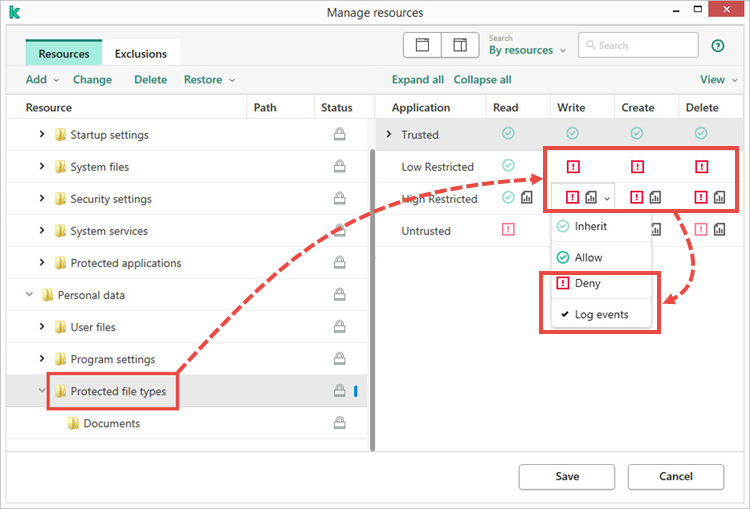
- Make sure that the applications you often use with protected file types are in the Trusted group. Click Save.
The Host Intrusion Prevention has been set up for protection against file-encrypting malware.
Before installing patches for Kaspersky Lab solutions, it is necessary to temporarily restore initial settings. If your browser is located in a group with high or low restrictions it will not be possible to download protected files.
How to set up protection against file-encrypting malware remotely
Make sure the Behavior Detection, Remediation Engine and Automatic Exploit Prevention components are enabled in the settings.
- Open the Kaspersky Security Center console.
- Go to Managed devices → Policies and open the Kaspersky Endpoint Security for Windows policy properties.
- Go to Advanced Threats Protection → Host Intrusion Prevention → Settings.
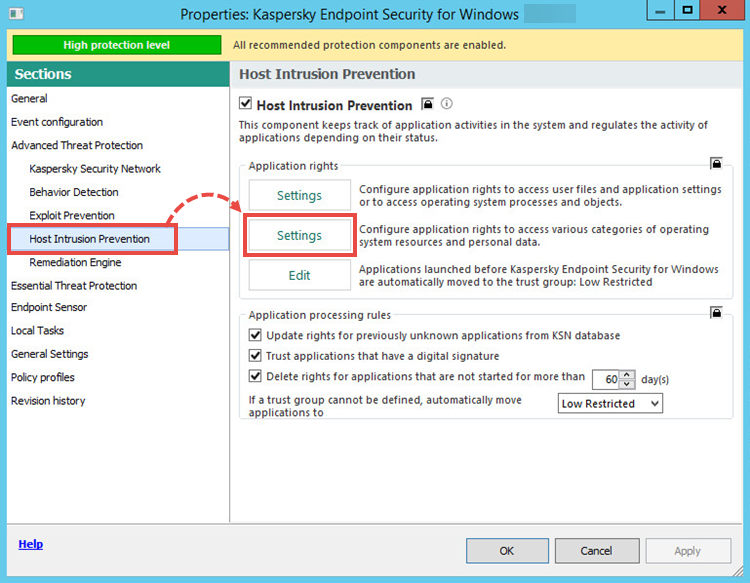
- Select Personal data and click Add → Category.
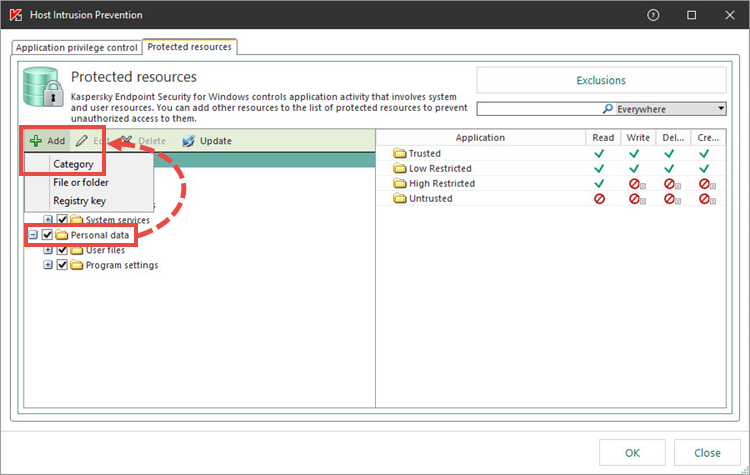
- Enter the name for the new category, e.g. Protected file types. Click OK.
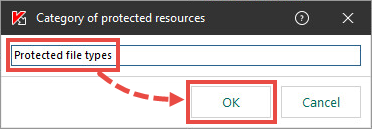
- Select Protected file types and create subcategories, e.g. Documents or Images. To add other file types, repeat steps 4–5.
- Select the category to add a type of protected files. E.g. Documents for files with the DOC or DOCX extension. Click Add → File or folder.
- Fill out the Name filed, click Browse and enter the mask for the file in the *.<extension> format. Click OK → OK.
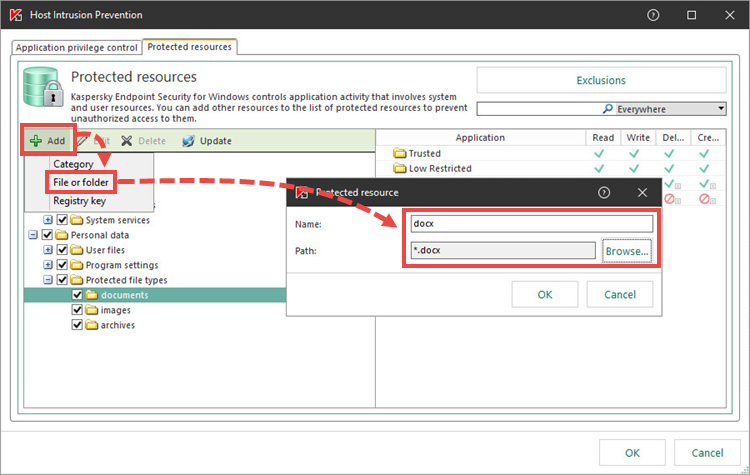
- Add other file types. To add other file types, repeat steps 7–8.
- Set the rules for the High restricted and Low restricted categories. Select the Protected file types category and set the Block option and Log events in the Write, Read, delete and Create columns.
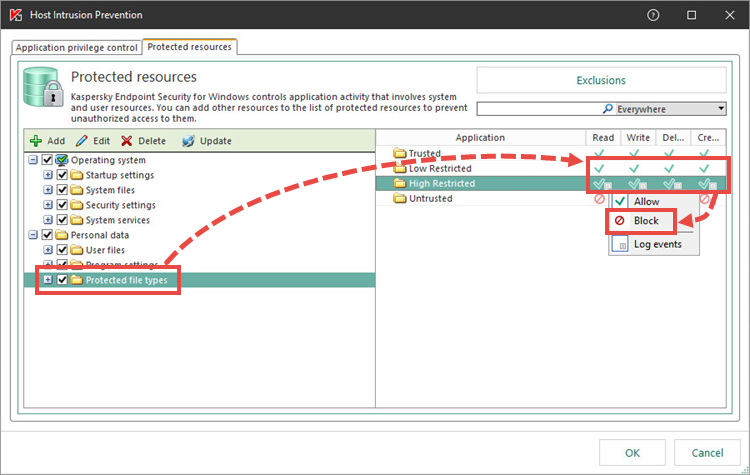
- Make sure that the applications are in the Trusted group. Click OK → Apply.
- Go to Event configuration → Info. Open the properties for Host Intrusion Prevention was triggered.
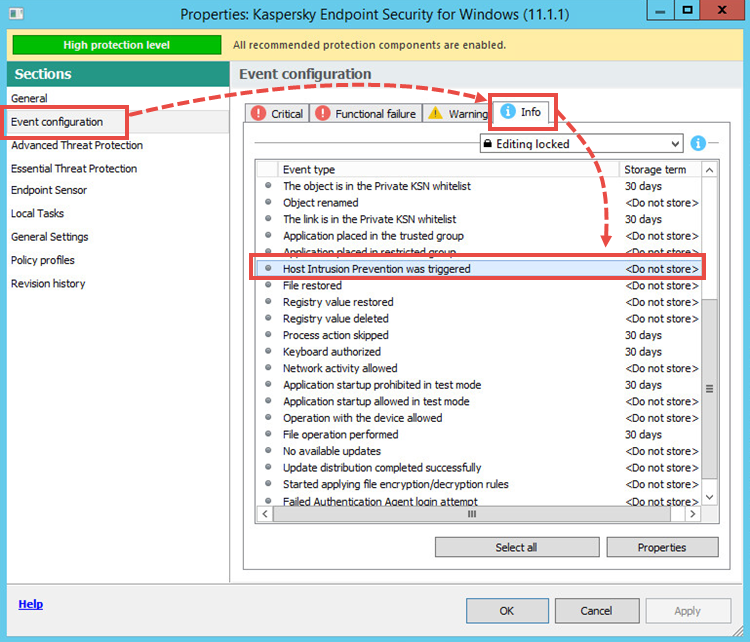
- Select the checkbox for On Administration Server for (days). If necessary, adjust settings to receive the notifications to your email. Click OK.
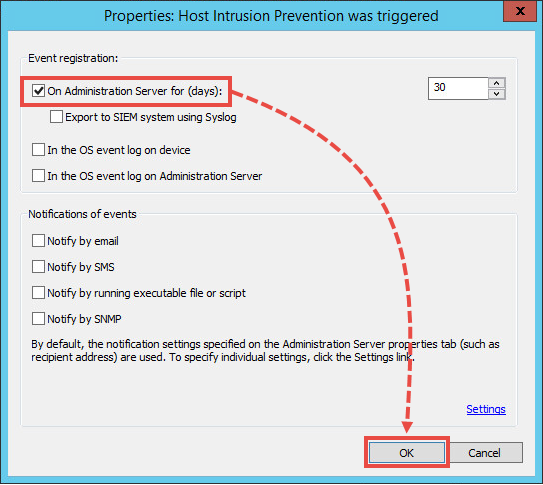
The Host Intrusion Prevention has been set up for protection against file-encrypting malware. If a malicious file is run on a managed computer, Kaspersky Security Center will register that event. To track the events, go to Administration Server → Events.
If the Administration Server registers too many events, the oldest will be overwritten.
Before installing patches for Kaspersky Lab solutions, it is necessary to temporarily restore initial settings. If your browser is located in a group with high or low restrictions it will not be possible to download protected files.
To use all the functions of Kaspersky Security Center Remote Diagnostic Utility, restore initial settings or disable the Host Intrusion Prevention component.
Types of files which are encrypted by malware
| File type | Extension |
|---|---|
|
Documents |
DOC, DOCX, PDF |
|
XLS, XLSX |
|
|
PPT, PPTX, RTF |
|
|
ODT, ODP, ODS |
|
|
DJVU |
|
|
Images |
JPG, JPEG, BMP |
|
GIF, PNG, PSD |
|
|
CDR, DWG, MAX |
|
|
3DS |
|
|
Archives |
RAR, ZIP, 7Z |
|
TAR, GZ |
|
|
Multimedia |
AVI, MP3, WAV |
|
MKV, FLAC, MP4 |
|
|
MOV, WMV |
|
|
Databases |
MDB, 1CD, SQLITE |
|
SQL |
|
|
Other |
KWM, ISO, TORRENT |
|
PHP, C, CPP |
|
|
PAS, CER, KEY |
|
|
PST, LNK |
How to submit suspicious files for analysis
If you have found a malicious file that may cause infection and encryption of files, send a request to technical support through Kaspersky CompanyAccount. Attach the file to your request and add the comment “possible cryptovirus”.
To find the files that have been removed during disinfection:
- If you are using Kaspersky Endpoint Security for Windows version 11.7.0–11.11.0, in the main application window click Backup.
- If you are using Kaspersky Endpoint Security for Windows version 11.5.0–11.6.0, in the main application window click More Tools → Backup.
