Contents
- Data Encryption
- Encryption functionality limitations
- Changing the length of the encryption key (AES56 / AES256)
- Enabling Single Sign-On (SSO) technology
- Special considerations for file encryption
- Full Disk Encryption
- File Level Encryption on local computer drives
- Encrypting files on local computer drives
- Forming encrypted file access rules for applications
- Encrypting files that are created or modified by specific applications
- Generating a decryption rule
- Decrypting files on local computer drives
- Creating encrypted packages
- Extracting encrypted packages
- Restoring access to encrypted data after operating system failure
- Encryption of removable drives
- Using the Authentication Agent
- Using a token and smart card with Authentication Agent
- Editing Authentication Agent help messages
- Limited support for characters in Authentication Agent help messages
- Selecting the Authentication Agent trace level
- Managing Authentication Agent accounts
- Adding a command for creating an Authentication Agent account
- Adding an Authentication Agent account editing command
- Adding a command for deleting an Authentication Agent account
- Restoring Authentication Agent account credentials
- Responding to a user request to restore Authentication Agent account credentials
- Removing objects and data that remained after test operation of Authentication Agent
- Viewing data encryption details
- Managing encrypted files with limited file encryption functionality
- Working with encrypted devices when there is no access to them
- Obtaining access to encrypted devices through the application interface
- Granting user access to encrypted devices
- Providing a user with a recovery key for hard drives encrypted with BitLocker
- Creating the executable file of Restore Utility
- Restoring data on encrypted devices using the Restore Utility
- Responding to a user request to restore data on encrypted devices
- Creating an operating system rescue disk
Data Encryption
Kaspersky Endpoint Security lets you encrypt files and folders that are stored on local and removable drives, or entire removable drives and hard drives. Data encryption minimizes the risk of information leaks that may occur when a portable computer, removable drive or hard drive is lost or stolen, or when data is accessed by unauthorized users or applications. Kaspersky Endpoint Security uses the Advanced Encryption Standard (AES) encryption algorithm.
If the license has expired, the application does not encrypt new data, and old encrypted data remains encrypted and available for use. In this event, encrypting new data requires the program be activated with a new license that permits the use of encryption.
If your license has expired, or the End User License Agreement has been violated, the key, Kaspersky Endpoint Security, or encryption components has been removed, the encrypted status of previously encrypted files is not guaranteed. This is because some applications, such as Microsoft Office Word, create a temporary copy of files during editing. When the original file is saved, the temporary copy replaces the original file. As a result, on a computer that has no or inaccessible encryption functionality, the file remains unencrypted.
Kaspersky Endpoint Security offers the following aspects of data protection:
- File Level Encryption on local computer drives. You can compile lists of files by extension or group of extensions and lists of folders stored on local computer drives, and create rules for encrypting files that are created by specific applications. After a Kaspersky Security Center policy is applied, Kaspersky Endpoint Security encrypts and decrypts the following files:
- files individually added to lists for encryption and decryption;
- files stored in folders added to lists for encryption and decryption;
- files created by separate applications.
For details on applying a Kaspersky Security Center policy, please refer to the Kaspersky Security Center Help.
- Encryption of removable drives. You can specify a default encryption rule, according to which the application applies the same action to all removable drives, or specify encryption rules for individual removable drives.
The default encryption rule has a lower priority than encryption rules created for individual removable drives. Encryption rules created for removable drives of the specified device model have a lower priority than encryption rules created for removable drives with the specified device ID.
To select an encryption rule for files on a removable drive, Kaspersky Endpoint Security checks whether or not the device model and ID are known. The application then performs one of the following operations:
- If only the device model is known, the application uses the encryption rule (if any) created for removable drives of the specific device model.
- If only the device ID is known, the application uses the encryption rule (if any) created for removable drives with the specific device ID.
- If the device model and ID are known, the application applies the encryption rule (if any) created for removable drives with the specific device ID. If no such rule exists, but there is an encryption rule created for removable drives with the specific device model, the application applies this rule. If no encryption rule is specified for the specific device ID nor for the specific device model, the application applies the default encryption rule.
- If neither the device model nor device ID is known, the application uses the default encryption rule.
The application lets you prepare a removable drive for using encrypted data stored on it in portable mode. After enabling portable mode, you can access encrypted files on removable drives connected to a computer without encryption functionality.
The application performs the action specified in the encryption rule when the Kaspersky Security Center policy is applied.
- Managing rules of application access to encrypted files. For any application, you can create an encrypted file access rule that blocks access to encrypted files or allows access to encrypted files only as ciphertext, which is a sequence of characters obtained when encryption is applied.
- Creating encrypted packages. You can create encrypted archives and protect access to such archives with a password. The contents of encrypted archives can be accessed only by entering the passwords with which you protected access to those archives. Such archives can be securely transmitted over networks or on removable drives.
- Full Disk Encryption. You can select an encryption technology: Kaspersky Disk Encryption or BitLocker Drive Encryption (hereinafter also referred to as simply "BitLocker").
BitLocker is a technology that is part of the Windows operating system. If a computer is equipped with a Trusted Platform Module (TPM), BitLocker uses it to store recovery keys that provide access to an encrypted hard drive. When the computer starts, BitLocker requests the hard drive recovery keys from the Trusted Platform Module and unlocks the drive. You can configure the use of a password and/or PIN code for accessing recovery keys.
You can specify the default full disk encryption rule and create a list of hard drives to be excluded from encryption. Kaspersky Endpoint Security performs full disk encryption by sector after the Kaspersky Security Center policy is applied. The application encrypts all logical partitions of hard drives simultaneously.
After the system hard drives have been encrypted, at the next computer startup the user must complete authentication using the
before the hard drives can be accessed and the operating system is loaded. This requires entering the password of the token or smart card connected to the computer, or the user name and password of the Authentication Agent account created by the local area network administrator using Authentication Agent account management tasks. These accounts are based on Microsoft Windows accounts under which users log into the operating system. You can manage Authentication Agent accounts and use the Single Sign-On (SSO) technology that lets you log into the operating system automatically using the user name and password of the Authentication Agent account.If you back up a computer and then encrypt the computer data, after which you restore the backup copy of the computer and encrypt the computer data again, Kaspersky Endpoint Security creates duplicates of Authentication Agent accounts. To remove the duplicate accounts, you must use the klmover utility with the
dupfixkey. The klmover utility is included in the Kaspersky Security Center build. You can read more about its operation in the Kaspersky Security Center Help.Access to encrypted hard drives is possible only from computers on which Kaspersky Endpoint Security with full disk encryption functionality is installed. This precaution minimizes the risk of data leaks from an encrypted hard drive when an attempt to access it is made outside of the local area network of the company.
To encrypt hard drives and removable drives, you can use the Encrypt used disk space only function. It is recommended you only use this function for new devices that have not been previously used. If you are applying encryption to a device that is already in use, it is recommended you encrypt the entire device. This ensures that all data is protected - even deleted data that might still contain retrievable information.
Before beginning encryption, Kaspersky Endpoint Security obtains the map of file system sectors. The first wave of encryption includes sectors that are occupied by files at the moment when encryption is started. The second wave of encryption includes sectors that were written to after encryption began. After encryption is complete, all sectors containing data are encrypted.
After encryption is complete and a user deletes a file, the sectors that stored the deleted file become available for storing new information at the file system level but remain encrypted. Thus, as files are written to a new device and the device is regularly encrypted with the Encrypt used disk space only function enabled, all sectors will be encrypted after some time.
The data needed to decrypt files is provided by the Kaspersky Security Center Administration Server that controlled the computer at the time of encryption. If the computer with encrypted objects was managed by a different Administration Server for some reason, you can obtain access to the encrypted data in one of the following ways:
- Administration Servers in the same hierarchy:
- You do not need to take any additional actions. The user will retain access to the encrypted objects. Encryption keys are distributed to all Administration Servers.
- Separated Administration Servers:
- Request access to encrypted objects from the LAN administrator.
- Restore data on encrypted devices using the Restore Utility.
- Restore the configuration of the Kaspersky Security Center Administration Server that controlled the computer at the time of encryption from a backup copy and use this configuration on the Administration Server that now controls the computer with encrypted objects.
If there is no access to encrypted data, see the special instructions for working with encrypted data (Working with encrypted files in the event of limited file encryption functionality, Working with encrypted devices should access to them not exist).
Encryption functionality limitations
Data Encryption has the following limitations:
- Data Encryption is available only when using Kaspersky Endpoint Security with the Kaspersky Security Center administration system. Data Encryption when using Kaspersky Endpoint Security in offline mode is not possible because Kaspersky Endpoint Security stores encryption keys in Kaspersky Security Center.
- Data Encryption management is available only in the Kaspersky Security Center Administration Console. It is not possible to manage Data Encryption in the Kaspersky Security Center Web Console or the Kaspersky Security Center Cloud Console.
- If Kaspersky Endpoint Security is installed on a computer running Microsoft Windows for File Servers, only full disk encryption using BitLocker Drive Encryption technology is available. If Kaspersky Endpoint Security is installed on a computer running Windows for personal computers, data encryption functionality is fully available.
Full disk encryption using Kaspersky Disk Encryption technology is unavailable for hard drives that do not meet the hardware and software requirements.
Kaspersky Endpoint Security does not support the following configurations:
- The boot loader is located on one drive while the operating system is on a different drive.
- The system contains embedded software of the UEFI 32 standard.
- Intel Rapid Start Technology and drives that have a hibernation partition even when Intel Rapid Start Technology is disabled.
- Drives in MBR format with more than four extended partitions.
- Swap file located on a non-system drive.
- Multiboot system with several simultaneously installed operating systems.
- Dynamic partitions (only primary partitions are supported).
- Drives with less than 0.5% free unfragmented disk space.
- Drives with a sector size different from 512 bytes or 4096 bytes that emulate 512 bytes.
- Hybrid drives.
Changing the length of the encryption key (AES56 / AES256)
Kaspersky Endpoint Security uses the Advanced Encryption Standard (AES) encryption algorithm. Kaspersky Endpoint Security supports the AES encryption algorithm with an effective key length of 256 or 56 bits. The data encryption algorithm depends on the AES encryption library that is included in the distribution package: Strong encryption (AES256) or Lite encryption (AES56). The AES encryption library is installed together with the application.
Changing the length of the encryption key is available only for Kaspersky Endpoint Security 11.2.0 or later.
Changing the encryption key length consists of the following steps:
- Decrypt objects that Kaspersky Endpoint Security encrypted before you begin changing the encryption key length:
After the encryption key length is changed, objects that were previously encrypted become unavailable.
- Remove Kaspersky Endpoint Security.
- Install Kaspersky Endpoint Security from the Kaspersky Endpoint Security distribution package containing a different encryption library.
You can also change the encryption key length by upgrading the application. The key length can be changed through an application upgrade only if the following conditions are met:
- Kaspersky Endpoint Security version 10 Service Pack 2 or later is installed on the computer.
- Data encryption components (File Level Encryption, Full Disk Encryption) are not installed on the computer.
By default, data encryption components are not included in Kaspersky Endpoint Security. The BitLocker Management component does not affect the change in the length of the encryption key.
To change the encryption key length, run the kes_win.msi or setup_kes.exe file from the distribution package containing the necessary encryption library. You can also remotely upgrade the application by using the installation package.
It is impossible to change the length of the encryption key using the distribution package of the same version of the application that is installed on your computer without first uninstalling the application.
Page topEnabling Single Sign-On (SSO) technology
Single Sign-On (SSO) technology is incompatible with third-party providers of account credentials.
To enable Single Sign-On (SSO) technology:
- Open the Kaspersky Security Center Administration Console.
- In the Managed devices folder in the Administration Console tree, open the folder with the name of the administration group to which the relevant client computers belong.
- In the workspace, select the Policies tab.
- Select the necessary policy and double-click to open the policy properties.
- In the Data encryption section, select the Common encryption settings subsection.
- In the Common encryption settings subsection, click the Configure button in the Password settings section.
This opens the Authentication agent tab of the Encryption password settings window.
- Select the Use Single Sign-On (SSO) technology check box.
- Click OK.
- To save your changes, in the Properties: <Policy name> window, click OK.
- Apply the policy.
For details on applying a Kaspersky Security Center policy, refer to Kaspersky Security Center Help.
Special considerations for file encryption
When using file encryption functionality, keep the following points in mind:
- The Kaspersky Security Center policy with preset settings for removable drive encryption is formed for a specific group of managed computers. Therefore, the result of applying the Kaspersky Security Center policy configured for encryption / decryption of removable drives depends on the computer to which the removable drive is connected.
- Kaspersky Endpoint Security does not encrypt / decrypt files with read-only status that are stored on removable drives.
- Kaspersky Endpoint Security encrypts / decrypts files in predefined folders only for local user profiles of the operating system. Kaspersky Endpoint Security does not encrypt / decrypt files in predefined folders of roaming user profiles, mandatory user profiles, temporary user profiles, and redirected folders. The list of standard folders recommended by Kaspersky for encryption includes the following folders:
- Documents.
- Favorites.
- Cookies.
- Desktop.
- Temporary Internet Explorer files.
- Temporary files.
- Outlook files.
- Kaspersky Endpoint Security does not encrypt files whose modification could harm the operating system and installed applications. For example, the following files and folders with all nested folders are on the list of encryption exclusions:
- %WINDIR%.
- %PROGRAMFILES%, %PROGRAMFILES(X86)%.
- Windows registry files.
The list of encryption exclusions cannot be viewed or edited. While files and folders on the list of encryption exclusions can be added to the encryption list, they will not be encrypted during a file encryption task.
- The following device types are supported as removable drives:
- Data media connected via the USB bus
- hard drives connected via USB and FireWire buses
- SSD drives connected via USB and FireWire buses
Full Disk Encryption
If Kaspersky Endpoint Security is installed on a computer running Microsoft Windows for Workstations, BitLocker Drive Encryption and Kaspersky Disk Encryption technologies are available for encryption. If Kaspersky Endpoint Security is installed on a computer running Microsoft Windows for File Servers, only BitLocker Drive Encryption technology is available.
Kaspersky Endpoint Security supports full disk encryption in FAT32, NTFS and exFat file systems.
Before starting full disk encryption, the application runs a series of checks to determine if the device can be encrypted, which includes checking the system hard drive for compatibility with Authentication Agent or with BitLocker encryption components. To check for compatibility, the computer must be restarted. After the computer has been rebooted, the application performs all the necessary checks automatically. If the compatibility check is successful, full disk encryption starts after the operating system has loaded and the application has started. If the system hard drive is found to be incompatible with Authentication Agent or with BitLocker encryption components, the computer must be restarted by pressing the Reset hardware button. Kaspersky Endpoint Security logs information about the incompatibility. Based on this information, the application does not start full disk encryption at operating system startup. Information about this event is logged in Kaspersky Security Center reports.
If the hardware configuration of the computer has changed, the incompatibility information logged by the application during the previous check should be deleted in order to check the system hard drive for compatibility with Authentication Agent and BitLocker encryption components. To do so, prior to full disk encryption, type avp pbatestreset in the command line. If the operating system fails to load after the system hard drive has been checked for compatibility with Authentication Agent, you must remove the objects and data remaining after test operation of Authentication Agent by using the Restore Utility and then start Kaspersky Endpoint Security and execute the avp pbatestreset command again.
After full disk encryption has started, Kaspersky Endpoint Security encrypts all data that is written to hard drives.
If the user shuts down or restarts the computer during full disk encryption, Authentication Agent is loaded before the next startup of the operating system. Kaspersky Endpoint Security resumes full disk encryption after successful authentication in Authentication Agent and operating system startup.
If the operating system switches to hibernation mode during full disk encryption, Authentication Agent is loaded when the operating system switches back from hibernation mode. Kaspersky Endpoint Security resumes full disk encryption after successful authentication in Authentication Agent and operating system startup.
If the operating system goes into sleep mode during full disk encryption, Kaspersky Endpoint Security resumes full disk encryption when the operating system comes out of sleep mode without loading Authentication Agent.
User authentication in the Authentication Agent can be performed in two ways:
- Enter the name and password of the Authentication Agent account created by the LAN administrator using Kaspersky Security Center tools.
- Enter the password of a token or smart card connected to the computer.
Use of a token or smart card is available only if the computer hard drives were encrypted using the AES256 encryption algorithm. If the computer hard drives were encrypted using the AES56 encryption algorithm, addition of the electronic certificate file to the command will be denied.
The authentication agent supports keyboard layouts for the following languages:
- English (UK)
- English (USA)
- Arabic (Algeria, Morocco, Tunis; AZERTY layout)
- Spanish (Latin America)
- Italian
- German (Germany and Austria)
- German (Switzerland)
- Portuguese (Brazil, ABNT2 layout)
- Russian (for 105-key IBM / Windows keyboards with the QWERTY layout)
- Turkish (QWERTY layout)
- French (France)
- French (Switzerland)
- French (Belgium, AZERTY layout)
- Japanese (for 106-key keyboards with the QWERTY layout)
A keyboard layout becomes available in the Authentication Agent if this layout has been added in the language and regional standards settings of the operating system and has become available on the welcome screen of Microsoft Windows.
If the Authentication Agent account name contains symbols that cannot be entered using keyboard layouts available in the Authentication Agent, encrypted hard drives can be accessed only after they are restored using the Restore Utility or after the Authentication Agent account name and password are restored.
Kaspersky Endpoint Security supports the following tokens, smart card readers, and smart cards:
- SafeNet eToken PRO 64K (4.2b) (USB).
- SafeNet eToken PRO 72K Java (USB).
- SafeNet eToken PRO 72K Java (Smart Card).
- SafeNet eToken 4100 72K Java (Smart Card).
- SafeNet eToken 5100 (USB)
- SafeNet eToken 5105 (USB)
- SafeNet eToken 7300 (USB)
- EMC RSA SecurID 800 (USB).
- Rutoken EDS (USB)
- Rutoken EDS (Flash)
- Aladdin-RD JaCarta PKI (USB)
- Aladdin-RD JaCarta PKI (Smart Card)
- Athena IDProtect Laser (USB)
- Gemalto IDBridge CT40 (Reader)
- Gemalto IDPrime .NET 511
Full disk encryption using Kaspersky Disk Encryption technology
Before starting full disk encryption on a computer, you are advised to make sure that the computer is not infected. To do so, start the Full Scan or Critical Areas Scan task. Performing full disk encryption on a computer that is infected by a rootkit may cause the computer to become inoperable.
To perform full disk encryption using Kaspersky Disk Encryption technology:
- Open the Kaspersky Security Center Administration Console.
- In the Managed devices folder in the Administration Console tree, open the folder with the name of the administration group to which the relevant client computers belong.
- In the workspace, select the Policies tab.
- Select the necessary policy and double-click to open the policy properties.
- In the Data encryption section, select Full Disk Encryption.
- In the Encryption technology drop-down list, select the Kaspersky Disk Encryption option.
Kaspersky Disk Encryption technology cannot be used if the computer has hard drives that were encrypted by BitLocker.
- In the Encryption mode drop-down list, select Encrypt all hard drives.
If the computer has several operating systems installed, after encrypting all hard drives you will be able to load only the operating system that has the application installed.
If you need to exclude some of the hard drives from encryption, create a list of such hard drives.
- Select one of the following encryption methods:
- If you want to apply encryption only to those hard drive sectors that are occupied by files, select the Encrypt used disk space only check box.
If you are applying encryption on a drive that is already in use, it is recommended to encrypt the entire drive. This ensures that all data is protected - even deleted data that might still contain retrievable information. The Encrypt used disk space only function is recommended for new drives that have not been previously used.
- If you want to apply encryption to the entire hard drive, clear the Encrypt used disk space only check box.
This function is applicable only to unencrypted devices. If a device was previously encrypted using the Encrypt used disk space only function, after applying a policy in Encrypt all hard drives mode, sectors that are not occupied by files will still not be encrypted.
- If you want to apply encryption only to those hard drive sectors that are occupied by files, select the Encrypt used disk space only check box.
- If a hardware incompatibility problem was encountered during encryption of the computer, you can select the Use Legacy USB Support check box to enable support for USB devices during the initial computer startup phase in BIOS.
Enabling / disabling Legacy USB Support does not affect support for USB devices after the operating system is started.
When Legacy USB Support is enabled, Authentication Agent does not support operations with USB tokens if the computer is operating in BIOS mode. It is recommended to use this option only when there is a hardware compatibility issue and only for those computers on which the problem occurred.
- Click OK to save changes.
- Apply the policy.
For details on applying a Kaspersky Security Center policy, refer to Kaspersky Security Center Help.
Full disk encryption using BitLocker Drive Encryption technology
Prior to starting full disk encryption on a computer, you are advised to make sure that the computer is not infected. To do so, start the Full Scan or Critical Areas Scan task. Performing full disk encryption on a computer that is infected by a rootkit may cause the computer to become inoperable.
The use of BitLocker Drive Encryption technology on computers with a server operating system may require installation of the BitLocker Drive Encryption component using the Add roles and components wizard.
To apply full disk encryption using BitLocker Drive Encryption technology:
- Open the Kaspersky Security Center Administration Console.
- In the Managed devices folder in the Administration Console tree, open the folder with the name of the administration group to which the relevant client computers belong.
- In the workspace, select the Policies tab.
- Select the necessary policy and double-click to open the policy properties.
- In the Data encryption section, select Full Disk Encryption.
- In the Encryption technology drop-down list, select BitLocker Drive Encryption.
- In the Encryption mode drop-down list, select Encrypt all hard drives.
If the computer has several operating systems installed, after encryption you will be able to load only the operating system in which the encryption was performed.
- If you want to enable BitLocker authentication in the preboot environment on tablet computers, select the Allow use of authentication requiring preboot keyboard input on tablets check box.
The touchscreen of tablet computers is not available in the preboot environment. To complete BitLocker authentication on tablet computers, the user must connect a USB keyboard, for example.
- Select one of the following types of encryption:
- If you want to use hardware encryption, select the Use hardware encryption check box.
- If you want to use software encryption, clear the Use hardware encryption check box.
- Select one of the following encryption methods:
- If you want to apply encryption only to those hard drive sectors that are occupied by files, select the Encrypt used disk space only check box.
- If you want to apply encryption to the entire hard drive, clear the Encrypt used disk space only check box.
This function is applicable only to unencrypted hard drives. If a hard drive was previously encrypted using the Encrypt used disk space only function, after applying a policy in Encrypt all hard drives mode, sectors that are not occupied by files will still not be encrypted.
- Select a method for accessing hard drives that were encrypted with BitLocker.
- If you want to use a (TPM) to store encryption keys, select the Use Trusted Platform Module (TPM) option.
- If you are not using a TPM for full disk encryption, select the Use password option and specify the minimum number of characters that a password must contain in the Minimum password length field.
For computers running Windows 7 or Windows Server 2008 R2, only encryption using a TPM module is available. If a TPM module is not installed, BitLocker encryption is not possible. Use of a password on these computers is not supported.
- If you selected the Use Trusted Platform Module (TPM) option during the previous step:
- If you want to set a PIN code that will be requested when the user attempts to access an encryption key, select the Use PIN check box and in the Minimum PIN length field, specify the minimum number of digits that a PIN code must contain.
- If you would like access to encrypted hard drives without a trusted platform module on the computer using a password, select the Use password if Trusted Platform Module (TPM) is unavailable check box, and in the Minimum password length field indicate the minimum number of characters the password should contain.
In this event, access to encryption keys will occur using the given password just like if the Use password check box is selected.
If the Use password if Trusted Platform Module (TPM) is unavailable check box is cleared and the trusted platform module is not available, full disk encryption will not start.
- Click OK to save changes.
- Apply the policy.
For details on applying a Kaspersky Security Center policy, refer to Kaspersky Security Center Help.
After applying the policy on the client computer with Kaspersky Endpoint Security installed, the following queries will be made:
- If encryption of the system hard drive is configured in the Kaspersky Security Center policy:
- If a TPM module is available, a PIN code prompt window appears.
- If a TPM module is not available, you will see a password prompt window for preboot authentication.
- If the Federal Information Processing standard compatibility mode is enabled for computer operating system, then in Windows 8 and earlier versions of operating system, a request for connecting a storage device is displayed to save the recovery key file.
If there is no access to encryption keys, the user may request the local network administrator to provide a recovery key (if the recovery key was not saved earlier on the storage device or was lost).
Page topCreating a list of hard drives excluded from encryption
You can create a list of exclusions from encryption only for Kaspersky Disk Encryption technology.
To form a list of hard drives excluded from encryption:
- Open the Kaspersky Security Center Administration Console.
- In the Managed devices folder in the Administration Console tree, open the folder with the name of the administration group to which the relevant client computers belong.
- In the workspace, select the Policies tab.
- Select the necessary policy and double-click to open the policy properties.
- In the Data encryption section, select Full Disk Encryption.
- In the Encryption technology drop-down list, select the Kaspersky Disk Encryption option.
Entries corresponding to hard drives excluded from encryption appear in the Do not encrypt the following hard drives table. This table is empty if you have not previously formed a list of hard drives excluded from encryption.
- To add hard drives to the list of hard drives excluded from encryption:
- Click the Add button.
The Add devices from Kaspersky Security Center list window opens.
- In the Add devices from Kaspersky Security Center list window, specify the values of the following parameters: Name, Computer, Disk type, and Kaspersky Disk Encryption.
- Click the Refresh button.
- In the Name column, select the check boxes in the table rows corresponding to those hard drives that you want to add to the list of hard drives excluded from encryption.
- Click OK.
The selected hard drives appear in the Do not encrypt the following hard drives table.
- Click the Add button.
- If you want to remove hard drives from the table of exclusions, select one or several lines in the Do not encrypt the following hard drives table and click the Delete button.
To select multiple lines in the table, select them while holding down the CTRL key.
- Click OK to save changes.
Hard drive decryption
You can decrypt hard drives even if there is no active license permitting data encryption.
To decrypt hard drives:
- Open the Kaspersky Security Center Administration Console.
- In the Managed devices folder in the Administration Console tree, open the folder with the name of the administration group to which the relevant client computers belong.
- In the workspace, select the Policies tab.
- Select the necessary policy and double-click to open the policy properties.
- In the Data encryption section, select Full Disk Encryption.
- In the Encryption technology drop-down list, select the technology with which the hard drives were encrypted.
- Do one of the following:
- In the Encryption mode drop-down list, select the Decrypt all hard drives option if you want to decrypt all encrypted hard drives.
- Add the encrypted hard drives that you want to decrypt to the Do not encrypt the following hard drives table.
This option is available only for Kaspersky Disk Encryption technology.
- Click OK to save changes.
- Apply the policy.
For details on applying a Kaspersky Security Center policy, please refer to the Kaspersky Security Center Help.
If the user shuts down or restarts the computer during decryption of hard drives that were encrypted using Kaspersky Disk Encryption technology, the Authentication Agent loads before the next startup of the operating system. Kaspersky Endpoint Security resumes hard drive decryption after successful authentication in the authentication agent and operating system startup.
If the operating system switches to hibernation mode during decryption of hard drives that were encrypted using Kaspersky Disk Encryption technology, Authentication Agent loads when the operating system comes out of hibernation mode. Kaspersky Endpoint Security resumes hard drive decryption after successful authentication in the authentication agent and operating system startup. After hard drive decryption, hibernation mode is unavailable until the first reboot of the operating system.
If the operating system goes into sleep mode during hard drive decryption, Kaspersky Endpoint Security resumes hard drive decryption when the operating system comes out of sleep mode without loading the Authentication Agent.
Page topUpdating the operating system
There are a number of special considerations for updating the operating system of a computer that is protected by Full Disk Encryption (FDE). Update the operating system as follows: first update the OS on one computer, then update the OS on a small portion of the computers, then update the OS on all computers of the network.
If you are using Kaspersky encryption technology, Authentication Agent is loaded before the operating system is started. Using Authentication Agent, the user can sign in to the system and receive access to encrypted drives. Then the operating system begins loading.
If you start an update of the operating system on a computer that is protected using Kaspersky encryption technology, the OS Update Wizard will remove Authentication Agent. As a result, the computer can be locked because the OS loader will not be able to access the encrypted drive.
A safe update of the operating system consists of the following steps:
- Hard drive decryption.
- Operating system update.
- Encryption of hard drives.
Automatic updating of the operating system is available under the following conditions:
- The operating system is updated through WSUS (Windows Server Update Services).
- Windows 10 version 1607 (RS1) or later is installed on the computer.
- Kaspersky Endpoint Security version 11.2.0 or later is installed on the computer.
If all the conditions are met, you can update the operating system in the usual way.
If you are using BitLocker disk encryption technology, you do not need to decrypt the hard drives to update Windows 10. For more details on BitLocker, please visit the Microsoft website.
Page topEliminating errors of encryption functionality update
Full Disk Encryption is updated when a previous version of the application is upgraded to Kaspersky Endpoint Security 11.2.0 for Windows.
When starting update of the Full Disk Encryption functionality the following errors may occur:
- Unable to initialize update.
- Device is incompatible with Authentication Agent.
To eliminate errors that occurred when you start update process of the Full Disk Encryption functionality in the new application version:
- Decrypt hard drives.
- Encrypt hard drives once again.
During update of the Full Disk Encryption functionality the following errors may occur:
- Unable to complete the update.
- Full Disk Encryption upgrade rollback completed with an error.
To eliminate errors that occurred during update process of the Full Disk Encryption functionality,
restore access to encrypted devices using Restore Utility.
Page topFile Level Encryption on local computer drives
File Level Encryption on local computer drives is available if Kaspersky Endpoint Security is installed on a computer running Microsoft Windows for workstations. Encryption of files on local computer drives is unavailable if Kaspersky Endpoint Security is installed on a computer that runs on Microsoft Windows for file servers.
This section covers encryption of files on local computer drives and provides instructions on how to configure and perform encryption of files on local computer drives with Kaspersky Endpoint Security and the Kaspersky Endpoint Security Console Plug-in.
Encrypting files on local computer drives
Kaspersky Endpoint Security does not encrypt files whose contents are located in OneDrive cloud storage, and blocks the encrypted files from copying to OneDrive cloud storage, if these files are not added to decryption rule.
Kaspersky Endpoint Security supports encryption of files in FAT32 and NTFS file systems. If a removable drive with an unsupported file system is connected to the computer, the encryption task for this removable drive ends with an error and Kaspersky Endpoint Security assigns the read-only status to the removable drive.
To encrypt files on local drives:
- Open the Kaspersky Security Center Administration Console.
- In the Managed devices folder in the Administration Console tree, open the folder with the name of the administration group to which the relevant client computers belong.
- In the workspace, select the Policies tab.
- Select the necessary policy and double-click to open the policy properties.
- In the Data encryption section, select File Level Encryption.
- In the right part of the window, select the Encryption tab.
- In the Encryption mode drop-down list, select the Default rules item.
- On the Encryption tab, click the Add button, and in the drop-down list select one of the following items:
- Select the Predefined folders item to add files from folders of local user profiles suggested by Kaspersky experts to an encryption rule.
The Select predefined folders window opens.
- Select the Custom folder item to add a manually entered folder path to an encryption rule.
The Add custom folder window opens.
- Select the Files by extension item to add file extensions to an encryption rule. Kaspersky Endpoint Security encrypts files with the specified extensions on all local drives of the computer.
The Add / edit list of file extensions window opens.
- Select the Files by groups of extensions item to add groups of file extensions to an encryption rule. Kaspersky Endpoint Security encrypts files that have the extensions listed in the groups of extensions on all local drives of the computer.
The Select groups of file extensions window opens.
- Select the Predefined folders item to add files from folders of local user profiles suggested by Kaspersky experts to an encryption rule.
- To save your changes, in the Properties: <Policy name> window, click OK.
- Apply the policy.
For details on applying a Kaspersky Security Center policy, refer to Kaspersky Security Center Help.
As soon as the policy is applied, Kaspersky Endpoint Security encrypts the files that are included in the encryption rule and not included in the decryption rule.
If the same file has been added to the encryption rule and the decryption rule, Kaspersky Endpoint Security does not encrypt this file if it is not encrypted, and decrypts the file if it is encrypted.
Kaspersky Endpoint Security encrypts unencrypted files if their properties (file path / file name / file extension) still meet the encryption rule criteria after modification.
Kaspersky Endpoint Security postpones the encryption of open files until they are closed.
When the user creates a new file whose properties meet the encryption rule criteria, Kaspersky Endpoint Security encrypts the file as soon as it is opened.
If you move an encrypted file to another folder on the local drive, the file remains encrypted regardless of whether or not this folder is included in the encryption rule.
Page topForming encrypted file access rules for applications
To form encrypted file access rules for applications:
- Open the Kaspersky Security Center Administration Console.
- In the Managed devices folder in the Administration Console tree, open the folder with the name of the administration group to which the relevant client computers belong.
- In the workspace, select the Policies tab.
- Select the necessary policy and double-click to open the policy properties.
- In the Data encryption section, select File Level Encryption.
- In the Encryption mode drop-down list, select the Default rules item.
Access rules are applied only when in the Default rules mode. After applying access rules in Default rules mode, if you switch to Leave unchanged, mode, Kaspersky Endpoint Security will ignore all access rules. All applications will have access to all encrypted files.
- In the right part of the window, select the Rules for applications tab.
- If you want to select applications exclusively from the Kaspersky Security Center list, click the Add button and in the drop-down list select the Applications from Kaspersky Security Center list item.
The Add applications from Kaspersky Security Center list window opens.
Do the following:
- Specify the filters to narrow down the list of applications in the table. To do so, specify the values of the Application, Vendor, and Period added parameters, and all check boxes from the Group section.
- Click the Refresh button.
The table lists applications that match the applied filters.
- In the Applications column, select check boxes opposite the applications for which you want to form encrypted file access rules.
- In the Rule for applications drop-down list, select the rule that will determine the access of applications to encrypted files.
- In the Actions for applications that were selected earlier drop-down list, select the action to be taken by Kaspersky Endpoint Security on encrypted file access rules that were previously formed for such applications.
- Click OK.
The details of an encrypted file access rule for applications appear in the table on the Rules for applications tab.
- If you want to manually select applications, click the Add button and in the drop-down list select the Custom applications item.
The Add / edit names of the executable files of applications window opens.
Do the following:
- In the entry field, type the name or list of names of executable application files, including their extensions.
You can also add the names of executable files of applications from the Kaspersky Security Center list by clicking the Add from Kaspersky Security Center list button.
- If required, in the Description field, enter a description of the list of applications.
- In the Rule for applications drop-down list, select the rule that will determine the access of applications to encrypted files.
- Click OK.
The details of an encrypted file access rule for applications appear in the table on the Rules for applications tab.
- In the entry field, type the name or list of names of executable application files, including their extensions.
- Click OK to save changes.
Encrypting files that are created or modified by specific applications
You can create a rule by which Kaspersky Endpoint Security will encrypt all files created or modified by the applications specified in the rule.
Files that were created or modified by the specified applications before the encryption rule was applied will not be encrypted.
To configure encryption of files that are created or modified by specific applications:
- Open the Kaspersky Security Center Administration Console.
- In the Managed devices folder in the Administration Console tree, open the folder with the name of the administration group to which the relevant client computers belong.
- In the workspace, select the Policies tab.
- Select the necessary policy and double-click to open the policy properties.
- In the Data encryption section, select File Level Encryption.
- In the Encryption mode drop-down list, select the Default rules item.
Encryption rules are applied only in Default rules mode. After applying encryption rules in Default rules mode, if you switch to Leave unchanged, mode, Kaspersky Endpoint Security will ignore all encryption rules. Files that were previously encrypted will remain encrypted.
- In the right part of the window, select the Rules for applications tab.
- If you want to select applications exclusively from the Kaspersky Security Center list, click the Add button and in the drop-down list select the Applications from Kaspersky Security Center list item.
The Add applications from Kaspersky Security Center list window opens.
Do the following:
- Specify the filters to narrow down the list of applications in the table. To do so, specify the values of the Application, Vendor, and Period added parameters, and all check boxes from the Group section.
- Click the Refresh button.
The table lists applications that match the applied filters.
- In the Applications column, select the check boxes opposite the applications whose created files need to be encrypted.
- In the Rule for applications drop-down list, select Encrypt all created files.
- In the Actions for applications that were selected earlier drop-down list, select the action to be taken by Kaspersky Endpoint Security on file encryption rules that were previously formed for such applications.
- Click OK.
Information about the encryption rule for files created or modified by the selected applications appears in the table on the Rules for applications tab.
- If you want to manually select applications, click the Add button and in the drop-down list select the Custom applications item.
The Add / edit names of the executable files of applications window opens.
Do the following:
- In the entry field, type the name or list of names of executable application files, including their extensions.
You can also add the names of executable files of applications from the Kaspersky Security Center list by clicking the Add from Kaspersky Security Center list button.
- If required, in the Description field, enter a description of the list of applications.
- In the Rule for applications drop-down list, select Encrypt all created files.
- Click OK.
Information about the encryption rule for files created or modified by the selected applications appears in the table on the Rules for applications tab.
- In the entry field, type the name or list of names of executable application files, including their extensions.
- Click OK to save changes.
Generating a decryption rule
To generate a decryption rule:
- Open the Kaspersky Security Center Administration Console.
- In the Managed devices folder in the Administration Console tree, open the folder with the name of the administration group to which the relevant client computers belong.
- In the workspace, select the Policies tab.
- Select the necessary policy and double-click to open the policy properties.
- In the Data Encryption section, select File Level Encryption.
- In the right part of the window, select the Decryption tab.
- In the Encryption mode drop-down list, select the Default rules item.
- On the Decryption tab, click the Add button, and in the drop-down list select one of the following items:
- Select the Predefined folders item to add files from folders of local user profiles suggested by Kaspersky experts to a decryption rule.
The Select predefined folders window opens.
- Select the Custom folder item to add a manually entered folder path to a decryption rule.
The Add custom folder window opens.
- Select the Files by extension item to add file extensions to a decryption rule. Kaspersky Endpoint Security does not encrypt files with the specified extensions on all local drives of the computer.
The Add / edit list of file extensions window opens.
- Select the Files by groups of extensions item to add groups of file extensions to a decryption rule. Kaspersky Endpoint Security does not encrypt files that have the extensions listed in the groups of extensions on all local drives of computers.
The Select groups of file extensions window opens.
- Select the Predefined folders item to add files from folders of local user profiles suggested by Kaspersky experts to a decryption rule.
- To save your changes, in the Properties: <Policy name> window, click OK.
- Apply the policy.
For details on applying a Kaspersky Security Center policy, refer to Kaspersky Security Center Help.
If the same file has been added to the encryption rule and the decryption rule, Kaspersky Endpoint Security does not encrypt this file if it is not encrypted, and decrypts the file if it is encrypted.
Page topDecrypting files on local computer drives
To decrypt files on local drives:
- Open the Kaspersky Security Center Administration Console.
- In the Managed devices folder in the Administration Console tree, open the folder with the name of the administration group to which the relevant client computers belong.
- In the workspace, select the Policies tab.
- Select the necessary policy and double-click to open the policy properties.
- In the Data Encryption section, select File Level Encryption.
- In the right part of the window, select the Encryption tab.
- Remove files and folders that you want to decrypt from the encryption list. To do so, select files and select the Delete rule and decrypt files item in the context menu of the Remove button.
You can delete several items from the encryption list at once. To do so, while holding down the CTRL key, select the files you need by left-clicking them and select the Delete rule and decrypt files item in the context menu of the Remove button.
Files and folders removed from the encryption list are automatically added to the decryption list.
- Form a file decryption list.
- To save your changes, in the Properties: <Policy name> window, click OK.
- Apply the policy.
For details on applying a Kaspersky Security Center policy, please refer to the Kaspersky Security Center Help.
As soon as the policy is applied, Kaspersky Endpoint Security decrypts encrypted files that are added to the decryption list.
Kaspersky Endpoint Security decrypts encrypted files if their parameters (file path / file name / file extension) change to match the parameters of objects added to the decryption list.
Kaspersky Endpoint Security postpones the decryption of open files until they are closed.
Page topCreating encrypted packages
When adding a file to the encrypted package whose contents reside in OneDrive cloud storage, Kaspersky Endpoint Security downloads the contents of the file and performs encryption.
Kaspersky Endpoint Security does not perform file compression when it creates an encrypted package.
To create an encrypted package:
- On a computer with Kaspersky Endpoint Security installed and encryption functionality enabled, use any file manager to select files and/or folders that you want to add to an encrypted package. Right-click to open their context menu.
- In the context menu, select New encrypted package.
The standard Microsoft Windows dialog box Choose path to save the encrypted package opens.
- In the standard Microsoft Windows dialog box Choose path to save the encrypted package, select a destination for saving the encrypted package on the removable drive. Click the Save button.
The New encrypted package window opens.
- In the New encrypted package window, type and confirm a password.
- Click the Create button.
The encrypted package creation process starts. When the process finishes, a self-extracting password-protected encrypted package is created in the selected destination folder on the removable drive.
If you cancel the creation of an encrypted package, Kaspersky Endpoint Security performs the following operations:
- Terminates the processes of copying files to the package and ends all ongoing package encryption operations, if any.
- Removes all temporary files that have been created in the process of creating and encrypting a package and the file of the encrypted package itself.
- Notifies the user that the encrypted package creation process has been forcefully terminated.
Extracting encrypted packages
To extract an encrypted package:
- In any file manager, select an encrypted package. Click to start the Unpacking Wizard.
The Enter password window opens.
- Enter the password that protects the encrypted package.
- In the Enter password window, click OK.
If password entry is successful, the standard Browse Microsoft Windows dialog box opens.
- In the standard Browse Microsoft Windows dialog box, select the destination folder to extract the encrypted package to and click OK.
The process of extracting the encrypted package to the destination folder starts.
If the encrypted package was previously extracted to the specified destination folder, the existing files in the folder will be overwritten with the files from the encrypted package.
If you cancel the extraction of an encrypted package, Kaspersky Endpoint Security performs the following operations:
- Stops the package decryption process and terminates all operations of copying files from the encrypted package, if such operations are in progress.
- Deletes all temporary files created in the course of decryption and extraction of the encrypted package, as well as all files that have been already copied from the encrypted package to the destination folder.
- Notifies the user that the encrypted package extraction process has been forcefully terminated.
Restoring access to encrypted data after operating system failure
You can restore access to data after operating system failure only for file level encryption (FLE). You cannot restore access to data if full disk encryption (FDE) is used.
To restore access to encrypted data after operating system failure:
- Reinstall the operating system without formatting the hard drive.
- Install Kaspersky Endpoint Security.
- Establish a connection between the computer and the Kaspersky Security Center Administration Server that controlled the computer when the data was encrypted.
Access to encrypted data will be granted under the same conditions that applied before operating system failure.
Page topEncryption of removable drives
Encryption of removable drives is available if Kaspersky Endpoint Security is installed on a computer running Microsoft Windows for workstations. Encryption of removable drives is not available if Kaspersky Endpoint Security is installed on a computer running Microsoft Windows for file servers.
This section contains information on encryption of removable drives and instructions on configuring and performing encryption of removable drives using Kaspersky Endpoint Security and the Kaspersky Endpoint Security Management Plug-in.
Starting encryption of removable drives
To encrypt removable drives:
- Open the Kaspersky Security Center Administration Console.
- In the Managed devices folder in the Administration Console tree, open the folder with the name of the administration group to which the relevant client computers belong.
- In the workspace, select the Policies tab.
- Select the necessary policy and double-click to open the policy properties.
- In the Data Encryption section, select the Encryption of removable drives subsection.
- In the Encryption mode drop-down list, select the default action that you want Kaspersky Endpoint Security to perform on removable drives:
- Encrypt entire removable drive (FDE). Kaspersky Endpoint Security encrypts the contents of a removable drive sector by sector. As a result, the application encrypts not only the files stored on the removable drive but also its file systems, including the file names and folder structures on the removable drive.
- Encrypt all files (FLE). Kaspersky Endpoint Security encrypts all files that are stored on removable drives. The application does not encrypt the file systems of removable drives, including the names of files and folder structures.
- Encrypt new files only. Kaspersky Endpoint Security encrypts only those files that have been added to removable drives or that were stored on removable drives and have been modified after the Kaspersky Security Center policy was last applied.
- Decrypt entire removable drive. Kaspersky Endpoint Security decrypts all encrypted files that are stored on removable drives, as well as the file systems of the removable drives if they were previously encrypted.
- Leave unchanged. Kaspersky Endpoint Security does not encrypt or decrypt files on removable drives.
Kaspersky Endpoint Security does not encrypt a removable drive that is already encrypted.
Kaspersky Endpoint Security supports encryption in FAT32 and NTFS file systems. If a removable drive with an unsupported file system is connected to the computer, removable drive encryption ends with an error and Kaspersky Endpoint Security assigns read-only access for the removable drive.
- If you want to use portable mode for encryption of removable drives, select the Portable mode check box.
Portable mode is a method of encryption of removable drives that lets you obtain access to data on computers that do not have Kaspersky Endpoint Security installed or that have no access to data encryption functionality.
Portable mode is available only for encryption at the file system level (FLE).
- If you want to encrypt a new removable drive, it is recommended to select the Encrypt used disk space only check box. If the check box is cleared, Kaspersky Endpoint Security will encrypt all files, including the residual fragments of deleted or modified files.
- If you want to configure encryption for individual removable drives, define encryption rules.
- If you want to use full disk encryption of removable drives in offline mode, select the Allow removable drive encryption in offline mode check box.
Offline encryption mode is encryption of removable drives when there is no connection to Kaspersky Security Center. During encryption, Kaspersky Endpoint Security saves the master key only on the user's computer. Kaspersky Endpoint Security will send the master key to Kaspersky Security Center during the next synchronization.
Offline encryption mode is available only for full disk encryption (FDE).
If the computer on which the master key is saved is corrupted and data is not sent to Kaspersky Security Center, it is not possible to obtain access to the removable drive.
If the Allow removable drive encryption in offline mode check box is cleared and there is no connection to Kaspersky Security Center, removable drive encryption is not possible.
- Click OK to save the changes.
After the policy is applied, when the user connects a removable drive or if a removable drive is already connected, Kaspersky Endpoint Security prompts the user for confirmation to perform the encryption operation (see the figure below).
The application lets you perform the following actions:
- If the user confirms the encryption request, Kaspersky Endpoint Security encrypts the data.
- If the user declines the encryption request, Kaspersky Endpoint Security leaves the data unchanged and assigns read-only access for this removable drive.
- If the user does not respond to the encryption request, Kaspersky Endpoint Security leaves the data unchanged and assigns read-only access for this removable drive. The application prompts for confirmation again when subsequently applying a Kaspersky Security Center policy or the next time this removable drive is connected.
If the user initiates safe removal of a removable drive during data encryption, Kaspersky Endpoint Security interrupts the data encryption process and allows removal of the removable drive before the encryption process has finished. Data encryption will be continued the next time the removable drive is connected to this computer.
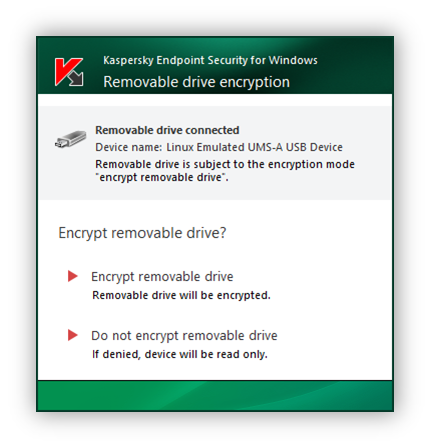
Removable drive encryption request
Page topAdding an encryption rule for removable drives
To add an encryption rule for removable drives:
- Open the Kaspersky Security Center Administration Console.
- In the Managed devices folder in the Administration Console tree, open the folder with the name of the administration group to which the relevant client computers belong.
- In the workspace, select the Policies tab.
- Select the necessary policy and double-click to open the policy properties.
- In the Data Encryption section, select the Encryption of removable drives subsection.
- Click the Add button, and in the drop-down list select one of the following items:
- If you want to add encryption rules for removable drives that are in the list of trusted devices of the Device Control component, select From list of trusted devices of this policy.
The Add devices from the list of trusted devices window opens.
- If you want to add encryption rules for removable drives that are in the Kaspersky Security Center list, select From Kaspersky Security Center list of devices.
The Add devices from Kaspersky Security Center list window opens.
- If you want to add encryption rules for removable drives that are in the list of trusted devices of the Device Control component, select From list of trusted devices of this policy.
- If you selected From Kaspersky Security Center list of devices during the previous step, specify the filters for displaying devices in the table. To do so:
- Specify the values of the following parameters: Display devices in the table for which the following is defined, Name, Computer.
- Click the Refresh button.
- In the Encryption mode for selected devices drop-down list, select the action to be performed by Kaspersky Endpoint Security on files stored on the selected removable drives.
- Select the Portable mode check box if you want Kaspersky Endpoint Security to prepare removable drives before encryption, making it possible to use encrypted files stored on them in portable mode.
Portable mode lets you use encrypted files stored on removable drives that are connected to computers without encryption functionality.
- Select the Encrypt used disk space only check box if you want Kaspersky Endpoint Security to encrypt only those disk sectors that are occupied by files.
If you are applying encryption on a drive that is already in use, it is recommended to encrypt the entire drive. This ensures that all data is protected - even deleted data that might still contain retrievable information. The Encrypt used disk space only function is recommended for new drives that have not been previously used.
If a device was previously encrypted using the Encrypt used disk space only function, after applying a policy in Encrypt entire removable drive mode, sectors that are not occupied by files will still not be encrypted.
- In the Actions for devices that were selected earlier drop-down list, select the action to be performed by Kaspersky Endpoint Security according to encryption rules that had been previously defined for removable drives:
- If you want the previously created encryption rule for the removable drive to remain unchanged, select Skip.
- If you want the previously created encryption rule for the removable drive to be replaced by the new rule, select Update.
- Click OK.
Lines containing the parameters of the created encryption rules appear in the Custom rules table.
- Click OK to save changes.
The added removable drive encryption rules are applied to removable drives that are connected to any computers controlled by the modified policy of Kaspersky Security Center.
Page topEditing an encryption rule for removable drives
To edit an encryption rule for a removable drive:
- Open the Kaspersky Security Center Administration Console.
- In the Managed devices folder in the Administration Console tree, open the folder with the name of the administration group to which the relevant client computers belong.
- In the workspace, select the Policies tab.
- Select the necessary policy and double-click to open the policy properties.
- In the Data Encryption section, select the Encryption of removable drives subsection.
- In the list of removable drives for which encryption rules have been configured, select an entry corresponding to the removable drive you need.
- Click the Set a rule button to edit the encryption rule for the selected removable drive.
The context menu of the Set a rule button opens.
- In the context menu of the Set a rule button, select the action to be performed by Kaspersky Endpoint Security on files stored on the selected removable drive.
- Click OK to save changes.
The modified removable drive encryption rules are applied to removable drives that are connected to any computers controlled by the modified policy of Kaspersky Security Center.
Page topEnabling portable mode for accessing encrypted files on removable drives
To enable portable mode for accessing encrypted files on removable drives:
- Open the Kaspersky Security Center Administration Console.
- In the Managed devices folder in the Administration Console tree, open the folder with the name of the administration group to which the relevant client computers belong.
- In the workspace, select the Policies tab.
- Select the necessary policy and double-click to open the policy properties.
- In the Data Encryption section, select the Encryption of removable drives subsection.
- Select the Portable mode check box.
Portable mode is available only if Encrypt all files or Encrypt new files only is selected in the Encryption mode for selected devices drop-down list.
- Click OK.
- Apply the policy.
For details on applying a Kaspersky Security Center policy, please refer to the Kaspersky Security Center Help.
- Connect the removable drive to a computer on which the Kaspersky Security Center policy was applied.
- Confirm the removable drive encryption operation.
This opens a window in which you can create a password for
. - Specify a password that meets the strength requirements and confirm it.
- Click OK.
Kaspersky Endpoint Security encrypts files on a removable drive according to the encryption rules defined in the Kaspersky Security Center policy. Portable File Manager used for working with encrypted files will also be written to the removable drive.
After enabling portable mode, you can access encrypted files on removable drives connected to a computer without encryption functionality.
Page topDecryption of removable drives
To decrypt removable drives:
- Open the Kaspersky Security Center Administration Console.
- In the Managed devices folder in the Administration Console tree, open the folder with the name of the administration group to which the relevant client computers belong.
- In the workspace, select the Policies tab.
- Select the necessary policy and double-click to open the policy properties.
- In the Data Encryption section, select the Encryption of removable drives subsection.
- If you want to decrypt all encrypted files that are stored on removable drives, in the Encryption mode drop-down list select Decrypt entire removable drive.
- To decrypt data that is stored on individual removable drives, edit the encryption rules for removable drives whose data you want to decrypt. To do so:
- In the list of removable drives for which encryption rules have been configured, select an entry corresponding to the removable drive you need.
- Click the Set a rule button to edit the encryption rule for the selected removable drive.
The context menu of the Set a rule button opens.
- Select the Decrypt all files item in the context menu of the Set a rule button.
- Click OK to save changes.
- Apply the policy.
For details on applying a Kaspersky Security Center policy, please refer to the Kaspersky Security Center Help.
After the policy has been applied, when the user connects a removable drive or if a removable drive is already connected, Kaspersky Endpoint Security notifies the user that the removable drive is subject to an encryption rule whereby encrypted files stored on the removable drive as well as the file system of the removable drive (if it is encrypted) will be decrypted. The application warns the user that the decryption process may take some time.
The Kaspersky Security Center policy with preset settings for data encryption on removable drives is formed for a specific group of managed computers. Therefore, the result of data decryption on removable drives depends on the computer to which the removable drive is connected.
If the user initiates safe removal of a removable drive during data decryption, Kaspersky Endpoint Security interrupts the data decryption process and allows removal of the removable drive before the decryption operation has finished.
Page topUsing the Authentication Agent
If system hard drives are encrypted, the Authentication Agent loads before startup of the operating system. Use the Authentication Agent to complete authentication for obtaining access to encrypted system hard drives and load the operating system.
After successful completion of the authentication procedure, the operating system loads. The authentication process is repeated every time the operating system restarts.
The user may be unable to pass authentication in some cases. For example, authentication is impossible if the user has forgotten the account credentials of the Authentication Agent account or the password to the token or smart card, or has lost the token or smart card.
If the user has forgotten the Authentication Agent account credentials or the password from a token or smart card, you must contact the corporate LAN administrator to recover them.
If a user has lost a token or smart card, the administrator must add the file of a token or smart card electronic certificate to the command for creating an Authentication Agent account. Then the user must complete the procedure for receiving access to encrypted devices or restoring data on encrypted devices.
Using a token and smart card with Authentication Agent
A token or smart card can be used for authentication when accessing encrypted hard drives. To do so, you must add the file of a token or smart card electronic certificate to the command for creating an Authentication Agent account.
Use of a token or smart card is available only if the computer hard drives were encrypted using the AES256 encryption algorithm. If the computer hard drives were encrypted using the AES56 encryption algorithm, addition of the electronic certificate file to the command will be denied.
To add the file of a token or smart card electronic certificate to the command for creating an Authentication Agent account, you must first save the file using third-party software for managing certificates.
The token or smart-card certificate must have the following properties:
- The certificate must be compliant with the X.509 standard, and the certificate file must have DER encoding.
If the electronic certificate of the token or smart card does not meet this requirement, the Management Plug-in does not load the file of this certificate into the command for creating an Authentication Agent account and displays an error message.
- The
KeyUsageparameter that defines the purpose of the certificate must have the valuekeyEnciphermentordataEncipherment.If the electronic certificate of the token or smart card does not meet this requirement, the Management Plug-in loads the file of this certificate into the command for creating an Authentication Agent account and displays a warning message.
- The certificate contains an RSA key with a length of at least 1024 bits.
If the electronic certificate of the token or smart card does not meet this requirement, the Management Plug-in does not load the file of this certificate into the command for creating an Authentication Agent account and displays an error message.
Editing Authentication Agent help messages
Before editing help messages of the Authentication Agent, please review the list of supported characters in a preboot environment.
To edit Authentication Agent help messages:
- Open the Kaspersky Security Center Administration Console.
- In the Managed devices folder in the Administration Console tree, open the folder with the name of the administration group to which the relevant client computers belong.
- In the workspace, select the Policies tab.
- Select the necessary policy and double-click to open the policy properties.
- In the Data Encryption section, select the Common encryption settings subsection.
- In the Templates section, click the Help button.
This opens the Authentication Agent help messages window.
- Do the following:
- Select the Authentication tab to edit the help text shown in the Authentication Agent window when account credentials are being entered.
- Select the Change password tab to edit the help text shown in the Authentication Agent window when the password for the Authentication Agent account is being changed.
- Select the Recover password tab to edit the help text shown in the Authentication Agent window when the password for the Authentication Agent account is being recovered.
- Edit help messages.
If you want to restore the original text, click the By default button.
You can enter help text containing 16 lines or less. The maximum length of a line is 64 characters.
- Click OK.
- To save your changes, in the Properties: <Policy name> window, click OK.
Limited support for characters in Authentication Agent help messages
In a preboot environment, the following Unicode characters are supported:
- Basic Latin alphabet (0000 - 007F)
- Additional Latin-1 characters (0080 - 00FF)
- Extended Latin-A (0100 - 017F)
- Extended Latin-B (0180 - 024F)
- Uncombined extended ID characters (02B0 - 02FF)
- Combined diacritical marks (0300 - 036F)
- Greek and Coptic alphabets (0370 - 03FF)
- Cyrillic (0400 - 04FF)
- Hebrew (0590 - 05FF)
- Arabic script (0600 - 06FF)
- Additional extended Latin (1E00 - 1EFF)
- Punctuation marks (2000 - 206F)
- Currency symbols (20A0 - 20CF)
- Letter-like symbols (2100 - 214F)
- Geometric figures (25A0 - 25FF)
- Presentation forms of Arabic script-B (FE70 - FEFF)
Characters that are not specified in this list are not supported in a preboot environment. It is not recommended to use such characters in Authentication Agent help messages.
Page topSelecting the Authentication Agent trace level
The application logs service information about the operation of the Authentication Agent and information about the user's operations with the Authentication Agent in the trace file.
To select the Authentication Agent trace level:
- As soon as a computer with encrypted hard drives starts, press the F3 button to call up a window for configuring Authentication Agent settings.
- Select the trace level in the Authentication Agent settings window:
- Disable debug logging (default). If this option is selected, the application does not log information about Authentication Agent events in the trace file.
- Enable debug logging. If this option is selected, the application logs information about the operation of the Authentication Agent and the user operations performed with the Authentication Agent in the trace file.
- Enable verbose logging. If this option is selected, the application logs detailed information about the operation of the Authentication Agent and the user operations performed with the Authentication Agent in the trace file.
The level of detail of entries under this option is higher compared to the level of the Enable debug logging option. A high level of detail of entries can slow down the startup of the Authentication Agent and the operating system.
- Enable debug logging and select serial port. If this option is selected, the application logs information about the operation of the Authentication Agent and the user operations performed with the Authentication Agent in the trace file, and relays it via the COM port.
If a computer with encrypted hard drives is connected to another computer via the COM port, Authentication Agent events can be examined from this other computer.
- Enable verbose debug logging and select serial port. If this option is selected, the application logs detailed information about the operation of the Authentication Agent and the user operations performed with the Authentication Agent in the trace file, and relays it via the COM port.
The level of detail of entries under this option is higher compared to the level of the Enable debug logging and select serial port option. A high level of detail of entries can slow down the startup of the Authentication Agent and the operating system.
Data is recorded in the Authentication Agent trace file if there are encrypted hard drives on the computer or during full disk encryption.
The Authentication Agent trace file is not sent to Kaspersky, unlike other trace files of the application. If necessary, you can manually send the Authentication Agent trace file to Kaspersky for analysis.
Page topManaging Authentication Agent accounts
The following Kaspersky Security Center tools are available for managing Authentication Agent accounts:
- Group task for managing Authentication Agent accounts. This task lets you manage Authentication Agent accounts for a group of client computers.
- Full Disk Encryption, account management local task. This task lets you manage Authentication Agent accounts for individual client computers.
You can manage Authentication Agent accounts only in the Administration Console and in the Kaspersky Security Center Web Console. Authentication Agent accounts cannot be managed in the Kaspersky Security Center Cloud Console.
To configure the settings for the Authentication Agent account management task:
- Create (Creating a local task, Creating a group task) an Authentication Agent account management task.
- Open the Settings section in the Properties: <name of Authentication Agent account management task> window.
- Add commands for creating Authentication Agent accounts.
- Add commands for editing Authentication Agent accounts.
- Add commands for deleting Authentication Agent user accounts.
- If necessary, edit the added commands for managing Authentication Agent accounts. To do so, select a command in the Commands for managing Authentication Agent accounts table and click the Edit button.
- If necessary, delete the added commands for managing Authentication Agent accounts. To do so, select one or several commands in the Commands for managing Authentication Agent accounts table and click the Remove button.
To select multiple lines in the table, select them while holding down the CTRL key.
- To save the changes, click OK in the task properties window.
- Run the task.
Commands for managing Authentication Agent accounts added to the task will be executed.
Page topAdding a command for creating an Authentication Agent account
To add a command for creating an Authentication Agent account:
- Open the Settings section in the Properties: <name of Authentication Agent account management task> window.
- Click the Add button and in the drop-down list select Account adding command.
The Add user account window opens.
- In the Add user account field within the Windows account window, specify the Microsoft Windows account name based on which the Authentication Agent account will be created.
To do so, type the account name manually or click the Select button.
- If you manually entered the name of a Microsoft Windows account, click the Allow button to determine the security identifier (SID) of the account.
If you choose not to determine the security identifier (SID) by clicking the Allow button, it will be determined when the task is performed on the computer.
Determining the SID of the Microsoft Windows account when adding an Authentication Agent account creation command is a convenient way to make sure the manually entered Microsoft Windows account name is correct. If the entered Microsoft Windows user account does not exist on the computer or in the trusted domain for which the Full Disk Encryption, account management local task is being modified, the Authentication Agent account management task ends with an error.
- Select the Replace existing account check box if you want the existing account previously created for the Authentication Agent to be replaced with the account being created.
This step is available when you are adding an Authentication Agent account creation command in the properties of a group task for managing Authentication Agent accounts. This step is not available if you add a command for creating Authentication Agent account in the properties of the Full Disk Encryption, account management local task.
- In the User name field, type the name of the Authentication Agent account that must be entered during authentication for access to encrypted hard drives.
- Select the Allow password-based authentication check box if you want the application to prompt the user to enter the Authentication Agent account password during authentication for accessing encrypted hard drives.
- If you selected the Allow password-based authentication check box during the previous step:
- In the Password field, type the password for the Authentication Agent account that must be entered during authentication for accessing encrypted hard drives.
- In the Confirm password field, confirm the Authentication Agent account password entered at the previous step.
- Do one of the following:
- Select the Change password upon first authentication option if you want the application to show a password change request to the user passing authentication under the account specified in the command for the first time.
- Otherwise, select the Do not require password change option.
- Select the Allow certificate-based authentication check box if you want the application to prompt the user to connect a token or smart card to the computer during authentication for accessing encrypted hard drives.
- If you selected the Allow certificate-based authentication check box during the previous step, click the Browse button and select the file of the token or smart card electronic certificate in the Select certificate file window.
- If required, in the Command description field, enter the Authentication Agent account details that you need for managing the command.
- Do one of the following:
- Select the Allow authentication option if you want the application to allow the user working under the account specified in the command to access the authentication dialog in Authentication Agent.
- Select the Block authentication option if you want the application to block the user working under the account specified in the command from accessing the authentication dialog in Authentication Agent.
- In the Add user account window, click OK.
Adding an Authentication Agent account editing command
To add a command for editing an Authentication Agent account:
- In the Settings section of the Properties: <name of the Authentication Agent account management task> window, open the context menu of the Add button and select the Account editing command item.
The Edit user account window opens.
- In the Windows account field within the Edit user account window, specify the name of the Microsoft Windows user account that was used to create the Authentication Agent account that you want to edit. To do so, type the account name manually or click the Select button.
- If you manually entered the name of a Microsoft Windows user account, click the Allow button to determine the security identifier (SID) of the user account.
If you choose not to determine the security identifier (SID) by clicking the Allow button, it will be determined when the task is performed on the computer.
Determining the SID of the Microsoft Windows user account when adding an Authentication Agent account editing command is a convenient way to make sure the manually entered Microsoft Windows user account name is correct. If the Microsoft Windows user account entered does not exist or belongs to an untrusted domain, the group task for managing Authentication Agent accounts ends with an error.
- Select the Change user name check box and enter a new name for the Authentication Agent account if you want Kaspersky Endpoint Security to change the user name for all Authentication Agent accounts created using the Microsoft Windows account with the name indicated in the Windows account field to the name typed in the field below.
- Select the Modify password-based authentication settings check box to make password-based authentication settings editable.
- Select the Allow password-based authentication check box if you want the application to prompt the user to enter the Authentication Agent account password during authentication for accessing encrypted hard drives.
- If you selected the Allow password-based authentication check box during the previous step:
- In the Password field, enter the new password of the Authentication Agent account.
- In the Confirm password field, confirm the password entered at the previous step.
- Select the Edit the rule of password change upon authentication in Authentication Agent check box if you want Kaspersky Endpoint Security to change the value of the password change setting for all Authentication Agent accounts created using the Microsoft Windows account with the name indicated in the Windows account field to the setting value specified below.
- Specify the value of the password change setting upon authentication in Authentication Agent.
- Select the Modify certificate-based authentication settings check box to make settings of authentication based on the electronic certificate of a token or smart card editable.
- Select the Allow certificate-based authentication check box if you want the application to prompt the user to enter the password to the token or smart card connected to the computer during the authentication process in order to access encrypted hard drives.
- If you selected the Allow certificate-based authentication check box during the previous step, click the Browse button and select the file of the token or smart card electronic certificate in the Select certificate file window.
- Select the Edit command description check box and edit the command description if you want Kaspersky Endpoint Security to change the command description for all Authentication Agent accounts created using the Microsoft Windows account with the name indicated in the Windows account field.
- Select the Edit the rule of access to authentication in Authentication Agent check box if you want Kaspersky Endpoint Security to change the rule for user access to the authentication dialog in Authentication Agent to the value specified below for all Authentication Agent accounts created using the Microsoft Windows account with the name indicated in the Windows account field.
- Specify the rule for accessing the authentication dialog in Authentication Agent.
- In the Edit user account window, click OK.
Adding a command for deleting an Authentication Agent account
To add a command for deleting an Authentication Agent account:
- In the Settings section of the Properties: <name of Authentication Agent account management task> window, open the context menu of the Add button and select Account deletion command.
The Delete user account window opens.
- In the Windows account field within the Delete user account window, specify the name of the Microsoft Windows user account that was used to create the Authentication Agent account that you want to delete. To do so, type the account name manually or click the Select button.
- If you manually entered the name of a Microsoft Windows user account, click the Allow button to determine the security identifier (SID) of the user account.
If you choose not to determine the security identifier (SID) by clicking the Allow button, it will be determined when the task is performed on the computer.
Determining the SID of the Microsoft Windows user account when adding an Authentication Agent account deletion command is a convenient way to make sure the manually entered Microsoft Windows user account name is correct. If the Microsoft Windows user account entered does not exist or belongs to an untrusted domain, the group task for managing Authentication Agent accounts ends with an error.
- In the Delete user account window, click OK.
Restoring Authentication Agent account credentials
These instructions are intended for users of client computers with Kaspersky Endpoint Security installed.
To restore the user name and password of an Authentication Agent account:
- Authentication Agent loads on a computer with encrypted hard drives before the operating system is loaded. In the interface of Authentication Agent, click the Forgot your Password button to initiate the process of restoring the user name and password of an Authentication Agent account.
- Follow the instructions of the Authentication Agent to obtain the request units for restoring the user name and password of the Authentication Agent account.
- Dictate the contents of the request blocks to the LAN administrator of your enterprise together with the name of the computer.
- Enter the sections of the response to the Authentication Agent account user name and password restoration request that have been generated and provided to you by the LAN administrator.
- Enter a new password for the Authentication Agent account and confirm it.
The user name of the Authentication Agent account is defined using the sections of the response to the requests for restoration of the user name and password of the Authentication Agent account.
After you enter and confirm the new password of the Authentication Agent account, the password will be saved and you will be provided access to encrypted hard drives.
Page topResponding to a user request to restore Authentication Agent account credentials
To create and send the user sections of the response to the request for restoration of the user name and password of an Authentication Agent account:
- Open the Kaspersky Security Center Administration Console.
- In the Managed devices folder of the Administration Console tree, open the folder with the name of the administration group that includes the computer of the user who has requested restoration of the user name and password of an Authentication Agent account.
- In the workspace, select the Devices tab.
- On the Devices tab, select the computer of the user who has requested restoration of the user name and password of an Authentication Agent account and right-click to open the context menu.
- In the context menu, select Grant access in offline mode.
The Grant access in offline mode window opens.
- In the Grant access in offline mode window, select the Authentication Agent tab.
- In the Encryption algorithm in use section, select the type of encryption algorithm.
- In the Account drop-down list, select the name of the Authentication Agent account created for the user who is requesting recovery of the Authentication Agent account name and password.
- In the Hard drive drop-down list, select the encrypted hard drive for which you need to recover access.
- In the User request section enter the blocks of request dictated by the user.
The contents of the sections of the response to the user's request for recovery of the user name and password of an Authentication Agent account will be displayed in the Access key field.
- Dictate the contents of the blocks of reply to the user.
Removing objects and data that remained after test operation of Authentication Agent
During application uninstallation, if Kaspersky Endpoint Security detects objects and data that remained on the system hard drive after test operation of Authentication Agent, application uninstallation is interrupted and becomes impossible until such objects and data are removed.
Objects and data may remain on the system hard drive after test operation of Authentication Agent only in exceptional cases. For example, this can happen if the computer has not been restarted after a Kaspersky Security Center policy with encryption settings was applied, or if the application fails to start after test operation of Authentication Agent.
You can remove objects and data that remained on the system hard drive after test operation of Authentication Agent in the following ways:
- Using the Kaspersky Security Center policy.
- Using Restore Utility.
To use a Kaspersky Security Center policy to remove objects and data that remained after test operation of Authentication Agent:
- Apply to the computer a Kaspersky Security Center policy with settings configured to decrypt all computer hard drives.
- Start Kaspersky Endpoint Security.
To remove information about application incompatibility with Authentication Agent,
type the avp pbatestreset command in the command line.
Encryption components must be installed for the avp pbatestreset command to be executed.
Viewing data encryption details
This section describes how you can view the details of data encryption.
About encryption status
While encryption or decryption in progress, Kaspersky Endpoint Security relays information about the status of encryption parameters applied to client computers to Kaspersky Security Center.
The following encryption status values are possible:
- Encryption policy not defined. A Kaspersky Security Center encryption policy has not been defined for the computer.
- Applying policy. Data encryption and / or decryption is in progress on the computer.
- Error. An error occurred during data encryption and / or decryption on the computer.
- Reboot required. The operating system has to be rebooted in order to start or finish data encryption or decryption on the computer.
- Compliant with policy. Data encryption on the computer has been completed using the encryption settings specified in the Kaspersky Security Center policy applied to the computer.
- Cancelled by user. The user has declined to confirm the file encryption operation on the removable drive.
Viewing the encryption status
To view the encryption status of computer data:
- Open the Kaspersky Security Center Administration Console.
- In the Managed devices folder of the Administration Console tree, open the folder with the name of the administration group to which the relevant computer belongs.
- In the workspace, select the Devices tab.
The Devices tab in the workspace shows the properties of computers in the selected administration group.
- On the Devices tab in the workspace, slide the scroll bar all the way to the right.
- If the Encryption status column is not displayed:
- Right-click to open the context menu for the table header.
- In the context menu, in the View drop-down list, select Add/Remove columns.
The Add/Remove columns window opens.
- In the Add/Remove columns window, select the Encryption status check box.
- Click OK.
The Encryption status column shows the encryption status of data on computers in the selected administration group. This status is formed based on information about file encryption on local drives of the computer, and about full disk encryption.
Viewing encryption statistics in details panes of Kaspersky Security Center
To view the encryption status in details panes of Kaspersky Security Center:
- Open the Kaspersky Security Center Administration Console.
- In the console tree, select the Administration Server – <Computer name> node.
- In the workspace to the right of the Administration Console tree, select the Statistics tab.
- Create a new page with details panes containing data encryption statistics. To do so:
- On the Statistics tab, click the Customize view button.
The Properties: Statistics window opens.
- In the Properties: Statistics window, click Add.
The Properties: New page window opens.
- In the General section of the Properties: New page window, type the page name.
- In the Details panes section, click the Add button.
The New details pane window opens.
- In the New details panel window in the Protection status group, select the Encryption of devices item.
- Click OK.
The Properties: Encryption Control window opens.
- If necessary, edit the details pane settings. To do so, use the View and Devices sections of the Properties: Encryption of devices window.
- Click OK.
- Repeat steps d – h of the instructions, selecting the Encryption of removable drives item in the Protection status section of the New details pane window.
The details panes added appear in the Details panes list in the Properties: New page window.
- In the Properties: New page window, click OK.
The name of the page with details panes created at the previous steps appears in the Pages list of the Properties: Statistics window.
- In the Properties: Statistics window, click Close.
- On the Statistics tab, click the Customize view button.
- On the Statistics tab, open the page that was created during the previous steps of the instructions.
The details panes appear, showing the encryption status of computers and removable drives.
Page topViewing file encryption errors on local computer drives
To view the file encryption errors on local computer drives:
- Open the Kaspersky Security Center Administration Console.
- In the Managed devices folder of the Administration Console tree, open the folder with the name of the administration group that includes the client computer whose list of file encryption errors you want to view.
- In the workspace, select the Devices tab.
- On the Devices tab, select the name of the computer in the list and right-click it to open the context menu.
- Do one of the following:
- In the context menu of the computer, select Protection.
- In the context menu of the computer, select the Properties item. In the Properties: <computer name> window, select the Protection section.
- In the Protection section of the Properties: <computer name> window, click the View list of data encryption errors link to open the Data encryption errors window.
This window shows the details of file encryption errors on local computer drives. When an error is corrected, Kaspersky Security Center removes the error details from the Data encryption errors window.
Viewing the data encryption report
To view the data encryption report:
- Open the Kaspersky Security Center Administration Console.
- In the Administration Server node of the Administration Console tree, select the Reports tab.
- Click the New report template button.
The Report Template Wizard starts.
- Follow the instructions of the Report Template Wizard. In the Select report template type window in the Other section, select one of the following items:
- Managed device encryption status report.
- Mass storage device encryption status report.
- File encryption errors report.
- Report on blocked access to encrypted files.
After you have finished with the New Report Template Wizard, the new report template appears in the table on the Reports tab.
- Select the report template that was created at the previous steps of the instructions.
- In the context menu of the template, select Show report.
The report generation process starts. The report is displayed in a new window.
Page topManaging encrypted files with limited file encryption functionality
When the Kaspersky Security Center policy is applied and files are then encrypted, Kaspersky Endpoint Security receives an encryption key required for directly accessing the encrypted files. Using this encryption key, a user working under any Windows user account that was active during file encryption can directly access the encrypted files. Users working under Windows accounts that were inactive during file encryption must connect to Kaspersky Security Center in order to access the encrypted files.
Encrypted files may be unaccessible under the following circumstances:
- The user's computer stores encryption keys, but there is no connection with Kaspersky Security Center for managing them. In this case, the user must request access to encrypted files from the LAN administrator.
If access to Kaspersky Security Center does not exist, you must:
- request an access key for access to encrypted files on computer hard drives;
- to access encrypted files that are stored on removable drives, request separate access keys for encrypted files on each removable drive.
- Encryption components are deleted from the user's computer. In this event, the user may open encrypted files on local and removable disks but the contents of those files will appear encrypted.
The user may work with encrypted files under the following circumstances:
- Files are placed inside encrypted packages created on a computer with Kaspersky Endpoint Security installed.
- Files are stored on removable drives on which portable mode has been allowed.
Accessing encrypted files without a connection to Kaspersky Security Center
These instructions are intended for users of client computers with Kaspersky Endpoint Security installed.
To access encrypted files without a connection to Kaspersky Security Center:
- Attempt to access the encrypted file that you need.
If there is no connection to Kaspersky Security Center when you attempt to access a file that is stored on a local drive of the computer, Kaspersky Endpoint Security generates a file with a request for access to all encrypted files that are stored on local computer drives. If you attempt to access a file that is stored on a removable drive, Kaspersky Endpoint Security generates a file that requests access to all encrypted files that are stored on the removable drive. The Access denied to file window opens.
- Send the corporate LAN administrator the request access file with the KESDC extension for the encrypted files. To do so, perform one of the following:
- To email the file that requests access to encrypted files to the local area network administrator, click the Send by email button.
- To save the file requesting access to the encrypted files and deliver it to the LAN administrator by a different method, click the Save button.
- Obtain the key file for accessing encrypted files that has been created and provided to you by the local area network administrator.
- Activate the key for accessing encrypted files in one of the following ways:
- In any file manager, select the file of the key for accessing encrypted files. Open it by double-clicking.
- Do the following:
- Open the main window of Kaspersky Endpoint Security.
- Click the
 button.
This opens the Events window.
- Select the Status of access to files and devices tab.
The tab displays a list of all requests for access to encrypted files.
- Select the request for which you received the key file for accessing encrypted files.
- To load the provided key file for accessing encrypted files, click Browse.
The standard Select access key file Microsoft Windows dialog box opens.
- In the standard Select access key file window of Microsoft Windows, select the administrator-provided file with the .kesdr extension and name matching the file name of the access request file.
- Click the Open button.
- In the Events window, click OK.
If a file with a request for access to encrypted files is generated during an attempt to access a file that is stored on a local drive of the computer, Kaspersky Endpoint Security grants access to all encrypted files that are stored on local computer drives. If a request access file for encrypted files is generated during an attempt to access a file that is stored on a removable drive, Kaspersky Endpoint Security grants access to all encrypted files that are stored on the removable drive. To access encrypted files that are stored on other removable drives, you must obtain a separate access key file for each removable drive.
Page topGranting user access to encrypted files without a connection to Kaspersky Security Center
To grant user access to encrypted files without a connection to Kaspersky Security Center:
- Open the Kaspersky Security Center Administration Console.
- In the Managed devices folder of the Administration Console tree, open the folder with the name of the administration group that includes the computer of the user requesting access to encrypted files.
- In the workspace, select the Devices tab.
- On the Devices tab, select the computer of the user requesting access to encrypted files and right-click to open the context menu.
- In the context menu, select Grant access in offline mode.
The Grant access in offline mode window opens.
- In the Grant access in offline mode window, select the Encryption tab.
- On the Encryption tab, click the Browse button.
The standard Select request access file Microsoft Windows dialog box opens.
- In the Select request access file window, specify the path to the request file received from the user, and click Open.
Kaspersky Security Center generates a key file for accessing the encrypted files. The details of the user request are displayed on the Encryption tab.
- Do one of the following:
- To email the generated access key file to the user, click the Send by email button.
- To save the access key file for the encrypted files and deliver it to the user by a different method, click the Save button.
Editing templates of encrypted file access messages
To edit templates of encrypted file access messages:
- Open the Kaspersky Security Center Administration Console.
- In the Managed devices folder in the Administration Console tree, open the folder with the name of the administration group to which the relevant client computers belong.
- In the workspace, select the Policies tab.
- Select the necessary policy and double-click to open the policy properties.
- In the Data Encryption section, select the Common encryption settings subsection.
- In the Templates section, click the Templates button.
The Templates window opens.
- Do the following:
- If you want to edit the user message template, select the User's message tab. The File access denied window opens when the user attempts to access an encrypted file while there is no key available on the computer for access to encrypted files. Clicking the Send by email button in the File access denied window automatically creates a user message. This message is sent to the corporate LAN administrator along with the file requesting access to encrypted files.
- If you want to edit the administrator message template, select the Administrator's message tab. This message is created automatically when you click the Send by email button in the Request access to encrypted files window and is sent to the user after the user is granted access to encrypted files.
- Edit the message templates.
You can use the By default button and the Variable drop-down list.
- Click OK.
- To save your changes, in the Properties: <Policy name> window, click OK.
Working with encrypted devices when there is no access to them
Obtaining access to encrypted devices
A user may be required to request access to encrypted devices in the following cases:
- The hard drive was encrypted on a different computer.
- The encryption key for a device is not on the computer (for example, upon the first attempt to access the encrypted removable drive on the computer), and the computer is not connected to Kaspersky Security Center.
After the user has applied the access key to the encrypted device, Kaspersky Endpoint Security saves the encryption key on the user's computer and allows access to this device upon subsequent access attempts even if there is no connection to Kaspersky Security Center.
Access to encrypted devices can be obtained as follows:
- The user uses the Kaspersky Endpoint Security application interface to create a request access file with the kesdc extension and sends it to the corporate LAN administrator.
- The administrator uses the Kaspersky Security Center Administration Console to create an access key file with the kesdr extension and sends it to the user.
- The user applies the access key.
Restoring data on encrypted devices
A user can use the Encrypted Device Restore Utility (hereinafter referred to as the Restore Utility) to work with encrypted devices. This may be required in the following cases:
- The procedure for using an access key to obtain access was unsuccessful.
- Encryption components have not been installed on the computer with the encrypted device.
The data needed to restore access to encrypted devices using the Restore Utility resides in the memory of the user's computer in unencrypted form for some time. To reduce the risk of unauthorized access to such data, you are advised to restore access to encrypted devices on trusted computers.
Data on encrypted devices can be restored as follows:
- The user uses the Restore Utility to create a request access file with the fdertc extension and sends it to the corporate LAN administrator.
- The administrator uses the Kaspersky Security Center Administration Console to create an access key file with the fdertr extension and sends it to the user.
- The user applies the access key.
To restore data on encrypted system hard drives, the user can also specify the Authentication Agent account credentials in the Restore Utility. If the metadata of the Authentication Agent account has been corrupted, the user must complete the restoration procedure using a request access file.
Before restoring data on encrypted devices, it is recommended to cancel the Kaspersky Security Center policy or disable encryption in the Kaspersky Security Center policy settings on the computer where the procedure will be performed. This prevents the drive from being encrypted again.
Obtaining access to encrypted devices through the application interface
These instructions are intended for users of client computers with Kaspersky Endpoint Security installed.
To obtain access to encrypted devices through the application interface:
- Attempt to access the encrypted device that you need.
The Access to data is blocked window opens.
- Send the corporate LAN administrator the request access file with the kesdc extension for the encrypted device. To do so, perform one of the following:
- To email the corporate LAN administrator the generated request access file for the encrypted device, click the Send by email button.
- To save the request access file for the encrypted device and deliver it to the corporate LAN administrator using a different method, click the Save button.
If you have closed the Access to data is blocked window without saving the request access file or without sending it to the corporate LAN administrator, you can do this at any time in the Events window on the Status of access to files and devices tab. To open this window, click the
button in the main application window. - Obtain and save the encrypted device access key file that has been created and provided to you by the corporate LAN administrator.
- Use one of the following methods to apply the access key for accessing the encrypted device:
- In any file manager, find the encrypted device access key file and double-click it to open it.
- Do the following:
- Open the main window of Kaspersky Endpoint Security.
- Click the button to open the Events window.
- Select the Status of access to files and devices tab.
The tab displays a list of all requests for access to encrypted files and devices.
- Select the request for which you received the access key file for accessing the encrypted device.
- To load the received access key file for accessing the encrypted device, click Browse.
The standard Select access key file Microsoft Windows dialog box opens.
- In the standard Select access key file window of Microsoft Windows, select the administrator-provided file with the kesdr extension and name matching the file name of the corresponding request access file for the encrypted device.
- Click the Open button.
- In the Status of access to files and devices window, click OK.
As a result, Kaspersky Endpoint Security grants access to the encrypted device.
Page topGranting user access to encrypted devices
To grant user access to an encrypted device:
- Open the Kaspersky Security Center Administration Console.
- In the Managed devices folder of the Administration Console tree, open the folder with the name of the administration group that includes the computer of the user requesting access to the encrypted device.
- In the workspace, select the Devices tab.
- On the Devices tab, select the computer of the user requesting access to the encrypted device and right-click to open the context menu.
- In the context menu, select Grant access in offline mode.
The Grant access in offline mode window opens.
- In the Grant access in offline mode window, select the Encryption tab.
- On the Encryption tab, click the Browse button.
The standard Select request access file Microsoft Windows dialog box opens.
- In the Select request access file window, specify the path to the request file with the kesdc extension that you received from the user.
- Click the Open button.
Kaspersky Security Center generates an encrypted device access key file with the kesdr extension. The details of the user request are displayed on the Encryption tab.
- Do one of the following:
- To email the generated access key file to the user, click the Send by email button.
- To save the access key file for the encrypted device and deliver it to the user by another method, click the Save button.
Providing a user with a recovery key for hard drives encrypted with BitLocker
To send a user a recovery key for a system hard drive that was encrypted using BitLocker:
- Open the Kaspersky Security Center Administration Console.
- In the Managed devices folder of the Administration Console tree, open the folder with the name of the administration group that includes the computer of the user requesting access to the encrypted drive.
- In the workspace, select the Devices tab.
- On the Devices tab, select the computer belonging to the user requesting access to the encrypted drive.
- Right-click to open the context menu and select Grant access in offline mode.
The Grant access in offline mode window opens.
- In the Grant access in offline mode window, select the Access to a BitLocker-protected system drive tab.
- Prompt the user for the recovery key ID indicated in the BitLocker password input window, and compare it with the ID in the Recovery key ID field.
If the IDs do not match, this key is not valid for restoring access to the specified system drive. Make sure that the name of the selected computer matches the name of the user's computer.
- Send the user the key that is indicated in the Recovery key field.
To send a user a recovery key for a non-system hard drive that was encrypted using BitLocker:
- Open the Kaspersky Security Center Administration Console.
- In the Administration Console tree, select the Additional → Data encryption and protection → Encrypted devices folder.
The workspace displays a list of encrypted devices.
- In the workspace, select the encrypted device to which you need to restore access.
- Right-click to display the context menu and select Get access to the device in Kaspersky Endpoint Security for Windows.
This opens the Restore access to the disk encrypted with BitLocker window.
- Prompt the user for the recovery key ID indicated in the BitLocker password input window, and compare it with the ID in the Recovery key ID field.
If the IDs do not match, this key is not valid for restoring access to the specified drive. Make sure that the name of the selected computer matches the name of the user's computer.
- Send the user the key that is indicated in the Recovery key field.
Creating the executable file of Restore Utility
These instructions are intended for users of client computers with Kaspersky Endpoint Security installed.
To create the executable file of Restore Utility:
- In the main application window, click the Support button located in the lower-left corner of the main application window.
- In the Support window, click the Restore encrypted device button.
Encrypted device Restore Utility starts.
- Click the Create Stand-alone Restore Utility button in the window of Restore Utility.
The Creating Stand-alone Restore Utility window opens.
- In the Save to window, manually type the path to the folder for saving the executable file of Restore Utility, or click the Browse button.
- Click OK in the Creating Stand-alone Restore Utility window.
The executable file of Restore Utility (fdert.exe) is saved in the selected folder.
Restoring data on encrypted devices using the Restore Utility
These instructions are intended for users of client computers with Kaspersky Endpoint Security installed.
To restore access to an encrypted device using the Restore Utility:
- Run Restore Utility in one of the following ways:
- Click the Support button in the main window of Kaspersky Endpoint Security to open the Support window and click the Restore encrypted device button.
- Run the fdert.exe executable file of Restore Utility. This file is created by Kaspersky Endpoint Security.
- In the Restore Utility window, from the Select device drop-down list select an encrypted device to which you want to restore access.
- Click the Scan button to allow the utility to define which of the actions should be taken on the device: whether it should be unlocked or decrypted.
If the computer has access to Kaspersky Endpoint Security encryption functionality, the Restore Utility prompts you to unlock the device. While unlocking the device does not decrypt it, the device becomes directly accessible as a result of being unlocked. If the computer does not have access to Kaspersky Endpoint Security encryption functionality, the Restore Utility prompts you to decrypt the device.
- If you want to import diagnostic information, do the following:
- Click the Save diagnostics button.
The Data Provision Statement window opens.
- Read and accept the terms of Regulation on Data Provisioning and click the OK button.
The standard Save as window of Microsoft Office opens.
- In the Save as window, specify the destination folder for the archive containing files with diagnostic information.
- Click the Save diagnostics button.
- Click the Fix MBR button if diagnostics of the encrypted system hard drive has returned a message about problems involving the master boot record (MBR) of the device.
Fixing the master boot record of the device can speed up the process of obtaining information that is needed for unlocking or decrypting the device.
- Click the Unlock or Decrypt button depending on the results of diagnostics.
The Device unlock settings or Device decryption settings window opens.
- If you want to restore data using an Authentication Agent account:
- Select the Use Authentication Agent account settings option.
- In the Name and Password fields, specify the Authentication Agent account credentials.
This method is possible only when restoring data on a system hard drive. If the system hard drive was corrupted and Authentication Agent account data has been lost, you must obtain an access key from the corporate LAN administrator to restore data on an encrypted device.
- If you want to use an access key to restore data:
- Select the Specify device access key manually option.
- Click the Receive access key button.
The Receive device access key window opens.
- Click the Save button and select the folder in which to save the request access file with the fdertc extension.
- Send the request access file to the corporate LAN administrator.
Do not close the Receive device access key window until you have received the access key. When this window is opened again, you will not be able to apply the access key that was previously created by the administrator.
- Obtain and save the access key file that was created and provided to you by the corporate LAN administrator.
- Click the Load button and select the access key file with the fdertr extension in the window that opens.
- If you are decrypting a device, you must also specify the other decryption settings in the Device decryption settings window. To do so:
- Specify area to decrypt:
- If you want to decrypt the entire device, select the Decrypt entire device option.
- If you want to decrypt a portion of the data on a device, select the Decrypt individual device areas option and use the Start and End fields to specify the decryption area boundaries.
- Select the location for writing the decrypted data:
- If you want the data on the original device to be rewritten with the decrypted data, clear the Decrypt to a disk image file check box.
- If you want to save decrypted data separately from the original encrypted data, select the Decrypt to a disk image file check box and use the Browse button to specify the path where to save the VHD file.
- Specify area to decrypt:
- Click OK.
The device unlocking / decryption process starts.
Page topResponding to a user request to restore data on encrypted devices
To create a key file for accessing an encrypted device and provide it to a user:
- Open the Kaspersky Security Center Administration Console.
- In the Administration Console tree, select the Additional → Data encryption and protection → Encrypted devices folder.
- In the workspace, select the encrypted device for which you want to create an access key file, and in the device context menu select Get access to the device in Kaspersky Endpoint Security for Windows.
If you are not sure for which computer the request access file was generated, in the Administration Console tree select the Additional → Data encryption and protection folder and in the workspace click the Get device encryption key in Kaspersky Endpoint Security for Windows link.
The Allow access to the device window opens.
- Select the encryption algorithm in use. To do this, select one of the following options:
- AES256, if Kaspersky Endpoint Security have been installed from a distribution package located in the aes256 folder on the computer that the device was encrypted;
- AES56, if Kaspersky Endpoint Security have been installed from a distribution package located in the aes56 folder on the computer that the device was encrypted;
- Click the Browse button.
The standard Select request access file Microsoft Windows dialog box opens.
- In the Select request access file window, specify the path to the request file with the fdertc extension that you received from the user.
- Click the Open button.
Kaspersky Security Center generates an access key file with the fdertr extension for accessing the encrypted device.
- Do one of the following:
- To email the generated access key file to the user, click the Send by email button.
- To save the access key file for the encrypted device and deliver it to the user by another method, click the Save button.
Creating an operating system rescue disk
The operating system rescue disk can be useful when an encrypted hard drive cannot be accessed for some reason and the operating system cannot load.
You can load an image of the Windows operating system using the rescue disk and restore access to the encrypted hard drive using Restore Utility included in the operating system image.
To create an operating system rescue disk:
- Create an executable file for the Encrypted Device Restore Utility.
- Create a custom image of the Windows pre-boot environment. While creating the custom image of the Windows pre-boot environment, add the executable file of Restore Utility to the image.
- Save the custom image of the Windows pre-installation environment to bootable media such as a CD or removable drive.
Refer to Microsoft help files for instructions on creating a custom image of the Windows pre-boot environment (for example, in the Microsoft TechNet resource).