Security patterns for development under KasperskyOS
Each KasperskyOS-based solution has specific usage scenarios and is designed to counteract specific security threats. Nonetheless, there are some typical scenarios and threats encountered in many different solutions. This section describes the typical risks and threats, and contains a description of architectural patterns that can be employed to increase the security of a solution.
A security pattern (or template) describes a specific recurring security issue that arises in certain known contexts, and provides a well-proven, general scheme for resolving this kind of security issue. A pattern is not a finished project that can be converted directly into code. Instead, it is a solution to a general problem encountered in various projects.
A security pattern system is a set of security patterns together with instructions on their implementation, combination, and practical use when designing secure software systems.
Security patterns resolve security issues at different levels, beginning with patterns at the architectural level, including high-level design of the system, and ending with implementation-level patterns that contain recommendations on how to implement functions or methods.
This section describes the set of security patterns whose implementation examples are provided in KasperskyOS Community Edition.
Security patterns are described in a multitude of information security resources. Each pattern is accompanied by a list of the resources that were used to prepare its description.
Distrustful Decomposition pattern
Description
When using a monolithic application, a single process must be granted all the privileges necessary for the application to operate. This issue is resolved by the Distrustful Decomposition pattern.
The purpose of the Distrustful Decomposition pattern is to divide application functionality among individual processes that require different levels of privileges, and to control the interaction between these processes instead of creating a monolithic application.
Using the Distrustful Decomposition pattern reduces the following:
- Attack surface for each process.
- Functionality and data that a hacker will be able to access if one of the processes is compromised.
Alternate names
Privilege Reduction.
Context
Different functions of an application require different levels of privileges.
Problem
An unsophisticated implementation of an application combines many functions requiring different privileges into one component. This component would need to be run with the maximum level of privileges required for any one of these many functions.
Solution
The Distrustful Decomposition pattern divides functionality among individual processes and isolates potential vulnerabilities within a small subset of the system. A cybercriminal who conducts a successful attack will be able to use only the functionality and data of a single compromised component instead of the entire application.
Structure
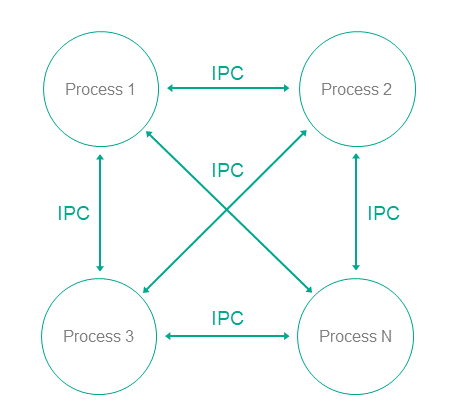
This pattern divides one monolithic application into multiple applications that are run as individual processes that could potentially have different privileges. Each process implements a small, clearly defined set of functions of the application. Processes use interprocess communication mechanism to exchange data.
Operation
- In KasperskyOS, an application is divided into processes.
- Processes can exchange messages via IPC.
- A user or remote system connects to the process that provides the necessary functionality with the level of privileges sufficient to perform the requested functions.
Implementation recommendations
Interaction between processes can be unidirectional or bidirectional. It is recommended to always use unidirectional interaction whenever possible. Otherwise, the potential attack surface of individual components increases, which reduces the overall security of the entire system. If bidirectional IPC is used, processes should not trust bidirectional data exchange. For example, if a file system is used for IPC, file contents cannot be trusted.
Specialized implementation in KasperskyOS
In universal operating systems such as Linux or Windows, this pattern does not use anything except the standard process/privileges model that already exists in these operating systems. Each program is run in its own process space with potentially different privileges of the specific user in each process. However, an attack on the OS kernel would reduce the effectiveness of this pattern.
Use of this pattern when developing for KasperskyOS means that control over processes and IPC is entrusted to the microkernel, which is difficult to successfully attack. The Kaspersky Security Module is used for IPC control.
Use of KasperskyOS mechanisms ensures a high level of reliability of the software system with the same or less effort required from the developer when compared to the use of this pattern in programs running under universal operating systems.
In addition, KasperskyOS provides the capability for flexible configuration of security policies. Moreover, the process of defining and editing security policies is potentially independent of the process of developing the applications.
Linked patterns
Use of the Distrustful Decomposition pattern involves use of the Defer to Kernel and Policy Decision Point patterns.
Implementation examples
Examples of an implementation of the Distrustful Decomposition pattern:
Sources of information
The Distrustful Decomposition pattern is described in detail in the following resources:
- Chad Dougherty, Kirk Sayre, Robert C. Seacord, David Svoboda, Kazuya Togashi (JPCERT/CC), "Secure Design Patterns" (March-October 2009). Software Engineering Institute. https://resources.sei.cmu.edu/asset_files/TechnicalReport/2009_005_001_15110.pdf
- Dangler, Jeremiah Y., "Categorization of Security Design Patterns" (2013). Electronic Theses and Dissertations. Paper 1119. https://dc.etsu.edu/etd/1119
Secure Logger example
The Secure Logger example demonstrates use of the Distrustful Decomposition pattern for separating event log read/write functionality.
Example architecture
The security goal of the Secure Logger example is to prevent any possibility of distortion or deletion of information from the event log. This example utilizes the capabilities provided by KasperskyOS to achieve this security goal.
A logging system can be examined by distinguishing the following functional steps:
- Generate information to be written to the log.
- Save information to the log.
- Read entries from the log.
- Provide entries in a convenient format for the consumer.
Accordingly, the logging subsystem can be divided into four processes depending on the required functional capabilities of each process.
For this purpose, the Secure Logger example contains the following four programs: Application, Logger, Reader and LogViewer.
- The
Applicationprogram initiates the creation of entries in the event log maintained by theLoggerprogram. - The
Loggerprogram creates entries in the log and writes them to the disk. - The
Readerprogram reads entries from the disk to send them to theLogViewerprogram. - The
LogViewerprogram sends entries to the user.
The IPC interface provided by the Logger program is intended only for writing to storage. The IPC interface of the Reader program is intended only for reading from storage. The example architecture looks as follows:
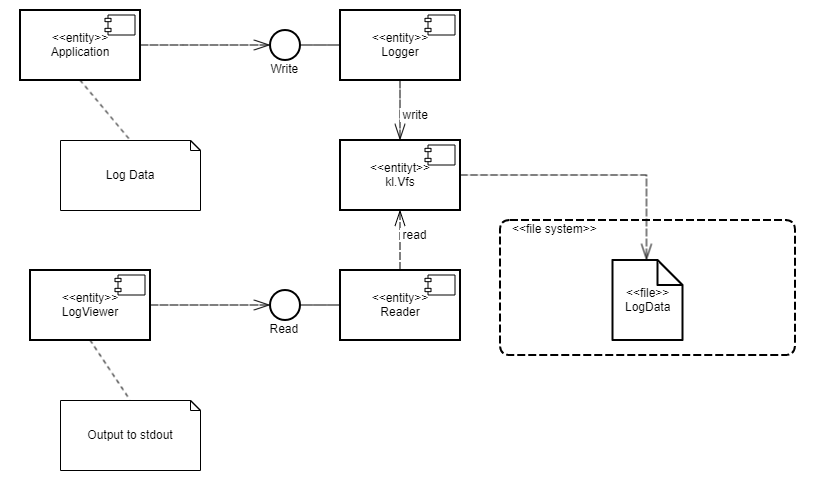
- The
Applicationprogram uses the interface of theLoggerprogram to save log entries. - The
LogViewerprogram uses the interface of theReaderprogram to read the log entries and present them to a user.
The LogViewer program normally has external channels for interacting with a user (for example, to receive data write commands and to provide data to a user). Naturally, this program is an untrusted component of the system, and therefore could potentially be used to conduct an attack. However, even if a successful attack results in the infiltration of unauthorized executable code into the LogViewer program, information in the log cannot be distorted through this program. This is because the program can only utilize the data read interface, which cannot actually be used to distort or delete data. Moreover, the LogViewer program does not have the capability to gain access to other interfaces because this access is controlled by the security module.
A security policy in the Secure Logger example has the following characteristics:
- The
Applicationprogram has the capability to query theLoggerprogram to create a new entry in the event log. - The
LogViewerprogram has the capability to query theReaderprogram to read entries from the event log. - The
Applicationprogram does not have the capability to query theReaderprogram to read entries from the event log. - The
LogViewerprogram does not have the capability to query theLoggerprogram to create a new entry in the event log.
Example files
The code of the example and build scripts are available at the following path:
/opt/KasperskyOS-Community-Edition-<version>/examples/secure_logger
Building and running example
See Building and running examples section.
Page topSeparate Storage example
The Separate Storage example demonstrates use of the Distrustful Decomposition pattern to separate data storage for trusted and untrusted applications.
Example architecture
The Separate Storage example contains two user programs: UserManager and CertificateManager.
These programs work with data located in the corresponding files:
- The
UserManagerprogram works with data from theuserlist.txtfile. - The
CertificateManagerprogram works with data from thecertificate.cerfile.
Each of these programs uses its own instance of the VFS program to access a separate file system. Each VFS program includes a block device driver linked to an individual logical drive partition. The UserManager program does not have access to the file system of the CertificateManager program, and vice versa.
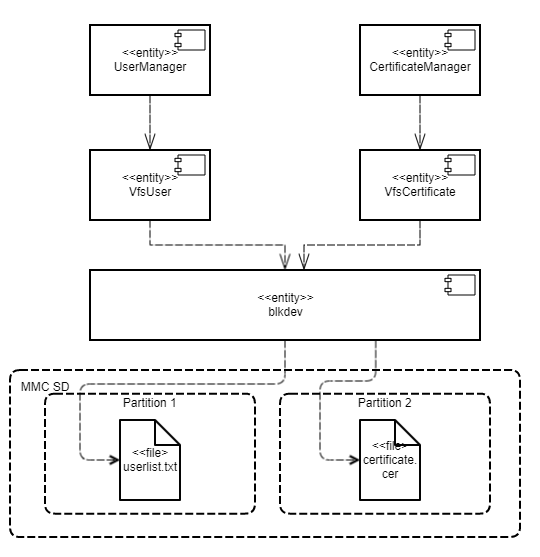
This architecture guarantees that if there is an attack or error in any of the UserManager or CertificateManager programs, this program will not be able to access any file that was not intended for the specific program's operations.
A security policy in the Separate Storage example has the following characteristics:
- The
UserManagerprogram has access to the file system only through theVfsUserprogram. - The
CertificateManagerprogram has access to the file system only through theVfsCertificateprogram.
Example files
The code of the example and build scripts are available at the following path:
/opt/KasperskyOS-Community-Edition-<version>/examples/separate_storage
Building and running example
To run an example on QEMU, go to the directory containing the example, build the example and run the following commands:
$ cd build/einit
# Before running the following command, be sure that the path to
# the directory with the qemu-system-aarch64 executable file is saved in
# the PATH environment variable. If it is not there,
# add it to the PATH variable.
$ qemu-system-aarch64 -m 2048 -machine vexpress-a15 -nographic -monitor none -sd hdd.img -kernel kos-qemu-image
See also Building and running examples section.
Preparing an SD card to run on Raspberry Pi 4 B
To run the Separate Storage example on Raspberry Pi 4 B, the following additional actions are necessary:
- The SD card must contain both a bootable partition with the solution image as well as 2 additional partitions with the
ext2orext3file systems. - The first additional partition must contain the
userlist.txtfile from the./resources/files/directory. - The second additional partition must contain the
certificate.cerfile from the./resources/files/directory.
To run the Separate Storage example on Raspberry Pi 4 B, you can use an SD card prepared for running the embed_ext2_with_separate_vfs example on Raspberry Pi 4 B, after copying the userlist.txt and certificate.cer files to the appropriate partitions.
Defer to Kernel pattern
Description
The Defer to Kernel pattern lets you take advantage of permission control at the OS kernel level.
The purpose of this pattern is to utilize mechanisms available at the OS kernel level to clearly separate the functionality requiring elevated privileges from the functionality that does not require elevated privileges. By using kernel mechanisms, we do not have to implement new tools for arbitrating security decisions at the user level.
Alternate names
Policy Enforcement Point (PEP), Protected System, Enclave.
Context
The Defer to Kernel pattern is applicable if the system has the following characteristics:
- The system has processes that run without elevated privileges, including user processes.
- Some system functions require elevated privileges that must be verified before processes are granted access to data.
- You need to verify not only the privileges of the requesting process, but also the overall permissibility of the requested operation within the operational context of the entire system and its overall security.
Problem
When functionality is divided among various processes with different levels of privileges, these privileges must be verified when a request is made from one process to another. These verifications must be carried out and their resulting permissions must be granted by trusted code that has a minimal risk of being compromised. The trustworthiness of application code is almost always questionable due to its sheer volume and due to its primary orientation toward implementation of functional requirements.
Solution
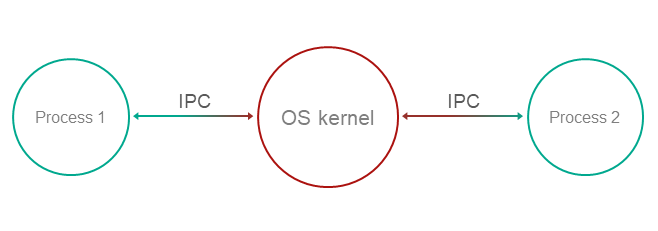
Clearly separate privileged functionality and data from non-privileged functionality and data at the process level, and give the OS kernel control of interprocess communication (IPC), including verification of access rights when there is a request for functionality or data requiring elevated privileges, and verification of the overall state of the system and the states of individual processes at the time of the request.
Structure
Operation
- Functionality and management of data with various privileges are compartmentalized among processes.
- The OS kernel ensures isolation of processes.
Process-1wants to request privileged functionality or data fromProcess-2using IPC.- The kernel controls IPC and allows or denies communication based on security policies and based on the available information regarding the operational context and state of
Process-1.
Implementation recommendations
To ensure that a specific implementation of a pattern operates securely and reliably, the following is required:
- Isolation
Complete and guaranteed isolation of processes must be ensured.
- Inability to bypass the kernel
Absolutely all IPC interactions must be controlled by the kernel.
- Kernel self-defense
The trustworthiness of the kernel must be ensured through its own means of protection against compromise.
- Provability
The kernel requires a certain level of guaranteed security and reliability.
- Capability for external computation of access permissions
Access permissions must be computed at the OS level, and must not be implemented in application code.
For this purpose, tools must be provided for describing access policies so that security policies are detached from the business logic.
Specialized implementation in KasperskyOS
The KasperskyOS kernel guarantees isolation of processes and serves as a Policy Enforcement Point (PEP).
Linked patterns
The Defer to Kernel pattern is a special case of the Distrustful Decomposition and Policy Decision Point patterns. The Policy Decision Point pattern defines the abstraction process that intercepts all requests to resources and verifies that they comply with the defined security policy. The distinctive feature of the Defer to Kernel pattern is that the verification process is performed by the OS kernel, which is a more reliable and portable solution that reduces the time spent on development and testing.
Impacts
By making the OS kernel responsible for applying the access policy, you separate the security policy from the business logic (which may be very complicated) and thereby simplify development and improve portability through the use of OS kernel functions.
This also makes it possible to prove the overall security of a solution by simply demonstrating that the kernel is operating correctly. The difficulty in proving correct execution of code grows nonlinearly as the size of the code increases. The Defer to Kernel pattern minimizes the amount of trusted code, provided that the OS kernel itself is not too large.
Implementation examples
Example of a Defer to Kernel pattern implementation: Defer to Kernel example.
Sources of information
The Defer to Kernel pattern is described in detail in the following resources:
- Chad Dougherty, Kirk Sayre, Robert C. Seacord, David Svoboda, Kazuya Togashi (JPCERT/CC), "Secure Design Patterns" (March-October 2009). Software Engineering Institute. https://resources.sei.cmu.edu/asset_files/TechnicalReport/2009_005_001_15110.pdf
- Dangler, Jeremiah Y., "Categorization of Security Design Patterns" (2013). Electronic Theses and Dissertations. Paper 1119. https://dc.etsu.edu/etd/1119
- Schumacher, Markus, Fernandez-Buglioni, Eduardo, Hybertson, Duane, Buschmann, Frank, and Sommerlad, Peter. "Security Patterns: Integrating Security and Systems Engineering" (2006).
Defer to Kernel example
The Defer to Kernel example demonstrates the use of Defer to Kernel and Policy Decision Point patterns.
The Defer to Kernel example contains three user programs: PictureManager, ValidPictureClient and NonValidPictureClient.
In this example, the ValidPictureClient and NonValidPictureClient programs query the PictureManager program to receive information.
Only the ValidPictureClient program is allowed to interact with the PictureManager program.
The KasperskyOS kernel guarantees isolation of running programs (processes).
Control of interaction between programs in KasperskyOS is delegated to the Kaspersky Security Module. The subsystem analyzes each sent request and response and decides whether to allow or deny delivery based on the defined security policy.
A security policy in the Defer to Kernel example has the following characteristics:
- The
ValidPictureClientprogram is explicitly allowed to interact with thePictureManagerprogram. - The
NonValidPictureClientprogram is explicitly not allowed to interact with thePictureManagerprogram. This means that this interaction is denied (based on the Default Deny principle).
Dynamically created IPC channels
The example also demonstrates the capability to dynamically create IPC channels between processes. IPC channels are dynamically created by using a name server, which is a special kernel service provided by the NameServer program. The capability to dynamically create IPC channels allows you to change the topology of interaction between programs on the fly.
Any program that is allowed to interact with NameServer via IPC can register its own interfaces in the name server. Another program can request the registered interfaces from the name server, and then connect to the relevant interface.
The security module is used to control interactions via IPC (even those that were created dynamically).
Example files
The code of the example and build scripts are available at the following path:
/opt/KasperskyOS-Community-Edition-<version>/examples/defer_to_kernel
Building and running example
See Building and running examples section.
Page topPolicy Decision Point pattern
Description
The Policy Decision Point pattern encapsulates the computation of decisions based on security model methods into a separate system component that ensures that these security methods are performed in their full scope and correct sequence.
Alternate names
Check Point, Access Decision Function.
Context
The system has functions with different levels of privileges, and the security policy is complex (contains many security model methods bound to security events).
Problem
If security policy checks are divided among different system components, the following issues arise:
- You have to carefully make sure that all necessary checks are performed in all required cases.
- It is difficult to ensure that all checks are performed in the correct order.
- It is difficult to prove that the verification system is operating correctly, has no conflicts, and its integrity has not been compromised.
- The security policy is linked to the business logic. This means that any modification of the security policy requires changes to the business logic, which complicates support and increases the likelihood of errors.
Solution
All verifications of security policy compliance are conducted in a separate component called a Policy Decision Point (PDP). This component is responsible for ensuring that verifications are conducted in their correct sequence and scope. Policy checks are separated from the code that implements the business logic.
Structure
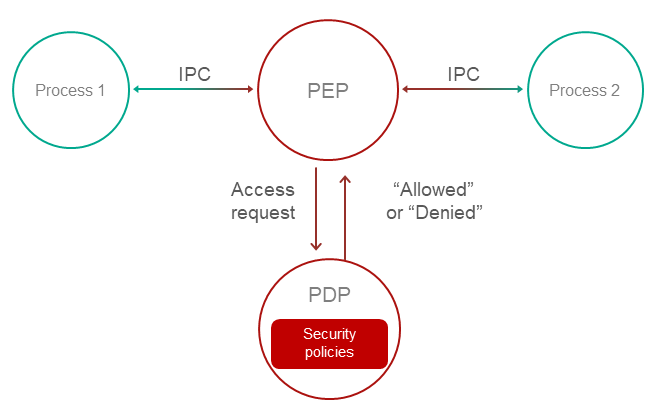
Operation
- A Policy Enforcement Point (PEP) receives a request to access functionality or data.
For example, the PEP may be the OS kernel. For more details, refer to Defer to Kernel pattern.
- The PEP gathers the request attributes required for making decisions on access control.
- The PEP requests an access control decision from the Policy Decision Point (PDP).
- The PDP computes a decision on whether to grant access based on the security policy and based on the information received in the request from the PEP.
- The PEP denies or allows interaction based on the decision of the PDP.
Implementation recommendations
Implementations must take into account the problem of "Verification time vs. Usage time". For example, if a security policy depends on the quickly changing status of a specific system object, a computed decision loses its relevance as quickly as the status changes. In a system that utilizes the Policy Decision Point pattern, you must take care to minimize the time interval between the access decision and the time when the request based on this decision is fulfilled.
Specialized implementation in KasperskyOS
The KasperskyOS kernel guarantees isolation of processes and serves as a Policy Enforcement Point (PEP).
Control of interaction between processes in KasperskyOS is delegated to the Kaspersky Security Module. This module analyzes each sent request and response and decides whether to allow or deny delivery based on the defined security policy. Therefore, the Kaspersky Security Module performs the role of the Policy Decision Point (PDP).
Impacts
This pattern lets you configure a security policy without making any modifications to the code that implements the business logic, and delegate system support involving information security.
Linked patterns
Use of the Policy Decision Point pattern involves use of the Distrustful Decomposition and Defer to Kernel patterns.
Implementation examples
Example of a Policy Decision Point pattern implementation: Defer to Kernel example.
Sources of information
The Policy Decision Point pattern is described in detail in the following resources:
- Chad Dougherty, Kirk Sayre, Robert C. Seacord, David Svoboda, Kazuya Togashi (JPCERT/CC), "Secure Design Patterns" (March-October 2009). Software Engineering Institute. https://resources.sei.cmu.edu/asset_files/TechnicalReport/2009_005_001_15110.pdf
- Dangler, Jeremiah Y., "Categorization of Security Design Patterns" (2013). Electronic Theses and Dissertations. Paper 1119. https://dc.etsu.edu/etd/1119
- Schumacher, Markus, Fernandez-Buglioni, Eduardo, Hybertson, Duane, Buschmann, Frank, and Sommerlad, Peter. "Security Patterns: Integrating Security and Systems Engineering" (2006).
- Bob Blakley, Craig Heath, and members of The Open Group Security Forum. "Security Design Patterns" (April 2004). The Open Group. https://pubs.opengroup.org/onlinepubs/9299969899/toc.pdf
Privilege Separation pattern
Description
The Privilege Separation pattern involves the use of non-privileged isolated system modules for interaction with clients (other modules or users) that do not have any privileges. The purpose of the Privilege Separation pattern is to reduce the amount of code that is executed with special privileges without impacting or restricting application functionality.
The Privilege Separation pattern is a special case of the Distrustful Decomposition pattern.
Example
An unauthenticated user connects to a system that has functions requiring elevated privileges.
Context
The system has components with a large attack surface due to their high number of connections with unsafe sources and/or a complicated, potentially error-prone implementation.
Problem
When a client with unknown privileges interacts with a privileged component of the system, there are risks that the data and functionality accessible to that component could be compromised.
Solution
Interactions with unsafe clients must be conducted only through specially allocated components that have no privileges. The Privilege Separation pattern does not modify system functionality. Instead, it merely separates functionality into components with different privileges.
Operation
Pattern operations can be divided into two phases:
- Pre-Authentication. The client is not yet authenticated. It sends a request to a privileged master process. The master process creates a child process with no privileges (and no access to the file system). This child process performs client authentication.
- Post-Authentication. The client is authenticated and authorized. The privileged master process creates a new child process that has privileges corresponding to the permissions of the client. This process is responsible for all subsequent interaction with the client.
Recommendations on implementation in KasperskyOS
At the Pre-Authentication phase, the master process can save the state of each non-privileged process in the form of a finite-state machine and change the state of the finite-state machine during authentication.
Requests from child processes to the master process are performed using standard IPC mechanisms. However, interaction control is conducted using the Kaspersky Security Module.
Impacts
If attackers gain control of a non-privileged process, they will not gain access to any privileged functions or data. If attackers gain control of an authorized process, they will obtain only the privileges of this process.
In addition, code that is organized in this manner is easier to check and test. You just have to pay special attention to the functionality that operates with elevated privileges.
Implementation examples
Example of a Privilege Separation pattern implementation: Device Access example.
Sources of information
The Privilege Separation pattern is described in detail in the following resources:
- Chad Dougherty, Kirk Sayre, Robert C. Seacord, David Svoboda, Kazuya Togashi (JPCERT/CC), "Secure Design Patterns" (March-October 2009). Software Engineering Institute. https://resources.sei.cmu.edu/asset_files/TechnicalReport/2009_005_001_15110.pdf
- Dangler, Jeremiah Y., "Categorization of Security Design Patterns" (2013). Electronic Theses and Dissertations. Paper 1119. https://dc.etsu.edu/etd/1119
Device Access example
The Device Access example demonstrates use of the Privilege Separation pattern.
Example architecture
The example contains the following three programs: Device, LoginManager and Storage.
In this example, the Device program queries the Storage program to receive information and queries the LoginManager program for authorization.
The Device program obtains access to the Storage program after successful authorization.

This example demonstrates the capability to separate the authorization logic and the data access logic into independent components. This separation guarantees that data access can be opened only after successful authorization. The security module monitors whether authorization was successfully completed. This architecture also enables independent development and testing of the authorization logic and the data access provision logic.
A security policy in the Device Access example has the following characteristics:
- The
Deviceprogram has the capability to query theLoginManagerprogram for authorization. - Calls of the
GetInfo()method of theStorageprogram are managed by methods of the Flow security model:- The finite-state machine described in the
sessionobject configuration has two states:unauthenticatedandauthenticated. - The initial state is
unauthenticated. - Only transitions from
unauthenticatedtoauthenticatedand vice versa are allowed. - The
sessionobject is created when theDeviceprogram is started. - When the
Deviceprogram successfully calls theLogin()method of theLoginManagerprogram, the state of thesessionobject changes toauthenticated. - When the
Deviceprogram successfully calls theLogout()method of theLoginManagerprogram, the state of thesessionobject changes tounauthenticated. - When the
Deviceprogram calls theGetInfo()method of theStorageprogram, the current state of thesessionobject is verified. The call is allowed only if the current state of the object isauthenticated.
- The finite-state machine described in the
Example files
The code of the example and build scripts are available at the following path:
/opt/KasperskyOS-Community-Edition-<version>/examples/device_access
Building and running example
See Building and running examples section.
Page topInformation Obscurity pattern
Description
The purpose of the Information Obscurity pattern is to encrypt confidential data in otherwise unsafe environments and thereby protect against data theft.
Context
This pattern should be used when data is frequently transferred between parts of a system and/or between the system and other (external) systems.
Problem
Confidential data may be transmitted through an untrusted environment within one system (through untrusted components) or between different systems (through untrusted networks). If this environment is compromised, confidential data could be intercepted by a cybercriminal.
Solution
The security policy must separate individual data based on its specific level of confidentiality so that you can determine which data should be encrypted and which encryption algorithms should be used. Encryption and decryption may take a lot of time, therefore their use should be limited whenever possible. The Information Obscurity pattern resolves this issue by utilizing a specific confidentiality level to determine what exactly must be concealed with encryption.
Implementation examples
Example of an Information Obscurity pattern implementation: Secure Login example.
Sources of information
The Information Obscurity pattern is described in detail in the following resources:
- Dangler, Jeremiah Y., "Categorization of Security Design Patterns" (2013). Electronic Theses and Dissertations. Paper 1119. https://dc.etsu.edu/etd/1119
- Schumacher, Markus, Fernandez-Buglioni, Eduardo, Hybertson, Duane, Buschmann, Frank, and Sommerlad, Peter. "Security Patterns: Integrating Security and Systems Engineering" (2006).
Secure Login (Civetweb, TLS-terminator) example
The Secure Login example demonstrates use of the Information Obscurity pattern. This example demonstrates the capability to transmit critical system information through an untrusted environment.
Example architecture
This example simulates the acquisition of remote access to an IoT device by sending user account credentials (user name and password) to this device. The untrusted environment within the IoT device is the web server that responds to requests from users. Practical experience has shown that this kind of web server is easy to detect and frequently attacked successfully because IoT devices do not have built-in tools for protection against intrusion and other attacks. Users also gain access to the IoT device through an untrusted network. Obviously, encryption algorithms must be used in these types of conditions to protect user account credentials from being compromised.
In terms of the architecture in these systems, the following objects can be distinguished:
- Data source: user's browser.
- Point of communication with the device: web server.
- Subsystem for processing information from the user: authentication subsystem.
To employ cryptographic protection, the following steps must be completed:
- Configure interaction between the data source and the device over the HTTPS protocol. This helps prevent unauthorized surveillance of HTTP traffic and MITM (man-in-the-middle) attacks.
- Generate a shared secret between the data source and the information processing subsystem.
- Use this secret to encrypt information on the data source side and to decrypt the information on the information processing subsystem side. This helps prevent data within the device from being compromised (at the point of communication).
The Secure Login example includes the following components:
Civetwebweb server (untrusted component,WebServerprogram).- User authentication subsystem (trusted component,
AuthServiceprogram). - TLS terminator (trusted component,
TlsEntityprogram). This component supports the TLS (transport layer security) mechanism. Together with the web server, the TLS terminator supports the HTTPS protocol on the device side (the web server interacts with the browser through the TLS terminator).
The user authentication process occurs as follows:
- Using their browser, the user opens the page at
https://localhost:1106(when running the example on QEMU) or athttps://<Raspberry Pi IP address>:1106(when running the example on Raspberry Pi 4 B). HTTP traffic between the browser and TLS terminator will be transmitted in encrypted form, but the web server will work only with unencrypted HTTP traffic.This example uses a self-signed certificate, so most up-to-date browsers will warn you that the connection is not secure. You need to agree to use this "insecure" connection, which will actually be encrypted despite the warning. In some browsers, you may encounter the message
"TLS: Error performing handshake: -30592: errno = Success". - The
Civetwebweb server running in theWebServerprogram displays theindex.htmlpage containing an authentication prompt. - The user clicks the
Log inbutton. - The
WebServerprogram queries theAuthServiceprogram via IPC to get the page containing the user name and password input form. - The
AuthServiceprogram performs the following actions:- Generates a private key and public settings, and calculates the public key based on the Diffie-Hellman algorithm.
- Creates the
auth.htmlpage containing the user name and password input form (the page code contains the public settings and the public key). - Transfers the received page to the
WebServerprogram via IPC.
- The
Civetwebweb server running in theWebServerprogram displays theauth.htmlpage containing the user name and password input form. - The user completes the form and clicks the
Submitbutton (correct data for authentication is contained in the filesecure_login/auth_service/src/authservice.cpp). - The
auth.htmlpage code executed by the browser performs the following actions:- Generates a private key and calculates the public key and shared secret key based on the Diffie-Hellman algorithm.
- Encrypts the password by using the
XORoperation with the shared secret key. - Transmits the user name, encrypted password and public key to the web server.
- The
WebServerprogram queries theAuthServiceprogram via IPC to get the page containing the authentication result by transmitting the user name, encrypted password and public key. - The
AuthServiceprogram performs the following actions:- Calculates the shared secret key based on the Diffie-Hellman algorithm.
- Decrypts the password by using the shared secret key.
- Returns the
result_err.htmlpage orresult_ok.htmlpage depending on the authentication result.
- The
Civetwebweb server running in theWebServerprogram displays theresult_err.htmlpage or theresult_ok.htmlpage.
This way, confidential data is transmitted only in encrypted form through the network and web server. In addition, all HTTP traffic is transmitted through the network in encrypted form. Data is transferred between components via IPC interactions controlled by the Kaspersky Security Module.
Unit testing using the GoogleTest framework
In addition to the Information Obscurity pattern, the Secure Login example demonstrates use of the GoogleTest framework to conduct unit testing of applications developed for KasperskyOS (this framework is provided in KasperskyOS Community Edition).
The source code of the tests is located at the following path:
/opt/KasperskyOS-Community-Edition-<version>/examples/secure_login/tests
These unit tests are designed for verification of certain CPP modules of the authentication subsystem and web server.
To start testing:
- Go to the directory with the
Secure Loginexample. - Delete the
builddirectory containing the results of the previous build by running the following command:sudo rm -rf build/
- Open the
cross-build.shscript file in a text editor. - Add the
-D RUN_TESTS="y" \build flag to the script (for example, after the-D CMAKE_BUILD_TYPE:STRING=Release \build flag). - Save the script file and then run the command:
$ sudo ./cross-build.sh
Tests are conducted in the TestEntity program. The AuthService and WebServer programs are not started in this case. Therefore, the example cannot be used to demonstrate the Information Obscurity pattern when testing is being conducted.
After testing is finished, the results of the tests are displayed.
Example files
The code of the example and build scripts are available at the following path:
/opt/KasperskyOS-Community-Edition-<version>/examples/secure_login
Building and running example
To run an example on QEMU, go to the directory containing the example, build the example and run the following commands:
$ cd build/einit
# Before running the following command, be sure that the path to
# the directory with the qemu-system-aarch64 executable file is saved in
# the PATH environment variable. If it is not there,
# add it to the PATH variable.
$ qemu-system-aarch64 -m 2048 -machine vexpress-a15 -nographic -monitor none -net nic,macaddr=52:54:00:12:34:56 -net user,hostfwd=tcp::1106-:1106 -sd sdcard0.img -kernel kos-qemu-image
See also Building and running examples section.
Page top