Contents
- Kaspersky Total Security
- About the subscription
- About data provision
- Purchasing a license
- Activating the application
- Renewing a license
- Managing application notifications
- Installing and removing the application
- Application licensing
- Assessing computer protection status and resolving security issues
- Update databases and application modules
- Scanning the computer
- Restoring an object deleted or disinfected by the application
- Troubleshooting the operating system after infection
- Protecting email
- Protecting personal data on the Internet
- About protection of personal data on the Internet
- About On-Screen Keyboard
- Starting On-Screen Keyboard
- Configuring the display of the On-Screen Keyboard icon
- Protecting data entered on the computer keyboard
- Checking a website for safety
- About secure connection to Wi-Fi networks
- Running Kaspersky Secure Connection
- Configuring notifications of vulnerabilities in Wi-Fi networks
- Protecting financial transactions and online purchases
- About protection of financial transactions and online purchases
- Configuring Safe Money
- Configuring Safe Money for a specific website
- Send feedback on Safe Money
- Enabling automatic activation of the Kaspersky Protection extension
- About protection against screenshots
- Enabling protection against screenshots
- About clipboard data protection
- Starting Kaspersky Password Manager
- Web tracking protection
- Anti-Banner protection during website browsing
- Removing traces of activity on the computer
- Controlling users' activity on the computer and on the Internet
- Remote management of computer protection
- Reserving operating system resources for computer games
- Handling unknown applications
- Checking application reputation
- Controlling application activity on the computer and on the network
- Configuring Application Control
- About applications' access to the webcam
- Configuring the settings of application access to the webcam
- Allowing application access to the webcam
- About protecting an audio stream coming from sound recording devices
- Configuring audio stream protection settings
- About System Changes Control
- Configuring Application Manager settings
- Updating installed applications
- Removing installed applications
- Trusted Applications mode
- File Shredder
- Unused Data Cleaner
- Backup and Restore
- About Backup and Restore
- Creating a backup task
- Step 1. Select files
- Step 2. Select folders for backup
- Step 3. Select file types for backup
- Step 4. Select backup storage
- Step 5. Creating a backup schedule
- Step 6. Setting a password to protect backup copies
- Step 7. File versions storage settings
- Step 8. Entering the backup task name
- Step 9. Wizard completion
- Starting a backup task
- Restoring data from a backup copy
- Restoring data from a backup copy using Kaspersky Restore Utility
- About Online storage
- Online storage activation
- Storing data in data vaults
- Password-protecting access to Kaspersky Total Security management functions
- Pausing and resuming computer protection
- Restoring the default application settings
- Viewing the application operation report
- Applying the application settings on another computer
- Participating in Kaspersky Security Network
- Participating in the Protect a Friend program
- Using the application from the command prompt
- Contacting Technical Support
- Limitations and warnings
- Limitations of Kaspersky Total Security when the operating system is upgraded
- Other sources of information about the application
- Glossary
- Activating the application
- Activation code
- Anti-virus databases
- Application modules
- Backup and Restore
- Blocking an object
- Compressed file
- Data vault
- Database of malicious web addresses
- Database of phishing web addresses
- Digital signature
- Disk boot sector
- False positive
- File mask
- Heuristic analyzer
- Hypervisor
- iChecker Technology
- Incompatible application
- Infected object
- Kaspersky Lab update servers
- Kaspersky Security Network (KSN)
- Keylogger
- License term
- Phishing
- Probable spam
- Probably infected object
- Protected Browser
- Protection components
- Protocol
- Quarantine
- Rootkit
- Script
- Security level
- Spam
- Startup objects
- Task
- Task settings
- Threat level
- Traces
- Traffic scanning
- Trust group
- Trusted process
- Unknown virus
- Update
- Update package
- Virus
- Vulnerability
- AO Kaspersky Lab
- Information about third-party code
- Trademark notices
Kaspersky Total Security
This section describes the functions, components, and distribution kit of Kaspersky Total Security, and provides a list of hardware and software requirements of Kaspersky Total Security.
What's new
Kaspersky Total Security provides the following new features:
- Tutorials for the main application components available in the main window have been added.
- Software Updater functionality has been added. Using this component, you can manage updates for applications that are installed on your computer. For example, you can automatically install only important updates or all updates.
- Kaspersky Secure Connection has been added. This application protects your data on public Wi-Fi networks and provides anonymity on the Internet.
- Software Cleaner functionality has been added. Using this component, you can remove applications from your computer, such as rarely used applications or applications that were installed without your consent.
- Wi-Fi network connection notifications have been improved. Wi-Fi network categorization issues have been fixed.
- Anti-Banner component operation mode has been improved.
- Private Browsing functionality has been improved. Operation of the Kaspersky Protection extension has been improved.
- Safe Money functionality has been improved. An option to send feedback has been added.
- Application upgrade in the background mode has been improved. You no longer have to accept the terms of the End User License Agreement again during the upgrade unless those terms have been changed.
- Mail Anti-Virus has been improved. The default level of heuristic analysis has been increased to medium.
Distribution kit
You can purchase the application in one of the following ways:
- Boxed. Distributed via stores of our partners.
- At the eStore. Distributed at online stores of Kaspersky Lab (for example, http://www.kaspersky.com, in the Online Shop section) or via partner companies.
If you purchase the boxed version of the application, the distribution kit contains the following items:
- Sealed envelope with the setup CD, which contains application files and documentation files
- Brief User Guide, with an activation code
- License Agreement, which stipulates the terms on which you can use the application
The content of the distribution kit may differ depending on the region in which the application is distributed.
If you purchase Kaspersky Total Security at an online store, you copy the application from the website of the store. Information that is required for activating the application, including an activation code, will be sent to you by email after your payment has been received.
Page topAbout Kaspersky Total Security
Kaspersky Total Security provides comprehensive protection against various types of information security threats, network and phishing attacks, and spam. Various functions and protection components are available as part of Kaspersky Total Security to deliver comprehensive protection.
Computer Protection
Protection components are designed to protect the computer against various types of information security threats, network attacks, fraud, and spam. Every type of threat is handled by an individual protection component (see the description of components in this section). You can enable and disable protection components, and configure their settings.
In addition to the real-time protection provided by the security components, we recommend that you regularly scan your computer for viruses and other malware. This is necessary in order to prevent any possible spreading of malicious programs that have not been discovered by protection components, for example, because a low security level was set or for other reasons.
To keep Kaspersky Total Security up to date, you need to update the databases and application modules used by the application.
Some specific tasks that should be run occasionally (such as removal of traces of a user's activities in the operating system) are performed by using advanced tools and wizards.
The following protection components stand guard over your computer in real time:
What follows is a description of the logic of how the protection components interact when Kaspersky Total Security has been set to the mode that is recommended by Kaspersky Lab specialists (in other words, with the default application settings).
File Anti-Virus
File Anti-Virus prevents infection of the computer's file system. The component starts upon startup of the operating system, continuously remains in the computer's RAM, and scans all files that are opened, saved, or launched on your computer and all connected drives. Kaspersky Total Security intercepts each attempt to access a file and scans the file for known viruses and other malware. Further access to the file is allowed only if the file is not infected or is successfully disinfected by the application. If a file cannot be disinfected for any reason, it is deleted. A copy of the file is moved to Quarantine when that happens. If an infected file is placed in the same location where the deleted file with the same name used to be, Quarantine saves only a copy of the last file. A copy of the previous file with the same name is not saved.
Mail Anti-Virus
Mail Anti-Virus scans incoming and outgoing email messages on your computer. An email message is available to the recipient only if it does not contain dangerous objects.
Web Anti-Virus
Web Anti-Virus intercepts and blocks the execution of scripts on websites if they pose a threat. Web Anti-Virus also monitors all web traffic and blocks access to dangerous websites.
IM Anti-Virus
IM Anti-Virus ensures the safe use of IM clients. The component protects information that comes to your computer via IM protocols. IM Anti-Virus ensures safe operation of various applications for instant messaging.
Application Control
Application Control logs actions performed by applications in the operating system, and manages applications' activities based on the group to which the component has assigned an application. A set of rules is specified for each group of applications. These rules manage the applications' access to various operating system resources.
Application Manager
Application Manager lets you manage applications installed on the computer and control changes that applications make to operating system settings. Certain browser settings and proxy server settings belong to the controlled settings.
Webcam Protection
Webcam Protection blocks unauthorized access to the webcam and notifies you that access has been blocked.
Firewall
Firewall ensures your security when you use local networks and the Internet. The component filters all network activities by using rules of two types: rules for applications and packet rules.
Network Monitor
Network Monitor is designed for monitoring network activity in real time.
System Watcher
The System Watcher component rolls back the changes made to the operating system by malware. The component protects against malware, including exploits, screen lockers, and encryptors that encrypt data and extort ransom for restoring files to their original state. Disabling this component is not recommended.
Network Attack Blocker
Network Attack Blocker loads at operating system startup and tracks incoming network traffic for activities characteristic of network attacks. When an attempt to attack your computer is detected, Kaspersky Total Security blocks all network activity from the attacking computer that is aimed at your computer.
Anti-Spam
Anti-Spam integrates into the email client installed on your computer and scans all incoming email messages for spam. All messages containing spam are marked with a special header. You can configure Anti-Spam to handle spam messages in a particular way (for example, delete them automatically or move them to a special folder).
Anti-Phishing
Anti-Phishing allows checking URLs to find out if they are included in the list of phishing URLs. This component is built into Web Anti-Virus, Anti-Spam, and IM Anti-Virus.
Anti-Banner
Anti-Banner blocks ad banners on websites and in application interfaces.
Private Browsing
Private Browsing detects requests sent by the browser to tracking services and can modify requests to and responses from tracking services in a way that protects you from tracking of your online activity.
Safe Money
Safe Money provides protection of confidential data when using online banking services and payment systems, and prevents theft of funds when making online payments.
Secure Keyboard Input
Secure Keyboard Input provides protection from keyloggers for personal data entered on websites. On-Screen Keyboard prevents interception of data entered on the hardware keyboard and protects personal data against interception attempts that use screen shots.
Trusted Applications mode
Trusted Applications mode protects the computer from applications that may be unsafe. When Trusted Applications mode is enabled, Kaspersky Total Security allows running only applications that are identified as trusted (for example, based on information about an application from Kaspersky Security Network, or a trusted digital signature).
Parental Control
Parental Control is designed to protect children and teenagers from threats related to computer and Internet use.
Parental Control allows you to set flexible restrictions on access to web resources and applications for different users depending on their age. In addition, Parental Control allows viewing statistical reports on the activities of controlled users.
Protection for all devices
If a computer has Kaspersky Total Security installed, you can manage protection of this computer remotely from My Kaspersky portal.
Backup and Restore
Backup and Restore functionality is designed to protect your data against loss as a result of hardware failures. Kaspersky Total Security can perform scheduled data backups to removable drives, network and online storages. You can copy files by category and specify the number of versions of the same file to store.
Data Encryption
Data Encryption is designed to protect your confidential data against unauthorized access. You can unlock a data vault and view its contents only after entering a password.
Page topHardware and software requirements
General requirements:
- 920 MB free disk space on the hard drive
- Processor that supports the SSE2 instruction set
- CD-/DVD-ROM (for installing from the installation CD)
- Internet access (for the application installation and activation, for the use of Kaspersky Security Network, and for updating databases and application modules)
- Microsoft Internet Explorer 8.0 or later
To access My Kaspersky portal, we recommend using Microsoft Internet Explorer 9.0 or later.
- Microsoft Windows Installer 3.0 or later
- Microsoft .NET Framework 4 or later
- Webcam access protection is provided only for compatible webcam models
Requirements for Microsoft Windows XP Home Edition (Service Pack 3 or later), Microsoft Windows XP Professional (Service Pack 3 or later), and Microsoft Windows XP Professional x64 Edition (Service Pack 2 or later):
- Processor with a clock speed of 1 GHz or higher
- 512 MB free RAM
Requirements for Microsoft Windows Vista Home Basic (Service Pack 1 or later), Microsoft Windows Vista Home Premium (Service Pack 1 or later), Microsoft Windows Vista Business (Service Pack 1 or later), Microsoft Windows Vista Enterprise (Service Pack 1 or later), Microsoft Windows Vista Ultimate (Service Pack 1 or later), Microsoft Windows 7 Starter (Service Pack 1 or later), Microsoft Windows 7 Home Basic (Service Pack 1 or later), Microsoft Windows 7 Home Premium (Service Pack 1 or later), Microsoft Windows 7 Professional (Service Pack 1 or later), Microsoft Windows 7 Ultimate (Service Pack 1 or later), Microsoft Windows 8, Microsoft Windows 8 Pro, Microsoft Windows 8 Enterprise, Microsoft Windows 8.1 (Windows 8.1 Update), Microsoft Windows 8.1 Pro (Windows 8.1 Update), Microsoft Windows 8.1 Enterprise (Windows 8.1 Update), Microsoft Windows 10 Home (TH1, TH2, RS1, RS2, RS3, RS4, RS5), Microsoft Windows 10 Enterprise (TH1, TH2, RS1, RS2, RS3, RS4, RS5), and Microsoft Windows 10 Pro (TH1, TH2, RS1, RS2, RS3, RS4, RS5):
- Processor with a clock speed of 1 GHz or higher
- 1 GB free RAM (for 32-bit operating systems); 2 GB free RAM (for 64-bit operating systems)
Supported browsers:
- Microsoft Internet Explorer 8.0, 9.0, 10.0, and 11.0
Internet Explorer 8 – 11 browser with the new Windows user interface is not supported.
- Microsoft Edge versions 20.x – 25.x or later
- Mozilla Firefox versions 52.x – 60.x or later
- Mozilla Firefox ESR 52.x
- Google Chrome versions 44.x – 52.x
Kaspersky Total Security supports Google Chrome and Mozilla Firefox in 32-bit and in 64-bit operating systems.
Requirements for tablet computers:
- Microsoft Tablet PC
- Intel Celeron processor with a clock speed of 1.66 GHz or faster
- 1000 MB free RAM
Requirements for netbooks:
- Intel Atom CPU 1.60 GHz or faster
- 1024 MB free RAM
- 10.1-inch display with 1024x600 screen resolution
- Intel GMA 950 graphics core
Requirements for Kaspersky Password Manager when installed on Microsoft Windows XP Home (32-bit) Service Pack 3 or later, Microsoft Windows XP Professional (32-bit) Service Pack 3 or later, Microsoft Windows XP Professional (64-bit) Service Pack 2 or later:
- Microsoft Internet Explorer 8.0 or later
- Mozilla Firefox 31 or later
- Google Chrome 36 or later
- Yandex.Browser 14.10 or later
About the subscription
A subscription to Kaspersky Total Security establishes use of the application within the selected parameters (expiration date and number of protected devices). You can obtain a subscription for Kaspersky Total Security from a service provider (for example, from your Internet provider). You can pause or resume your subscription, renew it automatically, or cancel it. You can manage your subscription via your personal account page on the service provider's website.
Vendors can provide two types of subscriptions for Kaspersky Total Security: update subscriptions and update and protection subscriptions.
A subscription can be limited (for example, to one year) or unlimited (with no expiration date). To continue using Kaspersky Total Security after a limited subscription expires, you must renew it. Unlimited subscriptions are renewed automatically as long as timely prepayment has been made to the service provider.
When a limited subscription expires, you are given a grace period to renew your subscription. Application functionality remains unchanged during this time.
If the subscription is not renewed before the grace period expires, Kaspersky Total Security stops updating the application databases (in the case of update subscriptions), stops interacting with Kaspersky Security Network, and also stops protecting the computer and running scan tasks (in the case of update and protection subscriptions).
To use Kaspersky Total Security by subscription, apply the activation code received from your service provider. In some cases, an activation code can be downloaded and applied automatically. When using the application by subscription, you cannot apply another activation code to renew your license. You can apply another activation code only when the subscription term expires.
If Kaspersky Total Security is already in use under a current license when you register your subscription, after registration Kaspersky Total Security will be used by subscription. The activation code that you have used to activate the application can be applied on another computer.
To cancel your subscription, contact the service provider from whom you have purchased Kaspersky Total Security.
Depending on the subscription provider, the set of subscription management options may vary. In addition, you may not be provided with a grace period during which you can renew the subscription.
Page topAbout data provision
You agree to automatically submit the information specified below to AO Kaspersky Lab via the installed software (hereinafter "the Software"), the rights to which belong to AO Kaspersky Lab (hereinafter "Kaspersky Lab" or "the Rightholder"), for the purposes of improving the quality of real-time protection and generating the most suitable informational and advertising offers, improving the quality of operation of the software and the timely detection and rectification of errors associated with the mechanism for installation, removal and update of the software, accounting for the number of users, and for the purpose of evaluating the effectiveness of and improving the quality of the Protect a Friend program:
- Information on the checksums of files being processed (MD5 and SHA256), ID of the version of software configurations, information needed to determine the reputation of an URL (including the URL whose reputation is requested, the ID of the connection protocol, and the number of the port used), the full version and type of the utilized software, the unique software installation ID, information about the types of threats detected, the ID of the detected threat in the database of threats, the name of the threat according to the Rightholder's classification, the ID of the scan task during which the threat was detected, the checksum (MD5) of the emulation template and the template size, the versions of emulator components and their configuration settings, as well as information on utilized digital certificates and the information necessary to verify their authenticity, including checksums (SHA256) of the certificate with which the scanned object is signed, and the public certificate key, the name of the Wi-Fi network (SSID) to which the computer is connected at the moment when the data was submitted, the checksums (MD5 and SHA256) of the MAC address (BSSID) of the access point, the ID of the type of authentication when connecting to the Wi-Fi network, the checksums (SHA256) received when using the unique computer ID, the unique ID of the software's installation on the computer, the name of the wireless network and the MAC address of the access point, the list of available Wi-Fi networks at the moment when the data is submitted, the values of DHCP settings, the domain name and checksum (SHA256) of the path from the URL address of Internet access provision service, the values of the security settings, and the WPS access points (Wi-Fi Protected Setup).
- Information about the computer, the utilized license, the utilized product and its settings, including the bit rate, the type and version of the operating system installed on the computer, the unique ID of the computer with the installed software, the unique ID of the user in the Rightholder's services, the type, version and language localization of the installed software, the ID of the software installer, information about the utilized license (including the type of license, validity period, the application activation date and the license expiration date, ID of the license and information about the User's acquisition of the license, the current status of the license, the ID of the sequence of the utilized licenses, the version of the protocol for interaction with the activation service), information about registration of the license and connection of the software to the Rightholder's services. This also includes provision of information about the type of operation performed by the User in response to the offer displayed, the ID of the offer, the ID of the link contained in the offer, the date and time when the offer was displayed, the number of days until license expiration, and the number of days since activation at the time when the offer was shown.
- Information about hardware installed on the computer, including information on the manufacturer, the model and capacity of the hard drive (HDD), the size of the physical and virtual memory, the RAM manufacturer, the manufacturer and model of the motherboard, the manufacturer and name of the BIOS application, the model and quantity of cores in the installed processor, the manufacturer and model of the video card and the size of the video RAM, the manufacturer and type of network adapter, its data transfer speed, the manufacturer and name of the monitor, the manufacturer and model of the computer, the manufacturer, model and type of computer housing, and the battery indicator. Information about the devices connected to the computer: the class / model of the device, the manufacturer of the device and name, and the date on which the device last connected to the computer. Information about devices that support the UPnP protocol, including the name of the manufacturer, model and name of the device, as well as the date of last connection. Information about the system load, including the free and used memory, and the size of free disk space.
- Information about all installed applications, including the name and version of the installed application, the versions of the installed updates, the name of the publisher, the date of installation and the full path to the installation folder on the computer, and the configuration (settings) of applications (including browsers).
- The name of the computer on the network (local and domain name), regional OS settings (including information on the time zone, the default keyboard layout, and interface language), UAC settings, OS network firewall settings and its activity indicator, OS parental control settings, and Windows Update settings.
- Aggregated information about User activity on the computer, including the duration of the User's interaction with the computer, the period of information aggregation, the total number of events during this period, and aggregated information about processes started by the User in the system, including the name of the process, the total number of times the process was run, the total duration of its operation, the checksum (CRC64) of the account name from which the process was started, the full path to the process file, information about the product to which the process is associated (name, description, manufacturer, and version), the total number of times the product window was displayed, and the total duration of its display, statistical parameters of the window name, including the name localization language and the distribution of words in the name.
- Information about visited websites, including the domain parts of URL addresses that the User entered into the address bar of the browser or that the User opened from search systems, the type of website opened by the User, the total number and total duration of its visits, its statistical parameters, including the language and distribution of words in the text.
- Information about use of the product's graphical user interface, including the time of User interaction with the interface, the IDs of the utilized control elements, and the type of user interaction with the interface.
- Information about the date of installation and activation of the software on the computer, the duration of the software installation task, the ID of the installation task result, the ID of the installation task, the ID of the partner from which the license was acquired, the type of installation of the software on the computer (initial installation, upgrade, etc.), and the indicator of installation success or the installation error number, the type and ID of the application with which the upgrade is performed, the upgrade task ID, indicator of the User's participation in KSN and in the Protect a Friend program (including the ID of the program available for the software), IDs of third-party software that was offered for installation, and that was selected by the User for installation and that was installed together with the software, the duration of software installation, indicator of software installation interruption by the user, and the ID of the software upgrade campaign.
- Information about the unique ID of the User participating in the Program, the ID of the type of action, the ID of the badge (achievement), the ID of the active Program, and the name of the social network where the User posted a link, profile, or badge (achievement).
To improve the quality of protection of users performing payment transactions on the Internet, you agree to automatically provide the financial website with information about the name and version of the Software and the Software customization setting, the ID of the Software plug-in in the web browser used to access the financial website, and the ID showing whether a safe browser or a regular browser was used.
The information transmitted does not contain any personal data or other confidential information of the User and is needed for the operation of the Rightholder's Software, unless expressly stated otherwise.
The information received is protected by the Rightholder in the manner prescribed by the law and is required for the operation of the Software made available to use under the license.
Kaspersky Lab may use the acquired statistical data based on the information collected to monitor trends in computer security threats and publish reports on those threats.
Page topPurchasing a license
You can purchase a license or renew an existing license. On purchasing a license, you will receive an activation code that you have to apply to activate the application.
To purchase a license:
- Open the main application window.
- Open the Licensing window in one of the following ways:
- By clicking the License is missing link in the lower part of the main window if the application is not activated.
- By clicking the License link in the lower part of the main window if the application is activated.
- In the window that opens, click the Purchase license button.
The web page of Kaspersky Lab eStore or a partner company opens on which you can purchase a license.
Page topActivating the application
To make use of the features of the application and its additional services, you must activate it.
If you did not activate the application during installation, you can do so later. You will be reminded about the need to activate the application by Kaspersky Total Security messages that appear in the taskbar notification area.
To activate Kaspersky Total Security:
- Open the main application window.
- In the lower part of the main application window, click the Enter activation code link. The Activation window opens.
- In the Activation window, enter the activation code in the entry field and click the Activate button.
An application activation request is made.
- Enter the user's registration data.
Depending on the terms of use, the application can prompt you to log in to My Kaspersky portal. If you are not a registered user, complete the registration form to gain access to additional features.
Registered users can perform the following actions:
- Contact Technical Support and the Virus Lab
- Manage activation codes
- Receive information about new applications and special offers from Kaspersky Lab
This step is not available in all versions of Kaspersky Total Security.
- Click the Done button in theActivation window to complete the registration procedure.
Renewing a license
You can renew the license. To do this, you can specify a new activation code without waiting for the current license to expire. When the current license expires, Kaspersky Total Security is activated automatically with the extra activation code.
To specify an extra activation code for automatic renewal of the license:
- Open the main application window.
- In the lower part of the main window, click the License link to open the Licensing window.
- In the window that opens, in the New activation code section, click the Enter activation code button.
- Enter the activation code in the corresponding fields and click the Add button.
Kaspersky Total Security then sends the data to the Kaspersky Lab activation server for verification. After the license expires, the activation server rechecks the data during the first attempt to activate the application with the new activation code.
- Click the Done button.
The new activation code will be displayed in the Licensing window.
The application is automatically activated with the new activation code when the license expires. You can also activate the application manually with a new activation code, by clicking the Activate now button. This button is available if the application has not been activated automatically. This button is unavailable before the license expires.
If the new activation code that you specify has already been applied on this computer or on another computer, the activation date for the purpose of renewing the license is the date on which the application was first activated with this activation code.
Page topManaging application notifications
Notifications that appear in the taskbar notification area inform you of application events that require your attention. Depending on how critical the event is, you may receive the following types of notifications:
- Critical notifications inform you of events that have critical importance for the computer's security, such as detection of a malicious object or dangerous activity in the operating system. Windows used for critical notifications and pop-up messages are red.
- Important notifications inform you of events that are potentially important for the computer's security, such as detection of a probably infected object or suspicious activity in the operating system. Windows used for important notifications and pop-up messages are yellow.
- Information notifications inform you of events that do not have critical importance for the computer's security. Windows used for information notifications and pop-up messages are green.
If a notification is displayed on the screen, you should select one of the options that are suggested in the notification. The optimal option is the one recommended as the default by Kaspersky Lab experts.
A notification can be closed automatically when the computer is restarted, when Kaspersky Total Security is quit, or in Connected Standby mode in Windows 8. Application Control notifications are closed automatically after 500 seconds. Notifications about the startup of applications are closed after 1 hour. When a notification is closed automatically, Kaspersky Total Security performs the default recommended action.
Notifications are not displayed during the first hour of application operation if you have purchased a computer with Kaspersky Total Security preinstalled (OEM distribution). The application processes detected objects in accordance with the recommended actions. The results of this processing are saved in a report.
Installing and removing the application
This section contains step-by-step instructions for Kaspersky Total Security installation and removal.
Standard installation procedure
Kaspersky Total Security will be installed to your computer in interactive mode using the Setup Wizard.
The Wizard consists of a series of pages (steps), which you can navigate through by clicking the Back and Next buttons. To close the Wizard after it finishes, click the Done button. To stop the Wizard's activity at any step of installation, close the Wizard window.
If the application will be used to protect more than one computer (with the maximum number of computers defined by the terms of the End User License Agreement), the installation procedure will be identical on all computers.
To install Kaspersky Total Security on your computer,
On the installation CD, run the file with the .exe extension.
The application is then installed with the help of a standard Setup Wizard.
In some regions, the installation CD does not include the application installation package. The installation CD contains only the autorun file. When this file is executed, the application download window opens.
To install Kaspersky Total Security using the autorun file:
- Click the Download and Install button in the application download window.
By clicking the Download and Install button, you send information about the version of your operating system to Kaspersky Lab.
- If the download failed, click the Download and install manually from website link that will take you to a website where you can download the application manually.
To install Kaspersky Total Security, you can also download an installation package from the Internet. In this case, the Setup Wizard displays several additional installation steps for some localization languages.
Along with the application, plug-ins for browsers are installed to ensure safe Internet browsing.
When you run audio and video recording or playback applications for the first time since installation of Kaspersky Total Security, audio and video playback or recording may be interrupted. This is required to enable the functionality that controls access by applications to sound recording devices. The system service that controls audio hardware is restarted when Kaspersky Total Security is run for the first time.
Kaspersky Total Security is installed together with the Kaspersky Secure Connection application intended for establishing a secure connection via Virtual Private Network (VPN). You can remove Kaspersky Secure Connection separately from Kaspersky Total Security. If the use of VPN is prohibited in your country, Kaspersky Secure Connection is not installed.
Checking for a newer version of the application
Before installation, the Setup Wizard checks the update servers of Kaspersky Lab for a newer version of Kaspersky Total Security.
If the Setup Wizard does not detect any newer version of the application on Kaspersky Lab update servers, it starts installing the current version.
If the Setup Wizard detects a newer version of Kaspersky Total Security on Kaspersky Lab update servers, it prompts you to download and install it on your computer. It is recommended that you install the new version of the application, because newer versions include more enhancements that allow you to ensure more reliable protection of your computer. If you refuse to install the new version, the Wizard starts installing the current version of the application. If you agree to install the new version of the application, the Setup Wizard copies the files from the installation package to your computer and starts installing the new version.
Page topStarting installation of the application
During this step, the Setup Wizard offers to install the application.
To proceed with installation, click the Continue button.
Depending on the installation type and the localization language, during this step the Setup Wizard may prompt you to view the License Agreement concluded between you and Kaspersky Lab, as well as ask whether you want to participate in Kaspersky Security Network.
Page topReviewing the End User License Agreement
This step of the Setup Wizard is displayed for some localization languages when installing Kaspersky Total Security from an installation package downloaded from the Internet.
During this step, the Setup Wizard asks you to review the End User License Agreement concluded between you and Kaspersky Lab.
Read the End User License Agreement thoroughly and, if you agree with all of its terms, click the Accept button. Installation of the application to your computer then continues.
If the terms of the End User License Agreement are not accepted, the application will not be installed.
Page topKaspersky Security Network Statement
During this step, the Setup Wizard invites you to participate in Kaspersky Security Network. Participation in the program involves sending information about threats detected on your computer, running applications, and downloaded signed applications, as well as information about your operating system, to AO Kaspersky Lab. No personal data received from you is collected, processed, or stored.
Review the Kaspersky Security Network Statement. If you accept all of its terms, in the Wizard window, click the Accept button.
If you do not want to participate in Kaspersky Security Network, click the Decline button.
After you accept or decline participation in Kaspersky Security Network, application installation continues.
Page topInstalling the application
Some versions of Kaspersky Total Security are distributed by subscription, and a password received from the service provider must be entered before installation.
After you enter the password, application installation starts.
Installation of the application can take some time. Wait for it to finish.
Upon installation completion, the Setup Wizard automatically proceeds to the next step.
Kaspersky Total Security performs several checks during installation. These checks may detect the following problems:
- Non-compliance of the operating system with the software requirements. During installation the Wizard checks the following conditions:
- Whether the operating system and Service Pack meet the software requirements
- All the required applications are available
- The amount of free disk space is enough for installation
- The user installing the application has administrator privileges
If any of the above-listed requirements is not met, a corresponding notification is displayed.
- Presence of incompatible applications on the computer. If any incompatible applications are detected, they are displayed in a list on the screen, and you will be prompted to remove them. You are advised to manually remove any applications that Kaspersky Total Security cannot remove automatically. When removing incompatible applications, you will need to restart your operating system, after which installation of Kaspersky Total Security continues automatically.
- Presence of malicious programs on the computer. If any malicious programs that interfere with installation of anti-virus software are detected on the computer, the Setup Wizard prompts you to download Kaspersky Virus Removal Tool, a special tool designed to neutralize infections.
If you agree to install the utility, the Setup Wizard downloads it from the Kaspersky Lab servers, after which installation of the utility starts automatically. If the Wizard cannot download the utility, you are prompted to download it on your own by clicking the link provided.
Completing installation
During this step, the Wizard informs you of the completion of application installation.
Click the Done button.
All necessary application components will be automatically started immediately after installation is complete.
In some cases, you may need to restart your operating system to complete installation.
Page topActivating the application
The Activation Wizard is started at the first launch of Kaspersky Total Security.
Activation is the process of making operational a fully functional version of the application for a specified period of time.
If you have purchased a license for Kaspersky Total Security and downloaded the application from an online store, the application can be activated automatically during installation.
The following options for Kaspersky Total Security activation are offered:
- Activate application. Select this option and enter an activation code if you have purchased a license for the application.
If you specify an activation code for Kaspersky Internet Security or Kaspersky Anti-Virus in the entry field, the procedure for switching to Kaspersky Internet Security or Kaspersky Anti-Virus starts after activation is completed.
- Activate trial version of the application. Select this activation option if you want to install the trial version of the application before making a decision on whether to purchase a license. You will be able to use the application and all of its features during a short evaluation period. When the trial license expires, the trial version of the application cannot be activated for a second time.
An Internet connection is required for activation of the application.
During application activation, you may have to register on My Kaspersky portal.
Registering a user
This step is not available in all versions of Kaspersky Total Security.
Registered users are able to send requests to Technical Support and the Virus Lab through My Kaspersky portal, manage activation codes conveniently, and receive the latest information about new applications and special offers from Kaspersky Lab.
If you agree to register, specify your registration data in the corresponding fields and click the Sign in button to send the data to Kaspersky Lab.
In some cases user registration is required to start using the application.
Page topCompleting activation
The Wizard informs you that Kaspersky Total Security has been successfully activated.
Click the Done button to exit the Wizard.
Page topInstalling the application from the command prompt
You can install Kaspersky Total Security from the command prompt.
Command prompt syntax:
<path to the file of the installation package> [parameters]
Detailed instructions and a list of installation settings are available on the Technical Support website.
Page topGetting started
In order for Kaspersky Total Security to fully support browsers, the Kaspersky Protection extension has to be installed and enabled in browsers. Kaspersky Total Security uses the Kaspersky Protection extension to embed a script into the web page opened in Protected Browser and into traffic. The application uses this script to interact with the web page and to transmit data to banks whose websites are protected by the Safe Money component. The application protects data transmitted by the script using a digital signature. Kaspersky Total Security can embed the script without using the Kaspersky Protection extension.
Kaspersky Total Security signs data transmitted by the script using the installed anti-virus databases and requests to Kaspersky Security Network. The application sends requests to Kaspersky Security Network regardless of whether or not you accepted the terms of the Kaspersky Security Network Statement.
The Kaspersky Protection extension is installed in browsers during installation of Kaspersky Total Security.
After installing Kaspersky Total Security, you have to enable the Kaspersky Protection extension:
- In Mozilla Firefox, you have to allow the Kaspersky Protection extension to be enabled. If you refuse to enable the extension, you will later need to install and enable the Kaspersky Protection extension manually by installing it from the Firefox Add-ons website.
- In Google Chrome, you have to allow the Kaspersky Protection extension to be enabled. If you refuse to enable the extension, you will later need to install and enable the Kaspersky Protection extension manually by installing it from the Chrome web store.
- In the Microsoft Edge browser running under Microsoft Windows 10, you must manually install the Kaspersky Protection extension from Windows Store. You can proceed to install the extension from the notification in Notification Center. After you have installed the Kaspersky Protection extension in the Microsoft Edge browser, you must activate this extension. Removal of the Kaspersky Protection extension from the browser can only be performed manually.
In the Microsoft Internet Explorer, the Kaspersky Protection extension is enabled automatically.
If your computer is running the Windows 10 operating system, you have to install the Kaspersky Protection extension in the Microsoft Internet Explorer browser manually. You can proceed to installing the extension using the informational message in Notification Center.
Page topUpgrading a previous version of the application
Installing Kaspersky Total Security over a previous version of Kaspersky Total Security or over Kaspersky PURE
If an earlier version of Kaspersky Total Security or Kaspersky PURE is already installed on your computer, you can upgrade it to the latest version of Kaspersky Total Security. If you have a current license for Kaspersky PURE or a previous version of Kaspersky Total Security, you do not need to activate the application: the Setup Wizard will automatically retrieve information about the license and apply it during installation of Kaspersky Total Security.
If you had previously created a container in Kaspersky PURE, on first access to the container, Kaspersky Total Security converts it to a data vault. Files in the data vault become available when the conversion is complete.
Installing Kaspersky Total Security over Kaspersky Internet Security
If you install Kaspersky Total Security on a computer on which Kaspersky Internet Security with a current license is already installed, the Activation Wizard prompts you to select one of the following options:
- Continue using Kaspersky Internet Security under the current license. In this case, the Migration Wizard will be started. When the Migration Wizard finishes, Kaspersky Internet Security will be installed to your computer. You can use Kaspersky Internet Security until the license for the previous version of Kaspersky Internet Security expires.
- Proceed with installation of the new version of Kaspersky Total Security. In this case, the application is installed and activated according to the standard scenario.
Kaspersky Total Security will be installed to your computer in interactive mode using the Setup Wizard.
The Wizard consists of a series of pages (steps), which you can navigate through by clicking the Back and Next buttons. To close the Wizard after it finishes, click the Done button. To stop the Wizard's activity at any step of installation, close the Wizard window.
If the application will be used to protect more than one computer (with the maximum number of computers defined by the terms of the End User License Agreement), the installation procedure will be identical on all computers.
To install Kaspersky Total Security on your computer,
On the installation CD, run the file with the .exe extension.
The application is then installed with the help of a standard Setup Wizard.
In some regions, the installation CD does not include the application installation package. The installation CD contains only the autorun file. When this file is executed, the application download window opens.
To install Kaspersky Total Security using the autorun file:
- Click the Download and Install button in the application download window.
By clicking the Download and Install button, you send information about the version of your operating system to Kaspersky Lab.
- If the download failed, click the Download and install manually from website link that will take you to a website where you can download the application manually.
To install Kaspersky Total Security, you can also download an installation package from the Internet. In this case, the Setup Wizard displays several additional installation steps for some localization languages.
Along with the application, plug-ins for browsers are installed to ensure safe Internet browsing.
When you run audio and video recording or playback applications for the first time since installation of Kaspersky Total Security, audio and video playback or recording may be interrupted. This is required to enable the functionality that controls access by applications to sound recording devices. The system service that controls audio hardware is restarted when Kaspersky Total Security is run for the first time.
Kaspersky Total Security is installed together with the Kaspersky Secure Connection application intended for establishing a secure connection via Virtual Private Network (VPN). You can remove Kaspersky Secure Connection separately from Kaspersky Total Security. If the use of VPN is prohibited in your country, Kaspersky Secure Connection is not installed.
Certain limitations apply to the upgrade from the previous version.
Checking for a newer version of the application
Before installation, the Setup Wizard checks the update servers of Kaspersky Lab for a newer version of Kaspersky Total Security.
If the Setup Wizard does not detect any newer version of the application on Kaspersky Lab update servers, it starts installing the current version.
If the Setup Wizard detects a newer version of Kaspersky Total Security on Kaspersky Lab update servers, it prompts you to download and install it on your computer. It is recommended that you install the new version of the application, because newer versions include more enhancements that allow you to ensure more reliable protection of your computer. If you refuse to install the new version, the Wizard starts installing the current version of the application. If you agree to install the new version of the application, the Setup Wizard copies the files from the installation package to your computer and starts installing the new version.
Page topStarting installation of the application
During this step, the Setup Wizard offers to install the application.
To proceed with installation, click the Continue button.
Depending on the installation type and the localization language, during this step the Setup Wizard may prompt you to view the License Agreement concluded between you and Kaspersky Lab, as well as ask whether you want to participate in Kaspersky Security Network.
Page topReviewing the End User License Agreement
This step of the Setup Wizard is displayed for some localization languages when installing Kaspersky Total Security from an installation package downloaded from the Internet.
During this step, the Setup Wizard asks you to review the End User License Agreement concluded between you and Kaspersky Lab.
Read the End User License Agreement thoroughly and, if you agree with all of its terms, click the Accept button. Installation of the application to your computer then continues.
If the terms of the End User License Agreement are not accepted, the application will not be installed.
Page topKaspersky Security Network Statement
During this step, the Setup Wizard invites you to participate in Kaspersky Security Network. Participation in the program involves sending information about threats detected on your computer, running applications, and downloaded signed applications, as well as information about your operating system, to AO Kaspersky Lab. No personal data received from you is collected, processed, or stored.
Review the Kaspersky Security Network Statement. If you accept all of its terms, in the Wizard window, click the Accept button.
If you do not want to participate in Kaspersky Security Network, click the Decline button.
After you accept or decline participation in Kaspersky Security Network, application installation continues.
Page topInstalling the application
Some versions of Kaspersky Total Security are distributed by subscription, and a password received from the service provider must be entered before installation.
After you enter the password, application installation starts.
Installation of the application can take some time. Wait for it to finish.
Upon installation completion, the Setup Wizard automatically proceeds to the next step.
Kaspersky Total Security performs several checks during installation. These checks may detect the following problems:
- Non-compliance of the operating system with the software requirements. During installation the Wizard checks the following conditions:
- Whether the operating system and Service Pack meet the software requirements
- All the required applications are available
- The amount of free disk space is enough for installation
- The user installing the application has administrator privileges
If any of the above-listed requirements is not met, a corresponding notification is displayed.
- Presence of incompatible applications on the computer. If any incompatible applications are detected, they are displayed in a list on the screen, and you will be prompted to remove them. You are advised to manually remove any applications that Kaspersky Total Security cannot remove automatically. When removing incompatible applications, you will need to restart your operating system, after which installation of Kaspersky Total Security continues automatically.
- Presence of malicious programs on the computer. If any malicious programs that interfere with installation of anti-virus software are detected on the computer, the Setup Wizard prompts you to download Kaspersky Virus Removal Tool, a special tool designed to neutralize infections.
If you agree to install the utility, the Setup Wizard downloads it from the Kaspersky Lab servers, after which installation of the utility starts automatically. If the Wizard cannot download the utility, you are prompted to download it on your own by clicking the link provided.
Completing installation
During this step, the Wizard informs you of the completion of application installation.
Restart the operating system after the application has been installed.
Click the Done button. All necessary application components will be automatically started immediately after installation is complete.
Page topRemove the application
After removing Kaspersky Total Security, your computer and personal data will be unprotected.
Kaspersky Total Security is uninstalled with the help of the Setup Wizard.
To start the Wizard on a computer running under Microsoft Windows 7 or earlier versions,
in the Start menu, select All Programs -> Kaspersky Total Security -> Remove Kaspersky Total Security.
To start the Wizard on a computer running under Microsoft Windows 8 or a later operating system:
- On the start screen, right click the Kaspersky Total Security tile to call up the toolbar.
- Click the Remove button on the toolbar.
- In the window that opens, select Kaspersky Total Security in the list.
- Click the Remove button in the upper part of the list.
Entering the password to remove the application
To remove Kaspersky Total Security, you must enter the password for accessing the application settings. If you cannot specify the password, for any reason, application removal will be prohibited.
This step is displayed only if a password has been set for application removal.
Page topSaving data for future use
During this step you can specify which of the data used by the application you want to keep for further use during the next installation of the application (for example, when installing a newer version of the application).
You can save the following data:
- License information is a set of data that rules out the need to activate the application during future installation, by allowing you to use it under the current license unless the license expires before you start the installation.
- Quarantine files are files scanned by the application and moved to Quarantine.
After Kaspersky Total Security is removed from the computer, quarantined files become unavailable. To perform operations with these files, Kaspersky Total Security must be installed.
- Operational settings of the application are the values of the application settings selected during configuration.
The settings that you saved during removal of Kaspersky Total Security cannot be used in other Kaspersky Lab applications. If you saved the settings of previously installed versions of Kaspersky Total Security and then removed the latest version of Kaspersky Total Security without saving the settings, the settings of all previously installed versions of the application are also removed.
You can also export the protection settings at the command prompt, by using the following command:
avp.com EXPORT <file_name>. - iChecker data are files that contain information about objects that have already been scanned using .
- Anti-Spam databases are databases with specimens of spam messages added by the user.
- Data Encryption refers to files placed in data vaults for storage.
Confirming application removal
Since removing the application threatens the security of your computer and personal data, you will be asked to confirm your intention to remove the application. To do this, click the Remove button.
Page topCompleting removal
During this step, the Wizard removes the application from your computer. Wait until removal is complete.
After you remove Kaspersky Total Security, you can specify the reason why you decided to remove the application by leaving a comment on the Kaspersky Lab website. To do this, visit the Kaspersky Lab website, by clicking the Complete form button.
This functionality may be unavailable in some regions.
During removal of the application, you must restart your operating system. If you cancel an immediate restart, completion of the removal procedure is postponed until the operating system is restarted or the computer is turned off and then started up.
Page topAbout the End User License Agreement
The End User License Agreement is a binding agreement between you and AO Kaspersky Lab, stipulating the terms on which you may use the application.
Read through the terms of the License Agreement carefully before you start using the application.
You accept the terms of the License Agreement by confirming that you agree with the License Agreement when installing the application. If you do not accept the terms of the License Agreement, you must abort application installation and must not use the application.
Page topAbout the license
A license is a time-limited right to use the application, granted under the End User License Agreement. The license is related to the unique code that you have for activating your copy of Kaspersky Total Security.
A license entitles you to the following kinds of services:
- The right to use the application on one or several devices
The number of devices on which you may use the application is specified in the End User License Agreement.
- Assistance from Kaspersky Lab Technical Support
- Other services available from Kaspersky Lab or its partners during the term of the license
To operate the application, you must purchase a license for application use.
The license has a limited term. License expiration may be followed by a grace period during which you may use all application features without limitations.
If you have not renewed your license, the application may switch to limited functionality mode when the grace period expires. Some application features are unavailable in limited functionality mode. The duration of limited functionality mode depends on your region and licensing terms. When limited functionality mode expires, all application features become unavailable. You may find information about the grace period and limited functionality mode in the Licensing window, which opens by clicking the License link in the lower part of the main window.
We recommend renewing the license before it expires, in order to ensure maximum protection of your computer against all security threats.
Before purchasing a license, you can get a free trial version of Kaspersky Total Security. The trial version of Kaspersky Total Security remains functional during a short evaluation period. After the evaluation period expires, all the features of Kaspersky Total Security are disabled. To continue using the application, you must purchase a license.
If you do not wish to renew protection of your computer, you can remove Kaspersky Total Security.
Page topAbout limited functionality mode
The table below shows which Kaspersky Total Security features are available and which are unavailable when the application is in limited functionality mode. If the value in the Limited functionality mode column is "yes", this means that the relevant functionality is available in limited functionality mode. If the value in the Limited functionality mode column is "no", the relevant functionality is unavailable. Additional information is available in the Restrictions column.
Kaspersky Total Security functionality in limited functionality mode
Functionality |
Restrictions |
Limited functionality mode |
|---|---|---|
File Anti-Virus |
|
yes |
Virus scan |
Scan can be started manually. Scheduled scan and scan settings are unavailable. |
yes |
Vulnerability scan |
|
no |
Update databases and application modules |
Settings cannot be configured. |
yes |
Protection against adware and spyware |
|
yes |
Web Anti-Virus |
Works without restrictions. |
yes |
Mail Anti-Virus |
Works without restrictions. |
yes |
IM Anti-Virus |
Works without restrictions. |
yes |
Heuristic analysis |
Works without restrictions. |
yes |
Protection against rootkits |
|
no |
Automatic Exploit Prevention |
|
no |
System Watcher |
|
no |
Protection against phishing |
|
yes |
Checking of the reputation of files and links in Kaspersky Security Network |
Works without restrictions. |
yes |
Additional protection and management tools |
Works without restrictions. |
yes |
URL Advisor |
|
no |
Secure Keyboard Input |
|
no |
Rescue Disk |
Can be downloaded via the application interface. |
yes |
Password protection of application settings |
Works without restrictions. |
yes |
Performance |
Application performance settings can be configured. |
yes |
Task Manager |
Task Manager only displays the scan results without providing tools for controlling the scan or its settings. |
yes |
Gaming Profile |
Works without restrictions. |
yes |
Threats and Exclusions |
Works without restrictions. |
yes |
Self-Defense |
Works without restrictions. |
yes |
Quarantine |
Works without restrictions. |
yes |
Notifications |
Only the setting that controls delivery of Kaspersky Lab advertisements can be configured. |
yes |
Protect a Friend |
All features of participation in the Protect a Friend program are available. |
yes |
Configuration of application appearance |
Works without restrictions. |
yes |
My Kaspersky Account |
|
yes |
Microsoft Windows Troubleshooting |
Works without restrictions. |
yes |
Application Control |
|
no |
Firewall |
|
no |
Network Attack Blocker |
|
no |
Anti-Spam |
|
no |
Anti-Banner |
|
no |
Safe Money |
|
no |
Safe Search |
|
no |
Private Browsing |
|
no |
Privacy Cleaner |
|
no |
Parental Control |
|
no |
Webcam Protection |
|
no |
Notification on connection to an insecure Wi-Fi network |
|
no |
Network Monitor |
|
no |
Application Manager |
|
no |
Kaspersky Password Manager |
Kaspersky Password Manager is available if it was installed before limited functionality mode became active. If the application was not installed previously, it cannot be installed in limited protection mode. Kaspersky Password Manager cannot be started from the window of Kaspersky Total Security in limited functionality mode. |
no |
Unused Data Cleaner |
|
no |
File Shredder |
|
no |
Data Encryption |
Only access to data in previously created data vaults is available. |
no |
Backup and Restore |
Only recovery of data from previously created backup copies is available. |
no |
Remote management |
Only view and manage activation codes. |
yes |
About the activation code
An activation code is a code that you receive when you purchase a license for Kaspersky Total Security. This code is required for activation of the application.
The activation code is a unique sequence of twenty digits and Latin letters in the format xxxxx-xxxxx-xxxxx-xxxxx.
Depending on how you purchased the application, you can obtain the activation code in one of the following ways:
- When you purchase a boxed version of Kaspersky Total Security, an activation code is provided in the manual or on the retail box that contains the installation CD.
- When you purchase Kaspersky Total Security from an online store, an activation code is emailed to the address that you have specified when ordering.
The license term countdown starts from the date when you activate the application. If you have purchased a license for the use of Kaspersky Total Security on several devices, the license term starts counting down from the moment you first apply the activation code.
If you have lost or accidentally deleted your activation code after activating the application, contact Kaspersky Lab Technical Support to recover your code.
Page topAssessing computer protection status and resolving security issues
Problems with computer protection are symbolized by an indicator located in the upper part of the main application window. Green indicates that your computer is protected. Yellow indicates that there are protection problems and red indicates that your computer's security is at serious risk. You are advised to fix problems and security threats immediately.
Clicking the indicator in the main application window opens the Notification Center window (see the following figure), which contains detailed information about the status of computer protection and suggestions for how to fix the detected problems and threats.
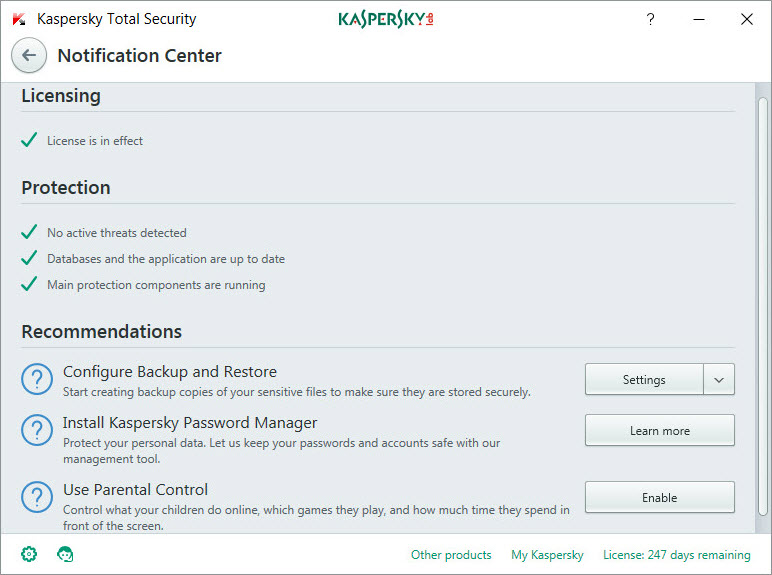
Notification Center window
Problems with protection are grouped by categories. For each problem, a list is displayed of actions that you can take to solve the problem.
Page topUpdate databases and application modules
This section contains information about database and application module updates.
About database and application module updates
The installation package of Kaspersky Total Security includes databases and application modules. Using these databases:
- Kaspersky Total Security detects the majority of threats using Kaspersky Security Network, which requires an Internet connection.
- Kaspersky Total Security does not detect adware, auto dialers, and other legitimate software that can be used by intruders to damage your computer or personal data.
To get full protection, we recommend updating the databases and application modules as soon as the application has been installed.
Databases and program modules are updated in stages:
- Kaspersky Total Security starts updating databases and application modules according to the specified settings: automatically, on schedule, or on demand. The application contacts an update source that stores a database and application module update package.
- Kaspersky Total Security compares the existing databases with the databases available at the update source. If the databases are different, Kaspersky Total Security downloads the missing parts of the databases.
The application then uses the updated databases and application modules to scan the computer for viruses and other threats.
You can use the following update sources:
- Kaspersky Lab update servers
- HTTP or FTP server
- Network folder
Updates of databases and application modules are subject to the following restrictions and specifics:
- Databases become outdated after two days.
- To download an update package from Kaspersky Lab servers, an Internet connection is required.
- Updates of databases and application modules are unavailable in the following cases:
- The license has expired, and the grace period or limited functionality mode is not available.
- A metered mobile Internet connection is used. This limitation applies on computers running under Microsoft Windows 8 or more recent versions of this operating system if automatic updates or scheduled updates are enabled and a traffic limit has been set for a metered mobile connection. If you want the application to update databases and application modules in this case, clear the Limit traffic on metered connections check box under Settings ->Additional ->Network.
- The application is used under subscription, and you have suspended your subscription on the website of the service provider.
Starting an update of databases and application modules
To start an update of databases and application modules,
in the context menu of the application icon located in the taskbar notification area, select the Update item.
To run an update of databases and application modules from the main application window:
- Open the main application window and click the Database update button.
The Database update window opens.
- In the Database update window, click the Run update button.
Scanning the computer
This section provides information about how to scan your computer for viruses and other threats.
Full Scan
During a full scan, Kaspersky Total Security scans the following objects by default:
- System memory
- Objects loaded on operating system startup
- System backup storage
- Hard drives and removable drives
We recommend running a full scan immediately after installing Kaspersky Total Security to your computer.
To start a full scan:
- Open the main application window.
- Click the Scan button.
The Scan window opens.
- In the Scan window, select the Full Scan section.
- In the Full Scan section, click the Run scan button.
Kaspersky Total Security starts a full scan of your computer.
Page topSelective Scan
A Selective Scan lets you scan a file, folder, or drive for viruses and other threats.
You can start a Selective Scan in the following ways:
- From the context menu of the object
- From the main application window
To start a Selective Scan from the context menu of an object:
- Open Microsoft Windows Explorer and go to the folder that contains the object to be scanned.
- Right-click to open the context menu of the object (see the following figure) and select Scan for viruses.

Object context menu
To start a Selective Scan from the main application window:
- Open the main application window.
- Click the Scan button.
The Scan window opens.
- In the Scan window, select the Selective Scan section.
- Specify objects to be scanned in one of the following ways:
- Drag objects to the Selective Scan window.
- Click the Add button and, in the file or folder selection window that opens, specify an object.
- Click the Run scan button.
Quick Scan
During a quick scan, Kaspersky Total Security scans the following objects by default:
- Objects loaded at the startup of the operating system
- System memory
- Disk boot sectors
To start a quick scan:
- Open the main application window.
- Click the Scan button.
The Scan window opens.
- In the Scan window, select the Quick Scan section.
- In the Quick Scan section, click the Run scan button.
Kaspersky Total Security starts a quick scan of your computer.
Page topVulnerability Scan
The operating system and applications installed on your computer may have vulnerabilities that can be exploited by malware. Scanning your computer will help find these vulnerabilities and prevent infection of your computer.
To start a vulnerability scan:
- Open the main application window.
- Click the More Tools button in the lower part of the main window to open the Tools window.
- In the left part of the Tools window, click the Vulnerability Scan link to open the Vulnerability Scan window.
- In the Vulnerability Scan window, click the Run scan button.
Kaspersky Total Security starts scanning your computer for vulnerabilities.
Page topRestoring an object deleted or disinfected by the application
Kaspersky Lab recommends that you avoid restoring deleted and disinfected objects since they may pose a threat to your computer.
To restore a deleted or disinfected object, you can use the backup copy of it that was created by the application during scanning of the object.
Kaspersky Total Security does not disinfect Windows Store apps. If scanning results indicate that such an app is dangerous, it is deleted from your computer.
When a Windows Store app is deleted, Kaspersky Total Security does not create a backup copy of it. To restore such objects, you must use the recovery tools included with the operating system (for detailed information, see the documentation for the operating system that is installed on your computer) or update apps via the Windows Store.
To restore a file that has been deleted or disinfected by the application:
- Open the main application window.
- Click the More Tools button in the lower part of the main window to open the Tools window.
- In the left part of the Tools window, click the Quarantine link to open the Quarantine window.
- In the Quarantine window that opens, select the required file from the list and click the Restore button.
Troubleshooting the operating system after infection
This section provides information about how to restore the operating system after it has been infected with viruses.
Recovering the operating system after infection
If you suspect that the operating system of your computer has been corrupted or modified due to malware activity or a system failure, use the Microsoft Windows Troubleshooting Wizard, which clears the system of any traces of malicious objects. Kaspersky Lab recommends that you run the Wizard after the computer has been disinfected to make sure that all threats and damage caused by infections have been fixed.
The Wizard checks whether there are any changes to the system, which can include access to the network being blocked, file name extensions for known formats being changed, Control Panel being blocked, etc. There are different reasons for these different kinds of damage. These reasons may include malware activity, incorrect system configuration, system failures, or malfunctioning applications for system optimization.
After the review is complete, the Wizard analyzes the information to evaluate whether there is system damage that requires immediate attention. Based on the review, the Wizard generates a list of actions that are necessary to eliminate the damage. The Wizard groups these actions by category based on the severity of the problems detected.
Page topTroubleshooting the operating system by using the Microsoft Windows Troubleshooting Wizard
To run the Microsoft Windows Troubleshooting Wizard:
- Open the main application window.
- Click the More Tools button in the lower part of the main window to open the Tools window.
- In the left part of the Tools window, click the Microsoft Windows Troubleshooting link in the Show more drop-down menu to run the Microsoft Windows Troubleshooting Wizard.
The Microsoft Windows Troubleshooting Wizard window opens.
The Wizard consists of a series of pages (steps), which you can navigate through by clicking the Back and Next buttons. To close the Wizard after it finishes, click the Done button. To stop the Wizard at any stage, click the Cancel button.
Let us review the steps of the Wizard in more detail.
Start recovery of the operating system
Make sure that the Wizard option Search for damage caused by malware activity is selected and click the Next button.
Search for problems
The Wizard searches for problems and damage that should be fixed. When the search is complete, the Wizard proceeds automatically to the next step.
Select actions to fix damage
All damage found at the previous step is grouped based on the type of danger that it poses. For each damage group, Kaspersky Lab recommends a set of actions to repair the damage. There are three groups:
- Strongly recommended actions eliminate problems that pose a serious security threat. You are advised to repair all damage in this group.
- Recommended actions are aimed at repairing damage that may pose a threat. You are also advised to repair damage in this group.
- Additional actions repair operating system damage that is not dangerous now, but may pose a threat to the computer's security in the future.
To view damage within a group, click the ![]() icon to the left of the group name.
icon to the left of the group name.
To get the Wizard to fix a specific type of damage, select the check box to the left of the damage description. By default, the Wizard fixes damage belonging to the groups of recommended and strongly recommended actions. If you do not want to fix a specific type of damage, clear the check box next to it.
It is strongly recommended that you not clear the check boxes selected by default, as doing so will leave your computer vulnerable to threats.
After you define the set of actions for the Wizard to perform, click the Next button.
Fix damage
The Wizard performs the actions selected during the previous step. It may take a while to fix damage. After fixing damage, the Wizard automatically proceeds to the next step.
Wizard completion
Click the Done button to exit the Wizard.
Page topAbout Rescue Disk
The rescue disk is a copy of Kaspersky Rescue Disk stored on a removable drive (a CD or USB device). You can use Kaspersky Rescue Disk for scanning and disinfecting infected computers that cannot be disinfected using other methods (for example, with anti-virus applications).
If you have purchased a boxed version of Kaspersky Total Security, in addition to the Kaspersky Total Security installation package the installation CD also includes Kaspersky Rescue Disk. You can use this installation CD as a Rescue Disk.
More details on using Kaspersky Rescue Disk are available on the Technical Support website.
Page topProtecting email
This section provides information about how to protect your email against spam, viruses, and other threats.
Configuring Mail Anti-Virus
Kaspersky Total Security allows scanning email messages for dangerous objects by using Mail Anti-Virus. Mail Anti-Virus starts when the operating system is started and remains constantly in the RAM of the computer, scanning all email messages that are sent or received over the POP3, SMTP, IMAP, and NNTP protocols, as well as via encrypted connections (SSL) over the POP3, SMTP, and IMAP protocols.
By default, Mail Anti-Virus scans both incoming and outgoing messages. If necessary, you can enable scanning of incoming messages only.
To configure Mail Anti-Virus:
- Open the main application window.
- Click the
 button in the lower part of the window.
The Settings window opens.
- In the left part of the window, in the Protection section, select the Mail Anti-Virus component.
The Mail Anti-Virus settings are displayed in the window.
- Make sure that the switch in the upper part of the window that enables / disables Mail Anti-Virus, is enabled.
- Select a security level:
- Recommended. When this security level is set, Mail Anti-Virus scans incoming and outgoing messages and attached archives, and performs heuristic analysis with the Medium scan level of detail.
- Low. If you select this security level, Mail Anti-Virus scans incoming messages only, without scanning attached archives.
- High. When this security level is set, Mail Anti-Virus scans incoming and outgoing messages and attached archives, and performs heuristic analysis with the Deep scan level of detail.
- In the Action on threat detection drop-down list, select the action that you want for Mail Anti-Virus to perform when an infected object is detected (for example, disinfect).
If no threats are detected in an email message, or if all infected objects have been successfully disinfected, the message becomes available for further access. If the component fails to disinfect an infected object, Mail Anti-Virus renames or deletes the object from the message and adds a notification to the message subject line, stating that the message has been processed by Kaspersky Total Security. Before deleting an object, Kaspersky Total Security creates a backup copy of it and places a copy in Quarantine.
If Kaspersky Total Security detects the password for the archive in the message text during scanning, the password is used to scan the contents of that archive for malware. The password is not saved. The archive is unpacked before scanning. If the application crashes while unpacking the archive, you can manually delete the files that are unpacked at the following path: %systemroot%\temp. The files have the PR prefix.
Page topBlocking unwanted email (spam)
If you receive large amounts of unwanted messages (spam), enable the Anti-Spam component and set the Recommended security level for it.
To enable Anti-Spam and set the Recommended security level:
- Open the main application window.
- Click the button in the lower part of the window.
The Settings window opens.
- In the left part of the window, select the Protection section.
- In the right part of the Protection section, select the Anti-Spam component.
The window displays the settings of Anti-Spam.
- In the right part of the window, enable Anti-Spam by using the switch.
- In the Security level section, make sure that the Recommended security level is set.
The Anti-Spam component can only analyze messages that are fully downloaded from the mail server, regardless of the protocol used.
Page topProtecting personal data on the Internet
This section provides information about how to make your Internet browsing safe and protect your data against theft.
About protection of personal data on the Internet
Kaspersky Total Security helps you to protect your personal data against theft:
- Passwords, user names, and other registration data
- Account numbers and bank card numbers
Kaspersky Total Security includes components and tools that allow you to protect your personal data against theft by criminals who use methods such as
and interception of data entered on the keyboard.Protection against phishing is provided by Anti-Phishing, which is implemented in the Web Anti-Virus, Anti-Spam, and IM Anti-Virus components. Enable these components to ensure comprehensive protection against phishing.
Protection against interception of data entered on the keyboard is provided by On-Screen Keyboard and Secure Keyboard Input.
The Privacy Cleaner Wizard clears the computer of all information about the user's activities.
Safe Money and Secure Connection protect data when you use Internet banking services and shop on online stores.
Protection against personal data transfer via the Internet is provided by one of the Parental Control tools.
About On-Screen Keyboard
When using the Internet, you frequently need to enter your personal data or your user name and password. This happens, for example, during account registration on websites, online shopping, and Internet banking.
There is a risk that personal data can be intercepted by hardware keyboard interceptors or keyloggers, which are programs that record keystrokes. The On-Screen Keyboard tool prevents the interception of data entered via the keyboard.
Many programs classified as spyware can take screenshots, which then are automatically transmitted to an intruder for further analysis to steal the user's personal data. On-Screen Keyboard protects entered personal data from attempts to intercept it by means of screenshots.
On-Screen Keyboard has the following features:
- You can click the On-Screen Keyboard buttons with the mouse.
- Unlike hardware keyboards, it is impossible to press several keys simultaneously on On-Screen Keyboard. This is why key combinations (such as ALT+F4) require that you click the first key (for example, ALT), then the second key (for example, F4), and then the first key again. The second click of the key acts in the same way as releasing the key on a hardware keyboard.
- The On-Screen Keyboard language can be switched by using the same shortcut that is specified by the operating system settings for the hardware keyboard. To do so, right-click the other key (for example, if the LEFT ALT+SHIFT shortcut is configured in the operating system settings for switching the keyboard language, left-click the LEFT ALT key and then right-click the SHIFT key).
To ensure protection of data entered via On-Screen Keyboard, restart your computer after installing Kaspersky Total Security.
The use of On-Screen Keyboard has the following limitations:
- On-Screen Keyboard prevents interception of personal data only when used with the Microsoft Internet Explorer, Mozilla Firefox, or Google Chrome browsers. (In Google Chrome 69.x or later, On-Screen Keyboard does not protect against interception of personal data.) When used with other browsers, On-Screen Keyboard does not protect entered personal data against interception.
- On-Screen Keyboard is not available in Microsoft Internet Explorer browser (versions 10 and 11) with the new Windows user interface style. In this case, we recommend opening On-Screen Keyboard from the interface of Kaspersky Total Security.
- On-Screen Keyboard cannot protect your personal data if the website requiring the entry of such data is hacked, because in this case the information is obtained directly by the intruders from the website.
- On-Screen Keyboard does not prevent screenshots that are made by using the Print Screen key and other combinations of keys specified in the operating system settings.
- When running On-Screen Keyboard, the AutoComplete feature of Microsoft Internet Explorer stops functioning, since the implementation of the automatic input scheme may allow criminals to intercept data.
- Kaspersky Total Security does not provide protection against unauthorized screenshots in Microsoft Windows 8 and 8.1 (64-bit only) if the On-Screen Keyboard window is open but the Protected Browser process is not started.
The preceding list describes the main restrictions in functionality for protection of data input. A full list of restrictions is given in an article on the Kaspersky Lab Technical Support website.
Page topStarting On-Screen Keyboard
You can open On-Screen Keyboard in the following ways:
- From the context menu of the application icon in the taskbar notification area
- From the application window
- From the toolbar of Microsoft Internet Explorer, Mozilla Firefox, or Google Chrome
- By using the quick launch icon of On-Screen Keyboard in entry fields on websites
You can configure the display of the quick launch icon in entry fields on websites.
When On-Screen Keyboard is used, Kaspersky Total Security disables the autofill option for entry fields on websites.
- By pressing a combination of keyboard keys
To open On-Screen Keyboard from the context menu of the application icon in the taskbar notification area:
Select Tools –> On-Screen Keyboard (see the following figure).
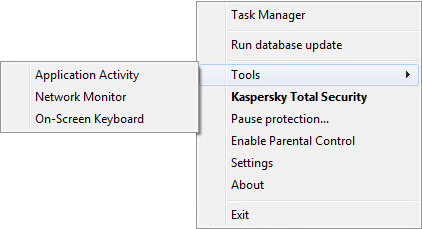
Kaspersky Total Security context menu
To open On-Screen Keyboard from the application window:
- Open the main application window.
- Click the More Tools button in the lower part of the main window to open the Tools window.
- In the left part of the Tools window, click the On-Screen Keyboard link to open On-Screen Keyboard.
To open On-Screen Keyboard from the toolbar of Google Chrome, Microsoft Internet Explorer or Mozilla Firefox:
- Click the
 Kaspersky Protection button on the browser toolbar.
 - Select the On-Screen Keyboard item in the menu that opens.
To open the On-Screen Keyboard by using the hardware keyboard:
Press the shortcut CTRL+ALT+SHIFT+P.
Page topConfiguring the display of the On-Screen Keyboard icon
To configure display of the quick launch icon of On-Screen Keyboard in entry fields on websites:
- Open the main application window.
- Click the button in the lower part of the window.
The Settings window opens.
- In the Additional section, select the On-Screen Keyboard subsection.
The window displays the settings of On-Screen Keyboard.
- If necessary, in the On-Screen Keyboard section, select the Open On-Screen Keyboard by typing CTRL+ALT+SHIFT+P check box.
- If you want the On-Screen Keyboard quick launch icon to be displayed in entry fields on all websites, select the Show quick launch icon in data entry fields check box.
- If you want the On-Screen Keyboard quick launch icon to be displayed only when websites of specific categories are accessed:
- In the On-Screen Keyboard section, click the Edit categories link to open the On-Screen Keyboard settings window.
- Select the check boxes for categories of websites on which you want the On-Screen Keyboard quick launch icon to be displayed in entry fields.
The On-Screen Keyboard quick launch icon is displayed when a website that belongs to any of the selected categories is accessed.
- If you want to enable or disable display of the On-Screen Keyboard quick launch icon on a specific website:
- In the On-Screen Keyboard section, click the Edit categories link to open the On-Screen Keyboard settings window.
- Click the Manage exclusions link to open the Exclusions for On-Screen Keyboard window.
- In the lower part of the window, click the Add button.
- A window opens for adding an exclusion for On-Screen Keyboard.
- In the Web address mask field, enter the web address of a website.
- In the Scope section, specify where you want the On-Screen Keyboard quick launch icon to be displayed (or not to be displayed): on the specified page or on all pages of the website.
- In the On-Screen Keyboard icon section, specify whether or not you want the On-Screen Keyboard quick launch icon to be displayed.
- Click the Add button.
The specified website appears in the list in the Exclusions for On-Screen Keyboard window.
When the specified website is accessed, the On-Screen Keyboard quick launch icon is displayed in the entry fields in accordance with the specified settings.
Page topProtecting data entered on the computer keyboard
Protection of data input on the computer keyboard allows avoiding interception of data that is entered via the keyboard.
Secure Keyboard Input has the following limitations:
- Secure Keyboard Input is available only for the Microsoft Internet Explorer, Mozilla Firefox, and Google Chrome browsers (not available in Google Chrome 69.x or later). When using other browsers, data entered via the computer keyboard is not protected from interception.
- Secure Keyboard Input is not available in Microsoft Internet Explorer from Windows Store.
- Protection of data input from the computer keyboard cannot protect your personal data if a website that requires entering such data has been hacked, because in this case information is obtained by intruders directly from the website.
The preceding list describes the main restrictions in functionality for protection of data input. A full list of restrictions is given in an article on the Kaspersky Lab Technical Support website.
You can configure protection of data input from the computer keyboard on various websites. After protection of data input from the computer keyboard is configured, you do not have to take any additional actions when entering data.
To configure protection of data input from the computer keyboard:
- Open the main application window.
- Click the button in the lower part of the window.
The Settings window opens.
- In the Additional section, select the On-Screen Keyboard subsection.
The window displays the settings of On-Screen Keyboard.
- In the lower part of the window, in the Secure Keyboard Input section, select the Enable Secure Keyboard Input check box.
- Open the On-Screen Keyboard settings window by clicking the Edit categories link in the lower part of the Secure Keyboard Input section.
- Select the check boxes for categories of websites on which you want to protect data that is entered via the keyboard.
- If you want to enable or disable protection of data input from the keyboard on a specific website:
- Open the Exclusions for Secure Keyboard Input window by clicking the Manage exclusions link.
- In the window, click the Add button.
- A window opens for adding an exclusion to Secure Keyboard Input.
- In the window that opens, in the Web address mask field, enter a website address.
- Select one of the options for Secure Data Input on this website (Apply to the specified page or Apply to the entire website).
- Select the action to be performed by Secure Data Input on this website (Protect or Do not protect).
- Click the Add button.
The specified website appears in the list in the Exclusions for Secure Keyboard Input window. When this website is accessed, Secure Data Input will be active, functioning in accordance with the settings that you have specified.
Page topChecking a website for safety
Kaspersky Total Security allows checking the safety of a website before you click a link to open it. Websites are checked using URL Advisor.
URL Advisor is not available in Microsoft Internet Explorer browser (versions 10 and 11) with the new Windows user interface style.
URL Advisor checks links on the web page opened in Microsoft Internet Explorer, Google Chrome or Mozilla Firefox. Kaspersky Total Security displays one of the following icons next to the checked link:
![]() – if the linked web page is safe according to Kaspersky Lab
– if the linked web page is safe according to Kaspersky Lab
![]() – if there is no information about the safety status of the linked web page
– if there is no information about the safety status of the linked web page
![]() – if the linked web page is dangerous according to Kaspersky Lab
– if the linked web page is dangerous according to Kaspersky Lab
To view a pop-up window with more details on the link, move the mouse pointer to the corresponding icon.
By default, Kaspersky Total Security checks links in search results only. You can enable link checking on every website.
To enable link checking on websites:
- Open the main application window.
- Click the button in the lower part of the window.
The Settings window opens.
- In the Protection section, select the Web Anti-Virus subsection.
The window displays the settings for Web Anti-Virus.
- In the lower part of the window, click the Advanced Settings link. The advanced settings window of Web Anti-Virus opens.
- In the URL Advisor section, select the Check URLs check box.
- If you want Kaspersky Total Security to scan the content of all websites, select On all websites except those specified.
- If necessary, specify web pages that you trust in the Exclusions window. Open this window by clicking the Manage exclusions link. Kaspersky Total Security will not scan the content of the specified web pages.
- If you want Kaspersky Total Security to check the content of specific web pages only:
- Select On specified websites only.
- Click the Configure checked websites link to open the Checked websites window.
- Click the Add button.
- Enter the address of the web page whose content you want to check.
- Select the checking status for the web page (if the status is Active, Kaspersky Total Security checks web page content).
- Click the Add button.
The specified web page appears in the list in the Checked websites window. Kaspersky Total Security checks URLs on this web page.
- To configure the advanced settings for URL checking, in the Advanced settings of Web Anti-Virus window, in the URL Advisor section, click the Configure URL Advisor link to open the URL Advisor window.
- If you want Kaspersky Total Security to notify you about the safety of links on all web pages, in the Checked URLs section, select All URLs.
- If you want Kaspersky Total Security to display information about whether a link belongs to a specific category of website content (for example, Profanity, obscenity):
- Select the Show information on the categories of website content check box.
- Select the check boxes next to categories of website content about which information should be displayed in comments.
Kaspersky Total Security checks links on the specified web pages and displays information about categories of the links in accordance with the current settings.
Page topAbout secure connection to Wi-Fi networks
Public Wi-Fi networks may be under-protected, for example, if a Wi-Fi network uses a vulnerable encryption protocol or a weak password. When you make Internet purchases over an insecure Wi-Fi network, your passwords and other confidential data are transmitted in non-encrypted text. Hackers can intercept your confidential data, find out your bank card number, and obtain access to your money.
When connecting to a Wi-Fi network, the application checks this network. If the Wi-Fi network is insecure, the full version of the application prompts you to enable a secure connection via a specially allocated server located in the country you specify. The website data is first transferred to the allocated server. The application then sends the data to your device over an encrypted secure connection.
To use the Secure Connection component, you need to run the Kaspersky Secure Connection application. Kaspersky Secure Connection is installed together with Kaspersky Total Security.
The Secure Connection component provides the following advantages:
- Safe use of payment systems and booking sites. Intruders will not be able to intercept the number of your bank card when you make online payments, book hotel rooms, or rent cars.
- Protection of your secret information. No one will be able to determine the IP address of your computer or your location.
- Protection of your privacy. No one will be able to intercept and read your private correspondence on social networks.
Secure Connection can also be used for other types of network connections such as a local Internet connection or USB modem connection.
By default, Kaspersky Secure Connection does not prompt you to enable a secure connection if the HTTPS protocol is used to connect to a website.
Changing the virtual location when visiting websites of banks, payment systems, booking websites, social networks, chats, and email websites could result in the triggering of anti-fraud systems (systems intended for analyzing online financial transactions for signs of fraudulent operations).
Use of Secure Connection may be regulated by local legislation. You may use Secure Connection only in accordance with its purpose and without violating local legislation.
Page topRunning Kaspersky Secure Connection
Kaspersky Secure Connection is installed together with Kaspersky Total Security. You can start Kaspersky Secure Connection from the Start menu (in the Microsoft Windows 7 operating system or earlier version), from the start screen (in the Microsoft Windows 8 operating system or later versions), or from the window of Kaspersky Total Security.
To start Kaspersky Secure Connection from the Kaspersky Total Security window:
- Open the main application window.
- In the lower part of the main window, click the More Tools button.
The Tools window opens.
- Click the Secure Connection link to open the Secure Connection window.
- Click the Open button.
This opens the main application window of Kaspersky Secure Connection.
More details about the operation of Kaspersky Secure Connection are available in the help files of this application.
Page topConfiguring notifications of vulnerabilities in Wi-Fi networks
If Kaspersky Secure Connection is not installed on your computer, Kaspersky Total Security displays a notification about the insecure transmission of your password over the Internet. You can allow or block password transmission in the notification window.
After you have installed Kaspersky Secure Connection, the settings for the display of notifications when connecting to Wi-Fi networks and transmitting an unencrypted password become inactive. You can configure the notification settings for Wi-Fi network connections in Kaspersky Secure Connection.
To configure notifications of vulnerabilities on Wi-Fi networks:
- Open the main application window.
- Click the button in the lower part of the window.
The Settings window opens.
- In the left part of the window, select the Protection section.
- In the right part of the Protection section, select the Firewall subsection.
The window displays the settings of the Firewall component.
- Select the Notify of vulnerabilities in Wi-Fi networks if you want to receive notifications when you are connecting to vulnerable Wi-Fi networks. If you do not want to receive notifications, clear the check box. This check box can be accessed if Kaspersky Secure Connection is not installed on the computer.
- If the Notify of vulnerabilities in Wi-Fi networks check box is selected, you can edit the advanced settings for display of notifications:
- Select the Block and warn about insecure transmission of passwords over the Internet check box to block all transmission of passwords in non-encrypted text format when you fill in the Password fields on the Internet.
- Click the Reset hidden alerts link to roll back to the default values of settings for display of notifications about transfers of passwords in non-encrypted form. If you have previously blocked display of notifications about password transfer in non-encrypted form, display of these notifications will resume.
Protecting financial transactions and online purchases
This section provides instructions on how you can protect your financial transactions and purchases online with Kaspersky Total Security.
About protection of financial transactions and online purchases
To provide protection for confidential data that you enter on websites of banks and payment systems (such as bank card numbers and passwords for accessing online banking services), as well as to prevent funds from being stolen when you make online payments, Kaspersky Total Security prompts you to open such websites in
.Protected Browser is a special browser operating mode designed to protect your data as you access bank or payment system websites. Protected Browser is started in an isolated environment to prevent other applications from injecting their code into the process of Protected Browser. Kaspersky Total Security creates special profiles for the Mozilla Firefox and Google Chrome browsers to prevent third-party add-ons from affecting the operation of Protected Browser. The application does not affect your data that the browsers may save in the profiles created for them.
Browsers that do not meet the software requirements cannot operate in Protected Browser mode. Instead of such browsers, either Internet Explorer or another browser configured in application settings starts in Protected Browser mode.
In Protected Browser mode, the application provides protection against the following types of threats:
- Untrusted modules. The application runs a check for untrusted modules every time you visit a bank or payment system website.
- Rootkits. The application scans for rootkits at Protected Browser startup.
- Known operating system vulnerabilities. The application scans for operating system vulnerabilities at Protected Browser startup.
- Invalid certificates of bank or payment system websites. The application checks certificates when you visit a bank or payment system website. The check is performed against a database of compromised certificates.
When you open a website in Protected Browser, a frame appears on the borders of the browser window. The color of the frame indicates the protection status.
The frame of the browser window can display the following color indications:
- Green frame. Signifies that all checks have been performed successfully. You can continue using Protected Browser.
- Yellow frame. Signifies that checks have revealed security problems that need to be resolved.
The application can detect the following threats and security problems:
- Untrusted module. Computer scanning and disinfection is required.
- Rootkit. Computer scanning and disinfection is required.
- Operating system vulnerability. Operating system updates need to be installed.
- Invalid certificate of a bank or payment system website.
If you do not eliminate the threats detected, the security of the bank or payment system website connection session is not guaranteed. Events involving the launch and use of Protected Browser with reduced protection are recorded in the Windows event log.
The yellow color of the frame may also signify that Protected Browser cannot be started due to technical limitations. For example, a third-party hypervisor is running or your computer does not support hardware virtualization technology.
To enable interaction with pages of protected websites, Kaspersky Total Security embeds a specially configured script into pages of websites. The application can embed the script either on its own or with the help of the Kaspersky Protection extension. The extension is also required for full support of Protected Browser. If the extension is not installed, the browser prompts you to install it at the first startup in Protected Browser mode. If you choose not to install the Kaspersky Protection extension, you can install it later.
Protected Browser cannot be run if the
check box is cleared in the Self-Defense subsection of the Advanced Settings section of the application settings window. Page top
Configuring Safe Money
To configure Safe Money:
- Open the main application window.
- Click the button in the lower part of the window.
The Settings window opens.
- In the left part of the window, select the Protection section.
- In the right part of the Protection section, select the Safe Money subsection.
The window displays the settings of the Safe Money component.
- Enable Safe Money by clicking the switch in the upper part of the window.
- In the On first access to websites of banks and payment systems section, select the action to be performed by the application when you first open a bank or payment system website in your browser:
- Select Run Protected Browser if you want the application to open the website in Protected Browser.
- Select Prompt for action if you want the application to ask you whether or not you want to open the website in Protected Browser when you visit the website.
- Select Do not run Protected Browser if you want the application not to open the website in Protected Browser.
- In the Additional section, open the To proceed to websites from the Safe Money window, use drop-down list and select the browser that the application will run in Protected Browser mode when you visit a bank or payment system website from the Safe Money window.
You can select one of the browsers installed on your computer or use the default browser of the operating system.
- To enable notifications regarding vulnerabilities detected in the operating system before running Protected Browser, select the Notify about operating system vulnerabilities check box.
Configuring Safe Money for a specific website
To configure Safe Money for a specified website:
- Open the main application window.
- Click the Safe Money button.
The Safe Money window opens. If you are opening the window for the first time, Kaspersky Total Security will offer to show you how Safe Money works. You can skip this informational tour.
- Click the Add website to Safe Money link to open fields for adding the website information in the right part of the window.
- In the Website for Safe Money field, enter the web address of the website that you want to open in Protected Browser.
A website address must be preceded by the prefix for the HTTPS protocol (for example, https://example.com), which is used by default by Protected Browser.
- Click the Add description link to open the Description field and enter the name or description of this website.
- Select the action that you want Protected Browser to perform when you open the website:
- If you want the website to open in Protected Browser every time you visit it, select Run Protected Browser.
- If you want Kaspersky Total Security to prompt you for an action when the website is opened, select Prompt for action.
- If you want to disable Safe Money for the website, select Do not run Protected Browser.
- In the right part of the window, click the Add button.
The website will be displayed in the list in the left part of the window.
Page topSend feedback on Safe Money
You can send Kaspersky Lab feedback on the operation of the Safe Money component.
To send feedback on the operation of the Safe Money component:
- Open the main application window.
- Click the Safe Money button.
The Safe Money window opens. If you are opening the window for the first time, Kaspersky Total Security will offer to show you how Safe Money works. You can skip this informational tour.
- Do one of the following:
- To send positive feedback, in the Send feedback drop-down list, select Like.
A window opens in which you can leave feedback about the operation of the Safe Money component.
- To send negative feedback, in the Send feedback drop-down list, select Don't like.
A window opens in which you can leave feedback about the operation of the Safe Money component.
- To send positive feedback, in the Send feedback drop-down list, select Like.
- Click the Send button.
You can send feedback on the operation of the Safe Money component up to 10 times per day.
Your feedback will be sent to Kaspersky Lab. If the application fails to send your feedback (for example, Internet connection is not available), this feedback is saved to your computer. Feedback is stored openly for 30 days.
You can also send feedback after the Safe Money component is disabled. After the component is disabled, you can send feedback once per month.
Page topEnabling automatic activation of the Kaspersky Protection extension
To enable automatic activation of the Kaspersky Protection extension:
- Open the main application window.
- Click the button in the lower part of the window.
The Settings window opens.
- In the left part of the window, select the Protection section.
- In the right part of the Protection section, select the Web Anti-Virus section.
- In the Web Anti-Virus settings window that opens, click the Advanced Settings link to open the Advanced settings of Web Anti-Virus window.
- In the Kaspersky Protection extension section, select the Automatically activate Kaspersky Protection extension in browsers check box.
About protection against screenshots
To protect your data when you browse protected websites, Kaspersky Total Security prevents spyware from taking unauthorized screenshots. Protection against screenshots is enabled by default. If protection has been disabled manually, you can enable it in the application settings window.
Kaspersky Total Security installed on a computer running a 64-bit version of Microsoft Windows 8, Microsoft Windows 8.1 or Microsoft Windows 10, uses
technology to provide protection against screenshots.On computers running on 64-bit Microsoft Windows 8, Microsoft Windows 8.1 or Microsoft Windows 10, the protection against screenshots that is provided by the Kaspersky Total Security hypervisor has the following limitations:
- This feature is not available when a third-party hypervisor, such as the VMware virtualization hypervisor, is running. After you close the third-party hypervisor, protection against screenshots becomes available again.
- The feature is not available if the CPU of your computer does not support hardware virtualization technology. For more details on whether your CPU supports hardware virtualization, please refer to the documentation shipped with your computer or to the website of the CPU manufacturer.
- The feature is not available if a third-party hypervisor (such as the VMware hypervisor) is running when you start Protected Browser.
Enabling protection against screenshots
To enable protection against screenshot capture:
- Open the main application window.
- Click the button in the lower part of the window.
The Settings window opens.
- In the left part of the window, select the Protection section.
- In the right part of the Protection section, select the Safe Money subsection and make sure that the Safe Money switch is on.
The Safe Money settings window opens.
- In the Additional section, select the Block capturing screenshots in Protected Browser check box. This check box is displayed when the application is installed on a 64-bit version of Windows 8, Windows 8.1 and Windows 10.
About clipboard data protection
Kaspersky Total Security blocks unauthorized access by applications to the clipboard when you make online payments, thus preventing theft of data by criminals. Such blocking is active only if an untrusted application attempts to obtain unauthorized access to your clipboard. If you copy data manually from the window of an application to another application's window (for example, from Notepad to a text editor window), access to clipboard is allowed. If the Internet Explorer browser opened in regular mode is the source of data being copied, only data from the browser address field can be copied to clipboard.
Page topStarting Kaspersky Password Manager
Kaspersky Password Manager is designed to safely store and synchronize passwords across all of your devices. Kaspersky Password Manager has to be installed independently of Kaspersky Total Security. After installation, you can start Kaspersky Password Manager from the Start menu (in the Microsoft Windows 7 operating system or earlier version), from the start screen (in the Microsoft Windows 8 operating system or later versions), or from the window of Kaspersky Total Security.
To start Kaspersky Password Manager that is already installed:
- Open the main application window of Kaspersky Total Security.
- Click the Password Manager button.
- In the window, click the Run button.
The Kaspersky Password Manager window opens.
To download and install Kaspersky Password Manager that has not been installed yet:
- Open the main application window.
- Click the Password Manager button.
The Password Manager window opens.
- Click the Download and install button.
Kaspersky Total Security downloads the Kaspersky Password Manager installation package and installs the application on your computer.
The Kaspersky Password Manager installation package you have downloaded remains in your computer regardless of whether or not it has been used to install Kaspersky Password Manager.
See the Kaspersky Password Manager Help for instructions on using Kaspersky Password Manager.
Page topWeb tracking protection
This section provides information on how Kaspersky Total Security can protect you against tracking of your online activity.
About Private Browsing
While you browse the web, websites use tracking services to collect information about your online activity. Tracking services use the received information to analyze your activity and can use analysis results to show you relevant advertisements.
The Private Browsing component is designed to prevent the collection of information about your online activity.
In detection mode, the Private Browsing component detects and counts attempts to collect data and writes this information in a report. Detection mode is enabled by default, and data collection is allowed on all websites.
In blocking mode, the Private Browsing component detects and blocks attempts to collect data, and information about these attempts are written in a report. In this mode, data collection is blocked on all websites except:
- by websites added to exclusions
- by websites of Kaspersky Lab and its partners
- by websites that may be rendered inoperable as a result of tracking services being blocked, according to information available to Kaspersky Lab
You can manage the Private Browsing component via the Kaspersky Total Security interface or with the help of the Kaspersky Protection extension in your browser.
Private Browsing has the following limitations:
- The application does not block data collection by the tracking service of the "Social networks" category while you are on the website of the relevant social network.
- If the web page from which the data collection attempt originated could not be determined, Kaspersky Total Security does not block this data collection attempt and does not display information about it.
- If the web page from which the data collection attempt originated could be determined but could not be matched to any web page currently open in the browser, Kaspersky Total Security applies the action specified in the Private Browsing settings (blocks or allows data collection). The application displays information about the data collection attempt in reports but does not include this information in the Private Browsing statistics displayed in the browser.
Blocking data collection
To block data collection:
- Open the main application window.
- Click the button in the lower part of the window.
The Settings window opens.
- In the left part of the window, select the Protection section.
The window with a list of protection components opens. The Private Browsing component is enabled by default. If the component is disabled, enable it by flipping the toggle switch to the
 position.
 - In the right part of the window, select the Private Browsing item.
The Private Browsing settings window opens.
- Select Block data collection.
Kaspersky Total Security will block data collection attempts on all websites except exclusions.
- If you want to block or allow data collection based on the categories of tracking services:
- Click the Categories and exclusions link to open the Categories and exclusions window.
- By default, data collection is blocked for all categories of tracking services and all social networks. Clear the check boxes opposite the categories of tracking services and social networks for which you want to allow data collection.
Allowing data collection on all websites
To allow data collection on all websites:
- Open the main application window.
- Click the button in the lower part of the window.
The Settings window opens.
- In the left part of the window, select the Protection section.
The window with a list of protection components opens. The Private Browsing component is enabled by default. If the component is disabled, enable it by flipping the toggle switch to the
position. - In the right part of the window, select the Private Browsing item.
The Private Browsing settings window opens.
- Select Allow data collection.
Kaspersky Total Security detects and counts attempts to track your online activity without blocking them. You can view the results of the component's operation in the report.
Allowing data collection as an exclusion
You can allow tracking of your activity on specific websites as an exclusion.
To allow data collection as an exclusion:
- Open the main application window.
- Click the button in the lower part of the window.
The Settings window opens.
- In the left part of the window, select the Protection section.
The window with a list of protection components opens. The Private Browsing component is enabled by default. If the component is disabled, enable it by flipping the toggle switch to the
position. - In the right part of the window, select the Private Browsing item.
The Private Browsing settings window opens.
- Select Block data collection.
Kaspersky Total Security will block data collection attempts on all websites except exclusions.
- By default, there is an exclusion to allow data collection on the websites of Kaspersky Lab and its partners. If you want to block data collection on these websites, clear the Allow data collection on the websites of Kaspersky Lab and its partners check box.
- By default, there is an exclusion to allow data collection on websites that may be rendered inoperable as a result of data collection being blocked, according to information available to Kaspersky Lab. If you want to block data collection on these websites, clear the Allow data collection on incompatible websites check box.
Kaspersky Lab updates the list of incompatible websites as compatibility issues are resolved.
- If you want to specify your own exclusions:
- Click the Categories and exclusions link to open the Categories and exclusions window.
- Click the Exclusions link to open the Private Browsing exclusions window.
- Click the Add button.
- In the window that opens, enter the address of the website on which you want to allow activity tracking, and click the Add button.
The specified website is added to the list of exclusions.
You can also allow data collection on a chosen website while it is open in the browser.
Page topViewing a report on data collection attempts
To view a report on data collection attempts:
- Open the main application window.
- Click the Privacy Protection button.
The Privacy Protection window opens.
In the Privacy Protection window, the Private Browsing section shows a consolidated report with information about attempts to collect data on your online activity.
You can also view the report on data collection attempts in a browser or in the application performance report.
Page topManaging the Private Browsing component in a browser
You can manage the Private Browsing component directly in the browser:
- Enable the component if it is disabled
- View statistics on detected attempts to collect data
- Go to the Private Browsing settings window
- Block or allow data collection
To manage the Private Browsing component in the browser,
Click the ![]() Kaspersky Protection button on the browser toolbar.
Kaspersky Protection button on the browser toolbar.
The menu that opens shows information about the operation of the component and the component controls.
Page topAnti-Banner protection during website browsing
This section provides information on how Kaspersky Total Security can protect you against ad banners on the Internet.
About Anti-Banner
The Anti-Banner component is designed to provide protection against banners while you browse the web. Anti-Banner blocks banners shown on the websites that you visit and in the interface of some applications. Anti-Banner blocks banners from the list of known banners which is embedded in the Kaspersky Total Security databases. You can manage the blocking of banners via the Kaspersky Total Security interface or directly in the browser.
By default, banners are allowed on websites from the list of Kaspersky Lab websites. This list is compiled by Kaspersky Lab experts and includes Kaspersky Lab websites and its partners' websites that host Kaspersky Lab advertisements. You can view this list or disable the use of this list if you consider it necessary to block banners on the websites of Kaspersky Lab and its partners.
Information about the operation of Anti-Banner is available in reports.
The following limitations apply to Anti-Banner:
- If the web page on which the banner is located could not be determined, Kaspersky Total Security does not block this banner and does not display information about it.
- If the web page on which the banner is located could be determined but could not be matched to any single web page opened in the web browser, Kaspersky Total Security blocks the banner or allows the banner to be displayed depending on the information that has been determined. The application displays information about the banner in reports but does not include this information in the Anti-Banner statistics displayed in the browser.
- The Anti-Banner statistics displayed in the browser can include banners detected the previous time the web pages loaded, including banners detected previously and loaded again.
- After updating the previous version of Kaspersky Total Security, the following settings become unavailable for editing via the user interface and take their default values:
- Use the banner list of Kaspersky Total Security
- Resolve IP addresses to domain names
- Use the list of blocked URLs
- Use the list of allowed URLs
The list that was previously opened by clicking the Configure blocked URLs link is now available by clicking the Blocked banners link in the current version. The list that was previously opened by clicking the Configure allowed URLs link is now available by clicking the Allowed banners link in the current version.
Enabling the Anti-Banner component
The Anti-Banner component is disabled by default. You can enable it via the Kaspersky Total Security interface or with the help of the Kaspersky Protection extension in your browser.
To enable the Anti-Banner component in the Kaspersky Total Security interface:
- Open the main application window.
- Click the button in the lower part of the window.
The Settings window opens.
- Select the Protection section.
- In the right part of the window, select the Anti-Banner component and enable it by flipping on the toggle switch.
To enable the Anti-Banner component in the browser window:
- Click the Kaspersky Protection button on the browser toolbar.
- In the drop-down menu in the Anti-Banner section, click the Enable button.
Blocking banners
Anti-Banner blocks website banners from the list of known banners which is embedded in the Kaspersky Total Security databases. If a banner is displayed on a web page even while Anti-Banner is running, this could mean that the banner is not in the list of known banners. You can manually block the display of this banner.
To block a banner, you must add it to the list of blocked banners. You can do this directly on the web page or in the Kaspersky Total Security interface.
If a banner is on a website from the list of websites with allowed banners, you cannot block the display of this banner.
To block a banner on a web page:
- If Anti-Banner is disabled, enable it:
- Click the Kaspersky Protection button on the browser toolbar.
- In the drop-down menu in the Anti-Banner section, click the Enable button.
- Refresh the web page to make the Anti-Banner context menu available.
- Click the
- Point the cursor at the banner that you want to block.
- Press the CTRL key on the keyboard and the right mouse button at the same time.
- In the context menu that opens, select Add to Anti-Banner.
The Add blocked banner window opens.
- In the Add blocked banner window, click the Add button.
The banner URL is added to the list of blocked banners.
- Refresh the web page in the browser to stop the banner from showing.
The banner will not be displayed the next time you visit this web page.
To block a banner via the Kaspersky Total Security interface:
- Open the main application window.
- Click the button in the lower part of the window.
The Settings window opens.
- Select the Protection section.
- Select the Anti-Banner component.
The Anti-Banner settings window opens.
- Enable Anti-Banner by clicking the switch in the upper part of the window.
- In the Anti-Banner settings window, click the Blocked banners link to open the Blocked banners window.
- In the Blocked banners window, click the Add button.
- In the window that opens, in the Web address mask (URL) field, enter the address or address mask of the banner.
- Specify Active as the status for this banner.
- Click the Add button.
Kaspersky Total Security will block the specified banner.
Page topAllowing banners
You can allow an individual banner as well as all banners on a website that you specify.
To allow an individual banner:
- Open the main application window.
- Click the button in the lower part of the window.
The Settings window opens.
- Select the Protection section.
- Select the Anti-Banner component.
The Anti-Banner settings window opens.
- Enable Anti-Banner by clicking the switch in the upper part of the window.
- In the Anti-Banner settings window, click the Allowed banners link to open the Allowed banners window.
- In the Allowed banners window, click the Add button.
- In the window that opens, in the Web address mask (URL) field, enter the address or address mask of the banner.
- Select the Active status.
- Click the Add button.
Kaspersky Total Security will not block the specified banner.
If a banner was added to the list of allowed banners but the banner is inside an ad block whose properties cause it to be blocked by Anti-Banner on a website, the banner will be blocked along with the ad block.
To allow all banners on a website:
- Open the main application window.
- Click the button in the lower part of the window.
The Settings window opens.
- Select the Protection section.
- Select the Anti-Banner component.
The Anti-Banner settings window opens.
- Enable Anti-Banner by clicking the switch in the upper part of the window.
- In the Anti-Banner settings window, click the Websites with allowed banners link to open the Websites with allowed banners window.
- In the Websites with allowed banners window, click the Add button.
- In the window that opens, in the Website field, enter the URL, for example,
example.com. - Select the Active status.
- Click the Add button.
The website will be added to the list of websites with allowed banners. Kaspersky Total Security does not block banners on websites from this list, even if a banner is added to the list of blocked banners.
Page topManaging Anti-Banner in the browser
You can manage the Anti-Banner component directly in the browser with the help of the Kaspersky Protection extension and the Anti-Banner context menu.
The Kaspersky Protection extension lets you perform the following actions:
- Enable and disable the component
- View the statistics for blocked banners
- Go to the Anti-Banner settings window
- View information about whether or not banners are blocked on a website opened in the browser, and manage the display of banners on a website
The Anti-Banner context menu lets you perform the following actions:
- Block a banner
- Allow or block all banners on a website
- Go to the Anti-Banner settings window
- Go to the web page containing information about the operation of Anti-Banner
To manage the Anti-Banner component via the Kaspersky Protection extension:
Click the ![]() Kaspersky Protection button on the browser toolbar.
Kaspersky Protection button on the browser toolbar.
The menu that opens shows information about the operation of the component and the component controls.
To manage the component via the Anti-Banner context menu:
- Point the cursor at the banner that you want to block, or at another element of the web page.
- Press the CTRL key on the keyboard and the right mouse button at the same time.
If the cursor is over an element that Kaspersky Total Security has identified as a banner, the Add to Anti-Banner option will be available in the menu. You can use this option to block the specific banner.
Removing traces of activity on the computer
User actions on a computer are recorded in the operating system. The following information is saved:
- Details of search queries entered by users and websites visited
- Information about started applications, as well as opened and saved files
- Microsoft Windows event log entries
- Other information about user activity
Intruders and unauthorized persons may be able to gain access to confidential data contained in information on past user actions.
Kaspersky Total Security includes the Privacy Cleaner Wizard, which cleans up traces of user activity in the operating system.
To run the Privacy Cleaner Wizard:
- Open the main application window.
- Click the More Tools button in the lower part of the main window to open the Tools window.
- In the left part of the Tools window, click the Privacy Cleaner link in the Show more drop-down menu to run the Privacy Cleaner Wizard.
The Wizard consists of a series of pages (steps), which you can navigate through by clicking the Back and Next buttons. To close the Wizard after it finishes, click the Done button. To stop the Wizard at any stage, click the Cancel button.
Let us review the steps of the Wizard in more detail.
Starting the Wizard
Make sure that the Search for user activity traces check box is selected. Click the Next button to start the Wizard.
Activity traces search
This Wizard searches for traces of activity on your computer. The search may take a while. When the search is complete, the Wizard proceeds automatically to the next step.
Selecting Privacy Cleaner actions
When the search is complete, the wizard informs you about the detected
and asks about the actions to take for elimination of these activity traces (see the following figure).
Activity traces detected and recommendations on eliminating them
To view the actions within a group, to the left of the group name, click the ![]() sign.
sign.
To make the Wizard perform a certain action, to the left of an action, select the corresponding check box. By default, the Wizard performs all recommended and strongly recommended actions. If you do not want to perform a certain action, clear the check box next to it.
It is strongly recommended that you not clear the check boxes selected by default, as doing so will leave your computer vulnerable to threats.
After you define the set of actions for the Wizard to perform, click the Next button.
Privacy Cleaner
The Wizard performs the actions selected during the previous step. Elimination of activity traces may take some time. To clean up certain activity traces, it may be necessary to restart the computer; if so, the Wizard notifies you.
When the clean-up is complete, the Wizard proceeds automatically to the next step.
Wizard completion
Click the Done button to exit the Wizard.
Page topControlling users' activity on the computer and on the Internet
This section provides information about how to control users' actions on the computer and on the Internet by using Kaspersky Total Security.
Using Parental Control
Parental Control allows monitoring actions performed by users on the local computer and online. You can use Parental Control to restrict access to Internet resources and applications, as well as view reports on users' activities.
More and more children and teenagers are obtaining access to computers and web resources. The use of computers and the Internet presents a number of challenges and threats for children:
- Loss of time and / or money when visiting chat rooms, gaming resources, online stores, and auctions
- Access to websites targeted at an adult audience, such as those featuring pornography, extremism, firearms, drug abuse, and explicit violence
- Downloading of files infected with malware
- Health damage inflicted by excessive computer use
- Contacts with strangers who may pretend to be peers to obtain information from underage users, such as real name, physical address, or time of day when nobody is home
Parental Control allows you to reduce the risks posed by computer and Internet use. To do this, the following functions are available:
- Limiting the time for computer and Internet use
- Creating lists of allowed and blocked games and applications, as well as temporarily restricting use of allowed applications
- Creating lists of allowed and blocked websites and selectively blocking categories of websites with inappropriate content
- Enabling safe search mode on search engines (links to websites with questionable content are not displayed in search results)
- Restricting file downloads from the Internet
- Creating lists of contacts that are allowed or blocked for communication via social networks
- Viewing the text of messaging via social networks
- Blocking sending of certain personal data
- Searching for specified keywords in message logs
You can configure features of Parental Control for each user account on a computer individually. You can also view Parental Control reports on the activities of monitored users.
Page topProceeding to the Parental Control settings
To go to the Parental Control settings:
- Open the main application window.
- In the main application window, click the Parental Control button.
- If access to Parental Control settings is not password-protected, the application prompts the user to set a password. Select one of the following options:
- To protect access to Parental Control settings with a password:
- Fill out the Password and Confirm password fields and click Continue.
- In the Password scope window, click the Create password button.
- In the Enter password window, confirm the password and click the Sign in button.
- If you do not want to password-protect access to Parental Control settings, click the Skip link to continue to the Parental Control settings.
The Parental Control window opens.
- To protect access to Parental Control settings with a password:
- Select a user account and click the Configure restrictions link to open the Parental Control settings window.
Controlling computer use
Parental Control allows you to limit the amount of time spent by the user at the computer. You can specify a time interval during which Parental Control should block access to the computer (bedtime), as well as a daily time limit on total computer use. You can specify different limit amounts for weekdays and for weekends.
To configure time limits on computer use:
- Go to the Parental Control settings window.
- In the Parental Control settings window, select the Computer section.
- To specify a time interval during which Parental Control will block access to the computer, in the Weekdays and Weekends sections, select the Block access from check box.
- In the drop-down list next to the Block access from check box, specify the block start time.
- In the to drop-down list, specify the block end time.
You can also set up a schedule of computer use by using a table. To view the table, click the
 button.
Parental Control blocks the user's access to the computer during the specified time interval.
- To set a time limit on total computer use during the day, in the Weekdays and Weekends sections, select the Allow access for no longer than check box and, from the drop-down list next to the check box, select a time interval.
Parental Control blocks the user's access to the computer when the total computer use during a day exceeds the specified amount of time.
- To set up breaks in the user's sessions of computer use, in the Time breaks section, select the Take a break check box and then, from the drop-down lists next to the check box, select values for the frequency of breaks (for example, every hour) and their length (for example, 10 minutes).
- Flip the toggle switch in the upper part of the window to Control is enabled.
Parental Control blocks the user's access to the computer in accordance with the new settings.
Page topControlling Internet use
By using Parental Control, you can limit time spent on the Internet and prohibit users from accessing certain categories of websites or specified websites. You can also prohibit the user from downloading files of certain types (such as archives or videos) from the Internet.
To limit the time for Internet use:
- Go to the Parental Control settings window.
- In the Parental Control settings window, select the Internet section.
- If you want to limit the total time for Internet use on weekdays, in the Internet access restriction section, select the Restrict access on weekdays to check box and then, from the drop-down list next to the check box, select a value for the time limit.
- If you want to limit the total time for Internet use on weekends, select the Restrict access on weekends to check box and then, from the drop-down list next to the check box, select a value for the time limit.
- Flip the toggle switch in the upper part of the window to Control is enabled.
Parental Control will limit the total amount of time spent on the Internet by the user, in accordance with the values that you have specified.
To restrict visits to specific websites:
- Go to the Parental Control settings window.
- In the Parental Control settings window, select the Internet section.
- To keep adult content from being displayed in search results, in the Control Web Browsing section select the Enable Safe Search check box.
When you search for information on such websites as Google, YouTube (only for users who have not signed in to the youtube.com website under their account) Bing, Yahoo!, Mail.ru, VKontakte, and Yandex, no adult content will be displayed in the search results.
- To block access to websites of certain categories:
- In the Control web browsing section, select the Control access to websites check box.
- Select the Block access to websites from selected categories option and click the Select categories of websites link to open the Block access to website categories window.
- Select the check boxes next to categories of websites that you want to block.
Parental Control will block all of the user's attempts to open a website if its contents are classified as belonging to any of the blocked categories.
- To block access to specific websites:
- In the Control web browsing section, select the Control access to websites check box.
- Click the Manage exclusions link to open the Exclusions window.
- In the lower part of the window, click the Add button.
A window for adding a new web address mask opens.
- Enter the address of a website to which you want to prohibit visits, by filling in the Web address mask field.
- In the Scope section, define the scope of what you want to block: the entire website or the specified web page only.
- If you want to block the specified website, in the Action section, select Block.
- Click the Add button.
The specified website appears in the list in the Exclusions window. Close the Exclusions window.
- Flip the toggle switch in the upper part of the window to Control is enabled.
Parental Control will block attempts to open websites in accordance with the current settings.
To prohibit downloading certain types of files from the Internet:
- Go to the Parental Control settings window.
- In the Parental Control settings window, select the Internet section.
- In the Block file downloading section, select the check boxes next to file types for which you want to block downloads.
- Flip the toggle switch in the upper part of the window to Control is enabled.
Parental Control will block downloads of files of the specified types from the Internet.
Page topControlling startup of games and applications
By using Parental Control, you can allow or prohibit the user to start games depending on their age rating. You can also prohibit the user from starting specified applications (such as games or IM clients) or limit the time allowed for using applications.
To block games with age-inappropriate content:
- Go to the Parental Control settings window.
- In the Parental Control settings window, select the Applications section.
- If you want to block all games that contain content inappropriate for the user's age, select the Restrict startup of games for users younger than check box and, from the drop-down list next to the check box, select an age restriction option.
- If you want to block games with content of a certain category:
- Select the Block games from adult categories check box.
- Click the Select categories of games link to open the Block games by categories window.
- Select the check boxes next to the content categories corresponding to games that you want to block.
- Return to the Applications section.
- If you want to use the rating system to block games, select the type of ratings and game content categorization in the Use this rating system to block games drop-down list:
- Detect automatically – Parental Control selects the type of game ratings depending on your location: the Pan European Game Information (PEGI) content rating system or the rating system for the USA and Canada (ESRB).
- PEGI – Parental Control uses the European rating system when configuring permissions to start games.
- ESRB – Parental Control uses the rating system for the USA and Canada when configuring permissions to start games.
- Flip the toggle switch in the upper part of the window to Control is enabled.
To restrict startup of a specific application:
- Go to the Parental Control settings window.
- In the Parental Control settings window, select the Applications section.
- Click the Settings link to go to the Block specified applications window.
- Click the Add button to open the Browse window and select the executable file of the application.
The selected application appears in the Block specified applications list. Kaspersky Total Security automatically adds the application to a certain category, for example, Games.
- Perform the following actions:
- To block application startup, select the Block item in the drop-down list to the right of the application name.
- To block all applications that belong to a specified category, select the check box next to the name of that category in the list (for example, you can block applications of the Games category).
- To allow application startup, select the Allow item in the drop-down list to the right of the application name.
- To set restrictions for the duration of application usage, select the Restrict item in the drop-down list to the right of the application name.
The Application usage restriction window opens.
Perform the following actions:
- If you want to set a time limit on use of an application on weekdays and weekends, in the Weekdays and Weekends sections, select the Allow access for no longer than check box and, in the drop-down list specify the number of hours that the user is allowed to use the application each day. You can also specify the time when the user is allowed / prohibited to use the application, by using the Exact usage time table.
- If you want to set pauses in use of an application, in the Time breaks section, select the Take a break check box and, from the drop-down lists, select values for the break frequency and length.
- Click the Save button.
- Close the Block specified applications window.
- Flip the toggle switch in the upper part of the window to Control is enabled.
Parental Control will apply the specified restrictions when the user accesses the application.
Page topControlling messaging on social networks
By using Parental Control, you can view a user's messaging over social networks, as well as block messaging with specified contacts.
To configure monitoring of a user's messaging:
- Go to the Parental Control settings window.
- In the Parental Control settings window, select the Communication section.
- To view messaging logs and, if necessary, block specified contacts:
- Select Block messaging with all contacts except allowed known contacts.
- Click the Known contacts link to open the Messaging Report window.
- View contacts with whom the user has been messaging. You can display specified contacts in the window by using one of the following methods:
- To view logs of the user's messaging over a specific social network, in the left part of the window select the required item from the drop-down list.
- To view contacts with whom the user has been writing most actively, in the drop-down list in the right part of the window, select By number of messages.
- To view contacts with whom the user has been communicating on a specified day, in the drop-down list in the right part of the window, select By date of messaging.
- To view the user's messaging with a specified contact, click the contact in the list.
A window with history of messaging with this contact opens.
- If you want to block the user's messaging with the selected contact, click the Block messaging button.
- Flip the toggle switch in the upper part of the window to Control is enabled.
Parental Control will block exchange of messages between the user and the selected contact.
Page topMonitoring message contents
By using Parental Control, you can monitor and prohibit the user's attempts to insert specified personal data (such as names, phone numbers, bank card numbers) and keywords (such as obscene words) into messages.
To configure control of personal data transfer:
- Go to the Parental Control settings window.
- In the Parental Control settings window, select the Content Control section.
- In the Personal data transfer control section, select the Block personal data transfer to third parties check box.
- Click the Edit list of personal data link to open the List of personal data window.
- In the lower part of the window, click the Add button.
A window opens for adding personal data.
- Select a type of personal data (for example, "phone number") by clicking the corresponding link or enter a description in the Field name field.
- Specify personal data (such as your last name or phone number) in the Value field.
- Click the Add button.
The personal data is listed in the List of personal data window.
- Close the List of personal data window.
- Flip the toggle switch in the upper part of the window to Control is enabled.
Parental Control monitors and blocks the user's attempts to use the specified personal data in messaging via the Internet.
To configure Keyword Control for messages:
- Go to the Parental Control settings window.
- In the Parental Control settings window, select the Content Control section.
- In the Keyword Control section, select the Detect use of key words check box.
- Click the Edit list of key words link to open the List of key words window.
- In the lower part of the window, click the Add button.
A window opens for adding a keyword.
- Enter a key phrase in the Value field and click the Add button.
The specified key phrase appears in the list of key words in the List of key words window.
- Close the List of key words window.
- Flip the toggle switch in the upper part of the window to Control is enabled.
Parental Control will detect transmission of messages that contain the specified key phrase during messaging over the Internet and will log information about such messages in a report.
Page topViewing the report on a user's activity
You can access reports on the activity of each user account that is controlled by Parental Control, with separate reporting on each category of controlled events.
To view a report on the activity of a controlled user account:
- Go to the Parental Control settings window.
- Select a user account and click the View report link to go to the reports window.
- In the section with the relevant type of restriction (for example, Internet or Communication), open the report on monitored actions by clicking the Details link.
The window displays a report on monitored actions of the user.
Page topRemote management of computer protection
This section describes how you can remotely manage protection of your computer with Kaspersky Total Security installed.
About remote management of computer protection
If a computer has Kaspersky Total Security installed, you can manage protection of this computer remotely. Computer protection can be managed remotely via My Kaspersky portal. To manage computer protection remotely, register on My Kaspersky portal, sign in to your My Kaspersky account, and go to Devices section.
My Kaspersky portal lets you accomplish the following computer security tasks:
- View the list of computer security problems and fix them remotely
- Scan the computer for viruses and other threats
- Update databases and application modules
- Configure Kaspersky Total Security components
If a computer scan is started from My Kaspersky portal, Kaspersky Total Security processes objects that are detected automatically without your involvement. On detecting a virus or other threat, Kaspersky Total Security attempts to perform disinfection without rebooting the computer. If disinfection without restarting the computer is impossible, the list of computer security problems on My Kaspersky portal shows a message to the effect that the computer needs restarting to perform disinfection.
If the list of detected objects on My Kaspersky portal includes more than 10 items, they are grouped. In this case, the detected objects can be processed via the portal only together without the ability to examine each object separately. To view separately objects in this case, you are advised to use the interface of the application installed on the computer.
Detailed information on using the portal is available in My Kaspersky portal help.
Page topAbout My Kaspersky account
A My Kaspersky account is required to sign in to My Kaspersky portal as well as to use the portal and certain Kaspersky Lab applications.
If you do not have a My Kaspersky account yet, you can create it on the portal or from the applications compatible with the portal. You can also use accounts used with other Kaspersky Lab resources to sign in to the portal.
While creating a My Kaspersky account, you have to specify a valid email address and set a password. The password must contain at least 8 characters, one numeral, one uppercase letter, and one lowercase Latin letter. Blank spaces are not allowed.
If the password is too weak or common, the account will not be created.
While creating an account, you can specify a secret question. This question provides additional security when recovering a forgotten password.
After the account is created, you will receive an email message containing a link for activation of your account.
Please activate your account using the email link, otherwise your account will be deleted.
Page topProceeding to remote management of computer protection
To proceed to remote management of computer protection:
- Open the main application window.
- Click the Protection for all devices button.
- In the Protection for all devices window, click the Connect to My Kaspersky button.
The My Kaspersky portal logon form loads in the Protection for all devices window, unless you have already logged on. Fill out the fields and log on to My Kaspersky portal.
A connection to My Kaspersky portal may fail due to a portal malfunction. When this happens, Kaspersky Total Security displays a notification about problems experienced by My Kaspersky portal that are being resolved by Kaspersky Lab staff. If you are unable to connect to My Kaspersky portal due to a portal malfunction, retry connecting later.
My Kaspersky portal page with the Devices section opens in the browser window by default.
Page topReserving operating system resources for computer games
When Kaspersky Total Security runs in full-screen mode together with some other applications (particularly computer games), the following issues may occur:
- Application or game performance decreases due to lack of system resources
- Notification windows of Kaspersky Total Security distract the user from the gaming process
To avoid changing the settings of Kaspersky Total Security manually every time you switch to full-screen mode, you can use Gaming Profile. When Gaming Profile is enabled, switching to full-screen mode automatically changes the settings of all the components of Kaspersky Total Security, ensuring optimal system functioning in that mode. After you exit from full-screen mode, application settings return to the initial values used before full-screen mode was activated.
To enable Gaming Profile:
- Open the main application window.
- Click the button in the lower part of the window.
The Settings window opens.
- In the left part of the window, select the Performance section.
The window displays the performance settings of Kaspersky Total Security.
- Select the Automatically disable some Kaspersky Total Security functionality (such as notifications) when applications are launched in full-screen mode check box.
Handling unknown applications
Kaspersky Total Security helps to minimize the risk associated with using unknown applications (such as the risk of infection with viruses and other malware and unwanted changes to operating system settings).
Kaspersky Total Security includes components and tools that allow checking an application's reputation and controlling its activities on your computer.
Checking application reputation
Kaspersky Total Security allows you to verify the reputation of applications with users all over the world. The reputation of an application comprises the following criteria:
- Name of the vendor
- Information about the (if the application is digitally signed)
- Information about the group to which the application has been assigned by Application Control or most users of Kaspersky Security Network
- Number of users of Kaspersky Security Network who use the application (available if the application has been included in the Trusted group in the Kaspersky Security Network database)
- Time at which the application become known to Kaspersky Security Network
- Countries in which the application is the most widespread
Checking of application reputation is available if you have agreed to participate in Kaspersky Security Network.
To learn the reputation of an application:
Open the context menu of the application's executable file and select Check reputation in KSN (see the following figure).
Context menu of an executable file
This opens a window with information about the reputation of the application in Kaspersky Security Network.
Controlling application activity on the computer and on the network
Application Control prevents applications from performing actions that may be dangerous for the operating system and controls access to operating system resources and your personal data.
Application Control tracks actions performed in the operating system by applications installed on the computer and regulates them based on rules. These rules restrict suspicious activity of applications, including access by applications to protected resources, such as files and folders, registry keys, and network addresses.
On 64-bit operating systems, applications' rights for the following actions cannot be configured:
- Direct access to physical memory
- Managing printer driver
- Service creation
- Service reading
- Service editing
- Service reconfiguration
- Service management
- Service start
- Service removal
- Access to internal browser data
- Access to critical objects of the operating system
- Access to password storage
- Setting debug privileges
- Use of program interfaces of the operating system
- Use of program interfaces of the operating system (DNS)
On 64-bit Microsoft Windows 8, applications' rights for the following actions cannot be configured:
- Sending windows messages to other processes
- Suspicious operations
- Hooks installation
- Interception of inbound stream events
- Making of screenshots
Applications' network activity is controlled by the Firewall component.
When an application is started on the computer for the first time, Application Control checks the safety of the application and assigns it to a group (Trusted, Untrusted, High Restricted, or Low Restricted). The group defines the rules that Kaspersky Total Security applies for controlling the activity of the application.
Kaspersky Total Security assigns applications to trust groups (Trusted, Untrusted, High Restricted, or Low Restricted) only if Application Control or Firewall is enabled, and also when both these components are enabled. If both these components are disabled, the functionality that assigns applications to trust groups does not work.
You can edit application control rules manually.
Page topConfiguring Application Control
To configure Application Control:
- Open the main application window of Kaspersky Total Security.
- In the lower part of the main window, click the More Tools button.
The Tools window opens.
- Select the Application Control section.
The Application Control window opens.
- In the Application Control window, in the Applications section, click the Manage applications link to open the Manage applications window.
- In the list, select the relevant application and double-click it to open the Application rules window.
- To configure the rules for access by an application to operating system resources:
- On the Files and system registry tab, select the relevant resource category.
- Click the column with an available action for the resource (Read, Write, Delete, or Create) to open the menu. In the context menu, select the relevant item (Allow, Deny, Prompt for action, or Inherit).
- To configure the rights of an application to perform various actions in the operating system:
- On the Rights tab, select the relevant category of rights.
- In the Action column, click the icon to open the context menu and select the relevant item (Allow, Deny, Prompt for action, or Inherit).
- To configure the rights of an application to perform various actions on the network:
- On the Network rules tab, click the Add button.
The Network rule window opens.
- In the window that opens, specify the required rule settings and click Save.
- Assign a priority to the new rule. To do so, select the rule and move it up or down the list.
- On the Network rules tab, click the Add button.
- To exclude certain application actions from the restrictions of Application Control, on the Exclusions tab, select the check boxes for actions that you do not want to be controlled.
- Click the Save button.
All exclusions created in the rules for applications are accessible in the Kaspersky Total Security settings window, in the Threats and Exclusions section.
Application Control monitors and restricts the actions of the application in accordance with the specified settings.
Page topAbout applications' access to the webcam
Criminals may attempt to obtain unauthorized access to your webcam by means of dedicated software. Kaspersky Total Security blocks unauthorized access to the webcam and notifies you that access has been blocked. By default, Kaspersky Total Security blocks access to the webcam for applications that have been included in the High Restricted or Untrusted groups.
In the Application Control settings window, you can allow access to the webcam for applications included in the High Restricted and Untrusted groups. If an application from the Low Restricted trust group attempts to connect to the webcam, Kaspersky Total Security displays a notification and prompts you to decide whether to provide that application with access to the webcam.
If a webcam access attempt is made by an application that is denied access by default, Kaspersky Total Security shows a notification. The notification shows information to the effect that an application installed on the computer (such as Skype) is currently receiving video data from the webcam. In the notification drop-down list, you can block the application from accessing the webcam or proceed to configure the settings of application access to the webcam. This notification is not displayed if applications are already running in full-screen mode on your computer.
In the drop-down list of the notification about video data received by the application, you can also choose to hide notifications or proceed to configure notification display settings.
By default, Kaspersky Total Security allows webcam access to applications that require your permission if the application's GUI is still being loaded, unloaded, or not responding, and you cannot allow access manually.
Webcam access protection functionality has the following features and limitations:
- The application controls video and still images derived from processing of webcam data.
- The application controls the audio signal if it is part of the video stream coming from the webcam.
- Kaspersky Total Security controls only webcams connected via USB or IEEE1394 that are displayed in Windows Device Manager as Imaging Devices.
Click this link to view the list of supported webcams.
To activate protection against unauthorized access to the webcam, the Application Control component must be enabled.
Webcam Protection has limitations if the application was installed in Microsoft Windows 10 Anniversary Update (RedStone 1).
Configuring the settings of application access to the webcam
To configure the settings of application access to the webcam:
- Open the main application window.
- Click the button in the lower part of the window.
The Settings window opens.
- In the Protection section, in the right part of the window select Webcam Protection.
- Configure the settings of application access to the webcam of your computer:
- To block all applications from accessing the webcam, select the Block access to webcam for all applications check box.
- To receive notifications when the webcam is used by an application that is allowed to do so, select the Show notification when the webcam is in use by an application for which webcam access is allowed check box.
Allowing application access to the webcam
To allow an application to access the webcam:
- Open the main application window.
- Click the More Tools button.
The Tools window opens.
- In the Tools window, click the Details button in the Application Control section.
The Application Control window opens.
- In the Application Control window, click the Manage applications link to open the Manage applications window.
- In the list, select the application for which you want to allow webcam access. Double-click the application to open the Application rules window.
- In the Application rules window, go to the Rights tab.
- In the list of rights categories, select Operating system modification -> Suspicious modifications in the operating system -> Access webcam.
- In the Action column, click the icon to open the context menu and select Allow.
- Click the Save button.
The selected application will be allowed access to the webcam.
Page topAbout protecting an audio stream coming from sound recording devices
Intruders may attempt to receive the audio stream from sound recording devices by means of special software. Sound recording devices are microphones that are connected to or built into the computer and capable of transmitting an audio stream through the sound card interface (input signal). Kaspersky Total Security monitors which applications receive an audio stream from sound recording devices and protects the audio stream from unauthorized intercepts.
By default, Kaspersky Total Security blocks applications from Untrusted and High Restricted trust groups from receiving the audio stream coming from sound recording devices connected to the computer. You can manually allow applications to receive the audio stream from sound recording devices.
If an application from the Low Restricted trust group is requesting access to a sound recording device, Kaspersky Total Security displays a notification and prompts you to choose whether or not to allow this application to receive the audio stream from a sound recording device. If Kaspersky Total Security is unable to display this notification (for example, when the Kaspersky Total Security graphical interface has not yet loaded), the application from the Low Restricted trust group is allowed to receive the audio stream from a sound recording device.
All applications in the Trusted group are allowed to receive an audio stream from sound recording devices by default.
Audio stream protection has the following special features:
- The Application Control component has to be enabled for this functionality to work.
- If the application started receiving the audio stream before the Application Control component was started, Kaspersky Total Security allows the application to receive the audio stream and does not show any notifications.
- After the settings of application access to sound recording devices have been changed (for example, the application has been prohibited from receiving the audio stream in the Application Control settings window), this application has to be restarted to stop it from receiving the audio stream.
- Control of access to the audio stream from sound recording devices does not depend on an application's webcam access settings.
- If the application GUI has not loaded yet, applications for which the "Prompt for action" permission has been set are allowed to receive the audio stream.
- Kaspersky Total Security protects access to built-in microphones and external microphones only. Other audio streaming devices are not supported.
- Kaspersky Total Security allows an application to receive an audio stream and does not show any notifications if the application began to receive the audio stream before Kaspersky Total Security was started, or if you placed the application into the Untrusted or High Restricted group after the application began to receive the audio stream.
Kaspersky Total Security does not guarantee protection of the audio stream from such devices as DSLR cameras, camcorders, and action cameras.
Page topConfiguring audio stream protection settings
To configure audio stream protection settings:
- Open the main application window.
- In the lower part of the main window, click the More Tools button.
The Tools window opens.
- Select the Application Control section.
The Application Control window opens.
- Click the Manage applications link to open the Manage applications window.
- In the list, select the application for which you want to allow access to sound recording devices. Double-click the application to open the Application rules window.
- In the Application rules window, go to the Rights tab.
- In the list of rights categories, select Operating system modification->Suspicious modifications in the operating system-> Access sound recording devices.
- In the Action column, click the icon and select one of the menu items:
- To allow the application to receive the audio stream, select Allow.
- To deny the application access to the audio stream, select Block.
- To receive notifications about instances of applications being allowed or denied access to the audio stream, in the Action column, click the icon and select Log events.
- Click the Save button.
About System Changes Control
Kaspersky Total Security uses Application Manager to control the following operating system changes:
- Change of the home page address in the browser
- Change of the search engine in the browser
- Installation of plug-ins, extensions, and toolbars in the browser
- Change of the default browser
- Changes of proxy server settings
The specified list of monitored changes is minimal and guaranteed by Kaspersky Lab. The scope of monitored changes may be expanded following an update of databases and application modules.
If any application attempts to change the default browser for one of the protocols (http, ftp, https) and you allow this change to be made in the notification window, Kaspersky Total Security subsequently automatically allows this application to change the default browser for the two other protocols without showing any notifications.
Kaspersky Total Security does not monitor operating system changes and does not show the notification when the operating system changes are made by the following applications:
- Browser
- Standard tool for editing browser settings
- A standard operating system tool for changing the controlled settings, such as explorer.exe
- An application incompatible with Kaspersky Total Security if controlling or reverting changes made by this application can cause it to malfunction
- Installation wizard of the new version of Kaspersky Total Security
- An application performing the same functions as Application Manager (for example, Yandex Browser Manager)
- Applications in the style of the new Windows user interface
Configuring Application Manager settings
To configure Application Manager settings:
- Open the main application window.
- Click the button in the lower part of the window.
The Settings window opens.
- In the left part of the Settings window, select the Protection section.
- Click the Application Manager link to open the Application Manager settings window.
- Flip on the Application Manager toggle switch to apply changes and enable the Application Manager protection component.
- In the System Changes Control group of settings, select the Control changes to the operating system, browser and network settings in order for the application to control changes to the operating system, browser, and network settings.
- Select the Block changes automatically check box to allow Kaspersky Total Security to block changes to all controlled operating system settings automatically without showing a notification.
- In the Installation Assistant group of settings, select the During installation of applications, automatically clear check boxes for installation of additional software check box to block installation of additional software during installation of new applications.
If the During installation of applications, automatically clear check boxes for installation of additional software check box was cleared after you started installing a certain application, the Installation Assistant continues to run for the duration of the current installation. Check boxes opposite applications offered for additional installation are cleared, and the additional applications themselves are not installed. This functionality will be disabled during the next installation. Additional applications will be installed together with the main application.
The Installation Assistant feature is unavailable for 64-bit setup wizards under Microsoft Windows XP (x64). The Installation Assistant functionality may not be available for some installation programs.
- Select the Do not display installation steps that may contain advertisements and offers to install additional programs check box to block the display of installation steps with ads during installation of new software on the computer.
Updating installed applications
This section provides information on how you can use Kaspersky Total Security to update installed applications.
About Software Updater
If you have not updated applications on your computer for a long time, these applications may contain vulnerabilities. Intruders can exploit such vulnerabilities to harm your computer or data.
Updating installed applications improves the security of your computer. Using Kaspersky Total Security, you can search for updates for installed applications and download and install the latest updates.
Kaspersky Total Security divides application updates into two types:
- Important - updates that fix vulnerabilities of installed applications and improve the security of your computer.
- Recommended – updates that improve the functionality and/or make changes to the installed applications.
Kaspersky Total Security regularly searches for updates. When Kaspersky Total Security finds a new update for an application installed on your computer, Kaspersky Total Security shows a pop-up notification in the bottom-right corner of the screen. Information about the availability, quantity, and type of available updates is displayed in the Notification Center. You can view, download, and install available updates via the Notification Center.
You can also manually start the search for application updates.
By default, Kaspersky Total Security automatically downloads and installs all updates for known applications if they do not require you to accept new end user license agreements.
In Windows 8 and later versions, Kaspersky Total Security pauses automatic downloads of application updates when a metered Internet connection is used. Downloading of updates is resumed once the unlimited connection is restored. If you have manually started the update, the application will download the update regardless of whether or not you are using a limited connection.
You may need administrator privileges on the computer to update certain applications.
Applications that you do not want to update or for which you do not want to install individual updates are placed by Kaspersky Total Security into the exclusions list. You can view and edit the list of exclusions.
Before starting the first search for application updates, Kaspersky Total Security may require an update of databases and application modules.
Page topConfiguring Software Updater settings
To configure Software Updater settings:
- Open the main application window.
- Click the button in the lower part of the window.
The Settings window opens.
- In the Protection section, in the right part of the window select Software Updater.
The Software Updater settings window opens.
- If you do not want Kaspersky Total Security to automatically download and install application updates that do not require acceptance of a new end user license agreement, clear the Automatically download and install updates if you do not have to accept new license agreements check box.
This check box is selected by default.
- In the Search for application updates section, select which application updates will be downloaded and installed by Kaspersky Total Security:
- Select Important updates that improve computer security if you want Kaspersky Total Security to install only important updates that fix software vulnerabilities and improve the security of your computer.
- Select All updates for known applications if you want Kaspersky Total Security to install all software updates.
The Important updates that improve computer security option is selected by default.
Search for application updates
To start a search for application updates:
- Open the main application window.
- Click the More Tools button.
The Tools window opens.
- Click the Software Updater link in the left part of the window and go to the Software Updater window.
- Click the Start scan button.
This starts the search for application updates. The results of the search are displayed in the window.
Page topViewing the list of application updates
Kaspersky Total Security regularly searches for updates for applications installed on your computer. Information about the number and types of updates available for applications can be viewed in Notification Center.
To view the list that is generated based on the results of a search for application updates:
- Open the main application window.
- Click the Details button in the upper part of the window.
This opens the Notification Center window.
- In the Protection section, click the Show button in the line with the message about available application updates.
This opens the Software Updater window with a list of available application updates.
- To update all applications appearing in the list, click the Update all button.
- To selectively update specific applications, perform one of the following actions:
- Click the Update button in the line containing the application that you want to update.
You are advised to read the end user license agreement before updating the application. End user license agreements are available in the License agreements drop-down list. By default, the language of the end user license agreement corresponds to the language of the application interface. If the end user license agreement in the language of the application interface is unavailable, the EULA text is provided in the language of the Kaspersky Total Security interface. In all other cases, the text of the end user license agreement is provided in English or the first available language if the English text is unavailable.
- Click the
 button to open the menu and select Do not update this application if you want Kaspersky Total Security to stop notifying you about available updates for the selected application.
The selected application is moved to the list of exclusions. Kaspersky Total Security stops showing notifications about new updates released for this application.
- Click the button to open the menu and select Skip this update if you want Kaspersky Total Security to stop notifying you about the selected update.
The selected application update is moved to the list of exclusions. Kaspersky Total Security shows a notification about a new update released for this application.
- Click the button to open the menu and select Open the vendor website if you want to manually download and install the update for the selected application.
The default browser of the operating system opens the website of the software vendor. You can view the update on the website and download it manually.
- Click the Update button in the line containing the application that you want to update.
The window interface, Software Updater, and viewing of the End User License Agreements may differ depending on the localization language of Kaspersky Total Security.
Page topRemoving an update or application from the exclusions list
When viewing the list of application updates, you can skip notifications about individual updates or skip notifications about all updates for specific applications. Kaspersky Total Security adds these updates and applications to the exclusions list.
To remove an update or application from the exclusions list:
- Open the main application window.
- Click the button in the lower part of the window.
The Settings window opens.
- In the Protection section, in the right part of the window select Software Updater.
The Software Updater settings window opens.
- Click the Exclusions link to open the Exclusions window.
The Exclusions list contains the applications and updates for which you have indicated that no updates are necessary, as well as individual updates of applications that you did not install.
- Select the update or application in the list and click the Remove from the list button.
During the next search for updates, Kaspersky Total Security will notify you about the availability of updates for applications that you have removed from the exclusions list.
Page topRemoving installed applications
This section provides information on how you can use Kaspersky Total Security to detect applications that you could possibly want to remove from your computer.
About Software Cleaner
Using Kaspersky Total Security, you can search your computer for applications that you could possibly want to remove. For example, these could be applications that were installed without your consent or applications that are rarely used by you.
Kaspersky Total Security regularly analyzes the applications that are installed on your computer in terms of the possible reasons for their removal and the detected applications are categorized.
Information about detected applications is displayed in the Notification Center. You can proceed to view the list of detected applications from the Notification Center.
You can also start the analysis of installed applications manually.
The applications that you want to keep can be added to the list of exclusions. You can view and edit the list of exclusions.
Page topCategories of applications detected
Applications detected during analysis are assigned to categories by Kaspersky Total Security. These categories are described in the table below.
Application categories
Application category |
Description |
|---|---|
Provides false information |
According to Kaspersky Lab*, the application provides you with false information about the status of the operating system or installed applications in order to prompt you to purchase and install other applications in the interests of the vendor. |
Installed without your consent |
According to Kaspersky Lab, the application was installed to your computer without your explicit consent provided electronically. |
Displays anonymous messages or banners |
According to Kaspersky Lab, the application anonymously displays messages and notifications. |
Slows down computer startup |
According to Kaspersky Lab, the application automatically starts with the operating system without your explicit consent. |
Involuntarily installed |
According to Kaspersky Lab, installation of the application is forced upon the user, for example, by blocking the browser or the operating system. |
Conceals its operation |
According to Kaspersky Lab, the application conceals its operation from you: it does not have visible windows and does not display an icon in the taskbar. |
Not supported by vendor and contains vulnerabilities |
The vendor no longer supports this application and does not release updates or vulnerability fixes. |
Conceals the option to close the application |
According to Kaspersky Lab, the application hides and/or restricts mechanisms that you may use to close the application window, exit the application, or remove this application from your computer. |
Installed together with another application |
The application is installed to your computer together with another application. It may have been installed by mistake, or you did not provide your consent to its installation. |
Rarely used |
Kaspersky Total Security data indicates that the application has not been started for more than 90 days. |
* According to information available to Kaspersky Lab, the application typically performs the actions described in the table. Kaspersky Total Security does not check whether or not these actions were actually performed on your computer.
Page topViewing the list of detected applications
To view the list that is generated based on the results of the analysis of installed applications:
- Open the main application window.
- Click the Details button in the upper part of the window.
This opens the Notification Center window.
- In the Recommendations section, click the Show button in the line containing the message about detected applications.
This opens a window containing the list of detected applications. The presumed reasons for possible removal are shown for each application in the list.
- If you want to remove an application from your computer, click the Remove button in the line containing a description of the application. Kaspersky Total Security starts Software Cleaner.
- If you want the application to remain on the computer and to no longer be included in the results of analysis of installed applications, click the Hide button in the line containing a description of the application. The application is added to the list of exclusions and Kaspersky Total Security stops showing it in the list of detected applications.
Viewing the list of exclusions
To view the list of exclusions:
- Open the main application window.
- Click the button in the lower part of the window.
The Settings window opens.
- Select the Protection section.
- In the right part of the window, select the Application Manager component.
The Application Manager window opens.
- Click the Exclusions link to open the Exclusions window.
The Exclusions window shows applications that you added to the list of exclusions by clicking the Hide button in the list of applications detected.
- To remove an application from the list of exclusions, click the Remove from the list button.
Starting an analysis of installed applications
To start the analysis of installed applications:
- Open the main application window.
- Click the More Tools button.
The Tools window opens.
- Click the Software Cleaner link in the left part of the window and go to the Analysis of installed applications window.
- Click the Run button.
This starts the analysis of installed applications. The analysis results are displayed in the window.
Page topTrusted Applications mode
This section provides information about Trusted Applications mode.
About Trusted Applications mode
In Kaspersky Total Security, you can create on your computer a secure environment, called Trusted Applications mode, in which only trusted applications are allowed to start. Trusted Applications mode is useful if you use a stable set of well-known applications and you do not need to frequently run new unknown applications downloaded from the Internet. When running in Trusted Applications mode, Kaspersky Total Security blocks all applications that have not been classified as trusted by Kaspersky Lab. The decision on whether to trust an application can be made based on information received from Kaspersky Security Network, details of the application's digital signature, and the trust level of the installer and the source of the application download.
Trusted Applications mode has the following features and limitations:
- To use Trusted Applications mode, make sure that all of the following protection components are enabled: Application Control, File Anti-Virus, and System Watcher. If any of these components stops running, Trusted Applications mode is disabled.
- Trusted Applications mode may be unavailable if system files are located on partitions of a hard drive with a non-NTFS file system.
- Trusted Applications mode may be missing or unavailable in the current version of Kaspersky Total Security. The availability of Trusted Applications mode in Kaspersky Total Security depends on your region and service provider. If you need Trusted Applications mode, you are recommended to ask for it when purchasing the application.
- If your version of Kaspersky Total Security supports Trusted Applications mode but this mode is not available currently, the mode may become available after you update the database and program modules. After the databases and application modules are updated, you can configure the run mode for unknown applications and modules.
Trusted Applications mode can be enabled automatically or manually. When Trusted Applications mode is enabled manually, all applications installed on the computer are assigned Trusted status. Applications installed after Trusted Application mode was enabled are not assigned Trusted status and are processed according to general rules of Application Control.
You can also enable Trusted Applications mode manually after Kaspersky Total Security analyzes the operating system and installed applications. If the analysis by Kaspersky Total Security detects that unknown applications have been installed on the computer but these applications are known to you, it is recommended to enable Trusted Applications mode and allow the startup of these applications in advance.
Trusted Applications mode is enabled automatically if Kaspersky Total Security analysis of the operating system and installed applications reveals that mostly trusted applications are used on the computer.
When Trusted Applications mode is enabled, Kaspersky Total Security may block applications that have not been recognized as trusted. If you use such applications, you can allow them to run, and then enable Trusted Applications mode.
Page topEnabling Trusted Applications mode
To enable Trusted Applications mode:
- Open the main application window.
- In the lower part of the main window, click the More Tools button.
The Tools window opens.
- In the Tools window, in the list of tools in the left part of the window click the Trusted Applications mode link to open the Trusted Applications mode window.
- Select one of the options to enable Trusted Applications mode:
- In the Trusted Applications mode window, click the Enable button.
Kaspersky Total Security begins operating in Trusted Applications mode. When this option is selected, Kaspersky Total Security allows running applications that had been installed on your computer before Trusted Applications mode became active.
- Click the Turn on and scan all installed applications link to start analysis of the operating system, after which Trusted Applications mode is enabled.
This runs analysis of the operating system and installed applications, except for temporary files and resource dynamic link libraries that contain executable code. The progress of the analysis is displayed in the Analysis of installed applications window that opens. You can minimize the Analysis of installed applications window.
- Wait until the analysis of the operating system and installed applications completes and view information about the results of analysis.
- If the analysis detects system files about which there is insufficient information available, the application notifies you about this. You can view a list of these files in the Unknown system files window. If these files are known to you and you want to work with them in Trusted Applications mode, allow startup of these files. To do this, click the Allow and continue button.
- If the analysis detects applications and modules about which there is insufficient information available, Kaspersky Total Security notifies you about this. You can view a list of these applications and modules in the Unknown applications and modules window. If you want to allow startup of these applications and modules, in the Unknown applications and modules window, move the switch in the Start column opposite the application or module to the Allowed position.
- Click the Enable Trusted Applications mode button.
Trusted Applications mode is now enabled. Kaspersky Total Security will block all applications and system files that have not been classified as trusted, except the ones that you have allowed. After you enable Trusted Applications mode and restart the operating system for the first time, unknown applications are allowed to start until Kaspersky Total Security starts. After later restarts of the operating system, Kaspersky Total Security blocks unknown applications from starting.
- In the Trusted Applications mode window, click the Enable button.
Disabling Trusted Applications mode
To disable Trusted Applications mode:
- Open the main application window.
- In the lower part of the main window, click the More Tools button.
The Tools window opens.
- In the Tools window, in the left part of the window click the Trusted Applications mode link to open the Trusted Applications mode window.
- In the lower part of the window, in the Trusted Applications mode is enabled section, click the Disable link.
Trusted Applications mode is now disabled.
Page topFile Shredder
Added security of personal data is ensured by protecting deleted information against unauthorized recovery by hackers.
Kaspersky Total Security contains a permanent data deletion tool that makes data recovery using standard software tools impossible.
Kaspersky Total Security makes it possible to delete data without the possibility to recover it from the following data media:
- Local and network drives. Deletion is possible if you have the rights required for writing and deleting data.
- Removable drives or other devices that are recognized as removable drives (such as floppy disks, memory cards, USB disks, or cell phones). Data can be deleted from a memory card if its mechanical protection from rewriting is disabled.
You can delete the data that you can access under your personal account. Before deleting data, make sure that it is not used by running applications.
To delete data permanently:
- Open the main application window.
- Click the More Tools button in the lower part of the main window to open the Tools window.
- Click the Show <N> more link to open a menu and select File Shredder.
The File Shredder window opens (see figure below).
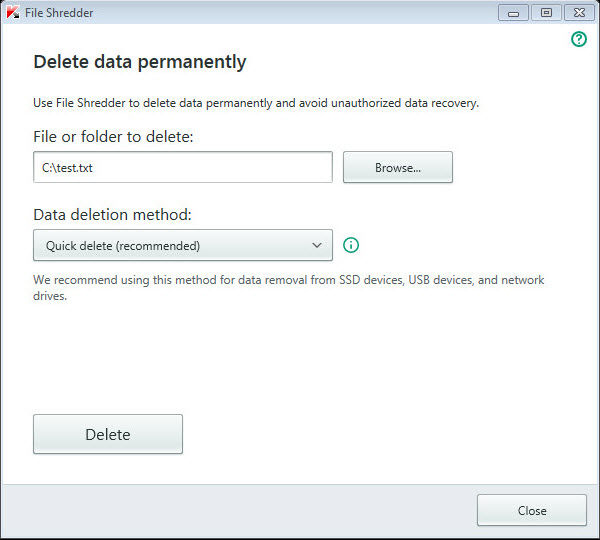
File Shredder window
- Click the Browse button, and in the Select folder window that opens select the folder or file to be deleted permanently.
Deletion of system files and folders may cause operating system malfunctions.
- In the Data deletion method drop-down list, select the requisite data deletion algorithm.
To delete data from SSD and USB devices, as well as from network drives, it is recommended to apply Quick delete or GOST R 50739-95, Russia. Other deletion methods can harm the SSD or USB device or the network drive.
- Click the Remove button.
- In the deletion confirmation window that opens, click Remove. If some files are not deleted, try to delete them again by clicking the Retry button in the window that opens. To select another folder to delete, click the Done button.
Unused Data Cleaner
This section provides instructions on removing temporary and unused files.
About cleaning up unused data
The operating system accumulates temporary or unused files over time. These files may use up a lot of disk space, thus impairing system performance, and may also be exploited by malware.
The temporary files are created at the launch of any applications or operating systems. But some of them remain undeleted even after you close the application or operating system. Kaspersky Total Security includes the Unused Data Cleaning Wizard.
Unused Data Cleaner can detect and remove the following files:
- System event logs, where the names of all active applications are recorded
- Event logs of various applications or update utilities (such as Windows Updater)
- System connection logs
- Temporary files of browsers (cookies)
- Temporary files remaining after installation / removal of applications
- Recycle Bin contents
- Files in the Temp folder, whose volume may grow up to several gigabytes
Besides the deletion of unused files from the system, the wizard deletes files which may contain confidential data (passwords, user names, registration form data). However, for complete deletion of such data, we recommend using the Privacy Cleaner Wizard.
Cleaning up unused data
To launch the Unused Data Cleaning Wizard:
- Open the main application window.
- Click the More Tools button in the lower part of the main window to open the Tools window.
- In the window that opens, click the Unused Data Cleaner link in the Show <N> more drop-down menu to launch the Unused Data Cleaning Wizard.
The Wizard consists of a series of pages (steps), which you can navigate through by clicking the Back and Next buttons. To close the Wizard after it finishes, click the Done button. To stop the Wizard at any step, click the Cancel button.
Let us review the steps of the Wizard in more detail.
Starting the Wizard
The first page of the Wizard shows information about the clean-up of unused data.
Click the Next button to start the Wizard.
Searching for unused data
The Wizard searches the computer for unused data. The search may take a while. Once the search is complete, the Wizard proceeds automatically to the next step.
Selecting actions to delete unused data
After the search for unused data has been completed, a window displaying the list of actions opens.
To make the Wizard perform a certain action, to the left of an action, select the corresponding check box. By default, the Wizard performs all recommended and strongly recommended actions. If you do not want to perform a certain action, clear the check box next to it.
Clearing the check boxes that are selected by default is not recommended. This may jeopardize the safety of your computer.
After you define the set of actions for the Wizard to perform, click the Next button.
Cleaning up unused data
The Wizard performs the actions selected during the previous step. The clean-up of unused data may take some time.
After the clean-up of unused data has been completed, the Wizard automatically proceeds to the next step.
While the Wizard is running, some files (such as the Microsoft Windows log file and Microsoft Office event log) may be in use by the operating system. In order to delete these files the wizard will suggest that you restart the operating system.
Wizard completion
Click the Done button to exit the Wizard.
Page topAbout Backup and Restore
Data backup is needed to protect your data against loss when your computer malfunctions or gets stolen, or when it is deleted accidentally or corrupted by hackers.
To backup data, create and start a backup task. The task can be started automatically according to schedule or manually. The application also lets you view information about completed backup tasks.
It is recommended to save backup copies of data on removable drives or in Online storage.
Kaspersky Total Security lets you use the following storage types for creating backup copies:
- Local drive
- Removable drive (e.g., an external hard drive)
- Network drive
- FTP server
- Online storage.
Creating a backup task
To create a backup task:
- Open the main application window.
- Click the Backup and Restore button.
- In the Backup and Restore window that opens, perform the following operations:
- Click the Select files for backup button if no backup task has been created yet.
- Click the Create backup copies of other files button if you already have an existing backup task and wish to create a new one.
The Backup Task Creation Wizard starts.
The Wizard consists of a series of pages (steps), which you can navigate through by clicking the Back and Next buttons. To close the Wizard after it finishes, click the Done button. To stop the Wizard at any step, click the Cancel button.
Let us review the steps of the Wizard in more detail.
Step 1. Select files
At this step of the Wizard, select the type of files or specify folders that you wish to back up:
- Select one of the preset file types (files from the My Documents and Desktop folders, photos and images, movies and videos, music files) to perform quick configuration. If you confirm this option, the wizard takes you straight to Step 4 "Select backup storage".
Kaspersky Total Security does not create backup copies of files located in the "Desktop" and "My Documents" folders if these folders are located on a network drive.
- Select the Create backup copies of files from specified folders option to manually specify folders that you want to back up.
Step 2. Select folders for backup
If you have selected the Create backup copies of files from specified folders option at the previous step of the Wizard, click the Add folder button and select a folder in the Select folder for backup window that opens or drag the folder into the application window.
Select the Limit backup by file types check box if you want to specify the categories of files to back up in the folders selected.
Page topStep 3. Select file types for backup
If you selected the Limit backup by file types check box at the previous step of the Wizard, at this step of the Wizard select check boxes opposite the types of files that you want to back up.
Page topStep 4. Select backup storage
At this step, select the a backup storage:
- Online storage. Select this option if you want to store backup copies in the Dropbox online storage. The Online storage has to be activated before it can be used. When you back up data in Online storage, Kaspersky Total Security does not create backup copies of data of the types that are subject to restrictions by Dropbox usage rules.
- Local drive. If you wish to store backup copies on a local drive, select the relevant local drive in the list.
- Network drive. If you wish to store backup copies on a network drive, select the relevant network drive in the list.
- Removable drive. If you wish to store backup copies on a removable drive, select the relevant removable drive in the list.
To ensure data security, we recommend using the Online storage or creating backup storages on removable drives.
To add a network storage:
- Click the Add network storage link to open the Add network storage window and select the type of network storage: network drive or FTP server.
- Specify the data required for connecting to the network storage.
- Click OK.
To add a removable drive as a backup storage:
- Click the Connect existing storage link to open the Connect storage window.
- Select the Removable drive section.
- Click the Browse button, and in the window that opens specify the removable drive on which you wish to save backup copies of files.
Select the Use advanced storage settings check box to configure file storage settings, such as the number of versions of backup copies of files stored and the duration of storage of backup copies.
Page topStep 5. Creating a backup schedule
Do one of the following at this step of the Wizard:
- Specify the backup task schedule if you want the backup task to start automatically.
- In the Run backup list, select the on demand option if you wish to start the task manually.
Step 6. Setting a password to protect backup copies
Select the Enable password protection check box and fill out the Password for access to backup copies and Confirm password fields to protect access to backup copies with a password.
Page topStep 7. File versions storage settings
This step is available if the Use advanced storage settings check box was selected at Step 4 "Select backup storage".
Configure file storage settings:
- Select the Restrict the number of versions of backup copies check box, and in the Versions of backup copies to store field specify the number of versions of backup copies of one file to be stored.
- Select the Restrict storage period for versions of backup copies check box, and in the Keep old versions of backup copies for field specify the number of days that each file version of a backup copy should be stored.
Step 8. Entering the backup task name
Do the following at this step:
- Enter the backup task name.
- Select the Run backup upon wizard completion check box to start the backup process automatically when the wizard finishes.
Step 9. Wizard completion
Click the Done button.
A backup task is created. The task you have created appears in the Backup and Restore window.
Page topStarting a backup task
To start a backup task:
- Open the main application window.
- Click the Backup and Restore button.
- In the Backup and Restore window that opens, select a backup task and click the Start button.
The backup task is started.
Page topRestoring data from a backup copy
To restore data from a backup copy:
- Open the main application window.
- Click the Backup and Restore button.
- Do one of the following:
- Click the Restore files button opposite the relevant backup task.
- Click the Manage storages button to open a window and click the Restore files button opposite the relevant backup storage.
- If a password was specified when the backup copy was created, enter this password in the Enter your password to access the storage window.
- In the Backup date / time drop-down list, select the date and time of creation of the backup copy.
- Select check boxes opposite the folders that you wish to restore.
- To restore only specific types of files, select these file types in the File type drop-down list.
- Click the Restore selected files button.
The Restore files from backup copies window opens.
- Select one of the two options:
- Original folder. If this option is selected, the application restores data to the original folder.
- Specified folder. If this option is selected, the application restores data to the specified folder. Click the Browse button to select the folder to which you want to restore data.
- In the If file names conflict drop-down list, select the action to be performed by the application when the name of the file being restored matches the name of the file already present in the destination folder.
- Click the Restore button.
The files selected for recovery will be restored from the backup copy and saved in the specified folder.
Restoring data from a backup copy using Kaspersky Restore Utility
Kaspersky Restore Utility lets you manage backup storage data on a computer where a Kaspersky Lab application, such as Kaspersky Small Office Security or Kaspersky Total Security, is corrupted or has been removed. By default, after installation of the application the utility is located in the Kaspersky Restore Utility folder located in the application setup folder. To use the utility on a computer where a Kaspersky Lab application is not installed or is corrupted, copy the utility to a removable drive.
To start the Restore Utility:
- Open the removable drive to which you have copied the utility.
- Run the kasperskylab.pure.restoretool file in the Kaspersky Restore Utility folder.
The Restore Utility main window opens. The window shows the default storage configured in Kaspersky Total Security or Kaspersky Small Office Security. You can manually specify the path to another storage.
To open a backup storage using the Restore Utility:
- Start the Restore Utility.
- In the main window of the Restore Utility, click the Select another storage button in the lower right corner.
The utility automatically detects the path to the Backup storage if it has been created on the local C:\ drive.
- In the window that opens, click the Browse button and specify the path to the Backup storage.
- Click the Select storage button.
To restore data from a backup copy:
- Start the Restore Utility.
- Do the following in the main window of the Restore Utility:
- In the Backup task drop-down list, select the task that resulted in the creation of the backup copies you need.
- In the Backup date / time drop-down list, select the date and time when the relevant backup copies were created.
- Select the files you need restored. To do so, select check boxes next to the relevant folders in the list.
Use the button to the right of the Search field to switch between a folder tree and a list of files.
- Click the Restore selected data button.
The Select where to place restored files window opens.
- In the window that opens, select the location for saving restored files.
- Original folder. Select this option to restore data to the original folder.
- Specified folder. Select this option to select the folder to which data should be restored. To select the folder to which data should be restored, click the Browse button.
- In the If file names conflict drop-down list, select an action to be performed by the application when the destination folder for the file being restored already contains a file with the same name:
- prompt for action – when files name match, the application prompts you to choose one of the options: replace the file with the backup copy, save both files, or do not restore the file.
- replace file with backup copy – Kaspersky Total Security deletes the existing file and replaces it with the file restored from the backup copy.
- save both files – Kaspersky Total Security leaves the existing file unchanged and saves the file restored from the backup copy under a new name in the same folder.
- do not restore this file – Kaspersky Total Security leaves the existing file unchanged and does not restore the file of the same name from the backup copy.
- Click the Restore button.
The Restore files window opens. The window shows the progress of file recovery from backup copies. You can stop the recovery process using the Stop button.
The required backup copies of the selected files are restored.
About Online storage
Kaspersky Total Security lets you save backup copies of your data in Online storage on a remote server via the Dropbox service.
To use Online storage:
- Make sure that the computer is connected to the Internet.
- Create an account on the website of the online data storage service provider.
- Activate Online storage.
You can use one and the same Dropbox account to back up data from different devices with Kaspersky Total Security installed to a single Online storage.
The Online storage size is determined by the provider of the online storage services, the Dropbox web service. See the Dropbox website for more details on the terms of use of the web service.
Page topOnline storage activation
To activate Online storage:
- Open the main application window.
- Click the Backup and Restore button.
- In the Backup and Restore window that opens, perform the following operations:
- Click the Select files for backup button if no backup task has been created previously.
- Click the Create backup copies of other files button if you already have a backup task.
The Backup Task Creation Wizard starts.
- In the data type selection window, select the data category or manually specify the files that you want to back up.
- In the storage selection window, select the Online storage and click the Activate button.
An Internet connection is required to create an Online storage.
A Dropbox account login dialog opens.
- In the window that opens, perform one of the following operations:
- Complete registration if you are not a registered Dropbox user.
- If you are a registered Dropbox user, log into your Dropbox account.
- To finish Online storage activation, confirm that Kaspersky Total Security is allowed to use your Dropbox account for backing up and restoring data. Kaspersky Total Security places backup copies of saved data in a separate folder that is created in the Dropbox storage folder for applications.
After Online storage activation has been completed, the storage selection window opens. It contains a selection of online storages to choose from. For the activated Online storage, the application shows the amount of used space and the amount of free space available for data storage.
About a data vault
Data vaults are designed to protect your confidential data against unauthorized access. A data vault is a data storage on your computer that you can lock or unlock using the password that only you know. You have to enter the password to modify the files stored in a locked data vault. If you have entered an invalid password 10 times in a row, access to the data vault is blocked for one hour.
If you lose or forget the password, you will not be able to recover your data.
Kaspersky Total Security uses the following data encryption algorithms to create data vaults: AES XTS 256 with an effective key length of 56 bits.
Moving files to a data vault
To place files in a data vault:
- Open the main application window.
- In the lower part of the main window, click the More Tools button.
The Tools window opens.
- Click the Data Encryption link to open the Data Encryption window.
- In the Data Encryption window, perform one of the following:
- Click the Create new data vault button if you do not have a data vault yet.
- Click the Create data vault button if you have previously created a data vault.
- Click the Add files and folders to data vault button to open the Explorer and specify the files that you want to place in the data vault.
The selected files appear in the Data Encryption window.
- Click the Continue button.
- Enter the data vault name and specify its location or use the default values of these settings.
- To be able to access the data vault quickly, select the Create desktop shortcut for data vault check box.
- Click the Continue button.
- Fill out the Password and Confirm password fields and click Continue.
- Select what to do with the source copies of files outside the data vault:
- To delete source copies of files outside the data vault, click Delete.
- To keep source copies of files outside the data vault, click Skip.
- Click the Done button.
The data vault you have created appears in the list of data vaults.
- To lock the data vault, click the Lock button.
Data in a locked data vault becomes available only after a password is entered.
Accessing files stored in a data vault
To gain access to the data in a data vault:
- Open the main application window.
- In the lower part of the main window, click the More Tools button.
The Tools window opens.
- Click the Data Encryption link to open the Data Encryption window.
- Click the Open button next to the data vault you need.
- Enter the password and click the Open data vault in Windows Explorer button.
Files stored in the data vault appear in the Explorer window. You can make the necessary changes to the files and lock the data vault again.
To unlock data vaults that were created using a previous version of the application, you must convert the data vaults from the old format into the new format. The application prompts you to perform conversion when you attempt to open a data vault in Kaspersky Total Security.
Data vault conversion to the new format can take a long time depending on the data vault size.
If you have not installed the latest update for Kaspersky Total Security, when upgrading to a new version the data vaults that you created in the previous version of the application may become unavailable.
Page topPassword-protecting access to Kaspersky Total Security management functions
A single computer may be shared by several users with various levels of experience and computer literacy. Unrestricted access of different users to Kaspersky Total Security and its settings may compromise the level of computer security.
To restrict access to the application, you can set an administrator password and specify the actions for which this password must be entered:
- Configuring the application settings
- Quitting the application
- Removing the application
To password-protect access to control over Kaspersky Total Security:
- Open the main application window.
- Click the button in the lower part of the window.
The Settings window opens.
- In the left part of the window, select the General section and click the Set up password protection link to open the Password protection window.
- In the window that opens, fill in the New password and Confirm password fields.
- In the Password scope group of settings, specify the application actions to which you want to restrict access.
A forgotten password cannot be recovered. If you have forgotten your password, contact Technical Support to recover access to Kaspersky Total Security settings.
Page topPausing and resuming computer protection
Pausing protection means temporarily disabling all protection components for some time.
When protection is paused or Kaspersky Total Security is not running, the activity of the applications running on your computer is monitored. Information about the results of monitoring of application activity is saved in the operating system. When Kaspersky Total Security is started again or protection is resumed, the application uses this information to protect your computer from malicious actions that may have been performed when protection was paused or when Kaspersky Total Security was not running. Information about the results of monitoring of application activity is stored indefinitely. This information is deleted if Kaspersky Total Security is removed from your computer.
To pause the protection of your computer:
- In the context menu of the application icon located in the taskbar notification area, select the Pause protection item.
The Pause protection window opens (see the following figure).
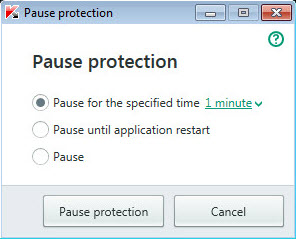
Pause protection window
- In the Pause protection window, select the time interval after which protection will be resumed:
- Pause for the specified time – protection is enabled after expiration of the time interval selected from the drop-down list.
- Pause until computer restart – protection is enabled after the application is started again or the operating system is restarted (if the application automatically starts on startup).
- Pause – protection will be resumed when you decide to resume it.
- Click the Pause protection button and confirm your choice in the window that opens.
To resume computer protection:
In the taskbar notification area, in the context menu of the application icon, select Resume protection.
Restoring the default application settings
You can restore the settings recommended by Kaspersky Lab for Kaspersky Total Security at any time. The settings can be restored using the Application Configuration Wizard.
When the Wizard completes its operation, the Recommended security level is set for all protection components.
To run the Application Configuration Wizard:
- Open the main application window.
- Click the button in the lower part of the window.
The Settings window opens.
- Select the General section.
The window displays the settings of Kaspersky Total Security.
- In the lower part of the window, in the Manage Settings drop-down list, select Restore settings.
Let us review the steps of the Wizard in more detail.
Starting the Wizard
Click the Next button to proceed with the Wizard.
Restore settings
At this step, the application settings are reverted to the default settings configured by Kaspersky Lab.
Finishing restoration
To close the Wizard after it completes its task, click the Done button.
Page topViewing the application operation report
Kaspersky Total Security maintains operation reports for each of the protection components. Using a report, you can obtain statistical information about the application's operation (for example, how many malicious objects have been detected and neutralized during a specified time period, how many times application databases and modules have been updated during the same period, how many spam messages have been detected, and much more).
To view the application operation report:
- Open the main application window.
- Click the More Tools button in the lower part of the main window to open the Tools window.
- In the Tools window, select the Report section to open the Reports window.
The Reports window displays reports on application operation for the current day (in the left part of the window) and for a particular time period (in the right part of the window).
- If you want to view a detailed report on application operation, in the upper part of the Reports window, click the Detailed reports link. The Detailed Reports window opens.
The Detailed Reports window displays data in the form of a table. For convenient viewing of reports, you can select various filtering options.
Applying the application settings on another computer
After you have configured the application, you can apply its settings to a copy of Kaspersky Total Security that is installed on another computer. As a result, the application will be configured identically on both computers.
The application settings are saved in a configuration file that you can move from one computer to another.
The settings of Kaspersky Total Security are moved from one computer to another in three steps:
- Save the application settings to configuration file.
- Move the configuration file to the other computer (for example, by email or on a removable drive).
- Import the settings from the configuration file to the application copy that is installed on the other computer.
To export the application settings:
- Open the main application window.
- Click the button in the lower part of the window.
The Settings window opens.
- In the Settings window, select the General section.
- In the Manage Settings drop-down list, select Export settings.
- The Save as window opens.
- Specify a name for the configuration file and click the Save button.
The application settings are now saved in the configuration file.
You can also export the application settings at the command prompt, by using the following command: avp.com EXPORT <file_name>.
To import settings into a copy of the application installed on another computer:
- On the other computer, open the main application window of Kaspersky Total Security.
- Click the button in the lower part of the window.
The Settings window opens.
- In the Settings window, select the General section.
- In the Manage Settings drop-down list, select Import settings.
The Open window opens.
- Specify a configuration file and click the Open button.
The settings are imported to the application that is installed on the other computer.
Page topParticipating in Kaspersky Security Network
Kaspersky Total Security uses cloud protection to make protection of your computer more effective. Cloud protection is implemented using the Kaspersky Security Network infrastructure that uses data received from users all over the world.
Kaspersky Security Network (KSN) is the cloud-based knowledge base of Kaspersky Lab containing information about the reputation of applications and websites. The use of data from Kaspersky Security Network ensures faster responses by Kaspersky Total Security to new threats, improves the performance of some protection components, and reduces the likelihood of false positives.
Users' participation in Kaspersky Security Network allows Kaspersky Lab to promptly receive information about types and sources of new threats, develop solutions for neutralizing them, and minimize the number of false positives. Participation in Kaspersky Security Network lets you access reputation statistics for applications and websites.
If you participate in Kaspersky Security Network, you automatically send information about the configuration of your operating system and the start and completion time of processes in Kaspersky Total Security to Kaspersky Lab.
Enabling and disabling participation in Kaspersky Security Network
Participation in Kaspersky Security Network is voluntary. You can enable or disable the use of Kaspersky Security Network (KSN) when installing Kaspersky Total Security and / or at any moment after the application is installed.
To enable or disable participation in Kaspersky Security Network:
- Open the main application window.
- Click the button in the lower part of the window.
The Settings window opens.
- In the Additional section, select Additional protection and management tools.
The window displays details of Kaspersky Security Network and Kaspersky Security Network participation settings.
- Enable or disable participation in Kaspersky Security Network:
- If you want to participate in Kaspersky Security Network, click the Enable button.
A window with the text of the Kaspersky Security Network Statement opens. If you accept the terms of the Statement, click the I agree button.
- If you do not want to participate in Kaspersky Security Network, click the Disable button.
- If you want to participate in Kaspersky Security Network, click the Enable button.
Checking the connection to Kaspersky Security Network
Your connection to Kaspersky Security Network may be lost for the following reasons:
- You do not participate in Kaspersky Security Network.
- Your computer is not connected to the Internet.
- Current key status does not allow connecting to Kaspersky Security Network.
The current status of the key is displayed in the Licensing window.
To test the connection to Kaspersky Security Network:
- Open the main application window.
- Click the More Tools button in the lower part of the main window to open the Tools window.
- In the left part of the Tools window, click the Cloud Protection link to open the Cloud Protection window.
The Cloud Protection window shows the status of your connection to Kaspersky Security Network.
Page topParticipating in the Protect a Friend program
With the Protect a Friend program, you can collect bonus points and exchange them for a bonus activation code for a Kaspersky Lab application (such as Kaspersky Internet Security). To do so, you have to publish a download link on Twitter and on your page in social networks. This link allows your friends to download an installation package for a Kaspersky Lab application with an extended evaluation period. When one of your friends on Twitter or on a social network downloads the Kaspersky Lab application installation package by clicking the link that you have published and then activates the application, you receive bonus points.
The number of bonus points depends on the application version.
Note that the option to participate in the Protect a Friend program may not be available to all users.
To log in to your profile in the Protect a Friend program, you must use the user name and password of your My Kaspersky account. If you do not have a My Kaspersky account yet, you can create one when you open your Protect a Friend profile for the first time.
A bonus activation code can also be specified in the application as the new activation code.
A bonus activation code can be used to activate the application on another computer (for example, you can give it as a present to another user).
A bonus activation code cannot be used in the following cases:
- The application is in use by subscription. In this case, you can use the bonus activation code when the subscription expires. You can also apply your bonus activation code on another computer.
- An activation code is already set in the application as the new code. In this case, you can use the bonus activation code when the license expires.
Creating an account on My Kaspersky portal
To participate in the Protect a Friend program, you must create an account on My Kaspersky portal.
To create your My Kaspersky account:
- Open the main application window.
- Click the Protection for all devices button.
- In the Protection for all devices window, click the Connect to My Kaspersky button.
The Registration on My Kaspersky portal window opens.
- Click the Next button.
- Enter your email address in the Email address field.
- Enter and confirm a password in the Password and Enter your password again fields. The password must contain at least eight characters.
- Select the Receive news and special offers from Kaspersky Lab by email check box if you want to receive Kaspersky Lab notifications in your mailbox.
- Click the Privacy Statement link to read the Privacy Statement.
- Select the By creating an account, you accept the Privacy Statement check box.
- Click the Create button.
The web page displays a message informing you of successful registration of your account on My Kaspersky portal. A message will be sent to your email address, containing a link that you must click to activate your My Kaspersky account.
- Click the link to activate your account on My Kaspersky portal.
The web page displays a message informing you of successful activation of your account on My Kaspersky portal. You can use your newly created My Kaspersky account to log in to your Protect a Friend profile.
Logging in to your profile in the Protect a Friend program
To log in to the web page with your profile in the Protect a Friend program:
- Open the main application window.
- Click the My Kaspersky link in the lower part of the window to start the default browser.
The Sign in to My Kaspersky window opens.
- Fill in the fields by entering the email address and the password that you specified during registration of your My Kaspersky account.
- Click the Sign In button.
- Go to the Protect a Friend section.
Read more about the rules of participation in the Protect a Friend program on My Kaspersky portal.
Page topUsing the application from the command prompt
You can use Kaspersky Total Security at the command prompt.
Command prompt syntax:
avp.com <command> [settings]
To view help on the command prompt syntax, enter the following command:
avp.com [ /? | HELP ]
This command allows you to obtain a full list of commands that are available for managing Kaspersky Total Security through the command prompt.
To obtain help on the syntax of a specific command, you can enter one of the following commands:
avp.com <command> /?
avp.com HELP <command>
At the command prompt, you can refer to the application either from the application installation folder or by specifying the full path to avp.com.
Page topContacting Technical Support
This section describes the ways to get technical support and the terms on which it is available.
How to get technical support
If you cannot find a solution to your issue in the application Help text or in any of the sources of information about the application, we recommend that you contact Kaspersky Lab Technical Support. Technical Support specialists will answer any of your questions about installing and using the application.
Before contacting Technical Support, please read the support rules.
You can contact Technical Support in one of the following ways:
- By telephone. This method allows you to consult with specialists from our Russian-language or international Technical Support.
- Send request from My Kaspersky portal. This method allows you to contact our specialists using the query form.
Technical support is available only to users who have purchased a license for use of the application. No technical support is provided to users of trial versions.
Page topTechnical support by phone
You can call Technical Support from most regions throughout the world. You can find information about how to obtain technical support in your region and contact information for Technical Support on the Kaspersky Lab Technical Support website.
Before contacting Technical Support, please read the support rules.
Page topTechnical support via My Kaspersky portal
My Kaspersky is a one-stop online resource for managing the protection of your devices and activation codes for Kaspersky Lab applications and for requesting technical support.
To access My Kaspersky portal, you have to register. To do so, enter your email address and create a password.
You can receive technical support via My Kaspersky portal in the following ways:
- Send email requests to Technical Support
- Contact Technical Support without using email
- Track the status of your requests in real time
You can also view a complete history of your technical support requests.
Email request to Technical Support
You have to specify the following information in your email request to Technical Support:
- Message subject
- Application name and version number
- Operating system name and version number
- Problem description
A specialist from Technical Support will send an answer to your question to My Kaspersky portal and to the email address that you have specified during registration.
Page topCollecting information for Technical Support
After you notify Technical Support specialists of a problem, they may ask you to create a report that contains information about your operating system and send it to Technical Support. Technical Support specialists may also ask you to create a trace file. The trace file allows tracing the process of performing application commands step by step and determining the stage of application operation at which an error occurs.
To provide better support on issues related to functioning of the application, Technical Support specialists may ask you to temporarily change application settings for debugging purposes while diagnostics are ongoing. To do so, you may need to perform the following actions:
- Collect extended diagnostic information
- Configure individual components of the application by changing special settings that are not accessible through the standard user interface
- Reconfigure storage and sending of collected diagnostic information
- Set up interception of network traffic and saving of network traffic to a file
Technical Support specialists will give you all information necessary for performing these actions (step-by-step instructions, settings to be changed, scripts, additional command line features, debugging modules, special utilities, etc.) and will inform you of what data will be collected for debugging purposes. After the extended diagnostic information is collected, it is saved on the user's computer. The collected data is not sent automatically to Kaspersky Lab.
You are advised to perform the preceding actions only under the guidance of a Technical Support specialist after receiving instructions to do so. Changing application settings by yourself in ways not described in Help or not recommended by Technical Support specialists can cause slowdowns and crashes of the operating system, reduce the protection level of your computer, and damage the availability and integrity of the processed information.
Creating a system state report
To create a system state report:
- Open the main application window.
- Click the
 button in the lower part of the window.
The Support window opens.
- In the window that opens, click the Support Tools link to open the Support Tools window.
- In the window that opens, click the How to create an operating system state report link to open a Knowledge Base article on how to create an operating system state report.
- Follow the instructions in the Knowledge Base article.
Sending data files
Once created, the trace files and the system state report should be sent to Kaspersky Lab Technical Support specialists.
You will need a request number to upload files to the Technical Support server. This number is available on My Kaspersky portal when you have an active request.
To upload the data files to the Technical Support server:
- Open the main application window.
- Click the button in the lower part of the window.
The Kaspersky Lab Technical Support window opens.
- Click the Support Tools link to open the Support Tools window.
- In the window that opens, click the Send report to Technical Support link to open the Send report window.
- Select the check boxes next to the data that you want to send to Technical Support.
- Enter the number assigned to your request by Technical Support.
- Click the Send report button.
The selected data files are packed and sent to the Technical Support server.
If you were unable to send the files for any reason, the data files can be stored on your computer and later sent from My Kaspersky portal.
To save data files to disk:
- Open the main application window.
- Click the button in the lower part of the window.
The Kaspersky Lab Technical Support window opens.
- In the window that opens, click the Support Tools link to open the Support Tools window.
- In the window that opens, click the Send report to Technical Support link to open the Send report window.
- Select the types of data to save to disk:
- Operating system information. Select this check box to save information about the operating system of your computer to disk.
- Data received for analysis. Select this check box to save application trace files to disk. Click the <number of files>, <data volume> link to open the Data received for analysis window. Select check boxes opposite the trace files that you want to save.
- Click the Save report link to open the window for saving an archive with data files.
- Specify the archive name and confirm saving.
The created archive can be sent to Technical Support from My Kaspersky portal.
Page top
Contents and storage of trace files
Trace files are stored on the computer openly for seven days after the writing of trace files is disabled. Trace files are deleted permanently after seven days.
Trace files are stored in the ProgramData\Kaspersky Lab folder.
The format of trace file names is as follows: KAV<version number_dateXX.XX_timeXX.XX_pidXXX.><trace file type>.log.
Trace files can contain confidential data. You can view the contents of a trace file by opening it in a text editor (such as Notepad).
Page topRunning AVZ scripts
You are advised not to change the text of an AVZ script received from Kaspersky Lab experts. If problems occur during script execution, please contact Technical Support.
To run an AVZ script:
- Open the main application window.
- Click the button in the lower part of the window.
The Support window opens.
- In the window that opens, click the Support Tools link.
The Support Tools window opens.
- In the window that opens, click the Run script link to open the Script execution window.
- Copy the text from the script sent by Technical Support specialists, paste it in the entry field in the window that opens, and click the Run button.
The script runs.
If the script is successfully executed, the Wizard closes automatically. If an error occurs during script execution, the Wizard displays a corresponding message.
Page topLimitations and warnings
Kaspersky Total Security has a number of limitations that are not critical to operation of the application.
Limitations on upgrades from a previous version of the application
The application can be upgraded if the following versions of Kaspersky Total Security are installed on your computer:
- Kaspersky PURE 3.0
- Kaspersky Total Security
- Kaspersky Total Security 2016
Upgrades from earlier versions of the application are not supported.
Upgrading from Kaspersky Total Security has the following limitations:
- When a previous version of Kaspersky Total Security is upgraded, the following application settings are replaced with default settings:
- Kaspersky Total Security display settings
- Scan schedule
- Participation in Kaspersky Security Network
- File Anti-Virus protection level
- Mail Anti-Virus protection level
- Anti-Banner settings
- Update sources
- List of trusted web addresses
- URL Advisor settings
- After an upgrade from a previous version of the application, Kaspersky Total Security starts automatically even if automatic startup of the application is disabled in the settings that have been saved. When the operating system restarts afterwards, Kaspersky Total Security does not start automatically if automatic startup of the application is disabled in the settings that have been saved.
Limitations on the operation of certain components and automatic processing of files
Infected files and malicious links are processed automatically according to rules created by Kaspersky Lab specialists. You cannot modify these rules manually. Rules can be updated following an update of databases and application modules. The rules for Firewall, Webcam Protection, Application Manager, Software Cleaner, Application Control, and Trusted Applications mode are also updated automatically.
If a device scan is started from My Kaspersky portal, files will be processed automatically based on the rules specified in the application. Files detected on a device can be processed automatically by request from My Kaspersky portal without your confirmation, even if interactive protection is enabled in the application.
Limitations on connection to Kaspersky Security Network
During its operation, the application may query Kaspersky Security Network for information. If data from Kaspersky Security Network could not be retrieved, the application makes decisions based on local anti-virus databases.
Limitations of System Watcher functionality
Protection against cryptors (malware that encrypts user files) has the following limitations:
- The Temp system folder is used to support this functionality. If the system drive with the Temp folder has insufficient disk space to create temporary files, protection against cryptors is not provided. In this case, the application does not display a notification that files are not backed up (protection is not provided).
- Temporary files are deleted automatically when you close Kaspersky Total Security or disable the System Watcher component.
- In case of an emergency termination of Kaspersky Total Security, temporary files are not deleted automatically. To delete temporary files, clear the Temp folder manually. To do so, open the Run window (Run command under Windows XP) and in the Open field type
%TEMP%. Click OK.
Encrypted connections scan limitations
Due to technical limitations of the implementation of scanning algorithms, scanning of encrypted connections does not support certain extensions of the TLS 1.0 protocol and later versions (particularly NPN and ALPN). Connections via these protocols may be limited. Browsers with SPDY protocol support use the HTTP over TLS protocol instead of SPDY even if the server to which the connection is established supports SPDY. This does not affect the level of connection security. If the server supports only the SPDY protocol and it is impossible to establish the connection via the HTTPS protocol, the application does not monitor the connection established.
Kaspersky Total Security does not support processing of HTTPS/2 Proxy traffic. The application does not process traffic transmitted via extensions of the HTTP/2 protocol.
Kaspersky Total Security monitors only those protected connection which it is able to decrypt. The application does not monitor connections added to the list of exclusions (Websites link in the Network settings window).
The following components perform decryption and scanning of encrypted traffic by default:
- Web Anti-Virus
- Safe Money
- URL Advisor
- Parental Control
Kaspersky Total Security decrypts encrypted traffic while the user is using the Google Chrome browser if the Kaspersky Protection extension is disabled in this browser.
Anti-Spam limitations
The following limitations apply to Anti-Spam:
- Anti-Spam functionality can be configured by editing the settings file for the Anti-Spam component.
- When switching to a previous or newer version of the application, Anti-Spam databases (specimens of spam messages added by the user via the mail client plug-in) are not saved.
Backup and Restore limitations
The following limitations apply to Backup and Restore:
- Online storage of backup copies becomes unavailable when the hard drive or computer is replaced. Visit the Kaspersky Lab support website for information on how to restore the connection to Online storage after replacing your hardware.
- Editing of service files of the backup storage can result in loss of access to the backup storage and inability to restore your data.
Limitations of Data Encryption functionality
When a data vault is created in the FAT32 file system, the size of the data vault file on the drive must not exceed 4 GB.
Specifics of kernel memory scanning for rootkits in Protected Browser mode
When an untrusted module is detected in Protected Browser mode, a new browser tab opens with a notification about malware detection. If this happens, you are recommended to exit the browser and run a Full Scan of the computer.
Specifics of clipboard data protection
Kaspersky Total Security allows an application to access clipboard in the following cases:
- An application with the active window attempts to place data in clipboard. The active window is the window that you are currently using.
- A trusted process of an application attempts to place data in clipboard.
- A trusted process of an application or a process with the active window attempts to receive data from clipboard.
- An application process that previously placed data in clipboard attempts to receive this data from clipboard.
Warning about compatibility with Kaspersky Lab applications
Kaspersky Total Security is compatible with the following Kaspersky Lab applications:
- Kaspersky Fraud Prevention for Endpoint 2.0
- Kaspersky Fraud Prevention for Endpoint 2.5
- Kaspersky Fraud Prevention for Endpoint 3.0
- Kaspersky Fraud Prevention for Endpoint 3.5
- Kaspersky Fraud Prevention for Endpoints 4.0
- Kaspersky Fraud Prevention for Endpoints 5.0
- Kaspersky Fraud Prevention for Endpoints 6.0
- Kaspersky Password Manager 2.0
- Kaspersky Password Manager 5.0
- Kaspersky Password Manager 7.0
- Kaspersky Password Manager 8.0
Specifics of infected file processing by application components
By default, the application can delete infected files that cannot be disinfected. Removal by default can be performed during file processing by such components as Application Control, Mail Anti-Virus, File Anti-Virus, during scan tasks, and also when System Watcher detects malicious activity of applications.
Limitations applicable to certain components in case of application installation together with Kaspersky Fraud Prevention for Endpoints
Operation of the following Kaspersky Total Security components is limited in Protected Browser if the application is installed together with Kaspersky Fraud Prevention for Endpoints:
- Web Anti-Virus, except Anti-Phishing
- Parental Control
- URL Advisor
- Anti-Banner
Warning about changes in IM Anti-Virus and Parental Control functionality
Beginning with the 2016 version of Kaspersky Total Security, the IM Anti-Virus component does not scan messages transmitted via the IRC protocol.
IM Anti-Virus supports only the following ICQ versions: ICQ 8 – ICQ 8.3. Later versions are not supported.
Beginning with the 2016 version of Kaspersky Total Security, the Parental Control component does not scan messages transmitted via IM clients.
About personal data contained in report files
Report files are stored locally on your computer. Path to report files: %allusersprofile%\Kaspersky Lab\AVP17.0.0\Report\Database.
Reports are stored in the following files:
- reports.db
- reports.db-wal
- reports.db-shm (does not contain any personal data)
Report files are protected against unauthorized access if self-defense is enabled in Kaspersky Total Security. If self-defense is disabled, report files are not protected.
Report files can contain personal data obtained during operation of protection components, such as File Anti-Virus component, Mail Anti-Virus, Anti-Spam, and Parental Control.
Report files can contain the following personal data:
- IP address of the user's device
- Online browsing history
- Blocked links
- Messaging history in social networks
- Key words specified in Parental Control settings
- Versions of the browser and operating system
- Names of cookies and other files and paths to them
- Email address, sender, message subject, message text, user names, and list of contacts
Specifics of the Autorun process operation
The autorun process logs the results of its operation. Data is logged in text files named “kl-autorun-<date><time>.log”. To view data, open the Run window (Run command under Windows XP) and in the Open field type %TEMP% and click OK.
All trace files are saved at the path to setup files that were downloaded during operation of the autorun process. Data is stored for the duration of operation of the autorun process and deleted permanently when this process is terminated. Data is not sent anywhere.
Kaspersky Total Security limitations under Microsoft Windows 10 RS4 with the Device Guard mode enabled:
Operation of the following functionality is partly limited:
- Clipboard protection
- Browser protection from keyboard and mouse input emulators (input spoofing)
- Protection from remote management applications
- Browser protection (management through API, protection from attacks that use dangerous messages to browser windows, protection from message queue management)
- Heuristic Analysis (emulation of the startup of malicious applications)
If UMCI mode is enabled in Windows, Kaspersky Total Security does not detect screen lockers.
About logging of events in the Windows event log that are related to the End User License Agreement and Kaspersky Security Network
Events involving accepting and declining the terms of the End User License Agreement, and also accepting and declining participation in Kaspersky Security Network, are recorded in the Windows event log.
Limitations on local address reputation checks in Kaspersky Security Network
Links to local resources are not scanned in Kaspersky Security Network.
Warning about applications that collect information
If an application that collects information and sends it to be processed is installed on your computer, Kaspersky Total Security may classify this application as malware. To avoid this, you can exclude the application from scanning by configuring Kaspersky Total Security as described in this document.
Warning about the creation of an application installation report
An installation report file is created when the application is installed to a computer. If application installation completed with an error, an installation report file is saved and you can send it to Kaspersky Lab Technical Support. You can view the contents of the installation report file by clicking the link in the application window. If the application is successfully installed, the installation report file is immediately deleted from your computer.
Application Control limitations
If VeraCrypt is installed on your computer, Kaspersky Total Security may terminate when working with the Application Control component. To resolve this issue, please try to upgrade VeraCrypt to version 1.19 or later.
Application limitations under Microsoft Windows 10 RS5
In Microsoft Windows 10 RS5, you can enable a special mode where the operating system supports case-sensitive names of files and folders.
If the case-sensitive mode is enabled, Kaspersky Total Security has the following limitations:
- If the case-sensitive mode is enabled for any folder in the Kaspersky Total Security installation path, you cannot install the application to the specified path.
- If the case-sensitive mode is enabled for some files and folders after Kaspersky Total Security installation, some application components may not work properly with those files and folders.
Limitations of Kaspersky Total Security when the operating system is upgraded
If you have upgraded Windows 7 to Windows 10, Windows 8 / 8.1 to Windows 10, or Windows 10 TH / RS1 to Windows 10 RS2 and have started Kaspersky Total Security for the first time, the application has the following limitations:
- File Anti-Virus is running in normal mode. Other protection components are not running.
- On-demand scan is not performed.
- Self-Defense of files and the registry is performed in normal mode. Self-Defense of processes is not performed.
- The Kaspersky Total Security interface is not available. Threats are automatically processed.
After you have upgraded the operating system, Kaspersky Total Security notifies you about the limitations of protection, adapts itself to the new operating system, and prompts you to restart the system when the adaptation process completes. After the operating system is restarted, Kaspersky Total Security resumes normal operation.
Page topOther sources of information about the application
Kaspersky Total Security page on the Kaspersky Lab website
On Kaspersky Total Security page, you can view general information about the application and its functions and features.
Kaspersky Total Security page contains a link to the eStore. There you can purchase or renew the application.
Kaspersky Total Security page in the Knowledge Base
Knowledge Base is a section on the Technical Support website.
On Kaspersky Total Security page in the Knowledge Base, you can read articles that provide useful information, recommendations, and answers to frequently asked questions on how to purchase, install, and use the application.
Articles in the Knowledge Base may provide answers to questions that relate both to Kaspersky Total Security as well as to other Kaspersky Lab applications. Articles in the Knowledge Base may also contain news from Technical Support.
Discussing Kaspersky Lab applications on the Forum
If your question does not require an immediate answer, you can discuss it with Kaspersky Lab experts and other users on our forum.
On the forum you can view existing topics, leave your comments, and create new discussion topics.
Page topGlossary
Activating the application
Switching the application to fully functional mode. Application activation is performed by the user during or after installation of the application. To activate the application, the user must have an activation code.
Activation code
A code that you receive when purchasing a license for Kaspersky Total Security. This code is required for activation of the application.
The activation code is a unique sequence of twenty alphanumeric characters in the format xxxxx-xxxxx-xxxxx-xxxxx.
Anti-virus databases
Databases that contain information about computer security threats known to Kaspersky Lab as of when the anti-virus databases are released. Entries in anti-virus databases allow detecting malicious code in scanned objects. Anti-virus databases are created by Kaspersky Lab specialists and updated hourly.
Application modules
Files included in the Kaspersky Lab installation package that are responsible for performing the main tasks of the corresponding application. A particular application module corresponds to each type of task performed by the application (protection, scan, updates of databases and application modules).
Backup and Restore
Creates backup copies of data stored on the computer. Backup copies are created to prevent data loss as a result of theft, hardware malfunctions, or hacker attacks.
Blocking an object
Denying access to an object from third-party applications. A blocked object cannot be read, executed, modified, or deleted.
Compressed file
An archive file that contains a decompression program and instructions for the operating system for executing it.
Data vault
A data vault is a special data storage in which files are stored in encrypted form. A password is needed to access such files. Data vaults are meant to prevent unauthorized access to user data.
Database of malicious web addresses
A list of web addresses whose content may be considered to be dangerous. Created by Kaspersky Lab specialists, the list is regularly updated and is included in the Kaspersky Lab application package.
Database of phishing web addresses
List of web addresses which have been defined as phishing web addresses by Kaspersky Lab specialists. The databases are regularly updated and are part of the Kaspersky Lab application package.
Digital signature
An encrypted block of data embedded in a document or application. A digital signature is used to identify the author of the document or application. To create a digital signature, the document or application author must have a digital certificate proving the author's identity.
A digital signature lets you verify the data source and data integrity and protect yourself against counterfeits.
Disk boot sector
A boot sector is a special area on a computer's hard drive, floppy disk, or other data storage device. It contains information on the disk's file system and a boot loader program, which is responsible for starting the operating system.
There exist a number of viruses that infect boot sectors, which are thus called boot viruses. The Kaspersky Lab application allows scanning boot sectors for viruses and disinfecting them if an infection is found.
False positive
A situation when a Kaspersky Lab application considers a non-infected object to be infected because the object's code is similar to that of a virus.
File mask
Representation of a file name using wildcards. The standard wildcards used in file masks are * and ?, where * represents any number of any characters and ? stands for any single character.
Heuristic analyzer
A technology for detecting threats about which information has not yet been added to Kaspersky Lab databases. The heuristic analyzer detects objects whose behavior in the operating system may pose a security threat. Objects detected by the heuristic analyzer are considered to be probably infected. For example, an object may be considered probably infected if it contains sequences of commands that are typical of malicious objects (open file, write to file).
Hypervisor
An application supporting the parallel operation of several operating systems on one computer.
iChecker Technology
A technology that allows increasing the speed of anti-virus scanning by excluding objects that have remained unchanged since their last scan, provided that the scan parameters (the databases and the settings) have not been altered. The information for each file is stored in a special database. This technology is used in both real-time protection and on-demand scan modes.
For example, you have an archive file that was scanned by a Kaspersky Lab application and assigned not infected status. Next time, the application will skip this archive unless the archive has been altered or the scan settings have been changed. If you have changed the archive content by adding a new object to it, modified the scan settings, or updated the application databases, the archive will be re-scanned.
Limitations of iChecker technology:
- This technology does not work with large files, since it is faster to scan a file than to check whether the file has been modified since it was last scanned.
- The technology supports a limited number of formats.
Incompatible application
An anti-virus application from a third-party developer or a Kaspersky Lab application that does not support management through Kaspersky Total Security.
Infected object
An object a portion of whose code completely matches part of the code of known malware. Kaspersky Lab does not recommend accessing such objects.
Kaspersky Lab update servers
Kaspersky Lab HTTP servers from which updates of databases and software modules are downloaded.
Kaspersky Security Network (KSN)
The cloud-based knowledge base of Kaspersky Lab containing information about the reputation of applications and websites. Use of data from Kaspersky Security Network ensures faster responses by Kaspersky Lab applications to threats, improves the performance of some protection components, and reduces the likelihood of false positives.
Keylogger
A program designed for hidden logging of information about keys pressed by the user. Keyloggers function as keystroke interceptors.
License term
A time period during which you have access to the application features and rights to use additional services.
Phishing
A type of Internet fraud aimed at obtaining unauthorized access to users' confidential data.
Probable spam
A message that cannot be unambiguously considered spam, but has several spam attributes (for example, certain types of mailings and advertising messages).
Probably infected object
An object whose code contains portions of modified code from a known threat, or an object whose behavior is similar to that of a threat.
Protected Browser
A dedicated operation mode of a standard browser designed for financial activities and online shopping. Using Protected Browser ensures the safety of confidential data that you enter on the websites of banks and payment systems such as bank card numbers or passwords used for online banking, and also prevents theft of payment assets when making online payments.
Protection components
Integral parts of Kaspersky Total Security intended for protection against specific types of threats (for example, Anti-Spam and Anti-Phishing). Each of the components is relatively independent of the other ones and can be disabled or configured individually.
Protocol
A clearly defined and standardized set of rules governing the interaction between a client and a server. Well-known protocols and the services associated with them include HTTP, FTP, and NNTP.
Quarantine
A dedicated storage in which the application places backup copies of files that have been modified or deleted during disinfection. Copies of files are stored in a special format that is not dangerous for the computer.
Rootkit
A program or a set of programs for hiding traces of an intruder or malware in the operating system.
On Windows-based operating systems, a rootkit usually refers to a program that penetrates the operating system and intercepts system functions (Windows APIs). Interception and modification of low-level API functions are the main methods that allow these programs to make their presence in the operating system quite stealthy. A rootkit can usually also mask the presence of any processes, folders, and files that are stored on a disk drive, in addition to registry keys, if they are described in the configuration of the rootkit. Many rootkits install their own drivers and services on the operating system (these also are "invisible").
Script
A small computer program or an independent part of a program (function) which, as a rule, has been developed to execute a specific task. It is most often used with programs that are embedded in hypertext. Scripts are run, for example, when you open some websites.
If real-time protection is enabled, the application tracks the execution of scripts, intercepts them, and scans them for viruses. Depending on the results of scanning, you may block or allow the execution of a script.
Security level
The security level is defined as a predefined collection of settings for an application component.
Spam
Unsolicited mass email mailings, most often including advertisements.
Startup objects
The set of programs needed to start and correctly operate the operating system and software installed on your computer. These objects are executed every time the operating system is started. There are viruses capable of infecting autorun objects specifically, which may lead, for example, to blocking of operating system startup.
Task
The functions of the Kaspersky Lab application are implemented in the form of tasks, such as: Full Scan task or Update task.
Task settings
Application settings that are specific for each task type.
Threat level
An index showing the probability that an application poses a threat to the operating system. The threat level is calculated using heuristic analysis based on two types of criteria:
- Static (such as information about the executable file of an application: size, creation date, etc.)
- Dynamic, which are used while simulating the application's operation in a virtual environment (analysis of the application's system calls)
Threat level allows detecting behavior typical of malware. The lower the threat level is, the more actions the application is allowed to perform in the operating system.
Traces
Running the application in debugging mode; after each command is executed, the application is stopped, and the result of this step is displayed.
Traffic scanning
Real-time scanning that uses information from the current (latest) version of the databases for objects transferred over all protocols (for example, HTTP, FTP, and other protocols).
Trust group
A group to which Kaspersky Total Security assigns an application or a process depending on the following criteria: presence of a digital signature, reputation on Kaspersky Security Network, trust level of the application source, and the potential danger of actions performed by the application or process. Based on the trust group to which an application belongs, Kaspersky Total Security can restrict the actions that the application may perform in the operating system.
In Kaspersky Total Security, applications belong to one of the following trust groups: Trusted, Low Restricted, High Restricted, or Untrusted.
Trusted process
A software process whose file operations are not restricted by the Kaspersky Lab application in real-time protection mode. When suspicious activity is detected in a trusted process, Kaspersky Total Security removes the process from the list of trusted processes and blocks its actions.
Unknown virus
A new virus about which there is no information in the databases. Generally, unknown viruses are detected by the application in objects by using the heuristic analyzer. These objects are classified as probably infected.
Update
The procedure of replacing / adding new files (databases or application modules) retrieved from the Kaspersky Lab update servers.
Update package
A file package designed for updating databases and application modules. The Kaspersky Lab application copies update packages from Kaspersky Lab update servers and automatically installs and applies them.
Virus
A program that infects other programs, by adding its code to them in order to gain control when infected files are run. This simple definition allows identifying the main action performed by any virus: infection.
Vulnerability
A flaw in an operating system or an application that may be exploited by malware makers to penetrate the operating system or application and corrupt its integrity. Presence of a large number of vulnerabilities in an operating system makes it unreliable, because viruses that penetrate the operating system may cause disruptions in the operating system itself and in installed applications.
Page topAO Kaspersky Lab
Kaspersky Lab is a world-renowned vendor of systems protecting computers against various threats, including viruses and other malware, unsolicited email (spam), network and hacking attacks.
In 2008, Kaspersky Lab was rated among the world’s top four leading vendors of information security software solutions for end users (IDC Worldwide Endpoint Security Revenue by Vendor). Kaspersky Lab is the preferred vendor of computer protection systems for home users in Russia ("IDC Endpoint Tracker 2014").
Kaspersky Lab was founded in Russia in 1997. It has since grown into an international group of companies with 38 offices in 33 countries. The company employs more than 3,000 skilled professionals.
Products. Kaspersky Lab’s products provide protection for all systems, from home computers to large corporate networks.
The personal product range includes security applications for desktop, laptop, and tablet computers, smartphones and other mobile devices.
The company offers protection and control solutions and technologies for workstations and mobile devices, virtual machines, file and web servers, mail gateways, and firewalls. The company's portfolio also features specialized products providing protection against DDoS attacks, protection for industrial control systems, and prevention of financial fraud. Used in conjunction with Kaspersky Lab’s centralized management system, these solutions ensure effective automated protection for companies and organizations of any size against computer threats. Kaspersky Lab's products are certified by major test laboratories, compatible with software from diverse vendors, and optimized to run on many hardware platforms.
Kaspersky Lab’s virus analysts work around the clock. Every day they uncover hundreds of thousands of new computer threats, create tools to detect and disinfect them, and include signatures of those threats in the databases used by Kaspersky Lab applications.
Technologies. Many technologies that are now part and parcel of modern anti-virus tools were originally developed by Kaspersky Lab. It is no coincidence that many other developers use the Kaspersky Anti-Virus kernel in their products, including: Alcatel-Lucent, Alt-N, Asus, BAE Systems, Blue Coat, Check Point, Cisco Meraki, Clearswift, D-Link, Facebook, General Dynamics, H3C, Juniper Networks, Lenovo, Microsoft, NETGEAR, Openwave Messaging, Parallels, Qualcomm, Samsung, Stormshield, Toshiba, Trustwave, Vertu, ZyXEL. Many of the company’s innovative technologies are patented.
Achievements. Over the years, Kaspersky Lab has won hundreds of awards for its services in combating computer threats. Following tests and research conducted by the reputed Austrian test laboratory AV-Comparatives in 2014, Kaspersky Lab ranked among the top two vendors by the number of Advanced+ certificates earned and was eventually awarded the Top Rated certificate. But Kaspersky Lab's main achievement is the loyalty of its users worldwide. The company’s products and technologies protect more than 400 million users, and its corporate clients number more than 270,000.
Kaspersky Lab website: |
|
Virus Encyclopedia: |
|
Virus Lab: |
http://newvirus.kaspersky.com (for analyzing suspicious files and websites) |
Kaspersky Lab’s web forum: |
Page top
Information about third-party code
Information about third-party code is contained in the file legal_notices.txt, in the application installation folder.
Page topTrademark notices
Registered trademarks and service marks are the property of their respective owners.
Dropbox is a trademark of Dropbox, Inc.
Google, Google Chrome, Google Talk, Chrome, YouTube, and SPDY are trademarks of Google, Inc.
ICQ is a trademark and/or service mark of ICQ LLC.
Intel, Celeron, and Atom are Trademarks of Intel Corporation in the U.S. and/or other countries.
JABBER is a registered Trademark and its use is licensed through the XMPP Standards Foundation.
Mail.Ru is a Trademark of Mail.ru LLC.
Microsoft, Bing, Windows, Windows Vista, Internet Explorer, Excel, Outlook, and Skype are registered trademarks of Microsoft Corporation in the United States and other countries.
Mozilla, Firefox are trademarks of the Mozilla Foundation.
VMware is a trademark of VMware, Inc., or trademark of VMware, Inc. registered in the USA or in other jurisdictions.
Page topApplication appearance log window
The Application appearance log window contains the results of analysis performed by System Watcher of malicious activity of the application. The following application data is available:
- Application name
- Location of the application on the computer
- Time at which application installation was completed
- Name of the process that installed the application to the computer
- Application run sequence
Kaspersky Total Security notification windows
Notifications that appear in the taskbar notification area inform you of application events that require your attention.
If a notification is displayed on the screen, you should select one of the options that are suggested in the notification. The optimal option is the one recommended as the default by Kaspersky Lab experts.
Page topActivation completed window
This window opens if the application was successfully activated.
Page topExplicit language window
This window displays a list of explicit language. If any of these words are present in a message, Kaspersky Total Security flags the message as spam.
Page topNew application started
This window displays the progress of the analysis that Application Control performs when an application is started.
Page topApplication Manager settings window
Enable / disable Application Manager
Control changes to the operating system, browser and network settings
Blocked and allowed applications
Page topNetwork connections termination
If the computer is shut down or protection is paused when the application is monitoring active network connections, notification about termination of those connections is displayed. This is necessary for properly quitting the application. Termination occurs automatically after 10 seconds or after you click the Yes button. Most terminated connections are recovered after a short time.
If the connection is terminated when you are downloading a file without a download manager, data transmission is interrupted. To download the file, you must start the download process again.
You can cancel termination of connections. To do this, in the notification dialog box, click the No button. The application continues to run.
Page topAdd / Edit registry key window
Applications for which webcam access is blocked window
This window displays the applications for which you have blocked webcam access.
Page topTrust group for unknown applications window
In this window, you can select a trust group for unknown applications.
Select trust group automatically
Page topActivation code corresponds to another application
This window opens if the activation code entered is intended for another application. The application name appears in the Corresponding application line. You can start using this application now or after your license for Kaspersky Total Security expires.
Page topRecommended setting window
Turn on protection against ads to install only desired software and block additional installations
Page topConfiguring a secure connection for website categories
By default, Kaspersky Secure Connection does not establish a secure connection when you open websites in a browser. You can configure activation of a secure connection for different website categories if Kaspersky Internet Security or Kaspersky Total Security is installed and activated on your computer. For example, you can specify that a secure connection must be enabled when you visit websites of payment systems or social networks.
To configure a secure connection for website categories:
- Open the main application window.
- In the main application window, click the button
 .
. - Select the Settings item in the drop-down menu.
The Settings window opens.
- Click the Advanced settings button.
The Advanced settings window opens.
- In the Enable secure connection when browsing the following categories of websites section, select a website category:
- Banks and payment systems. This category includes websites of banks and payment systems.
- Social networks. This category includes forums, chat sites, and social networks.
- Booking systems. This category includes hotel booking and car rental websites.
- Online stores and electronic commerce websites. This category includes websites on which you can make online purchases.
- Select an action for each website category:
- Prompt to enable secure connection. Kaspersky Total Security will prompt you to establish a secure connection when visiting the selected category of websites.
- Enable secure connection automatically. Kaspersky Total Security will automatically enable a secure connection when you visit the selected category of websites.
- Ignore. Kaspersky Total Security will not perform any actions when you visit the selected category of websites.
- If you selected the Prompt to enable secure connection or Enable secure connection automatically option, in the Choose location drop-down list, select the country through which you want to establish a secure connection for this category of websites.
- Select the Notify when enabled check box if you want to receive notifications about a secure connection being enabled when you visit this category of websites.
By default, Kaspersky Secure Connection does not prompt you to enable a secure connection if the HTTPS protocol is used to connect to a website.
Return to Kaspersky Secure Connection Help.
Page topHow to configure a secure connection for a selected website
To configure a secure connection for a selected website:
- Open the main application window.
- In the main application window, click the button .
- Select the Settings item in the drop-down menu.
The Settings window opens.
- Click the Advanced settings button.
The Advanced settings window opens.
- In the Exclusions for websites section, click the Settings button.
The Exclusions for websites window opens.
- Click the Add button to add a website to the list of exclusions from the settings that are specified for website categories.
The Add website window opens.
- In the Add websitewindow, enter the website address in the Web address (URL) field.
- In the Action to take when the website is accessed drop-down list, specify which action the application must take when you visit this website:
- Enable secure connection. Kaspersky Total Security enables a secure connection when you visit the specified website. For example, you can configure the application to enable a secure connection when you visit the website of your bank. This parameter is applied even if the Advanced settings window shows that the Banks and payment systems check box is cleared.
- Ignore. Kaspersky Total Security does not enable a secure connection when you visit the specified website.
- In the Choose location drop-down list, select the country through which you want to establish a secure connection when visiting this website.
If the country selected for a secure connection for the website differs from the country selected for the website category to which the website belongs, connection to the website will be established through the country that is specified for this website and not for the website category.
- Select the Notify when enabled check box if you want to receive notifications about a secure connection being enabled when you visit this website.
Kaspersky Secure Connection does not enable a secure connection if the HTTPS protocol is used to connect to a website.
Return to Kaspersky Secure Connection Help.
Page topActivation code cannot be used as a new code
This window is displayed if the entered activation code cannot be specified as a new code. This may occur if the activation code for a subscription has been entered. In this case, you can use the entered activation code for immediate activation of Kaspersky Total Security.
A previously used activation code can be used again on another computer until the license expires.
Apply the entered activation code now
Page topSign in to My Kaspersky window
When registering on the portal, the following settings are displayed:
By creating an account, you accept
When logging in to the portal, the following settings are displayed:
About advanced options for a secure connection
Additional features of a secure connection are available when Kaspersky Internet Security or Kaspersky Total Security is installed and running on your computer.
Additional features of a secure connection include:
- Settings for enabling a secure connection when visiting the following website categories:
- Forums, chats, social networks
- Websites of banks and payment systems
- Online stores and electronic commerce websites
- Hotel booking and car rental sites
- Settings for automatically changing the virtual location. If you specified different countries for different website categories in the secure connection settings, you can specify whether or not to change the virtual location when moving between websites of different categories.
- Secure connection settings for individual websites, for example, for websites that you visit often.
Return to Kaspersky Secure Connection Help.
Page topTrust group for applications started before startup of Kaspersky Total Security window
In this window, you can select a trust group for unknown applications started before startup of Kaspersky Total Security.
Page topInformation about the current license is found window
No, continue the wizard and enter a new activation code
Page topRegistration window
In this window, specify the registration data required to contact Technical Support.
Page topSelect data vault location window
In this window you can select the folder where the data vault will be stored.
Page topInternet connection is not available
This window is displayed if you fail to activate the application due to problems with your Internet connection.
Page topSwitching to other application
To run the Migration Wizard, click the Next button. The Migration Wizard installs the application that corresponds to the activation code entered (Kaspersky Internet Security or Kaspersky Anti-Virus).
If your license for Kaspersky Total Security has not yet expired, you can apply the activation code for Kaspersky Total Security on another computer.
To cancel migration to Kaspersky Internet Security or Kaspersky Anti-Virus, click the Cancel link.
Page topActivating the application with a new activation code
To apply a new activation code, click the Next button.
If the license has not yet expired, you can apply an activation code that has been used previously to activate the application on another computer.
To cancel activation of the application, click the Cancel link.
Page topMake sure that the activation code you enter is not the activation code for a subscription
Make sure that the activation code that you are specifying as a new code is not actually intended for subscription-based use of the application. Payment for subscription-based use of the application is collected when the subscription is obtained. If you have obtained a subscription for Kaspersky Total Security, do not use the application under the current license. Instead, activate the application with a subscription activation code.
Until the license expires, you can use an already used activation code to activate the application on another computer.
Page topActivation error
Application activation failed. To view information about the issue in the Knowledge Base, click the Reasons and possible solutions link.
Reasons and possible solutions
Page topLicense Information window
This window shows the following application license information:
- Key
- Key status
- Number of hosts covered by the license
- Activation date
- License expiration date
- Number of days before expiration of the license
- Activation ID
Blocked and allowed applications window
This window displays a list of applications that are allowed or not allowed to change the operating system settings. An empty list means that you have not yet allowed or blocked any applications from modifying operating system settings.
Page topMain window
Clicking this button displays the News section, where you can read news from Kaspersky Lab.
This button is available when there is at least one unread news item.
The ![]() button is displayed when unread news items are available.
button is displayed when unread news items are available.
Licensing window
License information is displayed in the section located in the upper part of the window:
- Key
You can stop using the application under the current license by clicking the
 button.
 - Key status
- Number of hosts covered by the license
- Activation date
- License expiration date
- Number of days before expiration of the license
For subscriptions, additional information about the subscription status may also be displayed.
Depending on the presence of a license, subscription, and on the properties of your version of the application, the window may display various buttons for initiating actions related to your license or subscription. Default buttons are described below.
Activate application / Enter activation code
Reasons and possible solutions
Visit service provider website
Page topEnd User License Agreement window
The window contains the text of the End User License Agreement. Use the scroll bar to view the End User License Agreement.
Page topKaspersky Online Store window
In this window, you can view offers from the online store and purchase licenses for Kaspersky Lab applications. If you have purchased a license earlier, you can renew it.
For some applications you can choose a license term and number of hosts on which you want to install the application, as well as enable automatic renewal of the subscription.
To access the online store through the interface of Kaspersky Total Security, the application must securely connect to a Kaspersky Lab server over HTTPS.
Support window
The Kaspersky Lab Technical Support section contains information required for contacting Kaspersky Lab Technical Support: version number of Kaspersky Total Security, release date and time of the application databases, operating system version, and key.
Answers to frequently asked questions
Application configuration tips
Support Tools window
How to create an operating system state report
Send report to Technical Support
Delete all service data and reports
Running AVZ scripts
This window displays the process of execution of the AVZ script. Script execution may take some time.
Page topNotification Center
The Licensing section shows notifications about the license and license-related problems.
The Protection section displays notifications about the protection status of your computer, disabled protection components, detected objects, and any problems with database and application software module updates.
When this button is clicked, Kaspersky Total Security begins processing the detected object.
This button is available if an object has been detected.
Clicking the ![]() button opens a menu from which you can select an additional action:
button opens a menu from which you can select an additional action:
- Add to exclusions creates an exclusion according to which the object should not be recognized as malicious.
- Ignore moves the notification to the Ignored problems section.
- Go to file opens the folder that originally contained the file.
- View report opens the Detailed reports window, which provides detailed information about detected objects and the application's actions performed on those objects.
- Learn more opens a web page with a description of the detected object.
When this button is clicked, Kaspersky Total Security begins processing all detected objects.
This button is available if more than 10 objects have been detected.
Clicking the ![]() button opens a menu from which you can select an additional action:
button opens a menu from which you can select an additional action:
- Ignore all moves all notifications of this group to the Ignored problems section.
- Show all opens a window with a list of all detected objects.
When this button is clicked, Kaspersky Total Security runs an update of the databases and application software modules.
Clicking the ![]() button opens a menu from which you can select additional actions:
button opens a menu from which you can select additional actions:
- Configure update opens the Update settings section of the application settings window. In this section, you can configure the mode for downloading and installing update packages, as well as select the update source.
- View report opens the report on updates of databases and application software modules.
The Recommendations section lists actions that should be performed to optimize operation of the application and use it more effectively.
The button is displayed in the following cases:
- If automatic updating of databases and application software modules is disabled. In this case, when this button is clicked, automatic updating of databases and application software modules becomes available.
Clicking the ![]() button opens a menu from which you can select the Configure update action. Selecting this action opens the Update settings section of the application settings window. In this section, you can configure the mode for downloading and installing update packages, as well as select the update source.
button opens a menu from which you can select the Configure update action. Selecting this action opens the Update settings section of the application settings window. In this section, you can configure the mode for downloading and installing update packages, as well as select the update source.
- If Parental Control is disabled. In this case, clicking the button opens the Parental Control window in which you can enable control for the selected user. If there are two or more users, the Enable button is shown until control for at least one of the users is disabled.
When you attempt to open the Parental Control window, the application prompts you to enter the password if access to Parental Control settings is password-protected. Otherwise, Kaspersky Total Security prompts you to set a password for accessing Parental Control settings.
The button is displayed in the following cases:
- If the password protecting access to Parental Control settings is not set. In this case, clicking the button opens the Password protection window. In this window you can set a password to protect access to Parental Control settings.
- If Backup settings are not configured. In this case, clicking the button launches the Backup Wizard.
Clicking the ![]() button opens a menu where you can select the Details item. Selecting this item opens the Backup and Restore window.
button opens a menu where you can select the Details item. Selecting this item opens the Backup and Restore window.
The News section displays notifications about news from Kaspersky Lab.
The Ignored problems section displays notifications to which the Ignore action has been applied. Problems listed in this section do not affect the color of the protection indicator in the main application window.
Detected objects
When this button is clicked, Kaspersky Total Security begins processing the detected object.
This button is available if an object has been detected.
Clicking the ![]() button opens a menu from which you can select an additional action:
button opens a menu from which you can select an additional action:
- Add to exclusions creates an exclusion according to which the object should not be recognized as malicious.
- Ignore moves the notification to the Ignored problems section.
- Go to file opens the folder that originally contained the file.
- Learn more opens a web page with a description of the detected object.
Cloud Protection window
Participate in Kaspersky Security Network
In some cases, Kaspersky Lab may temporarily restrict requests to Kaspersky Security Network concerning the reputation of files. When temporary restrictions are imposed on requests for information from Kaspersky Security Network, the corresponding notification is displayed in the left part of the window.
Selective Scan section
The list of objects contains disks, files, and folders to be scanned by Kaspersky Total Security when the Selective Scan task is running.
If the list of objects is empty, a rectangular area is displayed to which you can drag and drop objects for scanning. You can select objects in the Select file or folder to scan window. The window opens when you click the Add button.
By clicking the ![]() button shown next to each object in the list, you can remove the selected object from the scan list.
button shown next to each object in the list, you can remove the selected object from the scan list.
Full Scan section
By default, the application scans the following objects: system memory, objects loaded on operating system startup, backup storage, hard drives and removable drives.
Quick Scan section
During a quick scan, the application scans the system memory, boot sectors of the disk, and objects loaded at operating system startup.
External Device Scan section
The above-listed interface elements can be displayed if at least one external device is connected to the computer.
Task Manager section
This section shows a list of scan tasks that have been already completed or are currently running:
- Full Scan
- Quick Scan
- Selective Scan
- External Device Scan
- Vulnerability Scan
- Rootkit Scan
- Idle Scan
- Advanced Disinfection
The upper part of the window displays information about the current tasks: task name, progress indicator, time left until task completion, number of scanned files, and number of detected threats.
The lower part of the window displays a list of completed tasks. Tasks are listed in order of completion: the tasks completed most recently are displayed at the top. Each list item contains a task name, completion progress if the task has been paused, information about the amount of time elapsed since task completion, as well as the number of scanned files and detected and neutralized threats.
<N> vulnerabilities in operating system
Page topDatabase update window
Last update: <time of last update>
Downloaded: <total size of downloaded files>
Safe Money window
Add website / Add website to Safe Money
List of banks and payment systems
Contains a list of the websites of banks and payment systems for which you have defined special settings in Safe Money. Click an item in the list to specify the action that Kaspersky Total Security should perform. The icon in the left part of the list and the text in the middle of the list describe the action to be performed:
 Run Protected Browser.
 Prompt for action.
 Do not run Protected Browser, but open the website in the standard browser instead.
The button ![]() is displayed on the right of each list item. If you click this button, the entry fields will appear in the right part of the window. In the entry fields, you can change the settings for using Safe Money when you visit a website of a bank or payment system.
is displayed on the right of each list item. If you click this button, the entry fields will appear in the right part of the window. In the entry fields, you can change the settings for using Safe Money when you visit a website of a bank or payment system.
If the list is blank, Kaspersky Total Security uses the database of bank and payment system websites that has been recommended by Kaspersky Lab specialists. In this case, the Add website to Safe Money button is displayed instead of the list.
In the When this website is visited section, you can select the action that Kaspersky Total Security performs when the specified website is accessed by the user.
Parental Control window
Button ![]() /
/ ![]()
This button enables / disables control of the user's actions:
![]() – when control of the user's actions is enabled
– when control of the user's actions is enabled
![]() – when control of the user's actions is disabled
– when control of the user's actions is disabled
General Statistics
The upper part of the window displays the name of the user account whose actions are reported on in this window.
This switch allows enabling / disabling monitoring of the user's actions by Parental Control.
Depending on whether Parental Control is monitoring the user's actions, the button may have the following appearance:
![]() – Parental Control monitors the user's actions.
– Parental Control monitors the user's actions.
![]() – Parental Control does not monitor the user's actions.
– Parental Control does not monitor the user's actions.
Monitoring of a user's actions is performed in accordance with the Parental Control settings defined for that user.
In the Computer section, you can view the computer usage time of the selected user, view the report on computer usage, and configure Parental Control settings. Computer usage statistics are shown for the period specified in the report on computer usage time. By default, statistics for the current twenty-four hours are displayed.
In the Applications section, you can view details on applications that the selected user has used recently. Statistics on use of applications are shown for the time interval specified in the application usage report. By default, statistics for the current twenty-four hours are displayed.
The Internet section contains statistics on website visits and a report on the time that the user spent on those websites. You can also view the total number of blocked attempts to visit blocked websites.
The statistics on visited web resources are shown for the period specified in the report on Internet usage time. By default, statistics for the current twenty-four hours are displayed.
The Communication section contains statistics on user messaging via social networks during the reporting period. In this section, you can view information on contacts with whom the user has communicated most often, as well as the number of new contacts and blocked messages.
Statistics are shown for the period specified in the report on messaging via social networks. By default, the statistics for one week are shown.
The Content Control section shows information on the number of blocked attempts to transmit personal data and key words.
This statistics are shown for the period specified in the Content Control Report. By default, the statistics for one week are shown.
From the Profile section, you can go to the window in which you can assign a profile to a selected user.
Internet Usage Report
The upper part of the window displays the name of the user account whose actions are reported on in this window.
This switch allows enabling / disabling monitoring of the user's actions by Parental Control.
Depending on whether Parental Control is monitoring the user's actions, the button may have the following appearance:
![]() – Parental Control monitors the user's actions.
– Parental Control monitors the user's actions.
![]() – Parental Control does not monitor the user's actions.
– Parental Control does not monitor the user's actions.
Monitoring of a user's actions is performed in accordance with the Parental Control settings defined for that user.
In the Internet Usage Report window, you can view information about websites visited by the selected user during the specified period.
Page topComputer Usage Report
The upper part of the window displays the name of the user account whose actions are reported on in this window.
This switch allows enabling / disabling monitoring of the user's actions by Parental Control.
Depending on whether Parental Control is monitoring the user's actions, the button may have the following appearance:
![]() – Parental Control monitors the user's actions.
– Parental Control monitors the user's actions.
![]() – Parental Control does not monitor the user's actions.
– Parental Control does not monitor the user's actions.
Monitoring of a user's actions is performed in accordance with the Parental Control settings defined for that user.
In the Computer Usage Report window, you can view information about computer usage time for the specified period for the selected account.
Page topApplication Usage Report
The upper part of the window displays the name of the user account whose actions are reported on in this window.
This switch allows enabling / disabling monitoring of the user's actions by Parental Control.
Depending on whether Parental Control is monitoring the user's actions, the button may have the following appearance:
![]() – Parental Control monitors the user's actions.
– Parental Control monitors the user's actions.
![]() – Parental Control does not monitor the user's actions.
– Parental Control does not monitor the user's actions.
Monitoring of a user's actions is performed in accordance with the Parental Control settings defined for that user.
In the Application Usage Report window, you can view information about startup of applications during a specified time interval for a selected account.
Contains a list of all applications that the user has started during the specified period. The list also describes the duration of use of each application.
Applications are grouped by categories (for example, "Games" or "IM clients").
Clicking the ![]() button allows viewing the list of applications in a category.
button allows viewing the list of applications in a category.
Clicking the ![]() button minimizes the list of applications in the category to one line.
button minimizes the list of applications in the category to one line.
Report on key words and personal data transfer
The upper part of the window displays the name of the user account whose actions are reported on in this window.
This switch allows enabling / disabling monitoring of the user's actions by Parental Control.
Depending on whether Parental Control is monitoring the user's actions, the button may have the following appearance:
![]() – Parental Control monitors the user's actions.
– Parental Control monitors the user's actions.
![]() – Parental Control does not monitor the user's actions.
– Parental Control does not monitor the user's actions.
Monitoring of a user's actions is performed in accordance with the Parental Control settings defined for that user.
In this window, you can view information on use of key words and attempts to transmit personal data by the selected user.
List of key words and blocked personal data
Page topComputer section
In this window, you can specify when the user's access to the computer should be restricted.
Window view mode switching button![]() /
/ ![]()
Clicking this button switches between window views.
This button can be displayed as:
 The Weekdays and Weekends sections are displayed.
This option is selected by default.
- The Exact usage time section is displayed.
In the Weekdays section, you can limit the time allowed for computer use on weekdays. This section is available if the window view mode switching button is set to ![]() .
.
Block access from <HH:MM> until <HH:MM>
Allow access for no longer than <N> hours per day
In the Weekends section, you can limit the time for computer use on weekends. This section is available if the window view mode switching button is set to ![]() .
.
Block access from <HH:MM> until <HH:MM>
Allow access for no longer than <N> hours per day
The Exact usage time section displays a table of computer usage time. By using this table, you can set up an hour-by-hour schedule for use of the computer throughout the week. This section is available if the window view mode switching button is set to ![]() .
.
In the Time breaks section, you can set up periodic blocking of computer access during the day.
Take a break every <N> hours for <N minutes>
Internet section
In the Internet access restriction section, you can configure a time limit for Internet use on weekdays and on weekends.
Restrict access on weekdays to <N> hours per day
Restrict access on weekends to <N> hours per day
In the Control Web Browsing section, you can restrict access to websites depending on their content.
Block access to websites from selected categories
The Block file downloading section lets you specify the file types for which you want to block downloads.
The application blocks file downloads only if the download is performed directly by the browser without using download plug-ins.
Block access to website categories
In this window, you can specify categories of websites to which access will be blocked by Parental Control.
If the check box next to a category name is selected, Parental Control blocks access to websites included in the category.
If the check box with a category name is cleared, access to websites included in the category is allowed.
Exclusions window
In this window, you can create a list of exclusions from the Parental Control rules that have been configured. Access settings that affect websites added to the exclusion list are applied both when blocking websites by categories (the Block access to websites from selected categories button) and when blocking all websites (the Block access to all websites button).
For example, you can allow access to websites from the Internet communication media category but add the www.example.com website to the list of exclusions to block access to that particular website. In this case, Parental Control allows access to all social networks except the example.com social network. You can also block all websites and add a webmail website access to which will be allowed to the list of exclusions. In this case, Parental Control allows the user to access the webmail website only.
Messaging section
In the Social networking section, you can configure monitoring of user messaging via social networks.
Allow messaging with all contacts except blocked known contacts
Block messaging with all contacts except allowed known contacts
Content Control section
In the Personal data transfer control section, you can configure restrictions on personal data transfers by the user via social networks and websites.
Block personal data transfer to third parties
In the Keyword Control section, you can configure monitoring of usage of specific words and word combinations in the user's correspondence over social networks and on websites.
Messaging Report
The upper part of the window displays the name of the user account whose actions are reported on in this window.
This switch allows enabling / disabling monitoring of the user's actions by Parental Control.
Depending on whether Parental Control is monitoring the user's actions, the button may have the following appearance:
![]() – Parental Control monitors the user's actions.
– Parental Control monitors the user's actions.
![]() – Parental Control does not monitor the user's actions.
– Parental Control does not monitor the user's actions.
Monitoring of a user's actions is performed in accordance with the Parental Control settings defined for that user.
This list contains contacts with whom the user has communicated on social networks and through instant messengers.
Each item of the list contains the contact's name and the logo of the social network or the instant messenger used to receive and / or send messages.
If the ![]() badge is shown for the contact in the list, messaging with this contact is allowed.
badge is shown for the contact in the list, messaging with this contact is allowed.
If the ![]() badge is shown for the contact in the list, Parental Control blocks messaging with this contact.
badge is shown for the contact in the list, Parental Control blocks messaging with this contact.
By clicking a contact name in the list, you can view received and sent messages and allow or block messaging with the selected contact.
Applications section
In the Block games by content section, you can configure restrictions on games based on age ratings and on content.
Restrict startup of games for users younger than
Block games from adult categories
Use this rating system to block games
Application usage restriction window
In this window, you can impose restrictions on the use time of a selected application.
In the Weekdays section, you can limit use time of the application on weekdays.
Allow access for no longer than <N> hours per day
In the Weekends section, you can limit the time for use of the application on weekends.
Allow access for no longer than <N> hours per day
In the Time breaks section, you can set up periodic blocking of access to the application during the day.
Take a break every <N> hours for <N minutes>
The Exact usage time section displays a table of application usage time. By using this table, you can set up an hour-by-hour schedule for use of the application throughout the week.
Block games by categories
In this window, you can enable or disable blocking of games depending on their content. Classification of game content (the set of check boxes) corresponds to the PEGI or ESRB ratings. The type of game classification is selected automatically depending on your location. If necessary, you can select the type of game classification manually in the settings of the Parental Control component.
If the check box next to a category is selected, Parental Control blocks games included in the category.
If the check box next to a category is cleared, Parental Control allows starting games in the category.
Starting a game is allowed if all categories corresponding to the content of the game are allowed.
Trusted Applications mode window
In the Trusted Applications mode section, you can enable or disable Trusted Applications mode.
Turn on and scan all installed applications
Page topApplication Control
The Applications section displays information about the number of applications controlled by Kaspersky Total Security.
The Current activity section displays information about the number of currently running applications and processes. Information about the CPU workload, RAM volume, free disk space, and network activity is provided in graphic format.
Enabling Trusted Applications mode
To use Trusted Applications mode, you must enable the following components: Application Control, File Anti-Virus, and System Watcher. Clicking the Continue button enables these protection components automatically.
Analysis is complete. Unknown system files are detected
Unknown system files have been detected during the analysis of applications installed on the computer. If these files are known to you and you want to work with them in Trusted Applications mode, allow startup of these files. To do this, click the Allow and continue button.
Go to the list of unknown system files
Unknown system files
This column shows the name of an unknown system file.
When the ![]() button is clicked, additional information about the system file is displayed: product name, version, vendor details, and reason why Kaspersky Total Security does not classify the application to which this file belongs as trusted (for example, the application is not digitally signed).
button is clicked, additional information about the system file is displayed: product name, version, vendor details, and reason why Kaspersky Total Security does not classify the application to which this file belongs as trusted (for example, the application is not digitally signed).
Analysis is complete. Your decision is required
During the analysis of applications installed on the computer, applications were detected for which insufficient information is available. If these applications are known to you and you want to work with them in Trusted Applications mode, allow startup of these files. After that, enable the Trusted Applications mode.
Go to the list of applications and files in order to make a decision
Analysis is complete. Your decision is required
During the analysis of applications installed on the computer, applications were detected for which insufficient information is available. When Trusted Applications mode is in use, these applications will be blocked. You can allow running applications that you trust and enable Trusted Applications mode.
List of applications and modules
This column shows the application name.
When the ![]() button is clicked, additional information about the application is displayed: name, version, vendor details, and reason why Trusted Applications mode blocks the application (for example, the application is not digitally signed).
button is clicked, additional information about the application is displayed: name, version, vendor details, and reason why Trusted Applications mode blocks the application (for example, the application is not digitally signed).
Right-click an application in the list to open a context menu. From the context menu, you can open the folder containing the executable file of the application, as well as allow or block startup of the application.
Enable Trusted Applications mode
Unknown applications and modules
Display: List / Applications / Vendors / Folders
List of applications and modules
Applications / Groups and applications / Vendors and applications / Applications and folders
Depending on the selected display method, the column shows the name of an application or a module, or the name of an application, vendor, or folder.
If the List display method is selected and you click the ![]() button, additional information about the application is displayed: application name, version, vendor details, and reason why Kaspersky Total Security blocks the application (for example, the application is not digitally signed).
button, additional information about the application is displayed: application name, version, vendor details, and reason why Kaspersky Total Security blocks the application (for example, the application is not digitally signed).
If the Applications / Vendors / Folders grouping method is selected and you click the ![]() button, child applications and modules are displayed.
button, child applications and modules are displayed.
Analysis of installed applications is complete
Analysis of applications installed on your computer has been completed. When Trusted Applications mode is enabled, startup is allowed for all trusted applications. We recommend that you enable Trusted Applications mode.
Enable Trusted Applications mode
Page topManage applications window
To change how applications are displayed in the list, click these links:
- Clicking the Start link sorts applications in the list into two groups: Block startup
 and Allow startup
  .
. - Clicking the Restrictions link sorts applications in the list by trust groups. For example, trusted applications are listed in the Trusted group.
Application module access history
This column displays information about application modules that have been allowed or blocked.
Clicking the ![]() button shows nested lines with the names of blocked or unblocked application modules in the line of the list.
button shows nested lines with the names of blocked or unblocked application modules in the line of the list.
Clicking the ![]() button minimizes lines with the names of application modules to one line.
button minimizes lines with the names of application modules to one line.
Network rules tab
In the Rule description section located in the lower part of the window, you can view the properties of the selected rule.
Page topExclusions tab
Do not scan files before opening
Do not monitor application activity
Do not inherit restrictions from the (application’s) parent process
Do not monitor the activity of child applications
Allow interaction with the Kaspersky Total Security interface
Do not scan all traffic / Do not scan encrypted traffic
Only for specified IP addresses
Page topBlocked computers section
To unblock a computer selected in the list, open its context menu.
Page topNetwork activity section
The lower part of the window displays a network traffic chart that shows volumes of inbound and outbound traffic for a process selected in the list. The chart reflects traffic volume in real time. Traffic volume is displayed in kilobytes.
Page topNetwork traffic section
The lower part of the window displays a chart that shows the distribution of traffic of the selected application over time for the specified time interval.
Page topQuarantine window
Kaspersky Total Security does not disinfect Windows Store apps. If scanning results indicate that such an app is dangerous, it is deleted from your computer. When a Windows Store app is deleted, Kaspersky Total Security does not create a backup copy of it. To restore such objects, you must use the recovery tools included with the operating system (for detailed information, see the documentation for the operating system that is installed on your computer) or update apps via the Windows Store.
Privacy Protection window
Webcam Access is allowed / blocked
Private Browsing is enabled / disabled
Search for activity traces / Search for changes
This window shows the progress of searching for activity traces on your computer or analysis of the previous changes that were made by the Privacy Cleaner Wizard.
This process may take some time. You can interrupt the process by clicking Cancel.
Page topPrivacy Cleaner / Rolling back changes
This window displays the progress of clearing traces of your activities in the operating system. Eliminating problems may take some time. To remove some traces of activity, you may need to restart the computer.
If you have selected Roll back changes during the first step, the Privacy Cleaner Wizard rolls back the actions selected during the previous step.
Page topSearch for damage / Search for changes
This window shows the progress of searching for operating system damage or the analysis of changes that were previously made by the Microsoft Windows Troubleshooting Wizard.
This process may take some time. You can interrupt the process by clicking Cancel.
Page topTroubleshooting / Roll back changes
This window displays the progress of fixing operating system corruption detected during analysis. It may take a while to fix damage.
If you selected Roll back changes at the first step, the Microsoft Windows Troubleshooting Wizard rolls back the actions selected at the previous step.
Search for problems / Search for changes
This window shows the progress of analyzing the settings of Microsoft Internet Explorer or search for previous changes that were made by the Browser Configuration Wizard.
This process may take some time. You can interrupt the process by clicking Cancel.
Page topFixing problems / Rolling back changes
This window displays the progress of eliminating problems encountered while analyzing the browser settings. It may take a while to fix the problems.
If you have selected Roll back changes during the first step, the Browser Configuration Wizard rolls back the actions selected during the previous step.
General section
In the Interactive protection section, you can configure the way in which Kaspersky Total Security interacts with the user.
Perform recommended actions automatically
Do not delete probably infected objects
In the Autorun section, you can enable / disable automatic launch of Kaspersky Total Security at operating system startup.
Launch Kaspersky Total Security at computer startup (recommended)
Password protection window
The Change or remove password link is available if a password has been set earlier to protect access to Kaspersky Total Security functions.
In the Password scope section, you can specify which parts of application administration you want to protect with a password.
Configure application settings
Protection section
With this button, you can enable / disable application protection components.
Depending on the current status of a component, the button appears as:
![]() – when the component is enabled.
– when the component is enabled.
![]() – when the component is disabled.
– when the component is disabled.
Webcam Protection settings
Enable / disable Webcam Protection
Block access to webcam for all applications
Show notification when the webcam is in use by an application for which webcam access is allowed
Kaspersky Lab websites window
This window displays a list of Kaspersky Lab websites and its partners' websites that host Kaspersky Lab advertisements.
The list is compiled and updated by Kaspersky Lab experts. In the application, the list is updated automatically during an update of databases and application modules.
Page topAdvanced settings of Anti-Spam
In the Classify a message as spam section, you can define the conditions for mail filtering that Anti-Spam uses to recognize spam.
If it contains phishing elements
If it contains URLs from the database of malicious URLs
If it is from a blocked sender
If it contains blocked phrases
In the Do not classify a message as spam section, you can define the signs that Anti-Spam uses to recognize non-spam mail.
If it is from an allowed sender
If it contains allowed phrases
In the Actions with messages section, you can specify the tags to add to the subject lines of messages that are assigned the Spam or Probable spam status by Anti-Spam.
Add label [!! SPAM] to subject of message classified as spam
Add label [?? Probable SPAM] to subject of message classified as probable spam
Page topAnti-Spam window
Spam filtering is enabled / disabled
In the Spam section, you can set rules for processing messages that Anti-Spam considers to be spam.
In the Probable spam section, you can set rules for processing messages that Anti-Spam considers to be probable spam.
In the Additional section, you can set the procedure for scanning messages for spam, as well as the scan depth to apply to mail folders. This section is displayed only in Microsoft Outlook.
Scan incoming email subfolders
Page topSafe Money settings
In the On first access to websites of banks and payment systems section, you can select an action that Kaspersky Total Security performs when you access bank or payment system websites for the first time.
In the Additional section, you can configure additional settings for Safe Money.
To proceed to websites from the Safe Money window, use <browser>
Notify about operating system vulnerabilities
Block capturing screenshots in Protected Browser
Create shortcut for Safe Money
Web Anti-Virus settings
Enable / disable Web Anti-Virus
In the Security level section, you can select one of the predefined collections of settings (security levels) for Web Anti-Virus.
Restore recommended security level
Advanced settings of Web Anti-Virus window
In the Kaspersky Protection extension section, you can define the settings for installation and activation of application extension for browsers.
Automatically activate Kaspersky Protection extension in browsers
In the URL Advisor section, you can specify websites on which links must be checked, as well as websites that you want to exclude from scanning.
On all websites except those specified
The Additional section lets you select methods of URL checking by Web Anti-Virus.
Check the website for phishing
Check the website for advertising
Check if the website can be used by criminals to damage your computer or personal data
URL Advisor window
In the Checked URLs section, you can select the links that should be scanned by Web Anti-Virus.
Show information on the categories of website content
Add / edit exclusion for On-Screen Keyboard window
In the Scope section, you can specify what the On-Screen Keyboard icon display settings apply to: the entire website or the specified page.
In the On-Screen Keyboard icon section, you can specify whether or not the application should display the On-Screen Keyboard icon on pages matching the specified web address mask.
Do not show icon in browser window
Categories window
Password entry fields on all websites
All data entry fields for Safe Money
Add / edit exclusion for computer keyboard window
In the Scope section, you can specify the area for which the exclusion rule for Secure Keyboard Input applies.
In the Secure Keyboard Input section, you can specify whether Kaspersky Total Security protects data input from the computer keyboard for the selected site or web page.
Network Attack Blocker settings
Enable / disable Network Attack Blocker
Add an attacking computer to the list of blocked computers for <time>
Application Control settings
Enable / disable Application Control
In the Configure restrictions for applications section, you can configure the settings by which an application is added to a group of applications.
Trust digitally signed applications
Load rules for applications from Kaspersky Security Network (KSN)
Change trust group for unknown applications
Change trust group for applications started before startup of Kaspersky Total Security
Private Browsing settings window
Enable / disable Private Browsing
Allow data collection on the websites of Kaspersky Lab and its partners
Websites of Kaspersky Lab and its partners
Allow data collection on incompatible websites
Page topWebsites of Kaspersky Lab and its partners window
This window shows a list of websites of Kaspersky Lab and its partners.
The list is compiled and updated by Kaspersky Lab experts. In the application, the list is updated automatically during an update of databases and application modules.
Page topIncompatible websites window
This window shows a list of websites that may be rendered inoperable as a result of data collection being blocked, according to information available to Kaspersky Lab.
The list is compiled and updated by Kaspersky Lab experts. In the application, the list is updated automatically during an update of databases and application modules.
Page topWeb analytics services window
This window shows a list of web analytics services that use activity tracking to analyze your online activity.
The list is compiled and updated by Kaspersky Lab experts. In the application, the list is updated automatically during an update of databases and application modules.
Page topAd agencies window
This window shows a list of ad agencies that track your online activity for advertising purposes.
The list is compiled and updated by Kaspersky Lab experts. In the application, the list is updated automatically during an update of databases and application modules.
Page topWeb beacons window
This window shows a list of web beacons.
The list is compiled and updated by Kaspersky Lab experts. In the application, the list is updated automatically during an update of databases and application modules.
Page topResources tab
This tab lets you select system resources or user resources and modify the rights of applications to access these resources.
System Watcher settings
Enable / disable System Watcher
In the Automatic Exploit Prevention section, you can configure the actions that the application performs when executable files are run by vulnerable applications.
Monitor attempts to perform unauthorized operations
Action on detection of malware activity
Action to perform if malware activity can be rolled back
In the Protection against screen lockers section, you can configure the actions that Kaspersky Total Security performs if screen locker activity is detected. Screen lockers are malicious programs that limit the user's operations on a computer, by locking the screen and the keyboard, or by blocking access to the taskbar and shortcuts. Screen lockers may attempt to extort ransom for recovery of access to the operating system. By using protection against screen lockers, you can close any screen locker by pressing a specified combination of keys.
Detect and close screen lockers
Use the following key combination to close a screen locker manually
Mail Anti-Virus settings
Enable / disable Mail Anti-Virus
In the Security level section, you can select one of the predefined collections of settings (security levels) for Mail Anti-Virus. The decision of which security level you should select depends on operating conditions and the current situation.
Restore recommended security level
Advanced settings of Mail Anti-Virus window
In the Protection scope section you can select the type of email messages to be scanned by Mail Anti-Virus. The default settings in this section depend on the selected level of security.
Incoming and outgoing messages
In the Heuristic Analysis section, you can enable the use of heuristic analysis when scanning messages, as well as specify a level of heuristic analysis. The default settings in this section depend on the selected level of security.
In the Scan of compound files section, you can configure scan of
. The default settings in this section depend on the selected level of security.Do not scan archives larger than
In the Connectivity section, you can select protocols to be scanned and enable integration of Mail Anti-Virus plug-ins into The Bat! and Microsoft Outlook mail clients.
Scan POP3, SMTP, NNTP, and IMAP traffic
Connect Microsoft Outlook plug-in
Page topFirewall settings
Notify of vulnerabilities in Wi-Fi networks
Block and warn about insecure transmission of passwords over the Internet
Show devices that are connected to your home Wi-Fi network
Allow connections on random ports for active FTP mode
Do not disable Firewall until the operating system stops completely
Block network connections if the user cannot be prompted for action
Network properties window
Additional network connection settings are available for local and public networks.
In the Additional subnetworks section, you can expand the range of addresses in the network.
In the section for adding new IP addresses, you can specify the settings of a new IP address to add to the subnet. This section is available if you click the Add button.
In the Notifications section, you can configure the mode for notifications about changes on the network.
Notify on connection to network
Notify when the mapping between MAC address and IP address is changed
In the Default printer section, you can configure printer communication settings when connecting.
Network properties (adapter) window
In the New connections section, you can select the action that Firewall performs when a new connection using this adapter is detected.
Automatically move new networks to the group
Page topApplication network rules window
Clicking this link opens a window where you can choose the way to display applications in the list:
- Selecting the Expand all item shows all applications installed on the computer in the list.
- Selecting the Collapse all item shows trust groups in the list. To view applications within a group, this group must be expanded by clicking the
 icon.
icon. - Selecting the Show network applications only item shows only network applications in the list. Network applications are applications intended for organizing collaboration of a group of users on different computers.
- If Hide system applications is selected, the list does not display applications that are part of the operating system.
- If Hide Kaspersky Total Security is selected, the list does not show Kaspersky Total Security.
Packet rules window
Firewall sets the execution priority for each packet rule. The priority of a packet rule is determined by its position in the list. The first packet rule in the list has the highest priority. Firewall processes packet rules in the order in which they appear in the list, from top to bottom. Firewall finds the topmost packet rule that is suitable for the network connection and executes it by either allowing or blocking network activity. Firewall ignores all subsequent packet rules.
Page topFile Anti-Virus settings
Enable / disable File Anti-Virus
In the Security Level section, you can select one of three preconfigured security levels that File Anti-Virus uses when protecting files and memory.
Advanced settings of File Anti-Virus
In the File types section, you can select types of files that File Anti-Virus should scan. The default settings in this section depend on the selected level of security.
The Scan methods section is designed for selecting methods that File Anti-Virus should use to scan the computer. The default settings in this section depend on the selected level of security.
The Scan optimization section is designed for selecting methods that allow reducing the scan time. The default setting value in this section depends on the selected level of security.
Scan only new and changed files
The Scan of compound files section contains the list of compound files which File Anti-Virus checks for viruses. The default setting value in this section depends on the selected level of security.
In the Scan mode section you can select a condition that will trigger file scanning by File Anti-Virus.
In the Scan technologies section you can select a file scan technology.
Page topCompound files window
In the Background scan section, you can configure the background scan mode so that large compound files become available for use more quickly.
Extract compound files in the background
In the Size limit section, you can restrict the scanning of large compound files.
Do not unpack large compound files
Page topScan section
In the Security level section, you can use the slider to select one of the three available sets of preconfigured scan settings (security levels) created by Kaspersky Lab specialists.
Restore recommended security level
Restore default action for all types of scans
Scan external devices on connection
Page topFull Scan settings window
In the Security level section, you can use the slider to select one of the three available sets of preconfigured Full Scan settings (security levels) created by Kaspersky Lab specialists. This security level is applied during a Full Scan task regardless of the security level selected for scanning in general (in the Scan section of the Settings window).
Restore recommended security level
Page topAdditional settings of Full Scan window
In the File types section, you can select types of objects that Kaspersky Total Security should scan. The default settings in this section depend on the selected level of security.
In the Scan optimization section, you can select the settings that allow reducing scan time.
Scan only new and changed files
Skip objects scanned longer than
The Scan of compound files section contains a list of type of compound files that Kaspersky Total Security scans for viruses and other threats. The values of the default settings in this section depend on the security level set and the scan type selected (full scan, selective scan, or quick scan).
Do not unpack compound files larger than
In the Scan methods section, you can select methods that Kaspersky Total Security should use when scanning the computer. The default settings in this section depend on the selected level of security.
In the Scan technologies section you can select a file scan technology.
Page topQuick Scan settings window
In the Security level section, you can use the slider to select one of the three available sets of preconfigured Quick Scan settings (security levels) created by Kaspersky Lab specialists. This security level is applied during a Quick Scan task regardless of the security level selected for scanning in general (in the Scan section of the Settings window).
Restore recommended security level
Edit scan scope for Quick Scan
Page topAdditional settings of Quick Scan window
In the File types section, you can select types of objects that Kaspersky Total Security should scan. The default settings in this section depend on the selected level of security.
In the Scan optimization section, you can select the settings that allow reducing scan time.
Scan only new and changed files
Skip objects scanned longer than
The Scan of compound files section contains a list of type of compound files that Kaspersky Total Security scans for viruses and other threats. The values of the default settings in this section depend on the security level set and the scan type selected (full scan, selective scan, or quick scan).
Do not unpack compound files larger than
In the Scan methods section, you can select methods that Kaspersky Total Security should use when scanning the computer. The default settings in this section depend on the selected level of security.
In the Scan technologies section you can select a file scan technology.
Page topSelective Scan settings window
In the Security level section, you can use the slider to select one of the three available sets of preconfigured Selective Scan settings (security levels) created by Kaspersky Lab specialists. This security level is applied during a Selective Scan task regardless of the security level selected for scanning in general (in the Scan section of the Settings window).
Restore recommended security level
Page topAdditional settings of Selective Scan window
In the File types section, you can select types of objects that Kaspersky Total Security should scan. The default settings in this section depend on the selected level of security.
In the Scan optimization section, you can select the settings that allow reducing scan time.
Scan only new and changed files
Skip objects scanned longer than
The Scan of compound files section contains a list of type of compound files that Kaspersky Total Security scans for viruses and other threats. The values of the default settings in this section depend on the security level set and the scan type selected (full scan, selective scan, or quick scan).
Do not unpack compound files larger than
In the Scan methods section, you can select methods that Kaspersky Total Security should use when scanning the computer. The default settings in this section depend on the selected level of security.
In the Scan technologies section you can select a file scan technology.
Page topScan schedule
Run scheduled scan on the next day if computer is turned off
Run scheduled scan only when screensaver is active or computer is locked
Page topAdditional section
In the Update section, you can modify settings for downloading and installing Kaspersky Total Security databases and application software modules.
In the On-Screen Keyboard section, you can configure activation and display of On-Screen Keyboard, as well as specify the websites on which you want to protect data input.
In the Threats and Exclusions section, you can create a list of the objects that Kaspersky Total Security will ignore.
In the Self-Defense section, you can enable or disable protection of Kaspersky Total Security files as well as memory processes and system registry records.
In the Network section, you can enable or disable network port control and scanning of encrypted connections, as well as configure proxy server settings.
In the Notifications section, you can enable or disable notifications about application events. In this section, you can configure display of the information that is most relevant to you when you visit the websites of Kaspersky Lab and its partners.
In the Reports and Quarantine section, you can define storage settings for files moved to Quarantine and settings for information on detected threats that is recorded in reports.
The Additional protection and management tools lets you manage the connection to Kaspersky Security Network and My Kaspersky portal.
In the Appearance section, you can configure notification settings and the appearance of the application icon.
Page topUpdate settings window
Set up run mode for database updates
Configure user account settings
Page topOn-Screen Keyboard settings
In the On-Screen Keyboard section you can configure access to On-Screen Keyboard.
Open On-Screen Keyboard by typing CTRL+ALT+SHIFT+P
Show quick launch icon in data entry fields
In the Secure Keyboard Input section, you can enable secure keyboard data input, as well as specify which data to protect and on which websites.
Update sources window
When using an update source other than Kaspersky Lab update servers, make sure that the database and application module updates are compatible with your version of Kaspersky Total Security.
Page topSelect update source window
In this window, you can specify the folder from which Kaspersky Total Security obtains database and application module updates.
Page topThreats and Exclusions settings
In the Types of detected objects section, you can the specify types of objects to be detected by Kaspersky Total Security.
Detect other software that can be used by criminals to damage your computer or personal data
In the Exclusions section, you can create a list of the objects that Kaspersky Total Security will ignore.
In the Advanced Disinfection section, you can enable or disable use of Advanced Disinfection technology.
Enable Advanced Disinfection technology
Page topAdd / Edit exclusion window
In the Protection components section you can specify protection components (for example, File Anti-Virus or Web Anti-Virus) to that will apply the exclusion.
By default, all protection components apply a new exclusion.
Page topExclusions for application
Do not scan files before opening
Do not monitor application activity
Do not inherit restrictions from the (application’s) parent process
Do not monitor the activity of child applications
Allow interaction with the Kaspersky Total Security interface
Do not scan all / encrypted traffic
Only for specified IP addresses
Page topNetwork settings
In the Cost-Aware Networking section, you can specify whether or not the application must limit traffic based on calculations of Internet connection costs. This section is displayed when using Microsoft Windows 8 or a later operating system.
Limit traffic on metered connections
In the Traffic processing section, you can specify whether or not the application should inject a web page interaction script into traffic.
Inject script into web traffic to interact with web pages
In the Monitored ports section, you can choose the port monitoring mode that is used by Mail Anti-Virus, Anti-Spam, and Web Anti-Virus to scan data streams.
In the Encrypted connections scanning section, you can enable / disable scanning for encrypted connections that use the SSL protocol.
Do not scan encrypted connections
Scan encrypted connections upon request from protection components
Always scan encrypted connections
In the Proxy server section, you can configure the connection to a proxy server that you use to access the Internet.
The application defines the default proxy server settings during the installation process.
Page topProxy server settings
Automatically detect proxy server settings
Use specified proxy server settings
Use proxy server authentication
Bypass proxy server for local addresses
Page topNetwork ports
Monitor all network ports for applications that are vulnerable to network attacks
Page topCertificate Installation
This window displays the progress of automatic installation of the certificate. Task completion may take some time.
Kaspersky Total Security searches for web browsers installed on the user's computer and then automatically installs certificates to the Microsoft Windows certificate storage.
While installing the certificate, a Microsoft Windows security notification may appear on the screen, prompting you to confirm installation of the certificate.
Page topNotification settings
Restore all hidden notifications
Receive informational messages and advertisements from Kaspersky Lab
Show information about special offers
Receive special offers for social network users
Receive informational messages and advertisements after the current license expires
Page topReports and Quarantine settings
In the Reports section, you can configure the settings for report creation and storage.
Limit the size of report file to
In the Quarantine section, you can modify Quarantine settings.
Limit the size of Quarantine to
Page topAdditional protection tools settings
In the Kaspersky Security Network section, you can accept or cancel participation in Kaspersky Security Network.
Kaspersky Security Network is a cloud-based knowledge base of Kaspersky Lab containing information about the reputation of applications and websites. Use of data from Kaspersky Security Network ensures faster responses by Kaspersky Lab applications to new threats, improves the performance of some protection components, and reduces the likelihood of false positives.
Learn more about cloud protection
In the Computer is connected to My Kaspersky portal section, you can review information about the portal, go to the portal, or disconnect the computer from the portal. This section is displayed if the computer is connected to the portal.
Open My Kaspersky in a browser
Disconnect the computer from My Kaspersky
Appearance settings
Use application icon animation in the taskbar notification area
In the Smooth transition between windows section, you can configure smooth transition settings. The smooth transition between windows is done by sliding the new window over the previous one, from right to left.
Use if computer resources allow
Page topPerformance section
Disable scheduled tasks while running on battery power
Release resources to the operating system when the computer starts
Postpone computer scan tasks when the CPU and disk systems are at high load
Perform analysis of installed applications
Protection for all devices window
Disconnect the computer from My Kaspersky
Open My Kaspersky in a browser
Page topSoftware Updater settings
Enable / disable Software Updater
Automatically download and install updates if you do not have to accept new license agreements
Search for application updates
Page topSoftware Updater window
This window contains a list of available updates for installed applications.
Page topSoftware Cleaner window
This window displays a list of applications that possibly have non-standard installation or removal, are rarely used, or are categorized as advertising software.
Page topData vaults window
Create new data vault / Create data vault
Clicking this button opens the password entry window. After successful password entry, you can open the data vault in Explorer.
The button is displayed when the data vault is locked, i.e. when access to files in the data vault is password-protected.
Clicking the ![]() button opens a menu where you can select additional data vault operations:
button opens a menu where you can select additional data vault operations:
- Rename – selecting this item opens a window where you can rename the data vault.
- Change password – selecting this item opens a window where you can change the password used to access files in the data vault.
- Show location of data vault – selecting this item causes the folder with the data vault to be opened in Explorer.
- Create desktop shortcut for data vault – selecting this item causes a shortcut to the data vault to be created on the operating system desktop.
- Delete – selecting this item opens a window where you can confirm your intention to delete the data vault. You have to enter the data vault password to delete the data vault.
Add files and folders to data vault window
Add files and folders to data vault
List of files and folders selected to be added to a data vault.
You can add new files or folders to this list by dragging and dropping them or by clicking the Add files and folders to data vault link. Click the button to delete files or folders from the list.
Data vault settings window
Open data vault on connecting the removable drive
Create desktop shortcut for data vault
Page topWindow for deleting original files and folders outside the data vault
Backup and Restore window
I have a set of backup copies, restore files from this set
Buttons ![]() /
/ ![]() /
/ ![]()
The buttons can be used to manage the backup process:
![]() – stop a backup task. This button is displayed if a backup task is running or paused at the moment.
– stop a backup task. This button is displayed if a backup task is running or paused at the moment.
![]() – pause a backup task. This button is displayed if a backup task is running at the moment.
– pause a backup task. This button is displayed if a backup task is running at the moment.
![]() – start a backup task or resume a paused backup task. This button is available if a backup task has been completed or paused.
– start a backup task or resume a paused backup task. This button is available if a backup task has been completed or paused.
Clicking the button starts the process of creating backup copies of files. This button is displayed if a backup task is not running at the moment.
Clicking the ![]() button opens a menu from which you can select an additional action with the specified backup settings:
button opens a menu from which you can select an additional action with the specified backup settings:
- Edit settings – starts the backup settings editor wizard.
- Delete settings – deletes backup settings.
Create backup copies of other files
Restore files from the set of backup copies that is not on the list
Select files for backup window
Create backup copies of specified file types
Select folders for backup window
Select file types for backup window
<Number of files of selected type>
File versions storage settings window
Restrict the number of versions of backup copies
Versions of backup copies to store
Restrict storage period for versions of backup copies
Backup schedule window
Run scheduled backup at computer startup if it was turned off at the specified time
Page topOnline storage section
To use Online storage, log on to the dropbox.com website. Clicking OK opens a web page with the dropbox.com website login form automatically.
Preparing storage for backup copies window
This window shows the process of configuring the backup storage. The configuration process may take some time.
Page topStorages window
Clicking this button opens a window with a list of sets of backup copies stored in this storage. In this window you can select a set of backup copies from which to restore files.
Clicking the ![]() button opens a menu from which you can select an additional action:
button opens a menu from which you can select an additional action:
- Edit settings – starts the storage settings editor wizard.
- Delete storage – stops using the selected drive or online resources as a storage for backup copies of files and deletes all backup copies of files from the storage.
- Clean up storage – opens the Clean up storage window. In this window you can select backup copies of files to be removed from the storage in order to free up storage space.
Window with a list of sets of backup copies in storage
Clean up storage window
Backup copies created earlier than
Previous versions of backup copies
Backup copies of files whose originals were deleted
Page topRestore files from backup copies window
Button ![]() /
/ ![]()
The list includes backup copies of files that can be restored.
Depending on the ![]() /
/ ![]() toggle switch position, the window shows a folder tree or all backup copies of files arranged alphabetically.
toggle switch position, the window shows a folder tree or all backup copies of files arranged alphabetically.
This list shows information about the name of the backup copy of a file, location of the source file, file type, file name extension, file size, and number of backup copies of this file. Clicking the link in the Version column opens the Select backup copy version to restore window. This window lets you select the version of a backup copy from which to restore the file.
If the check box opposite the name of a backup copy of the file is selected, Kaspersky Total Security restores this file.
If the check box opposite the name of a backup copy of the file is cleared, Kaspersky Total Security does not restore this file.
Right-clicking a list item opens a context menu with the following items:
- Open file – the file is opened with the application intended for managing files of this type.
- Restore the latest backup copy version – opens the Select where to place restored files window in which you can specify the destination folder for restoring the file from the latest version of its backup copy.
- Versions of backup copies of file – the Select backup copy version to restore window opens. This window lets you select the version of a backup copy from which to restore the file.
Select where to place restored files window
Kaspersky Restore Utility window
Button ![]() /
/ ![]()
The list includes backup copies of files that can be restored.
Depending on the ![]() /
/ ![]() toggle switch position, the window shows a folder tree or all backup copies of files arranged alphabetically.
toggle switch position, the window shows a folder tree or all backup copies of files arranged alphabetically.
This list shows information about the name of the backup copy of a file, location of the source file, file type, file name extension, file size, and number of backup copies of this file. Clicking the link in the Version column opens the Select backup copy version to restore window. This window lets you select the version of a backup copy from which to restore the file.
If the check box opposite the name of a backup copy of the file is selected, Kaspersky Total Security restores this file.
If the check box opposite the name of a backup copy of the file is cleared, Kaspersky Total Security does not restore this file.
Right-clicking a list item opens a context menu with the following items:
- Open file – the file is opened with the application intended for managing files of this type.
- Restore the latest backup copy version – opens the Select where to place restored files window in which you can specify the destination folder for restoring the file from the latest version of its backup copy.
- Versions of backup copies of file – the Select backup copy version to restore window opens. This window lets you select the version of a backup copy from which to restore the file.
Step 2. Searching for unused data
This window shows the progress of the search for unused files on your computer (such as log and history files, temporary files, recycle bin contents). The search may take a while.
Step 4. Unused Data Cleaner
This window shows the progress of unused data clean-up. The clean-up process may take some time.