Contents
Building the examples
The examples are built using the CMake build system that is included in KasperskyOS Community Edition.
The code of the examples and build scripts are available at the following path:
/opt/KasperskyOS-Community-Edition-<version>/examples
Examples must be built in the home directory. For this reason, the directory containing the example that you need to build must be copied from /opt/KasperskyOS-Community-Edition-<version>/examples to the home directory.
Building the examples to run on QEMU
To build an example, go to the directory with the example and run this command:
$ ./cross-build.sh
Running cross-build.sh creates a KasperskyOS-based solution image that includes the example. The kos-qemu-image solution image is located in the <name of example>/build/einit directory.
Building the examples to run on Raspberry Pi 4 B
To build an example:
- Go to the directory with the example.
- Open the
cross-build.shscript file in a text editor. - In the last line of the script file, replace the
make simcommand withmake kos-image. - Save the script file and then run the command:
$ ./cross-build.sh
Running cross-build.sh creates a KasperskyOS-based solution image that includes the example. The kos-image solution image is located in the <name of example>/build/einit directory.
Running examples on QEMU
Running examples on QEMU on Linux with a graphical shell
An example is run on QEMU on Linux with a graphical shell using the cross-build.sh script, which also builds the example. To run the script, go to the folder with the example and run the command:
$ sudo ./cross-build.sh
Additional QEMU parameters must be used to run certain examples. The commands used to run these examples are provided in the descriptions of these examples.
Running examples on QEMU on Linux without a graphical shell
To run an example on QEMU on Linux without a graphical shell, go to the directory with the example, build the example and run the following commands:
$ cd build/einit
# Before running the following command, be sure that the path to
# the directory with the qemu-system-aarch64 executable file is saved in
# the PATH environment variable. If it is not there,
# add it to the PATH variable.
$ qemu-system-aarch64 -m 2048 -machine vexpress-a15,secure=on -cpu cortex-a72 -nographic -monitor none -smp 4 -nic user -serial stdio -kernel kos-qemu-image
Preparing Raspberry Pi 4 B to run examples
Connecting a computer and Raspberry Pi 4 B
To see the output of the examples on the computer:
- Connect the pins of the FT232 USB-UART converter to the corresponding GPIO pins of the Raspberry Pi 4 B (see the figure below).
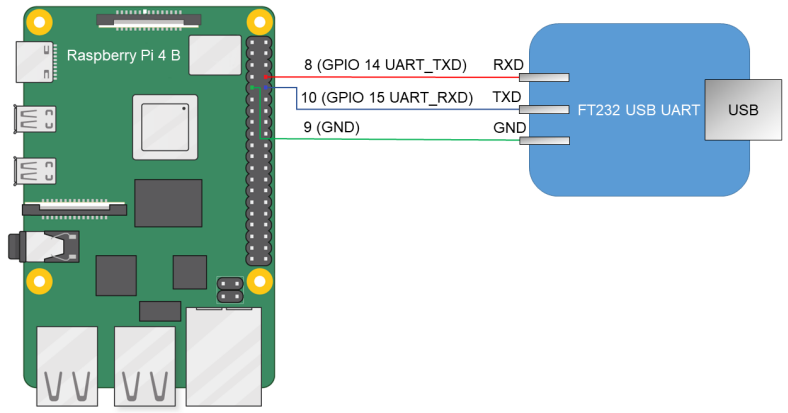
Diagram for connecting the USB-UART converter and Raspberry Pi 4 B
- Connect the computer's USB port to the USB-UART converter.
- Install PuTTY or a similar program for reading data from a COM port. Configure the settings as follows:
bps = 115200,data bits = 8,stop bits = 1,parity = none,flow control = none.
To allow a computer and Raspberry Pi 4 B to interact through Ethernet:
- Connect the network cards of the computer and Raspberry Pi 4 B to a switch or to each other.
- Configure the computer's network card so that its IP address is in the same subnet as the IP address of the Raspberry Pi 4 B network card (the settings of the Raspberry Pi 4 B network card are defined in the
dhcpcd.conffile, which is found at the path<example name>/resources/...).
Preparing a bootable SD card for Raspberry Pi 4 B
A bootable SD card for Raspberry Pi 4 B can be prepared automatically or manually.
To automatically prepare the bootable SD card, connect the SD card to the computer and run the following commands:
# To create a bootable drive image file (*.img),
# run the script corresponding to the revision of your
# Raspberry Pi. Supported revisions: 1.1, 1.2, 1.4 and 1.5.
# For example, if revision 1.1 is used, run:
$ sudo /opt/KasperskyOS-Community-Edition-<version>/examples/rpi4_prepare_fs_image_rev1.1.sh
# In the following command, path_to_img is the path to the image file
# of the bootable drive (this path is displayed upon completion
# of the previous command), [X] is the final character
# in the name of the SD card block device.
$ sudo dd bs=64k if=path_to_img of=/dev/sd[X] conv=fsync
To manually prepare the bootable SD card:
- Build the U-Boot bootloader for ARMv8, which will automatically run the example. To do this, run the following commands:
$ sudo apt install git build-essential libssl-dev bison flex unzip parted gcc-aarch64-linux-gnu xz-utils device-tree-compiler
$ git clone https://github.com/u-boot/u-boot.git u-boot-armv8
# For Raspberry Pi 4 B revisions 1.1 and 1.2 only:
$ cd u-boot-armv8 && git checkout tags/v2020.10
# For Raspberry Pi 4 B revisions 1.4 and 1.5 only:
$ cd u-boot-armv8 && git checkout tags/v2022.01
# For all Raspberry Pi revisions:
$ make ARCH=arm CROSS_COMPILE=aarch64-linux-gnu- rpi_4_defconfig
# In the menu that appears when you run the following command,
# in the 'Boot options' section, change the value in the 'bootcmd value' field to the following:
# fatload mmc 0 ${loadaddr} kos-image; bootelf ${loadaddr},
# and delete the value "usb start;" in the 'preboot default value' field.
# Exit the menu after saving the settings.
$ make ARCH=arm CROSS_COMPILE=aarch64-linux-gnu- menuconfig
$ make ARCH=arm CROSS_COMPILE=aarch64-linux-gnu- u-boot.bin
- Prepare the image containing the file system for the SD card. To do this, connect the SD card to the computer and run the following commands:
# For Raspberry Pi 4 B revisions 1.1 and 1.2 only:
$ wget https://downloads.raspberrypi.org/raspbian_lite/images/raspbian_lite-2020-02-14/2020-02-13-raspbian-buster-lite.zip
$ unzip 2020-02-13-raspbian-buster-lite.zip
$ loop_device=$(sudo losetup --find --show --partscan 2020-02-13-raspbian-buster-lite.img)
# For Raspberry Pi 4 B revision 1.4 only:
$ wget https://downloads.raspberrypi.org/raspios_lite_arm64/images/raspios_lite_arm64-2022-04-07/2022-04-04-raspios-bullseye-arm64-lite.img.xz
$ unxz 2022-04-04-raspios-bullseye-arm64-lite.img.xz
$ loop_device=$(sudo losetup --find --show --partscan 2022-04-04-raspios-bullseye-arm64-lite.img)
# For Raspberry Pi 4 B revision 1.5 only:
$ wget https://downloads.raspberrypi.org/raspios_lite_arm64/images/raspios_lite_arm64-2022-09-07/2022-09-06-raspios-bullseye-arm64-lite.img.xz
$ unxz 2022-09-06-raspios-bullseye-arm64-lite.img.xz
$ loop_device=$(sudo losetup --find --show --partscan 2022-09-06-raspios-bullseye-arm64-lite.img)
# For all Raspberry Pi revisions:
# Image will contain a boot partition of 1 GB in fat32 and 3 partitions of 256 MB each in ext2, ext3 and ext4, respectively:
$ sudo parted ${loop_device} rm 2
$ sudo parted ${loop_device} resizepart 1 1G
$ sudo parted ${loop_device} mkpart primary ext2 1000 1256M
$ sudo parted ${loop_device} mkpart primary ext3 1256 1512M
$ sudo parted ${loop_device} mkpart primary ext4 1512 1768M
$ sudo mkfs.ext2 ${loop_device}p2
$ sudo mkfs.ext3 ${loop_device}p3
$ sudo mkfs.ext4 -O ^64bit,^extent ${loop_device}p4
$ sudo losetup -d ${loop_device}
# In the following command, [X] is the last symbol in the name of the block device
# for the SD card.
$ sudo dd bs=64k if=$(ls *rasp*lite.img) of=/dev/sd[X] conv=fsync
- Copy the U-Boot bootloader to the SD card by running the following commands:
# In the following commands, the path ~/mnt/fat32 is just an example. You
# can use a different path.
$ mkdir -p ~/mnt/fat32
# In the following command, [X] is the last alphabetic character in the name of the block
# device for the partition on the formatted SD card.
$ sudo mount /dev/sd[X]1 ~/mnt/fat32/
$ sudo cp u-boot.bin ~/mnt/fat32/u-boot.bin
# For Raspberry Pi 4 B revision 1.5 only:
# In the following commands, the path ~/tmp_dir is just an example. You
# can use a different path.
$ mkdir -p ~/tmp_dir
$ cp ~/mnt/fat32/bcm2711-rpi-4-b.dtb ~/tmp_dir
$ dtc -I dtb -O dts -o ~/tmp_dir/bcm2711-rpi-4-b.dts ~/tmp_dir/bcm2711-rpi-4-b.dtb && \
$ sed -i -e "0,/emmc2bus = /s/emmc2bus =.*//" ~/tmp_dir/bcm2711-rpi-4-b.dts && \
$ sed -i -e "s/dma-ranges = <0x00 0xc0000000 0x00 0x00 0x40000000>;/dma-ranges = <0x00 0x00 0x00 0x00 0xfc000000>;/" ~/tmp_dir/bcm2711-rpi-4-b.dts && \
$ sed -i -e "s/mmc@7e340000 {/mmc@7e340000 {\n\t\t\tranges = <0x00 0x7e000000 0x00 0xfe000000 0x1800000>;\n dma-ranges = <0x00 0x00 0x00 0x00 0xfc000000>;/" ~/tmp_dir/bcm2711-rpi-4-b.dts && \
$ dtc -I dts -O dtb -o ~/tmp_dir/bcm2711-rpi-4-b.dtb ~/tmp_dir/bcm2711-rpi-4-b.dts
$ sudo cp ~/tmp_dir/bcm2711-rpi-4-b.dtb ~/mnt/fat32/bcm2711-rpi-4-b.dtb
$ sudo rm -rf ~/tmp_dir
- Fill in the configuration file for the U-Boot bootloader on the SD card by using the following commands:
$ echo "[all]" > ~/mnt/fat32/config.txt
$ echo "arm_64bit=1" >> ~/mnt/fat32/config.txt
$ echo "enable_uart=1" >> ~/mnt/fat32/config.txt
$ echo "kernel=u-boot.bin" >> ~/mnt/fat32/config.txt
$ echo "dtparam=i2c_arm=on" >> ~/mnt/fat32/config.txt
$ echo "dtparam=i2c=on" >> ~/mnt/fat32/config.txt
$ echo "dtparam=spi=on" >> ~/mnt/fat32/config.txt
$ sync
$ sudo umount ~/mnt/fat32
Running examples on Raspberry Pi 4 B
To run an example on a Raspberry Pi 4 B:
- Go to the directory with the example and build the example.
- Make sure that Raspberry Pi 4 B and the bootable SD card are prepared to run examples.
- Copy the KasperskyOS-based solution image to the bootable SD card. To do this, connect the bootable SD card to the computer and run the following commands:
# In the following command, [X] is the last alphabetic character in the name of the block
# device for the partition on the bootable SD card.
# In the following commands, the path ~/mnt/fat32 is just an example. You
# can use a different path.
$ sudo mount /dev/sd[X]1 ~/mnt/fat32/
$ sudo cp build/einit/kos-image ~/mnt/fat32/kos-image
$ sync
$ sudo umount ~/mnt/fat32
- Connect the bootable SD card to the Raspberry Pi 4 B.
- Supply power to the Raspberry Pi 4 B and wait for the example to run.
The output displayed on the computer indicates that the example started.