Preparing Raspberry Pi 4 B to run examples
Connecting a computer and Raspberry Pi 4 B
To see the output of the examples on the computer:
- Connect the pins of the FT232 USB-UART converter to the corresponding GPIO pins of the Raspberry Pi 4 B (see the figure below).
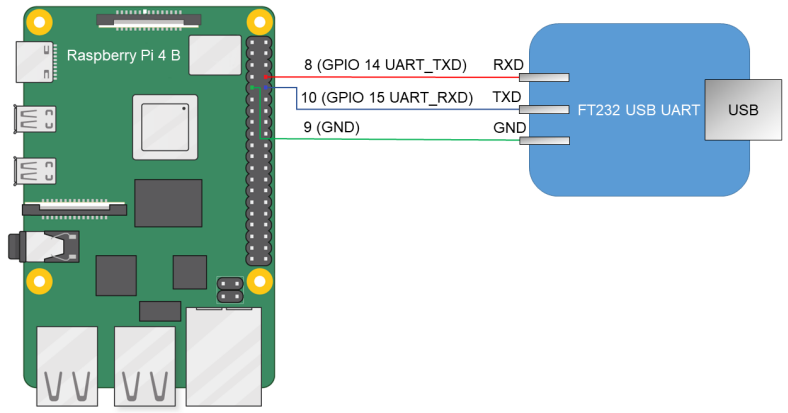
Diagram for connecting the USB-UART converter and Raspberry Pi 4 B
- Connect the computer's USB port to the USB-UART converter.
- Install PuTTY or a similar program for reading data from a COM port. Configure the settings as follows:
bps = 115200,data bits = 8,stop bits = 1,parity = none,flow control = none.
To allow a computer and Raspberry Pi 4 B to interact through Ethernet:
- Connect the network cards of the computer and Raspberry Pi 4 B to a switch or to each other.
- Configure the computer's network card so that its IP address is in the same subnet as the IP address of the Raspberry Pi 4 B network card (the settings of the Raspberry Pi 4 B network card are defined in the
dhcpcd.conffile, which is found at the path<example name>/resources/...).
Preparing a bootable SD card for Raspberry Pi 4 B
A bootable SD card for Raspberry Pi 4 B can be prepared automatically or manually.
To automatically prepare the bootable SD card, connect the SD card to the computer and run the following commands:
# To create a bootable drive image file (*.img),
# run the script corresponding to the revision of your
# Raspberry Pi. Supported revisions: 1.1, 1.2, 1.4 and 1.5.
# For example, if revision 1.1 is used, run:
$ sudo /opt/KasperskyOS-Community-Edition-<version>/examples/rpi4_prepare_fs_image_rev1.1.sh
# In the following command, path_to_img is the path to the image file
# of the bootable drive (this path is displayed upon completion
# of the previous command), [X] is the final character
# in the name of the SD card block device.
$ sudo dd bs=64k if=path_to_img of=/dev/sd[X] conv=fsync
To manually prepare the bootable SD card:
- Build the U-Boot bootloader for ARMv8, which will automatically run the example. To do this, run the following commands:
$ sudo apt install git build-essential libssl-dev bison flex unzip parted gcc-aarch64-linux-gnu xz-utils device-tree-compiler
$ git clone https://github.com/u-boot/u-boot.git u-boot-armv8
# For Raspberry Pi 4 B revisions 1.1 and 1.2 only:
$ cd u-boot-armv8 && git checkout tags/v2020.10
# For Raspberry Pi 4 B revisions 1.4 and 1.5 only:
$ cd u-boot-armv8 && git checkout tags/v2022.01
# For all Raspberry Pi revisions:
$ make ARCH=arm CROSS_COMPILE=aarch64-linux-gnu- rpi_4_defconfig
# In the menu that appears when you run the following command,
# in the 'Boot options' section, change the value in the 'bootcmd value' field to the following:
# fatload mmc 0 ${loadaddr} kos-image; bootelf ${loadaddr},
# and delete the value "usb start;" in the 'preboot default value' field.
# Exit the menu after saving the settings.
$ make ARCH=arm CROSS_COMPILE=aarch64-linux-gnu- menuconfig
$ make ARCH=arm CROSS_COMPILE=aarch64-linux-gnu- u-boot.bin
- Prepare the image containing the file system for the SD card. To do this, connect the SD card to the computer and run the following commands:
# For Raspberry Pi 4 B revisions 1.1 and 1.2 only:
$ wget https://downloads.raspberrypi.org/raspbian_lite/images/raspbian_lite-2020-02-14/2020-02-13-raspbian-buster-lite.zip
$ unzip 2020-02-13-raspbian-buster-lite.zip
$ loop_device=$(sudo losetup --find --show --partscan 2020-02-13-raspbian-buster-lite.img)
# For Raspberry Pi 4 B revision 1.4 only:
$ wget https://downloads.raspberrypi.org/raspios_lite_arm64/images/raspios_lite_arm64-2022-04-07/2022-04-04-raspios-bullseye-arm64-lite.img.xz
$ unxz 2022-04-04-raspios-bullseye-arm64-lite.img.xz
$ loop_device=$(sudo losetup --find --show --partscan 2022-04-04-raspios-bullseye-arm64-lite.img)
# For Raspberry Pi 4 B revision 1.5 only:
$ wget https://downloads.raspberrypi.org/raspios_lite_arm64/images/raspios_lite_arm64-2022-09-07/2022-09-06-raspios-bullseye-arm64-lite.img.xz
$ unxz 2022-09-06-raspios-bullseye-arm64-lite.img.xz
$ loop_device=$(sudo losetup --find --show --partscan 2022-09-06-raspios-bullseye-arm64-lite.img)
# For all Raspberry Pi revisions:
# Image will contain a boot partition of 1 GB in fat32 and 3 partitions of 256 MB each in ext2, ext3 and ext4, respectively:
$ sudo parted ${loop_device} rm 2
$ sudo parted ${loop_device} resizepart 1 1G
$ sudo parted ${loop_device} mkpart primary ext2 1000 1256M
$ sudo parted ${loop_device} mkpart primary ext3 1256 1512M
$ sudo parted ${loop_device} mkpart primary ext4 1512 1768M
$ sudo mkfs.ext2 ${loop_device}p2
$ sudo mkfs.ext3 ${loop_device}p3
$ sudo mkfs.ext4 -O ^64bit,^extent ${loop_device}p4
$ sudo losetup -d ${loop_device}
# In the following command, [X] is the last symbol in the name of the block device
# for the SD card.
$ sudo dd bs=64k if=$(ls *rasp*lite.img) of=/dev/sd[X] conv=fsync
- Copy the U-Boot bootloader to the SD card by running the following commands:
# In the following commands, the path ~/mnt/fat32 is just an example. You
# can use a different path.
$ mkdir -p ~/mnt/fat32
# In the following command, [X] is the last alphabetic character in the name of the block
# device for the partition on the formatted SD card.
$ sudo mount /dev/sd[X]1 ~/mnt/fat32/
$ sudo cp u-boot.bin ~/mnt/fat32/u-boot.bin
# For Raspberry Pi 4 B revision 1.5 only:
# In the following commands, the path ~/tmp_dir is just an example. You
# can use a different path.
$ mkdir -p ~/tmp_dir
$ cp ~/mnt/fat32/bcm2711-rpi-4-b.dtb ~/tmp_dir
$ dtc -I dtb -O dts -o ~/tmp_dir/bcm2711-rpi-4-b.dts ~/tmp_dir/bcm2711-rpi-4-b.dtb && \
$ sed -i -e "0,/emmc2bus = /s/emmc2bus =.*//" ~/tmp_dir/bcm2711-rpi-4-b.dts && \
$ sed -i -e "s/dma-ranges = <0x00 0xc0000000 0x00 0x00 0x40000000>;/dma-ranges = <0x00 0x00 0x00 0x00 0xfc000000>;/" ~/tmp_dir/bcm2711-rpi-4-b.dts && \
$ sed -i -e "s/mmc@7e340000 {/mmc@7e340000 {\n\t\t\tranges = <0x00 0x7e000000 0x00 0xfe000000 0x1800000>;\n dma-ranges = <0x00 0x00 0x00 0x00 0xfc000000>;/" ~/tmp_dir/bcm2711-rpi-4-b.dts && \
$ dtc -I dts -O dtb -o ~/tmp_dir/bcm2711-rpi-4-b.dtb ~/tmp_dir/bcm2711-rpi-4-b.dts
$ sudo cp ~/tmp_dir/bcm2711-rpi-4-b.dtb ~/mnt/fat32/bcm2711-rpi-4-b.dtb
$ sudo rm -rf ~/tmp_dir
- Fill in the configuration file for the U-Boot bootloader on the SD card by using the following commands:
$ echo "[all]" > ~/mnt/fat32/config.txt
$ echo "arm_64bit=1" >> ~/mnt/fat32/config.txt
$ echo "enable_uart=1" >> ~/mnt/fat32/config.txt
$ echo "kernel=u-boot.bin" >> ~/mnt/fat32/config.txt
$ echo "dtparam=i2c_arm=on" >> ~/mnt/fat32/config.txt
$ echo "dtparam=i2c=on" >> ~/mnt/fat32/config.txt
$ echo "dtparam=spi=on" >> ~/mnt/fat32/config.txt
$ sync
$ sudo umount ~/mnt/fat32