Contents
Kaspersky Virus Removal Tool Help
 Getting started
Run the application without installing.
 Hardware and software requirements
Check supported operating systems.
 Quarantine
The application places detected objects in isolated storage.
 Monitoring and reports
 Command line
Manage the application from the command line.
About
|
Kaspersky Virus Removal Tool is a free application for scanning computers running a Linux operating system and disinfecting detected threats. You can use this application to detect malware, as well as adware and legitimate software that intruders can use to cause harm.
|
Main functionality of Kaspersky Virus Removal Tool:
|
|
|
Scanning and disinfection |
Technologies |
Installation |
The application scans files of all formats, including the contents of archives. |
The application uses built-in anti-virus databases and Kaspersky Security Network to detect infection on your computer. |
The application does not need to be installed on the computer. |
Hardware and software requirements
You can use Kaspersky Virus Removal Tool on a computer that satisfies the following requirements:
Minimum hardware requirements
- Hard drive: 1 GB of free space
- CPU: Intel Pentium 1 GHz or higher
- RAM: 1 GB
- Internet connection
Minimum software requirements
The application supports the following 64-bit operating systems for the x86_64 architecture:
- AlmaLinux OS 8 or later
- AlterOS 7.5 or later
- Astra Linux Common Edition 2.12 or later
- CentOS 6.7 or later
- Debian GNU/Linux 10.0 or later
- EulerOS 2.0 or later
- Linux Mint 19.2 or later
- openSUSE Leap 15.0 or later
- Oracle Linux 7.3 or later
- Red Hat Enterprise Linux 6.7 or later
- Rocky Linux 8.5 or later
- SUSE Linux Enterprise Server 12.5 or later
- Ubuntu 12.04 or later
- Uncom OS Home / Business / Education / Enterprise 2.2 or later
- ALT Linux Workstaton / Workstation K / Server / Education 8 or later
- ROSA Linux Workstation / Server 12 or later
- RED OS 7.3 and later
Permissions for running the application
You can run Kaspersky Virus Removal Tool as superuser (root) or as a regular user. To use the application as a regular user, you must run the application on the command line with the --allowuser option.
When running the application as a regular user, Kaspersky Virus Removal Tool works in a limited mode. In limited mode, Kaspersky Virus Removal Tool may lack access rights to system memory, boot sectors, and other important areas. Kaspersky Virus Removal Tool may also lack write permissions to disinfect or delete detected objects. Disinfecting or deleting such objects will cause an error. Therefore, for a high level of protection, run the application as superuser (root). You can use a regular user account to scan, for example, individual user-owned directories or connected USB drives.
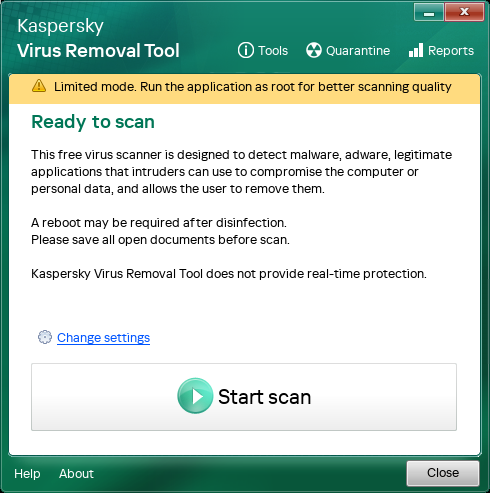
Limited mode
Page top
Running the application
Kaspersky Virus Removal Tool does not require installation. We recommend quitting all active applications before running Kaspersky Virus Removal Tool.
Running the application involves the following steps:
1 Downloading the application file
Download the application file from the Kaspersky official website and save the file on your local disk, for example, in the ~/Downloads directory.
2 Granting the execute permission
To make the application file executable using the graphical user interface:
- Run your file manager and change to the directory with the
kvrt.runapplication file. - Right-click the file to display the context menu and go to file properties.
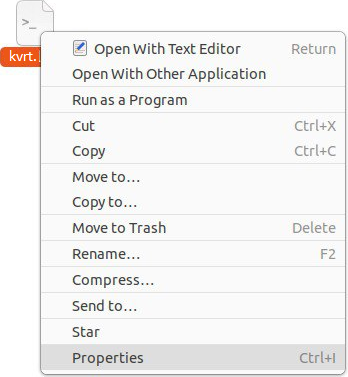
Context menu of the file
- In file properties, select the access permissions section. Depending on your operating system, this section can have different names, such as Permissions, Access rights, Discretionary attributes, etc.
- Allow running the file as an application. Depending on your operating system, this setting can have different names, such as Allow executing file as program, Executable as program, Execute, etc.
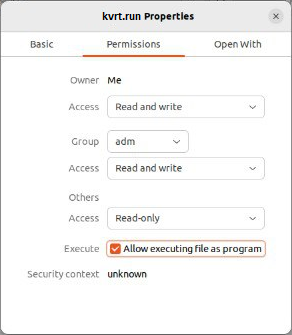
File properties
If you cannot make the file executable using the GUI, you can use the command line.
To make the application file executable using the command line:
- Run the Terminal application or its equivalent.
- Change to the directory with the
kvrt.runapplication file:cd ~/Downloads - Run the following command to grant the execute permission:
chmod +x kvrt.run
3 Running the application file
To run the application file using the graphical user interface:
- Right-click the file to display the context menu and select the command to run the file as an application. Depending on your operating system, this menu item can be named, for example, Run as a program, etc.
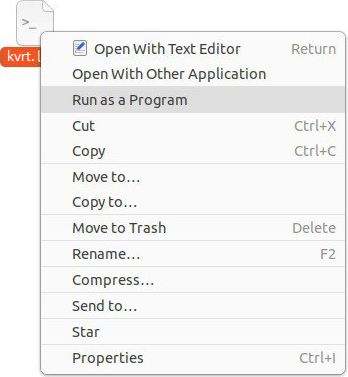
Context menu of the file
- If you cannot run the file as an application, try running the application by double-clicking the file icon. The operating system may prompt you to confirm the execution of the file. In some operating systems, double-clicking the file icon opens the text editor instead of running the application.
If you cannot run the application file using the GUI, you can use the command line.
To run the application file using the command line:
- Change to the directory with the
kvrt.runapplication file:cd ~/Downloads - Run the application file:
./kvrt.run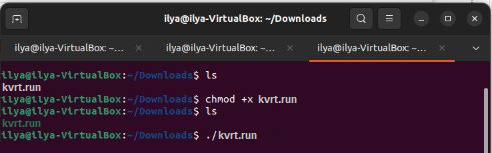
Running the application in Terminal
The application prompts you to enter your password to run the application as superuser (root).
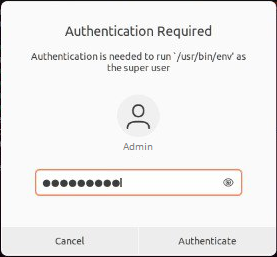
Superuser password prompt
The application unpacks the necessary files into a temporary directory at /tmp/<random_character_sequence>. When the application is closed, the temporary directory is deleted. If you terminate the process of the application, the temporary directory is deleted when the computer is restarted. You can specify a different directory for saving temporary files on the command line (--target <directory_path>).
The application displays the End User License Agreement, the Privacy Policy, and the KSN Statement. Kaspersky Security Network (KSN) is an infrastructure of cloud services providing access to the online Kaspersky Knowledge Base that contains information about the reputation of files, web resources, and software. KSN participants receive information from Kaspersky and send Kaspersky information about objects detected on the user's computer to be analyzed additionally by Kaspersky analysts and to be included in the reputation and statistical databases.
Carefully read the terms and conditions of the agreements before you accept them.
After completing the initialization, the application displays the main window of Kaspersky Virus Removal Tool. The application may then request proxy server credentials to connect to the internet. Internet access is required to connect to the KSN and update anti-virus databases.
The application creates a directory in which it places its working files:
/var/opt/KVRT2024_Dataif the application was run by the superuser (root)./home/<user_name>/KVRT2024_Dataif the application was run by an ordinary user.
If Kaspersky Virus Removal Tool fails to run, you can scan your computer using the Kaspersky Rescue Disk. Kaspersky Rescue Disk is an application that allows scanning your computer without booting an operating system. To use it, you must create a bootable USB drive or CD/DVD disk and boot your computer from the external media. Kaspersky Rescue Disk can be managed in the same way as Kaspersky Virus Removal Tool.
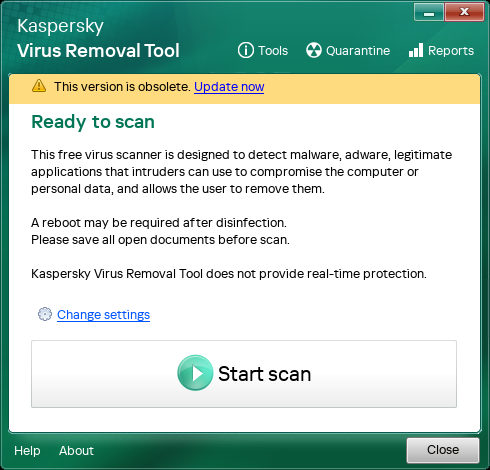
Main application window
Page top
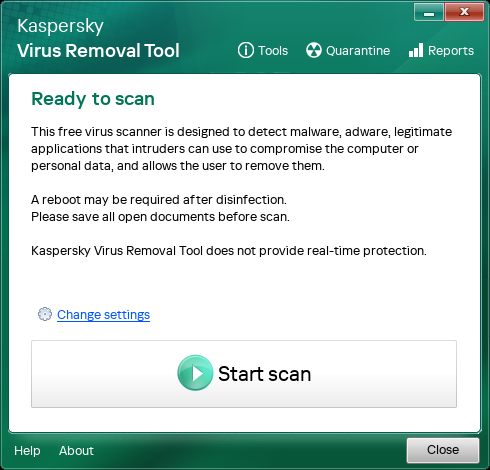
Scanning the computer
Kaspersky Virus Removal Tool can perform a standard scan of your computer. As part of this scan, the application scans system memory, startup objects, and boot sectors of your computer for viruses and other malware. Kaspersky Virus Removal Tool scans files of all formats, including the contents of archives. You can only run the scan manually. You cannot schedule the scan.
To scan your computer:
- Run Kaspersky Virus Removal Tool.
- Click Start scan.
If necessary, edit the scan scope.
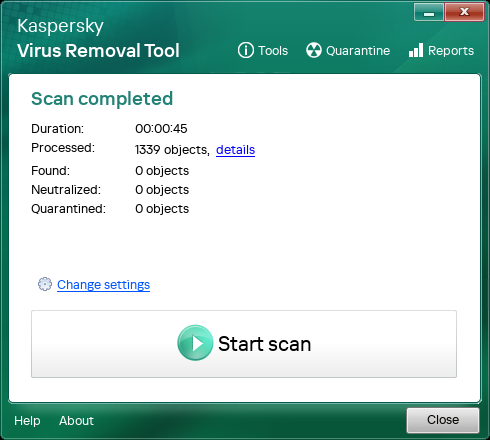
Kaspersky Virus Removal Tool scans your computer. When the scan is complete, Kaspersky Virus Removal Tool displays the results of the scan. The application also generates an application performance report.
Main application window
No threats detected
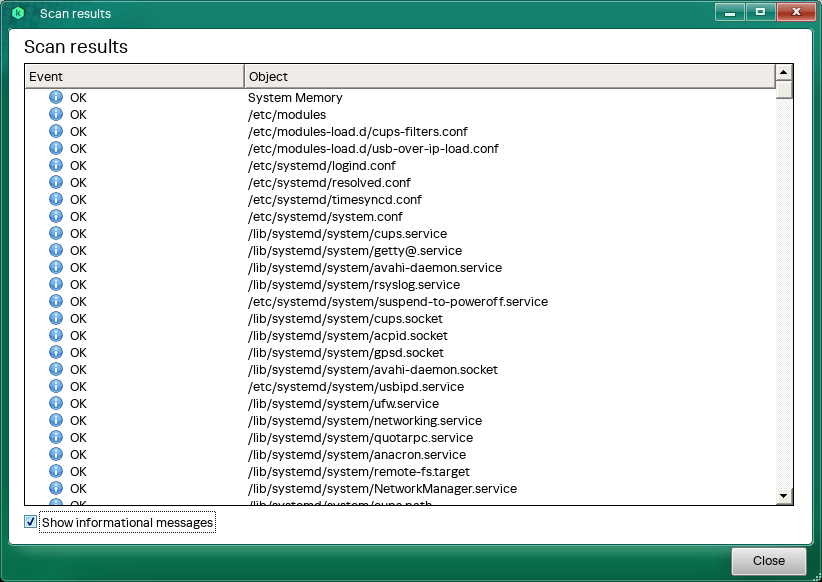
If the scan does not detect infected or probably infected objects, the application displays scan results with general information.
Computer scan results
You can then click Details to see detailed scan results. By default, the application displays only warning and error events. To view the list of scanned files, select the Show informational messages check box.
Infected or probably infected objects not detected
Page top
Object detected
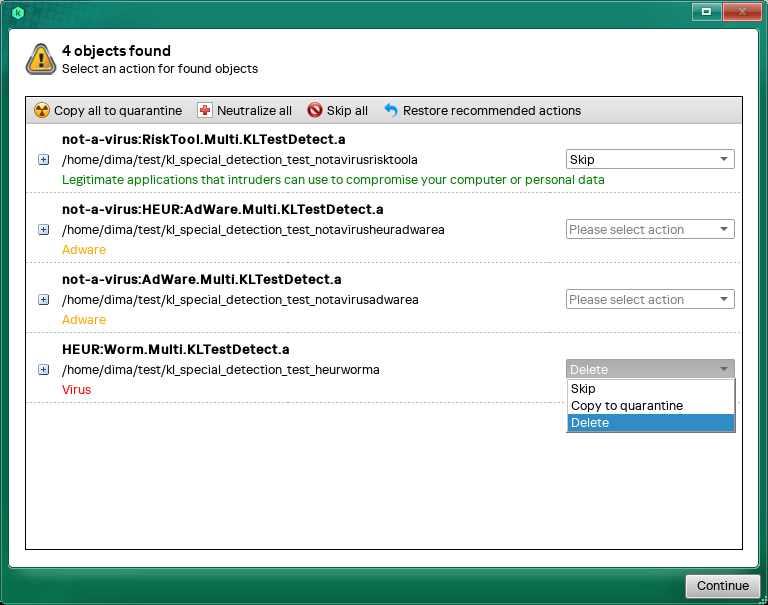
If the scan detects infected or probably infected objects, the application displays information about such objects (see figure below):
- Object name
- File location
- Type of the detected object (for example, a virus)
- Threat level in accordance with the Kaspersky classification (high threat level highlighted in red, medium level in amber, and low in green)
- MD5 and SHA256 hashes (click
 ).
).
Information about the detected object
Kaspersky Virus Removal Tool suggests an action to take on the infected or probably infected object:
- Skip.
- Copy to quarantine. Kaspersky Virus Removal Tool copies the object to quarantine. The original object is left in place and is not modified.
Files in quarantine are archived in a way that prevents them from causing harm to the computer. After a file is quarantined, you can permanently delete or restore it.
- Disinfect. Kaspersky Virus Removal Tool attempts to disinfect the object. If the object cannot be disinfected, the application saves a copy in quarantine and deletes the object.
- Delete. Kaspersky Virus Removal Tool saves a copy in quarantine and deletes the object.
- Restore. Kaspersky Virus Removal Tool attempts to restore the object from backup.
You can select an action for each individual object or for all objects at the same time. For all objects, the application lets you perform neutralization. Neutralization involves applying actions in the following order:
- Disinfection.
- If the object cannot be disinfected, the application attempts to restore the object from backup.
- If the object cannot be restored, the application deletes the object.
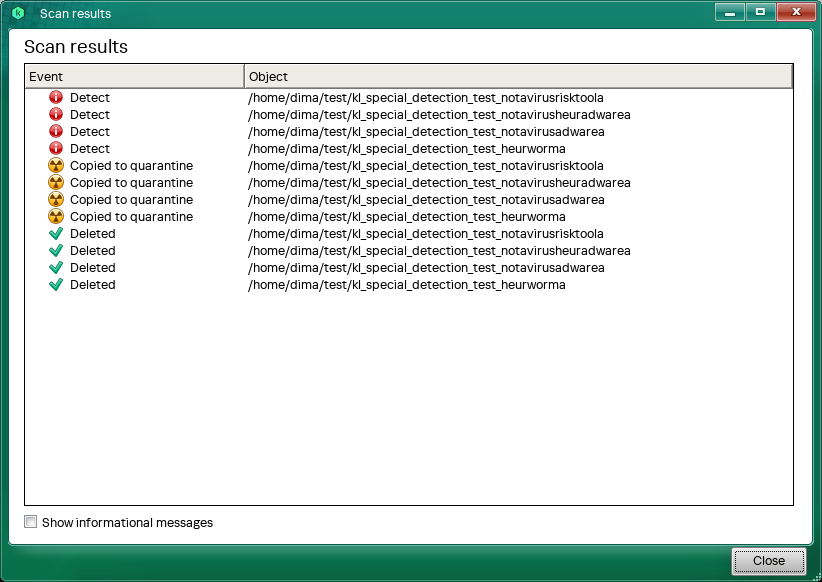
After processing the detected object, you can click Details to see detailed scan results. By default, the application displays only critical and important events. To view the list of scanned files, select the Show informational messages check box.
Computer scan details
Page top
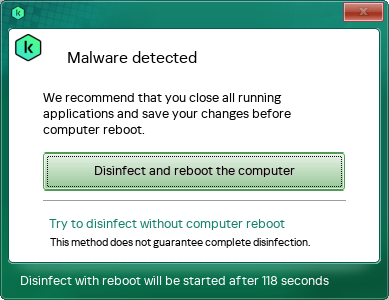
Active infection found
If the scan finds an active infection, the application displays a notification (see figure below). The application also starts a countdown for a decision to be made (120 seconds). After completing the decision countdown, Kaspersky Virus Removal Tool automatically attempts Advanced Disinfection. After completing Advanced Disinfection, Kaspersky Virus Removal Tool restarts the computer. You can try disinfecting the object without a restart. To do so, click Try to disinfect without computer reboot while the countdown is active.
For disinfecting an active threat, we recommend selecting disinfection with a computer restart. After restarting the computer, we recommend running the scan again.
Before Advanced Disinfection with a restart, you must close all applications to save your data and then click Disinfect and reboot the computer. If you need more time to close all applications and save your data, click the countdown counter. This pauses the countdown. Then you must select the Advanced Disinfection method: with or without a restart.
Notification about an active infection
Page top
Custom scan
By default, the application scans system memory, startup objects, and boot sectors of the computer, that is, a Quick Scan is performed. You can define your own scan scope and, for example, perform a Full Scan or scan individual custom directories.
To define a custom scan scope and run the scan:
- Run Kaspersky Virus Removal Tool.
- Click Change settings.
- Select check boxes next to objects you want to scan (see figure below):
- System volumes — list of mount points recommended for scanning (for example, Downloads, Documents, Temporary files, etc).
- All volumes — all mount points except service and network mount points. Service mount points include Pseudo File Systems such as sysfs, procfs and others.
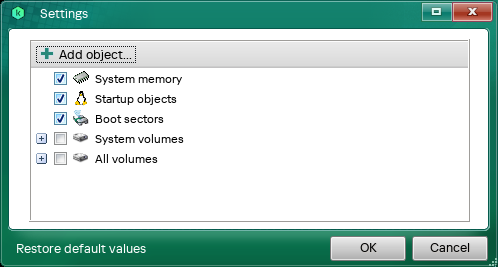
Editing the scan scope
- Click Add object to manually add a directory to the scan scope.
The application does not support masks.
- Save the edited settings.
You can also start a custom scan on command line.
Page top
Updating application anti-virus databases
If the anti-virus databases of the application are out of date, Kaspersky Virus Removal Tool displays a notification. To update application anti-virus databases, click Update now. The application starts your browser and begins downloading a new version of the application with the latest anti-virus database updates. Quit the previous version of the application and run the new version.
Notification about out-of-date anti-virus databases
The application displays the database release date in the About window.
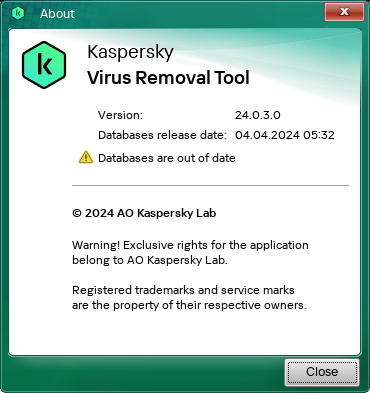
Database release date
Page top
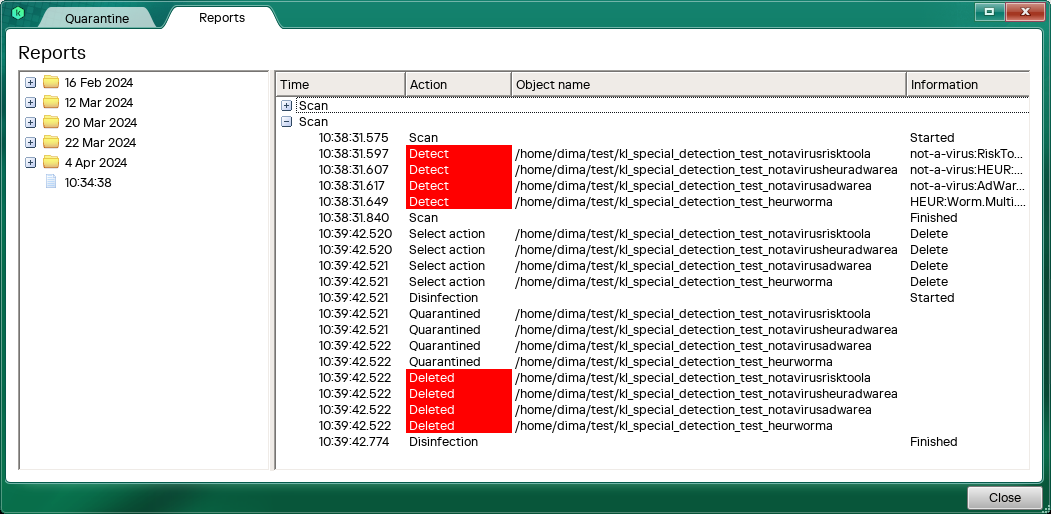
Managing quarantine
Copies of deleted or disinfected files are placed in a special directory on your computer that is known as quarantine. Copies of files are stored in a special format that is not dangerous to your computer. You can restore a deleted or disinfected file from the backup copy stored in quarantine.
By default, the application uses the following quarantine directory:
/var/opt/KVRT2024_Data/Quarantineif the application was run by the superuser (root)./home/<user_name>/KVRT2024_Data/Quarantineif the application was run by an ordinary user.
Files are stored in an encrypted form. File names have the kvrt*.klq format. Only the user that ran the application can access the files.
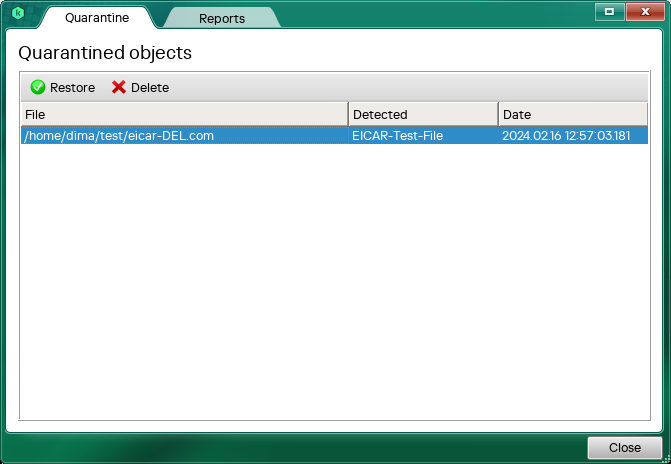
Quarantine
Restoring an object that was deleted by a scan
If the application, when scanning your computer, deleted a file and you still need it, you can restore the file.
We recommend that you avoid restoring deleted or disinfected files because they may cause harm to your computer.
To restore an object from quarantine:
- After the scan finishes, select the Quarantine tab.
Kaspersky Virus Removal Tool displays a list of quarantined files.
- Select the file that you want to restore.
- Click Restore.
Quarantine
Clearing quarantine
To delete an object from quarantine:
- After the scan finishes, select the Quarantine tab.
Kaspersky Virus Removal Tool displays a list of quarantined files.
- Select the object that you want to delete.
- Click Delete.
Quarantine
Monitoring the application
Kaspersky Virus Removal Tool provides the following monitoring functionality:
- Application performance report.
Kaspersky Virus Removal Tool constantly generates reports about its performance. Reports are available in the user interface of the application and as files in the application directory.
- System report.
You may need the system report when contacting the virus laboratory of Kaspersky. You can generate this report using the System Analyzer utility.
- Application traces and dumps.
You may need traces and dumps when contacting Kaspersky Technical Support.
Application performance report
Kaspersky Virus Removal Tool generates reports of the following types:
- Standard report.
A standard report includes warning and error events. This report is available in the user interface of the application. The application also creates report files in the directory of the application. For example, a report may contain information about starting and finishing a computer scan, actions that the application takes on detected objects, and so on.
- Detailed report.
This report is only available as a file in the directory of the application. To enable detailed report generation, you must run a special command. The detailed report reflects all application events.
To enable the generation of detailed reports, run the following command:
./kvrt.run -- -details
To open the standard application performance report:
- Run Kaspersky Virus Removal Tool.
- Select the Reports tab.
The application displays reports grouped by date. The application also generates reports in the following directory:
/var/opt/KVRT2024_Data/Reportsif the application was run by the superuser (root)./home/<user_name>/KVRT2024_Data/Reportsif the application was run by an ordinary user.
Files are stored in an encrypted form. You can view reports in the application interface only. To view reports in a text editor, you must run the application from the command line with the -dontencrypt option.
Standard report file names have the report_<date>_*.klr.enc1 format. Detailed report file names have the details_<date>_*.klr.enc1 format. The files are accessible to all users.
Application performance report
Page top
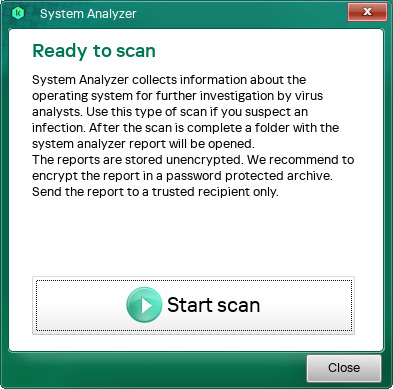
System report
You can generate a system report using the System Analyzer utility. Information in the report is intended for Kaspersky virus analysts. If you suspect that your computer might be infected, this report may be necessary for analysis.
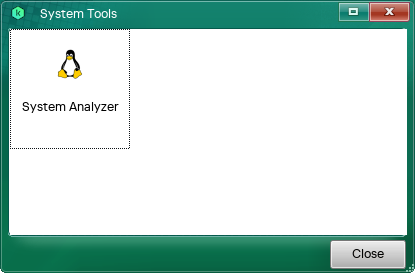
Utilities
To create a system report:
- Run Kaspersky Virus Removal Tool.
- Select the Utilities tab.
- Double-click the System Analyzer icon.
The application runs the System Analyzer utility.
- Click Start scan.
As a result, the utility generates a system report in the following directory:
/var/opt/KVRT2024_Data/Anomaliesif the application was run by the superuser (root)./home/<user_name>/KVRT2024_Data/Anomaliesif the application was run by an ordinary user.
File names have the *.txt format. Only the user that ran the application can access the files.
System Analyzer utility
Page top
Collecting traces and dumps
If you have not found a solution to your problem in the application documentation, we recommend visiting our forum. After you explain your problem to Kaspersky experts, they may ask you to create a trace file and a dump file. The trace file allows tracing the process of performing application commands step by step and determining the stage of application operation at which an error occurs. A dump file contains all information about the working memory of Kaspersky Virus Removal Tool processes at the moment when the dump file was created. Kaspersky Virus Removal Tool creates dumps when the application quits unexpectedly.
To enable trace file collection, run the following command:
./kvrt.run -- -trace
You can also configure the trace level using the -tracelevel <level> option.
Next, you must reproduce the actions that led to the issue. As a result, Kaspersky Virus Removal Tool creates trace and dump files in the following directory:
/var/opt/KVRT2024_Data/Tracesif the application was run by the superuser (root)./home/<user_name>/KVRT2024_Data/Tracesif the application was run by an ordinary user.
Files are stored in an encrypted form. Trace file names have the KVRT.<application_version>_<date>_<time>_*.log.enc1 format. Dump file names have the *.dmp.enc1 format. Only the user that ran the application can access the files.
Managing the application from the command line
You can manage Kaspersky Virus Removal Tool from the command line.
Managing the unpacker from the command line
The unpacker of Kaspersky Virus Removal Tool supports the following commands.
Command line options
Command |
Description |
|---|---|
|
Display unpacker command help. This does not start the application.
|
|
Check the integrity of the
|
|
Allow the application to be run by an ordinary user.
|
|
Specify a directory for unpacking temporary files. The directory must not exist. If you specified the directory for unpacking temporary files manually, the application does not delete the directory after the application is closed. You must delete the temporary directory manually.
By default, the application places its files in the |
|
Do not run the application after unpacking.
|
|
Hide the unpacking indicator (quiet unpacking mode).
|
Managing the application from the command line
Kaspersky Virus Removal Tool supports the following management commands:
Command line options
Command |
Description |
|---|---|
|
Display command line syntax help.
|
|
Enable trace collection.
|
|
Set trace level.
|
|
Specify the directory for saving application files (reports, traces, quarantine, etc).
By default, the application saves files in the following directory:
|
|
Automatically accept the End User License Agreement, the Privacy Policy, and the KSN Statement.
|
|
Scan the computer without GUI (silent mode). To run the scan in silent mode, you must accept the terms and conditions of the End User License Agreement, the Privacy Policy, and the KSN Statement ( By default, the application only detects infected or probably infected objects and logs the corresponding events. The application does not apply any actions to objects. To neutralize detected objects, you must specify the threat level of the objects ( By default, the application scans system memory, startup objects, and boot sectors of the computer. You can design a custom scan scope (for example, The application outputs the scan results to the command line and writes information to a report file.
|
|
Automatically disinfect active infection with a computer restart, perform the scan in silent mode. The application does not display a notification if an active threat is detected, and does not start a countdown to let you make a decision. The application attempts to disinfect the active threat immediately and restarts the computer after the disinfection. If this option is not specified, the application attempts to disinfect the active threat in silent mode without a restart. For disinfecting an active threat, we recommend selecting disinfection with a computer restart. After restarting the computer, we recommend running the scan again.
|
|
Neutralize detected objects when scanning in silent mode and specify the threat level of objects to be neutralized. The application supports the following threat levels:
Neutralization involves applying actions in the following order:
|
|
Disable the encryption of traces, dumps, and reports.
|
|
Add all mount points except service and network mount points to the scan scope. By default, the application scans system memory, startup objects, and boot sectors of the computer.
|
|
Run a scan of only the defined scope (custom folder scan). With this option, the application excludes the system memory, startup objects, and boot sectors of the computer from scanning. To run a custom folder scan, define a scan scope using the
|
|
Add a directory to the scan scope. You can add multiple directories. The application supports full paths. By default, the application scans system memory, startup objects, and boot sectors of the computer.
|
|
Add multiple directories, listed in a text file, to the scan scope. Do not enclose paths in the file in quotation marks. Each path must start on a new line. The encoding of the file must be ANSI or UTF8 with BOM. By default, the application scans system memory, startup objects, and boot sectors of the computer.
|
|
Exclude a directory or file from the scan scope. You can exclude multiple objects. The application supports full paths. By default, the application scans system memory, startup objects, and boot sectors of the computer.
|
|
Exclude multiple directories or files, listed in a text file, from scanning. Do not enclose paths in the file in quotation marks. Each path must start on a new line. The encoding of the file must be ANSI or UTF8 with BOM. By default, the application scans system memory, startup objects, and boot sectors of the computer.
|
|
Enable the generation of detailed reports. The detailed report reflects all application events. By default, the application generates standard reports. A standard report includes warning and error events.
|
|
Connect to a proxy server with a configuration file. The application only supports absolute paths.
|
Requirements for the proxy server configuration file
Kaspersky Virus Removal Tool can automatically determine proxy server connection settings. If the application cannot connect to the proxy server automatically, you can specify connection settings using a configuration file. To do so, you must run the application on the command line with the -proxyconfig <file_path> option.
Configuration file requirements:
- File name —
proxy.dat - Encoding — UTF8 without BOM
Syntax:
server=<proxy_server_address>#For example, server=myproxy.comport=<port>#For example, port=1122username=<user_name>#For example, username=Fredpassword=<password>#For example, password=1234
Application data storage
After you quit the application, the KVRT2024_Data directory remains on your computer. By default, the application saves files in the following directory:
/var/opt/KVRT2024_Dataif the application was run by the superuser (root)./home/<user_name>/KVRT2024_Dataif the application was run by an ordinary user.
The user is responsible for ensuring the security and controlling and restricting access to the information that is stored on the computer.
The KVRT2024_Data directory contains the following:
- The
Quarantinedirectory contains quarantined files.Files can contain the following user data:
- Object name
- File location
- Name of the user that ran the application
Files are stored in an encrypted form. File names have the
kvrt*.klqformat. Only the user that ran the application can access the files. - The
Reportdirectory contains application performance report files.Files can contain the following user data:
- Locations of scanned files
- Web page addresses that were found in scanned objects
- Name of the user that ran the application
Files are stored in an encrypted form. Standard report file names have the
report_<date>_*.klr.enc1format. Detailed report file names have thedetails_<date>_*.klr.enc1format. Only the user that ran the application can access the files. - The
Tracesdirectory contains trace and dump files.Trace files can contain the following general data:
- Event time
- Number of the execution thread
- Application component that caused the event
- Event severity (information, warning, critical, error)
- A description of the application component command execution event and the result of the command
In addition to general data, trace files may contain user data:
- Personal information including the full name of the individual if such information is part of a path to a file on the computer
- User account name if the user account name is part of a file name
- Email address or web address containing a user account name and password if these are part of the name of a detected object
- Remote IP addresses with which the computer established connections
- Web addresses that are part of names of scanned objects
If the application uses a proxy server, the trace files may contain the following data:
- Proxy server address
- Computer name
- IP address and port of the computer
- User name used to authorize at the proxy server
Dumps store information about the working memory of processes at the moment the process crashes, and they may also contain personal information.
Files are stored in an encrypted form. Trace file names have the
KVRT.<application_version>_<date>_<time>_*.log.enc1format. Dump file names have the*.dmp.enc1format. Only the user that ran the application can access the files.
Sources of information about the application
If you have questions about the application, you can discuss it with Kaspersky experts and fellow users on our forum.
On the user forum, you can read threads, post comments, and create new threads.
Page top
Information about third-party code
Information about third-party code is contained in the legal_notices.txt file located in the KVRT2024_Data directory. The application creates a directory in which it places its working files:
/var/opt/KVRT2024_Dataif the application was run by the superuser (root)./home/<user_name>/KVRT2024_Dataif the application was run by an ordinary user.
Trademark notices
Registered trademarks and service marks are the property of their respective owners.
Pentium is a registered trademark of Intel Corporation in the U.S. and/or other countries.
Linux is the registered trademark of Linus Torvalds in the U.S. and other countries.
Page top