Using Kaspersky Scan Engine in ICAP mode with Dell EMC Isilon
You can configure Kaspersky Scan Engine to work with Dell EMC Isilon. For convenience, this process is separated into several steps.
The instruction below applies to Dell EMC Isilon 9.1. For information about the interfaces of other versions, see Dell EMC Isilon documentation.
Step I. Configuring Kaspersky Scan Engine
To configure Kaspersky Scan Engine:
- Allow Kaspersky Scan Engine to send the
204 No ContentHTTP status code by doing one of the following:- Turn on the Send code 204 toggle in Kaspersky Scan Engine GUI.
- Set the value of the
Allow204element to1in the ICAP mode configuration file.
- Enable scanning of files in the response modification mode (RESPMOD) by doing one of the following:
- Set the objects that must be scanned in RESPMOD to Files in Kaspersky Scan Engine GUI.
- Set the value of the
ScanInRespModeelement toContentin the ICAP mode configuration file.
- Set the address that Kaspersky Scan Engine uses to process responses in RESPMOD to
avscanby doing one of the following:- Set the value of Response mode address field to
avscanin Kaspersky Scan Engine GUI. - Set the value of the RespModeAddress element to
avscanin the ICAP mode configuration file.
- Set the value of Response mode address field to
Step II. Configuring Dell EMC Isilon
To configure Dell EMC Isilon:
- In the Dell OneFS web administration interface, go to Data Protection > Antivirus > ICAP.
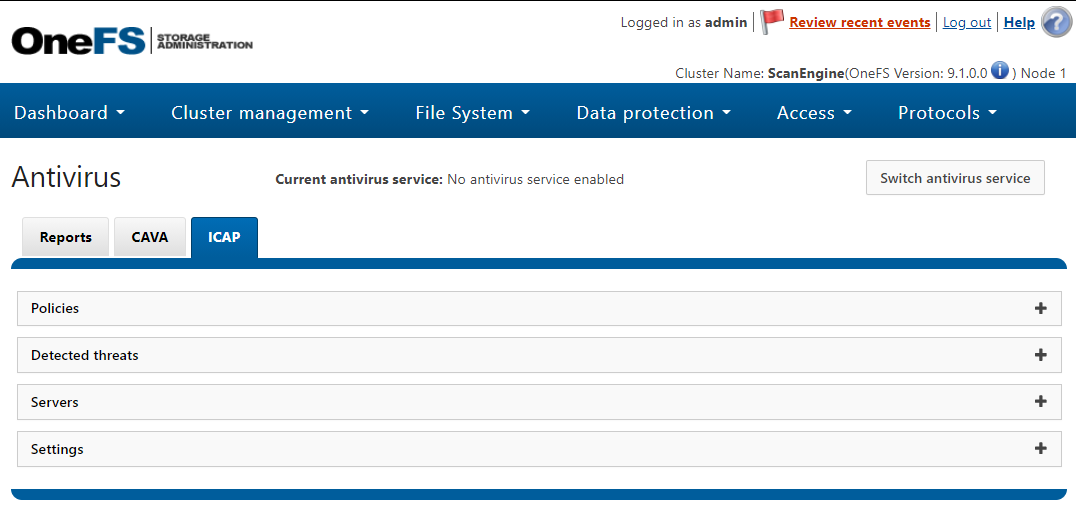
The ICAP tab
- In the Servers area, click Add Server.
The Add ICAP antivirus server dialog box appears.
- In the Add ICAP antivirus server dialog box, do the following:
- In the Server URL field, type the address Kaspersky Scan Engine:
icap://%KSE_IP%:1344/avscan. Here%KSE_IP%is the IPv4 address. - In the Server name field, type the name for the server, for example
KasperskyScanEngine. - Click Add Server.
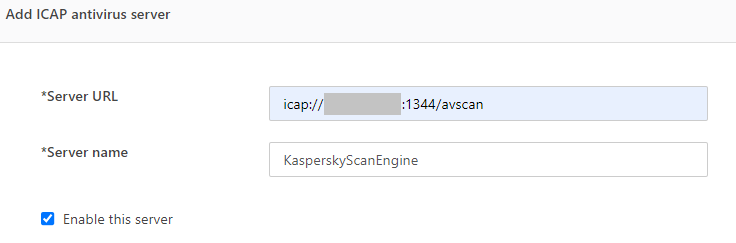
The Add ICAP antivirus server dialog box
- In the Server URL field, type the address Kaspersky Scan Engine:
- In the Settings area, specify the following:
- The action on detection. For example, you can choose Attempt to truncate file when threat is found.
- Optionally, you can specify the maximum size of the files to scan. The default value is 2 GB.
- Optionally, you can specify the path prefixes. Path prefixes are the paths in the filesystem that will trigger scanning when files are added to them.
- Optionally, you can specify the filters for object names. Filters for object names define objects that should or should not be scanned in On-Access mode.
- Optionally, you can enable the Enable scan of files on open, Enable file access when scanning fails, and Enable scan of files on closed settings.
- Optionally, configure scan report retention.
- Click Submit.
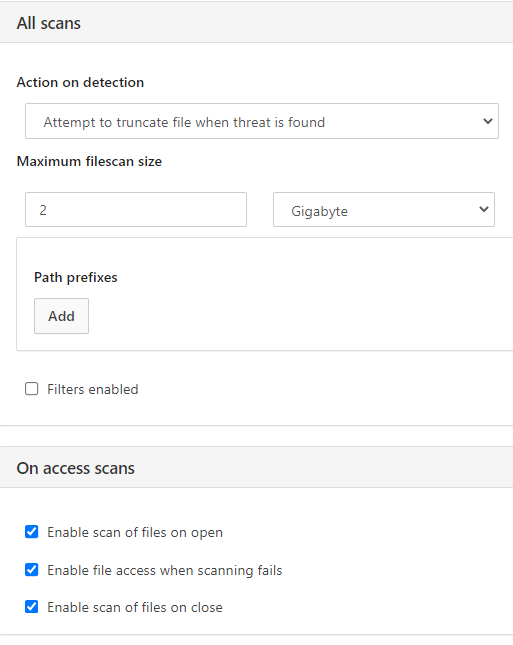
The All scans dialog box
- Click Switch antivirus service.
- Turn on Switch ICAP antivirus.
- Click Confirm.
Schedule scanning
You can configure scanning schedule to scan your storage on a regular basis.
To configure scanning schedule:
- In the Dell OneFS web administration interface, go to Data protection > Antivirus > ICAP > Policies.
- Click the Create an antivirus policy.
The Create a policy dialog box appears.
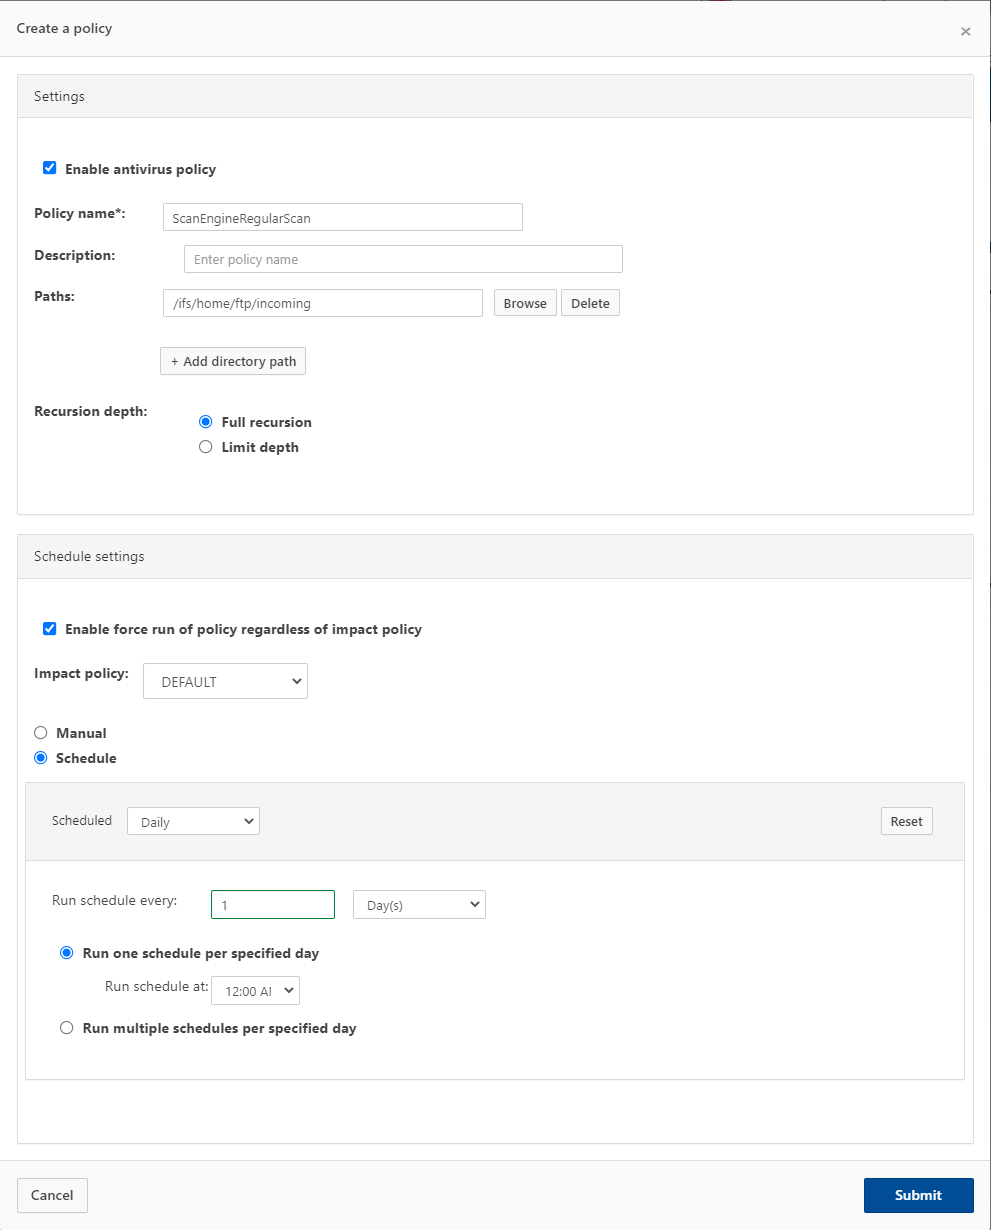
The Create a policy dialog box
- Select the Enable antivirus policy check box.
- Specify the name of the policy in the Policy name text field.
- Enter the description of the policy in the Description text field.
- Add paths to the directories that you want to scan.
- Optionally, you can set a limit on the recursion depth in the Recursion depth section, but this is not recommended.
- Specify the impact policy settings:
- Optionally, you can select Enable force run of policy regardless of impact policy, but this is not recommended.
- Select the
DEFAULTimpact policy from the Impact Policy drop-down list.
- Select the Scheduled radio button.
- Specify the scheduling settings:
- Choose the interval for running the policy.
- Configure the policy to run at the desired time.
- Click Submit.
Reviewing the detect objects
To review the detected objects,
In the Dell OneFS web administration interface, go to Data Protection > Antivirus > ICAP > Detected Threats.

The list of detected objects
This is the list of files that were quarantined or truncated, along with the name of the detected object, file path, remediation method, policy, and timestamp.
Click the View details button next to a detected object to view the detailed information.
To restore a file from the list and allow user access to it:
- Click the More drop-down list.
- Select Release file.
Recommendations
You must configure at least one copy of Kaspersky Scan Engine to provide virus scanning for each Isilon cluster. In a typical environment, a minimum of two Kaspersky Scan Engine instances are required to handle a NAS server. Having only one instance can cause denial of file access, in which case the instance does not respond. Isilon clusters handle load balancing across multiple Kaspersky Scan Engine instances automatically.
All Kaspersky Scan Engine instances that are registered with an Isilon cluster must have identical configurations.
Page top