- Kaspersky Secure Mail Gateway
- The Kaspersky Secure Mail Gateway interface
- Application licensing
- About the End User License Agreement
- About the license certificate
- About the key
- About the key file
- About the activation code
- About the subscription
- About data provision
- Modes of Kaspersky Secure Mail Gateway operation under license
- Adding an activation code
- Adding a key file
- Removing a key
- Monitoring license key status
- Configuring warnings about upcoming license key expiration
- Purchasing a license
- Renewing a license
- Updating Kaspersky Secure Mail Gateway
- Application installation and setup
- Deploying a virtual machine in the management console of the VMware ESXi hypervisor
- Deploying a virtual machine in the web interface of VMware vSphere
- Deploying a virtual machine in the management console of the Microsoft Hyper-V Manager hypervisor
- Deploying a virtual machine using Microsoft SCVMM
- Application installation and setup
- Removing the application
- Preparing for removing the application
- Deleting a virtual machine in the management console of the VMware ESXi hypervisor
- Deleting a virtual machine in the web interface of VMware vSphere
- Deleting a virtual machine in the management console of the Microsoft Hyper-V hypervisor
- Deleting a virtual machine using Microsoft SCVMM
- Getting started with the application
- Integrating Kaspersky Secure Mail Gateway into the existing corporate email infrastructure
- Monitoring of application operation
- Using message processing rules
- Viewing the rule table
- Configuring rule table display
- Message processing rule configuration scenario
- Creating message processing rules
- Configuring Anti-Virus protection
- Configuring link scanning
- Configuring Anti-Spam protection
- Configuring Anti-Phishing protection
- Configuring Content Filtering
- Mail Sender Authentication
- Notification settings for message scan events
- Adding a Warning about insecure message
- Adding email disclaimers
- Configuring KATA protection
- Examples of message processing rule configuration
- Viewing rule information
- Enabling and disabling a message processing rule
- Changing rule settings
- Deleting message processing rules
- Allowlists and denylists
- Managing the cluster
- Creating a new cluster
- Viewing the cluster node table
- Configuring the display of the cluster node table
- Viewing information about a cluster node
- Adding a node to the cluster
- Modifying node settings
- Removing a node from a cluster
- Changing the role of a node in a cluster
- Deleting the cluster
- Restarting a cluster node
- Managing the SSL certificate of the cluster node
- Checking data integrity
- Modifying the network settings of a cluster node
- Managing roles and user accounts
- Backup
- Configuring Backup settings
- Configuring personal Backup
- Viewing the table of objects in Backup
- Configuring the display of the table of objects in Backup
- Filtering and finding messages in Backup
- Viewing information about a message in Backup
- Delivering a message from Backup
- Downloading a message from Backup
- Deleting a message from Backup
- Backup digest
- Event log
- Viewing the event log
- Configuring event table display
- Filtering email traffic processing events
- Filtering application events
- Viewing information about email traffic processing events
- Viewing information about an application event
- Application event types
- Exporting the event log
- Configuring the event log
- Message queue
- Reports
- General protection settings
- About computer protection against certain legitimate applications
- Configuring the Anti-Virus module
- Configuring link scanning
- Configuring the Anti-Spam module
- Configuring the Anti-Phishing module
- Configuring Content Filtering
- Configuring external services
- Preparing to configure SPF and DMARC Mail Sender Authentication for outgoing messages
- Configuring date and time
- Configuring the proxy server connection settings
- Updating Kaspersky Secure Mail Gateway
- Database update for Kaspersky Secure Mail Gateway
- Exporting and importing settings
- Participating in Kaspersky Security Network and using Kaspersky Private Security Network
- Integration with an external directory service
- KATA protection
- Integration with a single KATA server
- Integration with multiple servers of the KATA cluster
- Creating a configuration file for the built-in balancer
- Configuring and running the built-in balancer on a cluster node
- Adding a KATA server
- Configuring KATA protection settings
- KATA integration dashboard
- Adding, modifying, and deleting IP addresses of KATA servers
- Disabling KATA integration
- Managing the application over SNMP
- Configuring the snmpd service in the operating system
- Enabling and disabling the use of the SNMP protocol in Kaspersky Secure Mail Gateway
- Configuring SNMP server connection settings
- Enabling and disabling forwarding of SNMP traps
- Configuring encryption of SNMP connections
- Description of MIB objects of Kaspersky Secure Mail Gateway
- Exporting MIB objects
- Email notifications for Kaspersky Secure Mail Gateway
- Configuring notifications about application events
- Configuring notifications about bounce messages
- Configuring notifications about message processing rules triggering
- Configuring notification templates
- Using macros in notification templates
- Adding a unique message ID to the notification
- Configuring the address for messages sent by the application
- Authentication using the single sign-on technology
- Connecting to cluster nodes over the SSH protocol
- Editing MTA settings
- DKIM signature for outgoing messages
- Using the TLS protocol in the operation of Kaspersky Secure Mail Gateway
- Domains and configuration of email routing
- Publishing application events to a SIEM system
- Contacting Technical Support
- Glossary
- Advanced persistent threat (APT)
- Anti-Phishing
- Anti-Spam
- Anti-Spam Quarantine
- Anti-Virus
- Backup
- Backup digest
- BEC attack
- Certificate fingerprint
- Cluster
- Content Filtering
- Control node
- Directory service
- DKIM Mail Sender Authentication
- DMARC Mail Sender Authentication
- Email notification
- Heuristic analysis
- Kaspersky Anti Targeted Attack Platform
- Kaspersky Private Security Network
- Kaspersky Security Network (KSN)
- Kerberos authentication
- Key file
- Keytab file
- LDAP
- Malicious links
- Moebius service
- MTA
- NTLM authentication
- Phishing
- PTR record
- Reputation filtering
- SCL rating
- Secondary node
- Service Principal Name (SPN)
- SIEM system
- SMTP verification
- SNMP agent
- SNMP trap
- Spam
- SPF Mail Sender Authentication
- Spoofing
- TLS encryption
- Update source
- Virtual machine
- Information about third-party code
- Trademark notices
KATA integration dashboard
You can use the following methods to monitor the KATA integration status:
- View summary information about the state of the connection to the KATA server on all cluster nodes by checking the KATA Protection information pane in the Nodes section.
The following statuses are available:
- View detailed information about the state of the connection to the KATA server on each cluster node.
To do so, on the KATA Protection dashboard, click View details to go to the Settings → External services → KATA Protection → Status section.
The workspace displays the cluster nodes table containing information about the connection to the KATA server:
- IP address:port is the IP address and port of the cluster node.
- Role is the role of the node in the cluster.
- SHA-256 fingerprint is the server certificate fingerprint.
- Status is the state of the connection to the KATA server:
- Connected means that the cluster node is successfully connected and authorized on the KATA server.
- Connection not authorized means that a connection to the KATA server has been established but the KATA administrator has not yet confirmed the integration request.
- Connection problems indicates an error connecting to the KATA server.
- Disabled means that KATA integration is disabled in application settings.
- Too many authorization requests means that the maximum number of integration requests configured on the KATA server has been exceeded.
The default value is 50.
If a connection exists to at least one KATA server, the table displays the successful connection status. If no connection exists with any of the KATA servers, the table displays an error.
- View information about the KATA server connection in the information window of each cluster node.
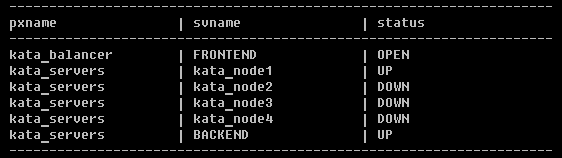
- Use a script to monitor the connection status of individual KATA servers in Technical Support Mode (when integrating with multiple servers of KATA version 5.0 or later).
The script requests the connection status from the built-in balancer and outputs it to the console.
To view connection status for individual KATA servers:
- Connect to the cluster node over SSH to gain access to the Technical Support Mode.
- Run the following command:
The connection and connection status table is displayed.
For example results of running the command, see the figure below:
The last column of the table displays the connection status for individual KATA servers (for example, kata_node1, kata_node2 lines) and the overall connection status (the BACKEND line).
Possible connection status values:
If a connection exists with at least one KATA server, the overall connection status is UP.