Contents
- Kaspersky Secure Mail Gateway
- The Kaspersky Secure Mail Gateway interface
- Application licensing
- About the End User License Agreement
- About the license certificate
- About the key
- About the key file
- About the activation code
- About the subscription
- About data provision
- Modes of Kaspersky Secure Mail Gateway operation under license
- Adding an activation code
- Adding a key file
- Removing a key
- Monitoring license key status
- Configuring warnings about upcoming license key expiration
- Purchasing a license
- Renewing a license
- Application installation and setup
- Deploying a virtual machine in the management console of the VMware ESXi hypervisor
- Deploying a virtual machine in the web interface of VMware vSphere
- Deploying a virtual machine in the management console of the Microsoft Hyper-V Manager hypervisor
- Deploying a virtual machine using Microsoft SCVMM
- Application installation and setup
- Removing the application
- Preparing for removing the application
- Deleting a virtual machine in the management console of the VMware ESXi hypervisor
- Deleting a virtual machine in the web interface of VMware vSphere
- Deleting a virtual machine in the management console of the Microsoft Hyper-V hypervisor
- Deleting a virtual machine using Microsoft SCVMM
- Getting started with the application
- Monitoring of program operation
- Using message processing rules
- Viewing the rule table
- Configuring rule table display
- Message processing rule configuration scenario
- Creating message processing rules
- Configuring Anti-Virus protection
- Configuring URL Advisor
- Configuring Anti-Spam protection
- Configuring Anti-Phishing protection
- Configuring Content Filtering
- Mail Sender Authentication
- Notification settings for message scan events
- Adding a Warning about insecure message
- Adding email disclaimers
- Configuring KATA protection
- Viewing rule information
- Enabling and disabling a message processing rule
- Changing rule settings
- Deleting message processing rules
- Allowlists and denylists
- Managing the cluster
- Creating a new cluster
- Viewing the cluster node table
- Configuring the display of the cluster node table
- Viewing information about a cluster node
- Adding a node to the cluster
- Modifying node settings
- Removing a node from a cluster
- Changing the role of a node in a cluster
- Deleting the cluster
- Restarting a cluster node
- Managing the SSL certificate of the cluster node
- Checking data integrity
- Modifying the network settings of a cluster node
- Managing roles and user accounts
- Backup
- Configuring Backup settings
- Configuring personal Backup
- Viewing the table of objects in Backup
- Configuring the display of the table of objects in Backup
- Filtering and finding message copies in Backup
- Viewing information about a message in Backup
- Delivering a message from Backup
- Downloading a message from Backup
- Deleting a message copy from Backup
- Event log
- Message queue
- Reports
- General protection settings
- About computer protection against certain legitimate applications
- Configuring the Anti-Virus module
- Configuring URL Advisor
- Configuring the Anti-Spam module
- Configuring the Anti-Phishing module
- Configuring Content Filtering
- Configuring external services
- Preparing to configure SPF and DMARC Mail Sender Authentication for outgoing messages
- Configuring date and time
- Configuring the proxy server connection settings
- Downloading upgrade packages
- Database update for Kaspersky Secure Mail Gateway
- Exporting and importing settings
- Participating in Kaspersky Security Network and using Kaspersky Private Security Network
- Integration with an external directory service
- KATA protection
- Integration with a single KATA server
- Integration with multiple servers of the KATA cluster
- Creating a configuration file for the built-in balancer
- Configuring and running the built-in balancer on a cluster node
- Adding a KATA server
- Configuring KATA protection settings
- KATA integration dashboard
- Adding, modifying, and deleting IP addresses of KATA servers
- Disabling KATA integration
- Managing the application over SNMP
- Configuring the snmpd service in the operating system
- Enabling and disabling the use of the SNMP protocol in Kaspersky Secure Mail Gateway
- Configuring SNMP server connection settings
- Enabling and disabling forwarding of SNMP traps
- Configuring encryption of SNMP connections
- Description of MIB objects of Kaspersky Secure Mail Gateway
- Exporting MIB objects
- Email notifications for Kaspersky Secure Mail Gateway
- Authentication using the single sign-on technology
- Connecting to cluster nodes over the SSH protocol
- Editing MTA settings
- DKIM signature for outgoing messages
- Using the TLS protocol in the operation of Kaspersky Secure Mail Gateway
- Domains and configuration of email routing
- Publishing application events to a SIEM system
- Contacting Technical Support
- Glossary
- Advanced persistent threat (APT)
- Anti-Phishing
- Anti-Spam
- Anti-Spam Quarantine
- Anti-Virus
- Backup
- BEC attack
- Certificate fingerprint
- Cluster
- Content Filtering
- Control node
- Directory service
- DKIM Mail Sender Authentication
- DMARC Mail Sender Authentication
- Email notification
- Heuristic analysis
- Kaspersky Anti Targeted Attack Platform
- Kaspersky Private Security Network
- Kaspersky Security Network (KSN)
- Kerberos authentication
- Key file
- Keytab file
- LDAP
- Malicious links
- Moebius service
- MTA
- NTLM authentication
- Phishing
- PTR record
- Reputation filtering
- SCL rating
- Secondary node
- Service Principal Name (SPN)
- SIEM system
- SMTP verification
- SNMP agent
- SNMP trap
- Spam
- SPF Mail Sender Authentication
- Spoofing
- TLS encryption
- Update source
- Virtual machine
- Information about third-party code
- Trademark notices
Kaspersky Secure Mail Gateway
Kaspersky Secure Mail Gateway lets you deploy a mail gateway as a cluster system, which can scale with the volume of processed traffic, and integrate it into the existing mail infrastructure of your organization. An operating system, mail server, and Kaspersky anti-virus application are preinstalled on the mail gateway.
Kaspersky Secure Mail Gateway protects incoming and outgoing email against malicious objects, spam and phishing content, and performs content filtering of email messages.
Kaspersky Secure Mail Gateway functionality includes:
- Performs Anti-Virus scanning of messages:
- Checking messages for viruses and malware, macros (for example, Microsoft Office files containing macros), encrypted objects, archives (including recognizing types of files inside archives and compound objects).
- Using information from to ensure a faster response to new threats.
- Integrates with (KPSN) so that organizations where Internet access is restricted by internal rules and policies can utilize Kaspersky Security Network (KSN) functionality.
- Integrating with (KATA) for detection of threats such as zero-day attacks, targeted attacks, and complex targeted attacks known as advanced persistent threats (APT).
- Performs Anti-Spam scanning of messages:
- Checking messages for spam, probable spam, mass mail (including spoofed domain recognition and IP address reputation checking).
- Detects messages containing Unicode . If Unicode spoofing is detected, the message is considered to be spam. The program adds the unicode_spoof tag to the X-KSMG-AntiSpam-Method message header.
- Adds the X-MS-Exchange-Organization-SCL X-headers to messages based on the Anti-Spam scan results. This tag contains the .
- Places messages into Anti-Spam Quarantine and manages the Anti-Spam Quarantine in the web interface.
- Performs Anti-Phishing scanning of messages.
- Scans messages for malicious or advertising links, as well as links related to legitimate software.
- Performs content filtering of messages:
- By name
- By size
- By attachment type (Kaspersky Secure Mail Gateway can determine the actual format and type of attachments regardless of file extension).
- Lets you perform Mail Sender Authentication using , , and technologies.
- Configuring integration with Active Directory to obtain information about domain users.
- Obtaining information about program events:
- Logging mail traffic processing events as well as system events that occur during the operation of the program. The log can be filtered to search for events conveniently.
- Exporting events in the CSV format.
- Publishing program events to a used in your organization over the Syslog protocol. Information about each program event is relayed as a separate syslog message in CEF format.
- Configuring settings and managing the program via a web interface.
- Monitoring the status of email traffic and usage of system resources and viewing lists of the latest detected threats in the web interface of the program.
- Delimiting user access to program functionality using a role system.
- Configuring single sign-on authentication.
- Creating a cluster to scale the solution (horizontally or vertically) with centralized management of all servers in the cluster using the program web interface.
- Managing Backup:
- Saving backup copies of messages in Backup based on scan results.
- Saving messages from Backup to a file.
- Forwarding messages to recipients.
- Receiving information about users from different domains and granting users access to personal Backup.
- Creating allowlists and denylists, which let you fine-tune the way the mail system reacts to messages from certain addresses.
- Updating program databases from Kaspersky update servers and custom sources on schedule and on demand.
The update functionality (including anti-virus signature updates and code base updates), as well as the KSN functionality may not be available in the application in the territory of the USA.
- Configuring email notifications:
- Notifying the sender, recipients, and other addresses about objects detected in a message.
- Sending notifications to users about system events encountered by the program.
- Adding email disclaimers to outgoing and incoming messages, and adding warnings about potentially unsafe messages.
- Generating and viewing reports about the results of message processing and program events.
- Processing email messages in accordance with rules configured for groups of senders and recipients.
- Adding, modifying, or deleting information about domains (including local domains of the organization) and email addresses, editing Kaspersky Secure Mail Gateway settings for such domains and email addresses, configuring email routing.
- Lets you configure .
- Adding, modifying, and deleting DKIM and TLS encryption keys.
- Receiving program operation statistics via the SNMP protocol, and enabling or disabling forwarding of .
Kaspersky Secure Mail Gateway is distributed as an ISO image of a virtual machine for deployment in the VMware ESXi or Microsoft Hyper-V hypervisor.
Deploying of the image creates a virtual machine with a pre-installed CentOS 7.9 operating system, a mail server, and Kaspersky Secure Mail Gateway. After deploying the virtual machine, you can configure it using the Initial Configuration Wizard.
What's new
Kaspersky Secure Mail Gateway 2.0 provides the following improvements:
- New cluster architecture for scaling the solution (horizontally or vertically) with the capability to centrally manage all servers of the cluster through the program web interface.
- New role-based restriction of user access to program functionality (when integrated with Microsoft Active Directory).
- Added centralized management of message Backup (including user-based).
- Integration with KATA 3.7 and KATA 4.0 for detecting and blocking objects.
- Event log with filtering capabilities to conveniently search and export events to a CSV file for further analysis.
- Improved mechanism for detecting sophisticated attacks aimed at compromising corporate correspondence (such as and Active Directory spoofing attacks).
- Added Kaspersky URL Advisor module in message processing rules to detect malicious links, adware links and legitimate software links, and distinguish them from phishing links.
- Added spam detection technology based on recognition of spoofed domains (look-alike).
- Upgraded operating system preinstalled in the ISO image and updated Mail Transfer Agent (MTA).
- Added identification of the reputation of IP addresses during scans by the Anti-Spam module.
- New information displayed in the Dashboard section, and added capability to filter information about cluster nodes and to create your own graph layouts.
- Added capability to import settings from KSMG 1.1 MR3.
Hardware and software requirements
Hardware requirements of the virtual machine configuration for ISO image deployment
- 8 CPU cores
- 16 GB of RAM
- 200 GB of disk space
Software requirements for corporate LAN computers (to use SSO authentication for the application web interface)
- Windows 8.1.
- Windows 10 (1809, 20H2, 21H2).
- Windows 11 (21H2).
Software requirements for the hypervisor for deploying the virtual machine
- VMware ESXi 6.5 Update 3.
- VMware ESXi 6.7 Update 3b.
- VMware ESXi 7.0 Update 2d.
- Microsoft Hyper-V Server 2016 (Generation 1 only).
- Microsoft Hyper-V Server 2019.
Software requirements for configuring integration with an LDAP server
- Windows Server 2012 R2 Standard.
- Windows Server 2016 Standard.
- Windows Server 2019 Standard.
- Windows Server 2022 Standard.
Software requirements for managing Kaspersky Secure Mail Gateway via the web interface
To run the web interface, one of the following browsers must be installed on the computer:
- Mozilla Firefox version 94.
- Google Chrome version 96.
- Microsoft Edge version 96.
These system requirements guarantee that Kaspersky Secure Mail Gateway will have a peak throughput of 10 messages per second with an average message size of 300 KB. The actual performance of the application depends on the processor model and its clock rate. To increase throughput, you are advised to increase virtual machine resources or deploy several virtual machine images and distribute the stream of email messages among them while creating the appropriate record on the DNS server, or use network load balancing services.
Page top
Distribution kit
Kaspersky Secure Mail Gateway is included in the following comprehensive solutions for security and system administration from Kaspersky:
To select a comprehensive solution that is most suitable for your organization, consult with specialists of a Kaspersky partner company. The contact details and addresses of partners are provided on the Kaspersky website at https://locator.kaspersky.com/b2b/.
The content of the distribution kit may differ depending on the region in which the application is distributed.
When you buy Kaspersky Secure Mail Gateway, you copy the application from the website of a partner company or the Kaspersky website. Information that is required for activating the application will be sent to you by email after your payment has been received.
Page top
About information X-headers
Based on the results of the scan, the application appends special information X-headers to the header of the message, for example:
- X-KSMG-Rule-ID – list of message processing rule IDs.
- X-KSMG-Message-Action – action taken by the application on the message, and the application module that was triggered.
- X-KSMG-AntiVirus – header for messages processed by the Anti-Virus module (contains the name and version of the application as well as the release date of Anti-Virus databases).
- X-KSMG-AntiVirus-Status – status assigned to the message by Anti-Virus based on the Anti-Virus scan results.
- X-KSMG-AntiSpam-Lua-Profiles – version of Anti-Spam databases and information about the assigned spam rating.
- X-KSMG-AntiSpam-Method – method used to identify spam.
- X-KSMG-AntiSpam-Rate – rating assigned to the message by the Anti-Spam engine.
- X-KSMG-AntiSpam-Status – status assigned to the message by the Anti-Spam engine based on the scan results.
- X-KSMG-AntiSpam-Envelope-From – message sender.
- X-KSMG-AntiSpam-Auth – status assigned to the message as a result of Mail Sender Authentication using SPF, DKIM, DMARC technologies.
- X-KSMG-AntiSpam-Version – version of the Anti-Spam module.
- X-KSMG-AntiSpam-Info – criteria which the Anti-Spam module applied to assign the status to the message.
- X-KSMG-AntiSpam-Moebius-Timestamps – information about signatures of the Moebius service.
- X-KSMG-AntiPhishing – header for messages processed by the Anti-Phishing module (contains the result of the scan).
- X-KSMG-LinksScanning – header for messages processed by the URL Advisor module (contains the scan result and the release date of the Anti-Virus databases).
- X-KSMG-AntiSpam-Interceptor-Info – message scan result.
The header can contain the following values:
- not scanned – the Anti-Spam module is disabled.
- timeout expired – the scan was not completed because timeout was reached.
- scan successful – the message was scanned successfully.
- fallback – the scan was not completed because an error was encountered.
Network accesses used
All necessary ports are already configured for the application deployed from the ISO image. Information about network accesses required by application functionality is listed in the following table.
Network accesses required by the application
Functionality |
Protocol |
Port |
Direction |
Purpose of the connection |
|---|---|---|---|---|
TCP |
443 |
Inbound |
Application administrator's computer |
|
TCP |
22 |
Inbound |
Application administrator's computer |
|
TCP |
9045 by default (can be change during installation) |
Inbound and outbound |
Other cluster nodes |
|
Inbound SMTP traffic |
TCP |
25 |
Inbound |
Internal and external SMTP servers |
Outbound SMTP traffic |
TCP |
25 by default (can be changed in the application web interface) |
Outbound |
Internal and external SMTP servers |
DNS requests |
UDP, TCP |
53 |
Outbound |
DNS server manually specified by the administrator |
TCP |
8080 by default (can be changed in the application web interface) |
Outbound |
Proxy server |
|
TCP |
443 |
Outbound |
Kaspersky servers • activation-v2.kaspersky.com • eu.activation-v2.kaspersky.com • americas.activation-v2.kaspersky.com • apac.activation-v2.kaspersky.com • china.activation-v2.kaspersky.com • activation-v2.geo.kaspersky.com • activate.activation-v2.kaspersky.com |
|
TCP |
80, 443 |
Outbound |
Kaspersky servers. You can see the list of servers in the Knowledge Base, article 6105. |
|
TCP |
443 |
Outbound |
Kaspersky servers • ds.kaspersky.com • ksn-file-geo.kaspersky-labs.com • ksn-verdict-geo.kaspersky-labs.com • ksn-url-geo.kaspersky-labs.com • ksn-kas-geo.kaspersky-labs.com • ksn-a-stat-geo.kaspersky-labs.com • ksn-info-geo.kaspersky-labs.com • ksn-cinfo-geo.kaspersky-labs.com • dc1.ksn.kaspersky-labs.com • dc1-file.ksn.kaspersky-labs.com • dc1-kas.ksn.kaspersky-labs.com • dc1-st.ksn.kaspersky-labs.com |
|
TCP |
443 |
Outbound |
KPSN server |
|
TCP |
443 |
Outbound |
Kaspersky servers • moebius.kaspersky-labs.com • moebius-new.kaspersky-labs.com |
|
TCP |
389 |
Outbound |
Active Directory servers |
|
UDP, TCP |
88 |
Outbound |
Active Directory servers |
|
TCP |
445 (can be changed in the application web interface) |
Outbound |
Active Directory servers |
|
UDP |
123 |
Outbound |
NTP servers |
|
TCP |
443 by default (can be changed in the application web interface) |
Outbound |
KATA server |
|
UDP, TCP |
161 by default (can be changed in application configuration files) |
Inbound |
Monitoring system |
|
UDP, TCP |
162 by default (can be changed in application configuration files) |
Outbound |
Monitoring system |
|
UDP |
514 by default (can be changed in application configuration files) |
Outbound |
External Syslog server |
|
TCP |
601 by default (can be changed in application configuration files) |
Outbound |
External Syslog server |
Known limitations of Kaspersky Secure Mail Gateway 2.0
Content Filtering does not detect CSV and SLDM attachment types. If you need the Content Filtering module to detect these attachment types, please contact Technical Support.
Page top
The Kaspersky Secure Mail Gateway interface
You work with the Kaspersky Secure Mail Gateway through a web interface.
The main window of the web interface contains the following items:
- Management console tree in the left part of the main window of the program web interface.
- Workspace in the right part of the main window of the program web interface.
The Kaspersky Secure Mail Gateway's control panel tree
The Kaspersky Secure Mail Gateway's control panel tree includes the following sections:
- Dashboard. Contains widget and dashboards for monitoring the operation of the program.
- Rules. Lets you create and configure rules for processing messages.
- User lists. Lets you create and configure personal customized lists of allowed and denied addresses.
- Nodes. Lets you manage cluster nodes.
- Events. Contains information about events detected in email traffic as well as system events encountered during the operation of the program.
- Backup. Contains information about messages that had copies placed in Backup based on scanning by program modules, as well as a filter for searching messages in Backup.
- Message queue. Contains information about the message queue of the Mail Transfer Agent (MTA), Anti-Spam Quarantine, KATA Quarantine (if integration with KATA is configured), and the message search filter.
- Reports. Lets you generate reports about the operation of the program and send them by email.
- Accounts. Contains information about program user accounts and access rights.
- Settings. Contains the General, Personal accounts, External services, Logs and events, Monitoring, Application access, and Built-in MTA sections in which you can configure the program settings.
The workspace of Kaspersky Secure Mail Gateway web interface
The workspace contains information about the sections that you select in the management console and control elements for editing the program settings.
Settings in the workspace of the main window are grouped into settings groups for sections that let you manage Kaspersky Secure Mail Gateway settings.
Page top
Application licensing
This section provides information about general concepts related to licensing of Kaspersky Secure Mail Gateway.
About the End User License Agreement
The End User License Agreement is a binding agreement between you and AO Kaspersky Lab, stipulating the terms on which you may use the application.
Read through the terms of the End User License Agreement carefully before you start using the application.
You can view the terms and conditions of the End User License Agreement in the following ways:
- During installation of Kaspersky Secure Mail Gateway.
- By reading the license.txt file. This file is included in the distribution kit of the application.
By confirming that you agree with the End User License Agreement when installing the application, you signify your acceptance of the terms of the End User License Agreement. If you do not accept the terms and conditions of the End User License Agreement, you must cancel the installation and may not use the application.
Page top
About the license certificate
A License Certificate is a document that you receive together with a key file or activation code.
The License Certificate contains the following license information:
- License key or order number.
- Details of the license holder.
- Information about the application that can be activated using the license.
- Limitation on the number of licensing units (for example, devices on which the application can be used under the license).
- License start date
- License expiration date or license validity period.
- License type.
About the key
A license key is a sequence of bits used to activate and use the application in accordance with the End User License Agreement. A license key is generated by Kaspersky.
You can add a key to the application in one of the following ways: apply a key file or enter an activation code.
The added license key is displayed in the application interface as a unique alphanumeric sequence.
Kaspersky can block a license key over violations of the End User License Agreement. If the license key has been blocked, you must add a different license key to continue using the application.
The following types of keys are used for Kaspersky Secure Mail Gateway:
- Fully-functional key. When this key is added, the application works in full-functionality mode. This means that it scans for spam, phishing, viruses and other types of malware, employs Link scanning, Content Filtering and Mail Sender Authentication, and scans messages using Kaspersky Anti Targeted Attack Platform.
- Key for Anti-Virus protection. When this key is added, the application scans for viruses and other types of malware, employs Link scanning, Mail Sender Authentication and Content Filtering, and scans messages using Kaspersky Anti Targeted Attack Platform. With this key, the application does not scan for spam or phishing content. The status label assigned by the application to a message following scans by these modules contains information regarding limited functionality.
- Key for Anti-Spam and Anti-Phishing protection. When this key is added, the application scans messages for spam and phishing content, employs Content Filtering and Mail Sender Authentication, and scans messages using Kaspersky Anti Targeted Attack Platform. The application does not scan for viruses or other malware, and does not employ URL Advisor. The status label assigned by the application to a message following scans by these modules contains information regarding limited functionality.
Anti-Spam and Anti-Virus databases are updated regardless of key type.
About the key file
A key file is a file with the .key extension that you receive from Kaspersky. The purpose of the key file is to add a license key to activate the application.
You receive a key file at the email address you specified after purchasing Kaspersky Secure Mail Gateway or after requesting the trial version of Kaspersky Secure Mail Gateway.
You do not need to connect to Kaspersky activation servers in order to activate the application with a key file.
You can recover a key file if it is accidentally deleted. You may need a key file to register with Kaspersky CompanyAccount.
To recover a key file, do one of the following:
- Contact the vendor of the license.
- Receive a key file from the Kaspersky website based on your existing activation code.
About the activation code
An activation code is a unique sequence of 20 Latin alphabet characters and digits. You enter the activation code in order to add a license key to activate Kaspersky Secure Mail Gateway. You receive an activation code at the email address you specified after purchasing Kaspersky Secure Mail Gateway or after requesting the trial version of Kaspersky Secure Mail Gateway.
To activate the application with an activation code, Internet access is required for connecting to Kaspersky activation servers.
If you have lost your activation code after activating the application, contact the Kaspersky partner from whom you purchased the license.
Page top
About the subscription
A subscription for Kaspersky Secure Mail Gateway is a purchase order for the application with specific parameters (subscription expiration date, number of devices protected).
A subscription can be limited (for example, lasting one year) or unlimited (without an expiration date). To continue using Kaspersky Secure Mail Gateway after a limited subscription expires, you need to renew it. An unlimited subscription is extended automatically if prepayment is made on time.
When a limited subscription expires, you may be provided a grace period for renewal. During this grace period, the application remains fully functional.
To use Kaspersky Secure Mail Gateway based on a subscription, you must apply an activation code. After the activation code is applied, a key is installed. This key defines the license granting use of the application on subscription.
Page top
About data provision
The program operates with the use of data whose transmission and processing requires the consent of the Kaspersky Secure Mail Gateway administrator.
You can view the list of data and the terms on which it is used as well as give consent to data processing in the following agreements between your organization and Kaspersky:
- In the End User License Agreement.
In accordance with the terms and conditions of the End User License Agreement that you have accepted, you consent to automatic real-time provision of information required for improving the security level of the mail server to Kaspersky. This information is enumerated in the End User License Agreement under "Conditions regarding Data Processing":
- identifier of the program;
- unique identifier of activation of the current license activation code;
- identifier of the program installation;
- name and version of the program.
- In the Privacy Policy.
- In the Kaspersky Security Network Statement and the Supplementary Kaspersky Security Network Statement.
In the course of participation in the Kaspersky Security Network and submission of KSN statistics to Kaspersky, information can be transmitted that was obtained as a result of the program's operation. The list of data that is transmitted is provided in the Kaspersky Security Network Statement and the Supplementary Kaspersky Security Network Statement.
Data protection
Kaspersky protects any information received in this way as prescribed by law and applicable rules of Kaspersky. Data is transmitted over encrypted data links.
RAM of Kaspersky Secure Mail Gateway may contain any processed data of program users. The administrator of Kaspersky Secure Mail Gateway must personally ensure the security of such data.
By default, access to personal information of users can only be gained by the superuser (root) account of operating systems, the administrator account of Kaspersky Secure Mail Gateway Local administrator, as well as system accounts kluser, postfix, opendkim, and nginx, which components of the program use in the course of their operation. The program itself has no capability to restrict the permissions of administrators and other users of operating systems on which the program is installed. Access to the storage location of the data is restricted by the file system. The administrator should take steps to control access to personal information of other users by any system level measures at the administrator's own discretion.
Data is sent between cluster nodes through an encrypted channel (over HTTPS with user authorization using a security certificate). Data is sent to the web interface through an encrypted channel over HTTPS. Web interface users must complete the authentication procedure, and the Local administrator is authorized with a password.
Email delivery supports SMTPS encryption.
Managing the program using the management console of the server on which the program is installed using the superuser account lets you manage dump settings. A dump is generated whenever the program crashes and can be useful for analyzing the causes of the crash. The dump may include any data, including fragments of analyzed files. By default, dump generation in Kaspersky Secure Mail Gateway is disabled.
Access to such data can be gained from the Management Console of the server on which the program is installed, using an account with super-user privileges.
When sending diagnostic information to Kaspersky Technical Support, the Kaspersky Secure Mail Gateway administrator must take steps to ensure the security of dumps and trace files.
The administrator of Kaspersky Secure Mail Gateway is responsible for access to this information.
Scope of data that can be stored by the program
The following table contains the complete list of user data that can be stored by Kaspersky Secure Mail Gateway.
User data that can be stored in Kaspersky Secure Mail Gateway
Data type |
Where data is used |
Storage location |
Storage duration |
Access |
|---|---|---|---|---|
Basic functionality of the program |
||||
|
Program configuration |
/var/opt/kaspersky |
Indefinite. |
|
|
Message processing rules |
/var/opt/kaspersky |
Indefinite. |
|
Information from email messages:
Information about LDAP attributes of users:
|
Runtime statistics |
/var/opt/kaspersky |
Indefinite. |
|
Information from email messages:
Information about LDAP attributes of users:
|
Message processing event log |
/var/opt/kaspersky |
In accordance with settings specified by the user of the program. By default, the storage duration is 3 days and the maximum size of the log is 1 GB. When this limit is reached, older records are deleted. |
|
/var/log/ksmg-messages |
Indefinite. When the size reaches 23 GB, older records are deleted. |
|
||
/var/log/ksmg-important |
Indefinite. When the size reaches 500 MB, older records are deleted. |
|
||
|
System event log |
/var/opt/kaspersky |
In accordance with settings specified by the user of the program. By default, 100,000 entries are stored. When this limit is reached, older records are deleted. |
|
/var/log/ksmg-messages |
Indefinite. When the size reaches 23 GB, older records are deleted. |
|
||
/var/log/ksmg-important |
Indefinite. When the size reaches 500 MB, older records are deleted. |
|
||
Information from email messages:
Data on program updates:
Information about user accounts:
|
Trace files |
/var/log/kaspersky |
Indefinite. When the size reaches 150 MB per trace stream, older records are deleted. |
|
/var/log/kaspersky/extra |
Indefinite. When the size reaches 400 MB per trace stream, older records are deleted. |
|||
/var/log/ksmg-traces |
Indefinite. When the size reaches 23 GB per trace stream, older records are deleted. |
|||
Information from email messages:
|
Backup |
/var/opt/kaspersky |
Indefinite. When the size reaches 7 GB, older records are deleted. |
|
Information from email messages:
|
Anti-Spam Quarantine |
/var/opt/kaspersky |
Indefinite. When the size reaches 1 GB, older records are deleted. |
|
Information from email messages:
|
KATA Quarantine. |
/var/opt/kaspersky |
Indefinite. When the size reaches 1 GB, older records are deleted. |
|
Information from email messages:
|
Temporary files |
|
Until program restart. |
|
Integration with Active Directory |
||||
|
|
/var/opt/kaspersky/ksmg/ldap/cache.dbm |
Indefinite. The data is regularly updated. When integration with Active Directory is disabled, the data is deleted. |
|
Integration with Kaspersky Anti Targeted Attack Platform (KATA) |
||||
Information from email messages:
|
Forwarding of objects to be scanned on the KATA server |
Data is not saved. |
Data is not saved. |
|
Built-in mail server functionality |
||||
|
Built-in mail server settings |
/etc/postfix/ /var/opt/kaspersky/ |
Indefinite. Data is deleted when the corresponding settings are removed in the program web interface. Certificate files can be overwritten when a certificate is replaced. |
|
Information from email messages:
|
Event log of the built-in mail server |
/var/log/maillog |
Indefinite. When the size reaches 23 GB, older records are deleted. |
|
Information from email messages:
|
Message queues of the built-in mail server |
/var/spool/postfix |
Indefinite. Messages are deleted when they are delivered to recipients. |
|
Connecting over SSH:
Connecting over the web interface:
|
Authorization event log |
/var/log/secure |
Not longer than 5 weeks. A weekly file rotation is maintained. |
|
SSH public keys of program administrators. |
Built-in SSH server settings |
/etc/ssh/authorized_keys |
Indefinite. Data is deleted when the corresponding settings are removed in the program web interface. |
|
Scope of data transmitted to the Kaspersky Security Network service
Data is sent to KSN servers in an encrypted form. By default, data can be accessed by Kaspersky staff, the superuser (root) account of operating systems, and the kluser system account, which components of the program use in the course of their operation.
For a full enumeration of user data transmitted to the KSN service, see the following table.
The enumerated data is transmitted only if consent has been given to participate in Kaspersky Security Network.
Data transmitted to the Kaspersky Security Network service
Data type |
Where data is used |
Storage location |
Storage duration |
|---|---|---|---|
|
Sending KSN requests |
KSN servers |
Indefinite. The maximum number of stored entries is 360,000. When this limit is reached, those entries are deleted that have not been accessed for the longest time. |
|
Sending KSN statistics |
KSN servers |
Before sending statistics to KSN. After disabling the sending of KSN statistics in program settings, the data is deleted when the next attempt to send them occurs. |
When the application databases are updated from Kaspersky servers, the following information is transmitted:
- Program version and type
- Unique ID of the current license key
- Unique program installation ID
- Update session ID
Modes of Kaspersky Secure Mail Gateway operation under license
Kaspersky Secure Mail Gateway can operate in various modes depending on the license.
Unlicensed
Kaspersky Secure Mail Gateway runs in this mode from the time when you install the application and start its web interface and until you add an active key.
Kaspersky Secure Mail Gateway does not scan email messages in Unlicensed mode.
Trial license
In this mode, Kaspersky Secure Mail Gateway scans email messages and updates databases.
When the trial license key expires, Kaspersky Secure Mail Gateway stops scanning email messages and updating databases.
In order for Kaspersky Secure Mail Gateway to resume operation, you have to install a commercial license key.
Commercial license
In this mode, Kaspersky Secure Mail Gateway scans email messages and updates databases.
When the commercial license key expires, Kaspersky Secure Mail Gateway continues scanning email messages but stops updating databases.
To resume database updates, add a new commercial license key or renew the existing commercial license key.
Kaspersky Secure Mail Gateway supports the following types of commercial license keys:
- Fully-functional key. When this key is added, the application works in full-functionality mode. This means that it scans for spam, phishing, viruses and other types of malware, employs Link scanning, Content Filtering and Mail Sender Authentication, and scans messages using Kaspersky Anti Targeted Attack Platform.
- Key for Anti-Virus protection. When this key is added, the application scans for viruses and other types of malware, employs Link scanning, Mail Sender Authentication and Content Filtering, and scans messages using Kaspersky Anti Targeted Attack Platform. With this key, the application does not scan for spam or phishing content. The status label assigned by the application to a message following scans by these modules contains information regarding limited functionality.
- Key for Anti-Spam and Anti-Phishing protection. When this key is added, the application scans messages for spam and phishing content, employs Content Filtering and Mail Sender Authentication, and scans messages using Kaspersky Anti Targeted Attack Platform. The application does not scan for viruses or other malware, and does not employ URL Advisor. The status label assigned by the application to a message following scans by these modules contains information regarding limited functionality.
Key denylist
A key can be added to the key denylist in a number of cases. If this has happened, Kaspersky Secure Mail Gateway stops scanning email messages, but continues attempts to update databases in case the key is removed from the list of forbidden keys.
As soon as the key has been removed from the list of forbidden keys, Kaspersky Secure Mail Gateway resumes scanning of email messages in accordance with the valid license.
After message scans are disabled, the following functionality continues to work in the application:
- Mail Transfer Agent (MTA)
- LDAP server connection
- Event log
- Application operation reports
- Use of the web interface to manage all application settings except protection settings, message processing rules and their related settings for notifications and comments.
Adding an activation code
To add an activation code:
- In the application web interface window, select the Settings → General → Licensing section.
- Click Add license key.
This opens the Add license key window.
- In the Type of license key drop-down list, select Activation code.
- In the Activation code text box, type the program activation code in the XXXXX-XXXXX-XXXXX-XXXXX format, where X is a letter of the Latin alphabet (A-Z) or a decimal digit (0-9).
- Click Activate.
The activation code will be sent to Kaspersky activation servers for verification.
If the code was entered incorrectly, a message is displayed in the workspace saying that the program was not activated. You can try to enter the activation code again in the same window.
If the code you typed is valid, a message appears confirming successful activation of the program. You can verify the state of the license key on cluster nodes.
You can also activate the program with a key file.
Adding a key file
It is recommended to activate the program using an activation code.
To add a key file:
- In the application web interface window, select the Settings → General → Licensing section.
- Click Add license key.
This opens the Add license key window.
- In the Type of license key drop-down list, select Key file.
- Under License key file, click Browse.
The file selection window opens.
- Select a key file to add and click Open.
- Click Activate.
The key file is added and the program is activated. You can verify the state of the license key on cluster nodes.
Removing a key
If you remove the license key, you cannot use the program functionality available under your license.
To remove a key:
- In the application web interface window, select the Settings → General → Licensing section.
- Click Remove license key.
- In the confirmation window, click OK.
The license key will be deleted from all cluster nodes.
Monitoring license key status
To track down license key problems, you can view summary information about licensing on all cluster nodes in the Licensing dashboard in the Nodes section.
A license key status can be one of the following:
- No errors means a valid license key was added.
- Warnings means the license key will soon expire.
You can configure the time in days before expiry when this status is displayed in licensing settings.
- Errors means that a license key was not added or licensing errors occurred (for example, the key has expired or the key is on the denylist).
The right part of the dashboard shows the number of cluster nodes for each status.
To view detailed information about the status of the license key on each cluster node,
click View details in the Licensing pane to go to the Settings → Licensing → License key status section.
The upper part of the section displays a group of settings with information about the added license key:
- Status of the license key (for example, Active license key or The key is in denylist).
- License type is the type of license (trial or commercial).
- Functionality level is the application operating mode.
- Serial number is a unique sequence of Latin alphabet characters and digits.
- Program is the name of the application for which the license key was issued.
The lower part of the section displays the table of cluster nodes with information about the status of the license key on each node:
- IP address:port is the IP address and port of the cluster node.
- License key status is a detailed description of the status of the license key on the cluster node.
- Serial number is a unique sequence of Latin alphabet characters and digits.
- Expiration date is the date and time when the current license will expire.
If you are using a commercial license key, after this expiration date the application will continue scanning messages using the last downloaded databases but will stop receiving database updates. If you are using a trial license key, application functionality will be completely disabled at the specified date and time of expiration.
This table is displayed if the user has View nodes information and/or Create/edit/delete nodes permissions, and View settings and/or Edit settings permissions.
You can also view information about the added license key in the information window of each cluster node.
Page top
Configuring warnings about upcoming license key expiration
You can configure warnings about upcoming expiration of the license key in the application web interface. When the set number of days remains until expiration, the administrator is prompted with a warning in the following sections of the web interface:
- In the Nodes section in the Licensing pane
- In the cluster node information window
- In the table of license key status for each cluster node in the Settings → Licensing → License key status section.
To configure warnings about upcoming license key expiration:
- In the application web interface window, select the Settings → Licensing → Settings section.
- In the Notify about license key expiration before (days) field, enter the number of days before the expiration of the license key you want to receive warning in the application web interface.
If you want to disable warnings, enter 0.
Possible values: integers from 0 to 99. Default value: 30.
- Click Save.
Warnings about upcoming expiration of the license key are configured.
Page top
Purchasing a license
Kaspersky Secure Mail Gateway is included in the following comprehensive solutions for security and system administration from Kaspersky:
To select a comprehensive solution that is most suitable for your organization, consult with specialists of a Kaspersky partner company. The contact details and addresses of partners are provided on the Kaspersky website at https://locator.kaspersky.com/b2b/.
Renewing a license
Renewing a license involves the following steps:
- Disabling message reception in the cluster
After the key is removed, Kaspersky Secure Mail Gateway will skip all messages without scanning by the scan modules. Allowlists and denylists will keep working. We recommend disabling message reception in the Kaspersky Secure Mail Gateway cluster to prevent messages with malicious content from reaching the organization.
- Removing an existing license key
- Adding a new license key
You can add a key to the application in one of the following ways: apply a key file or enter an activation code.
- Running database updates
- Checking the state of nodes
Go to the Nodes section and make sure that there are no database update errors or licensing errors.
If the Operating system restart is required is displayed for a node, restart that node.
- Enabling message reception in the cluster
Application installation and setup
Servers on which you are installing the application must have static IP addresses. Otherwise, after the cluster is created, managing node settings as well as synchronizing settings with the Control node will be unavailable.
You can install the application on a virtual server without an operating system. The application is deployed using an ISO file that contains an operating system image with pre-installed Kaspersky Secure Mail Gateway and a built-in mail server.
Installation to virtual machines on the following hypervisors is supported:
- VMware ESXi.
You can perform all virtual machine deployment activities using the following interfaces:
- Microsoft Hyper-V.
You can perform all virtual machine deployment activities using the following interfaces:
- In the Microsoft System Center Virtual Machine Manager (hereinafter also Microsoft SCVMM) interface
- In the Microsoft Hyper-V Manager management console
Make sure that the version of the hypervisor and the hardware resources allocated for the virtual machine meet all applicable hardware and software requirements.
Only Generation 1 virtual machines are supported when the program is installed to a Microsoft Hyper-V Server 2016 hypervisor. Use of Generation 2 virtual machines may lead to virtual machine malfunctions or cause disrupted operation of the hypervisor
The port setup in the operating system that is required for correct operation of the application is already complete. You can read the list of network accesses used.
After installation, the application begins recording information relevant to the operation of its component in the Kaspersky Secure Mail Gateway event log, the syslog event log, as well as trace files in accordance with the specified trace level. For more details, see the section About data provision.
Deploying a virtual machine in the management console of the VMware ESXi hypervisor
Deploying a virtual machine image involves the following steps:
- Uploading an ISO file to data storage
The ISO file of Kaspersky Secure Mail Gateway contains an operating system image with the application pre-installed and a built-in mail server.
- Creating a virtual machine
When creating a virtual machine, you must modify settings in accordance with recommendations for the operation of Kaspersky Secure Mail Gateway.
- Modifying virtual machine settings
If you want to connect a virtual machine to multiple network segments, you need to add an additional network adapter for each segment. If this is not necessary, you can skip this step.
- Connecting to the virtual machine and starting the Setup Wizard
Before you can use Kaspersky Secure Mail Gateway, you must complete application setup.
Uploading an ISO file
Before running the Virtual Machine Creation Wizard, you must upload an ISO file to the data storage of the host.
To upload an ISO file in the management console of the VMware ESXi hypervisor:
- Open the management console of the VMware ESXi hypervisor.
- In the Navigator panel, select the Storage section.
- Select the Datastores tab.
- Click Datastore browser.
This opens the Datastore browser window.
- Select the data storage and the folder in which you want to upload the ISO file.
- Click Upload.
The file selection window opens.
- Select a file and click Open.
Wait until the file finishes uploading. When the upload is complete, the name of the ISO file is displayed in the file table of the host's data storage. Make sure the size of the uploaded file in the table matches the size of the source file.
Page top
Creating a virtual machine in the management console of the VMware ESXi hypervisor
To create a virtual machine in the management console of the VMware ESXi hypervisor:
- Open the management console of the VMware ESXi hypervisor.
- In the Navigator panel, select the Virtual Machines section.
- Click Create/Register VM.
The Virtual Machine Creation Wizard opens.
- Follow the steps of the wizard:
The virtual machine is created with the specified settings.
Page top
Modifying virtual machine settings
To add additional network adapters:
- Open the management console of the VMware ESXi hypervisor.
- In the Navigator pane, in the Virtual Machines section, select the virtual machine whose settings you want to edit.
- Click the Edit button on the control panel.
This opens the virtual machine properties window.
- On the Virtual Hardware tab, click the Add network adapter button.
The new network adapter will be displayed in the left pane.
- Select the added network adapter in the left pane and use the drop-down list on the right to select the network segment that the adapter should connect to.
- Click Save.
The additional network adapters will be added.
Page top
Connecting to the virtual machine and starting the Setup Wizard
To connect to the virtual machine and begin configuring Kaspersky Secure Mail Gateway in the management console of the VMware ESXi hypervisor:
- Open the management console of the VMware ESXi hypervisor.
- In the Navigator panel, in the Virtual Machines section, select the virtual machine that you want to start.
- Click Power on.
The virtual machine starts.
- Click Console and in the drop-down list, select the console launch format:
- Open browser console.
- Launch remote console.
The management console of the virtual machine opens. After connecting to the virtual machine, the Setup and Initial Configuration Wizard starts. Follow the instructions of the wizard.
Deploying a virtual machine in the web interface of VMware vSphere
Deploying a virtual machine image involves the following steps:
- Uploading an ISO file to data storage
The ISO file of Kaspersky Secure Mail Gateway contains an operating system image with the application pre-installed and a built-in mail server.
- Creating a virtual machine
When creating a virtual machine, you must modify settings in accordance with recommendations for the operation of Kaspersky Secure Mail Gateway.
- Modifying virtual machine settings
If you want to connect a virtual machine to multiple network segments, you need to add an additional network adapter for each segment. If this is not necessary, you can skip this step.
- Connecting to the virtual machine and starting the Setup Wizard
Before you can use Kaspersky Secure Mail Gateway, you must complete application setup.
Uploading an ISO file
To upload an ISO file to data storage using the VMware vSphere web interface:
- In the web interface of VMware vSphere Client, enter administrator credentials.
- In the left pane, click the
 icon.
icon.The Storage page opens.
- Select a storage from the list and open the Files tab.
- Select the folder in which you want to upload the ISO file.
- Click the Upload files button.
The file selection window opens.
- Select the ISO file and click Open.
Wait until the file finishes uploading. When the upload is complete, the name of the ISO file is displayed in the file table of the host's data storage. Make sure the size of the uploaded file in the table matches the size of the source file.
Page top
Creating a virtual machine in the web interface of VMware vSphere
To create a virtual machine in the VMware vSphere web interface:
- In the web interface of VMware vSphere Client, enter administrator credentials.
- In the left pane, click the
 icon.
icon.The Hosts and clusters page opens.
- Select the data center and the storage in which you want to create a virtual machine.
The workspace displays the properties window for the selected storage.
- In the control panel, in the Actions drop-down list, select New Virtual Machine...
The Virtual Machine Creation Wizard opens.
- Follow the steps of the wizard:
- Select a method for creating the virtual machine.
- Enter the name and location of the virtual machine.
- Select computing resources.
- Select the virtual data storage.
- Configure the compatibility with the virtual infrastructure.
- Select the guest operating system.
- Set up the hardware configuration of the virtual machine.
- Confirm the creation of the virtual machine.
The virtual machine with the defined settings will be created and displayed in the list in the left pane.
Page top
Modifying virtual machine settings
To add additional network adapters:
- In the web interface of VMware vSphere Client, enter administrator credentials.
- In the left pane, click the icon.
The Hosts and clusters page opens.
- Select the virtual machine whose settings you want to edit.
- In the control panel, in the Actions drop-down list, select Edit Settings...
This opens the virtual machine properties window.
- In the upper-right corner, click the Add new device button and use the drop-down list to select Network adapter.
The new network adapter will be displayed in the partitions tree on the left.
- Select the added network adapter from the partitions list and use the drop-down list on the right to select the network segment that the adapter should connect to.
- Click OK.
The additional network adapters will be added.
Page top
Connecting to the virtual machine and starting the installation
To connect to the virtual machine and begin installing Kaspersky Secure Mail Gateway in the web interface of VMware vSphere:
- In the web interface of VMware vSphere Client, enter administrator credentials.
- In the left pane, click the icon.
The Hosts and clusters page opens.
- In the context menu of the virtual machine that you want to start, select Power → Power On.
The virtual machine starts.
- In the control panel, in the Actions drop-down list, select Open console.
The management console of the virtual machine opens. After connecting to the virtual machine, the Setup and Initial Configuration Wizard starts. Follow the instructions of the wizard.
Deploying a virtual machine in the management console of the Microsoft Hyper-V Manager hypervisor
Deploying a virtual machine image involves the following steps:
- Creating a virtual machine
- Modifying virtual machine settings
The virtual machine creation wizard does not let you edit certain settings. Therefore you need to modify the number of virtual processors and secure boot settings in the virtual machine you have created.
- Connecting to the virtual machine and starting the Setup Wizard
Before you can use Kaspersky Secure Mail Gateway, you must complete application setup.
Creating a virtual machine in the management console of Microsoft Hyper-V Manager
Before creating a virtual machine, you must put the ISO file into any network folder that is accessible to the server with the hypervisor. If you are opening the Microsoft Hyper-V Manager console on the same server where the hypervisor is installed, you can put the ISO file on the local hard disk.
To create a virtual machine:
- Open the Microsoft Hyper-V Manager management console.
- In the left part of the window, select the hypervisor which you want to connect to and deploy the virtual machine image.
- In the context menu, select New → Virtual Machine.
The Virtual Machine Creation Wizard opens.
- Follow the steps of the wizard:
The virtual machine is created with the specified settings. Make sure the virtual machine is displayed in the Virtual Machines list on the selected hypervisor.
The virtual machine is created with the default number of CPUs. You must modify this setting in virtual machine properties after it is created.
Page top
Modifying virtual machine settings
Before proceeding with this procedure make sure the virtual machine is powered off.
For the program to work correctly, you must modify the number of processors of the virtual machine and edit secure boot settings.
To modify virtual machine settings:
- Start Hyper-V Manager.
- In the main window of the program, in the Virtual Machines table, select the virtual machine that you deployed from the ISO file.
- Right-click to open the context menu and click Settings.
This opens the virtual machine properties window.
- In the Security group of settings, in the Template drop-down list, select Microsoft UEFI Certificate Authority.
This is applicable only to second-generation virtual machines.
- In the Hardware group of settings, select the Processor section.
- In the Number of virtual processors field, enter the number of virtual processors.
The minimum recommended value is 8. You can enter a greater value if you need higher performance from your virtual machine.
- If you need to connect the virtual machine to multiple network segments, add additional network adapters. To do so:
- In the Hardware settings group, select the Add Hardware section.
- In the workspace, select Network Adapter and click the Add button.
The new network adapter will be displayed at the end of the list in the Hardware block.
- Select the new network adapter in the Hardware block and use the Virtual switch drop-down list to select the network segment that you want to connect to.
- Click OK.
The number of processors for the virtual machine is modified.
Page top
Connecting to the virtual machine and starting the Setup Wizard
To connect to the virtual machine and begin configuring Kaspersky Secure Mail Gateway in the management console of Microsoft Hyper-V Manager:
- Open the Microsoft Hyper-V Manager management console
- In the left part of the window, select the hypervisor on which the virtual machine is deployed.
- In the workspace, right-click the virtual machine that you want to start.
- In the context menu, click Start.
The virtual machine starts.
- In the context menu of the virtual machine, click Connect.
The virtual machine management console opens and the Setup and Initial Configuration Wizard starts. Follow the instructions of the wizard.
Page top
Deploying a virtual machine using Microsoft SCVMM
Deploying a virtual machine image involves the following steps:
- Uploading the ISO file to the Microsoft SCVMM server library
The ISO file of Kaspersky Secure Mail Gateway contains an operating system image with the application pre-installed and a built-in mail server.
- Creating a virtual machine
When creating a virtual machine, you must modify settings in accordance with recommendations for the operation of Kaspersky Secure Mail Gateway.
- Modifying virtual machine settings
If you want to connect a virtual machine to multiple network segments, you need to add an additional network adapter for each segment. If this is not necessary, you can skip this step.
- Connecting to the virtual machine and starting the Setup Wizard
Before you can use Kaspersky Secure Mail Gateway, you must complete application setup.
Uploading an ISO file
To upload an ISO file to the library of the Microsoft SCVMM server, you must place the ISO file on a local hard disk of the computer where the Microsoft SCVMM program runs.
To upload an ISO file to the library of the Microsoft SCVMM server:
- Start Virtual Machine Manager (VMM).
- In the lower left part of the window, select the Library section.
- In the control panel, click Import Physical Resource.
This opens the Import Library Resources window.
- Click Browse....
This opens the Select Destination Folder window.
- Select the resource library and a folder where you want to upload the ISO file, then click OK.
- In the Import Library Resources window, click Add resource....
This opens the Select resource items window.
- Select the ISO file and click Open.
- Click Import.
The ISO file is uploaded to the library of the Microsoft SCVMM server and is displayed in the Physical Library Objects table.
Page top
Creating a virtual machine using Microsoft SCVMM
If the Microsoft Hyper-V hypervisor is connected to the Microsoft System Center infrastructure, you can create a virtual machine using Microsoft SCVMM.
To create a virtual machine:
- Start Virtual Machine Manager (VMM).
- In the lower-left corner of the window, select the VMs and Services section.
- In the toolbar, click Create Virtual Machine and in the drop-down list, select Create Virtual Machine.
The Virtual Machine Creation Wizard opens.
- Follow the steps of the wizard:
- Select a method for creating the virtual machine.
- Enter the name and generation of the virtual machine.
- Set up the hardware configuration of the virtual machine.
- Select the virtual machine placement type.
- Select the hypervisor on which you want to create the virtual machine.
- Verify the settings values.
- Select the operating system and configure the advanced settings.
- Confirm the creation of the virtual machine.
This starts the process of creating the virtual machine with specified settings. Make sure the process completes correctly and the virtual machine is displayed in the list of virtual machines of the selected hypervisor.
Page top
Modifying virtual machine settings
To edit the settings of a virtual machine:
- Start Virtual Machine Manager (VMM).
- In the lower-left part of the window, select the VMs and Services section.
- In the upper right part of the window, in the tree, select the hypervisor on which the virtual machine was created.
- In the workspace of the window, select the virtual machine whose settings you want to edit.
- In the context menu, select Properties.
This opens the virtual machine properties window.
- In the left pane, select the Hardware Configuration section.
- In the upper control panel, click the New button and select Network adapter from the drop-down list.
The new network adapter will be displayed in the Network Adapters settings group.
- In the workspace, do the following:
- For the network adapter connection mode, select Connected to a VM network.
- To the right of the VM network field, click Browse....
This opens the Select a VM Network window.
- Select the network segment that the added network adapter should connect to, and click OK.
- Click OK.
The new virtual machine settings will be applied.
Page top
Connecting to the virtual machine and starting the Setup Wizard
To connect to the virtual machine and begin configuring Kaspersky Secure Mail Gateway using Microsoft SCVMM:
- Start Virtual Machine Manager (VMM).
- In the lower-left part of the window, select the VMs and Services section.
- In the upper right part of the window, in the tree, select the hypervisor on which the virtual machine was created.
- In the workspace of the window, select the virtual machine that you want to start.
- In the toolbar, click Power On.
The virtual machine starts.
- In the control panel, click Connect or View and in the drop-down list, select Connect via Console.
The virtual machine management console opens and the Setup and Initial Configuration Wizard starts. Follow the instructions of the wizard.
Page top
Application installation and setup
These instructions describe the process of installing and setting up the application on a virtual machine that uses a BIOS boot loader. For virtual machines with UEFI, the pseudographic interface can be different.
To install and configure the application:
- Start the prepared virtual machine or physical server and choose to load it from the CD.
It will begin loading from the ISO disk image.
- In the next window, select Install -- Kaspersky Secure Mail Gateway or wait for the operating system to load and the Setup Wizard to start automatically.

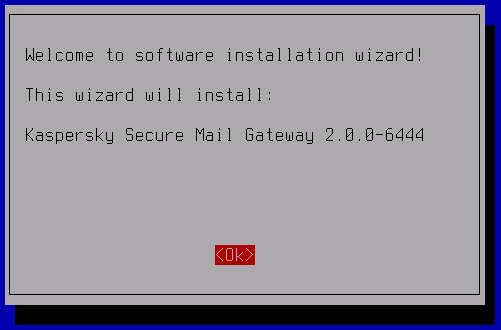
- In the welcome window of the Setup Wizard, click OK.
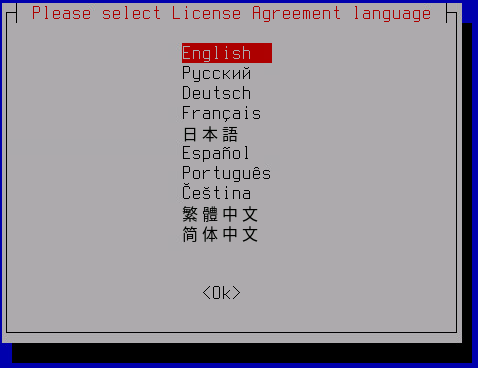
- Select the language to display the End User License Agreement and the Privacy Policy in.
- Carefully read the End User License Agreement and express your consent or disagreement:
- If you want to accept the terms of the End User License Agreement, click I accept.
- If you want to reject the terms of the End User License Agreement, click I decline.
Use the up/down or Page up/Page down keys to view the text of the End User License Agreement. You can switch between buttons by using the Tab key.
If you decline the terms of the End User License Agreement, application setup is canceled.
- Accept or decline the Privacy Policy:
- If you want to accept the terms of the Privacy Policy, click I accept.
- If you want to reject the terms of the Privacy Policy, click I decline.
If you decline the terms of the Privacy Policy, application setup is canceled.
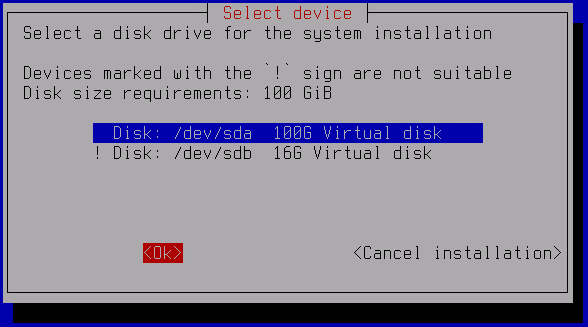
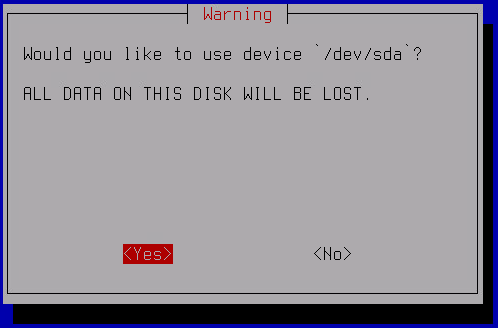
- Select a disk to install the application to and in the confirmation window, click Yes.
Wait until the data is copied from the ISO disk image to the virtual disk. After the copy operation is completed, the virtual machine will be restarted and the Initial Configuration Wizard for the application will start.
- This opens the Hostname window; in that window, in the Hostname field, enter the fully qualified domain name of the server hosting Kaspersky Secure Mail Gateway as indicated on the DNS server, and click OK.
This opens a window containing a list of available network adapters.
- Select the network adapter that you want to configure and press ENTER.
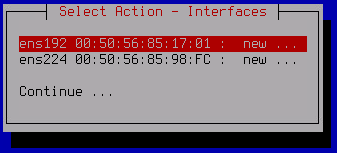
To start using the network adapter, you must initialize it. If the adapter has not been initialized before, an initialization confirmation window will open.
- In the confirmation window, click Yes. The status of the adapter is changed from new to on. Select the adapter from the list and press ENTER.
The adapter properties window opens.
- Configure an IPv4 address for the network adapter. To do so, move the cursor to the Use DHCP line and press ENTER.
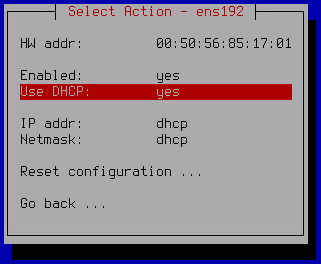
- In the opened window, select the appropriate mode:
- If you want to use a static IP address for the server hosting the application, click Yes.
- If you want to receive network adapter settings via DHCP, click No.
DHCP is used by default. This mode will be suitable for installing the application for testing or demonstration purposes. It is recommended to use a static configuration to ensure proper operation of a cluster in a real-world infrastructure.
- If you selected a static configuration at the previous step, do the following in the opened Interface IP configuration window:
- In the Addresses field, enter the IP address of the network adapter.
- In the Netmask field, enter the network mask.
- Click OK to save changes.
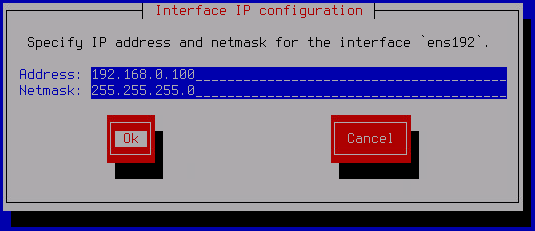
- Click the Go back button at the bottom of the window after network adapter configuration is complete.
This opens a window containing a list of all available network adapters. If necessary, you can repeat the configuration steps for another network interface controller.
- After configuring all network adapters, select Continue at the bottom of the list.
The Select Action – Routing window opens.
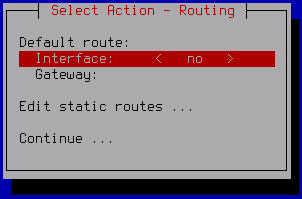
- To configure the default route:
- Select Interface and press ENTER.
- In the opened Select gateway device window, select the network adapter that should be used for the default route and press ENTER.
- If you selected a network adapter using DHCP at the previous step, the dhcp value will be automatically defined in the Gateway field. If you selected a network adapter with a static configuration, the dhcp option will be unavailable for the default gateway.
- To assign a static IP address for the default gateway:
- Select Gateway and press ENTER.
- For adapters that use DHCP, click Yes in the opened Use static configuration window.
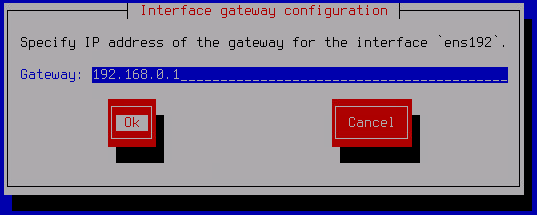
The Interface gateway configuration window opens.
- In the Gateway field, enter a static address for the default gateway and click OK.
- If necessary, you can configure a static route. To do so:
- In the Select Action – Routing window, select Edit static routes and press ENTER.
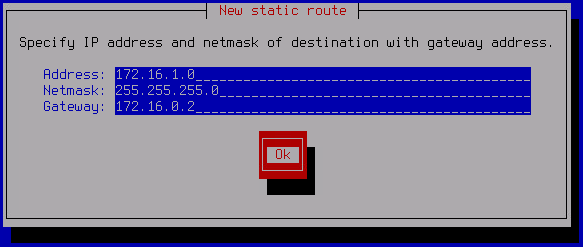
- In the opened Select Action – Routes window, click New route.
The New static route window opens.
- In the Address field, enter the IP address of the network adapter.
- In the Netmask field, enter the network mask.
- In the Gateway field, enter the IP address of the gateway.
- Click OK.
- In the opened window, select the network adapter that will be used for the static route, and press ENTER.
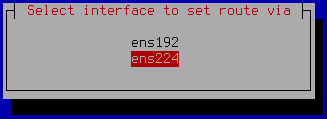
The added static route will be displayed in the Select Action – Routes window.
If necessary, you can repeat steps b – g to add another static route.
- After configuration is complete, click Go back in the lower part of the Select Action – Routes window.
- Click Continue in the lower part of the Select Action – Routing window.
The Select Action – Resolver window opens.
- If you want to receive the addresses of DNS servers and a search list of DNS suffixes over the DHCP protocol:
- In the Use DHCP field, press ENTER.
The Obtain DNS addresses over DHCP window opens.

- Select the network interface of the DHCP service.
The values of the Search list, Primary DNS and Secondary DNS fields will be filled in automatically.
- In the Select Action – Resolver window, click Continue.
- In the Use DHCP field, press ENTER.
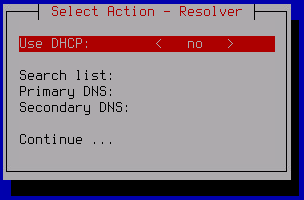
- If you want to manually configure the DNS service settings:
- Make sure that the no option is defined for the Use DHCP field.
- In the Search list field, press ENTER.
The Interface DNS configuration window opens.
- In the Search list field, enter the domain search DNS suffixes separated by a space.
- In the Primary field, enter the address of the primary DNS server.
- In the Secondary field, enter the address of the secondary DNS server.
- Click OK.

- In the Select Action – Resolver window, click Continue.
This opens the next window of the Initial Configuration Wizard.
- Select the IP address of the network interface to be used for inbound connections while interacting with other cluster nodes. Click OK.

- Enter a port for the interaction with the other cluster nodes and click OK.
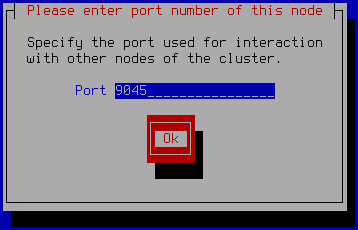
We recommend using the default value of 9045.
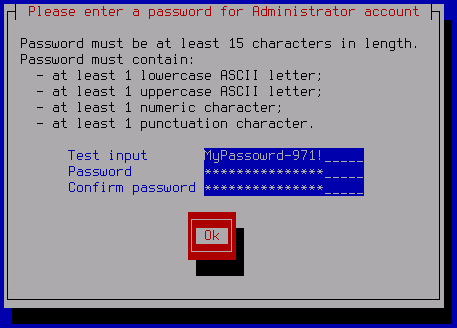
- Enter a Local administrator password.
The password must contain:
- At least 15 characters
- Only ASCII characters (A-Z, a-z), numeric characters and special characters
- Characters of the following types:
- Uppercase character (A-Z).
- Lowercase character (a-z)
- Number.
- Special character.
- Use any appropriate method to save the certificate fingerprint of the server that is displayed in the final window of the Setup Wizard.
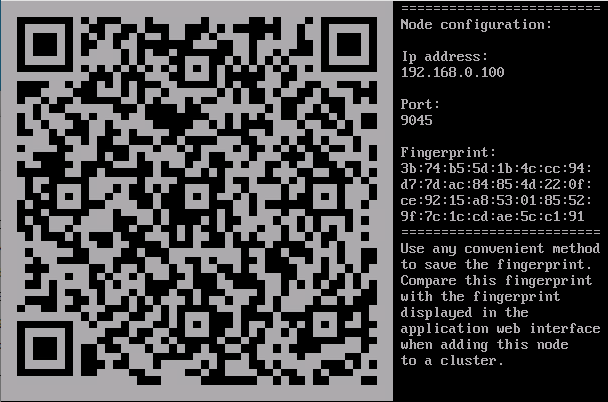
When adding a server to the cluster using the application web interface, you need to match this fingerprint against the fingerprint that is displayed in the web interface.
Application installation and setup is complete. After this you are able to use a browser to connect to the application web interface to configure the application.
After initial configuration is completed, it is recommended to open the virtual machine properties and disable loading from the disk containing the ISO image.
Page top
Removing the application
After removing the application all information related to it will be lost.
The application does not have a standard removal procedure.
You can remove the whole virtual machine including virtual disk files and system snapshot files. To do so, follow one of the procedures in this sections depending on the hypervisor used.
If you deployed the application on a physical server, to remove the application you will have to format the hard drive of the server by using a specialized data deletion tool and then make sure that the application can no longer be loaded.
Preparing for removing the application
Before removing the application from a physical server or a virtual machine:
- Disable load balancing for the cluster node that you are removing
- Stop traffic processing requests
To do so, make sure traffic processing is rerouted around the cluster node that you are removing.
- Remove the node from the cluster
Deleting a virtual machine in the management console of the VMware ESXi hypervisor
Before removing the application, you must make preparations.
To delete a virtual machine in the management console of the VMware ESXi hypervisor:
- Open the management console of the VMware ESXi hypervisor.
- In the Navigator panel, select the Virtual Machines section.
- Select the listed virtual machine that you want to delete.
- If the virtual machine is running, shut it down. To do so, click the Power off button. Wait until the virtual machine shuts down.
- In the control panel, in the Actions drop-down list, select Delete.
- In the confirmation window, click Delete.
The virtual machine with Kaspersky Secure Mail Gateway installed is deleted and is no longer displayed in the list of virtual machines.
Page top
Deleting a virtual machine in the web interface of VMware vSphere
Before removing the application, you must make preparations.
To delete a virtual machine in the VMware vSphere web interface:
- In the web interface of VMware vSphere Client, enter administrator credentials.
- In the left pane, click the icon.
The Hosts and clusters page opens.
- Select the listed virtual machine that you want to delete.
- If the virtual machine is running, shut it down. To do so, select the virtual machine. Then, in the control panel, in the Actions drop-down list, select Power → Power off.
- In the confirmation window, click Yes. Wait until the virtual machine shuts down.
- In the control panel, in the Actions drop-down list, select Delete from Disk.
- In the confirmation window, click Yes.
The virtual machine with Kaspersky Secure Mail Gateway installed is deleted and is no longer displayed in the list of virtual machines.
Page top
Deleting a virtual machine in the management console of the Microsoft Hyper-V hypervisor
Before removing the application, you must make preparations.
To delete a virtual machine in the management console of the Microsoft Hyper-V hypervisor:
- Start Hyper-V Manager.
- In the main window of the program, in the list of the virtual machines of the hypervisor in the Virtual Machines table, select the virtual machine that you want to delete.
- If the virtual machine is running, shut it down. To do so, right-click to open the context menu and select Turn Off. Wait until the virtual machine shuts down.
- In the context menu of the virtual machine, select Settings.
This opens the virtual machine properties window.
- In the Hardware settings group, select SCSI Controller → Hard Drive.
- Use any convenient method to save the path indicated in the Virtual hard disk field and close the virtual machine properties window.
By default, after removing a virtual machine in the hypervisor management console, the file of the virtual hard drive is not deleted from the server. You will need to manually delete it.
- In the context menu of the virtual machine, click Delete.
- In the confirmation window, click Delete.
- On the physical server of the hypervisor, manually delete the file of the virtual hard drive from the folder indicated at step 6.
The virtual machine with Kaspersky Secure Mail Gateway installed is deleted and is no longer displayed in the list of virtual machines.
Page top
Deleting a virtual machine using Microsoft SCVMM
Before removing the application, you must make preparations.
To delete a virtual machine using Microsoft SCVMM:
- Start Virtual Machine Manager (VMM).
- In the lower-left corner of the window, select the VMs and Services section.
- In the tree in the upper left panel, select the hypervisor on which the virtual machine was created.
- Select the listed virtual machine that you want to delete.
- If the virtual machine is running, shut it down. To do so, click Power Off in the toolbar.
- In the confirmation window, click Yes. Wait until the virtual machine shuts down.
- In the toolbar, click Delete.
- In the confirmation window, click Yes.
The virtual machine with Kaspersky Secure Mail Gateway installed is deleted and is no longer displayed in the list of virtual machines.
Page top
Getting started with the application
After completing the installation, you can manage the application using the web interface in a browser on any computer.
Kaspersky Secure Mail Gateway administrator must take steps to secure the communication between the browser and the Control node. For security purposes, it is also recommended to configure Kerberos authentication with single sign-on technology.
To manage application settings, you must connect to the Control node. When connecting to Secondary nodes, you can change the role of the node in the cluster and view the status of other connected servers.
View modes of the program web interface
The program has two web interface view modes: administrator mode and user mode.
User mode is available to all users in an Active Directory domain that is configured for Single Sign-On (SSO) authentication. The menu displays sections containing personal Backup and personal lists of allowed and blocked addresses if access to them is allowed by the administrator in the Settings → Personal accounts settings. These sections only display information about the messages and addresses of the current user. To view this information, you need to set up integration with the LDAP server. Otherwise, these sections will be available to the user but an error message will be displayed instead of information about messages and addresses.
Administrator mode is available to a program user who has at least one role assigned. The menu displays the sections that the user is permitted to access. By default, administrator mode opens after successful authorization. If necessary, you can switch to user mode for the current user account.
To switch from administrator mode to user mode:
- At the bottom of the left menu pane, click on the name of the current user.
- In the pane that opens on the right, turn on the User mode toggle switch.
The main window of the program web interface will open in user mode for the current user account.
To switch from user mode to administrator mode:
- At the bottom of the left menu pane, click on the name of the current user.
- In the pane that opens on the right, turn off the User mode toggle switch.
The main window of the program web interface will open in administrator mode for the current user account.
Page top
Connecting to the application web interface
If you connect to the web interface for the first time after installing the application, you will need to create a new cluster before you start.
You will be able to view and change various application settings depending on the account you are using to connect to the web interface.
The Local Administrator account created during installation of the application has the full set of permissions. Other application accounts cannot be created. However, if you have configured Single Sign-On (SSO) authentication, Active Directory domain users can connect to the web interface under their domain accounts in administrator mode or user mode and view available sections in accordance with permissions defined in the application.
To connect to the application web interface under the Local Administrator account:
- Enter the following address in your browser:
https://<IP address or fully qualified domain name (FQDN) of the Control node>This opens the web interface authorization page prompting you to enter the user name and password.
- In the User name field, enter the name of the administrator account.
For the Local Administrator account, enter
Administrator. - In the Password field, enter the administrator password.
The Local Administrator password is configured during application setup.
If you enter the wrong password five times, authorization using the Local Administrator account will be disabled for five minutes before you can try again. The capability for authorization under a domain account via the NTLM protocol will remain available.
- Click Log in.
This opens the main window of the application web interface.
To connect to the application web interface under a different user account:
Enter the following address in your browser:
https://<IP address or fully qualified domain name (FQDN) of the Control node>
If you configured authentication with Kerberos Single Sign-On, you only need to enter the address in FQDN format.
The rest of the authorization procedure depends on your answers to the following questions:
- Which protocol is being used for authentication?
- Is the computer in an Active Directory domain configured for SSO authentication?
The figure below shoes the authorization procedure depending on the factors listed above.
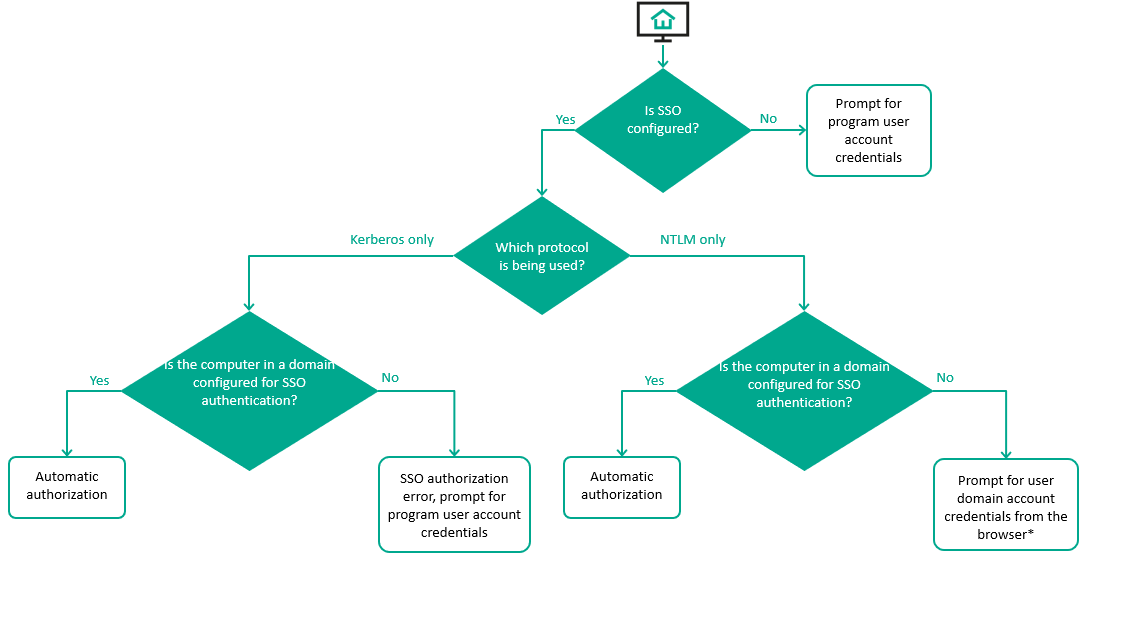
Authorization procedure when connecting to the web interface in user mode
* If you enter the wrong password five times when prompted by a browser for your user's domain account credentials, NTLM authentication will be disabled for five minutes. The capability for authorization under the Local Administrator account will remain available.
If the application is configured to use Kerberos and NTLM authentication simultaneously, the authorization procedure is as follows:
- Attempt to complete authorization using the Kerberos protocol.
- If unsuccessful, attempt to complete authorization using the NTLM protocol.
- If unsuccessful, you are prompted to enter the application user account credentials.
For automatic authorization to work correctly on computers that are members of an Active Directory domain that is configured to use SSO authentication, additional configuration is required in the operating system and in the browser settings.
If authorization is successful, the main window of the application web interface is opened. If the user has the permissions to access different web interface viewing modes, they will be able to switch between these modes.
Monitoring of program operation
You can monitor the program by using widgets and dashboards. You can filter monitoring data by period and by cluster nodes.
The Dashboard section of the program web interface displays the following information:
- System Health. A chart of errors encountered by the cluster. You can click Go to Nodes to go to the Nodes section and view details about the health of each cluster node.
- Processed. This widget displays statistics of program actions applied to all processed email messages:
- Attachments deleted.
- Deleted.
- Disinfected.
- Quarantined.
- Rejected.
- Skipped.
You can click Size or Count to toggle between total size or count of all processed messages respectively.
- Detected. This widget displays the number of detected objects grouped by protection module:
- Anti-Phishing.
- Anti-Spam.
- Anti-Virus.
- Content Filtering.
- Mail Sender Authentication.
- Links scanning.
- KATA.
This is displayed only when KATA integration is configured.
If a protection module detects multiple objects in a message, only one object is counted for that module in statistics. If multiple objects are detected in a message by different protection modules, one object is counted in statistics for each protection module.
You can click the link in the upper-right corner of the information pane to go to the Events section and view related events containing detection information for a selected period.
- Widgets that display the number of messages scanned by the given module and grouped by scan result:
- Anti-Virus.
- Anti-Spam.
- Anti-Phishing.
- Content Filtering.
- Links scanning.
- Mail Sender Authentication.
Only the Anti-Virus widget is displayed by default. You can create a new widget layout or modify the current layout to add the widgets you need.
All widgets with protection module statistics display the following scan statuses:
- Detected means the message was found to contain an object that satisfies rule application criteria.
- Not detected means the message was scanned and does not contain threats or other objects.
- Document with macro means the message has an attachment, which contains a document with macros.
Only applies to Anti-Virus.
- Quarantined means the message was moved to .
Only applies to Anti-Spam.
- Not processed is a group of statuses that are assigned to the message if it was not scanned for one of the following reasons:
- Encrypted means an object could not be scanned because it is encrypted.
Only applies to Anti-Virus.
- Error means an error occurred when scanning the message.
- Bases error means the message could not be scanned because program databases were not loaded.
- License restrictions means the message could not be scanned because of program licensing limitations (for example, the license key could have expired).
- Encrypted means an object could not be scanned because it is encrypted.
- Disabled by settings is a group of statuses assigned to the message if it was not scanned in accordance with one of the following program settings configured by the administrator:
- Allowlist means the message was delivered without scanning because the sender address is on the global allow list.
- Denylist means the message was rejected without scanning because the sender address is on the global deny list.
- Nesting level exceeded means the maximum archive nesting level configured in general protection settings was reached.
Only applies to Anti-Virus.
- Personal allowlist means the message was not scanned by the Anti-Spam module because the sender address is on the personal allow list of the recipient.
Only applies to Anti-Spam.
- Personal denylist means the sender address is on the personal deny list of the recipient. The action configured in personal list settings was applied to the message.
Messages placed in Backup based on personal list settings are not counted. Such messages are accounted for in statistics for other statuses in accordance with the scan result.
- Local policy means the message was sent from a relay IP.
Only applies to Mail Sender Authentication.
- Disabled in protection settings the module is turned off in general protection settings or in a message processing rule.
- Already processed by another module means the message was not scanned by this module because the message was already scanned by a different protection module and a Reject or Delete message action was applied to the message (and a copy of the message was not put in Backup).
- Last threats. Table with information about recent detected threats:
- Time is the time when the threat was detected.
- Threat name is the name of the threat detected in the object.
- Result is the action performed with the object.
All information currently available to the program is displayed. Time filtering criteria are not applied.
- Messages. This widget displays the incoming and outgoing email traffic processed by the program.
When counting outgoing messages, notifications sent by the program are counted, but messages with Deleted, Rejected, and Quarantined scan status are not counted.
You can click Size or Count to toggle between total size or count of incoming and outgoing messages respectively.
- Top rules applied. Table with information about rules that were most frequently applied when processing messages:
- Rule name is the name of the applied rule set by the administrator.
- Count is the trigger count for the rule.
If the rule was deleted by the administrator, it is not displayed on this dashboard.
Not all dashboards are displayed by default. You can create a new layout and add the panes you need, and then switch between available layouts.
Creating a new layout
After the application is installed, the Dashboard section displays only the default layout. You can create a new layout and configure the display of dashboards in it.
To create a new layout:
- In the application web interface window, select the Dashboard section.
- In the upper part of the window, click
 .
. - In the drop-down list, select New layout.
The default set of widgets is displayed.
- If you want to edit the default name of the layout:
- In the upper part of the workspace next to the New layout # name, click
 .
. - This opens a window; type the new name in the Layout name text box.
- Click Save.
- In the upper part of the workspace next to the New layout # name, click
- If you want to add widgets to the layout:
- Click Add widget.
This opens the Add widget window.
- Select check boxes next to the names of widgets that you want to add to the layout.
- Click Add.
- Click Add widget.
- If you want to reposition the widget in the layout, drag the widget to a new location in the layout by clicking and holding the upper part of the widget with the left mouse button.
- If you want to remove a widget from the layout, click
 in the upper right corner of the panel.
 - If you want to zoom a widget, click the icon in the upper right corner of the panel and select a value in the drop-down list.
- If you want to hide a category of data on the widget, click the color indicator to the left of the category (for example,
 for objects with the Not detected status).
 - If necessary, toggle the presentation of the data (histogram or line diagram) using the
 view switch in the upper right corner of the panel.
 - Click Save.
The new layout is added to the list of layouts in the Dashboard section. You can now select it from the list of available layouts.
Page top
Modifying a layout
To modify a layout:
- In the application web interface window, select the Dashboard section.
- In the upper right corner of the workspace, in the drop-down list to the right, select the layout that you want to modify.
- Click and in the drop-down list, select Customize layout.
- Make the changes you want.
- Click Save.
The layout is modified.
Page top
Removing a layout
To delete a layout:
- In the application web interface window, select the Dashboard section.
- In the upper right corner of the workspace, in the drop-down list to the right, select the layout that you want to delete.
- Click and in the drop-down list, select Delete layout.
The layout will be removed.
Page top
Selecting a layout from the list
To select a layout from the list of available layouts:
- In the application web interface window, select the Dashboard section.
- In the upper right corner of the workspace, in the drop-down list to the right, select the layout that you want to open.
The selected layout is displayed in the workspace.
Page top
Filtering monitoring data
To filter the data displayed in widgets:
- In the application web interface window, select the Dashboard section.
- If you want to filter the data by period, in the upper right corner of the workspace, in the left drop-down list, select one of the following:
- Last hour.
- Last day.
- Last week.
- Last month.
- Last year.
Data for the last hour is displayed by default.
- If you want to filter the data by cluster node, in the middle drop-down list, select the IP address of the node.
By default, data is displayed for all nodes.
Data displayed in widgets is filtered in accordance with the specified criteria.
Page top
Using message processing rules
A message processing rule (hereinafter also referred to as a "rule") is a set of parameters and actions applied by the program to messages that meet specific criteria. For a rule to be applied to a message, the addresses of the sender and recipient must be specified in the rule settings.
By default, the program contains the following preset message processing rules:
- AllowList processes messages from the global allowlist.
- DenyList processes messages from the global denylist.
- Default processes messages according to the settings predefined by Kaspersky.
The AllowList and DenyList rules are disabled by default.
When Kaspersky Secure Mail Gateway processes an email message, it applies rules in accordance with their priority, that is, in the order of occurrence in the rule table, top to bottom. If the combination of sender-recipient addresses does not match, the program moves on to the next rule. As soon as it finds the sender-recipient pair of addresses in any rule, the program applies the processing settings configured in that rule to the message, and the search for a match is finished.
If none of the rules contains the "sender - recipient" pair of addresses, the message is processed in accordance with the preset settings of the Default rule.
If the message has a DKIM signature, it can be damaged by processing rules that modify the subject or body of the message, delete attachments, treat detected malicious objects, or add email disclaimers to the body of the message.
For each rule, you can configure your own email message processing criteria and select an action that is applied to the messages. If multiple program modules are triggered and they have different response actions configured, the most strict action will be performed ( Delete message → Reject → Delete attachment → Skip ).
The Reject action is recommended only if Kaspersky Secure Mail Gateway is directly integrated into the mail infrastructure, that is, if it functions as an edge gateway. If the program is integrated behind a third-party edge gateway, that is, it functions as an interior gateway, applying the Reject action will result in the edge gateway generating non-delivery notifications (DSN, Delivery status notification). Sending such notifications to non-existent email addresses may degrade the reputation of the edge gateway on the Internet.
Viewing the rule table
To view the rule table,
In the application web interface window, select the Rules section.
The table displays the following information about rules:
- Priority.
A number corresponding to priority determines the sequence in which rules are applied. Rules applied in the order of appearance in the table, top to bottom, that is, from highest priority to the lowest.
- Rule name.
Name of the rule defined by the user.
- Status.
Toggle switch for enabling or disabling the rule.
- Mode.
The rule can operate in one of the following modes:
 – Use the settings of scan modules.
 – Reject without scanning.
 – Delete without notifying the sender.
 – Skip without scanning.
- Description.
Any additional information about the rule specified by the user.
You can click the Detects notifications link to configure the general settings for email notifications regarding detections applicable to all rules. Then you need to enable notifications for each rule that you want to receive a message for whenever that rule is triggered.
Page top
Configuring rule table display
To configure the display of the rule table:
- In the application web interface window, select the Rules section.
- Click
 .
.This opens the Customize table window.
- Select check boxes next to settings that you want to display in the table.
At least one check box must be selected.
The display of the rule table is configured.
Page top
Message processing rule configuration scenario
You can modify general protection settings that are applied to all message processing rules in the Settings → General section.
- Creating a rule
When you create a rule, you must specify sender and recipient addresses, whose messages are to be processed in accordance with the settings of the rule, as well as the message processing mode. Other general settings are optional.
- Anti-Virus protection of messages
Kaspersky Secure Mail Gateway scans email messages for viruses and other threats using the Anti-Virus module.
You can enable or disable Anti-Virus scanning of messages for the rule. If Anti-Virus scan is enabled in the rule, you can configure the scan depending on object type:
- Infected and probably infected objects, as well as legitimate programs that can be exploited by hackers
- Objects with errors encountered during scanning
- Encrypted objects
- Attachments with macros
- Link scanning
Kaspersky Secure Mail Gateway checks if the links in the body of the message are malicious, that is, if they lead to web sites that distribute malware. You can also enable the detection of advertising links and links relevant to legitimate programs.
- Anti-Spam protection
Kaspersky Secure Mail Gateway filters messages passing through the mail server to remove unsolicited mail (spam) using the Anti-Spam module.
You can enable or disable Anti-Spam protection for the rule. If Anti-Spam protection is enabled for a rule, you can configure the scan depending on object type:
- Spam
- Probable spam
- Mass mail.
- Anti-Phishing protection
Kaspersky Secure Mail Gateway filters messages passing through the mail server to remove
using the Anti-Phishing module.You can enable or disable Anti-Phishing protection for the rule.
- Content filtering of messages
Kaspersky Secure Mail Gateway can perform content filtering of messages that pass through the mail server.
You can enable or disable Content Filtering for the rule. If Content Filtering is enabled for a rule, you can restrict the relaying of messages by the mail server in accordance with the following criteria:
- Message size
- Mask of attachment name
- Format of attachments
- Mail Sender Authentication
Mail Sender Authentication is designed to provide additional protection for your corporate mail infrastructure against spam and phishing.
Kaspersky Secure Mail Gateway uses the following Mail Sender Authentication technologies:
- SPF authentication (Sender Policy Framework).
- DKIM authentication (DomainKeys Identified Mail).
- DMARC authentication (Domain-based Message Authentication, Reporting and Conformance).
- Notifications of message scan results
You can set up notifications about message scan events to be emailed to addresses from the configured general list, the sender, recipients, or other addresses.
- Warnings about insecure messages
You can configure a Warning template text to be added to the body of the message that has one of the following scan statuses:
- Encrypted;
- Infected;
- Error;
- Phishing;
- Links scanning.
- Email disclaimers
An email disclaimer (hereinafter also "disclaimer") is a text that the program can add at the end of an email message.
You can enable or disable disclaimers for one or more message processing rules and configure disclaimer templates.
- KATA protection
Kaspersky Secure Mail Gateway can be integrated with Kaspersky Anti Targeted Attack Platform and forward messages to the KATA server for scans.
You can enable or disable KATA protection for a rule. If KATA protection is enabled in a rule, you can select a specific action for messages in which objects were detected, indicate whether or not the program should place a copy of messages in Backup, and configure a tag to be added to the subject of messages.
Creating message processing rules
To create a message processing rule:
- In the main window of the program web interface, open the management console tree and select the Rules section.
- In the upper part of the workspace, click Create.
A new message processing rule opens.
- In the left pane, select the General section.
- In the Rule name field, type the name of the new rule.
The rule must have a unique name in the list of Kaspersky Secure Mail Gateway rules.
- In the Description field, type the rule description.
- In the Mode settings group, select one of the following message processing options corresponding to criteria of the rule:
- Use the settings of scan modules to use the settings of Anti-Virus, Anti-Spam, and Anti-Phishing modules as well as Content Filtering settings.
The left pane displays sections where you can configure modules used by the rule.
- Reject without scanning to reject messages without scanning them with Anti-Virus, Anti-Spam, or Anti-Phishing modules, or applying Content Filtering settings.
- Delete without notifying the sender to delete messages without scanning them with Anti-Virus, Anti-Spam, or Anti-Phishing modules, or applying Content Filtering settings; do not notify the sender about non-delivery.
- Skip without scanning to deliver messages without scanning them.
- Use the settings of scan modules to use the settings of Anti-Virus, Anti-Spam, and Anti-Phishing modules as well as Content Filtering settings.
- If you want to modify the priority of the rule, in the Rule priority settings group, set the position of the rule in the rule table.
By default, the rule is assigned the highest priority of all previously created rules.
- In the Sender email settings group, specify senders to whom the rule must apply. To do this, select one of the following tabs:
To apply the rule, you must specify at least one sender.
- In the Recipient email settings group, specify recipients to whom the rule must apply. To do this, select one of the following tabs:
To apply the rule, you must specify at least one recipient.
- In the lower right corner, click Save.
The rule is created and added to the rule table in the Rules section.
For modified settings to be applied by Kaspersky Secure Mail Gateway, the rule must be enabled. By default, the new rule is disabled and not used during operation of the program.
Configuring Anti-Virus protection
Before configuring Anti-Virus protection in the message processing rule, make sure that the Anti-Virus module is enabled in general protection settings.
To configure Anti-Virus protection in the message processing rule:
- In the application web interface window, select the Rules section.
- In the rule table, select the rule for which you want to configure Anti-Virus protection.
This opens the View rule window.
- Click Edit.
Rule settings become editable.
- In the left pane, select the Anti-Virus section.
- Use the toggle switch to the right of the section title to enable or disable Anti-Virus scanning of messages that match rule criteria.
Anti-Virus protection of messages is enabled by default.
- If you have disabled Anti-Virus scanning at the previous step, configure Anti-Virus module settings applied to the following objects based on the results of the scan:
- If necessary, configure the list of exclusions from scanning. To do so, in the Exclusions from scanning settings group:
- If you want to exclude archives from Anti-Virus scans, select the Do not scan archives check box.
- If you want to exclude attached objects with certain names from Anti-Virus scans, in the Do not scan attachments by name masks field, type a name mask and press Enter.
Enter masks one by one. Repeat the steps for each mask you want to add.
Masks are case-insensitive and may contain any characters.
- Click Save.
Anti-Virus protection is configured. The specified settings are applied to messages that match the rule criteria.
To ensure that the configured settings are applied during the operation of Kaspersky Secure Mail Gateway, make sure that email virus scans are enabled for the rule and that the rule that you have configured is enabled.
Page top
Configuring URL Advisor
Before configuring link scanning in the message processing rule, make sure that link scanning is enabled in general protection settings.
To configure URL Advisor settings in the message processing rule:
- In the application web interface window, select the Rules section.
- In the rule table, select the rule for which you want to configure Anti-Virus protection.
This opens the View rule window.
- Click Edit.
Rule settings become editable.
- In the left pane, select the Links scanning section.
- Use the toggle switch to the right of the section title to enable or disable link scanning for messages that match rule criteria.
By default, link scanning is enabled.
- If at the previous step, you enabled link scanning, configure how malicious or advertising links as well as links relevant to legitimate programs are treated after the scan:
- In the Action drop-down list, select the action that will be applied to messages:
- Delete message.
- Reject.
- Skip.
The Reject action is selected by default.
- If you want messages with detected objects to be automatically placed in Backup based on the results of a scan, select the Move copy to Backup check box.
This check box is selected by default.
- If you want a tag to be added after the scan to the beginning of the subject of messages, type the text of the tag in the text box under the Move copy to Backup check box.
The [Malicious|Adware|Legitimate links] tag is added by default.
- In the Action drop-down list, select the action that will be applied to messages:
- Click Save.
Configuring Anti-Spam protection
Before configuring Anti-Spam protection in the message processing rule, make sure that the Anti-Spam module is enabled in general protection settings.
To configure Anti-Spam protection in the message processing rule:
- In the application web interface window, select the Rules section.
- In the rule table, select the rule for which you want to configure Anti-Spam protection.
This opens the View rule window.
- Click Edit.
Rule settings become editable.
- In the left pane, select the Anti-Spam section.
- Use the toggle switch to the right of the section title to enable or disable Anti-Spam scanning of messages that match rule criteria.
By default, Anti-Spam protection of messages is enabled.
- If you have disabled Anti-Spam protection at the previous step, configure Anti-Spam module settings applied to the following objects based on the results of the scan:
- In the settings group Additional settings, select check boxes next to the names of settings that you want to enable:
- Use graphical image processing technologies if you want to use the GSG technology that identifies images containing text to analyze such text for being spam. The text is recognized regardless of whether it has been modified, rotated in the image, hidden in "noise" or otherwise modified to conceal the purpose of the image.
- Unicode spoofing protection if you want to enable Unicode spoofing protection. If Unicode spoofing is detected, the message is considered to be spam. The application adds the
unicode_spooftag to theX-KSMG-AntiSpam-Methodmessage header.The application scans for Unicode spoofing only in the values of the
MAIL FROMcommand from the SMTP session, as well as in theFrom,Sender,Reply-Tomessage headers.
- Click Save.
Anti-Spam protection is configured. The specified settings are applied to messages that match the rule criteria.
To ensure the configured settings are applied during the operation of Kaspersky Secure Mail Gateway, make sure to enable Anti-Spam protection for the rule and to enable the configured rule.
Page top
Configuring Anti-Phishing protection
Before configuring Anti-Phishing protection in the message processing rule, make sure that the Anti-Phishing module is enabled in general protection settings.
To configure Anti-Phishing protection in the message processing rule:
- In the application web interface window, select the Rules section.
- In the rule table, select the rule for which you want to configure Anti-Phishing protection.
This opens the View rule window.
- Click Edit.
Rule settings become editable.
- In the left pane, select the Anti-Phishing section.
- Use the toggle switch to the right of the section title to enable or disable Anti-Phishing scanning of messages that match rule criteria.
By default, Anti-Phishing protection of messages is enabled.
- If you enabled Anti-Phishing protection at the previous step, use the drop-down list to select an action to perform on phishing messages:
- Delete message.
- Reject.
- Skip.
The Reject action is selected by default.
- If you want phishing messages to be automatically placed in Backup based on the results of a scan, select the Move copy to Backup check box.
This check box is cleared by default.
- If you want a tag to be added to the beginning of the subject of phishing messages based on the results of a scan, type the text of the tag in the text box under the Move copy to Backup check box.
By default, the [Phishing] tag is added.
- Click Save.
Anti-Phishing protection is configured. The specified settings are applied to messages that match the rule criteria.
To ensure the configured settings are applied during the operation of Kaspersky Secure Mail Gateway, make sure to enable Anti-Phishing protection for the rule and to enable the configured rule.
Page top
Configuring Content Filtering
Before configuring Content Filtering in the message processing rule, make sure that Content Filtering is enabled in general protection settings.
To configure Content Filtering in the message processing rule:
- In the application web interface window, select the Rules section.
- In the rule table, select the rule for which you want to configure Content Filtering.
This opens the View rule window.
- Click Edit.
Rule settings become editable.
- In the left pane, select the Content Filtering section.
- Use the toggle switch to the right of the section title to enable or disable content filtering of messages that match rule criteria.
By default, Content Filtering of messages is disabled.
- If at the previous step, you have enabled Content Filtering, configure the following filtering criteria:
- If you want to scan for forbidden formats or names of files within compound objects (including archives), select the Scan compound objects check box.
If you enable scanning compound objects, the Scan file formats and names in archive check box is selected automatically because archives are a subset of compound objects.
- If at the previous step, you did not enable scanning compound objects and want to scan for forbidden formats or filenames only in archives, select the Scan file formats and names in archive check box.
- Click Save.
Content Filtering is configured. The specified settings are applied to messages that match the rule criteria.
To ensure the configured settings are applied during the operation of Kaspersky Secure Mail Gateway, make sure to enable Content Filtering for the rule and to enable the configured rule.
Page top
Mail Sender Authentication
Before configuring Mail Sender Authentication in the message processing rule, make sure that the relevant authentication technologies are enabled in general protection settings.
To configure Mail Sender Authentication in the message processing rule:
- In the application web interface window, select the Rules section.
- In the rule table, select the rule for which you want to configure Mail Sender Authentication.
This opens the View rule window.
- Click Edit.
Rule settings become editable.
- In the left pane, select the Mail Sender Authentication section.
- Use the toggle switch to the right of the section title to enable or disable mail sender authentication for messages that match rule criteria.
By default, Mail Sender Authentication is disabled.
- If at the previous step you have enabled Mail Sender Authentication, configure general settings for all authentication types:
- Select the Consider temporary errors (TempError) as an authentication violation check box if you want Kaspersky Secure Mail Gateway to consider temporary errors (TempError) a violation of Mail Sender Authentication.
- Select the Consider permanent errors (PermError) as an authentication violation check box if you want Kaspersky Secure Mail Gateway to consider permanent errors (PermError) a violation of Mail Sender Authentication.
- Configure the following scan types:
- Click Save.
Mail Sender Authentication is configured. The specified settings are applied to messages that match the rule criteria.
To ensure the configured settings are applied during the operation of Kaspersky Secure Mail Gateway, make sure to enable Mail Sender Authentication for the rule and to enable the configured rule.
Page top
Notification settings for message scan events
You can configure delivery of email notifications about message scanning events for one or several rules.
This option is available if forwarding of notifications is enabled in the general settings for email notifications.
You can configure delivery of email notifications to recipients from the general list, sender, recipient of messages or to other recipients about the following message scan events:
- Malicious objects detected.
- Encrypted objects detected.
- Anti-Virus scan errors detected.
- Content Filtering issues detected.
- Phishing messages detected.
- A macro detected in the attachment.
- Malicious links detected.
- If an object detected by KATA.
You can configure notifications about KATA alerts only if integration with Kaspersky Anti Targeted Attack Platform is enabled.
To configure notifications about message scanning events:
- In the application web interface window, select the Rules section.
- In the rule table, select the rule for which you want to configure notifications about scanning events.
This opens the View rule window.
- Click Edit.
Rule settings become editable.
- In the left pane, select the Notifications section.
- In the group of settings with the name of the selected event (for example, Malicious objects detected), select the check boxes next to the names of settings:
- Notify recipients from the general list if you want notifications about the selected event to be sent to addresses from the general list.
If the check box is selected, you need to define the list of addresses in the general email notification settings after clicking the Specify link.
- Notify sender if you want notifications about the selected event to be sent to message sender addresses.
- Notify recipient if you want notifications about the selected event to be sent to message recipient addresses.
- Additional addresses if you want notifications about the selected event to be sent to additional email addresses.
- Notify recipients from the general list if you want notifications about the selected event to be sent to addresses from the general list.
- If you have configured notifications to be sent to message recipient addresses, select one of the following options:
- Notify only if you want the notification to be sent without the original message.
- Notify with source message in attachment if you want the notification to be sent with the original message in an attachment.
- If you have configured notifications to be sent to additional email addresses, type an address in the text box and press Enter.
The email addresses are entered one at a time. Repeat the process of adding addresses to the list for all email addresses that you are adding.
- If necessary, click the Customize notification templates link in the upper-right corner of the window and edit the notification templates.
- Click Save.
Notifications about message scanning events are configured.
To ensure the configured settings are applied during the operation of Kaspersky Secure Mail Gateway, make sure to enable the configured rule.
Adding a Warning about insecure message
To add a warning about insecure message:
- In the application web interface window, select the Rules section.
- In the rule table, select the rule for which you want to configure a warning about insecure message.
This opens the View rule window.
- Click Edit.
Rule settings become editable.
- In the left pane, select the Insecure message warning section.
- In the Warning template drop-down list, select the Warning template about insecure message that you want to add.
- Select check boxes next to one or several types of messages to which you want to add a warning:
- For encrypted messages.
- For phishing messages.
- For infected messages.
- For messages with Anti-Virus scan errors.
- For messages containing links.
- Click Save.
Warnings are added to the text of the messages in accordance with settings.
Whether the warning is displayed correctly depends on the software that the recipient uses to view email as well as on the content of the messages. For this reason, we do not recommend relying entirely on warnings to inform users about potential threats and other objects detected in messages. For example, you can also add a text tag to the beginning of the message subject.
To ensure the configured settings are applied during the operation of Kaspersky Secure Mail Gateway, make sure to enable the configured rule.
Adding email disclaimers
To add an email disclaimer to scanned messages:
- In the application web interface window, select the Rules section.
- In the rule table, select the rule for which you want to configure an email disclaimer.
This opens the View rule window.
- Click Edit.
Rule settings become editable.
- In the left pane, select the Email disclaimer section.
- Enable or disable the email disclaimer using the toggle switch to the right of the section title.
Disclaimers are not added by default.
- In the Add disclaimer drop-down list, select the disclaimer template that you want to add to messages.
- Click Save.
Adding an email disclaimer is configured.
To ensure the configured settings are applied during the operation of Kaspersky Secure Mail Gateway, make sure to enable adding email disclaimers for the rule and to enable the configured rule.
Configuring KATA protection
Before configuring KATA protection settings in a message processing rule, make sure that KATA integration has been configured in the general protection settings.
To configure KATA protection in a message processing rule:
- In the application web interface window, select the Rules section.
- In the rules table, select the rule for which you want to configure KATA protection.
This opens the View rule window.
- Click Edit.
Rule settings become editable.
- In the left pane, select the KATA Protection section.
- Use the toggle switch on the right of the section title to enable or disable KATA protection for messages that match the rule criteria.
KATA protection is disabled by default.
- If you enabled KATA protection at the previous step, use the In case of detection drop-down list to select the action to take on messages:
- Delete message.
- Reject.
- Skip.
The Delete message action is selected by default.
- If you want messages with detected objects to be automatically placed in Backup based on the results of a scan on the KATA server, select the Move copy to Backup check box.
This check box is selected by default.
- If you want the application to add a tag to the beginning of the subject of messages in which objects are detected by KATA scans, type the text of the tag in the text box under the Move copy to Backup check box.
The [KATA detect] tag is added by default.
- Click Save.
KATA protection is now configured. The specified settings are applied to messages that match the rule criteria.
To ensure that the settings you have configured are actually used during operation of Kaspersky Secure Mail Gateway, make sure that KATA protection is enabled for the rule and that the rule you have configured is enabled.
Page top
Viewing rule information
To view information about a rule:
- In the application web interface window, select the Rules section.
- Select the rule for which you want to view information.
This opens the View rule window.
It contains the following sections:
- General.
- Anti-Virus.
- Links scanning.
- Anti-Spam.
- Anti-Phishing.
- Content Filtering.
- Mail Sender Authentication.
- Notifications.
- Insecure message warning.
- Email disclaimer.
- KATA Protection.
This is displayed only when KATA integration is configured.
Enabling and disabling a message processing rule
To enable or disable a message processing rule:
- In the application web interface window, select the Rules section.
- Do one of the following:
- Flip on the toggle switch in the line with the name of the rule that you want to enable.
- Flip off the toggle switch in the line with the name of the rule that you want to disable.
Changing rule settings
To modify rule settings:
- In the application web interface window, select the Rules section.
- Select the rule for which you want to modify settings.
This opens the View rule window.
- In the lower part of the window, click Edit.
This opens the Edit rule window.
- Make the changes you want.
- Click Save.
Rule settings are modified.
Deleting message processing rules
To delete a message processing rule:
- In the application web interface window, select the Rules section.
- Select the rule that you want to delete.
This opens the View rule window.
- In the lower part of the window, click Delete.
- In the confirmation window, click OK.
The message processing rule is deleted.
Allowlists and denylists
You can use allowlists and denylists for more granular control of the way the mail system reacts to messages from certain addresses. For example, sources that are officially not spam but are identified by the program as mass mail (for example, messages from news portals) can be added to the allowlist.
You can use the following to configure allowlists and denylists:
- Preset AllowList and DenyList message processing rules. You can also create your own rules with sender and recipient addresses to whose messages the specified action must be applied, and change the priorities of the rules.
By default, AllowList and DenyList rules are turned off, and no sender and recipient addresses are specified therein. You will have to generate address lists in these rules and turn on the rules.
- Personal allowlists and denylists that contain sender addresses for a single recipient. A personal allowlist allows messages to pass through without Anti-Spam scans. The messages are still scanned for phishing, viruses, and other threats, and content filtering is also performed.
A flowchart of the default algorithm for processing messages in accordance with allowlists and denylists is shown in the figure below. You can change the action for the DenyList rule (Reject or Delete message) as well as change the rules priority by moving the AllowList and DenyList rules around the rule table. In this case, the algorithm for applying program actions will differ from the one described below.
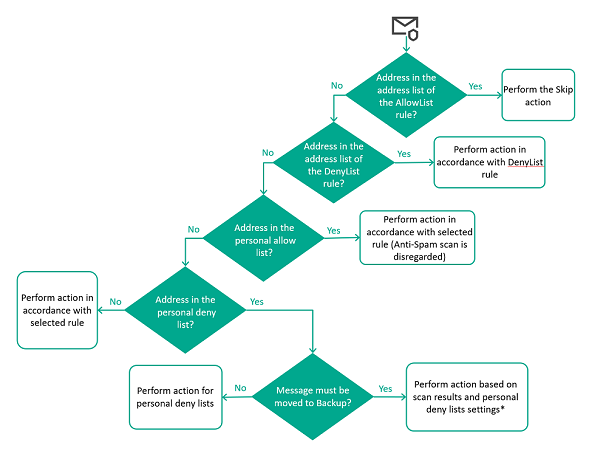
Algorithm for processing messages in accordance with allowlists and denylists
Messages whose sender and recipients have their addresses on an allowlist or denylist in message processing rules are processed as follows:
- If the addresses of the sender and recipients of a message are on the allowlist in the AllowList rule, the program skips the message without scanning it by default.
- If the addresses are not specified in the AllowList rule, the address is checked against the denylist in the DenyList rule. If sender and recipient addresses are found in the list, by default the program rejects the message without performing a scan. You can change the action for the DenyList rule.
If the message is not subject to global allowlists and denylists in message processing rules, the program checks if the sender address is found in personal lists of the recipient.
- If the sender address is on the personal allowlist, an Anti-Spam scan is not performed. The message is processed in accordance with the results of scanning with the other program modules.
- If the sender address is not present in the personal allowlist of the recipient, the address is checked against the personal denylist. If there's a match, the message is not delivered to the recipient who owns the personal denylist. Depending on the specified action, the program deletes or rejects the message. The program can also place the message in Backup.
* Before placing a copy of the message in Backup, the program scans it with all protection modules. Based on the results of the scan, the program applies the strictest possible action to the message. For example, if the scan results trigger a rule that applies the Delete message action but personal denylists stipulate the Reject action, the Delete message action is performed because it is the more strict response. In other words, the message is deleted in accordance with the rule settings instead of being rejected in accordance with personal denylist settings.
Messages placed in Backup are not taken into account when counting messages with the Personal denylist status in widgets in the Dashboard section.
If the addresses are not present in any of the lists either in message processing rules or in personal lists of the recipient, the message is processed in accordance with the selected rule. The rule selection algorithm is described in more detail in the chapter about the application of message processing rules.
Configuring personal lists
Settings in this section apply to all personal accounts.
To configure personal allowlists and denylists:
- In the application web interface window, select the Settings → Personal accounts → Allowlists and denylists section.
- Enable or disable the display and use of allow and/or deny lists using Allowlist and Denylist toggle switches.
When you enable a personal allowlist or denylist, it becomes available for viewing and is used for email traffic processing.
- In the If the sender's address is in denylist drop-down list, select one of the following actions on messages:
- Delete message if you want to delete messages from a sender whose address is in the personal deny list.
- Reject if you want to reject messages from a sender whose address is in the personal deny list.
- If you want to move messages from a sender whose address is in the personal deny list to Backup, select the Move copy to Backup check box.
This check box is selected by default.
- Click Save.
Personal allowlists and denylists are configured.
Viewing personal allowlists and denylists
To manage personal allowlists and denylists in the program web interface, you must add a LDAP server connection.
In administrator mode, you can view personal allowlists and denylists for all users whose account information is saved in the LDAP cache.
In user mode, only lists for the current user are displayed if the administrator has turned on the display and use of personal lists in program settings.
To view personal allowlists and denylists in administrator mode:
- Connect to the program web interface using program administrator credentials.
- Select User lists in the program web interface window.
- In the text box, enter the user name in the LDAP directory service in the distinguishedName format.
A list of LDAP accounts matching the search string you specified appears under the entry field.
- Click the LDAP record of the user whose lists you want to view.
- Click Search to the right of the text box.
The workspace displays the allowlists and denylists of the selected user.
To view personal allowlists and denylists in user mode:
- Connect to the program web interface using domain user credentials.
- Select the User lists section.
The workspace displays allowlists and denylists of the current user.
Creating personal lists
To gain access to personal allowlists and denylists in the program web interface, you must add a LDAP server connection.
In administrator mode, you can add, edit, and delete addresses in personal lists of all users whose account data are stored in the LDAP cache.
In user mode, you can view and edit personal lists only for the current user.
To create personal allowlists and denylists:
- If you are in administrator mode:
- Select User lists in the program web interface window.
- In the text box, enter the user name in the LDAP directory service in the distinguishedName format.
A list of LDAP accounts matching the search string you specified appears under the entry field.
- Click the LDAP record of the user whose lists you want to edit.
- Click Search to the right of the text box.
- If in user mode, select the User lists section.
The workspace displays personal lists: the allowlist in the left part, and the denylist in the right part.
Complete steps 3–5 for each personal list.
- If you want to add a new address to the personal list, enter it in the text box and press Enter.
You can add addresses one by one or enter multiple semicolon-separated addresses.
You can use the symbols "*" and "?" to create an address mask, and regular expressions beginning with the prefix "re:".
Regular expressions are not case-sensitive.
Adding internationalized addresses is supported.
- If you want to edit a previously added address, click the address in the text box, make the necessary changes in edit mode and press Enter.
- If you want to delete an address from the personal list, click
 to the right of the address.
 - Click Save.
If at least one address has an incorrect format, the lists cannot be saved. Fix all addresses highlighted with a red background and repeat the save operation.
Personal allowlists and denylists are created.
Managing the cluster
After installation and setup, you can configure the application in the web interface. To do so, you must combine all nodes hosting the Kaspersky Secure Mail Gateway application into a
. You can add nodes to a cluster and remove nodes from a cluster. You can to any node in the cluster. The other servers in the cluster will receive the role. Regardless of their role, all cluster nodes will process traffic.All nodes must be added to the cluster by their IP addresses of the same format (only IPv4 or only IPv6).
The table of cluster nodes is displayed in the application web interface in the Nodes section.
Creating a new cluster
After the application is installed, you must create a cluster for managing nodes through the application web interface. In addition, you can create multiple clusters to manage different groups of servers separately from each other.
To create a new cluster:
- In the web interface of the node to which you want to assign the Control node role, click Create new cluster.
- Refresh the browser page after a few minutes.
The web interface of the Control node.
The cluster is created. After this, you can add Secondary nodes to the cluster.
Page top
Viewing the cluster node table
To view the cluster node table:
in the program web interface window, select the Nodes section.
The table displays the following information about cluster nodes:
- IP address:port is the IP address and the port for connecting cluster node to the server.
- Role is the role of the node in the cluster.
- Status is information about whether the node is experiencing any problems.
The status display includes the following information about the node:
- Status of connection to KSN/KPSN servers
- License key status
- Application database update status
- Date and time and result of the last update task
- Status of time synchronization with the Control node (for Secondary nodes).
The following statuses are available:
- Synchronized means the node has no problems with any of the listed parameters.
- Node is not available means there is no connection with the node (the time when the node became unreachable is also specified).
- Unable to guarantee fault tolerance of the application: no servers with Secondary node role.
- No SPN for Kerberos Single Sign-On.
- Operating system restart is required.
- Domain controller data is either out of date or missing.
If there are errors or warnings for a specific parameter in a widget, all statuses are listed (for example, Databases are out of date, Protection level decreased, The license is suspended).
- Comment is any additional information about the node.
If necessary, you can view detailed information about each cluster node.
Page top
Configuring the display of the cluster node table
To configure the display of the cluster node table:
- In the application web interface window, select the Nodes section.
The cluster node table opens.
- In the table on the right, click .
This opens the cluster node table settings menu.
- Select check boxes next to settings that you want to display in the table.
At least one check box must be selected.
The display of the cluster node table is now configured.
Viewing information about a cluster node
To view information about a cluster node:
- In the application web interface window, select the Nodes section.
- Select the node whose information you want to view.
A window containing information about the node opens.
The window contains the following information depending on server type:
- Node information settings group:
- Certificate fingerprint: is the of the server.
- Virtualization technology is the name of the virtualization platform.
The following values are possible:
- ACRN
- bhyve (FreeBSD hypervisor)
- Bochs Emulator
- Linux KVM
- Microsoft Hyper-V
- Not used means that the program is installed on a physical server
- Oracle VM VirtualBox
- Parallels Desktop or Server
- QEMU
- QNX
- UML (user-mode Linux)
- VMware Workstation or Server
- Xen
- z/VM
Kaspersky Secure Mail Gateway supports Microsoft Hyper-V and VMware ESXi. Program performance cannot be guaranteed when using other hypervisors.
- Comment is additional information about the node. Optional setting.
- Current server role is the role of the current node in the cluster.
- Scan threads is the number of message streams that Kaspersky Secure Mail Gateway can scan simultaneously.
- Settings settings group:
- For the Control node:
- Applied refers to the last time when settings were successfully applied to program modules.
- Time is the state of time synchronization with the hypervisor and the NTP server.
- For a Secondary node:
- Synchronized refers to the last time when settings were successfully received from the Control node. If settings were received, you can assign the Control role to this Secondary node without losing the defined settings.
- Applied refers to the last time when settings were successfully applied to program modules.
- For the Control node:
- Database information settings group:
- Database update is the state of the program databases and the result and time of their last successful update.
- Anti-Virus is the state of the Anti-Virus module databases.
- Anti-Phishing is the state of the Anti-Phishing module databases.
- Anti-Spam is the state of the Anti-Spam module databases.
The following values are possible:
- Databases are up to date.
- Databases are out of date.
- Databases are obsolete.
- Bases error.
- External services settings group:
- KSN/KPSN status is the status of the connection to KSN/KPSN services.
- KATA status is the state of the connection to the KATA server (displayed only when KATA integration is configured).
- Kerberos keytab file status is the existence of SPN entries about all Secondary nodes in the keytab file (displayed only if Kerberos authentication is enabled).
- LDAP status settings group (displayed only if integration with an Active Directory domain is configured):
- Connection is the date and time of the last successful connection to the Active Directory domain controller.
- Data for rules match is the date and time of the last successful update of user account data used for selecting traffic processing rules.
- User accounts autofill is the date and time of the last successful update of data used for autocompletion of user names in the program web interface.
If at least one of these steps results in an error, the cluster nodes table shows an error message.
- Server time settings group (displayed only for Secondary nodes):
- Time is the status of time synchronization with the following:
- Server hosting the Control node
- Hypervisor
- NTP server
If the status is Failure, you can copy error information to the clipboard by clicking the button to the right of the status.
- Time is the status of time synchronization with the following:
- License information settings group:
- License expiration date.
- License is the information about the status of the license key (for an active license key, expiration date and the number of days to expiration is also displayed).
- Program is the name of the program for which the added license key was issued.
- Functionality level is the program operation mode depending on the added license key.
- License type is the type of license (trial, commercial, or subscription).
- Serial number is the serial number of the license key.
Adding a node to the cluster
To add a node to the cluster:
- In the application web interface window, select the Nodes section.
- Click Add node.
This opens the Add node window.
- In the IP address and Port fields, type the IP address and port of the server hosting the application that you want to add as a cluster node.
- If necessary, type additional information about the node you are adding in the Comment field.
- In the Scan threads field, enter the number of traffic streams that the mail server can process simultaneously.
Default value: 16.
- Click Next.
- Compare the certificate fingerprint in the Check node window with the certificate fingerprint of the server. If the certificate fingerprints match, click Confirm.
The certificate fingerprint is displayed in the local console of the server after the Initial Configuration Wizard completes.
The node is added to the cluster and is displayed in the node table on the Nodes page.
To use the time zone configured for the other nodes, restart the new cluster node.
Before you direct email traffic to the added node, you must update application databases and perform LDAP synchronization. Otherwise, the application cannot provide an adequate level of protection or place email messages in Personal Backup, and rules that mention attributes of Active Directory accounts cannot be applied.
Page top
Modifying node settings
You cannot change the IP address and port of the server on which the program is installed. If necessary, remove the node from the cluster and add a new node with the required address.
To modify node settings:
- In the application web interface window, select the Nodes section.
- In the cluster nodes table, select the node whose settings you want to modify.
The node settings window opens.
- In the lower right corner of the window, click Edit.
This opens the Edit node window.
- If necessary, change the following settings:
- Type any additional information about the node in the Comment field.
- The number of simultaneous mail traffic processing threads in the Scan threads field.
The recommended value is the number of CPU cores times two.
- Click Save.
Node settings will be modified.
Page top
Removing a node from a cluster
The Control node cannot be removed.
When a node is removed from a cluster, the program is not removed from the server. You can add the node back to the cluster at any time and continue to manage the program settings for this node.
To remove a node from a cluster:
- In the application web interface window, select the Nodes section.
- In the cluster nodes table, select the Secondary node that you want to remove from the cluster.
The node settings window opens.
- In the lower left corner of the window, click Delete.
This will open a window for confirming deletion of the node from the cluster.
- Click OK.
The node will be removed from the cluster. Information about the node will no longer be displayed in the cluster nodes table. Quarantined objects, backup copies of objects, database updates, event logs, reports, and received diagnostics is stored on the server where the program is installed.
Page top
Changing the role of a node in a cluster
You can assign the Control node role to any cluster node. The other nodes will have the Secondary node role. For example, you may need to change the roles due to a failure of the Control node, or if you have to remove the application from this server.
To assign the Secondary node role to the Control node:
- In the application web interface window, select the Nodes section.
- In the cluster nodes table, select the Control node.
The node settings window opens.
- Click Change role to Secondary node.
The Control node will become a Secondary node. The web interface of the Secondary node opens.
To assign the Control node role to a Secondary node:
- In the application web interface window, select the Nodes section.
- In the cluster nodes table, select a Secondary node.
The node settings window opens.
- Click Go to manage node.
Authorization page opens in a new browser window.
- Enter the name and password of the application administrator.
The web interface of the Secondary node opens.
- Click Change role to Control node.
- In the confirmation window, click OK.
The Secondary node will become the Control node.
Page top
Deleting the cluster
A cluster can be removed only if there are no Secondary nodes.
To delete the cluster:
- In the application web interface window, select the Nodes section.
- In the cluster nodes table, select the Control node.
The node settings window opens.
- In the lower part of the window, click Delete cluster.
This will open a window for confirming deletion of the node from the cluster.
- Click OK.
The cluster is deleted. You will see the web interface of the server hosting the application that is not part of a cluster.
Page top
Restarting a cluster node
Restarting through the web interface is available only for the application ISO image. If the application is installed from an RPM or DEB package, the restart is handled by the operating system.
A restart of the operating system of a node may be required for applying certain updates, such as OpenSSL library updates. If this is the case, the cluster nodes table displays the Operating system restart is required notification.
To restart the Control node using the application web interface:
- In the application web interface window, select the Nodes section.
- In the cluster nodes table, select the Control node.
A window containing information about the node opens.
- Click Restart.
- In the confirmation window, click OK.
The operating system will be restarted. This may take some time. Reload the browser page after several minutes. After the restart completes, you will see the page for connecting to the web interface of the application.
Traffic processing will be stopped before the restart completes.
To restart the Secondary node using the application web interface:
- In the application web interface window, select the Nodes section.
- In the cluster nodes table, select the Secondary node that you want to restart.
A window containing information about the node opens.
- Click the Go to manage node link to go to the web interface of the Secondary node.
The page for connecting to the web interface opens in a new tab of the browser.
- Enter the account credentials and connect to the Secondary node.
- Click Restart.
- In the confirmation window, click OK.
The operating system will be restarted. This may take some time. Reload the browser page after several minutes. After the restart completes, you will see the page for connecting to the web interface of the Secondary node.
Traffic processing will be stopped before the restart completes.
Page top
Managing the SSL certificate of the cluster node
By default, Kaspersky Secure Mail Gateway 2.0 uses a self-signed certificate automatically generated during cluster node deployment as the SSL certificate of the cluster node. When logging in to the program web interface with this certificate, the browser displays an insecure connection warning. For better convenience and security when using the web interface, you can replace the default certificate of the node with a certificate issued by a trusted certification authority.
To replace the SSL certificate of a cluster node, you will need the following files:
- A certificate file in the X.509 format with the PEM extension or a container file with a certificate chain in the X.509 format with the PEM extension
- An RSA private key file with the PEM extension (without a passphrase)
You can prepare the private key file and the certificate on your own, or alternatively you can obtain ready-to-use files from a certification authority.
Steps involved in replacing the SSL certificate of the cluster node and creating the private key and certificate files on your own
- Creating a private key file and a Certificate Signing Request
You will receive one of the following files from the certification authority:
- Signed X.509 certificate file with the CER or CRT extension
- PKCS#7 certificate chain file with the P7B extension The file includes the website certificate signed at your request as well as certificates of intermediate certificate authorities.
- Converting obtained files into the PEM encoding
Depending on the type of the file obtained at the previous step, do one of the following:
- Replacing the SSL certificate of a cluster node
Steps involved in replacing the SSL certificate of the cluster node using private key and certificate files provided by a certification authority
- Obtaining private key and certificate files from the certification authority
The private key and certificates are provided as a PFX container (PKCS#12 format, PFX or P12 extension).
If your organization uses the Active Directory Certification Services service as the certification authority, use the Web Server template to create the certificate. Save the result as a certificate chain in the DER encoding.
- Extracting certificate and private key files from a PFX container
- Replacing the SSL certificate of a cluster node
Creating an SSL certificate signature request file
You can create a Certificate Signing Request file using the openssl utility or online services.
To create a Certificate Signing Request file using the openssl utility:
- Prepare a request.config text file with the following contents (for examples of settings, see the table below):
[req]default_bits=2048prompt=nodefault_md=sha256req_extensions=req_extdistinguished_name=dn[dn]C=<two-letter country code>ST=<region>L=<city>O=<organization name>OU=<organizational unit name>emailAddress=<email address of the web server administrator>CN=<domain name of the Control Node of the cluster>[req_ext]subjectAltName=@alt_names[alt_names]DNS.1=<domain name of the Control Node of the cluster>DNS.2=<domain name of the Secondary Node of the cluster>DNS.3=<domain name of the Secondary Node of the cluster> - Create a private RSA key with the PEM extension (without a passphrase):
openssl genrsa -out key.pem 2048 - Create a Certificate Signing Request using the following command:
openssl req -new -sha256 -key key.pem -out request.csr -config request.config
This creates the following files:
- key.pem is the RSA private key file with the PEM extension. Save this file to use it for replacing the certificate on the cluster node.
- request.csr is the Certificate Signing Request in the PKCS#10 format. Submit this file to the certification authority.
Examples of settings in the request.config file
Setting |
Example |
|---|---|
C |
|
ST |
|
L |
|
O |
|
OU |
|
|
|
CN |
|
DNS.1 |
|
DNS.<number> |
|
Converting a certificate from the DER encoding to the PEM encoding
After processing the Certificate Signing Request, the certification authority may issue a signed certificate in the X.509 format (file with the CER or CRT extension).
The X.509 certificate file can be provided in two encodings:
- DER encoded
- Base64 encoded (PEM encoding)
If the certificate is provided in the DER encoding, you must convert it to the PEM encoding. You can use the openssl utility to convert the certificate.
To convert a certificate from the DER encoding to the PEM encoding, use the following command:
openssl x509 -in source.cer -inform DER -out cert.pem
You can use the obtained cert.pem file to replace the web interface certificate.
Page top
Extracting the certificate chain from a PKCS#7 container
After processing the Certificate Signing Request, the certification authority may provide a certificate chain in the PKCS#7 format (file with the P7B extension). The chain includes the website certificate signed at your request as well as certificates of intermediate certificate authorities.
The PKCS#7 certificate file can be provided in two encodings:
- DER encoded
- Base64 encoded (PEM encoding)
To use the certificates, you must extract them from the container to get a PEM-encoded file. You can use the openssl utility to convert the certificate.
To convert the DER encoded PKCS#7 file, use the following command:
openssl pkcs7 -in source.p7b -inform DER -print_certs -out cert.pem
To convert a PEM encoded PKCS#7 file, use the following command:
openssl pkcs7 -in source.p7b -inform PEM -print_certs -out cert.pem
You can use the obtained cert.pem file to replace the web interface certificate.
Page top
Extracting certificate and private key files from a PFX container
If the certification authority provided the certificate as a PFX container (PKCS#12 format, file with the PFX or P12 extension), you must extract PEM-encoded certificate and private key files from the container.
You can extract the certificate and private key files using openssl. To extract the files, you will need to enter the passphrase of the PFX container.
To extract the private key file, use the following command:
openssl pkcs12 -in source.pfx -nocerts -nodes -out key.pem
To extract the certificate key file, use the following command:
openssl pkcs12 -in source.pfx -clcerts -nokeys -out cert.pem
You will get the following files:
- key.pem is the PEM-encoded RSA private key file (without a passphrase).
- cert.pem is the PEM-encoded X.509 certificate file.
You can use the private key and certificate files thus obtained to replace the web interface certificate.
Page top
Replacing the SSL certificate of a cluster node
To replace the SSL certificate of a cluster node:
- Log in over SSH to the management console of the node for which you want to replace the certificate.
- Place the certificate file (cert.pem) and the private key file (key.pem) in the
/rootdirectory. - Change to the web server config files directory:
cd /etc/nginx/ksmg - Create backup copies of the current certificate and private key:
cp -p webapi.crt webapi.crt.backupcp -p webapi.key webapi.key.backup - Replace the contents of the certificate and private key files:
cat /root/cert.pem > webapi.crtcat /root/key.pem > webapi.key - Set the owner of the certificate and access permissions of the private key:
chown root:root webapi.crtchmod 644 webapi.crtchown kluser:root webapi.keychmod 600 webapi.key - Restart the nginx service:
systemctl restart nginx - Check the status of the nginx service:
systemctl status nginxThe service must have the
runningstatus. - Open the web interface of the cluster node in the browser. If the certificate was successfully replaced, the insecure connection warning is not displayed.
- If the replacement was successful, delete the original certificate and private key files from the
/rootdirectory:rm -f /root/cert.pem /root/key.pem
The SSL certificate of the cluster node is replaced. If you want to replace certificates on multiple cluster nodes, you must follow the step-by-step instruction on each of the nodes.
Page top
Checking data integrity
An application module integrity check is run automatically after the application is started on a cluster node. This allows to check if application components are correctly installed and not tampered with or corrupted.
You can run a data integrity check manually at any time. The integrity check is run for each cluster node separately. This involves checking the hashes of application executable files using the GOST R 34.11-2012 algorithm.
You can see the results of manually started scans in the summary table for cluster nodes.
If the integrity check does not find any integrity violations, the results window displays a corresponding message. If there are integrity violations, you can download an archive with the list of encountered problems.
Information about the integrity check is recorded in the event log and in Syslog.
Viewing information about data integrity check tasks
To view information about the latest integrity check tasks performed on all cluster nodes:
- In the application web interface window, select the Nodes section.
- Click Integrity check in the upper part of the workspace to open the Integrity check window.
You will see a table containing information about the latest completed integrity check tasks on cluster nodes:
- IP address:port is the IP address and port for connection to the node for which the integrity check was run.
- Role is the role of the node in the cluster.
- Last task status:
Dash if the integrity check has never been run.
- In progress (with task progress percentage).
- Cancelling.
- Deleting.
- Completed (with task completion time).
- Completed with error (with task completion time and error description).
- Pending.
- Integrity check result:
- Failed means that the task was completed and data integrity breaches were detected.
- Succeeded means that the task was completed and no data integrity breaches were detected.
To view information about all integrity check tasks performed on a single cluster node:
- In the application web interface window, select the Nodes section.
- Click Integrity check in the upper part of the workspace to open the Integrity check window.
- Select the cluster node whose task information you want to view.
This opens the View archives window. This window displays a table containing information about the start date and the results of all scan tasks successfully completed on the selected node.
Page top
Running an integrity check manually
To run an integrity check manually:
- In the application web interface window, select the Nodes section.
- Click Integrity check in the upper part of the workspace to open the Integrity check window.
- In the table in the workspace, select the cluster node for which you want to run an integrity check.
This opens the View archives window.
- In the lower part of the window, click Start.
The integrity check is run.
The task result is displayed in the View archives window and in the cluster node table on the Integrity check page. If there are application module integrity violations, you can download an archive with the list of encountered problems.
Page top
Downloading an archive with integrity check results
An archive with integrity check results is available for download only if module integrity violations were found. If there are no violations, only a success message is displayed.
To download an integrity check result archive:
- In the application web interface window, select the Nodes section.
- Click Integrity check in the upper part of the workspace to open the Integrity check window.
- In the table in the workspace, select the cluster node for which you want to download an integrity check results archive.
This opens the View archives window.
- In the row containing the relevant archive, click
 to the right of the archive name.
The archive is saved on your computer in the browser's downloads folder.
Page top
Removing an archive with integrity check results
To delete the archive with integrity check results:
- In the application web interface window, select the Nodes section.
- Click Integrity check in the upper part of the workspace to open the Integrity check window.
- In the table in the workspace, select the cluster node for which you want to delete an integrity check results archive.
This opens the View archives window.
- In the row containing the relevant archive, click
 to the right of the archive name.
The archive is deleted from the list.
Page top
Modifying the network settings of a cluster node
This section contains instructions for modifying network settings of a Kaspersky Secure Mail Gateway cluster node and lists the actions that must be taken before and after the procedure to ensure the correctness of settings.
Modifying the network settings of a cluster node
You can change the IP address and port of the server where Kaspersky Secure Mail Gateway is installed. Modifying network settings and configuring a new address is performed on each individual node using a special script. You can download the script for Kaspersky Secure Mail Gateway version 2.0 here. Before using the script, it must be copied to the cluster node whose address is planned to be changed.
To maintain the integrity and the ability to manage the Kaspersky Secure Mail Gateway cluster, node addresses must be changed in a certain order. The procedure depends on the number of nodes in the cluster and the number of nodes for which you want to change addresses. The following cases are possible:
- Some nodes in the cluster must have their addresses changed.
- All nodes in the cluster must have their addresses changed. This scenario is also used when the cluster consists of a single node.
Network settings modification scenario for a subset of the nodes
The administrator must ensure network connectivity between nodes with new and old addresses.
Scenario for modifying the network settings of a subset of cluster nodes involves the following steps:
- Changing the role of a node from Control to Secondary
You must carry out this step if the Control node is in the subset of nodes for which you want to change addresses. Temporarily assign the Control node role to a node for which you are not planning to change the address.
- Disabling mail traffic processing on selected nodes
If you are using a load balancer, in balancer settings, turn off the load for nodes whose addresses you are planning to change. If you are not using a load balancer, in the web interface of Kaspersky Secure Mail Gateway, disable the reception of messages for the selected nodes.
After turning off the load, wait until messages from all queues are completely sent on the selected nodes.
- Changing the addresses of Secondary nodes
Change the addresses of selected Secondary nodes, one by one. To do so, on each node:
- Modify the network settings of the Secondary node in Technical Support Mode.
You can modify the network settings of the operating system, IP addresses of network adapters, the default gateway address, DNS server addresses.
- Test the network settings of the operating system on the node.
This step lets you make sure that the new network settings are in fact applied.
- Modify the A and PTR records on the DNS server for the Secondary node to match the new IP address and domain name of the node.
This is necessary for correct functioning of Kerberos authentication with the Single Sign-On technology and for interaction with other mail systems.
- Change the address of the node in the program in Technical Support Mode
This step is necessary if the IP address or port of the node was modified.
- Modify the network settings of the Secondary node in Technical Support Mode.
- Replacing Secondary nodes with the old addresses with Secondary nodes with the new addresses in the cluster using the program web interface
Nodes that had their address changed must be removed from the cluster; these nodes must then be added to the cluster with the new addresses.
- Changing the role of a node from Secondary to Control
This step is necessary is the Control node role was temporarily assigned to a different node.
- Checking the availability and health of all cluster nodes
You can view the statuses of cluster nodes in the web interface of the Control node.
- Enabling mail traffic processing on nodes
Enable mail traffic processing on cluster nodes with new addresses, one after another. Make sure that traffic is being processed without errors.
Network settings modification scenario for all nodes
Scenario for modifying the network settings of all cluster nodes involves the following steps:
- Disabling mail traffic processing on all cluster nodes
If you are using a load balancer, turn off the load on the nodes in load balancer settings. If you are not using a load balancer, in the web interface of Kaspersky Secure Mail Gateway, disable the reception of messages for all nodes.
After turning off the load, wait until messages from all queues are completely sent on the nodes.
- Changing the address of the Control node
To do so, on the Control node:
- Modify the network settings of the node in Technical Support Mode.
You can modify the network settings of the operating system, IP addresses of network adapters, the default gateway address, DNS server addresses.
- Test the network settings of the operating system on the node.
This step lets you make sure that the new network settings are in fact applied.
- Modify the A and PTR records on the DNS server for the Control node to match the new IP address and domain name of the node.
This is necessary for correct functioning of Kerberos authentication with the Single Sign-On technology and for interaction with other mail systems.
- Change the address of the node in the program in Technical Support Mode
This step is necessary if the IP address or port of the node was modified.
- Modify the network settings of the node in Technical Support Mode.
- Removing Secondary nodes from the cluster
Log in to the web interface of the Control node using the new address and remove all Secondary nodes from the cluster.
If the cluster contains a single node, skip this step and go to step 6.
- Changing the addresses of Secondary nodes
Change the addresses of all Secondary nodes, one by one. To do so, on each node:
- Modify the network settings of the Secondary node in Technical Support Mode.
You can modify the network settings of the operating system, IP addresses of network adapters, the default gateway address, DNS server addresses.
- Test the network settings of the operating system on the node.
This step lets you make sure that the new network settings are in fact applied.
- Modify the A and PTR records on the DNS server for the Secondary node to match the new IP address and domain name of the node.
This is necessary for correct functioning of Kerberos authentication with the Single Sign-On technology and for interaction with other mail systems.
- Change the address of the node in the program in Technical Support Mode
This step is necessary if the IP address or port of the node was modified.
- Modify the network settings of the Secondary node in Technical Support Mode.
- Adding Secondary nodes to the cluster
Use the new address of the Control node to log in to the web interface and add Secondary nodes with the new addresses to the cluster.
- Checking the availability and health of all cluster nodes
You can view the statuses of cluster nodes in the web interface of the Control node.
- Enabling mail traffic processing on nodes
Enable the reception of messages on cluster nodes under their new addresses, one by one. Make sure that traffic is being processed without errors.
Modifying the network settings of a node in Technical Support Mode
This section provides step-by-step instructions for modifying the network settings of a cluster node using a script in Technical Support Mode.
To begin modifying the network settings of a cluster node:
- Connect to the Kaspersky Secure Mail Gateway virtual machine management console under the root account using a private SSH key.
You will enter Technical Support Mode.
- Run the cluster node network settings modification script:
sh ksmg20_change_network_settings.sh -e
The cluster node network settings modification script starts.
Page top
Step 1. Modifying the network settings of the operating system of a node
At this step, you can modify the settings of network adapters.
To edit the network settings of the operating system on the node:
- In the Select Action – Interfaces window, select the network adapter for which you want to modify settings.
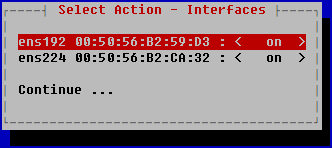
- In the Select Action – <Adapter name> window, in the IP addr line, press ENTER.
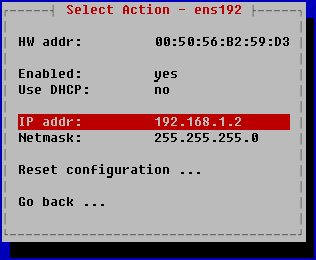
- In the Interface IP configuration window, use the TAB key to select the setting that you want to modify and enter the new value:
- If you want to modify the IP address of the adapter, enter the new value in the Address field.
- If you want to change the subnet mask, enter the new value in the Netmask field.
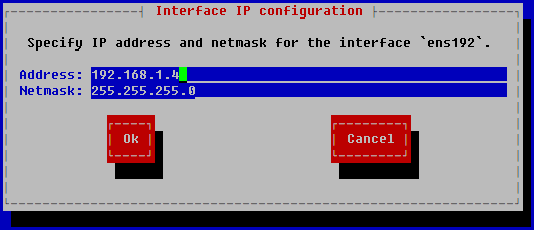
- To save changes, click Оk.
- In the Select Action – <Adapter name> window, select Go back in the bottom of the list.
- This opens a window containing a list of all available network adapters. If necessary, you can repeat the configuration steps for another network interface controller.
- After configuring all network adapters, select Continue in the bottom of the list.
Step 2. Modifying routing settings
At this step, you can modify the default route settings and static routes.
To modify routing settings:
- In the Select Action – Routing window, select routing settings that you want to modify.
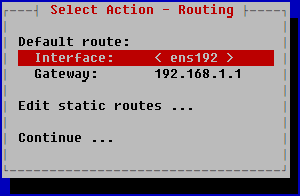
- The network adapter of the default route
- Select Interface and press ENTER.
This opens the Select gateway device window.
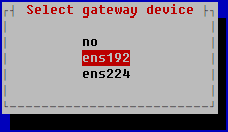
- Select the network adapter that must be used for the default route and press ENTER.
- Select Interface and press ENTER.
- Default gateway address
- Select Gateway and press ENTER.
The Interface gateway configuration window opens.
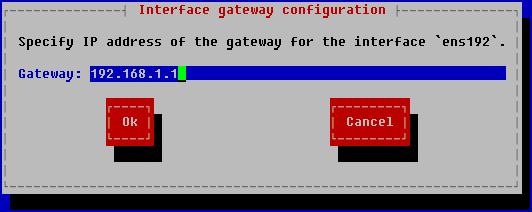
- Change the default gateway address and click Оk.
- Select Gateway and press ENTER.
- Static route
- Select Edit static routes and press ENTER.
- This opens the Select Action – Routes window.
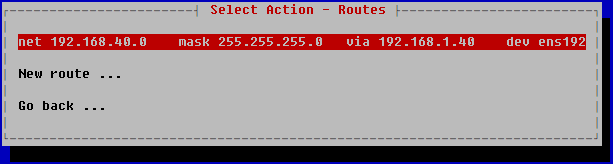
- The network adapter of the default route
- If you want to modify a static route, you can take the following actions:
- Modifying the settings of an existing static route
- In the Select Action – Routes window, select a route from the list.
This opens the Select Action – Edit static routewindow.
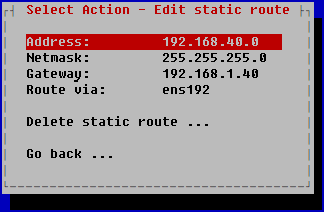
- Select the row of the setting, press ENTER, then in the Edit static route window, use the TAB key to select the relevant setting, edit its value and click Ok.
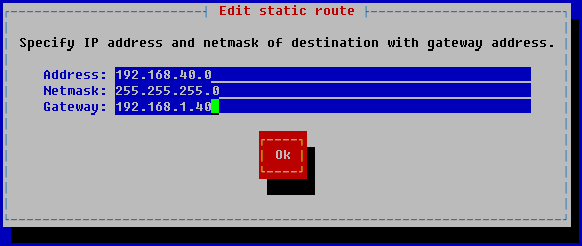
- To change the network adapter of the selected route, in the Select Action – Edit static route window, select Route via, then in the Select interface to set route via window, select the network adapter for the static route and press ENTER.
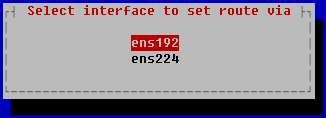
- In the Select Action – Routes window, select a route from the list.
- Adding a new static route
- In the Select Action – Routes window, click New route and press ENTER.
The New static route window opens.
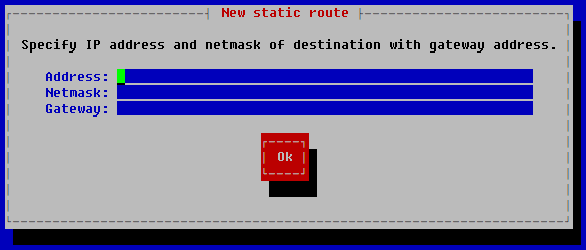
- Specify the settings of the new static route:
- In the Address field, enter the IP address of the network adapter.
- In the Netmask field, enter the network mask.
- In the Gateway field, enter the address of the gateway.
- Save the settings by clicking Оk.
- If you want to change the network adapter of the selected route, select Route via, then in the Select interface to set route via window, select the network adapter for the static route and press ENTER.
- In the Select Action – Routes window, click New route and press ENTER.
- Deleting a static route
- In the Select Action – Routes window, select a route from the list.
This opens the Select Action – Edit static routewindow.
- Select Delete static route, then in the Delete static route window, click Yes.

- In the Select Action – Routes window, select a route from the list.
- Modifying the settings of an existing static route
- Configure the static route in the Select Action – Edit static route window, then select Go back.
This opens the Select Action – Routes window with a modified list of static routes.
- In the Select Action – Routes window, click Go back.
This opens the Select Action – Routing window.
- In the Select Action – Routing window, click Continue.
Step 3. Modifying DNS server settings
At this step, you can modify the DNS server settings.
To modify DNS server settings:
- In the Select Action – Resolver window:
- Make sure that the no option is defined for the Use DHCP field.
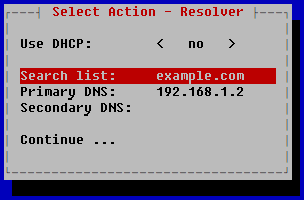
- In the Search list field, press ENTER.
The Interface DNS configuration window opens.
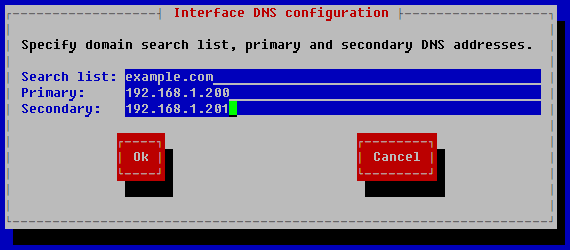
- In the Search list field, enter the domain search DNS suffixes separated by a space.
- In the Primary field, enter the address of the primary DNS server.
- In the Secondary field, enter the address of the secondary DNS server.
- Click OK.
- Make sure that the no option is defined for the Use DHCP field.
- In the Select Action – Resolver window, click Continue.
As a result, the wizard applies the new network settings of the node. Connect to the node over SSH using the new IP address and proceed to test the applied settings.
Page top
Testing the network settings of the operating system of a node
Before you change the address of the node in Kaspersky Secure Mail Gateway, it is recommended to make sure the new network settings of the operating system have been applied.
To test the network settings of the operating system of a cluster node:
- In Technical Support Mode, connect to the node using the new IP address.
- Check if the current network settings of the operating system match the settings that you have specified in the steps of the wizard. To view and check the settings of the operating system, use the following commands:
- To test the network adapter settings:
ip address - To test the default route and static route:
ip route - To test the DNS server settings:
cat /etc/resolv.conf
- To test the network adapter settings:
- Make sure the DNS server has a record for the new domain name of the node:
host <domain name of the node>If the record for the domain name of the node is not found on the DNS server, check if the network settings are specified correctly. If necessary, modify the network settings of the operating system.
- If necessary, change the domain name of the host:
hostnamectl set-hostname <new domain name of the host> - Check if the new domain name is in fact assigned to the host:
hostnamectl statusThe output includes the line
static hostnamewith the assigned domain name of the cluster node.
As a result, the network settings of the operating system on node are tested.
Page top
Modifying the address of a node in Kaspersky Secure Mail Gateway
Before you change the address of the node in Kaspersky Secure Mail Gateway, it is recommended to make sure the new network settings of the operating system have been applied.
To change the IP address or port of a cluster node:
- Stop the ksmg.celeryd service:
systemctl stop ksmg.celeryd - Run the cluster node network settings modification script:
sh ksmg20_change_network_settings.sh -a - This opens a window containing a list of available IP addresses.
Select the IP address that you want to assign to the cluster node and click Оk.
- In the Please enter port number of this node window, specify the port for inter-cluster communication and click Ok.
The default value is 9045.
- Press any key to continue.
The script restarts the services and applies the new address of the cluster node.
- Restart the cluster node:
shutdown -r
As a result, the address of the cluster node is modified. Proceed to configure Kaspersky Secure Mail Gateway cluster nodes in the web interface.
Page top
Managing roles and user accounts
You can create different roles for application user accounts depending on permissions that they need. The list of roles and user accounts that have these roles is displayed in the Accounts section of the application web interface.
For each role, you can define a set of permission that the role has. In addition, the application has default rules created during application installation:
- Superuser with a full set of permissions.
- "Viewer" with permissions only to view information in the application web interface.
You cannot delete or modify a default role.
Adding a role
To add a role:
- In the window of the application web interface, open the management console tree and select the Accounts section.
This opens the role list.
- Click Add.
This opens the role adding window.
- In the Role name field, enter the name of the role.
- In the Permissions group of settings, select check boxes next to permissions that the role must have:
Functional area
Permission name
Description
Dashboard and reports
View dashboard and reports
With this permission, the user can view Dashboard and Reports sections, but not modify settings in these sections.
Manage dashboard and reports
With this permission, the user can modify report settings as well as view information in Dashboard and Reports sections.
Settings
View settings
This permission allows the user to view program settings in the Settings section, but not to modify them.
Edit settings
This permission allows the user to modify program settings in the Settings section.
This permission also allows the user to view program settings.
Manage SSH access
Allows editing application settings in the SSH access section.
The user can also view application settings.
Rules
View rules
This permission allows the user to view the table of message processing rules. The user cannot add or delete rules, or modify rule settings.
Create/edit rules
This permission allows the user to add message processing rules as well as modify their settings.
Delete rules
This permission allows the user to delete message processing rules.
Events
View mail traffic events
This permission allows the user to view information about traffic processing events.
View system events
This permission allows the user to view information about system events.
Accounts
View roles
This permission allows the user to view the list of roles in the Accounts section. The user cannot add or delete roles, or modify role settings.
Create/edit/assign/revoke roles
This permission allows the user to add roles and modify role settings.
This permission also allows the user to view the list of roles in the Accounts section.
Delete roles
This permission allows the user to delete roles.
This permission also allows the user to view the list of roles in the Accounts section.
Nodes
View nodes information
This permission allows the user to view information about nodes in the Nodes section. The user cannot add or delete servers, or modify server settings and roles.
Create/edit/delete nodes
This permission allows the user to add and remove cluster nodes as well as modify settings and roles of nodes in the cluster.
This permission also allows the user to view cluster node information.
Get diagnostic information
With this permission, the user can get diagnostic information about cluster nodes.
This permission also allows the user to view cluster node information.
Check data integrity
With this permission, the user can run an integrity check on cluster nodes as well as view integrity check results.
This permission also allows the user to view cluster node information.
Message Queue
View messages information
This permission allows the user to view information about the message queue and Anti-Spam Quarantine in the Message queue section.
Flush messages
This permission allows the user to force send a queued message without waiting for its turn.
This permission also allows the user to view information about the message queue and the Anti-Spam Quarantine.
Delete messages
This permission allows the user to delete messages from the queue.
This permission also allows the user to view information about the message queue and the Anti-Spam Quarantine.
Backup
View messages
This permission allows the user to view information about objects in Backup in the Backup section.
Deliver messages
This permission allows the user to deliver to recipients those messages in Backup for which the Anti-Virus, Anti-Phishing, and Link Scanning modules did not detect any threats.
This permission also allows the user to view information about objects in Backup.
Deliver insecure messages
This permission allows the user to deliver any messages from Backup to recipients.
This permission also allows the user to view information about objects in Backup.
Forward messages to any addresses
This permission allows the user to forward messages from Backup to any address, if Anti-Virus, Anti-Phishing, and Link Scanning modules did not detect any threats in those messages.
This permission also allows the user to view information about objects in Backup.
Forward insecure messages to any addresses
This permission allows the user to forward any messages from Backup to any addresses.
This permission also allows the user to view information about objects in Backup.
Delete messages.
This permission allows the user to delete copies of messages from Backup.
This permission also allows the user to view information about objects in Backup.
Save messages
This permission allows the user to download copies of messages from Backup, if Anti-Virus, Anti-Phishing, and Link Scanning modules did not detect any threats in the messages.
This permission also allows the user to view information about objects in Backup.
Save insecure messages
This permission allows the user to download copies of any messages from Backup.
This permission also allows the user to view information about objects in Backup.
Allowlists and denylists
View all allowlists and denylists
With this permission, the user can view personal allowlists and denylists. The user cannot edit these lists.
Manage all allowlists and denylists
With this permission, the user can add, remove, and edit addresses in personal allowlists and denylists.
With this permission, the user can also view all personal lists.
- Click Add.
The role is added.
After the user's next login, sections of the web interface are displayed in accordance with the permissions that the user's role has.
Viewing role information
To view role information:
- In the window of the application web interface, open the management console tree and select the Accounts section.
This opens the role list.
- In the left part of the window, select the role for which you want to view information.
The following information is displayed:
- On the Users tab, you can find a list of user accounts that have the selected role. You can revoke a role or assign it to new users.
- On the Permissions tab, you can find the set of permissions that users with this role have. You can modify the list of permissions for the selected role.
Changing role settings
You cannot modify the Superuser role.
You can modify role settings: name of the role and the set of permissions the role has.
To modify role settings:
- In the window of the application web interface, open the management console tree and select the Accounts section.
This opens the role list.
- Select the role for which you want to modify settings.
- Click Edit role to the right of the Roles field.
- You can also select the Permissions tab in the right part of the window and click Edit.
This opens the Edit role window.
- If necessary, edit the name of the role in the Role name field.
- If necessary, modify the list of permissions that the role has. To do so, select or clear check boxes in the Permissions group of settings.
- Click Save.
Role settings are modified.
Page top
Deleting a role
To delete a role:
- In the window of the application web interface, open the management console tree and select the Accounts section.
This opens the role list.
- Select the role that you want to delete.
- Click the Delete button.
This opens the role deletion confirmation window.
- Click Yes.
The role is deleted.
Assigning a role
To assign a role to a user:
- In the window of the application web interface, open the management console tree and select the Accounts section.
- This opens the role list.
- Select the role that you want to assign to a user.
- Select the Users tab in the right part of the window.
- Click Assign role.
This opens the Assign role window.
- Enter
domain/name(NTLM) oruser@REALM(Kerberos) of the user to which you want to assign the role. - Click Save.
The role is assigned to the selected user.
Revoking a role
To revoke a role from a user:
- In the window of the application web interface, open the management console tree and select the Accounts section.
This opens the role list.
- Select the role that you want to revoke.
- Select the Users tab in the right part of the window.
- On the Users tab, select check boxes next to users for which you want to revoke the role.
- Click Revoke role.
- In the confirmation window, click Yes.
The role is revoked for the user. The user can no longer manipulate application settings that were accessible in accordance with permissions of this role.
Page top
Changing the Administrator account password
An Administrator account with superuser privileges can log into the system without external services. The password of that account remains valid for one year. When the administrator tries to log in to the application web interface with an expired password, a password change prompt is displayed. Authentication with the Administrator account becomes available only when the password is changed.
To change the password of the Administrator account:
- In the application web interface window, select the Settings section, Application access subsection.
- Go to the Local administrator section.
- In the Old password field, enter the current password of the Administrator account.
This password is initially configured during the installation of the application.
- In the New password field, enter the new password that satisfies the password requirements.
The password requirements are listed under the field.
Reusing the password is not allowed. Kaspersky Secure Mail Gateway matches the new password against the last 24 passwords. An error is displayed if a full match with one of the previously used passwords is discovered.
- In the Confirm password field, enter the new password again.
- Click Save.
The password is changed.
Page top
Backup
Backup is designed to store copies of messages which Kaspersky Secure Mail Gateway saves during processing. Access permissions to message copies in Backup are restricted to ensure the security of the Kaspersky Secure Mail Gateway server.
If a rule that has the Move copy to Backup check box selected in its settings is applied to a message, a copy of the message is placed in Backup regardless of the specified action.
Copies of messages are placed in Backup together with attachments.
In administrator mode, information is displayed about all message copies placed in Backup.
In user mode, personal Backup is displayed with information about messages of the current user. Personal Backup contains messages that had Disinfect, Delete attachment, or Delete message actions applied to them. If the Skip or Reject action was applied to the message, it is not available in personal Backup of the user.
A user can view personal Backup as well as perform actions on message copies if the administrator has turned on the relevant options in personal Backup settings.
With relevant permissions, the program administrator can do the following with message copies in Backup:
- Filter messages in Backup.
- View message information and scan results.
- Deliver messages from Backup.
- Download message copies to a computer.
Not available for personal Backup.
- Delete message copies from Backup.
When deleting from personal Backup, the copy of the message is not deleted from global Backup. All operations with the copy of the message remain available in global Backup.
The default maximum Backup space is 7 GB. As soon as the size of Backup exceeds the default threshold value, the program starts to remove the oldest message copies from Backup. When the size of Backup is again below the threshold value, the program stops removing message copies from Backup.
Configuring Backup settings
To configure Backup settings:
- In the program web interface window, select Settings → General → Backup.
- In the Backup maximum size (MB) field, enter the total size of all messages in Backup, after which older copies of messages will start getting deleted.
The minimum value is 1024 MB. The default value is 7168 MB (7 GB). The value of the setting must not exceed half of the free space in the /var partition on the cluster nodes.
- In the Storage period (days) field, specify the number of days to wait before the oldest copies of messages are deleted.
Possible values: integers from 1 to 1100 (~3 years). The default value is 30 days.
Copies of messages are deleted based on the limit that is reached first.
- Select an action to take for messages that need to be placed in Backup if Backup is unavailable:
- Process messages.
The message is processed regardless of whether it is possible to place a copy in Backup. If the Delete attachment or Disinfect action is configured, the modified message is sent to recipients after the attachment is disinfected or deleted. If the Delete message action is configured, the message is deleted without notifying the recipient. If the Reject action is configured, the message is rejected.
- Temporary fail.
If an error occurs while placing a copy of the message in Backup, the program returns SMTP error 451.
- Reject messages.
If an error occurs while placing a copy of the message in Backup, the message is rejected.
- Process messages.
- Click Save.
Backup is configured.
Page top
Configuring personal Backup
To configure personal Backup:
- In the program web interface window, select the Settings → Personal accounts section.
- Select the Backup tab.
- If you want user mode to display the section of personal Backup with information about message copies placed there, set the View message information toggle switch to Enabled.
- If you want user mode to allow deleting messages from personal Backup, set the Delete messages toggle switch to Enabled.
This is available only if the View message information option is enabled.
- If you want user mode to allow delivery of safe messages from personal Backup, set the Deliver messages toggle switch to Enabled.
This is available only if the View message information option is enabled.
- In the drop-down list below, select the format in which you want messages to be delivered from personal Backup:
- in attachment.
- in original form.
- Click Save.
Personal backup is configured.
Page top
Viewing the table of objects in Backup
Messages that had Skip or Reject actions applied to them are not placed in personal Backup. Information about such messages is only available in Backup in administrator mode.
To view the table of objects in Backup:
In the application web interface window, select the Backup section.
The table displays the following information about objects in Backup:
- Sender email is the email address of the message sender. The address is taken from the SMTP session.
- Sender IP is the IP address of the host that sent the message.
- Recipient email are the email addresses of the message recipients. The addresses are taken from the SMTP session.
In personal Backup, recipient information from the
BCCfield is not displayed. - Subject is the subject of the message.
- Detected by is the name of the application module whose settings caused the message to be placed in Backup.
- Backup reason is the scan result that caused the message to be placed in Backup.
- Message size is the size of the message.
- Time received is the date and time when the message was received.
- Application message ID is an unique ID that the application assigns to the message.
- SMTP message ID is the ID assigned to the message at the mail server.
- Node is the IP address of the cluster node that processed the message.
The column is not available in personal Backup.
By default, the table displays all columns. You can configure the table display.
Page top
Configuring the display of the table of objects in Backup
To configure the display of the table of objects in Backup:
- In the application web interface window, select the Backup section.
This opens the table of objects in Backup.
- Click .
This opens the Customize table window.
- Select check boxes next to settings that you want to display in the table.
At least one check box must be selected.
The display of the table of objects in Backup is configured.
Page top
Filtering and finding message copies in Backup
To find message copies in Backup:
- In the application web interface window, select the Backup section.
- Click
 .
.This opens the Filters window.
- Click the Add filter button to add a filter criterion to search for copies of messages.
- In the fields that appear, configure the filtering criterion that you want. To do so, populate the filter fields in accordance with the following table.
a. Select one of the following criteria:
b. Select one of the following logical operators:
c. Enter the following value:
Detected by
Logical operators are not provided for this criterion.
Select the check boxes next to the names of program modules whose scan results caused the messages to be placed in Backup.
You can select one or several scan engines:
- Anti-Virus.
- Anti-Spam.
- Anti-Phishing.
- Content Filtering.
- Personal denylist of addresses.
- Links scanning.
- Mail Sender Authentication.
- KATA (displayed only when KATA integration is configured).
Scan engines can be combined with the logical "AND" operator.
Sender email
- contains
Text for searching sender email addresses.
You can enter an email address (for example: example-email@example.com), domain name (for example: example.com) or several symbols from the email address (for example: exa).
If you have configured LDAP server integration, the program searches for LDAP cache records matching the entered search string and display a tooltip with account names.
Sender IP
- equal
Search text for the IP address from which the message was sent.
You can enter the address in IPv4 or IPv6 format.
Recipient email
- contains
Text for searching recipient email addresses.
You can enter an email address (for example: example-email@example.com), domain name (for example: example.com) or several symbols from the email address (for example: exa).
If you have configured LDAP server integration, the program searches for LDAP cache records matching the entered search string and display a tooltip with account names.
When filtering messages in personal Backup, recipient addresses from the
BCCfield are disregarded.Subject
- contains
Message header search text
Application message ID
- equal
Unique identifier assigned to the message by the program.
SMTP message ID
- contains
Message ID on the mail server.
This ID can be used for searching for the message in Backup when responding to a user request, if you have configured an ID to be added to notifications about rejected messages.
Date and time
- from
- before
Time period for processing messages and storing them in Backup.
Message size (KB)
- more or equal.
- less or equal.
Size limit for message search in kilobytes.
Node
- equal
- not equal
Cluster node that processed the message.
The criterion is not available in personal Backup.
You can enter multiple filtering criteria. To add another criterion, click Add filter.
- Click Apply.
Copies of messages that match the search parameters are displayed in the list of message copies in the Backup section.
The table displays information about the last 5000 messages. If more than 5000 messages match the filtering criteria, consider refining the search criteria.
Viewing information about a message in Backup
To view information about a message in Backup:
- In the application web interface window, select the Backup section.
- In the Backup objects table, select the message for which you want to view information.
This opens the View message information window.
The window displays the following information about the message:
- Backup reason.
Name of the program module which performed the scan that placed the message in Backup.
- Application message ID.
Unique ID that the program assigns to messages during processing.
- Subject.
Message subject.
- Sender email.
Email address of the message sender.
- Sender IP.
IP address of the server from which the message was sent.
- Sent at.
Date and time when the message was sent.
- Received at.
Date and time when the program received the message to begin processing.
- Node.
Node that processed the message.
The field is not available in personal Backup.
- SMTP message ID.
ID assigned to the message by the mail server.
- Attachments.
Attachment names and sizes (in bytes).
- The Rules section contains the following information about the rules that caused a copy of the message to be placed in Backup:
- Rule name.
- Recipient email.
Recipient email addresses from the
Tofield. - CC.
Recipient email addresses from the
CCfield. - BCC.
Recipient email addresses from the
BCCfield.The field is not available in personal Backup.
- Action.
Action that was performed on the message based on the results of scanning with all program modules.
- Scan results.
You can expand this group to view scan result details for each program module.
- Anti-Virus.
- Anti-Spam.
- Anti-Phishing.
- Links scanning.
- Content Filtering.
- Personal denylist.
- Mail Sender Authentication.
You can expand this group and view authentication result details for each of the technologies: SPF, DKIM, DMARC.
- KATA.
This is displayed only when KATA integration is configured.
- Backup reason.
Name of the program module which performed the scan that placed the message in Backup.
- The Deliver message group of settings lets you send the message to recipients or forward it to other addresses as an attachment or in original form.
The group of settings is not available in personal Backup. In administrator mode, this group is displayed only if the permissions to forward messages from Backup are available.
Click the link in the upper part of the message information window to go to the Events section and view information about events related to the processing of this message.
Delivering a message from Backup
In administrator mode, you can deliver messages from global Backup to recipients or forward the messages to any addresses. Available delivery settings depend on the relevant permissions.
In user mode, you can deliver messages from personal Backup to the address of the current user if the administrator has enabled this option in personal Backup settings. Unsafe messages cannot be delivered from personal Backup.
When delivering a message from personal Backup, recipient information from the BCC field is removed.
To deliver a message from global Backup:
- In the application web interface window, select the Backup section.
- In the Backup objects table, select the message that you want to deliver.
This opens the View message information window.
- If you want to deliver a message to recipients:
- Turn on the To recipient email addresses whose messages were backed up toggle switch.
- Select check boxes next to recipients to whom you want to deliver the message.
- If you want to forward a message to other addresses:
- Turn on the To additional email addresses toggle switch.
- In the text box below, enter the email addresses to which you want to forward the message.
- Select the check box next to the name of the Deliver the message in an attachment setting if you want to deliver the message in an attachment.
If the check box is cleared, the message is sent in its original form.
This check box is selected by default.
You can change the default address that is indicated as the sender of a message containing an attachment from Backup.
- Click Deliver.
- In the confirmation window, click OK.
The message is placed in the delivery queue.
To deliver a message from personal Backup:
- In the application web interface window, select the Backup section.
- In the Backup objects table, select the message that you want to deliver.
This opens the View message information window.
- Click Deliver in the lower right corner.
- In the confirmation window, click OK.
The message is placed in the delivery queue. The message is delivered in the format specified by the administrator in personal Backup settings.
Downloading a message from Backup
Messages cannot be downloaded from personal Backup.
To download a message from Backup:
- In the application web interface window, select the Backup section.
- In the Backup objects table, select the message that you want to save on the hard drive.
This opens the View message information window.
- In the lower part of the window, click Download.
The message is saved in the Downloads folder of the browser.
Page top
Deleting a message copy from Backup
When deleting from personal Backup, the copy of the message is not deleted from global Backup. All operations with the copy of the message remain available in global Backup.
To delete a message copy from Backup:
- In the application web interface window, select the Backup section.
- In the Backup objects table, select the message whose copy you want to delete.
This opens the View message information window.
- Click Delete in the lower right corner.
- In the confirmation window, click OK.
The message copy is deleted from Backup.
Event log
Various events occur during the operation of Kaspersky Secure Mail Gateway. These events reflect changes in the state of the application and the results of message processing rules. To let the administrator independently analyze mistakes in application settings or monitor the operation of message processing rules, and to enable effective technical support by Kaspersky experts, Kaspersky Secure Mail Gateway logs information about all such events in the event log.
The event log is stored on application nodes. Records in the event log are automatically rotated when the maximum allowed file size or the maximum allowed storage duration is reached.
Viewing the event log
To view the Kaspersky Secure Mail Gateway event log:
- In the main window of the application web interface, open the management console tree and select the Events section.
- Select one of the following tabs depending on the type of events that you want to view:
- Mail traffic.
- System.
Event information is displayed as a table.
Columns of the table of email traffic processing events display the following information:
- Date and time is the date and time when the event occurred.
- Sender email is the email address of the message sender.
- Sender IP is the IP address of the host that sent the message.
- Recipient email is the email address of the message recipient.
- Subject is the message subject.
- Rule name is the name of the rule which caused the message to be processed.
You can view rule details by clicking the link with the rule name.
- Action is the action that was performed on the message.
- Application message ID is the unique ID that the program assigns to the message.
- SMTP message ID is the ID assigned to the message at the mail server.
- Node is the IP address or port of the node where the message was processed.
Columns of the system event table display the following information:
- Date and time is the date and time when the event occurred.
- Node is the IP address or port of the node where the message was processed.
- Event type is the type of the event.
- User is the user name of the node where the event occurred.
- Result is the result of processing the event.
- Details is the name of the detecting technology that logged the event.
- You can sort events in the columns. To do so, click the header of the column in the table:
- Events in Sender email, Recipient email, Subject, Rule name, Action, Event type, User, Result, Details columns are sorted alphabetically: A to Z and Z to A.
By default, event records are displayed in alphabetic order, A to Z.
- Events in Date and time and Node columns are sorted in ascending and descending order.
By default, event records are displayed in ascending order.
- Events in Sender email, Recipient email, Subject, Rule name, Action, Event type, User, Result, Details columns are sorted alphabetically: A to Z and Z to A.
The table of events is displayed in accordance with sorting criteria.
By default, the table displays all columns. To customize how the table is displayed, open the Customize table window by clicking the ![]() button.
button.
Configuring event table display
To configure the display of the event table:
- In the main window of the application web interface, open the management console tree and select the Events section.
- Select one of the following tabs depending on the type of events that you want to view:
- Mail traffic.
- System.
Event information is displayed as a table.
- Click .
This opens the Customize table window.
- If you want to turn the display of a table column on or off:
- If you want to display a column, select the check box next to the setting that you want to see in the table. You can select multiple settings.
- If you want to hide a column, clear the check box next to the setting that you do not want to see in the table. You can select multiple settings.
At least one check box must be selected.
- If you want to change the order of columns in the table:
- Select the row with the relevant setting.
- In the right part of the row, press and hold the
 button and drag the row up or down.
 - In the lower part of the window, click OK.
- Close the table display configuration window.
The display of the event table is configured.
Page top
Filtering email traffic processing events
You can filter events in the event log by one or more criteria.
To filter email traffic processing events in the event log:
- In the main window of the program web interface, open the management console tree and select the Events section.
- Select the Mail traffic tab.
Event information is displayed as a table.
- Click Filters.
This opens the add filter window.
- Click Add filter.
- In the fields that appear, configure the filtering criterion that you want. To do so, populate the filter fields in accordance with the following table.
a. Select one of the following criteria:
b. Select one of the following logical operators:
c. Enter the following value:
Date and time
- from
- before
Message processing period.
Sender email
- contains
- not contains
- equal
- not equal
Text for searching sender email addresses.
You can enter an email address (for example: example-email@example.com), domain name (for example: example.com) or several symbols from the email address (for example: exa).
Recipient email
- contains
- not contains
- equal
- not equal
Text for searching recipient email addresses.
Subject
- contains
- not contains
Message header search text
Rule name
- contains
- not contains
- equal
- not equal
Name of the rule that was applied when processing the message.
Action
- equal
- not equal
Action that was performed on the message.
Sender IP
- equal
- not equal
Search text for the IP address from which the message was sent.
You can enter the address in IPv4 or IPv6 format.
Application message ID
- equal
- not equal
Unique identifier assigned to the message by the program.
SMTP message ID
- contains
- not contains
- equal
- not equal
Message ID on the mail server.
This ID can be used for finding an event when responding to a user request, if you have configured an ID to be added to notifications about rejected messages.
Node
- equal
- not equal
Cluster node that processed the message.
Scan statuses
In the drop-down list on the right, select one of the following detection technologies:
- Anti-Phishing.
- Anti-Spam.
- Anti-Virus.
- Content Filtering.
- Mail Sender Authentication.
- Links scanning.
- KATA (displayed only when KATA integration is configured).
- contains
- not contains
Click the Select statuses field. In the drop-down list, select the check boxes next to the statuses that you want to use to filter events. Statuses can be combined with the logical "OR" operator.
The set of displayed statuses depends on the selected technology.
You can enter multiple filtering criteria. To add another criterion, click Add filter.
- Click Search.
- Close the add filter window.
The table of events is displayed in accordance with filtering criteria.
The table displays information about the last 5000 events. If more than 5000 events match the filtering criteria, consider refining the search criteria.
Page top
Filtering system events
Information about system events is logged in the event log of the node where the events take place. When the node is removed from the cluster or access is lost to the node, the event log becomes unavailable.
You can filter events in the event log by one or more criteria.
To filter system events in the event log:
- In the main window of the program web interface, open the management console tree and select the Events section.
- Select the System tab.
Event information is displayed as a table.
- Click Filters.
This opens the add filter window.
- Click Add filter.
- In the fields that appear, configure the filtering criterion that you want. To do so, populate the filter fields in accordance with the following table.
a. Select one of the following criteria:
b. Select one of the following logical operators:
c. Enter the following value:
Date and time
- from
- before
Time period when the event occurred.
Node
- equal
- not equal.
IP address and port of the node on which the event occurred.
Event type
- equal
- not equal.
Select one of the following event types:
- LDAP synchronization;
- Audit;
- Database update;
- Settings export;
- Settings import.
User
- contains
- not contains
- equal
- not equal.
Name of the user in LDAP under whose account the event occurred.
Actions that the program performs automatically are recorded in the event log under the "kluser" account.
Result.
- equal
- not equal.
Select one of the following options:
- Success;
- Fail.
You can enter multiple filtering criteria. To add another criterion, click Add filter.
- Click Search.
- Close the add filter window.
The table of events is displayed in accordance with filtering criteria.
The table displays information about the last 5000 events. If more than 5000 events match the filtering criteria, consider refining the search criteria.
Page top
Viewing information about email traffic processing events
Click the link in the upper part of the window to go to the Backup section and view the information about messages in Backup related to this event.
To view information about an email traffic processing event:
- In the main window of the application web interface, open the management console tree and select the Events section.
- Select the Mail traffic tab.
Email traffic processing event information is displayed as a table.
- Select the event for which you want to view information.
This opens a window containing information about the event.
The information window for an email traffic processing event contains the following fields:
- Date and time is the date and time when the event occurred.
- Node is the IP address or port of the node where the message was processed.
- Sender email is the IP address of the message sender. The address is taken from the SMTP session (value of the
MAIL FROMcommand). - To is the address of the message recipient. Contains addresses from the SMTP session (values of the
RCPT TOcommand) that occur in theToMIME header. - CC is the address of the recipient of a copy of the message. Contains addresses from the SMTP session (values of the
RCPT TOcommand) that occur in theCcMIME header, but not in theToMIME header. - BCC is the address of the recipient of a blind copy of the message. Contains addresses from the SMTP session (values of the
RCPT TOcommand) that do not occur in either theToMIME header or theCcMIME header. - Subject is the message subject.
- Rule name is the name of the rule which caused the message to be processed.
You can view rule details by clicking the link with the rule name.
- Action is the action that was performed on the message.
- The Scan result settings group displays statuses assigned to the message by each scanning module.
- Anti-Virus:
- Not scanned.
- Not detected.
- Encrypted.
- Error.
- Disinfected.
- Infected.
- Anti-Spam:
- Not scanned.
- Not detected.
- Trusted.
- Formal message.
- Error.
- Probable spam.
- Denylist.
- Spam.
- Massmail.
- Anti-Phishing:
- Not scanned.
- Not detected.
- Error.
- Phishing.
- Links scanning:
- Not scanned.
- Not detected.
- Error.
- Detected.
- Bases error.
- Content Filtering:
- Not scanned.
- Not detected.
- Size exceeded.
- Banned file name.
- Banned file format.
- Error.
- KATA:
- Detected.
- Error.
- Not detected.
- Not scanned.
- Skipped.
This is displayed only when KATA integration is configured.
- Anti-Virus:
- Attachment information:
- File name.
- File size (bytes).
- File formats.
The information about the file format is displayed if the format of the attached file is specified in a Content Filtering processing rule.
- Attachment scan result.
System event types
The following table describes system events that are recorded in the event log (Events → System section).
Description of system event types
Event type |
Event processing result |
Information |
|---|---|---|
Database update. |
Success |
Anti-Virus databases are up to date |
Success |
Update started |
|
Success |
Anti-Virus databases are applied. Update time: "<Date and time of the update>" |
|
Fail |
Database update error:<Name of the error> |
|
Fail |
Error loading Anti-Virus databases: <Name of the error> |
|
Success |
Anti-Spam databases are up to date |
|
Success |
Anti-Spam databases are applied. Update time: "<Date and time of the update>" |
|
Fail |
Error loading Anti-Spam databases: <Name of the error> |
|
Success |
Anti-Phishing databases are up to date |
|
Success |
Anti-Phishing databases are applied. Update time: "<Date and time of the update>" |
|
Fail |
Error loading Anti-Phishing databases: <Name of the error> |
|
Audit |
Success |
Audit started |
LDAP synchronization |
Success |
LDAP synchronization started |
Settings export |
Fail |
Application settings export failed |
Success |
Application settings are exported |
|
Settings import |
Fail |
Application settings import failed |
Success |
Application settings are imported |
Exporting the event log
You can export the event table to a CSV file.
To export the event table:
- In the main window of the application web interface, open the management console tree and select the Events section.
- Select one of the following tabs depending on the type of events that you want to view:
- Mail traffic.
- System.
Event information is displayed as a table.
- Click Export.
- If the browser settings enable the capability to choose the path for saving downloading files, the selection window will open. Specify the path where you want to save the file and click Save.
The file begins downloading. The event table is exported into a CSV file.
If you have filtered the events in the table, configured sorting for events in columns or column display in the table, all settings are saved when you export the table to a file.
Page top
Configuring the event log
When configuring the event storage duration and selecting event types to be logged, you must take into account the amount of free disk space on processing servers.
Settings for event logging in the event log do not affect Syslog event logging settings.
To configure the logging of events in the event log:
- In the program web interface window, select the Settings → Logs and events → Events section.
- In the Mail traffic settings group:
- In the Log mail processing events drop-down list, select traffic processing events that you want to be logged in the event log. You can select one of the following options:
- All
- Delete message/Delete attachment/Reject action applied
- Nothing
By default, the All option is selected.
New settings are applied only to events logged in the event log after the settings are applied. New settings do not apply to events that were logged earlier.
Settings are applied on all cluster nodes.
- In the Maximum event log size (MB) field, enter the size of the event log that, when reached, will cause earlier records to be deleted.
Default value: 1024 MB. Possible values: integers from 100 to 2147483647.
- In the Logging period (days) field, enter the number of days during which the program must store network traffic processing events on the server.
Default value: 3 days. Possible values: integers from 1 to 8589934592.
- In the Log mail processing events drop-down list, select traffic processing events that you want to be logged in the event log. You can select one of the following options:
- In the System group of settings, in the Maximum number of events field, enter the number of Kaspersky Secure Mail Gateway events that, if exceeded, will cause older records to be deleted.
The default value is 100,000. Possible values: integers from 1 to 2147483647.
Event logging in the event log is configured.
Page top
Message queue
This section contains information on working with Kaspersky Secure Mail Gateway message queues, as well as how to sort, filter, and flush messages from the message queue, Anti-Spam Quarantine and KATA Quarantine, or search messages in queue.
Viewing the table of queued messages
To view the table of queued messages:
In the application web interface window, select the Message queue section.
The table displays the following information about messages in the queue:
- Queue.
- Message ID.
- Sender email.
The address is taken from the SMTP session.
- Recipient email.
The address is taken from the SMTP session.
- Subject.
Displayed only for messages from the queues of KATA Quarantine and Anti-Spam Quarantine.
- Message size.
- Received at.
- Error.
- Node.
By default, the table displays all columns. To customize how the table is displayed, open the Customize table window by clicking the ![]() button.
button.
Enabling and disabling the transmission and reception of messages
To enable or disable transmission or reception of messages by the mail transfer agent of Kaspersky Secure Mail Gateway:
- In the application web interface window, select the Message queue section.
- Click Manage settings for sending/receiving.
This opens the Settings for sending and receiving window.
- In the Select node drop-down list, select the node for which you want to configure receiving or sending messages.
If you want to apply settings to all cluster nodes simultaneously, select All nodes.
- You can enable or disable receiving messages using the Receiving toggle switch.
- You can enable or disable sending messages using the Sending toggle switch.
If in advanced MTA settings, the Reject messages for unknown recipient domains
Attention! These settings control transmission and reception of messages by the mail transfer agent of Kaspersky Secure Mail Gateway.
Viewing overall statistics
KATA Quarantine information is displayed only when KATA integration is configured.
To view summary statistics on all cluster nodes:
In the application web interface window, select the Message queue section.
The following information is displayed:
- MTA queue, occupied. Cumulative size of messages in all Postfix queues and percentage of occupied disk space.
- MTA queue, messages. Current total number of messages in all Postfix queues.
- Anti-Spam Quarantine, occupied. Size of the Anti-Spam Quarantine and Anti-Spam Quarantine usage percentage relative to the maximum size set in the Anti-Spam module settings.
- Anti-Spam Quarantine, messages. The current number of messages in Anti-Spam Quarantine.
- KATA Quarantine, occupied. KATA Quarantine size and KATA Quarantine usage percentage compared to the maximum size defined in the KATA protection settings.
- KATA Quarantine, messages. Current number of messages in KATA Quarantine.
You can also view individual statistics on each cluster node.
Viewing statistics by node
KATA Quarantine information is displayed only when KATA integration is configured.
To view statistics on individual cluster nodes:
- In the application web interface, select the Message queue section.
- Click the Show queue statistics on the nodes button.
The Queue statistics on the nodes page opens.
This page displays a table containing statistics on queues for cluster nodes. The table contains the following columns:
- Node. IP address and port for connecting to the cluster node.
- MTA queue, messages. Current total number of messages in all Postfix queues.
- MTA queue, occupied. Cumulative size of messages in all Postfix queues.
- MTA queue, occupied (%). Percentage of disk space occupied by messages of all Postfix queues.
- Anti-Spam Quarantine, messages. The current number of messages in Anti-Spam Quarantine.
- Anti-Spam Quarantine, occupied. Anti-Spam Quarantine size.
- Anti-Spam Quarantine, occupied (%). Anti-Spam Quarantine usage percentage compared to the maximum size defined in the Anti-Spam module settings.
- KATA Quarantine, messages. Current number of messages in KATA Quarantine.
- KATA Quarantine, occupied. KATA Quarantine size.
- KATA Quarantine, occupied (%). KATA Quarantine usage percentage compared to the maximum size defined in the KATA protection settings.
If the queues contain more than 5000 messages, their approximate number is displayed.
Sorting messages in queue
To sort messages in the queue:
- In the application web interface window, select the Message queue section.
This opens a table of messages in the message queue.
- Click the table column header by which you want to sort messages:
- Queue to sort by the name of the queue.
- Message ID to sort by Message ID in queue.
- Sender email to sort by sender address. The address is taken from the SMTP session.
- Recipient email to sort by recipient address. The address is taken from the SMTP session.
- Subject to sort by message subject.
- Message size to sort by message size.
- Received at to sort by the time when the message was queued.
- Error to sort by message scan error.
- Node to sort by cluster node which processed the message.
- If you want to change the sorting order, click the header of the column again. The new sorting order will be displayed to the left of the name of the column as the
 or
or  button.
Messages in the queue are sorted.
Filtering and searching queued messages
To filter or find messages in the queue:
- In the application web interface window, select the Message queue section.
- Click Filters.
This opens the Filters window.
- In the Queue group of settings, select check boxes next to names of queues that you want to use to filter messages.
You can select one queue or multiple queues:
- KATA Quarantine.
- Anti-Spam Quarantine.
- Deferred.
- Hold.
- Active.
- Inbound.
The Inbound queue contains messages from the Incoming and Maildrop queues.
- Click Add filter to add a filter criterion to search for messages.
- In the fields that appear, configure the filtering criterion that you want. To do so, populate the filter fields in accordance with the following table.
a. Select one of the following criteria:
b. Select one of the following logical operators:
c. Enter the following value:
Sender email
- contains
Text for searching sender email addresses.
You can enter an email address (for example: example-email@example.com), domain name (for example: example.com) or several symbols from the email address (for example: exa).
Recipient email
- contains
Text for searching recipient email addresses.
Message date
- from
- before
Time period for processing messages and storing them in Backup.
Message size (KB)
- less or equal.
- more or equal.
Size limit for message search in kilobytes.
Message ID
- contains
Unique identifier assigned to the message by the program.
Node
- equal
- not equal
Cluster node that processed the message.
You can enter multiple filtering criteria. To add another criterion, click
 .
. - Click Apply.
Copies of messages that match the search criteria are displayed in the list of messages in the Message queue section.
The table displays information about the last 5000 messages. If more than 5000 messages match the filtering criteria, consider refining the search criteria.
Forced delivery of queued messages
Forced delivery of messages from Anti-Spam quarantine can lower the level of spam detection.
Frequent attempts to send undelivered messages outside of the queue cause the remaining messages to be delivered more slowly.
To force send messages from the queue:
- In the application web interface window, select the Message queue section.
- Select the check boxes next to the messages that you want to send, or select all messages.
- In the toolbar in the upper part of the working area, click Flush.
If you selected all messages and defined filtering criteria, this operation is applied only to the messages that meet the defined criteria. If you need to send all messages in queue, you must reset the filter.
- In the confirmation window, do one of the following:
- If the number of messages is less than 5000, click the OK button to confirm flushing of all messages (selected messages or those that meet the defined filtering criteria).
- If the number of messages exceeds 5000, choose whether you need to send only the displayed messages or all messages (all queued messages or those that meet the defined filtering criteria).
The messages are sent.
Deleting queued messages
When a message is removed from the queue, the message is deleted. The recipient does not receive the message, and the sender does not receive any notifications.
To delete messages from the queue:
- In the application web interface window, select the Message queue section.
- Select the check boxes next to the messages that you want to delete, or select all messages.
- In the toolbar at the top of the working area, click Delete.
If you selected all messages and defined filtering criteria, this operation is applied only to the messages that meet the defined criteria. If you need to delete all messages in queue, you must reset the filter.
- In the confirmation window, do one of the following:
- If the number of messages is less than 5000, click the OK button to confirm deletion of all messages (selected messages or those that meet the defined filtering criteria).
- If the number of messages exceeds 5000, choose whether you need to delete only the displayed messages or all messages (all queued messages or those that meet the defined filtering criteria).
The messages are deleted.
Page top
Reports
You can create reports to keep track of results produced by the application.
Kaspersky Secure Mail Gateway supports one-off on-demand reports as well as scheduled reports.
Information about all created reports is displayed in a table in the Reports section. For your convenience, you can filter and sort report entries.
To view the contents of a report, you can:
- Configure the report to be emailed when creating it on demand or scheduling it
- Forward a previously created report to additional addresses or re-send it to original addresses
- Download the report
You can change the default address that is configured as the sender of application performance reports.
Reports are stored in a database on the Control node. If you assign the Control node role to a different server in the cluster, all previously created reports are lost.
Creating on-demand reports
To create an on-demand report:
- In the application web interface window, select the Reports section.
- Select the On demand tab.
- Click Create report.
This opens the Create a report manually window.
- In the Period drop-down list, select the type of time period for which you want to generate a report:
- Custom means any time period (the last 124 days are available).
- Day means 00:00:00 to 23:59:59 of the selected day (if the current day is selected, 00:00:00 to report creation time).
The last 7 days are available including the current day.
- Week means 00:00:00 Monday to 23:59:59 Sunday of the selected week (if the current week is selected, 00:00:00 Monday to report creation time).
The last 17 weeks are available including the current week.
- Month means 00:00:00 of the 1st day of the selected month to 23:59:59 of the last day of the selected month (if the current month is selected, 00:00:00 of the 1st day to report creation time).
The last 4 months are available including the current month.
- Year means 00:00:00 of January 1st to 23:59:59 of December 31st of the selected year (if the current year is selected, 00:00:00 of January 1st to report creation time).
The last 3 years are available including the current year.
- Click the text box in the field below to open a calendar. In the calendar, select a time period that you want to be represented in the report.
- In the Nodes drop-down list, select the address of the cluster node for which you want to get a report, or All nodes if you want to get a report for all nodes.
- If you want to email the newly created report, in the Delivery settings group of settings, click Add.
A new group of settings is displayed for report delivery.
- In the Email addresses field, enter addresses to which you want to send the report.
You can enter multiple semicolon-separated addresses.
- In the Format drop-down list, select the file format that you want to use when sending the report.
- In the Language drop-down box, select the language of the report.
- If necessary, you can add a new group of settings by clicking Add or remove an unnecessary group of settings by clicking to the right of the group.
- Click Generate.
The report is created. Report information is displayed in a table on the On demand tab. You can download the newly created report or send it by email.
Configuring scheduled reports
You can configure any scheduled report type (daily, weekly, or monthly) independently from each other.
Scheduled reports contain information on all cluster nodes. You cannot select individual nodes.
To configure scheduled reports:
- In the application web interface window, select the Reports section.
- Select the By schedule tab.
- Click Set up schedule.
This opens the Set up schedule window.
- Select one of the following tabs depending on the type of report that you want to configure:
- Daily. The report covers the period from 00:00 to 23:59 of the preceding day.
- Weekly. The report covers the period from 00:00 Monday to 23:59 Sunday of the preceding week.
- Monthly. The report covers the period from 00:00 of the first day of the preceding month to 23:59 of the last day of the preceding month.
- Set the toggle switch with the name of the report type to Enabled.
- In the Schedule group of settings, enter the time when you want scheduled reports to be created.
- If you want to send reports by email, in the Delivery settings group of settings, click Add.
A new group of settings is displayed for report delivery.
- In the Email addresses field, enter addresses to which you want to send reports.
You can enter multiple semicolon-separated addresses.
- In the Format drop-down list, select the file format that you want to use when sending reports.
- In the Language drop-down box, select the language of reports.
- If necessary, you can add a new group of settings by clicking Add or remove an unnecessary group of settings by clicking to the right of the group.
- Click Save.
Scheduled reports are configured. As soon as the first report is created at the specified time, information about the report is displayed in the report table. You can download the report or send it by email.
Page top
Configuring report table display
By default, the report table displays all available columns. If necessary, you can hide some of them or change the order.
To configure the display of the report table:
- In the application web interface window, select the Reports section.
- Select one of the following tabs:
- On demand if you want to configure the one-off on-demand report table.
- By schedule if you want to configure the scheduled report table.
The workspace displays the table of created reports.
- Click in the first row of the table.
This opens the Customize table window.
- Select the check boxes next to the columns that you want displayed in the table.
- If you want to change the position of a column in the table, in the right part of the row with the name of the column, click and hold the button and drag the column to the desired position.
- Click OK.
The display of the report table is configured.
Page top
Filtering and sorting reports
You can sort previously created report entries by the value of any column in the report table. You can set ascending or descending sorting order by clicking  in the column header.
You can also filter reports by creation time, time period covered by the report, or type (only for scheduled reports).
To filter reports:
- In the application web interface window, select the Reports section.
- Select one of the following tabs:
- On demand if you want to filter one-off on-demand reports.
- By schedule if you want to filter scheduled reports.
The workspace displays the table of created reports.
- Click the icon.
This opens the Filters window.
- Click Add filter to add a filter criterion to search for reports.
- In the fields that appear, configure the filtering criterion that you want. To do so, populate the filter fields in accordance with the following table.
a. Select one of the following criteria:
b. Select one of the following logical operators:
c. Enter the following value:
Type
- equal
- not equal
In the drop-down list, select a report type (only for scheduled reports):
- Daily
- Weekly
- Monthly.
Creation time
- from
- before
Report creation time range.
Period start date
- from
- before
Report period start time range.
Period end date
- from
- before
Report period end time range.
You can enter multiple filtering criteria.
- Click Apply.
The report table is populated with reports that satisfy the search criteria.
Page top
Viewing report information
To view information about a report:
- In the application web interface window, select the Reports section.
- Select one of the following tabs:
- On demand if you want to view information about one-off on-demand reports.
- By schedule if you want to view information about scheduled reports.
The workspace displays the table of created reports.
- Select the report for which you want to view information.
This opens the View report information window.
The window displays the following report information:
- Creation time. Report creation time.
- Period. Time period that is covered by the information contained in the report.
- Type. Scheduled report type:
- Daily.
- Monthly.
- Weekly.
Not displayed for on-demand reports.
- Nodes. IP addresses and connection ports for nodes covered by the report (or All nodes).
- Delivery settings. Group of settings concerned with email delivery of the report, which includes a list of addresses, language, and format of the report.
- On creation. Delivery settings specified when the report was created.
- By forwarding. Delivery settings specified for a previously created report when it was forwarded to additional addresses.
The Delivery settings block displays only unique groups of settings.
- Result. The following values are possible:
- Error.
- Pending.
- Success.
Report contents
Reports contain the following information about application performance.
- The General information section.
- Detects. Number and volume of processed messages, counted separately for each application module:
- Anti-Virus.
- Links scanning.
- KATA protection.
This is displayed only when KATA integration is configured.
- Anti-Phishing.
- Anti-Spam.
- Mail Sender Authentication.
- Content Filtering.
- Actions. Number and volume of processed messages, counted for each type of action performed by the application:
- Not detected.
- Disinfected.
- Attachments deleted.
- Skipped.
- Unprocessed.
- Deleted.
- Rejected.
- Quarantined.
- Nodes. Number and volume of processed messages counted for each cluster node that processes email traffic.
- Detects. Number and volume of processed messages, counted separately for each application module:
- The Object types section.
- Anti-Virus. Number of messages for the selected period, counted for each Anti-Virus scan status:
- Not detected.
- Detected.
- Attachments with macros.
- Unprocessed messages.
Unprocessed messages are grouped by the following reasons why the scan was not performed:
- Encrypted. Could not scan because the message was encrypted.
- Scan error. An error occurred during Anti-Virus scan.
- Application settings. Anti-Virus scanning disabled in general protection settings.
- License restrictions. License issues.
- Bases error. Anti-virus databases are missing.
- Links scanning. Number of messages for the selected period, counted for each link scanning status:
- Not detected.
- Detected.
- Unprocessed messages.
Unprocessed messages are grouped by the following reasons why the scan was not performed:
- Scan error. An error occurred during link scanning.
- Application settings. Link scanning disabled in general protection settings.
- License restrictions. License issues.
- Bases error. Application databases are missing.
- Anti-Phishing. Number of messages for the selected period, counted for each Anti-Phishing scan status:
- Not detected.
- Detected.
- Unprocessed messages.
Unprocessed messages are grouped by the following reasons why the scan was not performed:
- Scan error. An error occurred during Anti-Virus scan.
- Application settings. Anti-Phishing scanning disabled in general protection settings.
- License restrictions. License issues.
- Bases error. Application databases are missing.
- Anti-Spam. Number of messages for the selected period, counted for each Anti-Spam scan status:
- Not detected.
- Detected.
Detected objects are grouped by the following types:
- Spam.
- Probable spam.
- Massmail.
- Quarantined.
- Unprocessed messages.
Unprocessed messages are grouped by the following reasons why the scan was not performed:
- Scan error. An error occurred during Anti-Virus scan.
- Application settings. Anti-Spam scanning disabled in general protection settings.
- License restrictions. License issues.
- Bases error. Application databases are missing.
- Mail Sender Authentication. Number of messages for the selected period, counted for each Mail Sender Authentication status:
- Not detected.
- Detected.
- Unprocessed messages.
Unprocessed messages are grouped by the following reasons why the scan was not performed:
- Application settings. Mail Sender Authentication disabled in general protection settings.
- License restrictions. License issues.
- Bases error. Application databases are missing.
- Content Filtering.
- Not detected.
- Detected.
Detected objects are grouped by the following types:
- Message size. Maximum allowed message size exceeded.
- Attachment name. Attachment name matches criteria set in the message processing rule.
- Attachment type. Attachment format matches criteria set in the message processing rule.
- Unprocessed messages.
Unprocessed messages are grouped by the following reasons why the scan was not performed:
- Scan error. An error occurred during Anti-Virus scan.
- Application settings. Content Filtering disabled in general protection settings.
- License restrictions. License issues.
- Bases error. Application databases are missing.
- Message processing rules applied. Number and volume of messages processed for each triggered rule.
- Anti-Virus. Number of messages for the selected period, counted for each Anti-Virus scan status:
- The Anti-Virus statistic section.
- Top 10 malicious objects received. Names of the most frequent malicious objects in received messages and the number of times the Anti-Virus module was triggered for each object.
- Top 10 senders of malicious objects. Email addresses of the most frequent senders of malicious objects and the number of times the Anti-Virus module was triggered for each sender. The addresses are taken from the SMTP session.
- Top 10 recipients of malicious objects. Email addresses of the most frequent recipients of malicious objects and the number of times the Anti-Virus module was triggered for each recipient. The addresses are taken from the SMTP session.
- The Links scanning statistic section.
- Top 10 sources of malicious|adware|legitimate links. IP addresses of servers that were most frequently used to send malicious/adware/legitimate links and the number of detections for each source.
- Top 10 recipients of malicious|adware|legitimate links. Email addresses of the most frequent recipients of malicious/adware/legitimate links and the number of detections for each recipient. The addresses are taken from the SMTP session.
- The Anti-Phishing statistic section.
- Top 10 sources of phishing. IP addresses of servers that were most frequently used to send phishing messages and the number of detections for each source.
- Top 10 recipients of phishing. Email addresses of the most frequent recipients of phishing messages and the number of detections for each recipient. The addresses are taken from the SMTP session.
- The Anti-Spam statistic section.
- Top 10 sources of spam. IP addresses of servers that were most frequently used to send spam or mass mail and the number of detections for each source.
- Top 10 recipients of spam. Email addresses of the most frequent recipients of spam or mass mail and the number of detections for each recipient. The addresses are taken from the SMTP session.
Deleting reports
To delete a report:
- In the application web interface window, select the Reports section.
- Select one of the following tabs:
- On demand if you want to delete a one-off on-demand report.
- By schedule if you want to delete a scheduled report.
The workspace displays the table of created reports.
- Select the report that you want to delete.
This opens the View report information window.
- In the lower part of the window, click Delete.
- In the confirmation window, click OK.
The report is deleted.
Downloading reports
To download a report:
- In the application web interface window, select the Reports section.
- Select one of the following tabs:
- On demand if you want to download a one-off on-demand report.
- By schedule if you want to download a scheduled report.
The workspace displays the table of created reports.
- Select the report that you want to download.
This opens the View report information window.
- In the lower part of the window, click Download.
This opens the Download report window.
- In the Language drop-down box, select the language of the report.
- In the Format drop-down list, select one of the following report file formats:
- Html.
- Pdf.
- Click Download.
The report file is saved on your computer in the browser's downloads folder.
Page top
Sending reports by email
You can enter recipient email addresses when you create an on-demand report or configure scheduled reports.
If necessary, you can forward a previously created report to additional addresses or re-send it to original addresses specified when the report was created.
To send a previously created report by email:
- In the application web interface window, select the Reports section.
- Select one of the following tabs:
- On demand if you want to send a one-off on-demand report.
- By schedule if you want to send a scheduled report.
The workspace displays the table of created reports.
- Select the report that you want to send.
This opens the View report information window.
- In the lower left corner, click Deliver report.
This opens the Deliver report window.
- In the Delivery settings group of settings, click Add.
A new group of settings is displayed for delivering the report to additional addresses.
- In the Email addresses field, enter addresses to which you want to send the previously created report.
You can enter multiple semicolon-separated addresses.
- In the Format drop-down list, select the file format that you want to use when sending the report.
- In the Language drop-down box, select the language of the report.
- If necessary, you can add a new group of settings by clicking Add or remove an unnecessary group of settings by clicking to the right of the group.
- If you want to re-send the report to addresses specified when the report was created, turn on the Resend to original recipients toggle switch.
The toggle switch is not displayed if no addresses were specified under Delivery settings when the on-demand report was created or when scheduled reports were configured.
- In the lower left corner, click Send.
The report is sent to the specified addresses. The lower part of the workspace displays a pop-up window with information about the delivery result.
Page top
General protection settings
Kaspersky Secure Mail Gateway protects incoming and outgoing mail traffic of the organization. You can configure the following general protection settings:
- Anti-Virus protection
- Link scanning.
- Anti-Spam protection
- Anti-Phishing protection
- Content filtering of messages
- Mail Sender Authentication
General protection settings are applied when scanning all messages. You can configure actions taken on messages after the scan and additional settings using message processing rules.
Kaspersky Secure Mail Gateway performs anti-virus protection of messages: scans email messages for viruses and other threats and disinfects infected objects using the current (latest) version of Anti-Virus databases.
Messages are scanned for viruses and other threats by the Anti-Virus module. The Anti-Virus module scans the body of the message and all attached files in any format (attachments) using the Anti-Virus databases. The Anti-Virus module detects and blocks email attachments that are intended for a limited number of recipients and are components of targeted attacks designed to exploit software vulnerabilities.
You can configure the following settings of the Anti-Virus module:
- Maximum duration of message scan
- Maximum depth of archive scan
- exclusions from scanning for certain legitimate programs that can be used by hackers.
Based on the results of the scan, the Anti-Virus module assigns a status to the message:
- Not detected means the message is not infected.
- Infected means the message is infected; either it cannot be disinfected, or disinfection has not been attempted.
- Disinfected means the message was disinfected.
- Encrypted means the message could not be scanned because it is encrypted.
- Error means an error occurred when scanning the message.
- Bases error means the message could not be scanned because of an error while applying the application databases.
- Intrusion threat means the object can be used by hackers to intrude the LAN.
- Not scanned means the message was not scanned in accordance with the application settings.
- Probably infected means the object contains signs of malware.
The Anti-Virus module is enabled by default. If required, you can disable the Anti-Virus module or disable Anti-Virus scanning for any rule.
Kaspersky Secure Mail Gateway checks the links in the body of the message for being
, advertising, or relevant to legitimate programs that can cause harm to the computer.You can modify the following settings of link scanning:
- Maximum duration of message scan.
- Exclusions from the scan.
You can disable the detection of advertising links and links relevant to certain legitimate programs.
Based on the results of link scanning, the application assigns one of the following statuses to the message:
- Bases error means the message could not be scanned because of an application database error.
- Not detected means the message does not contain any links that would be detectable in accordance with the application settings.
- Error means the scan returned an error.
- Detected means the message contains malicious links, advertising links, or links relevant to legitimate programs.
- Not scanned means the message was not scanned in accordance with the application settings.
Kaspersky Secure Mail Gateway filters messages passing through the mail server to remove unsolicited mail (spam).
Messages are scanned for spam by the Anti-Spam module. The Anti-Spam module scans each message for signs of spam. First, the Anti-Spam module scans the attributes of the message, such as sender and recipient addresses, size, and headers (including the From and To fields). Second, the Anti-Spam module analyzes the message content (including the Subject header) and attached files.
If spam or probable spam is detected in a message, a certain status is assigned to it depending on the spam rating. The spam rating of a message is an integer number from 0 to 100, which is a sum of points awarded to the message for each time the Anti-Spam module was triggered while processing the message. The spam rating takes into account the results of the SPF scan and
.When the Anti-Spam module is enabled, protection against BEC attacks is automatically enabled. This protection helps recognize spoofed messages from hackers attempting to compromise business correspondence.
You can configure the following settings of the Anti-Spam module:
- .
The Moebius service compares the current Anti-Spam database used by the application with the database on the Moebius server and determines the difference. Missing entries are then sent to the Control node over HTTPS. To keep the size of transmitted data reasonable and ensure normal functioning of the Moebius server, Anti-Spam databases must be updated on a regular basis.
- Protection against Active Directory spoofing.
The Anti-Spam module helps prevent spoofing attacks in which hackers use a fake name (Display Name) in the From message header, and the domain from which the message was sent does not match the domain of the specific organization. You can indicate one Active Directory group containing at most 10 000 users which will be protected against spoofing.
- Check the reputation of IP addresses and domains.
This option lets you check SMTP session data based on records of blocked IP addresses and domains in Anti-Spam module databases.
- Anti-Spam Quarantine.
Anti-Spam Quarantine is available only if KSN participation is enabled.
After a message is placed in Anti-Spam Quarantine, the application contacts KSN servers for further scanning of the message. The KSN cloud service improves the accuracy of spam detection because KSN databases contain more up-to-date information than Anti-Spam databases used by the application.
- Maximum duration of message scan.
- Maximum storage duration of a message in Anti-Spam Quarantine
- Maximum number of messages in Anti-Spam Quarantine.
- Maximum size of the Anti-Spam Quarantine.
Based on the Anti-Spam scan results, the Anti-Spam module assigns one of the following statuses to the message:
- Not detected means the message does not contain spam.
- Spam means the message is definitely diagnosed as spam.
- Probable spam means the message is probably spam.
- Massmail means the message belongs to a mass mailing campaign.
- Error means the scan returned an error.
- Bases error means the message could not be scanned because of an application database error.
- Formal message means the application treats the message as a formal automatically generated notification (for example, auto-responses by users or notifications about exceeded mailbox size).
- Not scanned means the message was not scanned in accordance with the application settings.
- Trusted means the message was received from a sender whose domain is in the list of allowed domains in databases of the Anti-Spam module and the message passed the DMARC sender authentication.
Based on the scan results, the X-MS-Exchange-Organization-SCL X-header is added to the message. This header contains the SCL rating.
By default, the Anti-Spam module is enabled. If required, you can disable the Anti-Spam module or disable Anti-Spam scanning for any rule.
Kaspersky Secure Mail Gateway filters messages passing through the mail server to remove phishing.
Messages are scanned for phishing by the Anti-Phishing module. The Anti-Phishing module analyzes the message content (including the Subject header) and attached files.
You can configure the maximum duration of an Anti-Phishing scan.
Based on the results of the scan, the Anti-Phishing module assigns a status to the message:
- Not detected means the message does not contain phishing URLs, images or text that could trick users into disclosing confidential data to hackers, or links to websites with malware.
- Phishing means the message was found to contain images or text that could trick users into disclosing confidential data to hackers.
- Phishing link means the message was found to contain a link to a website with malware.
- Error means the scan returned an error.
- Bases error means the message could not be scanned because of an application database error.
- Not scanned means the message was not scanned in accordance with the application settings.
The Anti-Phishing module is enabled by default. If required, you can disable the Anti-Phishing module or disable Anti-Phishing scanning of messages for any rule.
Kaspersky Secure Mail Gateway can perform content filtering of messages that pass through the mail server. You can restrict transmission of messages with specific parameters by the mail server.
You can configure the following settings of Content Filtering:
- Maximum duration of message scan
- Maximum depth of archive scan
As a result of content filtering, the Scan Logic message scanning control module assigns one of the following content filtering statuses to messages:
- Not detected means the message has not been found to contain any violations of the restrictions specified in content filtering settings.
- Banned file name means the message contains an attachment with a banned name.
- Banned file format means the message contains an attachment having a banned file format.
- Size exceeded means the message exceeds the maximum allowed size.
- Bases error means the message could not be scanned because of an application database error.
- Error means the message scan returned an error.
- Not scanned means the message was not scanned in accordance with the application settings.
By default, Content filtering of messages is enabled. If necessary, you can disable Content Filtering in general protection settings or per rule.
Mail Sender Authentication is designed to provide additional protection for your corporate mail infrastructure against spam and phishing.
Kaspersky Secure Mail Gateway uses the following Mail Sender Authentication technologies:
- SPF authentication (Sender Policy Framework).
- DKIM authentication (DomainKeys Identified Mail).
- DMARC authentication (Domain-based Message Authentication, Reporting and Conformance).
SPF Mail Sender Authentication – comparing IP addresses of mail senders with the list of possible message sources that has been created by the mail server administrator.
Kaspersky Secure Mail Gateway receives lists of possible message sources from the DNS server.
Enable SPF message authentication if Kaspersky Secure Mail Gateway receives messages directly from the Internet. Disable SPF message authentication if Kaspersky Secure Mail Gateway receives messages from an intermediate internal server.
DKIM Mail Sender Authentication – verification of the digital signature added to messages.
A digital signature associated with the name of the organization's domain is added to messages. Kaspersky Secure Mail Gateway verifies this digital signature.
DMARC Mail Sender Authentication – Verification that determines the policy and actions taken on messages based on the results of SPF and DKIM Mail Sender Authentication.
SPF- and DKIM authentication must be enabled to perform DMARC authentication. If SPF- or DKIM authentication is disabled, DMARC authentication will also be disabled.
After the message has passed SPF and DKIM authentication, the program verifies that the domain containing the sender address in the From field of the message header matches the SPF and DKIM IDs.
To enable SPF, DKIM, and DMARC Mail Sender Authentication, you must allow Kaspersky Secure Mail Gateway to connect to the DNS server. If the connection to the DNS server is prohibited, SPF, DKIM, and DMARC Mail Sender Authentication is disabled.
Based on the results of Mail Sender Authentication, one of the following statuses is assigned to the message:
- Not detected means authentication violations were not detected in the message.
- Error means an error occurred during authentication.
- Authentication failed means authentication could not be performed.
- Not scanned means the message was not scanned in accordance with application settings.
- Violation found means at least one authentication was violated.
- Violation not found means authentication violations were not detected.
By default, all Mail Sender Authentication checks are enabled. If necessary, you can disable any Mail Sender Authentication in general protection settings or per rule.
To let the remote mail server perform Message Sender Authentication of outgoing messages (when the message sender is Kaspersky Secure Mail Gateway), you must take steps to add SPF and DMARC records to the settings of your DNS server.
About computer protection against certain legitimate applications
Legitimate programs are programs that may be installed and used on computers of users and are intended for performing user tasks. However, when exploited by hackers, legitimate programs of certain types can harm the user's computer and the corporate LAN. If hackers gain access to these programs, or if they plant them on the user's computer, some of their features can be used to compromise the security of the user's computer or the corporate LAN.
These programs include IRC clients, dialers, file downloaders, computer system activity monitors, password management utilities, and Internet servers for FTP, HTTP, and Telnet.
Such programs are described in the table below.
Legitimate programs
Type |
Name |
Description |
|---|---|---|
Client-IRC |
Online chat clients |
Users install these programs to communicate with people in Internet Relay Chats. Hackers use them to spread malware. |
Dialer |
Auto-dialers |
They can establish hidden phone connections using a modem. |
Downloader |
Downloader programs |
These programs can download files from web pages in hidden mode. |
Monitor |
Monitoring programs |
These programs allow monitoring activities on the computer on which they are installed (seeing which programs are active and how they exchange data with programs that are installed on other computers). |
PSWTool |
Password recovery tools |
These programs allow viewing and recovery of forgotten passwords. Hackers secretly plant them on computers for the same purpose. |
RemoteAdmin |
Remote administration programs |
These programs are widely used by system administrators. These programs allow obtaining access to the interface of a remote computer to monitor and manage it. Hackers secretly plant them on computers for the same purpose: to monitor and control computers. Legitimate remote administration programs differ from Backdoor-type Trojans for remote administration. Trojans have the capability to penetrate the system and perform an unauthorized installation of themselves; legitimate programs do not have such capability. |
Server-FTP |
FTP servers |
These programs function as FTP servers. Hackers plant them on computers to obtain remote access over the FTP protocol. |
Server-Proxy |
Proxy servers |
These programs function as proxy servers. Hackers plant them on computers to send spam from them. |
Server-Telnet |
Telnet servers |
These programs function as Telnet servers. Hackers plant them on computers to obtain remote access over the Telnet protocol. |
Server-Web |
Web servers |
These programs function as web servers. Hackers plant them on computers to obtain remote access over the HTTP protocol. |
RiskTool |
Tools for managing a virtual machine |
These programs offer the user additional capabilities for managing the computer. The tools allow the user to hide files or windows of active programs and terminate active processes. |
NetTool |
Network tools |
These programs offer the user of the computer on which they are installed additional capabilities for interacting with other computers on the network. These tools allow restarting other computers, detecting open ports, and running programs that are installed on the computers. |
Client-P2P |
P2P network clients |
These programs allow using peer-to-peer (P2P) networks. These programs can be used by hackers to spread malware. |
Client-SMTP |
SMTP clients |
These programs send email messages without the user's knowledge. Hackers plant them on computers to send spam from them. |
WebToolbar |
Web toolbars |
These programs add toolbars to the interfaces of other programs to use search engines. |
FraudTool |
Fake programs |
These programs pass themselves off as other programs. For example, there are fake anti-virus programs that display messages about detected malware. However, in reality, they do not find or disinfect anything. |
Configuring the Anti-Virus module
To configure the Anti-Virus module:
- In the application web interface window, select the Settings → General → Protection section.
- Select the Anti-Virus tab.
- Enable or disable the Anti-Virus module using the Use Anti-Virus toggle switch.
The Anti-Virus module is enabled by default.
- If at the previous step you enabled the Anti-Virus module, configure the following anti-virus scan settings:
- If you want to use technology for detecting threats that the program cannot detect using Anti-Virus databases, use the Use heuristic analysis toggle switch to enable heuristic analysis.
By default, heuristic analysis is enabled.
- If you have enabled heuristic analysis, in the Heuristic analysis level drop-down list, select one of the following levels:
- Light.
- Medium.
- Deep.
By default, the Medium level is selected.
- In the Maximum scanning time (s) field, specify the maximum duration of Anti-Virus scanning of a message in seconds.
Possible values: integers from 1 to 600. Default value: 180.
If the virus scan of a message does not finish within the time limit you specified, Kaspersky Secure Mail Gateway:
- Interrupts the message scan.
- Performs your configured action on the message.
- Assigns the Error status to the message.
- Adds a record to the /var/log/ksmg-messages event log.
- In the Maximum scanned level of archives field, specify the maximum nesting level of messages scanned by the Anti-Virus module.
Possible values: integers from 1 to 20000. Default value: 32.
- If you want to use technology for detecting threats that the program cannot detect using Anti-Virus databases, use the Use heuristic analysis toggle switch to enable heuristic analysis.
- If necessary, configure exclusions from Anti-Virus scanning. To do so, in the Scan exclusions group of settings, enable or disable Anti-Virus scanning of , which can harm the corporate LAN if exploited by hackers, using the Some legitimate applications toggle switch.
By default, messages containing legitimate programs are excluded from scanning. If this setting is disabled, the action specified in rules for infected objects is applied to such messages.
- Click Save.
The Anti-Virus module is configured.
Page top
Configuring URL Advisor
You can turn on link scanning to track links that lead to malicious websites as well as advertising links and links relevant to legitimate software that can harm your corporate LAN if used by hackers.
To configure link scanning:
- In the application web interface window, select the Settings → General → Protection section.
- Select the Links scanning tab.
- Enable or disable link scanning using the Scan links toggle switch.
By default, link scanning is enabled.
- In the Maximum scanning time (s) field, specify the maximum duration of a message scan in seconds.
Possible values: integers from 1 to 600. Default value: 30.
If the message cannot be scanned within the time limit you specified, Kaspersky Secure Mail Gateway:
- Interrupts the message scan.
- Performs your configured action on the message.
- Assigns the Error status to the message.
- Adds a record to the /var/log/ksmg-messages event log.
- If necessary, configure exclusions from scanning. To do so, in the Scan exclusions settings group:
- Use the Adware links toggle switch to enable or disable scanning of adware.
This setting is enabled by default, which means that adware is not scanned.
- Use the Links related to some legitimate applications toggle switch to enable or disable scanning of links to certain legitimate applications that could potentially harm the corporate LAN if exploited by hackers.
This setting is enabled by default, which means that links to certain legitimate applications are not scanned.
- Use the Adware links toggle switch to enable or disable scanning of adware.
- Click Save.
Link scanning is configured.
Page top
Configuring the Anti-Spam module
The Anti-Spam module only scans the first 50 MB of the message. If the message is bigger, the rest of it is not scanned, and the status is assigned based on the first 50 MB.
To configure the Anti-Spam module settings:
- In the application web interface window, select the Settings → General → Protection section.
- Select the Anti-Spam tab.
- Enable or disable the Anti-Spam module with the Use Anti-Spam toggle switch.
By default, the Anti-Spam module is enabled.
- If at the previous step you enabled the Anti-Spam module, configure the following:
- Enable or disable the Moebius service with the Use Moebius toggle switch.
By default, the Moebius is disabled.
- Use the Protection against AD spoofing toggle switch to enable or disable protection against spoofing attacks.
Protection against spoofing attacks is disabled by default.
- If you enabled protection against spoofing attacks at the previous step, use the Group LDAP: distinguishedName field to specify the Active Directory group whose users will receive this protection.
You can add only one group. The number of entries in a group containing an email address must not exceed 10000. When this number is exceeded, protection against spoofing attacks will be applied to 10000 users randomly selected from this group.
- Use the IP and domain reputation toggle switch to enable or disable use of the Anti-Spam module databases to check the reputation of IP addresses and domains that were the source of messages.
Checking the reputation of IP addresses and domains is enabled by default.
- Enable or disable Anti-Spam Quarantine with the Use Anti-Spam Quarantine toggle switch.
If Anti-Spam Quarantine is enabled, email messages that do not have a final Anti-Spam check result are temporarily stored in Anti-Spam Quarantine.
Modifying default Anti-Spam quarantine settings can lower the level of spam detection.
- In the Maximum scanning time (s) subsection, specify the maximum duration of Anti-Spam scanning of a message in seconds.
Possible values: integers from 1 to 600. Default value: 30.
If Anti-Spam scanning of a message does not finish within the time limit you specified, Kaspersky Secure Mail Gateway:
- Stops scanning the message (Skip action).
- Assigns the Error status to the message.
- Delivers the message to the recipient.
- Adds a record to the /var/log/ksmg-messages event log.
- Enable or disable the Moebius service with the Use Moebius toggle switch.
- In the Maximum Quarantine duration (s) field, specify the time to store a message in Anti-Spam Quarantine before the message is delivered to the recipient.
Possible values: integers from 1 to 86400. Default value: 3000.
- In the Maximum number of messages, specify the number of messages that, once exceeded, prevents messages from being quarantined.
Specify 0 if no limit is required.
Possible values: integers from 0 to 9007199254740993. Default value: 0.
- In the Maximum Quarantine size (MB) field, enter the size of Anti-Spam Quarantine that, once exceeded, prevents messages from being quarantined.
Possible values: integers from 0 to 8192. Default value: 1024.
- Click Save.
The Anti-Spam module is configured.
Page top
Configuring the Anti-Phishing module
To configure the Anti-Phishing module:
- In the application web interface window, select the Settings → General → Protection section.
- Select the Anti-Phishing tab.
- Enable or disable the Anti-Phishing module with the Use Anti-Phishing toggle switch.
The Anti-Phishing module is enabled by default.
- If at the previous step you enabled the Anti-Phishing module, in the Maximum scanning time (s) field, enter the maximum duration of an Anti-Phishing scan in seconds.
Possible values: integers from 1 to 600. Default value: 30.
If the message cannot be scanned within the time limit you specified, Kaspersky Secure Mail Gateway:
- Interrupts the message scan.
- Performs your configured action on the message.
- Assigns the Error status to the message.
- Adds a record to the /var/log/ksmg-messages event log.
- Click Save.
The Anti-Phishing module is configured.
Page top
Configuring Content Filtering
To configure Content Filtering:
- In the application web interface window, select the Settings → General → Protection section.
- Select the Content Filtering tab.
- Enable or disable Content Filtering with the Use Content Filtering toggle switch.
By default, Content Filtering is disabled.
- If at the previous step, you have enabled Content Filtering, configure the following:
- In the Maximum scanning time (s) field, specify the maximum duration of content scan of a message in seconds.
Possible values: integers from 1 to 600. Default value: 30.
If the message cannot be scanned within the time limit you specified, Kaspersky Secure Mail Gateway:
- Stops scanning the message (Skip action).
- Assigns the Error status to the message.
- Delivers the message to the recipient.
- Adds a record to the /var/log/ksmg-messages event log.
- In the Maximum scanned level of archives field, specify the maximum message nesting level down to which Content Filtering is performed.
Possible values: integers from 1 to 20000. Default value: 32.
If you set this field to a value other than 0, the application will scan archives only to the specified depth even if their nesting level is greater than the specified value. If no violations of restrictions configured in Content Filtering settings are found down to the specified depth, the application displays the scanning result as Not detected.
- In the Maximum scanning time (s) field, specify the maximum duration of content scan of a message in seconds.
- Click Save.
Content Filtering is configured.
Page top
Configuring external services
To configure external services:
- In the application web interface window, select the Settings → General → Protection section.
- Select the External services tab.
- Allow or prohibit connecting to a DNS server using the Allow connection to DNS server toggle switch.
By default, connection is allowed.
If the connection to the DNS server is prohibited, SPF, DKIM, and DMARC Mail Sender Authentication is disabled.
- In the DNS server timeout (s) field, specify the maximum time in seconds to wait for a response from the DNS server.
The default value is 10 seconds. When this time elapses, the DNS server is considered unavailable and the message is processed without Mail Sender Authentication.
- In the KSN server timeout (s) field, specify the maximum KSN server timeout in seconds.
The default value is 10 seconds. When this time elapses, the KSN server is considered unavailable and the message is processed without a KSN reputation database scan.
The option is used only if you have consented to participation in the Kaspersky Security Network program or Kaspersky Private Security Network.
- Enable or disable SPF Mail Sender Authentication using the Use SPF toggle switch.
If SPF Mail Sender Authentication is enabled, IP addresses of message senders are matched against the list of possible message sources created by the administrator of the mail server.
Before you enable SPF authentication, you must perform prepare the DNS server.
By default, this authentication is enabled.
- Enable or disable DKIM Mail Sender Authentication using the Use DKIM toggle switch.
If DKIM Mail Sender Authentication is enabled, the application verifies digital signatures of messages.
By default, this authentication is enabled.
- Enable or disable DMARC Mail Sender Authentication using the Use DMARC toggle switch.
If you enabled DMARC Mail Sender Authentication, the application checks if the domain of the sender address matches the SPF and DKIM IDs. The address is taken from the 'From' MIME header.
Before you enable DMARC authentication, you must perform prepare the DNS server.
By default, this authentication is enabled.
If SPF- or DKIM authentication is disabled, DMARC authentication will also be disabled.
- Click Save.
External services are configured.
Page top
Preparing to configure SPF and DMARC Mail Sender Authentication for outgoing messages
In order for the remote mail server to be able to perform message authentication when the message sender is Kaspersky Secure Mail Gateway (authentication of the sender of outgoing messages), you have to add the SPF and DMARC records to the settings of your DNS server.
To add SPF and DMARC records to the settings of your DNS server:
- Sign in to your DNS server under the administrator account.
- Locate the page with information on updating DNS records of the domain for whose addresses you want to configure Mail Sender Authentication for outgoing messages.
For example, this page can be named "DNS Management", "Name Server Management", or "Advanced Settings".
- Find records in TXT format for the domain for whose addresses you want to configure Mail Sender Authentication for outgoing messages.
- In the list of records in TXT format, add the SPF record for a certain domain with the following contents:
<name of the domain for whose addresses you want to configure SPF Mail Sender Authentication for outgoing messages> IN TXT "v=<SPF version> +all>"For example, you can add the following string:
example.com IN TXT "v=spf1 +all"For details on configuring settings of the SPF record, see the RFC 7208 document.
- In the list of records in TXT format, add the DMARC record for a certain domain with the following contents:
_dmarc.<name of the domain for whose addresses you want to configure DMARC Mail Sender Authentication for outgoing messages>. IN TXT "v=<DMARC version>; p=<action that the remote mail server will perform on all email messages that do not satisfy the DMARC requirements>;"For example, you can add the following string:
_dmarc.example.com. IN TXT "v=DMARC1; p=quarantine;"See DMARC documentation for details on configuring settings of the DMARC record.
- Save changes.
The syntax of the sample SPF and DMARC records is provided for purposes of adding it to the settings of a BIND DNS server. The syntax of the SPF and DMARC records to be added to other DNS servers may differ slightly from the examples provided.
Configuring date and time
You can configure the server time used in application settings. Database updates and message processing rules for which the schedule is defined will be applied based on the set time.
To configure the time on the server:
- In the application web interface, select the Settings → General → Date and time section.
- In the Time zone settings group:
- In the Country drop-down list, select the country of the necessary time zone.
- In the Time zone drop-down list, select the time zone.
- In the Time synchronization settings group, use the Synchronize with NTP server toggle switch to enable or disable synchronization with an NTP server.
If the application ISO image is deployed on a VMware virtual machine, time synchronization with the hypervisor is automatically disabled if you enable synchronization with an NTP server. If you are using the Hyper-V hypervisor, you can enable or disable time synchronization in virtual machine settings in the Settings → Integration Service section using the Time Synchronization check box.
- If you have enabled synchronization with an NTP server, in the NTP servers field, type the fully qualified domain name (FQDN) or IP address of the NTP server in IPv4 or IPv6 format and press Enter.
You can type addresses one by one or paste a whole list of semicolon-separated servers.
- Click Save.
- Restart all cluster nodes to apply the configuration.
Date and time is configured. The entered changes will be saved on the Control node and will be distributed to all cluster nodes. The time synchronization status will be displayed in the information about each cluster node.
Page top
Configuring the proxy server connection settings
The specified proxy server settings are used for database updates, activating the application, and for the operation of KSN/KPSN and Moebius services.
To configure the proxy server connection settings:
- In the application web interface window, select the Settings → External services → Proxy server connection section.
- Enable or disable the use of proxy server with the Use proxy server toggle switch.
- If at the previous step, you have enabled the use of a proxy server, enter the address and port of the proxy server in the Proxy server address fields.
By default, port 8080 is used.
- Select the Bypass proxy server for local and private addresses check box if you do not want to use a proxy server for internal and private email addresses.
- In the User name (optional) and Password (optional) fields, enter the user name and password if you want to use authentication for connecting to the proxy server.
The user name and password are transmitted to the proxy server as unencrypted plain text, which means that third parties can capture this information by analyzing network traffic. An adversary may attempt to use these credentials to gain access to other systems, therefore, to prevent additional damage from user name and password interception, we recommend never reusing these credentials in other systems.
- Click Save.
Proxy server connection is configured.
Downloading upgrade packages
Kaspersky Lab may release upgrade packages for Kaspersky Secure Mail Gateway. For example, Kaspersky Lab can release critical fixes for vulnerabilities or bugs, scheduled upgrades that add new or improve existing features of Kaspersky Secure Mail Gateway, and packages with additional localizations for Kaspersky Secure Mail Gateway.
Following the release of Kaspersky Secure Mail Gateway upgrades, you can install them via the web interface of Kaspersky Secure Mail Gateway.
Before installing upgrades or a localization package using the web interface of Kaspersky Secure Mail Gateway, you must download the update package or the localization package with the KTGZ extension along with instructions on how to install this update from the Kaspersky website or a partner company website.
Kaspersky Secure Mail Gateway services may be suspended for the duration of upgrade installation. The upgrade process may take several minutes. After starting an upgrade of Kaspersky Secure Mail Gateway, do not interrupt the upgrade process or turn off the virtual machine. You may need to restart Kaspersky Secure Mail Gateway after upgrading.
Centralized installation of upgrade packages to all cluster nodes is not supported. The upgrade steps must be completed individually on each node of the cluster.
This functionality is available only if the user has the Edit settings permission.
Before upgrading Kaspersky Secure Mail Gateway, you are strongly advised to make a copy of your Kaspersky Secure Mail Gateway virtual machine (a snapshot of the virtual machine in the hypervisor) to be able to return to the previous version of Kaspersky Secure Mail Gateway, if installation of the new version of Kaspersky Secure Mail Gateway fails.
To download an upgrade package and start its installation:
- When updating the Control node, in the web interface window, select the Settings → General → Install patch section.
When updating a Secondary node, in the web interface window, click Install patch.
- Click Browse.
This opens the file selection window.
- Select the upgrade file that you want to download and click Open.
The name of the downloaded file will be displayed over the download area.
- Click the Upgrade button.
- Follow the steps of the Upgrade Wizard.
The steps of the Upgrade Wizard may vary depending on the type of upgrade.
More detailed instructions on installing each upgrade are provided in the instruction manual that comes with this upgrade.
Page top
Database update for Kaspersky Secure Mail Gateway
Databases of the Anti-Virus, Anti-Spam, and Anti-Phishing modules (hereafter also referred to as "databases") are files containing records that can be used to detect malicious code in scanned objects. These records contain information about the control sections of malicious code and algorithms used for disinfecting objects that contain such threats.
Virus analysts at Kaspersky detect hundreds of new threats daily, create records to identify them, and include them in database updates packages (or update packages). Update packages consist of one or more files containing records to identify threats that were detected since the previous update package was released. In order to minimize the risk of infecting the protected mail server, we recommend that you receive database update packages regularly.
As long as the license is in effect, you can receive scheduled database update packages automatically, or download and install update packages manually from the Kaspersky website.
About update sources
During installation, Kaspersky Secure Mail Gateway downloads the latest databases from one of Kaspersky's update servers. After installation, several
are available.The main update source is Kaspersky update servers. These are special internet sites which contain updates for databases and application modules for all Kaspersky applications. If you connect to the Internet via a proxy server, you must configure proxy server connection settings.
To reduce the amount of Internet traffic, you can set up database updates from a custom update source. HTTP or FTP servers or local folders on your computer can serve as custom update sources.
Monitoring database status
Kaspersky Secure Mail Gateway periodically and automatically checks for new update packages on Kaspersky's update servers. Application database statuses corresponding to the time of the last update are described in the following table.
Application database statuses
Scanning module |
Up to date |
Out of date |
Obsolete |
|---|---|---|---|
Anti-Virus |
under 24 hours |
24 hours to 7 days |
over 7 days |
Anti-Spam |
under 5 hours |
5 to 24 hours |
over 24 hours |
Anti-Phishing |
under 48 hours |
48 to 72 hours |
over 72 hours |
The current application database status is displayed in the Licensing pane as well as in the database information table on every cluster node in the Settings → External services → Database update → Update status section.
Configuring the database update schedule and settings
To configure the database update schedule and settings:
- In the application web interface window, select the Settings → External services → Database update section.
- Select the Update settings tab.
- In the Source drop-down list, select one of the following update sources:
- Kaspersky servers (secure connection).
- Kaspersky servers (insecure connection).
- Custom.
By default, the value is set to Kaspersky servers (secure connection).
- If you selected Custom at the previous step, in the Custom source field, specify the address of the custom source from which you want to receive update packages. You can specify the following sources:
- URL of the update server
For servers that use HTTPS, the update will proceed only if the Kaspersky server is specified.
- Local directory
Specify the full path to an update directory that exists on all cluster nodes. If the directory with the specified path is missing on the Control node, a notification is shown to the administrator. If the specified directory is missing on a Secondary node, database update for that node is performed with old settings.
- A network folder, that is, a directory on a remote computer mounted over SMB or NFS.
You can also select the If inaccessible, use Kaspersky servers check box if you want to receive update packages from Kaspersky update servers whenever the custom update source is unavailable. This check box is cleared by default.
- URL of the update server
- In the Schedule drop-down list, select one of the options and do the following to configure the schedule:
- Manually.
- Once. In the field that opens, specify the date and time to start a database update.
- Day(s). In the field that opens, specify the time to start a daily database update.
- Weekly. In the fields that open, specify the day of the week and time to start a database update.
For example, if the values are set to Mo and 3:00 PM, the database update runs every Monday at 3:00 PM.
- Monthly. In the fields that open, specify the day of the month and time to start a database update.
For example, if the values are set to 20 and 15:00, the database update runs on the 20th day of the month at 3:00 PM.
If the specified value exceeds the number of days in a given month, the database update in that month will take place on the last day. For example, if the value is 31, in 30-day months, the database update will take place on the 30th of the month.
- Run every. In the fields that open, specify the frequency for starting a database update (in minutes, hours, or days).
For example, if the frequency value is 30 and Minute(s) frequency is selected, database update is run every half hour.
The first database update starts immediately after the changes are saved.
By default, database update runs every 15 minutes.
- In the Maximum duration (min) field, specify the maximum duration of a database update (in minutes), after which the database update should be stopped.
If the database update task does not complete in the allotted time, it runs again at the next scheduled opportunity.
By default, the value is set to 180.
- Set the Run skipped tasks toggle switch to Enabled if you want to run skipped database update tasks the next time the program starts.
The update can fail to run at the scheduled time, for example, if the computer was turned off or the program was not running.
If running skipped tasks is disabled, skipped database update tasks will not be started the next time the program starts. The next database update will be started according to the schedule.
By default, the running of skipped tasks is enabled.
- Click Save.
Database update schedule and settings are configured.
Updating databases manually
This functionality is available only if the user has the Edit settings permission.
To run a database update manually:
- In the application web interface window, select the Settings → External services → Database update section.
- Select the Update status tab.
- Click Update databases.
The database update runs. The bottom part of the window displays a message about the status of the update task.
Monitoring application database status
To track down application database update problems, you can view summary information about the database status on all cluster nodes in the Databases update dashboard in the Nodes section.
The following statuses are available:
- No errors means all application databases are up to date, and the update process was completed without errors.
- Databases are out of date means that traffic processing was not stopped, and at least one of the following events occurred:
- Anti-Virus databases have not been updated for a period of 24 hours to 7 days
- Anti-Spam databases have not been updated for a period of 5 to 24 hours
- Anti-Phishing databases have not been updated for a period of 48 to 72 hours
- Databases are obsolete means that traffic processing was not stopped, and at least one of the following events occurred:
- Anti-Virus databases have not been updated for over 7 days
- Anti-Spam databases have not been updated for over 24 hours
- Anti-Phishing databases have not been updated for over 72 hours
- Errors means one of the following events occurred:
- Databases for one or more scanning modules are missing
- Traffic processing is stopped on one or more cluster nodes
- One or more cluster nodes are unavailable, application database status information cannot be obtained.
The number of cluster nodes on which the last update task returned an error is displayed under the horizontal line in the Last update errors field.
To view detailed information about the status of application databases on each cluster node:
click View details in the Databases update pane to go to the Settings → External services → Database update → Update status section.
The workspace displays the table of cluster nodes containing information about application databases for every scanning module:
- IP address:port is the IP address and port of the cluster node.
- Anti-Virus is the current status of the Anti-Virus databases.
- Anti-Phishing is the status of the Anti-Phishing module databases.
- Anti-Spam is the status of the Anti-Spam module databases.
- Update status is the status of the last update task:
- If the task was completed successfully, the completion time of the task is displayed.
- If the task returned an error, the launch time of the current task is displayed as well as the time of the last successful database update (if any).
- If the task has never been launched after the application was installed or if the cluster node is unavailable, a dash is displayed.
- If the task is in progress, its completion percentage is displayed.
This table is displayed if the user has View nodes information and/or Create/edit/delete nodes permissions, and View settings and/or Edit settings permissions.
You can also view information about the status of application databases in the information window of each cluster node.
Page top
Exporting and importing settings
This functionality is available if the user has the Edit settings permission.
Kaspersky Secure Mail Gateway settings can be exported or imported for the following purposes:
- Backing up application settings.
If you ever need to deploy the application on a new server, you can import previously exported settings of rules and personal allow and deny lists of addresses. This helps reduce the time spent on configuration of a new node.
- Migrating the application to a new version.
Prior to upgrading the application, you can export the settings from the old version and import them into the new version.
Migration from a newer version to an older version is not supported.
When settings are exported, a configuration file containing the application version and values of settings is created. The generated configuration file is saved locally on the node with role Control.
When importing a configuration file, you can select which settings must be applied:
- Message processing rules (including predefined Allowlist and Denylist rules).
- Personal lists of allowed and denied addresses.
Values of other settings are unchanged after the import is complete.
Exporting settings
To export settings:
- In the application web interface window, select the Settings → General → Export/Import settings section.
- Select the Export tab.
- Click the Export button.
The current state of the export operation is displayed in the table below. After successful completion of the operation, a string with the date and time of export is displayed.
- Click the icon in the relevant row.
The configuration file with exported settings will be saved in the downloads folder of the browser.
Page top
Importing settings
To import settings:
- In the program web interface window, select Settings → General → Export/Import settings.
- Select the Import tab.
- Click Browse.
This opens the file selection window.
- Select the file with previously exported settings.
The Import settings settings group is displayed under the upload area.
- Select the check boxes next to the settings that you want to import.
- Click the Import button.
A message regarding the result of the import operation is displayed.
Page top
Migrating settings from an older version
You can migrate settings only from Kaspersky Secure Mail Gateway 1.1 Maintenance Release 3 (hereinafter also referred to as "version 1.1 MR3"). Migration from earlier versions of the program is not supported.
The settings migration scenario includes the following steps.
- Exporting settings from version 1.1 MR 3
An exported configuration file saves the settings of message processing rules (including predefined Allowlist and Denylist rules), and personal lists of allowed and denied addresses.
- Importing settings to version 2.0
During the import, the values from the configuration file will be migrated for the selected settings.
Message processing rules are imported as follows:
- The Notify administrator setting of version 1.1 MR3 is transferred to the Notify recipients from the general list notifications setting in version 2.0.
- The following settings of version 1.1 MR3 that are lacking from version 2.0 are deleted:
- Anti-Virus module settings (message size limit, attachment scan exclusions by file type)
- Anti-Spam module settings (message processing based on a DNSBL list, use of custom DNSBL and SURBL lists, elevation of the spam rating for messages written in selected languages, scans of attachments in RTF format, message size limit)
- Settings for sending notifications to a recipient (including the original message or without it)
- For new version 2.0 settings that are not available in version 1.1 MR3, the default settings are defined in accordance with the table below.
Default values for new settings of version 2.0
Setting
Default value
Content filtering by attachment format
Attachments that have type from the list below
Link scanning
- Enabled.
- Action – Reject.
- Tag – [Malicious|Adware|Legitimate links].
- The Move copy to Backup check box is selected.
Warning about insecure message for messages containing links
Disabled
Configuring exported files storage
You can limit the number of exported settings files that are stored on the server. If the limit is exceeded, previously exported files are deleted.
To configure how exported files are stored:
- In the application web interface window, select the Settings → General → Export/Import settings section.
- Select the Export tab.
- Click the Storage settings button.
The Exported files storage settings window opens.
- In the Maximum exported configuration files field, specify the maximum number of exported files stored on the server.
Available values: 1 – 2147483647. By default, the value is set to 50.
The number of exported files is limited to the entered value.
Page top
Participating in Kaspersky Security Network and using Kaspersky Private Security Network
To protect your computer more effectively, Kaspersky Secure Mail Gateway uses data that is gathered from users around the globe. Kaspersky Security Network is designed for gathering this data.
Kaspersky Security Network (KSN) is a cloud service infrastructure that provides access to Kaspersky's online knowledge base containing information about the reputation of files, web resources, and software. Data from Kaspersky Security Network ensures a faster response by Kaspersky Secure Mail Gateway to new objects that have not yet been added to the antivirus databases, improves the performance of some protection components, and reduces the risk of false alarms.
Thanks to users who participate in Kaspersky Security Network, Kaspersky is able to promptly gather information about the types and sources of objects that are not yet listed in databases of anti-virus software, develop solutions for neutralizing such objects, and minimize the number of false positives. Participation in KSN also enables other users of KSN to receive up-to-date information about threats to enterprise IT infrastructure.
When you participate in Kaspersky Security Network, Kaspersky Secure Mail Gateway sends queries about reputation of files, web resources, and software to Kaspersky Security Network, and receives responses containing reputation data for such objects.
Participation in Kaspersky Security Network is voluntary. You can make a decision about participation in the Kaspersky Security Network after the cluster is created in the application web interface (the Settings → External services → KSN/KPSN → KSN/KPSN settings section). It can be reversed at any time.
For more details on participation in Kaspersky Security Network, please refer to the Kaspersky Security Network Statement.
If you do not want to participate in KSN, you can use the Kaspersky Private Security Network (hereinafter also referred to as KPSN). KPSN is a solution that allows users to access the reputation databases of Kaspersky Security Network and other statistical data without sending data from their computers to Kaspersky Security Network.
If you want to purchase the Kaspersky Private Security Network application, you can contact Kaspersky partners in your region.
Participation in KSN is configured on the Control node and is applied to all Secondary nodes in a the cluster.
Configuring participation in Kaspersky Security Network
You can view the list of data transmitted to KSN servers in the About data provision section. All transmitted data is processed in accordance with the applicable law of the relevant region. If the server with the installed application is moved to a different region, the data is processed in accordance with the law of the new region. The administrator receives a corresponding notification in the Nodes section.
To configure the participation in KSN:
- In the application web interface window, select the Settings → External services → KSN/KPSN section.
- Select the KSN/KPSN settings tab.
- In the Use KSN/KPSN drop-down list, select one of the following options:
- KSN if you want to participate in KSN.
- Do not use if you do not want to participate in KSN.
Selecting KSN opens the Use Kaspersky Security Network (KSN) window.
- Please read the text of the KSN Statement and click I agree to participate in KSN to confirm your agreement with the conditions of participation.
This opens the Send KSN statistics to improve the threat detection rate window.
- Please read the text of the Supplementary KSN Statement and do one of the following:
- If you agree to send your usage statistics of the KSN service to Kaspersky, click I agree to send KSN statistics.
- If you do not want to send statistics, click Decline.
- Click Save.
Participation in Kaspersky Security Network is configured. After this you must specify the maximum KSN server response timeout.
Configuring the usage of Kaspersky Private Security Network
To configure the usage of KPSN:
- In the application web interface window, select the Settings → External services → KSN/KPSN section.
- Select the KSN/KPSN settings tab.
- In the Use KSN/KPSN drop-down list, select one of the following options:
- KPSN if you want to participate in KPSN.
- Do not use if you do not want to participate in KPSN.
If you selected KPSN the workspace displays a group of settings for adding a KPSN configuration file.
- Click Browse.
This opens the file selection window.
- Select the KPSN configuration file that you want to add.
The KPSN configuration file must be in ZIP or PKCS7 format.
- Click Save.
The usage of Kaspersky Private Security Network is configured.
Monitoring KSN/KPSN operation
To track down KSN/KPSN related problems, you can view summary information about the operation of services on all cluster nodes in the KSN/KPSN status dashboard in the Nodes section.
The following statuses are available:
- No errors means the KSN or KPSN service is used and error-free.
- Disabled means the use of KSN/KPSN services is disabled in application settings.
- Requests filtered means the number of requests sent to KSN/KPSN services for object reputation checking is limited.
Such a limitation allows reducing the load on KSN/KPSN servers.
- Errors means KSN/KPSN services encountered errors.
The right part of the dashboard shows the number of cluster nodes for each status.
To view detailed KSN/KPSN service usage information for each cluster node,
click View details in the KSN/KPSN status pane or the list of sections in the left panel to go to the Settings → External services → KSN/KPSN → KSN/KPSN status section.
The workspace displays the table of cluster nodes with information about KSN/KPSN service usage on each node:
- IP address:port is the IP address and port of the cluster node.
- Status is the operational status of the KSN/KPSN service.
For Requests filtered and Errors statuses, the date and time when the node last had the No errors status is also displayed.
- Role is the role of the node in the cluster.
This table is displayed if the user has View nodes information and/or Create/edit/delete nodes permissions, and View settings and/or Edit settings permissions.
You can also view information about KSN/KPSN usage in the information window of each cluster node.
Page top
Integration with an external directory service
Kaspersky Secure Mail Gateway can connect to servers of external
used by your organization over the .A connection to an external directory service via the LDAP protocol enables the Kaspersky Secure Mail Gateway administrator to:
- Add senders or recipients from an external directory service to message processing rules.
- Use the autocompletion feature on Sender email and Recipient email fields when filtering copies of messages of corporate LAN users in Backup.
After configuring the LDAP server connection, the program automatically synchronizes data with the Active Directory domain controller every 30 minutes. If you need to update user account data immediately (for example, after adding a user), you can start the synchronization manually.
Each cluster node synchronizes independently of other nodes. As a result of a successfully synchronization, the LDAP cache stores the following information:
- Accounts of all users in the domain
- Groups to which domain users belong
- Email addresses of domain users
The program stores and uses this data until the next synchronization is initiated. If the domain controller is not available, the last received data is used. After deleting the LDAP server connection, all LDAP cache data is deleted.
Creating a keytab file
The keytab file is created on the domain controller server or on a Windows Server computer that is part of the domain, under the domain administrator account.
To create a keytab file:
- In the Active Directory Users and Computers snap-in, create a separate user account that will be used to connect the application to the LDAP server (for example, an account named
ksmg-ldap).When creating the user, select the Password never expires option.
- To use the AES256-SHA1 encryption algorithm, in the Active Directory Users and Computers snap-in, in the properties of the created user account on the Account tab, select the This account supports Kerberos AES 256 bit encryption check box.
- Use the ktpass tool to create a keytab file for the
ksmg-ldapuser. To do so, run the following command on the command line:C:\Windows\system32\ktpass.exe -princ ksmg-ldap@<realm Active Directory domain name in uppercase> -crypto AES256-SHA1 -ptype KRB5_NT_PRINCIPAL -pass <ksmg-ldap user password> -out <path to file>\<file name>.keytabYou can use the * character for the -pass parameter value if you do not want to provide the password in the command text. If this is the case, the tool will prompt you for the password when running the command.
Example:
C:\Windows\system32\ktpass.exe -princ ksmg-ldap@COMPANY.COM -crypto AES256-SHA1 -ptype KRB5_NT_PRINCIPAL -pass * -out C:\Keytabs\ksmg-ldap.keytab
The keytab file will be created. If you change the user account password, you will have to generate a new keytab file.
Page top
Adding a LDAP server connection
This functionality is available only if the user has the Edit settings permission.
You can add a connection to one or several LDAP servers.
To add a LDAP server connection:
- In the application web interface window, select the Settings → External services → LDAP server connections section.
- Click Add.
This opens the Add connection window.
- In the Name field, enter the name that you want to be displayed in the program web interface.
The program does not use this name for interacting with the LDAP server.
- Click the Upload button to upload a previously created keytab file.
The file selection window opens.
- Select the keytab file and click Open.
The keytab file must contain only one entry with credentials of a Kaspersky Secure Mail Gateway user that has access to the domain being added.
- In the Search base (Base DN) field, type the DN (Distinguished Name) of the directory object beginning with which Kaspersky Secure Mail Gateway will start searching directory records.
- Enter the directory suffix in the following format:
ou=<department name>(if required),dc=<domain name>,dc=<parent domain name>.For example, you can enter
ou=people,dc=example,dc=com.Here
peopleis the directory level from which Kaspersky Secure Mail Gateway starts searching for records (the search is run at thepeoplelevel and lower levels. Objects located above this level are excluded from the search scope);exampleis the domain name of the directory in which Kaspersky Secure Mail Gateway searches for records;comis the name of the parent domain in which the directory is located. - Click Add.
The LDAP server connection is added.
Deleting a LDAP server connection
You can delete a connection to one or several LDAP servers.
To delete a LDAP server connection:
- In the application web interface window, select the Settings → External services → LDAP server connections section.
- Select the LDAP server that you want to delete.
This opens the View connection settings window.
- Click Delete.
This opens the confirmation window.
- Click OK.
The LDAP server connection is deleted. Data synchronization with the domain controller is stopped. User account data for users from this domain is deleted from the LDAP cache.
Modifying LDAP server connection settings
To modify the LDAP server connection settings:
- In the application web interface window, select the Settings → External services → LDAP server connections section.
- Select the LDAP server for which you want to modify connection settings.
This opens the View connection settings window.
- Click Edit.
- If necessary, change the following settings:
- The name of the LDAP server that is displayed in program web interface in the Name field.
- The keytab file by clicking Browse.
- The starting directory for searching for records, in the Search base (Base DN) field.
- Click Save.
LDAP server connection settings are modified.
Manually starting synchronization with the Active Directory domain controller
To manually start the synchronization with the Active Directory domain controller:
- In the application web interface window, select the Settings → External services → LDAP server connections section.
- Click Synchronize now.
Data synchronization with the domain controller is started. This updates user account data that is used for selecting rules and autocompleting usernames in the program web interface.
The current status of synchronization with Active Directory is displayed in the Nodes section when you view cluster node information.
Page top
KATA protection
You can configure the integration of Kaspersky Secure Mail Gateway with Kaspersky Anti Targeted Attack Platform.
Kaspersky Anti Targeted Attack Platform (KATA) is a program designed for the protection of corporate IT infrastructure and timely detection of threats such as zero-day attacks, targeted attacks, and advanced persistent threats (hereinafter also referred to as "APT").
As a result of the integration, Kaspersky Secure Mail Gateway will be able to send email messages to KATA for scanning and receive the scan results. KATA scans messages for signs of targeted attacks and intrusions into the corporate IT infrastructure.
Based on the results of a KATA scan, Kaspersky Secure Mail Gateway can block individual messages.
The following KATA integration variants are possible:
- With a single KATA server.
For integration, it is sufficient to specify the IP address of the KATA server with the Central Node component. If the Central Node component is deployed as a cluster (available for KATA version 5.0 and later), you can specify the IP address of any processing server in the cluster.
The address is specified in KATA integration settings in the web interface of the Kaspersky Secure Mail Gateway Control node.
- With the KATA cluster and with the built-in balancer (available for KATA 5.0 and later).
Multiple KATA processing servers from the Central Node cluster provide fault tolerance — if connection becomes lost with one of the servers, the clients automatically switch to one of the other available servers.
The built-in balancer runs on Kaspersky Secure Mail Gateway cluster nodes. The built-in balancer monitors the availability of KATA servers for each node and provides automatic switching between KATA servers.
Integration with a single KATA server
Configuring the integration of Kaspersky Secure Mail Gateway with a single KATA server involves the following steps.
- Adding a KATA server
When adding a KATA server, you must compare the certificate fingerprints displayed in the web interfaces of Kaspersky Secure Mail Gateway and KATA. If the fingerprints match, the administrator confirms addition of the KATA server. Then the Control node sends the address and certificate of the KATA sever to all cluster nodes without waiting for authorization confirmation.
- Configuring KATA protection settings
You can configure the following settings:
- sending all messages to be scanned by KATA or only those messages in which nothing was detected after scans by all Kaspersky Secure Mail Gateway modules.
- Timeout for a response from the KATA server.
- KATA Quarantine settings.
- Authorization of Kaspersky Secure Mail Gateway in the KATA web interface.
When adding a KATA server, a request is sent for authorization of the external system. In the KATA web interface, the KATA administrator must confirm this request for authorization from each cluster node. For details about processing requests from external systems, please refer to the Kaspersky Anti Targeted Attack Platform Help Guide.
- Checking the KATA server connection
Integration with multiple servers of the KATA cluster
Only applicable when integrating with КАТА 5.0 or a later version.
Configuring the integration of Kaspersky Secure Mail Gateway with multiple servers of the KATA cluster involves the following steps:
- Preparing a configuration file for the built-in balancer
- Configuring and running the built-in balancer on each cluster node of Kaspersky Secure Mail Gateway
- Adding a KATA server
Specify 127.0.0.1:8000 as the address of the KATA server.
When adding a KATA server, you must compare the certificate fingerprints displayed in the web interfaces of Kaspersky Secure Mail Gateway and KATA. If the fingerprints match, the administrator confirms addition of the KATA server. Then the Control node sends the address and certificate of the KATA sever to all cluster nodes without waiting for authorization confirmation.
- Configuring KATA protection settings
You can configure the following settings:
- Sending all messages to be scanned by KATA or only those messages in which nothing was detected after scans by all application modules.
- Timeout for a response from the KATA server.
- KATA Quarantine settings.
- Authorization of Kaspersky Secure Mail Gateway in the KATA web interface.
When adding a KATA server, a request is sent for authorization of the external system. In the KATA web interface, the KATA administrator must confirm this request for authorization from each cluster node. For details about processing requests from external systems, please refer to the Kaspersky Anti Targeted Attack Platform Help Guide.
- Checking the KATA server connection
Creating a configuration file for the built-in balancer
Only applicable when integrating with multiple servers of КАТА 5.0 or a later version.
To create a configuration file for the built-in balancer:
- Create a text file in the Unix format (LF for newline) and name it haproxy.cfg.
- Add the following lines to the file:
globallog 127.0.0.1 local6chroot /var/lib/haproxypidfile /var/run/haproxy.pidstats socket /var/lib/haproxy/stats user root group adm mode 660 level usermaxconn 1000user haproxygroup haproxydaemondefaultsmode tcplog globalretries 3timeout queue 1mtimeout connect 10stimeout client 1mtimeout server 1mtimeout check 10smaxconn 1000frontend kata_balancerbind 127.0.0.1:8000default_backend kata_servers - Choose the appropriate method of specifying KATA server addresses and add the corresponding line to the file.
- If you want to specify IP addresses of all KATA servers in the configuration file, add the following lines to the file:
backend kata_serversbalance roundrobindefault-server checkserver kata_node1 <IP-address1:port1>server kata_node2 <IP-address2:port2>server kata_node3 <IP-address3:port3>server kata_node4 <IP-address4:port4> - If you want to obtain an up-to-date list of addresses using a domain name (DNS record), add the following lines to the file:
resolvers dns_serversparse-resolv-confaccepted_payload_size 8192timeout resolve 10stimeout retry 10shold valid 60sbackend kata_serversbalance roundrobindefault-server check resolvers dns_servers init-addr noneserver-template kata_node 8 <domain_name>:<port>To obtain the list of addresses using a domain name, on the DNS server, create a domain name (for example, kata.example.com) with multiple A records indicating the IP addresses of KATA servers.
- If you want to specify IP addresses of all KATA servers in the configuration file, add the following lines to the file:
- Save the configuration file.
The configuration file for the built-in balancer is created.
Page top
Configuring and running the built-in balancer on a cluster node
Only applicable when integrating with multiple servers of КАТА 5.0 or a later version.
To configure the built-in balancer on a cluster node:
- Connect to the cluster node over SSH to gain access to the Technical Support Mode.
- Download the balancer RPM packages here.
- Place the balancer RPM packages in the current directory and install them using the following commands:
yum -y install pcre2-10.23-2.el7.x86_64.rpmyum -y install haproxy-2.6.4-6960.zap.el7.x86_64.rpm - Rename the basic configuration file of the balancer with the following command:
mv /etc/haproxy/haproxy.cfg /etc/haproxy/haproxy.cfg.orig - Place the previously prepared configuration haproxy.cfg configuration file in the /etc/haproxy directory and set access rights for it using the following commands:
chown root:root /etc/haproxy/haproxy.cfgchmod 640 /etc/haproxy/haproxy.cfg - Create the /etc/rsyslog.d/haproxy.conf file with the following content:
$ModLoad imudp$UDPServerRun 514$UDPServerAddress 127.0.0.1if $syslogfacility-text == 'local6' then /var/log/haproxy.logif $syslogfacility-text == 'local6' then stop - Create the /var/log/haproxy.log file and set access rights for it using the following commands:
touch /var/log/haproxy.logchown root:adm /var/log/haproxy.logchmod 640 /var/log/haproxy.log - If necessary, edit the log rotation settings file for the log balancer (/etc/logrotate.d/haproxy).
By default, entries are rotated daily. Entries are kept for 10 days.
- Restart the system log service:
systemctl restart rsyslog - Start the built-in balancer service:
systemctl start haproxy - Allow running the built-in balancer service automatically:
systemctl enable haproxy - Check the status of the built-in balancer service:
systemctl status haproxyThe status must be running.
- Check the presence of entries in the built-in balancer log:
tail /var/log/haproxy.log
The built-in balancer is configured and started on the Kaspersky Secure Mail Gateway cluster node.
Page top
Adding a KATA server
If you are using a KATA version older than 5.0, you can configure integration only with a single KATA server.
To add a KATA server:
- In the application web interface, select Settings → External services → KATA Protection.
- Select the Settings tab.
- Click the Add KATA server button in the KATA server settings group.
The Add KATA server window opens.
- In the IP address field, enter the fully qualified domain name (FQDN) or IPv4 address of the KATA server on which the Central Node component is installed.
When integrating with multiple servers of the КАТА cluster 5.0 or later, specify the value
127.0.0.1.IPv6 addresses are not supported.
- In the Port field, enter the KATA server connection port.
The default value is 443.
When integrating with multiple servers of КАТА 5.0 or later, specify the value
8000. - Click Next.
The SHA256 fingerprint field displays the KATA server certificate fingerprint.
- Check the entered data and make sure that the certificate fingerprint displayed in the web interface matches the certificate fingerprint of the KATA server. If the fingerprints match, click Confirm.
The KATA server will be added. Information about the server is displayed in the KATA Protection section on the Settings tab in the KATA server settings group.
Page top
Configuring KATA protection settings
To configure the KATA protection settings:
- In the application web interface, select Settings → External services → KATA Protection.
- Select the Settings tab.
- If you want KATA to scan messages in which nothing was detected by Kaspersky Secure Mail Gateway scans, move the Send to KATA messages without detects toggle switch to Enabled.
A request to authorize Kaspersky Secure Mail Gateway in the KATA web interface is sent only when the Send to KATA messages without detects toggle switch is enabled. After successful authorization, the status of nodes on the Status tab changes to Connected.
- If you also want to send messages that triggered other scan modules to KATA for scanning, set the Send to KATA messages with detects toggle switch to Enabled.
This option is available only if the Send to KATA messages without detects toggle switch is turned on.
Messages that meet KATA's own criteria are sent to KATA for scanning.
- In the KATA response timeout (s) field, enter the maximum time to wait for the message scan results from the KATA server.
When the defined timeout is exceeded, the program interrupts the message scan, assigns to it the Skipped status for the KATA module, and takes the appropriate action on the message without regard for the scan by the KATA server.
Possible values: 60 - 86400 (24 hours). Default value: 600
- In the KATA Quarantine maximum size (MB) field, enter the maximum allowed disk space that can be occupied by KATA Quarantine (when full, copies of messages will no longer be placed in Quarantine).
When the maximum disk space is exceeded, the program interrupts the message scan, assigns to it the Skipped status for the KATA module, and takes the appropriate action on the message without regard for the scan by the KATA server.
Possible values: 1 - 8589934592. Default value: 1024
- In the Maximum number of messages in KATA Quarantine field, enter the maximum number of messages in KATA Quarantine (when reached, copies of messages will no longer be placed in Quarantine).
When the maximum number is exceeded, the program interrupts the message scan, assigns to it the Skipped status for the KATA module, and takes the appropriate action on the message without regard for the scan by the KATA server.
Possible values: 1 - 4294967296. Default value: 5000
- Click Save.
The KATA protection settings are now configured.
Page top
KATA integration dashboard
You can use the following methods to monitor the KATA integration status:
- View summary information about the state of the connection to the KATA server on all cluster nodes by checking the KATA Protection information pane in the Nodes section.
- View detailed information about the state of the connection to the KATA server on each cluster node.
- View information about the KATA server connection in the information window of each cluster node.
- Use a script to monitor the connection status of individual KATA servers in Technical Support Mode (when integrating with multiple servers of KATA version 5.0 or later).
To view connection status for individual KATA servers:
- Create the /opt/kaspersky/ksmg-appliance-addon/bin/hastat file and add the following strings to it:
columns = [ 'pxname', 'svname', 'status' ]out_form = '{:<20} | {:<20} | {}'s = socket.socket(socket.AF_UNIX, socket.SOCK_STREAM)s.connect('/var/lib/haproxy/stats')s.sendall('show stat\n'.encode())rows = response.decode().split('\n')headers = rows.pop(0)[2:].strip().split(',')indexes = [ headers.index(c) for c in columns ]print(out_form.format(*columns)) - Save the file.
- Connect to the cluster node over SSH to gain access to the Technical Support Mode.
- Run the following command:
The connection and connection status table is displayed.
For example results of running the command, see the figure below:
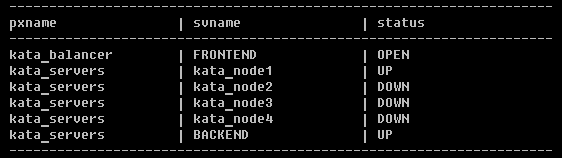
The last column of the table displays the connection status for individual KATA servers (for example, kata_node1, kata_node2 lines) and the overall connection status (the BACKEND line).
Possible connection status values:
If a connection exists with at least one KATA server, the overall connection status is UP.
The script requests the connection status from the built-in balancer and outputs it to the console.
- Create the /opt/kaspersky/ksmg-appliance-addon/bin/hastat file and add the following strings to it:
Adding, modifying, and deleting IP addresses of KATA servers
The procedure of adding, modifying, and deleting IP addresses depends on the number of KATA servers.
Integration with a single KATA server
To modify the IP address of the server:
- In the web interface of Kaspersky Secure Mail Gateway, select the Settings → External services → KATA Protection section.
- Select the Settings tab and under KATA server, click Change.
To delete the IP address of the server:
- In the web interface of Kaspersky Secure Mail Gateway, select the Settings → External services → KATA Protection section.
- Select the Settings tab and under KATA server, click Delete.
Integration with multiple KATA servers
Only applicable when integrating with КАТА 5.0 or a later version.
The procedure for adding, modifying, and deleting KATA server addresses depends on the method of specifying addresses chosen at the stage of preparing the configuration file of the built-in balancer:
- The domain name is used to obtain KATA server addresses.
- IP addresses of KATA servers are specified in the configuration file.
Disabling KATA integration
To disable KATA integration:
- In the web interface of the Kaspersky Secure Mail Gateway Control node, select the Settings → External services → KATA Protection section, go to the Settings tab, and under KATA server, click Delete.
- When integrating with multiple servers with КАТА 5.0 and later, perform the following action on each cluster node:
- Connect to the cluster node over SSH to gain access to the Technical Support Mode.
- Stop the built-in balancer service:
systemctl stop haproxy - Disable running the built-in balancer service automatically:
systemctl disable haproxy - Check the status of the built-in balancer service:
systemctl status haproxyThe status must be stopped.
Integration with KATA is disabled.
Page top
Managing the application over SNMP
SNMP (Simple Network Management Protocol) is a protocol for managing network devices.
To work over the SNMP protocol, Kaspersky Secure Mail Gateway uses an to track information about application performance. Kaspersky Secure Mail Gateway can send this information in the form of statistics or SNMP traps, which are notifications about application events.
The SNMP protocol allows you to access the following information about the application:
- General information
- Runtime statistics of Kaspersky Secure Mail Gateway since the time of its installation
- Information about Kaspersky Secure Mail Gateway runtime events.
Read-only access is granted.
Information about SNMP traps and statistics sent over SNMP is stored in the MIB database. The local snmpd service on each cluster node serves as the SNMP server receiving the statistics. Interaction with an external SNMP server over the AgentX protocol is not supported. SNMP traps can be received by using the snmptrapd service locally on each cluster node, or they can be redirected to an external server.
For operations over the SNMP protocol, preconfigure the snmpd service in the operating system on each cluster node.
Configuring the snmpd service in the operating system
The recommended snmpd service settings defined in the configuration file /etc/snmp/snmpd.conf are described in the instructions on configuring encryption of SNMP connections.
To configure the snmpd service:
- Add the following strings to the file /etc/snmp/snmpd.conf for connections through the UNIX socket:
master agentxagentXSocket unix:/var/run/agentx-master.socketagentXPerms 770 770 kluser klusers - Restart the snmpd service. To do so, run the following command:
systemctl restart snmpd - Add the snmpd service to autostart. To do so, run the following command:
systemctl enable snmpd
The snmpd service will be configured. To enable the application to operate over the SNMP protocol, enable use of SNMP in the application web interface.
If the snmpd service was configured prior to installing Kaspersky Secure Mail Gateway, application data may be incorrectly transmitted over the SNMP protocol. If this is the case, restart the snmpd service.
Page top
Enabling and disabling the use of the SNMP protocol in Kaspersky Secure Mail Gateway
Prior to enabling the use of SNMP, preconfigure the snmpd service in the operating system.
To enable or disable SNMP in the application:
- In the application web interface window, select Settings → Monitoring → SNMP.
- Turn on or turn off the Use SNMP toggle switch.
- Click Save.
Use of SNMP will be enabled or disabled according to your selection.
Configuring SNMP server connection settings
To configure the settings for connecting to the SNMP server:
- In the application web interface window, select Settings → Monitoring → SNMP.
- Turn on the Use SNMP toggle switch if it is disabled.
- In the Socket path field, specify the path to the socket file.
The path
/var/run/agentx-master.socketis defined by default.A UNIX socket is used to connect to the SNMP server. Use of TCP- and UDP sockets is not supported.
- In the Server timeout (s) field, specify the maximum amount of seconds to wait for a response from the SNMP server. You can specify a value in the range from 1 to 255 seconds.
The default value is 15 seconds.
- Click Save.
The SNMP server connection settings are now configured.
Enabling and disabling forwarding of SNMP traps
To enable or disable the forwarding of SNMP traps for application events:
- In the application web interface window, select Settings → Monitoring → SNMP.
- Turn on or turn off the Send SNMP traps toggle switch.
This option is available only if the Use SNMP toggle switch is turned on.
Forwarding of SNMP traps will be enabled or disabled according to your selection. The application will send SNMP traps in response to events that correspond to MIB objects.
Configuring encryption of SNMP connections
Third-party applications could potentially access data sent over SNMP or replace this data with their own data. To ensure secure data transfer over SNMP, it is recommended to configure encryption of SNMP connections.
To configure SNMP connection encryption:
- Add the following line to the /etc/snmp/snmpd.conf file:
view systemview included .1 - Obtain an EngineID, which is needed to process SNMP traps. To do so, run the following command on each server in the cluster:
snmpget -v2c -c<community name> 127.0.0.1 SNMP-FRAMEWORK-MIB::snmpEngineID.0 2>/dev/null | sed -ne 's/ //g; s/.*:/0x/p'Specify the community name that is used in your organization. If necessary, create a new community. For data transfer security purposes, it is not recommended to use the default "public" community.
Prior to running the command, make sure that the snmpd service is running.
- Configure the snmpd service on each server in the cluster. To do so:
- Stop the snmpd service. To do so, run the following command:
systemctl stop snmpd - Create a new user. To do so, run the following command:
net-snmp-create-v3-user -ro -a SHA -A <password> -x <password> -X AES <username> - Add the following strings to the /etc/snmp/snmpd.conf configuration file:
# accept KSMG statistics over unix socketmaster agentxagentXSocket unix:/var/run/agentx-master.socketagentXPerms 770 770 kluser klusers# accept incoming SNMP requests over UDPagentAddress udp:127.0.0.1:161rouser <username> priv .1.3.6.1# comment the following line if you don't need to forward SNMP traps over an SNMPv3 connectiontrapsess -e <EngineID> -v3 -l authPriv -u <username> -a SHA -A <password> -x AES -X <password> udp:<IP address>:162For
<IP address>, indicate the IP address that will be used by the snmptrapd service to accept network connections. If you want to save SNMP traps locally on the server, enter127.0.0.1. - Add the following strings to the configuration file /etc/snmp/snmp.conf:
mibdirs +/opt/kaspersky/ksmg/share/snmp-mibs/mibs allIf the snmp.conf configuration file does not exist in the specified directory, create it.
- Start the snmpd service. To do so, run the following command:
systemctl start snmpd - Check the SNMP connection. To do so, execute the following commands:
snmpwalk -mALL -v3 -l authPriv -u <username> -a SHA -A <password> -x AES -X <password> udp:127.0.0.1:161 .1.3.6.1.4.1.23668snmpget -v3 -l authPriv -u <username> -a SHA -A <password> -x AES -X <password> udp:127.0.0.1:161 KSMG-PRODUCTINFO-STATISTICS::applicationName.0
- Stop the snmpd service. To do so, run the following command:
- Configure the snmptrapd service on the server where you want to receive SNMP traps. To do so:
- Stop the snmptrapd service with the following command:
systemctl stop snmptrapd - Add the following line to the /var/lib/net-snmp/snmptrapd.conf file:
createUser -e <EngineID> <username> SHA "<password>" AES "<password>"If the snmptrapd.conf configuration file does not exist in the specified directory, create it.
The user account credentials (
<username>and<password>) must be the same for the snmpd and snmptrapd services. - Add the following strings to the /etc/snmp/snmptrapd.conf configuration file:
snmpTrapdAddr udp:<IP address>:162authUser log <username> privdisableAuthorization noIf the snmptrapd.conf configuration file does not exist in the specified directory, create it.
- Start the snmptrapd service. To do so, run the following command:
systemctl start snmptrapdMake sure that the password that was indicated in plain text in the /var/lib/net-snmp/snmptrapd.conf file has been replaced with an obfuscated sequence of characters. To do so, you may need to restart the snmptrapd service several times by using the
systemctl restart snmptrapdcommand. - Add the snmptrapd service to autostart. To do so, run the following command:
systemctl enable snmptrapd - Check the SNMP connection by running the following command:
snmptrap -e <EngineID> -v3 -l authPriv -u <username> -a SHA -A <password> -x AES -X <password> udp:<IP address>:162 0 KSMG-EVENTS-MIB::restartedBinaryMake sure that the following string appears in the /var/log/messages file:
<date and time> <hostname> snmptrapd[7503]: <date and time> localhost [UDP: [127.0.0.1]:26325->[<IP address>]:162]:#012DISMAN-EVENT-MIB::sysUpTimeInstance = Timeticks: (0) 0:00:00.00#011SNMPv2-MIB::snmpTrapOID.0 = OID: KSMG-EVENTS-MIB::restartedBinary
For
<IP address>, indicate the IP address that will be used by the snmptrapd service to accept network connections. If you want to save SNMP traps locally on the server, enter127.0.0.1. - Stop the snmptrapd service with the following command:
Encryption of SNMP connections is now configured.
Page top
Description of MIB objects of Kaspersky Secure Mail Gateway
The table below provides information about
objects of Kaspersky Secure Mail Gateway.Events occurring during the operation of the program
Events occurring during the operation of the program
Symbolic name |
Description |
Parameters |
Object identifier (OID) |
|---|---|---|---|
|
Application database update ended with an error. |
|
.1.3.6.1.4.1.23668.1735.1.10 |
|
Compilation of Anti-Spam databases ended with an error. |
|
.1.3.6.1.4.1.23668.1735.1.30 |
|
Anti-Virus databases are out of date. |
|
.1.3.6.1.4.1.23668.1735.1.100 |
|
Anti-Virus databases are severely out of date. |
|
.1.3.6.1.4.1.23668.1735.1.120 |
|
Anti-Spam databases are out of date. |
|
.1.3.6.1.4.1.23668.1735.1.130 |
|
Anti-Spam databases are obsolete. |
|
.1.3.6.1.4.1.23668.1735.1.140 |
|
Anti-Phishing databases are out of date. |
|
.1.3.6.1.4.1.23668.1735.1.150 |
|
Anti-Phishing databases are severely out of date. |
|
.1.3.6.1.4.1.23668.1735.1.160 |
|
Error adding a backup copy. |
|
.1.3.6.1.4.1.23668.1735.1.200 |
|
Error deleting backup copies from Backup. |
|
.1.3.6.1.4.1.23668.1735.1.210 |
|
Maximum allowable size of Backup reached. |
|
.1.3.6.1.4.1.23668.1735.1.220 |
|
Activation code or key file has been added. |
|
.1.3.6.1.4.1.23668.1735.1.300 |
|
License key status changed. |
|
.1.3.6.1.4.1.23668.1735.1.360 |
|
License grace period has started. |
|
.1.3.6.1.4.1.23668.1735.1.380 |
|
Activation code or key file has been removed. |
|
.1.3.6.1.4.1.23668.1735.1.310 |
|
License expires soon. |
|
.1.3.6.1.4.1.23668.1735.1.320 |
|
License expired. |
|
.1.3.6.1.4.1.23668.1735.1.330 |
|
Trial license expired. |
|
.1.3.6.1.4.1.23668.1735.1.340 |
|
Activation code or key file has been added to the denylist. |
|
.1.3.6.1.4.1.23668.1735.1.350 |
|
Program process crashed. |
|
.1.3.6.1.4.1.23668.1735.1.400 |
|
Program process restarted. |
|
.1.3.6.1.4.1.23668.1735.1.410 |
|
Program started. This event occurs after all services necessary for the operation of Kaspersky Secure Mail Gateway have been started. |
|
.1.3.6.1.4.1.23668.1735.1.420 |
|
Threat detected. |
|
.1.3.6.1.4.1.23668.1735.1.510 |
|
Anti-Virus module error. |
|
.1.3.6.1.4.1.23668.1735.1.520 |
|
Anti-Spam module error. |
|
.1.3.6.1.4.1.23668.1735.1.530 |
|
The status of the connection with the KSN server has changed. |
|
.1.3.6.1.4.1.23668.1735.1.700 |
|
Server status error. For example, there is no server with the Control node role. |
|
.1.3.6.1.4.1.23668.1735.1.1600 |
|
The program has switched to emergency mode. |
|
.1.3.6.1.4.1.23668.1735.1.1610 |
|
Error synchronizing settings between the node with role Control and nodes with role Secondary. |
|
.1.3.6.1.4.1.23668.1735.1.1620 |
|
Data synchronization with Active Directory is complete. |
|
.1.3.6.1.4.1.23668.1735.1.910 |
Anti-Virus module statistics
Anti-Virus module statistics
Symbolic name |
Description |
Object identifier (OID) |
|---|---|---|
|
Number of scanned messages in which no threats were detected. |
.1.3.6.1.4.1.23668.1735.2.2.1.0 |
|
Number of messages in which threats were detected. |
.1.3.6.1.4.1.23668.1735.2.2.2.0 |
|
Number of messages whose encrypted (password-protected) attachments could not be scanned. |
.1.3.6.1.4.1.23668.1735.2.2.4.0 |
|
Number of messages containing attachments with macros. |
.1.3.6.1.4.1.23668.1735.2.2.5.0 |
|
Number of messages whose processing resulted in errors. |
.1.3.6.1.4.1.23668.1735.2.2.6.0 |
|
Number of messages that were excluded from threat scans based on the defined settings of the Anti-Virus module. |
.1.3.6.1.4.1.23668.1735.2.2.7.0 |
|
Number of messages that were excluded from threat scans due to licensing issues or problems with the application databases. |
.1.3.6.1.4.1.23668.1735.2.2.8.0 |
Anti-Virus database statistics
Anti-Virus database statistics
Symbolic name |
Description |
Object identifier (OID) |
|---|---|---|
|
Date and time when Anti-Virus databases were last updated. |
.1.3.6.1.4.1.23668.1735.2.6.1.0 |
|
Number of records in the Anti-Virus databases. |
.1.3.6.1.4.1.23668.1735.2.6.2.0 |
|
Current status of the Anti-Virus databases. |
.1.3.6.1.4.1.23668.1735.2.6.3.0 |
URL Advisor statistics
URL Advisor statistics
Symbolic name |
Description |
Object identifier (OID) |
|---|---|---|
|
Number of scanned messages in which no links were detected. |
.1.3.6.1.4.1.23668.1735.2.12.1.0 |
|
Number of messages in which the program detected malicious advertising links or links associated with legitimate applications that could be exploited by hackers. |
.1.3.6.1.4.1.23668.1735.2.12.3.0 |
|
Number of messages whose processing resulted in errors. |
.1.3.6.1.4.1.23668.1735.2.12.4.0 |
|
Number of messages that were excluded from malicious link scans based on the defined settings of the URL Advisor. |
.1.3.6.1.4.1.23668.1735.2.12.5.0 |
|
Number of messages that were excluded from malicious link scans due to licensing issues or problems with the application databases. |
.1.3.6.1.4.1.23668.1735.2.12.6.0 |
Anti-Spam module statistics
Anti-Spam module statistics
Symbolic name |
Description |
Object identifier (OID) |
|---|---|---|
|
Number of scanned messages in which no spam was detected. |
.1.3.6.1.4.1.23668.1735.2.3.1.0 |
|
Number of messages in which spam was detected. |
.1.3.6.1.4.1.23668.1735.2.3.2.0 |
|
Number of messages in which probable spam was detected. |
.1.3.6.1.4.1.23668.1735.2.3.3.0 |
|
Number of messages put in Anti-Spam Quarantine. |
.1.3.6.1.4.1.23668.1735.2.3.5.0 |
|
Number of messages whose processing resulted in errors. |
.1.3.6.1.4.1.23668.1735.2.3.6.0 |
|
Number of messages that were excluded from Anti-Spam scans based on the defined settings of the Anti-Spam module. |
.1.3.6.1.4.1.23668.1735.2.3.7.0 |
|
Number of messages that were excluded from Anti-Spam scans due to licensing issues or problems with the application databases. |
.1.3.6.1.4.1.23668.1735.2.3.8.0 |
|
Number of messages identified as mass mail. |
.1.3.6.1.4.1.23668.1735.2.3.9.0 |
Anti-Spam module database statistics
Anti-Spam module database statistics
Symbolic name |
Description |
Object identifier (OID) |
|---|---|---|
|
Date and time when the Anti-Spam module databases were last updated. |
.1.3.6.1.4.1.23668.1735.2.7.1.0 |
|
Current status of the Anti-Spam module databases. |
.1.3.6.1.4.1.23668.1735.2.7.2.0 |
Anti-Phishing module statistics
Anti-Phishing module statistics
Symbolic name |
Description |
Object identifier (OID) |
|---|---|---|
|
Number of scanned messages in which no phishing content was detected. |
.1.3.6.1.4.1.23668.1735.2.10.1.0 |
|
Number of messages in which phishing content was detected. |
.1.3.6.1.4.1.23668.1735.2.10.2.0 |
|
Number of messages whose processing resulted in errors. |
.1.3.6.1.4.1.23668.1735.2.10.4.0 |
|
Number of messages that were excluded from phishing scans based on the defined settings of the Anti-Phishing module. |
.1.3.6.1.4.1.23668.1735.2.10.5.0 |
|
Number of messages that were excluded from Anti-Phishing scans due to licensing issues or problems with the application databases. |
.1.3.6.1.4.1.23668.1735.2.10.6.0 |
Anti-Phishing module database statistics
Anti-Phishing module database statistics
Symbolic name |
Description |
Object identifier (OID) |
|---|---|---|
|
Date and time when the Anti-Phishing module databases were last updated. |
.1.3.6.1.4.1.23668.1735.2.11.1.0 |
|
Current status of the Anti-Phishing module databases. |
.1.3.6.1.4.1.23668.1735.2.11.2.0 |
Content Filtering statistics
Content Filtering statistics
Symbolic name |
Description |
Object identifier (OID) |
|---|---|---|
|
Number of scanned objects for which no action was taken. |
.1.3.6.1.4.1.23668.1735.2.4.1.0 |
|
Number of objects that were larger than the maximum allowed size defined in the Content Filtering settings. |
.1.3.6.1.4.1.23668.1735.2.4.2.0 |
|
Number of messages containing prohibited types of attachments. |
.1.3.6.1.4.1.23668.1735.2.4.3.0 |
|
Number of messages containing attachments with prohibited names. |
.1.3.6.1.4.1.23668.1735.2.4.4.0 |
|
Number of messages that were excluded from Content Filtering scans based on the defined settings. |
.1.3.6.1.4.1.23668.1735.2.4.5.0 |
|
Number of messages that were excluded from Content Filtering scans due to licensing issues or problems with the application databases. |
.1.3.6.1.4.1.23668.1735.2.4.6.0 |
Statistics of applied actions
Statistics of applied actions
Symbolic name |
Description |
Object identifier (OID) |
|---|---|---|
|
Number of messages for which no action was taken based on the scan results by all enabled program modules. |
.1.3.6.1.4.1.23668.1735.2.5.1.0 |
|
Number of disinfected messages. |
.1.3.6.1.4.1.23668.1735.2.5.2.0 |
|
Number of messages whose infected attachments were deleted. |
.1.3.6.1.4.1.23668.1735.2.5.3.0 |
|
Number of deleted messages. |
.1.3.6.1.4.1.23668.1735.2.5.4.0 |
|
Number of rejected messages. |
.1.3.6.1.4.1.23668.1735.2.5.5.0 |
|
Number of messages put in Quarantine because their processing was postponed. |
.1.3.6.1.4.1.23668.1735.2.5.6.0 |
|
Number of messages in which at least one scan module detected a threat or generated a scan error and for which the Skip action was performed. |
.1.3.6.1.4.1.23668.1735.2.5.7.0 |
|
Number of messages that were skipped by all modules due to inaccessible application databases. |
.1.3.6.1.4.1.23668.1735.2.5.8.0 |
Program statistics
Program statistics
Symbolic name |
Description |
Object identifier (OID) |
|---|---|---|
|
Application name. |
.1.3.6.1.4.1.23668.1735.2.8.1.0 |
|
Program version. |
.1.3.6.1.4.1.23668.1735.2.8.2.0 |
|
Date and time of program installation. |
.1.3.6.1.4.1.23668.1735.2.8.3.0 |
|
License expiration date and time. |
.1.3.6.1.4.1.23668.1735.2.8.4.0 |
|
Current status of the license key. |
.1.3.6.1.4.1.23668.1735.2.8.5.0 |
Reports statistics
Reports statistics
Symbolic name |
Description |
Object identifier (OID) |
|---|---|---|
|
Number of messages in which threats were detected. |
.1.3.6.1.4.1.23668.1735.2.9.1.0 |
|
Total size of messages in which threats were detected. |
.1.3.6.1.4.1.23668.1735.2.9.2.0 |
|
Number of messages in which spam was detected. |
.1.3.6.1.4.1.23668.1735.2.9.3.0 |
|
Total size of messages in which spam was detected. |
.1.3.6.1.4.1.23668.1735.2.9.4.0 |
|
Number of messages that were rejected based on the Content Filtering settings. |
.1.3.6.1.4.1.23668.1735.2.9.5.0 |
|
Total size of messages that were rejected based on the Content Filtering settings. |
.1.3.6.1.4.1.23668.1735.2.9.6.0 |
|
Number of unscanned messages. |
.1.3.6.1.4.1.23668.1735.2.9.7.0 |
|
Total size of unscanned messages. |
.1.3.6.1.4.1.23668.1735.2.9.8.0 |
|
Number of scanned messages in which nothing was detected. |
.1.3.6.1.4.1.23668.1735.2.9.9.0 |
|
Total size of scanned messages in which nothing was detected. |
.1.3.6.1.4.1.23668.1735.2.9.10.0 |
|
Total number of processed messages. |
.1.3.6.1.4.1.23668.1735.2.9.11.0 |
|
Total size of all processed messages. |
.1.3.6.1.4.1.23668.1735.2.9.12.0 |
|
Number of messages with phishing content. |
.1.3.6.1.4.1.23668.1735.2.9.13.0 |
|
Total size of messages with phishing content. |
.1.3.6.1.4.1.23668.1735.2.9.14.0 |
Backup statistics
Backup statistics
Symbolic name |
Description |
Object identifier (OID) |
|---|---|---|
|
Number of objects currently in Backup. |
.1.3.6.1.4.1.23668.1735.2.1.1.0 |
|
Disk space occupied by Backup. |
.1.3.6.1.4.1.23668.1735.2.1.2.0 |
Exporting MIB objects
To export files containing information about MIB objects:
- In the application web interface, add the public SSH key for connecting to the cluster node in Technical Support Mode.
- Run one of the following commands depending on the operating system installed on the node:
- Windows:
pscp -i <ppk_file_path> -r root@<hostname>:/opt/kaspersky/ksmg/share/snmp-mibs .You have to install the PuTTY tool before you can run this command.
- Linux:
scp -r root@<hostname>:/opt/kaspersky/ksmg/share/snmp-mibs .
- Windows:
Files containing information about MIB objects will be exported and saved in the snmp-mibs folder in the current directory.
Page top
Email notifications for Kaspersky Secure Mail Gateway
Notification about program events (hereinafter also referred to as "system notifications") contain information about program settings, errors encountered during program operation, and fault recovery.
You can configure the delivery of system notifications to the mail server administrator for the following program events:
- Protection:
- Anti-Virus bases are outdated.
- Anti-Spam bases are outdated.
- Anti-Phishing bases are outdated.
- Databases update issues.
- KSN/KPSN issues.
- KSN requests filtered.
- Synchronization:
- Node is not available.
- Data synchronization failed.
- Failed to apply settings.
- Time does not match the Control node time.
- Cluster configuration issues.
- LDAP integration:
- LDAP connection issues.
- Failed to save LDAP data for rules matching.
- Failed to save LDAP data for accounts autofill.
The text of the notification includes the following information:
- Name of the group and list of errors encountered when the notification was sent.
- Date and time of the last occurrence of each error.
For errors in Synchronization and LDAP integration groups, date and time of the last successful synchronization is also noted.
- IP address and connection port of the cluster node where the relevant errors occurred.
- Comment for the cluster node.
System notifications are sent once a day at 00:00 local time of the Control node if at least one of the aforementioned errors exists at that time. When new errors occur or existing errors are resolved, system notifications are sent at a maximum frequency of once every 15 minutes.
Notifications about message processing rules triggering contain information about objects detected by one or more program modules when scanning a message.
You can configure the delivery of notifications to the sender and recipients of the message, recipients from an additional list defined for the triggered rule, as well as to recipients from the general list for all rules. For each of the recipient groups, you can configure different notification templates.
Configuring notifications about program events
Requires the Edit settings permission.
To configure notifications about program events:
- In the program web interface window, select Settings → Monitoring → System notifications.
- Use the Send system notifications toggle switch to turn program event notifications on or off.
- If at the previous step you turned on the notifications, in the Notification settings group of settings, click Add.
- In the Emails text box that appears, type an email address and press Enter.
The email addresses are entered one at a time. Repeat the process of adding addresses to the list for all email addresses that you are adding.
You can use the "*" and "?" characters to create address masks.
- In the Language drop-down list, select the language of the notification text.
- If necessary, repeat steps 5-6 to add recipients of notifications in a different language.
- Click Save.
Notifications about program events are configured.
You can change the default address that is indicated as the sender of notifications about program events.
Configuring notifications about message processing rules triggering
Requires the Edit settings permission.
Make sure that notifications are turned on in the rule for which you want to receive notifications.
To configure notifications about message processing rules triggering:
- In the application web interface window, select the Rules section.
- Click the Detects notifications link.
The Detects notifications window opens.
- Use the Send notifications about detects toggle switch to enable or disable the sending of notifications about application events.
- If you enabled forwarding of notifications at the previous step, use the General list of recipients field to enter an email address and press ENTER.
You can enter multiple semicolon-separated addresses.
You can use the "*" and "?" characters to create address masks.
- Click Save.
Notifications about message processing rules triggering are configured. The application will send notifications to the specified addresses in accordance with the settings of the triggered rule:
- To recipients from the general list if the Notify recipients from the general list check box is selected for the rule.
- To the sender of the message if the Notify sender check box is selected for the rule.
- To recipients of the message if the Notify recipient check box is selected for the rule.
- To additional addresses if the Additional addresses check box is selected for the rule.
You can change the default address that is indicated as the sender of notifications about message processing rules being triggered.
Page top
Configuring notification templates
Templates can be edited only for rule triggering notifications. You cannot edit system notification texts.
You can configure different notification templates for recipients in the general list, message sender, message recipients, and recipients from the list of additional addresses configured for the rule.
By default, notification template texts are in English. Automatic language switching for templates is not available. If necessary, please rewrite the text in the required language. If you need to send notifications in different languages within one recipient group, you can write the same text in multiple languages and add the translations one after the other in the same template.
To configure notification templates:
- In the application web interface window, select the Rules section.
- Click the Detects notifications link.
The Detects notifications window opens.
- Click the Edit template link next to the relevant recipient to open the template editing window.
- If necessary, edit the notification subject in the Subject field.
- If necessary, edit the notification text in the Message body text area.
You can use macros in the subject and the body of the message. To do so, click the Add macro button and select the relevant macro from the drop-down list.
Macro values are automatically inserted in English. Language switching for macros is not available.
- Click Save.
- Repeat steps 3-6 for each template.
Notification templates are configured.
Page top
Using macros in notification templates
A macro is a fill element used in event notification templates. In the text of a notification generated based on the template, the macro is replaced with a certain value.
Macro syntax: %MACRO_NAME%
You can use the following macros in the body of rule triggering notifications (see the table below).
Macros for notification templates
Macro |
Description |
|---|---|
%NODE_IP% |
IP address of the cluster node that processed the message. |
%NODE_PORT% |
Connection port of the cluster node that processed the message. |
%PRODUCT_NAME% |
Application name — Kaspersky Secure Mail Gateway. |
%SMTP_MESSAGE_ID% |
|
%SENDER% |
Mail sender's address. |
%SENDER_IP% |
IP address of the message sender |
%ALL_RECIPIENTS% |
Addresses of all recipients of the original message. |
%AFFECTED_RECIPIENTS% |
Addresses of the original message recipients affected by the event described in the notification. |
%AFFECTED_RULES% |
List of triggered rule IDs. |
%MESSAGE_ID% |
ID assigned to the message by Kaspersky Secure Mail Gateway. |
%SUBJECT% |
Subject of an original message. |
%DATE% |
Date when the message was received. |
%MESSAGE_ACTION% |
Action performed on the message by the application. Possible values:
If the message was placed in Backup, the action is followed by a comma and the words |
%DATA_BEGIN% |
Service macro for designating the beginning of the list of attachments. |
%DATA_END% |
Service macro for designating the end of the list of attachments. |
%OBJECT_NAME% |
Name of the detected object. The value of the macro depends on its position in the body of the notification:
In the notification subject, the |
%OBJECT_SIZE% |
Size of the whole message or individual attachments. The value of the macro depends on its position in the body of the notification:
In the notification subject, the size of the whole message is always inserted for this macro. |
%STATUS% |
Scan result for the message or attachment. The value of the macro depends on its position in the body of the notification:
In the subject of the notification, the macro is always replaced with scan statuses of the whole message (if notification sending is enabled for the relevant statuses in the rule). If there are multiple statuses, they are inserted as a comma-separated list. |
%OBJECT_ACTION% |
Action performed on the message or attachment by the application. The value of the macro depends on its position in the body of the notification:
In the notification subject, the action performed on the whole message is always inserted. |
Page top
Adding a unique message ID to the notification
If the user receives a notification about a rejected message, the user can contact the administrator for detailed information. In this case, the original message will have to be found in Backup. To optimize the search, you can add a unique message identifier (also referred to as "message ID") to the notification template.
To add a message ID to the text of the notification:
- In the application web interface window, select the Rules section.
- In the rule table, select the rule for which you want to configure notifications about scanning events.
This opens the View rule window.
- In the left pane, select the Notifications section.
- Make sure that the check boxes next to the relevant notification recipients are selected. If necessary, make changes and click Save.
- Click the Customize notification templates link in the upper-right corner of the window.
The Detects notifications window opens.
- Click the Edit template link next to the relevant recipient to open the notification template configuration window.
- Add the following line to the template:
Message ID: %SMTP_MESSAGE_ID% - Click Save.
The macro for message ID is added to the notification template. The text of subsequent notifications will contain a unique message ID.
Page top
Configuring the address for receiving program messages
You can specify the email address that will be indicated as the sender of the following program messages:
- Notifications about triggered rules
- Notifications about program events
- Messages from Backup sent as an attachment
- Reports
- Notifications about failed delivery of messages when the program applies the Reject action.
To configure the address for receiving program messages:
- In the program web interface window, select Settings → Monitoring → Reply address.
- In the Reply address field, specify the address that will be displayed in the From field in messages sent by the program.
You can indicate only one address.
The default value is
ksmg@<FQDN of the cluster's Control node>. - Click Save.
The address for program messages is now configured.
Page top
Authentication using the single sign-on technology
When Single Sign-On is enabled, users can connect to the web interface without entering their credentials. The user's domain account is used for authentication.
We recommend using Kerberos authentication because this mechanism is more secure. If you use NTLM authentication, hackers can gain access to user password hashes by intercepting network traffic.
Creating a keytab file
You can use the same account to authenticate on all cluster nodes. To do so, create a
containing the for each of these nodes. When creating a keytab file, you will have to use an attribute for generating the salt, which modifies the hash function input.You must use any convenient method to save the generated "salt" so that it can be used later when adding new SPNs to the keytab file.
You can also create a separate Active Directory user account for each cluster node that requires configuration of Kerberos authentication.
Before you create a keytab file
Before creating a keytab file, for each SPN, make sure that it is not registered in Active Directory. You can do this by running the following command: setspn -Q <SPN>, where <SPN> has the following structure: HTTP/<fully qualified domain name (FQDN) of the cluster node>@<realm name of the Active Directory domain in upper case>.
The command should return "No such SPN found", which means that the SPN in question is not registered. If the SPN has already been registered, before creating the keytab file, you need to unassign the SPN from the account or delete the account itself in the Active Directory to which this SPN was assigned.
Example of checking an SPN for one Control node and two Secondary nodes: setspn -Q HTTP/control-01.test.local@TEST.LOCAL setspn -Q HTTP/secondary-01.test.local@TEST.LOCAL setspn -Q HTTP/secondary-02.test.local@TEST.LOCAL |
Creating a keytab file
The keytab file is created on the domain controller server or on a Windows Server computer that is part of the domain, under the domain administrator account.
To create a keytab file using one user account:
- In the
Active Directory Users and Computerssnap-in, create a user account (for example, named control-user). - To use the AES256-SHA1 encryption algorithm, in the Active Directory Users and Computers snap-in:
- Open the properties of the created account.
- On the Account tab, select the This account supports Kerberos AES 256 bit encryption check box.
- Use the ktpass tool to create a keytab file for
control-user. To do so, run the following command on the command line:C:\Windows\system32\ktpass.exe -princ HTTP/<fully qualified domain name (FQDN) of the Control node>@<realm Active Directory domain name in uppercase> -mapuser control-user@<realm Active Directory domain name in uppercase> -crypto AES256-SHA1 -ptype KRB5_NT_PRINCIPAL -pass * +dumpsalt -out <path to file>\<file name>.keytabThe tool will prompt you for the
control-userpassword when running the command.The SPN of the Control node is added to the created keytab file. The screen will display the generated salt:
Hashing password with salt "<hash value>". - For each cluster node, add an SPN entry to the keytab file. To do so, run the following command:
C:\Windows\system32\ktpass.exe -princ HTTP/<fully qualified domain name (FQDN) of the node>@<realm Active Directory domain name in uppercase> -mapuser control-user@<realm Active Directory domain name in uppercase> -crypto AES256-SHA1 -ptype KRB5_NT_PRINCIPAL -pass * -in <path and name of the previously created file>.keytab -out <path and new name>.keytab -setupn -setpass -rawsalt "<salt hash value obtained when creating the keytab file at step 3>"The tool will prompt you for the
control-userpassword when running the command.
The keytab file will be created. This file creates all added SPNs of cluster nodes.
Example: For example, you need to create a keytab file containing the SPNs of 3 nodes: To create a file named
Let's assume you have received the salt To add one more SPN, run the following command:
To add a third SPN, run the following command:
This will result in the creation of a file named |
To create a keytab file using a separate user account for each node:
- In the Active Directory Users and Computers snap-in, create a separate user account for each cluster node (for example, you can create user accounts named
control-user,secondary1-user,secondary2-user, and so on). - To use the AES256-SHA1 encryption algorithm, in the Active Directory Users and Computers snap-in:
- Open the properties of the created account.
- On the Account tab, select the This account supports Kerberos AES 256 bit encryption check box.
- Use the ktpass tool to create a keytab file for
control-user. To do so, run the following command on the command line:C:\Windows\system32\ktpass.exe -princ HTTP/<fully qualified domain name (FQDN) of the Control node>@<realm Active Directory domain name in uppercase> -mapuser control-user@<realm Active Directory domain name in uppercase> -crypto AES256-SHA1 -ptype KRB5_NT_PRINCIPAL -pass * -out <path to file>\<file name>.keytabThe tool will prompt you for the
control-userpassword when running the command.The SPN of the Control node is added to the created keytab file.
- For each cluster node, add an SPN entry to the keytab file. To do so, run the following command:
C:\Windows\system32\ktpass.exe -princ HTTP/<fully qualified domain name (FQDN) of the node>@<realm Active Directory domain name in uppercase> -mapuser secondary1-user@<realm Active Directory domain name in uppercase> -crypto AES256-SHA1 -ptype KRB5_NT_PRINCIPAL -pass * -in <path and name of the previously created file>.keytab -out <path and new name>.keytabThe tool will prompt you for the
secondary1-userpassword when running the command.
The keytab file will be created. This file creates all added SPNs of cluster nodes.
Example: For example, you need to create a keytab file containing the SPNs of 3 nodes: To create a file named
To add one more SPN, run the following command:
To add a third SPN, run the following command:
This will result in the creation of a file named |
After you create a keytab file
After creating a keytab file, for each SPN, make sure that it is registered and assigned to the relevant account. You can do this by running the following command: setspn -Q <SPN>, where <SPN> has the following structure: HTTP/<fully qualified domain name (FQDN) of the cluster node>@<realm name of the Active Directory domain in upper case>.
The command must return "Existing SPN found" and the account to which the SPN is assigned.
Additionally, after creating a keytab file, you can check the list of SPNs assigned to the relevant account. To do so, you can run the following command: setspn -L <account>, where <account> has the following structure: <user name>@<realm name of the Active Directory domain in upper case>.
If the keytab file was created with one account, the command should return a list of all SPNs for which the keytab file was created. If the keytab file was created with separate accounts for each node, the command should return one SPN that is assigned to the specific account.
Example command for one account: setspn -L control-user@TEST.LOCAL Example command for separate accounts for each node: setspn -L control-user@TEST.LOCAL setspn -L secondary1-user@TEST.LOCAL setspn -L secondary2-user@TEST.LOCAL |
Configuring Kerberos authentication
To use Kerberos authentication, make sure that in the DNS system, in the reverse lookup zone there is a
for the fully qualified domain name (FQDN) and an URL (if the URL is not the same as FQDN) of each cluster node.To configure
:- In the application web interface window, select the Settings → Application access → Single Sign-On login section.
- Select the Kerberos tab.
- Set the Use Kerberos toggle switch to Enabled.
- Click the Upload button to upload a previously created keytab file.
This functionality is available only if the user has the Edit settings permission.
The keytab file must contain the SPN of the Control node and Secondary nodes.
The file selection window opens.
- Select the keytab file and click Open.
- Click Save.
If the keytab file is found to not contain the SPN of the Control node or an SPN of any of the Secondary nodes, in the Nodes section that node has the No SPN for Kerberos Single Sign-On status. If no SPN is found for any of the nodes, the Save button cannot be clicked.
Kerberos authentication is configured. Users authenticated in Active Directory can connect to the application web interface using the Single Sign-On technology. Access to application functionality is determined by the permissions of the application user account.
When Kerberos authentication is disabled, the previously uploaded keytab file is deleted.
Page top
Configuring NTLM authentication
We recommend using Kerberos authentication because this mechanism is the most secure. If you use NTLM authentication, hackers can gain access to user passwords by intercepting network traffic.
To configure
:- In the application web interface window, select the Settings → Application access → Single Sign-On login section.
- Select the NTLM tab.
- Set the Use NTLM toggle switch to Enabled.
- In the Domain controller IP address/domain name field, enter the IP address or domain name of the domain controller that will be used for authentication.
You can specify two domain controllers. To add a second controller, click
. - In the Port field, enter the port used for connecting to the domain controller.
By default, port 445 is used.
- Click Save.
NTLM authentication is configured. Users authenticated in Active Directory can connect to the application web interface using the Single Sign-On technology. Access to application functionality is determined by the permissions of the application user account.
When connecting from computers that are not part of the domain, the user will have to enter the credentials of the user's domain account.
Page top
Additional configuration in the operating system and browser
These instructions are applicable to computers with a Windows operating system.
Depending on the type of browser and the authentication protocol being used, additional configuration may be required to ensure correct authorization of users from computers that are members of an Active Directory domain that is configured for SSO authentication. Authorization from computers that are not members of an Active Directory domain configured for SSO authentication does not require additional configuration and is carried out according to the procedure of the authentication protocol being used.
Kerberos authentication
To ensure correct operation of Kerberos authentication regardless of the type of browser being used, the following preliminary configuration of the operating system must be completed:
- Configure time synchronization on the servers of Active Directory domain controllers, on the Kaspersky Secure Mail Gateway cluster nodes, and on the computer that is used to connect to the web interface.
- Add A- and PTR records on the DNS server for the Kaspersky Secure Mail Gateway cluster nodes and make sure that they are correctly recognized on the cluster nodes and on the computer that is used to connect to the web interface.
For more information about configuring these settings, see the accompanying documentation on the operating system.
To perform additional configuration in the Google Chrome and Microsoft Edge browsers:
- On the computer from which you are connecting to the web interface, select the Internet options section in the control panel.
- On the Security tab, select the Local intranet zone and click the Sites button.
The Local intranet window will open.
- Click the Advanced button.
- This opens a window; in that window, enter the full URL of the cluster node in FQDN format in the text box and click Add. Repeat this step for each cluster node.
You can also enter a domain name to add all the addresses in the domain at the same time (for example,
.example.com). - Make sure that the addresses were added and click the Close button.
- Close all previously opened windows by clicking the OK buttons.
Additional configuration is now complete. The user whose profile has been configured is able to connect to the application web interface from this computer using the Google Chrome and Microsoft Edge browsers without entering their account credentials.
To perform additional configuration in the Mozilla Firefox browser:
- In the address bar of the browser, enter
about:config, then click the Accept the Risk and Continue button on the opened page. - In the options search bar, type
negotiate. - This opens a list of parameters; in that list, in the network.negotiate-auth.delegation-uris and network.negotiate-auth.trusted-uris fields, enter the full addresses of all cluster nodes in FQDN format separated by commas.
Click the
 icon on the right of the field to save the entered addresses.
You can also enter a domain name to add all the addresses in the domain at the same time (for example,
.example.com).
Additional configuration is now complete. The user whose profile has been configured is able to connect to the application web interface from this computer using the Mozilla Firefox browser without entering their account credentials.
NTLM authentication
No additional configuration is required for NTLM authentication to work correctly in the Google Chrome and Microsoft Edge browsers.
To perform additional configuration in the Mozilla Firefox browser:
- In the address bar of the browser, enter
about:config, then click the Accept the Risk and Continue button on the opened page. - In the options search bar, type
ntlm. - This opens a list of parameters; in that list, in the network.automatic-ntlm-auth.trusted-uris field, enter the full addresses of all cluster nodes in FQDN or IP address format separated by commas.
Click the
icon on the right of the field to save the entered addresses.You can also enter a domain name to add all the addresses in the domain at the same time (for example,
.example.com).When connecting to the web interface, you will need to enter the node address in the same format as indicated in this field.
Additional configuration is now complete. The user whose profile has been configured is able to connect to the application web interface from this computer using the Mozilla Firefox browser without entering their account credentials.
Page top
Connecting to cluster nodes over the SSH protocol
The Kaspersky Secure Mail Gateway administrator can connect to any cluster node over SSH as root to work with the application in Technical Support Mode using the command line. To do so, you must generate SSH keys and upload the SSH public key through the application web interface. After it is uploaded to the server hosting the Control node, this key is relayed and saved on all cluster nodes.
To prevent unauthorized access to the system, the administrator must independently ensure security of the SSH private key by using a token.
You can add one or more SSH public keys.
If an SSH connection could not be established, you can look for a solution on the application page in the Kaspersky Secure Mail Gateway Knowledge Base, article 15904.
Page top
Adding an SSH public key.
To upload the SSH public key through the application web interface:
- In the application web interface window, select the Settings → Application access → SSH access section.
- Click Add key.
This opens the Add an SSH public key window.
- In the Description field, enter any relevant information about the uploaded SSH key.
- In the Key data field, paste the previously generated SSH public key.
- Click Add.
The SSH public key is now added. The Kaspersky Secure Mail Gateway administrator will be able to connect to any cluster node if the appropriate SSH private key is available.
Page top
Viewing SSH public key information
To view SSH public key information:
- In the application web interface window, select the Settings → Application access → SSH access section.
This opens the SSH public key table.
- Select the key for which you want to view information.
This opens the View SSH key window.
The window contains the following information about the key:
- Description is a comment describing the public key, which was added when the key was added to the web interface.
- Key data is the content of the key.
- Created by is the name of the user account that uploaded the key.
- Created at is the time when the key was added.
Deleting an SSH public key
To delete the SSH public key:
- In the application web interface window, select the Settings → Application access → SSH access section.
This opens the SSH public key table.
- Select the key that you want to delete.
This opens the View SSH key window.
- Click Delete.
- In the confirmation window, click OK.
The SSH public key is now deleted.
Page top
Editing MTA settings
Kaspersky Secure Mail Gateway is integrated into the existing corporate mail infrastructure and is not a standalone mail system. For example, Kaspersky Secure Mail Gateway does not deliver email messages to recipients and does not manage user accounts.
Messages are sent between mail servers using the MTA agent. You can perform basic and advanced configuration of MTA manually using the application web interface.
Configuring basic MTA settings
To modify the basic settings of MTA:
- In the program web interface window, select the Settings → Built-in MTA → Basic Settings section.
- In the Domain name text box, type the domain name of Kaspersky Secure Mail Gateway (mydomain) that all cluster nodes will share.
- If you want each cluster node to use its own fully qualified domain name (myhostname), set the Use FQDN of cluster nodes toggle switch to Enabled.
- In the Hostname text box, type the full domain name of Kaspersky Secure Mail Gateway (myhostname).
The text box is accessible only if the Use FQDN of cluster nodes option is turned off.
- In the Message size limit (bytes) field, specify the maximum size of an email message including SMTP headers that can be forwarded through Kaspersky Secure Mail Gateway (message_size_limit), in bytes.
Specify 0 if no limit is required.
The default value is 20971520 bytes (20 MB).
- Create a list of trusted networks and network hosts that are allowed to send email messages via Kaspersky Secure Mail Gateway (mynetworks). To do so, enter the host IP addresses and/or network addresses in CIDR format in the Trusted networks field and press ENTER.
As a rule, these are internal networks and network hosts of your organization. For example, you can specify the IP addresses of Microsoft Exchange servers used at your organization.
You can type addresses one by one or paste a whole list of semicolon-separated networks.
If trusted networks are not specified, Kaspersky Secure Mail Gateway will not be receiving messages from internal mail servers and redirect them outside the network of your organization.
- In the Email destination address field, type the address and port of your edge gateway (relayhost). Kaspersky Secure Mail Gateway will be redirecting all messages to this address.
You can enter an IPv4 address (for example, 192.168.0.1), domain name, or FQDN, or you can leave the field empty. If the value of this field is not specified, Kaspersky Secure Mail Gateway uses your DNS server settings for routing email.
If you have configured email routing for individual domains, Kaspersky Secure Mail Gateway will be redirecting email messages to the addresses specified for each domain.
- If in the Email destination address field, you entered a domain name or a FQDN, you can enable MX record lookup for the specified domain name. To do so, move the MX lookup toggle switch to the Enabled position.
- Click Save.
Basic MTA settings are configured.
Configuring advanced MTA settings
To modify the advanced settings of MTA:
- In the application web interface window, select the Settings → Built-in MTA → Advanced Settings section.
- In the SMTP greeting text field, type the text that will accompany code 220 in the SMTP greeting (smtpd_banner).
Default value:
$myhostname ESMTP MTA. - In the Maximum connection attempts field, specify the maximum number of connection attempts by one remote SMTP client to the service of the SMTP server per minute (smtpd_client_connection_rate_limit).
Specify 0 if no limit is required.
Default value: 0 (no limit).
- In the Maximum simultaneous connection attempts field, specify the maximum number of simultaneous connection attempts by one remote SMTP client to the SMTP server (smtpd_client_connection_count_limit).
Specify 0 if no limit is required.
Default value: 50.
- In the Maximum mail delivery requests field, specify the maximum number of message delivery requests from one remote SMTP client to the SMTP server per minute (smtpd_client_message_rate_limit), regardless of whether this mail server accepts these messages or not.
Specify 0 if no limit is required.
Default value: 0 (no limit).
- In the Maximum SMTP session length field, specify the maximum period of time during which a request has to be received from the remote SMTP client and a response sent by the SMTP server (smtpd_timeout). In the drop-down list next to the field, select units of measurement.
The default value is 30 seconds.
- In the Maximum queue lifetime for a message field, specify the time period for storing messages in the queue with a transient error status (maximal_queue_lifetime), after which time the messages are considered undeliverable. In the drop-down list next to the field, select units of measurement.
Default value: 3 days.
- In the Maximum queue lifetime for a bounce message field, specify the time period for storing bounce messages in the queue with a transient error status (bounce_queue_lifetime), after which time the messages are considered undeliverable. In the drop-down list next to the field, select units of measurement.
Default value: 3 days.
- In the BCC address for all messages field, specify an optional email address for a BCC ("blind carbon copy") recipient of all messages received by the MTA mail transfer agent (always_bcc).
- Use the Check addresses format for RFC 821 compliance toggle switch to enable or disable the checking of email addresses in the values of
MAIL FROMandRCPT TOcommands from the SMTP session to verify that such addresses are in angle brackets and do not contain RFC 822 comments and phrases (strict_rfc821_envelopes).This scanning prevents receipt of messages from poor-quality software.
By default, this authentication is enabled.
- Use the Disable recipient verification SMTP VRFY toggle switch to enable or disable
SMTP VRFYcommand (disable_vrfy_command).The
SMTP VRFYcommand prevents specific services from collecting email addresses.By default, this authentication is disabled.
- In the EHLO keywords not sent by SMTP server in response settings group, select check boxes next to those case insensitive
EHLOcommands, which your SMTP server will not announce in response to anEHLOrequest from an external SMTP client (smtpd_discard_ehlo_keywords).Default values:
dsn,etrn. - If you want Kaspersky Secure Mail Gateway to reject a message delivery request if the domain from the
RCPT TOcommand does not contain MX and A records of the DNS server, or the MX record is distorted (for example, a zero-length MX host address is specified), set the Reject messages for unknown recipient domains toggle switch to Enabled.By default, request rejection is enabled.
- In the Reject messages for recipients drop-down list, select one of the following modes of :
- Do not reject.
Recipient verification is not performed.
- Reject for unverified recipients.
The application rejects the message if the recipient's server is unavailable or rejects the request (reject_unverified_recipient).
Default value: Reject for unverified recipients.
SMTP Recipient Address Verification is not performed when Kaspersky Secure Mail Gateway receives messages from trusted network hosts.
If SMTP verification of recipient addresses is disabled, a delivery failure notification is sent when an attempt is made to deliver a message to a nonexistent address. This increases the volume of email traffic and may increase the load on the mail server.
- Do not reject.
- Click Save.
Advanced MTA settings are configured.
DKIM signature for outgoing messages
A DKIM signature for outgoing messages is a digital signature added to messages sent from email addresses of a certain domain for purposes of identifying users by the name of the corporate domain.
The DomainKeys Identified Mail (DKIM) technology lets the user verify that the message was indeed sent from the declared domain. The DKIM technology aims to combat forged sender addresses that are often used in phishing messages and mail spam. Instead of the traditional IP address, DKIM identifies the sender using a digital signature associated with the name of the corporate domain. The signature is automatically checked by the recipient. Senders are authenticated using the domain name system (DNS), which allows sending public encryption keys.
You can configure the DKIM signature for messages in the web interface of Kaspersky Secure Mail Gateway. Configuration involves the following steps:
- Creating or importing a DKIM key.
- Retrieving a DNS record for a public DKIM key.
- Adding the retrieved DNS record to the settings of your DNS server.
Creating the DKIM key
To create a DKIM key:
- In the application web interface window, select the Settings → Built-in MTA → DKIM keys section.
- In the upper part of the workspace, click Create.
This opens the Create new DKIM key window.
- In the Name field, type the name of the DKIM key that will help you to find the key when adding the DKIM signature to messages.
- Click Create.
The DKIM key you have created appears in the list of DKIM keys in the workspace of the main window of the application web interface.
Viewing DKIM key information
To view information about a DKIM key:
- In the application web interface window, select the Settings → Built-in MTA → DKIM keys section.
- Select the DKIM key for which you want to view information.
This opens the DKIM key window.
The window displays the following information:
- Name is the unique name of the key specified during creation or import.
- Key length is the key length in bits.
- Public key is the content of the public key that you can copy to the clipboard by clicking Copy.
Importing the DKIM key from file
To import a DKIM key from a file:
- In the application web interface window, select the Settings → Built-in MTA → DKIM keys section.
- In the upper part of the workspace, click Import.
This opens the Import DKIM key window.
- In the Name field, type the name that you want to assign to the DKIM key being imported.
- Click Upload.
This opens the file selection window.
- Choose the file of the DKIM key that you want to import and click Open.
The file must contain an RSA key in PEM format and be 2048 or 4096 bits long.
- Click Import.
The DKIM key appears in the list of DKIM keys in the workspace of the main window of the application web interface.
Deleting the DKIM key
To delete a DKIM key:
- In the application web interface window, select the Settings → Built-in MTA → DKIM keys section.
- Select the DKIM key that you want to delete.
This opens the DKIM key window.
- Click Delete.
- In the confirmation window, click OK.
The DKIM key is deleted.
Retrieving a DNS record for a public DKIM key
To retrieve a DNS record for a public DKIM key:
- In the application web interface window, select the Settings → Built-in MTA → Domains section.
- Select the domain for which you want to configure adding a DKIM signature.
This opens the Edit domain window.
- Select the DKIM records tab.
- Click Add entry.
- Turn on the Enabled toggle switch.
- In the Selector field, type the name that will help you find the DKIM signature.
- In the DKIM key list, select the DKIM key based on which the DKIM signature will be added to messages.
- Click Save.
The DNS record field displays the DNS record of the public DKIM key for the selected domain.
Page top
Adding a DKIM key to DNS server settings
To add a public DKIM key to the settings of your DNS server:
- Sign in to your DNS server under the administrator account.
- Locate the page with information on updating DNS records of the domain for whose addresses you want to configure the DKIM signature to be added to outgoing messages.
For example, this page can be named "DNS Management", "Name Server Management", or "Advanced Settings".
- Find records in TXT format for the domain for whose addresses you want to configure the DKIM signature to be added to outgoing messages.
- In the list of records in TXT format, add the DNS record of the public DKIM key for a certain domain with the following contents:
<selector>._domainkey.<name of the domain for which you want to add the public DKIM key>. IN TXT ( "v=<DKIM version>; k=rsa; s=email" "p=<DNS record of the public DKIM key>" )Example of a DNS record for a Public DKIM key:
sel1._domainkey.test.example.com. IN TXT ( "v=DKIM1; k=rsa; s=email; ""p=MIIBIjANBgkqhkiG9w0BAQEFAAOCAQ8AMIIBCgKCAQEArqGgYtLwpVAFRDf+YfRK0aB5Qbne2xMAEye/aH4fLf7cOuOcWz/x5f33uxSpL8YwPgEXPoFogKWTFCqMUUBreHx1mbfgBn+uGYvlxJEXyFFmiMKHO0yTJntPrWxsCnF10ZSf5lBL/olqmgCTgkpBG11PcvCJq0bdEyWQ50avMCfg3zoean8CsiJUb91TWIy08T8HoW0huyQ3""W82jMhAYvO8FMgI1rbwaH7z3tlQxnGqc49+lRpz7T+p1Tl6Bs2iU8h2m1mIupIsNHF4Q+UtGNl9jaajhyz+NMmjLVTlaZvpbS3xODSBnZdpAXywUa4hfQsto1cHSAwEWsk90IQ/HHwIDAQAB" )See Document RFC 5617 for details on configuring settings of the DNS record of a public DKIM key.
- Save changes.
The syntax of the sample DNS record is provided for purposes of adding it to the settings of a BIND DNS server. The syntax of the DNS record to be added to other DNS servers may differ slightly from the example provided.
Configuring the DKIM signature when migrating to Kaspersky Secure Mail Gateway 2.0
When updating the program, it is recommended to configure the DKIM signature in Kaspersky Secure Mail Gateway 2.0 and use it in parallel with the DKIM signature for Kaspersky Secure Mail Gateway 1.1. This lets you carry out a seamless migration to Kaspersky Secure Mail Gateway 2.0.
Configuring the DKIM signature for messages when migrating from Kaspersky Secure Mail Gateway 1.1 to 2.0 involves the following steps:
- Creating or importing a DKIM key in the installed Kaspersky Secure Mail Gateway 2.0 program.
- Retrieving a DNS record for a public DKIM key.
- Adding the retrieved DNS record to the settings of your DNS server.
As a result, both versions of the program will add their DKIM signatures to messages, each with its own DKIM key.
Using the TLS protocol in the operation of Kaspersky Secure Mail Gateway
Kaspersky Secure Mail Gateway can process email messages that are sent over an encrypted link during a
session.TLS session is a sequence of the following events:
- The server from which email messages are sent (Client) establishes a connection to the server to which email messages are sent (Server).
- Servers start interacting via the SMTP protocol.
- The Client uses the
STARTTLScommand to offer the Server to use TLS during SMTP interaction. - If the Server is able to use TLS, it responds with the
Ready to start TLScommand and sends the Server certificate to the Client. - The Client receives the certificate and, if the Client is configured accordingly, verifies the authenticity of the Server certificate.
- The Client and the Server enable the data encryption mode.
- The servers exchange data.
- The session ends.
You can configure the TLS security mode for situations where Kaspersky Secure Mail Gateway receives messages from another server (acts as the Server) or sends messages to another server (acts as the Client).
Some mail servers use unencrypted channels to exchange email messages on the internet. Configuring mandatory TLS encryption in the application will make it impossible to exchange messages with such servers. For this reason, it is recommended to use the following TLS security settings with caution:
- TLS settings for receiving message → Server TLS security level = Require TLS Encryption
- TLS settings for sending messages → Client TLS security level = Require TLS Encryption and don't verify certificate or Require TLS Encryption and verify certificate
By default, the application checks the capability for TLS encryption but does not terminate a connection if encryption is not available. This lets you ensure data exchange with all servers but does not guarantee the security of the communication channels. Email messages transmitted over unencrypted channels could be intercepted, spoofed, or modified by hackers.
To ensure the authenticity and confidentiality of transmitted messages, it is recommended to configure S/MIME in the settings of the mail client being used in your organization.
If you chose to use TLS encryption in application settings to ensure safe data transfer, you will need a security certificate (hereinafter also referred to as the "TLS certificate"). You can use the default certificate automatically created by the application or add your own certificate.
Configuring TLS security for receiving and sending messages
To configure the TLS security mode for receiving and sending messages:
- In the application web interface window, select the Settings → Built-in MTA → TLS Encryption section.
- In the TLS settings for receiving message group of settings, in the Server TLS security level drop-down list, select one of the following modes of TLS encryption of the connection between Kaspersky Secure Mail Gateway and the server that sends email messages:
- No TLS Encryption if you do not want to use TLS encryption of the connection to the server that sends email messages.
In this case, Kaspersky Secure Mail Gateway receives all messages in unencrypted form.
- Attempt TLS Encryption if you want Kaspersky Secure Mail Gateway (Server) to prompt the server sending email messages (Client) to use TLS encryption of the connection.
In this case, Kaspersky Secure Mail Gateway sends a list of supported SMTP commands to the client, including
STARTTLS, but receives messages regardless of the Client's response. - Require TLS Encryption if you want to terminate the connection between Kaspersky Secure Mail Gateway (Server) and the server sending email messages (Client) if TLS encryption cannot be used.
In this case, Kaspersky Secure Mail Gateway sends a list of supported SMTP commands to the Client, including
STARTTLS. If the Client does not respond with aSTARTTLScommand, the connection is terminated. If the Client does send aSTARTTLScommand to the Server, Kaspersky Secure Mail Gateway responds with aReady to start TLScommand and sends the server certificate to the Client. The encrypted TLS connection is established after the Client has verified the authenticity of the Server certificate.
By default, the Attempt TLS Encryption mode is active.
- No TLS Encryption if you do not want to use TLS encryption of the connection to the server that sends email messages.
- In the Requesting client TLS certificate drop-down list, select one of the following options (not available for the No TLS Encryption mode):
- Do not request if you want Kaspersky Secure Mail Gateway not to request the client's TLS certificate.
- Request if you want Kaspersky Secure Mail Gateway to request the client's TLS certificate but to still be able to redirect messages regardless of the certificate verification result.
- Require if you want Kaspersky Secure Mail Gateway to require a TLS certificate of the client and refuse to forward messages if the client TLS certificate does not pass authentication.
Set the Request or Require mode only if you are certain that the clients supported by your mail server can provide a verifiable TLS certificate.
Correct operation of the Require mode requires selecting the Require TLS Encryption server TLS encryption mode.
By default, the value is set to Do not request.
- In the TLS settings for sending messages group of settings, in the Client TLS security level drop-down list, select one of the following modes of TLS encryption of the connection between Kaspersky Secure Mail Gateway and the server that receives email messages:
- No TLS Encryption if you do not want to use TLS encryption of the connection with the server that receives email messages.
In this case, Kaspersky Secure Mail Gateway redirects all messages in unencrypted form.
- Attempt TLS Encryption if you want Kaspersky Secure Mail Gateway to attempt to establish a TLS session with the receiving mail server and, if the receiving server does not support TLS, redirect messages in unencrypted form.
- Require TLS Encryption and don't verify certificate if you want Kaspersky Secure Mail Gateway to forward messages only if the receiving mail server supports TLS, but regardless of the authentication results of its TLS certificate.
- Require TLS Encryption and verify certificate if you want Kaspersky Secure Mail Gateway to forward messages only if the receiving mail server supports TLS, and its TLS certificate authenticates successfully.
Kaspersky Secure Mail Gateway does not redirect messages when these conditions are not satisfied.
By default, the Attempt TLS Encryption mode is active.
- No TLS Encryption if you do not want to use TLS encryption of the connection with the server that receives email messages.
- Click Apply.
TLS security modes for receiving and sending messages are configured.
Managing TLS certificates
Processing messages transmitted over encrypted TLS connections requires a TLS certificate. When you create a cluster, the application automatically creates a self-signed certificate and uses is as the active certificate. This certificate is displayed in the table of TLS certificates as Default Cert.
If you do not want to use this default certificate, you can add one or more TLS certificates and make one of the added certificates active. The other certificates are displayed in the table with the switch turned off. You can make a different certificate active at any time.
You can use certificates of the following types:
A comparison of certificate types supported by the application is provided in the following table.
Comparison of supported certificate types
Property |
Self-signed |
CSR-based |
PFX |
|---|---|---|---|
Must use a certification authority |
No |
Yes |
Yes |
The private key of the certificate is stored outside of the cluster |
No |
No |
Yes |
Can manually configure the certificate |
Can populate only some fields |
Can populate only some fields |
Yes |
Adding a self-signed certificate
To add a self-signed certificate:
- In the application web interface window, select the Settings → Built-in MTA → TLS Encryption section.
- Click Create certificate.
This opens the Create certificate window.
- Select Create self-signed certificate.
- In the Organization field, enter the name of the organization.
- In the Common name field, enter the domain name of the server for which you are creating the certificate.
- Click Create.
The certificate is added and appears in the table of TLS certificates.
Page top
Adding a CSR-based certificate
Adding a CSR-based certificate involves the following steps.
- Creating a request file using the application web interface
- Generating a certificate based on the request file in the certification authority
- Downloading the generated certificate using the application web interface
The application supports downloading individual certificates as .pem, .der, .cer, or .crt files, as well as PKCS#7 container files with the .p7b extension containing a chain of certificates.
Creating a request file
To create a request file:
- In the application web interface window, select the Settings → Built-in MTA → TLS Encryption section.
- Click Create certificate.
This opens the Create certificate window.
- Select Create CSR request.
- In the Organization field, enter the name of the organization.
- In the Common name field, enter the domain name of the server for which you are creating the certificate.
- In the FQDN field, enter a semicolon-separated list of fully qualified domain names for all cluster nodes.
If remote MTA agents interact directly with cluster nodes (the common virtual balanced DNS name is not used for the cluster), it is required to specify FQDN names of all cluster nodes for successful certificate verification. Specified FQDN names are saved to extended certificate attribute Subject Alt name. If some nodes are added to cluster or removed from cluster or their FQDN names are modified, you may need to generate new certificate with up-to-date FQDN list. Certificate verification is usually not obligatory for mail traffic encryption.
- Click Create.
The CSR request record appears in the TLS certificate table. This opens the View certificate window.
- Click Download CSR file.
The request file is saved in the browser's downloads folder. Use this request file to generate a certificate at the certification authority.
Page top
Generating a certificate in the certification authority
The instructions are provided for Microsoft Enterprise Certification Authority deployed on Windows Server 2016.
We recommend using the Internet Explorer browser. Other browsers may display some Microsoft Enterprise Certification Authority pages incorrectly.
To generate a CSR-based certificate:
- Open a previously created request file in any text editor and copy the contents of the file to the clipboard.
- Open the page of your certification authority in your browser:
https://<server address>/certsrv. - Select Request a certificate.
This opens the Request a Certificate page.
- Select advanced certificate request.
This opens the Advanced Certificate Request page.
- Select Submit a certificate request by using a base-64-encoded CMC or PKCS #10 file, or submit a renewal request by using a base-64-encoded PKCS #7 file.
This opens the Submit a Certificate Request or Renewal Request page.
- In the Base-64-encoded certificate request (CMC or PKCS #10 or PKCS #7) field, paste the contents of the request file that you copied at step 1.
- In the Certificate Template drop-down list, select one of the following options:
- Template with the Server Authentication extension if you want to use the certificate as a server certificate.
- Template with the Client Authentication extension if you want to use the certificate as a client certificate.
- Template with the Server Authentication and Client Authentication extensions if you want to use the certificate as a server certificate and a client certificate.
- Click Submit.
This opens the Certificate Issued page.
- Do the following:
- Select the encoding of the certificate file.
The application supports the DER and Base64 encodings for certificates.
- Select the format of the certificate:
- If you want to download the final certificate file with the .cer extension that does not contain intermediate certificates, select Download certificate.
- If you want to download the full chain of certificates as a PKCS#7 container with the .p7b extension, select Download certificate chain.
We recommend downloading the full chain of certificates to avoid problems with validating intermediate certification authorities.
- Select the encoding of the certificate file.
The certificate is generated and saved on your computer in the browser's downloads folder.
Page top
Uploading a certificate using the application web interface
To upload a CSR-based certificate in the application web interface:
- In the application web interface window, select the Settings → Built-in MTA → TLS Encryption section.
- In the TLS certificate table, select the record of the previously created CSR request file.
This opens the View certificate window.
- Click Browse.
This opens the file selection window.
- Select the certificate file generated at the certificate authority and click Open.
- Click Upload signed certificate.
The View certificate window displays the fingerprint and expiration date of the certificate.
The certificate is uploaded. In the TLS certificate table, the certificate type changes from CSR request to CSR-based.
Page top
Adding a PFX certificate
Adding a PFX certificate involves the following steps.
- Generating a certificate in the certification authority
The certificate with a private key is generated in the PKCS#12 container format and is saved in the certificate store of the current user.
- Exporting a certificate to a file
After generating the certificate, you must export it together with the private key to a .p12 or .pfx file.
- Uploading a certificate using the application web interface
Generating a certificate in the certification authority
The instructions are provided for Microsoft Certification Authority deployed on Windows Server 2016.
We recommend using the Internet Explorer browser. Other browsers may display some Microsoft Certification Authority pages incorrectly.
To generate a PFX certificate with a private key:
- Open the page of your certification authority in your browser:
https://<server address>/certsrv. - Select Request a certificate.
This opens the Request a Certificate page.
- Select advanced certificate request.
This opens the Advanced Certificate Request page.
- Select Create and submit a request to this CA.
This opens the Advanced Certificate Request page.
- In the Certificate Template drop-down list, select one of the following options:
- Template with the Server Authentication extension if you want to use the certificate as a server certificate.
- Template with the Client Authentication extension if you want to use the certificate as a client certificate.
- Template with the Server Authentication and Client Authentication extensions if you want to use the certificate as a server certificate and a client certificate.
- In the Identifying Information For Offline Template group of settings, enter the information for your organization.
The Name field is required.
- In the Key Options group of settings:
- Select Create new key set.
- In the Key Size field, type 2048.
- Select Automatic key container name.
- Select the Mark keys as exportable check box.
- In the Additional Options group of settings, make sure that the Save request check box is cleared.
- Click Submit.
This opens the Certificate Issued page.
- Select Install this certificate.
The certificate with a private key is generated and saved in the certificate store of your account.
Page top
Exporting a certificate to a file
To export a certificate with a private key to a file:
- Open the Microsoft Management Console.
- Select File → Add/Remove Snap-in.
This opens the Add or Remove Snap-ins window.
- Select the Certificates snap-in and click Add.
This opens the Certificates Snap-in window.
- Select My user account and click Finish.
- In the Add/Remove Snap-ins window, click OK.
- In the console tree, select Certificates – Current User → Personal → Certificates.
- In the workspace, select the certificate you generated earlier and double-click it to open its properties.
- Select the Details tab.
- Click Copy to File.
This starts the certificate export wizard.
- In the Export Private Key window, select Yes, export the private key.
- In the Export File Format window:
- Select Personal Information Exchange – PKCS #12 (.PFX).
- Select the Include all certificates in the certification path if possible check box.
- In the Security window:
- Select the Password check box.
- In the text box under the check box, enter a password to protect the certificate.
- Type the password again in the Confirm password field.
- In the File to Export window:
- Click Browse.
- This opens the Save as window.
- Select a path on your computer where you want to save the certificate file.
- Enter the file name and click Save.
- In the Completing the Certificate Export Wizard window, click Finish.
The certificate with a private key is exported to a file. The file is saved on your computer at the specified path.
Page top
Uploading a certificate using the application web interface
To upload a certificate with a private key in the application web interface:
- In the application web interface window, select the Settings → Built-in MTA → TLS Encryption section.
- Click Create certificate.
This opens the Create certificate window.
- Select the Import PFX-based certificate option.
- Click Browse.
The file selection window opens.
- Select the file into which you have exported the certificate with a private key and click Open.
The name of the certificate file is displayed in the field to the left of the Upload button.
- In the PFX password field, enter the password to protect the certificate that you have set in the certificate export wizard.
- Click Create.
The certificate is added and appears in the table of TLS certificates.
Page top
Viewing certificate information
To view information about a certificate:
- In the application web interface window, select the Settings → Built-in MTA → TLS Encryption section.
- In the TLS certificate table, select the certificate for which you want to view information.
This opens the View certificate window.
The window displays the following information about the certificate:
- Subject is the Common Name (CN) and name of the Organization (O) of the certificate's owner.
- Expiration date is the date and time when the certificate expires.
- Type is one of the following certificate types:
- Self-signed.
- CSR-based.
- PFX-based.
- Fingerprint (SHA256) is the SHA256 certificate fingerprint.
Making a certificate active
You can use the added TLS certificate as an active server or client certificate. If you are using TLS encryption, having an active server certificate is optional. An active client certificate is optional even when the client TLS security mode is enabled.
To set a certificate as active:
- In the application web interface window, select the Settings → Built-in MTA → TLS Encryption section.
- To assign a TLS certificate that will be used for processing inbound SMTP connections as the active server certificate, in the row with the relevant certificate, enable the switch in the Use as server certificate column.
- To assign a TLS certificate that will be used for processing outbound SMTP connections as the active client certificate, in the row with the relevant certificate, enable the switch in the Use as client certificate column.
The certificate is made active.
To make the current certificate inactive:
- In the application web interface window, select the Settings → Built-in MTA → TLS Encryption section.
- If you want to make the currently used server certificate inactive, make a different certificate active using the switch in the Use as server certificate column.
The previously active server certificate is automatically made inactive.
- If you want to make the currently used client certificate inactive, in the row of that certificate, disable the toggle switch in the Use as client certificate column.
The certificate is no longer active.
Page top
Downloading a certificate
To download a certificate:
- In the application web interface window, select the Settings → Built-in MTA → TLS Encryption section.
- In the TLS certificate table, select the certificate that you want to download.
This opens the View certificate window.
- Click one of the following buttons depending on the certificate format that you need:
- Download P7B chain for a certificate chain in the .p7b format.
- Download CRT file for a final certificate in the .crt format.
The certificate or chain of certificates is downloaded to the browser's downloads folder.
Page top
Deleting a certificate
To delete a certificate:
- In the application web interface window, select the Settings → Built-in MTA → TLS Encryption section.
- In the TLS certificate table, select the certificate that you want to delete.
This opens the View certificate window.
The active certificate cannot be deleted.
- Click Delete.
- In the confirmation window, click Yes.
The certificate is deleted.
Page top
Domains and configuration of email routing
This section contains information on how to add domains and email addresses to a transport map, configure email routing for those domains, remove domains from the list, configure TLS security modes for outgoing email messages, and add a DKIM signature to messages.
By default, Kaspersky Secure Mail Gateway uses the settings of your DNS server for email routing. You can manually configure email routing. To do so, you must create a transport map. In the transport map, enter the names of domains to which the email messages are addressed and then enter the IP addresses or fully qualified domain names (FQDN) to which Kaspersky Secure Mail Gateway must redirect messages addressed to these domains.
Example: To redirect messages addressed to the "example.com" domain to the 192.168.0.1:25 address:
|
This section also describes configuration of email routing for local domains (relay_domains).
Local domains (relay_domains) are domains of your organization for which Kaspersky Secure Mail Gateway receives email messages from any sources, including untrusted ones. Kaspersky Secure Mail Gateway receives messages from untrusted sources only for the domains you specified. Messages from untrusted sources sent to other domains are rejected.
If local domains are not specified, Kaspersky Secure Mail Gateway will not be receiving messages for your internal mail servers.
Viewing the transport map for domains
To view the transport map for domains:
In the application web interface window, select the Settings → Built-in MTA → Domains section.
The table displays the following information about transport map records:
- Record is the name of the domain, subdomain, or email address for which routing is configured.
- Domain type is the type of transport map record (domain, subdomain, or email address).
- Local domain is a switch that allows setting if the transport map record is a local domain (not displayed for records of the Email address type). For local domains, email messages are allowed from all sources, including untrusted sources.
- Protocol is the email protocol used for routing. SMTP and LMTP protocols are available; the default protocol is SMTP.
- Destination address is the IP address, server name, or domain name to which mail is being routed.
- Port is the port used for connecting to the server to which the mail is being routed.
- TLS security level is the TLS encryption mode used to encrypt connections for this domain or subdomain (not displayed for records of the Email address type) that is used for outgoing messages to this domain or subdomain.
- DKIM records is the DNS record of the public DKIM key required for configuring the DKIM signature of messages.
Adding a record to the transport map and configuring email routing (transport_map)
To add a record to the transport map and configure email routing:
- In the application web interface window, select the Settings → Built-in MTA → Domains section.
- Click Add domain.
The record creation window opens.
- In the Record type drop-down list, select one of the following record types:
- Domain.
- Subdomains.
- Email address.
- In the field below, enter the domain name and subdomain name in FQDN format, or the email address.
- Turn on the Local domain toggle switch if you want to add a local domain.
- Turn on the Email routing toggle switch if you want to configure email routing for the record that you are adding.
- In the Protocol drop-down list, select one of the email transmission protocols:
- SMTP.
- LMTP.
- In the Host field, enter an IPv4 address (for example, 192.168.0.1), an IPv6 address (for example, 2607:f0d0:1002:51::4), a FQDN, or a domain name to which you want to configure mail routing.
- In the Port field, enter the port you want to use for connecting to the server to which you want to route email.
- If in the Host field, you specified a domain name, you can enable MX record lookup using the MX DNS Lookup toggle switch.
- If you are adding a domain or subdomains, in the TLS Encryption mode for outgoing mail settings group, select one of the following options:
- Use <mode configured in the TLS encryption section> if for all outgoing messages to this domain or subdomain, you want to use the TLS connection encryption mode that is set for all of the mail server's outgoing messages.
- Override TLS Encryption mode for this domain if you want to configure a different connection TLS encryption mode for outgoing messages to this domain or subdomain.
- If you have chosen an alternative TLS encryption mode for this domain or subdomain, in the drop-down list below, select the TLS encryption mode that you want to set for the connection.
- No TLS Encryption.
- Attempt TLS Encryption.
- Require TLS Encryption and don't verify certificate.
- Require TLS Encryption and verify certificate.
By default, the No TLS Encryption mode is active.
- Click Save.
The added record is displayed in the transport map.
Modifying email routing
To change email routing:
- In the application web interface window, select the Settings → Built-in MTA → Domains section.
- In the transport map, select the entry for which you want to modify email routing settings.
This opens the Edit domain window.
- Make the changes you want.
- Click Save.
Email routing for this transport map entry is modified.
Deleting a record from the transport map
To remove a record from the transport map:
- In the application web interface window, select the Settings → Built-in MTA → Domains section.
- In the transport map, select the entry that you want to delete.
This opens the Edit domain window.
- Click Delete.
- In the confirmation window, click Yes.
The record is deleted from the transport map.
Publishing application events to a SIEM system
Kaspersky Secure Mail Gateway can publish application events to a SIEM system, which is already in use in your organization, over the syslog protocol.
Information about each application event is relayed as a separate syslog message in the CEF format (hereinafter also referred to as a "CEF message").
A CEF message containing event information is relayed immediately after the event occurs. Exceptions to this rule are classes of ScanLogic group events; CEF messages of these classes are relayed after email messages are processed by the ScanLogic module.
By default, export of CEF messages from the application is disabled. You can enable export of events and configure the publication of events to a SIEM system.
Configuring export of events in CEF format
To enable the export of events in Technical Support Mode, you must first upload the public SSH key in the application web interface.
You can save files containing exported events locally on the server, and configure their publication to an external SIEM system. If you do not need to save files locally, you can skip steps 4–7 of the instructions in this section.
Perform the instructions below on each cluster node whose events you want to export in CEF format.
To configure export of events in CEF format:
- Connect to the Kaspersky Secure Mail Gateway virtual machine management console under the root account using a private SSH key.
You will enter Technical Support Mode.
- Make the following changes to the event export configuration file /opt/kaspersky/ksmg/share/templates/core_settings/event_logger.json.template:
- If you want to select the Syslog category (facility) to which the events will be exported, specify one of the following values for the
facilityparameter in thesiemSettingssection:AuthAuthprivCronDaemonFtpLprMailNewsSyslogUserUucpLocal0Local1Local2Local3Local4Local5Local6Local7
It is recommended to specify a category (facility) for Syslog that is not used by other programs on the server.
The default value is
local2. - Set the
enabledparameter value totrue. - Define the export detail level by setting one of the following values for the
logLevelparameter:Error– export events related to errors.Info– export all events.Example:
"siemSettings":{"enabled": true,"facility": "Local2","logLevel": "Info",}
- If you want to select the Syslog category (facility) to which the events will be exported, specify one of the following values for the
- In the /etc/rsyslog.conf file, change the string
*.info;mail.none;authpriv.none;cron.none;local0.none;local1.none /var/log/messagesto
*.info;mail.none;authpriv.none;cron.none;local0.none;local1.none;<facility selected at step 2>.none /var/log/messages - Add the following string to the /etc/rsyslog.conf file:
<facility selected at step 2>.* -/var/log/ksmg-cef-messages - Create the /var/log/ksmg-cef-messages file and configure its access rights. To do so, execute the commands:
touch /var/log/ksmg-cef-messageschown root:klusers /var/log/ksmg-cef-messageschmod 640 /var/log/ksmg-cef-messages - Configure the rules for rotating files containing exported events. To do so, add the following strings to the /etc/logrotate.d/ksmg-syslog file:
/var/log/ksmg-cef-messages{size 500Mrotate 10notifemptysharedscriptspostrotate/usr/bin/systemctl kill -s HUP rsyslog.service >/dev/null 2>&1 || trueendscript} - Restart the rsyslog service. To do so, run the following command:
service rsyslog restart - In the application web interface, in the Settings → Logs and events → Events section, modify the value of any setting and click Save.
This is necessary for synchronization of parameters among cluster nodes and for applying changes that were made to the configuration file. Then you can restore the original value of a modified parameter.
Export of events in CEF format is now configured.
Page top
Configuring publication of application events to a SIEM system
To configure the publication of events in Technical Support Mode, you must first upload the public SSH key in the application web interface.
Prior to starting configuration, make sure that you have enabled export of events in CEF format.
Perform the instructions below on each cluster node whose events you want to publish to a SIEM system.
To configure the publication of application events to a SIEM system:
- Connect to the Kaspersky Secure Mail Gateway virtual machine management console under the root account using a private SSH key.
You will enter Technical Support Mode.
- Specify the address and port for connecting to the server hosting the SIEM system. To do so, add the following lines to the end of the /etc/rsyslog.conf file:
$ActionQueueFileName ForwardToSIEM$ActionQueueMaxDiskSpace 1g$ActionQueueSaveOnShutdown on$ActionQueueType LinkedList$ActionResumeRetryCount -1<category (facility)>.* @@<IP address of the SIEM system>:<port used by the SIEM system to receive messages from Syslog over TCP>Prior to making any changes to the /etc/rsyslog.conf file, you are advised to make a backup copy. An error while editing the file could cause the system to operate incorrectly.
- Restart the rsyslog service. To do so, run the following command:
service rsyslog restart
Publication of application events to the SIEM system is configured.
Page top
Content and properties of syslog messages in CEF format
Information about each detected event is relayed as a separate syslog message in CEF format with UTF-8 encoding.
A message in CEF format consists of a message body and header. Each Syslog message contains the following fields defined by the Syslog protocol settings in the operating system:
- Date and time of the event
- Name of the host where the event occurred
- Name of the application (always
KSMG)
Syslog event message fields defined by the application settings have the <key>="<value>" format. If a key has multiple values, these values are separated with a comma. Keys are separated by a colon.
The keys and their values contained in a message depend on the specific class of the event.
Example:
|
The maximum size of a syslog message about a detected event depends on the values of syslog settings on the server on which Kaspersky Secure Mail Gateway is installed. You can configure forwarding of syslog messages to only one external syslog server simultaneously.
Page top
Settings group event classes
In the body of CEF messages for classes of Setting group events, you can use keys in accordance with their semantics (see the table below).
Permissible values of the fields for classes of Settings group events
Key |
Value |
|---|---|
cn1 |
Task number. |
cn1Label |
Its value is always |
cs1 |
Task name. |
cs1Label |
Its value is always |
duser |
The user whose settings were changed. |
suser |
The user who changed the settings. |
act |
Its value is always |
Each class of Settings group events can contain only keys that are relevant to it (see the table below).
Relevant keys for classes of Settings group events
Event class |
Relevant keys |
|---|---|
LMS_EV_SETTINGS_CHANGED |
cn1, cn1Label, cs1, cs1Label, act |
LMS_EV_ALL_SETTINGS_CHANGED |
suser |
LMS_EV_PERSONAL_SETTINGS_CHANGED |
suser, duser |
Tasks group event classes
In the body of CEF messages for classes of Tasks group events, you can use keys in accordance with their semantics (see the table below).
Permissible values of the fields for classes of Tasks group events
Key |
Value |
|---|---|
deviceProcessName |
Task name. |
cs1 |
Application operating mode ( |
cs1Label |
Its value is always |
Each class of Tasks group events can contain only keys that are relevant to it (see the table below).
Relevant keys for classes of Tasks group events
Event class |
Relevant keys |
|---|---|
LMS_EV_PROCESS_CRASHED |
deviceProcessName |
LMS_EV_RESTARTED |
deviceProcessName |
LMS_EV_PRODUCT_STARTED |
cs1, cs1Label |
Backup group event classes
In the body of CEF messages for classes of Backup group events, you can use keys in accordance with their semantics (see the table below).
Permissible values of fields for classes of Backup group events
Key |
Value |
|---|---|
cn1 |
Message size. |
cn1Label |
Its value is always |
cn2 |
Maximum size of Backup. |
cn2Label |
Its value is always |
cn3 |
Number of messages in Backup. |
cn3Label |
Its value is always |
cs1 |
ID of the message in Backup. |
cs1Label |
Its value is always |
cnt |
Number of errors during the past 10 minutes. |
act |
Action to perform on the message in Backup (deliver / delete). |
suser |
User who performed the action on the message in Backup. |
cs2 |
Anti-Virus scan status. |
cs2Label |
Its value is always |
cs3 |
Link scan status. |
cs3Label |
Its value is always |
cs4 |
Status of Anti-Spam protection. |
cs4Label |
Its value is always |
cs5 |
Status of Anti-Phishing protection. |
cs5Label |
Its value is always |
cs6 |
Name of the malicious object. |
cs6Label |
Its value is always |
cs7 |
Status of content filtering. |
cs7Label |
Its value is always |
duser |
List of message recipients. The addresses are taken from the SMTP session. |
reason |
Description of the error. |
Each class of Backup group events can contain only keys that are relevant to it (see the table below).
Relevant keys for classes of Backup group events
Event class |
Relevant keys |
|---|---|
LMS_EV_BACKUP_ADD_ERROR |
cs1, cs1Label, cnt |
LMS_EV_BACKUP_ROTATE_ERROR |
reason, cnt |
LMS_EV_BACKUP_MESSAGE_RESTORE |
cs1, cs1Label, act, suser, cs2, cs2Label, cs3, cs3Label, cs4, cs4Label, cs5, cs5Label, cs6, cs6Label, duser |
License group event classes
In the body of CEF messages for classes of License group events, you can use keys in accordance with their semantics (see the table below).
Permissible values of the fields for classes of License group events
Key |
Value |
|---|---|
cs1 |
Serial number of the license key. |
cs1Label |
Its value is always |
cs2 |
Kaspersky Secure Mail Gateway operating mode in accordance with the license. |
cs2Label |
Its value is always |
cs3 |
License type. |
cs3Label |
Its value is always |
cn1 |
Number of days until license expiration. |
cn1Label |
Its value is always |
reason |
Description of the error. |
deviceCustomDate1 |
License expiration date. |
deviceCustomDate1Label |
Its value is always |
Each class of License group events can contain only keys that are relevant to it (see the table below).
Relevant keys for classes of License group events
Event class |
Relevant keys |
|---|---|
LMS_EV_LICENSE_OK |
cs1, cs1Label, cs2, cs2Label |
LMS_EV_LICENSE_INVALID |
cs1, cs1Label, reason |
LMS_EV_NO_LICENSE |
No value |
LMS_EV_LICENSE_BLACKLISTED |
cs1, cs1Label |
LMS_EV_LICENSE_TRIAL_EXPIRED |
cs1, cs1Label, deviceCustomDate1, deviceCustomDate1Label |
LMS_EV_LICENSE_EXPIRED |
cs1, cs1Label, deviceCustomDate1, deviceCustomDate1Label |
LMS_EV_LICENSE_ERROR |
reason |
LMS_EV_LICENSE_INSTALLED |
cs1, cs1Label, cs2, cs2Label, cs3, cs3Label |
LMS_EV_LICENSE_UPDATED |
cs1, cs1Label, cs2, cs2Label, cs3, cs3Label, deviceCustomDate1, deviceCustomDate1Label |
LMS_EV_GRACE_PERIOD |
cs1, cs1Label, cn1, cn1Label |
LMS_EV_LICENSE_REVOKED |
cs1, cs1Label |
LMS_EV_LICENSE_EXPIRES_SOON |
cs1, cs1Label, cn1, cn1Label |
Rules group event classes
Each class of Rules group events can contain only keys that are relevant to it (see the table below).
Relevant keys for classes of Rules group events
Event class |
Relevant keys |
|---|---|
LMS_EV_ALL_RULES_IMPORTED |
No value |
Quarantine group event classes
In the body of CEF messages for classes of Quarantine group events, you can use keys in accordance with their semantics (see the table below).
Permissible values of the fields for classes of Quarantine group events
Key |
Value |
|---|---|
cs1 |
Message ID. |
cs1Label |
Its value is always |
cs2 |
List of rules separated with commas. |
cs2Label |
Its value is always |
cs3 |
Account under which the action was performed on the message. |
cs3Label |
Its value is always |
src |
IP address from which the message was received. |
duser |
List of message recipients. The addresses are taken from the SMTP session. |
suser |
Mail sender. The address is taken from the SMTP session. |
act |
Action performed on the message ( |
Each class of Quarantine group events can contain only keys that are relevant to it (see the table below).
Relevant keys for classes of Quarantine group events
Event class |
Relevant keys |
|---|---|
LMS_EV_ASP_QUARANTINE |
cs1, cs1Label, src, suser, cs3, cs3Label, act |
LMS_EV_KATA_QUARANTINE |
cs1, cs1Label, cs2, cs2Label, scr, suser, duser, act, cs3, cs3Label |
Update group event classes
In the body of CEF messages for classes of Update group events, you can use keys in accordance with their semantics (see the table below).
Permissible values of the fields for classes of Update group events
Key |
Value |
|---|---|
reason |
Reason for the event. |
cn1 |
Number of days. |
cn1Label |
Its value is always |
cn2 |
Number of hours. |
cn2Label |
Its value is always |
cnt |
Number of records in databases. |
deviceCustomDate1 |
Database publication date. |
deviceCustomDate1Label |
Its value is always |
deviceCustomDate2 |
Index publication date. |
deviceCustomDate2Label |
Its value is always |
Each class of Update group events can contain only keys that are relevant to it (see the table below).
Relevant keys for classes of Update group events
Event class |
Relevant keys |
|---|---|
LMS_EV_ANTIVIRUS_BASES_UPDATED |
No value |
LMS_EV_ANTISPAM_BASES_UPDATED |
No value |
LMS_EV_ANTIPHISHING_BASES_UPDATED |
No value |
LMS_EV_BASES_NOTHING_TO_UPDATE |
No value |
LMS_EV_ANTIVIRUS_BASES_UP_TO_DATE |
No value |
LMS_EV_ANTIPHISHING_BASES_UP_TO_DATE |
No value |
LMS_EV_ANTISPAM_BASES_UP_TO_DATE |
No value |
LMS_EV_ANTIVIRUS_BASES_OUT_OF_DATE |
cn1, cn1Label |
LMS_EV_ANTIPHISHING_BASES_OUT_OF_DATE |
cn1, cn1Label |
LMS_EV_ANTISPAM_BASES_OUT_OF_DATE |
cn2, cn2Label |
LMS_EV_ANTIVIRUS_BASES_OBSOLETED |
cn1, cn1Label |
LMS_EV_ANTIPHISHING_BASES_OBSOLETED |
cn1, cn1Label |
LMS_EV_ANTISPAM_BASES_OBSOLETED |
cn1, cn1Label |
LMS_EV_ANTIVIRUS_BASES_APPLIED |
deviceCustomDate2, deviceCustomDate2Label, cnt, deviceCustomDate1, deviceCustomDate1Label |
LMS_EV_ANTISPAM_BASES_APPLIED |
deviceCustomDate1, deviceCustomDate1Label |
LMS_EV_ANTIPHISHING_BASES_APPLIED |
deviceCustomDate1, deviceCustomDate1Label |
LMS_EV_BASES_UPDATE_ERROR |
reason |
LMS_EV_ANTIVIRUS_BASES_ERROR |
reason |
LMS_EV_ANTISPAM_BASES_ERROR |
reason |
LMS_EV_ANTIPHISHING_BASES_ERROR |
reason |
ScanLogic group event classes
In the body of CEF messages for classes of ScanLogic group events, you can use keys in accordance with their semantics (see the table below).
Permissible values of the fields for classes of ScanLogic group events
Event class |
Key |
Value |
|---|---|---|
All ScanLogic group classes |
cs1 |
Message ID. |
cs1Label |
Its value is always |
|
src |
IP address of the server from which the message was received. |
|
act |
Action. |
|
fsize |
Message size. |
|
suser |
Mail sender. |
|
duser |
List of message recipients. |
|
reason |
Reason for the event. |
|
cs2 |
List of rules. |
|
cs2Label |
Its value is always |
|
outcome |
Scan status. |
|
cs3 |
List of recipients of notifications about triggered rules for which a notification is configured with the original message in an attachment. |
|
cs3Label |
Its value is always |
|
fname |
File name. |
|
LMS_EV_SCAN_LOGIC_AS_STATUS LMS_EV_SCAN_LOGIC_AP_STATUS LMS_EV_SCAN_LOGIC_MLF_STATUS |
cs4 |
Detection method. |
cs4Label |
Its value is always |
|
LMS_EV_SCAN_LOGIC_MA_STATUS |
cs4 |
SPF status. |
cs4Label |
Its value is always |
|
cs5 |
DKIM status. |
|
cs5Label |
Its value is always |
|
cs6 |
DMARC status. |
|
cs6Label |
Its value is always |
|
LMS_EV_SCAN_LOGIC_KT_STATUS |
suser |
Name of the user account that extracted the message from KATA Quarantine. |
cs4 |
Reason for skipping the scan. |
|
cs4Label |
Its value is always |
|
LMS_EV_SCAN_LOGIC_CF_STATUS |
cs4 |
Possible values:
|
cs4Label |
The value is always |
|
LMS_EV_SCAN_LOGIC_PART_RESULT |
cn1 |
Number of objects. |
cn1Label |
Its value is always |
|
cn2 |
Size of the blocked file. |
|
cn2Label |
The value is always |
|
cs3 |
Unscanned files. |
|
cs3Label |
Its value is always |
|
cs4 |
Names of threats. |
|
cs4Label |
Its value is always |
|
cs5 |
Name of the blocked file. |
|
cs5Label |
The value is always |
|
cs6 |
Format of the blocked file. |
|
cs6Label |
The value is always |
Each class of ScanLogic group events can contain only keys that are relevant to it (see the table below).
Relevant keys for classes of ScanLogic group events
Event class |
Relevant keys |
|---|---|
LMS_EV_SCAN_LOGIC_ALL_NOT_PROCESSED |
cs1, cs1Label, src, act, fsize, suser, duser, reason |
LMS_EV_SCAN_LOGIC_AS_STATUS |
cs1, cs1Label, src, act, fsize, suser, duser, cs2, cs2Label, cs4, cs4Label, reason, outcome |
LMS_EV_SCAN_LOGIC_AV_STATUS |
cs1, cs1Label, src, act, fsize, suser, duser, cs2, cs2Label, cs3, cs3Label, reason, outcome |
LMS_EV_SCAN_LOGIC_AP_STATUS LMS_EV_SCAN_LOGIC_MLF_STATUS |
cs1, cs1Label, src, act, fsize, suser, duser, cs2, cs2Label, cs3, cs3Label, reason, cs4, cs4Label, outcome |
LMS_EV_SCAN_LOGIC_KT_STATUS |
cs1, cs1Label, src, act, fsize, suser, duser, cs2, cs2Label, cs3, cs3Label, cs4, cs4Label, reason, suser, outcome |
LMS_EV_SCAN_LOGIC_MA_STATUS |
cs1, cs1Label, src, act, fsize, suser, duser, cs2, cs2Label, cs3, cs3Label, reason, cs4, cs4Label, cs5, cs5Label, cs6, cs6Label, outcome |
LMS_EV_SCAN_LOGIC_CF_STATUS |
cs1, cs1Label, src, act, fsize, suser, duser, cs2, cs2Label, cs3, cs3Label, reason, cs4, cs4Label, outcome |
LMS_EV_SCAN_LOGIC_PART_RESULT |
cs1, cs1Label, cn1, cn1Label, fname, act, reason, cs2, cs2Label, cs3, cs3Label, cs4, cs4Label, cs5, cs5Label, cs6, cs6Label, outcome, cn2, cn2Label |
LMS_EV_SCAN_LOGIC_MESSAGE_BACKUP |
cs1, cs1Label, src, act, fsize, suser, duser, reason, cs2, cs2Label |
If the avStatus=Infected or avStatus=Disinfected status is indicated in the mime part field in a LMS_EV_SCAN_LOGIC_PART_RESULT event, the disinfectedObjects or deletedObjects list is indicated as the cn1 key value if one of these lists is available. If both lists are not empty, the cn1 and cn1Label keys will be added twice.
Contacting Technical Support
This section describes the ways to get technical support and the terms on which it is available.
How to obtain Technical Support
If you cannot find a solution to your problem in the program documentation or in one of the other sources of information about Kaspersky Secure Mail Gateway, we recommend that you contact Technical Support. Technical Support staff will answer your questions about installing and using Kaspersky Secure Mail Gateway.
Kaspersky provides support for Kaspersky Secure Mail Gateway throughout its life cycle (see application life cycle page). Before contacting Technical Support, please read the support rules.
You can contact Technical Support in one of the following ways:
- By visiting the Technical Support website.
- By sending a request to Technical Support through the Kaspersky CompanyAccount portal.
Technical Support via Kaspersky CompanyAccount
Kaspersky CompanyAccount is a portal for organizations that use Kaspersky applications. The Kaspersky CompanyAccount portal is designed to facilitate interaction of users with Kaspersky staff via online requests. The Kaspersky CompanyAccount portal lets you monitor the progress of online requests as they are processed by Kaspersky staff, and keep a history of online requests.
You can register all of your organization's employees under a single account on Kaspersky CompanyAccount. A single account lets you centrally manage online requests to Kaspersky issued by registered employees and also manage the permissions of these employees using Kaspersky CompanyAccount.
The Kaspersky CompanyAccount portal is available in the following languages:
- English
- Spanish
- Italian
- German
- Polish
- Portuguese
- Russian
- French
- Japanese
You can learn more about Kaspersky CompanyAccount on the Technical Support website.
Page top
Obtaining information for Technical Support
When you inform Kaspersky Technical Support of a problem, they may request debug information including trace files and additional information about the operating system, running processes, and other diagnostic information. The trace file allows you to trace the execution of application commands step by step and determine the stage at which an error occurs. You can select events that will be written to the trace file: errors or information messages. All trace files and additional debug information are added to an archive which you can give to Technical Support.
Trace files may contain information about your organization that you consider to be confidential. Please obtain clearance with regard to the contents of the submitted archive from your organization's Security department before submitting the archive. Before you submit the trace log, please purge all data that you consider to be confidential.
All operations with diagnostic information in the application are made available by the Get diagnostic information permission.
Obtaining information for Technical Support involves the following steps:
- Changing the trace level to Debug
- Retracing user actions that preceded the fault
- Creating a trace file
- Downloading a trace file
The Debug trace level is significantly more demanding towards the storage subsystem and reduces application performance. After obtaining the trace file, it is recommended to change the trace level to Errors.
Creating a trace file
In case of malfunctions, Kaspersky Technical Support may ask you to create an archive with diagnostic information about Kaspersky Secure Mail Gateway.
The trace file must be created after retracing the user actions that caused the malfunction.
To create a trace file:
- In the application web interface window, select the Nodes section.
- Click Get diagnostic information in the upper part of the workspace to open the Diagnostic information for Technical Support window.
The workspace displays the table of cluster nodes with information about the time when the latest trace file was created for each node.
- In the table, select the node for which you want to obtain diagnostic information.
This opens the View archives window.
- In the lower part of the window, click Start.
The archive with diagnostic information is created. You can download or delete the obtained archive.
Page top
Changing trace level
The modified trace level is saved in application settings and does not affect previously created trace files.
To change trace level:
- In the application web interface window, select the Nodes section.
- Click Get diagnostic information in the upper part of the workspace to open the Diagnostic information for Technical Support window.
- Click Diagnostics level in the upper part of the workspace to open the Diagnostic level window.
- Select one of the following options:
- Errors.
- Debug.
This trace level is significantly more demanding towards the storage subsystem and reduces application performance. Use this debug level only if Kaspersky Technical Support requests trace files of this type.
By default, the value is set to Errors.
- Click Save.
The trace level is changed. New trace files are created in accordance with the selected level.
Page top
Downloading a trace file
To obtain a trace file:
- In the application web interface window, select the Nodes section.
- Click Get diagnostic information in the upper part of the workspace to open the Diagnostic information for Technical Support window.
The workspace displays the table of cluster nodes with information about the time when the latest trace file was created for each node.
- In the table, select the node for which you want to download a trace file.
This opens the View archives window.
- In the row containing the relevant file, click to the right of the file name.
The archive containing the file is saved on your computer in the browser's downloads folder.
Page top
Deleting a trace file
To delete a trace file:
- In the application web interface window, select the Nodes section.
- Click Get diagnostic information in the upper part of the workspace to open the Diagnostic information for Technical Support window.
The workspace displays the table of cluster nodes with information about previous trace runs.
- In the table, select the node for which you want to delete a trace file.
This opens the View archives window.
- In the row containing the relevant file, click to the right of the file name.
- In the confirmation window, click OK.
The archive containing the file is deleted from the list.
Page topGlossary
Advanced persistent threat (APT)
A sophisticated targeted attack against the corporate IT infrastructure that simultaneously uses different methods to infiltrate the network, hide on the network, and gain unobstructed access to confidential data.
Anti-Phishing
A component of Kaspersky Secure Mail Gateway designed to detect messages categorized as phishing.
Anti-Spam
A component of Kaspersky Secure Mail Gateway designed to detect messages categorized as spam.
Anti-Spam Quarantine
A Backup location where email messages are temporarily kept if the Anti-Spam module is unable to assign a final status after a scan.
Anti-Virus
A Kaspersky Secure Mail Gateway component designed to detect viruses in email messages and email attachments.
Backup
Special storage for email messages processed by the application.
If a rule applied to the message has "Place the message in Backup" configured in its settings, the application places the message in Backup before processing it regardless of the configured action.
BEC attack
Business Email Compromise (BEC) refers to fraudulent business correspondence for the purpose of committing financial fraud, acquiring confidential information, or undermining the reputation of a company. A BEC attack normally involves an entire sequence of actions that ultimately provide hackers with the opportunity to begin correspondence with an employee of a company, gain that employee's trust through the use of social engineering techniques, and persuade the employee to perform actions that conflict with the interests of the company and/or its customers.
Certificate fingerprint
Information that can be used to confirm the authenticity of a server certificate. The fingerprint is created by applying a cryptographic hash function to the content of the server certificate.
Cluster
Group of servers that have Kaspersky Secure Mail Gateway installed and are combined for centralized management through the application web interface.
Content Filtering
Filtering email messages based on message size, attachment file name mask, and attachment format. Based on the results of content filtering, you can restrict the forwarding of messages by the mail server.
Control node
Application component which allows the administrator to manage application settings using the web interface. The Control node monitors the state of Secondary nodes and provides them with settings and added license keys.
Directory service
A software system that can store information about network resources (such as users) in one place and provides centralized management capabilities.
DKIM Mail Sender Authentication
Verification of the digital signature of messages.
DMARC Mail Sender Authentication
Verification that determines the policy and actions taken on messages based on the results of SPF and DKIM Mail Sender Authentication.
Email notification
An email message describing an application event or a message scan event, which Kaspersky Secure Mail Gateway sends to the specified email addresses.
Heuristic analysis
Technology designed to detect threats that cannot be detected using the current version of Kaspersky application databases. It detects files that may be infected with an unknown virus or a new variety of a known virus.
Kaspersky Anti Targeted Attack Platform
Solution designed for the protection of a corporate IT infrastructure and timely detection of threats such as zero-day attacks, targeted attacks, and complex targeted attacks known as advanced persistent threats (hereinafter also referred to as "APT").
Kaspersky Private Security Network
A solution that allows users of Kaspersky anti-virus applications to access Kaspersky Security Network data without sending their own information to Kaspersky Security Network servers.
Kaspersky Security Network (KSN)
An infrastructure of cloud services that provides access to the Kaspersky online Knowledge Base, which contains information about the reputation of files, web resources, and software. The use of data from Kaspersky Security Network ensures that Kaspersky applications respond faster to threats, improves the performance of some protection components, and reduces the likelihood of false alarms.
Kerberos authentication
A mechanism for mutual authentication of the client and the server before establishing a connection between them, which allows sending data over insecure networks. The mechanism is based on using a ticket that is given to the user by a trusted authentication center.
Key file
A xxxxxxxx.key file that allows using a Kaspersky application according to the terms of a trial or commercial license.
Keytab file
A file containing pairs of unique names (principals) for clients that are allowed to use Kerberos authentication and encrypted keys derived from the user password. Keytab files are used in systems with Kerberos support to authenticate users without having to enter a password.
LDAP
Lightweight Directory Access Protocol for accessing directory services.
Malicious links
Web addresses leading to malicious resources, that is, web resources designed to spread malware.
Moebius service
Instant Anti-Spam database update service that allows to install critical updates in real time.
MTA
Mail Transfer Agent is an agent that handles message sending between mail servers.
NTLM authentication
An authentication mechanism that works through requests/responses between the server and the client without transmitting the user's password as plaintext over the network. The request and response are encrypted with hashes of the user password that are sent over the network. By skimming network traffic, hackers can gain access to password hashes, which makes this mechanism less secure than Kerberos authentication.
Phishing
A type of Internet fraud aimed at obtaining unauthorized access to users' confidential data.
PTR record
A DNS record establishing a correspondence between the IP address of a computer and its domain name.
Reputation filtering
A cloud service that uses technologies for determining the reputation of messages. Information about new kinds of spam appears in the cloud service sooner than in Anti-Spam module databases, making it possible to improve the speed and accuracy of spam detection.
SCL rating
Spam Confidence Level is a special tag used by Microsoft Exchange mail servers to measure the probability that a message contains spam. The SCL rating can range from 0 (minimum probability of spam) to 9 (the message is most likely spam). Kaspersky Secure Mail Gateway can change the SCL rating of a message depending on the message scan results.
Secondary node
Application component that scans email traffic in accordance with message processing rules. The Secondary node receives settings configured by the administrator from the Control node.
Service Principal Name (SPN)
Unique service ID on the network for Kerberos authentication.
SIEM system
SIEM system (Security Information and Event Management) is a solution for managing information and events in an organization's security system.
SMTP verification
SMTP verification of email addresses involves verifying the existence of recipient email addresses.
SNMP agent
A network management software module of Kaspersky Secure Mail Gateway that tracks information about application performance.
SNMP trap
An application event notification sent by the SNMP agent.
Spam
Unsolicited mass mailing of emails, most often including advertisements
SPF Mail Sender Authentication
Comparison of IP addresses of mail senders with the list of possible message sources that has been created by the mail server administrator.
Spoofing
A type of attack based on the falsification (spoofing) of transmitted data. Spoofing may be aimed at obtaining elevated privileges, primarily through bypassing the verification mechanism by generating a request similar to an authentic request. One variant of spoofing is to forge an HTTP header to gain access to hidden content.
The goal of spoofing may also be to deceive a user. A classic example of such an attack is the falsification of the sender's address in emails.
TLS encryption
Encryption of the connection between two servers, which ensures secure transmission of data between Internet servers.
Update source
Resource containing updates for Kaspersky Secure Mail Gateway Anti-Virus databases. The source of anti-virus database updates can be Kaspersky update servers, an HTTP- or FTP server, or a local or network folder.
Virtual machine
A fully isolated software system that executes machine-independent or machine code of the processor and can imitate the operating system of a program or device (such as a computer).
Page top
Information about third-party code
Information about third-party code is provided in the legal_notices.txt file located in the /opt/kaspersky/ksmg/share/doc folder.
Digital signatures are verified with Crypto-C data protection library version 2.0, (C) OOO CryptoEx, http://www.cryptoex.ru.
Page top
Trademark notices
Registered trademarks and service marks are the property of their respective owners.
Docker and the Docker logo are trademarks or registered trademarks of Docker, Inc. in the USA and/or other countries. Docker, Inc. and other parties may have rights to trademarks described with other terms used in this document.
The FreeBSD mark is the registered trademark of the FreeBSD Foundation.
Google Chrome, Google Analytics are trademarks of Google LLC.
z/VM is a trademark of International Business Machines Corporation registered in many jurisdictions throughout the world.
Linux is the registered trademark of Linus Torvalds in the U.S. and other countries.
Microsoft, Active Directory, Hyper-V, Internet Explorer, Microsoft Edge, Windows, and Windows Server are trademarks of the Microsoft group of companies.
Mozilla and Firefox are trademarks of the Mozilla Foundation in the USA and other countries.
Oracle is a registered trademark of Oracle and/or its affiliates.
Parallel, the Parallels Logo and Coherence are trademarks or registered trademarks of Parallels International GmbH.
CentOS is a trademark or registered trademark in the United States and other countries of Red Hat, Inc. or its subsidiaries.
QT is a trademark or registered trademark of The Qt Company Ltd.
VMware, VMware ESXi, VMware vSphere, and VMware Workstation are trademarks or registered trademarks of VMware, Inc. in the United States and/or other jurisdictions.
UNIX is a trademark registered in the USA and elsewhere and used under license granted by X/Open Company Limited.
Page top