Contents
- About Kaspersky Scan Engine
- Getting started with Kaspersky Scan Engine
- Installing Kaspersky Scan Engine
- Using Kaspersky Scan Engine in HTTP mode
- Kaspersky Scan Engine and HTTP mode
- Configuring Kaspersky Scan Engine in HTTP mode
- HTTP mode configuration file
- Configuring Format Recognizer
- Recognizable file formats
- Setting up the connection queue in HTTP mode
- Setting the session timeout
- Changing variables in the HTTP mode init script (Linux)
- Changing variables in the HTTP mode unit file (Linux)
- Configuring updating in HTTP mode
- Running Kaspersky Scan Engine in HTTP mode
- Running Kaspersky Scan Engine in HTTP mode manually
- Running Kaspersky Scan Engine in HTTP mode with init script (Linux)
- Running Kaspersky Scan Engine in HTTP mode with systemd unit file (Linux)
- Running Kaspersky Scan Engine in HTTP mode as service (Windows)
- Running Kaspersky Scan Engine in HTTP mode with a BAT script (Windows)
- Monitoring Kaspersky Scan Engine in HTTP mode
- Making requests in HTTP mode
- About KAV protocol
- Making requests in HTTP mode via KAV protocol version 3
- Supported API methods in KAV protocol version 3
- Format of a scan POST request
- Format of a response to a scan POST request
- Increasing the detection rate
- Example of an HTTP request to scan a local file
- Example of an HTTP request to scan a block of memory
- Example of an HTTP request to check a URL
- Example of an HTTP request to get the release date of the anti-virus database
- Example of an HTTP request to get the current KAV SDK version
- Example of an HTTP request to get licensing information
- Example of an HTTP request to get accumulated statistics
- Example of an HTTP request to clear accumulated statistics
- Example of an HTTP request to update the anti-virus database
- Example of an HTTP request to get the database update status
- Making requests in HTTP mode via KAV protocol versions 1 and 2
- Supported API methods in KAV protocol versions 1 and 2
- Request headers
- Example of an HTTP request to scan a local file
- Example of an HTTP request to scan a block of memory
- Example of a multipart HTTP request to scan a block of memory
- Example of an HTTP request to check a URL
- Example of an HTTP request to get the release date of the anti-virus database
- Example of an HTTP request to get the current KAV SDK version
- Example of an HTTP request to get licensing information
- Example of an HTTP request to get accumulated statistics
- Example of an HTTP request to clear accumulated statistics
- Using the sample HTTP client
- Using a proxy server
- Updating the anti-virus database in HTTP mode
- Logging in HTTP mode
- Building executable files for the HTTP service and the HTTP client
- Using Kaspersky Scan Engine in ICAP mode
- Kaspersky Scan Engine and ICAP mode
- Configuring Kaspersky Scan Engine in ICAP mode
- Running Kaspersky Scan Engine in ICAP mode
- Updating the anti-virus database in ICAP mode
- Getting accumulated statistics in ICAP mode
- Using Kaspersky Scan Engine in ICAP mode with Squid
- Logging in ICAP mode
- Building executable files for Kaspersky Scan Engine used in ICAP mode
- Using Kaspersky Scan Engine GUI
- Manually editing Kaspersky Scan Engine configuration file
- Verifying virus detection capabilities
- Logging
- Boosting performance of Kaspersky Scan Engine
- Uninstalling Kaspersky Scan Engine
- Using the password utility
- Using the encrypting utility
- Licensing
- Kaspersky Scan Engine GUI and SSL certificates
- Troubleshooting
- Data transferred to Kaspersky Lab
- Contacting Technical Support
- Information about third-party code
- Trademark notices
- Copyright
About Kaspersky Scan Engine
Kaspersky Scan Engine is a server-side security solution that provides anti-virus protection, HTTP traffic scanning, and file and URL reputation checking for third parties’ client-side solutions.
Kaspersky Scan Engine delivers comprehensive protection for a wide range of devices from malware, trojans, worms, rootkits, spyware, and adware. It can be used with various products and services including desktop applications, server solutions, proxy servers, and mail gateways.
Based on Kaspersky Anti-Virus Software Development Kit 8 Level 3 (KAV SDK) and the award-winning Kaspersky Anti-Virus Engine, Kaspersky Scan Engine employs the newest methods of detection and removing various types of malware.
You can request the KAV SDK documentation or purchase KAV SDK together with the documentation from your Technical Account Manager (TAM).
Key functions of Kaspersky Scan Engine
Kaspersky Scan Engine can work in one of two modes:
- HTTP mode
In this mode, Kaspersky Scan Engine works as a REST-like service that receives HTTP requests from client applications, scans objects passed in these requests, and sends back HTTP responses with scan results.
- ICAP mode
This mode is available only for Linux operating systems.
In this mode, Kaspersky Scan Engine works as an ICAP server that scans HTTP traffic that passes through a proxy server and URLs that are requested by users and filters out web page that contain malicious content.
Kaspersky Scan Engine also includes a graphical user interface that allows you to easily configure the behavior of Kaspersky Scan Engine, review its service events, and scan results.
Usage scenarios:
Kaspersky Scan Engine can scan files and blocks of random access memory (RAM) by using the Kaspersky anti-virus database and the advanced heuristics module. Scanning of compressed executables, archives, Microsoft Office macros, email messages, and email databases is supported.
Kaspersky Scan Engine can scan specific URLs (in HTTP mode) or URLs that users request from a proxy server (in ICAP mode). In ICAP mode, Kaspersky Scan Engine can return a user-specified HTML page instead of malicious web pages.
File and URL Reputation Checking
Kaspersky Scan Engine can receive information about reputation of the scanned files and URLs from Kaspersky Security Network (KSN).
The graphical user interface (GUI) allows you to configure Kaspersky Scan Engine, check the status of a Kaspersky Scan Engine key file or activation code, review service events, and scan results.
Key functionality:
- Award-wining Kaspersky anti-malware technology provides the best-in-class malware detection rates and can instantaneously react to emerging threats.
- Kaspersky Security Network provides information about the reputation of files and Internet resources, ensures that Kaspersky applications react to threats faster without waiting for an application database update, and reduces the likelihood of false positives.
- Filters out malicious, phishing, and adware URLs.
- Detection of multi-packed objects and objects packed using “grey” compression utilities (frequently used for hiding malicious programs from anti-virus software).
- Advanced heuristics analyzer and machine learning-based detection technologies.
- Disinfection of infected files, archives, and encoded objects.
- Updatable Anti-Virus engine: detection technologies and processing logic can be upgraded or modified through regular updates of the anti-virus database.
- Kaspersky Scan Engine natively supports multithreading and can process several tasks simultaneously. You can adjust the number of scanning processes and threads to increase performance of Kaspersky Scan Engine.
- Additional filtering layer is made possible by the Format Recognizer component. You can use this component to recognize and skip files of certain formats during the scanning process. Dozens of formats are supported, including executable, office, media files, and archives.
- Graphical user interface (GUI) for management and monitoring:
- Lets you configure application settings and manage the application.
- Lets you monitor the application operating status, status of the used key file or activation code, and the number of scanned and detected objects.
- Provides information about all scanned objects on a dashboard. Scan results can be imported in CSV format.
- Ease of installation and configuration, and no development is needed with out-of-the box installation. The solution will be running within minutes.
- Reporting features:
- Important application events are sent to Syslog in CEF format.
- All service events are visible on the GUI dashboard.
- Maintenance features:
- Anti-virus database updates are automatic. Kaspersky Scan Engine automatically restores corrupted databases.
- Easy collection of product traces with the GUI.
- Option to use online activation. With online activation, licensing information for Kaspersky Scan engine is updated automatically.
- Fault-tolerant and resilient architecture.
- Source code for HTTP client and ICAP service are provided in the distribution kit for customization.
- Comprehensive documentation and cross-platform API support. Similar APIs for Linux/UNIX and Windows versions.
- Option to minimize external traffic by creating local mirror server for the anti-virus database (additional tool needed).
Kaspersky Scan Engine detection technologies
This section describes detection technologies that are implemented in Kaspersky Scan Engine.
Signature analysis
This detection method is based on searching for a predefined string in scanned files. Signature analysis also includes detection based on the hash of the entire malicious file. Traditional signatures allow for the detection of specific objects with high precision. Other signature-based technologies, such as structure heuristics signatures and SmartHash, can detect unknown and polymorphic malware.
Signature analysis can detect specific attacks with high precision and few false positives. However, this detection method is ineffective against polymorphic malware and different versions of the same malware. Effective signature analysis also requires frequent signature updates.
The frequently updated and comprehensive anti-virus database of Kaspersky Scan Engine ensures the highest level of protection from known malware, trojans, worms, rootkits, spyware, and adware.
Advanced heuristics
When scanning a script or an executable file, Kaspersky Anti-Virus Engine emulates its execution in a secure artificial environment. If a suspicious activity is discovered during analysis of the behavior of the emulated object, it is considered malicious. This method helps detect new and unknown malware.
The emulator component of Kaspersky Scan Engine emulates a functional execution environment for the object, including functions and different subsystems of the target operation system. No real functions or subsystems are used during emulation.
Machine learning technologies
SmartHash is a Kaspersky Lab patented algorithm for building intelligent, locality-sensitive hashes. Locality-sensitive hashes are static file features that can be extracted and quantized. SmartHashes can be calculated for each file and different files can have the same SmartHash when they are functionally similar. Because of this, a single SmartHash allows for the identification of clusters of similar files and the effective detection of unknown malware from known malware families.The SmartHash technology utilizes several precision levels, a feature that allows for the detection of even highly polymorphic malware. Simultaneously, with a very high level of confidence, it minimizes the risk of false postive detection.
SmartHash benefits:
- Strength against new, evasive, and polymorphic malware.
- Detection within minutes.
- Works offline and online.
- Flexible model with several similarity levels that allows for detection of uninfected and malicious files.
- Resilient technology: mathematical model is updated by machine learning techniques and is constantly revised by experts. Using SmartHash results in minimal false positives and yields a high detection rate.
Besides detection functionality, SmartHash online improves the power of Kaspersky Lab whitelisting capabilities. SmartHash calculated on the client side can be compared against billions of known good files in the Kaspersky Lab database through global Kaspersky Security Network.
Kaspersky Lab uses machine learning to boost the detection rate of existing scanning technologies. It deploys machine learning for automated analysis of internal sandbox execution logs. Both known malicious files and unknown files are executed in internal behavioral sandbox systems. Some of these sandboxes mimic user systems running standard products. The most powerful sandboxes make use of granular logging capabilities, allowing for extremely fine-tuned detection.
Robots process the sandbox logs line by line. The execution logs of new malicious samples’ are studied by using Machine Learning, to find new detection indicators. These new indicators enrich mathematical models of non-signature-based detection methods as well as heuristic behavioral records created by Kaspersky Lab experts.
Processing of Compressed Executables And Archives
Kaspersky Scan Engine includes technology that allows for detection of viruses and other objects inside compressed executables and archives. With this technology, infected archives and compressed executables can be safely disinfected or deleted.
Kaspersky Scan Engine supports approximately 4000 different formats of compressed executables and archives.
Disinfection of Archives
This technology is designed to disinfect archived files. With this technology, infected objects inside archives are successfully disinfected or deleted, depending on user-defined settings. You do not have to use any other archiving utilities.
The Kaspersky Anti-Virus Engine is currently capable of removing viruses from ARJ, CAB, RAR, and ZIP archives.
Kaspersky Security Network
Kaspersky Security Network (KSN) is an infrastructure of cloud services that provides access to the online Knowledge Base of Kaspersky Lab which contains information about the reputation of files, web resources, and software. The use of data from Kaspersky Security Network ensures faster responses to threats, improves the performance of some protection components, and reduces the likelihood of false positives.
KSN can block new malware seconds after it appears, by using automatic rules that are generated from data provided by Kaspersky Lab users.
Kaspersky Lab hosts KSN servers in data centers all around the world providing minimal latency for cloud checks. KSN database contains terabytes of information that is constantly updated by security analysts and automatic methods.
When using KSN, you provide Kaspersky Lab with information about the installed copy of Kaspersky Scan Engine and detected objects. This information does not contain any personal or confidential information of the user. The information obtained is protected by Kaspersky Lab in accordance with statutory requirements. For the full list of information that is transferred to Kaspersky Lab when using KSN, see section "Data transferred to Kaspersky Lab during File and URL Reputation Checking".
Kaspersky Scan Engine is compliant with the General Data Protection Regulation (GDPR).
To learn about use cases for working with KSN, see section "File and URL Reputation Checking in KSN".
Malicious and phishing URL detection
Kaspersky Scan Engine includes an offline database of malicious and phishing URLs. In addition, you can check the reputation of the scanned URLs in Kaspersky Security Network.
Page top
Kaspersky Scan Engine architecture
Kaspersky Scan Engine is an implementation of Kaspersky HTTP Daemon and Kaspersky ICAP Plugin, which are parts of Kaspersky Anti-Virus SDK.
When Kaspersky Scan Engine is running as Kaspersky HTTP Daemon, it is working in HTTP mode. When Kaspersky Scan Engine is running as Kaspersky ICAP Plugin, it is working in ICAP mode.
Following are descriptions of the modes:
- HTTP mode
In this mode, Kaspersky Scan Engine works as a REST-like service that receives HTTP requests from client applications, scans files and URLs passed in these requests, and sends back HTTP responses with scan results.
- ICAP mode
This mode is available only for Linux operating systems.
In this mode, Kaspersky Scan Engine works as an ICAP server that scans HTTP traffic that passes through a proxy server, scans URLs that are requested by users, and filters out web pages that contain malicious content.
Kaspersky Scan Engine consists of the following components:
- The service that processes client requests. The services are different in HTTP and ICAP modes.
- Kaspersky Scan Engine GUI
The user interface that the user can access over a browser. Its functionality is implemented in the klScanEngineUI executable file.
- Kaspersky Anti-Virus Engine
The executable file that scans objects passed to it.
HTTP mode
In HTTP mode, Kaspersky Scan Engine consists of an HTTP service called kavhttpd, Kaspersky Anti-Virus Engine, and Kaspersky Scan Engine GUI.
When you use Kaspersky Scan Engine in HTTP mode, the interaction between the components occurs in the following order:
- Files and URLs for scanning are sent to kavhttpd in HTTP requests.
You can send objects to kavhttpd in two ways:
- By using an HTTP client, such as the sample HTTP client from the distribution kit
- By making HTTP requests manually
- The kavhttpd service sends objects to Kaspersky Anti-Virus Engine.
- Kaspersky Anti-Virus Engine scans the objects.
If you are using File and URL Reputation Checking, the objects are also sent to KSN for reputation checking.
- After scanning, Kaspersky Anti-Virus Engine returns the results to the kavhttpd service.
- The kavhttpd service sends scan results to the HTTP client or another application that sent objects for scanning.
If you are using Kaspersky Scan Engine GUI, the scan results are displayed on the Scan results page.
The diagram below shows the interaction between the components of Kaspersky Scan Engine.
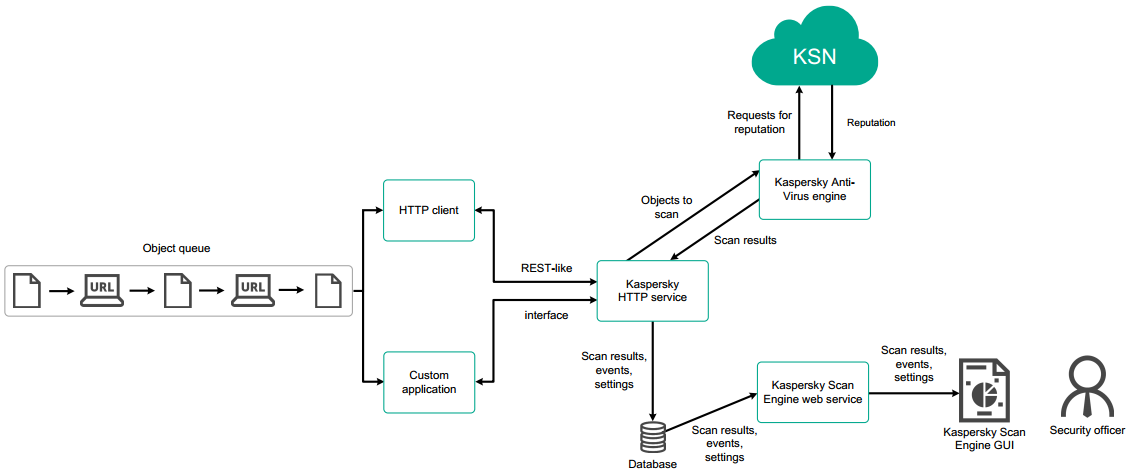
Interaction between HTTP clients and the Kaspersky Scan Engine working in HTTP mode
ICAP mode
In ICAP mode, Kaspersky Scan Engine consists of an ICAP server called kavicapd, Kaspersky Anti-Virus Engine, and Kaspersky Scan Engine GUI.
When you use Kaspersky Scan Engine in ICAP mode, the interaction between the components occurs in the following order:
- An ICAP client (for example, a proxy server) sends ICAP requests to kavicapd.
- The kavicapd service sends files to Kaspersky Anti-Virus Engine for scanning.
- Kaspersky Anti-Virus Engine scans the contents of HTTP messages and URLs that are encapsulated in these ICAP requests.
If you are using File and URL Reputation Checking, the contents of HTTP messages and URLs are also sent to KSN for reputation checking.
- After scanning, Kaspersky Anti-Virus Engine returns the results to the kavicapd service.
- The kavicapd service sends ICAP responses with scan results to the ICAP client.
If you are using Kaspersky Scan Engine GUI, the scanning results are displayed on the Scan results page.
Kaspersky Scan Engine can work with several ICAP clients at once.
The following example shows the interaction between a proxy server and Kaspersky Scan Engine working in ICAP mode.
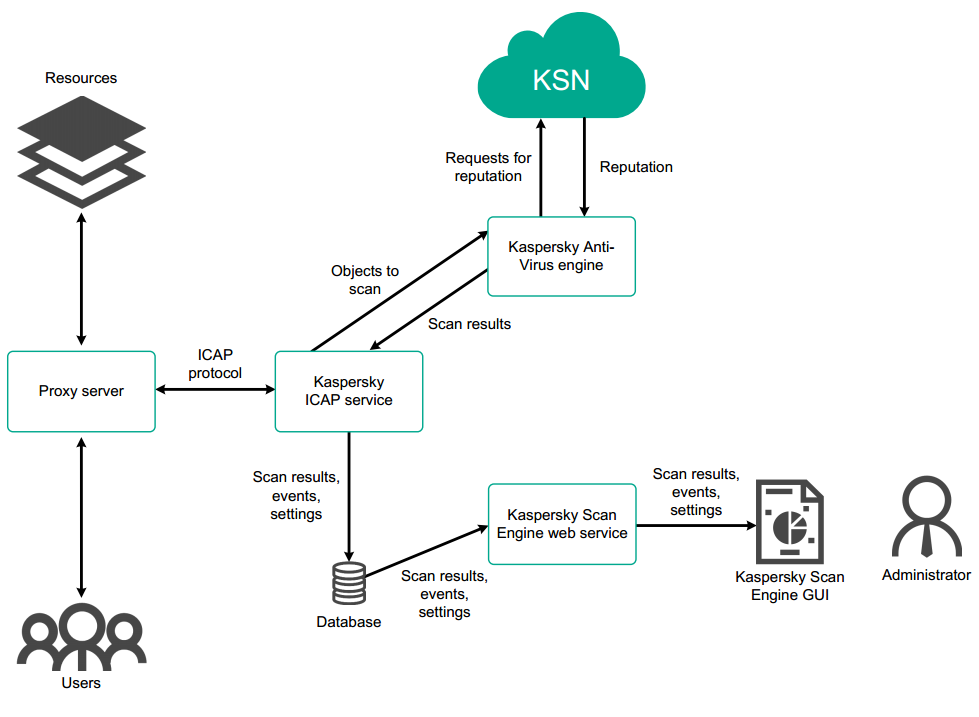
Interaction between a proxy server and the Kaspersky Scan Engine working in ICAP mode
Kaspersky Scan Engine usage scenarios
This section describes common usage scenarios of Kaspersky Scan Engine.
Threat Protection
Kaspersky Scan Engine helps you protect your network and data by detecting malware and legitimate software that can be used by intruders.
Before you start using Kaspersky Scan Engine, decide on your use case, in the following order:
- Decide what data you want to scan:
- Data uploaded to your network by your users.
- Data created inside your organization, such as documents.
- Data uploaded from sources outside your network. This can prevent supply chain attacks.
You can also use Kaspersky Scan Engine to add scanning functionality to your own applications and security services. Kaspersky Scan Engine scans objects of any format, including packed objects.
- Decide whether HTTP or ICAP mode is better for your environment.
For information about the two modes of Kaspersky Scan Engine, see section "Key functions of Kaspersky Scan Engine".
- Decide where you want to deploy Kaspersky Scan Engine.
- Decide how you will gain access to scan results:
- In Kaspersky Scan Engine GUI
- In a client application
- Decide which features of Kaspersky Scan Engine you will use:
- Decide whether you want to use Kaspersky Security Network (KSN) for checking the reputation of files and URLs
- Decide what level of heuristics you want to use
- Decide what actions Kaspersky Scan Engine must perform after detecting malware or legitimate software that can be used by intruders
- Decide whether you want to scan packed executables
- Decide whether you want to scan archives
- Decide whether you want to scan email
- Decide whether you want to scan email databases
After determining your use case for Kaspersky Scan Engine, proceed to section "Getting started with Kaspersky Scan Engine".
Below you can find instructions for typical tasks that Kaspersky Scan Engine performs in HTTP mode and in ICAP mode.
Scanning files with the sample HTTP client (HTTP mode)
This instruction assumes that you have already installed and configured Kaspersky Scan Engine by using the configuration file or the GUI.
To scan files with Kaspersky Scan Engine:
- Start the kavhttpd service.
- Start the sample HTTP client. The client is located in the
/bin/kavhttp_clientdirectory of the distribution kit. - Pass the files that you want to scan to the sample HTTP client:
- Scan files that are larger than 4 megabytes (MB) in scanfile mode. Use the
-foption and pass the local paths to the files to the sample HTTP client.The example below shows how to scan two files in scanfile mode:
./kavhttp_client -f /usr/dir1/example1.zip /usr/dir2/example2.iso
- Scan files that are smaller than 4 MB in scanmemory mode. Pass the paths (network or local) to the sample HTTP client. To do this, use the
-soption.The example below shows how to scan a file in scanmemory mode:
./kavhttp_client -s 192.0.2.0:888 /usr/dir/example.txt
- Scan files that are larger than 4 megabytes (MB) in scanfile mode. Use the
- Review the scan results.
Scanning traffic that passes through a proxy server (ICAP mode)
This instruction assumes that you have already installed and configured Kaspersky Scan Engine by using the configuration file or the GUI.
To scan traffic that passes through a proxy server:
- Configure your proxy server to work with Kaspersky Scan Engine. See section "Using Kaspersky Scan Engine in ICAP mode with Squid" for an example.
- Create a response template that you want to display or script to execute when malware or legitimate software that can be used by intruders is detected.
- Configure ICAP service rules for a situation when Kaspersky Scan Engine detects malware or legitimate software that can be used by intruders. You can do it either manually or by using the GUI.
- Start the kavicapd service.
Kaspersky Scan Engine will automatically detect malware or legitimate software that can be used by intruders, and process it according to the ICAP service rules.
Page top
Web Protection from malicious and phishing websites
This section describes common scenarios where you can use Kaspersky Scan Engine to check websites.
The instructions provided in this section assume that you have already installed Kaspersky Scan Engine.
Scanning URLs (HTTP mode)
To scan a URL with Kaspersky Scan Engine:
- In the
ServerSettings > Flagselement of the kavhttpd.xml configuration file, specify the settings you want:KAV_SHT_ENGINE_KSN—For checking the reputation of websites by KSN.KAV_SHT_ENGINE_WMUF—For detecting malicious websites.KAV_SHT_ENGINE_APUF—For detecting phishing websites.
You can also specify settings by means of the GUI.
- Start the kavhttpd service.
- Send the URL that you want to check to the kavhttpd service.
For example, you can use the sample HTTP client
%service_dir%/bin/kavhttp_clientfor this purpose, as follows:./kavhttp_client -u http://example.com
Also you can send an HTTP POST request to the kavhttpd service.
- Review the scan results.
You can block URLs for which the
DETECTEDresult is returned.
Checking URLs that users request through proxy server (ICAP mode)
To check URLs that pass through a proxy server:
- In the kavicapd.xml configuration file, specify the settings you want:
- In the
SDKSettings > ScanningModeelement, specifyKAV_O_M_PHISHINGfor detecting phishing websites. - In the
KSNSettings > UseKSNelement, specify1for checking the reputation of websites by KSN.
You can also specify settings by means of the GUI.
- In the
- Configure your proxy server to work with Kaspersky Scan Engine. See section "Using Kaspersky Scan Engine in ICAP mode with Squid" for an example.
- Create a response template if you want to display it instead of phishing web pages.
- Create ICAP service rules for cases when Kaspersky Scan Engine returns
PHISHINGandDETECTEDscan results.You can do it either manually or by using the GUI.
- Start the kavicapd service.
Kaspersky Scan Engine will automatically check URLs and process them according to the ICAP service rules.
Page top
File and URL reputation checking in KSN
This section describes common scenarios where you can use Kaspersky Scan Engine together with Kaspersky Security Network (KSN) to check files and websites.
The instructions provided in this section assume that you have already installed Kaspersky Scan Engine.
Checking files and websites with reputation checking (HTTP mode)
To check files and websites by means of reputation checking:
- In the
ServerSettings > Flagselement of the kavhttpd.xml configuration file, specify theKAV_SHT_ENGINE_KSNsetting.You can also use the GUI to turn on reputation checking.
- Start the kavhttpd service.
- Send URLs and files that you want to check to the kavhttpd service.
For example, you can use the sample HTTP client
%service_dir%/bin/kavhttp_client.Also, you can send HTTP POST requests to the kavhttpd service.
- Review the scan results.
The scan results will depend on the reputation of the URLs and files.
Checking URLs that users request through proxy server (ICAP mode)
To check URLs that pass through a proxy server:
- In the
KSNSettings > UseKSNelement of the kavicapd.xml configuration file, specify1for checking the reputation of files and websites by KSN.You can also turn on reputation checking by using the GUI.
- Configure your proxy server to work with Kaspersky Scan Engine. See section "Using Kaspersky Scan Engine in ICAP mode with Squid" for an example.
- Create ICAP service rules for scan results returned by Kaspersky Scan Engine.
You can create the rules either manually or by using the GUI.
- Start the kavicapd service.
Kaspersky Scan Engine will return the results of checking files and URLs on the basis of their reputation in KSN and will respond according to the ICAP service rules you have specified.
Page top
Hardware and software requirements
This section describes the Kaspersky Scan Engine system requirements.
Supported operating systems
Kaspersky Scan Engine runs on 64-bit Linux and 64-bit Microsoft Windows operating systems.
Software requirements
Kaspersky Scan Engine GUI can be used with the following web browsers:
- Google Chrome 60 or later
- Microsoft Internet Explorer 11 or later
- Mozilla Firefox 55 or later
- Microsoft Edge 38 or later
Kaspersky Scan Engine GUI requires PostgreSQL 10.7 or later to be installed. For more information, see section "Preparing to install Kaspersky Scan Engine GUI".
The Kaspersky Scan Engine distribution kit does not contain the Boost and OpenSSL sources. If you want to customize the HTTP service or ICAP service by editing and recompiling their sources shipped in the Kaspersky Scan Engine distribution kit, download the Boost and OpenSSL sources from the official websites and use them in your system. If you make changes in the sources of the HTTP or ICAP service and want to use Kaspersky Scan Engine GUI, get approval for the changes from your technical account manager (TAM) so that the HTTP or ICAP service can still work with Kaspersky Scan Engine GUI.
For compiling the HTTPD and ICAP services, use the following software:
- Boost 1.60
- OpenSSL (latest version)
- GCC 6.1 or later
- PostgresSQL libraries. It is recommenced to install the libpqxx-devel package.
Hardware requirements
Kaspersky Scan Engine requires 1 gigabyte (GB) of available hard disk space. If you use Kaspersky Scan Engine GUI, you also must allocate space for the PostgreSQL database that stores service events. You can keep the PostgreSQL database on the same computer as Kaspersky Scan Engine or on a different computer. The size of the database depends on the number of the events and can reach several gigabytes. The database stores events that occurred in the last six months.
The table below lists minimum processors and the RAM requirements for Kaspersky Scan Engine depending on the operating system that you use.
Operating System |
RAM and processor requirements |
|---|---|
64-bit Linux |
1 GB of RAM 1 GHz 64-bit (x64) or faster processor. |
64-bit Windows 7 and later 64-bit Windows Server 2008 R2 and later |
1 GB of RAM 1 GHz 64-bit (x64) or faster processor |
Distribution kit contents (Linux)
The Kaspersky Scan Engine distribution kit for Linux contains the following files and directories.
Distribution kit contents (Linux)
Item |
Description |
|
Application information file. |
|
Directory that contains anti-virus database files. |
|
Configuration file that contains logging settings for the kavhttpd service. |
|
Configuration file that contains logging settings for the kavicapd service. |
|
Executable file of the kavhttpd service. |
|
Executable file of the client application for the kavhttpd service. |
|
Script for starting the kavhttpd service. |
|
Executable file of the kavicapd service. |
|
Script for starting the kavicapd service. |
|
Kaspersky Scan Engine GUI binary file. |
|
Auxiliary library. |
|
File describing information that is provided to Kaspersky when you enable submission of statistics to Kaspersky Security Network (KSN). |
|
File describing information that is provided to Kaspersky when Kaspersky Scan Engine is used in online licensing mode. |
|
File describing information that is provided to Kaspersky when Kaspersky Scan Engine is used with cloud services. |
|
Directory that contains the Kaspersky Scan Engine documentation files. |
|
Main page of the Kaspersky Scan Engine documentation. |
|
End User License Agreement (EULA) for Kaspersky Security Network (KSN). |
|
Legal notices. |
|
End User License Agreement (EULA) for Kaspersky Scan Engine. |
|
Changes made to the Kaspersky Scan Engine documentation. |
|
Initialization script for managing the kavhttpd service. |
|
Initialization script for managing the kavicapd service. |
|
Initialization script for managing Kaspersky Scan Engine. |
|
systemd unit file for the kavhttpd service. |
|
Sample configuration file for the kavhttpd service. |
|
Sample configuration file for the kavicapd service. |
|
Kaspersky Scan Engine GUI configuration file. |
|
File with encrypted credentials for Kaspersky Scan Engine GUI. |
|
Directory with templates for Kaspersky Scan Engine GUI. |
|
Configuration file with service rules for the kavicapd service. |
|
Response template used in request modification (REQMOD) mode. |
|
Response template used in response modification (RESPMOD) mode. |
|
Sample script that displays messages with information about scanned objects and redirects them to the logger utility. |
|
Directory with header files for developing custom applications on the basis of Kaspersky Anti-Virus SDK. |
|
Installation script. |
|
A text file with the GCC version. |
|
Directory with Kaspersky Anti-Virus SDK libraries for developing custom applications. |
|
A text file with the version of the GLIBC library. |
|
Directory with plugins that extend the Kaspersky Anti-Virus SDK functionality. |
|
Release notes. |
|
Directory with sources of the kavhttpd service and its client application. |
|
Directory with sources of the kavicapd service. |
|
File with SQL queries to be performed after manual installation of Kaspersky Scan Engine. |
|
Utility for encrypting logins and passwords for proxy servers and Kaspersky Scan Engine database. |
|
Utility for signing custom applications. |
|
Utility for editing user credentials. |
|
Auxiliary library. |
|
OpenSSL utility. |
|
OpenSSL configuration file. |
|
Uninstallation script. |
|
A text file with the product version. |
Distribution kit contents (Windows)
The Kaspersky Scan Engine distribution kit for Windows contains the following files and directories.
Distribution kit contents (Windows)
Item |
Description |
|
Application information file. |
|
Executable file of the kavehost service (Kaspersky Anti-Virus Engine). |
|
Executable file of the client application for the kavhttpd service. |
|
Kaspersky Scan Engine GUI binary file. |
|
Kaspersky Scan Engine GUI configuration file. |
|
Executable file of the kavhttpd service. |
|
Sample configuration file for the kavhttpd service. |
|
Configuration file that contains logging settings for the kavhttpd service. |
|
Folder that contains anti-virus database files. |
|
OpenSSL library. |
|
32-bit images of libraries used by emulator component. |
|
Dynamic libraries used by Kaspersky Scan Engine. |
|
Binary modules used of by Kaspersky Scan Engine. |
|
Folder that contains the Kaspersky Scan Engine documentation files. |
|
File describing information that is provided to Kaspersky Lab when Kaspersky Scan Engine is used with cloud services. |
|
File describing information that is provided to Kaspersky Lab when you enable submission of statistics to Kaspersky Security Network (KSN). |
|
File describing information that is provided to Kaspersky Lab when Kaspersky Scan Engine is used in online licensing mode. |
|
Main page of the Kaspersky Scan Engine documentation. |
|
Legal notices. |
|
End User License Agreement (EULA) for Kaspersky Scan Engine. |
|
End User License Agreement (EULA) for Kaspersky Security Network (KSN). |
|
Changes made to the Kaspersky Scan Engine documentation. |
|
File with encrypted credentials for Kaspersky Scan Engine GUI. |
|
Folder with templates for Kaspersky Scan Engine GUI. |
|
Folder with header files for developing custom applications on the basis of Kaspersky Anti-Virus SDK. |
|
Universal C Runtime (UCRT) and C++ Runtime dynamic libraries. These files can be used if the target system does not have these libraries installed. |
|
Folder with sources of the |
|
File with SQL queries to be performed after manual installation of Kaspersky Scan Engine. |
|
Utility for encrypting user names and passwords for proxy servers and Kaspersky Scan Engine database. |
|
Utility for signing custom applications. |
|
Utility for editing user credentials. |
|
OpenSSL utility. |
|
OpenSSL configuration file. |
|
Microsoft Visual C++ Redistributable components. |
|
Installer. |
|
Script for managing the kavhttpd service and the klScanEngineUI service. |
|
Uninstaller. |
|
Release notes. |
|
A text file with the product version. |
Getting started with Kaspersky Scan Engine
This section explains how to start using Kaspersky Scan Engine quickly and easily.
Getting started with Kaspersky Scan Engine in HTTP mode
This section explains how to start using Kaspersky Scan Engine in HTTP mode.
Before you start using Kaspersky Scan Engine, we strongly recommend that you restrict access to Kaspersky Scan Engine files, including logs, with built-in tools provided by your operating system. This measure will help make your information more secure.
To start using Kaspersky Scan Engine in HTTP mode:
- Install Kaspersky Scan Engine.
Kaspersky Scan Engine starts automatically after installation is complete.
- Optionally, configure Kaspersky Scan Engine for use in HTTP mode.
For example, you can configure Format Recognizer to increase the processing speed of Kaspersky Scan Engine in HTTP mode.
- If you configure HTTP mode manually (without using the
installinstallation script), and you are using offline licensing mode, you have to put the license file in the directory that is specified in theLicensePathelement of the configuration file. If you are using online licensing mode, you have to specify the activation code. For more information about online and offline licensing modes, see sections "Activating Kaspersky Scan Engine in offline licensing mode", "Activating Kaspersky Scan Engine in online licensing mode". - Optionally, configure the init script or systemd unit file to manage Kaspersky Scan Engine in HTTP mode.
- For information on how to configure the init script, see section "Changing variables in the HTTP mode init script".
- For information on how to configure the systemd unit file, see section "Changing variables in the HTTP mode unit file".
For Linux systems only.
- Optionally, configure logging.
Notice that logging decreases performance of Kaspersky Scan Engine. Usually you need to enable logging only during the integration or for debugging.
- Update the anti-virus database or configure the update frequency.
To keep track of the update process and make sure that you get the latest updates, send an HTTP request to the
/api/v3.0/update/statusaddress. For more information, see section "Updating the database in HTTP mode", subsection "Getting the database update status". - Verify the detection capabilities of Kaspersky Scan Engine.
- Make requests to Kaspersky Scan Engine:
- Run the sample HTTP client from the command line to scan files.
For more information about using the sample HTTP client, see section "Using the HTTP client".
- Use a REST-like protocol for making HTTP requests.
- Use the source code of the sample HTTP client as an example for creating your own client.
- Run the sample HTTP client from the command line to scan files.
Getting started with Kaspersky Scan Engine in ICAP mode
This section explains how to start using Kaspersky Scan Engine in ICAP mode.
Before you start using Kaspersky Scan Engine, we strongly recommend that you restrict access to Kaspersky Scan Engine files, including logs, with built-in tools provided by your operating system. This step will help make your information more secure.
To start using Kaspersky Scan Engine in ICAP mode:
- Install Kaspersky Scan Engine.
Kaspersky Scan Engine starts automatically after installation is complete.
- Optionally, configure Kaspersky Scan Engine for use in ICAP mode.
- If you configure ICAP mode manually (without using the
installinstallation script), and you are using offline licensing mode, you have to put the license file in the directory that is specified in theLicensePathelement of the configuration file. If you are using online licensing mode, you have to specify the activation code. For more information about online and offline licensing modes, see sections "Activating Kaspersky Scan Engine in offline licensing mode", "Activating Kaspersky Scan Engine in online licensing mode". - Optionally, configure service rules.
- Optionally, configure logging.
Notice that logging decreases performance of Kaspersky Scan Engine. Usually you need to enable logging only during the integration or for debugging.
- Optionally, configure environment variables.
- Update the anti-virus database or configure the update frequency.
- Verify the detection capabilities of Kaspersky Scan Engine.
- Run Kaspersky Scan Engine in ICAP mode.
Installing Kaspersky Scan Engine
This section explains how to install Kaspersky Scan Engine.
Preparing to install Kaspersky Scan Engine GUI
Kaspersky Scan Engine GUI uses the PostgreSQL object-relational database management system to store scan statistics, scan results, service events, and service status. For this reason, if you want to use Kaspersky Scan Engine GUI, you must install PostgreSQL first.
You can use one of two integration schemes:
- Install Kaspersky Scan Engine on the same computer as PostgreSQL.
- Install Kaspersky Scan Engine on a different computer that has access to the computer with PostgreSQL.
Installing and configuring PostgreSQL (Linux)
Kaspersky Scan Engine GUI requires PostgreSQL 10.7 or later. The following procedure covers installation and configuration of PostgreSQL 10.7. The procedure for a later version may vary.
To install and configure PostgreSQL:
- Download and install PostgreSQL.
You can install PostgreSQL in one of the following ways:
- Install the package downloaded from the PostgreSQL website.
Visit https://www.postgresql.org/download/ to see a list of supported operating systems and installation instructions for each of them.
- Install PostgreSQL from source code.
Visit https://www.postgresql.org/docs/10/installation.html for installation instructions.
- Install the package downloaded from the PostgreSQL website.
- Open the
postgresql.confconfiguration file. The location of this file varies depending on your operating system:- In Debian-based Linux distributions
postgresql.confis located at /etc/postgresql/10/main/. - In RedHat-based Linux distributions
postgresql.confis located at /var/lib/pgsql/data/.
If you use another operating system, the location of
postgresql.confmay be different. - In Debian-based Linux distributions
- Specify the IP address that Kaspersky Scan Engine must use to connect to PostgreSQL in the
listen_addressessetting ofpostgresql.conf. - Specify the port on which the PostgreSQL is to listen for connections from Kaspersky Scan Engine in the
portsetting ofpostgresql.conf. - Save and close
postgresql.conf. - Open the
pg_hba.confconfiguration file. This file is located in the same directory aspostgresql.conf. - Specify that PostgreSQL must require an MD5-encrypted password for authentication from all of its clients:
- Find the following line in
pg_hba.conf:host all all 127.0.0.1/32 peer - Change this line to:
host all all 127.0.0.1/32 md5
- Find the following line in
- If PostgreSQL and Kaspersky Scan Engine are installed on different computers, add the following line to
pg_hba.conf:host all all %IP%/32 md5
Here
%IP%is the IP address of the computer on which Kaspersky Scan Engine is installed. - Save and close
pg_hba.conf. - Restart PostgreSQL by running the following command from the command line:
service postgresql restart
- Set the password for the default PostgreSQL user.
During installation PostgreSQL creates a superuser called postgres. By default, this user does not a have a password.
To set the password for the postgres user:
- From the command line, change the currect user to the postgres user:
su postgres - Under the postgres user account, start the psql utility by running the following command in the command line:
psql - In psql, change the password of the postgres user by running the following command:
alter user postgres with password '%PASSWORD%';Here
%PASSWORD%is the new password for the postgres user. - Quit the psql utility by running the following command in psql:
\q
- From the command line, change the currect user to the postgres user:
You can now install Kaspersky Scan Engine GUI.
To install Kaspersky Scan Engine GUI, you need a PostgreSQL user that has permissions for creating new databases and users. You can use the postgres user for that, or create a new user.
After installing PostgreSQL and setting the password for the postgres user, you can proceed to section Installation using script (Linux) or Manual installation (Linux).
All data is stored in a single database called kavebase. Kaspersky Scan Engine does not use any other databases.
Page top
Installing and configuring PostgreSQL (Windows)
To install and configure PostgreSQL:
- Download and install PostgreSQL.
Visit https://www.enterprisedb.com/downloads/postgres-postgresql-downloads to see a list of supported operating systems and download the installer.
- Open the
postgresql.confconfiguration file. This file is located at%postgresql_dir%\data. Here%postgresql_dir%(for example,C:\Program Files\PostgreSQL\11) is the folder that PostgreSQL was installed in. - Specify the IP address that Kaspersky Scan Engine must use to connect to PostgreSQL in the
listen_addressessetting ofpostgresql.conf. - Specify the port on which the PostgreSQL is to listen for connections from Kaspersky Scan Engine in the
portsetting ofpostgresql.conf. - Save and close
postgresql.conf. - Open the
pg_hba.confconfiguration file. This file is located in the same folder aspostgresql.conf. - Make sure that PostgreSQL requires an MD5-encrypted password for authentication from all of its clients. Find the following line in
pg_hba.conf:host all all 127.0.0.1/32 md5
If the authentication method specified on this line is other than
md5, change it tomd5. - If PostgreSQL and Kaspersky Scan Engine are installed on different computers, add the following line to
pg_hba.conf:host all all %IP%/32 md5
Here
%IP%is the IP address of the computer on which Kaspersky Scan Engine is installed. - Save and close
pg_hba.conf. - Restart PostgreSQL by running the following command from the command line:
sc stop postgresql-x64-11
sc start postgresql-x64-11
You can now install Kaspersky Scan Engine GUI.
To install Kaspersky Scan Engine GUI, you need a PostgreSQL user that has permissions for creating new databases and users. You can use the postgres user for that, or create a new user.
After installing PostgreSQL, you can proceed to section Installation using installer (Windows) or Manual installation (Windows).
All data is stored in a single database called kavebase. Kaspersky Scan Engine does not use any other databases.
Page top
Installation using script (Linux)
This section explains how to install Kaspersky Scan Engine using the install installation script. You can use the install installation script if Kaspersky Scan Engine is not installed on your computer (there is no /opt/kaspersky/ScanEngine directory).
If you want to use Kaspersky Scan Engine together with Kaspersky Scan Engine GUI, you must have PostgreSQL installed on a computer that is accessible from the computer on which you install Kaspersky Scan Engine. Kaspersky Scan Engine GUI does not work without PostgreSQL.
To install Kaspersky Scan Engine using the installation script:
- Make sure you have root (administrator) privileges.
- Run
install. - Read the End User License Agreement (EULA) for Kaspersky Scan Engine.
If you agree with the terms of the EULA, accept it. If you decline to accept the terms of the EULA, the installation will be canceled.
- Choose whether to use Kaspersky Scan Engine GUI.
- If you choose to use Kaspersky Scan Engine GUI, do the following:
- Perform the actions described in section "Preparing to install Kaspersky Scan Engine GUI".
- Specify the IP and port for connecting to PostgreSQL.
- Provide credentials for a user that has permissions for creating new databases and users. The credentials are not recorded anywhere.
With these credentials, Kaspersky Scan Engine will create a new database called kavebase in which Kaspersky Scan Engine will store its data, and a new PostgreSQL user called scanengine. From this moment on, Kaspersky Scan Engine will use the scanengine user to make changes to the database.
- Choose the mode for Kaspersky Scan Engine.
The following modes are available:
- HTTP
- ICAP
- For the HTTP mode, specify the IP address and port or the UNIX socket that Kaspersky Scan Engine will listen on for incoming requests to scan objects.
For the ICAP mode, specify the port whose traffic Kaspersky Scan Engine will scan.
- Specify whether Kaspersky Scan Engine must use Kaspersky Security Network (KSN).
- If you choose to use KSN, read the EULA for KSN and the Privacy Policy.
If you agree with the terms of the EULA and the Privacy Policy, accept it. If you decline the terms of the EULA for KSN or the Privacy Policy, you will not be able to use KSN, but the installation will continue. You can enable KSN later by using Kaspersky Scan Engine GUI or the Kaspersky Scan Engine configuration file (HTTP or ICAP).
- If you choose to use Kaspersky Scan Engine GUI, specify the port on which Kaspersky Scan Engine GUI will be available, if necessary.
- Specify whether to use a proxy server.
- If you choose to use a proxy server, specify the proxy settings.
- Specify the directory for storing temporary files.
The installation script will create the
scanenginesubdirectory in this directory; Kaspersky Scan Engine will use this subdirectory for storing temporary files. - Specify the licensing mode to be used in Kaspersky Scan Engine.
- For simplified licensing mode, specify the key file.
- For online licensing mode, specify the activation code.
- At the prompt, check the settings you have specified and modify them if necessary.
After you specify necessary data, the install script installs Kaspersky Scan Engine and then starts it. Finally, the script prints the summary information about the installation to the command line.
Manual installation (Linux)
This section describes how to manually install Kaspersky Scan Engine on Linux systems.
To install Kaspersky Scan Engine manually:
- Make sure that you have root (administrator) privileges.
- Create the
/opt/kaspersky/ScanEnginedirectory. This directory is called%service_dir%in this Help document. - Unpack the distribution kit contents to the
%service_dir%directory on your system. - Read the End User License Agreement (EULA) for Kaspersky Scan Engine. The EULA is located at
%service_dir%/doc/license.txt.If you agree to the terms of the EULA, proceed to the next step. If you decline the terms of the EULA, cancel the installation.
- Open file
%service_dir%/etc/klScanEngineUI.xml. - Accept the EULA. Change
<Common>rejected</Common>to<Common>accepted</Common>in theklScanEngineUI.xmlfile. - If you want to use Kaspersky Security Network (KSN), read the EULA for KSN and the Privacy Policy. This EULA is also located at
%service_dir%/doc/ksn_license.txtand contains the link to the Privacy Policy.If you agree to the terms of the EULA for KSN and the Privacy Policy, proceed to the next step. If you decline the terms of the EULA for KSN or the Privacy Policy, proceed to step 9.
- Accept the EULA for KSN. Change
<KSN>rejected</KSN>to<KSN>accepted</KSN>inklScanEngineUI.xml. - Save and close
%service_dir%/etc/klScanEngineUI.xml. - Create a symbolic link to
%service_dir%/etc/klScanEngineUI.xmlfrom the/etc/directory:ln -s
%service_dir%/etc/klScanEngineUI.xml /etc/klScanEngineUI.xml - If you want to use Kaspersky Scan Engine GUI, read subsection "Enabling Kaspersky Scan Engine GUI" below.
- Make a symbolic link to the proper Kaspersky Scan Engine configuration file from the
/etc/directory:- For HTTP mode, copy the
%service_dir%/etc/kavhttpd.xmlfile to the/etc/directory. - For ICAP mode, copy the
%service_dir%/etc/kavicapd.xmlfile to the/etc/directory.
For example, in HTTP mode you have to run the following command:
ln -s
%service_dir%/etc/kavhttpd.xml /etc/kavhttpd.xml - For HTTP mode, copy the
- Make a symbolic link to the proper Kaspersky Scan Engine init script from the
/etc/init.ddirctory:- For HTTP mode, copy the
%service_dir%/etc/init.d/kavhttpdfile to the/etc/init.ddirectory. - For ICAP mode, copy the
%service_dir%/etc/init.d/kavicapdfile to the/etc/init.ddirectory.
For example, in HTTP mode you have to run the following command:
ln -s
%service_dir%/etc/init.d/kavhttpd /etc/init.d/kavhttpd - For HTTP mode, copy the
- If you want Kaspersky Scan Engine to start automatically on system bootup, do the following:
- Go to the
/etc/init.d/directory. - Add the proper Kaspersky Scan Engine service to the system startup.
- For HTTP mode, run the following command:
- Red Hat-based distributions:
chkconfig --add kavhttpd- Debian-based distributions:
update-rc.d kavhttpd defaults - For ICAP mode, run the following command:
- Red Hat-based distributions:
chkconfig --add kavicapd- Debian-based distributions:
update-rc.d kavicapd defaults
- For HTTP mode, run the following command:
- Go to the
- Go to the next step of your "Getting started" section:
- For HTTP mode, see step 2 in section "Getting started with Kaspersky Scan Engine in HTTP mode".
- For ICAP mode, see step 2 in section "Getting started with Kaspersky Scan Engine in ICAP mode".
Enabling Kaspersky Scan Engine GUI
To enable Kaspersky Scan Engine GUI:
- Make sure that you have root (administrator) privileges.
- Perform the actions described in section "Preparing to install Kaspersky Scan Engine GUI".
- On the computer that has PostgreSQL installed, perform the actions listed below under a user that can create new users and databases. To perform these actions, you can use either the psql utility or pgAdmin.
- Create a new PostgreSQL user called
scanengine:CREATE USER scanengine; - Set the password for the
scanengineuser:ALTER USER scanengine WITH PASSWORD '%PASSWORD%'; - Using PostgreSQL, create a database called
kavebase:CREATE DATABASE kavebase OWNER scanengine; - In the
kavebasedatabase run the queries described in%service_dir%/samples/tables.sql.psql -d kavebase -a -f tables.sql
- Create a new PostgreSQL user called
- Open
/etc/klScanEngineUI.xml. - In the
<Mode>element, specify the mode that Kaspersky Scan Engine will work in:For HTTP mode:
<Mode>httpd</Mode>
For ICAP mode:
<Mode>icap</Mode>
- Change
<EnableUI>false</EnableUI>to<EnableUI>true</EnableUI>. - In the
<ConnectionString>element, specify the address of the Kaspersky Scan Engine GUI web service in %IP%:%port% format.For example:
<ConnectionString>198.51.100.0:443</ConnectionString>
- Specify the SSL certificate to install in the Kaspersky Scan Engine GUI web service.
- If you already have an SSL certificate that you want to install in the Kaspersky Scan Engine GUI web service, specify the paths to your certificate and your private key:
- In the
<SSLCertificatePath>element, specify the path to your SSL certificate. - In the
<SSLPrivateKeyPath>element, specify the path to your private key.
- In the
- If you do not have an SSL certificate that you want to install in the Kaspersky Scan Engine GUI web service, generate a new one. Run the
%service_dir%/tools/opensslutility as follows:
/opt/kaspersky/ScanEngine/tools/openssl req -x509 -nodes -days 1825 -subj /C=RU/CN="%СonnectionString%" -newkey rsa:2048 -extensions EXT -config "/opt/kaspersky/ScanEngine/tools/openssl.cnf" -keyout "/opt/kaspersky/ScanEngine/httpsrv/kl_scanengine_private.pem" -out "/opt/kaspersky/ScanEngine/httpsrv/kl_scanengine_cert.pem"
Here
%СonnectionString%is the value that is specified in the<ConnectionString>element. - If you already have an SSL certificate that you want to install in the Kaspersky Scan Engine GUI web service, specify the paths to your certificate and your private key:
- Encrypt the user name and password of the user that you specified in step 3. Kaspersky Scan Engine will use this user name and password to connect to the kavebase database.
To encrypt the credentials, use the kav_encrypt utility. This utility also automatically writes the encrypted user name and password to
klScanEngineUI.xml. The utility is located in the%service_dir%/tools/directory.Run the kav_encrypt utility with the following options:
-d '%USERNAME%:%PASSWORD%'
- In the
DatabaseSettings > ConnectionStringelement, specify the address of the kavebase database in format %IP%:%port%. - Save and close
/etc/klScanEngineUI.xml. - Make a symbolic link to
%service_dir%/etc/init.d/klScanEngineUIfrom/etc/init.d:ln -s
%service_dir%/etc/init.d/klScanEngineUI /etc/init.d/klScanEngineUI - If you want Kaspersky Scan Engine to start automatically on system bootup, do the following:
- Go to the
/etc/init.d/directory. - Add the Kaspersky Scan Engine GUI service to the system startup. Run the following command:
- Red Hat-based distributions:
chkconfig --add klScanEngineUI - Debian-based distributions:
update-rc.d klScanEngineUI defaults
- Red Hat-based distributions:
- Go to the
- Start Kaspersky Scan Engine GUI:
/etc/init.d/klScanEngineUI start
Installation using the installer (Windows)
This section explains how to install Kaspersky Scan Engine using the install.exe installer. You can use the install.exe installer if Kaspersky Scan Engine is not installed on your computer.
If you want to use Kaspersky Scan Engine together with Kaspersky Scan Engine GUI, you must have PostgreSQL installed on a computer that is accessible from the computer on which you install Kaspersky Scan Engine. Kaspersky Scan Engine GUI does not work without PostgreSQL.
To install Kaspersky Scan Engine using the installer:
- Unpack the distribution kit contents to an empty folder on your system.
- Make sure you have administrator privileges.
- Run
install.exe. - Read the End User License Agreement (EULA) for Kaspersky Scan Engine.
If you agree with the terms of the EULA, accept it. If you decline to accept the terms of the EULA, the installation will be canceled.
- Choose whether to use Kaspersky Scan Engine GUI.
- If you choose to use Kaspersky Scan Engine GUI, do the following:
- Perform the actions described in section "Installing and configuring PostgreSQL (Windows)".
- Specify the IP and port for connecting to PostgreSQL.
- Provide credentials for a user that has permissions for creating new databases and users. The credentials are not recorded anywhere.
With these credentials, Kaspersky Scan Engine will create a new database called kavebase in which Kaspersky Scan Engine will store its data, and a new PostgreSQL user called scanengine. From this moment on, Kaspersky Scan Engine will use the scanengine user to make changes to the database.
- Specify the IP address and port that Kaspersky Scan Engine will listen on for incoming requests to scan objects.
- Specify whether Kaspersky Scan Engine must use Kaspersky Security Network (KSN).
- If you choose to use KSN, read the EULA for KSN and the Privacy Policy.
If you agree with the terms of the EULA and the Privacy Policy, accept it. If you decline the terms of the EULA for KSN or the Privacy Policy, you will not be able to use KSN, but the installation will continue. You can enable KSN later by using Kaspersky Scan Engine GUI or the Kaspersky Scan Engine configuration file.
- If you choose to use Kaspersky Scan Engine GUI, specify the port on which Kaspersky Scan Engine GUI will be available, if necessary.
- Specify whether to use a proxy server.
- If you choose to use a proxy server, specify the proxy settings.
- Specify the directory for storing temporary files.
The installer will create the
scanenginesubdirectory in this directory; Kaspersky Scan Engine will use this subdirectory for storing temporary files. - Specify the licensing mode to be used in Kaspersky Scan Engine.
- For simplified licensing mode, specify the key file.
- For online licensing mode, specify the activation code.
- At the prompt, check the settings you have specified and modify them if necessary.
After you specify necessary data, install installs Kaspersky Scan Engine and then starts it. Kaspersky Scan Engine is installed to the %ProgramW6432%\Kaspersky Lab\ScanEngine folder.
Finally, the installer prints the summary information about the installation to the command line.
Page top
Manual installation (Windows)
This section describes how to manually install Kaspersky Scan Engine on Windows systems.
To install Kaspersky Scan Engine manually:
- Make sure that you have administrator privileges.
- Create the
%ProgramW6432%\Kaspersky Lab\ScanEnginefolder. This folder is called%service_dir%in this Help document. - Unpack the distribution kit contents to the
%service_dir%folder on your system. - Read the End User License Agreement (EULA) for Kaspersky Scan Engine. The EULA is located at
%service_dir%\doc\license.txt.If you agree to the terms of the EULA, proceed to the next step. If you decline the terms of the EULA, cancel the installation.
- Open file
%service_dir%\bin\klScanEngineUI.xml. - Accept the EULA. Change
<Common>rejected</Common>to<Common>accepted</Common>in the klScanEngineUI.xml file. - If you want to use Kaspersky Security Network (KSN), read the EULA for KSN and the Privacy Policy. This EULA is also located at %service_dir%\doc\ksn_license.txt and contains the link to the Privacy Policy.
If you agree to the terms of the EULA for KSN and the Privacy Policy, proceed to the next step. If you decline the terms of the EULA for KSN or the Privacy Policy, proceed to step 9.
- Accept the EULA for KSN. Change
<KSN>rejected</KSN>to<KSN>accepted</KSN>in klScanEngineUI.xml. - Save and close
%service_dir%\bin\klScanEngineUI.xml. - Open file
%service_dir%\bin\kavhttpd.xml. - At the
BasesPathand theTempPathelement specify the full path to the%service_dir%\bin\basesdirectory and to the directory that contains temporary files used by Kaspersky Scan Engine, respectively. Save and close the file. - If you want Kaspersky Scan Engine to start automatically on system bootup, do the following:
- In Windows, open a Command Prompt window as Administrator.
- Run the following command:
sc create "Kaspersky ScanEngine" binpath= "%service_dir%\bin\kavhttpd.exe -c %service_dir%\bin\kavhttpd.xml" start= auto DisplayName= "Kaspersky ScanEngine"Note that if the full path to the configuration file contains a space character, you have to add a quote mark (
") after the slash (\) mark. Example:C:\Program Files\Kaspersky Lab\ScanEngine\bin>sc create "Kaspersky ScanEngine" binpath= "C:\Program Files\Kaspersky Lab\ScanEngine\bin\kavhttpd.exe -c \"C:\Program Files\Kaspersky Lab\ScanEngine\bin\kavhttpd.xml\"" - Go to step 2 in section "Getting started with Kaspersky Scan Engine in HTTP mode".
Enabling Kaspersky Scan Engine GUI
To enable Kaspersky Scan Engine GUI:
- Make sure that you have administrator privileges.
- Perform the actions described in section "Installing and configuring PostgreSQL (Windows)".
- On the computer that has PostgreSQL installed, perform the actions listed below under a user that can create new users and databases. To perform these actions, you can use either the psql utility, or pgAdmin. If you use the psql utility, specify a space character and a user name after the
-Uparameter.- Create a new PostgreSQL user called
scanengine:CREATE USER scanengine; - Set the password for the
scanengineuser:ALTER USER scanengine WITH PASSWORD '%PASSWORD%'; - Using PostgreSQL, create a database called
kavebase:CREATE DATABASE kavebase OWNER scanengine; - In the
kavebasedatabase run the queries described in%service_dir%\samples\tables.sql.psql -d kavebase -a -f tables.sql
- Create a new PostgreSQL user called
- Open
%service_dir%\bin\klScanEngineUI.xml. - Change
<EnableUI>false</EnableUI>to<EnableUI>true</EnableUI>. - In the
<ConnectionString>element, specify the address of the Kaspersky Scan Engine GUI web service in%IP%:%port%format.For example:
<ConnectionString>198.51.100.0:443</ConnectionString>
- Specify the SSL certificate to install in the Kaspersky Scan Engine GUI web service.
- If you already have an SSL certificate that you want to install in the Kaspersky Scan Engine GUI web service, specify the paths to your certificate and your private key:
- In the
<SSLCertificatePath>element, specify the path to your SSL certificate. - In the
<SSLPrivateKeyPath>element, specify the path to your private key.
- In the
- If you do not have an SSL certificate that you want to install in the Kaspersky Scan Engine GUI web service, generate a new one. Run the
%service_dir%\tools\opensslutility as follows:
%service_dir%\tools\openssl.exe req -x509 -nodes -days 1825 -subj /C=RU/CN="%СonnectionString%" -newkey rsa:2048 -extensions EXT -config "%service_dir%\tools\openssl.cnf" -keyout "%service_dir%\httpsrv\kl_scanengine_private.pem" -out "%service_dir%\httpsrv\kl_scanengine_cert.pem"Here
%СonnectionString%is the value that is specified in the<ConnectionString>element. - If you already have an SSL certificate that you want to install in the Kaspersky Scan Engine GUI web service, specify the paths to your certificate and your private key:
- Encrypt the user name and password of the user that you specified in step 3. Kaspersky Scan Engine will use this user name and password to connect to the kavebase database.
To encrypt the credentials, use the kav_encrypt utility. This utility also automatically writes the encrypted user name and password to
klScanEngineUI.xml. The utility is located in the%service_dir%\tools\folder.Run the kav_encrypt utility with the following options:
-d %username%:%password%
- In the
DatabaseSettings > ConnectionStringelement, specify the address of the kavebase database in format%IP%:%port%. - Save and close
%service_dir%\bin\klScanEngineUI.xml. - If you want Kaspersky Scan Engine GUI to start automatically on system bootup, do the following:
- Open a Command Prompt window as Administrator.
- Run the following command:
sc create "Kaspersky ScanEngine UI" binpath= "%service_dir%\bin\klScanEngineUI.exe --svc" start= auto DisplayName= "Kaspersky ScanEngine UI"
- Start Kaspersky Scan Engine GUI
sc start "Kaspersky ScanEngine UI"
Using Kaspersky Scan Engine in HTTP mode
This chapter contains information about using Kaspersky Scan Engine in HTTP mode.
Kaspersky Scan Engine and HTTP mode
Hypertext Transfer Protocol (HTTP) is the standard communication protocol in the client-server computer model. In HTTP mode, Kaspersky Scan Engine operates as a REST-like service that receives HTTP requests in JSON or plain text format from client applications. The service scans objects passed in these requests, and sends back HTTP responses with scan results in JSON or plain text format.
In additional, a sample HTTP client source code is shipped in the distribution package. This sample HTTP client demonstrates how to make requests to Kaspersky Scan Engine in HTTP mode. You can also use the compiled sample to scan files from the command line.
Connection types
Kaspersky Scan Engine supports two connection types:
- TCP connection
- UNIX socket connection
For Linux systems only.
Scanning capabilities
Kaspersky Scan Engine supports the following scan modes:
scanfileIn this mode, the sample HTTP client passes file paths to Kaspersky Scan Engine, which reads the files and scans them.
scanmemoryIn this mode, the sample HTTP client passes file contents to Kaspersky Scan Engine, which scans the contents.
checkurlIn this mode, the sample HTTP client passes URLs to Kaspersky Scan Engine, which checks them for malicious and phishing addresses.
For more information, see section "Making requests in HTTP mode".
Page top
Configuring Kaspersky Scan Engine in HTTP mode
This section explains how to manually configure Kaspersky Scan Engine for use in HTTP mode without using Kaspersky Scan Engine GUI.
HTTP mode configuration file
The HTTP mode configuration file (hereinafter, also configuration file) is an XML file that specifies general settings for Kaspersky Scan Engine.
HTTP mode configuration file (Linux)
The Kaspersky Scan Engine distribution kit for LInux contains a %distr_kit%/etc/kavhttpd.xml configuration file.
After installing Kaspersky Scan Engine, you can copy kavhttpd.xml to your preferred location:
- If you copy
kavhttpd.xmlto the/etc/directory, Kaspersky Scan Engine automatically finds and parses this file. - If you copy
kavhttpd.xmlto a different location, you must set the path to this location when you start Kaspersky Scan Engine:- If you want to use the init script to start Kaspersky Scan Engine, see section "Running Kaspersky Scan Engine in HTTP mode with init script"
- If you want to use the systemd unit file to start Kaspersky Scan Engine, see section "Running Kaspersky Scan Engine in HTTP mode with systemd unit file"
- If you want to start Kaspersky Scan Engine from the command line manually, see section "Running Kaspersky Scan Engine in HTTP mode manually"
HTTP mode configuration file (Windows)
The Kaspersky Scan Engine distribution kit for Windows contains a %distr_kit%\bin\kavhttpd.xml configuration file.
Parameters of the HTTP mode configuration file
Most elements of the configuration file have default values that are used when the element is absent. Elements that are present in the configuration file must not be empty, unless stated otherwise.
ServerSettings
The following parameters specify Kaspersky Scan Engine settings:
MaxIncomingConnectionsNum—Specifies the maximum number of pending TCP connections to Kaspersky Scan Engine in HTTP mode. Extra connections may be dropped. This value must be an unsigned integer and cannot be0.The default value is
100. For more information aboutMaxIncomingConnectionsNum, see section "Setting up the connection queue in HTTP mode".MaxHTTPSessionsNum—Specifies the maximum number of active TCP connections that Kaspersky Scan Engine can maintain simultaneously. This value must be an unsigned integer.The default value is
10. If you setMaxHTTPSessionsNumto0, the default value is used. For more information aboutMaxHTTPSessionsNum, see section "Setting up the connection queue in HTTP mode".MaxTCPFileSize—Specifies the maximum allowed size (in bytes) of the headers and bodies of the HTTP messages that are passed to Kaspersky Scan Engine. This value must be an unsigned integer.It is recommended to specify at least 100 KB for the headers.
The default value is
104857600(100 MB). If you setMaxTCPFileSizeto0, the default value is used.ConnectionString—Specifies the IP address and the port for Kaspersky Scan Engine, or a path to the UNIX socket used by Kaspersky Scan Engine. This is a string value.ConnectionString—Mandatory parameter. The default value is/tmp/.kavhttpdin Linux and127.0.0.1:9999in Windows. You can specify an IP address and a port for a TCP connection in the following format:ip_addr:port.SessionTimeout—Specifies the timeout for processing the request and sending the response, in milliseconds (ms). This value must be an unsigned integer.The default value is
1000. If you setSessionTimeoutto0, the default value is used. For more information on setting the session timeout, see section "Setting the session timeout".Flags—Specifies the initialization options for Kaspersky Scan Engine. Initialization options are defined by a combination of flags separated by pipes (|).This is a string value.
Possible values:
KAV_SHT_ENGINE_KLAVEnable KLAV anti-virus engine.
If you set this flag, you do not have to specify the
KAV_SHT_ENGINE_KLAVEMUflag. Enabling the KLAV Engine automatically turns on the KLAV emulator.KAV_SHT_ENGINE_KLAVEMUEnable the advanced heuristic anti-virus engine (KLAV emulator). Add this flag if you want to use heuristics.
KAV_SHT_ENGINE_WMUFEnable detection of malicious websites.
KAV_SHT_ENGINE_APUFUse phishing protection.
KAV_SHT_ENGINE_KSNUse KSN to check the reputation of files and URLs.
Before specifying the
KAV_SHT_ENGINE_KSNflag, make sure that your key file allows you to use this functionality and that you accepted the terms of the EULA for KSN.KAV_SHT_ENGINE_STATISTIC_MAILSubmit statistical information to KSN in Linux.
Before specifying the
KAV_SHT_ENGINE_STATISTIC_MAILflag, make sure that your key file allows you to use this functionality.KAV_SHT_ENGINE_STATISTICSubmit statistical information to KSN in Windows.
Before specifying the
KAV_SHT_ENGINE_STATISTICflag, make sure that your key file allows you to use this functionality.
Notice that by enabling the
KAV_SHT_ENGINE_KSN,KAV_SHT_ENGINE_STATISTIC_MAIL, orKAV_SHT_ENGINE_STATISTICflags, you agree to transfer data, described in the corresponding About data provision*.txt file to Kaspersky Lab. For more information about the procedure of data provisioning, see section "About data provisioning". For information about statistics that can be submitted to KSN, see section "Statistics submitted to KSN".
KSNSettings
The following parameters specify KSN settings:
UrlCheckTimeoutMs—Specifies the maximum time that Kaspersky Scan Engine waits for a response from KSN when running reputation checks for URLs (in milliseconds). This value must be an unsigned integer and cannot be0.The default value is
20000.Notice that this parameter only sets the timeout for reputation checks in KSN. This timeout does not include the time required for sending a scan request and receiving a reputation status from KSN.
This timeout can be exceeded if KSN finds that the reputation status of the scanned file is Danger.ObjectCheckOnDemandTimeoutMs—Specifies the timeout for a response from KSN when running reputation checks for files (in milliseconds). This value must be an unsigned integer and cannot be0.The default value is
10000.Notice that this parameter only sets the timeout for reputation checks in KSN. This timeout does not include time required for sending a scan request and receiving a reputation status from KSN.
This timeout can be exceeded if KSN finds that the reputation status of the scanned file is Danger.CacheSizeKb—Specifies the maximum size of the KSN status cache (in kilobytes). This cache is used by Kaspersky Scan Engine to store scan results obtained from KSN.This value must be an unsigned integer. If the value of this parameter is
0, the KSN status cache is not used. The maximum value is262143. The default value is30720.
KAVScanningSettings
The following parameters specify scanning settings for KAV SDK, which is a part of Kaspersky Scan Engine:
ScannersCount—Specifies the number of scanning processes. You can have up to 256 scanning processes. This value must be an unsigned integer and cannot be0.The default value is
16.ThreadsCount—Specifies the maximum number of simultaneously running scanning threads. You can have up to 256 scanning threads. This value must be an unsigned integer and cannot be0.The default value is is
16.QueueLen—Specifies the maximum length of the queue for scan tasks. This value must be an unsigned integer and cannot be0.The default value is
1024.Flags—Specifies a scanning mode.A scanning mode is defined by a combination of flags separated by pipes (
|). This is a string value.Possible values:
KAV_O_M_PACKEDScan compressed executable files.
KAV_O_M_ARCHIVEDScan archived files.
KAV_O_M_MAILBASESScan email database files.
KAV_O_M_MAILPLAINScan email messages.
KAV_O_M_HEURISTIC_LEVEL_SHALLOW
Set the scanning level of the advanced heuristic code analyzer to shallow (the Low level in the graphical user interface).
KAV_O_M_HEURISTIC_LEVEL_MEDIUMSet the scanning level of the advanced heuristic code analyzer to
medium(the Medium level in the graphical user interface).KAV_O_M_HEURISTIC_LEVEL_DETAILSet the scanning level of the advanced heuristic code analyzer to
detailed(the High level in the graphical user interface).KAV_O_M_MSOFFICE_MACRONotify the user if a Microsoft Office document file contains a macro.
This element can be empty. In this case, the value of 0 is used.
The default value is KAV_O_M_PACKED | KAV_O_M_ARCHIVED | KAV_O_M_MAILBASES | KAV_O_M_MAILPLAIN | KAV_O_M_HEURISTIC_LEVEL_DETAIL.
Mode—Specifies a cleaning mode.This is a string value. This is a mandatory parameter.
Possible values:
KAV_SKIPIf malware is detected while scanning an object, Kaspersky Scan Engine will not try to disinfect or delete the object. The infected object will be skipped.
Specify this value if you want to use scanmemory mode.
KAV_DELETEIf malware is detected while scanning an object, Kaspersky Scan Engine will try to delete the object. If deletion is not possible, the infected object will be skipped.
KAV_CLEAN_DELETEIf malware is detected while scanning an object, Kaspersky Scan Engine will try to disinfect the object. If the disinfection attempt fails, or disinfection is not possible for specific malware, the object will be deleted. If deletion is not possible, the infected object will be skipped.
KAV_CLEAN_SKIPIf malware is detected while scanning an object, Kaspersky Scan Engine will try to disinfect the object. If the disinfection attempt fails, the infected object will be skipped.
The default value is
KAV_SKIP.
DirectorySettings
The following parameters specify directory settings for KAV SDK, which is a part of Kaspersky Scan Engine:
BasesPath—Specifies a directory where the database is located. This is a string value.This is a mandatory parameter.
Notice that in Windows systems you have to specify a full path to the directory where the database is located.
TempPath—Specifies a directory where the files created at runtime are stored. The path must be absolute. This is a string value.This is a mandatory parameter.
Do not delete any files from this directory.
LicensePath—Specifies a directory where the application ID file, the licensing file, and the key file are stored. This is a string value.KAV SDK looks for these files in the following directories:
- The directory that is specified in
LicensePath. - The directory that contains the
kavhttpdexecutable file. - The
%service_dir%/ppldirectory. For Linux systems only.
This is a mandatory parameter.
- The directory that is specified in
LicensingMode—Specifies the licensing mode used in Kaspersky Scan Engine.Possible values:
The default value is
1.ScanningPaths—Contains paths to the locations where scanning over TCP socket is allowed when a HTTP client sends scan requests from a remote computer. Specify these locations to prevent a remote HTTP client from accidentally scanning the whole filesystem on the computer where Kaspersky Scan Engine is installed.ScanningPath—Specifies a location where scanning over TCP socket in scanfile mode is allowed.Possible values:
- Absolute paths to a directory
Allow to scan files that are located inside this directory and all its subdirectories.
The directory must be located on the same computer as Kaspersky Scan Engine or on a remote hard disk mounted on that computer.
The path must start from the root directory of the computer that Kaspersky Scan Engine is installed on.
The kavhttpd service must have permissions to read files in the directory and its subdirectories.
- Absolute path to a file
Allow to scan the specified file.
The file must be located on the same computer as Kaspersky Scan Engine or on a remote hard disk mounted on that computer.
The path must start from the root directory of the computer that Kaspersky Scan Engine is installed on.
The kavhttpd service must have permissions to read the file.
/(forward slash)Allow to scan all files.
For Linux systems only.
- Absolute paths to a directory
Each path is specified inside its own <
ScanningPath>element.
UseHTTPProxy and HTTPProxy
The following parameters specify proxy server settings for KAV SDK, which is a part of Kaspersky Scan Engine. In the current version of KAV SDK, only the HTTP proxy type is supported.
UseHTTPProxy—Specifies whether Kaspersky Scan Engine uses a proxy server when connecting to the Internet. This value can be set to0or1.The default value is
0(proxy server is not used). To enable using a proxy server, set this value to1.HTTPProxy—Contains proxy settings.url—Address of the proxy server. This is a string value.The value of this parameter can be an IPv4 address, an IPv6 address, or a domain name. Do not specify the protocol (
http://orhttps://) in this parameter.If
UseHTTPProxyis set to1, this parameter is mandatory.port—Port of the proxy server. This value must be an unsigned integer and cannot be0.The default value is
3128.user—Encrypted user name for the proxy server authentication. The user name is encrypted by thekav_encryptutility. This is a string value.If
UseHTTPProxyis set to1, this parameter is mandatory.pass—Encrypted password for the proxy server authentication. The password is encrypted by thekav_encryptutility. This is a string value.If
UseHTTPProxyis set to1, this parameter is mandatory.
UpdateSettings
The following parameters specify update settings for Kaspersky Scan Engine. For more information, see section "Configuring updating in HTTP mode".
DisableBackup—Defines whether the database backup is disabled. This value can be set to0or1.If this parameter is
1, database backup is disabled.The default value is
0.UpdatePeriodMinutes—Specifies automatic update interval (in minutes). This value must be an unsigned integer.The maximum value is
44640.If this parameter is
0, Kaspersky Scan Engine does not perform automatic updates.The default value is
0.UseOnlyCustomSources—Specify whether the default update sources are used. This value can be set to0or1.If this parameter is
1, only the custom update sources are used.The default value is
0.UpdateSources—Contains custom update sources.Source—Specifies a custom update source. This is a string value.
Each update source is specified inside its own
<Source>element. For an example of this, see section "Configuring updating in HTTP mode", subsection "Specifying custom database update sources".
FormatRecognizerSettings
The following parameters specify Format Recognizer settings.
FormatsToSkipScanning—Specifies which file formats must not be scanned by Kaspersky Scan Engine in HTTP mode.To disable the format skipping functionality, remove the
FormatRecognizerSettingssection from the configuration file or leave theFormatsToSkipScanninglist empty.
Structure of the configuration file
Following is an example of the HTTP mode configuration file.
<Configuration>
<ServerSettings> <ConnectionString>/tmp/.kavhttpd</ConnectionString> <MaxIncomingConnectionsNum>100</MaxIncomingConnectionsNum> <MaxHTTPSessionsNum>50</MaxHTTPSessionsNum> <MaxTCPFileSize>100</MaxTCPFileSize> <SessionTimeout>1000</SessionTimeout> <Flags> </ServerSettings>
<KSNSettings> <UrlCheckTimeoutMs>20000</UrlCheckTimeoutMs> <ObjectCheckOnDemandTimeoutMs>10000</ObjectCheckOnDemandTimeoutMs> <CacheSizeKb>30720</CacheSizeKb> </KSNSettings>
<KAVScanningSettings> <ScannersCount>16</ScannersCount> <ThreadsCount>32</ThreadsCount> <QueueLen>1028</QueueLen> <Flags>KAV_O_M_PACKED | KAV_O_M_ARCHIVED | KAV_O_M_MAILBASES | KAV_O_M_MAILPLAIN | KAV_O_M_HEURISTIC_LEVEL_DETAIL</Flags> <Mode>KAV_SKIP</Mode> </KAVScanningSettings>
<DirectorySettings> <BasesPath>/home/bases</BasesPath> <TempPath>/home/temp</TempPath> <LicensePath>/home/license</LicensePath> <LicensingMode>1</LicensingMode> <ScanningPaths> <ScanningPath></ScanningPath> </ScanningPaths> </DirectorySettings>
<UseHTTPProxy>1</UseHTTPProxy>
<HTTPProxy> <url>myproxy.mycompany.com</url> <port>3128</port> <user>proxyuser</user> <pass>proxypass</pass> </HTTPProxy>
<UpdateSettings> <DisableBackup>0</DisableBackup> <UpdatePeriodMinutes>0</UpdatePeriodMinutes> <UseOnlyCustomSources>0</UseOnlyCustomSources> <UpdateSources> <Source>[update source]</Source> </UpdateSources> </UpdateSettings>
<FormatRecognizerSettings> <FormatsToSkipScanning> <KAV_FF_GENERAL_TXT/> <KAV_FF_GENERAL_CSV/> <KAV_FF_AUDIO_WMA/> </FormatsToSkipScanning> </FormatRecognizerSettings>
</Configuration> |
Configuring Format Recognizer
Format Recognizer is a component that can be used in Kaspersky Scan Engine to recognize and skip files of certain formats during the scanning process. Skipping files increases the processing speed of Kaspersky Scan Engine in HTTP mode.
Enabling Format Recognizer
To enable Format Recognizer:
- In the HTTP mode configuration file, locate the
FormatRecognizerSettingssection.If this section is missing, add it manually as follows:
<FormatRecognizerSettings>
...
</FormatRecognizerSettings>
- Within this section, in the
FormatsToSkipScanninglist, specify which file formats must not be scanned by Kaspersky Scan Engine, as follows:<FormatRecognizerSettings>
<FormatsToSkipScanning>
<KAV_FF_GENERAL_TXT/>
...
<KAV_FF_AUDIO_WMA/>
</FormatsToSkipScanning>
</FormatRecognizerSettings>
- For the changes to take effect, restart the kavhttpd service with the following command:
- On Linux:
/etc/init.d/kavhttpd restart - On Windows:
net stop "Kaspersky ScanEngine"net start "Kaspersky ScanEngine"
- On Linux:
Format Recognizer will start recognizing and skipping files of the formats specified in the FormatsToSkipScanning list. Kaspersky Scan Engine will not scan the skipped files, which will increase its processing speed.
Disabling Format Recognizer
To disable Format Recognizer:
- In the HTTP mode configuration file, remove the
FormatRecognizerSettingssection or leave theFormatsToSkipScanninglist empty. - For the changes to take effect, restart the kavhttpd service with the following command:
- On Linux:
/etc/init.d/kavhttpd restart - On Windows:
net stop "Kaspersky ScanEngine"net start "Kaspersky ScanEngine"
- On Linux:
Recognizable file formats
This group of constants defines file formats that can be recognized by Format Recognizer.
Text formats
KAV_FF_GENERAL_TXTKAV_FF_GENERAL_CSVKAV_FF_GENERAL_HTMLKAV_FF_GENERAL_HTML_STRICT
Multimedia formats
KAV_FF_VIDEO_FLVKAV_FF_VIDEO_F4VKAV_FF_VIDEO_AVIKAV_FF_VIDEO_3GPPKAV_FF_VIDEO_DIVXKAV_FF_VIDEO_MKVKAV_FF_VIDEO_MOVKAV_FF_VIDEO_ASFKAV_FF_VIDEO_RMKAV_FF_VIDEO_VOBKAV_FF_VIDEO_BIKKAV_FF_VIDEO_RTMPKAV_FF_AUDIO_MP3KAV_FF_AUDIO_FLACKAV_FF_AUDIO_APEKAV_FF_AUDIO_OGGKAV_FF_AUDIO_AACKAV_FF_AUDIO_WMAKAV_FF_AUDIO_AC3KAV_FF_AUDIO_WAVKAV_FF_AUDIO_MKAKAV_FF_AUDIO_RAKAV_FF_AUDIO_MIDIKAV_FF_AUDIO_CDAKAV_FF_IMAGE_JPEGKAV_FF_IMAGE_GIFKAV_FF_IMAGE_PNGKAV_FF_IMAGE_BMPKAV_FF_IMAGE_TIFFKAV_FF_IMAGE_EMFKAV_FF_IMAGE_EPSKAV_FF_IMAGE_PSDKAV_FF_IMAGE_CDRKAV_FF_MULTIMEDIA_SWF
Executable formats
Format |
Description |
Operating system |
Extensions |
|---|---|---|---|
|
32-bit executable files (exe only) |
32-bit Windows systems |
exe |
|
Executable files of programs with a user interface, and executable files for the Microsoft POSIX subsystem |
32-bit Windows systems |
exe |
|
Dynamic libraries |
32-bit Windows systems |
dll, ocx, scr |
|
Resource-only libraries |
32-bit Windows systems |
dll |
|
|
|
|
|
Executable files that contain only Common Intermediate Language (CIL) |
32-bit Windows systems |
exe, dll, ocx, scr |
|
Common Intermediate Language libraries |
32-bit Windows systems |
exe, dll, ocx, scr |
|
32-bit executable files |
32-bit Windows systems |
exe, dll, ocx, scr |
|
System files |
32-bit Windows systems |
sys |
|
.NET resource-only libraries (may contain trivial code) |
32-bit Windows systems |
dll |
|
Executable files that are not based on a Win32 or Win64 API |
16-bit Windows systems, DOS, OS/2 |
exe, dll |
|
New Executable (NE) resource-only libraries |
16-bit Windows systems, DOS, OS/2 |
exe, dll |
|
|
|
|
|
|
|
|
|
|
|
|
|
|
|
|
|
|
|
|
|
|
|
|
|
|
|
|
|
|
|
|
|
|
|
|
|
|
|
|
|
|
|
|
|
|
|
|
|
|
|
|
|
|
|
|
|
|
|
|
|
|
|
|
Office suite formats
KAV_FF_OFFICE_OPENXMLKAV_FF_OFFICE_MSOFFICE_MACROKAV_FF_OFFICE_MSOFFICEKAV_FF_OFFICE_RTFKAV_FF_OFFICE_PDFKAV_FF_OFFICE_MSGKAV_FF_OFFICE_EMLKAV_FF_OFFICE_VSDKAV_FF_OFFICE_VDXKAV_FF_OFFICE_XPSKAV_FF_OFFICE_ONEKAV_FF_OFFICE_ONEPKGKAV_FF_OFFICE_XSNKAV_FF_OFFICE_ODTKAV_FF_OFFICE_ODSKAV_FF_OFFICE_ODPKAV_FF_OFFICE_SXWKAV_FF_MSOFFICE_DOCKAV_FF_MSOFFICE_DOTKAV_FF_MSOFFICE_DOCXKAV_FF_MSOFFICE_DOTXKAV_FF_MSOFFICE_DOCMKAV_FF_MSOFFICE_DOTMKAV_FF_MSOFFICE_XLSKAV_FF_MSOFFICE_XLSXKAV_FF_MSOFFICE_XLTXKAV_FF_MSOFFICE_XLSMKAV_FF_MSOFFICE_XLTMKAV_FF_MSOFFICE_XLAMKAV_FF_MSOFFICE_XLSBKAV_FF_MSOFFICE_PPTKAV_FF_MSOFFICE_PPTXKAV_FF_MSOFFICE_POTXKAV_FF_MSOFFICE_PPTMKAV_FF_MSOFFICE_POTMKAV_FF_MSOFFICE_PPSXKAV_FF_MSOFFICE_PPSMKAV_FF_MSOFFICE_PUBKAV_FF_MSOFFICE_SCRAP
Database files
KAV_FF_DATABASE_MDBKAV_FF_DATABASE_ACCDBKAV_FF_DATABASE_ACCDC
Archive files
KAV_FF_ARCHIVE_ZIPKAV_FF_ARCHIVE_7ZKAV_FF_ARCHIVE_RARKAV_FF_ARCHIVE_ISOKAV_FF_ARCHIVE_CABKAV_FF_ARCHIVE_JARKAV_FF_ARCHIVE_BZIP2KAV_FF_ARCHIVE_GZIPAV_FF_ARCHIVE_ARJKAV_FF_ARCHIVE_DMGKAV_FF_ARCHIVE_XARKAV_FF_ARCHIVE_TARKAV_FF_ARCHIVE_ACE
Web archive files
KAV_FF_TEXT_CHMKAV_FF_TEXT_MHTKAV_FF_TEXT_REG
Miscellaneous
KAV_FF_CRYPTO_CAT
Setting up the connection queue in HTTP mode
The connection queue contains pending connections to Kaspersky Scan Engine. By configuring the connection queue, you can influence the performance of Kaspersky Scan Engine in HTTP mode. This section explains how to configure the connection queue.
Three parameters allow you to configure the connection queue: MaxHTTPSessionsNum, MaxIncomingConnectionsNum, and ThreadsCount. These parameters can be set in the HTTP mode configuration file.
MaxHTTPSessionsNum
This parameter specifies the maximum number of active TCP connections that Kaspersky Scan Engine can maintain simultaneously. When a TCP connection with a client closes, Kaspersky Scan Engine can accept another connection in its place.
MaxIncomingConnectionsNum
This parameter specifies the maximum number of pending TCP connections to Kaspersky Scan Engine. If the number of pending connections reaches MaxIncomingConnectionsNum, additional connections may be dropped.
ThreadsCount
This parameter specifies the maximum number of simultaneously running scan threads. When a scan thread completes a scanning task, it picks up another one from the scan queue.
Examples of the connection queue configuration
These examples show how you can use the connection queue to influence the behavior of Kaspersky Scan Engine.
- Kaspersky Scan Engine without a connection queue
Consider the following example: the value of
MaxIncomingConnectionsNumis16, the value ofThreadsCountis16, and the value ofMaxHTTPSessionsNumis50. In this example, Kaspersky Scan Engine can accept only16connections at a time, but becauseMaxHTTPSessionsNumis50, their scan tasks are accepted immediately. Additional connections may be dropped. Sixteen scan threads is usually enough to process scan tasks from 16 clients quickly, so the scan queue will be short. - Kaspersky Scan Engine with a connection queue
Consider the following example: the value of
MaxIncomingConnectionsNumis100, the value ofThreadsCountis16, and the value ofMaxHTTPSessionsNumis50. In this example, Kaspersky Scan Engine can accept50connections at a time. Kaspersky Scan Engine starts processing scan tasks from some of these clients in16scan threads, and the rest of the scan tasks form the scan queue. Other pending connections form the connection queue and wait to be accepted. Additional connections may be dropped.
Setting the session timeout
There are two parameters that affect the session timeout: the SessionTimeout parameter of the HTTP mode configuration file and the X-KAV-Timeout request header. This section explains how to configure the session timeout for Kaspersky Scan Engine in HTTP mode by using these two values.
SessionTimeout
This parameter of the configuration file sets the maximum time that Kaspersky Scan Engine can spend on receiving a scan request for an object and on processing this request (scanning operation), in milliseconds. This timeout is valid for all objects sent to Kaspersky Scan Engine.
Consider the following example: the value of SessionTimeout is set to 4000 (four seconds), and the request does not contain the X-KAV-Timeout header. Kaspersky Scan Engine spends one second on receiving the request. Then Kaspersky Scan Engine spends the remaining three seconds on scanning.
X-KAV-Timeout
This header sets the time that Kaspersky Scan Engine can spend on a scanning operation (in milliseconds), regardless of the value of the SessionTimeout parameter.
The range of values for this parameter is from 0 to 4294967295 (an unsigned 32-bit integer).
Consider the following example: the value of SessionTimeout is set to 4000 (four seconds), and the value of X-KAV-Timeout is set to 10000 (10 seconds). Kaspersky Scan Engine spends one second on receiving the request. Then Kaspersky Scan Engine spends 10 seconds (which is the value of X-KAV-Timeout) on scanning.
If SessionTimeout is exceeded during the reception of the request, the session is closed, regardless of the value of X-KAV-Timeout.
Consider the following example: the value of SessionTimeout is set to 4000 (four seconds), and the value of X-KAV-Timeout is set to 10000 (10 seconds). Kaspersky Scan Engine spends four seconds on receiving the request, and the session is closed because SessionTimeout is exceeded.
You can choose the value of X-KAV-Timeout on the basis of the size of the files that you want to scan. For example, Kaspersky Scan Engine could require 10 seconds to scan a large file, or 0.1 seconds to scan a small one.
Changing variables in the HTTP mode init script (Linux)
For Linux systems only.
You can configure Kaspersky Scan Engine by changing one or more variables in the init script located at /etc/init.d/kavhttpd.
SDKPATH—Specifies the directory where Kaspersky Scan Engine is located. The default value is/opt/kaspersky/ScanEngine.CONFILE—Specifies the name and the location of the HTTP mode configuration file. The default value is/etc/kavhttpd.xml.PIDFILE—Specifies the name and the location of the PID file. The default value is/var/run/kavhttpd.pid.The script adds a
-poption to the command line when launching the Kaspersky Scan Engine binary file.PROGNAME—Specifies the name of the Kaspersky Scan Engine binary file. The default value iskavhttpd.USE_WATCHDOG—Specifies whether monitoring is enabled or disabled. The default value is0(monitoring is disabled). To enable monitoring, specify1.For more information about monitoring, see section "Monitoring Kaspersky Scan Engine in HTTP mode".
Changing variables in the HTTP mode unit file (Linux)
For Linux systems only.
You can configure Kaspersky Scan Engine by changing one or more variables in its unit file, %distr_kit%/etc/kavhttpd.service.
Changing the path to the Kaspersky Scan Engine PID file
You can change this variable if you want to create a PID file of Kaspersky Scan Engine in a directory other than /var/run/kavhttpd.pid.
The following example shows how this variable is set in the unit file:
PIDFile=/var/run/kavhttpd.pid |
Changing environment variables
You must change these environment variables if Kaspersky Scan Engine is located in a directory other than /opt/kaspersky/ScanEngine.
The unit file uses the following environment variables:
SDKPATH—Specifies the directory where Kaspersky Scan Engine is located. The following example shows how this variable is set in the unit file:Environment=SDKPATH=/opt/kaspersky/ScanEngine
KL_PLUGINS_PATH—Specifies the path to the directory containing the PPL plugin files used by Kaspersky Scan Engine. The following example shows how this variable is set in the unit file:Environment=KL_PLUGINS_PATH=/ppl
LD_LIBRARY_PATH—Specifies the path to the directory containing shared libraries used by Kaspersky Scan Engine. The following block shows how this variable is set in the unit file:Environment=LD_LIBRARY_PATH=/lib:/ppl
Changing paths in the command executed on kavhttpd startup
You must change paths in the command executed on kavhttpd startup if you put the kavhttpd executable file or the HTTP mode configuration file in directories different from the ones specified in the unit file, or if you want to create a PID file of Kaspersky Scan Engine in a directory other from /var/run/kavhttpd.pid.
The following example shows how this command is set in the unit file:
ExecStart=/bin/sh -c 'cd ${SDKPATH}/bin; ./kavhttpd -c /etc/kavhttpd.xml -p /var/run/kavhttpd.pid' |
Configuring updating in HTTP mode
This section explains how to configure updating in Kaspersky Scan Engine.
Specifying the update settings
Kaspersky Scan Engine uses update settings stored in the HTTP mode configuration file. Set the necessary update settings in kavhttpd.xml before starting Kaspersky Scan Engine. For descriptions of all configuration file elements, see section "HTTP mode configuration file".
Specifying custom database update sources
Kaspersky Scan Engine updates the anti-virus database from database update sources. A database update source used by Kaspersky Scan Engine can be either default or custom. The default update sources are Kaspersky Lab update servers.
You can use the default update sources, custom update sources, or both.
To specify custom update sources:
- Specify custom update sources in the
UpdateSourceselement of the kavhttpd.xml configuration file. Use a separateSourceelement for each source.To use a local directory, specify an absolute path. To use a network location, specify a URL, including the protocol. The supported protocols are HTTP and FTP.
The following example shows two update sources:
<UpdateSources>
<Source>http://example1.com/updates/</Source>
<Source>http://example2.com/updates/</Source>
</UpdateSources>
- If you want to use only custom sources, set the
UseOnlyCustomSourcesparameter of kavhttpd.xml to1.If
UseOnlyCustomSourcesis0, Kaspersky Scan Engine uses default sources together with custom sources. In this case, Kaspersky Scan Engine first looks for updates in custom update sources.
The settings that you specified will be used after the kavhttpd service is started or restarted.
Configuring database backup
Database backup is a mechanism that protects Kaspersky Scan Engine from possible faults caused by the database update process.
By default, database backup is enabled. Kaspersky Scan Engine creates database backup copies automatically during updates. Make sure that your hard disk has enough free space for a full copy of the database.
To disable database backup,
Set the DisableBackup parameter in kavhttpd.xml to 1.
The setting that you specified will be used after the kavhttpd service is started or restarted.
Establishing connections to update sources
Kaspersky Scan Engine uses the connection settings defined in kavhttpd.xml to connect to update sources. For more information about how to configure connection settings, see section "HTTP mode configuration file".
Scheduling automatic database updates
If you want to update the database at regular intervals, use automatic updates.
By default, automatic updates are disabled.
To set up automatic updates:
- Set the
UpdatePeriodMinutesparameter in kavhttpd.xml to the required update interval (in minutes). - Restart the
kavhttpdservice.
Kaspersky Scan Engine will perform updates automatically.
For information on how to manually update the database, see section "Updating the anti-virus database in HTTP mode".
Page top
Running Kaspersky Scan Engine in HTTP mode
This section explains how to run Kaspersky Scan Engine in HTTP mode.
Running Kaspersky Scan Engine in HTTP mode manually
You can run the kavhttpd service by manually executing the kavhttpd binary file.
The following options are available when the kavhttpd service is run manually:
Options for running the kavhttpd binary file
Parameter |
Description |
|---|---|
|
Optional parameter. Specifies the path to the HTTP mode configuration file. The path can be absolute or relative. Relative path is specified relative to the current working directory. The default path to the configuration file is |
|
For Linux systems only. Optional parameter. Specifies the path to the PID file. The path can be absolute or relative. Relative path is specified relative to the current working directory. |
|
For Linux systems only. Optional parameter. Runs the kavhttpd service in watchdog mode. In this mode, the kavhttpd service automatically restarts if it freezes or crashes. |
|
For Windows systems only. Adds the kavhttpd service to the list of Windows services. The name of the service is |
|
For Windows systems only. Deletes the kavhttpd service from the list of Windows services. |
|
Optional parameter. Shows the Kaspersky Scan Engine version. |
|
Optional parameter. Shows Help. |
Running Kaspersky Scan Engine in HTTP mode with init script (Linux)
For Linux systems only.
The init script is located at %distr_kit%/etc/init.d/kavhttpd. You can run it from the command line to manage Kaspersky Scan Engine.
Starting Kaspersky Scan Engine automatically
To start Kaspersky Scan Engine automatically, add kavhttpd to the service startup list.
To add kavhttpd to the service startup list:
- If you use Security-Enhanced Linux (SELinux) in
enforcingmode, change the mode before proceeding:- Open
/etc/selinux/configfor editing. - Locate the line that contains the
SELINUXvariable:SELINUX=enforcing - Set the value of the
SELINUXvariable topermissiveordisabled:SELINUX=permissive - Save and close the
/etc/selinux/configconfiguration file.
- Open
- Copy the HTTP mode init script to the directory that contains init scripts. The location of this directory may vary depending on the operating system, but usually it is
/etc/init.d. - If necessary, edit the init script.
- Add the
kavhttpdservice to the service startup list. The exact method may vary depending on the operating system. - Verify that
kavhttpdhas been added successfully. - Restart the system for the configuration to take effect.
Starting Kaspersky Scan Engine
To start Kaspersky Scan Engine, run the init script with the start parameter, as follows:
/etc/init.d/kavhttpd start Starting kavhttpd: [ OK ] |
After Kaspersky Scan Engine is started, it listens for incoming requests from client applications.
Stopping Kaspersky Scan Engine
To stop Kaspersky Scan Engine, run the init script with the stop parameter:
/etc/init.d/kavhttpd stop Stopping kavhttpd: [ OK ] |
Restarting Kaspersky Scan Engine
To restart Kaspersky Scan Engine, run the init script with the restart parameter:
/etc/init.d/kavhttpd restart Stopping kavhttpd: [ OK ] Starting kavhttpd: [ OK ] |
Reloading the anti-virus database used by Kaspersky Scan Engine
To reload the anti-virus database used by Kaspersky Scan Engine, run the init script with the reloaddb parameter.
/etc/init.d/kavhttpd reloaddb Reload databases kavhttpd: [ OK ] |
Updating the anti-virus database used by Kaspersky Scan Engine
To update the anti-virus database used by Kaspersky Scan Engine, run the init script with the updatedb parameter.
/etc/init.d/kavhttpd updatedb Update databases kavhttpd: [ OK ] |
Getting the Kaspersky Scan Engine status
To get the status of Kaspersky Scan Engine, run the init script with the status parameter.
/etc/init.d/kavhttpd status kavhttpd (pid 12892) is running... |
Running Kaspersky Scan Engine in HTTP mode with systemd unit file (Linux)
For Linux systems only.
You can run the Kaspersky Scan Engine by using the kavhttpd service unit file for systemd. The unit file allows you to add the kavhttpd service to the service startup list and to manage the service manually from the command line.
This section assumes that you want to add the kavhttpd service for all users. For information on how to add and manage a service under a specific user, please see the official documentation for systemd and systemctl.
Starting Kaspersky Scan Engine automatically
To start Kaspersky Scan Engine automatically, add kavhttpd to the service startup list.
To add kavhttpd to the service startup list:
- Place the
kavhttpdunit file in the/etc/systemd/system/directory. - If necessary, edit the unit file.
- Reload
systemdby running the following command:systemctl daemon-reload
- Make sure that the
kavhttpdunit file is installed by running the following command:systemctl list-unit-files
- Enable kavhttpd to launch when the system starts by running the following command:
systemctl enable kavhttpd.service
Remove Kaspersky Scan Engine from the service startup list
To remove kavhttpd from the service startup list, run the following command:
systemctl disable kavhttpd.service |
Managing Kaspersky Scan Engine with systemd from the terminal
To start kavhttpd without rebooting the computer, run the following command:
systemctl start kavhttpd |
After this command is executed, the script prints the [OK] message and immediately returns control to the terminal, but it will take the kavhttpd service some time to start.
To stop kavhttpd without rebooting the computer, run the following command:
systemctl stop kavhttpd |
To reload the anti-virus database, run the following command:
systemctl reload kavhttpd |
Running Kaspersky Scan Engine in HTTP mode as service (Windows)
If you registered the kavehttpd as a Windows service, you can start it from the command line by using the following commands:
- If you installed Kaspersky Scan Engine by using the installer or registered kavehttpd as a service manually:
net start "Kaspersky ScanEngine" - If you registered kavehttpd by using the kavehttpd binary file:
net start kavhttpd
Running Kaspersky Scan Engine in HTTP mode with a BAT script (Windows)
Kaspersky Scan Engine dIstribution kit includes a BAT script that allows you to manage the kavhttpd service and the klScanEngineUI service.
This script will not work if you manually added the kavhttpd service to the list of Windows services.
The script is run from the command line.
Syntax:
kl_control.bat start | stop | restart | status | help
The table below describes the kl_control.bat options. If you specify more than one option, the script will execute the first one and exit.
The kl_control.bat options
Option |
Description |
|---|---|
|
Starts the kavhttpd service. If Kaspersky Scan Engine GUI is enabled, also starts the klScanEngineUI service. |
|
Stops the kavhttpd service. If Kaspersky Scan Engine GUI is enabled, also stops the klScanEngineUI service. |
|
Stops and restarts the kavhttpd service. If Kaspersky Scan Engine GUI is enabled, it also stops and restarts the klScanEngineUI service. |
|
Checks whether the kavhttpd and klScanEngineUI services are running. |
|
Shows Help. |
The kl_control.bat script prints an error message if an error occurred when you tried to stop or start the kavhttpd service. If you receive an error message, you can check the state of the kavhttpd service or the klScanEngineUI service by using Windows Task Manager.
Page top
Monitoring Kaspersky Scan Engine in HTTP mode
Monitoring Kaspersky Scan Engine in Linux
When monitoring is enabled, the kavhttpd service automatically restarts if it freezes or crashes.
If logging is enabled along with monitoring, the monitoring process writes log messages to a separate file.
To enable monitoring:
- Set the
USE_WATCHDOGparameter in the HTTP mode init script to1. - Restart Kaspersky Scan Engine.
For more information about editing the init script, see section "Changing variables in the HTTP mode init script".
Monitoring Kaspersky Scan Engine in Windows
The watchdog functionality is not supported in the service mode in Windows systems, but you can enable Windows to automatically restart the kavhttpd service after a crash.
To enable Windows to automatically restart the kavhttpd service process after a crash:
- Log in to a user account that has local administrator rights.
- Open the Services system utility. The exact way to do this depends on the operating system.
- Right-click the kavhttpd service. The service is called
Kaspersky ScanEngineif you installed Kaspersky Scan Engine by using the installer, orKAV HTTP for Windowsif you registered it as a service manually.A context menu appears.
- Select the Properties item.
The Properties window opens.
- Select the Recovery tab.
- Select the Restart the Service option in the First failure, Second failure, and Subsequent failures drop-down lists.
Making requests in HTTP mode
This section explains how to make requests to Kaspersky Scan Engine when working in HTTP mode.
About KAV protocol
A client application uses the KAV protocol to interact with Kaspersky Scan Engine by means of HTTP requests. The current KAV protocol version is 3, but versions 1 and 2 are also supported.
Choose the protocol version that works best for your solution:
- KAV protocol version 3
In version 3 of the protocol, the bodies of request messages and response messages are in JSON format. Version 3 supports more API methods than versions 1 and 2.
This is the recommended version of the protocol.
Note that on Windows systems, only KAV protocol version 3 is used.
- KAV protocol versions 1 and 2
In versions 1 and 2 of the protocol, the bodies of request messages and response messages are in plain text format.
Use these versions of the protocol if plain text format is necessary for your solution.
Making requests in HTTP mode via KAV protocol version 3
This section explains how to make HTTP requests to Kaspersky Scan Engine by using KAV protocol version 3.
Supported API methods in KAV protocol version 3
The following table lists the API methods that Kaspersky Scan Engine supports in HTTP mode when using KAV protocol version 3. The format of the requests does not depend on whether the client uses TCP or UNIX sockets for interaction with Kaspersky Scan Engine.
API methods supported in HTTP mode in KAV protocol version 3
API method |
HTTP method |
Description |
|---|---|---|
POST |
Scans a file. |
|
POST |
Scans a block of system memory. Use only the KAV_SKIP cleaning mode when scanning system memory. Kaspersky Scan Engine cannot disinfect or delete files in this mode. |
|
POST |
Checks a URL. |
|
GET |
Gets the release date of the anti-virus database. You can use this method to check whether |
|
GET |
Gets the current version of KAV SDK. You can use this method to check whether |
|
GET |
Gets information about the current key file or activation code. You can use this method to check whether |
|
GET |
Gets the accumulated statistics. |
|
POST |
Clears the accumulated statistics. |
|
POST |
Updates the anti-virus database. |
|
GET |
Gets the status of the database update process. |
Format of a scan POST request
Scan POST requests have the following format:
* Request headers *
* Request body * { "timeout": %TIMEOUT%, "omitCleanSubobjectResults": %TO_OMIT_CLEAN_SUBOBJECT_RESULTS%, "url": "%URL%", "requestHeaders": "%REQUEST_HEADERS%", "responseHeaders": "%RESPONSE_HEADERS%", "object": "%OBJECT%" } |
where:
timeoutis the object scan timeout in milliseconds (ms). This field is optional.omitCleanSubobjectResultsis a binary flag that specifies whether thesubObjectsScanResultsarray returned in the response must contain objects with theCLEANscan result. If the value istrue, such objects are omitted; if the value isfalse, such objects are retained. The default value istrue. This field is optionalFor more information on the structure of the
subObjectsScanResultsarray, see section "Format of a response to a scan POST request".urlis the URL to use as the scan task context. This field is optional.This field can be used for increasing the detection rate. For more information, see section "Increasing the detection rate".
requestHeadersspecifies the text of the HTTP request headers extracted from the HTTP transaction message. This field is optional.This field can be used for increasing the detection rate. For more information, see section "Increasing the detection rate".
responseHeadersspecifies the text of the HTTP response headers extracted from the HTTP transaction message. This field is optional.This field can be used for increasing the detection rate. For more information, see section "Increasing the detection rate".
objectis the full path to the file to scan (if a request is made to/api/v3.0/scanfile) or a Base64-encoded string (if a request is made to/api/v3.0/scanmemory). This field is mandatory.
If the request body contains any special characters, they must be escaped in accordance with Standard ECMA-404 (The JSON Interchange Syntax).
Page top
Format of a response to a scan POST request
If a scan POST request is successfully processed, the response body contains a JSON object with the following fields:
{ "object": "%SCAN_OBJECT%", "scanResult": "%SCAN_RESULT%", "detectionName": "%DETECTED_OBJECT%", "containsOfficeMacro": "%IS_MACRO_CONTAINED%", "subObjectsScanResults": [ { "object": "%SCAN_FILE%", "scanResult": "%SCAN_RESULT%", "detectionName": "%DETECTED_OBJECT%", "containsOfficeMacro": "%IS_MACRO_CONTAINED%" }, … { "object": "%SCAN_FILE%", "scanResult": "%SCAN_RESULT%", "detectionName": "%DETECTED_OBJECT%", "containsOfficeMacro": "%IS_MACRO_CONTAINED%" } ] } |
where:
objectcontains the full path to the scanned file (if a request is made to/api/v3.0/scanfile) or to a"memory"string (if a request is made to/api/v3.0/scanmemory).scanResultis the scan result and can have the following values:CLEANDETECTEDDISINFECTEDDELETEDNON_SCANNEDSERVER_ERROR
detectionNameis the name of the detected malicious object in the Kaspersky Lab classification system.containsOfficeMacrois the binary flag that has a value oftrueif a macro was detected in the object andfalseotherwise.subObjectsScanResultsis an array of scan results for each sub-object nested in the object that was scanned. This field with all of its sub-fields is only included in the response body if the scanned object contains nested sub-objects.subObjectsScanResults/objectis the path to the nested sub-object. Note that the path to the sub-object is separated from the path to its parent object by a double slash (//), for example:/home/user/archive.tar//folder/subobjectsubObjectsScanResults/scanResultis the scan result for the nested sub-object.subObjectsScanResults/detectionNameis the name of the detected malicious object in the Kaspersky Lab classification system.subObjectsScanResults/containsOfficeMacrois the binary flag that has a value oftrueif a macro was detected in the nested sub-object andfalseotherwise.
If a POST scan request is processed with an error, the response body contains a JSON object with a single error field:
{ "error": "%ERROR_MESSAGE%" } |
where error contains the description of the error that occurred during the request processing.
Increasing the detection rate
When an HTTP request is made to scan a file or a block of memory, there are two ways to increase the detection rate by specifying an optional scan task context:
- Provide the origin of the object to scan in the
urlfield of the POST request body:- If the object to scan was received from the web, specify the web address of origin, including the protocol, for example:
http://example.comThe supported protocols are HTTP, HTTPS, and FTP.
If the URL is unknown, we recommend that you use
http://example.comas the scan task context. - If the object to scan was received by email, specify the sender's email address in the following format:
[from:%sender_address%], for example:[from:example@example.com]If the sender's email address is unknown, we recommend that you use
[from:test@relay.example]as the scan task context.
Below is an example of an HTTP request to scan a local file received from the web. Note the use of the
urlfield to specify the web address of origin:POST /api/v3.0/scanfile HTTP/1.0
Content-Type: application/octet-stream
Content-Length: 22
{
"timeout": "10000",
"object": "\/home\/user\/eicar",
"url": "http:\/\/example.com"
}
The response is the same as in section "Example of an HTTP request to scan a local file".
- If the object to scan was received from the web, specify the web address of origin, including the protocol, for example:
- Provide request and response headers gathered from HTTP traffic related to the object to scan in the
requestHeadersandresponseHeadersfields of the POST request body.Note that you can combine the two types of scan task context to further boost the detection rate. In the example below, the request and response headers are specified along with the web address of origin.
POST /api/v3.0/scanfile HTTP/1.0
Content-Type: application/octet-stream
Content-Length: 22
{
"object": "\/home\/user\/eicars.tar",
"requestHeaders": ": authority: example.com\r\n: method: GET\r\n path:\/ \r\n:scheme: https\r\naccept: text\/html,application\/xhtml+xml,application\/xml;q=0.9,image\/webp,image\/apng,*\/*;q=0.8\r\naccept-encoding: gzip, deflate, br\r\naccept-language: ru-RU,ru;q=0.9,en-US;q=0.8,en;q=0.7,mt;q=0.6\r\ncache-control: no-cache\r\npragma: no-cache\r\nupgrade-insecure-requests: 1\r\nuser-agent: Mozilla\/5.0 (Windows NT 6.1; Win64; x64) AppleWebKit\/537.36 (KHTML, like Gecko) Chrome\/71.0.3578.98 Safari\/537.36",
"responseHeaders": "accept-ranges: bytes\r\ncache-control: max-age=604800\r\ncontent-type: text\/html; charset=UTF-8\r\ndate: Thu, 31 Jan 2019 18:51:11 GMT\r\netag: \"1541025663\"\r\nexpires: Thu, 07 Feb 2019 18:51:11 GMT\r\nlast-modified: Fri, 09 Aug 2013 23:54:35 GMT\r\nserver: ECS (dca\/532C)\r\nstatus: 200\r\nvary: Accept-Encoding\r\nx-cache: HIT",
"url": "http:\/\/example.com"
}
The successfully processed request will result in the following response:
HTTP/1.0 200 Ok
Connection: close
Content-Type: text/plain
Server: KAVHTTPD/1.0
X-KAV-ProtocolVersion: 3
Date: Wed, 30 Jan 2019 15:46:29 GMT
Content-Length: 75
{
"object": \/home\/user\/eicars.tar",
"scanResult": "DETECTED",
"detectionName": "multiple",
"subObjectsScanResults": [
{
"object": "\/home\/user\/eicars.tar\/\/eicar1",
"scanResult": "DETECTED",
"detectionName": "EICAR-Test-File"
},
{
"object": "\/home\/user\/eicars.tar\/\/eicar2",
"scanResult": "DETECTED",
"detectionName": "EICAR-Test-File"
}
]
}
Example of an HTTP request to scan a local file
The following example shows an HTTP request to scan a local file:
POST /api/v3.0/scanfile HTTP/1.0 Content-Type: application/octet-stream Content-Length: 22
{ "timeout": "10000", "object": "\/home\/user\/eicar" } |
For a description of all possible fields in the request body, see section "Format of a scan POST request". For recommendations on how to increase the detection rate, see section "Increasing the detection rate".
The following block shows the corresponding response:
HTTP/1.0 200 OK Connection: close Content-Type: text/plain Server: KAVHTTPD/1.0 X-KAV-ProtocolVersion: 3 Date: Wed, 30 Jan 2019 15:46:29 GMT Content-Length: 75
{ "object": "\/home\/user\/eicar", "scanResult": "DETECTED", "detectionName": "EICAR-Test-File" } |
For description of all possible fields in the response body, see section "Format of a response to a scan POST request".
Page top
Example of an HTTP request to scan a block of memory
The following example shows an HTTP request to scan a block of memory:
POST /api/v3.0/scanmemory HTTP/1.0 Content-Type: application/octet-stream Content-Length: 105
{ "timeout": "10000", "object": "WDVPIVAlQEFQWzRcUFpYNTQoUF4pN0NDKTd9JEVJQ0FSLVNUQU5EQVJELUFOVElWSVJVUy1URVNULUZJTEUhJEgrSCo=" } |
For a description of all possible fields in the request body, see section "Format of a scan POST request". For recommendations on how to increase the detection rate, see section "Increasing the detection rate".
The following example shows the corresponding response:
HTTP/1.0 200 OK Connection: close Content-Type: text/plain Server: KAVHTTPD/1.0 X-KAV-ProtocolVersion: 3 Date: Wed, 30 Jan 2019 16:08:12 GMT Content-Length: 72
{ "object": "memory", "scanResult": "DETECTED", "detectionName": "EICAR-Test-File" } |
For a description of all possible fields in the response body, see section "Format of a response to a scan POST request".
Example of an HTTP request to check a URL
The following example shows an HTTP request to check a URL:
POST /api/v3.0/checkurl HTTP/1.0 Content-Type: application/octet-stream Content-Length: 50
{ "timeout": "10000", "url": "http:\/\/ } |
The following example shows the corresponding response:
HTTP/1.0 200 OK Connection: close Content-Type: text/plain Server: KAVHTTPD/1.0 X-KAV-ProtocolVersion: 3 Date: Wed, 30 Jan 2019 16:15:44 GMT Content-Length: 104
{ "url": "http:\/\/ "scanResult": "DETECTED", "detectionName": "PHISHING_URL" } |
where:
urlis the URL that was checked.scanResultis the scan result and can have the following values:CLEANDETECTEDDISINFECTEDDELETEDNON_SCANNEDSERVER_ERROR
detectionNameis the name of the detected malicious object in the Kaspersky Lab classification system. It can have one of the following values:PHISHING_URLMALICIOUS_URLADWARE_URLRISKWARE_URL
Example of an HTTP request to get the release date of the anti-virus database
This release date request is usually made after a database update to make sure that the anti-virus database has been updated to the latest version.
The following example shows an HTTP request to get the release date of the anti-virus database:
GET /api/v3.0/basesdate HTTP/1.0 |
The following example shows the corresponding response:
HTTP/1.0 200 OK Connection: close Content-Type: text/plain Server: KAVHTTPD/1.0 X-KAV-ProtocolVersion: 3 Date: Wed, 30 Jan 2019 19:03:18 GMT Content-Length: 50
{ "databaseVersion": "30.01.2019 18:38 GMT" } |
where databaseVersion contains the current version of the anti-virus database in the following format: DD.MM.YYYY hh:mm GMT.
Example of an HTTP request to get the current KAV SDK version
The following example shows an HTTP request to get the current KAV SDK version:
GET /api/v3.0/version HTTP/1.0 |
The following example shows the corresponding response:
HTTP/1.0 200 OK Connection: close Content-Type: text/plain Server: KAVHTTPD/1.0 X-KAV-ProtocolVersion: 3 Date: Wed, 30 Jan 2019 19:05:51 GMT Content-Length: 36
{ "KAVSDKVersion": "8.8.2.58" } |
where KAVSDKVersion contains the current KAV SDK version in the following format: MajorVersion.MinorVersion.BuildNumber.Revision.
Example of an HTTP request to get licensing information
The following example shows an HTTP request to get licensing information:
GET /api/v3.0/licenseinfo HTTP/1.0 |
The following example shows the corresponding response that contains licensing information when offline licensing mode is used:
HTTP/1.0 200 OK Connection: close Content-Type: text/plain Server: KAVHTTPD/1.0 X-KAV-ProtocolVersion: 3 Date: Wed, 30 Jan 2019 19:04:30 GMT Content-Length: 81
{ "licenseName": "EXAMPLE.key", "licenseExpirationDate": "05.12.2020" } |
where:
licenseNameis the name of the current key file.licenseExpirationDateis the expiration date of the key file or activation code in the following format:DD.MM.YYYY.
The following block shows the corresponding response, which contains licensing information when online licensing mode is used. In this example, the license ticket has expired:
HTTP/1.0 200 OK Date: Mon, 10 February 2014 12:25:21 GMT Server: KAVHTTPD/1.0 Content-Length: 185 Connection: close Content-Type: text/plain
{ "activationCode": "EXMPL-*****-*****-12345", "licenseExpirationDate": "05.12.2020", "ticketExpired": "The license ticket has expired. Computer must be connected to the Internet to update the license ticket." } |
where:
activationCodeis the online activation code.licenseExpirationDateis the expiration date of the key file or activation code in the following format:DD.MM.YYYY.ticketExpiredcontains a message that is included in the response body only if the license ticket has expired.
Example of an HTTP request to get accumulated statistics
The following example shows an HTTP request to get accumulated statistics:
GET /api/v3.0/getstatistics HTTP/1.0 |
The following example shows the corresponding response:
HTTP/1.0 200 OK Connection: close Content-Type: text/plain Server: KAVHTTPD/1.0 X-KAV-ProtocolVersion: 3 Date: Wed, 30 Jan 2019 19:07:54 GMT Content-Length: 314
{ "statistics": { "total_requests": 3, "infected_requests": 3, "protected_requests": 3, "error_requests": 0, "engine_errors": 0, "processed_data": 204, "infected_data": 204, "processed_urls": 1, "infected_urls": 1 } } |
where statistics is an object containing the following accumulated statistics:
total_requestsis the total number of requests to scan a file or a block of memory or to check a URL.infected_requestsis the number of requests for which Kaspersky Scan Engine returned aDETECTED,DISINFECTED, orDELETEDscan result.protected_requestsis the number of requests for which Kaspersky Scan Engine returned aDISINFECTEDorDELETEDscan result.error_requestsis the number of requests for which Kaspersky Scan Engine returned aNOT_SCANNEDscan result (due to errors related to the scanned object).engine_errorsis the number of requests for which Kaspersky Scan Engine returned aSERVER_ERRORscan result (due to errors not related to the scanned object).processed_datais the total amount of scanned data in bytes.infected_datais the amount of scanned data, in bytes, passed in requests for which Kaspersky Scan Engine returned aDETECTED,DISINFECTED, orDELETEDscan result.processed_urlsis the total number of checked URLs.infected_urlsis the number of URLs recognized by Kaspersky Scan Engine as malicious, phishing, adware, or legitimate programs that can be used by intruders to damage computers and data.
Example of an HTTP request to clear accumulated statistics
The following example shows an HTTP request to clear accumulated statistics:
POST /api/v3.0/clearstatistics HTTP/1.0 Content-Type: application/octet-stream Content-Length: 2
{} |
The following example shows the corresponding response:
HTTP/1.0 200 OK Connection: close Content-Type: text/plain Server: KAVHTTPD/1.0 X-KAV-ProtocolVersion: 3 Date: Wed, 30 Jan 2019 19:09:27 GMT Content-Length: 27
{ "error": "CLEARED" } |
Example of an HTTP request to update the anti-virus database
This request can be made only if the client and Kaspersky Scan Engine are installed and running on the same computer. If you send this request from a different computer, Kaspersky Scan Engine will throw a 405 Method Not Allowed error.
The following example shows an HTTP request to update the anti-virus database:
POST /api/v3.0/update/start HTTP/1.0 Content-Type: application/octet-stream Content-Length: 2
{} |
The following example shows the corresponding response that is returned if the database update has been successfully initiated:
HTTP/1.0 200 OK Connection: close Content-Type: text/plain Server: KAVHTTPD/1.0 X-KAV-ProtocolVersion: 3 Date: Wed, 30 Jan 2019 18:05:44 GMT Content-Length: 26
{ "status": "update started" } |
The following example shows the corresponding response that is returned if an update is already in progress:
HTTP/1.0 200 OK Connection: close Content-Type: text/plain Server: KAVHTTPD/1.0 X-KAV-ProtocolVersion: 3 Date: Wed, 30 Jan 2019 18:05:44 GMT Content-Length: 35
{ "status": "update already launched" } |
The following example shows the corresponding response that is returned if an error occurred when launching the update:
HTTP/1.0 200 OK Connection: close Content-Type: text/plain Server: KAVHTTPD/1.0 X-KAV-ProtocolVersion: 3 Date: Wed, 30 Jan 2019 18:05:44 GMT Content-Length: 40
{ "status": "error while launching update" } |
Example of an HTTP request to get the database update status
This request can be made only if the client and Kaspersky Scan Engine are installed and running on the same computer. If you send this request from a different computer, Kaspersky Scan Engine will throw a 405 Method Not Allowed error.
The following example shows an HTTP request to get the database update status:
GET /api/v3.0/update/status HTTP/1.0 |
The following example shows the corresponding response:
HTTP/1.0 200 OK Connection: close Content-Type: text/plain Server: KAVHTTPD/1.0 X-KAV-ProtocolVersion: 3 Date: Wed, 30 Jan 2019 18:05:44 GMT Content-Length: 116
{ "status": "not started", "last_update_result": "success", "last_update_time": "21:03:53 30.01.2019" } |
For a description of all the fields that can be included in the response body, see section "Updating the anti-virus database in HTTP mode", subsection "Getting the database update status".
Page top
Making requests in HTTP mode via KAV protocol versions 1 and 2
This section explains how to make HTTP requests to Kaspersky Scan Engine by using KAV protocol versions 1 and 2.
Supported API methods in KAV protocol versions 1 and 2
In addition to using KAV protocol version 3, you can make POST and GET requests to Kaspersky Scan Engine by means of KAV protocol versions 1 and 2.
The following table lists the API methods that Kaspersky Scan Engine supports in HTTP mode in KAV protocol versions 1 and 2.
API methods supported in HTTP mode in KAV protocol versions 1 and 2
API method |
HTTP method |
Description |
|---|---|---|
POST |
Scans a file. |
|
POST |
Scans a block of system memory. Use only the KAV_SKIP cleaning mode when scanning system memory. Kaspersky Scan Engine cannot disinfect or delete files in this mode. |
|
POST |
Checks a URL. |
|
GET |
Gets the release date of the anti-virus database. You can use this method to check whether |
|
GET |
Gets the current version of KAV SDK. You can use this method to check whether |
|
GET |
Gets information about the current key file or activation code. You can use this method to check whether |
|
GET |
Gets the accumulated statistics. |
|
POST |
Clears the accumulated statistics. |
Request headers
An HTTP request, using the POST method, to Kaspersky Scan Engine must include the Content-Length header.
When making an HTTP request, there are three request headers specific to Kaspersky Scan Engine that you can set:
X-KAV-ProtocolVersionThis header specifies the KAV protocol version used. This header is mandatory.
X-KAV-TimeoutThis header specifies a scanning operation timeout in milliseconds (but not a session timeout). This header is optional.
This header takes values ranging from
0to4294967295(unsigned 32-bit integer value). Set the value based on the characteristics of the object to scan (for example, its size or whether it is multipart or not; Kaspersky Scan Engine takes longer to scan a large multipart object).For more information about a scanning timeout and a session timeout, see section "Setting the session timeout".
X-KAV-ObjectURLThis header contains the scan task context that Kaspersky Scan Engine uses to increase the detection rate. This header is optional.
The use of this header does not affect scanning performance.
We recommend that you use the scan task context in gateway integrations.
Use the following format for the context:
- If the object to scan is received from the web, specify the web address of origin, including the protocol, for example:
http://example.comThe supported protocols are HTTP, HTTPS, and FTP.
If the URL is unknown, we recommend to use
http://example.comas the scan task context. - If the object to scan was received by email, specify the sender's email address in the following format:
[from:%sender_address%], for example:[from:example@example.com]If the sender's email address is unknown, we recommend that you use
[from:test@relay.example]as the scan task context.
Scan task context is only applicable to file and memory scanning. If you specify scan task context for a URL, it will be ignored.
- If the object to scan is received from the web, specify the web address of origin, including the protocol, for example:
Example of an HTTP request to scan a local file
The following example shows an HTTP request to scan a local file:
POST /scanfile HTTP/1.0 Content-Length: 35 X-KAV-ProtocolVersion: 1 X-KAV-Timeout: 10
* Full path to the EICAR test file * |
If the file to scan is large, consider specifying the X-KAV-Timeout header.
The following example shows the corresponding response:
HTTP/1.0 200 OK Date: Mon, 10 February 2014 12:25:21 GMT Server: KAVHTTPD Content-Length: 32 Connection: close Content-Type: text/plain X-KAV-ProtocolVersion: 1
DETECTED EICAR-Test-File |
Example of an HTTP request to scan a block of memory
The following example shows an HTTP request to scan a block of memory:
POST /scanmemory HTTP/1.0 Content-Length: 35 X-KAV-ProtocolVersion: 1 X-KAV-Timeout: 10
* Contents of the EICAR test file * |
If the file to scan is large, consider specifying the X-KAV-Timeout header.
The following examole shows the corresponding response:
HTTP/1.0 200 OK Date: Mon, 10 February 2014 12:25:21 GMT Server: KAVHTTPD Content-Length: 64 Connection: close Content-Type: text/plain X-KAV-ProtocolVersion: 1
DETECTED EICAR-Test-File |
For information on how to make a multipart scan request, see section "Example of a multipart HTTP request to scan a block of memory".
Page top
Example of a multipart HTTP request to scan a block of memory
To make multipart HTTP requests, use the KAV protocol version 2 by specifying it in the X-KAV-ProtocolVersion request header.
When making a multipart HTTP request, you can specify request and response headers that were gathered from HTTP traffic related to the object being scanned. This data improves the detection rate.
The body of a multipart HTTP request must contain no more than three parts. These parts contain the following data:
- Request headers (optional)
This part must begin with the "
Request headers" string followed by\r\ncharacters. These characters must be followed by request headers from HTTP traffic related to the object that is being scanned. - Response headers (optional)
This part must begin with the "
Response headers" string followed by\r\ncharacters. These characters must be followed by response headers from HTTP traffic related to the object that is being scanned. - Object for scanning.
This part can contain the full path to the file to scan (if a request is made to
/scanfile) or a string (if a request is made to/scanmemory).
The following example shows a multipart HTTP request to scan a block of memory:
POST /scanmemory HTTP/1.0 Content-Length: 753 X-KAV-ProtocolVersion: 2 X-KAV-Timeout: 10
Content-Type: multipart/mixed; boundary=gc0p4Jq0M2Yt08jU534c0p
--gc0p4Jq0M2Yt08jU534c0p Request headers GET /files/test.exe HTTP/1.1 Host: source.example.com Accept: application/octet-stream Referer: http://malicious.example.com/ Host: source.example.com Connection: Keep-Alive --gc0p4Jq0M2Yt08jU534c0p Response headers HTTP/1.1 200 OK Content-Type: application/octet-stream Content-Length: 21541 Date: Mon, 25 Sep 2017 11:01:54 GMT Last-Modified: Fri, 28 Sep 2017 03:15:02 GMT --gc0p4Jq0M2Yt08jU534c0p * Contents of the EICAR test file * --gc0p4Jq0M2Yt08jU534c0p-- |
The following example shows the corresponding response:
HTTP/1.0 200 OK Date: Fri, 28 Sep 2017 03:15:02 GMT Server: KAVHTTPD Content-Length: 64 Connection: close Content-Type: text/plain X-KAV-ProtocolVersion: 2
DETECTED EICAR-Test-File |
Example of an HTTP request to check a URL
The following example shows an HTTP request to check a URL:
|
The following example shows the corresponding response:
HTTP/1.0 200 OK Date: Mon, 10 February 2014 12:25:22 GMT Server: KAVHTTPD Content-Length: 110 Connection: close Content-Type: text/plain X-KAV-ProtocolVersion: 1
DETECTED PHISHING_URL |
Example of an HTTP request to get the release date of the anti-virus database
The following example shows an HTTP request to get the release data of the anti-virus database:
GET Host: example.com X-KAV-ProtocolVersion: 1 |
The following example shows the corresponding response:
HTTP/1.0 200 OK Date: Mon, 10 February 2014 15:03:21 GMT Server: KAVHTTPD Content-Length: 40 Connection: close Content-Type: text/plain X-KAV-ProtocolVersion: 1
database version: 9.02.2014 15:03 GMT |
Example of an HTTP request to get the current KAV SDK version
The following example shows an HTTP request to get the current KAV SDK version:
GET Host: example.com X-KAV-ProtocolVersion: 1 |
The following example shows the corresponding response:
HTTP/1.0 200 OK Date: Mon, 10 February 2014 12:25:21 GMT Server: KAVHTTPD Content-Length: 27 Connection: close Content-Type: text/plain X-KAV-ProtocolVersion: 1
KAV SDK version: 8.8.0.80 |
Example of an HTTP request to get licensing information
The following example shows an HTTP request to get licensing information:
GET Host: example.com X-KAV-ProtocolVersion: 1 |
The following example shows the corresponding response that contains licensing information when offline licensing mode is used:
HTTP/1.0 200 OK Date: Mon, 10 February 2014 12:25:21 GMT Server: KAVHTTPD Content-Length: 65 Connection: close Content-Type: text/plain X-KAV-ProtocolVersion: 1
key file name: EXAMPLE.key license expiration date: 05.12.2020 |
The following example shows the corresponding response that contains licensing information when the online licensing mode is used. In this example, the license ticket has expired:
HTTP/1.0 200 OK Date: Mon, 10 February 2014 12:25:21 GMT Server: KAVHTTPD Content-Length: 185 Connection: close Content-Type: text/plain X-KAV-ProtocolVersion: 1
activation code: EXMPL-*****-*****-12345 license expiration date: 05.12.2020 The license ticket has expired. Computer must be connected to the Internet to update the license ticket. |
Example of an HTTP request to get accumulated statistics
The following example shows an HTTP request to get accumulated statistics:
GET Host: example.com X-KAV-ProtocolVersion: 1 |
For a description of the statistics returned in the HTTP response, see the example of making this request in KAV protocol version 3.
Page top
Example of an HTTP request to clear accumulated statistics
The following example shows an HTTP request to clear accumulated statistics:
POST User-Agent: KAV HTTP Client Content-Length: 0 X-KAV-ProtocolVersion: 1 |
The following example shows the corresponding response:
HTTP/1.0 200 OK Date: Mon, 10 February 2014 12:25:21 GMT Server: KAVHTTPD Content-Length: 0 Connection: close X-KAV-ProtocolVersion: 1 |
Using the sample HTTP client
This section explains how to use the sample HTTP client from the command line. The sample HTTP client is located in %service_dir%/bin.
This section explains how to use the executable file of the sample HTTP client. Explaining the implementation of the sample HTTP client is beyond the scope of this documentation. The source code of the sample HTTP client is located in the /samples/kavhttp directory of the Kaspersky Scan Engine distribution package.
About the sample HTTP client
The sample HTTP client is a console application that demonstrates how to implement a client for Kaspersky Scan Engine in HTTP mode. You can also use it to scan files from the console.
The sample HTTP client makes HTTP requests to Kaspersky Scan Engine. It supports TCP connections and UNIX socket connections and can pass file paths or file contents to Kaspersky Scan Engine.
When Kaspersky Scan Engine finishes scanning files, it sends a response to the sample HTTP client. The sample HTTP client prints the scan result to the standard output. For more information about the scan results, see section "Scan results for the HTTP client".
Syntax and options for the HTTP client
You can supply one or more options to the sample HTTP client.
Options
The following options are available in the sample HTTP client:
Options for running the sample HTTP client
Option |
Description |
|---|---|
|
Specifies the address of Kaspersky Scan Engine or a path to the UNIX socket. The connection string can be specified with or without quotation marks. The UNIX sockets are supported only on Linux systems. |
|
Specifies the request processing timeout, in milliseconds. |
|
Specifies the URL to scan. Only one URL can be specified at a time. |
|
Specifies the IP address (IPv4 or IPv6) of the host referred to by a URL. This option can only be used with Specifying an IP address increases the detection rate of Kaspersky Scan Engine. |
|
Enables scanfile mode. |
|
Specifies the scan task context. If this option is specified, the request must have the |
|
Specifies a path to a file with request headers that were gathered from the HTTP traffic for the scanned object. |
|
Specifies a path to a file with response headers that were gathered from the HTTP traffic for the scanned object. |
|
Shows the release date of the anti-virus database. You can use this option to check whether |
|
Shows the version of KAV SDK. You can use this option to check whether |
|
Shows information about the current key file. You can use this option to check whether |
|
Shows Help information. |
|
Makes an HTTP request in JSON format. Note that on Windows systems, only KAV protocol version 3 is used, and therefore the |
|
Makes an HTTP request to launch the anti-virus database update. Can be used with options |
|
Shows the status of the database update process. Can be used with options |
|
Gets the accumulated statistics. Can be used with options |
|
Clears the accumulated statistics. Can be used with options |
|
When making an HTTP request in JSON format, omits objects with the |
Connection type
Connections of two types are supported by the sample HTTP client:
- TCP connection
To use a TCP connection, specify an IP address in the
-soption in the following format: "ip_addr:port". - UNIX socket connection
For Linux systems only.
To use a UNIX socket connection, specify the path to the socket in the
-soption.This is the default option. The default socket file is
/tmp/.kavhttpd.
Timeout
The sample HTTP client uses the value specified in the -t option to determine the scan timeout, similarly to the X-KAV-Timeout header.
The default timeout value is 2000.
If 0 is specified in this option, the timeout is infinite.
Scan mode
The sample HTTP client support two scan modes, which you can specify by using the -f option:
- scanfile mode (
-f).In this mode, the sample HTTP client passes file paths to Kaspersky Scan Engine, which reads and scans the files.
To send a scan request to a remote computer over a TCP socket, you must specify the paths to the files that you want to scan or the directories that contain these files. For more information, see "Scanning files over TCP socket in scanfile mode". You do not have to do that if the sample HTTP client and Kaspersky Scan Engine are located on the same computer.
- scanmemory mode (default).
In this mode, the sample HTTP client passes file contents to Kaspersky Scan Engine, which scans the contents.
Use only the KAV_SKIP cleaning mode with scanmemory scan mode. Kaspersky Scan Engine cannot disinfect or delete files in scanmemory mode.
Scan task context
Kaspersky Scan Engine uses the scan task context to increase the detection rate. Using this option does not affect scanning performance.
It is recommended to use the scan task context in gateway integrations.
Use the following format for the context:
- If the object to scan is received from the Internet, specify the web address of the source, including the protocol.
Example:
http://example.comThe supported protocols are HTTP, HTTPS, and FTP. If the source URL is unknown, it is recommended to use
http://example.comas the scan task context. - If the object to scan is received by email, specify the sender's email address. Use the following format:
[from:%sender_address%].Example:
[from:example@example.com]
If the object is received by email, but the sender's email address is unknown, it is recommended to use [from:test@relay.example] as the scan task context.
The scan task context is applicable to file scanning only. If you specify the scan task context for a URL, it will be ignored.
Request and response headers
Specifying request and response headers that were gathered from HTTP traffic related to the scanned object improves the detection rate. It is recommended to use the request and response headers in gateway integrations.
Information messages
The -b, -v, and -l options can only be used together with the -s, -j, and -t options. If you use them with any other option, kavhttp_client returns an error.
You can use the -b, -v, and -l options to check whether kavhttpd is running.
Scanning files
You can specify one or more files to scan, separating them by a white space. Depending on the scan mode, the sample HTTP client then passes the paths to these files or their contents to Kaspersky Scan Engine.
Use the following syntax to scan files in scanfile mode:
./kavhttp_client [-s <ip:port | unix-socket>] [-t <timeout>] [-c <context>] [--req <req_file>] [--resp <resp_file>] -f <file1> [<file2>...] |
Use the following syntax to scan the contents of files in scanmemory mode:
./kavhttp_client [-s <ip:port | unix-socket>] [-t <timeout>] [-c <context>] [--req <req_file>] [--resp <resp_file>] <file1> [<file2>...] |
Scanning URLs
You can specify a URL to scan. If the URL contains spaces or tabs, enclose the URL in quotation marks, or make these characters percent-encoded. Similarly, if the URL contains quotation marks ("), make them percent-encoded.
Simultaneous scanning of multiple URLs is not supported. If you specify more than one URL, only the first one will be scanned.
Files cannot be scanned when the -u option is specified. The -u and -f options cannot be used together.
Use the following syntax to scan a URL:
./kavhttp_client [-s <IP:port | unix-socket>] [-t <timeout>] [-i <IP>] -u <URL> |
Scanning files over TCP socket in scanfile mode
You can send scan requests in both scanmemory mode and scanfile mode from the HTTP client on a remote computer to the computer on which the kavhttpd service runs.
In scanmemory mode, the content of the scanned object is sent in the HTTP request message and is scanned in the system memory of the computer that the kavhttpd service runs on.
In scanfile mode, the HTTP client sends to the kavhttpd service the path to the object that is located on the same computer as the kavhttpd service, or on a remote hard disk successfully mounted on that computer. The kavhttpd service reads the object from the hard disk and scans it.
However, when Kaspersky Scan Engine receives a scan request from a client on remote computer in scanfile mode, it scans only those files that are placed at locations specified in the <ScanningPath> elements of the HTTP mode configuration file. This restriction is necessary to prevent the HTTP client from accidentally scanning the whole file system from the remote computer.
To scan a file by using a TCP socket in scanfile mode:
- In a
<ScanningPath>element of the configuration file, specify the location of the file that you want to scan.For information about possible values of the
<ScanningPath>element, see section "HTTP mode configuration file", subsection "DirectorySettings".The following example shows how to specify a directory that contains files to scan:
<ScanningPaths>
<ScanningPath>/mnt/to_scan/</ScanningPath>
</ScanningPaths>
- Connect to Kaspersky Scan Engine on a remote computer by using a TCP socket and scan the file in scanfile mode.
The following example shows how to scan the eicar.txt file that is located in the /mnt/to_scan/ directory on the computer the kavhttpd service runs on:
user@computer:/opt/kaspersky/ScanEngine/bin# ./kavhttp_client -f -s 192.0.2.42:9999 /mnt/to_scan/eicar.txt
Syntax examples
This section contains examples of using the sample HTTP client application from the Linux command line. To run these example in Windows, call kavhttp_client.exe and add the -j option.
Use the default UNIX socket to scan one file by passing the file contents:
./kavhttp_client eicar.txt |
Use the default UNIX socket to scan one file by passing the path to the file:
./kavhttp_client -f eicar.txt |
Connect to Kaspersky Scan Engine over a TCP socket and scan two files by passing their contents:
./kavhttp_client -s 192.0.2.42:9999 eicar.txt test.sh |
Connect to Kaspersky Scan Engine over a TCP socket and scan two files by passing their contents with a 10-second timeout:
./kavhttp_client -s 192.0.2.42:9999 -t 10000 eicar.txt test.sh |
Connect to Kaspersky Scan Engine over a TCP socket and scan by passing the file path:
./kavhttp_client -f -s 192.0.2.42:9999 /mnt/to_scan/eicar.txt |
Connect to Kaspersky Scan Engine over a TCP socket and scan a URL:
./kavhttp_client -s 192.0.2.42:9999 -u http://example.com |
Connect to Kaspersky Scan Engine over a TCP socket and scan a URL with the IP of the host referred to by the URL:
user@computer:/opt/kaspersky/ScanEngine/bin# ./kavhttp_client -s 192.0.2.42:9999 -i 233.252.0.1 -u http://bug.qainfo.ru/TesT/Aphish_w |
Connect to Kaspersky Scan Engine over a TCP socket and request the release date of the anti-virus database:
./kavhttp_client –b -s 192.0.2.42:9999 |
Scan results for the HTTP client
For each scanned file, the sample HTTP client prints a scan result that specifies whether a scanned object is considered uninfected or malicious.
The following scan results are possible:
CLEANScanned object is considered uninfected.
DETECTEDScanned object is considered malicious. This scan result is followed by the name of the detected object or the type of the detected URL.
Kaspersky Scan Engine detects URLs of the following types:
- Malicious URLs. When such a URL is detected, Kaspersky Scan Engine returns
DETECTEDMALICIOUS_URL. The priority of this type is 1 (highest priority). - Phishing URLs. When such a URL is detected, Kaspersky Scan Engine returns
DETECTEDPHISHING_URL. The priority of this type is 2. - Adware URLs. When such a URL is detected, Kaspersky Scan Engine returns
DETECTEDADWARE_URL. The priority of this type is 3.A URL of this type can only be detected when Cloud Protection is enabled.
- URLs leading to legitimate software that can be used by intruders to damage computers or users' personal data). When such a URL is detected, Kaspersky Scan Engine returns
DETECTEDRISKWARE_URL. The priority of this type is 4 (lowest priority).A URL of this type can only be detected when Cloud Protection is enabled.
A URL can belong to several types simultaneously. In this case, Kaspersky Scan Engine returns the
DETECTEDscan result of the highest priority.- Malicious URLs. When such a URL is detected, Kaspersky Scan Engine returns
DISINFECTEDScanned object has been successfully disinfected.
DELETEDScanned object was deleted.
If the scanned object contains macros, the scan result of this file is appended with "AND CONTAINS OFFICE MACRO".
Below is an example of the output produced by the sample HTTP client:
./kavhttp_client test.sh service.sh eicar.txt Server address: /tmp/.kavhttpd Network timeout: 2000 Scan mode: scanmemory Scan file: test.sh CLEAN Scan file: service.sh CLEAN Scan file: eicar.txt DETECTED EICAR-Test-File |
If the scanning operation failed, the scan result will contain one of the following error codes:
NOT_SCANNEDSpecified object was not scanned. The reason for it is provided as well.
SERVER_ERRORAn error occurred in Kaspersky Scan Engine.
CONNECTION_CLOSEDConnection was closed by Kaspersky Scan Engine.
CLIENT_TIMEOUTOperation timed out. This happens when the client timeout is exceeded.
CONNECTION_FAILEDFailed to establish a connection to Kaspersky Scan Engine.
HTTP_ERRORThe server has responded with an HTTP status code that is not equal to
200. The HTTP status code and its description are provided as well.
HTTP client connection error messages
When a connection error occurs, the HTTP client prints an error message to the console.
Invalid responseThe connection was broken when the client was waiting for a response from the server. The client exits after this error.
Invalid responsefollowed byCONNECTION_CLOSEDThe connection was broken when the client was transmitting a file to scan to the server.
Invalid responsefollowed byCLIENT_TIMEOUTClient timeout (defined by the
-toption) was exceeded.HTTP_ERROR 408 Request TimeoutThe processing timeout (defined by the
SessionTimeoutparameter) was exceeded.
Using a proxy server
Kaspersky Scan Engine can use a proxy server to connect to Kaspersky Lab cloud services.
If a proxy server is specified in the HTTP mode configuration file, Kaspersky Scan Engine does the following:
- Kaspersky Scan Engine tries to establish a direct connection to the destination.
Note that this happens even if a proxy server is specified.
- If a direct connection cannot be established, Kaspersky Scan Engine tries to establish a connection by using the specified proxy server.
- If a proxy server connection cannot be established, Kaspersky Scan Engine uses offline technologies only.
Note that this also happens when network problems prevent a proxy server connection from being established. In this case, at regular intervals Kaspersky Scan Engine tries to establish a connection to the proxy server. If a connection is established before a certain timeout, Kaspersky Scan Engine uses online technologies.
You must restart Kaspersky Scan Engine to use the new proxy server settings.
Kaspersky Scan Engine does not print information about using online and offline technologies to the command line. You must analyze log files to get this information. For more information about enabling logging, see section "Logging".
For more information about specifying a proxy server, see section "HTTP mode configuration file".
Updating the anti-virus database in HTTP mode
With default configuration, Kaspersky Scan Engine uses the anti-virus database from the ./bin/bases directory. You can update the anti-virus database by sending a signal or an HTTP request to Kaspersky Scan Engine.
When the anti-virus database is updated, the encrypted user agent string of Kaspersky Scan Engine is transferred to Kaspersky Lab. For the list of transferred data, see section "Data transferred to Kaspersky Lab during an update".
Updating the database on demand
If you want to update the database manually, use updating on demand.
To update the database on demand in Linux by using signals:
- Before starting the
kavhttpdservice, specify the update setting in kavhttpd.xml. - Start the
kavhttpdservice. - Send a
SIGUSR2signal to thekavhttpdservice.If the client and Kaspersky Scan Engine are installed and running on the same computer, you can send an HTTP request to the
/api/v3.0/update/startaddress to update the database. Note that if you send this request from a different computer, Kaspersky Scan Engine will throw a405 Method Not Allowederror. If the database update has been successfully initiated, the HTTP response will contain the following JSON object:{
"status": "update started"
}
To learn how to track the database update status, see subsection "Getting the database update status" below.
To update the database on demand in Linux by using the sample HTTP client,
Call the sample HTTP client with the -d option:
kavhttp_client.exe -j -d
To update the database on demand in Windows,
Call the sample HTTP client with the -d option:
kavhttp_client.exe -j -d
For details on scheduling automatic database updates, see section "Configuring updating in HTTP mode", subsection "Scheduling automatic database updates".
Getting the database update status
If you want to obtain the database update status, send a GET request to the /api/v3.0/update/status address.
You can only send this request if the client and Kaspersky Scan Engine are installed and running on the same computer.
When Kaspersky Scan Engine receives the request, it returns a response in the following format:
{ "status": "%UPDATE_STATUS%", "progress": "%UPDATE_PROGRESS%", "last_update_result": "%UPDATE_RESULT%", "last_update_time": "%UPDATE_TIME%", } |
where:
statusis the current status of the database update. It can have one of the following values:"in progress""not started"
progressis the progress, in percent, of the database update.This element is only included in the response if the database update is being performed at present (that is if the
statuselement has the value of"in progress").last_update_resultis the result of the last database update. It can have one of the following values:"success""all components are up to date""invalid update sources""not all components are updated""download error""error while updating""error %ERROR_CODE% occurred", where%ERROR_CODE%is the error code received from Kaspersky Scan Engine
This element is only included in the response if the database update is not in progress at present (that is if the
statuselement has the value of"not started").last_update_timeis the date and the time of the last database update in the following format:%hh%:%mm%:%ss% %DD%.%MM%.%YYYY%.This element is only included in the response if the database update is not in progress at present (that is if the
statuselement has the value of"not started").
Configuring logging in HTTP mode
For instructions on how to enable logging, see section "Manually enabling logging in Kaspersky Scan Engine", subsection "Enabling logging in HTTP mode".
Configuring logging
To configure logging, change the parameters in the httpdkavlog.ini logging configuration file (hereinafter referred to as the logging configuration file) located in the %service_dir%/bin directory. The configuration file consists of several sections.
The [DebugLogging] section
LogLevel—Specifies the logging level.Possible values:
0Disables logging. This is the default value.
1Enables full logging mode. Use this mode for debugging purposes.
In HTTP mode, Kaspersky Scan Engine does not automatically remove log files from previous initializations. If necessary, you can remove these log files manually.
LogFolder—Specifies the path to a directory where log files are stored.The path can be absolute or relative. A relative path is calculated relative to the directory that contains the
kavhttpdbinary file.
The [SyslogLogging] section
The settings below are available only for Linux operating systems.
SyslogEnabled—Specifies whether the Kaspersky Scan Engine sends syslog messages.Possible values:
0Disables sending of syslog messages.
1Enables sending of syslog messages.
SyslogFormat—Specifies the format of syslog messages.Possible values:
cef—Specifies the CEF format of syslog messages.raw—Specifies the RAW format of syslog messages. Therawvalue is used when the value specified in this element is notceforraw, or no value is specified in this element, or if the logging configuration file does not contain theSyslogFormatparameter.
SyslogDestination—Specifies the destination address for syslog messages.Possible values:
%PROTOCOL%%IP%:%PORT%, where:%PROTOCOL%is a network protocol (usetcp://orudp://for this value).%IP%is an IPv4 address that receives syslog messages.%PORT%is a port that receives syslog messages.
If you do not specify a protocol as described above, Kaspersky Scan Engine will use the UDP protocol.
localhost—Indicates that syslog messages are redirected tosyslogd.- Absolute or relative path to a directory where log files with syslog messages are stored.
The directory contains the
httpd_kav_syslog.logfile. Log files with syslog messages created by previous sessions are not removed. If the directory contains an old file, Kaspersky Scan Engine writes new information to this file without deleting the old data.
Kaspersky Scan Engine can write debug logs and send syslog messages at the same time or separately.
Sending syslog messages is available starting from Kaspersky Scan Engine version 1.0.1.51.
Structure of the logging configuration file
Following is an example of a logging configuration file:
[DebugLogging] LogLevel=%LEVEL% LogFolder=%FOLDER%
[SyslogLogging] SyslogEnabled=%ENABLED% SyslogFormat=%FORMAT% SyslogDestination=%DESTINATION% |
Format of CEF logs in HTTP mode
If Kaspersky Scan Engine is configured to write syslog messages in CEF format, the log records about events appears as follows:
CEF:0|Kaspersky Lab|Kaspersky HTTP Service|%VERSION%|%EVENT_CLASS_ID%|%EVENT_NAME%|%SEVERITY%| msg=%EVENT_MSG% src=%CLIENT_IP% dvcpid=%HTTP_SERVICE_PID% sproc=unix_socket dvc=%HTTP_SERVICE_IP% start=%EVENT_TIME% fileHash=%SCANNED_FILE_MD5_HASH% fname=%SCANNED_FILE_NAME% request=%SCANNED_URL% act=%ACTION_MADE% cs1=%SCAN_RESULT% cs1Label=Scan result cs2=%VIRUS_NAME% cs2Label=Virus name\n
A record has the following fields:
%VERSION%Version of KAV SDK that Kaspersky Scan Engine is based on.
%EVENT_CLASS_ID%Class of the event. Possible values:
1Service event (not related to scanning).
2Event related to errors.
3Event related to scanning (for example, a scan result).
%EVENT_NAME%Name of the event. Possible values:
Initializing—Kaspersky Scan Engine initialized.Deinitializing—Kaspersky Scan Engine deinitialized.Service event—Service event occurred.Service error—Error occurred in the kavhttpd service .Core error—Error occurred in Kaspersky Anti-Virus Engine.Scan result—Kaspersky Scan Engine finished scanning an object.
%SEVERITY%Importance level of the event. The higher the level, the more important the event. Possible values:
5This value is specified for service events, when the scanning starts, or if the scan result is
CLEAN.7This value is specified for initialization, deinitialization, and errors.
8This value is specified if the scan result is something other than
CLEAN.
%EVENT_MSG%Description of the event, for example, the text of an error message.
%CLIENT_IP%IP address of the HTTP client that sent the scan request to Kaspersky Scan Engine. This field appears only if the request is sent over a TCP socket and is related to scanning.
%HTTP_SERVICE_PID%PID of Kaspersky Scan Engine.
%HTTP_SERVICE_IP%IP address that Kaspersky Scan Engine uses to receive scan requests from clients. This field appears only if Kaspersky Scan Engine receives scan requests over a TCP socket.
%EVENT_TIME%Time and date of the event. The time and date are taken from the computer that Kaspersky Scan Engine runs on.
sproc=unix_socketThis field appears only if Kaspersky Scan Engine receives scan requests over a UNIX socket.
%SCANNED_FILE_MD5_HASH%Hash of the object that was passed for scanning to Kaspersky Scan Engine. This field appears only if a client sent a scan request and Kaspersky Scan Engine has finished scanning.
%SCANNED_FILE_NAME%Name of the scanned file. If the client sent a request to scan a part of RAM, the value of this field is
MEMORY_BLOCK. This field appears only if a client sent a scan request and Kaspersky Scan Engine has finished scanning.%SCANNED_URL%URL specified in the
X-KAV-ObjectURLheader of the scan request. This field appears only if a client sent a scan request and Kaspersky Scan Engine has finished scanning.%ACTION_MADE%Action that was performed on the detected threat or a threat or legitimate software that can be used by intruders. This field appears only in events that contain scan results.
%SCAN_RESULT%Scan result. This field appears only in events that contain scan results.
cs1Label=Scan resultThis field appears only in events that contain scan results.
%VIRUS_NAME%Name of the detected threat or legitimate software that can be used by intruders. This field appears only if a threat or legitimate software that can be used by intruders was detected.
cs2Label=Virus nameThis field appears only if a threat or legitimate software that can be used by intruders was detected.
Writing syslog messages in CEF format is available starting from Kaspersky Scan Engine version 1.0.1.51.
Format of RAW logs in HTTP mode
If Kaspersky Scan Engine is configured to write syslog messages in RAW format, the log records about events appear as follows:
<%PRIORITY%>1 %TIMESTAMP% %HTTP_SERVICE_IP% KasperskyHTTPService %HTTP_SERVICE_PID% %MESSAGE_ID% [KL_HTTPD@23668 md5="%SCANNED_FILE_MD5_HASH%"] BOM %MESSAGE%\n
A record has the following fields:
%PRIORITY%Severity level of the event. Possible values:
163This value is specified for errors.
165This value is specified if the the scan result is something other than
CLEAN.166This value is specified for service events or if the the scan result is
CLEAN.
%TIMESTAMP%Date and time of the event in the Coordinated Universal Time (UTC) time zone.
%HTTP_SERVICE_IP%IP address that Kaspersky Scan Engine uses to receive scan requests from clients. If Kaspersky Scan Engine receives scan requests over a UNIX socket, the field contains the host name of the computer that Kaspersky Scan Engine runs on.
%HTTP_SERVICE_PID%PID of Kaspersky Scan Engine.
%MESSAGE_ID%Class of the event. Possible values:
SERVICE_MESSAGEService event.
ERROR_MESSAGEError.
SCAN_RESULT_MESSAGEScan result.
%SCANNED_FILE_MD5_HASH%MD5 hash of the object that was passed for scanning to Kaspersky Scan Engine. This field appears only when Kaspersky Scan Engine returns the scan result.
%MESSAGE%Description of the event, for example, the text of an error message.
Writing syslog messages in RAW format is available starting from Kaspersky Scan Engine version 1.0.1.51.
Page top
Building executable files for the HTTP service and the HTTP client
You can compile the kavehttpd service and the sample HTTP client from the source code located in the %service_dir%/samples/kavhttp/ directory.
Software requirements
To compile kavehttpd service and the sample HTTP client, you must install the following software on you computer:
- Boost 1.60 or later. The kavehttpd service source files are liked with Boost dynamically, which requires the boost-devel package.
The boost libraries must be compiled statically. You can find a list of the necessary boost libraries in
%service_dir%/samples/kavhttp/Makefile. - OpenSSL library. It is recommended to install the openssl-devel package.
- PostgresSQL libraries. It is recommenced to install the libpqxx-devel package.
Compiling Kaspersky Scan Engine and the sample HTTP client in Linux
To compile Kaspersky Scan Engine and the sample HTTP client in Linux:
- Navigate to the
%service_dir%/samples/kavhttp/directory. - Run
make.The compiled client executable files will be placed in the
%service_dir%/bindirectory. The compiled service executable files will be placed in the%service_dir%/opt/kaspersky/ScanEngine/sdk8l3/bin/directory.
The following example demonstrates building the executable files:
user@computer:/opt/kaspersky/ScanEngine# cd ./samples/kavhttp/ user@computer:/opt/kaspersky/ScanEngine/samples/kavhttp/# make |
Kaspersky Scan Engine and the sample HTTP client in Windows
To compile Kaspersky Scan Engine and the sample HTTP client in Windows:
- Navigate to the
%service_dir%/samples/kavhttp/http_service/windowsfolder. - Do the following:
- If you want to compile the kavehttpd service, open the
kavhttpd.vcxprojfile in Microsoft Visual Studio. - If you want to compile the sample HTTP client, open the
kavhttp_client.vcxprojfile in Microsoft Visual Studio.
- If you want to compile the kavehttpd service, open the
- Right-click the project in Solution Explorer and select Properties.
- In the properties window that opens, in the left navigation tree, select Configuration Properties > Linker > Input, and for the Additional Dependencies property add the paths to the Boost, OpenSSL, and PostgresSQL libraries.
- In the left navigation tree, select Configuration Properties > С/C++, and for the Additional Include Directories property add the headers of the Boost, OpenSSL, and PostgresSQL libraries.
- Right-click the project in Solution Explorer and select Build.
If you use Kaspersky Scan Engine GUI and intend to modify the provided binaries, please make sure to get prior approval for all changes from your technical account manager (TAM).
Page top
Using Kaspersky Scan Engine in ICAP mode
This chapter contains information about using Kaspersky Scan Engine in ICAP mode.
The ICAP mode is available only for Linux operating systems.
Kaspersky Scan Engine and ICAP mode
Internet Content Adaptation Protocol (ICAP) is the standard for communication between proxy servers and service providers. In ICAP mode, Kaspersky Scan Engine works with ICAP-compliant proxy servers. Kaspersky Scan Engine scans HTTP traffic that passes through a proxy server, and URLs requested by users.
In ICAP mode, Kaspersky Scan Engine consists of the kavicapd service, configuration files, and libraries, and has the following features:
- URL scan
Kaspersky Scan Engine allows you to scan URLs that users request from a proxy server. This function is available in both the request modification (REQMOD) mode and response modification (RESPMOD) mode of ICAP.
- HTTP traffic scan
Kaspersky Scan Engine allows you to scan incoming and outgoing HTTP traffic that passes through a proxy server. This function is available in both the request modification (REQMOD) mode and response modification (RESPMOD) mode of ICAP.
Scanning of multipart objects is supported.
- Support for the
204 NoContentHTTP status codeThe kavicapd service can be configured to reply with this status code if the message sent by a client does not require modification.
- Configuring the kavicapd service behavior with service rules
- Partial mode
In this mode, the ICAP plugin scans files as a whole, and then divides them into batches, and sends the batched files to the user. The plugin continues to scan files at the same time that it is sending the first batches of files to the user. This function allows users to receive large scanned files quickly.
This element is available starting from Kaspersky Scan Engine version 1.0.1.51.
- Preview mode
In this mode, the ICAP client sends preview requests to the ICAP plugin. The preview requests allow you to skip objects that the plugin does not consider malicious.
This element is available starting from Kaspersky Scan Engine version 1.0.1.51.
Configuring Kaspersky Scan Engine in ICAP mode
This section explains how to manually configure Kaspersky Scan Engine for use in ICAP mode without using Kaspersky Scan Engine GUI.
ICAP mode configuration file
The ICAP mode configuration file, kavicapd.xml, consists of several sections that specify settings for the kavicapd service and KAV SDK.
Preparing the ICAP mode configuration file
The Kaspersky Scan Engine distribution kit contains a %distr_kit%/etc/kavicapd.xml configuration file.
After installing Kaspersky Scan Engine, you can copy kavicapd.xml to your preferred location:
- If you copy
kavicapd.xmlto the/etc/directory, Kaspersky Scan Engine automatically finds and parses this file. - If you copy
kavicapd.xmlto a different location, you need to set the path to this location when you start Kaspersky Scan Engine:- If you want to use the init script to start Kaspersky Scan Engine, see section "Running Kaspersky Scan Engine in ICAP mode with the init script".
- If you want to start Kaspersky Scan Engine from command line manually, see section "Running Kaspersky Scan Engine in ICAP mode manually".
Parameters of the ICAP mode configuration file
Following are the sections of the ICAP mode configuration file, kavicapd.xml. An example configuration file is at the end.
Some sections of the configuration file are optional. However, if a section exists in the configuration file, all of its child elements must be present. Elements must not be empty, unless stated otherwise.
SDKSettings
The following parameters specify KAV SDK settings.
ScannersCount—Specifies the number of scanning processes. You can have up to 256 scanning processes.The default value is
16.ThreadsCount—Specifies the total number of scanning threads in all processes. You can have up to 256 scanning threads.The default value is
16.QueueLen—Specifies the length of the scan task queue.The default value is
1024.ScanTimeout—Specifies the scanning timeout, in milliseconds (ms). If the value of this parameter is0, the timeout is disabled.The default value is
10000(10 seconds).LicensePath—Specifies an absolute path to a directory where the application ID file, licensing file, and key file are stored.Kaspersky Scan Engine looks for these files in the following directories:
- The directory specified in
LicensePath. - The directory that contains the kavicapd executable file.
- The
%service_dir%/ppldirectory.
The default value is
/opt/kaspersky/ScanEngine/bin.- The directory specified in
BasesPath—Specifies an absolute path to a directory where the anti-virus database is located.The default value is
/opt/kaspersky/ScanEngine/bin/bases.TempPath—Specifies an absolute path to a directory where the files created at runtime are stored.The default value is
/tmp/kavicapd.Do not delete any files from this directory.
DiskUsageLimit—Specifies the maximum amount of disk space (in kilobytes) that can be allocated for unpacking a packed object.Limiting disk space allocated for an unpacked object helps protect the server from zip bombs (malicious archive files).
If the value of this parameter is
0, the zip bomb protection is disabled.The default value is
102400.ScanningModespecifies a file scanning mode.A scanning mode is defined by a combination of flags separated by pipes (
|).Possible values:
KAV_O_M_PACKEDScan compressed executable files.
KAV_O_M_ARCHIVEDScan archived files.
KAV_O_M_MAILBASESScan files that contain email databases.
KAV_O_M_MAILPLAINScan email messages.
KAV_O_M_HEURISTIC_LEVEL_SHALLOWSet the scanning level of the advanced heuristic code analyzer to
shallow(the Low level in the graphical user interface).KAV_O_M_HEURISTIC_LEVEL_MEDIUMSet the scanning level of the advanced heuristic code analyzer to
medium(the Medium level in the graphical user interface).KAV_O_M_HEURISTIC_LEVEL_DETAILSet the scanning level of the advanced heuristic code analyzer to
detail(the High level in the graphical user interface).KAV_O_M_MSOFFICE_MACRONotify the user if a Microsoft Office document file contains a macro.
KAV_O_M_PHISHINGEnable Phishing protection.
The default value is
KAV_O_M_PACKED | KAV_O_M_ARCHIVED | KAV_O_M_MAILPLAIN | KAV_O_M_MAILBASES | KAV_O_M_HEURISTIC_LEVEL_SHALLOW.LicensingMode—Specifies the licensing mode used in Kaspersky Scan Engine.Possible values:
The default value is
1.
KSNSettings
The following parameters specify Kaspersky Security Network (KSN) settings.
This is an optional section. If this section is absent from the configuration file, KSN is not used.
Note that by using KSN you agree to transfer data described in the About data provision.txt file to Kaspersky Lab. For more information about the procedure of data provisioning, see section "About data provisioning".
UseKSN—A Boolean value that defines whether KSN is enabled.If the value of this parameter is
1, KSN is enabled. It also automatically enables theKAV_O_M_COMPOSITE_SCAN_KSNflag. If the value of this parameter is0, KSN is disabled.The default value is
0.ObjectCheckOnDemandTimeoutMs—Specifies the KSN scanning timeout, in milliseconds (ms).This value cannot be
0.The default value is
10000(10 seconds).CacheSizeKb—Specifies the maximum size, in kilobytes (KB), of the KSN status cache.This cache is used by Kaspersky Scan Engine to store scan results obtained from KSN.
The default value is
30720.
ProxySettings
The following parameters specify proxy server settings for Kaspersky Scan Engine. Kaspersky Scan Engine uses these settings when it connects to the Internet.
This is an optional section. If this section is absent from the configuration file, Kaspersky Scan Engine does not use a proxy server when connecting to the Internet.
UseProxy—A Boolean value that defines whether Kaspersky Scan Engine uses a proxy server when connecting to the Internet.If the value of this parameter is
1, Kaspersky Scan Engine uses a proxy server. If the value of this parameter is0, Kaspersky Scan Engine does not use a proxy server.The default value is
0.Host—Specifies the proxy server IP address (IPv4 or IPv6) or a domain name.If a proxy server is used, this parameter is mandatory.
Do not specify the protocol (
http://orhttps://) in this parameter.Port—Specifies the port number of the proxy server.The default value is
3128.User—Specifies the encrypted user name that is used for authenticating on a proxy server. The user name is encrypted by thekav_encryptutility.If a proxy server is used, this parameter is mandatory.
If the
Userparameter and thePassparameter are empty, an anonymous proxy server is used.Pass—Specifies the encrypted password used for authenticating on a proxy server. The password is encrypted by thekav_encryptutility.If this element and the
Userelement are empty, an anonymous proxy server is used.
UpdateSettings
The following parameters specify update settings for Kaspersky Scan Engine.
This is an optional section. If this section is absent from the configuration file, updating is disabled.
DisableBackup—A Boolean value that defines whether anti-virus database backup is enabled.If the value of this parameter is
0, anti-virus database backup is enabled. If the value of this parameter is1, anti-virus database backup is disabled.The default value is
0.UpdatePeriodMinutes—Specifies the interval between automatic updates (in minutes).The maximum value is
44640.If this parameter is
0, Kaspersky Scan Engine does not perform automatic updates.The default value is
30.UseOnlyCustomSources—Specifies whether Kaspersky Lab update servers are used as a source of updates.If the value of this parameter is
1, only custom update sources are used. If the value of this parameter is0, Kaspersky Lab update servers are used along with custom update sources.The default value is
0.UpdateSources—Contains custom update sources.Sourcespecifies a custom update source.
USRSignalAction—Specifies an action that must be performed on receiving a signal specified in theUSRSignalToHandleparameter.Possible values:
reloadReloads the database without updating it. It is assumed that the files in the database directory are already up to date and must be reloaded.
updateUpdates and reloads the database.
The default value is
update.USRSignalToHandle—Specifies the signal that must be received to update or reload the database (this action is specified in theUSRSignalActionparameter).Possible values:
USR1Only the
SIGUSR1signal must be handled.USR2Only the
SIGUSR2signal must be handled.allBoth the
SIGUSR1andSIGUSR2signals must be handled.NoneSignals must not be handled (database update is performed according to a pre-defined schedule).
ICAPSettings
The following parameters specify Kaspersky Scan Engine settings.
Port—Specifies the port number of Kaspersky Scan Engine.The default value is
1344.MaxIcapSessionsCount—Specifies the maximum number of simultaneous connections to Kaspersky Scan Engine.RAMUsageLimit—Specifies the maximum amount of system memory, in kilobytes (KB) that can be allocated by Kaspersky Scan Engine.This measure prevents the operating system from running out of memory. Excessive use of system memory (in this case, RAM) can occur when Kaspersky Scan Engine scans large files or receives a lot of simultaneous scan requests. When the
RAMUsageLimitlimit is reached, Kaspersky Scan Engine stops processing the object that caused excessive consumption of memory.Set the value of
RAMUsageLimitas high as possible, but keep in mind that you have to leave enough system memory for the proper functioning of Kaspersky Scan Engine. The anti-virus database and libraries used by Kaspersky Scan Engine occupy about 300 megabytes (MB)—and this amount doubles during reloading of the database. Kaspersky Scan Engine also requires memory resources for all of its components.Do not set the value of
RAMUsageLimitlower than 7 MB. This is the minimum amount of system memory required to ensure the proper functioning of Kaspersky Scan Engine.If the value of this parameter is
0, the amount of system memory that can be allocated by Kaspersky Scan Engine is not limited.The default value is
0.Note that if the value of this parameter is set to
0, the operating system may run out of memory. If Kaspersky Scan Engine uses too much system memory, the operating system may stop the service.ExclusionsSpecifies the rules for the preview request mode (REQMOD). This feature enables the ICAP client to send preview requests to the ICAP plugin, which then skips scanning of objects that are not considered malicious.
Possible parameters:
ContentSizeThe exclusion rule for the object size, in kilobytes (KB), that is specified in the
Content-Lengthfield of the HTTP header. If theContent-Lengthvalue is greater than or equal to theContentSizevalue, the ICAP plugin does not scan this object. You can set this parameter only once.This parameter may be absent if you explicitly omitted it.
ContentTypeThe exclusion rule for the object type that is specified in the
Content-Typefield. If theContent-Typefield contains the value, which is specified in theContentTypeelement field, the ICAP plugin does not scan this object. You can set this parameter one or more times. The ICAP plugin will check all of these parameters.This parameter may be absent if you explicitly omitted it.
RequestURLThe exclusion rule for sending the request to a URL. The URL is contained in the
Hostfield (from the HTTP header) and in theURIfield (from the HTTP starting line). If theRequestURLelement contains the requested URL, the ICAP plugin does not scan the object. Before comparing the requested URL with the rule value from theRequestURLfield, the ICAP plugin applies normalizing rules to this URL.The
RequestURLparameter may contain masks.You can specify the asterisk (*) wildcard character from the third level of the domain and above. For example,
*.domain.com: this value includes all subdomains of this domain. The asterisk (*) wildcard character can be used as a substitute for any sequence of characters.On the
URIfield, you can specify the asterisk (*) and question mark (?) wildcard characters, which can be used to substitute for any sequence of characters, or a single character, respectively. For example,domain.com/test/page=*: this value includes all pages that contain the/test/page=path (such asdomain.com/test/page=123).You can set this parameter one or more times. The ICAP plugin will check all of these parameters.
This parameter may be absent if you explicitly omitted it.
If the object to scan complies with at least one of the rules, the ICAP plugin returns the code
204, regardless of the value that theAllow204parameter of thekavicapd.xmlfile contains. If the object to scan does not comply with any of the rules, the ICAP plugin returns error code100and then waits for the ICAP client to send this object.This element is available starting from Kaspersky Scan Engine version 1.0.1.51.
ScanMaxFileSize—Specifies the maximum size (in kilobytes) of a file that can be scanned by Kaspersky Scan Engine.If the value of this parameter is
0, Kaspersky Scan Engine will scan files of any size. If theContenSizeexclusion rule is specified, the value of theScanMaxFileSizeparameter is equal to the value of this rule.The default value is
0.Allow204—A Boolean value that defines whether Kaspersky Scan Engine sends a204NoContentHTTP status code instead of unchanged data to the proxy server.If the value of this parameter is
1, Kaspersky Scan Engine returns a204NoContentHTTP status code instead of unchanged data. If the value of this parameter is0, Kaspersky Scan Engine returns unchanged data.ScanInReqMode—Specifies the types of content that Kaspersky Scan Engine must scan in request modification (REQMOD) mode.This is an optional element. If this element is absent from the configuration file, the
Allvalue is used.Possible values:
ContentOnly scan the HTTP message body.
UrlOnly scan the requested URL.
AllScan the HTTP message body and the requested URL.
- Empty value
Do not scan HTTP messages in request modification (REQMOD) mode.
The default value is
All.ScanInRespMode—Specifies the types of content that Kaspersky Scan Engine must scan in response modification (RESPMOD) mode.This is an optional element. If this element is absent from the configuration file, the
Allvalue is used.Possible values:
ContentOnly scan the HTTP message body.
UrlOnly scan the requested URL.
AllScan the HTTP message body and the requested URL.
- Empty value
Do not scan HTTP messages in response modification (RESPMOD) mode.
The default value is
All.RulesFilePath—Specifies an absolute path to a file that contains service action rules.The default value is
/opt/kaspersky/ScanEngine/icap_data/kavicapd_gui_rules.conf.CmdPath—Specifies an absolute path to a directory containing scripts that can be executed when the corresponding rules are triggered.The default value is
/opt/kaspersky/ScanEngine/icap_data/scripts.ResponsesPath—Specifies an absolute path to a directory containing response templates that can be executed when the corresponding rules are triggered.The default value is
/opt/kaspersky/ScanEngine/icap_data/templates.HTTPClientIpICAPHeader—Specifies the name of the header field in which the IP address of the HTTP client is specified.This element is optional. It can have an empty value.
This element is available starting from Kaspersky Scan Engine version 1.0.1.51.
HTTPUserNameICAPHeader—Specifies the name of the header field in which the name of the HTTP client is specified.This element is available starting from Kaspersky Scan Engine version 1.0.1.51.This element is optional. It can have an empty value.
This element is available starting from Kaspersky Scan Engine version 1.0.1.51.
TransferBeforeScanEndingSpecifies Partial mode for files that are sent to the proxy server.
This element has the following attributes:
Delayspecifies the delay(s) between the start of receiving the object and sending the first batch of files to the proxy server.The range of possible values is from 1 to 3600. This element may be absent if you explicitly omitted it.
The preset value is 10.
ChunkSizespecifies the data rates (kilobytes per second (KB/s)) of the file that is being scanned while the scan is in progress.The range of possible values is from 1 to 1024. This element may be absent if you explicitly omitted it.
The preset value is 4.
You can specify one of two values for the element.
Possible values:
0The file is sent only after the scanning ends.
1The file can be sent before the scanning ends.
The preset value is
0.This element is available starting from Kaspersky Scan Engine version 1.0.1.51.
Structure of the configuration file
Following is an example ICAP mode configuration file.
<Configuration>
<SDKSettings> <ScannersCount>16</ScannersCount> <ThreadsCount>16</ThreadsCount> <QueueLen>1024</QueueLen> <ScanTimeout>10000</ScanTimeout> <!-- 0 = unlimited --> <LicensePath> <BasesPath> <TempPath>/tmp/kavicapd</TempPath> <LicensingMode>1</LicensingMode><!-- 1 = simplified licensing mode; 2 - online licensing mode --> <DiskUsageLimit>102400</DiskUsageLimit> <!-- 0 = turn zip-bomb protection off --> <ScanningMode>KAV_O_M_PACKED | KAV_O_M_ARCHIVED | KAV_O_M_MAILPLAIN | KAV_O_M_MAILBASES | KAV_O_M_HEURISTIC_LEVEL_SHALLOW</ScanningMode> </SDKSettings>
<KSNSettings> <UseKSN>0</UseKSN> <ObjectCheckOnDemandTimeoutMs>10000</ObjectCheckOnDemandTimeoutMs> <CacheSizeKb>30720</CacheSizeKb> </KSNSettings>
<UpdateSettings> <DisableBackup>0</DisableBackup> <UpdatePeriodMinutes>30</UpdatePeriodMinutes> <!-- 0 = turn update off --> <UseOnlyCustomSources>0</UseOnlyCustomSources> <UpdateSources> <!-- <Source></Source> --> </UpdateSources> </UpdateSettings>
<ProxySettings> <UseProxy>0</UseProxy> <Host>myproxy.mycompany.com</Host> <Port>3128</Port> <User>proxyuser</User> <Pass>proxypass</Pass> </ProxySettings>
<ICAPSettings> <Port>1344</Port> <MaxIcapSessionsCount>100</MaxIcapSessionsCount> <Exclusions> <ContentSize>2048</ContentSize> <ContentType>video/mp4</ContentType> <RequestURL>example.com</RequestURL> </Exclusions> <ScanMaxFileSize>0</ScanMaxFileSize> <!-- 0 = unlimited --> <RAMUsageLimit>0</RAMUsageLimit> <!-- 0 = unlimited --> <Allow204>0</Allow204> <ScanInReqMode>All</ScanInReqMode> <ScanInRespMode>All</ScanInRespMode> <RulesFilePath> <CmdPath> <ResponsesPath> <HTTPClientIpICAPHeader>X-Client-IP</HTTPClientIpICAPHeader> <HTTPUserNameICAPHeader>X-Client-Username</HTTPUserNameICAPHeader> <TransferBeforeScanEnding Delay="10" ChunkSize="4">0</TransferBeforeScanEnding> </ICAPSettings>
</Configuration> |
Configuring service rules
Rules define the behavior of Kaspersky Scan Engine in ICAP mode. These rules are listed in a service rules configuration file located in the /opt/kaspersky/ScanEngine/icap_data/ directory. The location of this file is specified in the RulesFilePath parameter of the ICAP mode configuration file. A sample configuration file, kavicapd_gui_rules.conf, is included in the distribution kit.
Each rule listed in the configuration file must be placed on a separate line.
Rule syntax
A kavicapd service rule consists of three parts:
- ICAP mode
Possible values:
REQRequest modification (REQMOD) mode
RESPResponse modification (RESPMOD) mode
ANYAny of the modes listed above
- Scan result
Possible values are listed below.
Possible values:
NON_SCANNEDThe object was not scanned.
FAILEDScan failed.
PHISHINGA phishing web address is detected.
DETECTEDThe scanned object or URL is infected.
MACROA Microsoft Office document containing a macro is detected.
CLEANThe scanned object is clean (non-infected).
- Response of Kaspersky Scan Engine in ICAP mode
Possible values:
SET_RESP=<response_template>Kaspersky Scan Engine sends an HTML response template with the specified name to a proxy server.
EXEC_CMD=<script>Kaspersky Scan Engine executes a script with the specified name.
NONEKaspersky Scan Engine does not modify the scanned object.
If the Kaspersky Scan Engine response is not specified in a rule, the default value of
NONEis used.
Understanding scan results
In ICAP mode, Kaspersky Scan Engine scans both HTTP traffic and web addresses requested by users. Scan results are ranked by severity, with the most severe result having the rank of 1. The following list shows the ranking of supported scan results by severity:
PHISHINGDETECTEDMACRONON_SCANNEDFAILEDCLEAN
If a traffic scan and a URL scan produce different scan results, the result with the highest severity level is chosen as the summary scan result. If both scan results are DETECTED, the summary scan result is also DETECTED, and the name of the detected object returned by Kaspersky Scan Engine is taken from the result of a URL scan. The scan results used in service rules are summary scan results.
Sample rules
Below are a few sample rules that you can specify:
RESP DETECTED SET_RESP=detect_resp EXEC_CMD=admin_notify RESP FAILED SET_RESP=err_resp REQ FAILED EXEC_CMD=admin_notify REQ CLEAN |
Working with response templates and scripts
Rules allow you to specify response templates that can be returned in place of blocked web pages, and to specify scripts that can be executed upon detection, for example, to notify the system administrator.
The Kaspersky Scan Engine distribution package contains sample response templates and a sample script that sends information about an incident to syslog.
Working with response templates
Kaspersky Scan Engine is shipped with two sample response templates located in the /opt/kaspersky/ScanEngine/icap_data/templates directory: detect_req and detect_res. The detect_req template is returned when a threat or a type of legitimate software that can be used by intruders to damage a user's computer or personal data is detected in request modification (REQMOD) mode. The detect_res template is returned when a threat or a type of legitimate software that can be used by intruders to damage a user's computer or personal data is detected in response modification (RESPMOD) mode.
You can create custom response templates and configure Kaspersky Scan Engine to return them with the modified message. Like sample response templates, custom response templates can use a detection context that provides additional information to a user. For more information on the detection context, see subsection "Using the detection context in response templates and scripts" below.
Even though Kaspersky Scan Engine returns response templates in place of blocked web pages, some browsers may not display these templates, returning a 403 Forbidden HTTP status code instead.
Working with scripts
Kaspersky Scan Engine is shipped with a send_syslog script located in the /opt/kaspersky/ScanEngine/icap_data/scripts directory.
The send_syslog script displays a message about a detected object and redirects the message to logger.
You can create custom shell scripts and configure Kaspersky Scan Engine to execute them upon detection. Like the sample script, custom scripts can use the detection context that provides additional information to a user. For more information on the detection context, see subsection "Using the detection context in response templates and scripts" below.
Using the detection context in response templates and scripts
Response templates and scripts support the detection context. When a response template is displayed, context variables are replaced with values returned by Kaspersky Scan Engine. To use the detection context in a script, reference context variables as environment variables.
The following variables are supported in the detection context:
_VirusName_—Name of the detected object._DateTime_—Date and time of the incident (in theYYYY-MM-DD HH:MM:MSformat)._ICAPDVersion_—Version of the ICAP plugin._URL_—Requested URL.
You can use the detection context in custom response templates and scripts.
Specifying paths to plugins and libraries
Before the kavicapd service is ready to run, the following paths must be specified:
- Plugin path
Path to a directory with PPL plugin files.
- Library path
Path to a directory with shared libraries.
The paths to plugins and shared libraries can be specified by exporting the KL_PLUGINS_PATH and LD_LIBRARY_PATH environment variables, respectively.
The KL_PLUGINS_PATH and LD_LIBRARY_PATH variables can be exported manually, or automatically by using the kavicapd init script. You can also use the kavicapd.sh shell script, which exports KL_PLUGINS_PATH and LD_LIBRARY_PATH and starts the kavicapd service.
Specifying the path to plugins and libraries manually
This method requires exporting the variables each time before you start the kavicapd service in a new session (the variables only exist during the current shell session).
The following example shows how to export the variables manually:
[user@host ~]$ export KL_PLUGINS_PATH="/opt/kaspersky/ScanEngine/ppl" [user@host ~]$ export LD_LIBRARY_PATH="/opt/kaspersky/ScanEngine/lib:${KL_PLUGINS_PATH}:${LD_LIBRARY_PATH}" |
Specifying the path to plugins and libraries with the init script
You can modify the ICAP mode init script so that it exports the variables automatically.
To export the variables by means of the init script:
- Locate the following code:
############# KAV SDK configuration ############
SDKPATH=/opt/kaspersky/ScanEngine
KL_PLUGINS_PATH="${SDKPATH}/ppl"
LD_LIBRARY_PATH="${SDKPATH}/lib:${KL_PLUGINS_PATH}:${LD_LIBRARY_PATH}"
- Change the values of
SDKPATH,KL_PLUGINS_PATH, andLD_LIBRARY_PATHto point to the location of the KAV SDK directory, plugin directory, and libraries directory, respectively.
The init script will export the variables when it is executed.
Specifying the path to plugins and libraries with the kavicapd.sh shell script
You can modify kavicapd.sh so that it exports the variables automatically.
To export the variables by means of the kavicapd.sh shell script:
- Open kavicapd.sh for editing and locate the following lines:
SDK_PATH=$PWD/../../../..
KL_PLUGINS_PATH=$SDK_PATH/ppl
LD_LIBRARY_PATH=$SDK_PATH/lib:$KL_PLUGINS_PATH:$LD_LIBRARY_PATH
- Change the values of
SDKPATH,KL_PLUGINS_PATH, andLD_LIBRARY_PATHto point to the location of the KAV SDK directory, plugin directory, and libraries directory, respectively.
The kavicapd.sh shell script will export the variables when it is executed.
Page top
Running Kaspersky Scan Engine in ICAP mode
This section explains how to run Kaspersky Scan Engine in ICAP mode.
Running Kaspersky Scan Engine in ICAP mode with the init script
You can run Kaspersky Scan Engine in ICAP mode by using the kavicapd service init script located in the %service_dir%/etc/init.d directory. The init script allows you to run the service manually from the command line or add it as a startup script.
Preparing the init script
By default, the kavicapd init script searches for the kavicapd executable file in the /opt/kaspersky/ScanEngine/bin directory. If you want to use the kavicapd service from another location, edit the init script accordingly. The DAEMON_DIR variable in the kavicapd script defines the path to the kavicapd executable file.
To prepare the kavicapd init script:
- Open the
kavicapd.shscript for editing. - Specify paths to plugins and libraries.
- Locate the following code:
########## ICAP service configuration ##########
DAEMON_DIR="${SDKPATH}/bin"
DAEMON="${DAEMON_DIR}/kavicapd"
PIDFILE=/var/run/kavicapd.pid
CONFILE=/etc/kavicapd.xml
- If required, manually set the value of the
DAEMON_DIRvariable to thekavicapdexecutable file location. - Set the value of the
PIDFILEvariable to thekavicapdPID file location.If the PID file does not exist, the process initiated by the
kavicapd.shscript will create it. - Set the value of the
CONFILEvariable to the ICAP mode configuration file location. - Locate the following line:
STATUS_FILE_PATH=/tmp/kavicapd
- Set the value of the
STATUS_FILE_PATHvariable to the directory that will contain the status file of thekavicapdservice.The value of this variable must be the same as the value of
TempPathin the ICAP mode configuration file. - Locate the following line:
UPDATE_SIGNAL="USR1"
- Set the value of the
UPDATE_SIGNALvariable to the signal that will be used to update and reload the database (updatedbcommand).Specify
USR1to useSIGUSR1, orUSR2to useSIGUSR2.If the
kavicapdservice receives aUSRsignal (SIGUSR1orSIGUSR2) that is not specified in this parameter, the service stops (this is the default behavior of Linux programs). Consider this behavior when specifying a value for this parameter. - Save the file and close the editor.
Running the service with the init script
The kavicapd.sh init script supports the following commands:
start—Start thekavicapdservice.After this command is executed, the script prints
[OK]and immediately returns control to the terminal, but it takes the service some time to start.stop—Stop thekavicapdservice.restart—Restart thekavicapdservice (that is, stop and then start the service).After this command is executed, the script prints
[OK]and immediately returns control to the terminal, but it takes the service some time to start.updatedb—Send aSIGUSR1orSIGUSR2signal (as specified in theUPDATE_SIGNALparameter of the init script) to thekavicapdservice.The
kavicapdservice handles this signal either by reloading or by updating and then reloading the database, as specified in the ICAP mode configuration file.status—Show the status of thekavicapdservice.Status message contains the following information:
- KAV SDK version
- ICAP version
- Information about the anti-virus database
- Information about the key file or activation code
Following is an example of the
statuscommand output in simplified licensing mode:kavicapd (pid 1107) is running...
KAV SDK version: KAV SDK v8.5.1.83
ICAPD version: KL ICAP Service v1.0 (KAV SDK v8.5.1.83)
Database release date: 2015-Sep-14 07:46:00
Records in the database: 4308101
Key file name: EXAMPLE.key
Key file expiration date: 2019-Jan-12 20:00:00
Days left: 590
Following is an example of the
statuscommand output in online licensing mode.kavicapd (pid 1107) is running...KAV SDK version: KAV SDK v8.5.1.83ICAPD version: KL ICAP Service v1.0 (KAV SDK v8.5.1.83)Database release date: 2015-Sep-14 07:46:00Records in the database: 4308101Activation code: EXMPL-*****-*****-12345License expiration date: 2019-Jan-12 20:00:00Days left: 590
To see the list of supported commands, execute the script without any parameters.
[user@host ~]$ /etc/init.d/kavicapd |
Running the service automatically
To start the service automatically, make kavicapd a startup service.
To make kavicapd a startup service:
- Copy the kavicapd.sh init script to the directory that contains init scripts. The location of this directory may vary depending on the operating system.
- Add the
kavicapdservice to the service startup list. The exact method may vary depending on the operating system. - Verify that the service has been added successfully.
- Restart the system for the changes to take effect.
Running Kaspersky Scan Engine in ICAP mode manually
You can run the kavicapd service by executing the kavicapd binary file manually.
Before executing the file, make sure that the paths to the directories that contain plugins and libraries are specified correctly.
The following options are available when the kavicapd service is run manually:
Options for running the kavicapd binary file
Option |
Description |
|---|---|
|
Mandatory parameter. Specifies the path to the ICAP mode configuration file. The path can be absolute or relative. The relative path is specified relative to the current working directory. |
|
Mandatory parameter. Specifies the path to the PID file. The path can be absolute or relative. The relative path is specified relative to the current working directory. |
|
Optional parameter. Runs the In this mode, the |
If you execute the kavicapd binary file without specifying any option, the list of supported options is displayed.
Running Kaspersky Scan Engine in ICAP mode with kavicapd shell script
You can run the kavicapd service by executing the /opt/kaspersky/ScanEngine/bin/kavicapd.sh shell script manually. Before executing the script, make sure that the paths to the directories that contain plugins and libraries are specified correctly.
Updating the anti-virus database in ICAP mode
In ICAP mode, Kaspersky Scan Engine supports several ways of updating the anti-virus database.
When the anti-virus database is updated, the encrypted user agent string of KAV SDK is transferred to Kaspersky Lab. For the list of transferred data, see section "Data transferred to Kaspersky Lab during an update".
Updating the anti-virus database by means of built-in functionality
Perform one of the following actions to update the anti-virus database:
- Configure automatic database updates in the
UpdateSettingssection of the ICAP mode configuration file. - Send a
SIGUSR2signal to thekavicapdservice.Kaspersky Scan Engine must be configured to update the database on this signal.
- Execute the
kavicapdinit script with theupdatedbcommand.Kaspersky Scan Engine must be configured to update the database on a signal from the init script. The init script must be configured to send the signal specified in the ICAP mode configuration file.
When you use one of these methods, a newer version of the database is automatically loaded by Kaspersky Scan Engine.
Page top
Getting accumulated statistics in ICAP mode
In ICAP mode, Kaspersky Scan Engine collects information about its usage and creates statistics from this data.These statistics are stored on your hard disk. You can view the statistics to monitor trends in the data requested from your network. For example, you can see if users in you network are trying to download a lot of malicious files.
To view accumulated statistics:
- Open the directory specified in the
TempPathelement of the configuration file. - Find the
report.jsonfile and open it.
Following is an example of the report.json file.
{ "statistics": { "total_requests": 3, "infected_requests": 3, "not_scanned_requests": 0, "error_requests": 0, "engine_errors": 1, "processed_data": 204, "infected_data": 0, "processed_urls": 1, "infected_urls": 1 } } |
where statistics is an object containing the following accumulated statistics:
total_requests—The total number of received requests in response modification (RESPMOD) mode and request modification (REQMOD) mode.infected_requests—The number of requests for which Kaspersky Scan Engine returned aDETECTED,PHISHING, orMACROscan result.not_scanned_requests—The number of valid scan requests that were not processed.Possible reasons:
- The object is too big or too small.
- The object is an encrypted archive.
- Kaspersky Scan Engine is configured to skip objects of the format that the object belongs to.
error_requests—The number of incorrect ICAP requests that were received by Kaspersky Scan Engine.engine_errors—The number of requests for which Kaspersky Scan Engine returned aFAILEDscan result.processed_data—The total amount of scanned data in bytes.This includes objects scanned in RESPMOD mode and objects in POST requests that were scanned in REQMOD mode.
infected_data—The amount of scanned data, in bytes, for which Kaspersky Scan Engine returned aDETECTED,PHISHING, orMACROscan result.This includes objects scanned in RESPMOD mode and objects in POST requests that were scanned in REQMOD mode.
processed_urls—The total number of checked URLs.infected_urls—The number of URLs for which Kaspersky Scan Engine returned aDETECTEDorPHISHINGscan result.
Resetting statistics
You can reset accumulated statistics at any time.
To reset accumulated statistics:
- Open the directory specified in the
TempPathelement of the configuration file. - Find the
report.jsonfile and delete it.
The kavicapd service will create a new report.json file with all statistics set to 0.
Using Kaspersky Scan Engine in ICAP mode with Squid
Squid is a caching and forwarding web proxy server for Windows and UNIX-like systems. You can use Kaspersky Scan Engine in ICAP mode with Squid.
Configuring Squid for working with Kaspersky Scan Engine in ICAP mode
For Kaspersky Scan Engine to work with Squid in ICAP mode, you must specify Kaspersky Scan Engine as an ICAP service in the Squid configuration file (squid.conf).
In Squid, an ICAP service is defined in the icap_service option and has three mandatory parameters: id, vectoring_point, and uri.
To specify Kaspersky Scan Engine as an ICAP service:
- Set
idto any appropriate identifier. - Set
vectoring_pointto an appropriate*_precachevalue:- For request modification (REQMOD) mode, specify
reqmod_precache. - For response modification (RESPMOD) mode, specify
respmod_precache.
- For request modification (REQMOD) mode, specify
- Set
urito the location of Kaspersky Scan Engine:- For REQMOD mode, the URI must have the following format:
icap://servername:port/req. - For RESPMOD mode, the URI must have the following format:
icap://servername:port/resp.
- For REQMOD mode, the URI must have the following format:
Following is an example of a Squid configuration file extract. In this example, Squid uses Kaspersky Scan Engine in ICAP mode to scan HTTP messages in both REQMOD mode and RESPMOD mode.
icap_enable on adaptation_send_username on adaptation_send_client_ip on icap_service srv_kl_resp respmod_precache 0 icap://localhost:1344/resp icap_service srv_kl_req reqmod_precache 0 icap://localhost:1344/req adaptation_access srv_kl_resp allow all adaptation_access srv_kl_req allow all icap_service_failure_limit -1 icap_service_revival_delay 30 icap_preview_enable off |
Configuring logging in ICAP mode
In ICAP mode, Kaspersky Scan Engine can log its activity. Logging settings are specified in the icapdkavlog.conf configuration file (hereinafter referred to as the logging configuration file), located in the /opt/kaspersky/ScanEngine/bin directory.
You can change the logging settings after the kavicapd service is started.
Elements of the logging configuration file
Logging—The root element of the file.Level—Specifies the logging level.Possible values:
noneornonLogging is disabled.
debugordbgDebug level. At this logging level, Kaspersky Scan Engine logs information that can help identify problems, such as changes in the state of a proxy server connection or return values of Kaspersky Scan Engine functions.
The default value is
none.Target—The parent element for parameters that specify where logs must be written.File—Indicates that logs are written directly to log files. It also specifies the properties of log files.This element has the following attributes:
size_limit—Specifies the maximum possible size of a log file, in megabytes (MB).If the value of this attribute is
0, the log file has no size limit.The default value is
0.folder—Specifies the directory where log files are stored.The path can be absolute or relative. The relative path is specified relative to the directory that holds the kavicapd executable file.
The default value is
./logs.clear_folder—Specifies whether Kaspersky Scan Engine must delete old logs on initialization.If the value of this parameter is
1,yes,true,on, orenabled, Kaspersky Scan Engine deletes old log files. If the value of this parameter is0,no,false,off, ordisabled, Kaspersky Scan Engine does not delete old log files.The default value is
0.
Generated log files are named as follows: icapdkav_<pid>_<date_time>_<log_number>.log, where <pid> is the PID of the process, <date_time> is local system date in the
YYYY-MM-DDhhmmssformat, and <log_number> is the number of the log (this parameter is appended to the file name only if the icapdkav_<pid>_<date_time>.log log file already exists).SyslogLoggingis a parent element that contains setting for logs that are redirected tosyslogd.SyslogEnabled—Specifies whether the Kaspersky Scan Engine sends syslog messages.Possible values:
0,false,no,off, ordisabledDisables sending of syslog messages.
- Any other value
Enables sending of syslog messages.
Syslogspecifies settings related to syslog messages.This element has the following attributes:
destination—Specifies the destination address for syslog messages.Possible values:
%PROTOCOL%%IP%:%PORT%, where:%PROTOCOL%is a network protocol (usetcp://orudp://for this value).%IP%is an IPv4 address that receives syslog messages.%PORT%is a port that receives syslog messages.
If you do not specify a protocol as described above, Kaspersky Scan Engine will use the UDP protocol.
localhost—Indicates that syslog messages are redirected tosyslogd.- Absolute or relative path to a directory where log files with syslog messages are stored.
The directory contains the
icapdkav_syslog.logfile. Log files with syslog messages created by previous sessions are not removed. If the directory contains an old file, Kaspersky Scan Engine writes new information to this file without deleting the old data.
format—Specifies the format of syslog messages.Possible values:
cef—Specifies thecefformat of syslog messages.raw—Specifies therawformat of of syslog messages. The rawvalue is used when the value specified in this element is notceforraw, or no value is specified in this element, or if the logging configuration file does not contain theSyslogFormatparameter.
Kaspersky Scan Engine can write debug logs and send syslog messages at the same time or separately.
Sending syslog messages is available starting from Kaspersky Scan Engine version 1.0.1.51.
Structure of the logging configuration file
Following is an example of a logging configuration file:
xml version="1.0" <Logging> <DebugLogging> <Level>debug</Level> <File size_limit="10" folder="./logs" clear_folder="1"/> </DebugLogging> <SyslogLogging> <SyslogEnabled>%ENABLED%</SyslogEnabled> <Syslog destination=”%IP:PORT%|localhost|Path” format=”cef|raw”/> </SyslogLogging> </Logging> |
Format of CEF logs in ICAP mode
If Kaspersky Scan Engine is configured to write syslog messages in CEF format, the log records about events appears as follows:
CEF:0|Kaspersky Lab|Kaspersky ICAP Server|%VERSION%|%EVENT_CLASS_ID%|%EVENT_NAME%|%SEVERITY%| msg=%EVENT_MSG% src=%CLIENT_IP% dvcpid=%ICAP_SERVER_PID% cs2=%HTTP_USER_NAME% cs2Label=X-Client-Username cs3=%HTTP_USER_IP% cs3Label=X-Client-IP start=%EVENT_TIME% fileHash=%SCANNED_FILE_HASH% request=%SCANNED_URL% cs1=%SCAN_RESULT% cs1Label=Scan result cs4=%VIRUS_NAME% cs4Label=Virus name cs5=%SCANNED_FILE_SHA256_HASH% cs5Label=SHA256
A record has the following fields:
%VERSION%Version of KAV SDK that Kaspersky Scan Engine is based on.
%EVENT_CLASS_ID%Class of the event. Possible values:
1Service event (not related to scanning).
2Error.
3Event related to scanning (for example, a scan result).
%EVENT_NAME%Name of the event. Possible values:
Initializing—Kaspersky Scan Engine initialized.Deinitializing—Kaspersky Scan Engine deinitialized.Service event—Service event occurred.Core error—Error occurred.Start scanning memory—Kaspersky Scan Engine started to scan a part of the RAM.Start checking URL—Kaspersky Scan Engine started to scan a URL.Scan result—Kaspersky Scan Engine finished scanning an object.
%SEVERITY%Importance level of the event. The higher the level, the more important the event. Possible values:
5This value is specified for service events, when the scanning starts, or if the the scan result is
CLEAN.7This value is specified for initialization, deinitialization, and errors.
8This value is specified if the the scan result is something other than
CLEAN.
%EVENT_MSG%Description of the event, for example, the text of an error message.
%CLIENT_IP%IP address of the ICAP client that sent the scan request to Kaspersky Scan Engine. This field appears only if the value of
%EVENT_CLASS_ID%is3.%ICAP_SERVER_PID%PID of Kaspersky Scan Engine.
%HTTP_USER_NAME%Name of the HTTP client that were specified in the
HTTPUserNameICAPHeaderparameter of the ICAP mode configuration file. The%HTTP_USER_NAME%field appears only if the value of%EVENT_CLASS_ID%is3.%HTTP_USER_IP%IP address of the HTTP client that were specified in the
HTTPClientIpICAPHeaderparameter of the ICAP mode configuration file. The%HTTP_USER_IP%field appears only if the value of%EVENT_CLASS_ID%is3.%EVENT_TIME%Time and date of the event. The time and date are taken from the computer that Kaspersky Scan Engine runs on.
%SCANNED_FILE_HASH%Hash of the object that was passed for scanning to Kaspersky Scan Engine. This field appears only if the value of
%EVENT_CLASS_ID%is3.%SCANNED_URL%URL that was passed for scanning to Kaspersky Scan Engine. This field appears only if the value of
%EVENT_CLASS_ID%is3.%SCAN_RESULT%Scan result. This field appears only if the value of
%EVENT_CLASS_ID%is3.cs1Label=Scan resultField appears only if the value of
%EVENT_CLASS_ID%is3.%VIRUS_NAME%Name of the threat or legitimate software that can be used by intruders. This field appears only if the value of
%EVENT_CLASS_ID%is3.%SCANNED_FILE_SHA256_HASH%SHA256 hash of object that was passed for scanning to Kaspersky Scan Engine. This field appears only when Kaspersky Scan Engine returns the scan result.
Writing syslog messages in CEF format is available starting from Kaspersky Scan Engine version 1.0.1.51.
Format of RAW logs in ICAP mode
If Kaspersky Scan Engine is configured to write syslog messages in RAW format, the log records about events appear as follows:
<%PRIORITY%>1 %TIMESTAMP% %ICAP_SERVICE_IP% KasperskyICAPServer %ICAP_SERVICE_PID% %MESSAGE_ID% [KL_ICAP@23668 icapMode="%ICAP_MODE%" requestLength="%REQUEST_LENGTH%" httpUserName="%HTTP_USER_NAME%" httpUserIP="%HTTP_USER_IP%" sha2="%SCANNED_FILE_SHA256_HASH%" md5="%SCANNED_FILE_MD5_HASH%"] BOM %MESSAGE%
A record has the following fields:
%PRIORITY%Importance level of the event. Possible values:
163This value is specified for errors.
165This value is specified if the the scan result is something other than
CLEAN.166This value is specified for service events or if the scan result is
CLEAN.
%TIMESTAMP%Date and time of the event in the Coordinated Universal Time (UTC) time zone.
%ICAP_SERVICE_IP%IP address of the computer that Kaspersky Scan Engine runs on.
%ICAP_SERVICE_PID%PID of the Kaspersky Scan Engine.
%MESSAGE_ID%Class of the event. Possible values:
SERVICE_MESSAGEService event.
ERROR_MESSAGEError message.
SCAN_RESULT_MESSAGEScan result.
%ICAP_MODE%Specifies whether Kaspersky Scan Engine scanned an object in Request Modification Mode (REQMOD) or Response Modification Mode (RESPMOD). This field appears only if the value of
%MESSAGE_ID%isSCAN_RESULT_MESSAGE.%REQUEST_LENGTH%Length of the body of the HTTP message scanned by Kaspersky Scan Engine. This field appears only if the value of
%MESSAGE_ID%isSCAN_RESULT_MESSAGEand the scanned object is not a URL.%HTTP_USER_NAME%Name of the HTTP client that was specified in the
HTTPUserNameICAPHeaderparameter of the ICAP mode configuration file. The%HTTP_USER_NAME%field appears only if the value of%MESSAGE_ID%isSCAN_RESULT_MESSAGE.%HTTP_USER_IP%IP address of the HTTP client that was specified in the
HTTPClientIpICAPHeaderparameter of the ICAP mode configuration file. The%HTTP_USER_IP%field appears only if the value of%MESSAGE_ID%isSCAN_RESULT_MESSAGE.%SCANNED_FILE_SHA256_HASH%SHA256 hash of the object that was passed for scanning to Kaspersky Scan Engine. This field appears only when Kaspersky Scan Engine returns the scan result.
%SCANNED_FILE_MD5_HASH%MD5 hash of the object that was passed for scanning to Kaspersky Scan Engine. This field appears only when Kaspersky Scan Engine returns the scan result.
%MESSAGE%Description of the event, for example, the text of an error message.
Writing syslog messages in RAW format is available starting from Kaspersky Scan Engine version 1.0.1.51.
Page top
Building executable files for Kaspersky Scan Engine used in ICAP mode
You can compile the kavicapd service from the source code located in the %service_dir%/samples/kavicap/ directory.
Software requirements
To compile the kavicapd service and the sample HTTP client, you must install the following software on you computer:
- Boost 1.59.0 or later. The kavicapd service source files are liked with Boost statically, which requires the boost-static.x86_64 package.
- OpenSSL library. It is recommended to install the openssl-devel package.
- PostgresSQL libraries. It is recommended to install the libpqxx-devel package.
You will also need the GNU Compiler Collection (GCC) 4.6.3 or later; use the same version of GCC that your version of Boost was compiled with.
To compile Kaspersky Scan Engine for use in ICAP mode:
- Navigate to the
%service_dir%/samples/kavicap/directory. - Run
gmake.
Using Kaspersky Scan Engine GUI
This section describes the graphical user interface (GUI) provided by Kaspersky Scan Engine.
Using Kaspersky Scan Engine GUI, the user can do the following:
- Configure Kaspersky Scan Engine
- Learn about the health of Kaspersky Scan Engine
- Browse service events and events with scan results
- Save service events and events with scan results to a file
Signing in to Kaspersky Scan Engine
When you try to access Kaspersky Scan Engine GUI, the authentication page is displayed. You cannot use Kaspersky Scan Engine GUI if you are not authorized.
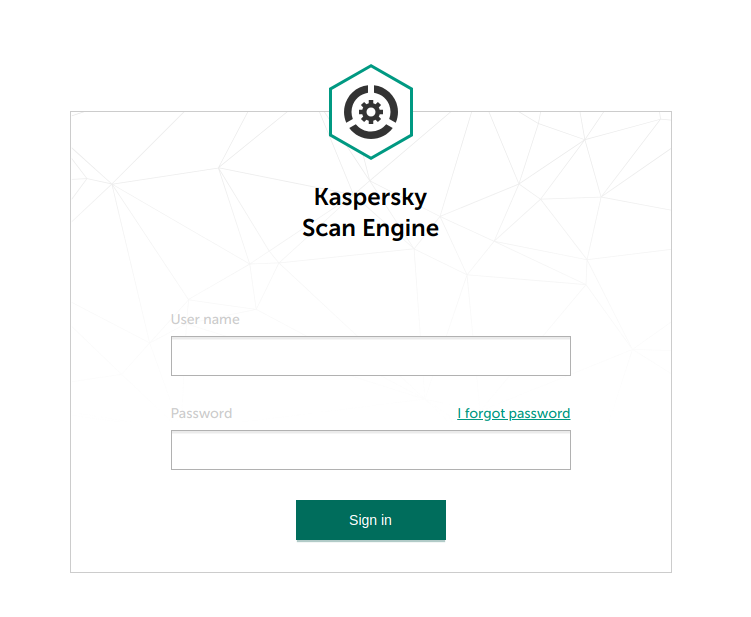
Authentication page
On the authentication page, you specify a user name and password and click Sign in. After you are authorized, the Kaspersky Scan Engine dashboard opens.
After you have installed Kaspersky Scan Engine, the following default credentials are set for Kaspersky Scan Engine GUI:
- User name:
admin - Password:
KAVAdmin!1
To avoid possible security risks, change the password as soon as possible.
If you changed the initial password and forgot it, you can restore it to its default value.
If you are inactive for 24 hours, your session is closed and you have to log in again to continue using Kaspersky Scan Engine GUI.
Page top
Using the footer bar
This section describes the footer bar of Kaspersky Scan Engine GUI. The footer bar is in the lower-left corner of every page of Kaspersky Scan Engine GUI.
The footer bar contains two buttons:
- The Documentation (
 ) button
By clicking this button, you open the page of the Kaspersky Scan Engine documentation where the current page of Kaspersky Scan Engine GUI is described.
- The Login (
 ) split button
After clicking this button, you can choose one of the following actions:
- Change password
- Log out
Kaspersky Scan Engine dashboard
This section describes the Kaspersky Scan Engine dashboard. It opens when you click Dashboard in Kaspersky Scan Engine GUI.
The Kaspersky Scan Engine dashboard displays the following information:
- Information about Kaspersky Scan Engine:
- The current status of Kaspersky Scan Engine
The information displayed indicates whether Kaspersky Anti-Virus Engine is running or not.
- The Kaspersky Anti-Virus Engine initialization result
This result is displayed if the initialization of Kaspersky Anti-Virus Engine failed.
- The KAV SDK version
- The current status of Kaspersky Scan Engine
- Information about the license:
- The license state:
- License key or activation code is valid.
- License key or activation code expires soon—Contact your TAM to purchase a new license key or get a new activation code.
- License key or activation code has expired—Replace the current license key or activation code with a new one.
- The license expiration date
- The license state:
- Information about the anti-virus database:
- The date of the last update of the anti-virus database
- The result of the last attempt of updating the anti-virus database
- The anti-virus database version
- The current state of the anti-virus database
One of the following database states is displayed:
- Up to date
- Out of date—You must launch the database update.
- Critically out of date—You must check your Internet connection and launch the database update as soon as possible.
This information is refreshed every several seconds.
The Kaspersky Scan Engine dashboard also contains a table with service events. The initial view of the table contains up to 50 last service events. You can scroll down the table to browse more service events. Using the table, you can do the following:
- Select the time period during which the scan results are collected to be displayed in the table.
The time period you select is kept when you refresh the web page.
- Specify a filter for the data to be displayed.
You can choose one or several modules that issued the events:
- Updater module
Events from this module are related to updating of the anti-virus database.
- Licensing module
Events from this module are related to the licensing functionality.
- Scanning module
Events from this module are related to errors that occurred during scanning of objects.
- Service
Events from this module can be either from HTTP Daemon or from ICAP Plugin.
You can also specify the severity of events to be displayed.
The filter you set is kept when you refresh the web page.
- Updater module
- Save the contents of the table to a file by clicking Export.
- Refresh the contents of the table manually by clicking Refresh.
The Kaspersky Scan Engine dashboard also contains several buttons that allow you to do the following:
- Restart—Restart Kaspersky Scan Engine.
- Update—Run the anti-virus database update.
- Update from scratch—Download the anti-virus database from scratch.
This process occurs as follows:
- Kaspersky Scan Engine stops.
- The anti-virus database is deleted.
- The anti-virus database is downloaded from the update server.
- Kaspersky Scan Engine starts.
Change license—(The button appears when the license has expired.) Navigate to the form that allows you to change the key file or activation code.
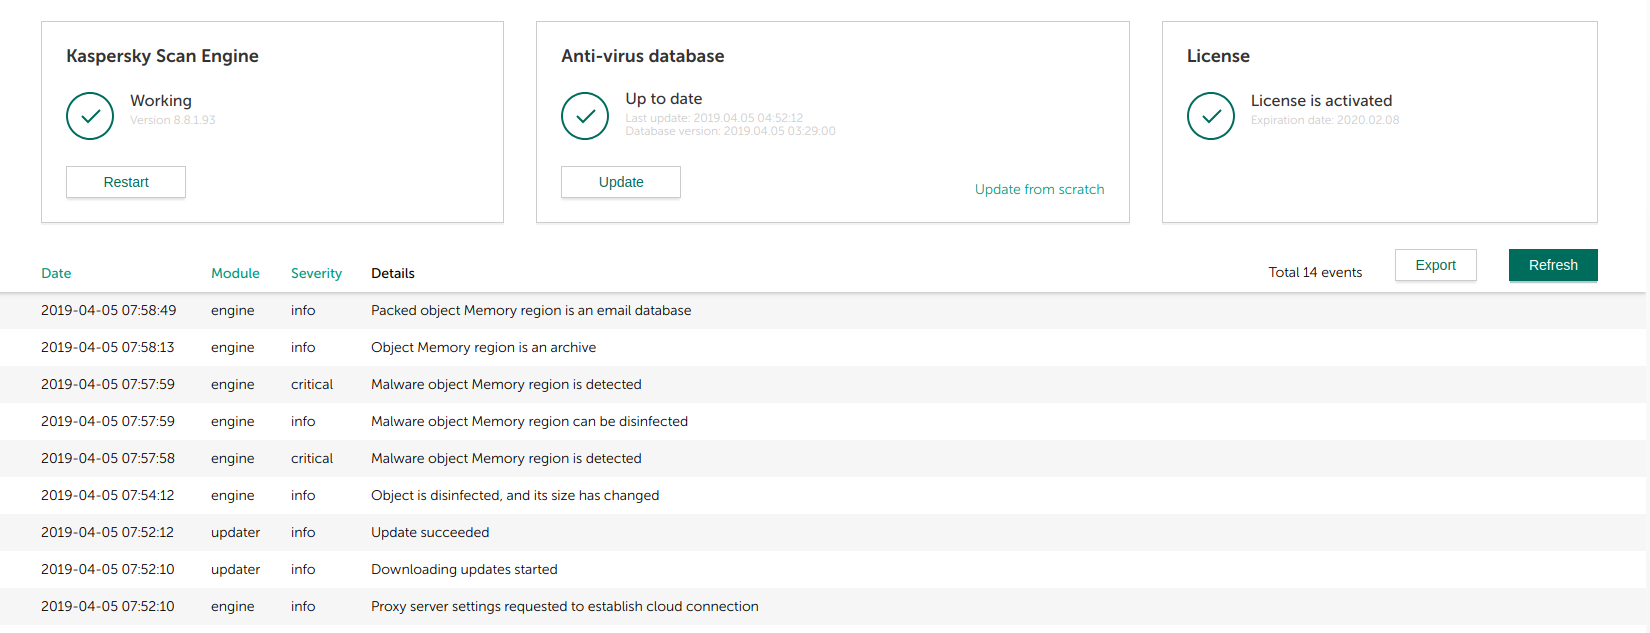
Kaspersky Scan Engine dashboard
Page top
Kaspersky Scan Engine scan results page
The Scan results page displays information about events with scan results generated by Kaspersky Scan Engine.
The Scan results page contains the following tables:
- Table with statistics about objects scanned by Kaspersky Anti-Virus Engine
The following information is displayed:
- Total—The number of scanned objects
- Malware—The number of objects detected as malicious
- Adware, etc.—The number of objects detected as legitimate software that can be used by intruders to damage computers or data
- Not infected—The number of clean objects
- Table with scan results for every object scanned by Kaspersky Anti-Virus Engine
The following information is displayed:
- Date—Date and time when the scan result is received
- Danger level (
 )—Danger level of the scanned object
 - Info—Name of the scanned file or the scanned URL
- Scan result—Category of the scanned object
- Threat name (if the scanned object is malicious).
- Action—Action that was performed after a threat or legitimate software that can be used by intruders had been detected:
- Disinfected—Scanned object was disinfected
- Deleted—Scanned object was deleted
- Skipped—Scanned object was skipped
This information appears if Kaspersky Scan Engine works in HTTP mode, the scanned object is not a URL, and you had not selected Skip in the Action on detected objects setting of the Scanning settings page
- Details—Additional information about the scanned object
- Version of the Kaspersky Scan Engine database
- MD5 hash of the scanned object (if a file was scanned)
- SHA256 hash of the scanned object (if a file was scanned)
You can do the following:
- Select the time period during which the scan results are collected for display in the table.
To do this, click the Date link.
This setting is retained and is not reset to its default value when the page is refreshed.
- Specify a filter for the data to be displayed.
To do this, click the Danger level (
) icon.Select the types of objects that you want to be displayed by selecting the corresponding check boxes:
- Clean objects
- Objects of High danger level
- Objects of Medium danger level
- Objects of Low danger level
This setting is retained and is not reset to its default value when the web page is refreshed.
- Click the Export button to save the table contents to a file.
- Click the Refresh button to refresh the table contents manually.
The initial view of the table contains up to 50 last scan results. You can scroll down the table to browse more scan results.
In the top right area of the Scan results page, you can click the Reset statistics button to clear the statistics of service events and events that have scan results.
Page top
Kaspersky Scan Engine settings pages
This section describes web pages that contain Kaspersky Scan Engine settings of different types.
Service settings
This section describes the Service section of the Settings page.

Service settings
If Kaspersky Scan Engine is initialized in HTTP mode, you can specify the following settings:
- Address that Kaspersky Anti-Virus Engine listens on for incoming objects to check
It can be either a UNIX socket or an IP address and port.
- Under Paths for remote scanning over a TCP socket you can specify paths to the locations where scanning is allowed when an HTTP client sends scan requests over a TCP socket from a remote computer. Specify these locations to prevent a remote HTTP client from accidentally scanning the whole file system on the computer where Kaspersky Scan Engine is installed.
Possible values:
- Absolute paths to a directory
This value allows you to scan files that are located inside this directory and all its subdirectories.
The directory must be located on the same computer as Kaspersky Scan Engine or on a remote hard disk mounted on that computer.
The path must start from the root directory of the computer that Kaspersky Scan Engine is installed on.
The kavhttpd service must have permissions to read files in the directory and its subdirectories.
- Absolute path to a file
Allows you to scan the specified file.
The file must be located on the same computer as Kaspersky Scan Engine or on a remote hard disk mounted on that computer.
The path must start from the root directory of the computer that Kaspersky Scan Engine is installed on.
The kavhttpd service must have permissions to read the file.
/(forward slash)Allows you to scan all files.
- Absolute paths to a directory
If Kaspersky Scan Engine is initialized in ICAP mode, you can set the following settings:
- Port that Kaspersky Scan Engine listens on for ICAP requests with contents to scan
- Setting that specifies whether Kaspersky Anti-Virus Engine must send the 204 code
For either mode you can specify the following settings under Maximum values:
- Sessions—Maximum number of sessions
The default value is
10. - Connections—Maximum number of active TCP connections that KAV HTTP can maintain simultaneously
The default value is
100. - Threads—Maximum number of scanning threads. You can have up to 256 scanning threads.
The default value is
16. - Scanners—Maximum number of scanners. You can have up to 256 scanners.
The default value is
16.
When you apply new service settings, Kaspersky Anti-Virus Engine restarts.
Page top
Scanning settings
This section describes the Scanning section of the Settings page.
If an error occurred during loading of the web page and the settings are unavailable, reload the page.
The Scanning section contains the following settings:
- Enable reputation checking—Indicates whether Kaspersky Security Network (KSN) must be used
If this toggle switch is turned to On and the End-User License Agreement (EULA) for KSN is not accepted, the EULA will be displayed and you must accept it in order to use KSN.
- Enable anti-phishing protection—Indicates whether the anti-phishing protection is turned On or Off.
- Object scan timeout (ms)—Timeout period, in milliseconds, for scanning a single object
- Heuristic level—Drop-down list provides levels of heuristic analysis
The level can be one of the following:
- Off
- Low
- Medium
- High
- Action on detected objects—To be performed after a threat or legitimate software that can be used by intruders is detected
This setting is available if Kaspersky Anti-Virus Engine is initialized in HTTP mode. You can select one of the following actions:
- Disinfect or delete
- Disinfect or skip
- Delete
- Skip
- Under Objects to scan, you will find check boxes for the following settings:
- Packed objects—Indicates whether packed objects must be scanned
- Archives—Indicates whether archives must be scanned
- Email databases—Indicates whether email clients' databases must be scanned
- Emails—Indicates whether email messages must be scanned
- Macros in Microsoft Office documents—Indicates whether Microsoft Office macros and documents must be scanned
- Formats of objects that must not be scanned
Clicking the Exclusions by file formats link opens the File formats not to scan window.
- Types of objects that must be scanned in request modification (REQMOD) mode
This setting is available if KAV Engine is initialized in ICAP mode. You can select one of the following object types:
- All
- Content
- URL
- None
- Types of objects that must be scanned in response modification (RESPMOD) mode
This setting is available if KAV Engine is initialized in ICAP mode. You can select one of the following object types:
- All
- Content
- URL
- None
When you apply new scanning settings, KAV Engine restarts.
Page top
ICAP rules
This section describes the ICAP rules page of Kaspersky Scan Engine GUI. Using the ICAP rules page, you can add, remove, and edit ICAP rules. You can create as many ICAP rules as you want.
This page is available if Kaspersky Scan Engine is initialized in ICAP mode.
If an error occurred while loading the web page and the settings are unavailable, reload the page.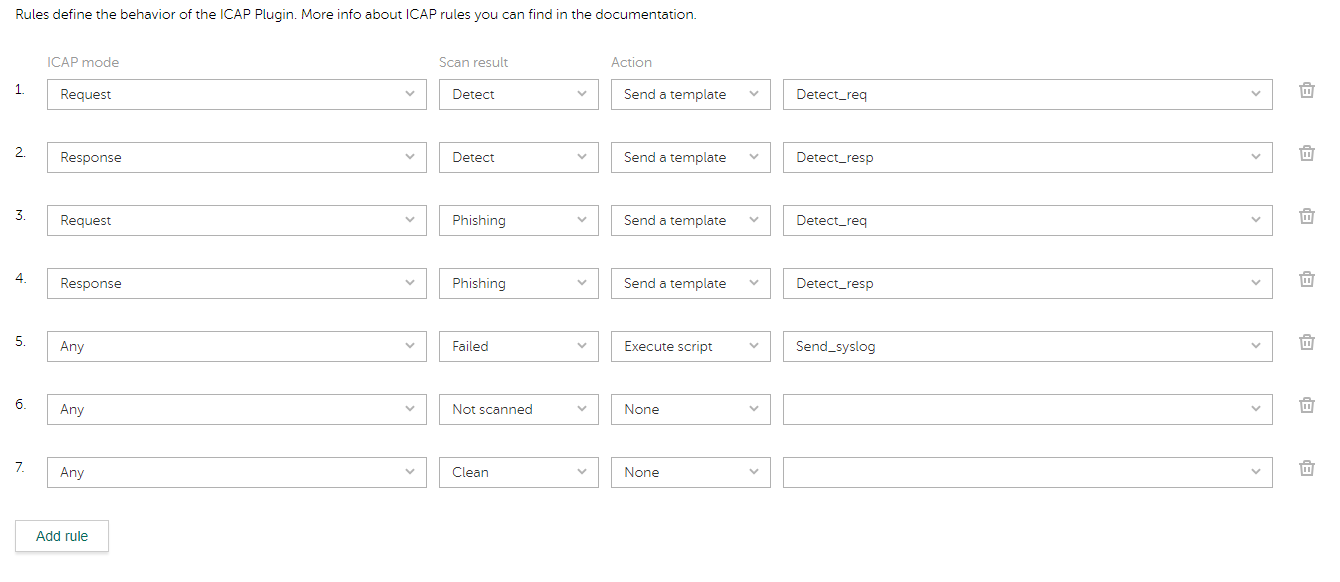
ICAP rules page
When you open the ICAP rules page, Kaspersky Scan Engine reads the following data,which is to be used when editing ICAP rules:
- Names of the response patterns that are stored in the directory specified in the
ResponsesPathelement of the ICAP Plugin configuration file - Names of the scripts that are stored in the directory specified in the
CmdPathelement of the ICAP Plugin configuration file
A single ICAP rule contains the following fields:
- ICAP mode that is relevant for the rule
You can select one of the following ICAP modes:
- Request
- Response
- Any
- Scan result after which the rule is activated
You can select one of the following scan results:
- Detect
- Not scanned
- Failed
- Macro
- Phishing
- Any
- Clean
- Response pattern
This response pattern is used on a blocked web page after the rule is activated.
When the ICAP rules web page is loaded, you can choose one of the response patterns received by Kaspersky Scan Engine. In an ICAP rule, you can specify either the response pattern or the script to execute, but not both.
You can leave this field empty.
- Script to execute
This script is executed after the rule is activated.
When the ICAP rules web page is loaded, you can choose one of the scripts got by Kaspersky Scan Engine. In an ICAP rule, you can specify either the response pattern or the script to execute, but not both.
You can leave this field empty.
Update settings
This section describes the Update section of the Settings page.
If an error occurred during loading of the web page and the settings are unavailable, reload the page.
The Update section contains the following settings:
- Enable automatic update—Indicates whether Kaspersky Anti-Virus Engine must periodically update the anti-virus database
- Automatic update period (minutes)—Duration (in minutes) of the automatic update of the anti-virus database
You can set this period only if the anti-virus database is updated automatically.
We recommend that you set this period to 30 minutes. We do not recommend that you specify a lesser value: a lower value will not increase the detection rate, but rather can cause instability of Kaspersky Scan Engine.
- Update from Kaspersky Lab servers—Indicates whether KAV Engine must use only Kaspersky Lab update servers
- External source—Web addresses of the custom update source
Setting these web addresses (and clicking the Add source button) is mandatory if KAV Engine must use only custom update sources.
- Use Kaspersky Lab servers if custom sources are unavailable—Select this check box if you want Kaspersky Scan Engine to use this option.
- Back up the anti-virus database—In the On position, the toggle switch indicates that KAV Engine will back up the anti-virus database. By default, this setting is enabled.
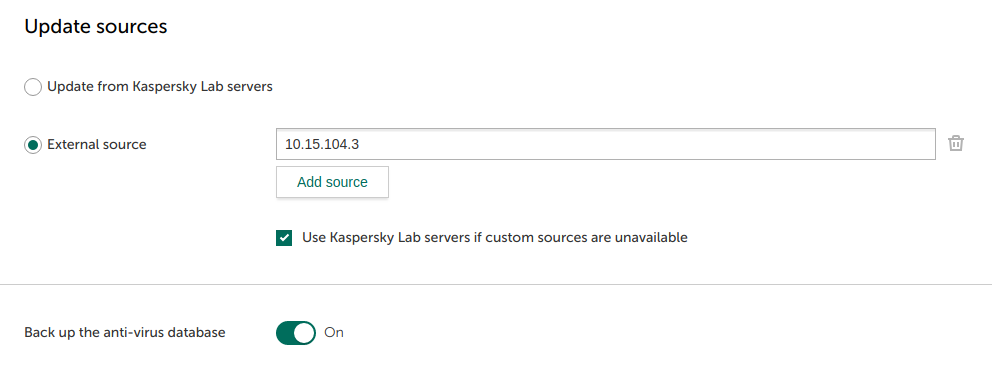
Update settings
License settings
This section describes the License section of the Settings page.
If an error occurred during loading of the web page and the settings are unavailable, reload the page.
The License section displays the following information:
- License key
- Key file name
This name is available in Simple licensing mode—that is, if Kaspersky Anti-Virus Engine uses a key file.
- Activation code
It is available in Online licensing mode—that is, if Kaspersky Anti-Virus Engine uses an activation code.
- Key file name
- Expiration date
Date on which the license expires.

Licensing web page
To replace the current key file or activation code with a new one:
- Click the Change button.
The License Replacement Wizard starts.
- Specify the new licensing mode.
- To specify Simple licensing mode, select the License file option.
- To specify Online licensing mode, select the Activation key option.
- Specify either the new key file or activation code depending on the licensing mode that you selected.
- Click Activate.
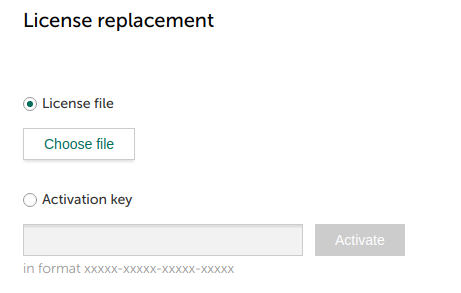
License replacement page
Logging settings
This section describes the Logging section of the Settings page.
If an error occurred during loading of the web page and the settings are unavailable, reload the page.
The Logging section displays the following information:
- Directory with log files—Path to the directory in which log files will be stored
You cannot change this setting by using Kaspersky Scan Engine GUI. You must edit the corresponding configuration file.
- Log size (MB)—Current log size in megabytes
The Logging section allows you to do the following:
- Enable logging and restart Scan Engine / Disable logging and restart Scan Engine—Start or stop logging
- Export log files—Save copies of log files
This action is available if logging is stopped.
- Clear log
This button is available if logging is stopped.
In this version of Kaspersky Scan Engine, you can start or stop logging only at the same time that you restart Kaspersky Anti-Virus Engine.
Page top
Proxy settings
This section describes the Proxy section of the Settings page.
If an error occurred during loading of the web page and the settings are unavailable, reload the page.
The Proxy section contains the following settings:
- Use proxy—Indicates whether Kaspersky Anti-Virus Engine must use a proxy server
- Proxy address—IP address or host of the proxy server
This setting is available if a proxy server is used.
- Port—Port of the proxy server
This setting is available if a proxy server is used.
- Login (optional)—Proxy login
This setting is available if a proxy server is used. The login is hidden, and asterisks are displayed instead of its characters. The proxy login is stored encrypted.
- Password (optional)—Proxy password
This setting is available if a proxy server is used. The password is hidden, and asterisks are displayed instead of its characters. The proxy password is stored encrypted.
Password changing
This section describes the Password section of the Settings page. You use this section to change the password for gaining access to Kaspersky Scan Engine GUI.
The Password section contains the following input fields under Administrator password change:
- Current password—Field for specifying the old password
- New password—Field for specifying the new password
- Confirm new password—Field for confirming the new password
All passwords are hidden, and asterisks are displayed instead of their characters.
A password for gaining access to Kaspersky Scan Engine GUI must meet the following requirements:
- Password must contain only ASCII letters, digits, and the following special symbols:
! " # $ % & ' ( ) * + , - . / : ; < = > ? @ [ \ ] ^ _ ` { | } ~ ) - Password must contain at least one Latin lowercase letter.
- Password must contain at least one Latin uppercase letter.
- Password must contain at least one digit.
- A password must contain at least one special symbol (
!,#,@, and so on). - Password length must be from 6 to 16 symbols inclusive.
After you change the password, all the sessions for the active account except the current one will be closed.
Page top
Working with the klScanEngineUI binary file
You can run the klScanEngineUI.exe binary file manually.
Working with the klScanEngineUI binary file in Linux
Linux syntax:
./klScanEngineUI [[-c <path>] [-p <path>] | [-w] | [-n] | [-v] | [-h]]
The table below describes the klScanEngineUI options in Linux.
The klScanEngineUI options in Linux
Option |
Description |
|---|---|
|
Optional parameter. Specifies the path to the configuration file for the klScanEngine UI service. |
|
Optional parameter. Specifies the path to the PID file. |
|
Optional parameter. Runs the the klScanEngine UI service in watchdog mode. In this mode, the klScanEngine UI automatically restarts if it freezes or crashes. |
|
Optional parameter. Enables nodaemon mode for the klScanEngine UI service. Specifying this parameter forces the klScanEngine UI service to run in the foreground. |
|
Optional parameter. Shows the Kaspersky Scan Engine version. |
|
Optional parameter. Shows Help. |
Working with the klScanEngineUI binary file in Windows
Windows syntax:
klScanEngineUI.exe [[--svc] | [--reg] | [--del] | [-v] | [-h]]
The table below describes the klScanEngineUI options in Windows.
The klScanEngineUI options in Windows
Option |
Description |
|---|---|
|
Start the service. |
|
Adds the klScanEngine UI service to the list of Windows services. The name of the service and its displayed name is |
|
Deletes the klScanEngine UI service from the list of Windows services. |
|
Optional parameter. Shows the Kaspersky Scan Engine version. |
|
Optional parameter. Shows Help. |
Manually editing Kaspersky Scan Engine configuration file
This section describes the Kaspersky Scan Engine configuration file.
The Kaspersky Scan Engine configuration file is an XML file named klScanEngineUI.xml.
Its location depends on the operating system:
%service_dir%/etc/klScanEngineUI.xmlin Linux%service_dir%\bin\klScanEngineUI.xmlin Windows
The table below describes the elements of the Kaspersky Scan Engine configuration file.
Scan Engine configuration file elements
Element |
Description |
|---|---|
|
Specifies whether the End User License Agreement (EULA) for Kaspersky Scan Engine is accepted:
|
|
Specifies whether the EULA for Kaspersky Security Network (KSN) is accepted:
|
|
Specifies whether the web service that implements Kaspersky Scan Engine GUI must be turned on:
|
|
Kaspersky Scan Engine mode:
|
|
IP address (or host) and port at which Kaspersky Scan Engine GUI will be available. You must access Kaspersky Scan Engine GUI from a computer on which Kaspersky Scan Engine is installed. In this case the Kaspersky Scan Engine documentation will also be available for you. |
|
Path to a Kaspersky Scan Engine certificate in PEM format. This can be either absolute or a relative path. A relative path is calculated relative to the Kaspersky Scan Engine binary file. |
|
Path to a Kaspersky Scan Engine private key in PEM format. This can be either absolute or a relative path. A relative path is calculated relative to the Kaspersky Scan Engine binary file. |
|
Path to the directory in which the templates for Kaspersky Scan Engine GUI are stored. This can be either absolute or a relative path. A relative path is calculated relative to the Kaspersky Scan Engine binary file. |
|
IP address and port at which the database that Kaspersky Scan Engine uses for storing data is available. |
|
Encrypted user name used to authenticate in the database that Kaspersky Scan Engine uses for storing data. The user name is encrypted by the kav_encrypt utility. |
|
Encrypted password used to authenticate in the database that Kaspersky Scan Engine uses for storing data. The password is encrypted by the kav_encrypt utility. |
Below is an example of the Kaspersky Scan Engine configuration file.
<Settings> <EULA> <Common>rejected</Common> Kaspersky Security Networkrejected</KSN> </EULA> <ServerSettings> <EnableUI>true</EnableUI> <Mode>httpd</Mode> <СonnectionString>127.0.0.1:9443</СonnectionString> <SSLCertificatePath>../ssl/cert.pem</SSLCertificatePath> <SSLPrivateKeyPath>../ssl/priv.pem</SSLPrivateKeyPath> <TemplatesPath>../httpsrv/templates/</TemplatesPath> </ServerSettings> <DatabaseSettings> <ConnectionString>10.65.81.3:8443</ConnectionString> <User>=a3Afasd+</User> <Password>=df2AfBB1</Password> </DatabaseSettings> </Settings> |
Verifying virus detection capabilities
This section explains how to verify that Kaspersky Scan Engine is detecting malicious objects correctly.
About EICAR Standard Anti-Virus Test File
Because it is unacceptable to use real malware for test purposes, there is a need for a file that contains no malicious code and can be safely passed around—but that must be detected by anti-virus software as a malicious object or, more specifically, as a test file.
The European Institute for Computer Anti-virus Research (EICAR) distributes such a file for testing anti-virus functionality. It is known as the "EICAR Standard Anti-Virus Test File" and can be downloaded from the EICAR official web site.
To download the test file or to read more about it, follow this link: https://www.eicar.org/download-anti-malware-testfile/.
If your computer already has anti-virus software, disable it before you download the test file.
The EICAR Standard Anti-Virus Test File contains the ASCII string which, when interpreted by command processor, returns the message string to the standard output and exits back to the command prompt.
Kaspersky Scan Engine will detect this test file, label it as infected and perform the action specified in the scan settings.
Page top
Verifying detection capabilities in HTTP mode
This section explains how to verify that Kaspersky Scan Engine works correctly in HTTP mode.
Verifying that Kaspersky Scan Engine detects malicious files correctly
To verify that Kaspersky Scan Engine detects malicious file correctly:
- Run the kavhttpd service.
- Start your HTTP client.
- Scan the EICAR test file by using your HTTP client in scanfile mode.
The following example shows how to do this with the sample HTTP client:
./kavhttp_client -f eicar.txt
- Verify that the EICAR test file is detected.
Verifying that Kaspersky Scan Engine detects malicious files in system memory correctly
To verify that Kaspersky Scan Engine detects malicious files in system memory correctly:
- Run the kavhttpd service.
- Start your HTTP client.
- Scan the content of the EICAR test file by using your HTTP client in scanmemory mode.
The following example shows how to do this with the sample HTTP client:
./kavhttp_client eicar.txt
- Verify that the EICAR test file is detected.
Verifying that Kaspersky Scan Engine detects malicious and phishing URLs correctly
To verify that Kaspersky Scan Engine detects malicious and phising URLs correctly:
- Run the kavhttpd service.
- Start your HTTP client.
- To verify that Kaspersky Scan Engine detects malicious URLs correctly, scan
http://bug.qainfo.ru/TesT/Wmuf_wby using your HTTP client.This URL is not malicious. Kaspersky Lab is using this URL to test the detection capabilities of anti-virus software.
The following example shows how to do this with the sample HTTP client:
./kavhttp_client -u
http://bug.qainfo.ru/TesT/Wmuf_w - Verify that the URL is detected.
- To verify that Kaspersky Scan Engine detects phishing URLs correctly, scan
http://bug.qainfo.ru/TesT/Aphish_wby using your HTTP client.This URL is not phishing. Kaspersky Lab is using this URL to test the detection capabilities of anti-virus software.
The following example shows how to do this with the sample HTTP client:
./kavhttp_client -u
http://bug.qainfo.ru/TesT/Aphish_w - Verify that the URL is detected.
Verifying that File and URL Reputation Checking works correctly
To verify that File and URL Reputation Checking works correctly:
- Request the KSN test file from your technical account manager (TAM). This file is not malicious, and is only used to verify that File and URL reputation checking works properly.
- Make sure that the
KAV_SHT_ENGINE_KSNflag is not specified in theFlagselement of the HTTP mode configuration file. - Run the kavhttpd service.
- Start your HTTP client.
- Scan the KSN test file by using your HTTP client in scanfile mode.
- Verify that the KSN test file is not detected.
- Specify the KAV_SHT_ENGINE_KSN flag in the
Flagselement of the HTTP mode configuration file. - Restart the kavhttpd service.
- Rescan the KSN test file by using your HTTP client in scanfile mode.
- Verify that the KSN test file is detected.
Verifying detection capabilities in ICAP mode
This section explains how to verify that Kaspersky Scan Engine works correctly in ICAP mode.
Verifying that Kaspersky Scan Engine detects malicious and phishing URLs correctly
To verify that Kaspersky Scan Engine detects malicious URLs correctly:
- Make sure that the directory with response templates contains the detect_req default template.
- Configure Kaspersky Scan Engine. Set the value of the
RulesFilePathparameter to the directory that contains kavicapd_gui_rules.conf, sample service rules file that is included in the distribution kit. - Start the kavicapd service.
- Create a .txt file with the following content:
REQMOD icap://127.0.0.1/req ICAP/1.0
Host: 127.0.0.1
Encapsulated: req-hdr=0, null-body=112
GET /TesT/Wmuf_w HTTP/1.1
Host: www.bug.qainfo.ru
Accept: text/html, text/plain
Accept-Encoding: compress
Make sure that every line ends with CRLF, as required by RFC 2616.
This is a REQMOD GET ICAP request message.
This message requests a test page that does not contain any real malicious content.
- Save the file with an appropriate name. In the following example this file is named icap_reqmod_malicious_detect.txt.
- Send the message to the port that the kavicapd service listens on (port 1344 by default).
The exact method may vary depending on the operating system. This example shows how to send the message using netcat:
cat icap_reqmod_malicious_detect.txt | nc localhost 1344
The kavicapd service will answer with the modified message headers and a response message that shows information about the blocked URL.
- Verify that the test web page was blocked.
When the web page is blocked, the kavicapd service returns the detect_req HTML response template. The response template contains the following information about the blocked web page:
Mode: REQMOD
Object name:
Date: 2017-May-31 14:13:29.295710
ICAPD version: KL ICAP Service v1.0 (KAV SDK v8.5.1.83)
KAV SDK Version: KAV SDK v8.5.1.83
URL:
http://bug.qainfo.ru/TesT/Wmuf_w - Create a .txt file with the following content:
REQMOD icap://127.0.0.1/req ICAP/1.0
Host: 127.0.0.1
Encapsulated: req-hdr=0, null-body=114
GET /TesT/Aphish_w HTTP/1.1
Host: www.bug.qainfo.ru
Accept: text/html, text/plain
Accept-Encoding: compress
- Save the file with and appropriate name. In the following example this file is named icap_reqmod_phishing_detect.txt.
- Send the message to the port that the kavicapd service listens on.
cat icap_reqmod_phishing_detect.txt | nc localhost 1344
- Verify that the test web page was blocked.
When the web page is blocked, the kavicapd service returns the detect_req HTML response template. The response template contains the following information about the blocked web page:
Mode: REQMOD
Object name:
Date: 2017-May-31 14:13:29.295710
ICAPD version: KL ICAP Service v1.0 (KAV SDK v8.5.1.83)
KAV SDK Version: KAV SDK v8.5.1.83
URL:
http://bug.qainfo.ru/TesT/Aphish_w
Verifying that Kaspersky Scan Engine detects malicious content in HTTP traffic correctly
To verify that Kaspersky Scan Engine detects malicious content in HTTP traffic correctly:
- Make sure that the directory with response templates contains the detect_req default template.
- Configure Kaspersky Scan Engine. Set the value of the
RulesFilePathparameter to the directory that contains kavicapd_gui_rules.conf, sample service rules file that is included in the distribution kit. - Start the kavicapd service.
- Create a .txt file with the following content:
REQMOD icap://127.0.0.1/req?arg=87 ICAP/1.0
Host: 127.0.0.1
Encapsulated: req-hdr=0, req-body=155
POST /origin-resource/form.pl HTTP/1.1
Host: www.origin-server.example.com
Accept: text/html, text/plain
Accept-Encoding: compress
Pragma: no-cache
44
X5O!P%@AP[4\PZX54(P^)7CC)7}$EICAR-STANDARD-ANTIVIRUS-TEST-FILE!$H+H*
0
Make sure that every line ends with CRLF, as required by RFC 2616.
This is a REQMOD POST ICAP request message.
This message contains EICAR Standard Anti-Virus Test File. The EICAR Standard Anti-Virus Test File is not a virus and is often used for testing anti-virus software. For more information about EICAR, see section "About EICAR Standard Anti-Virus Test File".
- Save the file with and appropriate name. In the following example this file is named icap_reqmod_detect.txt.
- Send the message to the port that the kavicapd service listens to (port 1344 by default).
The exact method may vary depending on the operating system. This example shows how to send the message using netcat:
cat icap_reqmod_detect.txt | nc localhost 1344
The kavicapd service will answer with the modified message headers and a response message that shows information about the detected object.
- Verify that EICAR Standard Anti-Virus Test File was detected.
When the EICAR file is detected, the kavicapd service returns the detect_req HTML response template. The response template contains the following information about the detected object:
Mode: REQMOD
Object name: EICAR-Test-File
Date: 2017-May-31 14:17:12.077704
ICAPD version: KL ICAP Service v1.0 (KAV SDK v8.5.1.83)
KAV SDK Version: KAV SDK v8.5.1.83
URL: www.origin-server.example.com/origin-resource/form.pl
Verifying that File and URL Reputation Checking works correctly
To verify that File and URL Reputation Checking works correctly:
- Request the KSN test file from your Technical Account Manager. This file is not malicious, and is only used to verify that File and URL Reputation Checking works properly.
- Make sure that the directory with response templates contains the detect_req default template.
- Configure Kaspersky Scan Engine:
- Set the value of the
RulesFilePathparameter to the directory that contains kavicapd_gui_rules.conf, sample service rules file that is included in the distribution kit. - Make sure that the
UseKSNparameter is set to0.
- Set the value of the
- Start the kavicapd service.
- Create a .txt file with the following content:
REQMOD icap://127.0.0.1/req?arg=87 ICAP/1.0
Host: 127.0.0.1
Encapsulated: req-hdr=0, req-body=155
POST /origin-resource/form.pl HTTP/1.1
Host: www.origin-server.example.com
Accept: text/html, text/plain
Accept-Encoding: compress
Pragma: no-cache
- Below the content you added to the .txt file, insert a new line.
- Below the new line, insert the contents of the KSN test file.
Make sure that every line ends with CRLF, as required by RFC 2616.
- Save the file with an appropriate name. In the following example this file is named icap_reqmod_detect_ksn.txt.
- Send the message to the port that the kavicapd service listens on (port 1344 by default).
The exact method may vary depending on the operating system. This example shows how to send the message by using the netcat utility:
cat icap_reqmod_detect_ksn.txt | nc localhost 1344
- Verify that the KSN test file is not detected.
- Set the value of the
UseKSNparameter of the ICAP mode configuration file to1. - Restart the kavicapd service.
- Send icap_reqmod_detect_ksn.txt to the kavicapd service again.
- Verify that the KSN test file is detected.
Logging
This section explains how to configure and enable logging in Kaspersky Scan Engine.
Manually enabling logging
This section describes how to enable logging manually.
For information on how to use Kaspersky Scan Engine GUI to enable logging, see section "Logging settings".
You can separately enable logging for Kaspersky Anti-Virus Engine
Note that logging significantly reduces Kaspersky Scan Engine performance. You are advised to use logging only for debugging purposes.
Enabling logging for Kaspersky Anti-Virus Engine
By default, Kaspersky Scan Engine does not log KAV Engine events.
To enable logging in Kaspersky Anti-Virus Engine:
- Create a file named kave.ini in the ppl subdirectory of the installation directory.
- Add the following lines to kave.ini:
[LOGGING]
WriteLog=9
- Specify other parameters, if they are needed.
- Save and close kave.ini.
- Restart the Kaspersky Scan Engine service:
- In HTTP mode, restart the kavhttpd service.
- In ICAP mode, restart the kavicapd service.
Logging settings for the kavicapd/kavhttpd service and Kaspersky Anti-Virus Engine are synchronized on start and restart of the klScanEngineUI service. Kaspersky Scan Engine sets the logging level (WriteLog) and log directory (LogsFolder) in kave.ini to be the same as specified in the DebugLogging section of icapdkavlog.conf (for ICAP mode) or httpdkavlog.ini (for HTTP mode).
Enabling logging in HTTP mode
By default, logging in HTTP mode is disabled. Kaspersky Scan Engine checks for the httpdkavlog.ini logging configuration file when the kavhttpd service starts. If this file exists, Kaspersky Scan Engine reads parameters from it.
To enable logging for the kavhttpd service:
- Create a file named httpdkavlog.ini in the directory where the kavhttpd binary file is located.
- Change the value of the
<LogLevel>element to1. - Specify the rest of the parameters, if needed.
- Save and close httpdkavlog.ini.
- Restart the kavhttpd service.
Enabling logging in ICAP mode
By default, logging in ICAP mode is disabled. Kaspersky Scan Engine checks the icapdkavlog.conf logging configuration file when the kavicapd service starts.
To enable logging for the kavicapd service:
- Open the icapdkavlog.conf logging configuration file.
- Specify
debugordbgin the<Level>element. - Specify other parameters, if they are needed.
- Save and close icapdkavlog.conf.
- Restart the kavicapd service.
Logging configuration file
This section describes properties of the kave.ini logging configuration file. The kave.ini logging configuration file defines the logging settings for Kaspersky Anti-Virus Engine.
- For a description of the logging configuration file for HTTP mode, see section "Configuring logging in HTTP mode".
- For a description of the logging configuration file for ICAP mode, see section "Logging in ICAP mode"
Logging settings for the kavicapd/kavhttpd service and Kaspersky Anti-Virus Engine are synchronized on start and restart of the klScanEngineUI service. Kaspersky Scan Engine sets the logging level (WriteLog) and log directory (LogsFolder) in kave.ini to be the same as specified in the DebugLogging section of icapdkavlog.conf (for ICAP mode) or httpdkavlog.ini (for HTTP mode).
The following table describes properties of the kave.ini logging configuration file.
Logging configuration file properties
Property |
Description |
|---|---|
|
Specifies whether previous log files are kept intact or are deleted on each initialization of Kaspersky Scan Engine. Possible values:
|
|
Only for Windows platforms. On Unix-like platforms, this parameter is ignored even if it is specified in kave.ini. Sets the maximum possible size of a log file in megabytes. Possible values: Any positive integer in the range 0 to 4095. Special cases:
Setting the limit to a non-zero value automatically turns on the append mode regardless of the value specified for the |
|
Logging level. Recommended values:
Using other values is not recommended. |
|
Path to the log directory. Do not enclose the path in quotation marks and do not use the escape sequence for whitespace. Possible values: Relative path A path is calculated relative to the directory that contains the kave.ini logging configuration file. If you specify a nonexistent directory, log files are created in a directory that contains the binary file of the service in use ( Absolute path If you specify a nonexistent directory, log files are created in a directory that contains the binary file of the service in use ( Local path The directory that contains kave.ini. A local path can be specified by either setting the value of the The full custom path for the log files must not exceed the limit of 260 characters, applied by |
|
This property specifies whether Kaspersky Scan Engine sends logging data to a syslog daemon. When using a syslog daemon, you can write logging data to log files, other programs, or redirect them to another host, as configured the configuration file for the syslog daemon. Possible values:
Before redirecting logging data to a syslog daemon, make sure to configure your syslog daemon for debug logging. Add the following line to the |
Remarks
In some cases, your technical account manager (TAM) may ask you to enable advanced logging. Advanced logging may help Kaspersky Lab specialists investigate troublesome issues.
To enable advanced logging:
- Open the
kave.inifile (create a new one in the folder withkavehostbinary if needed) - In the
Loggingsection add theBssLogsFolderoption and specify a location to store the files with advanced logging data.This location must be separate from your standard logging data location (specified in
LogsFolder).
Examples
The following example lists a sample configuration file for each of the target platforms.
The following sample configuration file may be used on a UNIX-like platform.
[LOGGING] WriteLog=9 Append=0 LogsFolder=./logs Syslog=0 |
Settings for internal use
The settings described below are only for internal use by Kaspersky Lab. Do not use these settings in your product.
The [DEBUG] section of the kave.ini configuration file can include the following properties:
UseTestActivationService—Specifies whether KAV SDK must connect to the test activation server.
Logged user data
When Kaspersky Scan Engine runs diagnostic logging, some user data may be stored locally in the log files created by Kaspersky Scan Engine. The data is added to the log files without making any changes. Kaspersky Scan Engine does not edit or alter this data, or otherwise send it anywhere. Logged data is stored locally on your computer with the running copy of Kaspersky Scan Engine in the location specified by the kave.ini file.
If protection of logged data is important to you, you must implement a method of protection yourself. For example, you may want to grant only specific user accounts access to the logged data.
The following types of user data are written in a plain text format to log files:
- Paths to scanned objects
- Scanned URLs
- Addresses of scanned memory blocks
- Contents of the Kaspersky Scan Engine user agent string:
- Version of the user agent string format
- Identifier of Kaspersky Scan Engine
- Licensing mode
- Identifier of the license
- Update session identifier
- Full version of Kaspersky Scan Engine: major, minor, build, revision, and hotfix.
If Kaspersky Scan Engine uses a proxy to establish connection to the Internet, Kaspersky Scan Engine also may log the following information:
- Proxy server IP address (IPv4 or IPv6) or host name
- Port number of the proxy server
- User name for the proxy authentication
Kaspersky Scan Engine does not log passwords for the proxy authentication.
Page top
Boosting performance of Kaspersky Scan Engine
Kaspersky Scan Engine supports multithreading. This feature allows you to use Kaspersky Scan Engine on high-load systems.
This section describes best practices for boosting performance of Kaspersky Scan Engine.
General recommendations on raising performance
To archive optimal performance, use the number of scanning processes equal to the number of CPU cores and two threads per process.
Recommendations for raising performance of Kaspersky Scan Engine in HTTP mode
The following list presents the recommended order of configuring Kaspersky Scan Engine for peak performance:
- Specify the number of scan processes and scan threads that you want in the
ScannersCountparameter and theThreadsCountparameter, respectively.The threads process scan tasks from the scan queue. The length of the scan queue is specified in the
QueueLenparameter of the HTTP mode configuration file. - Specify the maximum number of active TCP connections to Kaspersky Scan Engine in the
MaxHTTPSessionsNumparameter.When Kaspersky Scan Engine works in a high-load environment, it is recommended to make the value of this parameter greater than the value of
ThreadsCount, so that the scan queue is filled faster and scan threads do not stand idle. Please notice that Kaspersky Scan Engine loads files into system memory while scanning. The more active sessions Kaspersky Scan Engine has, the more system memory it consumes. You can limit the maximum allowed size of headers and bodies of HTTP messages that are sent to KAV HTTPD by specifying their maximum size in theMaxTCPFileSizeparameter. - Specify the desired number of pending TCP connections to Kaspersky Scan Engine in the
MaxIncomingConnectionsNumparameter. Notice that this value is passed to thelisten(2)system function and may be changed depending on the operating system.
It is recommended to set the value of MaxIncomingConnectionsNum several times greater than the value of MaxHTTPSessionsNum. This way, the pending connections will be put in the connection queue and scan tasks from these clients will not be lost.
Recommendations for raising performance of Kaspersky Scan Engine in ICAP mode
Specify the number of scan processes and scan threads that you want in the ScannersCount parameter and the ThreadsCount parameter, respectively.
Uninstalling Kaspersky Scan Engine
This section explains how to uninstall Kaspersky Scan Engine.
Uninstallation using the uninstaller (Linux and Windows)
This section describes how to uninstall Kaspersky Scan Engine using the uninstall (Linux) and uninstall.exe (Windows).
Before unistalling Kaspersky Scan Engine, make sure that files from the %service_dir% are not used by any processes.
To uninstall Kaspersky Scan Engine:
- Make sure you have root (administrator) privileges.
- Go to a directory other than
%service_dir%and rununinstallfrom there, for example, from the command line.If there is a Kaspersky Scan Engine instance running on the computer, the uninstaller stops it.
- Choose whether to delete the database that contains Kaspersky Scan Engine data.
After this the
uninstallremoves the following objects:- The database that contains Kaspersky Scan Engine data (if you have chosen this)
The PostgreSQL installation will not be removed, nor the PostgreSQL
scanenginedatabase user. Only the Kaspersky Scan Enginekavebasedatabase will be removed. If you want to re-install Kaspersky Scan Engine, remove thescanenginedatabase user.To remove the
scanenginedatabase user, run the following command:DROP ROLE scanengine; - The directory to which Kaspersky Scan Engine is installed
- The directory that contains temporary files used by Kaspersky Scan Engine
- The Kaspersky Scan Engine service (from the list of services)
- The database that contains Kaspersky Scan Engine data (if you have chosen this)
Manual uninstallation (Linux)
This section describes how to manually uninstall Kaspersky Scan Engine.
To manually uninstall Kaspersky Scan Engine:
- Make sure you have root (administrator) privileges.
- Stop Kaspersky Scan Engine:
- If you use Kaspersky Scan Engine in ICAP mode, run this command:
/etc/init.d/kavicapd stop - If you use Kaspersky Scan Engine in HTTP mode, run this command:
/etc/init.d/kavhttpd stop - If you use Kaspersky Scan Engine GUI, run this command:
/etc/init.d/klScanEngineUI stop
- If you use Kaspersky Scan Engine in ICAP mode, run this command:
- Remove the executable file and the configuration file:
- If you use Kaspersky Scan Engine in ICAP mode, run this command:
rm /etc/init.d/kavicapd /etc/kavicapd.xml - If you use Kaspersky Scan Engine in HTTP mode, run this command:
rm /etc/init.d/kavhttpd /etc/kavhttpd.xml - If you use Kaspersky Scan Engine GUI, run this command:
rm /etc/init.d/klScanEngineUI /etc/klScanEngineUI.xml
- If you use Kaspersky Scan Engine in ICAP mode, run this command:
- If you use Kaspersky Scan Engine GUI, open the PostgreSQL database and execute the following query:
DROP DATABASE kavebase;To remove the
scanenginedatabase user, run the following command:DROP ROLE scanengine; - Remove the
/opt/kaspersky/ScanEnginedirectory:rm –rf /opt/kaspersky/ScanEngine - Remove the directory that contains temporary files used by Kaspersky Scan Engine:
rm –rf %temp_dir%Here
%temp_dir%is the temporary directory.
Manual uninstallation (Windows)
This section describes how to manually uninstall Kaspersky Scan Engine.
To manually uninstall Kaspersky Scan Engine:
- Make sure that you have administrator privileges.
- Stop Kaspersky Scan Engine, run the following command:
sc stop "Kaspersky ScanEngine" - If you use Kaspersky Scan Engine UI, run the following command:
sc stop "Kaspersky ScanEngine UI" - If you added Kaspersky Scan Engine to the list of Windows services, delete it by running the following command:
sc delete "Kaspersky ScanEngine" - If you used Kaspersky Scan Engine GUI and added it to the list of Windows services, delete it by running the following command:
sc delete "Kaspersky ScanEngine UI" - If you use Kaspersky Scan Engine GUI, open the PostgreSQL database and execute the following query:
DROP DATABASE kavebase;To remove the
scanenginedatabase user, run the following command:DROP ROLE scanengine; - Remove the
%service_dir%directory. You can do this either by using Windows Explorer, or by running the following command:del /F %service_dir% - Remove the directory that contains temporary files used by Kaspersky Scan Engine. You can do this either by using Windows Explorer, or by running the following command:
del /F %temp_dir%Here
%temp_dir%is the temporary directory.
Using the password utility
This section describes how to reset the password for gaining access to Kaspersky Scan Engine. (You can set the password that you want by using Kaspersky Scan Engine GUI.)
The kl_access_util utility is used for setting the default password for the admin account.
The kl_access_util utility is run from the command line.
Linux syntax:
./kl_access_util [-r | --reset_default_user] | [-h | --help]
Windows syntax:
kl_access_util.exe [-r | --reset_default_user] | [-h | --help]
The table below describes the kl_access_util options.
kl_access_util options
Option |
Description |
|---|---|
|
Sets the password for the |
|
Prints the Help information about the kl_access_util utility to the command line. |
Using the encrypting utility
The kav_encrypt utility allows you to encrypt the user names and passwords stored in kavhttpd.xml, kavicapd.xml, and klScanEngineUI.xml.
The utility is run from the command line.
Linux syntax:
./kav_encrypt -m <httpd | icap> -p <user_name:password> | -d <user_name:password> | [-h]
Windows syntax:
kav_encrypt.exe -m <httpd | icap> -p <user_name:password> | -d <user_name:password> | [-h]
The table below describes the kav_encrypt options.
The kav_encrypt options
Option |
Description |
|---|---|
|
Specifies the working mode of Kaspersky Scan Engine. Possible values:
|
|
Specifies the user name and password of the proxy server that Kaspersky Scan Engine uses to gain access to the Internet. This option must be used together with the |
|
Specifies the user name and password of the user that owns the kavebase database. |
|
Prints the Help information about the kav_encrypt utility to the command line. |
Licensing
This section describes how to activate Kaspersky Scan Engine.
Licensing modes
Kaspersky Scan Engine supports the following licensing modes:
- Offline licensing mode
In this mode, the Kaspersky Scan Engine licensing system uses a key file to activate Kaspersky Scan Engine.
You do not have to be connected to the Internet to use this mode. However, you have to renew the key file regularly to avoid licensing limitations.
- Online licensing mode
In this mode, the Kaspersky Scan Engine licensing system uses an activation code to activate Kaspersky Scan Engine.
You must have a stable connection to the Internet to use this mode. When necessary, Kaspersky Scan Engine will connect to the Kaspersky Lab servers and renew the activation code automatically.
Activating Kaspersky Scan Engine in offline licensing mode
This section describes how to activate Kaspersky Scan Engine in offline licensing mode after Kaspersky Scan Engine is installed.
For information on how to do this by using Kaspersky Scan Engine GUI, see section "Licensing settings".
To activate Kaspersky Scan Engine in offline licensing mode, you need a key file. The key file is provided to you by your technical account manager (TAM).
To activate Kaspersky Scan Engine in offline licensing mode:
- Open the configuration file that corresponds to the mode you chose:
- If you are using Kaspersky Scan Engine in HTTP mode, open the kavhttpd.xml configuration file.
- If you are using Kaspersky Scan Engine in ICAP mode, open the kavicapd.xml configuration file.
- Do one of the following:
- Copy the key file to the directory specified in the
LicensePathelement of the configuration file.For a list of the other directories that Kaspersky Scan Engine automatically searches for the key file, see the description of the
LicensePathelement:- If you are using Kaspersky Scan Engine in HTTP mode, see section "HTTP mode configuration file".
- If you are using Kaspersky Scan Engine in ICAP mode, see section "ICAP mode configuration file".
- If you want to store the key file in a different directory, specify the path to this directory in the
LicensePathelement of the configuration file and copy the appinfo.kli file there.The appinfo.kli file is located in the /bin directory of the distribution kit.
- Copy the key file to the directory specified in the
- In the
LicensingModeelement of the configuration file, specify1. - Save the configuration file.
- Restart the Kaspersky Scan Engine service:
- In HTTP mode, restart the kavhttpd service.
- In ICAP mode, restart the kavicapd service.
If the activation is successful, Kaspersky Scan Engine will start normally and you will be able to update the anti-virus database. Otherwise, Kaspersky Scan Engine will return an error to the command line.
Activating Kaspersky Scan Engine in online licensing mode
This section describes how to activate Kaspersky Scan Engine in online licensing mode after Kaspersky Scan Engine is installed.
For information on how to do this by using Kaspersky Scan Engine GUI, see section "Licensing settings".
To activate Kaspersky Scan Engine in online licensing mode, you need an activation code. The activation code is provided to you by your technical account manager (TAM).
Your computer must be connected to the Internet to activate Kaspersky Scan Engine in online licensing mode. When you use online licensing mode, Kaspersky Scan Engine transfers to Kaspersky Lab information about the installed copy of Kaspersky Scan Engine and activation code. For a list of the transferred data, see section "Data transferred to Kaspersky Lab in online licensing mode".
To activate Kaspersky Scan Engine in online licensing mode:
- Create a text file named "license.txt".
- Copy your activation code to the newly created file.
Make sure that the format of the activation code is correct. The correct format is XXXXX-XXXXX-XXXXX-XXXXX, where X is a number (0-9) or an uppercase Latin letter (A-Z), excluding "I" and "O".
The file must not contain any other characters.
- Save the file.
- Open the configuration file that corresponds to the your integration mode:
- If you are using Kaspersky Scan Engine in HTTP mode, open the kavhttpd.xml configuration file.
- If you are using Kaspersky Scan Engine in ICAP mode, open the kavicapd.xml configuration file.
- Do one of the following:
- Copy license.txt to the directory specified in the
LicensePathelement of the configuration file.For the list of the other directories that Kaspersky Scan Engine automatically searches for license.txt, see the description of the
LicensePathelement:- If you are using Kaspersky Scan Engine in HTTP mode, see section "HTTP mode configuration file".
- If you are using Kaspersky Scan Engine in ICAP mode, see section "ICAP mode configuration file".
- If you want to store license.txt in a different directory, specify the path to this directory in the
LicensePathelement and copy the appinfo.kli file that directory. The appinfo.kli file is located in the /bin directory of the distribution kit.
- Copy license.txt to the directory specified in the
- In the
LicensingModeelement of the configuration file, specify2. - Save the configuration file.
- Restart the Kaspersky Scan Engine service:
- In HTTP mode, restart the kavhttpd service.
- In ICAP mode, restart the kavicapd service.
If the activation is successful, Kaspersky Scan Engine will start normally and you will be able to update the anti-virus database. Otherwise Kaspersky Scan Engine will return an error to the command line.
After successful activation in online licensing mode, the licensing information is synchronized with Kaspersky Lab servers. This synchronization can be used, for example, to change the expiration date for the activation code (thus removing the need for a new online activation) or to change the available functionality.
This is done automatically once per day. Maximum time without Internet connection is 15 to 30 days.
In order to synchronize licensing information with Kaspersky Lab servers, your computer must be connected to the Internet.
Licensing limitations
The license lifecycle in the offline and online licensing modes is the same. Kaspersky Scan Engine can be used until a certain date, which is called the expiration date. Kaspersky Scan Engine uses a key file or an activation code to determine the expiration date.
If the expiration date has passed, the key file or the activation code expires and you can only use Kaspersky Scan Engine with licensing limitations.
Licensing limitations
Kaspersky Scan Engine can have the following licensing limitations:
- If the time received from KSN is at least one day later than the expiration date of your key file or activation code, Kaspersky Scan Engine will work but you will not be able to use File and URL Reputation Checking.
- If the release date of the anti-virus database is at least three days later than the expiration date of your key file or activation code, Kaspersky Scan Engine will not work.
Removing licensing limitations in online licensing mode
To remove the licensing limitations, you can do the following:
- If your copy of Kaspersky Scan Engine was not connected to the Internet for the last 15 days or more, the licensing limitations are most likely caused by outdated licensing information. To remove licensing limitations, allow Kaspersky Scan Engine to connect to the Internet.
To prevent this problem, make sure that Kaspersky Scan Engine always has access to the Internet.
- If your activation code has expired, obtain a new activation code and activate Kaspersky Scan Engine with it. To activate Kaspersky Scan Engine with a new code, your copy of Kaspersky Scan Engine must be connected to the Internet.
- If other options are not possible, use an earlier version of the anti-virus database to initialize Kaspersky Scan Engine. This method does not remove limitations placed on File and URL Reputation Checking functionality.
Removing licensing limitations in offline licensing mode
To remove the licensing limitations, obtain a new key file and activate Kaspersky Scan Engine with it.
Kaspersky Scan Engine GUI and SSL certificates
The SSL certificate and a private key that are generated during the installation of Kaspersky Scan Engine allow you to use Kaspersky Scan Engine GUI via HTTPS. The certificate is self-signed, so the browser you use informs you about an untrusted connection. We recommend that you use a certificate that is trusted in your infrastructure. However if you cannot use a trusted certificate, you can add the self-signed certificate as trusted to your browser or operating system.
Generating SSL certificates for Kaspersky Scan Engine GUI
Kaspersky Scan Engine GUI uses an SSL certificate for HTTPS connections. By default, Kaspersky Scan Engine GUI uses a self-signed certificate and a private key that are generated during installation of Kaspersky Scan Engine. The generated certificate is valid for two years.
We recommend that you generate a certificate that will be trusted in your infrastructure and configure Kaspersky Scan Engine GUI to use this certificate instead of the self-signed certificate.
Before making changes, create a backup copy of the existing private key, certificate, and Kaspersky Scan Engine configuration file.
To generate a trusted certificate for Kaspersky Scan Engine GUI:
- Create a private key and a trusted certificate:
- Create a new private and public key pair.
- Use the public key to generate an SSL Certificate Signing Request (CSR).
- Sign the CSR by using the trusted certificate authority (CA).
This creates a trusted certificate for the private key.
- Convert the private key and the trusted certificate to PEM format.
- Copy both the private key and the certificate to the
%service_dir%/httpsrvdirectory. - Edit the
Settings > ServerSettings > SSLCertificatePathandSettings > ServerSettings > SSLPrivateKeyPathelements of the Kaspersky Scan Engine configuration file if necessary so that they will contain the paths to the certificate and private key respectively.Save the Kaspersky Scan Engine configuration file.
- Restart Kaspersky Scan Engine.
Adding the self-signed certificate as trusted to a browser (Linux)
The procedures in this section show you how to add the self-signed certificates generated during Kaspersky Scan Engine installation to the trusted storage. This will remove the security warnings generated by browsers.
The information in this section is applicable to the situation when the user gains access to Kaspersky Scan Engine GUI from the same computer on which Kaspersky Scan Engine GUI runs. If the Settings > ServerSettings > ConnectionString element of the Kaspersky Scan Engine configuration file refers to an external interface, the Kaspersky Scan Engine GUI website will not be considered trusted, because the self-signed certificate can be used only with https://127.0.0.1 and https://localhost addresses.
To avoid potential security risks, it is recommended to use a trusted certificate signed by a certificate authority (CA). For more information, see section "Generating SSL certificates for Kaspersky Scan Engine GUI".
Causing a self-signed certificate to be trusted by a browser (Kaspersky Scan Engine GUI opens in Mozilla Firefox)
You add Kaspersky Scan Engine GUI to the list of Mozilla Firefox trusted sites so that the browser will not display warnings about the certificate.
Causing a self-signed certificate to be trusted by a browser (Kaspersky Scan Engine GUI opens in a browser for Linux)
Procedures for using a browser to import a certificate as trusted (on Linux systems) vary depending on the browser and Linux distribution used. But the procedures share common steps: to open the browser settings form and use the form to import the certificate to a store.
To manually cause a self-signed certificate to be trusted by a browser on a Linux system:
- Create a
/usr/local/share/ca-certificates/directory if it does not exist on your computer:mkdir /usr/local/share/ca-certificates/ - Copy your root certificate (.crt file) to the created directory:
cp <full_path_to_the_certificate> /usr/local/share/ca-certificates/ - Update the certificates:
sudo update-ca-certificatesIf you do not have the ca-certificates package, install it with your package manager.
Removing a certificate from the list of trusted ones
After you have reconfigured or uninstalled Kaspersky Scan Engine, old certificates are no longer used by Kaspersky Scan Engine GUI. You can remove them from the list of trusted certificates.
On a Linux system, the removal procedure is performed in a way that is similar to the addition of a certificate: open the list of the trusted certificates and remove those that you do not need.
Page top
Adding the self-signed certificate as trusted to a browser (Windows)
The procedures in this section show you how to add the self-signed certificates generated during Kaspersky Scan Engine installation to the trusted storage. This will remove the security warnings generated by browsers.
The information in this section is applicable to the situation when the user gains access to Kaspersky Scan Engine GUI from the same computer on which Kaspersky Scan Engine GUI runs. If the Settings > ServerSettings > ConnectionString element of the Kaspersky Scan Engine configuration file refers to an external interface, the Kaspersky Scan Engine GUI website will not be considered trusted, because the self-signed certificate can be used only with https://127.0.0.1 and https://localhost addresses.
To avoid potential security risks, it is recommended to use a trusted certificate signed by a certificate authority (CA). For more information, see section "Generating SSL certificates for Kaspersky Scan Engine GUI".
Causing a self-signed certificate to be trusted by a browser (Kaspersky Scan Engine GUI is opened in Internet Explorer)
Gaining the browser's trust requires that you perform, in sequence, the following three procedures:
To save the certificate to a local file:
- Open the
https://127.0.0.1orhttps://localhostaddress in Internet Explorer.The browser informs you of a problem with the security certificate of the website.
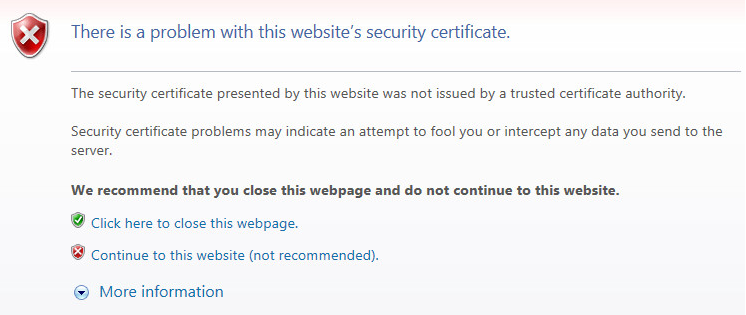
Certificate error message
- Select the Continue to this website (not recommended) link.
The Certificate Error message appears in the address bar.
- Click Certificate Error.
The Untrusted Certificate window opens.
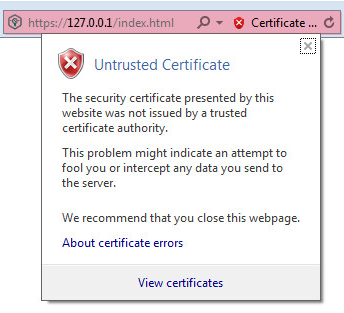
Untrusted Certificate window
- Select the View certificates link.
The Certificate window opens with information about the Kaspersky Scan Engine certificate.
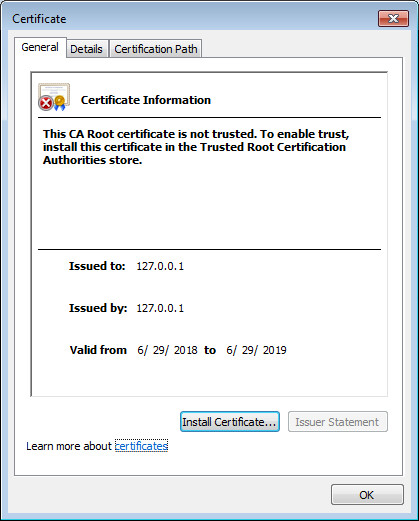
Certificate window
- Select the Details tab and click Copy to File to create a local copy of the certificate.
The Certificate Export Wizard starts.

Certificate Export Wizard
- Follow the Wizard instructions.
Use the default Wizard settings during the certificate export.
To start the certificate import process through Microsoft Management Console (MMC):
- From the Search box, navigate to the Run box and enter mmc.
You can now run MMC as Administrator.
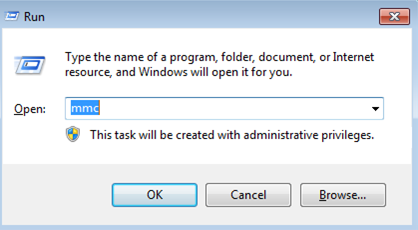
Running the MMC
- In the MMC-based console that opens, select File > Add/Remove Snap-in.
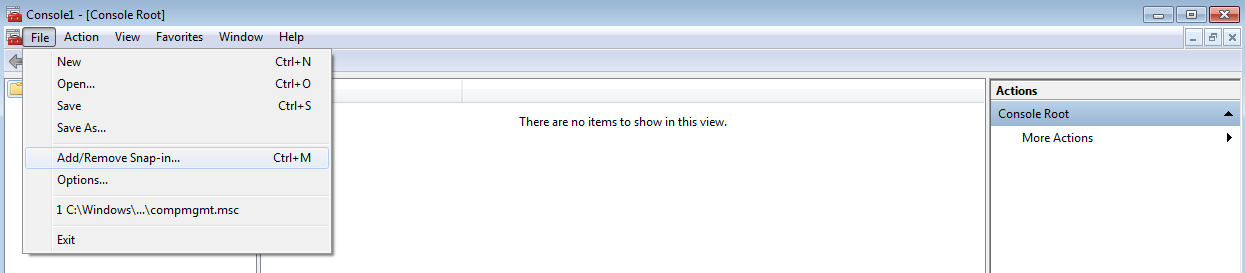
Selecting Add/Remove Snap-in
The Add or Remove Snap-ins window opens.
- In the Available snap-ins list, select Certificates and click Add.
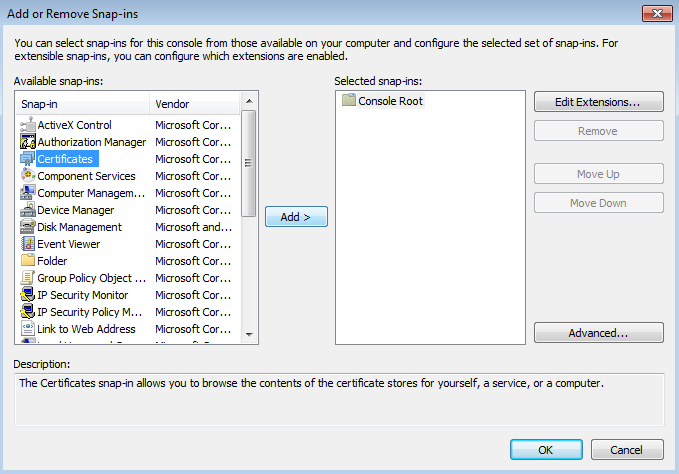
Adding a Certificates snap-in
The Certificates snap-in window opens.
- Select Computer account and click Next.
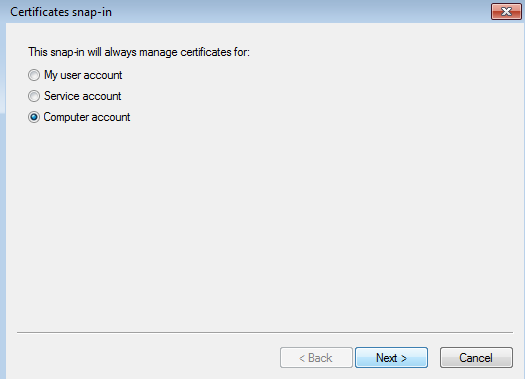
Selecting Computer account
In the Select Computer window that opens, click Finish.
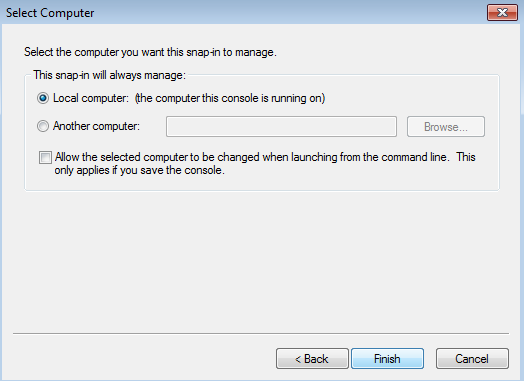
Selecting Local computer
- In the tree pane, select Certificates (Local Computer) > Trusted Root Certification Authorities, right-click Certificates, and select All Tasks > Import.
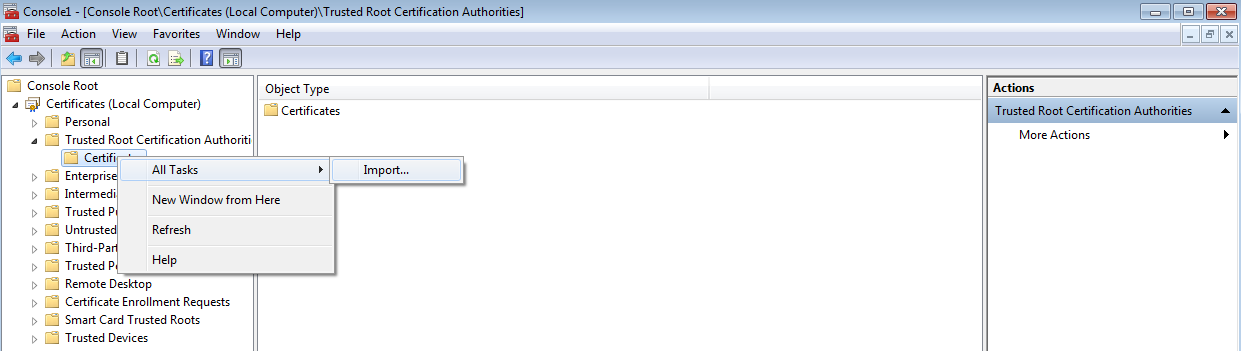
Selecting Import
The Certificate Import Wizard starts.
To add the saved certificate to the Trusted Root Certification Authorities store:
- On the Welcome page of the Wizard, click Next.
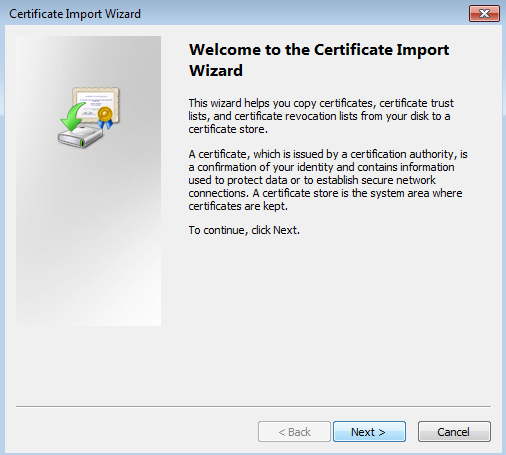
Certificate Import Wizard
- Click Browse and select the certificate that was saved in the "To make the self-signed certificate for Kaspersky Scan Engine GUI trusted when using Internet Explorer:" procedure above.
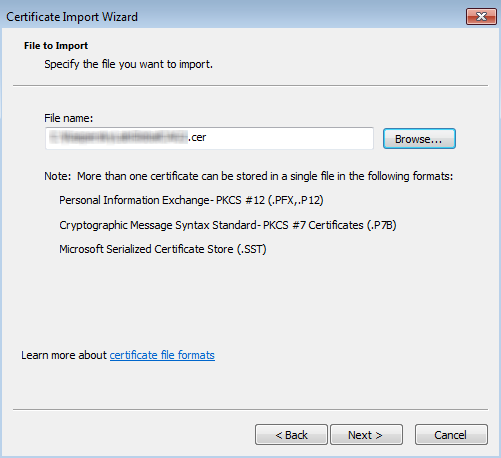
Importing the previously saved certificate
- On the next page of the Certificate Import Wizard, click Next.
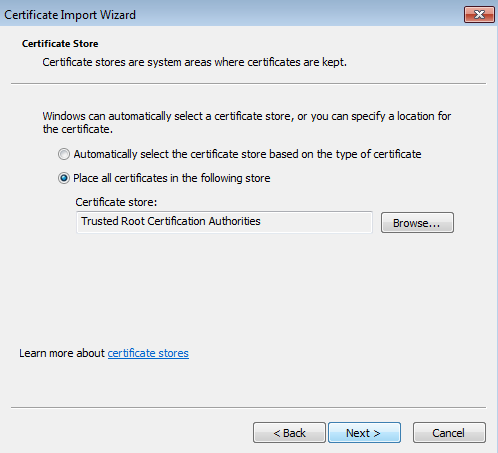
Selecting a certificate store
- On the last page of the Certificate Import Wizard, click Finish.
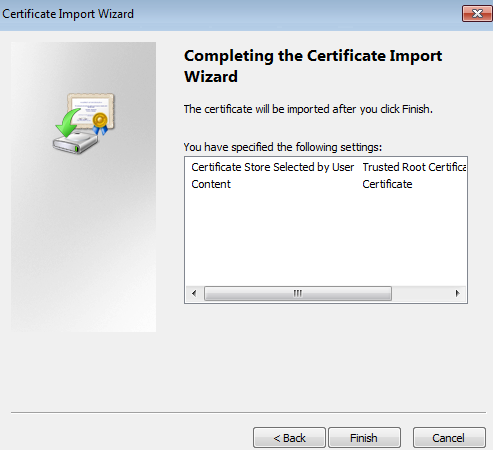
Completing the certificate import
- Close the MMC-based console and restart the browser.
The security problem (untrusted certificate) is resolved, as shown in the figure below.
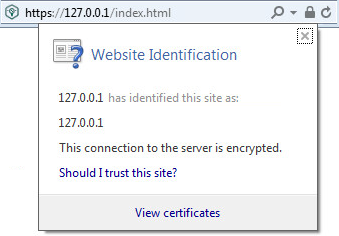
Website identification
Causing a self-signed certificate to be trusted by a browser (Kaspersky Scan Engine GUI opens in Google Chrome)
To make the self-signed certificate for Kaspersky Scan Engine GUI trusted when using Google Chrome:
- Open the
https://127.0.0.1orhttps://localhostaddress in Google Chrome.A warning is displayed in the address bar that the connection to the site is not secure.
- Click the Not secure message.
A window opens with security details about the website.
- Click Certificate to view the certificate information. (When the mouse pauses over Certificate, a Show certificate tooltip appears.)
- In the Certificate window that opens, select the Details tab and click Copy to File to create a local copy of the certificate.
The Certificate Export Wizard starts.
Certificate Export Wizard
- Follow the Wizard instructions.
Use the default Wizard settings during the certificate export.
- After the certificate is saved to a local disk, open it and add it to the Trusted Root Certification Authorities store as described in the procedure for Internet Explorer.
- Restart the browser.
Causing a self-signed certificate to be trusted by a browser (Kaspersky Scan Engine GUI opens in Mozilla Firefox)
You add Kaspersky Scan Engine GUI to the list of Mozilla Firefox trusted sites so that the browser will not display warnings about the certificate.
Removing a certificate from the list of trusted ones
After you have reconfigured or uninstalled Kaspersky Scan Engine, old certificates are no longer used by Kaspersky Scan Engine. You can remove them from the list of trusted certificates.
To remove a certificate from the list of trusted certificates:
- Open the Certificates management console by running the following command:
certmgr.msc - In the tree pane, select Trusted Root Certification Authorities > Certificates.
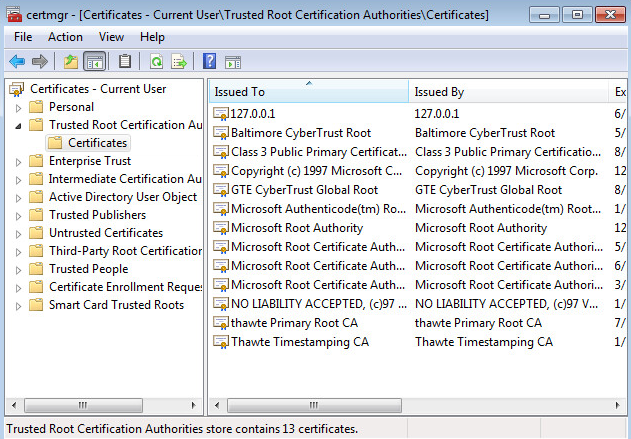
Certificates management console
- In the results pane, right-click the added certificate and select Delete.
Troubleshooting
This section provides information to help you solve problems you might encounter when using Kaspersky Scan Engine.
If you encounter a problem that is not mentioned in this section, turn on logging, repeat the actions that preceded the problem, and send the logs and configuration files to your TAM.
Problem: An error occurred while loading data by Kaspersky Scan Engine GUI (the dashboard or scan results page)
The cause of this problem is a failure of Kaspersky Scan Engine to connect to the kavebase database or read data from it.
To solve this problem, try the following actions:
- Check whether the PostgreSQL instance is running.
- Check whether the PostgreSQL instance is accessible from your Kaspersky Scan Engine instance.
- Check whether the
kavebasedatabase persists in the PostgreSQL instance.If not, create the
kavebasedatabase as described in section "Manual installation (Linux)". - Check whether the
scanenginedatabase user persists in the PostgreSQL instance.If not, create the
scanenginedatabase user as described in section "Manual installation (Linux)".
Problem: Kaspersky Scan Engine GUI is not displayed in a browser
To solve this problem, try the following actions:
- Check that the Kaspersky Scan Engine instance and the klScanEngineUI service are running.
- Check that you use a supported browser.
- Check that the klScanEngineUI.xml configuration file contains the following:
- The value specified in the
ServerSettings > EnableUIfield istrue. - The
ServerSettings > ConnectionStringelement contains one of the following IP addresses:127.0.0.1—In this case, Kaspersky Scan Engine GUI is accessible from the same computer on which Kaspersky Scan Engine is installed.- A network IP address—In this case, Kaspersky Scan Engine GUI is accessible over the network.
Make sure that the firewall does not block access to the computer on which Kaspersky Scan Engine is installed.
- The value specified in the
Problem: Untrusted connection error when connecting to Kaspersky Scan Engine GUI
The SSL certificates that are generated during the installation of Kaspersky Scan Engine are self-signed, so the browser you use informs you of an untrusted connection.
To solve this problem, try the following:
- (Recommended) Use other certificates that are trusted in your infrastructure.
- If you cannot use other certificates, you can add the initially generated certificates as trusted to your browser or operating system.
Problem: An error occurred while saving settings in Kaspersky Scan Engine GUI
- Check whether the settings that you have specified are correct.
- Check the status of the
kavhttpdorkavicapdservice by running one of the commands:/etc/init.d/kavhttpd status/etc/init.d/kavicapd status
Data transferred to Kaspersky Lab
This section provides information about data transferred to Kaspersky Lab during operation of Kaspersky Scan Engine.
Kaspersky Lab protects any information thus received in accordance with law and applicable Kaspersky Lab rules.
Kaspersky Lab uses any received information in anonymized form and as general statistics only. Aggregate statistics are automatically generated from the source information received, and do not contain any personal or other confidential data. The original information received is destroyed as new information is accumulated (once a year). Aggregate statistics are stored indefinitely.
Data transferred to Kaspersky Lab during an update
During an update, Kaspersky Scan Engine transfers its encrypted user agent string to Kaspersky Lab.
Purpose of data provisioning: calculating Kaspersky Lab's product usage statistics and update statistics.
Region where the data is processed: Moscow, Russia.
Data protection method: secure encryption.
The following information is transferred in the user agent string:
- Version of the user agent string format
- Identifier of Kaspersky Scan Engine
- Licensing mode
- Identifier of the license
- Update session identifier
- Full version of Kaspersky Scan Engine: major, minor, build, revision, and hotfix
Storage period:
- While statistic data is processed: 24 hours.
- After the statistic data is processed:
- License identifier: only the top 1000 identifiers are stored indefinitely.
- Other parameters are stored indefinitely. These parameters are not personal data.
For details about the data provisioning process, see section "About data provisioning".
Data transferred to Kaspersky Lab in online licensing mode
In online licensing mode, Kaspersky Scan Engine automatically updates licensing information once per day. When licensing information is updated, Kaspersky Scan Engine transfers to Kaspersky Lab information about the installed copy of Kaspersky Scan Engine and the activation code. This information is necessary to perform online activation.
The following information is transferred:
- Activation code provided during the online activation
- Identifier of Kaspersky Scan Engine
- Identifier of the locale used by Kaspersky Scan Engine
- Full version of the Kaspersky Scan Engine: major, minor, build, revision, and hotfix
- System date and time
- Unique identifier of the Kaspersky Scan Engine installation
- Current activation code status (active or blacklisted).
- Expiration date for the activation code.
- The functionality that is available with this activation code.
- The status of the activations limit (if it applies to the activation code)
For details about the data provisioning process, see section "About data provisioning".
Page top
Data transferred to Kaspersky Lab during File and URL Reputation Checking
When you use the File and URL Reputation Checking feature, Kaspersky Scan Engine transfers to Kaspersky Lab information about the installed copy of Kaspersky Scan Engine and detected objects.
The following information is transferred:
- Identifier of Kaspersky Scan Engine
- Full version of Kaspersky Scan Engine: major, minor, build, revision, and hotfix
- Identifier of the license owner
- Checksums of processed files (MD5, SHA256)
- Version of KSN
- Checksums of the detected object name (MD5, SHA256)
- Normalized URL
For details about the data provisioning process, see section "About data provisioning".
Page top
Statistics submitted to KSN
You can submit one of two sets of statistics: the complete set in Windows and the reduced set in Linux.
Set of statistics in Windows
This set of statistics includes the following:
- Detailed information about the version of KAV SDK used
- Information about the operating system version and anonymized IP address of the statistics sender
- Identifier of the license owner
- Detailed information about detected objects
- Files or parts of files that are at high risk of being exploited by intruders
This set of statistics can be used in Kaspersky Scan Engine for Windows.
You can find the full description of the submitted information in %distr_kit%/doc/About data provision extended.txt.
Set of statistics in Linux
This set of statistics includes the following:
- Information about the version of KAV SDK used
- Information about the operating system version of the statistics sender
- Identifier of the license owner
- Information about detected objects
This set of statistics is for mail gateway solutions and is to be used only on mail traffic.
You can find the full description of the submitted information in %distr_kit%/doc/About data provision – gateway set.txt.
For more information about the procedure of data provisioning, see section "About data provisioning".
About data provisioning
This section provides information about data provisioning.
The following files in the Kaspersky Scan Engine contain information about the procedure of data provisioning used in Kaspersky Scan Engine:
%distr_kit%/doc/About data provision.txt—Describes the procedure of data provisioning for File and URL Reputation Checking.%distr_kit%/doc/About data provision - online licensing.txt—Describes the procedure of data provisioning for online licensing mode.%distr_kit%/doc/About data provision - gateway set.txt—Describes the procedure of data provisioning when you submit statistical information to KSN in Kaspersky Scan Engine for Linux systems.%distr_kit%/doc/About data provision extended.txt—Describes the procedure of data provisioning when you submit statistical information to KSN in Kaspersky Scan Engine for Windows systems.
Contacting Technical Support
If you haven't found the solution for your issue in this documentation or other sources, create a request for Kaspersky Technical Support. When contacting Kaspersky Technical Support, provide the necessary information about Kaspersky Scan Engine.
Page top
Information about third-party code
Information about third-party code is contained in a file named legal_notices.txt and stored in the doc subdirectory of the application installation directory.
Trademark notices
Registered trademarks and service marks are the property of their respective owners.
Safari is a trademark of Apple Inc., registered in the U.S. and other countries.
Firefox and Mozilla are trademarks of the Mozilla Foundation.
Chrome, Google, Google Chrome are trademarks of Google, Inc.
Debian is a registered trademark of Software in the Public Interest, Inc.
Internet Explorer, Microsoft, Microsoft Edge, Visual Studio, Win32, Windows, Windows Server are registered trademarks of Microsoft Corporation in the United States and other countries.
Linux is the registered trademark of Linus Torvalds in the U.S. and other countries.
Red Hat is a registered trademark of Red Hat Inc. in the United States and other countries.
UNIX is a registered trademark in the United States and other countries, licensed exclusively through X/Open Company Limited.
Copyright
Dear User,
Thank you for choosing Kaspersky Lab as your security software provider. We hope that this document helps you to use our product.
Attention! This document is the property of AO Kaspersky Lab (herein also referred to as Kaspersky Lab): all rights to this document are reserved by the copyright laws of the Russian Federation and by international treaties. Illegal reproduction and distribution of this document or parts hereof incur civil, administrative, or criminal liability under applicable law.
Any type of reproduction or distribution of any materials, including translations, is allowed only with the written permission of Kaspersky Lab.
This document, and graphic images related to it, may be used for informational, non-commercial, and personal purposes only.
Kaspersky Lab reserves the right to amend this document without additional notification.
Kaspersky Lab assumes no liability for the content, quality, relevance, or accuracy of any materials used in this document to which rights are held by third parties, or for any potential harms associated with use of the document.
Document revision date: 8/27/2019
© 2019 AO Kaspersky Lab. All Rights Reserved.
https://www.kaspersky.com
https://support.kaspersky.com