Contents
- About Kaspersky Endpoint Security for Windows
- Installing and removing the application
- Installing the application
- About ways to install the application
- Installing the application by using the Setup Wizard
- Step 1. Making sure that the computer meets installation requirements
- Step 2. Welcome page of the installation procedure
- Step 3. Viewing the License Agreement and Privacy Policy
- Step 4. Selecting the installation type
- Step 5. Selecting application components to install
- Step 6. Selecting the destination folder
- Step 7. Adding scan exclusions
- Step 8. Preparing for application installation
- Step 9. Application installation
- Installing the application from the command line
- Remotely installing the application using System Center Configuration Manager
- Description of setup.ini file installation settings
- Initial Configuration Wizard
- Step 1. Application activation
- Step 2. Activating with an activation code
- Step 3. Activating with a key file
- Step 4. Selecting the functions to activate
- Step 5. Completing activation
- Step 6. Finishing the initial configuration of the application
- Step 7. Analyzing the operating system
- Step 8. Kaspersky Security Network Statement
- Updating to the new version of the application
- Removing the application
- Installing the application
- Application interface
- Application licensing
- About the End User License Agreement
- About the license
- About the license certificate
- About subscription
- About activation code
- About the key
- About the key file
- About data provision
- Viewing license information
- Purchasing a license
- Renewing subscription
- Visiting the website of the service provider
- About application activation methods
- Starting and stopping the application
- Participation in Kaspersky Security Network
- About participation in Kaspersky Security Network
- Enabling and disabling use of Kaspersky Security Network
- About data provision when using Kaspersky Security Network
- Enabling and disabling cloud mode for protection components
- Checking the connection to Kaspersky Security Network
- Checking the reputation of a file in Kaspersky Security Network
- Enhanced protection with Kaspersky Security Network
- Application Behavior Detection
- Exploit Prevention
- Host Intrusion Prevention
- About Host Intrusion Prevention
- Limitations of audio and video device control
- Enabling and disabling Host Intrusion Prevention
- Managing application trust groups
- Managing Application control rules
- Changing application control rules for trust groups and groups of applications
- Editing an application control rule
- Disabling downloads and updates of application control rules from the Kaspersky Security Network database
- Disabling the inheritance of restrictions from the parent process
- Excluding specific application actions from application control rules
- Removing outdated application control rules
- Protecting operating system resources and identity data
- Remediation Engine
- File Threat Protection
- About File Threat Protection
- Enabling and disabling File Threat Protection
- Automatic pausing of File Threat Protection
- File Threat Protection settings
- Changing the security level
- Changing the action taken on infected files by the File Threat Protection component
- Forming the protection scope of the File Threat Protection component
- Using heuristic analysis in the operation of the File Threat Protection component
- Using scan technologies in the operation of the File Threat Protection component
- Optimizing file scanning
- Scanning compound files
- Changing the scan mode
- Web Threat Protection
- About Web Threat Protection
- Enabling and disabling Web Threat Protection
- Web Threat Protection settings
- Changing the web traffic security level
- Changing the action to take on malicious web traffic objects
- Web Threat Protection scanning of links to check them against databases of phishing and malicious web addresses
- Using heuristic analysis in the operation of the Web Threat Protection component
- Editing the list of trusted web addresses
- Mail Threat Protection
- Network Threat Protection
- Firewall
- BadUSB Attack Prevention
- Application Control
- About Application Control
- Enabling and disabling Application Control
- Application Control functionality limitations
- About Application Control rules
- Managing Application Control rules
- Editing Application Control message templates
- About Application Control operating modes
- Selecting the Application Control mode
- Managing Application Control rules using Kaspersky Security Center
- Gathering information about applications that are installed on user computers
- Gathering information about applications that are started on user computers
- Creating application categories
- Step 1. Selecting the category type
- Step 2. Entering a user category name
- Step 3. Configuring the conditions for including applications in a category
- Step 4. Configuring the conditions for excluding applications from a category
- Step 5. Settings
- Step 6. Repository folder
- Step 7. Creating a custom category
- Adding executable files from the Executable files folder to the application category
- Adding and modifying an Application Control rule using Kaspersky Security Center
- Changing the status of an Application Control rule via Kaspersky Security Center
- Testing Application Control rules using Kaspersky Security Center
- Viewing events resulting from test operation of the Application Control component
- Viewing events resulting from operation of the Application Control component
- Adding event-related executable files to the application category
- Viewing a report on test blocked runs
- Viewing a report on blocked runs
- Best practices for implementing white list mode
- Device Control
- About Device Control
- Enabling and disabling Device Control
- About rules of access to devices and connection buses
- About trusted devices
- Standard decisions on access to devices
- Editing a device access rule
- Adding or excluding records to or from the event log
- Adding a Wi-Fi network to the trusted list
- Editing a connection bus access rule
- Actions with trusted devices
- Adding a device to the Trusted list from the application interface
- Adding devices to the Trusted list based on the device model or ID
- Adding devices to the Trusted list based on the mask of the device ID
- Configuring user access to a trusted device
- Removing a device from the list of trusted devices
- Importing the list of trusted devices
- Exporting the list of trusted devices
- Editing templates of Device Control messages
- Anti-Bridging
- Obtaining access to a blocked device
- Creating a key for accessing a blocked device using Kaspersky Security Center
- Web Control
- About Web Control
- Enabling and disabling Web Control
- Web resource content categories
- About web resource access rules
- Actions with web resource access rules
- Migrating web resource access rules from previous versions of the application
- Exporting and importing the list of web resource addresses
- Editing masks for web resource addresses
- Editing templates of Web Control messages
- Data Encryption
- About data encryption
- Encryption functionality limitations
- Changing the encryption algorithm
- Enabling Single Sign-On (SSO) technology
- Special considerations for file encryption
- File Level Encryption on local computer drives
- Encryption of removable drives
- Full Disk Encryption
- Using the Authentication Agent
- Using a token and smart card with Authentication Agent
- Editing Authentication Agent help messages
- Limited support for characters in Authentication Agent help messages
- Selecting the Authentication Agent trace level
- Managing Authentication Agent accounts
- Adding a command for creating an Authentication Agent account
- Adding an Authentication Agent account editing command
- Adding a command for deleting an Authentication Agent account
- Restoring Authentication Agent account credentials
- Responding to a user request to restore Authentication Agent account credentials
- Viewing data encryption details
- Managing encrypted files with limited file encryption functionality
- Working with encrypted devices when there is no access to them
- Obtaining access to encrypted devices through the application interface
- Granting user access to encrypted devices
- Providing a user with a recovery key for hard drives encrypted with BitLocker
- Creating the executable file of Restore Utility
- Restoring data on encrypted devices using the Restore Utility
- Responding to a user request to restore data on encrypted devices
- Restoring access to encrypted data after operating system failure
- Creating an operating system rescue disk
- Endpoint Sensor
- Updating databases and application software modules
- Scanning the computer
- About scan tasks
- Starting or stopping a scan task
- Configuring scan task settings
- Changing the security level
- Changing the action to take on infected files
- Generating a list of objects to scan
- Selecting the type of files to scan
- Optimizing file scanning
- Scanning compound files
- Using scan methods
- Using scan technologies
- Selecting the run mode for the scan task
- Starting a scan task under the account of a different user
- Scanning removable drives when they are connected to the computer
- Working with active threats
- Checking the integrity of application modules
- Managing reports
- Notification service
- Managing Backup
- Advanced application settings
- Trusted zone
- About the trusted zone
- Creating a scan exclusion
- Modifying a scan exclusion
- Deleting a scan exclusion
- Enabling and disabling a scan exclusion
- Editing the list of trusted applications
- Enabling and disabling trusted zone rules for an application in the list of trusted applications
- Using trusted system certificate storage
- Network Protection
- Kaspersky Endpoint Security Self-Defense
- Kaspersky Endpoint Security performance and compatibility with other applications
- About Kaspersky Endpoint Security performance and compatibility with other applications
- Selecting types of detectable objects
- Enabling or disabling Advanced Disinfection technology for workstations
- Enabling or disabling Advanced Disinfection technology for file servers
- Enabling or disabling energy-saving mode
- Enabling or disabling conceding of resources to other applications
- Password protection
- Creating and using a configuration file
- Trusted zone
- Remote administration of the application through Kaspersky Security Center
- Managing the application from the command line
- Commands
- SCAN. Virus Scan
- UPDATE. Updating databases and application software modules
- ROLLBACK. Rolling back the last update
- TRACES. Traces
- START. Start the profile
- STOP. Stopping a profile
- STATUS. Profile status
- STATISTICS. Profile operation statistics
- RESTORE. Restoring files
- EXPORT. Exporting application settings
- IMPORT. Importing application settings
- ADDKEY. Applying a key file.
- LICENSE. Licensing
- RENEW. Purchasing a license
- PBATESTRESET. Reset the pre-encryption check results
- EXIT. Exit the application
- EXITPOLICY. Disabling policy
- STARTPOLICY. Enabling policy
- DISABLE. Disabling protection
- SPYWARE. Spyware detection
- Appendix. Application profiles
- Commands
- Sources of information about the application
- Contacting Technical Support
- Glossary
- Active key
- Additional key
- Administration group
- Administration Server
- Anti-virus databases
- Application modules
- Application settings
- Archive
- Authentication Agent
- Backup
- Black list of addresses
- Certificate
- Certificate issuer
- Certificate subject
- Certificate thumbprint
- Database of malicious web addresses
- Database of phishing web addresses
- Disinfection
- Exploits
- False alarm
- File mask
- Heuristic Analysis
- Infectable file
- Infected file
- License certificate
- Network Agent
- Network Agent Connector
- Network service
- Normalized form of the address of a web resource
- OLE object
- Patch
- Phishing
- Portable File Manager
- Protection scope
- Scan scope
- Signature Analysis
- Task
- Task settings
- Trusted Platform Module
- Update
- Information about third-party code
- Trademark notices
About Kaspersky Endpoint Security for Windows
This section describes the functions, components, and distribution kit of Kaspersky Endpoint Security 11 for Windows (hereinafter referred to as Kaspersky Endpoint Security), and provides a list of hardware and software requirements of Kaspersky Endpoint Security.
What's new
Kaspersky Endpoint Security for Windows offers the following features and improvements:
- Integration of Endpoint Sensor, which is a component of Kaspersky Anti Targeted Attack Platform:
- IoC scanner (Indicators of Compromise)
- Incident response tools
- Incident investigation capabilities
- Support for server operating systems as part of the Behavior Detection, Remediation Engine, and Exploit Prevention components.
- Protection of shared folders against remote encryption as part of the Behavior Detection component.
- User interface improvements:
- Grouping of protection components into the following sections:
- Advanced Threat Protection.
- Essential Threat Protection.
- Naming of components in accordance with the current state of information security:
- The File Anti-Virus component has been renamed to File Threat Protection.
- The Mail Anti-Virus component has been renamed to Mail Threat Protection.
- The Web Anti-Virus component has been renamed to Web Threat Protection.
- The Network Attack Blocker component has been renamed to Network Threat Protection.
- The System Watcher component has been split into the following components: Behavior Detection, Remediation Engine, Exploit Prevention.
- The Application Privilege Control component has been renamed to Host Intrusion Prevention.
- The Application Startup Control component has been renamed to Application Control.
- Grouping of protection components into the following sections:
- Cloud mode for Threat Protection: condensed anti-virus databases when using Kaspersky Security Network require less RAM and hard drive space.
- Device Control:
- New Anti-Bridging feature (blocks unauthorized commuting between networks)
- New capability to import/export a list of trusted devices (in XML format, which is convenient for manually reading and editing)
- Application Control:
- Enable test mode for individual rules
- New KL category included in the Golden Image category: Trusted certificates.
- You can use a simplified interface for Kaspersky Endpoint Security: you can bring up the context menu of the application icon in the taskbar. However, the main application window is unavailable from here.
- The checksum (hash) of a detected file is sent to the Kaspersky Security Center Administration Server, is indicated in reports, and can be used for configuring exclusions (Trusted Zone).
- Masks (*,?, **) are supported in Trusted zone settings.
- Protection level indicator for a Kaspersky Security Center policy that notifies in case critically important protection components are disabled.
- Various usability improvements:
- Simplified Initial Configuration Wizard
- Optimized license management
In Kaspersky Endpoint Security 11 for Windows, the following features are no longer supported: Quarantine, IM Anti-Virus, Vulnerability Scan.
Page top
Distribution kit
The Kaspersky Endpoint Security distribution kit contains the following files:
- Files that are required for installing the application using any of the available methods:
- Update package files used during installation of the application.
- The klcfginst.msi file for installing the Kaspersky Endpoint Security administration plug-in via Kaspersky Security Center.
- The ksn_<language ID>.txt file, with which you can view the terms of participation in Kaspersky Security Network.
- The license.txt file, which you can use to view the End User License Agreement and the Privacy Policy.
- The incompatible.txt file that contains a list of incompatible software.
- The installer.ini file that contains the internal settings of the distribution kit.
It is not recommended to change the values of these settings. If you want to change installation options, use the setup.ini file.
You must unpack the distribution kit to access the files.
Page top
Organizing computer protection
Kaspersky Endpoint Security provides comprehensive computer protection against various types of threats, network and phishing attacks.
Each type of threat is handled by a dedicated component. Components can be enabled or disabled independently of one another, and their settings can be configured.
In addition to the real-time protection that the application components provide, we recommend that you regularly scan the computer for viruses and other threats. This helps to rule out the possibility of spreading malware that is undetected by protection components due to a low security level setting or for other reasons.
To keep Kaspersky Endpoint Security up to date, you must update the databases and modules that the application uses. The application is updated automatically by default, but if necessary, you can update the databases and application modules manually.
The following application components are control components:
- Application Control. This component keeps track of user attempts to start applications and regulates the startup of applications.
- Device Control. This component lets you set flexible restrictions on access to data storage devices (such as hard drives, removable drives, tape drives, and CD/DVD disks), data transmission equipment (such as modems), equipment that converts information into hard copies (such as printers), or interfaces for connecting devices to computers (such as USB, Bluetooth, and Infrared).
- Web Control. This component lets you set flexible restrictions on access to web resources for different user groups.
The operation of control components is based on the following rules:
- Application Control uses Application Control rules.
- Host Intrusion Prevention uses application privilege control rules.
- Device Control uses device access rules and connection bus access rules.
- Web Control uses web resource access rules.
The following application components are protection components:
- Behavior Detection. This component collects information about the actions of applications on your computer and provides this information to other components for more effective protection.
- Exploit Prevention. This component tracks executable files that are run by vulnerable applications. When there is an attempt to run an executable file from a vulnerable application that was not initiated by the user, Kaspersky Endpoint Security blocks this file from running.
- Host Intrusion Prevention. This component registers the actions of applications in the operating system and regulates application activity depending on the trust group of a particular application. A set of rules is specified for each group of applications. These rules regulate the access of applications to user data and to resources of the operating system. Such data includes user files (My Documents folder, cookies, user activity information) and files, folders, and registry keys that contain settings and important information from the most frequently used applications.
- Remediation Engine. This component lets Kaspersky Endpoint Security roll back actions that have been performed by malware in the operating system.
- File Threat Protection. This component protects the file system of the computer from infection. File Anti-Virus starts together with Kaspersky Endpoint Security, continuously remains active in computer memory, and scans all files that are opened, saved, or started on the computer and on all connected drives. This component intercepts every attempt to access a file and scans the file for viruses and other threats.
- Web Threat Protection. This component scans traffic that arrives on the user's computer via the HTTP and FTP protocols, and checks whether URLs are listed as malicious or phishing web addresses.
- Mail Threat Protection. This component scans incoming and outgoing email messages for viruses and other threats.
- Network Threat Protection. This component inspects inbound network traffic for activity that is typical of network attacks. Upon detecting an attempted network attack that targets your computer, Kaspersky Endpoint Security blocks network activity from the attacking computer.
- Firewall. This component protects data that is stored on the computer and blocks most possible threats to the operating system while the computer is connected to the Internet or to a local area network. The component filters all network activity according to rules of two kinds: network rules for applications and network packet rules.
- BadUSB Attack Prevention. This component prevents infected USB devices emulating a keyboard from connecting to the computer.
- Network Monitor. This component lets you view network activity of the computer in real time.
The following tasks are provided in Kaspersky Endpoint Security:
- Integrity Check. Kaspersky Endpoint Security checks the application modules in the application installation folder for corruption or modifications. If an application module has an incorrect digital signature, the module is considered corrupt.
- Full Scan. Kaspersky Endpoint Security scans the operating system, including RAM, objects that are loaded at startup, backup storage of the operating system, and all hard drives and removable drives.
- Custom Scan. Kaspersky Endpoint Security scans the objects that are selected by the user.
- Critical Areas Scan. Kaspersky Endpoint Security scans objects that are loaded at operating system startup, RAM, and objects that are targeted by rootkits.
- Rollback. Kaspersky Endpoint Security rolls back the last update of databases and modules.
- Update. Kaspersky Endpoint Security downloads updated databases and application modules. Updating keeps the computer protected against the latest viruses and other threats.
File encryption functionality lets you encrypt files and folders that are stored on local computer drives. The full disk encryption functionality allows encryption of hard drives and removable drives.
Remote administration through Kaspersky Security Center
Kaspersky Security Center makes it possible to remotely start and stop Kaspersky Endpoint Security on a client computer, and to remotely manage and configure application settings.
Service functions of the application
Kaspersky Endpoint Security includes a number of service functions. Service functions are meant to keep the application up to date, expand its functionality, and assist the user with operating the application.
- Reports. In the course of its operation, the application keeps a report on each application component and task. The report contains a list of Kaspersky Endpoint Security events and all operations that the application performs. In case of an incident, you can send reports to Kaspersky, where Technical Support specialists can look into the issue in more detail.
- Data storage. If the application detects infected files while scanning the computer for viruses and other threats, it blocks those files. Kaspersky Endpoint Security stores copies of disinfected and deleted files in Backup. Kaspersky Endpoint Security moves files that are not processed for any reason to the list of active threats. You can scan files, restore files to their original folders, and empty the data storage.
- Notification service. The notification service keeps the user informed about the current protection status of the computer and about the operation of Kaspersky Endpoint Security. Notifications can be displayed on the screen or sent by email.
- Kaspersky Security Network. User participation in Kaspersky Security Network enhances the effectiveness of computer protection through real-time collection of information on the reputation of files, web resources, and software from users worldwide.
- License. Purchasing a license unlocks full application functionality, provides access to application database and module updates, and support by phone or via email on issues related to installation, configuration, and use of the application.
- Support. All registered users of Kaspersky Endpoint Security can contact Technical Support specialists for assistance. You can send a request from My Kaspersky Account on the Technical Support website or receive assistance from support personnel over the phone.
If the application returns an error or hangs up during operation, it may be restarted automatically.
If the application encounters recurring errors that cause the application to crash, the application performs the following operations:
- Disables control and protection functions (encryption functionality remains enabled).
- Notifies the user that the functions have been disabled.
- Attempts to restore the application to a functional state after updating anti-virus databases or applying application module updates.
The application receives information on recurring errors and system hangs using special-purpose algorithms defined by Kaspersky experts.
Page top
Hardware and software requirements
To ensure proper operation of Kaspersky Endpoint Security, your computer must meet the following requirements:
Minimum general requirements:
- 2 GB of free disk space on the hard drive
- Processor with a clock speed of 1 GHz (that supports the SSE2 instruction set)
- RAM:
- 1 GB for a 32-bit operating system
- 2 GB for a 64-bit operating system.
Supported operating systems for personal computers:
- Windows 7 Home / Professional / Ultimate / Enterprise Service Pack 1 or later;
- Windows 8 Professional / Enterprise;
- Windows 8.1 Professional / Enterprise;
- Windows 10 Home / Pro / Education / Enterprise.
For details about support for the Microsoft Windows 10 operating system, please refer to the Technical Support Knowledge Base.
Supported operating systems for file servers:
- Windows Small Business Server 2008 Standard / Premium (64-bit);
- Windows Small Business Server 2011 Essentials / Standard (64-bit);
- Windows MultiPoint Server 2011 (64-bit);
- Windows Server 2008 Standard / Enterprise / Datacenter Service Pack 2 or later;
- Windows Server 2008 R2 Foundation / Standard / Enterprise / Datacenter Service Pack 1 or later;
- Windows Server 2012 Foundation / Essentials / Standard / Datacenter;
- Windows Server 2012 R2 Foundation / Essentials / Standard / Datacenter;
- Windows Server 2016 Essentials / Standard / Datacenter;
- Windows Server 2019 Essentials / Standard / Datacenter.
Microsoft Small Business Server 2011 Standard (64-bit) is supported only if Service Pack 1 for Microsoft Windows Server 2008 R2 is installed
For details about support for the Microsoft Windows Server 2016 and Microsoft Windows Server 2019 operating systems, please refer to the Technical Support Knowledge Base.
Supported virtual platforms:
- VMware Workstation 12.
- VMware ESXi 6.5.
- Microsoft Hyper-V 2016 Server.
- Citrix XenServer 7.2
- Citrix XenDesktop 7.14.
- Citrix Provisioning Services 7.14.
Special considerations
You can view the list of known limitations and errors in the current version of Kaspersky Endpoint Security in Article 14210 of the Technical Support Knowledge Base: http://support.kaspersky.com/kes11.
Page top
Installing and removing the application
This section guides you through installing Kaspersky Endpoint Security on your computer, completing initial configuration, upgrading from a previous version of the application, and removing the application from the computer.
Installing the application
This section describes how to install Kaspersky Endpoint Security on your computer and complete initial configuration of the application.
About ways to install the application
Kaspersky Endpoint Security for Windows can be installed locally (directly on the user's computer) or remotely from the administrator's workstation.
Local installation of Kaspersky Endpoint Security for Windows can be performed in one of the following modes:
- In interactive mode by using the Application Setup Wizard.
The interactive mode requires your input in the setup process.
- In silent mode from the command line.
After installation is started in silent mode, your involvement in the installation process is not required.
The application can be installed remotely on network computers using the following:
- Kaspersky Security Center software suite (for more detailed information, please refer to the Kaspersky Security Center Help Guide).
- Group Policy Editor of Microsoft Windows (see the operating system help files).
- System Center Configuration Manager.
We recommend closing all running applications before starting the installation of Kaspersky Endpoint Security (including remote installation).
Page top
Installing the application by using the Setup Wizard
The interface of the application Setup Wizard consists of a sequence of windows corresponding to the application installation steps. You can navigate between the Setup Wizard pages by using the Back and Next buttons. To close the Setup Wizard after it completes its task, click the Terminate button. To stop the Setup Wizard at any stage, click the Cancel button.
To install the application or upgrade the application from a previous version by using the Setup Wizard:
- Run the setup_kes.exe file included in the distribution kit.
The Setup Wizard starts.
- Follow the instructions of the Setup Wizard.
When the setup.exe file is launched, Kaspersky Endpoint Security checks the computer for any incompatible software. By default, upon detection of incompatible software the installation process is aborted and the list of applications incompatible with Kaspersky Endpoint Security appears on the screen. To continue installation, remove these applications from the computer.
Step 1. Making sure that the computer meets installation requirements
Before installing Kaspersky Endpoint Security for Windows on a computer or upgrading a previous version of the application, the following conditions are checked:
- Whether or not the operating system and service pack meet the software requirements for product installation.
- Whether or not the hardware and software requirements are met.
- Whether or not the user has the rights to install the software product.
If any one of the previous requirements is not met, a relevant notification is displayed on the screen.
If the computer meets the listed requirements, the Setup Wizard searches for Kaspersky applications that could lead to conflicts when running at the same time as the application being installed. If such applications are found, you are prompted to remove them manually.
If the detected applications include previous versions of Kaspersky Endpoint Security, all data that can be migrated (such as activation data and application settings) is retained and used during the installation of Kaspersky Endpoint Security 11 for Windows, and the previous version of the application is automatically removed. This applies to the following application versions:
- Kaspersky Endpoint Security 10 Service Pack 1 for Windows (build 10.2.2.10535)
- Kaspersky Endpoint Security 10 Service Pack 1 Maintenance Release 1 for Windows (build 10.2.2.10535(MR1))
- Kaspersky Endpoint Security 10 Service Pack 1 Maintenance Release 2 for Windows (build 10.2.4.674)
- Kaspersky Endpoint Security 10 Service Pack 1 Maintenance Release 3 for Windows (build 10.2.5.3201)
- Kaspersky Endpoint Security 10 Service Pack 1 Maintenance Release 4 for Windows (build 10.2.6.3733)
- Kaspersky Endpoint Security 10 Service Pack 2 for Windows (build 10.3.0.6294)
Step 2. Welcome page of the installation procedure
If all requirements for application installation are met, a welcome page appears after you start the installation package. The welcome page announces the beginning of installation of Kaspersky Endpoint Security on the computer.
To proceed with the Setup Wizard, click the Next button.
Page top
Step 3. Viewing the License Agreement and Privacy Policy
At this step of the Setup Wizard, you must read the End User License Agreement that is to be concluded between you and Kaspersky, as well as the Privacy Policy.
Please carefully read the End User License Agreement and the Privacy Policy. If you agree with all the terms of the End User License Agreement and the Privacy Policy, in the I confirm I have fully read, understood, and accept the following section select the following check boxes:
- the terms and conditions of this EULA
- Privacy Policy describing the handling of data
Installation of the application on your device will continue after you select both check boxes.
If you do not accept the End User License Agreement and the Privacy Policy, cancel installation by clicking the Cancel button.
Page top
Step 4. Selecting the installation type
At this step, you can select the most suitable type of Kaspersky Endpoint Security installation:
- Basic installation. If you choose this type of installation, all protection components, except for the BadUSB Attack Prevention component, are installed on the computer with settings recommended by Kaspersky experts.
- Standard installation. If you choose this type of installation, all protection and control components, except for the BadUSB Attack Prevention component, are installed on the computer with settings recommended by Kaspersky experts.
- Custom installation. If you select this type of installation, you are prompted to select the components to install and to specify the destination folder for the application.
This type of installation lets you install the components that are not included in the basic and standard installations.
Standard installation is selected by default.
To return to the previous step of the Setup Wizard, click the Back button. To proceed with the Setup Wizard, click the Next button. To stop the Setup Wizard, click the Cancel button.
Page top
Step 5. Selecting application components to install
This step is performed if you select Custom installation of the application.
At this step, you can select the components of Kaspersky Endpoint Security that you want to install. The File Threat Protection component is a mandatory component that must be installed. You cannot cancel its installation.
By default, all application components are selected for installation except the following components:
BitLocker Management performs the following functions:
- Manages BitLocker encryption built in to the Windows operating system.
- Configures encryption in Kaspersky Security Center policy settings and checks their applicability for the managed computer.
- Starts encryption and decryption processes.
- Monitors the encryption status on the managed computer.
- Centrally stores recovery keys on the Kaspersky Security Center Administration Server.
Endpoint Sensor is a component of Kaspersky Anti Targeted Attack Platform. This solution is intended for rapid detection of threats such as targeted attacks. The component continually monitors processes, active network connections, and files that are modified, and relays this information to Kaspersky Anti Targeted Attack Platform.
To select a component to install, click the icon next to the component name to bring up the context menu and select Feature will be installed on the local hard drive. For more details on what tasks are performed by the selected component and how much disk space is required to install the component, refer to the lower part of the current Setup Wizard page.
To view detailed information about the available space on local hard drives, click the Volume button. Information will be displayed in the Disk Space Requirements window that opens.
To cancel installation of the component, select the Feature will be unavailable option in the context menu.
To return to the list of components installed by default, click the Reset button.
To return to the previous step of the Setup Wizard, click the Back button. To proceed with the Setup Wizard, click the Next button. To stop the Setup Wizard, click the Cancel button.
Page top
Step 6. Selecting the destination folder
This step is available if you select Custom installation of the application.
During this step, you can specify the path to the destination folder where the application will be installed. To select the destination folder for the application, click the Browse button.
To view information about available space on local hard drives, click the Volume button. Information is shown in the Disk Space Requirements window that opens.
To return to the previous step of the Setup Wizard, click the Back button. To proceed with the Setup Wizard, click the Next button. To stop the Setup Wizard, click the Cancel button.
Page top
Step 7. Adding scan exclusions
This step is available if you select Custom installation of the application.
At this step, you can specify which scan exclusions you want to add to the application settings.
The Exclude areas that are recommended by Microsoft from scan scope / Exclude areas that are recommended by Kaspersky from scan scope check boxes include / exclude areas that are recommended by Microsoft or Kaspersky in / from the trusted zone.
If one of these check boxes is selected, Kaspersky Endpoint Security includes, respectively, the areas that Microsoft or Kaspersky recommends in the trusted zone. Kaspersky Endpoint Security does not scan such areas for viruses and other threats.
The Exclude areas that are recommended by Microsoft from scan scope check box is available when Kaspersky Endpoint Security is installed on a computer running Microsoft Windows for file servers.
To return to the previous step of the Setup Wizard, click the Back button. To proceed with the Setup Wizard, click the Next button. To stop the Setup Wizard, click the Cancel button.
Page top
Step 8. Preparing for application installation
It is recommended to protect the installation process because your computer may be infected with malicious programs that could interfere with installation of Kaspersky Endpoint Security for Windows.
Installation process protection is enabled by default.
However, if the application cannot be installed (for example, when performing remote installation with the help of Windows Remote Desktop), you are advised to disable protection of the installation process. If this is the case, abort the installation and start the Application Setup Wizard again. At the "Preparing for application installation" step, clear the Protect the installation process check box.
The Ensure compatibility with Citrix PVS check box enables / disables the function that installs drivers in Citrix PVS compatibility mode.
Select this check box only if you are working with Citrix Provisioning Services.
The Add the path to the file avp.com to the system variable %PATH% check box enables / disables an option that adds the path to the avp.com file to the %PATH% system variable.
If the check box is selected, starting Kaspersky Endpoint Security or any of its tasks from the command line does not require entering the path to the executable file. It is sufficient to enter the name of the executable file and the command to start the particular task.
To return to the previous step of the Setup Wizard, click the Back button. To install the program, click the Install button. To stop the Setup Wizard, click the Cancel button.
Current network connections may be terminated while the application is being installed on the computer. Most terminated network connections are restored after application installation is completed.
Page top
Step 9. Application installation
Installation of the application can take some time. Wait for it to complete.
If you are updating a previous version of the application, this step also includes settings migration and removal of the previous version of the application.
After Kaspersky Endpoint Security installation finishes, the Initial Configuration Wizard starts.
Page top
Installing the application from the command line
Kaspersky Endpoint Security can be installed from the command line in one of the following modes:
- In interactive mode by using the Application Setup Wizard.
- In silent mode. After installation is started in silent mode, your involvement in the installation process is not required. To install the application in silent mode, use the
/sand/qnkeys.
To install the application or upgrade the application version:
- Run the command line interpreter (cmd.exe) as an administrator.
- Go to the folder where the Kaspersky Endpoint Security distribution package is located.
- Run the following command:
setup_kes.exe /pEULA=1 /pPRIVACYPOLICY=1 [/pKSN=1|0] [/pALLOWREBOOT=1|0] [/pADDLOCAL=<component>] [/pSKIPPRODUCTCHECK=1|0] [/pSKIPPRODUCTUNINSTALL=1|0] [/pKLLOGIN=<user name> /pKLPASSWD=<password> /pKLPASSWDAREA=<password scope>] [/pENABLETRACES=1|0 /pTRACESLEVEL=<tracing level>] /sor
msiexec /i <distribution kit name> EULA=1 PRIVACYPOLICY=1 [KSN=1|0] [ALLOWREBOOT=1|0] [ADDLOCAL=<component>] [SKIPPRODUCTCHECK=1|0] [SKIPPRODUCTUNINSTALL=1|0] [KLLOGIN=<user name> KLPASSWD=<password> KLPASSWDAREA=<password scope>] [ENABLETRACES=1|0 TRACESLEVEL=<tracing level>] /qnEULAAcceptance or rejection of the terms of the End User License Agreement. Available values:
1– acceptance of the terms of the End User License Agreement.0– rejection of the terms of the End User License Agreement.The text of the License Agreement is included in the distribution kit of Kaspersky Endpoint Security. Accepting the terms of the End User License Agreement is necessary for installing the application or upgrading the application version.
PRIVACYPOLICYAcceptance or rejection of the Privacy Policy. Available values:
1– acceptance of the Privacy Policy.0– rejection of the Privacy Policy.The text of the Privacy Policy is included in the Kaspersky Endpoint Security distribution kit. To install the application or upgrade the application version, you must accept the Privacy Policy.
KSNAgreement or refusal to participate in Kaspersky Security Network (KSN). If no value is set for this parameter, Kaspersky Endpoint Security will prompt to confirm your consent or refusal to participate in KSN when Kaspersky Endpoint Security is first started. Available values:
1– agreement to participate in KSN.0– refusal to participate in KSN (default value).The Kaspersky Endpoint Security distribution package is optimized for use with Kaspersky Security Network. If you opted not to participate in Kaspersky Security Network, you should update Kaspersky Endpoint Security immediately after the installation is complete.
ALLOWREBOOT=1Automatic restart of the computer, if required after installation or upgrade of the application. If no value is set for this parameter, automatic computer restart is blocked.
Restart is not required when installing Kaspersky Endpoint Security. Restart is required only if you have to remove incompatible applications prior to installation. Restart may also be required when updating the application version.
ADDLOCALSelection of additional application components to be installed. By default, all application components are selected for installation except the following components: BadUSB Attack Prevention, File Level Encryption, Full Disk Encryption, BitLocker Management, and Endpoint Sensor. Available values:
MSBitLockerFeature. Installation of the BitLocker Management component.AntiAPTFeature. The Endpoint Sensor component is installed.
SKIPPRODUCTCHECK=1Disabling checking for incompatible software. The list of incompatible software is available in the incompatible.txt file that is included in the distribution kit. If no value is set for this parameter and incompatible software is detected, the installation of Kaspersky Endpoint Security will be terminated.
SKIPPRODUCTUNINSTALL=1Disable automatic removal of detected incompatible software. If no value is set for this parameter, Kaspersky Endpoint Security attempts to remove incompatible software.
KLLOGINSet the user name for accessing the features and settings of Kaspersky Endpoint Security (the Password protection component). The user name is set together with the
KLPASSWDandKLPASSWDAREAparameters. The user name KLAdmin is used by default.KLPASSWDSpecify a password for accessing Kaspersky Endpoint Security features and settings (the password is specified together with the
KLLOGINandKLPASSWDAREAparameters).If you specified a password but did not specify a user name with the
KLLOGINparameter, the KLAdmin user name is used by default.KLPASSWDAREASpecify the scope of the password for accessing Kaspersky Endpoint Security. When a user attempts to perform an action that is included in this scope, Kaspersky Endpoint Security prompts for the user’s account credentials (
KLLOGINandKLPASSWDparameters). Use the ";" character to specify multiple values. Available values:SET– modifying application settings.EXIT– exiting the application.DISPROTECT– disabling protection components and stopping scan tasks.DISPOLICY– disabling Kaspersky Security Center policy.UNINST– removing the application from the computer.DISCTRL– disabling control components.REMOVELIC– removing the key.REPORTS– viewing reports.
ENABLETRACESEnabling or disabling application traces. After Kaspersky Endpoint Security starts, it saves trace files in the folder %ProgramData%/Kaspersky Lab. Available values:
1– traces are enabled.0– traces are disabled (default value).
TRACESLEVELLevel of detail of traces. Available values:
100(critical). Only messages about fatal errors.200(high). Messages about all errors, including fatal errors.300(diagnostic). Messages about all errors, and a selection of messages containing warnings.400(important). All warnings and messages about ordinary and critical errors, and a selection of messages that contain additional information.500(normal). All warnings and messages about normal and fatal errors, and also messages containing detailed information about normal operation (default value).600(low). All possible messages.
Example:
setup.exe /pEULA=1 /pPRIVACYPOLICY=1 /pKSN=1 /pALLOWREBOOT=1 /smsiexec /i kes_win.msi EULA=1 PRIVACYPOLICY=1 KSN=1 KLLOGIN=Admin KLPASSWD=Password KLPASSWDAREA=EXIT;DISPOLICY;UNINST /qnsetup.exe /pEULA=1 /pPRIVACYPOLICY=1 /pKSN=1 /pENABLETRACES=1 /pTRACESLEVEL=600 /s
After the application is installed, Kaspersky Endpoint Security activates the trial license unless you indicated an activation code in the setup.ini file. A trial license usually has a short term. When the trial license expires, all Kaspersky Endpoint Security features become disabled. To continue using the application, you must activate a commercial license.
When installing the application or upgrading the application version in silent mode, use of the following files is supported:
- setup.ini – general settings for application installation
- install.cfg – settings of Kaspersky Endpoint Security operation
- setup.reg – registry keys
Registry keys from the setup.reg file are written to the registry only if the
setup.regvalue is set for theSetupRegparameter in the setup.ini file. The setup.reg file is generated by Kaspersky experts. It is not recommended to modify the contents of this file.
To apply settings from the setup.ini, install.cfg, and setup.reg files, place these files into the folder containing the Kaspersky Endpoint Security distribution package.
Page top
Remotely installing the application using System Center Configuration Manager
These instructions apply to System Center Configuration Manager 2012 R2.
To remotely install an application using System Center Configuration Manager:
- Open the Configuration Manager console.
- In the right part of the console, in the App management section, select Packages.
- In the upper part of the console in the control panel, click the Create package button.
This starts the New Package and Application Wizard.
- In the New Package and Application Wizard:
- In the Package section:
- In the Name field, enter the name of the installation package.
- In the Source folder field, specify the path to the folder containing the distribution kit of Kaspersky Endpoint Security.
- In the Application type section, select the Standard application option.
- In the Standard application section:
- In the Name field, enter the unique name for the installation package (for example, the application name including the version).
- In the Command line field, specify the Kaspersky Endpoint Security installation options from the command line.
- Click the Browse button to specify the path to the executable file of the application.
- Make sure that the Execution mode list has the Run with administrator rights item selected.
- In the Requirements section:
- Select the Start another application first check box if you want a different application to be started before installing Kaspersky Endpoint Security.
Select the application from the Application drop-down list or specify the path to the executable file of this application by clicking the Browse button.
- Select the This application can be started only on the specified platforms option in the Platform requirements section if you want the application to be installed only in the specified operating systems.
In the list below, select the check boxes opposite the operating systems in which Kaspersky Endpoint Security will be installed.
This step is optional.
- Select the Start another application first check box if you want a different application to be started before installing Kaspersky Endpoint Security.
- In the Summary section, check all entered values of the settings and click Next.
The created installation package will appear in the Packages section in the list of available installation packages.
- In the Package section:
- In the context menu of the installation package, select Deploy.
This starts the Deployment Wizard.
- In the Deployment Wizard:
- In the General section:
- In the Software field, enter the unique name of the installation package or select the installation package from the list by clicking the Browse button.
- In the Collection field, enter the name of the collection of computers on which the application will be installed, or select the collection by clicking the Browse button.
- In the Contains section, add distribution points (for more detailed information, please refer to the help documentation for System Center Configuration Manager).
- If required, specify the values of other settings in the Deployment Wizard. These settings are optional for remote installation of Kaspersky Endpoint Security.
- In the Summary section, check all entered values of the settings and click Next.
After the Deployment Wizard finishes, a task will be created for remote installation of Kaspersky Endpoint Security.
- In the General section:
Description of setup.ini file installation settings
The setup.ini file is used when installing the application from the command line or when using the Group Policy Editor of Microsoft Windows. To apply settings from the setup.ini file, place this file into the folder containing the Kaspersky Endpoint Security distribution package.
The setup.ini file consists of the following sections:
[Setup]– general settings of application installation.[Components]– selection of application components to be installed. If none of the components are specified, all components that are available for the operating system are installed. File Threat Protection is a mandatory component and is installed on the computer regardless of which settings are indicated in this section.[Tasks]– selection of tasks to be included in the list of Kaspersky Endpoint Security tasks. If no task is specified, all tasks are included in the task list of Kaspersky Endpoint Security.
The alternatives to the value 1 are the values yes, on, enable, and enabled.
The alternatives to the value 0 are the values no, off, disable, and disabled.
Settings of the setup.ini file
Section |
Parameter |
Description |
|---|---|---|
|
|
Path to the application installation folder. |
|
|
Kaspersky Endpoint Security activation code. |
|
|
Acceptance or rejection of the terms of the End User License Agreement. Available values:
|
|
|
Acceptance or rejection of the Privacy Policy. Available values:
|
|
|
Agreement or refusal to participate in Kaspersky Security Network (KSN). If no value is set for this parameter, Kaspersky Endpoint Security will prompt to confirm your consent or refusal to participate in KSN when Kaspersky Endpoint Security is first started. Available values:
|
|
|
Set the user name for accessing the features and settings of Kaspersky Endpoint Security (the Password protection component). The user name is set together with the |
|
|
Specify a password for accessing Kaspersky Endpoint Security features and settings (the password is specified together with the If you specified a password but did not specify a user name with the |
|
|
Specify the scope of the password for accessing Kaspersky Endpoint Security. When a user attempts to perform an action that is included in this scope, Kaspersky Endpoint Security prompts for the user’s account credentials (
|
|
|
Enabling or disabling the application installation protection mechanism. Available values:
|
|
|
Automatic restart of the computer, if required after installation or upgrade of the application. If no value is set for this parameter, automatic computer restart is blocked. Restart is not required when installing Kaspersky Endpoint Security. Restart is required only if you have to remove incompatible applications prior to installation. Restart may also be required when updating the application version. |
|
|
In the %PATH% system variable, add the path to executable files located in the Kaspersky Endpoint Security setup folder. Available values:
|
|
|
Enables or disables protection of the Kaspersky Endpoint Security service using AM-PPL technology (Antimalware Protected Process Light). Available values:
|
|
|
Enable writing of registry keys from the setup.reg file to the registry. |
|
|
Enabling or disabling application installation traces. Kaspersky Endpoint Security saves trace files in the folder %ProgramData%/Kaspersky Lab. Available values:
|
|
|
Level of detail of traces. Available values:
|
|
|
Installation of all components. If the parameter value |
|
|
Mail Threat Protection. |
|
|
Web Threat Protection. |
|
||
|
|
Host Intrusion Prevention. |
|
|
Behavior Detection. |
|
|
Exploit Prevention. |
|
|
Remediation Engine. |
|
|
Firewall |
|
|
Network Threat Protection. |
|
|
Web Control. |
|
|
Device Control. |
|
|
Application Control. |
|
|
File Level Encryption libraries. |
|
|
Full Disk Encryption libraries. |
|
|
BadUSB Attack Prevention. |
|
|
Endpoint Sensor. |
|
|
Network Agent Connector for remote administration of the application through Kaspersky Security Center. Available values:
|
|
|
Full Scan task. Available values:
|
|
|
Critical Areas Scan task. Available values:
|
|
|
Update task. Available values:
|
Initial Configuration Wizard
The Initial Configuration Wizard of Kaspersky Endpoint Security starts at the end of the application setup procedure. The Initial Configuration Wizard lets you activate the application and gathers information about the applications that are included in the operating system. These applications are added to the list of trusted applications whose actions within the operating system are not subject to any restrictions.
The interface of the Initial Configuration Wizard consists of a sequence of pages (steps). You can navigate between the Initial Configuration Wizard pages by using the Back and Next buttons. To complete the Initial Configuration Wizard procedure, click the Terminate button. To stop the Initial Configuration Wizard procedure at any stage, click Cancel.
If the Initial Configuration Wizard is interrupted for some reason, the already specified settings are not saved. The next time you attempt to use the application, the Initial Configuration Wizard will start again, and you will have to configure the settings from scratch.
Step 1. Application activation
The application must be activated on a computer with the current system date and time. If the system date and time are changed after activation of the application, the key becomes inoperable. The application switches to a mode of operation without updates, and Kaspersky Security Network is not available. The key can be made operable again only by reinstalling the operating system.
At this step, select one of the following Kaspersky Endpoint Security activation options:
- Activate with an activation code. To activate the application with an activation code, select this option and enter an activation code.
- Activate with a key file. Select this option to activate the application with a key file.
- Activate trial version. To activate the trial version of the application, select this option. The user can use the fully-functional version of the application for the duration of the term that is limited by the license for the trial version of the application. After the license expires, the application functionality is blocked and you cannot activate the trial version again.
- Activate later. Select this option if you want to skip the stage of Kaspersky Endpoint Security activation. The user will be able to work with only the File Threat Protection and Firewall components. The user will be able to update anti-virus databases and modules of Kaspersky Endpoint Security only once after installation. The Activate later option is available only at the first start of the Initial Configuration Wizard, immediately after installing the application.
An Internet connection is required to activate the trial version of the application, or to activate the application with an activation code.
To proceed with the Initial Configuration Wizard, select an activation option and click the Next button. To stop the Initial Configuration Wizard, click the Cancel button.
Page top
Step 2. Activating with an activation code
This step is available only when you activate the application with an activation code. This step is skipped when you activate the trial version of the application or when you activate the application with a key file.
During this step, Kaspersky Endpoint Security sends data to the activation server to verify the entered activation code:
- If the activation code verification is successful, the Initial Configuration Wizard automatically proceeds to the next window.
- If the activation code verification fails, a corresponding message appears. In this case, you should seek advice from the software vendor that sold you the license to Kaspersky Endpoint Security.
- If the number of activations with the activation code is exceeded, a corresponding notification appears. The Initial Configuration Wizard is interrupted, and the application suggests that you contact Kaspersky Technical Support.
To return to the previous step of the Initial Configuration Wizard, click the Back button. To stop the Initial Configuration Wizard, click the Cancel button.
Page top
Step 3. Activating with a key file
This step is available only when you activate the application with a key file.
At this step, specify the path to the key file. To do so, click the Browse button and select a key file of the form <File ID>.key.
After you select a key file, the following information is displayed in the lower part of the window:
- key;
- License type (commercial or trial) and the number of computers that are covered by this license
- date of application activation on the computer;
- license expiration date;
- application functionality available under the license;
- Notifications about key problems, if any. For example, Black list of keys corrupted.
To return to the previous step of the Initial Configuration Wizard, click the Back button. To proceed with the Initial Configuration Wizard, click the Next button. To stop the Initial Configuration Wizard, click the Cancel button.
Page top
Step 4. Selecting the functions to activate
This step is available only when you activate the trial version of the application.
At this step, you can select the functionality that will become available after activation of the application:
- Basic installation. If this option is selected, only the protection components and the Host Intrusion Prevention component will be available after activation of the application.
- Standard installation. If this option is selected, only protection and control components of the application will be available after activation.
- Full installation. If this option is selected, all installed application components, including data encryption functionality, will be available after activation of the application.
If you selected more components than the acquired license permits during installation, after activation of the application the components that are unavailable under the license will be installed but will not be operational. If the license purchased allows using more components than are currently installed, after the application is activated the components that have not been installed are listed in the Licensing section.
Standard installation is selected by default.
To return to the previous step of the Initial Configuration Wizard, click the Back button. To proceed with the Initial Configuration Wizard, click the Next button. To stop the Initial Configuration Wizard, click the Cancel button.
Step 5. Completing activation
During this step, the Initial Configuration Wizard informs you about successful activation of Kaspersky Endpoint Security. The following information about the license is provided:
- License type (commercial or trial) and the number of computers that are covered by this license
- license expiration date;
- application functionality available under the license.
To proceed with the Initial Configuration Wizard, click the Next button. To stop the Initial Configuration Wizard, click the Cancel button.
Page top
Step 6. Finishing the initial configuration of the application
The Initial Configuration Wizard completion window contains information about the completion of the Kaspersky Endpoint Security installation process.
If you want to start Kaspersky Endpoint Security, click the Finish button.
If you want to exit the Initial Configuration Wizard without starting Kaspersky Endpoint Security, clear the Start Kaspersky Endpoint Security for Windows check box and click Finish.
Page top
Step 7. Analyzing the operating system
During this step, information is collected about applications that are included in the operating system. These applications are added to the list of trusted applications whose actions within the operating system are not subject to any restrictions.
Other applications are analyzed after they are started for the first time following Kaspersky Endpoint Security installation.
To stop the Initial Configuration Wizard, click the Cancel button.
Page top
Step 8. Kaspersky Security Network Statement
At this step, you are invited to accept participation in Kaspersky Security Network by performing the following actions:
- Review the Kaspersky Security Network Statement.
- Select one of the following options:
- If you accept all of its terms, select the I agree to use Kaspersky Security Network option.
- If you do not accept the terms of participation in Kaspersky Security Network, select the I do not agree to use Kaspersky Security Network option.
The Kaspersky Endpoint Security distribution kit is optimized for use with Kaspersky Security Network. If you opted not to participate in Kaspersky Security Network, you should update Kaspersky Endpoint Security immediately after the installation is complete.
- To confirm your selection, click OK.
Updating to the new version of the application
When you update a previous version of the application to a newer version, consider the following:
- When updating a previous version to Kaspersky Endpoint Security for Windows 11.0.0, there is no need to remove the previous version of the application.
- We recommend quitting all active applications before starting the update.
- To update Kaspersky Endpoint Security from version 10 to version 11, you need to decrypt all encrypted hard drives.
Before updating, Kaspersky Endpoint Security blocks the Full Disk Encryption functionality. If Full Disk Encryption could not be blocked, the update installation will not start. After updating the application, the Full Disk Encryption functionality will be restored.
You can update the following applications to Kaspersky Endpoint Security 11.0.0 for Windows:
- Kaspersky Endpoint Security 10 Service Pack 1 for Windows (build 10.2.2.10535)
- Kaspersky Endpoint Security 10 Service Pack 1 Maintenance Release 2 for Windows (build 10.2.4.674)
- Kaspersky Endpoint Security 10 Service Pack 1 Maintenance Release 3 for Windows (build 10.2.5.3201)
- Kaspersky Endpoint Security 10 Service Pack 1 Maintenance Release 4 for Windows (build 10.2.6.3733)
- Kaspersky Endpoint Security 10 Service Pack 2 for Windows (build 10.3.0.6294)
- Kaspersky Endpoint Security 10 Service Pack 2 Maintenance Release 1 for Windows (build 10.3.0.6294)
- Kaspersky Endpoint Security 10 Service Pack 2 Maintenance Release 2 for Windows (build 10.3.0.6294)
- Kaspersky Endpoint Security 10 Service Pack 2 Maintenance Release 3 for Windows (build 10.3.3.275). .
When updating Kaspersky Endpoint Security 10 Service Pack 2 for Windows to Kaspersky Endpoint Security 11.0.0 for Windows, the files that were placed in Backup or Quarantine in the previous version of the application will be transferred to Backup in the new version of the application. For versions earlier than Kaspersky Endpoint Security 10 Service Pack 2 for Windows, files that were placed in Backup and Quarantine in a previous version of the application are not migrated to the newer version.
Kaspersky Endpoint Security can be updated on the computer in the following ways:
- locally, by using the Setup Wizard.
- locally from the command line.
- remotely, by using the Kaspersky Security Center software suite (refer to the Kaspersky Security Center Help for more information).
- remotely through the Microsoft Windows Group Policy Management Editor (for more details, see Microsoft Technical Support website).
- remotely, by using the System Center Configuration Manager.
Removing the application
This section describes how you can remove Kaspersky Endpoint Security from your computer.
About ways to remove the application
Removing Kaspersky Endpoint Security leaves the computer and user data unprotected against threats.
Kaspersky Endpoint Security can be removed from the computer in several ways:
- Locally in interactive mode, by using the Setup Wizard
- Locally in non-interactive mode, from the command line
- Remotely using the Kaspersky Security Center software suite (please refer to the Kaspersky Security Center Help Guide for more information)
- Remotely via the Group Policy Editor of Microsoft Windows (see the operating system help files)
Removing the application by using the Setup Wizard
To remove Kaspersky Endpoint Security by using the Setup Wizard:
- Open the Control Panel window in one of the following ways:
- If you are using Windows 7, select Control Panel in the Start menu.
- If you are using Windows 8 or Windows 8.1, press the Win+I key combination and select Control Panel.
- If you are using Windows 10, press the Win+X key combination and select Control Panel.
- In the Control Panel window, select Apps and Features.
- In the list of installed applications, select Kaspersky Endpoint Security for Windows.
- Click the Modify/Uninstall button.
This opens the Custom installation window of the Application Setup Wizard.
- In the Modify, Repair or Remove application window of the Setup Wizard, click the Remove button.
- Follow the instructions of the Setup Wizard.
Step 1. Saving application data for future use
During this step, you can specify which of the data used by the application you want to keep for further use during the next installation of the application (for example, when installing a newer version). If you do not specify any data, the application will be completely removed.
To save application data for future use,
select the check boxes next to the data types that you want to save:
- Activation data - data that eliminates the need to activate the application you install in the future. It is activated automatically under the current license, as long as the license has not expired by the time of installation.
- Backup files are files that are scanned by the application and placed in Backup.
Backup files that are saved after removal of the application can be accessed only from the same version of the application that was used to save those files.
If you plan to use Backup objects after removal of the application, you must restore those objects from storage before removing the application. However, Kaspersky experts do not recommend restoring objects from Backup because this may harm the computer.
- Operational settings of the application - values of application settings that are selected during application configuration.
- Local storage of encryption keys - data that provides direct access to files and devices that were encrypted before removal of the application. Encrypted files and drives can be accessed directly after the application is reinstalled with encryption functionality.
This check box is selected by default.
To proceed with the Setup Wizard, click the Next button. To stop the Setup Wizard, click the Cancel button.
Page top
Step 2. Confirming application removal
Because removing the application jeopardizes the security of your computer, you are asked to confirm that you want to remove the application. To do so, click the Delete button.
To stop removal of the application at any time, you can cancel this operation by clicking the Cancel button.
Page top
Step 3. Application removal. Completing removal
During this step, the Setup Wizard removes the application from the computer. Wait until application removal is complete.
When removing the application, your operating system may require a restart. If you decide to not restart immediately, completion of the application removal procedure is postponed until the operating system is restarted, or until the computer is turned off and then turned on again.
Page top
Removing the application from the command line
You can start the application uninstallation process from the command line executing the command from the folder containing the distribution kit. Uninstallation is performed in interactive or silent mode (without starting the Application Setup Wizard).
To start the application uninstallation process in interactive mode,
in the command line type setup_kes.exe /x or msiexec.exe /x {E7012AFE-DB97-4B8B-9513-E98C0C3AACE3}.
The Setup Wizard starts. Follow the instructions of the Setup Wizard.
To start the application uninstallation process in silent mode,
in the command line type setup_kes.exe /s /x or msiexec.exe /x {E7012AFE-DB97-4B8B-9513-E98C0C3AACE3} /qn.
This starts the application uninstallation process in silent mode (without starting the Setup Wizard).
If the application uninstallation operation is password protected, the user name and its corresponding password must be entered in the command line.
To remove the application from the command line in interactive mode when the user name and password for authentication of Kaspersky Endpoint Security removal, modification, or repair are set:
In the command line, type setup_kes.exe /pKLLOGIN=<User name> /pKLPASSWD=***** /x or
msiexec.exe KLLOGIN=<User name> KLPASSWD=***** /x {E7012AFE-DB97-4B8B-9513-E98C0C3AACE3}.
The Setup Wizard starts. Follow the instructions of the Setup Wizard.
To remove the application from the command line in silent mode when the user name and password for authentication of Kaspersky Endpoint Security removal, modification, or repair are set:
In the command line, type setup_kes.exe /pKLLOGIN=<User name> /pKLPASSWD=***** /s /x or
msiexec.exe /x {E7012AFE-DB97-4B8B-9513-E98C0C3AACE3} KLLOGIN=<User name> KLPASSWD=***** /qn.
Removing objects and data that remained after test operation of Authentication Agent
During application uninstallation, if Kaspersky Endpoint Security detects objects and data that remained on the system hard drive after test operation of Authentication Agent, application uninstallation is interrupted and becomes impossible until such objects and data are removed.
Objects and data may remain on the system hard drive after test operation of Authentication Agent only in exceptional cases. For example, this can happen if the computer has not been restarted after a Kaspersky Security Center policy with encryption settings was applied, or if the application fails to start after test operation of Authentication Agent.
You can remove objects and data that remained on the system hard drive after test operation of Authentication Agent in two ways:
- Using the Kaspersky Security Center policy.
- Using Restore Utility.
To use a Kaspersky Security Center policy to remove objects and data that remained after test operation of Authentication Agent:
- Apply to the computer a Kaspersky Security Center policy with settings configured to decrypt all computer hard drives.
- Start Kaspersky Endpoint Security.
To remove information about application incompatibility with Authentication Agent,
type the avp pbatestreset command in the command line.
Encryption components must be installed for the avp pbatestreset command to be executed.
Application interface
This section describes the primary elements of the application interface.
Application icon in the taskbar notification area
Immediately after installation of Kaspersky Endpoint Security, the application icon appears in the Microsoft Windows taskbar notification area.
The icon serves the following purposes:
- It indicates application activity.
- It acts as a shortcut to the context menu and main window of the application.
Indication of application activity
The application icon serves as an indicator of application activity:
- The
 icon signifies that all protection components of the application are enabled.
 - The
 icon signifies that important events that require your attention have occurred in the operation of Kaspersky Endpoint Security. For example, the File Threat Protection component is disabled and the application databases are out of date.
 - The
 icon signifies that critical events have occurred in the operation of Kaspersky Endpoint Security. For example, a failure in the operation of a component, or corruption of the application databases.
Application icon context menu
The context menu of the application icon contains the following items:
- Kaspersky Endpoint Security for Windows. Opens the main application window. In this window, you can adjust the operation of application components and tasks, and view the statistics of processed files and detected threats.
- Settings. Opens the Settings window. The Settings tab lets you change the default application settings.
- Pause protection and control / Resume protection and control. Temporarily pauses / resumes the operation of protection and control components. This context menu item does not affect the update task and scan tasks, being only available when the Kaspersky Security Center policy is disabled.
Kaspersky Security Network is used by Kaspersky Endpoint Security regardless of whether the operation of protection and control components is paused / resumed.
- Disable policy / Enable policy. Disables / enables the Kaspersky Security Center policy. This context menu item is available if a policy has been applied to a computer on which Kaspersky Endpoint Security is installed, and a password for disabling the Kaspersky Security Center policy has been set.
- About. This item opens an information window with application details.
- Exit. This item quits Kaspersky Endpoint Security. Clicking this context menu item causes the application to be unloaded from the computer RAM.
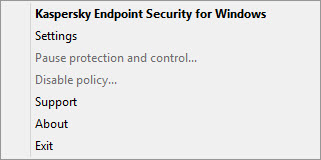
Application icon context menu
You can open the context menu of the application icon by resting the pointer on the application icon in the taskbar notification area of Microsoft Windows and right-clicking.
Page top
Main application window
The main window of Kaspersky Endpoint Security contains interface elements that provide access to the main functions of the application.
The main application window contains the following items:
- Link to Kaspersky Endpoint Security for Windows. Clicking this link opens the About window containing information about the application version.
- Button
 . Clicking this button takes you to the help system of Kaspersky Endpoint Security.
 - Threat detection technologies section. The section contains the following information:
- The left part of the section displays a list of threat detection technologies. The number of threats that were detected using the specific technology appears to the right of the name of each threat detection technology.
- Depending on the presence of active threats, the center of the section displays one of the following captions:
- No threats. If this caption is displayed, clicking the Threat detection technologies section opens the Threat detection technologies window, which provides a brief description of the threat detection technologies as well as the status and global statistics of the Kaspersky Security Network cloud service infrastructure.
- N active threats. If this caption is displayed, clicking the Threat detection technologies section opens the Active threats window, which displays a list of events associated with infected files that were not processed for some reason.
- Protection components section. Clicking this section opens the Protection components window. In this window, you can view the operating status of installed components. From this window, you can also open a subsection in the Settings window containing the settings of any installed component except encryption components.
- Tasks section. Clicking this section opens the Tasks window. In this window, you can manage the operation of Kaspersky Endpoint Security tasks that are used to update application modules and databases, scan files for viruses and other malware, and run an integrity check.
- Reports button. Clicking this button opens the Reports window containing information about events that have occurred during operation of the application in general or its separate components, or during the performance of tasks.
- Repositories button. Clicking this button opens the Backup window. In this window, you can view a list of copies of infected files that the application has deleted.
- Support button. Clicking this button opens the Support window, which contains information on the operating system, the current version of Kaspersky Endpoint Security, and links to Kaspersky information resources.
- Settings button. Clicking this button opens the Settings window in which you can modify the default settings of the application.
- Button
 /
/  /
/  . Clicking this button opens the Events window that contains information about available updates as well as requests to access encrypted files and devices.
 - License link. Clicking this link opens the Licensing window containing information about the current license.
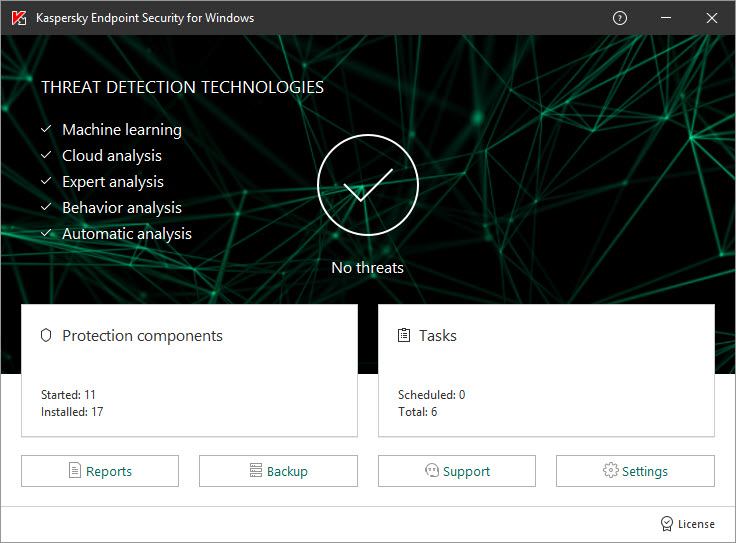
Main application window
To open the main window of Kaspersky Endpoint Security, perform one of the following actions:
- Click the application icon in the Microsoft Windows taskbar notification area.
- Select Kaspersky Endpoint Security for Windows in the context menu of the application icon.
Renewing a license
When your license approaches expiration, you can renew it. This ensures that your computer remains protected after expiration of the current license and until you activate the application under a new license.
To renew a license:
- Receive a new application activation code or key file.
- Add an additional key with the activation code or the key file that you have received.
An
is added as a result. It becomes upon license expiration.It may take some time for the key to be updated from additional to active due to load distribution across activation servers of Kaspersky.
Page top
Application settings window
The Kaspersky Endpoint Security settings window lets you configure overall application settings, individual components, reports and storages, scan tasks and update tasks, and communication with Kaspersky Security Network servers.
The application settings window consists of two parts (see the following figure):
- The left part contains application components, tasks, and an advanced settings section consisting of several subsections.
- The right part contains control elements that you can use to configure the settings of the component or task selected in the left part of the window, as well as advanced settings.
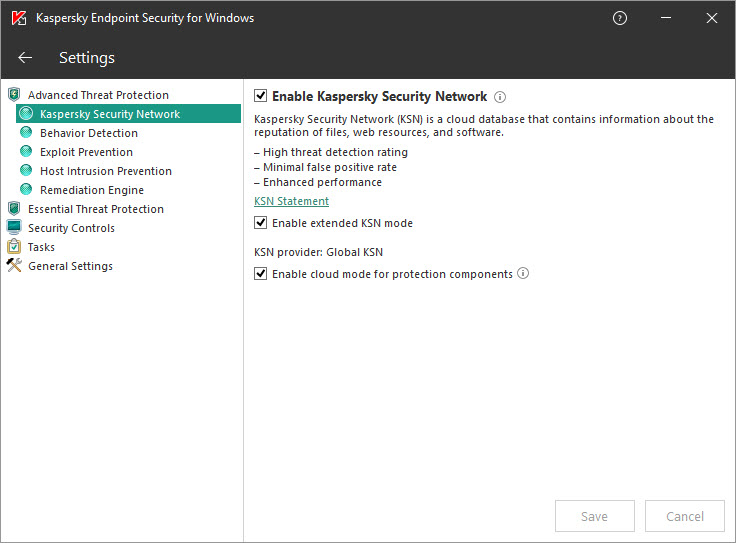
Application settings window
To open the application settings window, perform one of the following actions:
- In the main application window, select the Settings tab.
- In the context menu of the application icon, select Settings.
Simplified application interface
If a Kaspersky Security Center policy configured to display the simplified application interface is applied to a client computer on which Kaspersky Endpoint Security is installed, the main application window is not available on this client computer. Right-click to open the context menu of the Kaspersky Endpoint Security icon (see the figure below) containing the following items:
- Disable policy. Disables the Kaspersky Security Center policy on the client computer that has Kaspersky Endpoint Security installed. This context menu item is available if a policy has been applied to the computer and a password for disabling the Kaspersky Security Center policy has been set.
- Tasks. Drop-down list containing the following items:
- Update.
- Rollback.
- Full Scan.
- Custom Scan.
- Critical Areas Scan.
- Integrity Check.
- Support. This opens the Support window containing information necessary for contacting Kaspersky Technical Support.
- Exit. Exit Kaspersky Endpoint Security.
![]()
Context menu of the application icon when displaying the simplified interface
Page top
Application licensing
This section provides information about general concepts related to the application licensing.
About the End User License Agreement
The End User License Agreement is a binding agreement between you and AO Kaspersky Lab stipulating the terms on which you may use the application.
We recommend carefully reading the terms of the License Agreement before using the application.
You can view the terms of the License Agreement in the following ways:
- When installing Kaspersky Endpoint Security in interactive mode.
- By reading the license.txt file. This document is included in the application distribution kit.
By confirming that you agree with the End User License Agreement when installing the application, you signify your acceptance of the terms of the End User License Agreement. If you do not accept the terms of the End User License Agreement, you must abort the installation.
Page top
About the license
A license is a time-limited right to use the application, granted under the End User License Agreement.
A valid license entitles you to the following kinds of services:
- Use of the application in accordance with the terms of the End User License Agreement
- Technical Support
The scope of services and application usage term depend on the type of license under which the application was activated.
The following license types are provided:
- Trial – a free license intended for trying out the application.
A trial license usually has a short term. When the trial license expires, all Kaspersky Endpoint Security features become disabled. To continue using the application, you must purchase a commercial license.
You can activate the application under a trial license only once.
- Commercial – a paid license that is provided when you purchase Kaspersky Endpoint Security.
Application functionality available under the commercial license depends on the choice of product. The selected product is indicated in the License Certificate. Information on available products may be found on the Kaspersky website.
When the commercial license expires, key features of the application become disabled. To continue using the application, you must renew your commercial license. If you are not planning to renew your license, you must remove the application from your computer.
About the license certificate
A license certificate is a document transferred to the user together with a key file or activation code.
The license certificate contains the following license information:
- Order number
- Details of the user to whom the license is granted
- Details of the application that can be activated using the license
- Limitation on the number of licensed units (for example, the number of devices on which the application can be used under the license)
- License term start date
- License expiration date or license term
- License type
About subscription
A subscription for Kaspersky Endpoint Security is a purchase order for the application with specific parameters (such as the subscription expiry date and number of devices protected). You can order a subscription for Kaspersky Endpoint Security from your service provider (such as your ISP). A subscription can be renewed manually or automatically, or you may cancel your subscription. You can manage your subscription on the website of the service provider.
Subscription can be limited (for one year, for example) or unlimited (without an expiry date). To keep Kaspersky Endpoint Security working after expiry of the limited subscription term, you have to renew your subscription. Unlimited subscription is renewed automatically if the vendor's services have been prepaid on time.
When a limited subscription expires, you may be provided a subscription renewal grace period during which the application continues to function. The availability and duration of such a grace period is decided by the service provider.
To use Kaspersky Endpoint Security under subscription, you have to apply the activation code received from the service provider. After the activation code is applied, the active key is installed. The active key defines the license for using the application under subscription. An additional key can be installed only using an activation code and cannot be installed using a key file or under subscription.
The possible subscription management options may vary with each service provider. The service provider may not offer a grace period for renewing subscription, during which time the application will retain its functionality.
Activation codes purchased under subscription may not be used to activate previous versions of Kaspersky Endpoint Security.
Page top
About activation code
An activation code is a unique alphanumeric sequence of twenty Latin letters and numerals that you receive when purchasing a commercial license for Kaspersky Endpoint Security.
To activate the application with an activation code, Internet access is required to connect to Kaspersky activation servers.
When the application is activated using an activation code, the active key is installed. An additional key can be installed only using an activation code and cannot be installed using a key file or under subscription.
If an activation code is lost after activating the application, you can restore the activation code. You may need an activation code, for example, to register a Kaspersky CompanyAccount. To restore an activation code, you must contact Kaspersky Technical Support.
Page top
About the key
A key is a unique alphanumeric sequence. A key makes it possible to use the application on the terms indicated in the License Certificate (type of license, license validity period, license restrictions).
A license certificate is not provided for a key installed under subscription.
A key can be added to the application using an activation code or a key file.
You can add, edit, or delete keys. The key can be blocked by Kaspersky if the terms of the End User License Agreement are violated. If the key has been blocked, you have to add a different key to continue using the application.
If a key for an expired license has been deleted, application functionality is not available. You cannot add such a key again after it has been deleted.
There are two types of keys: active and additional.
An active key is a key that is currently used by the application. A trial or commercial license key can be added as the active key. The application cannot have more than one active key.
An additional key is a key that entitles the user to use the application, but is not currently in use. At the expiry of the active key, an additional key automatically becomes active. An additional key can be added only if the active key is available.
A key for a trial license can be added only as an active key. It cannot be added as the additional key. A trial license key cannot replace the active key to a commercial license.
If a key gets blacklisted, the application functionality defined by the license under which the application has been activated remains available for eight days. Kaspersky Security Network and database and application module updates are available with no restrictions. The application notifies that user that the key has been blacklisted. After eight days, application functionality becomes limited to the functionality level that is available after the license term expires: the application operates without updates and Kaspersky Security Network is not available.
Page top
About the key file
A key file is a file with the .key extension that you receive from Kaspersky after purchasing Kaspersky Endpoint Security. The purpose of a key file is to add a key that activates the application.
You do not need to connect to Kaspersky activation servers in order to activate the application with a key file.
You can recover a key file if it has been accidentally deleted. You may need a key file to register a Kaspersky CompanyAccount, for example.
To recover a key file, do one of the following:
- Contact the license vendor.
- Obtain a key file on the Kaspersky website based on your existing activation code.
When the application is activated using a key file, an active key is added. A reserve license key can be added only by using a key file and cannot be added using an activation code.
Page top
About data provision
If an activation code is applied to activate Kaspersky Endpoint Security, you agree to periodically transmit the following information automatically for the purposes of verifying correct use of the application:
- Type, version, and localization of Kaspersky Endpoint Security
- Versions of installed updates for Kaspersky Endpoint Security
- ID of the computer and ID of the specific Kaspersky Endpoint Security installation on the computer
- Activation code and unique ID of the specific activation of the current license
- Type, version and bit rate of the operating system, and name of the virtual environment (if Kaspersky Endpoint Security is installed in a virtual environment)
- IDs of Kaspersky Endpoint Security components that are active when the information is transmitted
Kaspersky may also use this information to generate statistics on the dissemination and use of Kaspersky software.
By using an activation code, you agree to automatically transmit the data listed above. If you do not agree to transmit this information to Kaspersky, you should use a key file to activate Kaspersky Endpoint Security.
By accepting the terms of the End User License Agreement, you agree to automatically transmit the following information:
- When upgrading Kaspersky Endpoint Security:
- Version of Kaspersky Endpoint Security
- ID of the active license
- ID of Kaspersky Endpoint Security
- Serial number of the active license
- Unique ID of the upgrade task start
- Unique ID of the Kaspersky Endpoint Security installation
- When following links from the Kaspersky Endpoint Security interface:
- Version of Kaspersky Endpoint Security
- Version of the operating system
- Kaspersky Endpoint Security activation date
- License expiration date
- Key creation date
- Kaspersky Endpoint Security installation date
- ID of Kaspersky Endpoint Security
- ID of the active license
- ID of the detected vulnerability in the operating system
- ID of the last update installed for Kaspersky Endpoint Security
- ID of the vulnerability found when scanning for vulnerable applications
- Hash of the detected threat, and the name of this threat according to the Kaspersky classification
- Kaspersky Endpoint Security activation error category
- Error code
- Kaspersky Endpoint Security activation error code
- Number of days until key expiration
- Number of days that have elapsed since the key was added
- Number of days that have elapsed since the license expired
- Number of computers on which the active license is applied
- Serial number of the active license
- Kaspersky Endpoint Security license term
- Current status of the license
- Type of active license
- Application type
- Unique ID of the upgrade task start
- Unique ID of the Kaspersky Endpoint Security installation
- Unique software installation ID on the computer
- Kaspersky Endpoint Security interface language
- About participation in Kaspersky Security Network:
- Whether the Kaspersky Security Network Statement was accepted or declined
- Date and time when the Kaspersky Security Network Statement was accepted or rejected
- ID of the Kaspersky Security Network Statement and the version of the Kaspersky Security Network Statement that was accepted or rejected by the user
- Information about whether the Enable Kaspersky Security Network check box is selected or cleared
- Information about whether the Enable extended KSN mode check box is selected or cleared
- Unique IDs of the personal computer and user
- Full version of the application and application type
If Kaspersky Security Network is fully disabled, these statistics will be transmitted every 4 hours during the 24-hour period after it is disabled. If you decline participation in Kaspersky Security Network during installation of Kaspersky Endpoint Security, these statistics will also be transmitted every 4 hours during the 24-hour period after Kaspersky Security Network is disabled on the computer.
Received information is protected by Kaspersky in accordance with the law and the requirements and applicable regulations of Kaspersky.
Read the End User License Agreement and visit the Kaspersky website to learn more about how we collect, process, store, and destroy information about application usage after you accept the End User License Agreement and consent to the Kaspersky Security Network Statement. The license.txt and ksn_<language ID>.txt files contain the text of the End User License Agreement and Kaspersky Security Network Statement and are included in the application distribution kit.
Page top
Viewing license information
To view license information:
- Open the main application window.
- Click the
 /
/  button in the lower part of the main application window.
The Licensing window opens. Information about the license is displayed in the section that is located in the upper part of the Licensing window.
Page top
Purchasing a license
You may purchase a license after installing the application. On purchasing a license, you receive an activation code or a key file for activating the application.
To purchase a license:
- Open the main application window.
- Click the / button in the lower part of the main application window.
The Licensing window opens.
- In the Licensing window, do one of the following:
- If no keys have been added or a key for trial license has been added, click the Purchase license button.
- If the key for a commercial license is added, click the Renew license button.
A window will open with the website of the Kaspersky online store, where you can purchase a license.
Renewing subscription
When you use the application under subscription, Kaspersky Endpoint Security automatically contacts the activation server at specific intervals until your subscription expires.
If you use the application under unlimited subscription, Kaspersky Endpoint Security automatically checks the activation server for renewed keys in background mode. If a key is available on the activation server, the application adds it by replacing the previous key. In this way, unlimited subscription for Kaspersky Endpoint Security is renewed without user involvement.
If you are using the application under a limited subscription, on the expiration date of the subscription (or on the expiration date of the subscription renewal grace period), Kaspersky Endpoint Security notifies you about this and stops attempting to renew the subscription automatically. In this case, Kaspersky Endpoint Security behaves in the same way as it does when a commercial license for the application expires: the application operates without updates and the Kaspersky Security Network is unavailable.
You can renew subscription on the website of the service provider.
You can update subscription status manually in the Licensing window. This may be required if the subscription has been renewed after the grace period and the application has not updated the subscription status automatically.
Page top
Visiting the website of the service provider
To visit the website of the service provider from the application interface:
- Open the main application window.
- Click the / button in the lower part of the main application window.
The Licensing window opens.
- In the Licensing window, click Contact your subscription provider.
About application activation methods
Activation is the process of activating a license that allows you to use a fully functional version of the application until the license expires. The application activation process involves adding a key.
You can activate the application in one of the following ways:
- When installing the application, with the help of the Initial Configuration Wizard. You can add the active key in this way.
- Locally from the application interface, by using the Activation Wizard You can add both the active key and the additional key in this way.
- Remotely with the Kaspersky Security Center software suite by creating and then starting an add key task. You can add both the active key and the additional key in this way.
- Remotely by distributing keys and activation codes stored in the Kaspersky Security Center Administration Server key storage to client computers (please refer to the Kaspersky Security Center Help Guide for more information about this). You can add both the active key and the additional key in this way.
The activation code purchased under subscription is distributed in the first place.
- Using the command line.
It may take some time for the application to be activated with an activation code (during either remote or non-interactive installation) due to load distribution across activation servers of Kaspersky. If you need to activate the application right away, you may interrupt the ongoing activation process and start activation using the Activation Wizard.
Page top
Using the Activation Wizard to activate the application
To activate Kaspersky Endpoint Security by using the Activation Wizard:
- Click the / button in the lower part of the main application window.
The Licensing window opens.
- In the Licensing window, click the Activate the application under a new license button.
The Application Activation Wizard starts.
- Follow the instructions of the Activation Wizard.
For more detailed information on the application activation procedure, please refer to the section on the Initial Configuration Wizard.
Page top
Activating the application from the command line
To activate the application from the command line,
type avp.com license /add <activation code or key file> /password=<password> in the command line.
Starting and stopping the application
This section describes how you can configure automatic startup of the application, start or stop the application manually, and pause or resume protection and control components.
Enabling and disabling automatic startup of the application
Automatic startup means that Kaspersky Endpoint Security starts immediately after operating system startup, without user intervention. This application startup option is enabled by default.
After installation, Kaspersky Endpoint Security starts automatically for the first time.
Downloading Kaspersky Endpoint Security anti-virus databases after startup of the operating system can take up to two minutes depending on the capabilities of the computer. During this time, the level of computer protection is reduced. Downloading anti-virus databases when Kaspersky Endpoint Security is started on an already loaded operating system does not cause a reduction in the level of computer protection.
To enable or disable automatic startup of the application:
- Open the application settings window.
- In the left part of the window, in the General Settings section, select Application Settings.
- Do one of the following:
- If you want to enable autorun of the application, select the Start Kaspersky Endpoint Security for Windows at computer startup check box.
- If you want to disable autorun of the application, clear the Start Kaspersky Endpoint Security for Windows at computer startup check box.
- To save changes, click the Save button.
Starting and stopping the application manually
Kaspersky experts recommend against manually stopping Kaspersky Endpoint Security because doing so exposes the computer and your personal data to threats. If necessary, you can pause computer protection for as long as you need to, without stopping the application.
Kaspersky Endpoint Security needs to be started manually if you have previously disabled automatic startup of the application.
To start the application manually,
In the Start menu, select Applications Kaspersky Endpoint Security for Windows.
To stop the application manually:
- Right-click to bring up the context menu of the application icon that is in the taskbar notification area.
- In the context menu, select Exit.
Pausing and resuming computer protection and control
Pausing computer protection and control means disabling all protection and control components of Kaspersky Endpoint Security for some time.
The application status is displayed using the application icon in the taskbar notification area.
- The icon signifies that computer protection and control are paused.
- The icon signifies that computer protection and control are disabled.
Pausing or resuming computer protection and control does not affect scan or update tasks.
If any network connections are already established when you pause or resume computer protection and control, a notification about the termination of these network connections is displayed.
To pause computer protection and control:
- Right-click to bring up the context menu of the application icon that is in the taskbar notification area.
- In the context menu, select Pause protection and control.
The Pause protection window opens.
- Select one of the following options:
- Pause for the specified time - Computer protection and control resume after the amount of time that is specified in the drop-down list below.
- Pause until restart - Computer protection and control resume after you quit and reopen the application or restart the operating system. Automatic startup of the application must be enabled to use this option.
- Pause - Computer protection and control resume when you decide to re-enable them.
- If you selected the Pause for the specified time option during the previous step, select the necessary interval in the drop-down list.
To resume computer protection and control:
- Right-click to bring up the context menu of the application icon that is in the taskbar notification area.
- In the context menu, select Resume protection and control.
You can resume computer protection and control at any time, regardless of the computer protection and control pause option that you selected previously.
Page top
Participation in Kaspersky Security Network
This section contains information about participation in Kaspersky Security Network and instructions on how to enable or disable use of Kaspersky Security Network.
About participation in Kaspersky Security Network
To protect your computer more effectively, Kaspersky Endpoint Security uses data that is received from users around the globe. Kaspersky Security Network is designed to collect such data.
Kaspersky Security Network (KSN) is an infrastructure of cloud services providing access to the online Kaspersky Knowledge Base that contains information about the reputation of files, web resources, and software. The use of data from Kaspersky Security Network ensures faster responses by Kaspersky Endpoint Security to new threats, improves the performance of some protection components, and reduces the likelihood of false positives.
Depending on the location of the infrastructure, there is a Global KSN service (the infrastructure is hosted by Kaspersky servers) and a Private KSN service.
After changing the license, submit the details of the new key to the service provider in order to be able to use Private KSN. Otherwise, data exchange with Private KSN will not be possible.
Thanks to users who participate in KSN, Kaspersky is able to promptly receive information about types and sources of threats, develop solutions for neutralizing them, and minimize the number of false alarms displayed by application components.
When using extended KSN mode, the application automatically sends its resultant operating statistics to KSN. The application can also send certain files (or parts of files) that hackers could use to harm the computer or data to Kaspersky for additional scanning.
For more detailed information about sending Kaspersky statistical information that is generated during participation in KSN, and about the storage and destruction of such information, please refer to the Kaspersky Security Network Statement and the Kaspersky website. The ksn_<language ID>.txt file containing the text of the Kaspersky Security Network Statement is included in the application distribution kit.
To reduce the load on KSN servers, Kaspersky may release application anti-virus databases that temporarily disable or partly restrict requests to Kaspersky Security Network. In this case, the status of the connection to KSN appears as Enabled with restrictions.
User computers managed by Kaspersky Security Center Administration Server can interact with KSN via the KSN Proxy service.
The KSN Proxy service provides the following capabilities:
- The user's computer can query KSN and submit information to KSN even without direct access to the Internet.
- KSN Proxy caches processed data, thereby reducing the load on the external network connection and speeding up receipt of the information that is requested by the user's computer.
More details about the KSN Proxy service can be found in the Kaspersky Security Center Help Guide.
KSN Proxy service settings can be configured in the properties of the Kaspersky Security Center policy.
Use of Kaspersky Security Network is voluntary. The application prompts you to use KSN during initial configuration of the application. Users can begin or discontinue participation in KSN at any time.
Page top
Enabling and disabling use of Kaspersky Security Network
To enable or disable use of Kaspersky Security Network:
- In the main application window, click the Settings button.
- In the application settings window, select Advanced Threat Protection → Kaspersky Security Network.
- Select the Kaspersky Security Network check box if you want Kaspersky Endpoint Security to use information about the reputation of files, web resources, and applications received from Kaspersky Security Network databases.
Kaspersky Endpoint Security will display the Kaspersky Security Network Statement. Please read and accept the terms of the Kaspersky Security Network (KSN) Statement if you agree to them.
By default, Kaspersky Endpoint Security uses the Extended KSN mode. Extended KSN mode is a mode in which Kaspersky Endpoint Security sends additional data to Kaspersky.
- If required, clear the Enable Extended KSN mode check box.
- Save your changes.
About data provision when using Kaspersky Security Network
By accepting the Kaspersky Security Network Statement, you agree to automatically transmit the following information:
- If the Enable Kaspersky Security Network check box is selected and the Enable extended KSN mode check box is cleared, the following information is transmitted:
- Web address of the page from which the user was directed to the scanned web address
- Web address whose reputation is requested
- Version of the protocol used to connect to Kaspersky services
- ID of the anti-virus databases
- ID of the scan task that detected the threat
- ID of the subsystem that initiated the request
- ID of the connection protocol and the utilized port number
- IDs of installed updates
- Name and ID of the detected threat according to the Kaspersky classification
- Public certificate key
- Type and full version of Kaspersky Endpoint Security
- Hash (SHA256) of the certificate with which the scanned object was signed
- Hash of the scanned file (MD5, SHA2-256 and SHA1) and file templates (MD5)
- If the Enable extended KSN mode check box is selected in addition to the Enable Kaspersky Security Network check box, the following information is also transmitted in addition to the information listed above:
- Trusted executable files and non-executable files, or parts thereof, transmitted for the purpose of preventing false positives.
- The following information included in application activity reports is transmitted:
- Web addresses and IP addresses called by the application
- Web addresses and IP addresses from which the started file was received
- Certificate term start and expiration date and time, if the transmitted file has a digital signature - the date and time of the signature, name of the certificate issuer, information about the certificate owner, thumbprint and public certificate key and their computation algorithms, and the serial number of the certificate
- Headers of process windows
- ID of anti-virus databases, name of the detected threat according to the classification of the Rightholder
- Names and paths to files that were accessed by the process
- Names of registry keys and their values that were accessed by the process
- Account name used to start the process
- Name, size, and version of the transmitted file, its description and checksums (MD5, SHA2-256, SHA1), format ID, name of its developer, name of the product to which the file belongs, full path to the file on the computer and the path template code, and the date and time of file creation and modification
- Information about the license installed in the software, license ID, and its type and expiration date
- checksums (MD5, SHA2-256, SHA1) of the name of the computer on which the process was started
- Local time of the computer when the information was transmitted
- The following additional information is transmitted:
- Web addresses and IP addresses of the requested web resource, information about the file and web client accessing the web resource, the name, size and checksums (MD5, SHA2-256, SHA1) of the file, full path to the file and path template code, the result of checking its digital signature, and its status in KSN
- If a potentially malicious object is detected, the following information about process memory data is provided: elements of the system object hierarchy (ObjectManager), UEFI BIOS memory data, and the names and values of registry keys.
- Web pages and emails containing suspicious and malicious objects.
- Version of the software update component, the number of software update component crashes when running update tasks during component operation, ID of the update task type, the number of unsuccessful update task terminations of the software update component.
- Data on errors that occurred in the operation of the software component: ID of the software status, error code and type, as well as the time it occurred, IDs of the component, module and process of the product in which the error occurred, ID of the task or category of the update during which the error occurred, logs of drivers used by the software (error code, module name, name of the source file and string where the error occurred), ID of the method for identifying the error that occurred in software operation, and the name of the process that initiated the interception or exchange of traffic that led to the error in software operation.
- Data on a system dump (BSOD): indicator of a BSOD occurring on the computer, name of the driver that caused the BSOD, memory stack and address in the driver, indicator of the duration of the OS session prior to the BSOD, memory stack of the driver crash, type of saved memory dump, indicator that the OS session lasted more than 10 minutes prior to the BSOD, unique ID of the dump, and the date and time of the BSOD.
- Data on updates of anti-virus databases and components of the software: names, dates, and time of index files loaded as a result of the last update and loaded in the current update, as well as the date and time when the last update finished, and the names of the updated categories of files and their checksums (MD5, SHA2-256, SHA1).
- ID of the scan task that detected the threat.
- Information for authenticating certificates with which files were signed: certificate thumbprint, checksum computation algorithm, public key and serial number of the certificate, name of the certificate issuer, result of checking the certificate, and the ID of the certificate database.
- Information about the version of the operating system (OS) installed on the computer and installed update packages, bit rate, revision and settings of the OS operating mode, and the version and checksums (MD5, SHA2-256, SHA1) of the OS kernel file.
- Information about rollback of malware actions: data on the file whose activity was rolled back (name of the file, full path to the file, its size and checksums (MD5, SHA2-256, SHA1)), data on successful and unsuccessful actions to delete, rename and copy files and restore the values in the registry (names of registry keys and their values), and information about system files modified by malware, before and after rollback.
- Information about executable file emulation: size of the file and its checksums (MD5, SHA2-256, SHA1), version of the emulation component, depth of emulation, vector of characteristics of logical blocks and functions within logical blocks obtained during emulation, and data from the executable file PE-header structure.
- Information about the date of installation and activation of the software on the computer: the type of license installed and its validity period, the ID of the partner from whom the license was purchased, the license serial number, the type of software installation on the computer (new installation, upgrade, etc.), the indicator of successful installation or the number of the installation error, the unique ID of the software installation on the computer, the type and ID of the application with which the update is performed, and the ID of the update task.
- Information about loaded software modules: name, size and checksums (MD5, SHA2-256, SHA1) of the module file, full path to it and the path template code, digital signature settings of the module file, data and time of signature creation, name of the subject and organization that signed the module file, ID of the process in which the module was loaded, name of the module supplier, and the sequence number of the module in the loading queue.
- Information about files downloaded by the user: URLs and IP addresses from which the files were downloaded and the download pages, ID of the download protocol and connection port number, indicator of malicious activity of addresses, attributes and size of the file and its checksums (MD5, SHA2-256, SHA1), information about the process that downloaded the file (checksums (MD5, SHA2-256, SHA1), date and time of creation and linking, autorun indicator, attributes, names of packers, information about the signature, executable file indicator, format ID, entropy), file name, file path on the computer, digital signature of the file and information about the signature, URL on which the detection occurred, number of the script on the page that turned out to be suspicious or malicious, information about completed http requests and responses to them.
- Information about running applications and their modules: data on processes running in the system (process ID (PID), process name, details of the account under which the process was started and the application and command that started the process, as well as an indicator of whether the application or process is trusted, the full path to process files and the command line, level of integrity of the process, description of the product to which the process belongs (the product name and publisher details), as well as information about currently used digital certificates and information required to verify them or indication of the absence of a digital signature of the file), as well as information about modules loaded into processes (name, size, type, creation date, attributes, check sums (MD5, SHA2-256, SHA1), and path), PE file header information, and the name of the packer (if the file was packed).
- Information about the set of all installed updates and about the set of the most recently installed updates and/or remote updates, type of event that caused update information to be sent, amount of time that elapsed after installation of the last update, and information about the anti-virus databases that were loaded when the information was transmitted.
- Information about an unsuccessful last restart of the operating system: the number of unsuccessful restarts since the OS was installed, system dump data (error code and parameters, name, version and checksum (CRC32) of the module that caused the error in OS operation, error address as an offset in the module, and checksums (MD5, SHA2-256, SHA1) of the system dump).
- Information about the Rightholder's software: full version, type, localization and operating status of the utilized software, versions of installed software components and their operating status, data on installed software updates, the TARGET filter value, and the version of the protocol utilized to connect to the Rightholder's services.
- Information about scanned objects: the assigned trust group to which or from which the file was moved, the reason for moving the file to the given category, the category ID, information about the source of categories and the category database versions, indicator of whether the file has a trusted certificate, name of the file developer, file version, and the name and version of the application to which the file belongs.
- Information about scanned files and URLs: checksums of the scanned file (MD5, SHA2-256, SHA1) and file patterns (MD5), size of the pattern, type of detected threat and its name according to the Rightholder's classification, ID of anti-virus databases, URL whose reputation was queried, as well as the URL of the page from which the user was directed to the scanned URL, the ID of the connection protocol, and the utilized port number.
- Information about the process that launched the attack on the software's self-defense: name and size of the process file, its checksums (MD5, SHA2-256, SHA1), full path to the file and the path template code, dates and time of creation and linking of the process file, executable file indicator, attributes of the process file, information about the certificate with which the process file was signed, code of the account used to start the process, ID of the operations that were performed for access to the process, type of resource with which the operation is performed (process, file, registry object, window search using the FindWindow function), name of the resource with which the operation is performed, indicator of operation success, the status of the process file and its signature in KSN.
- Information about the operation of protection components: full versions of components, code of the event that overflowed the event queue, and the number of such events, the total number of event queue overflows, information about the process file that initiated the event (name of the file and path to it on the computer, path template code, checksums (MD5, SHA2-256, SHA1) of the process associated with the file, file version), ID of the completed event capture, full version of the capture filter, ID of the captured event type, size of the event queue and the number of events between the first event in queue and the current event, the number of overdue events in queue, information about the process that initiated the current event (name of the process file and path to it on the computer, path template code, checksums (MD5, SHA2-256, SHA1) of the process), event processing time, maximum permissible event processing time, and the data transmission probability value.
- Information about software operation on the computer: data on CPU usage, data on memory usage (Private Bytes, Non-Paged Pool, Paged Pool), number of active threads in the software process and pending threads, and the duration of software operation prior to the error.
- Information about the results of categorizing requested web resources containing the scanned URL and IP address of the host, version of the software component that performed the categorization, categorization method, and the set of categories determined for the web resource.
- Information about network attacks: IP addresses of the attacking computer (IPv4 and IPv6), computer port number targeted by the network attack, ID of the protocol of the IP packet in which the attack was registered, target of the attack (company name, website), attack response flag, weighted level of the attack, and the trust level value.
- Information about network connections: version and check sums (MD5, SHA2-256, SHA1) of the file of a process that opened the port, path to the process file and its digital signature, local and remote IP addresses, numbers of the local and remote connection ports, connection status, and port opening time.
- Information about events in system logs: event time, name of the log in which the event was detected, event type and category, and the name of the event source and its description.
- Information about the computer's anti-virus protection status: versions, dates and time of release of the anti-virus databases being used, statistical data on updates and connections with the Rightholder's services, and the ID of the task and ID of the software component that performed the scan.
- Information about third-party applications that caused an error: their name, version and localization, error code and information about it from the system log of applications, address of error occurrence and memory stack of the third-party application, indicator of the error in the software component, amount of time the third-party application operated prior to the error, checksums (MD5, SHA2-256, SHA1) of the application process image in which the error occurred, path to this application process image and the path template code, information from the OS system log with a description of the error associated with the application, information about the application module in which the error occurred (error ID, error address as an offset in the module, name and version of the module, ID of the application crash in the Rightholder's plug-in and memory stack of the crash, and the amount of time the application operated prior to the malfunction).
- Information about software crashes: date and time of dump creation, its type, name of the process associated with the dump, version and time when statistics were sent with the dump, type of event that caused the software crash (unexpected power outage, crash of a third-party Rightholder's application, intercept processing errors), and the date and time of the unexpected power outage.
- Information about attacks related to spoofing network resources, and DNS- and IP addresses (IPv4 or IPv6) of visited websites.
- Information about utilized digital certificates required for verifying their authenticity: checksums (SHA256) of the certificate with which the scanned object was signed, and the public certificate key.
- Information about detected vulnerabilities: the vulnerability ID in the vulnerabilities database, the vulnerability danger class, and the status of detection.
- Information about the hardware installed on the computer: the type, name, model, and version of the firmware, specifications of embedded and connected devices, and the unique ID of the computer on which the software is installed.
- Information about software installed on the computer: name of the software and its developers, utilized registry keys and their values, information about files of the installed software (checksums (MD5, SHA2-256, SHA1), name, path to the file on the computer, size, version and digital signature), information about kernel objects, drivers, services, Microsoft Internet Explorer extensions, printing system extensions, Windows Explorer extensions, Active Setup elements, control panel applets, entries of the hosts file and system registry, and the versions of browsers and mail clients.
- Information about all potentially malicious objects and activities: name of the detected object and full path to the object on the computer, checksums of processed files (MD5, SHA2-256, SHA1), detection date and time, names and sizes of infected files and paths to them, path template code, indicator of whether the object is a container, names of the packer (if the file was packed), file type code, file format ID, list of actions performed by malware and the decision made by the software and user in response to them, ID of the anti-virus databases that were used to make the decision, the name of the detected threat according to the Rightholder's classification, the level of danger, the detection status and detection method, reason for inclusion into the analyzed context and sequence number of the file in the context, checksums (MD5, SHA2-256, SHA1), the name and attributes of the executable file of the application through which the infected message or link was transmitted, depersonalized IP addresses (IPv4 and IPv6) of the host of the blocked object, file entropy, file autorun indicator, time when the file was first detected in the system, the number of times the file has been run since the last statistics were sent, information about the name, checksums (MD5, SHA2-256, SHA1) and size of the mail client through which the malicious object was received, ID of the software task that performed the scan, indicator of whether the file reputation or signature was checked, file processing result, checksum (MD5) of the pattern collected for the object, the size of the pattern in bytes, and the technical specifications of the applied detection technologies.
- Executable files and non-executable files, wholly or partially.
- Number of software dumps and system dumps (BSOD) since the software was installed and since the last update, ID and version of the software module in which the malfunction occurred, the memory stack in the software process, and information about the anti-virus databases when the malfunction occurred.
- Description of WMI repository classes and class instances.
- Reports on activities of applications.
- Network traffic data packages.
- Sectors participating in the OS loading process.
- Service information about software operation: version of the compiler, indicator of malicious activity of the scanned object, version of the set of transmitted statistics, information about the availability and validity of statistical data, ID of the condition for generating the transmitted statistics, and indicator of whether the software is operating in interactive mode.
- Computer RAM segments.
Enabling and disabling cloud mode for protection components
When using Kaspersky Private Security Network, cloud mode functionality is available starting with Kaspersky Private Security Network version 3.0.
To enable or disable cloud mode for protection components:
- Open the application settings window.
- In the left part of the window, in the Advanced Threat Protection section, select Kaspersky Security Network.
Kaspersky Security Network settings are displayed in the right part of the window.
- Do one of the following:
- Select the Enable cloud mode for protection components check box.
If the check box is selected, Kaspersky Endpoint Security uses the light version of anti-virus databases, which reduces the load on operating system resources.
Kaspersky Endpoint Security downloads the light version of anti-virus databases during the next update after the check box was selected.
If the light version of anti-virus databases is not available for use, Kaspersky Endpoint Security automatically switches to the premium version of anti-virus databases.
- Clear the Enable cloud mode for protection components check box.
If the check box is cleared, Kaspersky Endpoint Security uses the full version of anti-virus databases.
Kaspersky Endpoint Security downloads the full version of anti-virus databases during the next update after the check box was cleared.
This check box is available if the Enable Kaspersky Security Network check box is selected.
- Select the Enable cloud mode for protection components check box.
- To save changes, click the Save button.
Checking the connection to Kaspersky Security Network
To check the connection to Kaspersky Security Network:
- Open the main application window.
- In the upper part of the window, click the Threat detection technologies section.
The Threat detection technologies window opens.
The following information about Kaspersky Security Network performance appears in the lower part of the Threat detection technologies window:
- One of the following status values of Kaspersky Endpoint Security connection to Kaspersky Security Network appears under the KASPERSKY SECURITY NETWORK (KSN) line:
- Enabled. Available.
This status means that Kaspersky Security Network is being used in Kaspersky Endpoint Security operations and KSN servers are available.
- Enabled. Not available.
This status means that Kaspersky Security Network is being used in Kaspersky Endpoint Security operations and KSN servers are unavailable.
- Disabled.
This status means that Kaspersky Security Network is not being used in Kaspersky Endpoint Security operations.
- Enabled. Available.
- The lines Whitelisted objects, Blacklisted objects, and Threats neutralized in the last 24 hours display global statistics of the infrastructure of Kaspersky Security Network cloud services.
- The Last synchronization line shows the date and time of the most recent synchronization of Kaspersky Endpoint Security with KSN servers.
The application gathers KSN usage statistics when the Threat detection technologies window is opened. The global statistics of the Kaspersky Security Network cloud service infrastructure and the Last synchronization line are not refreshed in real time.
If the time that has elapsed since the last synchronization with KSN servers exceeds 15 minutes or shows the Unknown status, the status of the Kaspersky Endpoint Security connection to Kaspersky Security Network takes the Enabled value. Not available.
A connection to Kaspersky Security Network servers may be absent due to the following reasons:
- The computer is not connected to the Internet.
- Application is not activated.
- License expired.
- Key-related problems have been detected (for example, the key has been blacklisted).
If the connection with Kaspersky Security Network servers cannot be restored, it is recommended to contact Technical Support or your service provider.
- One of the following status values of Kaspersky Endpoint Security connection to Kaspersky Security Network appears under the KASPERSKY SECURITY NETWORK (KSN) line:
Checking the reputation of a file in Kaspersky Security Network
The KSN service lets you retrieve information about applications that are included in Kaspersky reputation databases. This enables flexible management of application startup policies at the company level, thereby preventing the startup of adware and other programs that can be used by criminals to damage your computer or personal data.
To check the reputation of a file in Kaspersky Security Network:
- Right-click to bring up the context menu of the file whose reputation you want to check.
- Select the Check reputation in KSN option.
This option is available if you have accepted the terms of the Kaspersky Security Network Statement.
This opens the <File name> - Reputation in KSN window. The <File name> - Reputation in KSN window displays the following information about the file being checked:
- Path. Path in which the file is saved to disk.
- Product version. Application version (information is displayed only for executable files).
- Digital signature. Presence of a digital signature with the file.
- Signed. Date on which the certificate was signed with a digital signature.
- Created. File creation date.
- Modified. Date of last modification of the file.
- Size. Disk space occupied by the file.
- Information about how many users trust the file or block the file.
Enhanced protection with Kaspersky Security Network
Kaspersky offers an extra layer of protection to users through the Kaspersky Security Network. This protection method is designed to combat advanced persistent threats and zero-day attacks. Integrated cloud technologies and the expertise of Kaspersky virus analysts make Kaspersky Endpoint Security the unsurpassed choice for protection against the most sophisticated network threats.
Details on enhanced protection in Kaspersky Endpoint Security are available on the Kaspersky website.
Page top
Application Behavior Detection
This section contains information about application Behavior Detection and instructions on how to configure the component settings.
About Behavior Detection
The application Behavior Detection component collects data on the actions of applications on your computer and provides this information to other protection components to improve their performance.
The application Behavior Detection component utilizes Behavior Stream Signatures (BSS). These signatures contain sequences of actions that Kaspersky Endpoint Security classifies as dangerous. If application activity matches a behavior stream signature, Kaspersky Endpoint Security performs the selected responsive action. Kaspersky Endpoint Security functionality based on behavior stream signatures provides proactive defense for the computer.
Page top
Enabling and disabling Behavior Detection
By default, Behavior Detection is enabled and runs in the mode recommended by Kaspersky experts. You can disable Behavior Detection if necessary.
It is not recommended to disable Behavior Detection unless absolutely necessary because doing so would reduce the effectiveness of the protection components. The protection components may request data collected by the Behavior Detection component to detect threats.
To enable or disable Behavior Detection:
- Open the application settings window.
- In the left part of the window, in the Advanced Threat Protection section, select the Behavior Detection subsection.
In the right part of the window, the settings of the Behavior Detection component are displayed.
- Do one of the following:
- Select the Enable Behavior Detection check box if you want Kaspersky Endpoint Security to use behavior stream signatures to analyze application activity in the operating system.
- Clear the Enable Behavior Detection check box if you do not want Kaspersky Endpoint Security to use behavior stream signatures to analyze application activity in the operating system.
- To save changes, click the Save button.
Choose action in the event malicious activity is detected in a program
When Kaspersky Endpoint Security detects malicious activity, it logs an entry containing information about the detected application activity.
In order to choose what to do if a program engages in malicious activity, perform the following steps:
- Open the application settings window.
- In the left part of the window, in the Advanced Threat Protection section, select the Behavior Detection subsection.
In the right part of the window, the settings of the Behavior Detection component are displayed.
- Select the necessary action in the On detecting malware activity drop-down list:
- Delete file.
If this item is selected, on detecting malicious activity Kaspersky Endpoint Security deletes the executable file of the malicious application and creates a backup copy of the file in Backup.
- Terminate the program.
If this item is selected, on detecting malicious activity Kaspersky Endpoint Security terminates this application.
- Inform.
If this item is selected and malware activity of an application is detected, Kaspersky Endpoint Security adds information about the malware activity of the application to the list of active threats.
- Delete file.
- To save changes, click the Save button.
Configuring protection of shared folders against external encryption
The component monitors operations performed only with those files that are stored on mass storage devices with the NTFS file system and that are not encrypted with EFS.
Protection of shared folders against external encryption analyzes activity in shared folders analyzes activity in shared folders. If this activity matches a behavior stream signature that is typical for external encryption, Kaspersky Endpoint Security performs the selected action.
You can configure protection of shared folders against external encryption as follows:
- Select the action to take on detection of external encryption of shared folders.
- Configure addresses of exclusions from protection of shared folders against external encryption.
Enabling and disabling protection of shared folders against external encryption
By default, protection of shared folders against external encryption is disabled.
After Kaspersky Endpoint Security is installed, protection of shared folders against external encryption will be limited until the computer is restarted.
To enable or disable protection of shared folders against external encryption:
- Open the application settings window.
- In the left part of the window, in the Advanced Threat Protection section, select the Behavior Detection subsection.
In the right part of the window, the settings of the Behavior Detection component are displayed.
- Do one of the following:
- In the Protection of shared folders against external encryption section, select the Enable protection of shared folders against external encryption check box if you want Kaspersky Endpoint Security to analyze the activity that is typical for external encryption.
- In the Protection of shared folders against external encryption section, clear the Enable protection of shared folders against external encryption check box if you do not want Kaspersky Endpoint Security to analyze the activity that is typical for external encryption.
- To save changes, click the Save button.
Selecting the action to take on detection of external encryption of shared folders
When it detects an attempt to modify files in shared folders, Kaspersky Endpoint Security logs an entry containing information about the detected attempt to modify files in shared folders.
To select the action to take on detection of external encryption of shared folders:
- Open the application settings window.
- In the left part of the window, in the Advanced Threat Protection section, select the Behavior Detection subsection.
In the right part of the window, the settings of the Behavior Detection component are displayed.
- In the Protection of shared folders against external encryption section, in the On detection of external encryption of shared folders drop-down list, select the necessary action:
- Block connection.
If this item is selected, on detecting an attempt to modify files in shared folders, Kaspersky Endpoint Security blocks network activity originating from the computer attempting to modify files, creates backup copies of modified files, and logs an entry containing information about this attempt to modify files in shared folders. Also, if the Remediation Engine component is enabled, Kaspersky Endpoint Security restores modified files from backup copies.
If you selected Block connection, you can specify the duration (in minutes) that the network connection will be blocked in the Block connection for field.
- Inform.
If this item is selected, on detecting an attempt to modify files in shared folders, Kaspersky Endpoint Security adds information about this attempt to modify files in shared folders to the list of active threats.
- Block connection.
- To save changes, click the Save button.
Configuring addresses of exclusions from protection of shared folders against external encryption
The Audit Logon service must be enabled to enable exclusions of addresses from protection of shared folders against external encryption. By default, the Audit Logon service is disabled (for detailed information about enabling the Audit Logon service, please visit the Microsoft website).
The functionality for excluding addresses from shared folder protection does not work on a remote computer if the remote computer was turned on before Kaspersky Endpoint Security was started. You can restart this remote computer after Kaspersky Endpoint Security is started to ensure that the functionality for excluding addresses from shared folder protection works on this remote computer.
To exclude remote computers that perform external encryption of shared folders:
- Open the application settings window.
- In the left part of the window, in the Advanced Threat Protection section, select the Behavior Detection subsection.
In the right part of the window, the settings of the Behavior Detection component are displayed.
- In the Protection of shared folders against external encryption section, click the Exclusions button.
The Exclusions window opens.
- Do one of the following:
- If you want to add an IP address or computer name to the list of exclusions, click the Add button.
- If you want to edit an IP address or computer name, select it in the list of exclusions and click the Edit button.
The Computers window opens.
- Enter the IP address or name of the computer from which external encryption attempts must not be handled.
- In the Computers window, click OK.
- In the Exclusions window, click OK.
- To save changes, click the Save button.
Exploit Prevention
This section contains information about Exploit Prevention and instructions on how to configure the component settings.
About Exploit Prevention
The
Prevention component tracks executable files that are run by vulnerable applications. When there is an attempt to run an executable file from a vulnerable application that was not performed by the user, Kaspersky Endpoint Security blocks this file from running. Information about the blocked launch of the executable file is stored in the Exploit Prevention report. Page top
Enabling and disabling Exploit Prevention
By default, Exploit Prevention is enabled and runs in the mode recommended by Kaspersky experts. You can disable Exploit Prevention if necessary.
To enable or disable Exploit Prevention:
- Open the application settings window.
- In the left part of the window, in the Advanced Threat Protection section, select the Exploit Prevention subsection.
The settings of the Exploit Prevention component are displayed in the right part of the window.
- Do one of the following:
- Select the Enable Exploit Prevention check box if you want Kaspersky Endpoint Security to monitor executable files that are run by vulnerable applications.
If Kaspersky Endpoint Security detects that an executable file from a vulnerable application was run by something other than the user, Kaspersky Endpoint Security will perform the action that is selected in the On detecting exploit drop-down list.
- Clear the Enable Exploit Prevention check box if you do not want Kaspersky Endpoint Security to monitor executable files that are run by vulnerable applications.
- Select the Enable Exploit Prevention check box if you want Kaspersky Endpoint Security to monitor executable files that are run by vulnerable applications.
- To save changes, click the Save button.
Configuring Exploit Prevention
You can perform the following actions for configuring the Exploit Prevention component:
- Select an action to take when an exploit is detected
- Enable or disable system process memory protection.
Selecting an action to take when an exploit is detected
By default, on detection of an exploit, Kaspersky Endpoint Security blocks operations attempted by the exploit.
To choose an action to be taken when an exploit is detected:
- Open the application settings window.
- In the left part of the window, in the Advanced Threat Protection section, select the Exploit Prevention subsection.
The settings of the Exploit Prevention component are displayed in the right part of the window.
- Select the necessary action in the On detecting exploit drop-down list:
- Block operation.
If this item is selected, on detecting an exploit, Kaspersky Endpoint Security blocks the operations of this exploit and makes a log entry with information about this exploit.
- Inform.
If this item is selected, when Kaspersky Endpoint Security detects an exploit it logs an entry containing information about the exploit and adds information about this exploit to the list of active threats.
- Block operation.
- To save changes, click the Save button.
Enabling and disabling system processes memory protection
By default, protection of system process memory is enabled.
To enable or disable system process memory protection:
- Open the application settings window.
- In the left part of the window, in the Advanced Threat Protection section, select the Exploit Prevention subsection.
The settings of the Exploit Prevention component are displayed in the right part of the window.
- Do one of the following:
- In the System processes memory protection section, select the Enable system process memory protection check box if you want Kaspersky Endpoint Security to block external processes that attempt to access system processes.
- In the System processes memory protection section, clear the Enable system process memory protection check box if you do not want Kaspersky Endpoint Security to block external processes that attempt to access system processes.
- To save changes, click the Save button.
Host Intrusion Prevention
This component is available if Kaspersky Endpoint Security is installed on a computer that runs on Microsoft Windows for workstations. This component is unavailable if Kaspersky Endpoint Security is installed on a computer that runs on Microsoft Windows for file servers.
This section contains information about Host Intrusion Prevention and instructions on how to configure the component settings.
About Host Intrusion Prevention
The Host Intrusion Prevention component prevents applications from performing actions that may be dangerous for the operating system, and ensures control over access to operating system resources and personal data.
This component controls the activity of applications, including their access to protected resources (such as files and folders, registry keys) by using application control rules. Application privilege control rules are a set of restrictions that apply to various actions of applications in the operating system and to rights to access computer resources.
The network activity of applications is monitored by the Firewall component.
When an application is started for the first time, the Host Intrusion Prevention component checks the security of the application and places it into one of the trust groups. A trust group defines the rules that Kaspersky Endpoint Security applies when controlling application activity.
You are advised to participate in Kaspersky Security Network to help the Host Intrusion Prevention component work more effectively. Data that is obtained through Kaspersky Security Network allows you to sort applications into groups with more accuracy and to apply optimum application privilege control rules.
The next time the application starts, Host Intrusion Prevention verifies the integrity of the application. If the application is unchanged, the component applies the current application privilege control rules to it. If the application has been modified, Host Intrusion Prevention analyzes the application as if it were being started for the first time.
Page top
Limitations of audio and video device control
About audio stream protection
Audio stream protection has the following special considerations:
- The Host Intrusion Prevention component must be enabled for this functionality to work.
- If the application started receiving the audio stream before the Host Intrusion Prevention component was started, Kaspersky Endpoint Security allows the application to receive the audio stream and does not show any notifications.
- If you moved the application to the Untrusted group or High Restricted group after the application began receiving the audio stream, Kaspersky Endpoint Security allows the application to receive the audio stream and does not show any notifications.
- After the settings for the application's access to sound recording devices have been changed (for example, if the application has been blocked from receiving the audio stream in the Host Intrusion Prevention settings window), this application must be restarted to stop it from receiving the audio stream.
- Control of access to the audio stream from sound recording devices does not depend on an application's webcam access settings.
- Kaspersky Endpoint Security protects access to only built-in microphones and external microphones. Other audio streaming devices are not supported.
- Kaspersky Endpoint Security cannot guarantee the protection of an audio stream from such devices as DSLR cameras, portable video cameras, and action cameras.
Special considerations for the operation of audio and video devices during installation and upgrade of Kaspersky Endpoint Security
When you run audio and video recording or playback applications for the first time since installation of Kaspersky Endpoint Security, audio and video playback or recording may be interrupted. This is necessary in order to enable the functionality that controls access to sound recording devices by applications. The system service that controls audio hardware will be restarted when Kaspersky Endpoint Security is run for the first time.
About access to webcams by applications
Webcam access protection functionality has the following special considerations and limitations:
- The application controls video and still images derived from the processing of webcam data.
- The application controls the audio stream if it is part of the video stream received from the webcam.
- The application controls only webcams connected via USB or IEEE1394 that are displayed as Imaging Devices in the Windows Device Manager.
Supported webcams
Kaspersky Endpoint Security supports the following webcams:
- Logitech HD Webcam C270
- Logitech HD Webcam C310
- Logitech Webcam C210
- Logitech Webcam Pro 9000
- Logitech HD Webcam C525
- Microsoft LifeCam VX-1000
- Microsoft LifeCam VX-2000
- Microsoft LifeCam VX-3000
- Microsoft LifeCam VX-800
- Microsoft LifeCam Cinema
Kaspersky cannot guarantee support for webcams that are not specified in this list.
Page top
Enabling and disabling Host Intrusion Prevention
By default, the Host Intrusion Prevention component is enabled and runs in the mode recommended by Kaspersky experts. You can disable the Host Intrusion Prevention component if necessary.
To enable or disable the Host Intrusion Prevention component:
- Open the application settings window.
- In the left part of the window, in the Advanced Threat Protection section, select Host Intrusion Prevention.
In the right part of the window, the settings of the Host Intrusion Prevention component are displayed.
- In the right part of the window, do one of the following:
- Select the Enable Host Intrusion Prevention check box if you want to enable the Host Intrusion Prevention component.
- Clear the Enable Host Intrusion Prevention check box if you want to disable the Host Intrusion Prevention component.
- To save changes, click the Save button.
Managing application trust groups
When each application is started for the first time, the Host Intrusion Prevention component checks the security of the application and places the application into one of the
.
At the first stage of the application scan, Kaspersky Endpoint Security searches the internal database of known applications for a matching entry and simultaneously sends a request to the Kaspersky Security Network database (if an Internet connection is available). Based on the results of the search in the internal database and the Kaspersky Security Network database, the application is placed into a trust group. Each time the application is subsequently started, Kaspersky Endpoint Security sends a new query to the KSN database and places the application into a different trust group if the reputation of the application in the KSN database has changed.
You can select a trust group to which Kaspersky Endpoint Security automatically assigns all unknown applications. Applications that were started before Kaspersky Endpoint Security are automatically moved to the trust group specified in the Select trust group window.
For applications that were started before Kaspersky Endpoint Security, only network activity is controlled. Control is performed according to the network rules specified in the Firewall settings.
Configuring the settings for assigning applications to trust groups
If participation in Kaspersky Security Network is enabled, Kaspersky Endpoint Security sends KSN a query about the reputation of an application each time the application is started. Based on the received response, the application may be moved to a trust group that is different from the one specified in the Host Intrusion Prevention component settings.
Kaspersky Endpoint Security always places applications signed by Microsoft certificates or Kaspersky certificates into the Trusted group.
To configure the settings for placement of applications in trust groups:
- Open the application settings window.
- In the left part of the window, in the Advanced Threat Protection section, select Host Intrusion Prevention.
In the right part of the window, the settings of the Host Intrusion Prevention component are displayed.
- If you want to automatically place digitally signed applications from trusted vendors in the Trusted group, select the Trust applications that have a digital signature check box.
- To move all unknown applications to a specified trust group, select the required trust group from the If trust group cannot be defined, automatically move applications to drop-down list.
For security reasons, the Trusted group is not included in the values of the If trust group cannot be defined, automatically move applications to setting.
- To save changes, click the Save button.
Trusted vendors are those software vendors that are included in the trusted group by Kaspersky. You can also add vendor certificate to the trusted system certificate store manually.
Modifying a trust group
When an application is first started, Kaspersky Endpoint Security automatically places the application in a trust group. You can move the application to another trust group manually, if necessary.
Kaspersky specialists do not recommend moving applications from the automatically assigned trust group to a different trust group. Instead, you can edit the activity control rules for an individual application if necessary.
To change the trust group to which an application has been automatically assigned by Kaspersky Endpoint Security when first started:
- Open the application settings window.
- In the left part of the window, in the Advanced Threat Protection section, select Host Intrusion Prevention.
In the right part of the window, the settings of the Host Intrusion Prevention component are displayed.
- Click the Applications button.
The Applications window opens, with the Application Privilege Control tab displayed.
- Select the relevant application on the Application Privilege Control tab.
- Do one of the following:
- Right-click to display the context menu of the application. In the context menu of the application, select Move to group <group name>.
- To open the context menu, click the Trusted / Low Restricted / High Restricted / Untrusted link. In the context menu, select the required trust group.
- Click OK.
- To save changes, click the Save button.
Selecting a trust group for applications started before Kaspersky Endpoint Security
For applications that were started before Kaspersky Endpoint Security, only network activity is controlled. Control is performed according to the network rules specified in the Firewall settings. To specify which network rules must be applied to network activity monitoring for such applications, you must select a trust group.
To select the trust group for applications started before Kaspersky Endpoint Security:
- Open the application settings window.
- In the left part of the window, in the Advanced Threat Protection section, select Host Intrusion Prevention.
In the right part of the window, the settings of the Host Intrusion Prevention component are displayed.
- Click the Edit button.
This opens the Select trust group window.
- Select the necessary trust group.
- Click OK.
- To save changes, click the Save button.
Managing Application control rules
By default, application activity is controlled by application privilege control rules that are defined for the trust group to which Kaspersky Endpoint Security assigned the application on first launch. If necessary, you can edit the application privilege control rules for an entire trust group, for an individual application, or a group of applications that are within a trust group.
Application privilege control rules that are defined for individual applications or groups of applications within a trust group have a higher priority than application control rules that are defined for a trust group. In other words, if the settings of the application control rules for an individual application or a group of applications within a trust group differ from the settings of application control rules for the trust group, the Host Intrusion Prevention component controls the activity of the application or the group of applications within the trust group according to the application control rules that are defined for the application or the group of applications.
Changing application control rules for trust groups and groups of applications
The optimal application privilege control rules for different trust groups are created by default. The settings of rules for application group control inherit values from the settings of trust group control rules. You can edit the preset trust group control rules and the rules for application group control.
To edit the trust group control rules or the rules for application group control:
- Open the application settings window.
- In the left part of the window, in the Advanced Threat Protection section, select Host Intrusion Prevention.
In the right part of the window, the settings of the Host Intrusion Prevention component are displayed.
- Click the Applications button.
This opens the Application Privilege Control tab in the Host Intrusion Prevention window.
- Select the necessary trust group or application group.
- From the context menu of a trust group or of a group of applications, select Group rules.
The Application group control rules window opens.
- In the Application group control rules window, do one of the following:
- To edit trust group control rules or application group control rules that govern the rights of the trust group or application group to access the operating system registry, user files, and application settings, select the Files and system registry tab.
- To edit trust group control rules or application group control rules that govern the rights of the trust group or application group to access operating system processes and objects, select the Rights tab.
- For the required resource, in the column of the corresponding action, right-click to open the context menu.
- From the context menu, select the required item.
- Inherit
- Allow
- Block
- Log events
If you are editing trust group control rules, the Inherit item is not available.
- Click OK.
- In the Applications window, click OK.
- To save changes, click the Save button.
Editing an application control rule
By default, the settings of application control rules of applications that belong to an application group or trust group inherit the values of settings of trust group control rules. You can edit the settings of application control rules.
To change an application control rule:
- Open the application settings window.
- In the left part of the window, in the Advanced Threat Protection section, select Host Intrusion Prevention.
In the right part of the window, the settings of the Host Intrusion Prevention component are displayed.
- Click the Applications button.
This opens the Application Privilege Control tab in the Host Intrusion Prevention window.
- Select the necessary application.
- Do one of the following:
- From the context menu of the application, select Application rules.
- Click the Additional button in the lower-right corner of the Application Privilege Control tab.
The Application control rules window opens.
- In the Application control rules window, do one of the following:
- To edit application control rules that govern the rights of the application to access the operating system registry, user files, and application settings, select the Files and system registry tab.
- To edit application control rules that govern the rights of the application to access operating system processes and objects, select the Rights tab.
- For the required resource, in the column of the corresponding action, right-click to open the context menu.
- From the context menu, select the required item.
- Inherit
- Allow
- Block
- Log events
- Click OK.
- In the Applications window, click OK.
- To save changes, click the Save button.
Disabling downloads and updates of application control rules from the Kaspersky Security Network database
By default, when new information about an application is detected in the Kaspersky Security Network database, Kaspersky Endpoint Security applies the control rules downloaded from the KSN database for this application. You can then manually edit the control rules for the application.
If an application was not in the Kaspersky Security Network database when started for the first time, but information about it was added to the database later, by default Kaspersky Endpoint Security automatically updates the control rules for this application.
You can disable downloads of application control rules from the Kaspersky Security Network database and automatic updates of control rules for previously unknown applications.
To disable downloads and updates of application control rules from the Kaspersky Security Network database:
- Open the application settings window.
- In the left part of the window, in the Advanced Threat Protection section, select Host Intrusion Prevention.
In the right part of the window, the settings of the Host Intrusion Prevention component are displayed.
- Clear the Update control rules for previously unknown applications from KSN databases check box.
- To save changes, click the Save button.
Disabling the inheritance of restrictions from the parent process
Application startup may be initiated either by the user or by another running application. When application startup is initiated by another application, a startup sequence is created, which consists of parent and child processes.
When an application attempts to obtain access to a protected resource, the Host Intrusion Prevention analyzes all parent processes of the application to determine whether these processes have rights to access the protected resource. The minimum priority rule is then observed: when comparing the access rights of the application to those of the parent process, the access rights with a minimum priority are applied to the application's activity.
The priority of access rights is as follows:
- Allow This access right has the highest priority.
- Block This access right has the lowest priority.
This mechanism prevents a non-trusted application or an application with restricted rights from using a trusted application to perform actions that require certain privileges.
If the activity of an application is blocked due to the lack of rights that are granted to a parent process, you can edit these rights or disable the inheritance of restrictions from the parent process.
To disable the inheritance of restrictions from the parent process:
- Open the application settings window.
- In the left part of the window, in the Advanced Threat Protection section, select Host Intrusion Prevention.
In the right part of the window, the settings of the Host Intrusion Prevention component are displayed.
- Click the Applications button.
This opens the Application control rules tab in the Host Intrusion Prevention window.
- Select the necessary application.
- From the context menu of the application, select Application rules.
The Application control rules window opens.
- In the Application control rules window, select the Exclusions tab.
- Select the Do not inherit restrictions of the parent process (application) check box.
- Click OK.
- In the Applications window, click OK.
- To save changes, click the Save button.
Excluding specific application actions from application control rules
To exclude specific application actions from application control rules:
- Open the application settings window.
- In the left part of the window, in the Advanced Threat Protection section, select Host Intrusion Prevention.
In the right part of the window, the settings of the Host Intrusion Prevention component are displayed.
- Click the Applications button.
This opens the Application control rules tab in the Host Intrusion Prevention window.
- Select the necessary application.
- From the context menu of the application, select Application rules.
The Application control rules window opens.
- Select the Exclusions tab.
- Select check boxes next to application actions that do not need to be monitored.
- Click OK.
- In the Applications window, click OK.
- To save changes, click the Save button.
Removing outdated application control rules
By default, control rules for applications that have not been started in 60 days are deleted automatically. You can change the storage duration for control rules for unused applications or disable the automatic deletion of rules.
To delete outdated application control rules:
- Open the application settings window.
- In the left part of the window, in the Advanced Threat Protection section, select Host Intrusion Prevention.
In the right part of the window, the settings of the Host Intrusion Prevention component are displayed.
- Do one of the following:
- If you want Kaspersky Endpoint Security to delete control rules of unused applications, select the Delete control rules for applications that are not started for more than check box and specify the relevant number of days.
- To disable the automatic deletion of control rules of unused applications, clear the Delete control rules for applications that are not started for more than check box.
- To save changes, click the Save button.
Protecting operating system resources and identity data
The Host Intrusion Prevention component manages the rights of applications to take actions on various categories of operating system resources and personal data.
Kaspersky specialists have established preset categories of protected resources. You cannot edit or delete the preset categories of protected resources or the protected resources that are within these categories.
You can perform the following actions:
- Add a new category of protected resources.
- Add a new protected resource.
- Disable protection of a resource.
Adding a category of protected resources
To add a new category of protected resources:
- Open the application settings window.
- In the left part of the window, in the Advanced Threat Protection section, select Host Intrusion Prevention.
In the right part of the window, the settings of the Host Intrusion Prevention component are displayed.
- Click the Resources button.
This opens the Protected resources tab in the Host Intrusion Prevention window.
- In the left part of the Protected resources tab, select a section or category of protected resources to which you want to add a new category of protected resources.
- Click the Add button and in the drop-down list select Category.
The Category of protected resources window opens.
- In the Category of protected resources window that opens, enter a name for the new category of protected resources.
- Click OK.
A new item appears in the list of categories of protected resources.
- In the Host Intrusion Prevention window, click OK.
- To save changes, click the Save button.
After you add a category of protected resources, you can edit or remove it by clicking the Edit or Remove buttons in the upper-left part of the Protected resources tab.
Page top
Adding a protected resource
To add a protected resource:
- Open the application settings window.
- In the left part of the window, in the Advanced Threat Protection section, select Host Intrusion Prevention.
In the right part of the window, the settings of the Host Intrusion Prevention component are displayed.
- Click the Resources button.
This opens the Protected resources tab in the Host Intrusion Prevention window.
- In the left part of the Protected resources tab, select a category of protected resources to which you want to add a new protected resource.
- Click the Add button and in the drop-down list select the type of resource that you want to add:
- File or folder.
- Registry key.
The Protected resource window opens.
- In the Protected resource window, enter the name of the protected resource in the Name field.
- Click the Browse button.
- In the window that opens, specify the necessary settings depending on the type of protected resource that you want to add. Click OK.
- In the Protected resource window, click OK.
A new item appears in the list of protected resources of the selected category on the Protected resources tab.
- In the Host Intrusion Prevention window, click OK.
- To save changes, click the Save button.
After you add a protected resource, you can edit or remove it by clicking the Edit or Remove buttons in the upper-left part of the Protected resources tab.
Page top
Disabling resource protection
To disable resource protection:
- Open the application settings window.
- In the left part of the window, in the Advanced Threat Protection section, select Host Intrusion Prevention.
In the right part of the window, the settings of the Host Intrusion Prevention component are displayed.
- In the right part of the window, click the Resources button.
This opens the Protected resources tab in the Host Intrusion Prevention window.
- Do one of the following:
- In the left part of the tab, in the list of protected resources, select the resource for which you want to disable protection and clear the check box next to its name.
- Click Exclusions and do the following:
- In the Exclusions window, click the Add button. In the drop-down list, select the type of resource that you want to add to the list of exclusions from protection by the Host Intrusion Prevention component: File or folder or Registry key.
The Protected resource window opens.
- In the Protected resource window, enter the name of the protected resource in the Name field.
- Click the Browse button.
- In the window that opens, specify the necessary settings depending on the type of protected resource that you want to add to the list of exclusions from protection by the Host Intrusion Prevention component.
- Click OK.
- In the Protected resource window, click OK.
A new item appears in the list of resources that are excluded from protection by the Host Intrusion Prevention component.
After adding a resource to the list of exclusions from protection by the Host Intrusion Prevention component, you can edit or remove it by clicking the Edit or Remove buttons in the upper part of the Exclusions window.
- In the Exclusions window, click OK.
- In the Exclusions window, click the Add button. In the drop-down list, select the type of resource that you want to add to the list of exclusions from protection by the Host Intrusion Prevention component: File or folder or Registry key.
- In the Host Intrusion Prevention window, click OK.
- To save changes, click the Save button.
Remediation Engine
This section contains information about Remediation Engine and instructions on enabling or disabling the component.
About Remediation Engine
The Remediation Engine lets Kaspersky Endpoint Security roll back actions that have been performed by malware in the operating system.
When rolling back malware activity in the operating system, Kaspersky Endpoint Security handles the following types of malware activity:
- File activity.
Kaspersky Endpoint Security deletes executable files that have been created by a malicious program and are located on any media, except for network ones.
Kaspersky Endpoint Security deletes executable files that were created by programs that have been infiltrated by malware.
Kaspersky Endpoint Security does not restore changed or deleted files.
- Registry activity.
Kaspersky Endpoint Security deletes partitions and registry keys that have been created by malware.
Kaspersky Endpoint Security does not restore modified or deleted partitions and registry keys.
- System activity.
Kaspersky Endpoint Security terminates processes that have been initiated by a malicious program.
Kaspersky Endpoint Security terminates processes into which a malicious program has penetrated.
Kaspersky Endpoint Security does not resume processes that have been halted by a malicious program.
- Network activity.
Kaspersky Endpoint Security blocks the network activity of malicious programs.
Kaspersky Endpoint Security blocks network activity of processes into which a malicious program has penetrated.
A rollback of malware actions can be started by the File Threat Protection component or during a virus scan.
Rolling back malware operations affects a strictly defined set of data. Rollback has no adverse effects on the operating system or on the integrity of your computer data.
Page top
Enabling and disabling Remediation Engine
To enable or disable Remediation Engine:
- Open the application settings window.
- In the left part of the window, in the Advanced Threat Protection section, select the Remediation Engine subsection.
- Do one of the following:
- If you want Kaspersky Endpoint Security to roll back actions that were performed by malware in the operating system when it detects such malware, select the Enable Remediation Engine check box in the right part of the window.
- If you do not want Kaspersky Endpoint Security to roll back actions that were performed by malware in the operating system when it detects such malware, clear the Enable Remediation Engine check box in the right part of the window.
- To save changes, click the Save button.
File Threat Protection
This section contains information about the File Threat Protection component and instructions on how to configure the component settings.
About File Threat Protection
The File Threat Protection component lets you prevent infection of the file system of the computer. By default, the File Threat Protection component starts together with Kaspersky Endpoint Security, continuously resides in the computer's RAM, and scans files that are opened or run on the computer and on its attached drives to find viruses and other potential threats. The scan is performed according to the application settings.
On detecting a threat in a file, Kaspersky Endpoint Security performs the following:
- Detects the type of object detected in the file (such as a virus or Trojan).
- The application displays a notification about the malicious object detected in the file (if notifications are configured), and processes the file by taking the action specified in the File Threat Protection component settings.
Enabling and disabling File Threat Protection
By default, the File Threat Protection component is enabled and runs in the mode recommended by Kaspersky experts. You can disable File Threat Protection if necessary.
To enable or disable File Threat Protection:
- Open the application settings window.
- In the left part of the window, in the Essential Threat Protection section, select File Threat Protection.
The settings of the File Threat Protection component are displayed in the right part of the window.
- Do one of the following:
- If you want to enable File Threat Protection, select the Enable File Threat Protection check box.
- If you want to disable File Threat Protection, clear the Enable File Threat Protection check box.
- To save changes, click the Save button.
Automatic pausing of File Threat Protection
You can configure File Threat Protection to automatically pause at a specified time or when working with specific applications.
File Threat Protection should be paused only as a last resort when it conflicts with some applications. In case of any conflicts during the operation of a component, we recommend contacting Kaspersky Technical Support (https://companyaccount.kaspersky.com). The support experts will help you set up the File Threat Protection component to run simultaneously with other applications on your computer.
To configure automatic pausing of File Threat Protection:
- Open the application settings window.
- In the left part of the window, in the Essential Threat Protection section, select File Threat Protection.
The settings of the File Threat Protection component are displayed in the right part of the window.
- In the Security level section, click the Settings button.
The File Threat Protection window opens.
- In the File Threat Protection window, select the Additional tab.
- In the Pause task section:
- If you want to configure automatic pausing of File Threat Protection at a specified time, select the By schedule check box and click the Schedule button.
The Pause task window opens.
- If you want to configure automatic pausing of File Threat Protection at startup of specified applications, select the At application startup check box and click the Select button.
The Applications window opens.
- If you want to configure automatic pausing of File Threat Protection at a specified time, select the By schedule check box and click the Schedule button.
- Do one of the following:
- If you are configuring automatic pausing of File Threat Protection at a specified time, in the Pause task window, use the Pause task at and Resume task at fields to specify the time period (in HH:MM format) during which File Threat Protection should be paused. Click OK.
- If you are configuring automatic pausing of File Threat Protection at startup of the specified applications, use the Add, Edit, and Remove buttons in the Applications window to create a list of applications during whose operation File Threat Protection should be paused. Click OK.
- In the File Threat Protection window, click OK.
- To save changes, click the Save button.
File Threat Protection settings
You can perform the following actions for configuring the File Threat Protection component:
- Change the security level.
You can select one of the preset security levels or manually configure security level settings. If you change the security level settings, you can always revert back to the recommended security level settings.
- Change the action that is performed by the File Threat Protection component when it detects an infected file.
- Form the protection scope of the File Threat Protection component.
You can expand or restrict the protection scope by adding or removing scan objects, or by changing the type of files to be scanned.
- Configure Heuristic Analyzer.
The File Threat Protection component uses a scanning technique called Machine learning and signature analysis. During signature analysis, the File Threat Protection component compares the detected object with records in the application anti-virus databases. Based on the recommendations of Kaspersky experts, machine learning and signature analysis is always enabled.
To increase the effectiveness of protection, you can use heuristic analysis. During heuristic analysis, the File Threat Protection component analyzes the activity of objects in the operating system. Heuristic analysis enables detection of malicious objects for which no records are currently available in the antivirus databases of the application.
- Optimize scanning.
You can optimize the file scanning that is performed by the File Threat Protection component by reducing the scan time and increasing the operating speed of Kaspersky Endpoint Security. This can be achieved by scanning only new files and those files that have been modified since the previous scan. This mode applies both to simple and to compound files.
You can also enable the use of the iChecker and iSwift technologies that optimize the speed of file scanning by excluding files that have not been modified since the most recent scan.
- Configure scanning of compound files.
- Change the file scan mode.
Changing the security level
To protect the computer's file system, the File Threat Protection component applies various groups of settings. These groups of settings are called security levels. There are three preset security levels: High, Recommended, and Low. The Recommended security level settings are considered to be the optimal settings recommended by Kaspersky experts.
To change a security level:
- Open the application settings window.
- In the left part of the window, in the Essential Threat Protection section, select File Threat Protection.
The settings of the File Threat Protection component are displayed in the right part of the window.
- In the Security level section, do one of the following:
- If you want to set one of the preset security levels (High, Recommended, or Low), select it with the slider.
- If you want to configure a custom security level, click the Settings button and enter your custom settings in the File Threat Protection window that opens.
After you configure a custom security level, the name of the security level in the Security level section changes to Custom.
- If you want to change the security level to Recommended, click the Default button.
- To save changes, click the Save button.
Changing the action taken on infected files by the File Threat Protection component
By default, the File Threat Protection component automatically tries to disinfect all infected files that are detected. If disinfection fails, the File Threat Protection component deletes these files.
To change the action taken on infected files by the File Threat Protection component:
- Open the application settings window.
- In the left part of the window, in the Essential Threat Protection section, select File Threat Protection.
The settings of the File Threat Protection component are displayed in the right part of the window.
- In the Action on threat detection section, select the required option:
- Disinfect, delete if disinfection fails.
If this option is selected, the File Threat Protection component automatically attempts to disinfect all infected files that are detected. If disinfection fails, the File Threat Protection component deletes these files.
- Disinfect, block if disinfection fails.
If this option is selected, the File Threat Protection component automatically attempts to disinfect all infected files that are detected. If disinfection fails, the File Threat Protection component blocks these files.
- Block.
If this option is selected, the File Threat Protection component automatically blocks all infected files without attempting to disinfect them.
- Disinfect, delete if disinfection fails.
- To save changes, click the Save button.
Forming the protection scope of the File Threat Protection component
The protection scope refers to the objects that the component scans when enabled. The protection scopes of different components have different properties. The location and type of files to be scanned are properties of the protection scope of the File Threat Protection component. By default, the File Threat Protection component scans only
that are run from hard drives, removable drives and network drives.To create the protection scope:
- Open the application settings window.
- In the left part of the window, in the Essential Threat Protection section, select File Threat Protection.
The settings of the File Threat Protection component are displayed in the right part of the window.
- In the Security level section, click the Settings button.
The File Threat Protection window opens.
- In the File Threat Protection window, select the General tab.
- In the File types section, specify the type of files that you want the File Threat Protection component to scan:
- If you want to scan all files, select All files.
- If you want to scan files of formats which are the most vulnerable to infection, select Files scanned by format.
- If you want to scan files with extensions that are the most vulnerable to infection, select Files scanned by extension.
When selecting the type of files to scan, remember the following information:
- There are some file formats (such as .txt) for which the probability of intrusion of malicious code and its subsequent activation is quite low. At the same time, there are file formats that contain or may contain executable code (such as .exe, .dll, and .doc). The risk of intrusion and activation of malicious code in such files is quite high.
- An intruder may send a virus or another malicious program to your computer in an executable file that has been renamed with the .txt extension. If you select scanning of files by extension, such a file is skipped by the scan. If scanning of files by format is selected, the File Threat Protection component analyzes the file header regardless of the extension. This analysis may reveal that the file is in EXE format. Such a file is thoroughly scanned for viruses and other malware.
- In the Protection scope list, do one of the following:
- If you want to add a new object to the scan scope, click the Add button.
- If you want to change the location of an object, select the object from the scan scope and click the Edit button.
The Select scan scope window opens.
- If you want to remove an object from the list of objects to be scanned, select one from the list of objects to be scanned and click the Delete button.
A window for confirming deletion opens.
- Do one of the following:
- If you want to add a new object or change the location of an object from the list of objects to be scanned, select the object in the Select scan scope window and click the Add button.
All objects that are selected in the Select scan scope window are displayed in the Protection scope list in the File Threat Protection window.
Click OK.
- If you want to remove an object, click the Yes button in the window for confirming removal.
- If you want to add a new object or change the location of an object from the list of objects to be scanned, select the object in the Select scan scope window and click the Add button.
- If necessary, repeat steps 6-7 for adding, moving, or removing objects from the list of objects to be scanned.
- To exclude an object from the list of objects to be scanned, clear the check box next to the object in the Protection scope list. However, the object remains on the list of objects to be scanned, though it is excluded from scanning by the File Threat Protection component.
- In the File Threat Protection window, click OK.
- To save changes, click the Save button.
Using heuristic analysis in the operation of the File Threat Protection component
To configure the use of heuristic analysis in the operation of the File Threat Protection component:
- Open the application settings window.
- In the left part of the window, in the Essential Threat Protection section, select File Threat Protection.
The settings of the File Threat Protection component are displayed in the right part of the window.
- In the Security level section, click the Settings button.
The File Threat Protection window opens.
- In the File Threat Protection window, select the Performance tab.
- In the Scan methods section:
- If you want the File Threat Protection component to use heuristic analysis, select the Heuristic analysis check box and use the slider to set the heuristic analysis level: Light scan, Medium scan, or Deep scan.
- If you do not want the File Threat Protection component to use heuristic analysis, clear the Heuristic analysis check box.
- Click OK.
- To save changes, click the Save button.
Using scan technologies in the operation of the File Threat Protection component
To configure the use of scan technologies in the operation of the File Threat Protection component:
- Open the application settings window.
- In the left part of the window, in the Essential Threat Protection section, select File Threat Protection.
The settings of the File Threat Protection component are displayed in the right part of the window.
- In the Security level section, click the Settings button.
The File Threat Protection window opens.
- In the File Threat Protection window, select the Additional tab.
- In the Scan technologies section:
- Select the check boxes next to the names of the technologies that you want to use in the operation of the File Threat Protection component.
- Clear the check boxes next to the names of the technologies that you do not want to use in the operation of the File Threat Protection component.
- Click OK.
- To save changes, click the Save button.
Optimizing file scanning
To optimize file scanning:
- Open the application settings window.
- In the left part of the window, in the Essential Threat Protection section, select File Threat Protection.
The settings of the File Threat Protection component are displayed in the right part of the window.
- Click the Settings button.
The File Threat Protection window opens.
- In the File Threat Protection window, select the Performance tab.
- In the Scan optimization section, select the Scan only new and changed files check box.
- Click OK.
- To save changes, click the Save button.
Scanning compound files
A common technique for concealing viruses and other malware is to embed them in compound files such as archives or email databases. To detect viruses and other malware that are hidden in this way, the compound file must be unpacked, which may slow down scanning. You can limit the set of compound files to be scanned, thus speeding up scanning.
The method used to process an infected compound file (disinfection or deletion) depends on the type of file.
The File Threat Protection component disinfects compound files in the RAR, ARJ, ZIP, CAB, and LHA formats and deletes files in all other formats (except mail databases).
To configure scanning of compound files:
- Open the application settings window.
- In the left part of the window, in the Essential Threat Protection section, select File Threat Protection.
The settings of the File Threat Protection component are displayed in the right part of the window.
- In the Security level section, click the Settings button.
The File Threat Protection window opens.
- In the File Threat Protection window, select the Performance tab.
- In the Scan of compound files section, specify the types of compound files that you want to scan: archives, installation packages, or files in office formats.
- To scan only new and changed compound files, select the Scan only new and changed files check box.
The File Threat Protection component will scan only new and changed compound files of all types.
- Click the Additional button.
The Compound files window opens.
- In the Background scan section, do one of the following:
- To block the File Threat Protection component from unpacking compound files in the background, clear the Unpack compound files in the background check box.
- To allow the File Threat Protection component to unpack compound files when scanning in the background, select the Unpack compound files in the background check box and specify the required value in the Minimum file size field.
- In the Size limit section, do one of the following:
- To block the File Threat Protection component from unpacking large compound files, select the Do not unpack large compound files check box and specify the required value in the Maximum file size field. The File Threat Protection component will not unpack compound files that are larger than the specified size.
- To allow the File Threat Protection component to unpack large compound files, clear the Do not unpack large compound files check box.
A file is considered large if its size exceeds the value in the Maximum file size field.
The File Threat Protection component scans large-sized files that are extracted from archives, regardless of whether the Do not unpack large compound files check box is selected.
- Click OK.
- In the File Threat Protection window, click OK.
- To save changes, click the Save button.
Changing the scan mode
Scan mode refers to the condition that triggers file scanning by the File Threat Protection component. By default, Kaspersky Endpoint Security scans files in smart mode. In this file scan mode, the File Threat Protection component decides whether or not to scan files after analyzing operations that are performed with the file by the user, by an application on behalf of the user (under the account that was used to log in or a different user account), or by the operating system. For example, when working with a Microsoft Office Word document, Kaspersky Endpoint Security scans the file when it is first opened and last closed. Intermediate operations that overwrite the file do not cause it to be scanned.
To change the file scan mode:
- Open the application settings window.
- In the left part of the window, in the Essential Threat Protection section, select File Threat Protection.
The settings of the File Threat Protection component are displayed in the right part of the window.
- In the Security level section, click the Settings button.
The File Threat Protection window opens.
- In the File Threat Protection window, select the Additional tab.
- In the Scan mode section, select the required mode:
- Smart mode.
- On access and modification.
- On access.
- On execution.
- Click OK.
- To save changes, click the Save button.
Web Threat Protection
This component is available if Kaspersky Endpoint Security is installed on a computer that runs on Microsoft Windows for workstations. This component is unavailable if Kaspersky Endpoint Security is installed on a computer that runs on Microsoft Windows for file servers.
This section contains information about the Web Threat Protection component and instructions on how to configure the component settings.
About Web Threat Protection
Every time you go online, you expose information that is stored on your computer to viruses and other malware. They can infiltrate the computer while the user is downloading free software or browsing websites that are compromised by criminals. Network worms can find a way onto your computer as soon as you establish an Internet connection, even before you open a web page or download a file.
The Web Threat Protection component protects incoming and outgoing data that is sent to and from the computer over the HTTP and FTP protocols and checks URLs against the list of malicious or phishing web addresses.
The Web Threat Protection component intercepts every web page or file that is accessed by the user or an application via the HTTP or FTP protocol and analyzes them for viruses and other threats. The following happens next:
- If the page or file is found not to contain malicious code, the user gains immediate access to them.
- If a user accesses a web page or file that contains malicious code, the application performs the action that is specified in the Web Threat Protection component settings.
Enabling and disabling Web Threat Protection
By default, the Web Threat Protection component is enabled and runs in the mode recommended by Kaspersky experts. You can disable the Web Threat Protection component if necessary.
To enable or disable the Web Threat Protection component:
- Open the application settings window.
- In the left part of the window, in the Essential Threat Protection section, select Web Threat Protection.
The settings of the Web Threat Protection component are displayed in the right part of the window.
- Do one of the following:
- If you want to enable the Web Threat Protection component, select the Enable Web Threat Protection check box.
- If you want to disable the Web Threat Protection component, clear the Enable Web Threat Protection check box.
- To save changes, click the Save button.
Web Threat Protection settings
You can perform the following actions for configuration of the Web Threat Protection component:
- Change web traffic security level.
You can select one of the pre-installed security levels for web traffic that is received or transmitted via the HTTP and FTP protocols, or configure a custom web traffic security level.
If you change the web traffic security level settings, you can always revert to the recommended web traffic security level settings.
- Change the action that Kaspersky Endpoint Security performs on malicious web traffic objects.
If web traffic scanning of an object by the Web Threat Protection component shows that the object contains malicious code, the response by the Web Threat Protection component against this object depends on the action that you have specified.
- Configure link scanning by the Web Threat Protection component to check them against databases of phishing and malicious web addresses.
- Configure use of heuristic analysis when scanning web traffic for viruses and other malicious programs.
To increase the effectiveness of protection, you can use heuristic analysis. During heuristic analysis, Kaspersky Endpoint Security analyzes the activity of applications in the operating system. Heuristic analysis can detect threats for which there are currently no records in the Kaspersky Endpoint Security databases.
- Configure use of heuristic analysis when scanning web pages for phishing links.
- Optimize Web Threat Protection scanning of web traffic that is sent and received over the HTTP and FTP protocols.
- Create a list of trusted web addresses.
You can create a list of URLs whose content you trust. The Web Threat Protection component does not analyze information from trusted web addresses to check them for viruses or other threats. This option may be useful, for example, if the Web Threat Protection component interferes with the downloading of a file from a known website.
A URL may be the address of a specific web page or the address of a website.
Changing the web traffic security level
To protect data that is received and transmitted via the HTTP and FTP protocols, the Web Threat Protection component applies various groups of settings. Such groups of settings are called web traffic security levels. There are three pre-installed web traffic security levels: High, Recommended, and Low. The Recommended web traffic security level is considered the optimal setting, and is recommended by Kaspersky.
To change the web traffic security level:
- Open the application settings window.
- In the left part of the window, in the Essential Threat Protection section, select Web Threat Protection.
The settings of the Web Threat Protection component are displayed in the right part of the window.
- In the Security level section, do one of the following:
- If you want to install one of the pre-installed web traffic security levels (High, Recommended, or Low), use the slider to select one.
- If you want to configure a custom web traffic security level, click the Settings button and specify settings in the Web Threat Protection window that opens.
When you have configured a custom web traffic security level, the name of the security level in the Security level section changes to Custom.
- If you want to change the web traffic security level to Recommended, click the Default button.
- To save changes, click the Save button.
Changing the action to take on malicious web traffic objects
By default, on detection of an infected object in web traffic, the Web Threat Protection component blocks access to the object and displays a notification about the action.
To change the action to take on malicious web traffic objects:
- Open the application settings window.
- In the left part of the window, in the Essential Threat Protection section, select Web Threat Protection.
The settings of the Web Threat Protection component are displayed in the right part of the window.
- In the Action on threat detection section, select the action that Kaspersky Endpoint Security performs on malicious web traffic objects:
- Block download.
If this option is selected, on detecting an infected object in web traffic, the Web Threat Protection component blocks access to the object, displays a notification about the blocked access attempt, and makes a log entry with information about the infected object.
- Inform.
If this option is selected and an infected object is detected in the web traffic, the Web Threat Protection component allows this object to be downloaded to the computer; Kaspersky Endpoint Security logs an event containing information about the infected object and adds information about the infected object to the list of active threats.
- Block download.
- To save changes, click the Save button.
Web Threat Protection scanning of links to check them against databases of phishing and malicious web addresses
Scanning links to see if they are included in the list of phishing web addresses allows avoiding phishing attacks. A phishing attack can be disguised, for example, as an email message supposedly from your bank with a link to the official website of the bank. By clicking the link, you go to an exact copy of the bank's website and can even see its real web address in the browser, even though you are on a counterfeit site. From this point forward, all of your actions on the site are tracked and can be used to steal your money.
Because links to phishing websites may be received not only in an email message but also from other sources such as ICQ messages, the Web Threat Protection component monitors attempts to access a phishing website at the web traffic scan level and blocks access to such websites. Lists of phishing URLs are included with the Kaspersky Endpoint Security distribution kit.
To configure the Web Threat Protection component to check links against the databases of phishing and malicious web addresses:
- Open the application settings window.
- In the left part of the window, in the Essential Threat Protection section, select Web Threat Protection.
The settings of the Web Threat Protection component are displayed in the right part of the window.
- Click the Settings button.
The Web Threat Protection window opens.
- In the Web Threat Protection window, select the General tab.
- Do the following:
- If you want the Web Threat Protection component to check links against the databases of malicious web addresses, in the Scan methods section, select the Check if links are listed in the database of malicious links check box.
- If you want the Web Threat Protection component to check links against the databases of phishing web addresses, in the Anti-Phishing Settings section, select the Check if links are listed in the database of phishing links check box.
You can also check links against the reputation databases of Kaspersky Security Network.
- Click OK.
- To save changes, click the Save button.
Using heuristic analysis in the operation of the Web Threat Protection component
To configure the use of heuristic analysis:
- Open the application settings window.
- In the left part of the window, in the Essential Threat Protection section, select Web Threat Protection.
The settings of the Web Threat Protection component are displayed in the right part of the window.
- In the Security level section, click the Settings button.
The Web Threat Protection window opens.
- Select the General tab.
- If you want the Web Threat Protection component to use heuristic analysis to scan web traffic for viruses and other malware, in the Scan methods section, select the Heuristic analysis for detecting viruses check box and use the slider to set the heuristic analysis level: Light scan, Medium scan, or Deep scan.
- If you want the Web Threat Protection component to use heuristic analysis to scan web pages for phishing links, in the Anti-Phishing Settings section, select the Heuristic analysis for detecting phishing links check box.
- Click OK.
- To save changes, click the Save button.
Editing the list of trusted web addresses
To create a list of trusted web addresses:
- Open the application settings window.
- In the left part of the window, in the Essential Threat Protection section, select Web Threat Protection.
The settings of the Web Threat Protection component are displayed in the right part of the window.
- Click the Settings button.
The Web Threat Protection window opens.
- Select the Trusted web addresses tab.
- Select the Do not scan web traffic from trusted web addresses check box.
- Create a list of URLs / web pages whose content you trust. To create a list:
- Click the Add button.
The Web address / Web address mask window opens.
- Enter the address of the website / web page or the address mask of the website / web page.
- Click OK.
A new record appears in the list of trusted web addresses.
- Click the Add button.
- Click OK.
- To save changes, click the Save button.
Mail Threat Protection
This component is available if Kaspersky Endpoint Security is installed on a computer that runs on Microsoft Windows for workstations. This component is unavailable if Kaspersky Endpoint Security is installed on a computer that runs on Microsoft Windows for file servers.
This section contains information about the Mail Threat Protection component and instructions on how to configure the component settings.
About Mail Threat Protection
The Mail Threat Protection component scans incoming and outgoing email messages for viruses and other threats. It starts together with Kaspersky Endpoint Security, continuously remains active in computer memory, and scans all messages that are sent or received via the POP3, SMTP, IMAP, MAPI, and NNTP protocols. If no threats are detected in the email message, it becomes available and/or is processed.
When a threat is detected in an email message, the Mail Threat Protection component performs the following actions:
- Assigns the Infected status to the email message.
This status is assigned to the email message in the following cases:
- A scan of the email message finds a section of code of a known virus that is included in the anti-virus databases of Kaspersky Endpoint Security.
- The email message contains a section of code that is typical of viruses or other malware, or the modified code of a known virus.
- Identifies the type of object detected in the email message (such as a Trojan).
- Blocks the email message.
- Displays a notification about the detected object (if configured to do so in the notification settings).
- Performs the action defined in the Mail Threat Protection component settings.
This component interacts with mail clients installed on the computer. An embeddable extension is available for the Microsoft Office Outlook mail client that lets you fine-tune the message scan settings. The Mail Threat Protection extension is embedded in the Microsoft Office Outlook mail client during installation of Kaspersky Endpoint Security.
Page top
Enabling and disabling Mail Threat Protection
By default, the Mail Threat Protection component is enabled and runs in the mode recommended by Kaspersky experts. You can disable the Mail Threat Protection component if necessary.
To enable or disable the Mail Threat Protection component:
- Open the Configure application settings window.
- In the left part of the window, in the Essential Threat Protection section, select Mail Threat Protection.
The settings of the Mail Threat Protection component are displayed in the right part of the window.
- Do one of the following:
- If you want to enable the Mail Threat Protection component, select the Enable Mail Threat Protection check box.
- If you want to disable the Mail Threat Protection component, clear the Enable Mail Threat Protection check box.
- To save changes, click the Save button.
Mail Threat Protection settings
You can perform the following actions for configuring the Mail Threat Protection component:
- Change the mail security level.
You can select one of the pre-installed email security levels or configure a custom email security level.
If you have changed the email security level settings, you can always revert to the recommended email security level settings.
- Change the action that Kaspersky Endpoint Security performs on infected messages.
- Form the protection scope of the Mail Threat Protection component.
- Configure scanning of compound files attached to email messages.
You can enable or disable scanning of message attachments, limit the maximum size of message attachments to be scanned, and limit the maximum message attachment scan duration.
- Configure filtering by the type of email message attachments.
Filtering of message attachments by type allows for automatic renaming or deletion of files of the specified types.
- Configure Heuristic Analyzer.
To increase the effectiveness of protection, you can use
. During heuristic analysis, Kaspersky Endpoint Security analyzes the activity of applications in the operating system. Heuristic analysis can detect threats in messages for which there are currently no records in the Kaspersky Endpoint Security databases. - Configure email scanning in Microsoft Office Outlook.
An embeddable extension is available for the Microsoft Office Outlook mail client that allows convenient configuration of mail scan settings.
When working with other mail clients, including Microsoft Outlook Express, Windows Mail, and Mozilla Thunderbird, the Mail Threat Protection component scans traffic of the SMTP, POP3, IMAP, and NNTP mail protocols.
When working with the Mozilla Thunderbird mail client, the Mail Threat Protection component does not scan messages that are transmitted via the IMAP protocol for viruses and other threats if filters are used to move messages from the Inbox folder.
Changing the mail security level
The Mail Threat Protection component applies various groups of settings to protect mail. The settings groups are called email security levels. There are three email security levels: High, Recommended, and Low. The Recommended file security level is considered the optimal setting, and is recommended by Kaspersky.
To change the email security level:
- Open the application settings window.
- In the left part of the window, in the Essential Threat Protection section, select Mail Threat Protection.
The settings of the Mail Threat Protection component are displayed in the right part of the window.
- In the Security level section, do one of the following:
- If you want to install one of the pre-installed email security levels (High, Recommended, or Low), use the slider to select one.
- If you want to configure a custom security level, click the Settings button and enter your custom settings in the Mail Threat Protection window that opens.
After you configure a custom email security level, the name of the security level in the Security level section changes to Custom.
- If you want to change the email security level to Recommended, click the Default button.
- To save changes, click the Save button.
Changing the action to take on infected email messages
By default, the Mail Threat Protection component automatically attempts to disinfect all infected email messages that are detected. If disinfection fails, the Mail Threat Protection component deletes the infected email messages.
To change the action to take on infected email messages:
- Open the application settings window.
- In the left part of the window, in the Essential Threat Protection section, select Mail Threat Protection.
The settings of the Mail Threat Protection component are displayed in the right part of the window.
- In the Action on threat detection section, select the action for Kaspersky Endpoint Security to perform when an infected message is detected:
- Disinfect, delete if disinfection fails.
If this option is selected, the Mail Threat Protection component automatically attempts to disinfect all infected email messages that are detected. If disinfection fails, the Mail Threat Protection component deletes the infected email messages.
- Disinfect, block if disinfection fails.
If this option is selected, the Mail Threat Protection component automatically attempts to disinfect all infected email messages that are detected. If disinfection fails, the Mail Threat Protection component blocks the infected email messages.
- Block.
If this option is selected, the Mail Threat Protection component automatically blocks all infected email messages without attempting to disinfect them.
- Disinfect, delete if disinfection fails.
- To save changes, click the Save button.
Forming the protection scope of the Mail Threat Protection component
The protection scope refers to the objects that are scanned by the component when it is active. The protection scopes of different components have different properties. The properties of the protection scope of the Mail Threat Protection component include the settings for integrating the Mail Threat Protection component into mail clients, and the type of email messages and email protocols whose traffic is scanned by the Mail Threat Protection component. By default, Kaspersky Endpoint Security scans both incoming and outgoing email messages and traffic of the POP3, SMTP, NNTP, and IMAP protocols, and is integrated into the Microsoft Office Outlook mail client.
To form the protection scope of the Mail Threat Protection component:
- Open the application settings window.
- In the left part of the window, in the Essential Threat Protection section, select Mail Threat Protection.
The settings of the Mail Threat Protection component are displayed in the right part of the window.
- Click the Settings button.
The Mail Threat Protection window opens.
- Select the General tab.
- In the Protection scope section, do one of the following:
- If you want the Mail Threat Protection component to scan all incoming and outgoing messages on your computer, select the Incoming and outgoing messages option.
- If you want the Mail Threat Protection component to scan only incoming messages on your computer, select the Incoming messages only option.
If you choose to scan only incoming messages, it is recommended that you perform a one-time scan of all outgoing messages because there is a chance that your computer has email worms that are being spread over email. This helps to avoid problems resulting from unmonitored mass emailing of infected messages from your computer.
- In the Connectivity section, do the following:
- If you want the Mail Threat Protection component to scan messages that are transmitted via the POP3, SMTP, NNTP and IMAP protocols before they arrive on your computer, select the POP3 / SMTP / NNTP / IMAP traffic check box.
If you do not want the Mail Threat Protection component to scan messages that are transmitted via the POP3, SMTP, NNTP and IMAP protocols before they arrive on your computer, clear the POP3 / SMTP / NNTP / IMAP traffic check box. In this case, messages are scanned by the Mail Threat Protection extension embedded in the Microsoft Office Outlook mail client after they are received on the user computer if the Additional: Microsoft Office Outlook extension check box is selected.
If you use a mail client other than Microsoft Office Outlook, messages that are transmitted via the POP3, SMTP, NNTP and IMAP protocols are not scanned by the Mail Threat Protection component when the POP3 / SMTP / NNTP / IMAP traffic check box is cleared.
- If you want to allow access to Mail Threat Protection component settings from Microsoft Office Outlook and enable scanning of messages that are transmitted via the POP3, SMTP, NNTP, IMAP, and MAPI protocols after they arrive on the computer using the extension that is embedded into Microsoft Office Outlook, select the Additional: Microsoft Office Outlook extension check box.
If you want to block access to Mail Threat Protection component settings from Microsoft Office Outlook and disable scanning of messages that are transmitted via the POP3, SMTP, NNTP, IMAP, and MAPI protocols after they arrive on the computer using the extension that is embedded into Microsoft Office Outlook, clear the Additional: Microsoft Office Outlook extension check box.
The Mail Threat Protection extension is embedded in the Microsoft Office Outlook mail client during installation of Kaspersky Endpoint Security.
- If you want the Mail Threat Protection component to scan messages that are transmitted via the POP3, SMTP, NNTP and IMAP protocols before they arrive on your computer, select the POP3 / SMTP / NNTP / IMAP traffic check box.
- Click OK.
- To save changes, click the Save button.
Scanning compound files attached to email messages
To configure scanning of compound files attached to email messages:
- Open the application settings window.
- In the left part of the window, in the Essential Threat Protection section, select Mail Threat Protection.
The settings of the Mail Threat Protection component are displayed in the right part of the window.
- Click the Settings button.
The Mail Threat Protection window opens.
- Select the General tab.
- Perform the following in the Scan of compound files section:
- If you want the Mail Threat Protection component to skip archives that are attached to messages, clear the Scan attached archives check box.
- If you want the Mail Threat Protection component to skip Office format files that are attached to messages, clear the Scan attached Office formats check box.
- If you want the Mail Threat Protection to skip message attachments that are larger than N megabytes in size, select the Do not scan archives larger than N MB check box. If you select this check box, specify the maximum archive size in the field that is opposite the name of the check box.
- If you want the Mail Threat Protection component to scan message attachments that take more than N seconds to scan, clear the Do not scan archives for more than N sec check box.
- Click OK.
- To save changes, click the Save button.
Filtering email message attachments
The attachment filtering functionality is not applied to outgoing email messages.
Malicious programs can be distributed in the form of attachments in email messages. You can configure filtering based on the type of message attachments so that files of the specified types are automatically renamed or deleted. By renaming an attachment of a certain type, Kaspersky Endpoint Security can protect your computer against automatic execution of a malicious program.
To configure filtering of attachments:
- Open the application settings window.
- In the left part of the window, in the Essential Threat Protection section, select Mail Threat Protection.
The settings of the Mail Threat Protection component are displayed in the right part of the window.
- In the Security level section, click the Settings button.
The Mail Threat Protection window opens.
- In the Mail Threat Protection window, select the Attachment filter tab.
- Do one of the following:
- If you do not want the Mail Threat Protection component to filter message attachments, select the Disable filtering option.
- If you want the Mail Threat Protection component to rename message attachments of the specified types, select the Rename attachments of selected types option.
- If you want the Mail Threat Protection component to delete message attachments of the specified types, select the Delete attachments of selected types option.
- If you selected the Rename attachments of selected types option or the Delete attachments of selected types option during the previous step, select the check boxes opposite the relevant types of files.
You can change the list of file types by using the Add, Edit, and Remove buttons.
- Click OK.
- To save changes, click the Save button.
Scanning emails in Microsoft Office Outlook
During installation of Kaspersky Endpoint Security, the Mail Threat Protection extension is embedded into Microsoft Office Outlook (hereinafter also referred to as Outlook). It allows you to open the Mail Threat Protection component settings from within Outlook, and to specify when email messages are to be scanned for viruses and other threats. The Mail Threat Protection extension for Outlook can scan incoming and outgoing messages that are transmitted via the POP3, SMTP, NNTP, IMAP, and MAPI protocols.
The Mail Threat Protection extension supports operations with Outlook 2010, 2013, 2016.
The Mail Threat Protection component settings can be configured directly in Outlook if the Additional: Microsoft Office Outlook extension check box is selected in the interface of Kaspersky Endpoint Security.
In Outlook, incoming messages are first scanned by the Mail Threat Protection component (if the POP3 / SMTP / NNTP / IMAP traffic check box is selected in the interface of Kaspersky Endpoint Security) and then by the Mail Threat Protection extension for Outlook. If the Mail Threat Protection component detects a malicious object in a message, it notifies you about this event.
Outgoing messages are first scanned by the Mail Threat Protection extension for Outlook, and are then scanned by the Mail Threat Protection component.
Configuring mail scanning in Outlook
To configure mail scanning in Outlook 2007:
- Open the main window of Outlook 2007.
- Select Service → Settings from the menu bar.
The Options window opens.
- In the Options window, select the Email protection tab.
To configure mail scanning in Outlook 2010 / 2013 / 2016:
- Open the main Outlook window.
Select the File tab in the upper left corner.
- Click the Options button.
The Outlook Options window opens.
- Select the Add-Ins section.
Settings of plug-ins embedded into Outlook are displayed in the right part of the window.
- Click the Add-In Options button.
Configuring mail scan using Kaspersky Security Center
If mail is scanned using the Mail Threat Protection extension for Outlook, it is recommended to use Cached Exchange Mode. For more detailed information about the Exchange caching mode and recommendations on its use, please refer to the Microsoft Knowledge Base: https://technet.microsoft.com/en-us/library/cc179175.aspx
To configure the operating mode of the Mail Threat Protection extension for Outlook using Kaspersky Security Center:
- Open the Kaspersky Security Center Administration Console.
- In the Managed devices folder in the Administration Console tree, open the folder with the name of the administration group for which you want to configure mail scanning.
- In the workspace, select the Policies tab.
- Select the necessary policy.
- Open the Properties: <Policy name> window by using one of the following methods:
- In the context menu of the policy, select Properties.
- Click the Configure policy link located in the right part of the Administration Console workspace.
- In the Essential Threat Protection section, select Mail Threat Protection.
- In the Security level section, click the Settings button.
The Mail Threat Protection window opens.
- In the Connectivity section, click the Settings button.
The Email protection window opens.
- In the Email protection window:
- Select the Scan when receiving check box if you want the Mail Threat Protection extension for Outlook to scan incoming messages as they arrive to the mailbox.
- Select the Scan when reading check box if you want the Mail Threat Protection extension for Outlook to scan incoming messages when the user opens them.
- Select the Scan when sending check box if you want the Mail Threat Protection extension for Outlook to scan outgoing messages as they are sent.
- In the Email protection window, click OK.
- In the Mail Threat Protection window, click OK.
- Apply the policy.
For details on applying a Kaspersky Security Center policy, please refer to the Kaspersky Security Center Help Guide.
Network Threat Protection
This section contains information about Network Threat Protection and instructions on how to configure the component settings.
About Network Threat Protection
The Network Threat Protection component scans inbound network traffic for activity that is typical of network attacks. Upon detecting an attempted network attack that targets your computer, Kaspersky Endpoint Security blocks network activity from the attacking computer. Your screen then displays a warning stating that a network attack was attempted, and shows information about the attacking computer.
Network traffic from the attacking computer is blocked for one hour. You can edit the settings for blocking an attacking computer.
Descriptions of currently known types of network attacks and ways to fight them are provided in Kaspersky Endpoint Security databases. The list of network attacks that the Network Threat Protection component detects is updated during database and application module updates.
Page top
Enabling and disabling Network Threat Protection
By default, Network Threat Protection is enabled and running in the optimal mode. You can disable Network Threat Protection if necessary.
To enable or disable Network Threat Protection:
- Open the application settings window.
- In the left part of the window, in the Essential Threat Protection section, select Network Threat Protection.
The Network Threat Protection component settings are displayed in the right part of the window.
- Do the following:
- If you want to enable Network Threat Protection, select the Enable Network Threat Protection check box.
- If you want to disable Network Threat Protection, clear the Enable Network Threat Protection check box.
- To save changes, click the Save button.
Network Threat Protection settings
You can perform the following actions for configuring Network Threat Protection settings:
- Configure the settings used for blocking an attacking computer.
- Generate a list of addresses for exclusions from blocking.
Editing the settings used in blocking an attacking computer
To edit the settings for blocking an attacking computer:
- Open the application settings window.
- In the left part of the window, in the Essential Threat Protection section, select Network Threat Protection.
The Network Threat Protection component settings are displayed in the right part of the window.
- Select the Add the attacking computer to the list of blocked computers for check box.
If this check box is selected, on detecting a network attack attempt, the Network Threat Protection component blocks network activity from the attacking computer for the specified amount of time. This automatically protects the computer against possible future network attacks from the same address.
If this check box is cleared, on detecting a network attack attempt, the Network Threat Protection component does not enable automatic protection against possible future network attacks from the same address.
- Change the amount of time during which an attacking computer is blocked in the field next to the Add the attacking computer to the list of blocked computers for check box.
- To save changes, click the Save button.
Configuring addresses of exclusions from blocking
To configure addresses of exclusions from blocking:
- Open the application settings window.
- In the left part of the window, in the Essential Threat Protection section, select Network Threat Protection.
The Network Threat Protection component settings are displayed in the right part of the window.
- Click the Exclusions button.
The Exclusions window opens.
- Do one of the following:
- If you want to add a new IP address, click the Add button.
- If you want to edit a previously added IP address, select it in the list of addresses and click the Edit button.
The IP address window opens.
- Enter the IP address of the computer from which network attacks must not be blocked.
- In the IP address window, click OK.
- In the Exclusions window, click OK.
- To save changes, click the Save button.
Firewall
This section contains information about Firewall and instructions on how to configure the component settings.
About Firewall
During use on LANs and the Internet, a computer is exposed to viruses, other malware, and a variety of attacks that exploit vulnerabilities in operating systems and software.
The firewall protects personal data that is stored on the user's computer, blocking most possible threats to the operating system while the computer is connected to the Internet or a local area network. Firewall detects all network connections of the user's computer and provides a list of IP addresses, with an indication of the status of the default network connection.
The Firewall component filters all network activity according to network rules. Configuring network rules lets you specify the desired level of computer protection, from blocking Internet access for all applications to allowing unlimited access.
Page top
Enabling or disabling Firewall
By default, Firewall is enabled and functions in the optimal mode. If needed, you can disable Firewall.
To enable or disable Firewall:
- Open the application settings window.
- In the left part of the window, in the Essential Threat Protection section, select Firewall.
In the right part of the window, the settings of the Firewall component are displayed.
- Do one of the following:
- To enable Firewall, select the Enable Firewall check box.
- To disable Firewall, deselect the Enable Firewall check box.
- To save changes, click the Save button.
About network rules
Network rules are allowed or blocked actions that are performed by Firewall on detecting a network connection attempt.
Firewall provides protection against network attacks of different kinds at two levels: the network level and the program level. Protection at the network level is provided by applying network packet rules. Protection at the program level is provided by applying rules by which installed applications can access network resources.
Based on the two levels of Firewall protection, you can create:
- Network packet rules. Network packet rules impose restrictions on network packets, regardless of the program. Such rules restrict inbound and outbound network traffic through specific ports of the selected data protocol. Firewall specifies certain network packet rules by default.
- Application network rules. Application network rules impose restrictions on the network activity of a specific application. They factor in not only the characteristics of the network packet, but also the specific application to which this network packet is addressed or which issued this network packet. Such rules make it possible to fine-tune network activity filtering: for example, when a certain type of network connection is blocked for some applications but is allowed for others.
Network packet rules have a higher priority than network rules for applications. If both network packet rules and network rules for applications are specified for the same type of network activity, the network activity is handled according to the network packet rules.
You can specify an execution priority for each network packet rule and each network rule for applications.
Network packet rules have a higher priority than network rules for applications. If both network packet rules and network rules for applications are specified for the same type of network activity, the network activity is handled according to the network packet rules.
Network rules for applications work as follows: a network rule for applications includes access rules based on the network status: public, local, or trusted. For example, applications in the High Restricted trust group are not allowed any network activity in networks of all statuses by default. If a network rule is specified for an individual application (parent application), then the child processes of other applications will run according to the network rule of the parent application. If there is no network rule for the application, the child processes will run according to network access rule of the application’s trust group.
For example, you have prohibited any network activity in networks of all statuses for all applications, except browser X. If you start browser Y installation (child process) from browser X (parent application), then browser Y installer will access the network and download the necessary files. After installation, browser Y will be denied any network connections according to the Firewall settings. To prohibit network activity of browser Y installer as a child process, you must add a network rule for the installer of browser Y.
Page top
About the network connection status
Firewall controls all network connections on the user's computer and automatically assigns a status to each detected network connection.
The network connection can have one of the following status types:
- Public network. This status is for networks that are not protected by any anti-virus applications, firewalls, or filters (for example, for Internet cafe networks). When the user operates a computer that is connected to such a network, Firewall blocks access to files and printers of this computer. External users are also unable to access data through shared folders and remote access to the desktop of this computer. Firewall filters the network activity of each application according to the network rules that are set for it.
Firewall assigns Public network status to the Internet by default. You cannot change the status of the Internet.
- Local network. This status is assigned to networks whose users are trusted to access files and printers on this computer (for example, a LAN or home network).
- Trusted network. This status is intended for a safe network in which the computer is not exposed to attacks or unauthorized data access attempts. Firewall permits any network activity within networks with this status.
Changing the network connection status
To change the network connection status:
- Open the application settings window.
- In the left part of the window, in the Essential Threat Protection section, select Firewall.
In the right part of the window, the settings of the Firewall component are displayed.
- Click the Available networks button.
The Firewall window opens.
- Select the network connection whose status you want to change.
- In the context menu, select the network connection status:
- Public network.
- Local network.
- Trusted network.
- In the Firewall window, click OK.
- To save changes, click the Save button.
Managing network packet rules
You can perform the following actions while managing network packet rules:
- Create a new network packet rule.
You can create a new network packet rule by creating a set of conditions and actions that is applied to network packets and data streams.
- Enable or disable a network packet rule.
All network packet rules that are created by Firewall by default have Enabled status. When a network packet rule is enabled, Firewall applies this rule.
You can disable any network packet rule that is selected in the list of network packet rules. When a network packet rule is disabled, Firewall temporarily does not apply this rule.
A new custom network packet rule is added to the list of network packet rules by default with Enabled status.
- Edit the settings of an existing network packet rule.
After you create a new network packet rule, you can always return to editing its settings and modify them as needed.
- Change the Firewall action for a network packet rule.
In the list of network packet rules, you can edit the action that is taken by Firewall on detecting network activity that matches a specific network packet rule.
- Change the priority of a network packet rule.
You can raise or lower the priority of a network packet rule that is selected in the list.
- Remove a network packet rule.
You can remove a network packet rule to stop Firewall from applying this rule on detecting network activity and to stop this rule from showing in the list of network packet rules with Disabled status.
Creating and editing a network packet rule
When creating network packet rules, remember that they have priority over network rules for applications.
To create or edit a network packet rule:
- Open the application settings window.
- In the left part of the window, in the Essential Threat Protection section, select Firewall.
- Click the Network packet rules button.
- The Firewall window opens to the Network packet rules tab.
This tab shows a list of default network packet rules that are set by Firewall.
- Do one of the following:
- To create a new network packet rule, click the Add button.
- To edit a network packet rule, select it in the list of network packet rules and click the Edit button.
The Network rule window opens.
- In the Action drop-down list, select the action to be performed by Firewall on detecting this kind of network activity:
- Allow
- Block
- By application rules.
- In the Name field, specify the name of the network service in one of the following ways:
- Click the
 icon to the right of the Name field and select the name of the network service in the drop-down list.
The drop-down list includes network services that define the most frequently used network connections.
- Manually enter the name of the network service in the Name field.
- Click the
- Specify the data transfer protocol:
- Select the Protocol check box.
- In the drop-down list, select the type of protocol for which network activity is to be monitored.
Firewall monitors network connections that use the TCP, UDP, ICMP, ICMPv6, IGMP, and GRE protocols.
If you select a network service from the Name drop-down list, the Protocol check box is selected automatically and the drop-down list next to the check box contains the protocol type that corresponds to the selected network service. By default, the Protocol check box is cleared.
- In the Direction drop-down list, select the direction of the monitored network activity.
Firewall monitors network connections with the following directions:
- Inbound (packet).
- Inbound.
- Inbound / Outbound
- Outbound (packet).
- Outbound.
- If ICMP or ICMPv6 is selected as the protocol, you can specify the ICMP packet type and code:
- Select the ICMP type check box and select the ICMP packet type in the drop-down list.
- Select the ICMP code check box and select the ICMP packet code in the drop-down list.
- If TCP or UDP is selected as the protocol type, you can specify the comma-delimited port numbers of the local and remote computers between which the connection is to be monitored:
- Type the ports of the remote computer in the Remote ports field.
- Type the ports of the local computer in the Local ports field.
- In the Network adapters table, specify the settings of network adapters from which network packets can be sent or which can receive network packets. To do so, use the Add, Edit, and Delete buttons.
- If you want to restrict control of network packets based on their time to live (TTL), select the TTL check box and in the field next to it, specify the range of values of the time to live for inbound and/or outbound network packets.
A network rule will control the transmission of network packets whose time to live does not exceed the specified value.
Otherwise, clear the TTL check box.
- Specify the network addresses of remote computers that can send and/or receive network packets. To do so, select one of the following values in the Remote addresses drop-down list:
- Any address. The network rule controls network packets sent and/or received by remote computers with any IP address.
- Subnet addresses. The network rule controls network packets sent and/or received by remote computers with IP addresses associated with the selected network type: Trusted networks, Local networks, or Public networks.
- Addresses from the list. The network rule controls network packets sent and/or received by remote computers with IP addresses that can be specified in the list below using the Add, Edit, and Delete buttons.
- Specify the network addresses of computers that have Kaspersky Endpoint Security installed and can send and/or receive network packets. To do so, select one of the following values in the Local addresses drop-down list:
- Any address. The network rule controls network packets sent and/or received by computers with Kaspersky Endpoint Security installed and with any IP address.
- Addresses from the list. The network rule controls network packets sent and/or received by computers with Kaspersky Endpoint Security installed and with IP addresses that can be specified in the list below using the Add, Edit, and Delete buttons.
Sometimes a local address cannot be obtained for applications that work with network packets. If this is the case, the value of the Local addresses setting is ignored.
- If you want the actions of the network rule to be reflected in the report, select the Log events check box.
- In the Network rule window, click OK.
If you create a new network rule, the rule is displayed on the Network packet rules tab of the Firewall window. By default, the new network rule is placed at the end of the list of network packet rules.
- In the Firewall window, click OK.
- To save changes, click the Save button.
Enabling or disabling a network packet rule
To enable or disable a network packet rule:
- Open the application settings window.
- In the left part of the window, in the Essential Threat Protection section, select Firewall.
In the right part of the window, the settings of the Firewall component are displayed.
- Click the Network packet rules button.
The Firewall window opens to the Network packet rules tab.
- Select the necessary network packet rule in the list.
- Do one of the following:
- To enable the rule, select the check box next to the name of the network packet rule.
- To disable the rule, clear the check box next to the name of the network packet rule.
- Click OK.
- To save changes, click the Save button.
Changing the Firewall action for a network packet rule
To change the Firewall action that is applied to a network packet rule:
- Open the application settings window.
- In the left part of the window, in the Essential Threat Protection section, select Firewall.
In the right part of the window, the settings of the Firewall component are displayed.
- Click the Network packet rules button.
The Firewall window opens to the Network packet rules tab.
- In the list, select the network packet rule whose action you want to change.
- In the Permission column, right-click to bring up the context menu and select the action that you want to assign:
- Allow
- Block
- According to the application rule
- Log events
- In the Firewall window, click OK.
- To save changes, click the Save button.
Changing the priority of a network packet rule
The priority of a network packet rule is determined by its position in the list of network packet rules. The topmost network packet rule in the list of network packet rules has the highest priority.
Every manually created network packet rule is added to the end of the list of network packet rules and is of the lowest priority.
Firewall executes rules in the order in which they appear in the list of network packet rules, from top to bottom. According to each processed network packet rule that applies to a particular network connection, Firewall either allows or blocks network access to the address and port that are specified in the settings of this network connection.
To change the network packet rule priority:
- Open the application settings window.
- In the left part of the window, in the Essential Threat Protection section, select Firewall.
In the right part of the window, the settings of the Firewall component are displayed.
- Click the Network packet rules button.
The Firewall window opens to the Network packet rules tab.
- In the list, select the network packet rule whose priority you want to change.
- Use the Move up and Move down buttons to move the network packet rule to the desired spot in the list of network packet rules.
- Click OK.
- To save changes, click the Save button.
Managing application network rules
By default, Kaspersky Endpoint Security groups all applications that are installed on the computer by the name of the vendor of the software whose file or network activity it monitors. Application groups are in turn categorized into trust groups. All applications and application groups inherit properties from their parent group: application control rules, application network rules, and their execution priority.
Like the Host Intrusion Prevention component, by default the Firewall component applies the network rules for an application group when filtering the network activity of all applications within the group. The application group network rules define the rights of applications within the group to access different network connections.
By default, Firewall creates a set of network rules for each application group that is detected by Kaspersky Endpoint Security on the computer. You can change the Firewall action that is applied to the application group network rules that are created by default. You cannot edit, remove, disable, or change the priority of application group network rules that are created by default.
You can also create a network rule for an individual application. Such a rule will have a higher priority than the network rule of the group to which the application belongs.
You can perform the following actions while managing network rules of applications:
- Create a new network rule.
You can create a new network rule by which the Firewall must regulate the network activity of the application or applications that belong to the selected group of applications.
- Enable or disable a network rule.
All network rules are added to the list of network rules of applications with Enabled status. If a network rule is enabled, Firewall applies this rule.
You can disable a network rule that was manually created. If a network rule is disabled, Firewall temporarily does not apply this rule.
- Change the settings of a network rule.
After you create a new network rule, you can always return to its settings and modify them as needed.
- Change the Firewall action for a network rule.
In the list of network rules, you can edit the action that the Firewall applies for the network rule upon detecting network activity in this application or application group.
- Change the priority of a network rule.
You can raise or lower the priority of a custom network rule.
- Delete a network rule.
You can delete a custom network rule to stop the Firewall from applying this network rule to the selected application or application group upon detecting network activity, and to stop this rule from being displayed in the list of application network rules.
Creating and editing an application network rule
To create or edit a network rule for an application group:
- Open the application settings window.
- In the left part of the window, in the Essential Threat Protection section, select Firewall.
- Click the Application rules button.
The Firewall window opens to the Application network rules tab.
- In the list of applications, select the application or group of applications for which you want to create or edit a network rule.
- Right-click to bring up the context menu and select Application rules or Group rules depending on what you need to do.
This opens the Application control rules or Application group control rules window.
- Select the Network rules tab in the Application control rules or Application group control rules window.
- Do one of the following:
- To create a new network rule, click the Add button.
- To edit a network rule, select it in the list of network rules and click the Edit button.
The Network rule window opens.
- In the Action drop-down list, select the action to be performed by Firewall on detecting this kind of network activity:
- Allow
- Block
- In the Name field, specify the name of the in one of the following ways:
- Click the icon to the right of the Name field and select the name of the network service in the drop-down list.
The drop-down list includes network services that define the most frequently used network connections.
- Manually enter the name of the network service in the Name field.
- Click the
- Specify the data transfer protocol:
- Select the Protocol check box.
- In the drop-down list, select the type of protocol on which to monitor network activity.
Firewall monitors network connections that use the TCP, UDP, ICMP, ICMPv6, IGMP, and GRE protocols. If you select a network service from the Name drop-down list, the Protocol check box is selected automatically and the drop-down list next to the check box contains the protocol type that corresponds to the selected network service. By default, the Protocol check box is cleared.
- In the Direction drop-down list, select the direction of the monitored network activity.
Firewall monitors network connections with the following directions:
- Inbound.
- Inbound / Outbound.
- Outbound.
- If ICMP or ICMPv6 is selected as the protocol, you can specify the ICMP packet type and code:
- Select the ICMP type check box and select the ICMP packet type in the drop-down list.
- Select the ICMP code check box and select the ICMP packet code in the drop-down list.
- If TCP or UDP is selected as the protocol type, you can specify the comma-delimited port numbers of the local and remote computers between which the connection is to be monitored:
- Type the ports of the remote computer in the Remote ports field.
- Type the ports of the local computer in the Local ports field.
- Specify the network addresses of remote computers that can send and/or receive network packets. To do so, select one of the following values in the Remote addresses drop-down list:
- Any address. The network rule controls network packets sent and/or received by remote computers with any IP address.
- Subnet addresses. The network rule controls network packets sent and/or received by remote computers with IP addresses associated with the selected network type: Trusted networks, Local networks, or Public networks.
- Addresses from the list. The network rule controls network packets sent and/or received by remote computers with IP addresses that can be specified in the list below using the Add, Edit, and Delete buttons.
- Specify the network addresses of computers that have Kaspersky Endpoint Security installed and can send and/or receive network packets. To do so, select one of the following values in the Local addresses drop-down list:
- Any address. The network rule controls network packets sent and/or received by computers with Kaspersky Endpoint Security installed and with any IP address.
- Addresses from the list. The network rule controls network packets sent and/or received by computers with Kaspersky Endpoint Security installed and with IP addresses that can be specified in the list below using the Add, Edit, and Delete buttons.
Sometimes a local address cannot be obtained for applications that work with network packets. If this is the case, the value of the Local addresses setting is ignored.
- If you want the actions of the network rule to be reflected in the report, select the Log events check box.
- In the Network rule window, click OK.
If you created a new network rule, the rule is displayed on the Network rules tab.
- Click OK in the Application group control rules window if the rule is intended for a group of applications, or in the Application control rules window if the rule is intended for an application.
- In the Firewall window, click OK.
- To save changes, click the Save button.
Enabling and disabling an application network rule
To enable or disable an application network rule:
- Open the application settings window.
- In the left part of the window, in the Essential Threat Protection section, select Firewall.
In the right part of the window, the settings of the Firewall component are displayed.
- Click the Application rules button.
The Firewall window opens to the Application network rules tab.
- In the list, select the application or group of applications for which you want to enable or disable a network rule.
- Right-click to bring up the context menu and select Application rules or Group rules depending on what you need to do.
This opens the Application control rules or Application group control rules window.
- In the window that opens, select the Network rules tab.
- In the list of network rules for an application group, select the relevant network rule.
- Do one of the following:
- If you want to enable the rule, select the check box next to the name of the network rule.
- If you want to disable the rule, clear the check box next to the name of the network rule.
You cannot disable an application group network rule that is created by Firewall by default.
- Click OK in the Application group control rules window if the rule is intended for a group of applications, or in the Application control rules window if the rule is intended for an application.
- In the Firewall window, click OK.
- To save changes, click the Save button.
Changing the Firewall action for an application network rule
You can change the Firewall action that is applied to all network rules for an application or application group that were created by default, and change the Firewall action for a single custom network rule for an application or application group.
To change the Firewall action for all network rules for an application or group of applications:
- Open the application settings window.
- In the left part of the window, in the Essential Threat Protection section, select Firewall.
In the right part of the window, the settings of the Firewall component are displayed.
- Click the Application rules button.
The Firewall window opens to the Application network rules tab.
- If you want to change the Firewall action that is applied to all network rules that are created by default, select an application or group of applications in the list. Manually created network rules are left unchanged.
- In the Network column, click to display the context menu and select the action that you want to assign:
- Inherit
- Allow
- Block
- Click OK.
- To save changes, click the Save button.
To change the Firewall response for one network rule for an application or application group:
- Open the application settings window.
- In the left part of the window, in the Essential Threat Protection section, select the Firewall section.
In the right part of the window, the settings of the Firewall component are displayed.
- Click the Application rules button.
The Firewall window opens to the Application network rules tab.
- In the list, select the application or group of applications for which you want to change the action for one network rule.
- Right-click to bring up the context menu and select Application rules or Group rules depending on what you need to do.
This opens the Application control rules or Application group control rules window.
- In the window that opens, select the Network rules tab.
- Select the network rule for which you want to change the Firewall action.
- In the Permission column, right-click to bring up the context menu and select the action that you want to assign:
- Allow
- Block
- Log events
- Click OK in the Application group control rules window if the rule is intended for a group of applications, or in the Application control rules window if the rule is intended for an application.
- In the Firewall window, click OK.
- To save changes, click the Save button.
Changing the priority of an application network rule
The priority of a network rule is determined by its position in the list of network rules. Firewall executes the rules in the order in which they appear in the list of network rules, from top to bottom. According to each processed network rule that applies to a particular network connection, Firewall either allows or blocks network access to the address and port that are indicated in the settings of this network connection.
Manually created network rules have a higher priority than default network rules.
You cannot change the priority of application group network rules that are created by default.
To change the priority of a network rule:
- Open the application settings window.
- In the left part of the window, in the Essential Threat Protection section, select Firewall.
In the right part of the window, the settings of the Firewall component are displayed.
- Click the Application rules button.
The Firewall window opens to the Application network rules tab.
- In the list of applications, select the application or group of applications for which you want to change the priority of a network rule.
- Right-click to bring up the context menu and select Application rules or Group rules depending on what you need to do.
This opens the Application control rules or Application group control rules window.
- In the window that opens, select the Network rules tab.
- Select the network rule whose priority you want to change.
- Use the Move up and Move down buttons to move the network rule to the desired spot in the list of network rules.
- Click OK in the Application group control rules window if the rule is intended for a group of applications, or in the Application control rules window if the rule is intended for an application.
- In the Firewall window, click OK.
- To save changes, click the Save button.
Network Monitor
This section contains information about Network Monitor and instructions on how to start Network Monitor.
About Network Monitor
Network Monitor is a tool designed for viewing information about network activity of a user's computer in real time.
Page top
Starting Network Monitor
To start Network Monitor:
- Open the main application window.
- Click the Protection components section.
The Protection components window opens.
- Click the Network Monitor link in the lower part of the window.
The Network Monitor window opens. In this window, information about the network activity of the computer is shown on four tabs:
- The Network activity tab shows all currently active network connections with the computer. Both outbound and inbound network connections are displayed.
- The Open ports tab lists all open network ports of the computer.
- The Network traffic tab shows the volume of inbound and outbound network traffic between the user's computer and other computers in the network to which the user is currently connected.
- The Blocked computers tab lists the IP addresses of remote computers whose network activity has been blocked by the Network Threat Protection component after detecting network attack attempts from such IP addresses.
BadUSB Attack Prevention
This section contains information about the BadUSB Attack Prevention component.
About BadUSB Attack Prevention
Some viruses modify the firmware of USB devices to trick the operating system into detecting the USB device as a keyboard.
The BadUSB Attack Prevention component prevents infected USB devices emulating a keyboard from connecting to the computer.
When a USB device is connected to the computer and identified by the application as a keyboard, the application prompts the user to enter a numerical code generated by the application from this keyboard, or using On-Screen Keyboard (if it is available). This procedure is known as keyboard authorization. The application allows use of an authorized keyboard and blocks a keyboard that has not been authorized.
BadUSB Attack Prevention runs in background mode as soon as this component is installed. If a Kaspersky Security Center policy is not applied to a computer on which Kaspersky Endpoint Security is installed, you can enable or disable BadUSB Attack Prevention by temporarily pausing and resuming computer protection and control.
Page top
Installing the BadUSB Attack Prevention component
If you selected basic or standard installation during installation of Kaspersky Endpoint Security, the BadUSB Attack Prevention component will not be available. To install it, you must change the set of application components.
To install the BadUSB Attack Prevention component:
- Open the Control Panel window in one of the following ways:
- If you are using Windows 7, select Control Panel in the Start menu.
- If you are using Windows 8 or Windows 8.1, press the Win+I key combination and select Control Panel.
- If you are using Windows 10, press the Win+X key combination and select Control Panel.
- In the Control Panel window, select Apps and Features.
- In the list of installed applications, select Kaspersky Endpoint Security for Windows.
- Click the Modify/Uninstall button.
- In the Modify, Repair, or Remove application window of the Application Setup Wizard, click the Modify button.
This opens the Custom installation window of the Application Setup Wizard.
- In the Essential Threat Protection component group in the context menu of the icon next to the name of the BadUSB Attack Prevention component, select the Feature will be installed on the local hard drive option.
- Click the Next button.
- Follow the instructions of the Setup Wizard.
Enabling and disabling BadUSB Attack Prevention
To enable or disable BadUSB Attack Prevention:
- Open the application settings window.
- In the left part of the window, in the Essential Threat Protection section, select the BadUSB Attack Prevention subsection.
The BadUSB Attack Prevention settings are displayed in the right part of the window.
- Do one of the following:
- To enable BadUSB Attack Prevention, select the Enable BadUSB Attack Prevention check box.
- To disable BadUSB Attack Prevention, deselect the Enable BadUSB Attack Prevention check box.
- To save changes, click the Save button.
Allowing and prohibiting the use of On-Screen Keyboard for authorization
On-Screen Keyboard should be used only for authorization of USB devices that do not support the input of random characters (e.g. bar code scanners). It is not recommended to use On-Screen Keyboard for authorization of unknown USB devices.
To allow or prohibit the use of On-Screen Keyboard for authorization:
- Open the application settings window.
- In the left part of the window, in the Essential Threat Protection section, select the BadUSB Attack Prevention subsection.
The component settings are displayed in the right part of the window.
- Do one of the following:
- Select the Prohibit use of On-Screen Keyboard for authorization of USB devices check box if you want to block the use of the On-Screen Keyboard for authorization.
- Clear the Prohibit use of On-Screen Keyboard for authorization of USB devices check box if you want to allow the use of the On-Screen Keyboard for authorization.
- To save changes, click the Save button.
Keyboard authorization
USB devices identified by the operating system as keyboards and connected to the computer before installation of the BadUSB Attack Prevention component are considered authorized after installation of the component.
The application requires authorization of the connected USB device that has been identified by the operating system as a keyboard only if the prompt for USB keyboard authorization is enabled. The user cannot use an unauthorized keyboard until it is authorized.
If the prompt for USB keyboard authorization is disabled, the user can use all connected keyboards. Immediately after the prompt for USB keyboard authorization is enabled, the application shows a prompt for authorization of each unauthorized keyboard that is connected.
To authorize a keyboard:
- With USB keyboard authorization enabled, connect the keyboard to a USB port.
The <Keyboard name> keyboard authorization window opens with the details of the connected keyboard and a numerical code for its authorization.
- Enter the randomly generated numerical code in the authorization window from the connected keyboard or On-Screen Keyboard (if available).
- Click OK.
If the code has been entered correctly, the application saves the identification parameters – VID/PID of the keyboard and the number of the port to which it has been connected – in the list of authorized keyboards. Authorization does not need to be repeated when the keyboard is reconnected or after the operating system is restarted.
When the authorized keyboard is connected to a different USB port of the computer, the application shows a prompt for authorization of this keyboard again.
If the numerical code has been entered incorrectly, the application generates a new code. Three attempts are available for entering the numerical code. If the numerical code is entered incorrectly three times in a row or the <Keyboard name> keyboard authorization window is closed, the application blocks input from this keyboard. When the keyboard is reconnected or the operating system is restarted, the application prompts the user to perform keyboard authorization again.
Application Control
This section contains information about Application Control and instructions on how to configure the component settings.
About Application Control
The Application Control component monitors user attempts to start applications and regulates the startup of applications by using Application Control rules.
Startup of applications whose settings do not match any of the Application Control rules is regulated by the selected operating mode of the component. Black List mode is selected by default. This mode allows any user to start any application.
All user attempts to start applications are logged in reports.
By default, Application Control operates in Black List mode. This component allows all users to start all applications. When a user attempts to start an application that is blocked by Application Control rules, Kaspersky Endpoint Security blocks this application from starting (if the Block action is selected) or saves information about the application startup in a report (if the Notify action is selected).
Page top
Enabling and disabling Application Control
Although Application Control is disabled by default, you can enable Application Control if necessary.
To enable or disable Application Control:
- Open the application settings window.
- In the left part of the window, in the Security Controls section, select the Application Control subsection.
In the right part of the window, the settings of the Application Control component are displayed.
- Do one of the following:
- If you want to enable Application Control, select the Enable Application Control check box.
- If you want to disable Application Control, clear the Enable Application Control check box.
- To save changes, click the Save button.
Application Control functionality limitations
Operation of the Application Control component is limited in the following cases:
- When the application version is upgraded, importing Application Control component settings is not supported.
- When the application version is upgraded, the import of Application Control settings is supported only if Kaspersky Endpoint Security 10 Service Pack 2 for Windows is upgraded to Kaspersky Endpoint Security 11 for Windows.
When application versions other than Kaspersky Endpoint Security 10 Service Pack 2 for Windows are upgraded, the Application Control settings have to be configured anew in order to restore this component to operational state.
- If there is no connection with KSN servers, Kaspersky Endpoint Security receives information about the reputation of applications and their modules only from local databases.
The list of applications assigned by Kaspersky Endpoint Security to the KL category Applications trusted according to reputation in KSN when a connection to KSN servers is available may differ from the list of applications assigned by Kaspersky Endpoint Security to the KL category Applications trusted according to reputation in KSN when there is no connection to KSN.
- At the Kaspersky Security Center database, information on 150,000 processed files may be stored. Once this number of records has been achieved, new files will not be processed. To resume inventory operations, you must delete the files that were previously inventoried in the Kaspersky Security Center database from the computer on which Kaspersky Endpoint Security is installed.
- The component does not control the startup of scripts unless the script is sent to the interpreter via the command line.
If the startup of an interpreter is allowed by Application Control rules, the component will not block a script started from this interpreter.
- The component does not control the startup of scripts from interpreters that are not supported by Kaspersky Endpoint Security.
Kaspersky Endpoint Security supports the following interpreters:
- Java
- PowerShell
The following types of interpreters are supported:
- %ComSpec%;
- %SystemRoot%\\system32\\regedit.exe;
- %SystemRoot%\\regedit.exe;
- %SystemRoot%\\system32\\regedt32.exe;
- %SystemRoot%\\system32\\cscript.exe;
- %SystemRoot%\\system32\\wscript.exe;
- %SystemRoot%\\system32\\msiexec.exe;
- %SystemRoot%\\system32\\mshta.exe;
- %SystemRoot%\\system32\\rundll32.exe;
- %SystemRoot%\\system32\\wwahost.exe;
- %SystemRoot%\\syswow64\\cmd.exe;
- %SystemRoot%\\syswow64\\regedit.exe;
- %SystemRoot%\\syswow64\\regedt32.exe;
- %SystemRoot%\\syswow64\\cscript.exe;
- %SystemRoot%\\syswow64\\wscript.exe;
- %SystemRoot%\\syswow64\\msiexec.exe;
- %SystemRoot%\\syswow64\\mshta.exe;
- %SystemRoot%\\syswow64\\rundll32.exe;
- %SystemRoot%\\syswow64\\wwahost.exe.
About Application Control rules
Kaspersky Endpoint Security controls the startup of applications by users by means of rules. An Application Control rule specifies the triggering conditions and the action performed by the Application Control component when the rule is triggered (allowing or blocking application startup by users).
Rule-triggering conditions
A condition for triggering the rule has the following correspondence: "condition type - condition criterion - condition value" (see the figure below). Based on the rule-triggering conditions, Kaspersky Endpoint Security applies (or does not apply) a rule to an application.
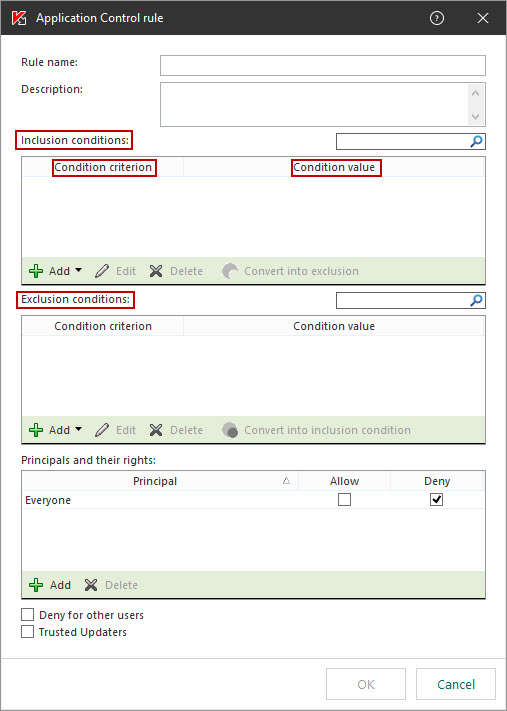
Application Control rule. Rule-triggering condition parameters
Rules use inclusion and exclusion conditions:
- Inclusion conditions. Kaspersky Endpoint Security applies the rule to the application if the application matches at least one of the inclusion conditions.
- Exclusion conditions. Kaspersky Endpoint Security does not apply the rule to the application if the application matches at least one of the exclusion conditions and does not match any of the inclusion conditions.
Rule-triggering conditions are created using criteria. The following criteria are used to create rules in Kaspersky Endpoint Security:
- Path to the folder containing the executable file of the application or path to the executable file of the application.
- Metadata: application executable file name, application executable file version, application name, application version, application vendor.
- Hash of the executable file of the application.
- Certificate: issuer, subject, thumbprint.
- Inclusion of the application in a KL category.
- Location of the application executable file on a removable drive.
The criterion value must be specified for each criterion used in the condition. If the parameters of the application being started match the values of criteria specified in the inclusion condition, the rule is triggered. In this case, Application Control performs the action prescribed in the rule. If application parameters match the values of criteria specified in the exclusion condition, Application Control does not control startup of the application.
Decisions made by the Application Control component when a rule is triggered
When a rule is triggered, Application Control allows users (or user groups) to start applications or blocks startup according to the rule. You can select individual users or groups of users that are allowed or not allowed to start applications that trigger a rule.
If a rule does not specify those users allowed to start applications satisfying the rule, this rule is called a block rule.
If a rule that does not specify any users who are not allowed to start applications that match the rule, this rule is called an allow rule.
The priority of a block rule is higher than the priority of an allow rule. For example, if an Application Control allow rule has been assigned for a user group while an Application Control block rule has been assigned for one user in this user group, this user will be blocked from starting the application.
Operating status of a rule
Application Control rules can have one of the following operating statuses:
- On. This status means that the rule is used when Application Control is in operation.
- Off. This status means that the rule is ignored when Application Control is in operation.
- Test. This status signifies that Kaspersky Endpoint Security allows the startup of applications to which the rules apply but logs information about the startup of such applications in the report.
Managing Application Control rules
You can perform the following actions for Application Control rules:
- Add a new rule
- Create or change the conditions for the triggering of a rule
- Edit rule status
An Application Control rule can be enabled, disabled, or switched to test mode. An Application Control rule is enabled by default after it is created.
- Delete rule
Adding and editing an Application Control rule
To add or edit an Application Control rule:
- Open the application settings window.
- In the left part of the window, in the Security Controls section, select the Application Control subsection.
In the right part of the window, the settings of the Application Control component are displayed.
- Select the Enable Application Control check box to make the component settings available for editing.
- Do one of the following:
- To add a rule, click the Add button.
- If you want to edit an existing rule, select it in the list of rules and click the Edit button.
The Application Control rule window opens.
- Specify or edit the settings of the rule:
- In the Rule name field, enter or edit the name of the rule.
- In the Inclusion conditions table, create or edit the list of inclusion conditions that trigger a rule by clicking the Add, Edit, Delete, and Convert into exclusion buttons.
- In the Exclusion conditions table, create or edit the list of exclusion conditions that trigger a rule by clicking the Add, Edit, Delete, and Convert into inclusion condition buttons.
- If required, change the type of rule-triggering condition:
- To change the condition type from an inclusion condition to an exclusion condition, select a condition in the Inclusion conditions table and click the Convert into exclusion button.
- To change the condition type from an exclusion condition to an inclusion condition, select a condition in the Exclusion conditions table and click the Convert into inclusion condition button.
- Compile or edit a list of users and/or groups of users who are allowed or not allowed to start applications that meet the rule trigger conditions. To do this, click the Add button in the Principals and their rights table.
The Select Users or Groups window in Microsoft Windows opens. This window lets you select users and / or user groups.
By default, the Everyone value is added to the list of users. The rule applies to all users.
If there is no user specified in the table, the rule cannot be saved.
- In the Principals and their rights table, select the Allow or Block check boxes opposite the users and/or groups of users to determine their right to start applications.
The check box that is selected by default depends on the Application Control operating mode.
- Select the Deny for other users check box if you want all users that do not appear in the Principal column and that are not part of the group of users specified in the Principal column to be blocked from starting applications that match the rule trigger conditions.
If the Deny for other users check box is cleared, Kaspersky Endpoint Security does not control the startup of applications by users that are not specified in the Principals and their rights table and that do not belong to the groups of users specified in the Principals and their rights table.
- If you want Kaspersky Endpoint Security to consider applications matching the rule trigger conditions as trusted updaters allowed to create other executable files that will be allowed to run subsequently, select the Trusted Updaters check box.
- Click OK.
- To save changes, click the Save button.
Adding a trigger condition for an Application Control rule
To add a new trigger condition for an Application Control rule:
- Open the application settings window.
- In the left part of the window, in the Security Controls section, select the Application Control subsection.
In the right part of the window, the settings of the Application Control component are displayed.
- Select the Enable Application Control check box to make the component settings available for editing.
- Do one of the following:
- If you want to create a new rule and add a trigger condition to it, click the Add button.
- If you want to add a trigger condition to an existing rule, select the rule in the list of rules and click the Edit button.
The Application Control rule window opens.
- In the Inclusion conditions or Exclusion conditions table, click the Add button.
You can use the drop-down list under the Add button to add various trigger conditions to the rule (please refer to the instructions below).
To add a rule trigger condition based on the properties of files in the specified folder:
- In the drop-down list under the Add button, select Condition(s) from properties of files in the specified folder.
The standard Select folder window of Microsoft Windows opens.
- In the Select folder window, select a folder that contains the executable files of applications whose properties you want to use as the basis for one or several conditions for triggering a rule.
- Click OK.
The Add condition window opens.
- In the Show criterion drop-down list, select the criterion based on which you want to create one or several rule trigger conditions: File hash code, Certificate, KL category, Metadata or Folder path.
Kaspersky Endpoint Security does not support an MD5 file hash code and does not control startup of applications based on an MD5 hash. An SHA256 hash is used as a rule trigger condition.
- If you selected Metadata in the Show criterion drop-down list, select the check boxes opposite the executable file properties that you want to use in the rule trigger condition: File name, File version, Application name, Application version, and Vendor.
If none of the specified properties are selected, the rule cannot be saved.
- If you selected in the Show criterion drop-down list, select the check boxes opposite the settings that you want to use in the rule trigger condition: , , and .
If none of the specified settings are selected, the rule cannot be saved.
It is not recommended to use only the Issuer and Principal criteria as rule trigger conditions. Use of these criteria is unreliable.
- Select the check boxes opposite the names of application executable files whose properties you want to include in the rule trigger conditions.
- Click the Next button.
A list of formulated rule trigger conditions appears.
- In the list of formulated rule trigger conditions, select the check boxes opposite the rule trigger conditions that you want to add to the Application Control rule.
- Click the Terminate button.
To add a rule trigger condition based on the properties of applications that started on the computer:
- In the drop-down list under the Add button, select Condition(s) from properties of started applications.
- In the Add condition window, in the Show criterion drop-down list, select the criterion based on which you want to create one or several rule trigger conditions: File hash code, Certificate, KL category, Metadata or Folder path.
Kaspersky Endpoint Security does not support an MD5 file hash code and does not control startup of applications based on an MD5 hash. An SHA256 hash is used as a rule trigger condition.
- If you selected Metadata in the Show criterion drop-down list, select the check boxes opposite the executable file properties that you want to use in the rule trigger condition: File name, File version, Application name, Application version, and Vendor.
If none of the specified properties are selected, the rule cannot be saved.
- If you selected Certificate in the Show criterion drop-down list, select the check boxes opposite the settings that you want to use in the rule trigger condition: Issuer, Principal, and Thumbprint.
If none of the specified settings are selected, the rule cannot be saved.
It is not recommended to use only the Issuer and Principal criteria as rule trigger conditions. Use of these criteria is unreliable.
- Select the check boxes opposite the names of application executable files whose properties you want to include in the rule trigger conditions.
- Click the Next button.
A list of formulated rule trigger conditions appears.
- In the list of formulated rule trigger conditions, select the check boxes opposite the rule trigger conditions that you want to add to the Application Control rule.
- Click the Terminate button.
To add a rule trigger condition based on a KL category:
- In the drop-down list under the Add button, select Condition(s) "KL category".
A KL category is a list of applications that have shared theme attributes. The list is maintained by Kaspersky experts. For example, the KL category of "Office applications" includes applications from the Microsoft Office suite, Adobe Acrobat, and others.
- In the Condition(s) "KL category" window, select the check boxes opposite the names of those KL categories based on which you want to create rule trigger conditions.
You can click the
 button on the left of the KL category name to selectively mark nested KL categories.
 - Click OK.
To add a custom rule trigger condition:
- In the drop-down list under the Add button, select Custom condition.
- In the Custom condition window, click the Select button and specify the path to the application executable file.
- Select the criterion based on which you want to create a rule trigger condition: File hash code, Certificate, Metadata or Path to file or folder.
Kaspersky Endpoint Security does not support an MD5 file hash code and does not control startup of applications based on an MD5 hash. An SHA256 hash is used as a rule trigger condition.
If you are using a symbolic link in the Path to file or folder field, you are advised to resolve the symbolic link for correct operation of the Application Control rule. To do so, click the Resolve symbolic link button.
- Configure the settings of the selected criterion.
- Click OK.
To add a rule trigger condition based on information about the drive storing the executable file of an application:
- In the drop-down list under the Add button, select Condition by file drive.
- In the Condition by file drive window, in the Drive drop-down list, select the type of storage device from which the startup of applications will serve as a rule trigger condition.
- Click OK.
Changing the status of an Application Control rule
To change the status of an Application Control rule:
- Open the application settings window.
- In the left part of the window, in the Security Controls section, select the Application Control subsection.
In the right part of the window, the settings of the Application Control component are displayed.
- Select the Enable Application Control check box to make the component settings available for editing.
- In the Status column, left-click to display the context menu and select one of the following:
- On. This status means that the rule is used when Application Control is in operation.
- Off. This status means that the rule is ignored when Application Control is in operation.
- Test. This status means that Kaspersky Endpoint Security always allows the startup of applications to which this rule applies but logs information about the startup of such applications in the report.
You can use the Test status to assign the action equivalent to the Notify option for a portion of rules when the Block option is selected in the Action drop-down list.
- To save changes, click the Save button.
Testing Application Control rules
To ensure that Application Control rules do not block applications required for work, it is recommended to enable testing of Application Control rules and analyze their operation after creating new rules.
An analysis of the operation of Application Control rules requires a review of the resultant Application Control events that are reported to Kaspersky Security Center. If test mode results in no blocked startup events for all applications required for the work of the computer user, this means that the correct rules were created. Otherwise, you are advised to update the settings of the rules you have created, create additional rules, or delete the existing rules.
Test mode for Application Control rules is disabled by default.
To enable testing of Application Control rules or to select a blocking action for Application Control:
- Open the application settings window.
- In the left part of the window, in the Security Controls section, select the Application Control subsection.
In the right part of the window, the settings of the Application Control component are displayed.
- Select the Enable Application Control check box to make the component settings available for editing.
- In the Application Control mode drop-down list, select one of the following items:
Black List, if you want to allow the startup of all applications except the applications specified in block rules.
- White List, if you want to block the startup of all applications except the applications specified in allow rules.
- Do one of the following:
- If you want to enable test mode for Application Control rules, select the Notify option in the Action drop-down list.
- If you want to enable blocking mode for Application Control rules, select the Block option in the Action drop-down list.
- To save changes, click the Save button.
Kaspersky Endpoint Security will not block applications whose startup is forbidden by the Application Control component, but will send notifications about their startup to the Administration Server.
Page top
Editing Application Control message templates
When a user attempts to start an application that is blocked by an Application Control rule, Kaspersky Endpoint Security displays a message stating that the application is blocked from starting. If the user believes that an application was mistakenly blocked from starting, the user can use the link in the message text to send a message to the local corporate network administrator.
Special templates are available for the message that is displayed when an application is blocked from starting and for the message sent to the administrator. You can modify the message templates.
To edit a message template:
- Open the application settings window.
- In the left part of the window, in the Security Controls section, select the Application Control subsection.
In the right part of the window, the settings of the Application Control component are displayed.
- Select the Enable Application Control check box to make the component settings available for editing.
- Click the Templates button.
The Message templates window opens.
- Do one of the following:
- If you want to edit the template of the message that is displayed when an application is blocked from starting, select the Blockage tab.
- If you want to modify the template of the message that is sent to the LAN administrator, select the Message to administrator tab.
- Modify the template of the message that is displayed when an application is blocked from starting or the message sent to the administrator. To do this, use the Default and Variable buttons.
- Click OK.
- To save changes, click the Save button.
About Application Control operating modes
The Application Control component operates in two modes:
- Black List. In this mode, Application Control allows all users to start all applications, except for applications that are specified in Application Control block rules.
This mode of Application Control is enabled by default.
- White List. In this mode, Application Control blocks all users from starting any applications, except for applications that are specified in Application Control allow rules.
If the allow rules of Application Control are fully configured, the component blocks the startup of all new applications that have not been verified by the LAN administrator, while allowing the operation of the operating system and of trusted applications that users rely on in their work.
You can read the recommendations on configuring application control rules in white list mode.
Each mode has two actions that can be taken on started applications that meet the conditions of Application Control rules: Kaspersky Endpoint Security can block the startup of applications or notify the user about the startup of applications.
Application Control can be configured to operate in these modes both by using the Kaspersky Endpoint Security local interface and by using Kaspersky Security Center.
However, Kaspersky Security Center offers tools that are not available in the Kaspersky Endpoint Security local interface, such as the tools that are needed for the following tasks:
- Creating application categories.
Application Control rules created in the Kaspersky Security Center Administration Console are based on your custom application categories and not on inclusion and exclusion conditions as is the case in the Kaspersky Endpoint Security local interface.
- Gathering information about applications that are installed on LAN computers.
This is why it is recommended to use Kaspersky Security Center to configure the operation of the Application Control component.
Page top
Selecting the Application Control mode
To select the Application Control mode:
- Open the application settings window.
- In the left part of the window, in the Security Controls section, select the Application Control subsection.
In the right part of the window, the settings of the Application Control component are displayed.
- Select the Enable Application Control check box to make the component settings available for editing.
- In the Application Control mode drop-down list, select one of the following items:
- Black List, if you want to allow the startup of all applications except the applications specified in block rules.
- White List, if you want to block the startup of all applications except the applications specified in allow rules.
The initially defined rules for white list mode are the Golden Image rule, which allows the startup of applications that are included in the "Golden Image" category, and the Trusted Updaters rule, which allows the startup of applications that are included in the "Trusted Updaters" KL category. The "Golden Image" KL category includes programs that ensure normal operation of the operating system. The "Trusted Updaters" KL category includes updaters for the most reputable software vendors. You cannot delete these rules. The settings of these rules cannot be edited. By default, the Golden Image rule is enabled, and the Trusted Updaters rule is disabled. All users are allowed to start applications that match the trigger conditions of these rules.
All rules created during the selected mode are saved after the mode is changed so that the rules can be used again. To revert to using these rules, all you have to do is select the necessary mode in the Application Control mode drop-down list.
- In the Action drop-down list, select the action to be performed by the component when a user attempts to start an application that is blocked by Application Control rules.
- Select the Control DLL and drivers check box if you want Kaspersky Endpoint Security to monitor the loading of DLL modules when applications are started by users.
Information about the module and the application that loaded the module will be saved to a report.
Kaspersky Endpoint Security monitors only the DLL modules and drivers loaded since the Control DLL and drivers check box was selected. Restart the computer after selecting the Control DLL and drivers check box if you want Kaspersky Endpoint Security to monitor all DLL modules and drivers, including ones loaded before Kaspersky Endpoint Security is started.
When enabling the function for controlling which DLL modules and drivers are loaded, make sure that the Application Control section has enabled the default Golden Image rule or another rule that contains the Trusted certificates KL category and ensures that trusted DLL modules and drivers are loaded before Kaspersky Endpoint Security is started. Enabling control of the loading of DLL modules and drivers when the Golden Image rule is disabled may cause instability in the operating system.
Application Control rules that were created based on other KL categories (except for the Trusted certificates KL category) are not used for startup control of DLL modules and drivers.
We recommend password protection be turned on to configure program settings so that it is possible to turn off allow rules blocking the launch of critically important DLL modules and drivers while not changing Kaspersky Security Center policy settings in the process.
- To save changes, click the Save button.
Managing Application Control rules using Kaspersky Security Center
This section contains information about using Kaspersky Security Center to configure Application Control rules, and provides recommendations on optimal use of Application Control.
Gathering information about applications that are installed on user computers
To create optimal Application Control rules, it is recommended to first get a picture of the applications that are used on computers on the corporate LAN. To do this, you can obtain the following information:
- Vendors, versions, and localizations of applications used on the corporate LAN.
- Frequency of application updates.
- Application usage policies adopted in the company (this may be security policies or administrative policies).
- Storage location of application distribution packages.
Information about applications that are used on corporate LAN computers is available in the Applications registry folder and in the Executable files folder. The Applications registry folder and the Executable files folder are located in the Application management folder in the Kaspersky Security Center Administration Console tree.
The Applications registry folder contains the list of applications that were detected by
which is installed on the client computer.The Executable files folder contains a list of all executable files that have ever been started on client computers or that were detected during the inventory task of Kaspersky Endpoint Security.
To view general information about the application and its executable files, and the list of computers on which an application is installed, open the properties window of an application that is selected in the Applications registry folder or in the Executable files folder.
To open the properties window for applications in the Applications registry folder:
- Open the Kaspersky Security Center Administration Console.
- In the Additional folder of the Administration Console tree, in the Application management folder, select the Applications registry folder.
- Select an application.
- In the context menu of the application, select Properties.
The Properties: <Application name> window opens.
To open the properties window for an executable file in the Executable files folder:
- Open the Kaspersky Security Center Administration Console.
- In the Additional folder of the Administration Console tree, in the Application management folder, select the Executable files folder.
- Select an executable file.
- In the context menu of the executable file, select Properties.
The Properties: <Executable file name> window opens.
Gathering information about applications that are started on user computers
To enable forwarding of information about applications started on computers that have Kaspersky Endpoint Security installed to the Administration Server:
- Open the Kaspersky Security Center Administration Console.
- In the Managed devices folder in the Administration Console tree, open the folder with the name of the administration group to which the relevant client computers belong.
- In the workspace, select the Policies tab.
- Select the necessary policy.
- Open the Properties: <Policy name> window by using one of the following methods:
- In the context menu of the policy, select Properties.
- Click the Configure policy link located in the right part of the Administration Console workspace.
- In the General Settings section, select the Reports and Storage subsection.
- In the right part of the window, in the Data transfer to Administration Server section, click the Settings button.
The Inform window opens.
- Select the About started applications check box.
- In the Inform window, click OK.
- In the Properties: <Policy name> window, click OK.
Creating application categories
For more convenience when creating Application Control rules, you can create application categories.
It is recommended to create a "Work applications" category that covers the standard set of applications that are used at the company. If different user groups use different sets of applications in their work, a separate application category can be created for each user group.
To create an application category:
- Open the Kaspersky Security Center Administration Console.
- In the Administration Console tree, select the Additional → Application management → Application categories folder.
- Click the Create category button in the workspace.
The user category creation wizard starts.
- Follow the instructions of the user category creation wizard.
Step 1. Selecting the category type
At this step, select one of the following types of application categories:
- Category with content added manually. If you selected this type of category, at the "Configuring the conditions for including applications in a category" step and the "Configuring the conditions for excluding applications from a category" step, you will be able to define the criteria whereby executable files will be included into a created category.
- Category which includes executable files from selected devices. If you selected this type of category, at the "Settings" step you will be able to specify a device whose executable files must be included in the category.
- Category with content added automatically. If you selected this type of category, at the "Repository folder" step you will be able to specify a folder from which executable files will be automatically included in the created category.
When creating a category with content added automatically, Kaspersky Security Center performs inventory on files with the following formats: EXE, COM, DLL, SYS, BAT, PS1, CMD, JS, VBS, REG, MSI, MSC, CPL, HTML, HTM, DRV, OCX, and SCR.
Step 2. Entering a user category name
At this step, specify a name for the application category.
To proceed with the Setup Wizard, click the Next button.
Page top
Step 3. Configuring the conditions for including applications in a category
This step is available if you selected the Category with content added manually category type.
At this step, in the Add drop-down list, select one or more of the following conditions to include applications into the category:
- From the list of executable files. Add applications from the list of executable files on the client device to the custom category.
- From file properties. Specify detailed data of executable files as a condition for adding applications to the custom category.
- Metadata from files in folder. Select a folder on the client device that contains executable files. Kaspersky Security Center will indicate the metadata of these executable files as a condition for adding applications to the custom category.
- Hash of files in folder. Select a folder on the client device that contains executable files. Kaspersky Security Center will indicate the hashes of these executable files as a condition for adding applications to the custom category.
- Certificates for files from folder. Select a folder on the client device that contains executable files signed with certificates. Kaspersky Security Center will indicate the certificates of these executable files as a condition for adding applications to the custom category.
It is not recommended to use conditions whose properties do not have the Certificate thumbprint parameter specified.
- MSI installer files metadata. Select an MSI installation package. Kaspersky Security Center will indicate the metadata of executable files packed in this MSI installation package as a condition for adding applications to the custom category.
- Checksums of files from MSI installer of the application. Select an installation package in MSI format. Kaspersky Security Center will indicate the hashes of executable files packed in this installation package as a condition for adding applications to the custom category.
- KL category. Specify a KL category as a condition for adding applications to the custom category.
A KL category is a list of applications that have shared theme attributes. The list is maintained by Kaspersky experts. For example, the KL category known as "Office applications" includes applications from the Microsoft Office suite, Adobe Acrobat, and others.
You can select all KL categories to generate an extended list of trusted applications.
- Application folder. Select a folder on the client device. Kaspersky Security Center will add executable files from this folder to the custom category.
- Certificates from certificate repository. Select a certificate from the certificate repository as a condition for adding applications to the custom category.
It is not recommended to use conditions whose properties do not have the Certificate thumbprint parameter specified.
- Drive type. Specify the type of storage device (all hard drives and removable drives, or only removable drives) as a condition for adding applications to the custom category.
To proceed with the Setup Wizard, click the Next button.
Page top
Step 4. Configuring the conditions for excluding applications from a category
This step is available if you selected the Category with content added manually category type.
Applications specified at this step are excluded from the category even if these applications were specified at the "Configuring the conditions for including applications in a category" step.
At this step, in the Add drop-down list, select one of the following conditions for excluding applications from the category:
- From the list of executable files. Add applications from the list of executable files on the client device to the custom category.
- From file properties. Specify detailed data of executable files as a condition for adding applications to the custom category.
- Metadata from files in folder. Select a folder on the client device that contains executable files. Kaspersky Security Center will indicate the metadata of these executable files as a condition for adding applications to the custom category.
- Hash of files in folder. Select a folder on the client device that contains executable files. Kaspersky Security Center will indicate the hashes of these executable files as a condition for adding applications to the custom category.
- Certificates for files from folder. Select a folder on the client device that contains executable files signed with certificates. Kaspersky Security Center will indicate the certificates of these executable files as a condition for adding applications to the custom category.
- MSI installer files metadata. Select an MSI installation package. Kaspersky Security Center will indicate the metadata of executable files packed in this MSI installation package as a condition for adding applications to the custom category.
- Checksums of files from MSI installer of the application. Select an installation package in MSI format. Kaspersky Security Center will indicate the hashes of executable files packed in this installation package as a condition for adding applications to the custom category.
- KL category. Specify a KL category as a condition for adding applications to the custom category.
A KL category is a list of applications that have shared theme attributes. The list is maintained by Kaspersky experts. For example, the KL category known as "Office applications" includes applications from the Microsoft Office suite, Adobe Acrobat, and others.
You can select all KL categories to generate an extended list of trusted applications.
- Application folder. Select a folder on the client device. Kaspersky Security Center will add executable files from this folder to the custom application category.
- Certificates from certificate repository. Select a certificate from the certificate repository as a condition for adding applications to the custom category.
- Drive type. Specify the type of storage device (all hard drives and removable drives, or only removable drives) as a condition for adding applications to the custom category.
To proceed with the Setup Wizard, click the Next button.
Page top
Step 5. Settings
This step is available if you selected the Category which includes executable files from selected devices category type.
At this step, click the Add button and specify the computers whose executable files will be added to the application category by Kaspersky Security Center. All executable files from the specified computers presented in the Executable files folder will be added to the application category by Kaspersky Security Center.
At this step, you can also configure the following settings:
- Algorithm for hash function calculation by Kaspersky Security Center. To select an algorithm, you must select at least one of the following check boxes:
- Calculate SHA-256 for files in this category (supported by Kaspersky Endpoint Security 10 Service Pack 2 for Windows and any later versions) check box.
- Calculate MD5 for files in this category (supported by versions earlier than Kaspersky Endpoint Security 10 Service Pack 2 for Windows) check box.
- Synchronize data with the Administration Server repository check box. Select this check box if you want Kaspersky Security Center to periodically clear the application category and add to it all executable files from the specified computers presented in the Executable files folder.
If the Synchronize data with the Administration Server repository check box is cleared, after an application category is created Kaspersky Security Center will not make any modifications to it.
- Scan period (h) field. In this field, you can specify the period of time (in hours) after which Kaspersky Security Center clears the application category and adds to it all executable files from the specified computers presented in the Executable files folder.
The field is available if the Synchronize data with the Administration Server repository check box is selected.
To proceed with the Setup Wizard, click the Next button.
Page top
Step 6. Repository folder
This step is available if you selected the Category with content added automatically category type.
At this step, click the Browse button and specify the folder in which Kaspersky Security Center will search for executable files to automatically add applications to the application category.
At this step, you can also configure the following settings:
- Include dynamic-link libraries (DLL) in this category check box. Select this check box if you want the application category to include dynamic-link libraries (files in DLL format) and the Application Control component to log the actions of such libraries running in the system.
Including DLL files in the application category may reduce the performance of Kaspersky Security Center.
- Include script data in this category check box. Select this check box if you want the application category to include data on scripts, and to not have scripts blocked by the Web Threat Protection component.
Including the script data in the application category may reduce the performance of Kaspersky Security Center.
- Algorithm for hash function calculation by Kaspersky Security Center. To select an algorithm, you must select at least one of the following check boxes:
- Calculate SHA-256 for files in this category (supported by Kaspersky Endpoint Security 10 Service Pack 2 for Windows and any later versions) check box.
- Calculate MD5 for files in this category (supported by versions earlier than Kaspersky Endpoint Security 10 Service Pack 2 for Windows) check box.
- Force folder scan for changes check box. Select this check box if you want Kaspersky Security Center to periodically search for executable files in the folder used for automatically adding to the application category.
If the Force folder scan for changes check box is cleared, Kaspersky Security Center searches for executable files in the folder used for automatically adding to the application category only if changes have been made in the folder, files have been added to it or deleted from it.
- Scan period (h) field. In this field, you can specify the time interval (in hours) after which Kaspersky Security Center will search for executable files in the folder used for automatically adding to the application category.
This field is available if the Force folder scan for changes check box is selected.
To proceed with the Setup Wizard, click the Next button.
Page top
Step 7. Creating a custom category
To exit the Application Setup Wizard, click the Finish button.
Page top
Adding executable files from the Executable files folder to the application category
To add executable files from the Executable files folder to the application category:
- Open the Kaspersky Security Center Administration Console.
- In the Additional folder of the Administration Console tree, in the Application management folder, select the Executable files folder.
- In the workspace, select the executable file that you want to add to the application category.
- Right-click to open the context menu for the selected executable files and select Add to category.
The Select user category window opens.
- In the Select user category window:
- In the upper part of the window, choose one of the following options:
- Create category of applications. Choose this option if you want to create a new application category and add executable files to it.
- Add rules to specified category. Choose this option if you want to select an existing application category and add executable files to it.
- In the Rule type section, choose one of the following options:
- Add inclusion rules. Select this option if you want to create a condition that adds executable files to the application category.
- Add exclusion rules. Select this option if you want to create a condition that excludes executable files from the application category.
- In the File info type section, choose one of the following options:
- Certificate data or SHA-256 for files without a certificate.
- Certificate data (files without a certificate will be skipped).
- Only SHA-256 (files without SHA-256 will be skipped).
- MD5 (discontinued mode, only for Kaspersky Endpoint Security 10 Service Pack 1 versions).
- In the upper part of the window, choose one of the following options:
- Click OK.
Adding and modifying an Application Control rule using Kaspersky Security Center
To add or modify an Application Control rule using Kaspersky Security Center:
- Open the Kaspersky Security Center Administration Console.
- In the Managed devices folder in the Administration Console tree, open the folder with the name of the administration group to which the relevant client computers belong.
- In the workspace, select the Policies tab.
- Select the necessary policy.
- Open the Properties: <Policy name> window by using one of the following methods:
- In the context menu of the policy, select Properties.
- Click the Configure policy link located in the right part of the Administration Console workspace.
- In the Security Controls section, select Application Control.
In the right part of the window, the settings of the Application Control component are displayed.
- Do one of the following:
- To add a rule, click the Add button.
- If you want to edit an existing rule, select it in the list of rules and click the Edit button.
The Application Control rule window opens.
- In the Category drop-down list, select the created application category based on which you want to create a rule.
- In the Principals and their rights table, click the Add button.
The standard Microsoft Windows Select Users or Groups window opens.
- In the Select Users or Groups window, specify the list of users and/or user groups for which you want to configure permission to start applications from the selected category.
- In the Principals and their rights table:
- If you want to allow users and/or groups of users to start applications that belong to the selected category, select the Allow check box in the relevant rows.
- If you want to block users and/or groups of users from starting applications that belong to the selected category, select the Block check box in the relevant rows.
- Select the Deny for other users check box if you want all users that do not appear in the Principal column and that are not part of the group of users specified in the Principal column to be blocked from starting applications that belong to the selected category.
- If you want Kaspersky Endpoint Security to consider applications included in the selected application category as trusted updaters allowed to create other executable files that will be subsequently allowed to run, select the Trusted Updaters check box.
- Click OK.
- In the Application Control section of the policy properties window, click the Apply button.
Changing the status of an Application Control rule via Kaspersky Security Center
To change the status of an Application Control rule:
- Open the Kaspersky Security Center Administration Console.
- In the Managed devices folder in the Administration Console tree, open the folder with the name of the administration group to which the relevant client computers belong.
- In the workspace, select the Policies tab.
- Select the necessary policy.
- Open the Properties: <Policy name> window by using one of the following methods:
- In the context menu of the policy, select Properties.
- Click the Configure policy link located in the right part of the Administration Console workspace.
- In the Security Controls section, select Application Control.
In the right part of the window, the settings of the Application Control component are displayed.
- In the Status column, left-click to display the context menu and select one of the following:
- On. This status means that the rule is used when Application Control is in operation.
- Off. This status means that the rule is ignored when Application Control is in operation.
- Test. This status means that Kaspersky Endpoint Security always allows the startup of applications to which the rule applies but logs information about the startup of such applications in the report.
You can use the Test status to assign the action equivalent to the Notify option for a portion of rules when the Block option is selected in the Action drop-down list.
- Click the Apply button.
Testing Application Control rules using Kaspersky Security Center
To ensure that Application Control rules do not block applications required for work, it is recommended to enable testing of Application Control rules and analyze their operation after creating new rules. When testing of Application Control rules is enabled, Kaspersky Endpoint Security will not block applications whose startup is forbidden by Application Control, but will instead send notifications about their startup to the Administration Server.
An analysis of the operation of Application Control rules requires a review of the resultant Application Control events that are reported to Kaspersky Security Center. If test mode results in no blocked startup events for all applications required for the work of the computer user, this means that the correct rules were created. Otherwise, you are advised to update the settings of the rules you have created, create additional rules, or delete the existing rules.
Blocking mode for Application Control rules is enabled by default.
To enable testing of Application Control rules or to select a blocking action for Application Control in Kaspersky Security Center:
- Open the Kaspersky Security Center Administration Console.
- In the Managed devices folder in the Administration Console tree, open the folder with the name of the administration group to which the relevant client computers belong.
- In the workspace, select the Policies tab.
- Select the necessary policy.
- Open the Properties: <Policy name> window by using one of the following methods:
- In the context menu of the policy, select Properties.
- Click the Configure policy link located in the right part of the Administration Console workspace.
- In the Security Controls section, select Application Control.
In the right part of the window, the settings of the Application Control component are displayed.
- In the Application Control mode drop-down list, select one of the following items:
- Black List, if you want to allow the startup of all applications except the applications specified in block rules.
- White List, if you want to block the startup of all applications except the applications specified in allow rules.
- Do one of the following:
- If you want to enable test mode for Application Control rules, select the Notify option in the Action drop-down list.
- If you want to enable blocking mode for Application Control rules, select the Block option in the Action drop-down list.
- To save changes, click the Save button.
Viewing events resulting from test operation of the Application Control component
To view Application Control events received by Kaspersky Security Center in test mode:
- Open the Kaspersky Security Center Administration Console.
- In the Administration Server node of the Administration Console tree, select the Events tab.
- Click the Create a selection button.
The Properties: <Selection name> window opens.
- Open the Events section.
- Click the Clear all button.
- In the Events table, select the Application startup prohibited in test mode and Application startup allowed in test mode check boxes.
- Click OK.
- In the Selection events drop-down list, select the created selection.
- Click the Run selection button.
Viewing events resulting from operation of the Application Control component
To view events resulting from the operation of the Application Control component received by Kaspersky Security Center:
- Open the Kaspersky Security Center Administration Console.
- In the Administration Server node of the Administration Console tree, select the Events tab.
- Click the Create a selection button.
The Properties: <Selection name> window opens.
- Open the Events section.
- Click the Clear all button.
- In the Events table, select the Application startup prohibited check box.
- Click OK.
- In the Selection events drop-down list, select the created selection.
- Click the Run selection button.
Adding event-related executable files to the application category
To add executable files associated with resultant Application Control events to the application category:
- Open the Kaspersky Security Center Administration Console.
- In the Administration Server node of the Administration Console tree, select the Events tab.
- Choose a selection of events related to operation of the Application Control component (Viewing events resulting from operation of the Application Control component, Viewing events resulting from test operation of the Application Control component) in the Selection events drop-down list.
- Click the Run selection button.
- Select the events whose associated executable files you want to add to the application category.
- Right-click to open the context menu for the selected events and select Add to category.
The Select user category window opens.
- In the Select user category window:
- In the upper part of the window, choose one of the following options:
- Create category of applications. Choose this option if you want to create a new application category and add executable files to it.
- Add rules to specified category. Choose this option if you want to select an existing application category and add executable files to it.
- In the Rule type section, choose one of the following options:
- Add inclusion rules. Select this option if you want to create a condition that adds executable files to the application category.
- Add exclusion rules. Select this option if you want to create a condition that excludes executable files from the application category.
- In the File info type section, choose one of the following options:
- Certificate data or SHA-256 for files without a certificate.
- Certificate data (files without a certificate will be skipped).
- Only SHA-256 (files without SHA-256 will be skipped).
- MD5 (discontinued mode, only for Kaspersky Endpoint Security 10 Service Pack 1 versions).
- In the upper part of the window, choose one of the following options:
- Click OK.
Viewing a report on test blocked runs
To view a report on test blocked runs:
- Open the Kaspersky Security Center Administration Console.
- In the Administration Server node of the Administration Console tree, select the Reports tab.
- Click the Create report template button.
The Report Template Wizard starts.
- Follow the instructions of the Report Template Wizard. At the Selecting the report template type step, select Other → Report on test blocked runs.
After you have finished with the New Report Template Wizard, the new report template appears in the table on the Reports tab.
- Run the report generation process created at previous steps of the instructions by using one of the following methods:
- In the context menu of the report, select Show report.
- Click the Show report link located in the right part of the Administration Console workspace.
- Open the report by double-clicking it.
The report is displayed in a new window.
The report generation process starts. The report is displayed in a new window.
Page top
Viewing a report on blocked runs
To view the report on blocked runs:
- Open the Kaspersky Security Center Administration Console.
- In the Administration Server node of the Administration Console tree, select the Reports tab.
- Click the Create report template button.
The Report Template Wizard starts.
- Follow the instructions of the Report Template Wizard. At the Selecting the report template type step, select Other → Report on blocked runs.
After you have finished with the New Report Template Wizard, the new report template appears in the table on the Reports tab.
- Run the report generation process created at previous steps of the instructions by using one of the following methods:
- In the context menu of the report, select Show report.
- Click the Show report link located in the right part of the Administration Console workspace.
- Open the report by double-clicking it.
The report is displayed in a new window.
Best practices for implementing white list mode
This section contains recommendations on implementing white list mode.
Planning implementation of white list mode
When planning implementation of white list mode, it is recommended to perform the following actions:
- Form the following types of groups:
- User groups. Groups of users for whom you need to allow use of various sets of applications.
- Administration groups. One or several groups of computers to which Kaspersky Security Center will apply white list mode. Creating several groups of computers is necessary if different white list mode settings are used for those groups.
- Create a list of applications that must be allowed to start.
Prior to creating a list, you are advised to do the following:
- Run the inventory task.
Information about the creation, reconfiguration, and startup of an inventory task is available in the Task management section.
- Enable forwarding of information about applications started on computers to the Administration Server.
- View the list of executable files.
- Run the inventory task.
Configuring white list mode
When configuring white list mode, it is recommended to perform the following actions:
- Create application categories containing the applications that must be allowed to start.
You can select one of the following methods for creating application categories:
- Category with content added manually (Step 3. Configuring the conditions for including applications in a category, Step 4. Configuring the conditions for excluding applications from a category). You can manually add to this category by using the following conditions:
- File metadata. If this condition is used, Kaspersky Security Center adds all executable files accompanied by the specified metadata to the application category.
- File hash code. If this condition is used, Kaspersky Security Center adds all executable files with the specified hash to the application category.
Use of this condition excludes the capability to automatically install updates because different versions of files will have a different hash.
- File certificate. If this condition is used, Kaspersky Security Center adds all executable files signed with the specified certificate to the application category.
- KL category. If this condition is used, Kaspersky Security Center adds all applications that are in the specified KL category to the application category.
- Application folder. If this condition is used, Kaspersky Security Center adds all executable files from this folder to the application category.
Use of the Application folder condition may be unsafe because any application from the specified folder will be allowed to start. It is recommended to apply rules that use the application categories with the Application folder condition only to those users for whom the automatic installation of updates must be allowed.
You can also add executable files from the Executable files folder to an application category with content added manually.
- Category with content added automatically. You can specify a folder from which executable files will be automatically assigned to the created application category.
- Category which includes executable files from selected devices. You can specify a computer for which all executable files will be automatically assigned to the created application category.
When using this method of creating application categories, Kaspersky Security Center receives information about applications on the computer from a list of executable files.
- Category with content added manually (Step 3. Configuring the conditions for including applications in a category, Step 4. Configuring the conditions for excluding applications from a category). You can manually add to this category by using the following conditions:
- Select white list mode for the Application Control component.
- Create Application Control rules using the created application categories.
The initially defined rules for white list mode are the Golden Image rule, which allows the startup of applications that are included in the Golden Image KL category, and the Trusted Updaters rule, which allows the startup of applications that are included in the Trusted Updaters KL category. The "Golden Image" KL category includes programs that ensure normal operation of the operating system. The "Trusted Updaters" KL category includes updaters for the most reputable software vendors. You cannot delete these rules. The settings of these rules cannot be edited. By default, the Golden Image rule is enabled, and the Trusted Updaters rule is disabled. All users are allowed to start applications that match the trigger conditions of these rules.
- Determine the applications for which automatic installation of updates must be allowed.
You can allow automatic installation of updates in one of the following ways:
- Specify an extended list of allowed applications by allowing the startup of all applications that belong to any KL category.
- Specify an extended list of allowed applications by allowing the startup of all applications that are signed with certificates.
To allow the startup of all applications signed with certificates, you can create a category with a certificate-based condition that uses only the Subject parameter with the value *.
- For the Application control rule, select the Trusted Updaters parameter. If this check box is selected, Kaspersky Endpoint Security considers the applications that belong to the category specified in the application category rule as Trusted Updaters. Kaspersky Endpoint Security allows the startup of applications that have been installed or updated by applications specified in the category rule, if no block rules apply to them.
- Create an allow rule using an application category based on the Application folder condition. When this method is used, all executable files within the specified folder will be added to the application category.
Use of the Application folder condition may be unsafe because any application from the specified folder will be allowed to start. It is recommended to apply rules that use the application categories with the Application folder condition only to those users for whom the automatic installation of updates must be allowed.
Testing white list mode
To ensure that Application Control rules do not block applications required for work, it is recommended to enable testing of Application Control rules and analyze their operation after creating new rules. When testing is enabled, Kaspersky Endpoint Security will not block applications whose startup is forbidden by Application Control rules, but will instead send notifications about their startup to the Administration Server.
When testing white list mode, it is recommended to perform the following actions:
- Determine the testing period (ranging from several days to two months).
- Enable testing of Application Control rules.
- Examine the events resulting from testing the operation of Application Control and reports on test blocked runs to analyze the testing results.
- Based on the analysis results, make changes to the white list mode settings.
In particular, based on the test results, you can add executable files related to events of the Application Control component to an application category with content added manually.
Supporting white list mode
After selecting a blocking action for Application Control, it is recommended to continue supporting white list mode by performing the following actions:
- Examine the events resulting from the operation of Application Control and reports on blocked runs to analyze the effectiveness of Application Control.
- Analyze users' requests to access applications.
- Analyze unfamiliar executable files by checking their reputation in Kaspersky Security Network or on the Kaspersky Whitelist portal.
- Prior to installing updates for the operating system or for software, install those updates on a test group of computers to check how they will be processed by Application Control rules.
- Add the necessary applications to categories used in Application Control rules.
Device Control
This component is available if Kaspersky Endpoint Security is installed on a computer that runs on Microsoft Windows for workstations. This component is unavailable if Kaspersky Endpoint Security is installed on a computer that runs on Microsoft Windows for file servers.
This section contains information about Device Control and instructions on how to configure the component settings.
About Device Control
Device Control ensures the security of confidential data by restricting user access to devices that are installed on the computer or connected to it, including:
- Data storage devices (hard drives, removable drives, tape drives, CD/DVD drives)
- Data transfer tools (modems, external network cards)
- Devices that are designed for converting data to hard copies (printers)
- Connection buses (also referred to as simply "buses"), referring to interfaces for connecting devices to computers (such as USB, FireWire, and Infrared)
Device Control manages user access to devices by applying device access rules (also referred to as "access rules") and connection bus access rules (also referred to as "bus access rules").
Page top
Enabling and disabling Device Control
By default, Device Control is enabled. You can disable Device Control, if necessary.
To enable or disable Device Control:
- Open the application settings window.
- In the left part of the window, in the Security Controls section, select Device Control.
In the right part of the window, the settings of the Device Control component are displayed.
- Do one of the following:
- If you want to enable Device Control, select the Enable Device Control check box.
- If you want to disable Device Control, clear the Enable Device Control check box.
- To save changes, click the Save button.
About rules of access to devices and connection buses
A device access rule is a combination of parameters that define the following functions of the Device Control component:
- Allowing selected users and / or user group to access specific types of devices during specific periods of time.
You can select a user and / or user group and create a device access schedule for them.
- Setting the right to read the content of memory devices.
- Setting the right to edit the content of memory devices.
By default, access rules are created for all types of devices in the classification of the Device Control component. Such rules grant all users full access to the devices at all times, if access to the connection buses of the respective types of devices is allowed.
The connection bus access rule allows or blocks access to the connection bus.
Rules that allow access to buses are created by default for all connection buses that are present in the classification of the Device Control component.
You cannot create or delete device access rules or connection bus access rules; you can only edit them.
Page top
About trusted devices
Trusted devices are devices to which users that are specified in the trusted device settings have full access at all times.
The following actions are available for working with trusted devices:
- Add the device to the list of trusted devices.
- Change the user and / or user group that is allowed to access the trusted device.
- Delete the device from the list of trusted devices.
If you have added a device to the list of trusted devices and created an access rule for this type of device which blocks or restricts access, Kaspersky Endpoint Security decides whether or not to grant access to the device based on its presence in the list of trusted devices. Presence in the list of trusted devices has a higher priority than an access rule.
Page top
Standard decisions on access to devices
Kaspersky Endpoint Security makes a decision on whether to allow access to a device after the user connects the device to the computer.
Standard decisions on access to devices
No.
|
Initial conditions |
Interim steps to take until a decision on access to the device is made |
Decision on access to the device |
||
Checking whether the device is included in the list of trusted devices |
Testing access to the device based on the access rule |
Testing access to the bus based on bus access rule |
|||
1 |
The device is not present in the device classification of the Device Control component. |
Not included in the list of trusted devices. |
No access rule. |
Not subject to scanning. |
Access allowed.
|
2 |
The device is trusted. |
Included in the list of trusted devices. |
Not subject to scanning. |
Not subject to scanning. |
Access allowed.
|
3 |
Access to the device is allowed. |
Not included in the list of trusted devices. |
Access allowed. |
Not subject to scanning. |
Access allowed.
|
4 |
Access to the device depends on the bus. |
Not included in the list of trusted devices. |
Access depends on the bus. |
Access allowed. |
Access allowed.
|
5 |
Access to the device depends on the bus. |
Not included in the list of trusted devices. |
Access depends on the bus. |
Access blocked. |
Access blocked.
|
6 |
Access to the device is allowed. No bus access rule is found. |
Not included in the list of trusted devices. |
Access allowed. |
No bus access rule. |
Access allowed.
|
7 |
Access to the device is blocked. |
Not included in the list of trusted devices. |
Access blocked. |
Not subject to scanning. |
Access blocked.
|
8 |
No device access rule or bus access rule is found. |
Not included in the list of trusted devices. |
No access rule. |
No bus access rule. |
Access allowed.
|
9 |
There is no device access rule. |
Not included in the list of trusted devices. |
No access rule. |
Access allowed. |
Access allowed.
|
10 |
There is no device access rule. |
Not included in the list of trusted devices. |
No access rule. |
Access blocked. |
Access blocked.
|
You can edit the device access rule after you connect the device. If the device is connected and the access rule allows access to it, but you later edit the access rule and block access, Kaspersky Endpoint Security blocks access the next time that any file operation is requested from the device (viewing the folder tree, reading, writing). A device without a file system is blocked only the next time that the device is connected.
If a user of the computer with Kaspersky Endpoint Security installed must request access to a device that the user believes was blocked by mistake, send the user the request access instructions.
Page top
Editing a device access rule
Depending on the type of device, you can modify various access settings, such as the list of users receiving access to the device, the access schedule, and allowed / blocked access.
To edit a device access rule:
- Open the application settings window.
- In the left part of the window, in the Security Controls section, select Device Control.
In the right part of the window, the settings of the Device Control component are displayed.
- In the right part of the window, select the Types of devices tab.
The Types of devices tab contains access rules for all devices that are included in the classification of the Device Control component.
- Select the access rule that you want to edit.
- Click the Edit button. This button is only available for device types which have a file system.
The Configuring device access rule window opens.
By default, a device access rule grants all users full access to the specified type of devices at any time. In the Users and / or groups of users list, this access rule contains the All group. In the Rights of the selected group of users by access schedules table, this access rule contains the Default schedule for access to devices, with the rights to perform all types of operations with devices.
- Edit the settings of the device access rule:
- Select a user and / or group of users from the Users and / or groups of users list.
To edit the Users and / or groups of users list, use the Add, Edit, and Remove buttons.
- In the Rights of the selected group of users by access schedules table, configure the schedule for access to devices for the selected user and / or group of users. To do this, select the check boxes next to the names of the access schedules for devices that you want to use in the device access rule that is to be edited.
To edit the list of access schedules to devices, use the Create, Edit, Copy, and Remove buttons in the Rights of the selected group of users by access schedules table.
- For each schedule for access to devices used in the rule being edited, specify the operations that are allowed when working with devices. To do so, in the Rights of the selected group of users by access schedules table, select the check boxes in the columns containing the names of the relevant operations.
- Click OK.
After you have edited the default settings of a device access rule, the setting for access to the type of device in the Access column in the table on the Types of devices tab is changed to the Restrict by rules value.
- Select a user and / or group of users from the Users and / or groups of users list.
- To save changes, click the Save button.
Adding or excluding records to or from the event log
Event logging is available only for operations with files on removable drives.
To enable or disable event logging:
- Open the application settings window.
- In the left part of the window, in the Security Controls section, select Device Control.
In the right part of the window, the settings of the Device Control component are displayed.
- In the right part of the window, select the Types of devices tab.
The Types of devices tab contains access rules for all devices that are included in the classification of the Device Control component.
- Select Removable drives in the table of devices.
The Logging button becomes available in the upper part of the table.
- Click the Logging button.
This opens the Logging Settings window.
- Do one of the following:
- If you want to enable logging of file deletion and write operations on removable drives, select the Enable logging check box.
Kaspersky Endpoint Security will save an event to the log file and send a message to the Kaspersky Security Center Administration Server whenever the user performs write or delete operations with files on removable drives.
- Otherwise, clear the Enable logging check box.
- If you want to enable logging of file deletion and write operations on removable drives, select the Enable logging check box.
- Specify which operations must be logged. To do so, perform one of the following:
- If you want Kaspersky Endpoint Security to log all events, select the Save information about all files check box.
- If you want Kaspersky Endpoint Security to log only information about files of a specific format, in the Filter on file formats section, select the check boxes opposite the relevant file formats.
- Specify which Kaspersky Endpoint Security users' actions must be logged as events. To do so:
- In the Users section, click the Select button.
The standard Select users or groups window in Microsoft Windows opens.
- Specify or edit the list of users and / or groups of users.
When the users specified in the Users section write to files located on removable drives or delete files from removable drives, Kaspersky Endpoint Security will save information about such operations to the event log and send a message to the Kaspersky Security Center Administration Server.
- In the Users section, click the Select button.
- In the Logging settings window, click OK.
- To save changes, click the Save button.
You can view events associated with files on removable drives in the Kaspersky Security Center Administration Console in the workspace of the Administration Server node on the Events tab. For events to be displayed in the local Kaspersky Endpoint Security event log, you must select the File operation performed check box in the notification settings for the Device Control component.
Page top
Adding a Wi-Fi network to the trusted list
You can allow users connect to Wi-Fi networks that you consider to be secure, such as a corporate Wi-Fi network. To do so, you must add the network to the list of trusted Wi-Fi networks. Device Control will block access to all Wi-Fi networks except those specified in the trusted list.
To add a Wi-Fi network to the trusted list:
- Open the application settings window.
- In the left part of the window, in the Security Controls section, select Device Control.
In the right part of the window, the settings of the Device Control component are displayed.
- In the right part of the window, select the Types of devices tab.
The Types of devices tab contains access rules for all devices that are included in the classification of the Device Control component.
- In the Access column opposite the Wi-Fi device, right-click to open the context menu.
- Select the Block with exceptions option.
- In the list of devices, select Wi-Fi and click the Edit button.
This opens the Trusted Wi-Fi networks window.
- Click the Add button.
This opens the Trusted Wi-Fi network window.
- In the Trusted Wi-Fi network window:
- In the Network name field, specify the name of the Wi-Fi network that you want to add to the trusted list.
- In the Authentication type drop-down list, select the type of authentication used when connecting to the trusted Wi-Fi network.
- In the Encryption type drop-down list, select the type of encryption used for securing traffic of the trusted Wi-Fi network.
- In the Comment field, you can specify any information about the added Wi-Fi network.
A Wi-Fi network is considered trusted if its settings match all settings specified in the rule.
- In the Trusted Wi-Fi network window, click OK.
- In the Trusted Wi-Fi networks window, click OK.
Editing a connection bus access rule
To edit a connection bus access rule:
- Open the application settings window.
- In the left part of the window, in the Security Controls section, select Device Control.
In the right part of the window, the settings of the Device Control component are displayed.
- Select the Connection buses tab.
The Connection buses tab displays the access rules for all connection buses that are classified in the Device Control component.
- Select the bus connection rule that you want to edit.
- Change the value of the access parameter:
- To allow access to a connection bus, click the Access column to open the context menu and select Allow.
- To block access to a connection bus, click the Access column to open the context menu and select Block.
- To save changes, click the Save button.
Actions with trusted devices
This section contains information about actions with trusted devices.
Adding a device to the Trusted list from the application interface
By default, when a device is added to the list of trusted devices, access to the device is granted to all users (the Everyone group of users).
To add a device to the Trusted list from the application interface:
- Open the application settings window.
- In the left part of the window, in the Security Controls section, select Device Control.
In the right part of the window, the settings of the Device Control component are displayed.
- In the right part of the window, select the Trusted devices tab.
- Click the Select button.
The Select trusted devices window opens.
- Select the check box next to the name of a device that you want to add to the list of trusted devices.
The list in the Devices column depends on the value that is selected in the Display connected devices drop-down list.
- Click the Select button.
The Select Users or Groups window in Microsoft Windows opens.
- In the Select Users or Groups window in Microsoft Windows, specify users and / or groups of users for which Kaspersky Endpoint Security recognizes the selected devices as trusted.
The names of users and / or groups of users that are specified in the Select users and / or groups of users window of Microsoft Windows are displayed in the Allow to users and / or groups of users field.
- In the Select trusted devices window, click OK.
In the table, on the Trusted devices tab of the Device Control component settings window, a line appears and displays the parameters of the trusted device that has been added.
- Repeat steps 4-7 for each device that you want to add to the list of trusted devices for the specified users and / or user groups.
- To save changes, click the Save button.
Adding devices to the Trusted list based on the device model or ID
By default, when a device is added to the list of trusted devices, access to the device is granted to all users (the Everyone group of users).
To add devices to the Trusted list based on the device model or ID:
- Open the Kaspersky Security Center Administration Console.
- In the Managed devices folder in the Administration Console tree, open the folder with the name of the administration group for which you want to create a list of trusted devices.
- In the workspace, select the Policies tab.
- Select the necessary policy.
- Open the Properties: <Policy name> window by using one of the following methods:
- In the context menu of the policy, select Properties.
- Click the Configure policy link located in the right part of the Administration Console workspace.
- In the Security Controls section, select Device Control.
- In the right part of the window, select the Trusted devices tab.
- Click the Add button.
The context menu of the button opens.
- In the context menu of the Add button, do one of the following:
- Select the Devices by ID button if you want to select devices with known unique IDs to be added to the list of trusted devices.
- Select the Devices by model item to add to the list those trusted devices whose VID (vendor ID) and PID (product ID) are known.
- In the window that opens, in the Device type drop-down list select the type of devices to be displayed in the table below.
- Click the Refresh button.
The table displays a list of devices for which device IDs and / or models are known and which belong to the type selected in the Device type drop-down list.
- Select check boxes next to the names of devices that you want to add to the list of trusted devices.
- Click the Select button.
The Select Users or Groups window in Microsoft Windows opens.
- In the Select Users or Groups window in Microsoft Windows, specify users and / or groups of users for which Kaspersky Endpoint Security recognizes the selected devices as trusted.
The names of users and / or groups of users that are specified in the Select users and / or groups of users window of Microsoft Windows are displayed in the Allow to users and / or groups of users field.
- Click OK.
Lines appear with the parameters of the trusted devices that have been added appear in the table on the Trusted devices tab.
- Click OK or Apply to save changes.
Adding devices to the Trusted list based on the mask of the device ID
By default, when a device is added to the list of trusted devices, access to the device is granted to all users (the Everyone group of users).
Devices can be added to the Trusted list based on the mask of their ID only in the Kaspersky Security Center Administration Console.
To add devices to the Trusted list based on the mask of their ID:
- Open the Kaspersky Security Center Administration Console.
- In the Managed devices folder in the Administration Console tree, open the folder with the name of the administration group for which you want to create a list of trusted devices.
- In the workspace, select the Policies tab.
- Select the necessary policy.
- Open the Properties: <Policy name> window by using one of the following methods:
- In the context menu of the policy, select Properties.
- Click the Configure policy link located in the right part of the Administration Console workspace.
- In the Security Controls section, select Device Control.
- In the right part of the window, select the Trusted devices tab.
- Click the Add button.
The context menu of the button opens.
- In the context menu of the Add button, select the Devices by ID mask item.
The Add trusted devices by ID mask window opens.
- In the Add trusted devices by ID mask window, enter the mask for device IDs in the Mask field.
- Click the Select button.
The Select Users or Groups window in Microsoft Windows opens.
- In the Select Users or Groups window in Microsoft Windows, specify users and / or groups of users for which Kaspersky Endpoint Security recognizes as trusted the devices whose models or IDs match the specified mask.
The names of users and / or groups of users that are specified in the Select users and / or groups of users window of Microsoft Windows are displayed in the Allow to users and / or groups of users field.
- Click OK.
In the table on the Trusted devices tab of the Device Control component settings window, a line appears with the settings of the rule for adding devices to the list of trusted devices by the mask of their IDs.
- To save changes, click the Save button.
Configuring user access to a trusted device
By default, when a device is added to the list of trusted devices, access to the device is granted to all users (the Everyone group of users). You can configure the access of users (or user groups) to a trusted device.
To configure user access to a trusted device:
- Open the application settings window.
- In the left part of the window, in the Security Controls section, select Device Control.
In the right part of the window, the settings of the Device Control component are displayed.
- In the right part of the window, select the Trusted devices tab.
- In the list of trusted devices, select a device for which you want to edit access rules.
- Click the Edit button.
The Configuring trusted device access rule window opens.
- Click the Select button.
The Select Users or Groups window in Microsoft Windows opens.
- In the Select Users or Groups window in Microsoft Windows, specify users and / or groups of users for which Kaspersky Endpoint Security recognizes the selected devices as trusted.
- Click OK.
The names of users and / or groups of users that are specified in the Select users and / or groups of users window of Microsoft Windows are displayed in the Allow to users and / or groups of users field of the Configuring trusted device access rule window.
- Click OK.
- To save changes, click the Save button.
Removing a device from the list of trusted devices
To remove a device from the list of trusted devices:
- Open the application settings window.
- In the left part of the window, in the Security Controls section, select Device Control.
In the right part of the window, the settings of the Device Control component are displayed.
- In the right part of the window, select the Trusted devices tab.
- Select the device that you want to remove from the list of trusted devices.
- Click the Delete button.
- To save changes, click the Save button.
A decision on access to a device that you have removed from the list of trusted devices is made by Kaspersky Endpoint Security based on device access rules and connection bus access rules.
Page top
Importing the list of trusted devices
To import the list of trusted devices:
- Open the application settings window.
- In the left part of the window, in the Security Controls section, select Device Control.
In the right part of the window, the settings of the Device Control component are displayed.
- In the right part of the window, select the Trusted devices tab.
- Click the Import button.
The Please select a configuration file window opens.
- In the Please select a configuration file window, select the XML file from which you want to import the list of trusted devices and click the Open button.
If the list of trusted devices contains some items, you will see a window titled The list already contains some elements. In this window, you can perform one of the following actions:
- Click Yes if you want to add the imported items to the existing ones.
- Click No if you want to delete the existing items before adding the imported ones.
- To save changes, click the Save button.
Exporting the list of trusted devices
To export the list of trusted devices:
- Open the application settings window.
- In the left part of the window, in the Security Controls section, select Device Control.
In the right part of the window, the settings of the Device Control component are displayed.
- In the right part of the window, select the Trusted devices tab.
- Select the list items that you want to export.
- Click the Export button.
The Please select a configuration file window opens.
- In the Please select a configuration file window, specify the name of the XML file to which you want to export the list of trusted devices, select the folder in which you want to save this file, and click the Save button.
Editing templates of Device Control messages
When the user attempts to access a blocked device, Kaspersky Endpoint Security displays a message stating that access to the device is blocked or that an operation with the device contents is forbidden. If the user believes that access to the device was mistakenly blocked or that an operation with device contents was forbidden by mistake, the user can send a message to the local corporate network administrator by clicking the link in the displayed message about the blocked action.
Templates are available for messages about blocked access to devices or forbidden operations with device contents, and for the message sent to the administrator. You can modify the message templates.
To edit the templates for Device Control messages:
- Open the application settings window.
- In the left part of the window, in the Security Controls section, select Device Control.
In the right part of the window, the settings of the Device Control component are displayed.
- In the right part of the window, click the Templates button.
The Message templates window opens.
- Do one of the following:
- To modify the template of the message about blocked access to a device or a forbidden operation with device contents, select the Blockage tab.
- To modify the template of the message that is sent to the LAN administrator, select the Message to administrator tab.
- Edit the message template. You can also use the following buttons: Variable, Default, and Link (this button is available only on the Blockage tab).
- Click OK.
- To save changes, click the Save button.
Anti-Bridging
This section contains information about Anti-Bridging and instructions on how to configure this function.
About Anti-Bridging
Anti-Bridging offers protection against network bridges, preventing the simultaneous establishment of multiple network connections for a computer that has Kaspersky Endpoint Security installed.
Page top
Enabling and disabling Anti-Bridging
Anti-Bridging is disabled by default. You can enable the function, if necessary.
To enable or disable Anti-Bridging:
- Open the application settings window.
- In the left part of the window, in the Security Controls section, select Device Control.
In the right part of the window, the settings of the Device Control component are displayed.
- Click the Anti-Bridging button.
The Anti-Bridging window opens.
- Do one of the following:
- Select the Enable Anti-Bridging check box to enable protection against network bridges.
After Anti-Bridging is enabled, Kaspersky Endpoint Security blocks already established connections according to the connection rules.
- Clear the Enable Anti-Bridging check box to disable protection against network bridges.
- Select the Enable Anti-Bridging check box to enable protection against network bridges.
- In the Anti-Bridging window, click OK.
- To save changes, click the Save button.
About connection rules
Connection rules are created for the following predefined types of devices:
- Network adapters
- Wi-Fi adapters
- Modems
If a connection rule is enabled, Kaspersky Endpoint Security:
- Blocks the active connection when establishing a new connection, if the device type specified in the rule is used for both connections.
- Blocks connections that are established using the types of devices for which lower-priority rules are used.
Changing the status of a connection rule
To change the status of a connection rule:
- Open the application settings window.
- In the left part of the window, in the Security Controls section, select Device Control.
In the right part of the window, the settings of the Device Control component are displayed.
- Click the Anti-Bridging button.
The Anti-Bridging window opens.
- Select the rule whose status you want to edit.
- In the Control column, left-click to bring up the context menu and do one of the following:
- If you want to enable use of the rule, select On.
- If you want to disable use of the rule, select Off.
- In the Anti-Bridging window, click OK.
- To save changes, click the Save button.
Change the priority of a connection rule
To change the priority of a connection rule:
- Open the application settings window.
- In the left part of the window, in the Security Controls section, select Device Control.
In the right part of the window, the settings of the Device Control component are displayed.
- Click the Anti-Bridging button.
The Anti-Bridging window opens.
- Select the rule whose priority you want to change.
- Do one of the following:
- Click the Move up button to move the rule up a level in the table of rules.
- Click the Move down button to move the rule down a level in the table of rules.
The higher a rule is on the list of rules, the higher priority it has. Anti-Bridging blocks all connections except one connection established using the type of device for which the highest-priority rule is used.
- In the Anti-Bridging window, click OK.
- To save changes, click the Save button.
Obtaining access to a blocked device
These instructions are intended for users of client computers with Kaspersky Endpoint Security installed.
The Kaspersky Endpoint Security functionality that grants temporary access to a device is available only if a Kaspersky Security Center policy is applied to the device and this functionality is enabled in the policy settings (for more detailed information, please refer to the Kaspersky Security Center Help Guide).
To request access to a blocked device:
- Open the application settings window.
- In the left part of the window, in the Security Controls section, select Device Control.
In the right part of the window, the settings of the Device Control component are displayed.
- In the right part of the window, click the Request access button.
The Request access to device window opens.
- From the list of connected devices, select the one to which you want to obtain access.
- Click the Generate request access file button.
This opens the Creating request access file window.
- In the Access duration field, specify the period of time for which you want to have access to the device.
- Click the Save button.
This opens the standard Save request access file window of Microsoft Windows.
- In the Save request access file window of Microsoft Windows, select the folder in which you want to save the request access file for the device, and click the Save button.
- Send the device request access file to the LAN administrator.
- Receive the device access key file from the LAN administrator.
- In the Request access to device window, click the Activate access key button.
The standard Open access key window of Microsoft Windows opens.
- In the Open access key window of Microsoft Windows, select the device access key file received from the LAN administrator and click Open.
The Activating the access key for the device window opens and displays information about granted access.
- In the Activating the access key for the device window, click OK.
To request access to a blocked device by clicking the link in the message informing that the device is blocked:
- In the window with the message that informs that a device or connection bus is blocked, click the Request access link.
This opens the Creating request access file window.
- In the Access duration field, specify the period of time for which you want to have access to the device.
- Click the Save button.
This opens the standard Save request access file window of Microsoft Windows.
- In the Save request access file window of Microsoft Windows, select the folder in which you want to save the request access file for the device, and click the Save button.
- Send the device request access file to the LAN administrator.
- Receive the device access key file from the LAN administrator.
- In the Request access to device window, click the Activate access key button.
The standard Open access key window of Microsoft Windows opens.
- In the Open access key window of Microsoft Windows, select the device access key file received from the LAN administrator and click Open.
The Activating the access key for the device window opens and displays information about granted access.
- In the Activating the access key for the device window, click OK.
The time period for which access to the device is granted may differ from the amount of time that you requested. Access to the device is granted for the time period that the local area network administrator specifies when generating the device access key.
Page top
Creating a key for accessing a blocked device using Kaspersky Security Center
To grant a user temporary access to a blocked device, an access key to the device is required. You can create an access key using Kaspersky Security Center.
To create an access key for a blocked device:
- Open the Kaspersky Security Center Administration Console.
- In the Managed devices folder of the Administration Console tree, open the folder with the name of the administration group to which the relevant client computer belongs.
- In the workspace, select the Devices tab.
- In the list of client computers, select the computer whose user needs to be granted temporary access to a locked device.
- In the context menu of the computer, select Grant access in offline mode.
The Grant access in offline mode window opens.
- Select the Device Control tab.
- On the Device Control tab, click the Browse button.
The standard Select request access file window of Microsoft Windows opens.
- In the Select request access file window, select the request access file that you have received from the user and click the Open button.
The Device Control shows the details of the locked device to which the user has requested access.
- Specify the value of the Access duration setting.
This setting defines the length of time for which you grant the user access to the locked device. The default value is the value that was specified by the user when creating the request access file.
- Specify the value of the Activation period setting.
This setting defines the time period during which the user can activate access to the blocked device by using the provided access key.
- Click the Save button.
This opens the standard Save access key window of Microsoft Windows.
- Select the destination folder in which you want to save the file containing the access key for the blocked device.
- Click the Save button.
Web Control
This component is available if Kaspersky Endpoint Security is installed on a computer that runs on Microsoft Windows for workstations. This component is unavailable if Kaspersky Endpoint Security is installed on a computer that runs on Microsoft Windows for file servers.
This section contains information about Web Control and instructions on how to configure the component settings.
About Web Control
Web Control allows controlling actions by LAN users, by restricting or blocking access to web resources.
A web resource is an individual web page or several web pages, or a website or several websites that have a common feature.
Web Control provides the following options:
- Saving traffic.
Traffic is controlled by restricting or blocking downloads of multimedia files, or by restricting or blocking access to web resources that are unrelated to users' job responsibilities.
- Delimiting access by content categories of web resources.
To save traffic and reduce potential losses from the misuse of employee time, you can restrict or block access to specified categories of web resources (for example, block access to sites that belong to the "Internet communication" category).
- Centralized control of access to web resources.
When using Kaspersky Security Center, personal and group settings of access to web resources are available.
All restrictions and blocks that are applied to access to web resources are implemented as web resource access rules.
Page top
Enabling and disabling Web Control
By default, Web Control is enabled. You can disable Web Control, if necessary.
To enable or disable Web Control:
- Open the application settings window.
- In the left part of the window, in the Security Controls section, select Web Control.
In the right part of the window, the settings of the Web Control component are displayed.
- Do one of the following:
- If you want to enable Web Control, select the Enable Web Control check box.
- If you want to disable Web Control, clear the Enable Web Control check box.
If Web Control is disabled, Kaspersky Endpoint Security does not control access to web resources.
- To save changes, click the Save button.
Web resource content categories
The web resource content categories (hereinafter also referred to as "categories") listed below have been selected to most fully describe the blocks of data hosted by web resources, taking into account their functional and thematic features. The order in which the categories appear in this list does not reflect the relative importance or prevalence of such categories on the Internet. The category names are provisional and used solely for the purposes of Kaspersky applications and websites. The names do not necessarily reflect the meaning implied by law. One web resource can belong to several categories at once.
Adult content
This category includes the following types of web resources:
- Web resources containing any photo or video materials depicting genitals of humans or humanoid creatures, acts of sexual intercourse or self-stimulation performed by human beings or humanoid creatures.
- Web resources containing any text materials, including literary or artistic materials, describing genitals of humans or humanoid creatures, acts of sexual intercourse or self-stimulation performed by human beings or humanoid creatures.
- Web resources devoted to a discussion of the sexual aspect of human relations.
- Web resources containing erotic materials, works that provide a realistic portrayal of sexual behavior of humans, or works of art designed to stimulate sexual arousal.
- Web resources of official media outlets and online communities with an established target audience, containing a special section and/or individual articles devoted to the sexual aspect of human relations.
- Web resources devoted to sexual perversions.
- Web resources that advertise and sell items for use in sex and stimulation of sexual arousal, sexual services and intimate dating, including services provided online via erotic video chats, "telephone sex", "sexting" ("virtual sex").
- Web resources with the following contents:
- Articles and blogs covering sex education with both scientific and popular themes.
- Medical encyclopedias, specifically their sections about sexual reproduction.
- Resources of medical institutions, specifically their sections covering treatment of sexual organs.
Software, audio, video
This category includes the following subcategories that you can individually select:
- Audio and video.
This subcategory includes web resources distributing audio and video materials: movies, recordings of sports broadcasts, recordings of concerts, songs, movie clips, videos, tutorial audio and video recordings, etc.
- Torrents.
This subcategory includes websites of torrent trackers intended for sharing files of unlimited size.
- File sharing.
This subcategory includes file sharing websites irrespective of the physical location of files being distributed.
Alcohol, tobacco, narcotics
This category includes web resources whose content is directly or indirectly related to alcoholic or alcohol-containing products, tobacco products, and narcotic, psychotropic and/or intoxicating substances.
- Web resources that advertise and sell such substances and paraphernalia for consuming them.
- Web resources with instructions on how to consume or produce narcotic, psychotropic, and/or intoxicating substances.
This category includes web resources addressing scientific and medical topics.
Violence
This category includes web resources containing any photo, video or text materials describing acts of physical or psychological violence directed against human beings, or cruel treatment of animals.
- Web resources depicting or describing scenes of executions, torture, or abuse, as well as tools intended for such practices.
Overlaps the "Weapons, explosives, pyrotechnics" category.
- Web resources depicting or describing scenes of murder, fighting, battery, or rape, scenes in which humans, animals, or imaginary creatures are abused or humiliated.
- Web resources with information inciting acts that jeopardize life and/or health, including self-harm or suicide.
- Web resource with information substantiating or justifying the admissibility of violence and/or cruelty, or inciting violent acts against humans or animals.
- Web resources with particularly realistic portrayals or descriptions of victims and atrocities of war, armed conflicts, and military clashes, accidents, catastrophes, natural disasters, industrial or social cataclysms, or human suffering.
- Browser computer games with scenes of violence and cruelty, including the so-called "shooters", "fightings", "slashers", etc.
Overlaps the "Computer games" category.
Weapons, explosives, pyrotechnics
This category includes web resources with information about weapons, explosives, and pyrotechnical products:
- Websites of weapons, explosives, and pyrotechnical products manufacturers and stores.
- Web resources devoted to the manufacture or use of weapons, explosives, and pyrotechnical products.
- Web resources containing analytical, historical, manufacturing, and encyclopedic materials devoted to weapons, explosives, and pyrotechnical products.
The term "weapons" means appliances, items, and means designed to harm the life or health of humans and animals and/or damage equipment and structures.
Profanity, obscenity
This category includes web resources where profane language has been detected.
Overlaps the "Adult content" category.
This category also includes web resources with linguistic and philological materials containing profanity as the subject of study.
Internet communication
This category includes web resources that enable users (whether registered or not) to send personal messages to other users of the relevant web resources or other online services and/or add content (either open to public access or restricted) to the relevant web resources on certain terms. You can individually select the following subcategories:
- Chats and forums and IM.
This subcategory includes web resources intended for public discussion of various topics using special web applications, as well as web resources designed to distribute or support instant messaging applications that enable real-time communication.
- Blogs.
This subcategory includes blog platforms, which are websites that provide paid or free services for creating and maintaining blogs.
- Social networks.
This subcategory includes websites designed for building, displaying, and managing contacts between persons, organizations, and governments, which require registration of a user account as a condition of participation.
- Dating sites.
This subcategory includes web resources serving as a variety of social networks providing paid or free services.
Overlaps the "Adult content" categories.
- Web-based email.
This subcategory includes only login pages of an email service and mailbox pages containing emails and associated data (such as personal contacts). This category does not include other web pages of an Internet service provider that also offers email service.
Gambling, lotteries, sweepstakes
This category includes web resources that offer users to participate financially in gambling, even if such financial participation is not a mandatory condition for access to the website. This category includes web resources offering:
- Gambling in which participants are required to make monetary contributions.
Overlaps the "Computer games" category.
- Sweepstakes that involve betting with money.
- Lotteries that involve purchasing lottery tickets or numbers.
- Information that can trigger the desire to participate in gambling, sweepstakes, and lotteries.
This category includes games that offer free-of-charge participation as a separate mode, as well as web resources that actively advertise web resources falling into this category to users.
Online stores, banks, payment systems
This category includes web resources designed for any online transactions in non-cash monetary funds using special-purpose web applications. You can individually select the following subcategories:
- Online stores.
This subcategory includes online shops and auctions selling any goods, work or services to individuals and/or legal entities, including websites of stores that conduct sales exclusively online and online profiles of physical stores that accept online payments.
- Banks.
This subcategory includes specialized web pages of banks with online banking functionality, including wire (electronic) transfers between bank accounts, making bank deposits, performing currency conversion, paying for third-party services, etc.
- Payment systems.
This subcategory includes web pages of e-money systems that provide access to the user's personal account.
In technical terms, payment can be effected using both bank cards of any types (plastic or virtual, debit or credit, local or international) and e-money. Web resources can fall into this category regardless of whether or not they have such technical aspects as data transmission over the SSL protocol, the use of 3D Secure authentication, etc.
Job search
This category includes web resources designed to bring together employers and job seekers:
- Websites of recruitment agencies (employment agencies and/or headhunting agencies).
- Websites of employers with descriptions of available job openings and their advantages.
- Independent portals with offers of employment from employers and recruitment agencies.
- Professional social networks that, among all else, make it possible to publish or find information about specialists who are not actively searching for employment.
Anonymizers
This category includes web resources that act as an intermediary in downloading content of other web resources using special web applications for purposes of:
- Bypassing restrictions imposed by a LAN administrator on access to web addresses or IP addresses;
- Anonymously accessing web resources, including web resources that specifically reject HTTP requests from certain IP addresses or their groups (for example, IP addresses grouped by country of origin).
This category includes both web resources intended exclusively for the above mentioned purposes ("anonymizers") and web resources with technically similar functionality.
Computer games
This category includes web resources devoted to computer games of various genres:
- Websites of computer game developers.
- Web resources devoted to a discussion of computer games.
- Web resources providing the technical capability for online participation in gaming, together with other participants or individually, with local installation of applications or without such installation ("browser games").
- Web resources designed to advertise, distribute, and support gaming software.
Religions, religious associations
This category includes web resources with materials on public movements, associations, and organizations with a religious ideology and/or cult in any manifestations.
- Websites of official religious organizations at different levels, from international religions to local religious communities.
- Websites of unregistered religious associations and societies that historically emerged by splintering from a dominant religious association or community.
- Websites of religious associations and communities that have emerged independently of traditional religious movements, including at the initiative of a specific founder.
- Websites of inter-confessional organizations pursuing cooperation among representatives of different traditional religions.
- Web resources with scholarly, historical, and encyclopedic materials on the subject of religions.
- Web resources with detailed portrayals or descriptions of the worship as part of religious cults, including rites and rituals involving the worship of God, beings and/or items believed to have supernatural powers.
News media
This category includes web resources with public news content created by the mass media or online publications that let users add their own news reports:
- Websites of official media outlets.
- Websites offering information services with the attribution of official sources of information.
- Websites offering aggregation services, of collections of news information from various official and unofficial sources.
- Websites where news content is created by users themselves ("social news sites").
Banners
This category includes web resources with banners. Advertising information on banners may distract users from their activities, while banner downloads increase the amount of traffic.
Regional legal restrictions
This category includes the Blocked as required by Russian Federation law subcategory, which includes web resources that are blocked in accordance with the law of the Russian Federation.
Page top
About web resource access rules
It is not recommended to create more than 1000 rules of access to web resources, as this can cause the system to become unstable.
A web resource access rule is a set of filters and actions that Kaspersky Endpoint Security performs when the user visits web resources that are described in the rule during the time span that is indicated in the rule schedule. Filters allow you to precisely specify a pool of web resources to which access is controlled by the Web Control component.
The following filters are available:
- Filter by content. Web Control categorizes web resources by content and data type. You can control user access to web resources with content and data falling into the types defined by these categories. When the users visit web resources that belong to the selected content category and / or data type category, Kaspersky Endpoint Security performs the action that is specified in the rule.
- Filter by web resource addresses. You can control user access to all web resource addresses or to individual web resource addresses and / or groups of web resource addresses.
If filtering by content and filtering by web resource addresses are specified, and the specified web resource addresses and / or groups of web resource addresses belong to the selected content categories or data type categories, Kaspersky Endpoint Security does not control access to all web resources in the selected content categories and / or data type categories. Instead, the application controls access only to the specified web resource addresses and / or groups of web resource addresses.
- Filter by names of users and user groups. You can specify the names of users and / or groups of users for which access to web resources is controlled according to the rule.
- Rule schedule. You can specify the rule schedule. The rule schedule determines the time span during which Kaspersky Endpoint Security monitors access to web resources covered by the rule.
After Kaspersky Endpoint Security is installed, the list of rules of the Web Control component is not blank. Two rules are preset:
- The Scripts and Stylesheets rule, which grants all users access at all times to web resources whose addresses contain the names of files with the css, js, or vbs extensions. For example: http://www.example.com/style.css, http://www.example.com/style.css?mode=normal.
- The "Default rule" which grants all users access to any web resources at any time.
Actions with web resource access rules
You can take the following actions on web resource access rules:
- Add a new rule
- Edit a rule
- Assign priority to a rule
The priority of a rule is defined by the position of the line containing a brief description of this rule within the access rules table in the settings window of the Web Control component. This means that a rule that is higher in the access rules table has a higher priority than one that is located below it.
If the web resource that the user attempts to access matches the parameters of several rules, Kaspersky Endpoint Security performs an action according to the rule with the highest priority.
- Test a rule.
You can check the consistency of rules by using the Rules diagnostics function.
- Enable and disable a rule.
A web resource access rule can be enabled (operation status: On) or disabled (operation status: Off). By default, after a rule is created, it is enabled (operation status: On). You can disable the rule.
- Delete rule
Adding and editing a web resource access rule
To add or edit a web resource access rule:
- Open the application settings window.
- In the left part of the window, in the Security Controls section, select Web Control.
In the right part of the window, the settings of the Web Control component are displayed.
- Do one of the following:
- To add a rule, click the Add button.
- If you want to edit a rule, select the rule in the table and click the Edit button.
The Rule of access to web resources window opens.
- Specify or edit the settings of the rule. To do so:
- In the Name field, enter or edit the name of the rule.
- From the Filter content drop-down list, select the required option:
- Any content.
- By content categories.
- By types of data.
- By content categories and types of data.
- If an option other than Any content is selected, sections open for selecting categories of content and/or data types. Select the check boxes next to the names of the required categories of content and/or data types.
Selecting the check box next to the name of a content category and/or data type means that Kaspersky Endpoint Security applies the rule to control access to web resources that belong to the selected categories of content and/or data types.
- From the Apply to addresses drop-down list, select the required option:
- To all addresses.
- To individual addresses.
- If the To individual addresses option is selected, a section opens where you create a list of web resources. You can add or edit the addresses and / or groups of addresses of web resources by using the Add, Edit, and Delete buttons.
- Select the Specify users and / or groups check box.
- Click the Select button.
The Select Users or Groups window in Microsoft Windows opens.
- Specify or edit the list of users and / or groups of users for which access to web resources that are described by the rule is to be allowed or blocked.
- From the Action drop-down list, select the required option:
- Allow If this value is selected, Kaspersky Endpoint Security allows access to web resources that match the parameters of the rule.
- Block If this value is selected, Kaspersky Endpoint Security blocks access to web resources that match the parameters of the rule.
- Warn. If this value is selected, Kaspersky Endpoint Security displays a warning that a web resource is unwanted when the user attempts to access web resources that match the rule. By using links from the warning message, the user can obtain access to the requested web resource.
- In the Rule schedule drop-down list, select the name of the necessary schedule or generate a new schedule based on the selected rule schedule. To do so:
- Opposite the Rule schedule drop-down list, click the Settings button.
The Rule schedule window opens.
- To add to the rule schedule a time interval during which the rule does not apply, in the table that shows the rule schedule, click the table cells that correspond to the time and day of the week that you want to select.
The color of the cells turns gray.
- To substitute a time interval during which the rule applies with a time interval during which the rule does not apply, click the gray cells in the table that correspond to the time and day of the week that you want to select.
The color of the cells turns green.
- Click the Save as button.
The Rule schedule name window opens.
- Type a rule schedule name or leave the default name that is suggested.
- Click OK.
- Opposite the Rule schedule drop-down list, click the Settings button.
- In the Rule of access to web resources window, click OK.
- To save changes, click the Save button.
Assigning priorities to web resource access rules
You can assign priorities to each rule from the list of rules, by arranging the rules in a certain order.
To assign a priority to a web resource access rule:
- Open the application settings window.
- In the left part of the window, in the Security Controls section, select Web Control.
In the right part of the window, the settings of the Web Control component are displayed.
- In the right part of the window, select the rule for which you want to change the priority.
- Use the Move up and Move down buttons to move the rule to the required rank in the list of rules.
- Repeat steps 3–4 for the rules whose priority you want to change.
- To save changes, click the Save button.
Testing web resource access rules
To check the consistency of Web Control rules, you can test them. For this purpose, the Web Control component includes a Rules Diagnostics function.
To test the web resource access rules:
- Open the application settings window.
- In the left part of the window, in the Security Controls section, select Web Control.
In the right part of the window, the settings of the Web Control component are displayed.
- In the right part of the window, click the Diagnostics button.
The Rules diagnostics window opens.
- Fill in the fields in the Conditions section:
- If you want to test the rules that Kaspersky Endpoint Security uses to control access to a specific web resource, select the Specify address check box Enter the address of the web resource in the field below.
- If you want to test the rules that Kaspersky Endpoint Security uses to control access to web resources for specified users and / or groups of users, specify a list of users and / or groups of users.
- If you want to test the rules that Kaspersky Endpoint Security uses to control access to web resources of specified content categories and / or data type categories, from the Filter content drop-down list, select the required option (By content categories, By types of data, or By content categories and types of data).
- If you want to test the rules with account of the time and day of the week when an attempt is made to access the web resources that are specified in the rule diagnostics conditions, select the Include time of access attempt check box. Then specify the day of the week and the time.
- Click the Test button.
Test completion is followed by a message with information about the action that is taken by Kaspersky Endpoint Security, according to the first rule that is triggered on the attempt to access the specified web resource (allow, block, or warn). The first rule to be triggered is the one with a rank on the list of Web Control rules which is higher than that of other rules meeting the diagnostics conditions. The message is displayed on the right of the Test button. The following table lists the remaining triggered rules, specifying the action taken by Kaspersky Endpoint Security. The rules are listed in the order of declining priority.
Page top
Enabling and disabling a web resource access rule
To enable or disable a web resource access rule:
- Open the application settings window.
- In the left part of the window, in the Security Controls section, select Web Control.
In the right part of the window, the settings of the Web Control component are displayed.
- In the right part of the window, select the rule that you want to enable or disable.
- In the Status column, do the following:
- If you want to enable the use of the rule, select the On value.
- If you want to disable the use of the rule, select the Off value.
- To save changes, click the Save button.
Migrating web resource access rules from previous versions of the application
When Kaspersky Endpoint Security 10 Service Pack 2 for Windows or an earlier version of the application is upgraded to Kaspersky Endpoint Security 11 for Windows, the web resource access rules based on web resource content categories are migrated as follows:
- Web resource access rules that are based on one or several web resource content categories from the "Chats and forums", "Web-based email", and "Social networks" lists migrate to the "Internet communication" web resource content category.
- Web resource access rules based on one or several web resource content categories from the "E-stores" and "Payment systems" lists migrate to the "Online stores, banks, payment systems" web resource content category.
- Web resource access rules based on the "Gambling" web resource content category migrate to the "Gambling, lotteries, sweepstakes" content category.
- Web resource access rules based on the "Browser games" web resource content category migrate to the "Computer games" content category.
- Web resource access rules based on web resource content categories that are not enumerated in the list above are migrated without changes.
Exporting and importing the list of web resource addresses
If you have created a list of web resource addresses in a web resource access rule, you can export it to a .txt file. You can subsequently import the list from this file to avoid creating a new list of web resource addresses manually when configuring an access rule. The option of exporting and importing the list of web resource addresses may be useful if, for example, you create access rules with similar parameters.
To export a list of web resource addresses to a file:
- Open the application settings window.
- In the left part of the window, in the Security Controls section, select Web Control.
In the right part of the window, the settings of the Web Control component are displayed.
- Select the rule whose list of web resource addresses you want to export to a file.
- Click the Edit button.
The Rule of access to web resources window opens.
- If you do not want to export the entire list of web resource addresses, but rather just a part of it, select the required web resource addresses.
- To the right of the field with the list of web resource addresses, click the
 button.
The action confirmation window opens.
- Do one of the following:
- If you want to export only the selected items of the web resource address list, in the action confirmation window, click the Yes button.
- If you want to export all items of the list of web resource addresses, in the action confirmation window, click the No button.
The standard Save as window of Microsoft Office opens.
- In the Save as Microsoft Windows window, select the file to which you want to export the list of web resource addresses. Click the Save button.
To import the list of web resource addresses from a file into a rule:
- Open the application settings window.
- In the left part of the window, in the Security Controls section, select Web Control.
In the right part of the window, the settings of the Web Control component are displayed.
- Do one of the following:
- If you want to create a new web resource access rule, click the Add button
- Select the web resource access rule that you want to edit. Then click the Edit button.
The Rule of access to web resources window opens.
- Do one of the following:
- If you are creating a new web resource access rule, select To individual addresses from the Apply to addresses drop-down list.
- If you are editing a web resource access rule, go to step 5 of these instructions.
- To the right of the field with the list of web resource addresses, click the
 button.
If you are creating a new rule, the standard Microsoft Windows Open file window opens.
If you are editing a rule, a window requesting your confirmation opens.
- Do one of the following:
- If you are editing a new web resource access rule, go to step 7 of these instructions.
- If you are editing a web resource access rule, do one of the following actions in the action confirmation window:
- If you want to add imported items of the list of web resource addresses to the existing ones, click the Yes button.
- If you want to delete the existing items of the list of web resource addresses and to add the imported ones, click the No button.
The Open file window in Microsoft Windows opens.
- In the Open file window in Microsoft Windows, select a file with a list of web resource addresses to import.
- Click the Open button.
- In the Rule of access to web resources window, click OK.
Editing masks for web resource addresses
Using a web resource address mask (also referred to as "address mask") may be useful if you need to enter numerous similar web resource addresses when creating a web resource access rule. If crafted well, one address mask can replace a large number of web resource addresses.
When creating an address mask, follow these rules:
- The
*character replaces any sequence that contains zero or more characters.For example, if you enter the *abc* address mask, the access rule is applied to all web resources that contain the sequence abc. Example: http://www.example.com/page_0-9abcdef.html.
To include the
*character in the address mask, enter the*character twice. - The
www.character sequence at the start of the address mask is interpreted as a*.sequence.Example: the address mask www.example.com is treated as *.example.com.
- If an address mask does not start with the
*character, the content of the address mask is equivalent to the same content with the*.prefix. - A sequence of
*.characters at the beginning of an address mask is interpreted as*.or an empty string.Example: the address mask http://www.*.example.com covers the address http://www2.example.com.
- If an address mask ends with a character other than
/or*, the content of the address mask is equivalent to the same content with the/*postfix.Example: the address mask http://www.example.com covers such addresses as http://www.example.com/abc, where a, b, and c are any characters.
- If an address mask ends with the
/character, the content of the address mask is equivalent to the same content with the /*.postfix. - The character sequence
/*at the end of an address mask is interpreted as/*or an empty string. - Web resource addresses are verified against an address mask, taking into account the protocol (http or https):
- If the address mask contains no network protocol, this address mask covers addresses with any network protocol.
Example: the address mask example.com covers the addresses http://example.com and https://example.com.
- If the address mask contains a network protocol, this address mask only covers addresses with the same network protocol as that of the address mask.
Example: the address mask http://*.example.com covers the address http://www.example.com but does not cover https://www.example.com.
- If the address mask contains no network protocol, this address mask covers addresses with any network protocol.
- An address mask that is in double quotes is treated without considering any additional replacements, except the
*character if it has been initially included in the address mask. Rules 5 and 7 do not apply to address masks enclosed in double quotation marks (see examples 14 – 18 in the table below). - The user name and password, connection port, and character case are not taken into account during comparison with the address mask of a web resource.
Examples of how to use rules for creating address masks
No.
Address mask
Address of web resource to verify
Is the address covered by the address mask
Comment
1
*.example.com
http://www.123example.com
No
See rule 1.
2
*.example.com
http://www.123.example.com
Yes
See rule 1.
3
*example.com
http://www.123example.com
Yes
See rule 1.
4
*example.com
http://www.123.example.com
Yes
See rule 1.
5
http://www.*.example.com
http://www.123example.com
No
See rule 1.
6
www.example.com
http://www.example.com
Yes
See rules 2, 1.
7
www.example.com
https://www.example.com
Yes
See rules 2, 1.
8
http://www.*.example.com
http://123.example.com
Yes
See rules 2, 4, 1.
9
www.example.com
http://www.example.com/abc
Yes
See rules 2, 5, 1.
10
example.com
http://www.example.com
Yes
See rules 3, 1.
11
http://example.com/
http://example.com/abc
Yes
See rule 6.
12
http://example.com/*
http://example.com
Yes
See rule 7.
13
http://example.com
https://example.com
No
See rule 8.
14
"example.com"
http://www.example.com
No
See rule 9.
15
"http://www.example.com"
http://www.example.com/abc
No
See rule 9.
16
"*.example.com"
http://www.example.com
Yes
See rules 1, 9.
17
"http://www.example.com/*"
http://www.example.com/abc
Yes
See rules 1, 9.
18
"www.example.com"
http://www.example.com; https://www.example.com
Yes
See rules 9, 8.
19
www.example.com/abc/123
http://www.example.com/abc
No
An address mask contains more information than the address of a web resource.
Editing templates of Web Control messages
Depending on the type of action that is specified in the properties of Web Control rules, Kaspersky Endpoint Security displays a message of one of the following types when users attempt to access Internet resources (the application substitutes an HTML page with a message for the HTTP server response):
- Warning message. This message warns the user that visiting the web resource is not recommended and/or violates the corporate security policy. Kaspersky Endpoint Security displays a warning message if the Warn option is selected from the Action drop-down list in the settings of the rule that describes this web resource.
If the user believes that the warning is mistaken, the user may click the link from the warning to send a pre-generated message to the local corporate network administrator.
- Message informing of blocking of a web resource. Kaspersky Endpoint Security displays a message informing that a web resource is blocked if the Block option is selected from the Action drop-down list in the settings of the rule that describes this web resource.
If the user believes that the web resource is blocked by mistake, the user may click the link in the web resource block notification message to send a pre-generated message to the local corporate network administrator.
While processing web traffic received over the HTTPS protocol, Kaspersky Endpoint Security blocks forbidden web resources without displaying Web Control messages.
Special templates are provided for the warning message, the message informing that a web resource is blocked, and the message sent to the LAN administrator. You can modify their content.
To change the template for Web Control messages:
- Open the application settings window.
- In the left part of the window, in the Security Controls section, select Web Control.
In the right part of the window, the settings of the Web Control component are displayed.
- In the right part of the window, click the Templates button.
The Message templates window opens.
- Do one of the following:
- If you want to edit the template of the message that warns the user against visiting a web resource, select the Warning tab.
- If you want to edit the template of the message that informs the user that access to a web resource is blocked, select the Blockage tab.
- To edit the template of the message sent to the administrator, select the Message to administrator tab.
- Edit the message template. You can also use the Variable drop-down list, as well as the Default and Link (this button is not available on the Message to administrator tab) buttons.
- Click OK.
- To save changes, click the Save button.
Data Encryption
If Kaspersky Endpoint Security is installed on a computer running Microsoft Windows for Workstations, data encryption functionality is fully available. If Kaspersky Endpoint Security is installed on a computer running Microsoft Windows for File Servers, only full disk encryption using BitLocker Drive Encryption technology is available.
This section contains information about encryption and decryption of files on local computer drives, hard drives and removable drives, and provides instructions on how to configure and perform encryption and decryption of data using Kaspersky Endpoint Security and the Kaspersky Endpoint Security administration plug-in.
If there is no access to encrypted data, see the special instructions for working with encrypted data (Working with encrypted files in the event of limited file encryption functionality, Working with encrypted devices should access to them not exist).
About data encryption
Kaspersky Endpoint Security lets you encrypt files and folders that are stored on local and removable drives, or entire removable drives and hard drives. Data encryption minimizes the risk of information leaks that may occur when a portable computer, removable drive or hard drive is lost or stolen, or when data is accessed by unauthorized users or applications.
If the license has expired, the application does not encrypt new data, and old encrypted data remains encrypted and available for use. In this event, encrypting new data requires the program be activated with a new license that permits the use of encryption.
If your license has expired, or the End User License Agreement has been violated, the key, Kaspersky Endpoint Security, or encryption components has been removed, the encrypted status of previously encrypted files is not guaranteed. This is because some applications, such as Microsoft Office Word, create a temporary copy of files during editing. When the original file is saved, the temporary copy replaces the original file. As a result, on a computer that has no or inaccessible encryption functionality, the file remains unencrypted.
Kaspersky Endpoint Security offers the following aspects of data protection:
- File Level Encryption on local computer drives. You can compile lists of files by extension or group of extensions and lists of folders stored on local computer drives, and create rules for encrypting files that are created by specific applications. After a Kaspersky Security Center policy is applied, Kaspersky Endpoint Security encrypts and decrypts the following files:
- files individually added to lists for encryption and decryption;
- files stored in folders added to lists for encryption and decryption;
- files created by separate applications.
For details on applying a Kaspersky Security Center policy, please refer to the Kaspersky Security Center Help Guide.
- Encryption of removable drives. You can specify a default encryption rule, according to which the application applies the same action to all removable drives, or specify encryption rules for individual removable drives.
The default encryption rule has a lower priority than encryption rules created for individual removable drives. Encryption rules created for removable drives of the specified device model have a lower priority than encryption rules created for removable drives with the specified device ID.
To select an encryption rule for files on a removable drive, Kaspersky Endpoint Security checks whether or not the device model and ID are known. The application then performs one of the following operations:
- If only the device model is known, the application uses the encryption rule (if any) created for removable drives of the specific device model.
- If only the device ID is known, the application uses the encryption rule (if any) created for removable drives with the specific device ID.
- If the device model and ID are known, the application applies the encryption rule (if any) created for removable drives with the specific device ID. If no such rule exists, but there is an encryption rule created for removable drives with the specific device model, the application applies this rule. If no encryption rule is specified for the specific device ID nor for the specific device model, the application applies the default encryption rule.
- If neither the device model nor device ID is known, the application uses the default encryption rule.
The application lets you prepare a removable drive for using encrypted data stored on it in portable mode. After enabling portable mode, you can access encrypted files on removable drives connected to a computer without encryption functionality.
The application performs the action specified in the encryption rule when the Kaspersky Security Center policy is applied.
- Managing rules of application access to encrypted files. For any application, you can create an encrypted file access rule that blocks access to encrypted files or allows access to encrypted files only as ciphertext, which is a sequence of characters obtained when encryption is applied.
- Creating encrypted packages. You can create encrypted packages and protect access to such archives with a password. The contents of encrypted packages can be accessed only by entering the passwords with which you protected access to those packages. Such packages can be securely transmitted over networks or on removable drives.
- Full Disk Encryption. You can select an encryption technology: Kaspersky Disk Encryption or BitLocker Drive Encryption (hereinafter also referred to as simply "BitLocker").
BitLocker is a technology that is part of the Windows operating system. If a computer is equipped with a Trusted Platform Module (TPM), BitLocker uses it to store recovery keys that provide access to an encrypted hard drive. When the computer starts, BitLocker requests the hard drive recovery keys from the Trusted Platform Module and unlocks the drive. You can configure the use of a password and/or PIN code for accessing recovery keys.
You can specify the default full disk encryption rule and create a list of hard drives to be excluded from encryption. Kaspersky Endpoint Security performs full disk encryption by sector after the Kaspersky Security Center policy is applied. The application encrypts all logical partitions of hard drives simultaneously. For details on applying a Kaspersky Security Center policy, please refer to the Kaspersky Security Center Help Guide.
After the system hard drives have been encrypted, at the next computer startup the user must complete authentication using the
before the hard drives can be accessed and the operating system is loaded. This requires entering the password of the token or smart card connected to the computer, or the user name and password of the Authentication Agent account created by the local area network administrator using Authentication Agent account management tasks. These accounts are based on Microsoft Windows accounts under which users log into the operating system. You can manage Authentication Agent accounts and use the Single Sign-On (SSO) technology that lets you log into the operating system automatically using the user name and password of the Authentication Agent account.If you back up a computer and then encrypt the computer data, after which you restore the backup copy of the computer and encrypt the computer data again, Kaspersky Endpoint Security creates duplicates of Authentication Agent accounts. To remove the duplicate accounts, you must use the klmover utility with the
dupfixkey. The klmover utility is included in the Kaspersky Security Center build. You can read more about its operation in the Kaspersky Security Center Help Guide.When the application version is upgraded to Kaspersky Endpoint Security 11 for Windows, the list of Authentication Agent accounts is not saved.
Access to encrypted hard drives is possible only from computers on which Kaspersky Endpoint Security with full disk encryption functionality is installed. This precaution minimizes the risk of data leaks from an encrypted hard drive when an attempt to access it is made outside of the local area network of the company.
To encrypt hard drives and removable drives, you can use the Encrypt used disk space only function. It is recommended you only use this function for new devices that have not been previously used. If you are applying encryption to a device that is already in use, it is recommended you encrypt the entire device. This ensures that all data is protected - even deleted data that might still contain retrievable information.
Before beginning encryption, Kaspersky Endpoint Security obtains the map of file system sectors. The first wave of encryption includes sectors that are occupied by files at the moment when encryption is started. The second wave of encryption includes sectors that were written to after encryption began. After encryption is complete, all sectors containing data are encrypted.
After encryption is complete and a user deletes a file, the sectors that stored the deleted file become available for storing new information at the file system level but remain encrypted. Thus, as files are written to a new device and the device is regularly encrypted with the Encrypt used disk space only function enabled, all sectors will be encrypted after some time.
The data needed to decrypt files is provided by the Kaspersky Security Center Administration Server that controlled the computer at the time of encryption. If the computer with encrypted files has found itself under the control of another Administration Server for any reason and the encrypted files had not been accessed a single time, access can be obtained in one of the following ways:
- request access to encrypted objects from the LAN administrator;
- restore data on encrypted devices using the Restore Utility;
- restore the configuration of the Kaspersky Security Center Administration Server that controlled the computer at the time of encryption from a backup copy and use this configuration on the Administration Server that now controls the computer with encrypted objects.
The application creates service files during encryption. Around 0.5% of non-fragmented free space on the hard drive is required to store them. If there is not enough non-fragmented free space on the hard drive, encryption will not start until enough space is freed up.
Compatibility between encryption functionality of Kaspersky Endpoint Security and Kaspersky Anti-Virus for UEFI is not supported. Encryption of the drives of computers on which Kaspersky Anti-Virus for UEFI is installed renders Kaspersky Anti-Virus for UEFI inoperable.
Encryption functionality limitations
Full disk encryption using Kaspersky Disk Encryption technology is unavailable for hard drives that do not meet the hardware and software requirements.
Kaspersky Endpoint Security does not support the following configurations:
- The boot loader is located on one drive while the operating system is on a different drive.
- The system contains embedded software of the UEFI 32 standard.
- Intel Rapid Start Technology and drives that have a hibernation partition even when Intel Rapid Start Technology is disabled.
- Drives in MBR format with more than four extended partitions.
- Swap file located on a non-system drive.
- Multiboot system with several simultaneously installed operating systems.
- Dynamic partitions (only primary partitions are supported).
- Drives with less than 0.5% free unfragmented disk space.
- Drives with a sector size different from 512 bytes or 4096 bytes that emulate 512 bytes.
- Hybrid drives.
Changing the encryption algorithm
The encryption algorithm used by Kaspersky Endpoint Security for data encryption depends on the encryption libraries that are included in the distribution kit.
To change the encryption algorithm:
- Decrypt objects that Kaspersky Endpoint Security encrypted before beginning to change the encryption algorithm.
After the encryption algorithm is changed, objects that were previously encrypted become unavailable.
- Remove Kaspersky Endpoint Security.
- Install Kaspersky Endpoint Security from the Kaspersky Endpoint Security distribution package containing an encryption algorithm for a different bit count.
Enabling Single Sign-On (SSO) technology
Single Sign-On (SSO) technology is incompatible with third-party providers of account credentials.
To enable Single Sign-On (SSO) technology:
- Open the Kaspersky Security Center Administration Console.
- In the Managed devices folder of the Administration Console tree, open the folder with the name of the administration group for which you want to enable Single Sign-On (SSO) technology.
- In the workspace, select the Policies tab.
- Select the necessary policy.
- Open the Properties: <Policy name> window by using one of the following methods:
- In the context menu of the policy, select Properties.
- Click the Configure policy link located in the right part of the Administration Console workspace.
- In the Data encryption section, select the Common encryption settings subsection.
- In the Common encryption settings subsection, click the Configure button in the Password settings section.
This opens the Authentication agent tab of the Encryption password settings window.
- Select the Use Single Sign-On (SSO) technology check box.
- Click OK.
- To save your changes, in the Properties: <Policy name> window, click OK.
- Apply the policy.
For details on applying a Kaspersky Security Center policy, please refer to the Kaspersky Security Center Help Guide.
Special considerations for file encryption
When using file encryption functionality, keep the following points in mind:
- The Kaspersky Security Center policy with preset settings for removable drive encryption is formed for a specific group of managed computers. Therefore, the result of applying the Kaspersky Security Center policy configured for encryption / decryption of removable drives depends on the computer to which the removable drive is connected.
- Kaspersky Endpoint Security does not encrypt / decrypt files with read-only status that are stored on removable drives.
- Kaspersky Endpoint Security encrypts / decrypts files in predefined folders only for local user profiles of the operating system. Kaspersky Endpoint Security does not encrypt / decrypt files in predefined folders of roaming user profiles, mandatory user profiles, temporary user profiles, and redirected folders. The list of standard folders recommended by Kaspersky for encryption includes the following folders:
- My Documents
- Favorites
- Cookies
- Desktop
- Temporary Internet Explorer files
- Temporary files
- Outlook files
- Kaspersky Endpoint Security does not encrypt files whose modification could harm the operating system and installed applications. For example, the following files and folders with all nested folders are on the list of encryption exclusions:
- %WINDIR%.
- %PROGRAMFILES%, %PROGRAMFILES(X86)%.
- Windows registry files.
The list of encryption exclusions cannot be viewed or edited. While files and folders on the list of encryption exclusions can be added to the encryption list, they will not be encrypted during a file encryption task.
- The following device types are supported as removable drives:
- Data media connected via the USB bus
- hard drives connected via USB and FireWire buses
- SSD drives connected via USB and FireWire buses
File Level Encryption on local computer drives
File Level Encryption on local computer drives is available if Kaspersky Endpoint Security is installed on a computer running Microsoft Windows for workstations. Encryption of files on local computer drives is unavailable if Kaspersky Endpoint Security is installed on a computer that runs on Microsoft Windows for file servers.
This section covers encryption of files on local computer drives and provides instructions on how to configure and perform encryption of files on local computer drives with Kaspersky Endpoint Security and the Kaspersky Endpoint Security Console Plug-in.
Encrypting files on local computer drives
Kaspersky Endpoint Security supports encryption of files on local drives with FAT32 and NTFS file systems.
To encrypt files on local drives:
- Open the Kaspersky Security Center Administration Console.
- In the Managed devices folder of the Administration Console tree, open the folder with the name of the administration group for which you want to configure encryption of files on local drives.
- In the workspace, select the Policies tab.
- Select the necessary policy.
- Open the Properties: <Policy name> window by using one of the following methods:
- In the context menu of the policy, select Properties.
- Click the Configure policy link located in the right part of the Administration Console workspace.
- In the Data encryption section, select File Level Encryption.
- In the right part of the window, select the Encryption tab.
- In the Encryption mode drop-down list, select the Default rules item.
- On the Encryption tab, click the Add button, and in the drop-down list select one of the following items:
- Select the Predefined folders item to add files from folders of local user profiles suggested by Kaspersky experts to an encryption rule.
The Select predefined folders window opens.
- Select the Custom folder item to add a manually entered folder path to an encryption rule.
The Add custom folder window opens.
- Select the Files by extension item to add file extensions to an encryption rule. Kaspersky Endpoint Security encrypts files with the specified extensions on all local drives of the computer.
The Add / edit list of file extensions window opens.
- Select the Files by group(s) of extensions item to add groups of file extensions to an encryption rule. Kaspersky Endpoint Security encrypts files that have the extensions listed in the groups of extensions on all local drives of the computer.
The Select groups of file extensions window opens.
- Select the Predefined folders item to add files from folders of local user profiles suggested by Kaspersky experts to an encryption rule.
- To save your changes, in the Properties: <Policy name> window, click OK.
- Apply the policy.
For details on applying a Kaspersky Security Center policy, please refer to the Kaspersky Security Center Help Guide.
As soon as the policy is applied, Kaspersky Endpoint Security encrypts the files that are included in the encryption rule and not included in the decryption rule.
If the same file has been added to the encryption rule and the decryption rule, Kaspersky Endpoint Security does not encrypt this file if it is not encrypted, and decrypts the file if it is encrypted.
Kaspersky Endpoint Security encrypts unencrypted files if their properties (file path / file name / file extension) still meet the encryption rule criteria after modification.
Kaspersky Endpoint Security postpones the encryption of open files until they are closed.
When the user creates a new file whose properties meet the encryption rule criteria, Kaspersky Endpoint Security encrypts the file as soon as it is opened.
If you move an encrypted file to another folder on the local drive, the file remains encrypted regardless of whether or not this folder is included in the encryption rule.
Page top
Forming encrypted file access rules for applications
To form encrypted file access rules for applications:
- Open the Kaspersky Security Center Administration Console.
- In the Managed devices folder in the Administration Console tree, open the folder with the name of the relevant administration group for which you want to configure encrypted file access rules for applications.
- In the workspace, select the Policies tab.
- Select the necessary policy.
- Open the Properties: <Policy name> window by using one of the following methods:
- In the context menu of the policy, select Properties.
- Click the Configure policy link located in the right part of the Administration Console workspace.
- In the Data encryption section, select File Level Encryption.
- In the Encryption mode drop-down list, select the Default rules item.
Access rules are applied only when in the Default rules mode. After applying access rules in Default rules mode, if you switch to Leave unchanged, mode, Kaspersky Endpoint Security will ignore all access rules. All applications will have access to all encrypted files.
- In the right part of the window, select the Rules for applications tab.
- If you want to select applications exclusively from the Kaspersky Security Center list, click the Add button and in the drop-down list select the Applications from Kaspersky Security Center list item.
The Add applications from Kaspersky Security Center list window opens.
Do the following:
- Specify the filters to narrow down the list of applications in the table. To do so, specify the values of the Application, Vendor, and Period added parameters, and all check boxes from the Group section.
- Click the Refresh button.
The table lists applications that match the applied filters.
- In the Applications column, select check boxes opposite the applications for which you want to form encrypted file access rules.
- In the Rule for application(s) drop-down list, select the rule that will determine the access of applications to encrypted files.
- In the Actions for applications that were selected earlier drop-down list, select the action to be taken by Kaspersky Endpoint Security on encrypted file access rules that were previously formed for such applications.
- Click OK.
The details of an encrypted file access rule for applications appear in the table on the Rules for applications tab.
- If you want to manually select applications, click the Add button and in the drop-down list select the Custom applications item.
The Add / edit names of the executable files of applications window opens.
Do the following:
- In the entry field, type the name or list of names of executable application files, including their extensions.
You can also add the names of executable files of applications from the Kaspersky Security Center list by clicking the Add from Kaspersky Security Center list button.
- If required, in the Description field, enter a description of the list of applications.
- In the Rule for application(s) drop-down list, select the rule that will determine the access of applications to encrypted files.
- Click OK.
The details of an encrypted file access rule for applications appear in the table on the Rules for applications tab.
- In the entry field, type the name or list of names of executable application files, including their extensions.
- Click OK to save changes.
Encrypting files that are created or modified by specific applications
You can create a rule by which Kaspersky Endpoint Security will encrypt all files created or modified by the applications specified in the rule.
Files that were created or modified by the specified applications before the encryption rule was applied will not be encrypted.
To configure encryption of files that are created or modified by specific applications:
- Open the Kaspersky Security Center Administration Console.
- In the Managed devices folder of the Administration Console tree, open the folder with the name of the relevant administration group for which you want to configure encryption of files that are created by specific applications.
- In the workspace, select the Policies tab.
- Select the necessary policy.
- Open the Properties: <Policy name> window by using one of the following methods:
- In the context menu of the policy, select Properties.
- Click the Configure policy link located in the right part of the Administration Console workspace.
- In the Data encryption section, select File Level Encryption.
- In the Encryption mode drop-down list, select the Default rules item.
Encryption rules are applied only in Default rules mode. After applying encryption rules in Default rules mode, if you switch to Leave unchanged, mode, Kaspersky Endpoint Security will ignore all encryption rules. Files that were previously encrypted will remain encrypted.
- In the right part of the window, select the Rules for applications tab.
- If you want to select applications exclusively from the Kaspersky Security Center list, click the Add button and in the drop-down list select the Applications from Kaspersky Security Center list item.
The Add applications from Kaspersky Security Center list window opens.
Do the following:
- Specify the filters to narrow down the list of applications in the table. To do so, specify the values of the Application, Vendor, and Period added parameters, and all check boxes from the Group section.
- Click the Refresh button.
The table lists applications that match the applied filters.
- In the Application column, select the check boxes opposite the applications whose created files need to be encrypted.
- In the Rule for application(s) drop-down list, select Encrypt all created files.
- In the Actions for applications that were selected earlier drop-down list, select the action to be taken by Kaspersky Endpoint Security on file encryption rules that were previously formed for such applications.
- Click OK.
Information about the encryption rule for files created or modified by the selected applications appears in the table on the Rules for applications tab.
- If you want to manually select applications, click the Add button and in the drop-down list select the Custom applications item.
The Add / edit names of the executable files of applications window opens.
Do the following:
- In the entry field, type the name or list of names of executable application files, including their extensions.
You can also add the names of executable files of applications from the Kaspersky Security Center list by clicking the Add from Kaspersky Security Center list button.
- If required, in the Description field, enter a description of the list of applications.
- In the Rule for application(s) drop-down list, select Encrypt all created files.
- Click OK.
Information about the encryption rule for files created or modified by the selected applications appears in the table on the Rules for applications tab.
- In the entry field, type the name or list of names of executable application files, including their extensions.
- Click OK to save changes.
Generating a decryption rule
To generate a decryption rule:
- Open the Kaspersky Security Center Administration Console.
- In the Managed devices folder in the Administration Console tree, open the folder with the name of the administration group for which you want to generate a list of files to be decrypted.
- In the workspace, select the Policies tab.
- Select the necessary policy.
- Open the Properties: <Policy name> window by using one of the following methods:
- In the context menu of the policy, select Properties.
- Click the Configure policy link located in the right part of the Administration Console workspace.
- In the Data Encryption section, select File Level Encryption.
- In the right part of the window, select the Decryption tab.
- In the Encryption mode drop-down list, select the Default rules item.
- On the Decryption tab, click the Add button, and in the drop-down list select one of the following items:
- Select the Predefined folders item to add files from folders of local user profiles suggested by Kaspersky experts to a decryption rule.
The Select predefined folders window opens.
- Select the Custom folder item to add a manually entered folder path to a decryption rule.
The Add custom folder window opens.
- Select the Files by extension item to add file extensions to a decryption rule. Kaspersky Endpoint Security does not encrypt files with the specified extensions on all local drives of the computer.
The Add / edit list of file extensions window opens.
- Select the Files by group(s) of extensions item to add groups of file extensions to a decryption rule. Kaspersky Endpoint Security does not encrypt files that have the extensions listed in the groups of extensions on all local drives of computers.
The Select groups of file extensions window opens.
- Select the Predefined folders item to add files from folders of local user profiles suggested by Kaspersky experts to a decryption rule.
- To save your changes, in the Properties: <Policy name> window, click OK.
- Apply the policy.
For details on applying a Kaspersky Security Center policy, please refer to the Kaspersky Security Center Help Guide.
If the same file has been added to the encryption rule and the decryption rule, Kaspersky Endpoint Security does not encrypt this file if it is not encrypted, and decrypts the file if it is encrypted.
Page top
Decrypting files on local computer drives
To decrypt files on local drives:
- Open the Kaspersky Security Center Administration Console.
- In the Managed devices folder of the Administration Console tree, open the folder with the name of the administration group for which you want to configure decryption of files on local drives.
- In the workspace, select the Policies tab.
- Select the necessary policy.
- Open the Properties: <Policy name> window by using one of the following methods:
- In the context menu of the policy, select Properties.
- Click the Configure policy link located in the right part of the Administration Console workspace.
- In the Data Encryption section, select File Level Encryption.
- In the right part of the window, select the Encryption tab.
- Remove files and folders that you want to decrypt from the encryption list. To do so, select files and select the Delete rule and decrypt files item in the context menu of the Remove button.
You can delete several items from the encryption list at once. To do so, while holding down the CTRL key, select the files you need by left-clicking them and select the Delete rule and decrypt files item in the context menu of the Remove button.
Files and folders removed from the encryption list are automatically added to the decryption list.
- Form a file decryption list.
- To save your changes, in the Properties: <Policy name> window, click OK.
- Apply the policy.
For details on applying a Kaspersky Security Center policy, please refer to the Kaspersky Security Center Help Guide.
As soon as the policy is applied, Kaspersky Endpoint Security decrypts encrypted files that are added to the decryption list.
Kaspersky Endpoint Security decrypts encrypted files if their parameters (file path / file name / file extension) change to match the parameters of objects added to the decryption list.
Kaspersky Endpoint Security postpones the decryption of open files until they are closed.
Page top
Creating encrypted packages
Kaspersky Endpoint Security does not perform file compression when it creates an encrypted package.
To create an encrypted package:
- On a computer with Kaspersky Endpoint Security installed and encryption functionality enabled, use any file manager to select files and/or folders that you want to add to an encrypted package. Right-click to open their context menu.
- In the context menu, select Add to encrypted package.
The standard Microsoft Windows dialog box Choose path to save the encrypted package opens.
- In the standard Microsoft Windows dialog box Choose path to save the encrypted package, select a destination for saving the encrypted package on the removable drive. Click the Save button.
The Add to encrypted package window opens.
- In the Add to encrypted package window, type and confirm a password.
- Click the Create button.
The encrypted package creation process starts. When the process finishes, a self-extracting password-protected encrypted package is created in the selected destination folder on the removable drive.
If you cancel the creation of an encrypted package, Kaspersky Endpoint Security performs the following operations:
- Terminates the processes of copying files to the package and ends all ongoing package encryption operations, if any.
- Removes all temporary files that have been created in the process of creating and encrypting a package and the file of the encrypted package itself.
- Notifies the user that the encrypted package creation process has been forcefully terminated.
Extracting encrypted packages
To extract an encrypted package:
- In any file manager, select an encrypted package. Click to start the Unpacking Wizard.
The Enter password window opens.
- Enter the password that protects the encrypted package.
- In the Enter password window, click OK.
If password entry is successful, the standard Browse Microsoft Windows dialog box opens.
- In the standard Browse Microsoft Windows dialog box, select the destination folder to extract the encrypted package to and click OK.
The process of extracting the encrypted package to the destination folder starts.
If the encrypted package was previously extracted to the specified destination folder, the existing files in the folder will be overwritten with the files from the encrypted package.
If you cancel the extraction of an encrypted package, Kaspersky Endpoint Security performs the following operations:
- Stops the package decryption process and terminates all operations of copying files from the encrypted package, if such operations are in progress.
- Deletes all temporary files created in the course of decryption and extraction of the encrypted package, as well as all files that have been already copied from the encrypted package to the destination folder.
- Notifies the user that the encrypted package extraction process has been forcefully terminated.
Encryption of removable drives
Encryption of removable drives is available if Kaspersky Endpoint Security is installed on a computer running Microsoft Windows for workstations. Encryption of removable drives is not available if Kaspersky Endpoint Security is installed on a computer running Microsoft Windows for file servers.
This section contains information on encryption of removable drives and instructions on configuring and performing encryption of removable drives using Kaspersky Endpoint Security and the Kaspersky Endpoint Security administration plug-in.
Starting encryption of removable drives
To encrypt removable drives:
- Open the Kaspersky Security Center Administration Console.
- In the Managed devices folder of the Administration Console tree, open the folder with the name of the administration group for which you want to configure encryption of removable drives.
- In the workspace, select the Policies tab.
- Select the necessary policy.
- Open the Properties: <Policy name> window by using one of the following methods:
- In the context menu of the policy, select Properties.
- Click the Configure policy link located in the right part of the Administration Console workspace.
- In the Data Encryption section, select the Encryption of removable drives subsection.
- In the Encryption mode drop-down list, select the default action to be performed by Kaspersky Endpoint Security on all removable drives that are connected to computers in the selected administration group:
- Encrypt entire removable drive. If this item is selected, when applying the Kaspersky Security Center policy with the specified encryption settings for removable drives, Kaspersky Endpoint Security encrypts the contents of removable drives sector by sector. As a result, the application encrypts not only files stored on removable drives but also file systems of removable drives, including the file names and folder structures. Kaspersky Endpoint Security does not re-encrypt removable drives that have already been encrypted.
This encryption scenario is enabled by the full disk encryption functionality of Kaspersky Endpoint Security.
- Encrypt all files. If this item is selected, when applying the Kaspersky Security Center policy with the specified encryption settings for removable drives, Kaspersky Endpoint Security encrypts all files that are stored on removable drives. Kaspersky Endpoint Security does not encrypt already-encrypted files again. The application does not encrypt the file systems of removable drives, including the names of encrypted files and folder structures.
- Encrypt new files only. If this item is selected, when applying the Kaspersky Security Center policy with the specified encryption settings for removable drives, Kaspersky Endpoint Security encrypts only those files that have been added to removable drives or that were stored on removable drives and have been modified after the Kaspersky Security Center policy was last applied.
- Decrypt entire removable drive. If this item is selected, when applying the Kaspersky Security Center policy with the specified encryption settings for removable drives, Kaspersky Endpoint Security decrypts all encrypted files that are stored on removable drives as well as the file systems of the removable drives if they were previously encrypted.
This encryption scenario is made possible by both file level encryption functionality and full disk encryption functionality of Kaspersky Endpoint Security.
- Leave unchanged. If this item is selected, when applying the Kaspersky Security Center policy with the specified encryption settings for removable drives, Kaspersky Endpoint Security does not encrypt or decrypt files on removable drives.
Kaspersky Endpoint Security supports encryption in FAT32 and NTFS file systems. If the Encrypt all files or Encrypt new files only option is selected and a removable drive with an unsupported file system is connected to the computer, the removable drive encryption task returns an error and Kaspersky Endpoint Security assigns read-only status to the removable drive.
- Encrypt entire removable drive. If this item is selected, when applying the Kaspersky Security Center policy with the specified encryption settings for removable drives, Kaspersky Endpoint Security encrypts the contents of removable drives sector by sector. As a result, the application encrypts not only files stored on removable drives but also file systems of removable drives, including the file names and folder structures. Kaspersky Endpoint Security does not re-encrypt removable drives that have already been encrypted.
- Create encryption rules for files on removable drives whose contents you want to encrypt.
- Apply the policy.
For details on applying a Kaspersky Security Center policy, please refer to the Kaspersky Security Center Help Guide.
As soon as the policy is applied, when the user connects a removable drive or if a removable drive is already connected, Kaspersky Endpoint Security notifies the user that the removable drive is subject to an encryption rule whereby data stored on the removable drive will be encrypted.
If the Leave unchanged rule is specified for the encryption of data on a removable drive, the application does not show the user any notifications.
The application warns the user that the encryption process may take some time.
The application prompts the user for confirmation of the encryption operation and performs the following actions:
- Encrypts data according to the policy settings, if the user consents to encryption.
- Leaves data unencrypted if the user rejects encryption, and restricts access to removable drive files to read-only.
- Leaves data unencrypted if the user ignores the prompt for encryption, restricts access to removable drive files to read-only, and prompts the user again to confirm data encryption the next time the Kaspersky Security Center policy is applied or a removable drive is connected.
The Kaspersky Security Center policy with preset settings for data encryption on removable drives is formed for a specific group of managed computers. Therefore, the result of data encryption on removable drives depends on the computer to which the removable drive is connected.
If the user initiates safe removal of a removable drive during data encryption, Kaspersky Endpoint Security interrupts the data encryption process and allows removal of the removable drive before the encryption process has finished.
If encryption of a removable drive failed, view the Data encryption report in the Kaspersky Endpoint Security interface. Access to files may be blocked by another application. In this case, try unplugging the removable drive from the computer and connecting it again.
Page top
Adding an encryption rule for removable drives
To add an encryption rule for removable drives:
- Open the Kaspersky Security Center Administration Console.
- In the Managed devices folder of the Administration Console tree, open the folder with the name of the administration group for which you want to add removable drive encryption rules.
- In the workspace, select the Policies tab.
- Select the necessary policy.
- Open the Properties: <Policy name> window by using one of the following methods:
- In the context menu of the policy, select Properties.
- Click the Configure policy link located in the right part of the Administration Console workspace.
- In the Data Encryption section, select the Encryption of removable drives subsection.
- Click the Add button, and in the drop-down list select one of the following items:
- If you want to add encryption rules for removable drives that are in the list of trusted devices of the Device Control component, select From list of trusted devices of this policy.
The Add devices from the list of trusted devices window opens.
- If you want to add encryption rules for removable drives that are in the Kaspersky Security Center list, select From Kaspersky Security Center list of devices.
The Add devices from Kaspersky Security Center list window opens.
- If you want to add encryption rules for removable drives that are in the list of trusted devices of the Device Control component, select From list of trusted devices of this policy.
- If you selected From Kaspersky Security Center list of devices during the previous step, specify the filters for displaying devices in the table. To do so:
- Specify the values of the following parameters: Display devices in the table for which the following is defined, Name, Computer, and Kaspersky Disk Encryption.
- Click the Refresh button.
- In the Encryption mode for selected devices drop-down list, select the action to be performed by Kaspersky Endpoint Security on files stored on the selected removable drives.
- Select the Portable mode check box if you want Kaspersky Endpoint Security to prepare removable drives before encryption, making it possible to use encrypted files stored on them in portable mode.
Portable mode lets you use encrypted files stored on removable drives that are connected to computers without encryption functionality.
- Select the Encrypt used disk space only check box if you want Kaspersky Endpoint Security to encrypt only those disk sectors that are occupied by files.
If you are applying encryption on a drive that is already in use, it is recommended to encrypt the entire drive. This ensures that all data is protected - even deleted data that might still contain retrievable information. The Encrypt used disk space only function is recommended for new drives that have not been previously used.
If a device was previously encrypted using the Encrypt used disk space only function, after applying a policy in Encrypt entire removable drive mode, sectors that are not occupied by files will still not be encrypted.
- In the Actions for devices that were selected earlier drop-down list, select the action to be performed by Kaspersky Endpoint Security according to encryption rules that had been previously defined for removable drives:
- If you want the previously created encryption rule for the removable drive to remain unchanged, select Skip.
- If you want a previously created encryption rule for a removal drive to be replaced by the new rule, select Update.
- Click OK.
Lines containing the parameters of the created encryption rules appear in the Custom rules table.
- Click OK to save changes.
The added removable drive encryption rules are applied to removable drives that are connected to any computers controlled by the modified policy of Kaspersky Security Center.
Page top
Editing an encryption rule for removable drives
To edit an encryption rule for a removable drive:
- Open the Kaspersky Security Center Administration Console.
- In the Managed devices folder of the Administration Console tree, open the folder with the name of the administration group for which you want to edit a removable drive encryption rule.
- In the workspace, select the Policies tab.
- Select the necessary policy.
- Open the Properties: <Policy name> window by using one of the following methods:
- In the context menu of the policy, select Properties.
- Click the Configure policy link located in the right part of the Administration Console workspace.
- In the Data Encryption section, select the Encryption of removable drives subsection.
- In the list of removable drives for which encryption rules have been configured, select an entry corresponding to the removable drive you need.
- Click the Set a rule button to edit the encryption rule for the selected removable drive.
The context menu of the Set a rule button opens.
- In the context menu of the Set a rule button, select the action to be performed by Kaspersky Endpoint Security on files stored on the selected removable drive.
- Click OK to save changes.
The modified removable drive encryption rules are applied to removable drives that are connected to any computers controlled by the modified policy of Kaspersky Security Center.
Page top
Enabling portable mode for accessing encrypted files on removable drives
To enable portable mode for accessing encrypted files on removable drives:
- Open the Kaspersky Security Center Administration Console.
- In the Managed devices folder of the Administration Console tree, open the folder with the name of the administration group for which you want to enable portable mode for accessing encrypted files on removable drives.
- In the workspace, select the Policies tab.
- Select the necessary policy.
- Open the Properties: <Policy name> window by using one of the following methods:
- In the context menu of the policy, select Properties.
- Click the Configure policy link located in the right part of the Administration Console workspace.
- In the Data Encryption section, select the Encryption of removable drives subsection.
- Select the Portable mode check box.
Portable mode is available only if Encrypt all files or Encrypt new files only is selected in the Encryption mode for selected devices drop-down list.
- Click OK.
- Apply the policy.
For details on applying a Kaspersky Security Center policy, please refer to the Kaspersky Security Center Help Guide.
- Connect the removable drive to a computer on which the Kaspersky Security Center policy was applied.
- Confirm the removable drive encryption operation.
This opens a window in which you can create a password for
. - Specify a password that meets the strength requirements and confirm it.
- Click OK.
Kaspersky Endpoint Security encrypts files on a removable drive according to the encryption rules defined in the Kaspersky Security Center policy. Portable File Manager used for working with encrypted files will also be written to the removable drive.
After enabling portable mode, you can access encrypted files on removable drives connected to a computer without encryption functionality.
Page top
Decryption of removable drives
To decrypt removable drives:
- Open the Kaspersky Security Center Administration Console.
- In the Managed devices folder of the Administration Console tree, open the folder with the name of the administration group for which you want to configure decryption of removable drives.
- In the workspace, select the Policies tab.
- Select the necessary policy.
- Open the Properties: <Policy name> window by using one of the following methods:
- In the context menu of the policy, select Properties.
- Click the Configure policy link located in the right part of the Administration Console workspace.
- In the Data Encryption section, select the Encryption of removable drives subsection.
- If you want to decrypt all encrypted files that are stored on removable drives, in the Encryption mode drop-down list select Decrypt entire removable drive.
- To decrypt data that is stored on individual removable drives, edit the encryption rules for removable drives whose data you want to decrypt. To do so:
- In the list of removable drives for which encryption rules have been configured, select an entry corresponding to the removable drive you need.
- Click the Set a rule button to edit the encryption rule for the selected removable drive.
The context menu of the Set a rule button opens.
- Select the Decrypt all files item in the context menu of the Set a rule button.
- Click OK to save changes.
- Apply the policy.
For details on applying a Kaspersky Security Center policy, please refer to the Kaspersky Security Center Help Guide.
After the policy has been applied, when the user connects a removable drive or if a removable drive is already connected, Kaspersky Endpoint Security notifies the user that the removable drive is subject to an encryption rule whereby encrypted files stored on the removable drive as well as the file system of the removable drive (if it is encrypted) will be decrypted. The application warns the user that the decryption process may take some time.
The Kaspersky Security Center policy with preset settings for data encryption on removable drives is formed for a specific group of managed computers. Therefore, the result of data decryption on removable drives depends on the computer to which the removable drive is connected.
If the user initiates safe removal of a removable drive during data decryption, Kaspersky Endpoint Security interrupts the data decryption process and allows removal of the removable drive before the decryption operation has finished.
If decryption of a removable drive failed, view the Data encryption report in the Kaspersky Endpoint Security interface. Access to files may be blocked by another application. In this case, try unplugging the removable drive from the computer and connecting it again.
Page top
Full Disk Encryption
If Kaspersky Endpoint Security is installed on a computer running Microsoft Windows for Workstations, BitLocker Drive Encryption and Kaspersky Disk Encryption technologies are available for encryption. If Kaspersky Endpoint Security is installed on a computer running Microsoft Windows for File Servers, only BitLocker Drive Encryption technology is available.
This section contains information on full disk encryption and instructions on configuring and performing full disk encryption with Kaspersky Endpoint Security and the Kaspersky Endpoint Security administration plug-in.
About Full Disk Encryption
Kaspersky Endpoint Security supports full disk encryption in FAT32, NTFS and exFat file systems.
Before starting full disk encryption, the application runs a series of checks to determine if the device can be encrypted, which includes checking the system hard drive for compatibility with Authentication Agent or with BitLocker encryption components. To check for compatibility, the computer must be restarted. After the computer has been rebooted, the application performs all the necessary checks automatically. If the compatibility check is successful, full disk encryption starts after the operating system has loaded and the application has started. If the system hard drive is found to be incompatible with Authentication Agent or with BitLocker encryption components, the computer must be restarted by pressing the Reset hardware button. Kaspersky Endpoint Security logs information about the incompatibility. Based on this information, the application does not start full disk encryption at operating system startup. Information about this event is logged in Kaspersky Security Center reports.
If the hardware configuration of the computer has changed, the incompatibility information logged by the application during the previous check should be deleted in order to check the system hard drive for compatibility with Authentication Agent and BitLocker encryption components. To do so, prior to full disk encryption, type avp pbatestreset in the command line. If the operating system fails to load after the system hard drive has been checked for compatibility with Authentication Agent, you must remove the objects and data remaining after test operation of Authentication Agent by using the Restore Utility and then start Kaspersky Endpoint Security and execute the avp pbatestreset command again.
After full disk encryption has started, Kaspersky Endpoint Security encrypts all data that is written to hard drives.
If the user shuts down or restarts the computer during full disk encryption, Authentication Agent is loaded before the next startup of the operating system. Kaspersky Endpoint Security resumes full disk encryption after successful authentication in Authentication Agent and operating system startup.
If the operating system switches to hibernation mode during full disk encryption, Authentication Agent is loaded when the operating system switches back from hibernation mode. Kaspersky Endpoint Security resumes full disk encryption after successful authentication in Authentication Agent and operating system startup.
If the operating system goes into sleep mode during full disk encryption, Kaspersky Endpoint Security resumes full disk encryption when the operating system comes out of sleep mode without loading Authentication Agent.
User authentication in the Authentication Agent can be performed in two ways:
- Enter the name and password of the Authentication Agent account created by the LAN administrator using Kaspersky Security Center tools.
- Enter the password of a token or smart card connected to the computer.
Use of a token or smart card is available only if the computer hard drives were encrypted using the AES256 encryption algorithm. If the computer hard drives were encrypted using the AES56 encryption algorithm, addition of the electronic certificate file to the command will be denied.
The authentication agent supports keyboard layouts for the following languages:
- English (UK)
- English (USA)
- Arabic (Algeria, Morocco, Tunis; AZERTY layout)
- Spanish (Latin America)
- Italian
- German (Germany and Austria)
- German (Switzerland)
- Portuguese (Brazil, ABNT2 layout)
- Russian (for 105-key IBM / Windows keyboards with the QWERTY layout)
- Turkish (QWERTY layout)
- French (France)
- French (Switzerland)
- French (Belgium, AZERTY layout)
- Japanese (for 106-key keyboards with the QWERTY layout)
A keyboard layout becomes available in the Authentication Agent if this layout has been added in the language and regional standards settings of the operating system and has become available on the welcome screen of Microsoft Windows.
If the Authentication Agent account name contains symbols that cannot be entered using keyboard layouts available in the Authentication Agent, encrypted hard drives can be accessed only after they are restored using the Restore Utility or after the Authentication Agent account name and password are restored.
Kaspersky Endpoint Security supports the following tokens, smart card readers, and smart cards:
- SafeNet eToken PRO 64K (4.2b) (USB)
- SafeNet eToken PRO 72K Java (USB)
- SafeNet eToken PRO 72K Java (Smart Card)
- SafeNet eToken 4100 72K Java (Smart Card)
- SafeNet eToken 5100 (USB)
- SafeNet eToken 5105 (USB)
- SafeNet eToken 7300 (USB)
- EMC RSA SecurID 800 (USB).
- Rutoken EDS (USB)
- Rutoken EDS (Flash)
- Aladdin-RD JaCarta PKI (USB)
- Aladdin-RD JaCarta PKI (Smart Card)
- Athena IDProtect Laser (USB)
- Gemalto IDBridge CT40 (Reader)
- Gemalto IDPrime .NET 511
Full disk encryption using Kaspersky Disk Encryption technology
Before starting full disk encryption on a computer, you are advised to make sure that the computer is not infected. To do so, start the Full Scan or Critical Areas Scan task. Performing full disk encryption on a computer that is infected by a rootkit may cause the computer to become inoperable.
To perform full disk encryption using Kaspersky Disk Encryption technology:
- Open the Kaspersky Security Center Administration Console.
- In the Managed devices folder in the Administration Console tree, open the folder with the name of the administration group for which you want to configure full disk encryption.
- In the workspace, select the Policies tab.
- Select the necessary policy.
- Open the Properties: <Policy name> window by using one of the following methods:
- In the context menu of the policy, select Properties.
- Click the Configure policy link located in the right part of the Administration Console workspace.
- In the Data encryption section, select Full Disk Encryption.
- In the Encryption technology drop-down list, select the Kaspersky Disk Encryption option.
Kaspersky Disk Encryption technology cannot be used if the computer has hard drives that were encrypted by BitLocker.
- In the Encryption mode drop-down list, select Encrypt all hard drives.
If the computer has several operating systems installed, after encrypting all hard drives you will be able to load only the operating system that has the application installed.
If you need to exclude some of the hard drives from encryption, create a list of such hard drives.
- Select one of the following encryption methods:
- If you want to apply encryption only to those hard drive sectors that are occupied by files, select the Encrypt used disk space only check box.
If you are applying encryption on a drive that is already in use, it is recommended to encrypt the entire drive. This ensures that all data is protected - even deleted data that might still contain retrievable information. The Encrypt used disk space only function is recommended for new drives that have not been previously used.
- If you want to apply encryption to the entire hard drive, clear the Encrypt used disk space only check box.
This function is applicable only to unencrypted devices. If a device was previously encrypted using the Encrypt used disk space only function, after applying a policy in Encrypt all hard drives mode, sectors that are not occupied by files will still not be encrypted.
- If you want to apply encryption only to those hard drive sectors that are occupied by files, select the Encrypt used disk space only check box.
- If a hardware incompatibility problem was encountered during encryption of the computer, you can select the Use Legacy USB Support check box to enable support for USB devices during the initial computer startup phase in BIOS.
Enabling / disabling Legacy USB Support does not affect support for USB devices after the operating system is started.
When Legacy USB Support is enabled, Authentication Agent does not support operations with USB tokens if the computer is operating in BIOS mode. It is recommended to use this option only when there is a hardware compatibility issue and only for those computers on which the problem occurred.
- Click OK to save changes.
- Apply the policy.
For details on applying a Kaspersky Security Center policy, please refer to the Kaspersky Security Center Help Guide.
Full disk encryption using BitLocker Drive Encryption technology
Prior to starting full disk encryption on a computer, you are advised to make sure that the computer is not infected. To do so, start the Full Scan or Critical Areas Scan task. Performing full disk encryption on a computer that is infected by a rootkit may cause the computer to become inoperable.
The use of BitLocker Drive Encryption technology on computers with a server operating system may require installation of the BitLocker Drive Encryption component using the Add roles and components wizard.
To perform full disk encryption using BitLocker Drive Encryption technology:
- Open the Kaspersky Security Center Administration Console.
- In the Managed devices folder in the Administration Console tree, open the folder with the name of the administration group for which you want to configure full disk encryption.
- In the workspace, select the Policies tab.
- Select the necessary policy.
- Open the Properties: <Policy name> window by using one of the following methods:
- In the context menu of the policy, select Properties.
- Click the Configure policy link located in the right part of the Administration Console workspace.
- In the Data encryption section, select Full Disk Encryption.
- In the Encryption technology drop-down list, select the BitLocker Drive Encryption option.
- In the Encryption mode drop-down list, select the Encrypt all hard drives option.
If the computer has several operating systems installed, after encryption you will be able to load only the operating system in which the encryption was performed.
- If you want to use a touchscreen keyboard to enter information in a preboot environment, select the Allow use of authentication requiring preboot keyboard input on tablets check box.
It is recommended to use this setting only for devices that have alternative data input tools such as a USB keyboard in a preboot environment.
- Select one of the following types of encryption:
- If you want to use hardware encryption, select the Use hardware encryption check box.
- If you want to use software encryption, clear the Use hardware encryption check box.
- Select one of the following encryption methods:
- If you want to apply encryption only to those hard drive sectors that are occupied by files, select the Encrypt used disk space only check box.
- If you want to apply encryption to the entire hard drive, clear the Encrypt used disk space only check box.
This function is applicable only to unencrypted devices. If a device was previously encrypted using the Encrypt used disk space only function, after applying a policy in Encrypt all hard drives mode, sectors that are not occupied by files will still not be encrypted.
- Select a method for accessing hard drives that were encrypted with BitLocker.
- If you want to use a (TPM) to store encryption keys, select the Use Trusted Platform Module (TPM) option.
- If you are not using a Trusted Platform Module (TPM) for full disk encryption, select the Use password option and specify the minimum number of characters that a password must contain in the Minimum password length field.
The availability of a Trusted Platform Module (TPM) is mandatory for the Windows 7 and Windows 2008 R2 operating systems, as well as for earlier versions.
- If you selected the Use Trusted Platform Module (TPM) option during the previous step:
- If you want to set a PIN code that will be requested when the user attempts to access an encryption key, select the Use PIN check box and in the Minimum PIN length field, specify the minimum number of digits that a PIN code must contain.
- If you would like access to encrypted hard drives without a trusted platform module on the computer using a password, select the Use password if Trusted Platform Module (TPM) is unavailable check box, and in the Minimum password length field indicate the minimum number of characters the password should contain.
In this event, access to encryption keys will occur using the given password just like if the Use password check box is selected.
If the Use password if Trusted Platform Module (TPM) is unavailable check box is cleared and the trusted platform module is not available, full disk encryption will not start.
- Click OK to save changes.
- Apply the policy.
For details on applying a Kaspersky Security Center policy, please refer to the Kaspersky Security Center Help Guide.
After applying the policy on the client computer with Kaspersky Endpoint Security installed, the following queries will be made:
- If the Kaspersky Security Center policy is configured to encrypt the system hard drive, the PIN code prompt window will appear if the Trusted Platform Module is in use, or otherwise the password request window will appear for preboot authentication.
- If the computer's operating system has Federal Information Processing standard compatibility mode turned on, then in Windows 8 and older the operating system will display a USB device connection request window to save the recovery key file.
If there is no access to encryption keys, the user may request that the local network administrator provide a recovery key (should the recovery key not have been saved earlier on the USB device or have been lost).
Page top
Creating a list of hard drives excluded from encryption
You can create a list of exclusions from encryption only for Kaspersky Disk Encryption technology.
To form a list of hard drives excluded from encryption:
- Open the Kaspersky Security Center Administration Console.
- In the Managed devices folder in the Administration Console tree, open the folder with the name of the administration group for which you want to create a list of hard drives to be excluded from encryption.
- In the workspace, select the Policies tab.
- Select the necessary policy.
- Open the Properties: <Policy name> window by using one of the following methods:
- In the context menu of the policy, select Properties.
- Click the Configure policy link located in the right part of the Administration Console workspace.
- In the Data encryption section, select Full Disk Encryption.
- In the Encryption technology drop-down list, select the Kaspersky Disk Encryption option.
Entries corresponding to hard drives excluded from encryption appear in the Do not encrypt the following hard drives table. This table is empty if you have not previously formed a list of hard drives excluded from encryption.
- To add hard drives to the list of hard drives excluded from encryption:
- Click the Add button.
The Add devices from Kaspersky Security Center list window opens.
- In the Add devices from Kaspersky Security Center list window, specify the values of the following parameters: Name, Computer, Disk type, and Kaspersky Disk Encryption.
- Click the Refresh button.
- In the Name column, select the check boxes in the table rows corresponding to those hard drives that you want to add to the list of hard drives excluded from encryption.
- Click OK.
The selected hard drives appear in the Do not encrypt the following hard drives table.
- Click the Add button.
- If you want to remove hard drives from the table of exclusions, select one or several lines in the Do not encrypt the following hard drives table and click the Delete button.
To select multiple lines in the table, select them while holding down the CTRL key.
- Click OK to save changes.
Hard drive decryption
You can decrypt hard drives even if there is no active license permitting data encryption.
To decrypt hard drives:
- Open the Kaspersky Security Center Administration Console.
- In the Managed devices folder of the Administration Console tree, open the folder with the name of the administration group for which you want to configure decryption of hard drives.
- In the workspace, select the Policies tab.
- Select the necessary policy.
- Open the Properties: <Policy name> window by using one of the following methods:
- In the context menu of the policy, select Properties.
- Click the Configure policy link located in the right part of the Administration Console workspace.
- In the Data encryption section, select Full Disk Encryption.
- In the Encryption technology drop-down list, select the technology with which the hard drives were encrypted.
- Do one of the following:
- In the Encryption mode drop-down list, select the Decrypt all hard drives option if you want to decrypt all encrypted hard drives.
- Add the encrypted hard drives that you want to decrypt to the Do not encrypt the following hard drives table.
This option is available only for Kaspersky Disk Encryption technology.
- Click OK to save changes.
- Apply the policy.
For details on applying a Kaspersky Security Center policy, please refer to the Kaspersky Security Center Help Guide.
If the user shuts down or restarts the computer during decryption of hard drives that were encrypted using Kaspersky Disk Encryption technology, the Authentication Agent loads before the next startup of the operating system. Kaspersky Endpoint Security resumes hard drive decryption after successful authentication in the authentication agent and operating system startup.
If the operating system switches to hibernation mode during decryption of hard drives that were encrypted using Kaspersky Disk Encryption technology, Authentication Agent loads when the operating system comes out of hibernation mode. Kaspersky Endpoint Security resumes hard drive decryption after successful authentication in the authentication agent and operating system startup. After hard drive decryption, hibernation mode is unavailable until the first reboot of the operating system.
If the operating system goes into sleep mode during hard drive decryption, Kaspersky Endpoint Security resumes hard drive decryption when the operating system comes out of sleep mode without loading the Authentication Agent.
Page top
Using the Authentication Agent
If system hard drives are encrypted, the Authentication Agent loads before startup of the operating system. Use the Authentication Agent to complete authentication for obtaining access to encrypted system hard drives and load the operating system.
After successful completion of the authentication procedure, the operating system loads. The authentication process is repeated every time the operating system restarts.
The user may be unable to pass authentication in some cases. For example, authentication is impossible if the user has forgotten the account credentials of the Authentication Agent account or the password to the token or smart card, or has lost the token or smart card.
If the user has forgotten the Authentication Agent account credentials or the password from a token or smart card, you must contact the corporate LAN administrator to recover them.
If a user has lost a token or smart card, the administrator must add the file of a token or smart card electronic certificate to the command for creating an Authentication Agent account. Then the user must complete the procedure for receiving access to encrypted devices or restoring data on encrypted devices.
Using a token and smart card with Authentication Agent
A token or smart card can be used for authentication when accessing encrypted hard drives. To do so, you must add the file of a token or smart card electronic certificate to the command for creating an Authentication Agent account.
Use of a token or smart card is available only if the computer hard drives were encrypted using the AES256 encryption algorithm. If the computer hard drives were encrypted using the AES56 encryption algorithm, addition of the electronic certificate file to the command will be denied.
To add the file of a token or smart card electronic certificate to the command for creating an Authentication Agent account, you must first save the file using third-party software for managing certificates.
The token or smart-card certificate must have the following properties:
- The certificate must be compliant with the X.509 standard, and the certificate file must have DER encoding.
If the electronic certificate of the token or smart card does not meet this requirement, the administration plug-in does not load the file of this certificate into the command for creating an Authentication Agent account and displays an error message.
- The
KeyUsageparameter that defines the purpose of the certificate must have the valuekeyEnciphermentordataEncipherment.If the electronic certificate of the token or smart card does not meet this requirement, the administration plug-in loads the file of this certificate into the command for creating an Authentication Agent account and displays a warning message.
- The certificate contains an RSA key with a length of at least 1024 bits.
If the electronic certificate of the token or smart card does not meet this requirement, the administration plug-in does not load the file of this certificate into the command for creating an Authentication Agent account and displays an error message.
Editing Authentication Agent help messages
Before editing help messages of the Authentication Agent, please review the list of supported characters in a preboot environment.
To edit Authentication Agent help messages:
- Open the Kaspersky Security Center Administration Console.
- In the Managed devices folder of the Administration Console tree, open the folder with the name of the administration group for which you want to edit Authentication Agent help messages.
- In the workspace, select the Policies tab.
- Select the necessary policy.
- Open the Properties: <Policy name> window by using one of the following methods:
- In the context menu of the policy, select Properties.
- Click the Configure policy link located in the right part of the Administration Console workspace.
- In the Data Encryption section, select the Common encryption settings subsection.
- In the Templates section, click the Help button.
This opens the Authentication Agent help messages window.
- Do the following:
- Select the Authentication tab to edit the help text shown in the Authentication Agent window when account credentials are being entered.
- Select the Change password tab to edit the help text shown in the Authentication Agent window when the password for the Authentication Agent account is being changed.
- Select the Recover password tab to edit the help text shown in the Authentication Agent window when the password for the Authentication Agent account is being recovered.
- Edit help messages.
If you want to restore the original text, click the Default button.
You can enter help text containing 16 lines or less. The maximum length of a line is 64 characters.
- Click OK.
- To save your changes, in the Properties: <Policy name> window, click OK.
Limited support for characters in Authentication Agent help messages
In a preboot environment, the following Unicode characters are supported:
- Basic Latin alphabet (0000 - 007F)
- Additional Latin-1 characters (0080 - 00FF)
- Extended Latin-A (0100 - 017F)
- Extended Latin-B (0180 - 024F)
- Uncombined extended ID characters (02B0 - 02FF)
- Combined diacritical marks (0300 - 036F)
- Greek and Coptic alphabets (0370 - 03FF)
- Cyrillic (0400 - 04FF)
- Hebrew (0590 - 05FF)
- Arabic script (0600 - 06FF)
- Additional extended Latin (1E00 - 1EFF)
- Punctuation marks (2000 - 206F)
- Currency symbols (20A0 - 20CF)
- Letter-like symbols (2100 - 214F)
- Geometric figures (25A0 - 25FF)
- Presentation forms of Arabic script-B (FE70 - FEFF)
Characters that are not specified in this list are not supported in a preboot environment. It is not recommended to use such characters in Authentication Agent help messages.
Page top
Selecting the Authentication Agent trace level
The application logs service information about the operation of the Authentication Agent and information about the user's operations with the Authentication Agent in the trace file.
To select the Authentication Agent trace level:
- As soon as a computer with encrypted hard drives starts, press the F3 button to call up a window for configuring Authentication Agent settings.
- Select the trace level in the Authentication Agent settings window:
- Disable debug logging (default). If this option is selected, the application does not log information about Authentication Agent events in the trace file.
- Enable debug logging. If this option is selected, the application logs information about the operation of the Authentication Agent and the user operations performed with the Authentication Agent in the trace file.
- Enable verbose logging. If this option is selected, the application logs detailed information about the operation of the Authentication Agent and the user operations performed with the Authentication Agent in the trace file.
The level of detail of entries under this option is higher compared to the level of the Enable debug logging option. A high level of detail of entries can slow down the startup of the Authentication Agent and the operating system.
- Enable debug logging and select serial port. If this option is selected, the application logs information about the operation of the Authentication Agent and the user operations performed with the Authentication Agent in the trace file, and relays it via the COM port.
If a computer with encrypted hard drives is connected to another computer via the COM port, Authentication Agent events can be examined from this other computer.
- Enable verbose debug logging and select serial port. If this option is selected, the application logs detailed information about the operation of the Authentication Agent and the user operations performed with the Authentication Agent in the trace file, and relays it via the COM port.
The level of detail of entries under this option is higher compared to the level of the Enable debug logging and select serial port option. A high level of detail of entries can slow down the startup of the Authentication Agent and the operating system.
Data is recorded in the Authentication Agent trace file if there are encrypted hard drives on the computer or during full disk encryption.
The Authentication Agent trace file is not sent to Kaspersky, unlike other trace files of the application. If necessary, you can manually send the Authentication Agent trace file to Kaspersky for analysis.
Page top
Managing Authentication Agent accounts
The following Kaspersky Security Center tools are available for managing Authentication Agent accounts:
- Group task for managing Authentication Agent accounts. This task lets you manage Authentication Agent accounts for a group of client computers.
- Encryption (account management) local task. This task lets you manage Authentication Agent accounts for individual client computers.
To configure the settings for the Authentication Agent account management task:
- Create (Creating a local task, Creating a group task) an Authentication Agent account management task.
- Open the Settings section in the Properties: <name of Authentication Agent account management task> window.
- Add commands for creating Authentication Agent accounts.
- Add commands for editing Authentication Agent accounts.
- Add commands for deleting Authentication Agent user accounts.
- If necessary, edit the added commands for managing Authentication Agent accounts. To do so, select a command in the Commands for managing Authentication Agent accounts table and click the Edit button.
- If necessary, delete the added commands for managing Authentication Agent accounts. To do so, select one or several commands in the Commands for managing Authentication Agent accounts table and click the Remove button.
To select multiple lines in the table, select them while holding down the CTRL key.
- To save the changes, click OK in the task properties window.
- Run the task.
Commands for managing Authentication Agent accounts added to the task will be executed.
Page top
Adding a command for creating an Authentication Agent account
To add a command for creating an Authentication Agent account:
- Open the Settings section in the Properties: <name of Authentication Agent account management task> window.
- Click the Add button and in the drop-down list select Account adding command.
The Add user account window opens.
- In the Add user account field within the Windows account window, specify the Microsoft Windows account name based on which the Authentication Agent account will be created.
To do so, type the account name manually or click the Select button.
- If you manually entered the name of a Microsoft Windows account, click the Allow button to determine the security identifier (SID) of the account.
If you choose not to determine the security identifier (SID) by clicking the Allow button, it will be determined when the task is performed on the computer.
Determining the SID of the Microsoft Windows account when adding an Authentication Agent account creation command is a convenient way to make sure the manually entered Microsoft Windows account name is correct. If the entered Microsoft Windows user account does not exist on the computer or in the trusted domain for which the Encryption (account management) local task is being modified, the Authentication Agent account management task ends with an error.
- Select the Replace existing account check box if you want the existing account previously created for the Authentication Agent to be replaced with the account being created.
This step is available when you are adding an Authentication Agent account creation command in the properties of a group task for managing Authentication Agent accounts. This step is unavailable if you are adding an Authentication Agent account creation command in the properties of an Encryption (account management) local task.
- In the User name field, type the name of the Authentication Agent account that must be entered during authentication for access to encrypted hard drives.
- Select the Allow password-based authentication check box if you want the application to prompt the user to enter the Authentication Agent account password during authentication for accessing encrypted hard drives.
- If you selected the Allow password-based authentication check box during the previous step:
- In the Password field, type the password for the Authentication Agent account that must be entered during authentication for accessing encrypted hard drives.
- In the Confirm password field, confirm the Authentication Agent account password entered at the previous step.
- Do one of the following:
- Select the Change password upon first authentication option if you want the application to show a password change request to the user passing authentication under the account specified in the command for the first time.
- Otherwise, select the Do not require password change option.
- Select the Allow certificate-based authentication check box if you want the application to prompt the user to connect a token or smart card to the computer during authentication for accessing encrypted hard drives.
- If you selected the Allow certificate-based authentication check box during the previous step, click the Browse button and select the file of the token or smart card electronic certificate in the Select certificate file window.
- If required, in the Command description field, enter the Authentication Agent account details that you need for managing the command.
- Do one of the following:
- Select the Allow authentication option if you want the application to allow the user working under the account specified in the command to access the authentication dialog in Authentication Agent.
- Select the Block authentication option if you want the application to block the user working under the account specified in the command from accessing the authentication dialog in Authentication Agent.
- In the Add user account window, click OK.
Adding an Authentication Agent account editing command
To add a command for editing an Authentication Agent account:
- In the Settings section of the Properties: <name of the Authentication Agent account management task> window, open the context menu of the Add button and select the Account editing command item.
The Edit user account window opens.
- In the Windows account field within the Edit user account window, specify the name of the Microsoft Windows user account that was used to create the Authentication Agent account that you want to edit. To do so, type the account name manually or click the Select button.
- If you manually entered the name of a Microsoft Windows user account, click the Allow button to determine the security identifier (SID) of the user account.
If you choose not to determine the security identifier (SID) by clicking the Allow button, it will be determined when the task is performed on the computer.
Determining the SID of the Microsoft Windows user account when adding an Authentication Agent account editing command is a convenient way to make sure the manually entered Microsoft Windows user account name is correct. If the Microsoft Windows user account entered does not exist or belongs to an untrusted domain, the group task for managing Authentication Agent accounts ends with an error.
- Select the Change user name check box and enter a new name for the Authentication Agent account if you want Kaspersky Endpoint Security to change the user name for all Authentication Agent accounts created using the Microsoft Windows account with the name indicated in the Windows account field to the name typed in the field below.
- Select the Modify password-based authentication settings check box to make password-based authentication settings editable.
- Select the Allow password-based authentication check box if you want the application to prompt the user to enter the Authentication Agent account password during authentication for accessing encrypted hard drives.
- If you selected the Allow password-based authentication check box during the previous step:
- In the Password field, enter the new password of the Authentication Agent account.
- In the Confirm password field, confirm the password entered at the previous step.
- Select the Edit the rule of password change upon authentication in Authentication Agent check box if you want Kaspersky Endpoint Security to change the value of the password change setting for all Authentication Agent accounts created using the Microsoft Windows account with the name indicated in the Windows account field to the setting value specified below.
- Specify the value of the password change setting upon authentication in Authentication Agent.
- Select the Modify certificate-based authentication settings check box to make settings of authentication based on the electronic certificate of a token or smart card editable.
- Select the Allow certificate-based authentication check box if you want the application to prompt the user to enter the password to the token or smart card connected to the computer during the authentication process in order to access encrypted hard drives.
- If you selected the Allow certificate-based authentication check box during the previous step, click the Browse button and select the file of the token or smart card electronic certificate in the Select certificate file window.
- Select the Edit command description check box and edit the command description if you want Kaspersky Endpoint Security to change the command description for all Authentication Agent accounts created using the Microsoft Windows account with the name indicated in the Windows account field.
- Select the Edit the rule of access to authentication in Authentication Agent check box if you want Kaspersky Endpoint Security to change the rule for user access to the authentication dialog in Authentication Agent to the value specified below for all Authentication Agent accounts created using the Microsoft Windows account with the name indicated in the Windows account field.
- Specify the rule for accessing the authentication dialog in Authentication Agent.
- In the Edit user account window, click OK.
Adding a command for deleting an Authentication Agent account
To add a command for deleting an Authentication Agent account:
- In the Settings section of the Properties: <name of Authentication Agent account management task> window, open the context menu of the Add button and select Account deletion command.
The Delete user account window opens.
- In the Windows account field within the Delete user account window, specify the name of the Microsoft Windows user account that was used to create the Authentication Agent account that you want to delete. To do so, type the account name manually or click the Select button.
- If you manually entered the name of a Microsoft Windows user account, click the Allow button to determine the security identifier (SID) of the user account.
If you choose not to determine the security identifier (SID) by clicking the Allow button, it will be determined when the task is performed on the computer.
Determining the SID of the Microsoft Windows user account when adding an Authentication Agent account deletion command is a convenient way to make sure the manually entered Microsoft Windows user account name is correct. If the Microsoft Windows user account entered does not exist or belongs to an untrusted domain, the group task for managing Authentication Agent accounts ends with an error.
- In the Delete user account window, click OK.
Restoring Authentication Agent account credentials
These instructions are intended for users of client computers with Kaspersky Endpoint Security installed.
To restore the user name and password of an Authentication Agent account:
- Authentication Agent loads on a computer with encrypted hard drives before the operating system is loaded. In the interface of Authentication Agent, click the Forgot your Password button to initiate the process of restoring the user name and password of an Authentication Agent account.
- Follow the instructions of the Authentication Agent to obtain the request units for restoring the user name and password of the Authentication Agent account.
- Dictate the contents of the request blocks to the LAN administrator of your enterprise together with the name of the computer.
- Enter the sections of the response to the Authentication Agent account user name and password restoration request that have been generated and provided to you by the LAN administrator.
- Enter a new password for the Authentication Agent account and confirm it.
The user name of the Authentication Agent account is defined using the sections of the response to the requests for restoration of the user name and password of the Authentication Agent account.
After you enter and confirm the new password of the Authentication Agent account, the password will be saved and you will be provided access to encrypted hard drives.
Page top
Responding to a user request to restore Authentication Agent account credentials
To create and send the user sections of the response to the request for restoration of the user name and password of an Authentication Agent account:
- Open the Kaspersky Security Center Administration Console.
- In the Managed devices folder of the Administration Console tree, open the folder with the name of the administration group that includes the computer of the user who has requested restoration of the user name and password of an Authentication Agent account.
- In the workspace, select the Devices tab.
- On the Devices tab, select the computer of the user who has requested restoration of the user name and password of an Authentication Agent account and right-click to open the context menu.
- In the context menu, select Grant access in offline mode.
The Grant access in offline mode window opens.
- In the Grant access in offline mode window, select the Authentication Agent tab.
- In the Encryption algorithm in use section, select the type of encryption algorithm.
- In the Account drop-down list, select the name of the Authentication Agent account created for the user who is requesting recovery of the Authentication Agent account name and password.
- In the Hard drive drop-down list, select the encrypted hard drive for which you need to recover access.
- In the User request section enter the blocks of request dictated by the user.
The contents of the sections of the response to the user's request for recovery of the user name and password of an Authentication Agent account will be displayed in the Access key field.
- Dictate the contents of the blocks of reply to the user.
Viewing data encryption details
This section describes how you can view the details of data encryption.
About encryption status
While encryption or decryption in progress, Kaspersky Endpoint Security relays information about the status of encryption parameters applied to client computers to Kaspersky Security Center.
The following encryption status values are possible:
- Encryption policy not defined. A Kaspersky Security Center encryption policy has not been defined for the computer.
- Applying policy. Data encryption and / or decryption is in progress on the computer.
- Error. An error occurred during data encryption and / or decryption on the computer.
- Reboot required. The operating system has to be rebooted in order to start or finish data encryption or decryption on the computer.
- Compliant with policy. Data encryption on the computer has been completed using the encryption settings specified in the Kaspersky Security Center policy applied to the computer.
- Canceled by user. The user has declined to confirm the file encryption operation on the removable drive.
Viewing the encryption status
To view the encryption status of computer data:
- Open the Kaspersky Security Center Administration Console.
- In the Managed devices folder of the Administration Console tree, open the folder with the name of the administration group to which the relevant computer belongs.
- In the workspace, select the Devices tab.
The Devices tab in the workspace shows the properties of computers in the selected administration group.
- On the Devices tab in the workspace, slide the scroll bar all the way to the right.
- If the Encryption status column is not displayed:
- Right-click to open the context menu for the table header.
- In the context menu, in the View drop-down list, select Add/Remove columns.
The Add/Remove columns window opens.
- In the Add/Remove columns window, select the Encryption status check box.
- Click OK.
The Encryption status column shows the encryption status of data on computers in the selected administration group. This status is formed based on information about file encryption on local drives of the computer, and about full disk encryption.
Viewing encryption statistics in details panes of Kaspersky Security Center
To view the encryption status in details panes of Kaspersky Security Center:
- Open the Kaspersky Security Center Administration Console.
- In the console tree, select the Administration Server – <Computer name> node.
- In the workspace to the right of the Administration Console tree, select the Statistics tab.
- Create a new page with details panes containing data encryption statistics. To do so:
- On the Statistics tab, click the Customize view button.
The Properties: Statistics window opens.
- In the Properties: Statistics window, click Add.
The Properties: New page window opens.
- In the General section of the Properties: New page window, type the page name.
- In the Details panes section, click the Add button.
The New details pane window opens.
- In the New details panel window in the Protection status group, select the Encryption of devices item.
- Click OK.
The Properties: Encryption Control window opens.
- If necessary, edit the details pane settings. To do so, use the View and Devices sections of the Properties: Encryption of devices window.
- Click OK.
- Repeat steps d – h of the instructions, selecting the Encryption of removable drives item in the Protection status section of the New details pane window.
The details panes added appear in the Details panes list in the Properties: New page window.
- In the Properties: New page window, click OK.
The name of the page with details panes created at the previous steps appears in the Pages list of the Properties: Statistics window.
- In the Properties: Statistics window, click Close.
- On the Statistics tab, click the Customize view button.
- On the Statistics tab, open the page that was created during the previous steps of the instructions.
The details panes appear, showing the encryption status of computers and removable drives.
Page top
Viewing file encryption errors on local computer drives
To view the file encryption errors on local computer drives:
- Open the Kaspersky Security Center Administration Console.
- In the Managed devices folder of the Administration Console tree, open the folder with the name of the administration group that includes the client computer whose list of file encryption errors you want to view.
- In the workspace, select the Devices tab.
- On the Devices tab, select the name of the computer in the list and right-click to open the context menu.
- Do one of the following:
- In the context menu of the computer, select Protection.
- In the context menu of the computer, select the Properties item. In the Properties: <computer name> window, select the Protection section.
- In the Protection section of the Properties: <computer name> window, click the View list of data encryption errors link to open the Data encryption errors window.
This window shows the details of file encryption errors on local computer drives. When an error is corrected, Kaspersky Security Center removes the error details from the Data encryption errors window.
Viewing the data encryption report
To view the data encryption report:
- Open the Kaspersky Security Center Administration Console.
- In the Administration Server node of the Administration Console tree, select the Reports tab.
- Click the Create report template button.
The Report Template Wizard starts.
- Follow the instructions of the Report Template Wizard. In the Select report template type window in the Other section, select one of the following items:
- Managed device encryption status report.
- Mass storage device encryption status report.
- File encryption errors report.
- Report on blocked access to encrypted files.
After you have finished with the New Report Template Wizard, the new report template appears in the table on the Reports tab.
- Select the report template that was created at the previous steps of the instructions.
- In the context menu of the template, select Show report.
The report generation process starts. The report is displayed in a new window.
Page top
Managing encrypted files with limited file encryption functionality
When the Kaspersky Security Center policy is applied and files are then encrypted, Kaspersky Endpoint Security receives an encryption key required for directly accessing the encrypted files. Using this encryption key, a user working under any Windows user account that was active during file encryption can directly access the encrypted files. Users working under Windows accounts that were inactive during file encryption must connect to Kaspersky Security Center in order to access the encrypted files.
Encrypted files may be unaccessible under the following circumstances:
- The user's computer stores encryption keys, but there is no connection with Kaspersky Security Center for managing them. In this case, the user must request access to encrypted files from the LAN administrator.
If access to Kaspersky Security Center does not exist, you must:
- request an access key for access to encrypted files on computer hard drives;
- to access encrypted files that are stored on removable drives, request separate access keys for encrypted files on each removable drive.
- Encryption components are deleted from the user's computer. In this event, the user may open encrypted files on local and removable disks but the contents of those files will appear encrypted.
The user may work with encrypted files under the following circumstances:
- Files are placed inside encrypted packages created on a computer with Kaspersky Endpoint Security installed.
- Files are stored on removable drives on which portable mode has been allowed.
Accessing encrypted files without a connection to Kaspersky Security Center
These instructions are intended for users of client computers with Kaspersky Endpoint Security installed.
To access encrypted files without a connection to Kaspersky Security Center:
- Attempt to access the encrypted file that you need.
If there is no connection to Kaspersky Security Center when you attempt to access a file that is stored on a local drive of the computer, Kaspersky Endpoint Security generates a file with a request for access to all encrypted files that are stored on local computer drives. If you attempt to access a file that is stored on a removable drive, Kaspersky Endpoint Security generates a file that requests access to all encrypted files that are stored on the removable drive. The Access denied to file window opens.
- Send the file that contains a request for access to encrypted files to the local area network administrator. To do so, perform one of the following:
- To email the file that requests access to encrypted files to the local area network administrator, click the Send by email button.
- To save the file requesting access to the encrypted files and deliver it to the LAN administrator by a different method, click the Save button.
- Obtain the key file for accessing encrypted files that has been created and provided to you by the local area network administrator.
- Activate the key for accessing encrypted files in one of the following ways:
- In any file manager, select the file of the key for accessing encrypted files. Open it by double-clicking.
- Do the following:
- Open the main window of Kaspersky Endpoint Security.
- Click the button.
This opens the Events window.
- Select the Status of access to files and devices tab.
The tab displays a list of all requests for access to encrypted files.
- Select the request for which you received the key file for accessing encrypted files.
- To load the provided key file for accessing encrypted files, click Browse.
The standard Select access key file Microsoft Windows dialog box opens.
- In the standard Select access key file window of Microsoft Windows, select the administrator-provided file with the .kesdr extension and name matching the file name of the access request file.
- Click the Open button.
- In the Events window, click OK.
If a file with a request for access to encrypted files is generated during an attempt to access a file that is stored on a local drive of the computer, Kaspersky Endpoint Security grants access to all encrypted files that are stored on local computer drives. If a request access file for encrypted files is generated during an attempt to access a file that is stored on a removable drive, Kaspersky Endpoint Security grants access to all encrypted files that are stored on the removable drive. To access encrypted files that are stored on other removable drives, you must obtain a separate access key file for each removable drive.
Page top
Granting user access to encrypted files without a connection to Kaspersky Security Center
To grant user access to encrypted files without a connection to Kaspersky Security Center:
- Open the Kaspersky Security Center Administration Console.
- In the Managed devices folder of the Administration Console tree, open the folder with the name of the administration group that includes the computer of the user requesting access to encrypted files.
- In the workspace, select the Devices tab.
- On the Devices tab, select the computer of the user requesting access to encrypted files and right-click to open the context menu.
- In the context menu, select Grant access in offline mode.
The Grant access in offline mode window opens.
- In the Grant access in offline mode window, select the Encryption tab.
- On the Encryption tab, click the Browse button.
The standard Select request access file Microsoft Windows dialog box opens.
- In the Select request access file window, specify the path to the request file received from the user, and click Open.
Kaspersky Security Center generates a key file for accessing the encrypted files. The details of the user request are displayed on the Encryption tab.
- Do one of the following:
- To email the generated access key file to the user, click the Send by email button.
- To save the access key file for the encrypted files and deliver it to the user by a different method, click the Save button.
Editing templates of encrypted file access messages
To edit templates of encrypted file access messages:
- Open the Kaspersky Security Center Administration Console.
- In the Managed devices folder of the Administration Console tree, open the folder with the name of the administration group for which you want to edit the templates of encrypted file access request messages.
- In the workspace, select the Policies tab.
- Select the necessary policy.
- Open the Properties: <Policy name> window by using one of the following methods:
- In the context menu of the policy, select Properties.
- Click the Configure policy link located in the right part of the Administration Console workspace.
- In the Data Encryption section, select the Common encryption settings subsection.
- In the Templates section, click the Templates button.
The Templates window opens.
- Do the following:
- If you want to edit the user message template, select the User's message tab. The File access denied window opens when the user attempts to access an encrypted file while there is no key available on the computer for access to encrypted files. Clicking the Send by email button in the File access denied window automatically creates a user message. This message is sent to the corporate LAN administrator along with the file requesting access to encrypted files.
- If you want to edit the administrator message template, select the Administrator's message tab. This message is created automatically when the Send by email button is clicked in the Grant access to encrypted files window and is sent to the user after the user is granted access to encrypted files.
- Edit the message templates.
You can use the Default button and the Variable drop-down list.
- Click OK.
- To save your changes, in the Properties: <Policy name> window, click OK.
Working with encrypted devices when there is no access to them
Obtaining access to encrypted devices
A user may be required to request access to encrypted devices in the following cases:
- The hard drive was encrypted on a different computer.
- The encryption key for a device is not on the computer (for example, upon the first attempt to access the encrypted removable drive on the computer), and the computer is not connected to Kaspersky Security Center.
After the user has applied the access key to the encrypted device, Kaspersky Endpoint Security saves the encryption key on the user's computer and allows access to this device upon subsequent access attempts even if there is no connection to Kaspersky Security Center.
Access to encrypted devices can be obtained as follows:
- The user uses the Kaspersky Endpoint Security application interface to create a request access file with the kesdc extension and sends it to the corporate LAN administrator.
- The administrator uses the Kaspersky Security Center Administration Console to create an access key file with the kesdr extension and sends it to the user.
- The user applies the access key.
Restoring data on encrypted devices
A user can use the Encrypted Device Restore Utility (hereinafter referred to as the Restore Utility) to work with encrypted devices. This may be required in the following cases:
- The procedure for using an access key to obtain access was unsuccessful.
- Encryption components have not been installed on the computer with the encrypted device.
The data needed to restore access to encrypted devices using the Restore Utility resides in the memory of the user's computer in unencrypted form for some time. To reduce the risk of unauthorized access to such data, you are advised to restore access to encrypted devices on trusted computers.
Data on encrypted devices can be restored as follows:
- The user uses the Restore Utility to create a request access file with the fdertc extension and sends it to the corporate LAN administrator.
- The administrator uses the Kaspersky Security Center Administration Console to create an access key file with the fdertr extension and sends it to the user.
- The user applies the access key.
To restore data on encrypted system hard drives, the user can also specify the Authentication Agent account credentials in the Restore Utility. If the metadata of the Authentication Agent account has been corrupted, the user must complete the restoration procedure using a request access file.
Before restoring data on encrypted devices, it is recommended to cancel the Kaspersky Security Center policy or disable encryption in the Kaspersky Security Center policy settings on the computer where the procedure will be performed. This prevents the drive from being encrypted again.
Obtaining access to encrypted devices through the application interface
These instructions are intended for users of client computers with Kaspersky Endpoint Security installed.
To obtain access to encrypted devices through the application interface:
- Attempt to access the encrypted device that you need.
The Access to data is blocked window opens.
- Send the corporate LAN administrator the request access file with the kesdc extension for the encrypted device. To do so, perform one of the following:
- To email the corporate LAN administrator the generated request access file for the encrypted device, click the Send by email button.
- To save the request access file for the encrypted device and deliver it to the corporate LAN administrator using a different method, click the Save button.
If you have closed the Access to data is blocked window without saving the request access file or without sending it to the corporate LAN administrator, you can do this at any time in the Events window on the Status of access to files and devices tab. To open this window, click the
button in the main application window. - Obtain and save the encrypted device access key file that has been created and provided to you by the corporate LAN administrator.
- Use one of the following methods to apply the access key for accessing the encrypted device:
- In any file manager, find the encrypted device access key file and double-click it to open it.
- Do the following:
- Open the main window of Kaspersky Endpoint Security.
- Click the button to open the Events window.
- Select the Status of access to files and devices tab.
The tab displays a list of all requests for access to encrypted files and devices.
- Select the request for which you received the access key file for accessing the encrypted device.
- To load the received access key file for accessing the encrypted device, click Browse.
The standard Select access key file Microsoft Windows dialog box opens.
- In the standard Select access key file window of Microsoft Windows, select the administrator-provided file with the kesdr extension and name matching the file name of the corresponding request access file for the encrypted device.
- Click the Open button.
- In the Status of access to files and devices window, click OK.
As a result, Kaspersky Endpoint Security grants access to the encrypted device.
Page top
Granting user access to encrypted devices
To grant user access to an encrypted device:
- Open the Kaspersky Security Center Administration Console.
- In the Managed devices folder of the Administration Console tree, open the folder with the name of the administration group that includes the computer of the user requesting access to the encrypted device.
- In the workspace, select the Devices tab.
- On the Devices tab, select the computer of the user requesting access to the encrypted device and right-click to open the context menu.
- In the context menu, select Grant access in offline mode.
The Grant access in offline mode window opens.
- In the Grant access in offline mode window, select the Encryption tab.
- On the Encryption tab, click the Browse button.
The standard Select request access file Microsoft Windows dialog box opens.
- In the Select request access file window, specify the path to the request file with the kesdc extension that you received from the user.
- Click the Open button.
Kaspersky Security Center generates an encrypted device access key file with the kesdr extension. The details of the user request are displayed on the Encryption tab.
- Do one of the following:
- To email the generated access key file to the user, click the Send by email button.
- To save the access key file for the encrypted device and deliver it to the user by another method, click the Save button.
Providing a user with a recovery key for hard drives encrypted with BitLocker
To send a user a recovery key for a system hard drive that was encrypted using BitLocker:
- Open the Kaspersky Security Center Administration Console.
- In the Managed devices folder of the Administration Console tree, open the folder with the name of the administration group that includes the computer of the user requesting access to the encrypted drive.
- In the workspace, select the Devices tab.
- On the Devices tab, select the computer belonging to the user requesting access to the encrypted drive.
- Right-click to open the context menu and select Grant access in offline mode.
The Grant access in offline mode window opens.
- In the Grant access in offline mode window, select the Access to a BitLocker-protected system drive tab.
- Prompt the user for the recovery key ID indicated in the BitLocker password input window, and compare it with the ID in the Recovery key ID field.
If the IDs do not match, this key is not valid for restoring access to the specified system drive. Make sure that the name of the selected computer matches the name of the user's computer.
- Send the user the key that is indicated in the Recovery key field.
To send a user a recovery key for a non-system hard drive that was encrypted using BitLocker:
- Open the Kaspersky Security Center Administration Console.
- In the Administration Console tree, select the Additional → Data encryption and protection → Encrypted devices folder.
The workspace displays a list of encrypted devices.
- In the workspace, select the encrypted device to which you need to restore access.
- Right-click to bring up the context menu and select Get access key to specified encrypted device.
This opens the Restore access to the disk encrypted with BitLocker window.
- Prompt the user for the recovery key ID indicated in the BitLocker password input window, and compare it with the ID in the Recovery key ID field.
If the IDs do not match, this key is not valid for restoring access to the specified drive. Make sure that the name of the selected computer matches the name of the user's computer.
- Send the user the key that is indicated in the Recovery key field.
Creating the executable file of Restore Utility
These instructions are intended for users of client computers with Kaspersky Endpoint Security installed.
To create the executable file of Restore Utility:
- Open the main application window.
- Click the Support button in the bottom left corner of the main application window to open the Support window.
- In the Support window, click the Restore encrypted device button.
Encrypted device Restore Utility starts.
- Click the Create stand-alone Restore Utility button in the window of Restore Utility.
The Creating stand-alone Restore Utility window opens.
- In the Save to window, manually type the path to the folder for saving the executable file of Restore Utility, or click the Browse button.
- Click OK in the Creating stand-alone Restore Utility window.
The executable file of Restore Utility (fdert.exe) is saved in the selected folder.
Restoring data on encrypted devices using the Restore Utility
These instructions are intended for users of client computers with Kaspersky Endpoint Security installed.
To restore access to an encrypted device using the Restore Utility:
- Run Restore Utility in one of the following ways:
- Click the Support button in the main window of Kaspersky Endpoint Security to open the Support window and click the Restore encrypted device button.
- Run the fdert.exe executable file of Restore Utility. This file is created by Kaspersky Endpoint Security.
- In the Restore Utility window, from the Select device drop-down list select an encrypted device to which you want to restore access.
- Click the Scan button to allow the utility to define which of the actions should be taken on the device: whether it should be unlocked or decrypted.
If the computer has access to Kaspersky Endpoint Security encryption functionality, the Restore Utility prompts you to unlock the device. While unlocking the device does not decrypt it, the device becomes directly accessible as a result of being unlocked. If the computer does not have access to Kaspersky Endpoint Security encryption functionality, the Restore Utility prompts you to decrypt the device.
- Click the Fix MBR button if diagnostics of the encrypted system hard drive has returned a message about problems involving the master boot record (MBR) of the device.
Fixing the master boot record of the device can speed up the process of collecting information that is needed for unlocking or decrypting the device.
- Click the Unlock or Decrypt button depending on the results of diagnostics.
The Device unlock settings or Device decryption settings window opens.
- If you want to restore data using an Authentication Agent account:
- Select the Use Authentication Agent account settings option.
- In the Name and Password fields, specify the Authentication Agent account credentials.
This method is possible only when restoring data on a system hard drive. If the system hard drive was corrupted and Authentication Agent account data has been lost, you must obtain an access key from the corporate LAN administrator to restore data on an encrypted device.
- If you want to use an access key to restore data:
- Select the Specify device access key manually option.
- Click the Receive access key button.
- The Receive device access key window opens.
- Click the Save button and select the folder in which to save the request access file with the fdertc extension.
- Send the request access file to the corporate LAN administrator.
Do not close the Receive device access key window until you have received the access key. When this window is opened again, you will not be able to apply the access key that was previously created by the administrator.
- Obtain and save the access key file that was created and provided to you by the corporate LAN administrator.
- Click the Load button and select the access key file with the fdertr extension in the window that opens.
- If you are decrypting a device, you must also specify the other decryption settings in the Device decryption settings window. To do so:
- Specify area to decrypt:
- If you want to decrypt the entire device, select the Decrypt entire device option.
- If you want to decrypt a portion of the data on a device, select the Decrypt individual device areas option and use the Start and End fields to specify the decryption area boundaries.
- Select the location for writing the decrypted data:
- If you want the data on the original device to be rewritten with the decrypted data, clear the Save data to file after decryption check box.
- If you want to save decrypted data separately from the original encrypted data, select the Save data to file after decryption check box and use the Browse button to specify the path in which to save the data.
- Specify area to decrypt:
- Click OK.
The device unlocking / decryption process starts.
Page top
Responding to a user request to restore data on encrypted devices
To create a key file for accessing an encrypted device and provide it to a user:
- Open the Kaspersky Security Center Administration Console.
- In the Administration Console tree, select the Additional → Data encryption and protection → Encrypted devices folder.
- In the workspace, select the encrypted device for which you want to create an access key file, and in the device context menu select Get access key to specified encrypted device.
If you are not sure for which computer the request access file was generated, in the Administration Console tree select the Additional → Data encryption and protection folder and in the workspace click the Get device encryption key link.
The Allow access to the device window opens.
- Select the encryption algorithm in use. To do this, select one of the following options:
- AES256, if Kaspersky Endpoint Security have been installed from a distribution package located in the aes256 folder on the computer that the device was encrypted;
- AES56, if Kaspersky Endpoint Security have been installed from a distribution package located in the aes56 folder on the computer that the device was encrypted;
- Click the Browse button.
The standard Select request access file Microsoft Windows dialog box opens.
- In the Select request access file window, specify the path to the request file with the fdertc extension that you received from the user.
- Click the Open button.
Kaspersky Security Center generates an access key file with the fdertr extension for accessing the encrypted device.
- Do one of the following:
- To email the generated access key file to the user, click the Send by email button.
- To save the access key file for the encrypted device and deliver it to the user by another method, click the Save button.
Restoring access to encrypted data after operating system failure
You can restore access to data after operating system failure only for file level encryption (FLE). You cannot restore access to data if full disk encryption (FDE) is used.
To restore access to encrypted data after operating system failure:
- Reinstall the operating system without formatting the hard drive.
- Install Kaspersky Endpoint Security.
- Establish a connection between the computer and the Kaspersky Security Center Administration Server that controlled the computer during encryption of the data.
Access to encrypted data will be granted under the same conditions that applied before operating system failure.
Page top
Creating an operating system rescue disk
The operating system rescue disk can be useful when an encrypted hard drive cannot be accessed for some reason and the operating system cannot load.
You can load an image of the Windows operating system using the rescue disk and restore access to the encrypted hard drive using Restore Utility included in the operating system image.
To create an operating system rescue disk:
- Create an executable file for the Encrypted Device Restore Utility.
- Create a custom image of the Windows pre-boot environment. While creating the custom image of the Windows pre-boot environment, add the executable file of Restore Utility to the image.
- Save the custom image of the Windows pre-installation environment to bootable media such as a CD or removable drive.
Refer to Microsoft help files for instructions on creating a custom image of the Windows pre-boot environment (for example, in the Microsoft TechNet resource).
Endpoint Sensor
The settings of the Endpoint Sensor component are available only in the Kaspersky Security Center Administration Console. To use this component, you must install the administration plug-in.
This section contains information about Endpoint Sensor and instructions on how to enable or disable this component.
About Endpoint Sensor
Endpoint Sensor is a component of Kaspersky Anti Targeted Attack Platform. This solution is intended for rapid detection of threats such as targeted attacks.
This component is installed on client computers. On these computers, the component continually monitors processes, active network connections, and files that are modified, and relays this information to Kaspersky Anti Targeted Attack Platform.
The component functionality is available under the following operating systems:
- Microsoft Windows 7 Professional / Enterprise / Ultimate x86 Edition SP1, Microsoft Windows 7 Professional / Enterprise / Ultimate x64 Edition SP1.
- Microsoft Windows 8.1 Enterprise x86 Edition, Microsoft Windows 8.1 Enterprise x64 Edition.
- Microsoft Windows 10 Pro / Enterprise x86 Edition, Microsoft Windows 10 Pro / Enterprise x64 Edition.
- Microsoft Windows Server 2012 Standard / Foundation / Essentials x64 Edition, Microsoft Windows Server 2012 R2 Standard / Foundation / Essentials x64 Edition.
- Microsoft Windows Server 2016
For additional information about Kaspersky Anti Targeted Attack Platform that is not provided in this document, please refer to the Kaspersky Anti Targeted Attack Platform help.
Inbound connections to computers with the Endpoint Sensor component must be allowed from the Kaspersky Anti Targeted Attack Platform server directly, without a proxy server.
Page top
Enabling and disabling the Endpoint Sensor component
To enable or disable the Endpoint Sensor component:
- Open the Kaspersky Security Center Administration Console.
- In the Managed devices folder of the Administration Console tree, open the folder with the name of the relevant administration group for which you want to edit policy settings.
- In the workspace, select the Policies tab.
- Select the necessary policy.
- Open the Properties: <Policy name> window by using one of the following methods:
- In the context menu of the policy, select Properties.
- Click the Configure policy link located in the right part of the Administration Console workspace.
- Select the Endpoint Sensor section.
- Do one of the following:
- If you want to enable Endpoint Sensor, select the Endpoint Sensor check box.
- If you want to disable Endpoint Sensor, clear the Endpoint Sensor check box.
- If you selected the check box at the previous step:
- In the Server address field, specify the Kaspersky Anti Targeted Attack Platform server address consisting of the following parts:
- Protocol name
- IP address or fully qualified domain name (FQDN) of the server
- Path to the Windows Event Collector on the server
- In the Port field, specify the port number that is used to connect to the Kaspersky Anti Targeted Attack Platform server.
- In the Server address field, specify the Kaspersky Anti Targeted Attack Platform server address consisting of the following parts:
- Click OK.
- Apply the policy.
For details on applying a Kaspersky Security Center policy, please refer to the Kaspersky Security Center Help Guide.
Updating databases and application software modules
This section contains information about database and application module updates (also called "updates"), and instructions on how to configure update settings.
About database and application module updates
Updating the databases and application modules of Kaspersky Endpoint Security ensures up-to-date protection on your computer. New viruses and other types of malware appear worldwide on a daily basis. Kaspersky Endpoint Security databases contain information about threats and ways of neutralizing them. To detect threats quickly, you are urged to regularly update the databases and application modules.
Regular updates require a license in effect. If there is no current license, you will be able to perform an update only once.
The main update source for Kaspersky Endpoint Security is Kaspersky update servers.
Your computer must be connected to the Internet to successfully download the update package from Kaspersky update servers. By default, the Internet connection settings are determined automatically. If you use a proxy server, you need to adjust the connection settings.
While performing an update, the following objects are downloaded and installed on your computer:
- Kaspersky Endpoint Security databases. Computer protection is provided using databases that contain signatures of viruses and other threats and information on ways to neutralize them. Protection components use this information when searching for and neutralizing infected files on your computer. The databases are constantly updated with records of new threats and methods for counteracting them. Therefore, we recommend that you update the databases regularly.
In addition to the Kaspersky Endpoint Security databases, the network drivers that enable the application's components to intercept network traffic are updated.
- Application modules. In addition to the databases of Kaspersky Endpoint Security, you can also update the application modules. Updating the application modules fixes vulnerabilities in Kaspersky Endpoint Security, adds new functions, or enhances existing functions.
While updating, the application modules and databases on your computer are compared against the up-to-date version at the update source. If your current databases and application modules differ from their respective up-to-date versions, the missing portion of the updates is installed on your computer.
Context help files can be updated together with application module updates.
If the databases are obsolete, the update package may be large, which may cause additional Internet traffic (up to several dozen MB).
Information about the current status of Kaspersky Endpoint Security databases is displayed in the Update section in the Tasks window.
Information on update results and on all events that occur during the performance of the update task is logged in the Kaspersky Endpoint Security report.
Page top
About update sources
An update source is a resource that contains updates for databases and application modules of Kaspersky Endpoint Security.
Update sources include the Kaspersky Security Center server, Kaspersky update servers, and network or local folders.
If you do not have access to Kaspersky update servers (for example, Internet access is restricted), you can contact Kaspersky headquarters to request contact information for Kaspersky partners. Kaspersky partners will provide you with updates on a removable drive.
When ordering updates on a removable drive, please specify whether you also need application module updates.
Page top
Update settings configuration
You can perform the following actions to configure the update settings:
- Add new update sources.
The default list of update sources includes Kaspersky Security Center and Kaspersky update servers. You can add other update sources to the list. You can specify HTTP/FTP servers and shared folders as update sources.
If several resources are selected as update sources, Kaspersky Endpoint Security tries to connect to them one after another, starting from the top of the list, and performs the update task by retrieving the update package from the first available source.
If you select a resource outside the LAN as the update source, you must have an Internet connection to perform an update.
- Select the region of the Kaspersky update server.
If you use Kaspersky update servers as an update source, you can select the location of the Kaspersky update server that is used to download the update package. Kaspersky update servers are located in several countries. Using the nearest Kaspersky update servers helps to reduce the time that is spent on retrieving an update package.
By default, the application uses information about the current region from the operating system's registry.
- Configure updating of Kaspersky Endpoint Security from a shared folder.
To save Internet traffic, you can configure Kaspersky Endpoint Security updates so that computers on your LAN receive updates from a shared folder. To this end, one of the computers on your LAN receives an up-to-date update package from the Kaspersky Security Center server or from Kaspersky update servers and then copies the retrieved update package to a shared folder. After that, other computers on your LAN are able to receive the update package from this shared folder.
- Select the update task run mode.
If it is not possible to run the update task for any reason (for example, the computer is not on at that time), you can configure the skipped task to be start automatically as soon as this becomes possible.
You can postpone starting the update task after the application starts if you select the By schedule update task run mode, and if the start time of Kaspersky Endpoint Security matches the update task start schedule. The update task can only be run after the specified time interval elapses after the startup of Kaspersky Endpoint Security.
- Configure the update task to run under the rights of a different user account.
Adding an update source
To add an update source:
- Open the application settings window.
- In the left part of the window, in the Tasks section, select Update.
In the right part of the window, the Application Update Settings are displayed.
- In the Run mode and update source section, click the Update source button.
This opens the Source tab of the Update window.
- On the Source tab, click the Add button.
The Select update source window opens.
- In the Select update source window, select a folder with the update package or enter the full path to the folder in the Source field.
- Click OK.
- In the Update window, click OK.
- To save changes, click the Save button.
Selecting the update server region
To select the update server region:
- Open the application settings window.
- In the left part of the window, in the Tasks section, select Update.
In the right part of the window, the Application Update Settings are displayed.
- In the Run mode and update source section, click the Update source button.
This opens the Source tab of the Update window.
- On the Source tab, in the Regional settings section, choose Select from the list.
- In the drop-down list, select the country that is nearest to your current location.
- Click OK.
- To save changes, click the Save button.
Configuring updates from a shared folder
Configuring the updates of Kaspersky Endpoint Security from a shared folder consists of the following steps:
- Enabling the copying of an update package to a shared folder on one of the computers on the local area network.
- Configuring updates of Kaspersky Endpoint Security from the specified shared folder to the remaining computers on the local area network.
To enable copying of the update package to the shared folder:
- Open the application settings window.
- In the left part of the window, in the Tasks section, select Update.
In the right part of the window, the Application Update Settings are displayed.
- In the Additional section, select the Copy updates to folder check box.
- Specify the path to the shared folder where the update package is to be placed. You can do this in one of the following ways:
- Enter the path to the shared folder in the field under the Copy updates to folder check box.
- Click the Browse button. Then, in the Select folder window that opens, select the necessary folder and click OK.
- To save changes, click the Save button.
To configure updating of Kaspersky Endpoint Security from a shared folder:
- Open the application settings window.
- In the left part of the window, in the Tasks section, select Update.
In the right part of the window, the Application Update Settings are displayed.
- In the Run mode and update source section, click the Update source button.
This opens the Source tab of the Update window.
- On the Source tab, click the Add button.
The Select update source window opens.
- In the Select update source window, select the shared folder that contains the update package or enter the full path to the shared folder in the Source field.
- Click OK.
- On the Source tab, clear the check boxes next to the names of the update sources that you have not specified as the shared folder.
- Click OK.
- To save changes, click the Save button.
Selecting the update task run mode
To select the update task run mode:
- Open the application settings window.
- In the left part of the window, in the Tasks section, select Update.
In the right part of the window, the Application Update Settings are displayed.
- Click the Run mode button.
The Run mode tab opens in the Update window.
- In the Run mode section, select one of the following options for starting an update task:
- If you want Kaspersky Endpoint Security to run the update task depending on whether or not an update package is available from the update source, select Automatically. The frequency of checks by Kaspersky Endpoint Security for update packages increases during virus outbreaks and is less at other times.
- If you want to start an update task manually, select Manually.
- If you want to configure a startup schedule for the update task, select By schedule.
- Do one of the following:
- If you have selected the Automatically or Manually option, go to step 6 in the instructions.
- If you have selected the By schedule option, specify the settings of the update task run schedule. To do so:
- In the Frequency drop-down list, specify when to start the update task. Select one of the following options: Minutes, Hours, Days, Every week, At a specified time, Every month, or After application startup.
- Depending on the item that is selected from the Frequency drop-down list, specify values for the settings that define the startup time of the update task.
- In the Postpone running after application startup for field, specify the time interval by which the start of the update task is postponed after the startup of Kaspersky Endpoint Security.
If the After application startup item is selected from the Frequency drop-down list, the Postpone running after application startup for field is not available.
- If you want Kaspersky Endpoint Security to run skipped update tasks as soon as possible, select the Run skipped tasks check box.
If Hours, Minutes or After application startup is selected from the Frequency drop-down list, the Run skipped tasks check box is unavailable.
- Click OK.
- To save changes, click the Save button.
Starting an update task under the rights of a different user account
By default, the Kaspersky Endpoint Security update task is started on behalf of the user whose account you have used to log in to the operating system. However, Kaspersky Endpoint Security may be updated from an update source that the user cannot access due to a lack of required rights (for example, from a shared folder that contains an update package) or an update source for which proxy server authentication is not configured. In the Kaspersky Endpoint Security settings, you can specify a user that has such rights and start the Kaspersky Endpoint Security update task under that user account.
To start an update task under a different user account:
- Open the application settings window.
- In the left part of the window, in the Tasks section, select Update.
In the right part of the window, the Application Update Settings are displayed.
- In the Run mode and update source section, click the Run mode button.
The Run mode tab opens in the Update window.
- On the Run mode tab, in the User section, select the Run task as check box.
- In the Name field, enter the name of the user account whose rights are necessary for accessing the update source.
- In the Password field, enter the password of the user whose rights are necessary for accessing the update source.
- Click OK.
- To save changes, click the Save button.
Configuring application module updates
To configure application module updates:
- Open the application settings window.
- In the left part of the window, in the Tasks section, select Update.
In the right part of the window, the Application Update Settings are displayed.
- In the Additional section, do one of the following:
- Select the Download updates of application modules check box if you want the application to include application module updates in the update packages.
- Otherwise, clear the Download updates of application modules check box.
- If the Download updates of application modules check box was selected at the previous step, specify the conditions under which the application will install the application module updates:
- Select the Install critical and approved updates option if you want the application to install critical updates of application modules automatically, and other updates after their installation is approved, locally via the application interface or using Kaspersky Security Center.
- Select the Install only approved updates option if you want the application to install application module updates after their installation is approved, locally via the application interface or using Kaspersky Security Center.
- To save changes, click the Save button.
Starting and stopping an update task
Regardless of the selected update task run mode, you can start or stop a Kaspersky Endpoint Security update task at any time.
To download an update package from Kaspersky servers, an Internet connection is required.
To start or stop an update task:
- Open the main application window.
- Click the Tasks button in the lower part of the main application window.
The Tasks window opens.
- Click the section with the name of the update task.
The selected section is expanded.
- Do one of the following:
- If you want to start the update task, select Start from the menu.
The task progress status that is displayed under the name of the update task changes to Running.
- If you want to stop the update task, select Stop from the menu.
The task progress status that is displayed under the name of the update task changes to Stopped.
- If you want to start the update task, select Start from the menu.
To start or stop the update task when the simplified application interface is displayed:
- Right-click to bring up the context menu of the application icon that is in the taskbar notification area.
- In the Tasks drop-down list in the context menu, do one of the following:
- select a non-running update task to start it
- select a running update task to stop it
- select a paused update task to resume or restart it
Rolling back the last update
After the databases and application modules are updated for the first time, the function of rolling back the databases and application modules to their previous versions becomes available.
Each time that a user starts the update process, Kaspersky Endpoint Security creates a backup copy of the current databases and application modules. This lets you roll back the databases and application modules to their previous versions when necessary. Rolling back the last update is useful, for example, when the new database version contains an invalid signature that causes Kaspersky Endpoint Security to block a safe application.
To roll back the last update:
- Open the main application window.
- Click the Tasks button in the lower part of the main application window.
The Tasks window opens.
- Click the section with the name of the update rollback task.
The selected section is expanded.
- Click the Start button.
This starts the rollback task.
The task progress status that is displayed under the name of the rollback task changes to Running.
To start or stop a rollback task when the simplified application interface is displayed:
- Right-click to bring up the context menu of the application icon that is in the taskbar notification area.
- In the Tasks drop-down list in the context menu, do one of the following:
- select a non-running rollback task to start it
- select a running rollback task to stop it
- select a paused rollback task to resume or restart it
Configuring proxy server use
To configure proxy server settings:
- Open the application settings window.
- In the left part of the window, in the Tasks section, select Update.
In the right part of the window, the Application Update Settings are displayed.
- In the Proxy server section, click the Settings button.
The Proxy Server Settings window opens.
You can also open the Proxy Server Settings window in the Application Settings subsection of the General Settings section in the application settings window.
- In the Proxy Server Settings window, select the Use proxy server check box.
- Select one of the following options for determining the proxy server address:
- Automatically detect proxy server address.
This option is selected by default.
- Use specified proxy server address and port.
- Automatically detect proxy server address.
- If you selected the Use specified proxy server address and port option, specify values in the Address and Port fields.
- If you want to enable authentication on the proxy server, select the Set user name and password for authentication check box and specify values in the following fields:
- User name.
Field for entering the user name that is used for authentication on the proxy server.
- Password.
Field for entering the user password that is used for authentication on the proxy server.
- User name.
- If you want to disable proxy server use when updating Kaspersky Endpoint Security from the shared folder, select the Bypass proxy server for local addresses check box.
- Click OK.
- To save changes, click the Save button.
Scanning the computer
A virus scan is vital to computer security. Regularly run virus scans to rule out the possibility of spreading malware that is undetected by protection components due to a low security level setting or for other reasons.
This section describes the specifics and settings of scan tasks, security levels, scan methods and technologies, and instructions on handling files which Kaspersky Endpoint Security has not processed during a virus scan.
About scan tasks
To find viruses and other types of malware and check the integrity of application modules, Kaspersky Endpoint Security includes the following tasks:
- Full Scan. A thorough scan of the entire computer. By default, Kaspersky Endpoint Security scans the following objects:
- Kernel memory
- Objects that are loaded at startup of the operating system
- Boot sectors
- Operating system backup
- All hard and removable drives
- Critical Areas Scan. By default, Kaspersky Endpoint Security scans the kernel memory, running processes, and disk boot sectors.
- Custom Scan. Kaspersky Endpoint Security scans the objects that are selected by the user. You can scan any object from the following list:
- Kernel memory
- Objects that are loaded at startup of the operating system
- Operating system backup
- Outlook mailbox
- All hard, removable, and network drives
- Any selected file
- Integrity Check. Kaspersky Endpoint Security checks the application modules for corruption or modifications.
The Full Scan and Critical Areas Scan tasks are somewhat different than the others. For these tasks, it is not recommended to edit the scan scope.
After scan tasks start, the task completion progress is displayed under the name of the running scan task in the Tasks window.
Information on the scan results and events that have occurred during the performance of scan tasks is logged in a Kaspersky Endpoint Security report.
Page top
Starting or stopping a scan task
Regardless of the selected scan task run mode, you can start or stop a scan task at any time.
To start or stop a scan task:
- Open the main application window.
- Click the Tasks button in the lower part of the main application window.
The Tasks window opens.
- Click the section with the name of the scan task.
The selected section is expanded.
- Do one of the following:
- Click the Start button if you want to run the scan task.
The task progress status that is displayed under the name of this scan task changes to Running.
- If you want to stop the scan task, select Stop in the context menu.
The task progress status that is displayed under the name of this scan task changes to Stopped.
- Click the Start button if you want to run the scan task.
To start or stop a scan task when the simplified application interface is displayed:
- Right-click to bring up the context menu of the application icon that is in the taskbar notification area.
- In the Tasks drop-down list in the context menu, do one of the following:
- select a non-running scan task to start it
- select a running scan task to stop it
- select a paused scan task to resume or restart it
Configuring scan task settings
To configure scan task settings, you can perform the following:
- Change the security level.
You can select one of the preset security levels or manually configure security level settings. If you change the security level settings, you can always revert back to the recommended security level settings.
- Change the action that Kaspersky Endpoint Security performs if it detects an infected file.
- Edit the scan scope.
You can expand or restrict the scan scope by adding or removing scan objects, or by changing the type of files to be scanned.
- Optimize scanning.
You can optimize file scanning: reduce scan time and increase the operating speed of Kaspersky Endpoint Security. This can be achieved by scanning only new files and those files that have been modified since the previous scan. This mode applies both to simple and to compound files. You can also set a limit for scanning a single file. When the specified time interval expires, Kaspersky Endpoint Security excludes the file from the current scan (except archives and objects that include several files).
You can also enable the use of the iChecker and iSwift technologies. These technologies optimize the speed of scanning files, by excluding files that have not been modified since the most recent scan.
- Configure scanning of compound files.
- Configure the scan methods.
Kaspersky Endpoint Security uses a scanning technique called Machine learning and signature analysis. During signature analysis, Kaspersky Endpoint Security matches the detected object with records in its database. Based on the recommendations of Kaspersky experts, machine learning and signature analysis is always enabled.
To increase the effectiveness of protection, you can use heuristic analysis. During heuristic analysis, Kaspersky Endpoint Security analyzes the activity of objects in the operating system. Heuristic analysis can detect malicious objects for which there are currently no records in the Kaspersky Endpoint Security database.
- Select the scan task run mode.
If it is impossible to run the scan task for any reason (for example, the computer is off at that time), you can configure the skipped task to be run automatically as soon as this becomes possible.
You can postpone the scan task start after application startup if you have selected the By schedule update task run mode and the Kaspersky Endpoint Security startup time matches the scan task run schedule. The scan task can only be run after the specified time interval elapses after the startup of Kaspersky Endpoint Security.
- Configure the scan task to run under a different user account.
- Specify the settings for scanning removable drives when they are connected.
Changing the security level
To perform scan tasks, Kaspersky Endpoint Security uses various combinations of settings. These combinations of settings saved in the application are called security levels. There are three preset security levels: High, Recommended, and Low. The Recommended security level settings are considered to be optimal. They are recommended by Kaspersky experts.
To change a security level:
- Open the application settings window.
- In the left part of the window, in the Tasks section, select the subsection containing the name of the required scan task (Full Scan, Critical Areas Scan or Custom Scan).
In the right part of the window, the settings of the selected scan task are displayed.
- In the Security level section, do one of the following:
- If you want to apply one of the preset security levels (High, Recommended, or Low), select it with the slider.
- If you want to configure a custom security level, click the Settings button and specify the settings in the appearing window with the name of the scan task.
After you configure a custom security level, the name of the security level in the Security level section changes to Custom.
- If you want to change the security level to Recommended, click the Default button.
- To save changes, click the Save button.
Changing the action to take on infected files
By default, on detection of infected files, Kaspersky Endpoint Security tries to disinfect them, or deletes them if disinfection is not possible.
To change the action to take on infected files:
- Open the application settings window.
- In the left part of the window, in the Tasks section, select the subsection containing the name of the required scan task (Full Scan, Critical Areas Scan, Custom Scan, Scan from context menu).
In the right part of the window, the settings of the selected scan task are displayed.
- In the Action on threat detection section, select one of the following options:
- Select the Disinfect, delete if disinfection fails check box if you want Kaspersky Endpoint Security to try to disinfect them, or delete them if disinfection is not possible.
- Select the Disinfect, inform if disinfection fails check box if you want Kaspersky Endpoint Security to try to disinfect them, and inform you if disinfection is not possible.
- Select the Inform check box if you want Kaspersky Endpoint Security to inform you when infected files are detected.
On detection of infected files that are part of the Windows Store application, Kaspersky Endpoint Security applies the Delete action.
- To save changes, click the Save button.
Generating a list of objects to scan
To generate a list of objects to scan:
- Open the application settings window.
- In the left part of the window, in the Tasks section, select the subsection containing the name of the required scan task (Full Scan, Critical Areas Scan, Custom Scan, Scan from context menu).
In the right part of the window, the settings of the selected scan task are displayed.
- Click the Scan scope button.
The Scan scope window opens.
- If you want to add a new object to the scan scope:
- Click the Add button.
The Select scan scope window opens.
- Select the object and click Add.
All objects that are selected in the Select scan scope window are displayed in the Scan scope list.
- Click OK.
- Click the Add button.
- If you want to change the path to an object in the scan scope:
- Select the object in the scan scope.
- Click the Edit button.
The Select scan scope window opens.
- Enter the new path to the object in the scan scope.
- Click OK.
- If you want to remove an object from the scan scope:
- Select the object that you want to remove from the scan scope.
To select multiple objects, select them while holding down the CTRL key.
- Click the Delete button.
A window for confirming deletion opens.
- Click Yes in the removal confirmation window.
You cannot remove or edit objects that are included in the default scan scope.
- Select the object that you want to remove from the scan scope.
- To exclude an object from the scan scope, clear the check box next to the object in the Scan scope window.
The object remains in the list of objects in the scan scope, but it is not scanned when the scan task runs.
- Click OK.
- To save changes, click the Save button.
Selecting the type of files to scan
To select the type of files to scan:
- Open the application settings window.
- In the left part of the window, in the Tasks section, select the subsection containing the name of the required scan task (Full Scan, Critical Areas Scan, Custom Scan, Scan from context menu).
In the right part of the window, the settings of the selected scan task are displayed.
- In the Security level section, click the Settings button.
A window with the name of the selected scan task opens.
- In the window with the name of the selected scan task, select the Scope tab.
- In the File types section, specify the type of files that you want to scan when the selected scan task runs:
- If you want to scan all files, select All files.
- If you want to scan files of formats which are the most vulnerable to infection, select Files scanned by format.
- If you want to scan files with extensions that are typically the most vulnerable to infection, select Files scanned by extension.
When selecting the type of files to scan, consider the following:
- There are some file formats (such as TXT) for which there is a low probability of intrusion of malicious code and its subsequent activation. At the same time, there are file formats that contain (such as EXE and DLL formats) or may contain executable code (such as DOC format). The risk of intrusion and activation of malicious code in such files is high.
- An intruder may send a virus or another malicious program to your computer in an executable file that has been renamed with the .txt extension. If you select scanning of files by extension, the application skips this file during scanning. If scanning of files by format is selected, the File Threat Protection component analyzes the file header regardless of the extension. If this analysis reveals that the file has the EXE format, the application scans it.
- In the window containing the name of the scan task, click OK.
- To save changes, click the Save button.
Optimizing file scanning
To optimize file scanning:
- Open the application settings window.
- In the left part of the window, in the Tasks section, select the subsection containing the name of the required scan task (Full Scan, Critical Areas Scan, Custom Scan, Scan from context menu).
In the right part of the window, the settings of the selected scan task are displayed.
- In the Security level section, click the Settings button.
A window with the name of the selected scan task opens.
- In the window that opens, select the Scope tab.
- In the Scan optimization section, perform the following actions:
- Select the Scan only new and changed files check box.
- Select the Skip files that are scanned for longer than check box and specify the scan duration for a single file (in seconds).
- Click OK.
- To save changes, click the Save button.
Scanning compound files
A common technique of concealing viruses and other malware is to implant them in compound files, such as archives or databases. To detect viruses and other malware that are hidden in this way, the compound file must be unpacked, which may slow down scanning. You can limit the types of compound files to be scanned and thereby speed up scanning.
To configure scanning of compound files:
- Open the application settings window.
- In the left part of the window, in the Tasks section, select the subsection containing the name of the required scan task (Full Scan, Critical Areas Scan or Custom Scan).
In the right part of the window, the settings of the selected scan task are displayed.
- In the Security level section, click the Settings button.
A window with the name of the selected scan task opens.
- In the window that opens, select the Scope tab.
- In the Scan of compound files section, specify which compound files you want to scan: archives, installation packages, files in office formats, files in mail formats, and password-protected archives.
- If the Scan only new and changed files check box is cleared in the Scan optimization section, click the all / new link next to the name of the compound file type if you want to specify for each type of compound file whether to scan all files of this type or only new files of this type.
This link changes its value when it is clicked.
If the Scan only new and changed files check box is selected, only new files are scanned.
- Click the Additional button.
The Compound files window opens.
- In the Size limit section, do one of the following:
- If you do not want to unpack large compound files, select the Do not unpack large compound files check box and specify the required value in the Maximum file size field.
- If you want to unpack large compound files regardless of their size, clear the Do not unpack large compound files check box.
Kaspersky Endpoint Security scans large files that are extracted from archives, regardless of whether the Do not unpack large compound files check box is selected.
- Click OK.
- In the window with the name of the scan task, click OK.
- To save changes, click the Save button.
Using scan methods
To use scan methods:
- Open the application settings window.
- In the left part of the window, in the Tasks section, select the subsection containing the name of the required scan task (Full Scan, Critical Areas Scan, Custom Scan, Scan from context menu).
In the right part of the window, the settings of the selected scan task are displayed.
- In the Security level section, click the Settings button.
A window with the name of the selected scan task opens.
- In the window that opens, select the Additional tab.
- If you want the application to use heuristic analysis when running the scan task, in the Scan methods section, select the Heuristic analysis check box. Then use the slider to set the heuristic analysis level: Light scan, Medium scan, or Deep scan.
- Click OK.
- To save changes, click the Save button.
Using scan technologies
To use scan technologies:
- Open the application settings window.
- In the left part of the window, in the Tasks section, select the subsection containing the name of the required scan task (Full Scan, Critical Areas Scan, Custom Scan, Scan from context menu).
In the right part of the window, the settings of the selected scan task are displayed.
- In the Security level section, click the Settings button.
A window with the name of the selected scan task opens.
- In the window that opens, select the Additional tab.
- In the Scan technologies section, select the check boxes next to the names of technologies that you want to use during the scan.
- Click OK.
- To save changes, click the Save button.
Selecting the run mode for the scan task
To select the scan task run mode:
- Open the application settings window.
- In the left part of the window, in the Tasks section, select the subsection containing the name of the relevant task: Full Scan, Critical Areas Scan or Custom Scan.
In the right part of the window, the settings of the selected scan task are displayed.
- Click the Run mode button.
A window with the properties of the selected task opens on the Run mode tab.
- In the Run mode section, select the task run mode: Manually or By schedule.
- If you selected the By schedule option, specify the schedule settings. To do so:
- In the Frequency drop-down list, select the task run frequency (Minutes, Hours, Days, Every week, At a specified time, Every month, or After application startup, After every update).
- Depending on the selected frequency, configure advanced settings that specify the task run schedule.
- If you want Kaspersky Endpoint Security to start skipped scan tasks as soon as possible, select the Run skipped tasks check box.
If Minutes, Hours, After application startup or After every update item is selected in the Frequency drop-down list, the Run skipped tasks check box is unavailable.
- If you want Kaspersky Endpoint Security to suspend a task when computer resources are limited, select the Run only when the computer is idling check box.
This schedule option helps to conserve computer resources.
- Click OK.
- To save changes, click the Save button.
Starting a scan task under the account of a different user
By default, a scan task is run with the permissions of the account under which the user logged in to the operating system. However, you may need to run a scan task under a different user account. You can specify a user who has the appropriate rights in the settings of the scan task and run the scan task under this user's account.
To configure the start of a scan task under a different user account:
- Open the application settings window.
- In the left part of the window, in the Tasks section, select the subsection containing the name of the relevant task: Full Scan, Critical Areas Scan or Custom Scan.
In the right part of the window, the settings of the selected scan task are displayed.
- Click the Run mode button.
This opens a window with the properties of the selected task on the Run mode tab.
- On the Run mode tab, in the User section, select the Run task as check box.
- In the Name field, enter the name of the user account whose rights are necessary for starting the scan task.
- In the Password field, enter the password of the user whose rights are necessary for starting the scan task.
- Click OK.
- To save changes, click the Save button.
Scanning removable drives when they are connected to the computer
Some malicious programs exploit operating system vulnerabilities to replicate themselves via local networks and removable drives. Kaspersky Endpoint Security allows you to scan removable drives that are connected to your computer for viruses and other malware.
To configure scanning of removable drives when they are connected:
- Open the application settings window.
- In the left part of the window, in the Tasks section, select Removable drives scan.
The right part of the window displays the settings for scanning removable drives.
- In the Action on connection of a removable drive drop-down list, select the required action:
- Do not scan
- Detailed Scan
In this mode, Kaspersky Endpoint Security scans all files located on the removable drive, including files within compound objects.
- Quick Scan
In this mode, Kaspersky Endpoint Security scans only potentially infectable files, and does not unpack compound objects.
- Do one of the following:
- If you want Kaspersky Endpoint Security to scan only those removable drives whose size does not exceed a specified value, select the Maximum removable drive size check box and specify the value (in megabytes) in the neighboring field.
- If you want Kaspersky Endpoint Security to scan all hard drives, clear the Maximum removable drive size check box.
- Do one of the following:
- If you want Kaspersky Endpoint Security to display the removable drives scan progress in a separate window, select the Show scan progress check box.
- If you want Kaspersky Endpoint Security to run a removable drive scan in the background, clear the Show scan progress check box.
- To save changes, click the Save button.
Working with active threats
This section contains instructions on handling infected files which Kaspersky Endpoint Security has not processed while scanning the computer for viruses and other threats.
About active threats
Kaspersky Endpoint Security logs information about files that it has not processed for some reason. This information is recorded in the form of events in the list of active threats.
An infected file is considered processed if Kaspersky Endpoint Security performs one of the following actions on this file according to the specified application settings while scanning the computer for viruses and other threats:
- Disinfect.
- Remove.
- Delete if disinfection fails.
Kaspersky Endpoint Security moves the file to the list of active threats if, for any reason, Kaspersky Endpoint Security failed to perform an action on this file according to the specified application settings while scanning the computer for viruses and other threats.
This situation is possible in the following cases:
- The scanned file is unavailable (for example, it is located on a network drive or on a removable drive without write privileges).
- The action that is selected in the Action on threat detection section for scan tasks is Inform, and the user selects the Skip action when a notification about the infected file is displayed.
You can perform one of the following actions:
- Manually start a Custom Scan task for files in the list of active threats after updating databases and application modules. File status may change after the scan.
- Delete entries from the list of active threats.
Working with the list of active threats
The list of active threats is presented as a table of events related to infected files that were not processed for some reason.
You can perform the following actions with files from the list of active threats:
- View the list of active threats
- Scan active threats from the list using the current version of Kaspersky Endpoint Security databases and modules
- Restore files from the list of active threats to their original folders or to a different folder of your choice (when the original folder cannot be written to)
- Remove files from the list of active threats
- Open the folder where the file was initially located from the list of active threats
You can also perform the following actions while managing data in the table:
- Filter active threats based on column values or custom filter conditions.
- Use the active threat search function.
- Sort active threats.
- Change the order and arrangement of columns that are shown in the list of active threats
- Group active threats.
If necessary, you can copy information about selected active threats to the clipboard.
Start custom scan task for files from the list of active threats
You can manually start a custom scan task for infected files that for some reason were not processed. You can start the scan if, for example, the last scan was interrupted for some reason or if you want to rescan files from the list of active threats after the latest update of databases and application modules.
To start a Custom Scan of files from the list of active threats:
- Open the main application window.
- Click the <...> active threats section.
The Active threats window opens.
- In the table in the Active threats window, select one or more entries associated with files that you want to scan.
To select multiple entries, select them while holding down the CTRL key.
- Start the Custom Scan task in one of the following ways:
- Click the Rescan button.
- Right-click to bring up the context menu and select Rescan.
Deleting entries from the list of active threats
To delete entries from the list of active threats:
- Open the main application window.
- Click the <...> active threats section.
The Active threats window opens.
- In the table in the Active threats window, select one or more entries that you want to delete from the list of active threats.
To select multiple entries, select them while holding down the CTRL key.
- Delete entries in one of the following ways:
- Click the Delete button.
- Right-click to open the context menu and select Delete.
Checking the integrity of application modules
This section contains information about the specifics and settings of the integrity check task.
About the Integrity Check task
Kaspersky Endpoint Security checks the application modules in the application installation folder for corruption or modifications. If an application module has an incorrect digital signature, the module is considered corrupt.
After the integrity check task starts, its progress is displayed in the line under the task name in the Tasks window.
The results of the integrity check task are recorded in reports.
Page top
Starting or stopping an integrity check task
Regardless of the selected run mode, you can start or stop an integrity check task at any time.
To start or stop an integrity check task:
- Open the main application window.
- Click the Tasks button in the lower part of the main application window.
The Tasks window opens.
- Click the section with the name of the integrity scan task.
The selected section is expanded.
- Do one of the following:
- Click the Start button if you want to run the integrity check task.
The task progress status that is displayed under the name of the integrity check task changes to Running.
- If you want to stop the integrity check task, select Stop from the context menu.
The task progress status that is displayed under the name of the integrity check task changes to Stopped.
- Click the Start button if you want to run the integrity check task.
To start or stop the integrity check task when the simplified application interface is displayed:
- Right-click to bring up the context menu of the application icon that is in the taskbar notification area.
- In the Tasks drop-down list in the context menu, do one of the following:
- select a non-running integrity check task to start it
- select a running integrity check task to stop it
- select a paused integrity check task to resume or restart it
Selecting the run mode for the integrity check task
To select the run mode for the integrity check task:
- Open the application settings window.
- In the left part of the window, in the Tasks section, select Integrity check.
In the right part of the window, the integrity check task settings are displayed.
- In the Run mode section, choose one of the following options:
- If you want to manually start the integrity check task, select Manually.
- If you want to configure the startup schedule for the integrity check task, select By schedule.
- If you selected the By schedule option during the previous step, specify the settings of the task run schedule. To do so:
- In the Frequency drop-down list, specify when the integrity check task is to be started. Select one of the following options: Minutes, Hours, Days, Every week, At a specified time, Every month, or After application startup.
- Depending on the item that is selected from the Frequency drop-down list, specify the value for the settings that define the task start time.
- If you want Kaspersky Endpoint Security to start skipped integrity check tasks as soon as possible, select the Run skipped tasks check box.
If the After application startup, Minutes, or Hours item is selected from the Frequency drop-down list, the Run skipped tasks check box is unavailable.
- If you want Kaspersky Endpoint Security to suspend a task when computer resources are limited, select the Run only when the computer is idling check box.
This schedule option helps to conserve computer resources.
- To save changes, click the Save button.
Managing reports
This section describes how you can configure report settings and manage reports.
About reports
Information about the operation of each Kaspersky Endpoint Security component, performance of each scan task, update task and integrity check task, and overall operation of the application is recorded in the report.
Reports are stored in the folder ProgramData\Kaspersky Lab\KES\Report.
Reports may contain the following user data:
- Paths to files scanned by Kaspersky Endpoint Security
- Paths to registry keys modified by Kaspersky Endpoint Security
- Microsoft Windows user name
- Addresses of web pages opened by the user.
Report data is presented in the form of a table which contains a list of events. Each table line contains information on a separate event. Event attributes are located in the table columns. Certain columns are compound ones which contain nested columns with additional attributes. To view additional attributes, you must press the  button next to the name of the graph. Events that are logged during the operation of various components or the performance of various tasks have different sets of attributes.
The following reports are available:
- System Audit report. Contains information about events occurring during the interaction between the user and the application and in the course of application operation in general, which are unrelated to any particular Kaspersky Endpoint Security components or tasks.
- Report on the operation of a Kaspersky Endpoint Security component or the execution of a task.
- Encryption report. Contains information about events occurring during data encryption and decryption.
Reports use the following event importance levels:
- Informational events. Icon
 . Formal events that normally do not contain important information.
 - Important events. Icon
 . Events that need attention because they reflect important situations in the operation of Kaspersky Endpoint Security.
 - Critical events. Icon
 . Events of critical importance that indicate problems in the operation of Kaspersky Endpoint Security or vulnerabilities in the protection of the user's computer.
For convenient processing of reports, you can modify the presentation of data on the screen in the following ways:
- Filter the event list by various criteria.
- Use the search function to find a specific event.
- View the selected event in a separate section.
- Sort the list of events by each report column.
- Display and hide events grouped by the event filter.
- Change the order and arrangement of columns that are shown in the report.
You can save a generated report to a text file, if necessary.
You can also delete report information on Kaspersky Endpoint Security components and tasks that are combined into groups. Kaspersky Endpoint Security deletes all entries of the selected reports from the earliest entry to the current time.
If Kaspersky Endpoint Security is running under the management of Kaspersky Security Center, information about events may be transmitted to the Kaspersky Security Center Administration Server. For more details about managing reports in Kaspersky Security Center, please refer to the Kaspersky Security Center Help system.
Page top
Configuring report settings
You can configure report settings in the following ways:
- Configure the maximum report storage term.
The default maximum storage term for reports on events that are logged by Kaspersky Endpoint Security is 30 days. After that period of time, Kaspersky Endpoint Security automatically deletes the oldest entries from the report file. You can cancel the time-based restriction or change the maximum report storage duration.
- Configure the maximum size of the report file.
You can specify the maximum size of the file that contains the report. By default, the maximum report file size is 1024 MB. To avoid exceeding the maximum report file size, Kaspersky Endpoint Security automatically deletes the oldest entries from the report file when the maximum report file size is reached. You can cancel the restriction on the size of the report file or set a different value.
Configuring the maximum report storage term
To modify the report maximum storage term:
- Open the application settings window.
- In the left part of the window, in the General Settings section, select Reports and Storage.
- In the right part of the window, in the Reports section, perform one of the following actions:
- To limit the report storage term, select the Store reports no longer than check box. In the field next to the Store reports no longer than check box, specify the maximum report storage term.
The default maximum storage term for reports is 30 days.
- To cancel the limit on the report storage term, clear the Store reports no longer than button.
The limit on the report storage term is enabled by default.
- To limit the report storage term, select the Store reports no longer than check box. In the field next to the Store reports no longer than check box, specify the maximum report storage term.
- To save changes, click the Save button.
Configuring the maximum size of the report file
To configure the maximum report file size:
- Open the application settings window.
- In the left part of the window, in the General Settings section, select Reports and Storage.
- In the right part of the window, in the Reports section, perform one of the following actions:
- To limit the report file size, select the Maximum file size check box. In the field on the right of the Maximum file size check box, specify the maximum report file size.
By default, the report file size is limited to 1024 MB.
- To remove the restriction on the report file size, clear the Maximum file size check box.
The report file size limit is enabled by default.
- To limit the report file size, select the Maximum file size check box. In the field on the right of the Maximum file size check box, specify the maximum report file size.
- To save changes, click the Save button.
View reports
If a user can view reports, the user can also view all events reflected in the reports.
To view reports:
- Open the main application window.
- Click the Reports button in the lower part of the main application window.
The Reports window opens.
- In the left part of the Reports window, in the list of components and tasks, select a component or task.
The right part of the window displays a report containing a list of events resulting from the operation of the selected component or selected task of Kaspersky Endpoint Security.
You can sort events in the report based on the values in cells of one of the columns.
By default, report events are sorted in ascending order of the values in cells of the Event date column.
Page top
Viewing event information in a report
You can view a detailed summary of each event in the report.
To view a detailed summary of an event in the report:
- Open the main application window.
- Click the Reports button in the lower part of the main application window.
The Reports window opens.
- In the left part of the window, select the relevant report on the component or task.
Events included in the report scope are displayed in the table in the right part of the window. To find specific events in the report, use the filter, search, and sorting functions.
- Select the relevant event in the report.
A section with the event summary is displayed in the lower part of the window.
Page top
Saving a report to file
The user is personally responsible for ensuring the security of information from a report saved to file, and particularly for controlling and restricting access to this information.
You can save the report that you generate to a file in text format (TXT) or a CSV file.
Kaspersky Endpoint Security logs events in the report in the same way as they are displayed on the screen: in other words, with the same set and sequence of event attributes.
To save a report to file:
- Open the main application window.
- Click the Reports button in the lower part of the main application window.
The Reports window opens.
- In the left part of the Reports window, in the list of components and tasks, select a component or task.
A report is displayed in the right part of the window, which contains a list of events in the operation of the selected Kaspersky Endpoint Security component or task.
- If necessary, you can modify data presentation in the report by:
- Filtering events
- Running an event search
- Rearranging columns
- Sorting events
- Click the Save report button in the upper right part of the window.
A context menu opens.
- In the context menu, select the encoding for saving the report file: Save as ANSI or Save as Unicode.
The standard Save as window of Microsoft Office opens.
- In the Save as window, specify the destination folder for the report file.
- In the File name field, type the report file name.
- In the File type field, select the necessary report file format: TXT or CSV.
- Click the Save button.
Clearing reports
To remove information from reports:
- Open the application settings window.
- In the left part of the window, in the General Settings section, select Reports and Storage.
- In the right part of the window, in the Reports section, click the Delete reports button.
The Delete reports window opens.
- Select check boxes opposite the reports from which you want to delete information:
- All reports.
- Protection components report. Contains information about the operation of the following Kaspersky Endpoint Security components:
- Behavior Detection.
- Exploit Prevention.
- Host Intrusion Prevention.
- File Threat Protection.
- Web Threat Protection.
- Mail Threat Protection.
- Network Threat Protection.
- BadUSB Attack Prevention.
- Control components report. Contains information about the operation of the following Kaspersky Endpoint Security components:
- Application Control.
- Device Control.
- Web Control.
- Data encryption report. Contains information about completed data encryption tasks.
- Scan tasks report. Contains information about the following completed scan tasks:
- Full Scan.
- Critical Areas Scan.
- Custom Scan.
Information about completed Integrity check task is deleted only if the All reports check box is selected.
- Update task report. Contains information about completed update tasks:
- Firewall report. Contains information about Firewall operation.
- Click OK.
Notification service
This section contains information about the notification service that alerts the user about events in the operation of Kaspersky Endpoint Security, and also contains instructions on configuring notification parameters.
About Kaspersky Endpoint Security notifications
All sorts of events occur during the operation of Kaspersky Endpoint Security. Notifications of these events can be either be purely informational or contain critical information. For example, notifications may inform of a successful database and application module update or record component errors that need remedying.
Kaspersky Endpoint Security supports the logging of information about events in the operation of the Microsoft Windows application log and / or the Kaspersky Endpoint Security event log.
Kaspersky Endpoint Security delivers notifications in the following ways:
- using pop-up notifications in the Microsoft Windows taskbar notification area;
- by email.
You can configure the delivery of event notifications. The method of notification delivery is configured for each type of event.
Page top
Configuring the notification service
You can perform the following actions for configuring the notification service:
- Configure the settings of event logs where Kaspersky Endpoint Security records events.
- Configure how on-screen notifications are displayed.
- Configure the delivery of email notifications.
When using the table of events to configure the notification service, you can perform the following actions:
- Filter notification service events by column values or by custom filter conditions.
- Use the search function for notification service events.
- Sort notification service events.
- Change the order and set of columns that are displayed in the list of notification service events.
Configuring event log settings
To configure event log settings:
- Open the application settings window.
- In the left part of the window, in the General Settings section, select Interface.
The settings of the Kaspersky Endpoint Security interface are displayed in the right part of the window.
- In the Notifications section, click the Settings button.
This opens the Notifications window.
Kaspersky Endpoint Security components and tasks are shown in the left part of the window. The right part of the window lists the events generated for the selected component or task.
- In the left part of the window, select the component or task for which you want to configure the event log settings.
- Select check boxes opposite the relevant events in the Save in local log and Save in Windows Event Log columns.
Events whose check boxes are selected in the Save in local log column are displayed in Logs of applications and services in the Kaspersky Event Log section. Events whose check boxes are selected in the Save in Windows Event Log column are displayed in Windows logs in the Application section. To open the event logs, select Start → Control Panel → Administration → Event Viewer.
Events may contain the following user data: paths to files scanned by Kaspersky Endpoint Security; paths to registry keys modified by Kaspersky Endpoint Security; Microsoft Windows user name; addresses of web pages opened by the user.
- Click OK.
- To save changes, click the Save button.
Configuring the display and delivery of notifications
To configure the display and delivery of notifications:
- Open the application settings window.
- In the left part of the window, in the General Settings section, select Interface.
The settings of the Kaspersky Endpoint Security interface are displayed in the right part of the window.
- In the Notifications section, click the Settings button.
This opens the Notifications window.
Kaspersky Endpoint Security components and tasks are shown in the left part of the window. The right part of the window lists events generated for the selected component or the selected task.
- In the left part of the window, select the component or task for which you want to configure the delivery of notifications.
- In the Notify on screen column, select the check boxes next to the required events.
Information about the selected events is displayed on the screen as pop-up messages in the Microsoft Windows taskbar notification area.
- In the Notify by email column, select the check boxes next to the required events.
Information about the selected events is delivered by email if the mail notification delivery settings are configured.
Events may contain the following user data: paths to files scanned by Kaspersky Endpoint Security; paths to registry keys modified by Kaspersky Endpoint Security; Microsoft Windows user name; addresses of web pages opened by the user.
- Click the Email notification settings button.
This opens the Email notification settings window.
- Select the Send event notifications check box to enable the delivery of information about Kaspersky Endpoint Security events selected in the Notify by email column.
- Specify the email notification delivery settings.
- In the Email notification settings window, click OK.
- In the Notifications window, click OK.
- To save changes, click the Save button.
Configuring the display of warnings about the application status in the notification area
To configure the display of application status warnings in the notification area:
- Open the application settings window.
- In the left part of the window, in the General Settings section, select Interface.
The settings of the Kaspersky Endpoint Security interface are displayed in the right part of the window.
- In the Warnings section, select the check boxes opposite those categories of events about which you want to see notifications in the notification area of Microsoft Windows.
- To save changes, click the Save button.
When events associated with the selected categories occur, the application icon in the notification area will change to or depending on the severity of the warning.
About Backup
Backup is a list of backup copies of files that have been deleted or modified during the disinfection process. A backup copy is a file copy created before the file was disinfected or deleted. Backup copies of files are stored in a special format and do not pose a threat.
Backup copies of files are stored in the folder ProgramData\Kaspersky Lab\KES\QB.
Users in the Administrators group are granted the permissions to access this folder. Limited access rights to this folder are granted to the user whose account was used to install Kaspersky Endpoint Security.
Kaspersky Endpoint Security does not provide the capability to configure user access permissions to backup copies of files.
Sometimes it is not possible to maintain the integrity of files during disinfection. If you partially or completely lose access to important information in a disinfected file after disinfection, you can attempt to restore the file from its backup copy to its original folder.
If Kaspersky Endpoint Security is running under the management of Kaspersky Security Center, backup copies of files may be transmitted to the Kaspersky Security Center Administration Server. For more details about managing backup copies of files in Kaspersky Security Center, please refer to the Kaspersky Security Center Help system.
Page top
Configuring Backup settings
You can configure Backup settings as follows:
- Configure the maximum storage period for copies of files in Backup.
The default maximum storage period for copies of files in Backup is 30 days. After expiration of the maximum storage term, Kaspersky Endpoint Security deletes the oldest files from Backup. You can cancel the time-based restriction or change the maximum file storage term.
- Configure the maximum size of Backup.
By default, the maximum size of Backup is 100 MB. After the maximum size is reached, Kaspersky Endpoint Security automatically deletes the oldest files from Backup so that the maximum size is not exceeded. You can cancel the Backup size limit or change the maximum size.
Configuring the maximum storage period for files in Backup
To configure the maximum storage period for files in Backup:
- Open the application settings window.
- In the left part of the window, in the General Settings section, select Reports and Storage.
- Do one of the following:
- If you want to limit the storage period for copies of files in Backup, in the Backup section in the right part of the window, select the Store objects no longer than check box. In the field on the right of the Store objects no longer than check box, specify the maximum storage period for copies of files in Backup. The default maximum storage period for copies of files in Backup is 30 days.
- If you want to cancel the storage period limit for copies of files in Backup, in the Backup section in the right part of the window, clear the Store objects no longer than check box.
- To save changes, click the Save button.
Configuring the maximum size of Backup
To configure the maximum size of Backup:
- Open the application settings window.
- In the left part of the window, in the General Settings section, select Reports and Storage.
- Do one of the following:
- If you want to limit the total size of Backup, select the Maximum storage size check box in the right part of the window in the Backup section and specify the maximum size of Backup in the field to the right of the Maximum storage size check box.
By default, the maximum storage size for data comprising the backup copies of files is 100 MB.
- If you want to remove the limit on the size of Backup, clear the Maximum storage size check box in the right part of the window in the Backup settings section.
The size of Backup is unlimited by default.
- If you want to limit the total size of Backup, select the Maximum storage size check box in the right part of the window in the Backup section and specify the maximum size of Backup in the field to the right of the Maximum storage size check box.
- To save changes, click the Save button.
Restoring and deleting files from Backup
If malicious code is detected in a file, Kaspersky Endpoint Security blocks the file, assigns the Infected status to it, places a copy of it in Backup, and attempts to disinfect it. If file disinfection succeeds, the status of the backup copy of the file changes to Disinfected. The file becomes available in its original folder. If a file cannot be disinfected, Kaspersky Endpoint Security deletes it from its original folder. You can restore the file from its backup copy to its original folder.
Upon detecting malicious code in a file that is part of the Windows Store application, Kaspersky Endpoint Security immediately deletes the file without moving a copy of the file to Backup. You can restore the integrity of the Windows Store application by using the appropriate tools of the Microsoft Windows 8 operating system (see the Microsoft Windows 8 help files for details on restoring a Windows Store application).
Kaspersky Endpoint Security automatically deletes backup copies of files with any status from Backup after the storage term configured in application settings has elapsed.
You can also manually delete any copy of a file from Backup.
The set of backup copies of files is presented as a table.
While managing Backup, you can perform the following actions with backup copies of files:
- View the set of backup copies of files.
For a backup copy of a file, the path to the original folder of the file is displayed. The path to the original folder of the file may contain personal data.
- Restore files from backup copies to their original folders.
- Delete backup copies of files from Backup.
You can also perform the following actions while managing data in the table:
- Filter backup copies by columns, including by custom filter conditions.
- Use the backup copy search function.
- Sort backup copies.
- Change the order and set of columns that are displayed in the table of backup copies.
You can copy information about selected Backup files to the clipboard. To select multiple Backup files, right-click to open the context menu of any file and choose Select all. To deselect files that you do not want to scan, click them while holding down the CTRL key.
Restoring files from Backup
If several files with identical names and different content located in the same folder are moved to Backup, only the file that was last placed in Backup can be restored.
To restore files from Backup:
- Open the main application window.
- Click the Repositories button in the lower part of the main application window.
The Backup window opens.
- If you want to restore all files from Backup, in the Backup window select Restore all from the context menu of any file.
Kaspersky Endpoint Security restores all files from their backup copies to their original folders.
- To restore one or more files from Backup :
- In the table in the Backup window, select one or multiple Backup files.
To select multiple Backup files, right-click to open the context menu of any file and choose Select all. To deselect files that you do not want to scan, click them while holding down the CTRL key.
- Restore files in one of the following ways:
- Click the Restore button.
- Right-click to open the context menu and select Restore.
Kaspersky Endpoint Security restores files from the selected backup copies to their original folders.
- In the table in the Backup window, select one or multiple Backup files.
Deleting backup copies of files from Backup
To delete backup copies of files from Backup:
- Open the main application window.
- Click the Repositories button in the lower part of the main application window.
- The Backup window opens.
- If you want to delete all files from Backup, perform one of the following actions:
- In the context menu of any file, select Delete all.
- Click the Clear storage button.
Kaspersky Endpoint Security deletes all backup copies of files from Backup.
- If you want to delete one or more files from Backup:
- In the table in the Backup window, select one or multiple Backup files.
To select multiple Backup files, right-click to open the context menu of any file and choose Select all. To deselect files that you do not want to scan, click them while holding down the CTRL key.
- Delete files in one of the following ways:
- Click the Delete button.
- Right-click to open the context menu and select Delete.
Kaspersky Endpoint Security deletes the selected backup copies of files from Backup.
- In the table in the Backup window, select one or multiple Backup files.
Advanced application settings
This section contains information about configuring the general settings of Kaspersky Endpoint Security.
Trusted zone
This section contains information on the trusted zone and instructions on configuring scan exclusion and creating a list of trusted applications.
About the trusted zone
A trusted zone is a system administrator-configured list of objects and applications that Kaspersky Endpoint Security does not monitor when active. In other words, it is a set of scan exclusions.
The administrator forms the trusted zone independently, taking into account the features of the objects that are handled and the applications that are installed on the computer. It may be necessary to include objects and applications in the trusted zone when Kaspersky Endpoint Security blocks access to a certain object or application, if you are sure that the object or application is harmless.
You can exclude the following objects from scanning:
- Files of certain formats
- Files that are selected by a mask
- Selected files
- Folders
- Application processes
Scan exclusions
A scan exclusion is a set of conditions upon which Kaspersky Endpoint Security does not scan an object for viruses and other threats.
Scan exclusions make it possible to safely use legitimate software that can be exploited by criminals to damage the computer or user data. Although they do not have any malicious functions, such applications can be used as an auxiliary component in malware. Examples of such applications include remote administration tools, IRC clients, FTP servers, various utilities for suspending or concealing processes, keyloggers, password crackers, and auto-dialers. Such applications are not categorized as viruses. Details on legal software that can be used by criminals to harm the computer or personal data are available at the Kaspersky Virus Encyclopedia at https://encyclopedia.kaspersky.com/knowledge/riskware/.
Such applications may be blocked by Kaspersky Endpoint Security. To prevent them from being blocked, you can configure scan exclusions for the applications in use. To do so, add the name or name mask that is listed in the Kaspersky Virus Encyclopedia to the trusted zone. For example, you may frequently use the Remote Administrator program. This is a remote access application that gives you control over a remote computer. Kaspersky Endpoint Security regards this activity as suspicious and may block it. To prevent the application from being blocked, create a scan exclusion with the name or name mask that is listed in the Kaspersky Virus Encyclopedia.
If an application that collects information and sends it to be processed is installed on your computer, Kaspersky Endpoint Security may classify this application as malware. To avoid this, you can exclude the application from scanning by configuring Kaspersky Endpoint Security as described in this document.
Scan exclusions can be used by the following application components and tasks that are configured by the system administrator:
- Behavior Detection.
- Exploit Prevention.
- Host Intrusion Prevention.
- File Threat Protection.
- Web Threat Protection.
- Mail Threat Protection.
- Scan tasks
List of trusted applications
The list of trusted applications is a list of applications whose file and network activity (including malicious activity) and access to the system registry are not monitored by Kaspersky Endpoint Security. By default, Kaspersky Endpoint Security scans objects that are opened, executed, or saved by any program process and controls the activity of all applications and network traffic that is generated by them. Kaspersky Endpoint Security excludes applications in the list of trusted applications from scanning.
For example, if you consider objects that are used by the standard Microsoft Windows Notepad application to be safe without scanning, meaning that you trust this application, you can add Microsoft Windows Notepad to the list of trusted applications. Scanning then skips objects that are used by this application.
In addition, certain actions that are classified by Kaspersky Endpoint Security as suspicious may be safe within the context of the functionality of a number of applications. For example, the interception of text that is typed from the keyboard is a routine process for automatic keyboard layout switchers (such as Punto Switcher). To take account of the specifics of such applications and exclude their activity from monitoring, we recommend that you add such applications to the trusted applications list.
Excluding trusted applications from scanning allows avoiding compatibility conflicts between Kaspersky Endpoint Security and other programs (for example, the problem of double-scanning of the network traffic of a third-party computer by Kaspersky Endpoint Security and by another anti-virus application), and also increases the computer's performance, which is critical when using server applications.
At the same time, the executable file and process of the trusted application are still scanned for viruses and other malware. An application can be fully excluded from Kaspersky Endpoint Security scanning by means of scan exclusions.
Page top
Creating a scan exclusion
Kaspersky Endpoint Security does not scan an object if the drive or folder containing this object is included in the scan scope at the start of one of the scan tasks. However, the scan exclusion is not applied when a custom scan task is started for this particular object.
To create a scan exclusion:
- Open the application settings window.
- In the left part of the window, in the General Settings section, select Exclusions.
The exclusions settings are displayed in the right part of the window.
- In the Scan exclusions and trusted zone section, click the Settings button.
The Trusted zone window opens on the Scan exclusions tab.
- Click the Add button.
The Scan exclusion window opens. In this window, you can create a scan exclusion using one or more criteria from the Properties section.
- To exclude a file or folder from scanning:
- In the Properties section, select the File or folder check box.
- Click the select file or folder link in the Scan exclusion description section to open the Name of file or folder window.
- Enter the file or folder name or the , or select the file or folder in the folder tree by clicking Browse.
- In the Name of file or folder window, click OK.
A link to the added file or folder appears in the Scan exclusion description section of the Scan exclusion window.
- To exclude objects with a specific name from scanning:
- In the Properties section, select the Object name check box.
- Click the enter object name link in the Scan exclusion description section to open the Object name window.
- Enter the object name or name mask according to the classification of the Kaspersky Virus Encyclopedia:
- Click OK in the Object name window.
A link to the added object name appears in the Scan exclusion description section of the Scan exclusion window.
- To exclude an object with a specific hash from scanning:
- In the Properties section, select the Object hash check box.
- Click the enter object hash link in the Scan exclusion description section to open the Object hash window.
- Enter the SHA256 hash of the object according to the classification in the Kaspersky Virus Encyclopedia, or select the file by clicking the Browse button.
- Click OK in the Object hash window.
A link to the added object hash appears in the Scan exclusion description section of the Scan exclusion window.
- If necessary, in the Comment field, enter a brief comment on the scan exclusion that you are creating.
- Specify the Kaspersky Endpoint Security components that should use the scan exclusion:
- Click the any link in the Scan exclusion description section to activate the select components link.
- Click the select components link to open the Protection components window.
- Select the check boxes opposite the components to which the scan exclusion must be applied.
- In the Protection components window, click OK.
If the components are specified in the settings of the scan exclusion, this exclusion is applied only during scanning by these components of Kaspersky Endpoint Security.
If the components are not specified in the settings of the scan exclusion, this exclusion is applied during scanning by all components of Kaspersky Endpoint Security.
- In the Scan exclusion window, click OK.
The scan exclusion you have added appears in the table on the Scan exclusions tab of the Trusted zone window. The configured settings of this scan exclusion appear in the Scan exclusion description section.
- In the Trusted zone window, click OK.
- To save changes, click the Save button.
Modifying a scan exclusion
To modify a scan exclusion:
- Open the application settings window.
- In the left part of the window, in the General Settings section, select Exclusions.
The exclusions settings are displayed in the right part of the window.
- In the Scan exclusions and trusted zone section, click the Settings button.
The Trusted zone window opens on the Scan exclusions tab.
- Select the scan exclusion that you want to modify in the list.
- Change the scan exclusion settings using one of the following methods:
- Click the Edit button.
The Scan exclusions window opens.
- Open the window for editing the necessary setting by clicking the link in the Scan exclusion description field.
- Click the Edit button.
- If you clicked the Edit button during the previous step, click OK in the Scan exclusion window.
The modified settings of this scan exclusion appear in the Scan exclusion description section.
- In the Trusted zone window, click OK.
- To save changes, click the Save button.
Deleting a scan exclusion
To delete a scan exclusion:
- Open the application settings window.
- In the left part of the window, in the General Settings section, select Exclusions.
The exclusions settings are displayed in the right part of the window.
- In the Scan exclusions and trusted zone section, click the Settings button.
The Trusted zone window opens on the Scan exclusions tab.
- Select the scan exclusion that you need in the list of scan exclusions.
- Click the Delete button.
The deleted scan exclusion disappears from the list.
- In the Trusted zone window, click OK.
- To save changes, click the Save button.
Enabling and disabling a scan exclusion
To enable or disable a scan exclusion:
- Open the application settings window.
- In the left part of the window, in the General Settings section, select Exclusions.
The exclusions settings are displayed in the right part of the window.
- In the Scan exclusions and trusted zone section, click the Settings button.
The Trusted zone window opens on the Scan exclusions tab.
- Select the exclusion that you need in the list of scan exclusions.
- Do one of the following:
- To enable a scan exclusion, select the check box next to the name of this scan exclusion.
- To disable a scan exclusion, clear the check box next to the name of this scan exclusion.
- Click OK.
- To save changes, click the Save button.
Editing the list of trusted applications
To edit the list of trusted applications:
- Open the application settings window.
- In the left part of the window, in the General Settings section, select Exclusions.
The exclusions settings are displayed in the right part of the window.
- In the Scan exclusions and trusted zone section, click the Settings button.
The Trusted zone window opens.
- In the Trusted zone window, select the Trusted applications tab.
- To add an application to the trusted applications list:
- Click the Add button.
- In the context menu that opens, do one of the following:
- If you want to find the application in the list of applications installed on the computer, select the Applications item in the menu.
The Select application window opens.
- If you want to specify the path to the executable file of the relevant application, select Browse.
The standard Open file window in Microsoft Windows opens.
- If you want to find the application in the list of applications installed on the computer, select the Applications item in the menu.
- Select the application in one of the following ways:
- If you selected Applications during the previous step, select the application in the list of applications installed on the computer and click OK in the Select application window.
- If you selected Browse during the previous step, specify the path to the executable file of the relevant application and click the Open button in the standard Open window of Microsoft Windows.
These actions cause the Scan exclusions for application window to open.
- Select the check boxes opposite the relevant trusted zone rules for the selected application:
- Do not scan opened files.
- Do not monitor application activity.
- Do not inherit restrictions of the parent process (application).
- Do not monitor child application activity.
- Do not block interaction with the application interface.
- Do not scan network traffic.
If you add a trusted application using Kaspersky Endpoint Security Administration plug-in, you must specify the application without using masks for the Do not scan network traffic setting to work.
- In the Scan exclusions for application window, click OK.
The trusted application that you have added appears in the trusted applications list.
- To edit the settings of a trusted application:
- Select a trusted application in the trusted applications list.
- Click the Edit button.
- The Scan exclusions for application window opens.
- Select or clear the check boxes opposite the relevant trusted zone rules for the selected application:
If no trusted zone rules are selected in the Scan exclusions for application window, the trusted application is included in the scan. In this case, the trusted application is not removed from the list of trusted applications, but its check box is cleared.
- In the Scan exclusions for application window, click OK.
- To remove a trusted application from the trusted applications list:
- Select a trusted application in the trusted applications list.
- Click the Delete button.
- In the Trusted zone window, click OK.
- To save changes, click the Save button.
Enabling and disabling trusted zone rules for an application in the list of trusted applications
To enable or disable the action of trusted zone rules applied to an application from the list of trusted applications:
- Open the application settings window.
- In the left part of the window, in the General Settings section, select Exclusions.
The exclusions settings are displayed in the right part of the window.
- In the Scan exclusions and trusted zone section, click the Settings button.
The Trusted zone window opens.
- In the Trusted zone window, select the Trusted applications tab.
- In the list of trusted applications, select the necessary trusted application.
- Do one of the following:
- To exclude a trusted application from Kaspersky Endpoint Security scanning, select the check box next to its name.
- To include a trusted application in Kaspersky Endpoint Security scanning, clear the check box next to its name.
- Click OK.
- To save changes, click the Save button.
Using trusted system certificate storage
Use of system certificate storage lets you exclude applications signed by a trusted digital signature from virus scans. Kaspersky Endpoint Security automatically assigns such applications to the Trusted group.
To begin using trusted system certificate storage:
- Open the application settings window.
- In the left part of the window, in the General Settings section, select Exclusions.
The exclusions settings are displayed in the right part of the window.
- In the Scan exclusions and trusted zone section, click the Settings button.
The Trusted zone window opens.
- In the Trusted zone window, select the Trusted system certificate store tab.
- Select the Use trusted system certificate store check box.
- In the Trusted system certificate store drop-down list, select which system store must be considered as trusted by Kaspersky Endpoint Security .
- In the Trusted zone window, click OK.
- To save changes, click the Save button.
Network Protection
This section contains information about network traffic monitoring and instructions on how to configure the settings of monitored network ports.
About Network Protection
During the operation of Kaspersky Endpoint Security, the Mail Threat Protection and Web Threat Protection components monitor data streams that are transmitted via specific protocols and that pass through specific open TCP and UDP ports on the user's computer. For example, the Mail Threat Protection component analyzes information that is transmitted via SMTP, while the Web Threat Protection component analyzes information that is transmitted via HTTP and FTP.
Kaspersky Endpoint Security divides TCP and UDP ports of the operating system into several groups, depending on the likelihood of their being compromised. Some network ports are reserved for services that may be vulnerable. You are advised to monitor these ports more thoroughly, because the likelihood that they are attacked is greater. If you use non-standard services that rely on non-standard network ports, these network ports may also be targeted by an attacking computer. You can specify a list of network ports and a list of applications that request network access. These ports and applications then receive special attention from the Mail Threat Protection and Web Threat Protection components as they monitor network traffic.
Page top
Configuring the settings of network traffic monitoring
You can perform the following actions to configure the settings of network traffic monitoring:
- Enable monitoring of all network ports.
- Create a list of monitored network ports.
- Create a list of applications for which all network ports are monitored.
Enabling monitoring of all network ports
To enable monitoring of all network ports:
- Open the application settings window.
- In the left part of the window, in the General Settings section, select Exclusions.
The exclusions settings are displayed in the right part of the window.
- In the Monitored ports section, select the Monitor all network ports option.
- To save changes, click the Save button.
Creating a list of monitored network ports
To create a list of monitored network ports:
- Open the application settings window.
- In the left part of the window, in the General Settings section, select Exclusions.
The exclusions settings are displayed in the right part of the window.
- In the Monitored ports section, select Monitor only selected ports.
- Click the Settings button.
The Network ports window opens. The Network ports window displays a list of network ports that are normally used for transmission of email and network traffic. This list of network ports is included in the Kaspersky Endpoint Security package.
- In the list of network ports, perform the following:
- Select the check boxes opposite those network ports that you want to include in the list of monitored network ports.
By default, the check boxes are selected opposite all network ports that are listed in the Network ports window.
- Clear the check boxes opposite those network ports that you want to exclude from the list of monitored network ports.
- Select the check boxes opposite those network ports that you want to include in the list of monitored network ports.
- If a network port is not shown in the list of network ports, add it by doing the following:
- Under the list of network ports, click the Add link to open the Network port window.
- Enter the network port number in the Port field.
- Enter the name of the network port in the Description field.
- Click OK.
The Network port window closes. The newly added network port is shown at the end of the list of network ports.
- In the Network ports window, click OK.
- To save changes, click the Save button.
When the FTP protocol runs in passive mode, the connection can be established via a random network port that is not added to the list of monitored network ports. To protect such connections, select the Monitor all network ports check box in the Monitored ports section or configure the monitoring of all ports for applications that establish the FTP connection.
Page top
Creating a list of applications for which all network ports are monitored
You can create a list of applications for which Kaspersky Endpoint Security monitors all network ports.
We recommend including applications that receive or transmit data via the FTP protocol in the list of applications for which Kaspersky Endpoint Security monitors all network ports.
To create a list of applications for which all network ports are monitored:
- Open the application settings window.
- In the left part of the window, in the General Settings section, select Exclusions.
The exclusions settings are displayed in the right part of the window.
- In the Monitored ports section, select Monitor only selected ports.
- Click the Settings button.
The Network ports window opens.
- Select the Monitor all ports for specified applications check box.
- In the list of applications under the Monitor all ports for specified applications check box, do the following:
- Select the check boxes next to the names of applications for which you want to monitor all network ports.
By default, the check boxes are selected next to all applications that are listed in the Network ports window.
- Clear the check boxes next to the names of applications for which you do not want to monitor all network ports.
- Select the check boxes next to the names of applications for which you want to monitor all network ports.
- If an application is not included in the list of applications, add it as follows:
- Click the Add link under the list of applications and open the context menu.
- In the context menu, select the way in which to add the application to the list of applications:
- To select an application from the list of applications that are installed on the computer, select the Applications command. The Select application window opens, letting you specify the name of the application.
- To specify the location of the application's executable file, select the Browse command. The standard Open window in Microsoft Windows opens, letting you specify the name of the application executable file.
The Application window opens after you select the application.
- In the Name field, enter a name for the selected application.
- Click OK.
The Application window closes. The application that you have added appears at the end of the list of applications.
- In the Network ports window, click OK.
- To save changes, click the Save button.
Kaspersky Endpoint Security Self-Defense
This section describes the self-defense and remote control defense mechanisms of Kaspersky Endpoint Security and provides instructions on configuring the settings of these mechanisms.
About Kaspersky Endpoint Security Self-Defense
Kaspersky Endpoint Security protects the computer from malicious programs, including malware that attempts to block the operation of Kaspersky Endpoint Security or even delete it from the computer.
The stability of the security system on the computer is ensured by the self-defense and remote control defense mechanisms in Kaspersky Endpoint Security.
The Self-Defense mechanism prevents alteration or deletion of application files on the hard drive, memory processes, and entries in the system registry.
Remote Control Defense blocks all attempts from a remote computer to control application services.
On computers that run on 64-bit operating systems, only Kaspersky Endpoint Security Self-Defense is available for preventing the alteration and deletion of application files on the hard drive and system registry entries.
Page top
Enabling and disabling Self-Defense
The Self-Defense mechanism of Kaspersky Endpoint Security is enabled by default. You can disable Self-Defense, if necessary.
To enable or disable Self-Defense:
- Open the application settings window.
- In the left part of the window, in the General Settings section, select Application Settings.
The advanced settings of Kaspersky Endpoint Security are displayed in the right part of the window.
- Do one of the following:
- To enable the Self-Defense mechanism, select the Enable Self-Defense check box.
- To disable the Self-Defense mechanism, clear the Enable Self-Defense check box.
- To save changes, click the Save button.
Enabling and disabling Remote Control Defense
The remote control defense mechanism is enabled by default. You can disable the remote control defense mechanism, if necessary.
To enable or disable the remote control defense mechanism:
- Open the application settings window.
- In the left part of the window, in the General Settings section, select Application Settings.
The advanced settings of Kaspersky Endpoint Security are displayed in the right part of the window.
- Do one of the following:
- If you want to enable Remote Control Defense, select the Disable external management of the system services check box.
- If you want to disable Remote Control Defense, clear the Disable external management of the system services check box.
- To save changes, click the Save button.
Supporting remote administration applications
You may occasionally need to use a remote administration application while external control protection is enabled.
To enable the operation of remote administration applications:
- Open the application settings window.
- In the left part of the window, in the General Settings section, select Exclusions.
The exclusions settings are displayed in the right part of the window.
- In the Scan exclusions and trusted zone section, click the Settings button.
The Trusted zone window opens.
- In the Trusted zone window, select the Trusted applications tab.
- Click the Add button.
- In the context menu that opens, do one of the following:
- To find the remote administration application in the list of applications that are installed on the computer, select the Applications item.
The Select application window opens.
- To specify the path to the executable file of the remote administration application, select Browse.
The standard Open file window in Microsoft Windows opens.
- To find the remote administration application in the list of applications that are installed on the computer, select the Applications item.
- Select the application in one of the following ways:
- If you selected Applications during the previous step, select the application in the list of applications installed on the computer and click OK in the Select application window.
- If you selected Browse during the previous step, specify the path to the executable file of the relevant application and click the Open button in the standard Open window of Microsoft Windows.
These actions cause the Scan exclusions for application window to open.
- Select the Do not monitor application activity check box.
- In the Scan exclusions for application window, click OK.
The trusted application that you have added appears in the trusted applications list.
- To save changes, click the Save button.
Kaspersky Endpoint Security performance and compatibility with other applications
This section contains information about the performance of Kaspersky Endpoint Security and compatibility with other applications, and also guidelines for selecting the types of detectable objects and operating mode of Kaspersky Endpoint Security.
About Kaspersky Endpoint Security performance and compatibility with other applications
Performance of Kaspersky Endpoint Security
The performance of Kaspersky Endpoint Security refers to the number of types of objects that can harm the computer that are detectable, as well as energy consumption and use of computer resources.
Selecting types of detectable objects
Kaspersky Endpoint Security lets you fine-tune the protection of your computer and select the types of objects that the application detects during operation. Kaspersky Endpoint Security always scans the operating system for viruses, worms, and Trojans. You cannot disable scanning of these types of objects. Such malware can cause significant harm to the computer. For greater security on your computer, you can expand the range of detectable object types by enabling monitoring of legal software that can be used by criminals to damage your computer or personal data.
Using energy-saving mode
Energy consumption by applications is a key consideration for portable computers. Kaspersky Endpoint Security scheduled tasks usually use up considerable resources. When the computer is running on battery power, you can use energy-saving mode to consume power more sparingly.
In energy-saving mode, the following scheduled tasks are postponed automatically:
Whether or not energy saving mode is enabled, Kaspersky Endpoint Security pauses encryption tasks when a portable computer switches to battery power. The application resumes encryption tasks when the portable computer switches from battery power to mains power.
Conceding computer resources to other applications
Use of computer resources by Kaspersky Endpoint Security may impact the performance of other applications. To resolve the problem of simultaneous operation during increased load on the CPU and hard drive subsystems, Kaspersky Endpoint Security can pause scheduled tasks and concede resources to other applications.
However, a number of applications start immediately when CPU resources become available, proceeding to work in background mode. To prevent scanning from depending on the performance of other applications, it is better to not concede operating system resources to them.
You can start such tasks manually, if necessary.
Using advanced disinfection technology
Today's malicious programs can penetrate the lowest levels of an operating system, which makes them virtually impossible to eliminate. After detecting malicious activity in the operating system, Kaspersky Endpoint Security performs an extensive disinfection procedure that uses special advanced disinfection technology. Advanced disinfection technology is aimed at purging the operating system of malicious programs that have already started their processes in RAM and that prevent Kaspersky Endpoint Security from removing them by using other methods. The threat is neutralized as a result. While Advanced Disinfection is in progress, you are advised to refrain from starting new processes or editing the operating system registry. The advanced disinfection technology uses considerable operating system resources, which may slow down other applications.
After the Advanced Disinfection process has been completed on a computer running Microsoft Windows for workstations, Kaspersky Endpoint Security requests the user's permission to reboot the computer. After system reboot, Kaspersky Endpoint Security deletes malware files and starts a "lite" full scan of the computer.
A reboot prompt is impossible on a computer running Microsoft Windows for file servers due to the specifics of Kaspersky Endpoint Security for file servers. An unplanned reboot of a file server can lead to problems involving temporary unavailability of file server data or loss of unsaved data. It is recommended to reboot a file server strictly according to schedule. This is why Advanced Disinfection technology is disabled by default for file servers.
If active infection is detected on a file server, an event is relayed to Kaspersky Security Center with information that Active Disinfection is required. To disinfect an active infection of a file server, enable Active Disinfection technology for file servers and start a Virus scan group task at a time convenient for file server users.
Page top
Selecting types of detectable objects
To select types of detectable objects:
- Open the application settings window.
- In the left part of the window, in the General Settings section, select Exclusions.
The exclusions settings are displayed in the right part of the window.
- In the Objects for detection section, click the Settings button.
The Objects for detection window opens.
- Select check boxes opposite the types of objects that you want Kaspersky Endpoint Security to detect:
- Malicious tools
- Adware
- Auto-dialers
- Other
- Packed files that may cause harm
- Multi-packed files
- Click OK.
The Objects for detection window closes. In the Objects for detection section, the selected types of objects are listed under Detection of the following object types is enabled.
- To save changes, click the Save button.
Enabling or disabling Advanced Disinfection technology for workstations
To enable or disable Advanced Disinfection technology for workstations:
- Open the application settings window.
- In the left part of the window, in the General Settings section, select Application Settings.
The advanced settings of Kaspersky Endpoint Security are displayed in the right part of the window.
- In the right part of the window, do one of the following:
- Select the Enable Advanced Disinfection technology to enable advanced disinfection technology.
- Clear the Enable Advanced Disinfection technology to disable advanced disinfection technology.
- To save changes, click the Save button.
When the Advanced Disinfection task is started through Kaspersky Security Center, the majority of operating system functions are unavailable to the user. The workstation is restarted after the task has been completed.
Page top
Enabling or disabling Advanced Disinfection technology for file servers
To enable Advanced Disinfection technology for file servers, perform one of the following actions:
- Enable Advanced Disinfection technology in the properties of the active Kaspersky Security Center policy. To do so:
- Open the Application Settings section in the policy properties window.
- Select the Enable Advanced Disinfection technology check box.
- To save the changes, click OK in the policy properties window.
- In the properties of the Virus scan group task of Kaspersky Security Center, select the Run Advanced Disinfection immediately check box.
To disable Advanced Disinfection technology for file servers, perform one of the following:
- Enable Advanced Disinfection technology in the properties of the Kaspersky Security Center policy. To do so:
- Open the Application Settings section in the policy properties window.
- Clear the Enable Advanced Disinfection technology check box.
- To save the changes, click OK in the policy properties window.
- In the properties of the Virus scan group task of Kaspersky Security Center, clear the Run Advanced Disinfection immediately check box.
Enabling or disabling energy-saving mode
To enable or disable energy conservation mode:
- Open the application settings window.
- In the left part of the window, in the General Settings section, select Application Settings.
The advanced settings of Kaspersky Endpoint Security are displayed in the right part of the window.
- In the Performance section:
- To enable energy conservation mode, select the Postpone scheduled tasks while running on battery power check box.
When energy conservation mode is enabled and the computer is running on battery power, the following tasks are not run even if scheduled:
- Update task
- Full Scan task
- Critical Areas Scan task
- Custom Scan task
- Integrity Check task
- If you want to disable energy conservation mode, clear the Postpone scheduled tasks while running on battery power check box. In this case, Kaspersky Endpoint Security carries out scheduled tasks regardless of the computer's source of power.
- To enable energy conservation mode, select the Postpone scheduled tasks while running on battery power check box.
- To save changes, click the Save button.
Enabling or disabling conceding of resources to other applications
To enable or disable conceding of resources to other applications:
- Open the application settings window.
- In the left part of the window, in the General Settings section, select Application Settings.
The advanced settings of Kaspersky Endpoint Security are displayed in the right part of the window.
- In the Performance section:
- If you want to enable the mode in which resources are conceded to other applications, select the Concede resources to other applications check box.
When configured to concede resources to other applications, Kaspersky Endpoint Security postpones scheduled tasks that slow down other applications:
- Update task
- Full Scan task
- Critical Areas Scan task
- Custom Scan task
- Integrity Check task
- If you want to disable the mode in which resources are conceded to other applications, clear the Concede resources to other applications check box. In this case Kaspersky Endpoint Security carries out scheduled tasks regardless of the operation of other applications.
By default, the application is configured to concede resources to other applications.
- If you want to enable the mode in which resources are conceded to other applications, select the Concede resources to other applications check box.
- To save changes, click the Save button.
Password protection
This section contains information on restricting access to Kaspersky Endpoint Security with a password.
About restricting access to Kaspersky Endpoint Security
Multiple users with different levels of computer literacy can share a computer. If users have unrestricted access to Kaspersky Endpoint Security and its settings, the overall level of computer protection may be reduced.
You can restrict access to Kaspersky Endpoint Security by setting a user name and password and specifying operations for which the application prompts the user for these credentials:
When a previous version of the application is upgraded to Kaspersky Endpoint Security 11 for Windows, the password is preserved (if it was set). To edit the password protection settings for the first time, use the default user name KLAdmin.
Page top
Enabling and disabling password protection
We recommend exercising care when you use a password to restrict access to the application. If you forget the password, contact Kaspersky Technical Support for instructions on disabling password protection.
To enable password protection:
- Open the application settings window.
- In the left part of the window, in the General Settings section, select Interface.
The settings of the Kaspersky Endpoint Security interface are displayed in the right part of the window.
- In the Password protection section, click the Settings button.
The Password protection window opens.
- Select the Enable password protection check box.
- In the User name field, enter the user name that must be specified in the Password check window when subsequent password-protected operations are performed.
- In the New password field type a password for accessing the application.
- Confirm the password in the Confirm password field.
- If you want to restrict access for all operations with the application, in the Password scope section, click the Select all button.
- If you want to selectively restrict user access, in the Password scope section, select the check boxes next to the names of the relevant operations:
- Configure application settings.
- Exit the application.
- Disable protection components.
- Disable control components.
- Remove key.
- Remove / modify / restore the application.
- Restore access to data on encrypted drives.
- View reports.
- Click the OK button.
The application verifies the passwords entered. If the passwords match, the application applies the password. If the passwords do not match, the application prompts you to confirm the password again in the Confirm password field.
- To save changes, in the application settings window, click the Save button.
After password protection is enabled, the application will prompt for a password each time an operation included in the password scope is performed. If you do not want the application to prompt you for the password each time you attempt to perform a password-protected operation again during the current session, you can select the Save password for current session check box in the Password check window.
When the Save password for current session check box is cleared, the application prompts you for the password each time you attempt to perform a password-protected operation.
To disable password protection:
- Open the application settings window.
- In the left part of the window, in the General Settings section, select Interface.
The settings of the Kaspersky Endpoint Security interface are displayed in the right part of the window.
- In the Password protection section, click the Settings button.
The Password protection window opens.
- Clear the Enable password protection check box.
- Click the OK button.
- To save changes, in the application settings window, click the Save button.
The Password check window opens.
- Enter the user name in the User name field.
- Enter the access password for Kaspersky Endpoint Security in the Password field.
- Click OK.
You can disable Password protection only if you are logged in as KLAdmin. It is not possible to disable password protection if you are using any other user account or a temporary password.
Modifying the Kaspersky Endpoint Security access password
To change the access password for Kaspersky Endpoint Security:
- Open the application settings window.
- In the left part of the window, in the General Settings section, select Interface.
The settings of the Kaspersky Endpoint Security interface are displayed in the right part of the window.
- In the Password protection section, click the Settings button.
The Password protection window opens.
- Enter the user name in the User name field.
- In the New password field, enter a new password for accessing the application.
- In the Confirm password field, enter the new password again.
- Click OK.
The application verifies the passwords entered. If the passwords match, the application applies the new password and closes the Password protection window. If the passwords do not match, the application prompts you to confirm the password again in the Confirm password field.
- To save changes, in the application settings window, click the Save button.
The Password check window opens.
- Enter the user name in the User name field.
- Enter the old access password for Kaspersky Endpoint Security in the Password field.
- Click OK.
About using a temporary password
When working on client computers managed by a Kaspersky Security Center policy, users may need to perform operations with Kaspersky Endpoint Security that are password protected at the policy level. When password protection is enabled, only the Kaspersky Security Center administrator can perform the operations specified in the password scope. However, if the connection with Kaspersky Security Center has been lost (such as when the user is outside of the corporate network), functions for working with the local interface of Kaspersky Security Center are limited.
To provide a user with the capability to perform necessary operations without giving the user the password that is set in the policy settings, the Kaspersky Security Center administrator can create a temporary password. A temporary password has a limited validity period and a limited scope of action. After the user enters the temporary password in the local interface of the application, the operations allowed by the Kaspersky Security Center administrator become available.
When the temporary password expires, Kaspersky Endpoint Security continues to operate in accordance with the settings of the Kaspersky Security Center policy. Operations that are password protected at the policy level become unavailable to the user.
Page top
Creating a temporary password using the Kaspersky Security Center Administration Console
To create a temporary password and send it to a user:
- Open the Kaspersky Security Center Administration Console.
- In the Managed devices folder of the Administration Console tree, open the folder with the name of the administration group that includes the computer of the user requesting the temporary password.
- In the workspace, select the Devices tab.
- In the context menu of the computer belonging to the user requesting the temporary password, select Properties.
The Properties: <Computer name> window opens.
- In the Properties: <Computer name> window, select the Applications section.
- Select Kaspersky Endpoint Security for Windows and open the application properties window by using one of the following methods:
- Click the Properties button at the bottom of the screen.
- In the context menu of the application, select Properties.
This opens the Application settings "<Application name>" window.
- In the Application settings "<Application name>" window, in the General Settings section, select Interface.
- In the Password protection section, click the Settings button.
The Password protection window opens.
- In the Password protection window, in the Temporary password section, click the Settings button.
This button is available if password protection is enabled for Kaspersky Security Center in the Kaspersky Security Center policy that is running on the computer.
The Create temporary password window opens.
- In the Expiration date field, specify the date on which the user will no longer be able to use the temporary password.
On this date, the temporary password will become invalid. A new temporary password must be created for providing access to perform operations in the local interface of Kaspersky Endpoint Security.
- In the Temporary password scope table, select the check boxes opposite the operations that must be available to the user while the temporary password is valid.
- Click the Create button.
This opens the Temporary password window containing an encrypted password.
- Copy the password and instructions on applying it and send them to the user.
Creating and using a configuration file
A configuration file with Kaspersky Endpoint Security settings lets you accomplish the following tasks:
- Perform local installation of Kaspersky Endpoint Security via the command line with predefined settings.
To do so, you must save the configuration file in the same folder where the distribution kit is located.
- Perform remote installation of Kaspersky Endpoint Security via Kaspersky Security Center with predefined settings.
- Migrate Kaspersky Endpoint Security settings from one computer to another.
To create a configuration file:
- Open the application settings window.
- In the left part of the window, in the General Settings section, select Manage Settings.
The right part of the window displays the settings management functions.
- In the Manage settings section, click the Save button.
This opens the standard Please select a configuration file window of Microsoft Windows.
- Specify the path in which you want to save the configuration file, and enter its name.
To use the configuration file for local or remote installation of Kaspersky Endpoint Security, you must name it install.cfg.
- Click the Save button.
To import Kaspersky Endpoint Security settings from a configuration file:
- Open the application settings window.
- In the left part of the window, in the General Settings section, select Manage Settings.
The right part of the window displays the settings management functions.
- In the Manage settings section, click the Load button.
This opens the standard Please select a configuration file window of Microsoft Windows.
- Specify the path to the configuration file.
- Click the Open button.
All values of Kaspersky Endpoint Security settings will be set according to the selected configuration file.
Page top
Remote administration of the application through Kaspersky Security Center
This section describes Kaspersky Endpoint Security administration through Kaspersky Security Center.
About managing the application via Kaspersky Security Center
Kaspersky Security Center lets you remotely install and uninstall, start and stop Kaspersky Endpoint Security, configure application settings, change the set of available application components, add keys, and start and stop update and scan tasks.
In the section about Application Control, you can find information about managing Application Control rules using Kaspersky Security Center.
For additional information about managing the application via Kaspersky Security Center that is not provided in this document, please refer to the Kaspersky Security Center help.
The application can be managed via Kaspersky Security Center using the Kaspersky Endpoint Security administration plug-in.
The version of the administration plug-in may differ from the version of Kaspersky Endpoint Security installed on the client computer. If the installed version of the administration plug-in has less functionality than the installed version of Kaspersky Endpoint Security, the settings of the missing functions are not regulated by the administration plug-in. These settings can be modified by the user in the local interface of Kaspersky Endpoint Security.
Page top
Special considerations when working with different versions of administration plug-ins
You can use an administration plug-in to change the following items:
- Policies
- Policy profiles
- Group tasks
- Local tasks
- Local settings of Kaspersky Endpoint Security
You can manage Kaspersky Endpoint Security via Kaspersky Security Center only if you have an administration plug-in whose version is equal to or later than the version specified in the information regarding the compatibility of Kaspersky Endpoint Security with the administration plug-in. You can view the minimum required version of the administration plug-in in the installer.ini file included in the distribution kit.
If any component is opened, the administration plug-in checks its compatibility information. If the version of the administration plug-in is equal to or later than the version specified in the compatibility information, you can change the settings of this component. Otherwise, you cannot use the administration plug-in to change the settings of the selected component. It is recommended to upgrade the administration plug-in.
Changing previously defined settings using a later version of the administration plug-in
You can use a later version of the administration plug-in to change all previously defined settings, and configure new settings that were not present in your previously used version of the administration plug-in.
For new settings, a later version of the administration plug-in assigns the default values when a policy, policy profile, or task are saved for the first time.
After you change the settings of a policy, policy profile, or group task using a later version of the administration plug-in, these components will become unavailable for previous versions of the administration plug-in. The local settings of Kaspersky Endpoint Security and the settings of local tasks are still available for the administration plug-in of previous versions.
Page top
Starting and stopping Kaspersky Endpoint Security on a client computer
To start or stop the application on a client computer:
- Open the Kaspersky Security Center Administration Console.
- In the Managed devices folder of the Administration Console tree, open the folder with the name of the to which the relevant client computer belongs.
- In the workspace, select the Devices tab.
- Select the computer on which you want to start or stop the application.
- Right-click to display the context menu of the client computer and select Properties.
A client computer properties window opens.
- In the client computer properties window, select the Applications section.
A list of Kaspersky applications that are installed on the client computer appears in the right part of the client computer properties window.
- Select Kaspersky Endpoint Security for Windows.
- Do the following:
- To start the application, click the
 button on the right of the list of Kaspersky applications or do the following:
- Select Properties in the context menu of Kaspersky Endpoint Security or click the Properties button located under the list of Kaspersky applications.
The Kaspersky Endpoint Security for Windows (11.0.0) application settings window opens.
- In the General section, click the Run button in the right part of the window.
- Select Properties in the context menu of Kaspersky Endpoint Security or click the Properties button located under the list of Kaspersky applications.
- To stop the application, click the
 button on the right of the list of Kaspersky applications or do the following:
- Select Properties in the context menu of Kaspersky Endpoint Security or click the Properties button located under the list of Kaspersky applications.
The Kaspersky Endpoint Security for Windows (11.0.0) application settings window opens.
- In the General section, click the Stop button in the right part of the window.
- Select Properties in the context menu of Kaspersky Endpoint Security or click the Properties button located under the list of Kaspersky applications.
- To start the application, click the
Configuring Kaspersky Endpoint Security settings
To configure Kaspersky Endpoint Security settings:
- Open the Kaspersky Security Center Administration Console.
- In the Managed devices folder of the Administration Console tree, open the folder with the name of the administration group to which the relevant client computer belongs.
- In the workspace, select the Devices tab.
- Select the computer for which you want to configure Kaspersky Endpoint Security settings.
- In the context menu of the client computer, select Properties.
A client computer properties window opens.
- In the client computer properties window, select the Applications section.
A list of Kaspersky applications that are installed on the client computer appears in the right part of the client computer properties window.
- Select Kaspersky Endpoint Security for Windows.
- Do one of the following:
- Select Properties from the context menu of Kaspersky Endpoint Security for Windows.
- Click the Properties button under the list of Kaspersky applications.
The Kaspersky Endpoint Security for Windows application settings window opens.
- In the General Settings section, configure the settings for Kaspersky Endpoint Security as well as the report and storage settings.
The other sections of the Kaspersky Endpoint Security for Windows application settings window are the same as in the standard sections of Kaspersky Security Center. A description of these sections is provided in the Kaspersky Security Center Help Guide.
If an application is subject to a policy that prohibits changes to specific settings, you will not be able to edit them while configuring application settings in the General Settings section.
- To save your changes, in the Kaspersky Endpoint Security for Windows application settings window, click OK.
Task management
This section describes how to manage tasks for Kaspersky Endpoint Security. For more details on task management through Kaspersky Security Center, please refer to the Kaspersky Security Center Help Guide.
About tasks for Kaspersky Endpoint Security
Kaspersky Security Center controls the activity of Kaspersky applications on client computers by means of tasks. Tasks implement the primary administrative functions, such as key installation, computer scanning, and database and application software module updates.
You can create the following types of tasks to administer Kaspersky Endpoint Security through Kaspersky Security Center:
- Local tasks that are configured for an individual client computer.
- Group tasks that are configured for client computers within administration groups.
- Tasks for a set of computers that do not belong to administration groups.
Tasks for sets of computers outside of administration groups apply only to the client computers that are specified in the task settings. If new client computers are added to a set of computers for which a task is configured, this task does not apply to these new computers. To apply the task to these computers, create a new task or edit the settings of the existing task.
To remotely manage Kaspersky Endpoint Security, you can use the following tasks of any of the listed types:
- Add key. Kaspersky Endpoint Security adds a key for application activation, including an additional key.
- Change application components. Kaspersky Endpoint Security installs or removes components on client computers according to the list of components specified in the task settings.
- Inventory. Kaspersky Endpoint Security collects information about all application executable files that are stored on computers.
You can enable inventory of DLL modules and script files. In this case, Kaspersky Security Center will receive information about DLL modules loaded on a computer with Kaspersky Endpoint Security installed, and about files containing scripts.
Enabling inventory of DLL modules and script files significantly increases the inventory task duration and the database size.
If the Application Control component is not installed on a computer with Kaspersky Endpoint Security installed, the inventory task on this computer will return an error.
- Update. Kaspersky Endpoint Security updates databases and application modules according to the configured update settings.
- Rollback. Kaspersky Endpoint Security rolls back the last update of databases and modules.
- Virus scan. Kaspersky Endpoint Security scans the computer areas specified in the task settings for viruses and other threats.
- Checking connection with KSN. Kaspersky Endpoint Security sends a query about the availability of KSN servers and updates the KSN connection status.
- Integrity Check. Kaspersky Endpoint Security receives data about the set of application modules installed on the client computer and scans the digital signature of each module.
- Manage Authentication Agent accounts. While performing this task, Kaspersky Endpoint Security generates commands for removing, adding, or modifying Authentication Agent accounts.
You can perform the following actions with tasks:
- Start, stop, suspend, and resume tasks.
- Create new tasks.
- Edit task settings.
The rights to access the settings of Kaspersky Endpoint Security tasks (read, write, execute) are defined for each user who has access to Kaspersky Security Center Administration Server, through the settings of access to functional areas of Kaspersky Endpoint Security. To configure access to the functional areas of Kaspersky Endpoint Security, go to the Security section of the properties window of Kaspersky Security Center Administration Server.
Page top
Configuring the task management mode
To configure the mode for working with tasks in the local interface of Kaspersky Endpoint Security:
- Open the Kaspersky Security Center Administration Console.
- In the Managed devices folder of the Administration Console tree, open the folder with the name of the administration group for which you want to configure the mode for working with tasks in the local interface of Kaspersky Endpoint Security.
- In the workspace, select the Policies tab.
- Select the necessary policy.
- Open the Properties: <Policy name> window by using one of the following methods:
- In the context menu of the policy, select Properties.
- Click the Configure policy link located in the right part of the Administration Console workspace.
- In the Local Tasks section, select the Task management subsection.
- In the Task management section:
- If you want to allow users to work with local tasks in the interface and command line of Kaspersky Endpoint Security, select the Allow use of local tasks check box.
If the check box is cleared, the functions of local tasks are stopped. In this mode, local tasks do not run according to schedule. Local tasks are also unavailable for starting and editing in the local interface of Kaspersky Endpoint Security, and when working with the command line.
- If you want to allow users to view the list of group tasks, select the Allow group tasks to be displayed check box.
- If you want to allow users to modify the settings of group tasks, select the Allow management of group tasks check box.
- If you want to allow users to work with local tasks in the interface and command line of Kaspersky Endpoint Security, select the Allow use of local tasks check box.
- Click OK to save changes.
- Apply the policy.
For details on applying a Kaspersky Security Center policy, please refer to the Kaspersky Security Center Help Guide.
Creating a local task
To create a local task:
- Open the Kaspersky Security Center Administration Console.
- In the Managed devices folder of the Administration Console tree, open the folder with the name of the administration group to which the relevant client computer belongs.
- In the workspace, select the Devices tab.
- Select the computer for which you want to create a local task.
- Do one of the following:
- In the context menu of the client computer, select the All tasks Create task option.
- In the context menu of the client computer, select Properties, and in the Properties: <Computer name> window that appears, on the Tasks tab, click the Add button.
- In the Perform action drop-down list, select Create task.
The Task Wizard starts.
- Follow the instructions of the Task Wizard.
Creating a group task
To create a group task:
- Open the Kaspersky Security Center Administration Console.
- Do one of the following:
- Select the Managed devices folder in the Administration Console tree to create a group task for all computers managed by Kaspersky Security Center.
- In the Managed devices folder in the Administration Console tree, select the folder with the name of the administration group to which the relevant client computers belong.
- Select the Tasks tab in the workspace.
- Click the Create task button.
The Task Wizard starts.
- Follow the instructions of the Task Wizard.
Creating a task for device selection
To create a task for device selection, perform the following:
- Open the Kaspersky Security Center Administration Console.
- Select the Tasks folder in the Administration Console tree.
- Click the Create task button.
The Task Wizard starts.
- Follow the instructions of the Task Wizard.
Starting, stopping, suspending, and resuming a task
If the Kaspersky Endpoint Security application is running on a client computer, you can start, stop, suspend, and resume a task on this client computer through Kaspersky Security Center. When Kaspersky Endpoint Security is suspended, running tasks are suspended and it becomes impossible to start, stop, suspend, or resume a task through Kaspersky Security Center.
To start, stop, suspend, or resume a local task:
- Open the Kaspersky Security Center Administration Console.
- In the Managed devices folder of the Administration Console tree, open the folder with the name of the administration group to which the relevant client computer belongs.
- In the workspace, select the Devices tab.
- Select the computer on which you want to start, stop, pause, or resume a local task.
- Right-click to display the context menu of the client computer and select Properties.
A client computer properties window opens.
- Select the Tasks section.
A list of local tasks appears in the right part of the window.
- Select a local task that you want to start, stop, suspend, or resume.
- Perform the necessary action on the task by using one of the following methods:
- Right-click to open the context menu of the local task and select Run / Stop / Pause / Resume.
- To start or stop a local task, click the / button on the right of the local tasks list.
- Do the following:
- Click the Properties button under the local tasks list, or select Properties in the task context menu.
The Properties: <Task name> window opens.
- On the General tab, click the Run / Stop / Pause / Resume button.
- Click the Properties button under the local tasks list, or select Properties in the task context menu.
To start, stop, pause, or resume a group task:
- Open the Kaspersky Security Center Administration Console.
- In the Managed devices folder of the Administration Console tree, open the folder with the name of the administration group for which you want to start, stop, pause or resume a group task.
- Select the Tasks tab in the workspace.
Group tasks are displayed in the right part of the window.
- Select a group task that you want to start, stop, pause, or resume.
- Perform the necessary action on the task by using one of the following methods:
- In the context menu of the group task, select Run / Stop / Pause / Resume.
- Click the / button in the right part of the window to start or stop a group task.
- Do the following:
- Click the Task Settings link in the right part of the Administration Console workspace, or select Properties in the task context menu.
The Properties: <Task name> window opens.
- On the General tab, click the Run / Stop / Pause / Resume button.
- Click the Task Settings link in the right part of the Administration Console workspace, or select Properties in the task context menu.
To start, stop, pause, or resume a task for a selection of computers:
- Open the Kaspersky Security Center Administration Console.
- In the Tasks folder of the Administration Console tree, select the task for the selection of computers that you want to start, stop, pause, or resume.
- Do one of the following:
- In the task context menu, select Run / Stop / Pause / Resume.
- Click the / button in the right part of the window to start or stop the task for specific computers.
- Do the following:
- Click the Task Settings link in the right part of the Administration Console workspace, or select Properties in the task context menu.
The Properties: <Task name> window opens.
- On the General tab, click the Run / Stop / Pause / Resume button.
- Click the Task Settings link in the right part of the Administration Console workspace, or select Properties in the task context menu.
Editing task settings
To edit the settings of a local task:
- Open the Kaspersky Security Center Administration Console.
- In the Managed devices folder of the Administration Console tree, open the folder with the name of the administration group to which the relevant client computer belongs.
- In the workspace, select the Devices tab.
- Select a computer for which you want to configure application settings.
- Right-click to display the context menu of the client computer and select Properties.
A client computer properties window opens.
- Select the Tasks section.
A list of local tasks appears in the right part of the window.
- Select the necessary local task in the local tasks list.
- Click the Properties button.
The Properties: <Local task name> window opens.
- In the Properties:<Local task name> window, select the Settings section.
- Edit the local task settings.
- To save the changes, in the Properties: <Local task name> window, click OK.
- To save the changes, in the Properties: <Computer name> window, click OK.
To edit the settings of a group task:
- Open the Kaspersky Security Center Administration Console.
- In the Managed devices folder, open the folder with the name of the relevant administration group.
- Select the Tasks tab in the workspace.
Group tasks are displayed in the Administration Console workspace.
- Select the necessary group task.
- Right-click to display the context menu of the group task and select Properties.
The Properties: <Group task name> window opens.
- In the Properties: <Group task name> window, select the Settings section.
- Edit the group task settings.
- To save the changes, in the Properties: <Group task name> window, click OK.
To edit the settings of a task for a selection of computers:
- Open the Kaspersky Security Center Administration Console.
- In the Tasks folder of the Administration Console tree, select the task for the selection of computers whose settings you want to edit.
- Right-click to display the context menu of the task for a selection of computers and select Properties.
The Properties: <Name of the task for a selection of computers> window opens.
- In the Properties: <Name of the task for the selection of computers> window, select the Settings section.
- Edit the task settings for the selection of computers.
- To save the changes, in the Properties: <Name of the task for the selection of computers> window, click OK.
Except for the Settings section, all sections in the task properties window are identical to those that are used in Kaspersky Security Center. For a detailed description of them, please refer to the Kaspersky Security Center Help Guide. The Settings section contains the specific settings of Kaspersky Endpoint Security for Windows. Its contents depend on the selected task or on the task type.
Page top
Inventory task settings
You can configure the following settings for the inventory task:
- Inventory scope. In this section, you can specify the file system objects that will be scanned during inventory. These objects can be local folders, network folders, removable drives, hard drives, or the entire computer.
- Inventory task settings. In this section, you can configure the following settings:
- Scan when the computer is idling. This check box enables / disables the function that suspends the inventory task when computer resources are limited. Kaspersky Endpoint Security pauses the inventory task if the screensaver is off and the computer is unlocked.
- DLL modules inventory. This check box enables / disables the function that analyzes data on DLL modules and relays analysis results to the Administration Server.
- Script files inventory. This check box enables / disables the function that analyzes data on files containing scripts and relays the analysis results to the Administration Server.
- Advanced. Click this button to open the Advanced Settings window in which you can configure the following settings:
- Scan only new and changed files. This check box enables / disables the mode for scanning only new files and files that have been modified since the previous inventory.
- Skip files that are scanned for longer than. The check box enables / disables a limit on the length of time for scanning one file. On expiration of the time period set in the field on the right, Kaspersky Endpoint Security stops scanning the file.
- Scan archives. This check box enables / disables scanning of RAR, ARJ, ZIP, CAB, LHA, JAR, and ICE archives for the presence of executable files.
- Scan distribution packages. This check box enables / disables scanning of distribution packages when running the inventory task.
- Do not unpack large compound files.
If this check box is selected, Kaspersky Endpoint Security does not scan compound files if their size exceeds the value that is specified in the Maximum file size field.
If this check box is cleared, Kaspersky Endpoint Security scans compound files of all sizes.
Kaspersky Endpoint Security scans large files that are extracted from archives, regardless of whether the Do not unpack large compound files check box is selected.
- Maximum file size. Kaspersky Endpoint Security does not unpack only those files that are larger than the value specified in this field. The value is specified in megabytes.
Managing policies
This section discusses the creation and configuration of policies for Kaspersky Endpoint Security. For more detailed information about managing Kaspersky Endpoint Security using Kaspersky Security Center policies, please refer to the Kaspersky Security Center Help Guide.
About policies
You can use policies to apply identical Kaspersky Endpoint Security settings to all client computers within an administration group.
You can locally change the values of settings specified by a policy for individual computers in an administration group using Kaspersky Endpoint Security. You can locally change only those settings whose modification is not prohibited by the policy.
The ability to change application settings on the client computer is determined by the status of the “lock” on these settings in the policy properties:
- A closed “lock” (
 ) means the following:
- Kaspersky Security Center blocks changes to settings that this lock relates to from the Kaspersky Endpoint Security interface on client computers. On all client computers, Kaspersky Endpoint Security uses the same values of these settings, i.e. the values that are defined in the policy properties.
- Kaspersky Security Center blocks changes to settings that this lock relates to in the properties of those policies for nested administration groups and slave Administration Servers in which the Inherit settings of top level policy function is enabled. The values of these settings that are defined in top level policy properties are used.
- An open “lock” (
 ) means the following:
- Kaspersky Security Center allows changes to settings that this lock relates to from the Kaspersky Endpoint Security interface on client computers. On each client computer, Kaspersky Endpoint Security operates according to the local values of these settings if the component is enabled.
- Kaspersky Security Center allows changes to settings that this lock relates to in the properties of those policies for nested administration groups and slave Administration Servers in which the Inherit settings of top level policy function is enabled. The values of these settings do not depend on what is specified in the top level policy properties.
After the policy is applied for the first time, local application settings change in accordance with the policy settings.
The rights to access policy settings (read, write, execute) are specified for each user who has access to the Kaspersky Security Center Administration Server and separately for each functional scope of Kaspersky Endpoint Security. To configure the rights to access policy settings, go to the Security section of the properties window of the Kaspersky Security Center Administration Server.
The following functional scopes of Kaspersky Endpoint Security are singled out:
- Essential Threat Protection. The functional scope includes the File Threat Protection, Mail Threat Protection, Web Threat Protection, Network Threat Protection, Firewall, and Scan Task components.
- Application Control. The functional scope includes the Application Control component.
- Device Control. The functional scope includes the Device Control component.
- Encryption. The functional scope includes the Full Disk Encryption and File Level Encryption components.
- Trusted zone. The functional scope includes the Trusted Zone.
- Web Control. The functional scope includes the Web Control component.
- Advanced Threat Protection. The functional scope includes KSN settings and the Behavior Detection, Exploit Prevention, Host Intrusion Prevention, and Remediation Engine components.
- Basic functionality. This functional scope includes general application settings that are not specified for other functional scopes, including: licensing, inventory tasks, application database and module update tasks, Self-Defense, advanced application settings, reports and storages, password protection and application interface settings.
You can perform the following operations with a policy:
- Create a policy.
- Edit policy settings.
If the user account under which you accessed the Administration Server does not have rights to edit settings of certain functional scopes, the settings of these functional scopes are not available for editing.
- Delete a policy.
- Change policy status.
For information on using policies that are not related to interaction with Kaspersky Endpoint Security, please refer to the Kaspersky Security Center Help Guide.
Page top
Creating a policy
To create a policy:
- Open the Kaspersky Security Center Administration Console.
- Do one of the following:
- Select the Managed devices folder in the Administration Console tree if you want to create a policy for all computers managed by Kaspersky Security Center.
- In the Managed devices folder in the Administration Console tree, select the folder with the name of the administration group to which the relevant client computers belong.
- In the workspace, select the Policies tab.
- Do one of the following:
- Click the Create policy button.
- Right-click to open the context menu and select Create Policy.
The Policy Wizard starts.
- Follow the instructions of the Policy Wizard.
Editing policy settings
To edit policy settings:
- Open the Kaspersky Security Center Administration Console.
- In the Managed devices folder of the Administration Console tree, open the folder with the name of the relevant administration group for which you want to edit policy settings.
- In the workspace, select the Policies tab.
- Select the necessary policy.
- Open the Properties: <Policy name> window by using one of the following methods:
- In the context menu of the policy, select Properties.
- Click the Configure policy link located in the right part of the Administration Console workspace.
Kaspersky Endpoint Security for Windows policy settings include the settings of components and the application settings. The Advanced Threat Protection, Essential Threat Protection and Security Controls sections of the Properties: <Policy name> window contain the settings of the protection and control components, the Data Encryption section contains settings for full disk encryption, file level encryption, and encryption of removable drives, the Endpoint Sensor section contains the settings of the Endpoint Sensor component, the Local tasks section contains the settings of local and group tasks, and the General Settings section contains the application settings.
The settings of data encryption and control components in policy settings are displayed if the corresponding check boxes are selected in the Interface settings window of Kaspersky Security Center. By default, these check boxes are selected.
- Edit the policy settings.
- To save your changes, in the Properties: <Policy name> window, click OK.
Security level indicator in the policy properties window
The security level indicator is displayed in the top part of the Properties: <Policy name> window. The indicator can take one of the following values:
- High protection level. The indicator takes this value and turns green if all components from the following categories are enabled:
- Critical. This category includes the following components:
- File Threat Protection.
- Behavior Detection.
- Exploit Prevention.
- Remediation Engine.
- Important. This category includes the following components:
- Kaspersky Security Network.
- Web Threat Protection.
- Mail Threat Protection.
- Host Intrusion Prevention.
- Critical. This category includes the following components:
- Medium protection level. The indicator takes this value and turns yellow if one of the important components is disabled.
- Low protection level. The indicator takes this value and turns red in one of the following cases:
- One or multiple critical components are disabled.
- Two ore more important components are disabled.
If the indicator is displayed with Medium protection level or Low protection level, the Learn more link, which opens the Recommended protection components window, is available to the right of the indicator. In this window, you can enable any of the recommended protection components.
Page top
Configuring the display of the application interface
To configure the display of the application interface:
- Open the Kaspersky Security Center Administration Console.
- In the Managed devices folder of the Administration Console tree, open the folder with the name of the administration group for which you want to configure the display of the application interface.
- In the workspace, select the Policies tab.
- Select the necessary policy.
- Open the Properties: <Policy name> window by using one of the following methods:
- In the context menu of the policy, select Properties.
- Click the Configure policy link located in the right part of the Administration Console workspace.
- In the General Settings section, select the Interface subsection.
- In the Interaction with user section, do one of the following:
- Select the Display application interface check box if you want the following interface elements to be displayed on the client computer:
- Folder containing the application name in the Start menu
- Kaspersky Endpoint Security icon in the Microsoft Windows taskbar notification area
- Pop-up notifications
If this check box is selected, the user can view and, depending on the available rights, change application settings from the application interface.
- Clear the Display application interface check box if you want to hide all signs of Kaspersky Endpoint Security on the client computer.
- Select the Display application interface check box if you want the following interface elements to be displayed on the client computer:
- In the Interaction with user section, select the Simplified application interface check box if you want the simplified application interface to be displayed on a client computer that has Kaspersky Endpoint Security installed.
This check box is available if the Display application interface check box is selected.
Sending user messages to the Kaspersky Security Center server
A user may need to send a message to the local corporate network administrator in the following cases:
- Device Control blocked access to the device.
The message template for a request to access a blocked device is available in the Kaspersky Endpoint Security interface in the Device Control section.
- Application Control blocked the startup of an application.
The message template for a request to allow the startup of a blocked application is available in the Kaspersky Endpoint Security interface in the Application Control section.
- Web Control blocked access to a web resource.
The message template for a request to access a blocked web resource is available in the Kaspersky Endpoint Security interface in the Web Control section.
The method used to send messages and the utilized template depends on whether or not there is an active Kaspersky Security Center policy running on the computer that has Kaspersky Endpoint Security installed, and whether or not there is a connection with the Kaspersky Security Center Administration Server. The following scenarios are possible:
- If a Kaspersky Security Center policy is not running on the computer that has Kaspersky Security Center installed, a user's message is sent to the local area network administrator by email.
The message fields are populated with the values of fields from the template defined in the local interface of Kaspersky Endpoint Security.
- If a Kaspersky Security Center policy is running on the computer that has Kaspersky Security Center installed, the standard message is sent to the Kaspersky Security Center Administration Server.
In this case, user messages are available for viewing in the Kaspersky Security Center event storage. The message fields are populated with the values of fields from the template defined in the Kaspersky Security Center policy.
- If a Kaspersky Security Center out-of-office policy is running on the computer with Kaspersky Endpoint Security installed, the method used to send messages depends on whether or not there is a connection with Kaspersky Security Center.
- If a connection with Kaspersky Security Center is established, Kaspersky Endpoint Security sends the standard message to the Kaspersky Security Center Administration Server.
- If a connection with Kaspersky Security Center is absent, a user's message is sent to the local area network administrator by email.
In both cases, the message fields are populated with the values of fields from the template defined in the Kaspersky Security Center policy.
Viewing user messages in the Kaspersky Security Center event storage
The Application Control, Device Control, and Web Control components enable LAN users with computers that have Kaspersky Endpoint Security installed to send messages to the administrator.
A user can send messages to the administrator using two methods:
- As an event in the Kaspersky Security Center event storage.
The user's event is sent to the Kaspersky Security Center event storage if the Kaspersky Endpoint Security application that is installed on the user's computer is operating under an active policy.
- As an email message.
User information is sent in the form of an email message if a policy or out-of-office policy is applied to a computer that has Kaspersky Endpoint Security installed.
To view a user message in the Kaspersky Security Center event storage:
- Open the Kaspersky Security Center Administration Console.
- In the Administration Server node of the Administration Console tree, select the Events tab.
The Kaspersky Security Center workspace displays all events occurring during the operation of Kaspersky Endpoint Security, including messages to the administrator that are received from LAN users.
- To configure the event filter, in the Selection events drop-down list, select User requests.
- Select the message sent to the administrator.
- Open the Event settings window in one of the following ways:
- Right-click the event. In the context menu that opens, select Properties.
- Click the Open event properties window button in the right part of the Administration Console workspace.
Managing the application from the command line
You can manage Kaspersky Endpoint Security from the command line. You can view the list of commands for managing the application by executing the HELP command. To read about the syntax of a specific command, enter HELP <command>.
Commands
To manage Kaspersky Endpoint Security from the command line:
- Run the command line interpreter (cmd.exe) as an administrator.
- Go to the folder where the Kaspersky Endpoint Security executable file is located.
- To execute a command, enter:
avp.com <command> [options]
As a result, Kaspersky Endpoint Security will execute the command (see figure below.)

Managing the application from the command line
SCAN. Virus Scan
Run the virus scan task.
Command syntax
SCAN [<scan scope>] [<action on threat detection>] [<file types>] [<scan exclusions>] [/R[A]:<report file>] [<scan technologies>] [/C:<file with scan settings>]
Scan scope |
|
|
A space-separated list of files and folders. Long paths must be enclosed in quotation marks. Short paths (MS-DOS format) do not need to be enclosed in quotation marks. For example:
|
|
Run the Full Scan task. Kaspersky Endpoint Security scans the following objects:
|
|
Scan the kernel memory. |
|
Scan the objects that are loaded at startup of the operating system. |
|
Scan Outlook mailbox. |
|
Scan removable drives. |
|
Scan hard drives. |
|
Scan network drives. |
|
Scan the files in the Kaspersky Endpoint Security Backup. |
|
Scan the files and folders from a list. Each file in the list must be on a new line. Long paths must be enclosed in quotation marks. Short paths (MS-DOS format) do not need to be enclosed in quotation marks. For example:
|
Action on threat detection |
|
|
Inform. If this option is selected, Kaspersky Endpoint Security adds the information about infected files to the list of active threats on detection of these files.. |
|
Disinfect; inform if disinfection fails. If this option is selected, Kaspersky Endpoint Security automatically attempts to disinfect all infected files that are detected. If disinfection is not possible, Kaspersky Endpoint Security adds the information about the infected files that are detected to the list of active threats. |
|
Disinfect; delete if disinfection fails. If this option is selected, Kaspersky Endpoint Security automatically attempts to disinfect all infected files that are detected. If disinfection fails, Kaspersky Endpoint Security deletes the files. This action is selected by default. |
|
Disinfect the infected files that are detected. If disinfection fails, delete the infected files. Also delete compound files (for example, archives) if the infected file cannot be disinfected or deleted. |
|
Delete infected files. Also delete compound files (for example, archives) if the infected file cannot be deleted. |
|
Prompt the user for action as soon as a threat is detected. |
|
Prompt the user for action after the scan is completed. |
File types |
|
|
Files scanned by extension. If this setting is enabled, Kaspersky Endpoint Security scans infectable files only. The file format is then determined based on the file's extension. |
|
Files scanned by format. If this setting is enabled, Kaspersky Endpoint Security scans infectable files only. Before scanning a file for malicious code, the internal header of the file is analyzed to determine the format of the file (for example, .txt, .doc, or .exe). During scanning, the extension of the file is also taken into account. |
|
All files. If this setting is enabled, Kaspersky Endpoint Security checks all files without exception (all formats and extensions). This is the default setting. |
Scan exclusions |
|
|
RAR, ARJ, ZIP, CAB, LHA, JAR, and ICE archives are excluded from the scan scope. |
|
Mail databases, incoming and outgoing e-mails are excluded from the scan scope. |
|
Files that match the file mask are excluded from the scan scope. For example:
|
|
Files that take longer to scan than the specified time limit (in seconds) are excluded from the scan scope. |
|
Files that are larger than the specified size limit (in megabytes) are excluded from the scan scope. |
Saving events to a report file mode |
|
|
Save only critical events to the report file. |
|
Save all events to a report file. |
Scan technologies |
|
|
This technology increases scanning speed by excluding certain files from scanning. Files are excluded from scanning by using a special algorithm that takes into account the release date of Kaspersky Endpoint Security databases, the date that the file was last scanned on, and any modifications to the scanning settings. |
|
This technology increases scanning speed by excluding certain files from scanning. Files are excluded from scanning by using a special algorithm that takes into account the release date of Kaspersky Endpoint Security databases, the date that the file was last scanned on, and any modifications to the scanning settings. The iSwift technology is an advancement of the iChecker technology for the NTFS file system. |
Advanced settings |
|
|
File with Virus scan task settings. The file must be created manually and saved in TXT format. The file can have the following contents: |
Example:
|
UPDATE. Updating databases and application software modules
Run the Update task.
Command syntax
UPDATE [local] ["<update source>"] [/R[A]:<report file>] [/C:<file with update settings >]
Update task settings |
|
|
Start of the Update task that was created automatically after the application had been installed. You can change the settings of the Update task in the local application interface or in the console of Kaspersky Security Center. If this setting is not configured, Kaspersky Endpoint Security starts the Update task with default settings or with the settings specified in the command. You can configure Update task settings as follows:
|
Update source |
|
|
Address of a HTTP or FTP server, or of a shared folder with the update package. You can specify only one update source. If the update source is not specified, Kaspersky Endpoint Security uses the default source – Kaspersky update servers. |
Saving events to a report file mode |
|
|
Save only critical events to the report file. |
|
Save all events to a report file. |
Advanced settings |
|
|
File with the Update task settings. The file must be created manually and saved in TXT format. The file may have the following contents: |
Example:
|
ROLLBACK. Rolling back the last update
Roll back the last anti-virus database update. This lets you roll back the databases and application modules to their previous version when necessary, for example, when the new database version contains an invalid signature that causes Kaspersky Endpoint Security to block a safe application.
Command syntax
ROLLBACK [/R[A]:<report file>]
Saving events to a report file mode |
|
|
Save only critical events to the report file. |
|
Save all events to a report file. |
Example:
|
TRACES. Traces
Enable / disable tracing. By default, tracing is disabled.
Command syntax
TRACES on|off [<tracing level>] [<advanced settings>]
Tracing level |
|
|
Level of detail of traces. Available values:
|
Advanced settings |
|
|
Run a command with the |
|
Use the OutputDebugString function and save the trace file. The OutputDebugString function sends a character string to the application debugger to display on screen. For details, visit the MSDN website. |
|
Save one trace file (no size limit). |
|
Save traces to a limited number of files of limited size and overwrite the older files when the maximum size is reached. |
|
Save traces to dump files. |
Examples:
|
START. Start the profile
Start the profile (for example, to update databases or to enable a protection component).
Command syntax
START <profile> [/R[A]:<report file>]
Profile |
|
|
Profile name. A Profile is a Kaspersky Endpoint Security component, task or feature. You can view the list of available profiles by executing the |
Saving events to a report file mode |
|
|
Save only critical events to the report file. |
|
Save all events to a report file. |
Example:
|
STOP. Stopping a profile
Stop the running profile (for example, stop scanning, stop removable drives scan, or disable a protection component).
To execute this command, Password protection must be enabled. The user must have the following permissions: Configure application settings, Disable protection components, and Disable control components.
Command syntax
STOP <profile> /login=<user name> /password=<password>
Profile |
|
|
Profile name. A Profile is a Kaspersky Endpoint Security component, task or feature. You can view the list of available profiles by executing the |
Authentication |
|
|
Information about the user account that is granted the required Password protection permissions. |
STATUS. Profile status
Show status information for application profiles (for example, running or completed). You can view the list of available profiles by entering the HELP STATUS command.
Kaspersky Endpoint Security also displays information about the status of service profiles. Information about the status of service profiles may be required when you are contacting Kaspersky Technical Support.
Command syntax
STATUS [<profile>]
STATISTICS. Profile operation statistics
View statistical information about an application profile (for example, scan duration or the number of threats detected.) You can view the list of available profiles by executing the HELP STATISTICS command.
Command syntax
STATISTICS <profile>
RESTORE. Restoring files
You can restore a file from Backup to its original folder. If a file with the same name already exists at the specified path, the suffix "-copy"is appended to the file name. The file that is being restored is copied keeping its original name.
To execute this command, Password protection must be enabled. The user must have the Restore from Backup permission.
Backup stores reserve copies of files that were deleted or modified during disinfection. A backup copy is a file copy created before the file was disinfected or deleted. Backup copies of files are stored in a special format and do not pose a threat.
Backup copies of files are stored in the folder C:\ProgramData\Kaspersky Lab\KES\QB.
Users in the Administrators group are granted full permission to access this folder. Limited access rights to this folder are granted to the user whose account was used to install Kaspersky Endpoint Security.
Kaspersky Endpoint Security does not provide the capability to configure user access permissions to backup copies of files.
Command syntax
RESTORE [/REPLACE] <file name> /login=<user name> /password=<password>
Advanced settings |
|
|
Overwrite an existing file. |
|
The name of the file to be restored. |
Authentication |
|
|
Information about the user account that is granted the required Password protection permissions. |
Example:
|
EXPORT. Exporting application settings
Export Kaspersky Endpoint Security settings to a file. The file will be located in the C:\Windows\SysWOW64 folder.
Command syntax
EXPORT <profile> <file name>
Profile |
|
|
Profile name. A Profile is a Kaspersky Endpoint Security component, task or feature. You can view the list of available profiles by executing the |
File to export |
|
|
The name of the file to which the application settings will be exported. You can export Kaspersky Endpoint Security settings to a DAT or CFG configuration file, to a TXT text file, or to an XML document. |
Examples:
|
IMPORT. Importing application settings
Imports settings for Kaspersky Endpoint Security from a file that was created with the EXPORT command.
To execute this command, Password protection must be enabled. The user must have the following permissions: Configure application settings, Disable protection components, and Disable control components.
Command syntax
IMPORT <file name> /login=<username> /password=<password>
File to import |
|
|
The name of the file from which the application settings will be imported. You can import Kaspersky Endpoint Security settings from a DAT or CFG configuration file, a TXT text file, or an XML document. |
Authentication |
|
|
Information about the user account that is granted the required Password protection permissions. |
Example:
|
ADDKEY. Applying a key file.
Apply the key file to activate Kaspersky Endpoint Security. If the application is already activated, the key will be added as an additional one.
Command syntax
ADDKEY <file name> /login=<user name> /password=<password>
Key file |
|
|
Key file name. |
Authentication |
|
|
User account credentials. These credentials need to be entered only if Password protection is enabled. |
Example:
|
LICENSE. Licensing
Perform actions with Kaspersky Endpoint Security license keys.
To execute this command and remove a license key, Password protection must be enabled. The user must have the Remove key permission.
Command syntax
LICENSE <operation> [/login=<user name> /password=<password>]
Operation |
|
|
Apply the key file to activate Kaspersky Endpoint Security. If the application is already activated, the key will be added as an additional one. |
|
Activate Kaspersky Endpoint Security using an activation code. If the application is already activated, the key will be added as an additional one. |
|
Renew your license with a key file. An additional key is added as a result. It becomes active upon license expiration. It is not possible to add an active key by executing this command. |
|
Renew your license with an activation code. An additional key is added as a result. It becomes active upon license expiration. It is not possible to add an active key by executing this command. |
|
Remove a license key. Additional key will also be removed. |
Authentication |
|
|
Information about the user account that is granted the required Password protection permissions. |
Example:
|
PBATESTRESET. Reset the pre-encryption check results
Resets the results of the check for compatibility with BitLocker encryption technology. These results also include a check for the computer compatibility with the authentication Agent.
Before running Full Disk Encryption, the application performs a number of checks to verify that the computer can be encrypted using the BitLocker technology. If the computer cannot be encrypted, Kaspersky Endpoint Security logs information about the incompatibility. The next time you try to encrypt, the application does not perform this check and warns you that encryption is not possible. If the hardware configuration of the computer has changed, the compatibility check results previously logged by the application must be reset to re-check the system hard drive for compatibility with Authentication Agent and for BitLocker encryption technology support.
EXIT. Exit the application
Exits Kaspersky Endpoint Security. The application will be unloaded from the computer's RAM.
To execute this command, Password protection must be enabled. The user must have the Exit the application permission.
Command syntax
EXIT /login=<user name> /password=<password>
EXITPOLICY. Disabling policy
Disables a Kaspersky Security Center policy on the computer. All Kaspersky Endpoint Security settings are available for configuration, including settings that have a closed lock in the policy (![]() ).
).
To execute this command, Password protection must be enabled. The user must have the Disable Kaspersky Security Center policy permission.
Command syntax
EXITPOLICY /login=<user name> /password=<password>
STARTPOLICY. Enabling policy
Enables a Kaspersky Security Center policy on the computer. The application settings will be configured according to the policy.
Page top
DISABLE. Disabling protection
Disables File Threat Protection on a computer with an expired Kaspersky Endpoint Security license. It is not possible to run this command on a computer that has the application that is not activated,.or has a valid license.
Page top
SPYWARE. Spyware detection
Enable / disable spyware detection. By default, spyware detection is enabled.
Command syntax
SPYWARE on|off
Appendix. Application profiles
A Profile is a Kaspersky Endpoint Security component, task or feature. Profiles are used to manage the application from the command line. You can use profiles to execute START, STOP, STATUS, STATISTICS, EXPORT, and IMPORT commands. Using profiles, you can configure application settings (for example, STOP DeviceControl) or run tasks (for example, START Scan_My_Computer).
The following profiles are available:
BehaviorDetection– Behavior Detection.DeviceControl– Device control.EntAppControl– Application Control.File_MonitoringorFM– File Threat Protection.FirewallorFW– Firewall.HIPS– Host Intrusion prevention.IDS– Network Threat Protection.IntegrityCheck– Integrity check.Mail_MonitoringorEM– Mail Threat Protection.Rollback– update rollback.Scan_ContextScan– Scan from context menu.Scan_IdleScan– Background scan.Scan_Memory– Kernel memory scan.Scan_My_Computer– Full scan.Scan_Objects– Custom scan.Scan_Qscan– Scan objects that are loaded at operation system startup.Scan_Removable_Drive– Removable drives scan.Scan_StartuporSTARTUP– Critical Areas Scan.Updater– Update.Web_MonitoringorWM– Web Threat Protection.WebControl– Web Control.
Kaspersky Endpoint Security also supports service profiles. Service profiles may be required when you are contacting Kaspersky Technical Support.
Page top
Sources of information about the application
Kaspersky Endpoint Security page on the Kaspersky website
On the Kaspersky Endpoint Security page, you can view general information about the application and its functions and features.
The Kaspersky Endpoint Security page contains a link to the online store. There you can purchase or renew the application.
Kaspersky Endpoint Security page in the Knowledge Base
Knowledge Base is a section on the Technical Support website.
On the Kaspersky Endpoint Security page in the Knowledge Base, you can read articles that provide useful information, recommendations, and answers to frequently asked questions on how to purchase, install, and use the application.
Knowledge Base articles can answer questions relating to not only Kaspersky Endpoint Security but also to other Kaspersky applications. Articles in the Knowledge Base may also contain news from Technical Support.
Discussion of Kaspersky applications in user community
If your question does not require an urgent answer, you can discuss it with Kaspersky experts and other users in our Community.
In this community you can view existing topics, leave your comments, and create new discussion topics.
Page top
Contacting Technical Support
This section describes the ways to get technical support and the terms on which it is available.
How to obtain technical support
If you cannot find a solution to your problem in the application documentation or in one of the sources of information about the application, we recommend that you contact Technical Support. Technical Support specialists will answer your questions about installing and using the application.
Before contacting Technical Support, please read the support rules.
You can contact Technical Support in one of the following ways:
- By calling Technical Support by phone
- By sending a request to Kaspersky Technical Support through the Kaspersky CompanyAccount portal
Technical support by phone
You can call Technical Support representatives from most regions throughout the world. You can find information on ways to receive technical support in your region and contacts for Technical Support on the website of Kaspersky Technical Support.
Before contacting Technical Support, please read the support rules.
Page top
Technical Support via Kaspersky CompanyAccount
Kaspersky CompanyAccount is a portal for companies that use Kaspersky applications. The Kaspersky CompanyAccount portal is designed to facilitate interaction between users and Kaspersky experts via electronic requests. You can use Kaspersky CompanyAccount portal to track the status of your electronic requests and store a history of those requests.
You can register all of your organization's employees under a single account on Kaspersky CompanyAccount. A single account lets you centrally manage electronic requests from registered employees to Kaspersky and also manage the privileges of these employees via Kaspersky CompanyAccount.
Kaspersky CompanyAccount portal is available in the following languages:
- English
- Spanish
- Italian
- German
- Polish
- Portuguese
- Russian
- French
- Japanese
To learn more about Kaspersky CompanyAccount, visit the Technical Support website.
Page top
Collecting information for Technical Support
After you inform Kaspersky Technical Support specialists about your issue, they may ask you to create a trace file. The trace file allows you to trace the process of performing application commands step by step and determine the stage of application operation at which an error occurs.
Technical Support specialists may also require additional information about the operating system, processes that are running on the computer, detailed reports on the operation of application components.
While running diagnostics, Technical Support experts may ask you to change application settings by:
- Activating the functionality that gathers extended diagnostic information.
- Fine-tuning the settings of individual application components, which are not available via standard user interface elements.
- Changing the settings for storage of diagnostic information that is gathered.
- Configuring the interception and logging of network traffic.
Technical Support experts will provide all the information needed to perform these operations (description of the sequence of steps, settings to be modified, configuration files, scripts, additional command line functionality, debugging modules, special-purpose utilities, etc.) and inform you about the scope of data gathered for purposes of debugging. The extended diagnostic information gathered is saved on the user's computer. Data that has been gathered is not automatically transmitted to Kaspersky.
The operations listed above should be performed only under the supervision of Technical Support specialists by following their instructions. Unsupervised changes to application settings performed in ways other than those described in the Administrator's Guide or instructions of Technical Support specialists can slow down or crash the operating system, affect computer security, or compromise the availability and integrity of data being processed.
Creating an application trace file
Application traces – detailed records of actions that are performed by the application, and messages about events occurring during operation of the application.
To create an application trace file:
- In the main application window, click the Support button.
The Support window opens.
- In the Support window, click the System tracing button.
The Information for Technical Support window opens.
- To start the tracing process, select one of the following items in the Application traces drop-down list:
- is enabled
Select this item to enable tracing.
- with rotation.
Select this item to enable tracing and limit the maximum number of trace files and the maximum size of each trace file. If the maximum number of trace files of the maximum size is written, the oldest trace file is deleted so that a new trace file can be written.
If this item is selected, you can specify a value for the following fields:
- Maximum number of files for rotation
In this field, you can specify the maximum number of trace files written.
- Maximum size for each file
In this field, you can specify the maximum size of each trace file written.
- Maximum number of files for rotation
- is enabled
- In the Level drop-down list, select the trace level.
You are advised to clarify the required trace level with a Technical Support specialist. In the absence of guidance from Technical Support, set the trace level to Normal (500).
- Restart Kaspersky Endpoint Security.
- To stop the tracing process, return to the Information for Technical Support window and select is disabled in the Application traces drop-down list.
You can also create trace files when installing the application from the command line, including by using the setup.ini file.
Page top
Enabling and disabling dump writing
To enable or disable dump writing:
- Open the application settings window.
- In the left part, select Application Settings in the General Settings section.
The application settings are displayed in the right part of the window.
- In the Debug information section, click the Settings button.
The Debug information window opens.
- Do one of the following:
- Select the Enable dump writing check box if you want the application to write dumps of the application.
- Clear the Enable dump writing check box if you do not want the application to write dumps of the application.
- Click OK in the Debug information window.
- To save the changes, click the Save button in the main application window.
Enabling and disabling protection of dump files and trace files
Dump files and trace files contain information about the operating system, and may also contain user data. To prevent unauthorized access to such data, you can enable protection of dump files and trace files.
If protection of dump files and trace files is enabled, the files can be accessed by the following users:
- Dump files can be accessed by the system administrator and local administrator, and by the user that enabled the writing of dump files and trace files.
- Trace files can be accessed only by the system administrator and local administrator.
To enable or disable protection of dump files and trace files:
- Open the application settings window.
- In the left part, select Application Settings in the General Settings section.
The application settings are displayed in the right part of the window.
- In the Debug information section, click the Settings button.
The Debug information window opens.
- Do one of the following:
- Select the Enable dump and trace files protection check box if you want to enable protection.
- Clear the Enable dump and trace files protection check box if you want to disable protection.
- Click OK in the Debug information window.
- To save the changes, click the Save button in the main application window.
Dump files and trace files that were written while protection was active remain protected even after this function is disabled.
Page top
Contents and storage of dump files
The user is personally responsible for ensuring the safety of data collected, particularly for controlling and restricting access to collected data stored on the computer.
Dump files are stored on the computer as long as the application is in use, and are deleted permanently when the application is removed. Dump files are stored in the folder ProgramData\Kaspersky Lab.
A dump file contains all information about the working memory of Kaspersky Endpoint Security processes at the moment when the dump file was created. A dump file may also contain personal data.
Page top
Contents and storage of trace files
The user is personally responsible for ensuring the safety of data collected, particularly for monitoring and restricting access to collected data stored on the computer until it is submitted to Kaspersky.
Trace files are stored on the computer as long as the application is in use, and are deleted permanently when the application is removed.
Trace files are stored in the ProgramData\Kaspersky Lab folder.
The trace file has the following name format: KES<version number_dateXX.XX_timeXX.XX_pidXXX.><trace file type>.log.
The Authentication Agent trace file is stored in the System Volume Information folder and has the following name: KLFDE.{EB2A5993-DFC8-41a1-B050-F0824113A33A}.PBELOG.bin.
You can view data saved in trace files.
All trace files contain the following common data:
- Event time.
- Number of the thread of execution.
The Authentication Agent trace file does not contain this information.
- Application component that caused the event.
- Degree of event severity (informational event, warning, critical event, error).
- A description of the event involving command execution by a component of the application and the result of execution of this command.
Contents of SRV.log, GUI.log, and ALL.log trace files
SRV.log, GUI.log, and ALL.log trace files may store the following information in addition to general data:
- Personal data, including the last name, first name, and middle name, if such data is included in the path to files on the local computer.
- The user name and password if they were transmitted openly. This data can be recorded in trace files during Internet traffic scanning. Traffic is recorded in trace files only from trafmon2.ppl.
- The user name and password if they are contained in HTTP headers.
- The name of the Microsoft Windows account if the account name is included in a file name.
- Your email address or a web address containing the name of your account and password if they are contained in the name of the object detected.
- Websites that you visit and redirects from these websites. This data is written to trace files when the application scans websites.
- Proxy server address, computer name, port, IP address, and user name used to sign in to the proxy server. This data is written to trace files if the application uses a proxy server.
- Remote IP addresses to which your computer established connections.
- Message subject, ID, sender's name and address of the message sender's web page on a social network. This data is written to trace files if the Web Control component is enabled.
Contents of HST.log, BL.log, Dumpwriter.log, WD.log, AVPCon.dll.log trace files
In addition to general data, the HST.log trace file contains information about the execution of a database and application module update task.
In addition to general data, the BL.log trace file contains information about events occurring during operation of the application, as well as data required to troubleshoot application errors. This file is created if the application is started with the avp.exe –bl parameter.
In addition to general data, the Dumpwriter.log trace file contains service information required for troubleshooting errors that occur when the application dump file is written.
In addition to general data, the WD.log trace file contains information about events occurring during operation of the avpsus service, including application module update events.
In addition to general data, the AVPCon.dll.log trace file contains information about events occurring during the operation of the Kaspersky Security Center connectivity module.
Contents of trace files of application plug-ins
Trace files of application plug-ins contain the following information in addition to general data:
- The shellex.dll.log trace file of the plug-in that starts the scan task from the context menu contains information about the execution of the scan task and data required to debug the plug-in.
- The mcou.OUTLOOK.EXE trace file of the Mail Threat Protection plug-in may contain parts of email messages, including email addresses.
Contents of the Authentication Agent trace file
In addition to general data, the Authentication Agent trace file contains information about the operation of Authentication Agent and the actions performed by the user with Authentication Agent.
Page topGlossary
Active key
A key that is currently used by the application.
Additional key
A key that certifies the right to use the application but is not currently being used.
Administration group
A set of devices that share common functions and a set of Kaspersky applications installed on them. Devices are grouped so that they can be managed conveniently as a single unit. A group may include other groups. It is possible to create group policies and group tasks for each installed application in the group.
Administration Server
A component of Kaspersky Security Center that centrally stores information about all Kaspersky applications that are installed within the corporate network. It can also be used to manage these applications.
Anti-virus databases
Databases that contain information about computer security threats known to Kaspersky as of the anti-virus database release date. Anti-virus database signatures help to detect malicious code in scanned objects. Anti-virus databases are created by Kaspersky specialists and updated hourly.
Application modules
Files that are included in the application setup file, which implement the core functionality of the application. A separate executable module corresponds to each type of task performed by the application (Real-time Protection, On-demand Scan, and Update). When starting a full scan of the computer from the main application window, you initiate the module of this task.
Application settings
Application settings that are common to all types of tasks and govern the overall operation of the application, such as application performance settings, report settings, and backup settings.
Archive
One or several files packed into a single compressed file. A specialized application called an archiver is required for packing and unpacking data.
Authentication Agent
Interface that lets you complete authentication to access encrypted hard drives and load the operating system after the bootable hard drive has been encrypted.
Backup
A special storage for backup copies of files that are created before disinfection or deletion is attempted.
Black list of addresses
A list of email addresses from which all incoming messages are blocked by the Kaspersky application, regardless of the message content.
Certificate
Electronic document that contains the private key and information about the key owner and the key scope, and that confirms that the public key belongs to the owner. The certificate must be signed by the certification center that issued it.
Certificate issuer
Certification center that issued the certificate.
Certificate subject
Holder of a private key linked to a certificate. This can be a user, application, any virtual object, computer, or service.
Certificate thumbprint
Information used to identify a certificate key. A thumbprint is created by applying a cryptographic hash function to the value of the key.
Database of malicious web addresses
A list of web addresses whose content may be considered to be dangerous. The list is created by Kaspersky specialists. It is regularly updated and is included in the Kaspersky application distribution kit.
Database of phishing web addresses
A list of web addresses which Kaspersky specialists have determined to be phishing-related. The database is regularly updated and is part of the Kaspersky application distribution kit.
Disinfection
A method of processing infected objects that results in complete or partial recovery of data. Not all infected objects can be disinfected.
Exploits
Program code that uses some kind of vulnerability in the system or software. Exploits are often used to install malware on the computer without the user’s knowledge.
False alarm
A false alarm occurs when the Kaspersky application reports an uninfected file as infected because the signature of the file is similar to that of a virus.
File mask
Representation of a file name and extension by using wildcards.
File masks can contain any characters that are allowed in file names, including wildcards:
- * – Replaces any zero or more characters.
- ? – Replaces any one character.
Note that the file name and extension are always separated by a period.
Heuristic Analysis
The technology was developed for detecting threats that cannot be detected by using the current version of Kaspersky application databases. It detects files that may be infected with an unknown virus or a new variety of a known virus.
Infectable file
A file which, due to its structure or format, can be used by intruders as a "container" to store and spread malicious code. As a rule, these are executable files, with such file extensions as .com, .exe, and .dll. There is a fairly high risk of intrusion of malicious code in such files.
Infected file
A file which contains malicious code (code of known malware has been detected when scanning the file). Kaspersky does not recommend using such files, because they may infect your computer.
License certificate
A document that Kaspersky transfers to the user together with the key file or activation code. It contains information about the license granted to the user.
Network Agent
A Kaspersky Security Center component that enables interaction between the Administration Server and Kaspersky applications that are installed on a specific network node (workstation or server). This component is common for all Kaspersky applications running under Windows. Dedicated versions of Network Agent are intended for applications running under other operating systems.
Network Agent Connector
Application functionality that connects the application with the Network Agent. The Network Agent enables remote administration of the application through Kaspersky Security Center.
Network service
Set of parameters that define network activity. For this network activity, you can create a network rule that regulates the operation of Firewall.
Normalized form of the address of a web resource
The normalized form of the address of a web resource is a textual representation of a web resource address that is obtained through normalization. Normalization is a process whereby the textual representation of a web resource address changes according to specific rules (for example, exclusion of the user login, password, and connection port from the text representation of the web resource address; additionally, the web resource address is changed from uppercase to lowercase characters).
Regarding the operation of protection components, the purpose of normalization of web resource addresses is to avoid scanning website addresses, which may differ in syntax while being physically equivalent, more than once.
Example: Non-normalized form of an address: www.Example.com\. Normalized form of an address: www.example.com. |
OLE object
An attached file or a file that is embedded in another file. Kaspersky applications allow scanning OLE objects for viruses. For example, if you insert a Microsoft Office Excel table into a Microsoft Office Word document, the table is scanned as an OLE object.
Patch
A small addition to the application that fixes bugs discovered during operation of the application, or installs updates.
Phishing
A type of Internet fraud in which email messages are sent with the purpose of stealing confidential data, which is most often financial data.
Portable File Manager
This is an application that provides an interface for working with encrypted files on removable drives when no encryption functionality is available on the computer.
Protection scope
Objects that are constantly being scanned by the Essential Threat Protection component when it is running. The protection scopes of different components have different properties.
Scan scope
Objects that Kaspersky Endpoint Security scans while performing a scan task.
Signature Analysis
A threat detection technology that uses the Kaspersky Endpoint Security databases, which contain descriptions of known threats and methods for eradicating them. Protection that uses signature analysis provides a minimally acceptable level of security. Following the recommendations of Kaspersky's experts, this method is always enabled.
Task
Functions performed by the Kaspersky application as tasks, for example: Real-time File Protection, Full Device Scan, Database Update.
Task settings
Application settings specific to each type of tasks.
Trusted Platform Module
A microchip developed to provide basic functions related to security (for example, for storing encryption keys). A Trusted Platform Module is usually installed on the computer motherboard and interacts with all other system components via the hardware bus.
Update
The procedure of replacing or adding new files (databases or application modules) that are retrieved from Kaspersky update servers.
Page top
Information about third-party code
Information about third-party code is contained in the file legal_notices.txt, in the application installation folder.
Page top
Trademark notices
Registered trademarks and service marks are the property of their respective owners.
Adobe, Acrobat, Flash and Shockwave are the trademarks or registered trademarks of Adobe Systems Incorporated in the USA and / or elsewhere.
FireWire is a trademark of Apple, Inc., registered in the United States and elsewhere.
AutoCAD is a trademark or registered trademark of Autodesk, Inc. and/or its subsidiaries/affiliates in the United States and elsewhere.
The wordmark Bluetooth and its logo are the property of Bluetooth SIG, Inc.
Borland is trademark or registered trademark of Borland Software Corporation in the United States and elsewhere.
Citrix and Citrix Provisioning Services are trademarks of Citrix Systems, Inc. and/or its subsidiaries registered in the patent office of the United States and other countries.
dBase is a trademark of dataBased Intelligence, Inc.
EMC and SecurID are trademarks or registered trademarks of EMC Corporation in the United States and/or elsewhere.
IBM is a trademark of International Business Machines Corporation registered in many jurisdictions throughout the world.
ICQ is a trademark and / or service mark of ICQ LLC.
Intel and Pentium are the trademarks of Intel Corporation registered in the United States and elsewhere.
Logitech is a registered trademark or trademark of the Logitech Company in the US and elsewhere.
Microsoft, Access, BitLocker, Excel, Internet Explorer, LifeCam Cinema, MultiPoint, Outlook, PowerPoint, PowerShell, Visual C++, Visual Basic, Visual FoxPro, Windows, Windows Store and Windows Server are trademarks of Microsoft Corporation registered in the United States and elsewhere.
Mozilla and Thunderbird are the trademarks of the Mozilla Foundation.
Java and JavaScript are registered trademarks of the Oracle Corporation and/or its affiliates.
Page top