Kaspersky Endpoint Security 12.1 for Windows
- Čeština (Česká republika)
- Deutsch
- Español (España)
- Español (México)
- Français
- Italiano
- Magyar (Magyarország)
- Nederlands (Nederland)
- Polski (Polska)
- Português (Brasil)
- Português (Portugal)
- Română (România)
- Tiếng Việt (Việt Nam)
- Türkçe (Türkiye)
- Русский
- العربية (الإمارات العربية المتحدة)
- 한국어 (대한민국)
- 简体中文
- 繁體中文
- 日本語(日本)
- Kaspersky Endpoint Security for Windows Help
- Kaspersky Endpoint Security for Windows
- Installing and removing the application
- Deployment through Kaspersky Security Center
- Installing the application locally using the Wizard
- Remotely installing the application using System Center Configuration Manager
- Description of setup.ini file installation settings
- Change application components
- Upgrading from a previous version of the application
- Remove the application
- Application licensing
- About the End User License Agreement
- About the license
- About the license certificate
- About subscription
- About license key
- About activation code
- About the key file
- Comparison of application functionality depending on license type for workstations
- Comparison of application functionality depending on license type for servers
- Activating the application
- Viewing license information
- Purchasing a license
- Renewing subscription
- Data provision
- Getting started
- About the Kaspersky Endpoint Security for Windows Management Plug-in
- Special considerations when working with different versions of management plug-ins
- Special considerations when using encrypted protocols for interacting with external services
- Application interface
- Getting started
- Managing policies
- Task management
- Configuring local application settings
- Starting and stopping Kaspersky Endpoint Security
- Pausing and resuming computer protection and control
- Creating and using a configuration file
- Restoring the default application settings
- Malware Scan
- Updating databases and application software modules
- Database and application module update scenarios
- Starting and stopping an update task
- Starting an update task under the rights of a different user account
- Selecting the update task run mode
- Adding an update source
- Configuring updates from a shared folder
- Updating application modules
- Using a proxy server for updates
- Last update rollback
- Working with active threats
- Computer protection
- File Threat Protection
- Enabling and disabling File Threat Protection
- Automatic pausing of File Threat Protection
- Changing the action taken on infected files by the File Threat Protection component
- Forming the protection scope of the File Threat Protection component
- Using scan methods
- Using scan technologies in the operation of the File Threat Protection component
- Optimizing file scanning
- Scanning compound files
- Changing the scan mode
- Web Threat Protection
- Mail Threat Protection
- Enabling and disabling Mail Threat Protection
- Changing the action to take on infected email messages
- Forming the protection scope of the Mail Threat Protection component
- Scanning compound files attached to email messages
- Email messages attachment filtering
- Exporting and importing extensions for attachment filtering
- Scanning emails in Microsoft Office Outlook
- Network Threat Protection
- Firewall
- BadUSB Attack Prevention
- AMSI Protection
- Exploit Prevention
- Behavior Detection
- Enabling and disabling Behavior Detection
- Selecting the action to take on detecting malware activity
- Protection of shared folders against external encryption
- Enabling and disabling protection of shared folders against external encryption
- Selecting the action to take on detection of external encryption of shared folders
- Creating an exclusion for protection of shared folders against external encryption
- Configuring addresses of exclusions from protection of shared folders against external encryption
- Exporting and importing a list of exclusions from protection of shared folders against external encryption
- Host Intrusion Prevention
- Remediation Engine
- Kaspersky Security Network
- Encrypted connections scan
- Wipe Data
- File Threat Protection
- Computer control
- Web Control
- Device Control
- Enabling and disabling Device Control
- About access rules
- Editing a device access rule
- Editing a connection bus access rule
- Managing access to mobile devices
- Control of printing
- Control of Wi-Fi connections
- Monitoring usage of removable drives
- Changing the caching duration
- Actions with trusted devices
- Obtaining access to a blocked device
- Editing templates of Device Control messages
- Anti-Bridging
- Adaptive Anomaly Control
- Enabling and disabling Adaptive Anomaly Control
- Enabling and disabling an Adaptive Anomaly Control rule
- Modifying the action taken when an Adaptive Anomaly Control rule is triggered
- Creating an exclusion for an Adaptive Anomaly Control rule
- Exporting and importing exclusions for Adaptive Anomaly Control rules
- Applying updates for Adaptive Anomaly Control rules
- Editing Adaptive Anomaly Control message templates
- Viewing Adaptive Anomaly Control reports
- Application Control
- Application Control functionality limitations
- Receiving information about the applications that are installed on users' computers
- Enabling and disabling Application Control
- Selecting the Application Control mode
- Managing Application Control rules
- Adding a trigger condition for the Application Control rule
- Adding executable files from the Executable files folder to the application category
- Adding event-related executable files to the application category
- Adding an Application Control rule
- Changing the status of an Application Control rule via Kaspersky Security Center
- Exporting and importing Application Control rules
- Viewing events resulting from operation of the Application Control component
- Viewing a report on blocked applications
- Testing Application Control rules
- Application activity monitor
- Rules for creating name masks for files or folders
- Editing Application Control message templates
- Best practices for implementing a list of allowed applications
- Network ports monitoring
- Log Inspection
- File Integrity Monitor
- Password protection
- Trusted zone
- Managing Backup
- Notification service
- Managing reports
- Kaspersky Endpoint Security Self-Defense
- Kaspersky Endpoint Security performance and compatibility with other applications
- Data Encryption
- Encryption functionality limitations
- Changing the length of the encryption key (AES56 / AES256)
- Kaspersky Disk Encryption
- Special features of SSD drive encryption
- Starting Kaspersky Disk Encryption
- Creating a list of hard drives excluded from encryption
- Exporting and importing a list of hard drives excluded from encryption
- Enabling Single Sign-On (SSO) technology
- Managing Authentication Agent accounts
- Using a token and smart card with Authentication Agent
- Hard drive decryption
- Restoring access to a drive protected by Kaspersky Disk Encryption technology
- Signing in with the Authentication Agent service account
- Updating the operating system
- Eliminating errors of encryption functionality update
- Selecting the Authentication Agent tracing level
- Editing Authentication Agent help texts
- Removing leftover objects and data after testing the operation of Authentication Agent
- BitLocker Management
- File Level Encryption on local computer drives
- Encrypting files on local computer drives
- Forming encrypted file access rules for applications
- Encrypting files that are created or modified by specific applications
- Generating a decryption rule
- Decrypting files on local computer drives
- Creating encrypted packages
- Restoring access to encrypted files
- Restoring access to encrypted data after operating system failure
- Editing templates of encrypted file access messages
- Encryption of removable drives
- Viewing data encryption details
- Working with encrypted devices when there is no access to them
- Detection and Response solutions
- KSWS to KES Migration Guide
- Correspondence of KSWS and KES components
- Correspondence of KSWS and KES settings
- Migrating KSWS components
- Migrating KSWS tasks and policies
- Installing KES instead of KSWS
- Migrating the [KSWS+KEA] configuration to [KES+built-in agent] configuration
- Making sure Kaspersky Security for Windows Server was successfully removed
- Activating KES with a KSWS key
- Special considerations for migrating high-load servers
- Example of migration from [KSWS+KEA] to KES
- Managing the application on a Core Mode server
- Managing the application from the command line
- Installing the application
- Activating the application
- Remove the application
- AVP commands
- SCAN. Malware Scan
- UPDATE. Updating databases and application software modules
- ROLLBACK. Last update rollback
- TRACES. Tracing
- START. Start the profile
- STOP. Stopping a profile
- STATUS. Profile status
- STATISTICS. Profile operation statistics
- RESTORE. Restoring files from Backup
- EXPORT. Exporting application settings
- IMPORT. Importing application settings
- ADDKEY. Applying a key file
- LICENSE. Licensing
- RENEW. Purchasing a license
- PBATESTRESET. Reset the disk check results before encrypting the disk
- EXIT. Exit the application
- EXITPOLICY. Disabling policy
- STARTPOLICY. Enabling policy
- DISABLE. Disabling protection
- SPYWARE. Spyware detection
- KSN. Switching between KSN / KPSN
- KESCLI commands
- Scan. Malware Scan
- GetScanState. Scan completion status
- GetLastScanTime. Determining the scan completion time
- GetThreats. Obtaining data on detected threats
- UpdateDefinitions. Updating databases and application software modules
- GetDefinitionState. Determining the update completion time
- EnableRTP. Enabling protection
- GetRealTimeProtectionState. File Threat Protection status
- Version. Identifying the application version
- Detection and Response management commands
- Error codes
- Appendix. Application profiles
- Managing the application through the REST API
- Sources of information about the application
- Contacting Technical Support
- Limitations and warnings
- Glossary
- Active key
- Additional key
- Administration group
- Anti-virus databases
- Archive
- Authentication Agent
- Certificate issuer
- Database of malicious web addresses
- Database of phishing web addresses
- Disinfection
- False alarm
- Infectable file
- Infected file
- IOC
- IOC file
- License certificate
- Mask
- Network Agent
- Normalized form of the address of a web resource
- OLE object
- OpenIOC
- Portable File Manager
- Protection scope
- Scan scope
- Task
- Trusted Platform Module
- Appendices
- Appendix 1. Application settings
- File Threat Protection
- Web Threat Protection
- Mail Threat Protection
- Network Threat Protection
- Firewall
- BadUSB Attack Prevention
- AMSI Protection
- Exploit Prevention
- Behavior Detection
- Host Intrusion Prevention
- Remediation Engine
- Kaspersky Security Network
- Log Inspection
- Web Control
- Device Control
- Application Control
- Adaptive Anomaly Control
- File Integrity Monitor
- Endpoint Sensor
- Kaspersky Sandbox
- Endpoint Detection and Response
- Endpoint Detection and Response (KATA)
- Full Disk Encryption
- File Level Encryption
- Encryption of removable drives
- Templates (data encryption)
- Exclusions
- Application settings
- Reports and storage
- Network settings
- Interface
- Manage Settings
- Updating databases and application software modules
- Appendix 2. Application trust groups
- Appendix 3. File extensions for quick removable drives scan
- Appendix 4. File Types for the Mail Threat Protection attachment filter
- Appendix 5. Network settings for interaction with external services
- Appendix 6. Application events
- Appendix 7. Supported file extensions for Execution prevention
- Appendix 8. Supported script interpreters for Execution prevention
- Appendix 9. IOC scan scope in the registry (RegistryItem)
- Appendix 10. IOC file requirements
- Appendix 1. Application settings
- Information about third-party code
- Trademark notices
Offline mode for granting access
You can grant access to a blocked device in offline mode only if Kaspersky Security Center is deployed in the organization and a policy has been applied to the computer. In the policy settings, in the Device Control section, the Allow request for temporary access check box must be selected.
A user requests access to a blocked device as follows:
- Connect the device to the computer.
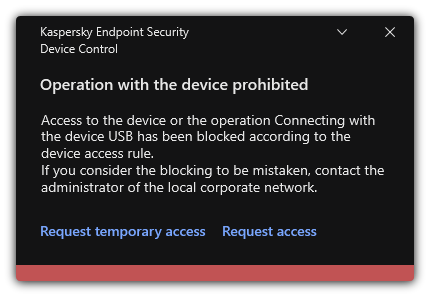
Kaspersky Endpoint Security will show a notification stating that access to the device is blocked (see the figure below).
- Click the Request temporary access link.
This opens a window containing a list of connected devices.
- In the list of connected devices, select the device to which you want to gain access.
- Click Generate request access file.
- In the Access duration field, specify the period of time for which you want to have access to the device.
- Save the file to computer memory.
As a result, a request access file with the *.akey extension will be downloaded to computer memory. Use any available method to send the device request access file to the corporate LAN administrator.
Device Control notification
- Open the Kaspersky Security Center Administration Console.
- In the Managed devices folder of the Administration Console tree, open the folder with the name of the administration group to which the relevant client computer belongs.
- In the workspace, select the Devices tab.
- In the list of client computers, select the computer whose user needs to be granted temporary access to the blocked device.
- In the context menu of the computer, select the Grant access in offline mode item.
- In the window that opens, select the Device Control tab.
- Click the Browse button and download the request access file received from the user.
You will see information about the blocked device to which the user has requested access.
- If necessary, change the value of the Access duration setting.
By default, the Access duration setting takes the value that was indicated by the user when creating the access request file.
- Specify the value of the Activate by setting.
This setting defines the time period during which the user can activate access to the blocked device by using the provided access key.
- Save the access key file to computer memory.
- In the main window of the Web Console, select Devices → Managed devices.
- In the list of client computers, select the computer whose user needs to be granted temporary access to the blocked device.
- Click the ellipsis button (
) above the list of computers and then click the Grant access to the device in offline mode button.
- In the window that opens, select the Device Control section.
- Click the Browse button and download the request access file received from the user.
You will see information about the blocked device to which the user has requested access.
- If necessary, change the value of the Access duration (hours) setting.
By default, the Access duration (hours) setting takes the value that was indicated by the user when creating the access request file.
- Specify the time period during which the access key can be activated on the device.
This setting defines the time period during which the user can activate access to the blocked device by using the provided access key.
- Save the access key file to computer memory.
As a result, the blocked device access key will be downloaded to computer memory. An access key file has the *.acode extension. Use any available method to send the blocked device access key to the user.
The user activates the access key as follows:
- In the main application window, click the
button.
- In the application settings window, select Security Controls → Device Control.
- In the Access request block, click the Request access to device button.
- In the window that opens, click the Activate access key button.
- In the window that opens, select the file with the device access key received from the corporate LAN administrator.
This opens a window containing information about access provision.
- Click OK.
As a result, the user receives access to the device for the time period set by the administrator. The user receives the full set of rights for accessing the device (read and write). When the key expires, access to the device will be blocked. If the user requires permanent access to the device, add the device to the trusted list.