Contents
- About Kaspersky Security for Microsoft Office 365
- What's new
- Quick Start
- Getting started with Kaspersky Security for Microsoft Office 365
- About Kaspersky Business Hub
- Signing up for Kaspersky Security for Microsoft Office 365
- Regranting consent
- Opening Kaspersky Security for Microsoft Office 365 Management Console
- Kaspersky Security for Microsoft Office 365 Management Console interface
- Configuring a connection to Office 365
- Configuring regional and language options
- Configuring integration with SIEM
- Kaspersky Security for Microsoft Office 365 administrators
- Data Discovery
- Protection settings
- Application licensing
- On-demand scan
- Notifications
- Quarantine
- Monitoring
- Support for MSP integrations
- Sources of information about the application and Technical Support
- Reporting detection problems
- Glossary
- Account on Kaspersky Business Hub
- Activating the application
- Activation code
- Anti-spam databases
- Anti-virus databases
- Database of malicious web addresses
- Database of phishing web addresses
- File mask
- Heuristic analyzer
- Kaspersky Business Hub
- Kaspersky Security for Microsoft Office 365 Management Console
- Kaspersky Security Network (KSN)
- License term
- Malicious Links
- Malware
- Mass mail
- Notification
- Office 365 Global Administrator account
- On-demand scan
- Phishing
- Phishing links
- Quarantine
- Real-time scan
- Security policy
- Spam
- Virus
- Workspace
- Leaving feedback
- Information about third-party code
- Trademark notices
About Kaspersky Security for Microsoft Office 365
Kaspersky Security for Microsoft Office 365 is a software solution designed for advanced protection of Exchange Online mailboxes, OneDrive users and SharePoint Online sites that are managed through Office 365. Email messages are scanned for viruses, Trojans, and other types of
that can be transmitted by email, as well as for spam, mass mail, phishing and confidential information. OneDrive and SharePoint Online files (including files uploaded and transmitted via Microsoft Teams) are scanned for malware and confidential information.You do not need to install Kaspersky Security for Microsoft Office 365 on your computer. You only need a browser and Internet access to connect to the Kaspersky Security for Microsoft Office 365 Management Console.
You cannot use Kaspersky Security for Microsoft Office 365 if your Office 365 organization is registered in Microsoft Azure national clouds (also known as sovereign clouds).
Kaspersky Security for Microsoft Office 365 is compliant with the General Data Protection Regulation (GDPR) and applicable European Union laws pertaining to confidential information, personal data, and data protection.
In the U.S. updates functionality (including providing anti-virus signature updates and codebase updates), as well as KSN functionality may not be available in the software.
Key features of Kaspersky Security for Microsoft Office 365
Kaspersky Security for Microsoft Office 365 protects your cloud-oriented enterprise communication and collaboration apps (Microsoft Exchange Online, OneDrive, SharePoint Online and Microsoft Teams) from known and unknown cyberthreats.
Kaspersky Security for Microsoft Office 365 advantages
While Microsoft's default, built-in security controls provide only a basic level of security, Kaspersky Security for Microsoft Office 365 deals with known, unknown and advanced threats, including Business Email Compromise (BEC) - one of the most financially damaging online crimes aiming at commercial, government and non-profit organizations. Kaspersky Security for Microsoft Office 365 uses the following emerging technologies to protect cloud-oriented enterprises from ransomware, malicious attachments, spam, phishing, and other threats:
- A signature-based protection using machine learning (AutoPhiT) along with advanced heuristic and behavioural analysis.
- A combination of SPF (Sender Policy Framework), DKIM (DomainKeys Identified Mail), DMARC (Domain-based Message Authentication Reporting and Conformance) email validation, and lookalike detection method is used to detect and prevent email spoofing and phishing, BEC attacks and spam.
- Deep Quarantine - heuristics activity is improved using deep learning neural networks.
- Protection from mailsploit/ghost spoofing and code injection attacks that become possible due to mail clients bugs.
- IP reputation - a better way to detect spam on the IP level.
- Data Discovery - sharing of confidential text or image data stored and transmitted within and beyond your organization is traced, so you can consider actions to prevent the possible leakage.
Kaspersky Security for Microsoft Office 365 special features
Kaspersky Security for Microsoft Office 365 has the following special features available while protecting the Microsoft Office 365 services:
- Microsoft Exchange Online
Your incoming and outgoing email messages are automatically scanned for viruses, Trojans, and other types of malware and ransomware that can be transmitted by email. Your organization is protected from unsolicited mail (spam), mass mail, list linking, phishing, spoofing, conversation hijacking and BEC attacks. Nevertheless, you can configure your own allowlists for safe senders and use the denylist option for known unwanted addresses. You can effectively filter unnecessary attachments in the email messages using specific criteria. At that, on-demand scan is also available, and you should use it right after you migrate to Kaspersky Security for Microsoft Office 365 — this feature eliminates targeted email threats that your mailboxes might have been exposed to even before Kaspersky Security for Microsoft Office 365 was activated.
- Microsoft OneDrive
Multilayered threat detection ensures protection of your OneDrive files from viruses, worms, Trojans, ransomware and other malware by means of a configurable security policy.
- Microsoft SharePoint Online
You can configure advanced scanning of your SharePoint Online sites for infected files.
- Microsoft Teams
Files transmitted via Microsoft Teams are scanned for malware according to the protection settings configured for your OneDrive and SharePoint Online services.
Kaspersky Security for Microsoft Office 365 common features
Kaspersky Security for Microsoft Office 365 has the following common features available while protecting the Microsoft Office 365 services mentioned above:
- Viewing the statistics
You can view the application current state and detection statistics by means of an accessible dashboard including daily charts and diagrams in the browser window.
- Management
Manage the application settings in Kaspersky Security for Microsoft Office 365 through the Management Console. Choose what and how to protect. Use pre-configured security policies or configure the security levels individually.
- Quarantine
Infected messages and files are moved by Kaspersky Security for Microsoft Office 365 to Quarantine to prevent infection. Kaspersky Security for Microsoft Office 365 provides a common view for items located in Kaspersky Security for Microsoft Office 365 Quarantine and Exchange Online Quarantine, thus allowing you to review all the detections made by Kaspersky Security for Microsoft Office 365 and default Microsoft security. At that, you can locate, download or release selected items if necessary.
- Reporting
You can generate scheduled reports on the detections made by Kaspersky Security for Microsoft Office 365 during certain periods. At that, Kaspersky Security for Microsoft Office 365 provides timely notifications about detections of files and messages that contain malicious objects.
Kaspersky Security for Microsoft Office 365 licensing
Kaspersky Security for Microsoft Office 365 provides trial and commercial licensing:
- Try it for free
When you create your account on Kaspersky Business Hub portal, you are given a trial license that allows you to protect 1000 Exchange Online mailboxes and 1000 OneDrive users for 30 days.
- Purchase a commercial license
The price of a commercial Kaspersky Security for Microsoft Office 365 license depends on the number of protected objects only. For example, if you have an organization that comprises 100 licensed Office 365 mailboxes and 80 OneDrive users, you should buy a license for 100 mailboxes. At that, resource mailboxes, room mailboxes, and shared mailboxes without an Office 365 license do not require a Kaspersky Security for Microsoft Office 365 license. The number of protected SharePoint Online sites is not limited by the license.
Kaspersky Security for Microsoft Office 365 provides two types of commercial licenses:
- Annual license – for 1, 2 or 3 years.
- Subscription license – a monthly license, which provides a possibility to change the number of protected objects flexibly at any moment of license term.
MSP support
Kaspersky Security for Microsoft Office 365 offers great opportunities for management service providers: you can easily manage numbers of clients via single account using Kaspersky Business Hub portal where you can manage your company workspaces for Kaspersky software solutions.
In the U.S. updates functionality (including providing anti-virus signature updates and codebase updates), as well as KSN functionality may not be available in the software.
Page top
Hardware and software requirements
Kaspersky Security for Microsoft Office 365 is compatible with the Office 365 service plans that include Exchange Online, SharePoint or OneDrive and the standalone plans of these applications.
You only need a browser and Internet access to manage Kaspersky Security for Microsoft Office 365. The hardware and software requirements for a computer or mobile device correspond to those of the browser that is used to manage Kaspersky Security for Microsoft Office 365.
Kaspersky Security for Microsoft Office 365 supports the following browsers:
- Google Chrome 78 and later
- Firefox 69 and later
- Microsoft Edge 80 and later
- Safari 12 and later
About data provision
Kaspersky Security for Microsoft Office 365 protects Exchange Online mailboxes, OneDrive users and SharePoint Online sites managed through Office 365. To use the full functionality of Kaspersky Security for Microsoft Office 365, you must create a user account on the website of the Right Owner (Kaspersky). You can use an existing Kaspersky Business Hub account or create a new one by providing your email address, company name, and a password.
Kaspersky processes and uses this information only to ensure the functionality of Kaspersky Security for Microsoft Office 365, unless you agree to use the information for other purposes (for example, to receive a news feed about Kaspersky products and services to your email address).
By creating a user account and connecting the application to Office 365, you confirm that you are the sole owner of any data you provide and that you are entitled to provide such data.
Any information provided is protected and processed in accordance with the Kaspersky Privacy Policy.
Kaspersky Security for Microsoft Office 365 may receive, store, and process the types of data that is described below for the purpose of protecting Exchange Online mailboxes, OneDrive users and SharePoint Online sites.
The data may migrate between Kaspersky Security for Microsoft Office 365 servers within the same data center during technical maintenance or to ensure correct load balancing. Metadata of quarantined items is stored in the same data center. You select the data center when you create a workspace on Kaspersky Business Hub for your company.
Kaspersky protects any information received in this way as prescribed by law and the applicable rules of Kaspersky. Data are transmitted over encrypted communication channels.
The data that is used for protecting Exchange Online mailboxes:
- A list of all mailboxes and a list of user display names of the protected Office 365 organization used to promptly connect to Exchange Online after Kaspersky Security for Microsoft Office 365 is restarted.
- Email messages and appointments, message attachments, and X-headers.
The application receives these items for scanning and processes them according to the protection settings. Email messages and items are not stored in the Kaspersky Security for Microsoft Office 365 infrastructure.
- The metadata of email messages (sender, recipient, subject, primary SMTP address of the related mailbox).
- The email address specified during registration and the corresponding IP-address.
This information is required to ensure correct application event logging. The registration email address is also used to notify the administrators about application events.
- Application settings configured by the Administrator in the Management Console.
- The email address specified for a new administrator of the application.
- Tenant ID for Office 365 organization.
- The flag indicating that mailbox has Exchange Online license.
- Email addresses excluded from scanning.
- Email addresses specified in notification settings.
- Statistics on application operations on email messages (senders, recipients, subjects and scan results).
- Names of Active Directory groups, IDs of the groups, and information about group membership.
- A list of Office 365 plans for users.
The data that is used for protecting OneDrive users:
- A list of all users who are OneDrive owners.
- Files that are stored on OneDrive of the protected user, and their complete metadata. The Product receives these files for scanning and processes them according to the protection settings. OneDrive files are not stored in the Kaspersky Security for Microsoft Office 365 infrastructure.
- OneDrive file name and path.
- Display name of OneDrive user.
- Display name of the user, application or device that modified OneDrive file.
- List of OneDrive file versions.
- Drive identifier from OneDrive and its SharePoint identifiers: ListID, SiteID, SiteURL, WebID.
- All SharePoint lists for the site that contains the scanned drive.
- Notifications about OneDrive file creation, modification or deletion with file attributes and performed actions.
- The email address specified during registration and the corresponding IP-address.
This information is required to ensure correct application event logging. The registration email address is also used to notify the administrators about application events.
- Application settings configured by the Administrator in the Management Console.
- The email address specified for a new administrator of the application.
- Tenant ID for Office 365 organization.
- Email addresses specified in notification settings.
- Statistics on application operations on OneDrive files (users display names, file names and scan results).
- Names of Active Directory groups, IDs of the groups, and information about group membership.
- A list of Office 365 plans for users.
The data that is used for protecting SharePoint Online sites:
- A list of all SharePoint Online sites under control of the User.
- All SharePoint lists.
- Files that are stored on protected SharePoint Online sites and their complete metadata. The Product receives these files for scanning and processes them according to the protection settings. Files stored on SharePoint Online sites are not stored in the Kaspersky Security for Microsoft Office 365 infrastructure.
- Name and path to file stored on SharePoint Online site.
- Display name of the user, application or device that modified file stored on SharePoint Online site.
- List of versions of file stored on SharePoint Online site.
- Drive identifier from OneDrive and its SharePoint identifiers: ListID, SiteID, SiteURL, WebID.
- Notifications about creation, modification or deletion of file stored on SharePoint Online site with file attributes and performed actions.
- The email address specified during registration and the corresponding IP address.
- Product settings available at Portal.
- The email address specified for a new administrator of the Product.
- Tenant ID for Office 365 organization.
- Email addresses specified in notification settings.
- Statistics of Product operations on files stored on SharePoint Online sites (users display names, site names, file names and scan results).
Kaspersky will retain the above-listed data in restricted mode for the specified duration following the license expiration or termination so that you can extract the data related to your Office 365 organization from its databases.
The above-listed data has the following retention period:
- 31 days after expiration of the trial license, if no commercial license has been assigned to the application.
- 181 days after expiration of the commercial license, if it has not been renewed.
Exceptions to this rule are the following types of data:
- Quarantine-related data. The retention period for messages and files moved to Quarantine is 30 days.
- Statistics on application operations. The retention period for statistical data is 92 days.
After the retention period is over, all the data described above are removed from application databases.
Kaspersky Security for Microsoft Office 365 uses Kaspersky Security Network to improve detection of new threats and their sources. The following data will be processed by Kaspersky on a regular basis to protect Exchange Online mailboxes, OneDrive users and SharePoint Online sites from known threats to information security:
- IP address belonging to the sender of the scanned message.
- Checksums (MD5, SHA2-256, SHA1) of the scanned object.
- Web address for which the reputation is being requested.
- Top-level domain names used in web addresses in the scanned messages.
- Checksum (MD5) of the names of files attached to the message.
- Number of IP addresses (v4 and v6) in the message header and a flag indicating the address belonging to the local or external network.
- Irreversible hash function of domain names in the header of the scanned message.
- Message scan result and spam rating.
- Checksum (MD5) of the scanned message sender's email address.
- Web addresses from scanned messages with deleted passwords.
- Checksums (MD5) of graphic objects included in the message.
- Short text signatures composed of message text used for filtering known spam mailings, and application decisions about them (only irreversible text digests that cannot be used to recover the original text are processed; the text itself is not transmitted to Kaspersky).
- IP addresses of the message sender and intermediate mail servers, sender's mail client version, message ID, information about the completion of message fields, the checksum (CRC32) of message fragments defined by markup language, sender domain names taken from the SMTP session and MIME-header, checksums (CRC23) of the sender name taken from the SMTP-session and MIME-header, checksums (CRC32) of the sender's name and domain taken from the SMTP session.
- Lexical diversity coefficient: a measurable parameter of a set-length text showing vocabulary wealth. It is calculated as a ratio of the number of certain lemmas and the number of their appearance in the text.
- Average sentence length.
- Average word length.
- Number of commas.
- Number of semicolons.
- Number of quotes.
- Number of exclamation marks.
- Number of question marks.
- Number of line breaks.
- Number of brackets.
- Font.
- Number of links.
- Message time.
- Presence of certain words and the frequency of their usage.
- Web address that was detected by the Anti-Phishing module as relevant to phishing.
- Numerical identifiers of companies with well-known brands that are often used to add credibility to phishing messages and are detected in the scanned email message.
- Numerical values of trust level and weight for phishing detection calculated by the Anti-Phishing module. Status of phishing detection with category of phishing determined by Anti-Phishing module.
- Unique identifier, which indicates that web addresses were detected in the text of the same scanned email message.
- The first IP address from the "Received" message headers that is not reserved for local networks.
The following data will be processed by Kaspersky on a regular basis to ensure uninterrupted operation of the application:
- Message size.
- Scanned object size and type.
- Message subject.
- Message ID.
- Exchange Web Services (EWS) object ID.
- Anonymized mailbox name and anonymized primary SMTP address.
- Name of Office 365 organization.
- Message timestamp.
- Anonymized message sender.
- Anonymized message recipients.
- Message scan result.
- IP address and anonymized email address of the Administrator who modified application settings.
- The list of settings that have been modified, without indicating the actual parameter values.
- Kaspersky Security for Microsoft Office 365 organization ID, date of organization setup, IP address of the computer used to set up the organization.
- License type: trial / commercial / commercial (subscription) / NFR.
- Number of detections with the following statuses assigned: Clean / Infected / Spam / Mass mail / Phishing /Attachment filtering.
- Number of objects in Kaspersky Security for Microsoft Office 365 Quarantine and Exchange Online Quarantine.
- Total number of mailboxes in the organization, number of mailboxes covered by the license, and number of mailboxes selected for protection.
- Anonymized display name of OneDrive user.
- Anonymized display name of the user that modified the file on OneDrive.
- Display name of the application or device that modified the file on OneDrive.
- OneDrive file ID, name and path.
- The checksum of the OneDrive file.
- Date and time of OneDrive file creation or modification.
- OneDrive file size.
- OneDrive file scan result.
- Total number of OneDrive users in the organization, number of OneDrive users covered by the license, number of OneDrive users selected for protection.
- Total number and the list of all SharePoint Online sites in the organization, number and list of SharePoint Online sites selected for protection, number of SharePoint Online sites covered by the license.
- All SharePoint lists.
- Anonymized display name of the user that uploaded or modified the file on the SharePoint Online site.
- Display name of the application or device that modified the file stored on the SharePoint Online site.
- The checksum of the file stored on the SharePoint Online site.
- Creation or modification date and time of the file stored on the SharePoint Online site.
- ID, name, and path to the file stored on the SharePoint Online site.
- The list of versions of the file stored on the SharePoint Online site.
- Size of the file stored on the SharePoint Online site.
- Scan result of the file stored on the SharePoint Online site.
In addition to logging the application activity, Kaspersky tracks changes in the application configuration. These details are recorded in the audit log. The audit log files contain the details on the following actions and procedures:
- Connecting the application to your Office 365 organization.
- Managing the Service Account.
- Specifying the protection scope.
- Modifying the protection and notification settings.
- Managing quarantined items.
- Managing licenses.
The audit log retention period is 180 days.
All the data specified above can also be used to offer the users security solutions that best match their needs.
Upon your request, Kaspersky can extract any data related to your Office 365 organization from Kaspersky databases and submit them for your revision. If necessary, this data can also be deleted from the Kaspersky infrastructure. The service period for such requests is 1 calendar month. However, please note that an automatic retention period of 14 days is set for the following types of data:
- Application activity logs and dump files.
- SQL database backup.
Please note that the backed up messages and files are stored not on Kaspersky servers but in the hidden folders of the corresponding mailboxes in your Exchange Online infrastructure and the corresponding folders in your OneDrive storage. If you do not want to store the quarantined items any longer, remove them manually.
Kaspersky reserves the right to use received data to generate reports on information security risks.
All the data specified above can also be used for considering possibilities of basic services extension.
Page top
Additional processors of personal data
The data provided by Kaspersky Security for Microsoft Office 365 users is additionally processed by the following services and software solutions:
Additional data processors
Organization name and address |
Service |
|---|---|
Microsoft Ireland Operations Limited One Microsoft Place South County Business Park, Leopardstown, Dublin 18, D18 P521 |
MS Azure (data hosting) |
What's new
This section contains information about the new features and improvements in each update of Kaspersky Security for Microsoft Office 365.
Update 20.07.2024
The following changes have been introduced:
- You can now trace Argentinian personally identifiable information stored and transmitted within and beyond your organization by means of the Data Discovery module.
Update 06.06.2024
The following changes have been introduced:
- The rights granted for Administrator and Quarantine administrator are now clearly specified: the users with administrator rights in Kaspersky Security for Microsoft Office 365 now acquire Kaspersky Business Hub administrator rights within an organization, while Quarantine administrator does not have access to Kaspersky Next Pro view and KES Cloud, but has a view-only access to settings and manages Kaspersky Security for Microsoft Office 365 Quarantine and reports activities.
- Integration with a SIEM system can now be configured via the user interface. Integration provides for sending threat detection events from Kaspersky Security for Microsoft Office 365 to Splunk Enterprise.
Update 15.01.2024
The following changes have been introduced:
- You can now trace Chilean personally identifiable information stored and transmitted within and beyond your organization by means of the Data Discovery module.
Update 10.10.2023
The following changes have been introduced:
- You can now trace Colombian and Mexican personally identifiable information stored and transmitted within and beyond your organization by means of the Data Discovery module.
Update 29.06.2023
The following changes have been introduced:
- You can now trace Brazilian and Portuguese personally identifiable information stored and transmitted within and beyond your organization by means of the Data Discovery module.
- You can now leave feedback on Kaspersky Security for Microsoft Office 365 operation on any page of Management Console.
Update 20.02.2023
The following changes have been introduced:
- You can prevent receiving password-protected files attached to email messages by configuring the application to delete such messages and files. This option is now available within the Attachment filtering module in the Exchange Online security policy.
- We significantly improved detection of spoofing, conversation hijacking and BEC attacks within the Anti-Phishing module. Such attacks are now prevented in both recommended and enhanced anti-phishing modes.
Update 07.10.2022
The following changes have been introduced:
- If you consider messages containing business offers unwanted, you can now treat them as mass mail and configure the application to automatically move such messages to Junk Email folder. This option is available within the Mass Mail Prevention module.
- With the new Spanish PII category of the Data Discovery module, you can trace Spanish personally identifiable information (e.g. identity card, passport, etc.) stored and transmitted within and beyond your organization.
Update 24.08.2022
In the new version, access to Exchange Online Quarantine is carried out by granting Kaspersky Security for Microsoft Office 365 a general consent to access all your Office 365 services. If you have already granted Kaspersky Security for Microsoft Office 365 a general consent to access your Office 365 services before, access to Exchange Online Quarantine will be granted automatically. If you granted only separate consents to access your Office 365 services, these services remain protected, but Exchange Online Quarantine items are not displayed in your Office 365 Quarantine, while they are available in the Exchange Online web console. When you grant Kaspersky Security for Microsoft Office 365 a general consent to access all your Office 365 services and Exchange Online Quarantine, it will operate on a full scale.
Update 14.07.2022
The following changes have been introduced:
- A new role of the application administrator with limited rights is available. You can assign a Quarantine administrator role to a user that will be able to manage Kaspersky Security for Microsoft Office 365 Quarantine and reports activities only.
- With the new UK PII category of the Data Discovery module, you can trace UK personally identifiable information (e.g. driving license, passport, etc.) stored and transmitted within and beyond your organization.
- Within the Mass Mail Prevention module, a specialized option aimed to block list linking attacks is available. This type of attacks is recognized by large number of unwanted registration confirmation messages.
Update 06.06.2022
In the new version, you can trace French personally identifiable information stored and transmitted within and beyond your organization by means of the Data Discovery module.
Update 10.02.2022
The following changes have been introduced:
- The Data Discovery module can now trace Italian and USA personally identifiable information stored and transmitted within and beyond your organization. We also extended the drill-down of Data Discovery detections list: now you can check on the exact types of the detected personally identifiable information.
- The Quarantine items viewing is improved: we added indication for released items and implemented previewing of quarantined messages.
Update 18.11.2021
The following changes have been introduced:
- The Data Discovery module can now detect confidential data in images stored and transmitted within and beyond your organization.
- We elaborated the information panel contents for more convenience.
Update 30.06.2021
We implemented a possibility of automatic notification delivery when the Data Discovery module detects a potential data breach.
Update 24.05.2021
The following changes have been introduced:
- We implemented the Data Discovery module, which detects any confidential data (credit cards and German personally identifiable information: identity cards, driver licenses, passports, residence permits, social security and taxpayer info) stored and transmitted within and beyond your organization. Kaspersky Security for Microsoft Office 365 will scan your Exchange Online mailboxes, OneDrive files, and SharePoint Online sites in order to detect any potential data breaches and prevent them.
- You can now grant Kaspersky Security for Microsoft Office 365 a limited access to all your Office 365 services at once and in one place.
Update 03.03.2021
The following changes have been introduced:
- The application interface was redesigned for faster display of long lists.
- We significantly reworked the application infrastructure to support large Office 365 organizations.
Update 14.01.2021
The following changes have been introduced:
- We elaborated the application interface so you can fill the allowlist and the denylist using previously formed lists of email addresses and masks.
- The free trial term of the application is reduced back to thirty days. This update will affect new users only.
Update 25.12.2020
Implemented the Denylist module that allows blocking of incoming email messages from known unwanted senders.
Update 10.12.2020
The following changes have been introduced:
- Implemented a feature that allows permanent deletion of the email messages with detected malware, spam and phishing: deleted messages cannot be recovered.
- Implemented an enforced anti-phishing mode that provides supplementary detection of unclear content similar to phishing.
Update 25.11.2020
The following changes have been introduced:
- Implemented a feature that allows scanning of incoming and outgoing messages from internal addresses for spam.
- You can now export the list of all quarantined items to a comma-separated values (CSV) file for further analysis.
Update 24.11.2020
You can now view the current Microsoft Teams protection status on the information panel.
Update 22.05.2020
If your users still receive spam and phishing email messages, you can help us detect those better. We added a special technology, which would pick samples of messages from the Junk Email folder and send them to us for analysis. If you want to improve your protection from spam and phishing, please contact Technical Support and ask to enable this feature for you.
Please don't forget to inform your users to move probable spam and phishing messages to the Junk Email folder.
Update 30.04.2020
Implemented a feature that makes possible to allow emails regardless of Sender Policy Framework (SPF) check results.
Update 24.03.2020
The following changes have been introduced:
- To help companies ensure the security of remote working and collaboration, Kaspersky has extended the product's free trial version to six months.
- The Backup section of the Management Console has been renamed to Quarantine to avoid misinterpretation of the functionality.
Update 21.02.2020
Some email messages require additional checks for spam, phishing, and spoofing. Such messages are now temporarily moved to the Quarantine storage until the checks are over. If the messages are considered as clean, they are automatically released to their original folders.
Update 15.01.2020
The following functionalities and improvements have been implemented:
- The information panel has been redesigned: you can now view the license status and operational details for your services on separate tiles.
- You can also view SharePoint Online (Sneak-peek) detection statistics on the information panel.
- Additionally, you can generate reports to view detailed SharePoint Online (Sneak-peek) detection statistics.
Update 18.12.2019
SharePoint Online support (Sneak-peek) is added:
- You can connect to your SharePoint Online by granting an access delegation consent for Kaspersky Security for Microsoft Office 365 application.
- You can select specific SharePoint Online sites for protection or protect all your sites.
- Files uploaded to the protected SharePoint Online sites are scanned by multilayered threat detection engine.
- Infected files deleted during the scan are moved to the Quarantine storage.
Update 22.09.2019
You can now view the current license information for protected OneDrive users in the License section of the Management Console interface.
Update 01.08.2019
The following functionalities have been implemented for OneDrive support (Sneak-peek):
- Detection statistics display on the information panel.
- Reports generation.
Update 07.04.2019
OneDrive support (Sneak-peek) is added:
- Multilayered threat detection on file uploads in OneDrive.
- Selection of OneDrive users for protection.
- Deleted files are stored in Quarantine.
- Consent for OneDrive is separate from Exchange Online and is implemented via OAuth 2.0.
Update 04.04.2019
The Protection section has been redesigned.
Update 21.03.2019
You can now connect Kaspersky Security for Microsoft Office 365 to your Exchange Online by using the OAuth 2.0 authentication method. The legacy (basic) authentication is no longer required.
You can now separately configure a connection to your Exchange Online and a Service Account that is required for accessing messages from Exchange Online Quarantine. This helps minimize the set of privileges granted to Kaspersky Security for Microsoft Office 365 in accordance with your needs.
Update 29.01.2019
The Kaspersky Security for Microsoft Office 365 Management Console user interface has been redesigned. The new design is consistent with the user interface of Kaspersky Endpoint Security Cloud and Kaspersky Business Hub.
Notifications that are sent to Kaspersky Security for Microsoft Office 365 administrators as a result of an Anti-Malware scan or Attachment Filtering can now include the list of detected files. Default notifications include the %DETECTED_FILES% variable. You can also use this variable when configuring custom notifications.
Update 21.01.2019
Anti-Spoofing functionality (protection against attacks that use false source IP addresses) has been improved.
Update 10.01.2019
Anti-Spam functionality has been improved.
Update 05.12.2018
You can now configure message sender exclusions from anti-phishing checks.
Update 15.11.2018
You can now manage Kaspersky Security for Microsoft Office 365 administrators (grant and revoke administrator rights) through the Kaspersky Security for Microsoft Office 365 Management Console.
The exact time of license expiration has been added.
Update 31.10.2018
Security policies have been added to provide flexible protection against malware and phishing and to filter spam, mass mail, and attachments from mailboxes.
The security policies inspect messages in mailboxes to detect violations. Security policies are applied to selected users or user groups. Depending on the conditions that are specified for each policy violation, Kaspersky Security for Microsoft Office 365 will take a certain action or send a notification.
Kaspersky Security for Microsoft Office 365 has the default security policy for company-wide mailbox protection. You can also configure custom security policies for specific users and groups.
Update 18.10.2018
Kaspersky Security for Microsoft Office 365 now supports integration with solutions for managed service providers, also known as MSPs. The integration allows service providers to perform the monitoring and billing of Kaspersky Security for Microsoft Office 365 in the same MSP solution that is used for other services.
Update 06.09.2018
The performance of Kaspersky Security for Microsoft Office 365 has been improved.
Update 23.08.2018
You can now include not only selected mailboxes but also entire user groups in the protection scope. Mailboxes and user groups that do not need to be scanned can now be excluded from the protection scope.
Update 30.07.2018
The usage scenario for the trial version has been improved. You can now try out the application features with an increased number of mailboxes included in the protection scope. In trial mode, it is recommended to protect no more than 1000 mailboxes at the same time. Kaspersky reserves the right to change the trial license restrictions without notice.
Update 17.07.2018
Customized notifications informing mailbox owners of deleted messages have been added. If a message is deleted from a mailbox as a result of Anti-Malware scan, Anti-Phishing scan, or Attachment Filtering, the application can inform the user owning this mailbox. You can use the default notification template that includes detailed information about the deleted message or configure your own notification template.
Customized file replacement templates have been added. If an attached file is removed from a message as a result of Anti-Malware scan or Attachment Filtering, it is replaced with a text file containing the corresponding information message. You can now edit the text of this message and adapt it to comply with the requirements of your corporate security policy. In your custom template, you can keep using the variables included in the default template to provide the user with detailed information about the deleted attachments.
Update 28.06.2018
You can now initiate an on-demand malware scan of email messages and other email objects that have been registered in specific mailboxes within a specific period of time. This feature can be used to double-check that the mailboxes contain no viruses or other malicious objects, or to scan mailboxes that were previously not protected by Kaspersky Security for Microsoft Office 365.
Update 25.05.2018
You can now choose to delete infected attachments or attachments matching the filtering criteria instead of deleting the entire message. In this case, the removed attachment is replaced with a text file that informs the user about the action taken by the application.
Kaspersky Security for Microsoft Office 365 is now compliant with the General Data Protection Regulation (GDPR) and applicable European Union laws on confidential information, personal data, and data protection.
Update 29.03.2018
You can now do the following:
- Use Kaspersky Business Hub to purchase licenses for Kaspersky Security for Microsoft Office 365.
- Use Kaspersky Business Hub to delete a workspace.
- Configure exclusions from Anti-Spam scan.
- Specify the email addresses of concerned users to be notified about detected threats, phishing or malicious links, and/or filtered attachments.
As compared to the previous update, the application is also available in the Spanish and Portuguese languages.
Update 01.02.2018
The first version of Kaspersky Security for Microsoft Office 365 has been released.
Kaspersky Security for Microsoft Office 365 is a software solution designed for the protection of mailboxes managed through Microsoft Office 365. Email messages are scanned for viruses, Trojans, and other types of malware that can be transmitted by email, as well as for spam and phishing.
Kaspersky Security for Microsoft Office 365 provides Anti-Virus functionality, Anti-Phishing functionality, Anti-Spam functionality, and Attachment filtering.
Kaspersky Security for Microsoft Office 365 can perform the following operations:
- Scan incoming and outgoing mail for malware.
- Filter unsolicited mail (spam) from user mailboxes.
- Scan email messages for phishing and malicious links.
- Filter attachments in email messages.
- Move messages to Quarantine to prevent the risk of data loss.
- Notify the system administrator about messages that contain malicious objects and/or filtered attachments.
- Display statistics on application activity.
As compared to the previous version, the application is also available in the German and French languages.
Beta version 02.10.2017
The application is available for a limited number of users and in the English language only.
Page top
Quick Start
Read this section to get going with Kaspersky Security for Microsoft Office 365. The section contains tips about starting protection of your Office 365 services.
After you perform the quick start scenario, your Office 365 services will become protected. The quick start scenario contains the following steps:
- Creating an account
To start using Kaspersky Security for Microsoft Office 365, you need to create an account on the Kaspersky Business Hub portal.
- Creating a workspace
After you have created the account, create your first workspace.
It is of critical importance that you create a separate workspace for each company with a separate Office 365 organization. It is not possible to connect different Office 365 organizations to the same workspace.
- Connecting to your Office 365 services
After you have created a company workspace, you are redirected to Kaspersky Security for Microsoft Office 365 Management Console where you must connect your workspace to your Office 365 organization.
Go to the Getting started tab of the Information panel section and grant limited access to your Office 365 organization in order to protect your Office 365 services.
- Managing protection
After you have established connection to your Office 365 services, you must enable and configure the protection for these services.
Go to the Protection settings section and apply default security policies to provide company-wide protection for your Exchange Online mailboxes, OneDrive files, or SharePoint Online sites.
- Activating the application
After you have enabled and configured protection for your Office 365 services, it is recommended to activate the commercial license to ensure the application's uninterrupted operation.
You can activate the application in the License section.
If you experience any issues while working with the application, you can find a solution in other sources of information or contact Technical Support.
Page top
Getting started with Kaspersky Security for Microsoft Office 365
This section describes how to sign up for Kaspersky Business Hub and start using Kaspersky Security for Microsoft Office 365.
Additional actions that you can perform in Kaspersky Business Hub are described in Help for Kaspersky Business Hub.
About Kaspersky Business Hub
Kaspersky Business Hub is a portal where you can manage company
for the following Kaspersky software solutions:- Kaspersky Endpoint Security Cloud
- Kaspersky Security for Microsoft Office 365
Using Kaspersky Business Hub, you can do the following:
- Create an account.
- Edit an account.
- Create a company workspace for a supported Kaspersky software solution.
- Purchase and renew a license for a supported Kaspersky software solution.
- Edit information about companies.
- Take a demo training on malicious software.
- Leave feedback about the training.
- Leave feedback about the supported Kaspersky software solutions.
- Delete a company workspace.
- Delete an account.
Signing up for Kaspersky Security for Microsoft Office 365
Signing up for Kaspersky Security for Microsoft Office 365 consists of the following steps:
- Creating and confirming an account in Kaspersky Business Hub.
- Creating a Kaspersky Security for Microsoft Office 365 company workspace in Kaspersky Business Hub.
Creating an account
This article describes how to create an
.As an alternative, you can create an account on My Kaspersky, and then use it to sign in to Kaspersky Business Hub and create your workspace.
Your My Kaspersky account must be created directly on the website and not by using an external authentication provider (like Google). Otherwise, you will not be able to use Kaspersky Business Hub.
To create an account in Kaspersky Business Hub:
- In your browser, go to Kaspersky Business Hub.
- Click the Create an account button on the start page of Kaspersky Business Hub.
The Kaspersky Account portal opens.
- On the Sign up to enter Kaspersky Business Hub page, enter the email address and password for your account (see the figure below).
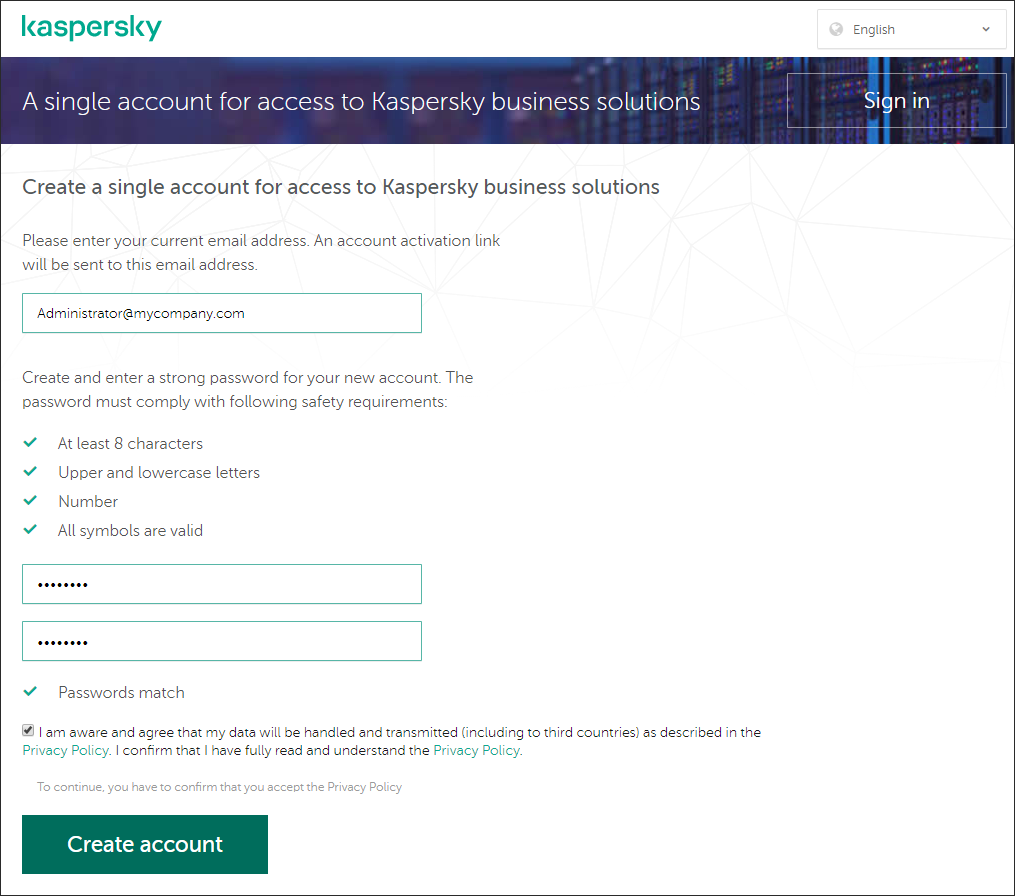
Creating an account in Kaspersky Business Hub
- Click the Privacy Policy link and carefully read the Privacy Policy text.
- If you are aware and agree that your data will be handled and transmitted (including to third countries) as described in the Privacy Policy and you confirm that you have fully read and understand the Privacy Policy, select the check box next to the text of consent to data processing in accordance with the Privacy Policy, and then click the Create button.
If you do not accept the Privacy Policy, do not use Kaspersky Business Hub.
- A message from Kaspersky is sent to the email address that you specified. The message contains a one-time security code.
Open the email message in your mailbox, and then copy the one-time security code that it contains.
- Return to Kaspersky Account, and then paste the copied code to the entry field.
Creation of the account in Kaspersky Business Hub is complete.
Page top
Creating a company workspace
Immediately after the account is created, you can create a company workspace for Kaspersky Security for Microsoft Office 365 on Kaspersky Business Hub.
Before you start, make sure that you know the following:
- The name of the company in which you intend to use the software solution.
- The country in which the company is located. If the company is located in Canada, you must also know the province.
To create a company workspace on Kaspersky Business Hub:
- In your browser, go to Kaspersky Business Hub.
- Click the Sign in button on the start page of Kaspersky Business Hub.
- Enter the email address and password that you specified when you created the account, and then click the Sign in button.
The portal displays a page prompting you to accept the Terms of Use of Kaspersky Business Hub.
- Carefully read the Terms of Use of Kaspersky Business Hub.
- If you accept the Terms of Use, select the check box under the text of the Terms of Use, and then click the I accept the terms button.
If you do not accept the Terms of Use, do not use Kaspersky Business Hub.
If you click the I decline button, you will not be able to continue working with Kaspersky Business Hub and use the software solutions accessible on it.
After you click the I accept the terms button, the country selection page is displayed.
- Do any of the following:
- Select a country from the drop-down list, and then click the Confirm button.
This information is optional. It is requested only once. The information is required to display license prices in the correct currency. If you do not specify a country, license prices will be displayed in the default currency. You can change the country by contacting Technical Support.
- If you prefer not to specify a country, click the Skip button.
The Create a Workspace Wizard starts. Proceed through the Wizard by using the Next button.
- Select a country from the drop-down list, and then click the Confirm button.
- On the Step 01: Select a software solution page of the Wizard, select the Kaspersky software solution that you plan to use:
- Kaspersky Endpoint Security Cloud, if you want to protect the computers and mobile devices of company employees.
- Kaspersky Security for Microsoft Office 365, if you want to protect the Exchange Online mailboxes, OneDrive files, and SharePoint Online sites of company employees.
If you opt to try the free version of a software solution on any Kaspersky promo page, you are redirected to the Create a Workspace Wizard in which this step of the software solution selection is skipped.
- On the Step 02: Terms of Use of Kaspersky Security for Microsoft Office 365 page of the Wizard, do the following:
- Carefully read the Agreement, the Privacy Policy, and the Data Processing Agreement for the selected software solution.
- If you agree to the terms and conditions of the Agreement and the Data Processing Agreement, and if you are aware and agree that your data will be handled and transmitted (including to third countries) as described in the Privacy Policy, and you confirm that you have fully read and understand the Privacy Policy, select the check boxes next to the three listed documents, and then click the I accept the terms button.
If you do not agree to the terms and conditions, do not use the selected Kaspersky software solution.
If you click the I decline button, the workspace creation process on Kaspersky Business Hub will be terminated.
- On the Step 03: Workspace information page of the Wizard, specify the main details of your company:
- Fill in the following required fields:
- Name of your company. Specify the name of the company in which you intend to use the software solution. You can enter a string up to 255 characters long. The string can contain upper- and lowercase characters, numerals, whitespaces, dots, commas, minuses, dashes, and underscores. The specified company name will be displayed on Kaspersky Business Hub and in Kaspersky Security for Microsoft Office 365 Management Console.
- Country. In the drop-down list, select the country in which your company is located. If you select Canada, also specify the province in the State drop-down list that appears below this field.
- Data center. Location of the data center that will process your email traffic and store the application databases. Select the data center location in accordance with domestic legal requirements.
Available locations are as follows:
- USA North
- West Europe (Netherlands)
- Fill in the Additional company description field (optional).
It may be useful if you have more than one workspace on Kaspersky Business Hub. You can enter a string up to 255 characters long. The string can contain upper- and lowercase characters, numerals, whitespaces, dots, commas, minuses, dashes, and underscores.
- Fill in the following required fields:
- On the Step 04: Additional information page of the Wizard, enter your contact details.
This page of the Wizard is displayed only once, when you create your first workspace.
- Fill in the following fields:
- Your first name.
- Your last name.
- Your phone number.
- Your email address. By default, this field displays the email address specified in the settings of your account on Kaspersky Business Hub. You can specify a different email address.
- Postal code (only for Austria, Ireland, Switzerland, Liechtenstein, Germany, and the United Kingdom).
- Number of users. An approximate number of employees that use Office 365 business email in the company.
- The other fields of the form on this page of the Wizard are filled automatically with the details that you specified when you entered the company information. Change them, if necessary.
- Company name.
- Country.
- State (only for Canada).
- If you agree to provide your contact details for participation in surveys and to receive information about Kaspersky applications, select the check box next to the appropriate text.
Providing your contact information is optional. Kaspersky receives your data only if you select this check box.
This check box is cleared by default.
After you select this check box, Kaspersky Business Hub displays reCAPTCHA. Follow the onscreen instructions.
Creation of a company workspace on Kaspersky Business Hub is complete.
- Fill in the following fields:
Kaspersky Business Hub displays a page prompting you to wait until the company workspace is ready.
After the workspace is created, you are automatically redirected to the Management Console. You can proceed to configuring a connection to Exchange Online, configuring a connection to OneDrive, configuring a connection to SharePoint Online, and configuring a Service Account.
Page top
Deleting a workspace from the Kaspersky Business Hub portal
You can delete the workspace of a company if that company has decided to stop using this workspace.
You can use one of the following methods to delete a company workspace:
- Do it yourself on the Kaspersky Business Hub portal. For details, see Kaspersky Endpoint Security Cloud Online Help.
- Contact Kaspersky Customer Service. After a Technical Support engineer at Kaspersky receives your request, the company workspace will be deleted.
After the workspace is deleted, protection for the corresponding Office 365 organization is no longer provided. Any data related to the Office 365 organization is automatically deleted from Kaspersky servers.
Page top
More about available data centers
We are planning to close the Data Center located in the US, and are transferring workspaces of our clients from the Data Center in the USA to Latin America.
To provide proper functioning of your workspace, we suggest creating a new workspace in either of available data centers: Latin America (Brazil) or Europe.
To move your workspace to another data center, please do the following:
- Go to the list of workspaces (left-bottom corner, administrator email - Manage workspaces).
- In the list of workspaces, click 'New company'.
- Choose a data center: Western Europe or Latin America.
- After the workspace is created, grant access to your Microsoft Office 365 in this new workspace.
- Configure all required settings of the new workspace.
- Enter your old US Data Center workspace and disconnect it from Microsoft Office 365 (Settings - Connection - Revoke access).
- Delete your old workspace.
We strongly recommend that you move to another data center, if your company is not US based.
If you have questions on this issue, you can contact support team.
Page top
Limitations for data centers
In September 2024, updating of Kaspersky Security for Microsoft Office 365 will be terminated in the US North data center, and at the end of September 2024 all the data will be deleted.
If your company is US-based, unfortunately we cannot provide you any option to continue using Kaspersky Security for Microsoft Office 365 after it is deleted in US North data center.
If you have any data (reports, quarantine data, etc) in Kaspersky Security for Microsoft Office 365 console that should be used by you after September 10, 2024, we recommend that you save this data from the console before that date:
- Quarantine:
- save items from Quarantine to disk
- release items from Quarantine (items will be restored in an initial location)
- download detections as CSV files
- On-demand scan
- Reports:
If your company is NOT US-based, but the disclaimer in the Management console says that your company is considered as US-based, please contact our Support.
Page top
Regranting consent
To regrant Kaspersky Security for Microsoft Office 365 a consent to access all your Office 365 services, perform the following steps:
- Sign in to Kaspersky Business Hub.
- Authorize with administrator rights, specifying an email address and a password.
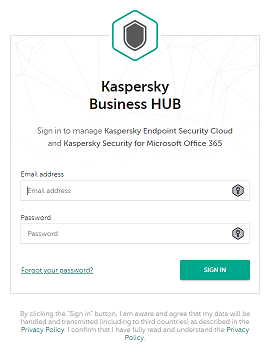
Signing in to Kaspersky Business Hub
- Choose your companies and KS365 workspaces.
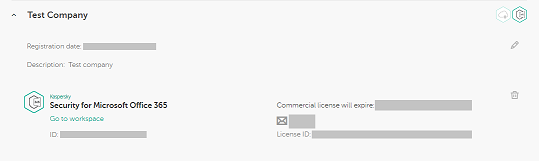
Choosing workspaces
- Enter your workspace.

Entering workspace
- Grant access to you office 365 space.
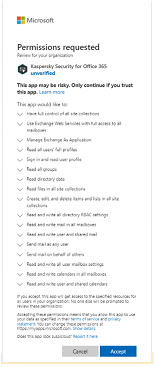
Granting access
- Redirect to your workspace.
Access granted
Now you have regranted Kaspersky Security for Microsoft Office 365 a consent to access all your Office 365 services.
If you did not succeed to regrant a consent, do either of the following:
- Clean up cache of your browser.
- Use another browser to regrant a consent.
Opening Kaspersky Security for Microsoft Office 365 Management Console
Right after you create a workspace for Kaspersky Security for Microsoft Office 365,
opens automatically. Later, you can open Kaspersky Security for Microsoft Office 365 Management Console, as described in this section.To open Kaspersky Security for Microsoft Office 365 Management Console:
- In your browser, go to Kaspersky Business Hub.
- Sign in to your account on Kaspersky Business Hub by specifying the user name and the password.
- If you set up two-step verification, enter the one-time security code that is either sent to you by SMS or generated in your authenticator app (depending on the two-step verification method that you set up).
The portal page displays a list of companies for which you are an administrator.
- Click the link with the company name (or the arrow icon to the left of it) to expand the node of the required company.
The portal page displays information about the selected company.
- Under the name of the selected company, click the Kaspersky Security for Microsoft Office 365 link or the Go to workspace link to proceed to the workspace of the company.
Occasionally, a workspace may be unavailable due to maintenance. If this is the case, you will not be able to proceed to Kaspersky Security for Microsoft Office 365 Management Console. If you try to open the Kaspersky Security for Microsoft Office 365 workspace, a message appears, prompting you to switch to the workspace again after some time.
You cannot open a workspace that is marked for deletion.
- If any of the Kaspersky Security for Microsoft Office 365 legal documents have been changed since you accepted their terms and conditions, the portal page displays the changed documents.
Do the following:
- Carefully read the displayed documents.
- If you agree to the terms and conditions of the displayed documents, select the check boxes next to the listed documents, and then click the I accept the terms button.
If you do not agree to the terms and conditions, stop using the selected Kaspersky software solution.
If you click the I decline button, the operation will be terminated.
Kaspersky Security for Microsoft Office 365 Management Console opens.
Page top
Kaspersky Security for Microsoft Office 365 Management Console interface
You can manage application settings in Kaspersky Security for Microsoft Office 365 through the Management Console in the browser window.
The left part of the Management Console displays the navigation area, which consists of several sections. The right part of the Management Console is occupied by the section contents:
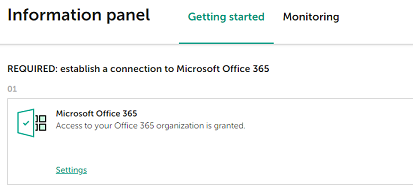
- Information panel. In this section, you can do the following:
- On the Getting started tab, you can establish a connection to Microsoft Office 365 and view the information about required and recommended actions.
- On the Monitoring tab, you can view summary statistics on the application operations, the statuses of protection components, and licensing information.
- Data Discovery. In this section, you can enable, disable, and configure the protection of confidential information stored and transmitted within and beyond your organization.
- Protection settings. In this section, you can enable or disable Anti-Malware, Anti-Spam, Anti-Phishing, and Attachment Filtering, and define the security policies.
- On-demand scan. In this section, you can manually start a malware scan of specific mailboxes.
- Quarantine. In this section, you can view information about messages that have been moved to Quarantine, and release them to their original folders or save to disk, if necessary.
- Reports. In this section, you can generate reports on the operations of Kaspersky Security for Microsoft Office 365.
- Settings. In this section, you can do the following:
- On the Regional and language options tab, you can select the language to be used in notifications and reports and set the date and time format for the information displayed in the Management Console, in notifications, and in reports.
- On the Administrators tab, you can add and remove Kaspersky Security for Microsoft Office 365 administrators.
- On the Connection tab, you can configure the connection of the application to your Microsoft Office 365 services.
- On the Integrations tab, you can configure integration with your Splunk Enterprise.
- License. In this section, you can add an activation code and view information about the license currently in use.
The bottom part of the navigation area contains the following links:
- Privacy Policy. Click this link to view the Kaspersky Privacy Policy for Websites page. This page informs you about the processing and the privacy of your personal data when using Kaspersky websites.
- Legal Notice. Click this link to go to the official website of Kaspersky.
- Help. Click this link to get Online Help materials for Kaspersky Security for Microsoft Office 365.
- Support. Click this link for information about how to contact Technical Support.
- Feedback. Click this link to submit ideas and suggestions concerning the application to Kaspersky.
In the lower-left corner of the Management Console, the <User account name> link is displayed. By clicking this link, you can:
- Select the interface language.
- Go to the workspaces of other companies that you administer in Kaspersky Business Hub by clicking the Manage workspaces link.
- Configure your Kaspersky Business Hub account by clicking the Manage user account link.
- Terminate your activities and exit Kaspersky Security for Microsoft Office 365 by clicking the Sign out link.
All data from your workspace is saved.
If you simply close the tab or the browser window, unauthorized persons can obtain access to the Management Console.
Configuring a connection to Office 365
To protect Office 365 services of your company, you need to connect Kaspersky Security for Microsoft Office 365 to your Office 365.
Connecting Kaspersky Security for Microsoft Office 365 to your Office 365 is carried out by granting Kaspersky Security for Microsoft Office 365 a general consent to access all your Office 365 services (Exchange Online, OneDrive, and SharePoint Online) and Exchange Online Quarantine. When connecting to Office 365, Kaspersky Security for Microsoft Office 365 uses OAuth 2.0, an open standard for access delegation. This standard allows users to grant websites or applications access to information on other websites, without disclosing the passwords. In contrast to OAuth 2.0, the old basic authentication protocol requires a user name and a password for access.
As from October 1, 2022, Microsoft Corporation stops supporting the basic authentication as a method for accessing Office 365 and now recommends the use of OAuth 2.0. Decommissioning the basic authentication can help protect your Office 365 from brute force or password spray attacks.
If you have granted Kaspersky Security for Microsoft Office 365 only separate consents to access your Office 365 services, these services remain protected, but Exchange Online Quarantine items are not displayed in your Office 365 Quarantine, while they are available in the Exchange Online web console. At that, you should grant Kaspersky Security for Microsoft Office 365 a general consent to access all your Office 365 services and Exchange Online Quarantine to ensure that Kaspersky Security for Microsoft Office 365 operates on a full scale.
You cannot use Kaspersky Security for Microsoft Office 365 if your Office 365 organization is registered in Microsoft Azure national clouds (also known as sovereign clouds).
Configuring a connection to Office 365 involves the following:
- When you connect the application to an Office 365 organization, the workspace used for the current session is tied to this organization. To protect Office 365 services of another organization, you must register a new company on the Kaspersky Business Hub portal.
- After you disconnect a workspace from an Office 365 organization, you can connect this organization to the same or any other workspace.
You can also disconnect the application from your Office 365, if you no longer want to protect the Office 365 services of your company.
Connecting to Office 365
To connect Kaspersky Security for Microsoft Office 365 to your Office 365:
- Open the Kaspersky Security for Microsoft Office 365 Management Console.
- In the left part of the page, select the Information panel section.
- Open the Getting started tab.
- In the Microsoft Office 365 block, click the Grant access link.
You are redirected to the Microsoft Online website.
- Specify the required Office 365 Global Administrator account and accept the granting of the requested permissions.
The Global Administrator account that you specify must belong to the same Office 365 organization whose services you want to protect. Note that Kaspersky Security for Microsoft Office 365 does not store the Global Administrator credentials and uses the acquired consent only.
You are returned to the Kaspersky Security for Microsoft Office 365 Management Console. After the specified credentials are checked and verified, the Microsoft Office 365 block displays the following message: Access to your Office 365 organization is granted.
Kaspersky Security for Microsoft Office 365 is now connected to your Office 365, and you can view the Exchange Online Quarantine items on the Quarantine page.
After the connection is established, the Kaspersky Security for Microsoft Office 365 application appears in the list of applications in the Azure Active Directory admin center of your Office 365 organization.
Page top
Disconnecting from Office 365
You can disconnect the application from your Office 365 if you no longer want to protect the Office 365 services of your company.
To disconnect Kaspersky Security for Microsoft Office 365 from your Office 365:
- Open the Kaspersky Security for Microsoft Office 365 Management Console.
- In the left part of the page, select the Settings section.
- Open the Connection tab.
If the connection has been configured, the Office 365 connection block displays the access granted message and a green check mark next to it.
- Click the Revoke access button.
- In the confirmation window, click the Revoke access button.
Kaspersky Security for Microsoft Office 365 is now disconnected from your Office 365. Your Office 365 services are no longer protected.
Later, you can connect Kaspersky Security for Microsoft Office 365 to your Office 365 again at any time.
Page top
Configuring regional and language options
You can adapt the date and time settings to your regional preferences. The date and time format will be used for the information displayed in the Management Console, in application reports, and in notifications.
You can also change the language to be used in notifications and reports.
To configure the regional and language options:
- Open the Kaspersky Security for Microsoft Office 365 Management Console.
- In the left part of the page, select the Settings section.
- On the Regional and language options tab, in the Notification and report settings section, select your language from the Notification and report language drop-down list.
- In the Date and time settings section, select your time zone from the Time zone drop-down list.
- In the Format drop-down list, select the locale whose time and date format you want to apply.
Examples of the date and time in the selected format are displayed under the Format drop-down list.
- Click Save.
Regional and language options are configured.
Page top
Configuring integration with SIEM
On the Integrations tab, you can configure integration with your Splunk Enterprise. For detailed information about integration, click the Learn more button. To download the utility installation package, click the Download installation package button.
Page top
Kaspersky Security for Microsoft Office 365 administrators
This section gives information about Kaspersky Security for Microsoft Office 365 administrators and provides instructions for granting and revoking administrator rights.
About Kaspersky Security for Microsoft Office 365 administrators
Kaspersky Security for Microsoft Office 365 provides two types of administrator rights: Administrator and Quarantine administrator.
You can grant administrator rights to other users directly in the Kaspersky Security for Microsoft Office 365 Management Console as described later in this section.
You can revoke administrator rights from a user either in the Kaspersky Security for Microsoft Office 365 Management Console or in the Kaspersky Endpoint Security Cloud Management Console. In either case, the user will no longer be able to manage any workspaces of the related company on the Kaspersky Business Hub.
You cannot revoke administrator rights from yourself or from a user who was granted administrator rights for integration with an MSP solution.
Administrator
A Kaspersky Security for Microsoft Office 365 Administrator is a user whose account has permissions to manage all Kaspersky Security for Microsoft Office 365 operations and monitor its activities. An Administrator can manage Kaspersky Security for Microsoft Office 365 and receive notifications about application operations only after registering on the Kaspersky Business Hub.
The users that are granted administrator rights in Kaspersky Security for Microsoft Office 365 also acquire Kaspersky Business Hub administrator rights within an organization.
Also, the following users automatically become Administrators of Kaspersky Security for Microsoft Office 365:
- A Kaspersky Endpoint Security Cloud administrator who creates a company workspace for Kaspersky Security for Microsoft Office 365.
- A user who is granted administrator rights for the Kaspersky Endpoint Security Cloud workspace of the same company on the Kaspersky Business Hub.
- A user who is granted administrator rights (by means of Kaspersky Security Integrations for MSP) for integration with an MSP solution.
Quarantine administrator
A Kaspersky Security for Microsoft Office 365 Quarantine administrator is a user whose account has permissions to manage Kaspersky Security for Microsoft Office 365 Quarantine and reports activities only. A Quarantine administrator can manage Kaspersky Security for Microsoft Office 365 Quarantine, generate instant reports for a custom time range and receive notifications about application operations only after registering on the Kaspersky Business Hub.
A Quarantine administrator can perform the following actions within the Kaspersky Security for Microsoft Office 365 Quarantine:
- View the details of quarantined items.
- Filter the list of quarantined items.
- Preview content of quarantined Exchange Online messages.
- Delete quarantined items.
- Release quarantined items.
- Save quarantined items to disk.
- Export the list of quarantined items.
Quarantine administrator rights can be granted via Kaspersky Security for Microsoft Office 365 Management Console only.
Page top
Adding a Kaspersky Security for Microsoft Office 365 administrator
To grant administrator rights to another user:
- Open the Kaspersky Security for Microsoft Office 365 Management Console.
- In the left part of the page, select the Settings section.
- Click the Administrators tab.
- Click the Add button.
The Add administrator window is displayed.
- In the Add administrator window, perform the following actions:
- In the Administrator email address field, enter the email address of the user to whom you want to grant administrator rights.
- Select the administrator Access level:
- Administrator: to grant full administrator rights within the workspace.
- Quarantine administrator: to grant administrator rights within the Kaspersky Security for Microsoft Office 365 Quarantine and Reports scopes only. Note that a Quarantine administrator will be granted full administrator rights for the Kaspersky Endpoint Security Cloud workspace of the same company on the Kaspersky Business Hub.
- Click Add.
The specified user is granted the administrator rights according to the selected access level.
A notification is sent to the specified user's email address. This notification confirms that the user has been granted administrator rights and contains a prompt to register on the Kaspersky Business Hub (if the user has not registered there yet).
Filtering the list of administrators by their access level and editing administrators' details is not available.
Page top
Removing a Kaspersky Security for Microsoft Office 365 administrator
You cannot revoke administrator rights from yourself or from a user who was granted administrator rights for integration with an MSP solution.
To revoke administrator rights from a user:
- Open the Kaspersky Security for Microsoft Office 365 Management Console.
- In the left part of the page, select the Settings section.
- Click the Administrators tab.
- Click the
 button in the row containing the email address of the user from whom you want to revoke administrator rights.
The Remove window is displayed.
- In the Remove window, click the Remove button.
Administrator rights are revoked from the specified user. After that, this user no longer has access to the company or to its workspaces. However, the Kaspersky Business Hub account of this user remains active.
A notification about revoking administrator rights is sent to the email address of the specified user.
Page top
Data Discovery
The Data Discovery module detects any confidential text or image data stored and transmitted by the users within and beyond the Exchange Online mailboxes, OneDrive storages and SharePoint Online sites of your organization. By default, detected items containing confidential information are neither moved nor deleted, but displayed in the Quarantine list, so you can consider actions to prevent the possible leakage.
This section describes how to enable and configure tracing of the following types of confidential information in text and image presentation:
- Credit/Debit Card Number
- Argentinian Driver's License
- Argentinian Identity Card
- Argentinian Unique Taxpayer Number
- Argentinian Passport
- Brazilian Driver's License
- Brazilian Identity Card (RG)
- Brazilian Individual Taxpayer Registry (CPF)
- Brazilian Passport
- Chilean Driver's License
- Chilean Identity Card
- Chilean Passport
- Chilean Unique Taxpayer Number
- Colombian Driver's License
- Colombian Identity Card
- Colombian Passport
- Colombian Unique Taxpayer Number (NIT)
- French Driver's License
- French Identity Card
- French Passport
- French Social Security Number
- German Driver's License
- German Identity Card
- German Passport
- German Residence Permit
- German Social Insurance Number (SIN)
- German Tax Identification Number (TIN)
- Italian Driver's License
- Italian Identity Card
- Italian Passport
- Italian Fiscal Code
- Mexican Citizen Card (CURP)
- Mexican Individual Taxpayer Registry (RFC)
- Mexican Passport
- Mexican Social Security Number
- Portuguese Driver's License
- Portuguese Citizen Card
- Portuguese Passport
- Portuguese Social Security Number (NISS)
- Portuguese Tax Identification Number (NIF)
- Spanish Identity Card
- Spanish Passport
- Spanish National Insurance Number
- Spanish Unique Taxpayer Reference
- UK Driving License
- UK Passport
- UK Residence Card
- UK National Insurance Number
- UK Tax Identification Number (TIN)
- US Driver's License
- US Passport
- US Social Security Number (SSN)
- US Individual Taxpayer Identification Number (ITIN)
Configuring the Data Discovery
You can enable and configure the Data Discovery module on the Data Discovery page.
To open the Data Discovery page:
- Open the Kaspersky Security for Microsoft Office 365 Management Console.
- In the left part of the page, select the Data Discovery section.
Enabling the Data Discovery
To enable the Data Discovery module:
- In the left part of the page, switch on the Data Discovery toggle button.
To enable the Data Discovery module, you must grant limited access to your Office 365 organization.
- Click Save.
After you enabled the Data Discovery module, you can configure the following settings:
Traced data
To define the traced confidential data:
- In the Traced data area, select the check boxes next to the information that you want to trace:
- Credit/debit cards: credit/debit card numbers.
- Personally identifiable information: documents containing personal data. Select the check boxes next to the state affiliation of the traced documents:
- Argentinian: Argentinian Driver's License, Argentinian Identity Card, Argentinian Passport, Argentinian Unique Taxpayer Number.
- Brazilian: Brazilian Individual Taxpayer Registry (CPF), Brazilian Identity Card (RG), Brazilian Passport, Brazilian Driver's License.
- Chilean: Chilean Driver's License, Chilean Identity Card, Chilean Passport, Chilean Unique Taxpayer Number.
- Colombian: Colombian Driver's License, Colombian Identity Card, Colombian Passport, Colombian Unique Taxpayer Number (NIT).
- French: Social Security Number, Passport, Identity Card, Driver's License.
- German: Social Insurance Number (SIN), Tax Identification Number (TIN), Identity Card, Residence Permit, Passport, Driver's License.
- Italian: Identity Card, Fiscal Code, Passport, Driver's License.
- Mexican: Mexican Citizen Card (CURP), Mexican Individual Taxpayer Registry (RFC), Mexican Passport, Mexican Social Security Number.
- Portuguese: Portuguese Passport, Portuguese Tax Identification Number (NIF), Portuguese Citizen Card, Portuguese Driver's License, Portuguese Social Security Number (NISS).
- Spanish: Identity Card, Passport, National Insurance Number, Unique Taxpayer Reference.
- UK: Driving License, Passport, Residence Card, National Insurance Number, Tax Identification Number (TIN).
- USA: Social Security Number (SSN), Taxpayer Identification Number (TIN), Passport, Driver's License.
- Click Save.
Services
To define the monitored Office 365 services:
- In the Services area, select the check boxes next to the Office 365 services of your organization that may store or transmit confidential data:
- Exchange Online
- OneDrive
- SharePoint Online
- Click Save.
Notifications
In the Notifications area, configure notifications that will be sent automatically. By default, notifications are disabled.
To enable and configure notifications:
- Select the Notify administrators about detections check box.
- Click the Select button to add recipients.
The Notification for administrators window appears.
- Enter the email addresses of the notification recipients.
You can specify up to 25 email addresses.
- Click the Plus (
 ) button.
The selected email addresses will be displayed under the Specify email address field.
- To delete an email address from the list, click the Delete () button in the row.
- Click Save.
The list of addresses is saved. The notifications will be sent to the specified addresses.
Monitoring scope
You can set a custom monitoring scope by selecting users / user groups and SharePoint Online sites that you want to monitor.
To define the monitored users:
- In the left part of the page, select the Monitored users section.
- Select one of the following options:
- Monitor all users and groups, if you want to monitor all users and user groups within the current Office 365 organization. If you select this option, any new users further added to your organization will be included automatically in the monitoring scope.
- Monitor selected users and groups, if you want to monitor only specific users and/or user groups. If you select specific user groups, any new users subsequently added to them will be included automatically in the monitoring scope.
- For the Monitor selected users and groups option, select the check boxes next to the users and/or user groups that you want to monitor.
To filter the list of users and/or user groups, use the Search entry field or the Display the following users and groups list (available values are All, Selected, and Not selected).
The users and user groups are listed alphabetically; at that, user groups are listed first. By default, the list of users and user groups is arranged by 10 lines per page. You can switch the pages of the list back and forth or change the default number of displayed lines per page at the bottom of the page.
To view the users included in a group, click the name of the group. The elements will be displayed in a separate window.
- Click Save.
To define the monitored SharePoint Online sites:
- In the left part of the page, select the Monitored sites section.
- Select one of the following options:
- Monitor all sites, if you want to monitor all sites within the current Office 365 organization. If you select this option, any new sites further added to your organization will be included automatically in the monitoring scope.
- Monitor selected sites, if you want to monitor only specific sites. If you select specific sites for protection, any new subsequently added sites must be included in the monitoring scope manually.
- For the Monitor selected sites option, select the check boxes next to the sites that you want to monitor.
To filter the list of sites, use the Search entry field or the Display the following sites list (available values are All, Selected, and Not selected).
The sites are listed alphabetically. By default, the list of sites is arranged by 10 lines per page. You can switch the pages of the list back and forth or change the default number of displayed lines per page at the bottom of the page.
- Click Save.
Protection settings
The protection is provided by means of the automatic real-time scan of all Exchange Online email messages, email attachments, OneDrive and SharePoint Online files. Configuration of the protection is based on Kaspersky Security for Microsoft Office 365 security policies. This section describes how to configure the protection of Exchange Online mailboxes, OneDrive users, and SharePoint Online sites.
Exchange Online security policies
Security policies provide flexible protection of mailboxes that are hosted in your Exchange Online. In the security policies, you specify what to do with the detected malware, phishing, spam, mass mail, unwanted attachments, and email messages from unwanted senders. Depending on your settings, Kaspersky Security for Microsoft Office 365 will take an action or send a notification to selected recipients.
Kaspersky Security for Microsoft Office 365 has a default security policy that contains settings recommended by the Kaspersky experts. You can also configure custom security policies for specific users and groups.
You can create a combination of conditions in one policy, or use several policies at once, to protect your company mailboxes. When a policy is created, it is assigned a priority. You must also specify a protection scope for each policy. The protection scope is a combination of mailboxes and user groups that are selected for protection, and mailboxes and user groups that are excluded from protection. The selected mailboxes are protected by the policy only when the policy is enabled.
When Kaspersky Security for Microsoft Office 365 detects malware, phishing, spam, mass mail, certain attachments in the email messages, or email messages from unwanted senders, the application determines the security policies that are applicable to the email message. A security policy is applicable if the actions with the detected item are configured in the policy and if the protection scope includes the mailbox in which the email message is detected.
If several policies are applicable for a detected item, only the policy with the highest priority is applied. If several items are detected in one message, only the policy with the highest priority is applied for each detection type (malware, phishing, spam, mass mail, or a specific attachment format).
For example, when you need to move email messages containing spam to the Junk Email folder for all users, but for the PR group you only want to tag the email messages, you can create a high-priority custom policy for spam with the PR group selected in the protection scope. This policy will take precedence over all of the other policies with lower priorities for the spam detected in PR group mailboxes. If a lower-priority policy for all users from this example also has Anti-Malware option switched on, it will apply to malware detected in PR department mailboxes.
This section provides instructions on working with the default security policy and on configuring custom security policies for email messages.
Working with a default security policy
You can enable company-wide protection by applying a default security policy to all of the mailboxes of your organization. By default, this security policy is not applied to any mailboxes.
The default security policy has the following settings:
- Delete email messages with malware or detected.
- Add the [!!Spam] tag to subjects of email messages that are identified as .
- Add the [!!Massmail] tag to subjects of email messages that are identified as .
To apply the default security policy:
- Open the Kaspersky Security for Microsoft Office 365 Management Console.
- In the left part of the page, select the Protection settings section.
- In the upper part of this section, select the Exchange Online subsection.
- Click the default security policy.
The Security policy properties window is displayed.
- Click the Edit button.
The policy configuration window is displayed.
- In the Protected mailboxes section, select Protect all users and groups.
- Click Save.
All new mailboxes subsequently added to your Office 365 organization will be included automatically in the protection scope.
Creating a custom security policy
You can create custom security policies to set up protection of mailboxes; and to detect malware, phishing, spam, mass mail, unwanted attachments, and email messages from unwanted senders in email messages for particular users and groups.
To create a custom security policy:
- Open the Kaspersky Security for Microsoft Office 365 Management Console.
- In the left part of the page, select the Protection settings section.
- In the upper part of this section, select the Exchange Online subsection.
- Click the Create a security policy button.
The Create a security policy window is displayed.
- In the Security policy name field, enter a security policy name. This name will be displayed in the list of security policies and in the policy configuration window.
- Click the Create button.
The policy configuration window is displayed.
- Specify the actions to apply to detected email messages. To do so, configure the Kaspersky Security for Microsoft Office 365 protection modules by switching on the required toggle button (Anti-Malware, Anti-Phishing, Anti-Spam, Mass Mail Prevention, Attachment Filtering, and Denylist) and specifying the settings, as described in the respective sections.
- Define the protection scope of the policy in the Protected mailboxes and Excluded mailboxes sections.
- Click Save.
The security policy is added to the Protection settings list and is assigned the highest priority. Later, you can change the policy priority.
The corresponding columns of the Protection settings list display the policy priority and the number of mailboxes that are included in the scope. The smaller the priority value, the higher the priority.
Anti-Malware settings
With the help of the Anti-Malware protection module, you can protect your company mailboxes against viruses, Trojans, worms, and other security threats that can be sent in email messages.
The Anti-Malware module scans messages by using the latest version of
, the , and the cloud services.If the application detects any malicious content included directly in the message body, the message body is replaced by the following text: The message text has been deleted due to its malicious content that posed a risk of infection. You can contact the administrator for detailed information.
When creating a security policy, you can specify the Anti-Malware settings.
Actions to be taken by the application
In the Action area, specify what the application must do with messages in which it detects malware:
- Delete and quarantine message
- Delete and quarantine infected attachment
- File replacement template
This option is available for the Delete and quarantine infected attachment action only.
- Tag the subject
This option is available for the Delete and quarantine infected attachment action only.
- Delete permanently: deleted messages cannot be recovered
Notifications
In the Notifications area, configure notifications that will be sent automatically:
- Notify administrators about detections
This option allows you to enable and configure notifications about detected items. By default, notifications are disabled.
To enable and configure notifications:
- Select the Notify administrators about detections check box.
- Click the Select button to add recipients.
The Notification for administrators window appears.
- Enter the email addresses of the notification recipients.
You can specify up to 25 email addresses.
- Click the Plus () button.
The selected email addresses will be displayed under the Specify email address field.
- To delete an email address from the list, click the Delete () button in the row.
- Click Save.
The list of addresses is saved. The notifications will be sent to the specified addresses.
- Notify mailbox owner about deleted messages
This option is available for the Delete and quarantine message and Delete permanently: deleted messages cannot be recovered actions only.
Anti-Phishing settings
With the help of the Anti-Phishing protection module, you can protect your company mailboxes against phishing, spoofing, conversation hijacking, BEC attacks and malicious links that can be sent in email messages.
Phishing links lead to fraudulent websites designed to steal the personal data of users, such as bank account details. A phishing attack can be disguised, for example, as a message from your bank with a link to its official website. If you click the link, you are redirected to an exact copy of the bank's website, and the browser might even display the bank website's address. However, you are actually on a spoofed (fake) website. All of your actions on the website are tracked and can be used to steal your personal data.
In spoofing and conversation hijacking attacks, malicious senders forge email addresses and content of the messages to be considered trustworthy by the recipients.
By means of email address spoofing or conversation hijacking, BEC attackers hold themselves out as persons the email recipients should trust to gain illegal advantages.
Malicious links lead to web resources designed to spread malware.
The application detects phishing, spoofing and malicious links according to the detection rules developed by the Kaspersky experts. Kaspersky regularly updates rules and methods of detecting phishing and malicious links.
While scanning messages for phishing, spoofing, BEC attacks and malicious links, the application analyzes not only links, but also the message subject, contents, design features, and other message attributes. The scan makes use of Kaspersky Security Network (KSN) cloud services. With the help of KSN, the application receives the latest information about phishing links and malicious links before they appear in the Kaspersky databases.
When creating a security policy, you can specify the Anti-Phishing settings.
Anti-Phishing mode
You can enable one of the following operation modes:
- Recommended mode: regular detection procedure
- Enforced mode: supplementary detection of unclear content similar to phishing
Actions to be taken by the application
In the Action area, specify what the application must do with messages in which it detects phishing and malicious links along with unclear content similar to phishing:
- Delete and quarantine message
- Move to Junk Email folder
- Allow through
- Tag the subject
This option is available for the Allow through and Move to Junk Email folder actions.
- Delete permanently: deleted messages cannot be recovered
Note that if you select Enforced mode: supplementary detection of unclear content similar to phishing, messages containing only unclear content similar to phishing will not be deleted permanently, but moved to Quarantine.
Notifications
In the Notifications area, configure notifications that will be sent automatically:
- Notify administrators about detections
This option allows you to enable and configure notifications about detected items. By default, notifications are disabled.
To enable and configure notifications:
- Select the Notify administrators about detections check box.
- Click the Select button to add recipients.
The Notification for administrators window appears.
- Enter the email addresses of the notification recipients.
You can specify up to 25 email addresses.
- Click the Plus () button.
The selected email addresses will be displayed under the Specify email address field.
- To delete an email address from the list, click the Delete () button in the row.
- Click Save.
The list of addresses is saved. The notifications will be sent to the specified addresses.
- Notify mailbox owner about deleted messages
This option is available for the Delete and quarantine message and Delete permanently: deleted messages cannot be recovered actions only.
Allowlist
In the Allowlist area, configure allowed senders:
- Allow messages from the following senders
This option allows you to configure allowed senders. These senders are considered trusted and messages from them are skipped from processing.
To configure allowed senders:
- Select the Allow messages from the following senders check box.
- Click the Select button.
The Sender allowlist window opens.
- Click the Add sender button.
The Add a sender to the allowlist window opens.
- In the Specify a complete email address or a mask entry field, provide an email address or several email addresses that should be added to the allowlist separated by semicolons or line breaks.
If you want to allow several senders at once, you can use
. For instance, if you specify the *@example.com mask, the allowlist contains all email addresses from the @example.com domain. You can also copy and paste a list of email addresses / masks separated by semicolons or line breaks in the entry field. - Click Validate.
The provided email addresses / masks are displayed in the list.
If the email addresses / masks are entered incorrectly, they are displayed in the list in a red font, and you must introduce changes to save them.
- Click Save to save the list of provided addresses / masks.
- If you want to delete an email address / mask from the list:
- Click the Delete () button next to the email address / mask.
- Click Save.
- Click the Delete (
- Do not check allowed senders' SPF
Anti-Spam settings
With the help of the Anti-Spam module, you can protect your company mailboxes against unsolicited email messages.
The Anti-Spam module scans incoming messages from external addresses. Scanning of incoming and outgoing messages from internal addresses is available when Scan internal messages for spam option is enabled.
Anti-Spam scans the message header, contents, attachments, design elements, and other message attributes. While performing the scan, Anti-Spam uses linguistic and heuristic algorithms that involve comparing the message being scanned with sample messages stored in anti-spam databases, as well as additional cloud services such as Kaspersky Security Network.
When creating a security policy, you can specify the Anti-Spam settings.
Actions to be taken by the application
In the Action area, specify what the application must do with messages in which it detects spam:
- Move to Junk Email folder
- Allow through
- Tag the subject
- Delete permanently: deleted messages cannot be recovered
Allowlist
In the Allowlist area, consider whether to scan internal messages and configure allowed senders:
- Scan internal messages for spam
- Allow messages from the following senders
This option allows you to configure allowed senders. These senders are considered trusted and messages from them are skipped from processing.
To configure allowed senders:
- Select the Allow messages from the following senders check box.
- Click the Select button.
The Sender allowlist window opens.
- Click the Add sender button.
The Add a sender to the allowlist window opens.
- In the Specify a complete email address or a mask entry field, provide an email address or several email addresses that should be added to the allowlist separated by semicolons or line breaks.
If you want to allow several senders at once, you can use masks. For instance, if you specify the *@example.com mask, the allowlist contains all email addresses from the @example.com domain. You can also copy and paste a list of email addresses / masks separated by semicolons or line breaks in the entry field.
- Click Validate.
The provided email addresses / masks are displayed in the list.
If the email addresses / masks are entered incorrectly, they are displayed in the list in a red font, and you must introduce changes to save them.
- Click Save to save the list of provided addresses / masks.
- If you want to delete an email address / mask from the list:
- Click the Delete () button next to the email address / mask.
- Click Save.
- Click the Delete (
New messages from an allowed sender that Kaspersky Security for Microsoft Office 365 identifies as spam remain in the Inbox folder. New messages from an allowed sender that Kaspersky Security for Microsoft Office 365 detects in the Junk Email folder are automatically moved to the Inbox folder.
Page top
Mass Mail Prevention settings
With the help of the Mass Mail Prevention module, you can protect your company mailboxes against mass mail. Mass mail refers to email messages that are generally sent by email marketing services in large numbers by subscription and are not detected as spam. For example, newsletters or marketing emails are detected as mass mail. If you consider messages containing business offers unwanted, they can be optionally treated as mass mail. This module also provides protection from list linking attacks implying multiple registration confirmation messages.
The Mass Mail Prevention module does not scan outgoing messages or messages exchanged within the organization.
When creating a security policy, you can configure protection from mass mail and list linking attacks.
Actions to be taken by the application
In the Action area, specify what the application must do with mass mail:
Allowlist
In the Allowlist area, configure allowed senders:
Allow messages from the following senders
This option allows you to configure allowed senders. These senders are considered trusted and messages from them are skipped from processing.
To configure allowed senders:
- Select the Allow messages from the following senders check box.
- Click the Select button.
The Sender allowlist window opens.
- Click the Add sender button.
The Add a sender to the allowlist window opens.
- In the Specify a complete email address or a mask entry field, provide an email address or several email addresses that should be added to the allowlist separated by semicolons or line breaks.
If you want to allow several senders at once, you can use masks. For instance, if you specify the *@example.com mask, the allowlist contains all email addresses from the @example.com domain. You can also copy and paste a list of email addresses / masks separated by semicolons or line breaks in the entry field.
- Click Validate.
The provided email addresses / masks are displayed in the list.
If the email addresses / masks are entered incorrectly, they are displayed in the list in a red font, and you must introduce changes to save them.
- Click Save to save the list of provided addresses / masks.
- If you want to delete an email address / mask from the list:
- Click the Delete () button next to the email address / mask.
- Click Save.
- Click the Delete (
New messages from an allowed sender that Kaspersky Security for Microsoft Office 365 identifies as mass mail remain in the Inbox folder. New messages from an allowed sender that Kaspersky Security for Microsoft Office 365 detects in the Junk Email folder are automatically moved to the Inbox folder.
Optional
In the Optional area, you can enable additional mass mail prevention options:
Page top
Attachment Filtering settings
With the help of the Attachment Filtering protection module, you can filter attachments in your company mailboxes.
Attachment Filtering is a feature that scans files attached to email messages. This feature allows you to control external and internal file exchange within your Exchange Online. If Attachment Filtering is enabled, Kaspersky Security for Microsoft Office 365 scans messages for files that match the specified filtering criteria and applies the action that you predefine in the settings.
When creating a security policy, you can specify the Attachment Filtering settings.
Attachment types to be detected
In the Attachment types area, configure the types of files to be detected by the application:
- Detect files of the following formats
- Detect files matching the following masks
This option allows you to filter attached files according to the specified file names and/or file name masks.
By default, file masks are not specified. To specify a file name or a file mask:
- Select the Detect files matching the following masks check box.
- Click the Select button under the check box.
The File masks window opens.
- Enter a file name or mask in the Specify a file mask entry field and click the Plus () button.
Examples of permitted file name masks:
- *.txt—all files with the .txt extension, for example, readme.txt or notes.txt.
- readme.???—all files named readme with an extension of three characters, for example, readme.txt or readme.doc.
- test—all files named test without an extension.
- To remove an entry from the list, click the Delete () button next to this entry.
- Click Save.
- Detect Microsoft Office files containing macros
- Detect protected files
Actions to be taken by the application
In the Action area, specify what the application must do with messages in which it detects the specified attachments:
- Delete and quarantine message
- Delete and quarantine attachment
- Allow through
- Tag the subject
This option is available for the Delete and quarantine attachment and Allow through actions.
- File replacement template
This option is available for the Delete and quarantine attachment action only.
Notifications
In the Notifications area, configure notifications that will be sent automatically:
- Notify administrators about detections
This option allows you to enable and configure notifications about detected items. By default, notifications are disabled.
To enable and configure notifications:
- Select the Notify administrators about detections check box.
- Click the Select button to add recipients.
The Notification for administrators window appears.
- Enter the email addresses of the notification recipients.
You can specify up to 25 email addresses.
- Click the Plus () button.
The selected email addresses will be displayed under the Specify email address field.
- To delete an email address from the list, click the Delete () button in the row.
- Click Save.
The list of addresses is saved. The notifications will be sent to the specified addresses.
- Notify mailbox owner about deleted messages
This option is available for the Delete and quarantine message action only.
Allowlist
In the Allowlist area, configure allowed senders and files to be skipped from processing.
- Allow files matching the following masks
This option allows you to configure allowed files. Files that match the specified masks will be skipped from processing.
To configure allowed files:
- Select the Allow files matching the following masks check box.
- Click the Select button.
The Allowed file masks window opens.
- To specify a file name or a file mask, enter it in the entry field and click the Plus () button.
Examples of permitted file name masks:
- *.txt—all files with the *.txt extension, for example, readme.txt or notes.txt.
- readme.???—all files named readme with an extension of three characters, for example, readme.txt or readme.doc.
- test—all files named test without an extension.
- To remove an entry from the list, click the Delete () button next to this entry.
- Click Save.
- Allow messages from the following senders
This option allows you to configure allowed senders. These senders are considered trusted and messages from them are skipped from processing.
To configure allowed senders:
- Select the Allow messages from the following senders check box.
- Click the Select button.
The Sender allowlist window opens.
- Click the Add sender button.
The Add a sender to the allowlist window opens.
- In the Specify a complete email address or a mask entry field, provide an email address or several email addresses that should be added to the allowlist separated by semicolons or line breaks.
If you want to allow several senders at once, you can use masks. For instance, if you specify the *@example.com mask, the allowlist contains all email addresses from the @example.com domain. You can also copy and paste a list of email addresses / masks separated by semicolons or line breaks in the entry field.
- Click Validate.
The provided email addresses / masks are displayed in the list.
If the email addresses / masks are entered incorrectly, they are displayed in the list in a red font, and you must introduce changes to save them.
- Click Save to save the list of provided addresses / masks.
- If you want to delete an email address / mask from the list:
- Click the Delete () button next to the email address / mask.
- Click Save.
- Click the Delete (
Denylist settings
With the help of the Denylist module, you can block incoming messages from certain senders.
To configure the list of the denied senders:
- Enable the Denylist module by switching on the module toggle button.
- Click the Select button.
The Sender denylist window opens.
- Click the Add sender button.
The Add a sender to the denylist window opens.
- In the Specify a complete email address or a mask entry field, provide an email address or several email addresses that should be added to the denylist separated by semicolons or line breaks.
If you want to block several senders at once, you can use masks. For instance, if you specify the *@example.com mask, the denylist contains all email addresses from the @example.com domain. You can also copy and paste a list of email addresses / masks separated by semicolons or line breaks in the entry field.
- Click Validate.
The provided email addresses / masks are displayed in the list.
If the email addresses / masks are entered incorrectly, they are displayed in the list in a red font, and you must introduce changes to save them.
- Click Save to save the list of provided addresses / masks.
- If you want to delete an email address / mask from the list:
- Click the Delete () button next to the email address / mask.
- Click Save.
- Click the Delete (
Actions to be taken by the application
In the Action area, specify what the application must do with messages from senders added to the denylist.
- Delete and quarantine message
- Move to Junk Email folder
- Allow through
- Tag the subject
This option is available for the Allow through and Move to Junk Email folder actions.
Kaspersky Security for Microsoft Office 365 Denylist module has a higher priority than other settings configured in third-party applications that can allow skipping email messages from scanning.
Page top
Protection scope for the security policy
When creating a security policy, you must define its protection scope by selecting user mailboxes and/or Active Directory user groups that you want to protect in the policy, and mailboxes and groups that are excluded from protection.
Protection of Active Directory groups of the Microsoft 365 type is not supported by the application; such groups are not displayed in the Management Console and cannot be included in the protection scope.
Depending on the size of the Office 365 organization and the number of selected mailboxes, it may take up to several hours to update the protection scope.
Protected mailboxes
To configure mailboxes and/or user groups that you want to protect in the policy:
- Select the Protected mailboxes section.
- Select one of the following options:
- Protect all users and groups, if you want to protect all user mailboxes and groups within the current Office 365 organization. If you select this option, any new mailboxes further added to your organization will be included automatically in the protection scope.
- Protect selected users and groups only, if you want to protect only specific mailboxes and/or user groups. If you select specific user groups, any new mailboxes subsequently added to them will be included automatically in the protection scope.
- For the Protect selected users and groups only option, select the check boxes next to the mailboxes and/or user groups that you want to protect.
To filter the list of mailboxes and/or user groups, use the Search entry field or the Display the following users and groups list (available values are All, Selected, and Not selected).
The mailboxes and user groups are listed alphabetically; at that, user groups are listed first. By default, the list of mailboxes and user groups is arranged by 10 lines per page. You can switch the pages of the list back and forth or change the default number of displayed lines per page at the bottom of the page.
To view the mailboxes included in a group, click the name of the group. The elements will be displayed in a separate window.
If you change the primary SMTP address for mailboxes included in the protection scope without group association, the application will recognize them as newly added ones. Protection for these mailboxes will be automatically disabled. To resume protection, select the required mailboxes from the list again.
- Click Save.
If necessary, you can force the application to retrieve the list of mailboxes and user groups from Exchange Online by clicking the Synchronize list link above the list.
Excluded mailboxes
To configure mailboxes and/or user groups that you want to exclude from protection:
- Select the Excluded mailboxes section.
- Select the corresponding elements.
To filter the list of mailboxes and/or user groups, use the Search entry field or the Display the following users and groups list (available values are All, Selected, and Not selected).
The mailboxes and user groups are listed alphabetically; at that, user groups are listed first. By default, the list of mailboxes and user groups is arranged by 10 lines per page. You can switch the pages of the list back and forth or change the default number of displayed lines per page at the bottom of the page.
If the same mailbox or user group is listed as a protected item but is also added to the list of exclusions, the exclusion has priority over the general protection scope settings.
- Click Save.
If necessary, you can force the application to retrieve the list of mailboxes and user groups from Exchange Online by clicking the Synchronize list link above the list.
If for any reason you want to anonymize any elements in the list or make them undetectable by the application, you can achieve this by customizing your Exchange Online settings. For the information about changing a user's display name, refer to the Office 365 documentation at https://docs.microsoft.com/en-us/office365/admin/add-users/change-a-user-name-and-email-address. For the information about blocking access to mailboxes, refer to the Azure Active Directory documentation at https://docs.microsoft.com/en-us/azure/active-directory/conditional-access/overview.
Page top
Changing a security policy priority
You can change priority for your security policies to set up flexible protection.
If several policies are applicable for a detected item, only the policy with the highest priority is applied. If several items are detected in one message, only the policy with the highest priority is applied for each detection type (malware, phishing, spam, mass mail, or a specific attachment format).
To change priority for a security policy:
- Open the Kaspersky Security for Microsoft Office 365 Management Console.
- In the left part of the page, select the Protection settings section.
- In the upper part of this section, select the Exchange Online subsection.
- In the line that corresponds to the required security policy, click the up arrow (↑) to increase the policy priority or the down arrow (↓) to decrease the policy priority.
The smaller the priority value, the higher the priority. For example, if you have 6 policies, policy with priority value 1 has the highest priority, while policy with priority value 6 has the lowest priority.
The priority of the selected security policy is changed.
Page top
Deleting a security policy
To delete a policy from the list:
- Open the Kaspersky Security for Microsoft Office 365 Management Console.
- In the left part of the page, select the Protection settings section.
- In the upper part of this section, select the Exchange Online subsection.
- Click the required security policy.
The Security policy properties window is displayed.
- Click the Delete button.
- In the confirmation window, click the Delete button.
The selected security policy is deleted.
Page top
OneDrive security policy
Beginning with version 1.2.22, Kaspersky Security for Microsoft Office 365 provides OneDrive support. Upon adding a company workspace for Kaspersky Security for Microsoft Office 365, a default security policy is created for OneDrive protection. This policy contains protection settings recommended by the Kaspersky experts. You can configure the security policy and specify what to do with the detected malware, and what users or user groups are to be protected. Depending on your settings, Kaspersky Security for Microsoft Office 365 will take an action or send a notification to selected recipients.
This section provides information about using and configuring the default OneDrive security policy.
Working with a default security policy
You can enable company-wide protection by applying a default security policy to all or specific OneDrive users. By default, this security policy is not applied to any users or user groups.
The default security policy has the following settings:
- Anti-Malware option is enabled.
- Files with malware detected are deleted.
To apply the default security policy:
- Open the Kaspersky Security for Microsoft Office 365 Management Console.
- In the left part of the page, select the Protection settings section.
- In the upper part of this section, select the OneDrive subsection.
- In the left part of the section, select the Protected users section.
- Select the Protect all users and groups option.
- Click Save.
The policy will be applied immediately.
All new OneDrive users will be included automatically in the protection scope.
Page top
Changing the default security policy
This section provides information about changing the Anti-Malware settings and protection scope of the default OneDrive security policy.
Anti-Malware settings
With the help of the Anti-Malware protection module, you can protect your company OneDrive users against viruses, Trojans, worms, and other security threats.
The Anti-Malware module scans OneDrive files by using the latest version of anti-virus databases, the heuristic analyzer, and the Kaspersky Security Network cloud services.
In the default security policy, you can specify the Anti-Malware settings.
Actions to be taken by the application
In the Action area, specify what the application must do with files in which it detects malware:
Notifications
In the Notifications area, configure notifications that will be sent automatically:
- Notify administrators about detections
This option allows you to enable and configure notifications about detected items. By default, notifications are disabled.
To enable and configure notifications:
- Select the Notify administrators about detections check box.
- Click the Select button to add recipients.
The Notification for administrators window appears.
- Enter the email addresses of the notification recipients.
You can specify up to 25 email addresses.
- Click the Plus () button.
The selected email addresses will be displayed under the Specify email address field.
- To delete an email address from the list, click the Delete () button in the row.
- Click Save.
The list of addresses is saved. The notifications will be sent to the specified addresses.
Protection scope for the security policy
In the default security policy, you can set a custom protection scope by selecting users and user groups that you want to protect in the policy.
Depending on the size of the Office 365 organization and the number of selected users, it may take up to several hours to update the protection scope.
Protected users
To configure users and / or user groups that you want to protect in the policy:
- Select the Protected users section.
- Select one of the following options:
- Protect all users and groups, if you want to protect all users and groups within the current Office 365 organization. If you select this option, any new users further added to your organization will be included automatically in the protection scope.
- Protect selected users and groups only, if you want to protect only specific users and/or user groups. If you select specific user groups, any new users subsequently added to them will be included automatically in the protection scope.
- For the Protect selected users and groups only option, select the check boxes next to the users and/or user groups that you want to protect.
To filter the list of users and/or user groups, use the Search entry field or the Display the following users and groups list (available values are All, Selected, and Not selected).
The users and user groups are listed alphabetically; at that, user groups are listed first. By default, the list of users and user groups is arranged by 10 lines per page. You can switch the pages of the list back and forth or change the default number of displayed lines per page at the bottom of the page.
To view the users included in a group, click the name of the group. The elements will be displayed in a separate window.
- Click Save.
If necessary, you can force the application to retrieve the list of users and user groups from OneDrive by clicking the Synchronize list link above the list.
Page top
SharePoint Online security policy
Beginning with version 1.2.25, Kaspersky Security for Microsoft Office 365 provides SharePoint Online support. Upon adding a company workspace for Kaspersky Security for Microsoft Office 365, a default security policy is created for protecting SharePoint Online sites. This policy contains protection settings recommended by the Kaspersky experts. You can configure the security policy and specify what to do with the detected malware, and choose what sites to protect. Depending on your settings, Kaspersky Security for Microsoft Office 365 will take an action or send a notification to selected recipients.
This section provides information about using and configuring the default SharePoint Online security policy.
Working with a default security policy
You can enable company-wide protection by applying a default security policy to all or specific SharePoint Online sites. By default, this security policy is not applied to any sites.
The default security policy has the following settings:
- Anti-Malware option is enabled.
- Files with malware detected are deleted.
To apply the default security policy:
- Open the Kaspersky Security for Microsoft Office 365 Management Console.
- In the left part of the page, select the Protection settings section.
- In the upper part of this section, select the SharePoint Online subsection.
- In the left part of the section, select the Protected sites section.
- Select the Protect all sites option.
- Click Save.
The policy will be applied immediately.
All new SharePoint Online sites will be included automatically in the protection scope.
Page top
Changing the default security policy
This section provides information about changing the Anti-Malware settings and protection scope of the default SharePoint Online security policy.
Anti-Malware settings
With the help of the Anti-Malware protection module, you can protect your company SharePoint Online sites against viruses, Trojans, worms, and other security threats.
The Anti-Malware module scans SharePoint Online files by using the latest version of anti-virus databases, the heuristic analyzer, and the Kaspersky Security Network cloud services.
In the default security policy, you can specify the Anti-Malware settings.
Actions to be taken by the application
In the Action area, specify what the application must do with files in which it detects malware:
Notifications
In the Notifications area, configure notifications that will be sent automatically:
- Notify administrators about detections
This option allows you to enable and configure notifications about detected items. By default, notifications are disabled.
To enable and configure notifications:
- Select the Notify administrators about detections check box.
- Click the Select button to add recipients.
The Notification for administrators window appears.
- Enter the email addresses of the notification recipients.
You can specify up to 25 email addresses.
- Click the Plus () button.
The selected email addresses will be displayed under the Specify email address field.
- To delete an email address from the list, click the Delete () button in the row.
- Click Save.
The list of addresses is saved. The notifications will be sent to the specified addresses.
Protection scope for the security policy
In the default security policy, you can set a custom protection scope by selecting sites that you want to protect in the policy.
Depending on the size of the Office 365 organization and the number of selected sites, it may take up to several hours to update the protection scope.
Protected sites
To configure sites that you want to protect in the policy:
- Select the Protected sites section.
- Select one of the following options:
- Protect all sites, if you want to protect all sites within the current Office 365 organization. If you select this option, any new sites further added to your organization will be included automatically in the protection scope.
- Protect selected sites only, if you want to protect only specific sites. If you select specific sites for protection, any new subsequently added sites must be included in the protection scope manually.
- For the Protect selected sites only option, select the check boxes next to the sites that you want to protect.
To filter the list of sites, use the Search entry field or the Display the following sites list (available values are All, Selected, and Not selected).
The sites are listed alphabetically. By default, the list of sites is arranged by 10 lines per page. You can switch the pages of the list back and forth or change the default number of displayed lines per page at the bottom of the page.
- Click Save.
If necessary, you can force the application to retrieve the list of SharePoint Online sites by clicking the Synchronize list link above the list.
Excluded sites
To configure sites that you want to exclude from protection:
- Select the Excluded sites section.
- Select the corresponding elements.
To filter the list of sites, use the Search entry field or the Display the following sites list (available values are All, Selected, and Not selected).
The sites are listed alphabetically. By default, the list of sites is arranged by 10 lines per page. You can switch the pages of the list back and forth or change the default number of displayed lines per page at the bottom of the page.
If the same site is listed as a protected item but is also added to the list of exclusions, the exclusion has priority over the general protection scope settings.
- Click Save.
If necessary, you can force the application to retrieve the list of SharePoint Online sites by clicking the Synchronize list link above the list.
Page top
Protecting Microsoft Teams
Kaspersky Security for Microsoft Office 365 scans files transmitted via Microsoft Teams for viruses, Trojans, and other types of malware provided that connection to OneDrive and SharePoint Online is established and protection of OneDrive users and SharePoint Online sites is enabled and configured.
Files uploaded by the users in Microsoft Teams chats are stored in the users' OneDrive storages, while files uploaded in Microsoft Teams channels are stored on the associated SharePoint Online sites.
To protect your Microsoft Teams, enable protection for all OneDrive users that use Microsoft Teams and all SharePoint Online sites.
Page top
Application licensing
This section provides information about general concepts related to application licensing.
About the license certificate
A license certificate is a document that you receive along with an activation code.
A license certificate contains the following information about the license provided:
- Order number.
- Information about the user who has been granted the license.
- Information about the application that can be activated under the license provided.
- Limit of the number of licensing units, namely the number of Exchange Online mailboxes or OneDrive users the application can protect under the license provided.
- License validity start date.
- License expiration date, or license term.
- License type.
About the license
A license is a time-limited right to use the application.
A license entitles you to:
- Use the application in accordance with the Terms of Use.
- Receive technical support.
The scope of services and validity period depends on the type of license under which the application was activated.
The following license types are available for Kaspersky Security for Microsoft Office 365:
- Trial. Free license intended for trying out Kaspersky Security for Microsoft Office 365. A trial license usually has a short term.
When you connect to the application for the first time, the trial mode is activated automatically. The trial license term is 30 days.
When the trial license expires, all Kaspersky Security for Microsoft Office 365 features become disabled. To continue using the application, you must purchase a commercial license. You can also switch the application to a commercial license at any moment during the trial period. After that, the trial mode cannot be resumed.
Kaspersky reserves the right to change the trial license restrictions without notice.
- Commercial. A paid license granted upon purchase of the application.
A commercial license is issued for a fixed number of mailboxes or OneDrive users that can be protected under this license. You specify the required number of mailboxes and users upon purchase of the application. If you want to increase the number of licensed objects, you need to contact your service provider.
The number of mailboxes and OneDrive users that use a Kaspersky Security for Microsoft Office 365 license includes only those mailboxes and users to which an Office 365 license is assigned. Protection of resource mailboxes, room mailboxes, and shared mailboxes without an Office 365 license does not require a Kaspersky Security for Microsoft Office 365 license.
When the commercial license expires, all Kaspersky Security for Microsoft Office 365 features become disabled. To continue using the application, you must purchase another commercial license or renew your subscription.
In the U.S. updates functionality (including providing anti-virus signature updates and codebase updates), as well as KSN functionality may not be available in the software.
Page top
About the activation code
An activation code is a unique sequence of 20 letters and numbers used for activating Kaspersky Security for Microsoft Office 365. You receive the activation code at the email address that you provided when you purchased Kaspersky Security for Microsoft Office 365.
If you lose your activation code, it can be recovered. To recover your activation code, contact Kaspersky Customer Service.
Page top
About the subscription
A subscription for Kaspersky Security for Microsoft Office 365 is a purchase order for the application that entitles you to use the application for a limited period of time. You can order a subscription for Kaspersky Security for Microsoft Office 365 from your service provider.
Depending on the subscription terms and conditions of your service provider, your subscription can be paused or resumed, renewed automatically, or canceled. When your subscription expires, your service provider may grant you a grace period to renew it. All application functionality remains available during this time.
When purchasing a subscription, you are provided with a corresponding activation code. To activate the application, submit the activation code in the License section of the Management Console.
Page top
Activating the application
Activation of the application is required when you want to switch from a trial license to a commercial license or to replace the current license with a new one.
To activate the application:
- Open the Kaspersky Security for Microsoft Office 365 Management Console.
- In the left part of the page, select the License section.
- If you want to assign a commercial license to the application running in trial mode, click the Switch to commercial license button.
If you want to replace the current license, click the Replace button.
The Activating application section opens.
- In the Enter activation code field, enter the activation code in the XXXXX-XXXXX-XXXXX-XXXXX format.
- Click Continue.
Kaspersky Security for Microsoft Office 365 transmits the entered activation code and the corresponding license ID to Kaspersky's activation servers for verification.
- After the activation code is verified, the following details about the corresponding license are displayed:
- Type—Commercial or Commercial (subscription).
- Owner—The contact person of the company that purchased the license.
- Expiration date—The date and time when the current license expires. The time format specified in the application settings is applied.
- License limit—The maximum number of mailboxes or OneDrive users you may select for protection under the current license. The number of mailboxes and OneDrive users that use a Kaspersky Security for Microsoft Office 365 license includes only those mailboxes and users to which an Office 365 license is assigned. Protection of resource mailboxes, room mailboxes, and shared mailboxes without an Office 365 license does not require a Kaspersky Security for Microsoft Office 365 license.
Review these details carefully to make sure they are correct.
- Click the Confirm button.
The license is assigned to the application. You can always check the license details in the License section.
Every day, the application connects to Kaspersky activation servers to update information about the current license.
Page top
On-demand scan
On-demand scan is a malware scan that is initiated by the Administrator. The on-demand scan allows you to scan email messages and other email objects that have been registered in specific mailboxes within a specific period of time. You can use this feature to double-check that your mailboxes contain no viruses or other malicious objects, or to scan mailboxes that were previously not protected by Kaspersky Security for Microsoft Office 365.
This section describes how to configure on-demand scan settings and how to view the scan results.
Configuring on-demand scan
To configure on-demand scan:
- Open the Kaspersky Security for Microsoft Office 365 Management Console.
- In the left part of the page, select the On-demand scan section.
- Click the Malware scan button.
- In the Time range subsection, specify the time range for email objects to be included in the scan scope based on their date:
- Click the Change button.
- Select the start date and the end date for the required time period.
- Click the Apply button.
- In the Action subsection, select the action to be performed by the application when it detects infected objects. The following options are available:
- Delete and quarantine message. The whole message is deleted from the user mailbox.
Delete and quarantine infected attachment. If the application detects a threat in the attached file, it removes the infected file only and delivers the rest of the message to the recipient. In this case, the removed attachment is replaced with a text file that informs the user about the action taken by the application and contains the list of infected attachments and those that were deleted as a result of the Anti-Malware scan. If an infected file is detected inside of an archive, the application removes the whole archive.
- Delete and quarantine message. The whole message is deleted from the user mailbox.
- For the Delete and quarantine infected attachment option, you can add a custom tag to the subjects of affected messages and / or customize the file replacement template:
- To tag the subject of a detected message, select the Tag the subject check box.
If necessary, change the tag in the entry field under the Tag the subject check box.
- To customize the replacement file:
- Click the Edit replacement file link next to the Delete and quarantine infected attachment label.
The Replacement file template window opens.
- Edit the template contents in the Message text field. For example, the text can include instructions or other information relevant to employees of your organization.
- If you want to restore the default template, click the Reset button.
- Click Save.
- Click the Edit replacement file link next to the Delete and quarantine infected attachment label.
- In your custom template, you can keep using the variables included in the default template.
- To tag the subject of a detected message, select the Tag the subject check box.
- In the Scan scope subsection, select users and / or Active Directory user groups that will be included in the current scan scope.
The users and user groups are listed alphabetically; at that, user groups are listed first. By default, the list of users and user groups is arranged by 10 lines per page. You can switch the pages of the list back and forth or change the default number of displayed lines per page at the bottom of the page.
You can type the user name or user group name in the Search entry field and click the
 button to find the specific user or user group.
 - In the Notifications subsection, you can request an email notification that will be automatically sent after the scan task is completed. Notifications contain an attached HTML report on the scan results. To request a notification, specify its recipients:
- Select the Notify administrators about scan results check box.
- In the entry field, type the email addresses of the required recipients.
To add several recipients, separate their email addresses with a semicolon (for example,
user@example.com;user2@example.com;user3@example.com).
You can specify up to five recipients.
The notification language corresponds to the language settings configured in the application settings.
- Click the Run scan button.
The scan task starts. Task progress is displayed in the same section of the Management Console. You can view the scan progress details by clicking the Scan progress link, or force the task to stop by clicking the Stop scan button.
After the task is completed, its details are available for review in the Scan history subsection.
Page top
Viewing scan history
You can always review the details of the on-demand scan tasks that you previously ran. The tasks are listed in the On-demand scan section, Scan history subsection.
For each on-demand scan task, the following information is available:
- Scan status:
- Completed, if the task has completed successfully
- Stopped, if the task has been canceled by the Administrator.
To review the full details of each scan task, click the Status link.
- Number of detected threats. If any threats have been detected, you can click the Status link and view the detailed information about each detection.
- Number of scanned mailboxes. The application displays the number of actually scanned mailboxes against the total number of mailboxes in the scan scope. If any mailboxes have not been scanned (for example, due to technical issues), you can click the Status link and review the corresponding details.
- Total number of messages scanned during the task performance.
- Time period covering the messages included in the scan scope.
- Date and time of scan start and of scan end.
Notifications
A notification is an email message informing the administrators about Kaspersky Security for Microsoft Office 365 operations.
The application uses two types of notifications: default notifications sent by the system, and custom notifications manually configured by the administrator.
Default notifications are generated automatically in the following cases:
- The application is temporarily unavailable.
- The application will soon be updated to the next version. Updates may include changes in the functionality and/or Terms of Use of the application.
- The application cannot connect to Exchange Online.
- The application cannot connect to OneDrive.
- The application cannot connect to SharePoint Online.
- The application license is about to expire or has expired.
- The number of mailboxes, users or sites selected for protection exceeds the limit covered by the license.
- The corresponding workspace on the Kaspersky Business Hub portal is about to be automatically deleted due to its inactivity, or upon your request. After the workspace has actually been deleted, a separate notification is sent.
These notifications are sent to all the application administrators and cannot be disabled.
Custom notifications can be enabled and configured in the application interface to inform the administrators and other concerned users about threats detected in Exchange Online email messages, OneDrive and SharePoint Online files, about detected phishing or malicious links, confidential data and / or filtered attachments. Kaspersky Security for Microsoft Office 365 sends a separate summary notification for each detection according to the specified security policies and enabled protection modules.
Page top
Quarantine
If Kaspersky Security for Microsoft Office 365 detects an Exchange Online message, OneDrive or SharePoint Online file that is supposed to be deleted or modified according to the configured security policies, the application does not permanently delete the original message or file. Instead, the application moves the message or file to a specially configured hidden folder located within the Office 365 service where the message or file was detected. This temporary storage is referred to as Quarantine.
If the Data Discovery module detects a confidential data leak threat, the detected items are not moved to Quarantine, but only displayed in the Quarantine list, so you can consider actions to prevent the possible leakage.
Keeping the message or file in Quarantine prevents the risk of immediate infection. In addition, temporary storage allows the administrators to review all of the detections made by the application, and to locate and release selected quarantined items.
Every message or file moved to Quarantine is registered as a separate quarantined item and displayed in the Quarantine section of the Management Console.
You can also use the Quarantine view to locate and manage messages originally stored in Exchange Online Quarantine. The application requests the details of the quarantined messages from Exchange Online and displays them along with the quarantined items of Kaspersky Security for Microsoft Office 365.
By default, displaying Exchange Online quarantined items in the Management Console is enabled. You can disable it by customizing the Quarantine view.
The application does not move messages from Exchange Online and files from OneDrive or SharePoint Online to the Kaspersky Security for Microsoft Office 365 infrastructure, nor does it perform any actions on them on its own.
Messages can be temporarily moved to Quarantine due to Anti-Spam and other ongoing scans that involve address Anti-Spoofing, potential spam and Anti-Phishing checks. If the messages are considered as clean after the additional checks, they are automatically released from Quarantine to their original folders. Such messages are stored in Quarantine for 50 minutes. You can also release them manually.
You can manage quarantined items as follows:
- View details of quarantined items.
- Filter the list of quarantined items.
- Preview content of quarantined Exchange Online messages.
- Delete quarantined items.
- Release quarantined items to their original folders.
- Save quarantined items to disk as original messages or files (applicable only to quarantined items of Kaspersky Security for Microsoft Office 365).
- Export the list of quarantined items.
Messages and files in the Quarantine view are stored for a pre-defined retention period. After the end of this period, the messages and files are permanently deleted along with their metadata. The retention period is 30 days for items moved to Quarantine by Kaspersky Security for Microsoft Office 365. The retention period for Exchange Online quarantined messages is defined by the corresponding Exchange Online settings. For information about configuring the Exchange Online Quarantine retention period, refer to the Office 365 documentation at https://docs.microsoft.com/en-us/office365/securitycompliance/manage-quarantined-messages-and-files.
The Quarantine view can display all detected messages, not only copies of messages that were deleted or modified according to the configured security policies. To enable this feature, contact Technical Support.
Viewing the details of quarantined items
You can use the Quarantine view to locate Exchange Online messages, OneDrive and SharePoint Online files placed in Kaspersky Security for Microsoft Office 365 Quarantine and/or Exchange Online Quarantine, review their details, and decide whether a message or file will be permanently deleted, released to user or site, or saved to disk for further internal inspection or other purposes.
The quarantined items are listed according to their detection date: the newest items are displayed at the top of the list. By default, the list of quarantined items is arranged by 10 lines per page. You can switch the pages of the list back and forth or change the default number of displayed lines per page at the bottom of the page.
To view details of quarantined items:
- Open the Kaspersky Security for Microsoft Office 365 Management Console.
- In the left part of the page, select the Quarantine section.
The Quarantine data is displayed in a table that contains the following details:
- Detection date
- Item date
- Status
Type of the detected event.
For detections made by Kaspersky Security for Microsoft Office 365:
- Malware
- Phishing
- Filtered attachment
- Spam
- Mass mail
- Denylist
- Data Discovery
Statuses assigned to items by Kaspersky Security for Microsoft Office 365 are marked by the
 icon.
icon. For detections made by Exchange Online:
- Bulk mail
- Phishing
- Spam
- Mail flow rule match
- Malware
Statuses assigned to items by Exchange Online are marked by the
 icon.
icon.Messages cannot be moved to Quarantine by the Anti-Spam module. The Spam or Mass mail status is displayed in the table of quarantined items only if it was assigned to the message together with the Phishing, Malware, or Filtered attachment status.
- Access level
- Categories
- Cardinality
- Detection path
- From
- To
- Subject
- Security policy
- User
- Threat
- Traffic type
- Scan type
- Storage
Quarantine storage type. The quarantined items can be stored by Kaspersky Security (the
icon is displayed), Exchange Online (the icon is displayed) or Temporary Quarantine (the  icon is displayed).
 - File name
- Modified by
- Service
- Released by
If you want to display a specific message or file details only, click the Columns button on the right side of the page and select the required columns.
If you want to refresh Kaspersky Security for Microsoft Office 365 Quarantine data, reload the corresponding Management Console web page in your browser.
The new Exchange Online Quarantine data is automatically requested by the application every two hours. In urgent cases, you can force the application to retrieve new messages from Exchange Online Quarantine by clicking the Load items button on the right side of the page.
Records about messages and files released from Quarantine remain in the table of quarantined items. They become inactive (grayed out) and have the Released status prefix. You can only delete them from the table manually.
If you refresh the Quarantine data, all check boxes next to the quarantined items in the list will be cleared.
Page top
Filtering the list of quarantined items
You can filter the list of quarantined items by using one or several criteria: date of detection by the application, assigned status, access level, traffic type, scan type, storage location, service, and/or other details specified in the search field. Filtering conditions are combined using the AND logical operator. Quarantined items that do not meet the filtering criteria are not displayed in the list.
To filter the list of quarantined items:
- Open the Kaspersky Security for Microsoft Office 365 Management Console.
- In the left part of the page, select the Quarantine section.
- Specify one or several filtering criteria.
- To filter the quarantined items by message or file detection date:
- Click the heading of the Detection date column.
- Specify the list order by clicking the Ascending or Descending buttons. The current order is displayed by up or down arrow next to the heading of the column.
- Click the Specify the time range button and specify the necessary range of dates.
- Click the Apply button.
- To filter the quarantined items by status, access level, traffic type, scan type, storage, or service, click the heading of the corresponding column and leave only the check boxes next to the statuses that you want to include in the filter.
- To change the list order of the quarantined items according to their cardinality (ascending or descending), click the heading of the Cardinality column. The current order is displayed by up or down arrow next to the heading of the column.
- To filter the quarantined items by Data Discovery categories:
- Click the heading of the Categories column.
The Data Discovery categories pane will open on the right side of the window.
- Select the check boxes next to the confidential data detections you want to display.
- Click the Apply button.
- Click the heading of the Categories column.
- If you want to filter the quarantined items by other details, enter a keyword in the search field and click the Search button in the upper-right corner of the Management Console.
- To filter the quarantined items by message or file detection date:
To remove the filter:
- To remove the filter by date, click the Detection date column, click the Specify the time range button, and then click Reset.
- To remove the filter by status, access level, cardinality, traffic type, scan type, storage, or service, click the heading of the corresponding column, and select check boxes next to all the available values.
- To remove the filter by other details, clear the text from the search field and click the Search button.
- To remove all the selected filters, click the Reset filters button.
If you refresh the Quarantine data in the list by reloading the corresponding web page in your browser, the selected filters will remain applied.
Page top
Previewing content of quarantined Exchange Online messages
You can preview content of quarantined Exchange Online messages without saving them to your computer or releasing them to their original folders.
To preview content of a quarantined message:
- Select a message in the list of quarantined items.
- Click the Preview button.
The message details and content will be displayed in the Message preview pane on the right side of the window.
You can also save or release the previewed message by clicking the Save to disk or Release buttons.
Saving or releasing quarantined items may cause harm to your computer because they may contain viruses and other malicious objects that pose a threat of infection.
Note that the following content cannot be previewed in Quarantine:
- Messages that do not contain any visible characters.
- Messages that may contain confidential information.
- Messages from Exchange Online Quarantine.
- Released messages.
- Message attachments.
- Calendar events.
- OneDrive files.
- SharePoint Online files.
Original layout of messages content might not be preserved in the Quarantine preview.
Page top
Deleting quarantined items
To delete quarantined items:
- Open the Kaspersky Security for Microsoft Office 365 Management Console.
- In the left part of the page, select the Quarantine section.
- Select the check box next to the quarantined items that you want to delete.
- Click the Delete button.
- In the confirmation window, click Delete.
The corresponding items are permanently deleted.
The Delete action applied to Exchange Online quarantined messages not only removes them from the Quarantine view, but permanently deletes them from the Quarantine and makes them non-retrievable.
Page top
Releasing quarantined items
Items detected by the Data Discovery module are not moved to Quarantine, but only displayed in the Quarantine list, so you cannot release them from Quarantine.
Kaspersky Security for Microsoft Office 365 can release selected quarantined items as original Exchange Online messages, OneDrive and SharePoint Online files, and place them in their original folders. If the folder in which the Exchange Online message was detected has been deleted, the message is restored to the Inbox folder.
Releasing messages from Exchange Online Quarantine triggers the "Release selected message(s) to ALL recipients" Exchange Online operation.
Releasing quarantined items may cause harm to your computer because they may contain viruses and other malicious objects that pose a threat of infection.
To release quarantined items:
- Open the Kaspersky Security for Microsoft Office 365 Management Console.
- In the left part of the page, select the Quarantine section.
- Select the check boxes next to the quarantined items that you want to release.
- Click the Release button.
- In the confirmation window, click the Release button.
After the messages and files have been released, they become available in their original folders unmodified. At that, records about the released messages and files remain in the table of quarantined items. They become inactive (grayed out) and have the Released status prefix. You can only delete them from the table manually.
OneDrive and SharePoint Online files are released as a whole, along with all versions and properties. At that, all access permissions for OneDrive files are restored except for link access permissions. For SharePoint Online files, all access permissions are restored except for direct access and link access permissions. Note that a file can be released only once.
Page top
Saving quarantined items to disk
Items detected by the Data Discovery module are not moved to Quarantine, but only displayed in the Quarantine list, so you cannot save them.
Kaspersky Security for Microsoft Office 365 can save quarantined items to disk as original messages and files. This option is only available for whole email messages and files placed in Quarantine by Kaspersky Security for Microsoft Office 365.
Saving items from Quarantine to disk for analysis may cause harm to your computer because they may contain viruses and other malicious objects that pose a threat of infection.
To save a quarantined item to disk:
- Open the Kaspersky Security for Microsoft Office 365 Management Console.
- In the left part of the page, select the Quarantine section.
- In the table listing quarantined items, select the check box next to the item that you want to save.
You can save only one quarantined item at a time. If you want to save a OneDrive or SharePoint Online file, select the version of the file you want to save.
- In the upper part of the section, click the Save to disk button.
- In the confirmation window, click the Save to disk button.
The item will be saved to your local folder.
Page top
Exporting the list of quarantined items
Kaspersky Security for Microsoft Office 365 can export the list of all quarantined items to a comma-separated values (CSV) file for further analysis.
To export the list of quarantined items to a CSV file:
- Open the Kaspersky Security for Microsoft Office 365 Management Console.
- In the left part of the page, select the Quarantine section.
- Click the Export to CSV file button.
The list of all quarantined items will be exported to a CSV file and saved to your local folder.
Page top
Monitoring
This section describes the monitoring features that help you review the protection status of your Office 365 services, and check statistics on the application operations.
In the Information panel section of the Management Console, you can monitor the current protection status of your Office 365 organization and view the statistics on the operation of enabled application modules. You can also generate instant or scheduled automatic reports on the activity of the application modules.
Information panel
Getting started
The Getting started tab of the Information panel section allows you to configure protection of your Office 365 organization, monitor the current protection status, manage delivery of scheduled reports, and configure integration with SIEM.
On the Microsoft Office 365 tile, you can grant limited access to your Office 365 organization to provide the protection.
Information about the current protection status of your Office 365 organization is provided in the following tiles:
- Exchange Online protection
- OneDrive protection
- SharePoint Online protection
- Teams protection
In the Recommended section, you can enhance your protection management, including reports delivery and integration with SIEM presented in the following tiles:
- Reports
- Kaspersky Security Integration with SIEM
Monitoring
The Monitoring tab of the Information panel section allows you to view the current statistics on the protection of your Office 365 organization.
The Top shared files with confidential data tile contains statistics on globally shared files containing the largest quantity of confidential data.
The Top confidential data detections tile contains statistics on the most frequent categories of detected confidential data.
The following tiles contain statistics on the operation of enabled application modules:
- Exchange Online detection statistics
- Exchange Online detection chart
- OneDrive detection statistics
- SharePoint Online detection statistics
The following tile contains statistics on the mailboxes that received the largest number of messages containing viruses:
Top mailboxes with detected threats
The following tile contains statistics on the mailboxes that received the largest number of messages containing spam and phishing links:
Top mailboxes with detected spam or phishing
In the drop-down list to the right of the Information panel section header, you can change the time period for which you want to display statistics.
Information about the five most recent detections is provided in the following tile:
Page top
Reports
Kaspersky Security for Microsoft Office 365 allows you to generate protection reports on the activity of the application protection modules in PDF format, or Data Discovery module reports in CSV format.
Reports include statistics analyzed over the period of time during which the corresponding application modules were enabled. The application retrieves no statistics on modules that are disabled.
You can generate an instant report manually or set up a schedule for automatic report generation.
Protection reports
Protection reports cover a period of at least one day, and include the following information:
- Exchange Online detection overview
- Exchange Online detailed statistics
- Top mailboxes with detected threats
- Top mailboxes with detected spam or phishing
- OneDrive detection overview
- OneDrive detailed statistics
- SharePoint Online detection overview
- SharePoint Online detailed statistics
Data Discovery reports
Data Discovery reports cover a period of at least one day, and include the following information:
- Detection date
- Item date
- Access level
- Categories
- Cardinality
- Detection path
- From
- To
- Subject
- User
- Traffic type
- Scan type
- Storage
- File name
- Modified by
- Service
Generating an instant report manually
To generate an instant report manually:
- Open the Kaspersky Security for Microsoft Office 365 Management Console.
- In the left part of the page, select the Reports section and click the Generate report button.
The Report generation section opens.
- Select a report type:
- Protection report in PDF
- Data Discovery report in CSV
- Specify the Report period for which you want to include statistics in the report.
The start date must be no earlier than 90 days (for Protection report in PDF) and no earlier than 30 days (for Data Discovery report in CSV) before the actual date of report generation. Earlier dates are not available for selection.
- Click Generate.
The report file is displayed in accordance with your browser settings. The time zone specified in the Settings section is applied.
Page top
Scheduling automatic report generation
To schedule automatic report generation:
- Open the Kaspersky Security for Microsoft Office 365 Management Console.
- In the left part of the page, select the Reports section.
- Click the New scheduled report button.
The Creating scheduled report section opens.
- Select a report type:
- Protection report in PDF
- Data Discovery report in CSV
If you select both report types, you receive your protection reports and Data Discovery reports in separate email messages.
- In the Report schedule drop-down list, specify the report generation frequency. The following options are available:
- Daily
- Weekly
- Monthly
- For the Weekly option, in the drop-down list on the right, select the day of the week on which you want the report to be generated.
For the Monthly option, select the day of the month accordingly.
If you schedule the report to be generated on a day that is not applicable for all months of the year, the application will send the report on the last day of the month. For example, if you configure the report to be sent on the 31st day of the month, it will be generated on the 30th day in April, June, September, and November and on the 28th/29th day in February accordingly.
The report covers the period until the day previous to the report generation date. For example, if you choose to receive weekly reports on Monday, the report covers the period starting from the previous Monday to the previous Sunday.
- In the Report recipients box, provide email addresses of the users you want to send the reports to.
To add an email address to the list, type it in the Specify email address entry field and click the
 button.
To remove an email address from the list, click the
button next to it. - Click Save.
The newly created scheduled report and its details are displayed in the Reports section.
You can schedule 5 automatic reports maximum.
You can manage an existing scheduled report as follows:
- Change the scheduled report settings listed above by pointing the report and clicking the
 button next to it.
 - Delete the scheduled report by pointing the report and clicking the button next to it and confirming the action in the dialog box that opens.
The application generates reports on schedule at 00:01 AM. The time zone specified in the Settings section applies.
Page top
Support for MSP integrations
Kaspersky Security for Microsoft Office 365 supports integration with solutions for managed service providers, also known as MSPs. The integration allows service providers to perform the monitoring and billing of Kaspersky Security for Microsoft Office 365 in the same MSP solution that is used for other services.
Integration configuration settings are encrypted and stored in the Kaspersky Security for Microsoft Office 365 infrastructure. For more information about the data and integration process, see the Kaspersky Security Integrations for MSP Online Help.
After the integration is completed, Kaspersky Security for Microsoft Office 365 sends data about detected events and the total number of protected mailboxes to the MSP solution. The data about detected events is displayed in tickets or service orders.
The following MSP solutions are supported:
- ConnectWise Manage
- Autotask
- Tigerpaw
The table below shows the types of tickets or service orders that can be created in MSP solutions:
Ticket or service order types in MSP solutions
Ticket or service order type |
Data sent from Kaspersky Security for Microsoft Office 365 to MSP solutions |
|---|---|
Problem with a connection to Exchange Online in the protected company |
|
Problem with a license |
|
Detection in a protected mailbox:
|
|
Sources of information about the application and Technical Support
Sources of information about the application
You can find information about the application from the following sources:
- Kaspersky Security for Microsoft Office 365 page on the Kaspersky website.
On this website, you can view general information about the application and its functions and features.
- Kaspersky Security for Microsoft Office 365 page in the Knowledge Base.
In the Knowledge Base, you can read articles that provide useful information, recommendations, and answers to frequently asked questions on how to buy, install, and use the application.
- Kaspersky Community.
In the community, you can view discussion topics, post your comments, and create new discussion topics.
Contacting Technical Support
If you cannot find a solution to your issue in the application documentation or in one of the sources of information about the application, we recommend that you contact Technical Support. Technical Support specialists will answer all your questions about installing and using the application.
Before contacting Technical Support, please read the support rules.
You can contact Technical Support in by sending a request to Kaspersky Customer Service using the Kaspersky CompanyAccount portal.
You can register all of your organization employees under a single account on Kaspersky CompanyAccount. A single account lets you centrally manage electronic requests from registered employees to Kaspersky and also manage the privileges of these employees via Kaspersky CompanyAccount.
Page top
Reporting detection problems
Reporting detection problems: Kaspersky Security for Microsoft Office 365 falsely identified an email as spam or phishing
If you encounter a false detection, you may need to report this problem to an organization that made this detection.
You can learn which organization made a detection from the Storage column of the table in the Quarantine section, or from the Storage section of the Email preview window:
- Detection is made by Microsoft Office 365.
In this case, you need to contact Microsoft Office 365 support.
- Detection is made by Kaspersky Security for Microsoft Office 365.
You can find a solution below in this section.
If an email was falsely identified as spam or phishing, send it to notspam@kaspersky.com in the archive, EML format (preferably), or MSG.
Reporting detection problems: Kaspersky Security for Microsoft Office 365 failed to detect a spam/phishing email
If Kaspersky Security for Microsoft Office 365 failed to detect a spam or phishing email, send it to the Anti-Spam Lab spam@kaspersky.com.
We will analyze all provided examples and use them to improve spam recognition technologies in our applications.
Please adhere to the following guidelines when sending an email for analysis:
- Send only the emails received within the last 48 hours.
- Send a spam email as an attachment in the EML format (preferably) or MSG. If it is not sent as an attachment or if it is archived, we will not be able to analyze it.
- The final size of the email with an attachment must not exceed 20 MB.
Reporting detection problems: Kaspersky Security for Microsoft Office 365 failed to detect a virus or falsely identified an object as virus
In case of non-detected or false detected virus, send an email with a virus attached as a password-protected archive to notvirus@kaspersky.com. Please provide the password in an email.
If you cannot find a solution to your issue, send a request to technical support through Kaspersky CompanyAccount portal and describe your issue in detail.
Page top
Glossary
Account on Kaspersky Business Hub
An account that you must have to configure Kaspersky Security for Microsoft Office 365 by, for example, adding and removing user accounts, and configuring security profiles (security policies). This account lets you use the My Kaspersky service. You create this account when you start using Kaspersky Security for Microsoft Office 365.
Activating the application
Switching the application to fully functional mode. The application is activated by the user through submitting an activation code for a commercial license in the application interface.
Activation code
A code that you receive when purchasing a license for Kaspersky Security for Microsoft Office 365. This code is required for activation of the application.
The activation code is a unique sequence of twenty letters and numbers in the format XXXXX-XXXXX-XXXXX-XXXXX.
Anti-spam databases
Databases that contain information about unsolicited mass email mailings known to Kaspersky as of when the anti-spam databases are released. Entries in anti-spam databases allow the signs of such mailings to be detected in scanned objects. Anti-spam databases are created and regularly updated by Kaspersky experts.
Anti-virus databases
Databases that contain information about computer security threats known to Kaspersky as of when the anti-virus databases are released. Entries in anti-virus databases allow malicious code to be detected in scanned objects. Anti-virus databases are created and regularly updated by Kaspersky experts.
Database of malicious web addresses
Database that contains a list of web addresses whose content may be considered to be dangerous. The database is created and regularly updated by Kaspersky experts.
Database of phishing web addresses
Database that contains a list of web addresses which have been defined as phishing web addresses by Kaspersky experts. The database is created and regularly updated by Kaspersky experts.
File mask
Representation of a file name using wildcards. The standard wildcards used in file masks are * and ?, where * represents any number of any characters and ? stands for any single character.
Heuristic analyzer
Technology for detecting threats about which information has not yet been added to Kaspersky databases. The heuristic analyzer detects objects whose behavior in the operating system may pose a security threat. In Kaspersky Security for Microsoft Office 365, objects detected by the heuristic analyzer are considered to be infected. For example, an object may be considered to be infected if it contains sequences of commands that are typical of malicious objects (open file, write to file).
Kaspersky Business Hub
Online resource for registering companies to use the Kaspersky software solution intended for centralized management and protection of the computers and mobile devices of employees of the registered companies.
Kaspersky Security for Microsoft Office 365 Management Console
The Kaspersky Security for Microsoft Office 365 component that provides a user interface for configuring and tracking the operation of Kaspersky Security for Microsoft Office 365.
Kaspersky Security Network (KSN)
An infrastructure of cloud services that provides access to the Kaspersky database with constantly updated information about the reputation of files, web resources, and software. Kaspersky Security Network ensures faster responses by Kaspersky applications to threats, improves the performance of some protection components, and reduces the likelihood of false positives.
License term
A time period during which you have access to the application features and rights to use additional services. The services you can use depend on the type of the license.
Malicious Links
Web addresses pointing to malicious resources that distribute malware.
Malware
Programs that are specifically designed to delete, block, modify, or copy data, or to disrupt the performance of computers and/or computer networks. This category includes viruses, worms, Trojans, and other programs used to automatically conduct malicious activity.
Mass mail
Email messages that are generally sent by email marketing services in large numbers by subscription and are not detected as spam. For example, newsletters or marketing emails are detected as mass mail.
Notification
A message with information about an event (or events) that is sent by the application via other notification delivery systems (for example, email) to the specified addresses.
Office 365 Global Administrator account
Administrator role in Office 365 infrastructure. Global Administrator has full access to all administrative features and other administrative roles in Office 365.
On-demand scan
A malware scan that is initiated by the Administrator. The on-demand scan allows you to scan email messages and other email objects that have been registered in specific mailboxes within a specific period of time.
Phishing
A type of internet fraud aimed at obtaining unauthorized access to users' confidential data.
Phishing links
Phishing links lead to fraudulent websites designed to steal the personal data of users, such as bank account details. A phishing attack can be disguised, for example, as a message from your bank with a link to its official website. If you click the link, you are redirected to an exact copy of the bank's website, and the browser might even display the bank website's address. However, you are actually on a spoofed (fake) website. All of your actions on the website are tracked and can be used to steal your personal data.
Quarantine
A hidden folder specially set up in a user mailbox or OneDrive where messages or files containing threats detected in this mailbox or OneDrive are moved to.
Real-time scan
A protection mode whereby all files, email messages and other email objects are scanned automatically in the protected mailbox or OneDrive.
Security policy
A set of processing rules that are applied to email messages and files in the protected company according to the configured settings.
Spam
Unsolicited mass email mailings, most often including advertisements.
Virus
A program that infects other ones, by adding its code to them in order to gain control when infected files are run. This simple definition allows identifying the main action performed by any virus: infection.
Workspace
Virtual Administration Server by Kaspersky that is designed to manage the security of Exchange Online mailboxes, OneDrive users and SharePoint Online sites that are connected to Kaspersky Security for Microsoft Office 365, and to store individual settings of Kaspersky Security for Microsoft Office 365 and the registration data of a company using the software.
Page top
Leaving feedback
You can leave feedback on the Kaspersky Security for Microsoft Office 365 operation. Your feedback can then be used to improve the software solution.
Kaspersky Security for Microsoft Office 365 allows you to leave general feedback or more specific feedback about certain usage scenarios that the development team are interested in (for example, working with Quarantine).
To leave feedback on the Kaspersky Security for Microsoft Office 365 operation:
- Open Kaspersky Security for Microsoft Office 365 Management Console.
- To leave general feedback, do either of the following:
- On any page of Management Console, click the Feedback link in the lower part of the left navigation area.
The feedback window appears where you can type and send your ideas or suggestions.
The Kaspersky Security for Microsoft Office 365 development team will receive your feedback, as well as your email address. The development team can contact you via this email address for further details. Three months after your feedback, it will be anonymized. All the information concerning your email address will be deleted.
- On the Information panel → Monitoring page, as well as in the Quarantine section of the Management Console, click the Leave feedback button.
Select the numerical value that signifies your answer to the question asked in the feedback window (for example, How satisfied are you with our solution?).
You can type your ideas about what could be improved in Kaspersky Security for Microsoft Office 365 or in the specific scenario.
The same feedback window appears automatically when you work with the Protection settings section of the Management Console.
About data provision.
Kaspersky do not store any location or other personal data along with your response. We receive the following information: statistics about the viewed page: URL, referrer, page load time (by using the browser's Navigation Timing API), and time spent on the page; statistics about the device that shows the page: desktop/mobile/tablet, operating system, browser type, version, language, and viewport or screen size.
- On any page of Management Console, click the Feedback link in the lower part of the left navigation area.
- Click the Send button to send your feedback.
Your feedback is sent.
Additionally, you can leave feedback on the operation of Kaspersky Security for Microsoft Office 365 from Kaspersky Business Hub.
Page top
Information about third-party code
The information about third-party code used in Kaspersky Security for Microsoft Office 365 is given below.
INFORMATION ABOUT THIRD-PARTY CODE
-------
This file contains information about third-party code which was used in the development of the Application.
Organization of the file:
* SOFTWARE CODE
* DEVELOPMENT TOOLS
* OTHER INFORMATION
=======
SOFTWARE CODE
Information about third-party software code used in the development of the Application.
Boost 1.72.0
Copyright Beman Dawes, David Abrahams, 1998-2005.
Copyright Rene Rivera 2004-2007.
-----
-----
hyperscan 5.2.1
Copyright (c) 2015, Intel Corporation
-----
==
the BSD License (three-clause)
==
Redistribution and use in source and binary forms, with or without modification, are permitted provided that the following conditions are met:
1. Redistributions of source code must retain the above copyright notice, this list of conditions and the following disclaimer.
2. Redistributions in binary form must reproduce the above copyright notice, this list of conditions and the following disclaimer in the documentation and/or other materials provided with the distribution.
3. Neither the name of the copyright holder nor the names of its contributors may be used to endorse or promote products derived from this software without specific prior written permission.
THIS SOFTWARE IS PROVIDED BY THE COPYRIGHT HOLDERS AND CONTRIBUTORS "AS IS" AND ANY EXPRESS OR IMPLIED WARRANTIES, INCLUDING, BUT NOT LIMITED TO, THE IMPLIED WARRANTIES OF MERCHANTABILITY AND FITNESS FOR A PARTICULAR PURPOSE ARE DISCLAIMED. IN NO EVENT SHALL THE COPYRIGHT HOLDER OR CONTRIBUTORS BE LIABLE FOR ANY DIRECT, INDIRECT, INCIDENTAL, SPECIAL, EXEMPLARY, OR CONSEQUENTIAL DAMAGES (INCLUDING, BUT NOT LIMITED TO, PROCUREMENT OF SUBSTITUTE GOODS OR SERVICES; LOSS OF USE, DATA, OR PROFITS; OR BUSINESS INTERRUPTION) HOWEVER CAUSED AND ON ANY THEORY OF LIABILITY, WHETHER IN CONTRACT, STRICT LIABILITY, OR TORT (INCLUDING NEGLIGENCE OR OTHERWISE) ARISING IN ANY WAY OUT OF THE USE OF THIS SOFTWARE, EVEN IF ADVISED OF THE POSSIBILITY OF SUCH DAMAGE.
-----
Neither the name of Intel Corporation nor the names of its contributors may be used to endorse or promote products derived from this software without specific prior written permission.
Intel's Slicing-by-8 CRC32 implementation
Copyright (c) 2004-2006, Intel Corporation
All rights reserved.
Redistribution and use in source and binary forms, with or without modification, are permitted provided that the following conditions are met:
Redistributions of source code must retain the above copyright notice, this list of conditions and the following disclaimer.
Redistributions in binary form must reproduce the above copyright notice, this list of conditions and the following disclaimer in the documentation and/or other materials provided with the distribution.
THIS SOFTWARE IS PROVIDED BY THE COPYRIGHT HOLDERS AND CONTRIBUTORS "AS IS" AND ANY EXPRESS OR IMPLIED WARRANTIES, INCLUDING, BUT NOT LIMITED TO, THE IMPLIED WARRANTIES OF MERCHANTABILITY AND FITNESS FOR A PARTICULAR PURPOSE ARE DISCLAIMED. IN NO EVENT SHALL THE COPYRIGHT HOLDER OR CONTRIBUTORS BE LIABLE FOR ANY DIRECT, INDIRECT, INCIDENTAL, SPECIAL, EXEMPLARY, OR CONSEQUENTIAL DAMAGES (INCLUDING, BUT NOT LIMITED TO, PROCUREMENT OF SUBSTITUTE GOODS OR SERVICES; LOSS OF USE, DATA, OR PROFITS; OR BUSINESS INTERRUPTION) HOWEVER CAUSED AND ON ANY THEORY OF LIABILITY, WHETHER IN CONTRACT, STRICT LIABILITY, OR TORT (INCLUDING NEGLIGENCE OR OTHERWISE) ARISING IN ANY WAY OUT OF THE USE OF THIS SOFTWARE, EVEN IF ADVISED OF THE POSSIBILITY OF SUCH DAMAGE.
Boost C++ Headers Library
Boost Software License - Version 1.0 - August 17th, 2003
Permission is hereby granted, free of charge, to any person or organization obtaining a copy of the software and accompanying documentation covered by this license (the "Software") to use, reproduce, display, distribute, execute, and transmit the Software, and to prepare derivative works of the Software, and to permit third-parties to whom the Software is furnished to do so, all subject to the following:
The copyright notices in the Software and this entire statement, including the above license grant, this restriction and the following disclaimer, must be included in all copies of the Software, in whole or in part, and all derivative works of the Software, unless such copies or derivative works are solely in the form of machine-executable object code generated by a source language processor.
THE SOFTWARE IS PROVIDED "AS IS", WITHOUT WARRANTY OF ANY KIND, EXPRESS OR IMPLIED, INCLUDING BUT NOT LIMITED TO THE WARRANTIES OF MERCHANTABILITY, FITNESS FOR A PARTICULAR PURPOSE, TITLE AND NON-INFRINGEMENT. IN NO EVENT SHALL THE COPYRIGHT HOLDERS OR ANYONE DISTRIBUTING THE SOFTWARE BE LIABLE FOR ANY DAMAGES OR OTHER LIABILITY, WHETHER IN CONTRACT, TORT OR OTHERWISE, ARISING FROM, OUT OF OR IN CONNECTION WITH THE SOFTWARE OR THE USE OR OTHER DEALINGS IN THE SOFTWARE.
The Google C++ Testing Framework (Google Test)
Redistribution and use in source and binary forms, with or without modification, are permitted provided that the following conditions are met:
Redistributions of source code must retain the above copyright notice, this list of conditions and the following disclaimer.
Redistributions in binary form must reproduce the above copyright notice, this list of conditions and the following disclaimer in the documentation and/or other materials provided with the distribution.
Neither the name of Google Inc. nor the names of its contributors may be used to endorse or promote products derived from this software without specific prior written permission.
THIS SOFTWARE IS PROVIDED BY THE COPYRIGHT HOLDERS AND CONTRIBUTORS "AS IS" AND ANY EXPRESS OR IMPLIED WARRANTIES, INCLUDING, BUT NOT LIMITED TO, THE IMPLIED WARRANTIES OF MERCHANTABILITY AND FITNESS FOR A PARTICULAR PURPOSE ARE DISCLAIMED. IN NO EVENT SHALL THE COPYRIGHT OWNER OR CONTRIBUTORS BE LIABLE FOR ANY DIRECT, INDIRECT, INCIDENTAL, SPECIAL, EXEMPLARY, OR CONSEQUENTIAL DAMAGES (INCLUDING, BUT NOT LIMITED TO, PROCUREMENT OF SUBSTITUTE GOODS OR SERVICES; LOSS OF USE, DATA, OR PROFITS; OR BUSINESS INTERRUPTION) HOWEVER CAUSED AND ON ANY THEORY OF LIABILITY, WHETHER IN CONTRACT, STRICT LIABILITY, OR TORT (INCLUDING NEGLIGENCE OR OTHERWISE) ARISING IN ANY WAY OUT OF THE USE OF THIS SOFTWARE, EVEN IF ADVISED OF THE POSSIBILITY OF SUCH DAMAGE.
icu 58.2
Copyright (C) 1991-2016 Unicode, Inc. All rights reserved.
-----
COPYRIGHT AND PERMISSION NOTICE (ICU 58 and later)
Distributed under the Terms of Use in http://www.unicode.org/copyright.html
Permission is hereby granted, free of charge, to any person obtaining a copy of the Unicode data files and any associated documentation (the "Data Files") or Unicode software and any associated documentation (the "Software") to deal in the Data Files or Software without restriction, including without limitation the rights to use, copy, modify, merge, publish, distribute, and/or sell copies of the Data Files or Software, and to permit persons to whom the Data Files or Software are furnished to do so, provided that either
(a) this copyright and permission notice appear with all copies of the Data Files or Software, or
(b) this copyright and permission notice appear in associated Documentation.
THE DATA FILES AND SOFTWARE ARE PROVIDED "AS IS", WITHOUT WARRANTY OF ANY KIND, EXPRESS OR IMPLIED, INCLUDING BUT NOT LIMITED TO THE WARRANTIES OF MERCHANTABILITY, FITNESS FOR A PARTICULAR PURPOSE AND NONINFRINGEMENT OF THIRD PARTY RIGHTS.
IN NO EVENT SHALL THE COPYRIGHT HOLDER OR HOLDERS INCLUDED IN THIS NOTICE BE LIABLE FOR ANY CLAIM, OR ANY SPECIAL INDIRECT OR CONSEQUENTIAL DAMAGES, OR ANY DAMAGES WHATSOEVER RESULTING FROM LOSS OF USE, DATA OR PROFITS, WHETHER IN AN ACTION OF CONTRACT, NEGLIGENCE OR OTHER TORTIOUS ACTION, ARISING OUT OF OR IN CONNECTION WITH THE USE OR PERFORMANCE OF THE DATA FILES OR SOFTWARE.
Except as contained in this notice, the name of a copyright holder shall not be used in advertising or otherwise to promote the sale, use or other dealings in these Data Files or Software without prior written authorization of the copyright holder.
---------------------
Third-Party Software Licenses
This section contains third-party software notices and/or additional terms for licensed third-party software components included within ICU libraries.
1. ICU License - ICU 1.8.1 to ICU 57.1
COPYRIGHT AND PERMISSION NOTICE
Copyright (c) 1995-2016 International Business Machines Corporation and others
All rights reserved.
Permission is hereby granted, free of charge, to any person obtaining a copy of this software and associated documentation files (the "Software"), to deal in the Software without restriction, including without limitation the rights to use, copy, modify, merge, publish, distribute, and/or sell copies of the Software, and to permit persons to whom the Software is furnished to do so, provided that the above copyright notice(s) and this permission notice appear in all copies of the Software and that both the above copyright notice(s) and this permission notice appear in supporting documentation.
THE SOFTWARE IS PROVIDED "AS IS", WITHOUT WARRANTY OF ANY KIND, EXPRESS OR IMPLIED, INCLUDING BUT NOT LIMITED TO THE WARRANTIES OF MERCHANTABILITY, FITNESS FOR A PARTICULAR PURPOSE AND NONINFRINGEMENT OF THIRD PARTY RIGHTS. IN NO EVENT SHALL THE COPYRIGHT HOLDER OR HOLDERS INCLUDED IN THIS NOTICE BE LIABLE FOR ANY CLAIM, OR ANY SPECIAL INDIRECT OR CONSEQUENTIAL DAMAGES, OR ANY DAMAGES WHATSOEVER RESULTING FROM LOSS OF USE, DATA OR PROFITS, WHETHER IN AN ACTION OF CONTRACT, NEGLIGENCE OR OTHER TORTIOUS ACTION, ARISING OUT OF OR IN CONNECTION WITH THE USE OR PERFORMANCE OF THIS SOFTWARE.
Except as contained in this notice, the name of a copyright holder shall not be used in advertising or otherwise to promote the sale, use or other dealings in this Software without prior written authorization of the copyright holder.
All trademarks and registered trademarks mentioned herein are the property of their respective owners.
2. Chinese/Japanese Word Break Dictionary Data (cjdict.txt)
The Google Chrome software developed by Google is licensed under the BSD license. Other software included in this distribution is provided under other licenses, as set forth below.
The BSD License
http://opensource.org/licenses/bsd-license.php
Copyright (C) 2006-2008, Google Inc.
All rights reserved.
Redistribution and use in source and binary forms, with or without modification, are permitted provided that the following conditions are met:
Redistributions of source code must retain the above copyright notice, this list of conditions and the following disclaimer.
Redistributions in binary form must reproduce the above copyright notice, this list of conditions and the following disclaimer in the documentation and/or other materials provided with the distribution.
Neither the name of Google Inc. nor the names of its contributors may be used to endorse or promote products derived from this software without specific prior written permission.
THIS SOFTWARE IS PROVIDED BY THE COPYRIGHT HOLDERS AND CONTRIBUTORS "AS IS" AND ANY EXPRESS OR IMPLIED WARRANTIES, INCLUDING, BUT NOT LIMITED TO, THE IMPLIED WARRANTIES OF MERCHANTABILITY AND FITNESS FOR A PARTICULAR PURPOSE ARE DISCLAIMED. IN NO EVENT SHALL THE COPYRIGHT OWNER OR CONTRIBUTORS BE LIABLE FOR ANY DIRECT, INDIRECT, INCIDENTAL, SPECIAL, EXEMPLARY, OR CONSEQUENTIAL DAMAGES (INCLUDING, BUT NOT LIMITED TO, PROCUREMENT OF SUBSTITUTE GOODS OR SERVICES; LOSS OF USE, DATA, OR PROFITS; OR BUSINESS INTERRUPTION) HOWEVER CAUSED AND ON ANY THEORY OF LIABILITY, WHETHER IN CONTRACT, STRICT LIABILITY, OR TORT (INCLUDING NEGLIGENCE OR OTHERWISE) ARISING IN ANY WAY OUT OF THE USE OF THIS SOFTWARE, EVEN IF ADVISED OF THE POSSIBILITY OF SUCH DAMAGE.
The word list in cjdict.txt are generated by combining three word lists listed below with further processing for compound word breaking. The frequency is generated with an iterative training against Google web corpora.
* Libtabe (Chinese)
- https://sourceforge.net/project/?group_id=1519
- Its license terms and conditions are shown below.
* IPADIC (Japanese)
- http://chasen.aist-nara.ac.jp/chasen/distribution.html
- Its license terms and conditions are shown below.
---------COPYING.libtabe ---- BEGIN--------------------
Copyright (c) 1999 TaBE Project.
Copyright (c) 1999 Pai-Hsiang Hsiao.
All rights reserved.
Redistribution and use in source and binary forms, with or without modification, are permitted provided that the following conditions are met:
. Redistributions of source code must retain the above copyright notice, this list of conditions and the following disclaimer.
. Redistributions in binary form must reproduce the above copyright notice, this list of conditions and the following disclaimer in the documentation and/or other materials provided with the distribution.
. Neither the name of the TaBE Project nor the names of its contributors may be used to endorse or promote products derived from this software without specific prior written permission.
THIS SOFTWARE IS PROVIDED BY THE COPYRIGHT HOLDERS AND CONTRIBUTORS "AS IS" AND ANY EXPRESS OR IMPLIED WARRANTIES, INCLUDING, BUT NOT LIMITED TO, THE IMPLIED WARRANTIES OF MERCHANTABILITY AND FITNESS FOR A PARTICULAR PURPOSE ARE DISCLAIMED. IN NO EVENT SHALL THE REGENTS OR CONTRIBUTORS BE LIABLE FOR ANY DIRECT, INDIRECT, INCIDENTAL, SPECIAL, EXEMPLARY, OR CONSEQUENTIAL DAMAGES (INCLUDING, BUT NOT LIMITED TO, PROCUREMENT OF SUBSTITUTE GOODS OR SERVICES; LOSS OF USE, DATA, OR PROFITS; OR BUSINESS INTERRUPTION) HOWEVER CAUSED AND ON ANY THEORY OF LIABILITY, WHETHER IN CONTRACT, STRICT LIABILITY, OR TORT (INCLUDING NEGLIGENCE OR OTHERWISE) ARISING IN ANY WAY OUT OF THE USE OF THIS SOFTWARE, EVEN IF ADVISED OF THE POSSIBILITY OF SUCH DAMAGE.
Copyright (c) 1999 Computer Systems and Communication Lab, Institute of Information Science, Academia Sinica. All rights reserved.
Redistribution and use in source and binary forms, with or without modification, are permitted provided that the following conditions are met:
. Redistributions of source code must retain the above copyright notice, this list of conditions and the following disclaimer.
. Redistributions in binary form must reproduce the above copyright notice, this list of conditions and the following disclaimer in the documentation and/or other materials provided with the distribution.
. Neither the name of the Computer Systems and Communication Lab nor the names of its contributors may be used to endorse or promote products derived from this software without specific prior written permission.
THIS SOFTWARE IS PROVIDED BY THE COPYRIGHT HOLDERS AND CONTRIBUTORS "AS IS" AND ANY EXPRESS OR IMPLIED WARRANTIES, INCLUDING, BUT NOT LIMITED TO, THE IMPLIED WARRANTIES OF MERCHANTABILITY AND FITNESS FOR A PARTICULAR PURPOSE ARE DISCLAIMED. IN NO EVENT SHALL THE REGENTS OR CONTRIBUTORS BE LIABLE FOR ANY DIRECT, INDIRECT, INCIDENTAL, SPECIAL, EXEMPLARY, OR CONSEQUENTIAL DAMAGES (INCLUDING, BUT NOT LIMITED TO, PROCUREMENT OF SUBSTITUTE GOODS OR SERVICES; LOSS OF USE, DATA, OR PROFITS; OR BUSINESS INTERRUPTION) HOWEVER CAUSED AND ON ANY THEORY OF LIABILITY, WHETHER IN CONTRACT, STRICT LIABILITY, OR TORT (INCLUDING NEGLIGENCE OR OTHERWISE) ARISING IN ANY WAY OUT OF THE USE OF THIS SOFTWARE, EVEN IF ADVISED OF THE POSSIBILITY OF SUCH DAMAGE.
Copyright 1996 Chih-Hao Tsai @ Beckman Institute,
University of Illinois
c-tsai4@uiuc.edu http://casper.beckman.uiuc.edu/~c-tsai4
---------------COPYING.libtabe-----END--------------------------------
---------------COPYING.ipadic-----BEGIN-------------------------------
Copyright 2000, 2001, 2002, 2003 Nara Institute of Science and Technology. All Rights Reserved.
Use, reproduction, and distribution of this software is permitted. Any copy of this software, whether in its original form or modified, must include both the above copyright notice and the following paragraphs.
Nara Institute of Science and Technology (NAIST), the copyright holders, disclaims all warranties with regard to this software, including all implied warranties of merchantability and fitness, in no event shall NAIST be liable for any special, indirect or consequential damages or any damages whatsoever resulting from loss of use, data or profits, whether in an action of contract, negligence or other tortuous action, arising out of or in connection with the use or performance of this software.
A large portion of the dictionary entries originate from ICOT Free Software. The following conditions for ICOT Free Software applies to the current dictionary as well.
Each User may also freely distribute the Program, whether in its original form or modified, to any third party or parties, PROVIDED that the provisions of Section 3 ("NO WARRANTY") will ALWAYS appear on, or be attached to, the Program, which is distributed substantially in the same form as set out herein and that such intended distribution, if actually made, will neither violate or otherwise contravene any of the laws and regulations of the countries having jurisdiction over the User or the intended distribution itself.
NO WARRANTY
The program was produced on an experimental basis in the course of the research and development conducted during the project and is provided to users as so produced on an experimental basis. Accordingly, the program is provided without any warranty whatsoever, whether express, implied, statutory or otherwise. The term "warranty" used herein includes, but is not limited to, any warranty of the quality, performance, merchantability and fitness for a particular purpose of the program and the nonexistence of any infringement or violation of any right of any third party.
Each user of the program will agree and understand, and be deemed to have agreed and understood, that there is no warranty whatsoever for the program and, accordingly, the entire risk arising from or otherwise connected with the program is assumed by the user.
Therefore, neither ICOT, the copyright holder, or any other organization that participated in or was otherwise related to the development of the program and their respective officials, directors, officers and other employees shall be held liable for any and all damages, including, without limitation, general, special, incidental and consequential damages, arising out of or otherwise in connection with the use or inability to use the program or any product, material or result produced or otherwise obtained by using the program, regardless of whether they have been advised of, or otherwise had knowledge of, the possibility of such damages at any time during the project or thereafter. Each user will be deemed to have agreed to the foregoing by his or her commencement of use of the program. The term "use" as used herein includes, but is not limited to, the use, modification, copying and distribution of the program and the production of secondary products from the program.
In the case where the program, whether in its original form or modified, was distributed or delivered to or received by a user from any person, organization or entity other than ICOT, unless it makes or grants independently of ICOT any specific warranty to the user in writing, such person, organization or entity, will also be exempted from and not be held liable to the user for any such damages as noted above as far as the program is concerned.
---------------COPYING.ipadic-----END----------------------------------
3. Lao Word Break Dictionary Data (laodict.txt)
Copyright (c) 2013 International Business Machines Corporation and others. All Rights Reserved.
Project: http://code.google.com/p/lao-dictionary/
Dictionary: http://lao-dictionary.googlecode.com/git/Lao-Dictionary.txt
License: http://lao-dictionary.googlecode.com/git/Lao-Dictionary-LICENSE.txt
(copied below)
This file is derived from the above dictionary, with slight modifications.
----------------------------------------------------------------------
Copyright (C) 2013 Brian Eugene Wilson, Robert Martin Campbell.
All rights reserved.
Redistribution and use in source and binary forms, with or without modification, are permitted provided that the following conditions are met:
Redistributions of source code must retain the above copyright notice, this list of conditions and the following disclaimer. Redistributions in binary form must reproduce the above copyright notice, this list of conditions and the following disclaimer in the documentation and/or other materials provided with the distribution.
THIS SOFTWARE IS PROVIDED BY THE COPYRIGHT HOLDERS AND CONTRIBUTORS "AS IS" AND ANY EXPRESS OR IMPLIED WARRANTIES, INCLUDING, BUT NOT LIMITED TO, THE IMPLIED WARRANTIES OF MERCHANTABILITY AND FITNESS FOR A PARTICULAR PURPOSE ARE DISCLAIMED. IN NO EVENT SHALL THE COPYRIGHT HOLDER OR CONTRIBUTORS BE LIABLE FOR ANY DIRECT, INDIRECT, INCIDENTAL, SPECIAL, EXEMPLARY, OR CONSEQUENTIAL DAMAGES (INCLUDING, BUT NOT LIMITED TO, PROCUREMENT OF SUBSTITUTE GOODS OR SERVICES; LOSS OF USE, DATA, OR PROFITS; OR BUSINESS INTERRUPTION) HOWEVER CAUSED AND ON ANY THEORY OF LIABILITY, WHETHER IN CONTRACT, STRICT LIABILITY, OR TORT (INCLUDING NEGLIGENCE OR OTHERWISE) ARISING IN ANY WAY OUT OF THE USE OF THIS SOFTWARE, EVEN IF ADVISED OF THE POSSIBILITY OF SUCH DAMAGE.
--------------------------------------------------------------------------
4. Burmese Word Break Dictionary Data (burmesedict.txt)
Copyright (c) 2014 International Business Machines Corporation and others. All Rights Reserved.
This list is part of a project hosted at:
github.com/kanyawtech/myanmar-karen-word-lists
--------------------------------------------------------------------------
Copyright (c) 2013, LeRoy Benjamin Sharon
All rights reserved.
Redistribution and use in source and binary forms, with or without modification, are permitted provided that the following conditions are met: Redistributions of source code must retain the above copyright notice, this list of conditions and the following disclaimer. Redistributions in binary form must reproduce the above copyright notice, this list of conditions and the following disclaimer in the documentation and/or other materials provided with the distribution.
Neither the name Myanmar Karen Word Lists, nor the names of its contributors may be used to endorse or promote products derived from this software without specific prior written permission.
THIS SOFTWARE IS PROVIDED BY THE COPYRIGHT HOLDERS AND CONTRIBUTORS "AS IS" AND ANY EXPRESS OR IMPLIED WARRANTIES, INCLUDING, BUT NOT LIMITED TO, THE IMPLIED WARRANTIES OF MERCHANTABILITY AND FITNESS FOR A PARTICULAR PURPOSE ARE DISCLAIMED. IN NO EVENT SHALL THE COPYRIGHT HOLDER OR CONTRIBUTORS BE LIABLE FOR ANY DIRECT, INDIRECT, INCIDENTAL, SPECIAL, EXEMPLARY, OR CONSEQUENTIAL DAMAGES (INCLUDING, BUT NOT LIMITED TO, PROCUREMENT OF SUBSTITUTE GOODS OR SERVICES; LOSS OF USE, DATA, OR PROFITS; OR BUSINESS INTERRUPTION) HOWEVER CAUSED AND ON ANY THEORY OF LIABILITY, WHETHER IN CONTRACT, STRICT LIABILITY, OR TORT (INCLUDING NEGLIGENCE OR OTHERWISE) ARISING IN ANY WAY OUT OF THE USE OF THIS SOFTWARE, EVEN IF ADVISED OF THE POSSIBILITY OF SUCH DAMAGE.
--------------------------------------------------------------------------
5. Time Zone Database
ICU uses the public domain data and code derived from Time Zone Database for its time zone support. The ownership of the TZ database is explained in BCP 175: Procedure for Maintaining the Time Zone Database section 7.
7. Database Ownership
The TZ database itself is not an IETF Contribution or an IETF document. Rather it is a pre-existing and regularly updated work that is in the public domain, and is intended to remain in the public domain. Therefore, BCPs 78 [RFC5378] and 79 [RFC3979] do not apply to the TZ Database or contributions that individuals make to it. Should any claims be made and substantiated against the TZ Database, the organization that is providing the IANA Considerations defined in this RFC, under the memorandum of understanding with the IETF, currently ICANN, may act in accordance with all competent court orders. No ownership claims will be made by ICANN or the IETF Trust on the database or the code. Any person making a contribution to the database or code waives all rights to future claims in that contribution or in the TZ Database.
-----
jsoncpp 1.7.2
The author (Baptiste Lepilleur) explicitly disclaims copyright in all jurisdictions which recognize such a disclaimer. In such jurisdictions, this software is released into the Public Domain.
-----
Placed in the Public Domain.
-----
jsoncpp 1.6.5
The author (Baptiste Lepilleur) explicitly disclaims copyright in all
jurisdictions which recognize such a disclaimer. In such jurisdictions,
this software is released into the Public Domain.
-----
Placed in the Public Domain.
-----
In jurisdictions which do not recognize Public Domain property (e.g. Germany as of
2010), this software is Copyright (c) 2007-2010 by Baptiste Lepilleur, and is
released under the terms of the MIT License (see below).
In jurisdictions which recognize Public Domain property, the user of this
software may choose to accept it either as 1) Public Domain, 2) under the
conditions of the MIT License (see below), or 3) under the terms of dual
Public Domain/MIT License conditions described here, as they choose.
The MIT License is about as close to Public Domain as a license can get, and is
described in clear, concise terms at:
http://en.wikipedia.org/wiki/MIT_License
The full text of the MIT License follows:
========================================================================
Copyright (c) 2007-2010 Baptiste Lepilleur
Permission is hereby granted, free of charge, to any person
obtaining a copy of this software and associated documentation
files (the "Software"), to deal in the Software without
restriction, including without limitation the rights to use, copy,
modify, merge, publish, distribute, sublicense, and/or sell copies
of the Software, and to permit persons to whom the Software is
furnished to do so, subject to the following conditions:
The above copyright notice and this permission notice shall be
included in all copies or substantial portions of the Software.
THE SOFTWARE IS PROVIDED "AS IS", WITHOUT WARRANTY OF ANY KIND,
EXPRESS OR IMPLIED, INCLUDING BUT NOT LIMITED TO THE WARRANTIES OF
MERCHANTABILITY, FITNESS FOR A PARTICULAR PURPOSE AND
NONINFRINGEMENT. IN NO EVENT SHALL THE AUTHORS OR COPYRIGHT HOLDERS
BE LIABLE FOR ANY CLAIM, DAMAGES OR OTHER LIABILITY, WHETHER IN AN
ACTION OF CONTRACT, TORT OR OTHERWISE, ARISING FROM, OUT OF OR IN
CONNECTION WITH THE SOFTWARE OR THE USE OR OTHER DEALINGS IN THE
SOFTWARE.
========================================================================
(END LICENSE TEXT)
The MIT license is compatible with both the GPL and commercial
software, affording one all of the rights of Public Domain with the
minor nuisance of being required to keep the above copyright notice
and license text in the source code. Note also that by accepting the
Public Domain "license" you can re-license your copy using whatever
license you like.
libyaml 0.2.2
Copyright (c) 2017-2019 Ingy dцt Net
Copyright (c) 2006-2016 Kirill Simonov
-----
==
the MIT License
==
Permission is hereby granted, free of charge, to any person obtaining a copy of this software and associated documentation files (the"Software"), to deal in the Software without restriction, including without limitation the rights to use, copy, modify, merge, publish, distribute, sublicense, and/or sell copies of the Software, and to permit persons to whom the Software is furnished to do so, subject to the following conditions:
The above copyright notice and this permission notice shall be included in all copies or substantial portions of the Software.
THE SOFTWARE IS PROVIDED "AS IS", WITHOUT WARRANTY OF ANY KIND, EXPRESS OR IMPLIED, INCLUDING BUT NOT LIMITED TO THE WARRANTIES OF MERCHANTABILITY, FITNESS FOR A PARTICULAR PURPOSE AND NONINFRINGEMENT. IN NO EVENT SHALL THE AUTHORS OR COPYRIGHT HOLDERS BE LIABLE FOR ANY CLAIM, DAMAGES OR OTHER LIABILITY, WHETHER IN AN ACTION OF CONTRACT, TORT OR OTHERWISE, ARISING FROM, OUT OF OR IN CONNECTION WITH THE SOFTWARE OR THE USE OR OTHER DEALINGS IN THE SOFTWARE.
-----
org.apache.tika.tika-parsers 1.23
https://mvnrepository.com/artifact/org.apache.tika/tika-parsers/1.23
-----
Distributed under the terms of the Apache License Version 2.0
-----
tesseract 4.1.0
(C) Copyright, Google Inc.
(c) Copyright, Hewlett-Packard Company.
-----
Distributed under the terms of the Apache License Version 2.0
-----
grpc 1.32.0
Copyright 2014 gRPC authors.
-----
Distributed under the terms of the Apache License Version 2.0
-----
Licensed under the Apache License, Version 2.0 (the "License");
you may not use this file except in compliance with the License.
You may obtain a copy of the License at
http://www.apache.org/licenses/LICENSE-2.0
Unless required by applicable law or agreed to in writing, software distributed under the License is distributed on an "AS IS" BASIS, WITHOUT WARRANTIES OR CONDITIONS OF ANY KIND, either express or implied.
See the License for the specific language governing permissions and limitations under the License.
Apache License
Version 2.0, January 2004
http://www.apache.org/licenses/
TERMS AND CONDITIONS FOR USE, REPRODUCTION, AND DISTRIBUTION
1. Definitions.
"License" shall mean the terms and conditions for use, reproduction, and distribution as defined by Sections 1 through 9 of this document.
"Licensor" shall mean the copyright owner or entity authorized by the copyright owner that is granting the License.
"Legal Entity" shall mean the union of the acting entity and all other entities that control, are controlled by, or are under common control with that entity. For the purposes of this definition, "control" means (i) the power, direct or indirect, to cause the direction or management of such entity, whether by contract or otherwise, or (ii) ownership of fifty percent (50%) or more of the outstanding shares, or (iii) beneficial ownership of such entity.
"You" (or "Your") shall mean an individual or Legal Entity exercising permissions granted by this License.
"Source" form shall mean the preferred form for making modifications, including but not limited to software source code, documentation source, and configuration files.
"Object" form shall mean any form resulting from mechanical transformation or translation of a Source form, including but not limited to compiled object code, generated documentation, and conversions to other media types.
"Work" shall mean the work of authorship, whether in Source or Object form, made available under the License, as indicated by a copyright notice that is included in or attached to the work (an example is provided in the Appendix below).
"Derivative Works" shall mean any work, whether in Source or Object form, that is based on (or derived from) the Work and for which the editorial revisions, annotations, elaborations, or other modifications represent, as a whole, an original work of authorship. For the purposes of this License, Derivative Works shall not include works that remain separable from, or merely link (or bind by name) to the interfaces of, the Work and Derivative Works thereof.
"Contribution" shall mean any work of authorship, including the original version of the Work and any modifications or additions to that Work or Derivative Works thereof, that is intentionally submitted to Licensor for inclusion in the Work by the copyright owner or by an individual or Legal Entity authorized to submit on behalf of the copyright owner. For the purposes of this definition, "submitted" means any form of electronic, verbal, or written communication sent to the Licensor or its representatives, including but not limited to communication on electronic mailing lists, source code control systems, and issue tracking systems that are managed by, or on behalf of, the Licensor for the purpose of discussing and improving the Work, but excluding communication that is conspicuously marked or otherwise designated in writing by the copyright owner as "Not a Contribution."
"Contributor" shall mean Licensor and any individual or Legal Entity on behalf of whom a Contribution has been received by Licensor and subsequently incorporated within the Work.
2. Grant of Copyright License. Subject to the terms and conditions of this License, each Contributor hereby grants to You a perpetual, worldwide, non-exclusive, no-charge, royalty-free, irrevocable copyright license to reproduce, prepare Derivative Works of, publicly display, publicly perform, sublicense, and distribute the Work and such Derivative Works in Source or Object form.
3. Grant of Patent License. Subject to the terms and conditions of this License, each Contributor hereby grants to You a perpetual, worldwide, non-exclusive, no-charge, royalty-free, irrevocable (except as stated in this section) patent license to make, have made, use, offer to sell, sell, import, and otherwise transfer the Work, where such license applies only to those patent claims licensable by such Contributor that are necessarily infringed by their Contribution(s) alone or by combination of their Contribution(s) with the Work to which such Contribution(s) was submitted. If You institute patent litigation against any entity (including a cross-claim or counterclaim in a lawsuit) alleging that the Work or a Contribution incorporated within the Work constitutes direct or contributory patent infringement, then any patent licenses granted to You under this License for that Work shall terminate as of the date such litigation is filed.
4. Redistribution. You may reproduce and distribute copies of the Work or Derivative Works thereof in any medium, with or without modifications, and in Source or Object form, provided that You meet the following conditions:
(a) You must give any other recipients of the Work or Derivative Works a copy of this License; and
(b) You must cause any modified files to carry prominent notices stating that You changed the files; and
(c) You must retain, in the Source form of any Derivative Works that You distribute, all copyright, patent, trademark, and attribution notices from the Source form of the Work, excluding those notices that do not pertain to any part of the Derivative Works; and
(d) If the Work includes a "NOTICE" text file as part of its distribution, then any Derivative Works that You distribute must include a readable copy of the attribution notices contained within such NOTICE file, excluding those notices that do not pertain to any part of the Derivative Works, in at least one of the following places: within a NOTICE text file distributed as part of the Derivative Works; within the Source form or documentation, if provided along with the Derivative Works; or, within a display generated by the Derivative Works, if and wherever such third-party notices normally appear. The contents of the NOTICE file are for informational purposes only and do not modify the License. You may add Your own attribution notices within Derivative Works that You distribute, alongside or as an addendum to the NOTICE text from the Work, provided that such additional attribution notices cannot be construed as modifying the License. You may add Your own copyright statement to Your modifications and may provide additional or different license terms and conditions for use, reproduction, or distribution of Your modifications, or for any such Derivative Works as a whole, provided Your use, reproduction, and distribution of the Work otherwise complies with the conditions stated in this License.
5. Submission of Contributions. Unless You explicitly state otherwise, any Contribution intentionally submitted for inclusion in the Work by You to the Licensor shall be under the terms and conditions of this License, without any additional terms or conditions. Notwithstanding the above, nothing herein shall supersede or modify the terms of any separate license agreement you may have executed with Licensor regarding such Contributions.
6. Trademarks. This License does not grant permission to use the trade names, trademarks, service marks, or product names of the Licensor, except as required for reasonable and customary use in describing the origin of the Work and reproducing the content of the NOTICE file.
7. Disclaimer of Warranty. Unless required by applicable law or agreed to in writing, Licensor provides the Work (and each Contributor provides its Contributions) on an "AS IS" BASIS, WITHOUT WARRANTIES OR CONDITIONS OF ANY KIND, either express or implied, including, without limitation, any warranties or conditions of TITLE, NON-INFRINGEMENT, MERCHANTABILITY, or FITNESS FOR A PARTICULAR PURPOSE. You are solely responsible for determining the appropriateness of using or redistributing the Work and assume any risks associated with Your exercise of permissions under this License.
8. Limitation of Liability. In no event and under no legal theory, whether in tort (including negligence), contract, or otherwise, unless required by applicable law (such as deliberate and grossly negligent acts) or agreed to in writing, shall any Contributor be liable to You for damages, including any direct, indirect, special, incidental, or consequential damages of any character arising as a result of this License or out of the use or inability to use the Work (including but not limited to damages for loss of goodwill, work stoppage, computer failure or malfunction, or any and all other commercial damages or losses), even if such Contributor has been advised of the possibility of such damages.
9. Accepting Warranty or Additional Liability. While redistributing the Work or Derivative Works thereof, You may choose to offer, and charge a fee for, acceptance of support, warranty, indemnity, or other liability obligations and/or rights consistent with this License. However, in accepting such obligations, You may act only on Your own behalf and on Your sole responsibility, not on behalf of any other Contributor, and only if You agree to indemnify, defend, and hold each Contributor harmless for any liability incurred by, or claims asserted against, such Contributor by reason of your accepting any such warranty or additional liability.
END OF TERMS AND CONDITIONS
pcre 8.43
THE BASIC LIBRARY FUNCTIONS
---------------------------
Written by: Philip Hazel
Email local part: ph10
Email domain: cam.ac.uk
University of Cambridge Computing Service, Cambridge, England.
Copyright (c) 1997-2019 University of Cambridge
All rights reserved.
PCRE JUST-IN-TIME COMPILATION SUPPORT
-------------------------------------
Written by: Zoltan Herczeg
Email local part: hzmester
Email domain: freemail.hu
Copyright(c) 2010-2019 Zoltan Herczeg
All rights reserved.
STACK-LESS JUST-IN-TIME COMPILER
--------------------------------
Written by: Zoltan Herczeg
Email local part: hzmester
Email domain: freemail.hu
Copyright(c) 2009-2019 Zoltan Herczeg
All rights reserved.
THE C++ WRAPPER FUNCTIONS
-------------------------
Contributed by: Google Inc.
Copyright (c) 2007-2012, Google Inc.
All rights reserved.
-----
==
the PCRE License (BSD+AD)
==
THE "BSD" LICENCE
-----------------
Redistribution and use in source and binary forms, with or without modification, are permitted provided that the following conditions are met:
* Redistributions of source code must retain the above copyright notice, this list of conditions and the following disclaimer.
* Redistributions in binary form must reproduce the above copyright notice, this list of conditions and the following disclaimer in the documentation and/or other materials provided with the distribution.
* Neither the name of the University of Cambridge nor the name of Google Inc. nor the names of their contributors may be used to endorse or promote products derived from this software without specific prior written permission.
THIS SOFTWARE IS PROVIDED BY THE COPYRIGHT HOLDERS AND CONTRIBUTORS "AS IS" AND ANY EXPRESS OR IMPLIED WARRANTIES, INCLUDING, BUT NOT LIMITED TO, THE IMPLIED WARRANTIES OF MERCHANTABILITY AND FITNESS FOR A PARTICULAR PURPOSE ARE DISCLAIMED. IN NO EVENT SHALL THE COPYRIGHT OWNER OR CONTRIBUTORS BE LIABLE FOR ANY DIRECT, INDIRECT, INCIDENTAL, SPECIAL, EXEMPLARY, OR CONSEQUENTIAL DAMAGES (INCLUDING, BUT NOT LIMITED TO, PROCUREMENT OF SUBSTITUTE GOODS OR SERVICES; LOSS OF USE, DATA, OR PROFITS; OR BUSINESS INTERRUPTION) HOWEVER CAUSED AND ON ANY THEORY OF LIABILITY, WHETHER IN CONTRACT, STRICT LIABILITY, OR TORT (INCLUDING NEGLIGENCE OR OTHERWISE) ARISING IN ANY WAY OUT OF THE USE OF THIS SOFTWARE, EVEN IF ADVISED OF THE POSSIBILITY OF SUCH DAMAGE.
-----
leptonica 1.80.0
Copyright (C) 2001-2020 Leptonica. All rights reserved.
-----
Distributed under the terms of the BSD License (two-clause)
-----
openjpeg 2.4.0
Copyright (c) 2002-2014, Universite catholique de Louvain (UCL), Belgium
Copyright (c) 2002-2014, Professor Benoit Macq
Copyright (c) 2003-2014, Antonin Descampe
Copyright (c) 2003-2009, Francois-Olivier Devaux
Copyright (c) 2005, Herve Drolon, FreeImage Team
Copyright (c) 2002-2003, Yannick Verschueren
Copyright (c) 2001-2003, David Janssens
Copyright (c) 2011-2012, Centre National d'Etudes Spatiales (CNES), France
Copyright (c) 2012, CS Systemes d'Information, France
All rights reserved.
-----
Distributed under the terms of the BSD License (two-clause)
-----
The copyright in this software is being made available under the 2-clauses BSD License, included below.This software may be subject to other third party and contributor rights, including patent rights, and no such rights are granted under this license.
The BSD 2-Clause License
Redistribution and use in source and binary forms, with or without modification, are permitted provided that the following conditions are met:
1. Redistributions of source code must retain the above copyright notice, this list of conditions and the following disclaimer.
2. Redistributions in binary form must reproduce the above copyright notice, this list of conditions and the following disclaimer in the documentation and/or other materials provided with the distribution.
THIS SOFTWARE IS PROVIDED BY THE COPYRIGHT HOLDERS AND CONTRIBUTORS "AS IS" AND ANY EXPRESS OR IMPLIED WARRANTIES, INCLUDING, BUT NOT LIMITED TO, THE IMPLIED WARRANTIES OF MERCHANTABILITY AND FITNESS FOR A PARTICULAR PURPOSE ARE DISCLAIMED. IN NO EVENT SHALL THE COPYRIGHT HOLDER OR CONTRIBUTORS BE LIABLE FOR ANY DIRECT, INDIRECT, INCIDENTAL, SPECIAL, EXEMPLARY, OR CONSEQUENTIAL DAMAGES (INCLUDING, BUT NOT LIMITED TO, PROCUREMENT OF SUBSTITUTE GOODS OR SERVICES; LOSS OF USE, DATA, OR PROFITS; OR BUSINESS INTERRUPTION) HOWEVER CAUSED AND ON ANY THEORY OF LIABILITY, WHETHER IN CONTRACT, STRICT LIABILITY, OR TORT (INCLUDING NEGLIGENCE OR OTHERWISE) ARISING IN ANY WAY OUT OF THE USE OF THIS SOFTWARE, EVEN IF ADVISED OF THE POSSIBILITY OF SUCH DAMAGE.
libjpeg-turbo 2.1.0
libjpeg-turbo Licenses
libjpeg-turbo is covered by three compatible BSD-style open source licenses:
The IJG (Independent JPEG Group) License, which is listed in README.ijg
This license applies to the libjpeg API library and associated programs (any code inherited from libjpeg, and any modifications to that code.)
The Modified (3-clause) BSD License, which is listed below
This license covers the TurboJPEG API library and associated programs, as well as the build system.
The zlib License
This license is a subset of the other two, and it covers the libjpeg-turbo SIMD extensions.
The Modified (3-clause) BSD License
Copyright (C)2009-2021 D. R. Commander. All Rights Reserved.
Copyright (C)2015 Viktor SzathmГЎry. All Rights Reserved.
Redistribution and use in source and binary forms, with or without modification, are permitted provided that the following conditions are met:
Redistributions of source code must retain the above copyright notice, this list of conditions and the following disclaimer.
Redistributions in binary form must reproduce the above copyright notice, this list of conditions and the following disclaimer in the documentation and/or other materials provided with the distribution.
Neither the name of the libjpeg-turbo Project nor the names of its contributors may be used to endorse or promote products derived from this software without specific prior written permission.
THIS SOFTWARE IS PROVIDED BY THE COPYRIGHT HOLDERS AND CONTRIBUTORS "AS IS", AND ANY EXPRESS OR IMPLIED WARRANTIES, INCLUDING, BUT NOT LIMITED TO, THE IMPLIED WARRANTIES OF MERCHANTABILITY AND FITNESS FOR A PARTICULAR PURPOSE ARE DISCLAIMED. IN NO EVENT SHALL THE COPYRIGHT HOLDERS OR CONTRIBUTORS BE LIABLE FOR ANY DIRECT, INDIRECT, INCIDENTAL, SPECIAL, EXEMPLARY, OR CONSEQUENTIAL DAMAGES (INCLUDING, BUT NOT LIMITED TO, PROCUREMENT OF SUBSTITUTE GOODS OR SERVICES; LOSS OF USE, DATA, OR PROFITS; OR BUSINESS INTERRUPTION) HOWEVER CAUSED AND ON ANY THEORY OF LIABILITY, WHETHER IN CONTRACT, STRICT LIABILITY, OR TORT (INCLUDING NEGLIGENCE OR OTHERWISE) ARISING IN ANY WAY OUT OF THE USE OF THIS SOFTWARE, EVEN IF ADVISED OF THE POSSIBILITY OF SUCH DAMAGE.
-----
-----
libtiff 4.3.0
Copyright (c) 1988-1997 Sam Leffler
Copyright (c) 1991-1997 Silicon Graphics, Inc.
-----
Permission to use, copy, modify, distribute, and sell this software and its documentation for any purpose is hereby granted without fee, provided that (i) the above copyright notices and this permission notice appear in all copies of the software and related documentation, and (ii) the names of Sam Leffler and Silicon Graphics may not be used in any advertising or publicity relating to the software without the specific, prior written permission of Sam Leffler and Silicon Graphics.
THE SOFTWARE IS PROVIDED "AS-IS" AND WITHOUT WARRANTY OF ANY KIND, EXPRESS, IMPLIED OR OTHERWISE, INCLUDING WITHOUT LIMITATION, ANY WARRANTY OF MERCHANTABILITY OR FITNESS FOR A PARTICULAR PURPOSE.
IN NO EVENT SHALL SAM LEFFLER OR SILICON GRAPHICS BE LIABLE FOR ANY SPECIAL, INCIDENTAL, INDIRECT OR CONSEQUENTIAL DAMAGES OF ANY KIND, OR ANY DAMAGES WHATSOEVER RESULTING FROM LOSS OF USE, DATA OR PROFITS, WHETHER OR NOT ADVISED OF THE POSSIBILITY OF DAMAGE, AND ON ANY THEORY OF LIABILITY, ARISING OUT OF OR IN CONNECTION WITH THE USE OR PERFORMANCE OF THIS SOFTWARE.
-----
libpng 1.6.37
Copyright (c) 1995-2019 The PNG Reference Library Authors.
Copyright (c) 2018-2019 Cosmin Truta.
Copyright (c) 2000-2002, 2004, 2006-2018 Glenn Randers-Pehrson.
Copyright (c) 1996-1997 Andreas Dilger.
Copyright (c) 1995-1996 Guy Eric Schalnat, Group 42, Inc.
-----
==
Libpng License
==
Permission is hereby granted to use, copy, modify, and distribute this source code, or portions hereof, for any purpose, without fee, subject to the following restrictions:
1. The origin of this source code must not be misrepresented.
2. Altered versions must be plainly marked as such and must not be misrepresented as being the original source.
3. This Copyright notice may not be removed or altered from any source or altered source distribution.
The Contributing Authors and Group 42, Inc. specifically permit, without fee, and encourage the use of this source code as a component to supporting the PNG file format in commercial products. If you use this source code in a product, acknowledgment is not required but would be appreciated.
A "png_get_copyright" function is available, for convenient use in "about" boxes and the like:
printf("%s",png_get_copyright(NULL));
Also, the PNG logo (in PNG format, of course) is supplied in the files "pngbar.png" and "pngbar.jpg (88x31) and "pngnow.png" (98x31).
Libpng is OSI Certified Open Source Software. OSI Certified Open Source is a certification mark of the Open Source Initiative.
-----
PNG Reference Library License version 2
Copyright (c) 1995-2019 The PNG Reference Library Authors.
Copyright (c) 2018-2019 Cosmin Truta.
Copyright (c) 2000-2002, 2004, 2006-2018 Glenn Randers-Pehrson.
Copyright (c) 1996-1997 Andreas Dilger.
Copyright (c) 1995-1996 Guy Eric Schalnat, Group 42, Inc.
The software is supplied "as is", without warranty of any kind, express or implied, including, without limitation, the warranties of merchantability, fitness for a particular purpose, title, and non-infringement. In no event shall the Copyright owners, or anyone distributing the software, be liable for any damages or other liability, whether in contract, tort or otherwise, arising from, out of, or in connection with the software, or the use or other dealings in the software, even if advised of the possibility of such damage.
Permission is hereby granted to use, copy, modify, and distribute this software, or portions hereof, for any purpose, without fee, subject to the following restrictions:
1. The origin of this software must not be misrepresented; you must not claim that you wrote the original software. If you use this software in a product, an acknowledgment in the product documentation would be appreciated, but is not required.
2. Altered source versions must be plainly marked as such, and must not be misrepresented as being the original software.
3. This Copyright notice may not be removed or altered from any source or altered source distribution.
PNG Reference Library License version 1 (for libpng 0.5 through 1.6.35)
---
libpng versions 1.0.7, July 1, 2000, through 1.6.35, July 15, 2018 are
Copyright (c) 2000-2002, 2004, 2006-2018 Glenn Randers-Pehrson, are
derived from libpng-1.0.6, and are distributed according to the same
disclaimer and license as libpng-1.0.6 with the following individuals
added to the list of Contributing Authors:
Simon-Pierre Cadieux
Eric S. Raymond
Mans Rullgard
Cosmin Truta
Gilles Vollant
James Yu
Mandar Sahastrabuddhe
Google Inc.
Vadim Barkov
and with the following additions to the disclaimer:
There is no warranty against interference with your enjoyment of the library or against infringement. There is no warranty that our efforts or the library will fulfill any of your particular purposes or needs. This library is provided with all faults, and the entire risk of satisfactory quality, performance, accuracy, and effort is with the user.
Some files in the "contrib" directory and some configure-generated files that are distributed with libpng have other copyright owners, and are released under other open source licenses.
libpng versions 0.97, January 1998, through 1.0.6, March 20, 2000, are
Copyright (c) 1998-2000 Glenn Randers-Pehrson, are derived from
libpng-0.96, and are distributed according to the same disclaimer and
license as libpng-0.96, with the following individuals added to the
list of Contributing Authors:
Tom Lane
Glenn Randers-Pehrson
Willem van Schaik
libpng versions 0.89, June 1996, through 0.96, May 1997, are
Copyright (c) 1996-1997 Andreas Dilger, are derived from libpng-0.88,
and are distributed according to the same disclaimer and license as
libpng-0.88, with the following individuals added to the list of
Contributing Authors:
John Bowler
Kevin Bracey
Sam Bushell
Magnus Holmgren
Greg Roelofs
Tom Tanner
Some files in the "scripts" directory have other copyright owners,
but are released under this license.
libpng versions 0.5, May 1995, through 0.88, January 1996, are
Copyright (c) 1995-1996 Guy Eric Schalnat, Group 42, Inc.
For the purposes of this copyright and license, "Contributing Authors" is defined as the following set of individuals:
Andreas Dilger
Dave Martindale
Guy Eric Schalnat
Paul Schmidt
Tim Wegner
The PNG Reference Library is supplied "AS IS". The Contributing Authors and Group 42, Inc. disclaim all warranties, expressed or implied, including, without limitation, the warranties of merchantability and of fitness for any purpose. The Contributing Authors and Group 42, Inc. assume no liability for direct, indirect, incidental, special, exemplary, or consequential damages, which may result from the use of the PNG Reference Library, even if advised of the possibility of such damage.
Permission is hereby granted to use, copy, modify, and distribute this source code, or portions hereof, for any purpose, without fee, subject to the following restrictions:
1. The origin of this source code must not be misrepresented.
2. Altered versions must be plainly marked as such and must not be misrepresented as being the original source.
3. This Copyright notice may not be removed or altered from any source or altered source distribution.
The Contributing Authors and Group 42, Inc. specifically permit, without fee, and encourage the use of this source code as a component to supporting the PNG file format in commercial products. If you use this source code in a product, acknowledgment is not required but would be appreciated.
zlib 1.2.11
(C) 1995-2017 Jean-loup Gailly and Mark Adler
-----
==
the Zlib License
==
This software is provided 'as-is', without any express or implied warranty. In no event will the authors be held liable for any damages arising from the use of this software.
Permission is granted to anyone to use this software for any purpose, including commercial applications, and to alter it and redistribute it freely, subject to the following restrictions:
1. The origin of this software must not be misrepresented; you must not claim that you wrote the original software. If you use this software in a product, an acknowledgment in the product documentation would be appreciated but is not required.
2. Altered source versions must be plainly marked as such, and must not be misrepresented as being the original software.
3. This notice may not be removed or altered from any source distribution.
-----
=======
DEVELOPMENT TOOLS
Information about third-party development tools used in the development of the Application.
jni OpenJDK 11
-----
As a special exception, the copyright holders of this library give you permission to link this library with independent modules to produce an executable, regardless of the license terms of these independent modules, and to copy and distribute the resulting executable under terms of your choice, provided that you also meet, for each linked independent module, the terms and conditions of the license of that module. An independent module is a module which is not derived from or based on this library. If you modify this library, you may extend this exception to your version of the library, but you are not obligated to do so. If you do not wish to do so, delete this exception statement from your version.
==
GNU GENERAL PUBLIC LICENSE
Version 2, June 1991
Copyright (C) 1989, 1991 Free Software Foundation, Inc.
51 Franklin Street, Fifth Floor, Boston, MA 02110-1301, USA
Everyone is permitted to copy and distribute verbatim copies of this license document, but changing it is not allowed.
Preamble
The licenses for most software are designed to take away your freedom to share and change it. By contrast, the GNU General Public License is intended to guarantee your freedom to share and change free software--to make sure the software is free for all its users. This General Public License applies to most of the Free Software Foundation's software and to any other program whose authors commit to using it. (Some other Free Software Foundation software is covered by the GNU Lesser General Public License instead.) You can apply it to your programs, too.
When we speak of free software, we are referring to freedom, not price. Our General Public Licenses are designed to make sure that you have the freedom to distribute copies of free software (and charge for this service if you wish), that you receive source code or can get it if you want it, that you can change the software or use pieces of it in new free programs; and that you know you can do these things.
To protect your rights, we need to make restrictions that forbid anyone to deny you these rights or to ask you to surrender the rights. These restrictions translate to certain responsibilities for you if you distribute copies of the software, or if you modify it.
For example, if you distribute copies of such a program, whether gratis or for a fee, you must give the recipients all the rights that you have. You must make sure that they, too, receive or can get the source code. And you must show them these terms so they know their rights.
We protect your rights with two steps: (1) copyright the software, and (2) offer you this license which gives you legal permission to copy, distribute and/or modify the software.
Also, for each author's protection and ours, we want to make certain that everyone understands that there is no warranty for this free software. If the software is modified by someone else and passed on, we want its recipients to know that what they have is not the original, so that any problems introduced by others will not reflect on the original authors' reputations.
Finally, any free program is threatened constantly by software patents. We wish to avoid the danger that redistributors of a free program will individually obtain patent licenses, in effect making the program proprietary. To prevent this, we have made it clear that any patent must be licensed for everyone's free use or not licensed at all.
The precise terms and conditions for copying, distribution and modification follow.
TERMS AND CONDITIONS FOR COPYING, DISTRIBUTION AND MODIFICATION
0. This License applies to any program or other work which contains a notice placed by the copyright holder saying it may be distributed under the terms of this General Public License. The "Program", below, refers to any such program or work, and a "work based on the Program" means either the Program or any derivative work under copyright law: that is to say, a work containing the Program or a portion of it, either verbatim or with modifications and/or translated into another language. (Hereinafter, translation is included without limitation in the term "modification".) Each licensee is addressed as "you".
Activities other than copying, distribution and modification are not covered by this License; they are outside its scope. The act of running the Program is not restricted, and the output from the Program is covered only if its contents constitute a work based on the Program (independent of having been made by running the Program). Whether that is true depends on what the Program does.
1. You may copy and distribute verbatim copies of the Program's source code as you receive it, in any medium, provided that you conspicuously and appropriately publish on each copy an appropriate copyright notice and disclaimer of warranty; keep intact all the notices that refer to this License and to the absence of any warranty; and give any other recipients of the Program a copy of this License along with the Program.
You may charge a fee for the physical act of transferring a copy, and you may at your option offer warranty protection in exchange for a fee.
2. You may modify your copy or copies of the Program or any portion of it, thus forming a work based on the Program, and copy and distribute such modifications or work under the terms of Section 1 above, provided that you also meet all of these conditions:
a) You must cause the modified files to carry prominent notices stating that you changed the files and the date of any change.
b) You must cause any work that you distribute or publish, that in whole or in part contains or is derived from the Program or any part thereof, to be licensed as a whole at no charge to all third parties under the terms of this License.
c) If the modified program normally reads commands interactively when run, you must cause it, when started running for such interactive use in the most ordinary way, to print or display an announcement including an appropriate copyright notice and a notice that there is no warranty (or else, saying that you provide a warranty) and that users may redistribute the program under these conditions, and telling the user how to view a copy of this License. (Exception: if the Program itself is interactive but does not normally print such an announcement, your work based on the Program is not required to print an announcement.)
These requirements apply to the modified work as a whole. If identifiable sections of that work are not derived from the Program, and can be reasonably considered independent and separate works in themselves, then this License, and its terms, do not apply to those sections when you distribute them as separate works. But when you distribute the same sections as part of a whole which is a work based on the Program, the distribution of the whole must be on the terms of this License, whose permissions for other licensees extend to the entire whole, and thus to each and every part regardless of who wrote it.
Thus, it is not the intent of this section to claim rights or contest your rights to work written entirely by you; rather, the intent is to exercise the right to control the distribution of derivative or collective works based on the Program.
In addition, mere aggregation of another work not based on the Program with the Program (or with a work based on the Program) on a volume of a storage or distribution medium does not bring the other work under the scope of this License.
3. You may copy and distribute the Program (or a work based on it, under Section 2) in object code or executable form under the terms of Sections 1 and 2 above provided that you also do one of the following:
a) Accompany it with the complete corresponding machine-readable source code, which must be distributed under the terms of Sections 1 and 2 above on a medium customarily used for software interchange; or,
b) Accompany it with a written offer, valid for at least three years, to give any third party, for a charge no more than your cost of physically performing source distribution, a complete machine-readable copy of the corresponding source code, to be distributed under the terms of Sections 1 and 2 above on a medium customarily used for software interchange; or,
c) Accompany it with the information you received as to the offer to distribute corresponding source code. (This alternative is allowed only for noncommercial distribution and only if you received the program in object code or executable form with such an offer, in accord with Subsection b above.)
The source code for a work means the preferred form of the work for making modifications to it. For an executable work, complete source code means all the source code for all modules it contains, plus any associated interface definition files, plus the scripts used to control compilation and installation of the executable. However, as a special exception, the source code distributed need not include anything that is normally distributed (in either source or binary form) with the major components (compiler, kernel, and so on) of the operating system on which the executable runs, unless that component itself accompanies the executable.
If distribution of executable or object code is made by offering access to copy from a designated place, then offering equivalent access to copy the source code from the same place counts as distribution of the source code, even though third parties are not compelled to copy the source along with the object code.
4. You may not copy, modify, sublicense, or distribute the Program except as expressly provided under this License. Any attempt otherwise to copy, modify, sublicense or distribute the Program is void, and will automatically terminate your rights under this License. However, parties who have received copies, or rights, from you under this License will not have their licenses terminated so long as such parties remain in full compliance.
5. You are not required to accept this License, since you have not signed it. However, nothing else grants you permission to modify or distribute the Program or its derivative works. These actions are prohibited by law if you do not accept this License. Therefore, by modifying or distributing the Program (or any work based on the Program), you indicate your acceptance of this License to do so, and all its terms and conditions for copying, distributing or modifying the Program or works based on it.
6. Each time you redistribute the Program (or any work based on the Program), the recipient automatically receives a license from the original licensor to copy, distribute or modify the Program subject to these terms and conditions. You may not impose any further restrictions on the recipients' exercise of the rights granted herein. You are not responsible for enforcing compliance by third parties to this License.
7. If, as a consequence of a court judgment or allegation of patent infringement or for any other reason (not limited to patent issues), conditions are imposed on you (whether by court order, agreement or otherwise) that contradict the conditions of this License, they do not excuse you from the conditions of this License. If you cannot distribute so as to satisfy simultaneously your obligations under this License and any other pertinent obligations, then as a consequence you may not distribute the Program at all. For example, if a patent license would not permit royalty-free redistribution of the Program by all those who receive copies directly or indirectly through you, then the only way you could satisfy both it and this License would be to refrain entirely from distribution of the Program.
If any portion of this section is held invalid or unenforceable under any particular circumstance, the balance of the section is intended to apply and the section as a whole is intended to apply in other circumstances.
It is not the purpose of this section to induce you to infringe any patents or other property right claims or to contest validity of any such claims; this section has the sole purpose of protecting the integrity of the free software distribution system, which is implemented by public license practices. Many people have made generous contributions to the wide range of software distributed through that system in reliance on consistent application of that system; it is up to the author/donor to decide if he or she is willing to distribute software through any other system and a licensee cannot impose that choice.
This section is intended to make thoroughly clear what is believed to be a consequence of the rest of this License.
8. If the distribution and/or use of the Program is restricted in certain countries either by patents or by copyrighted interfaces, the original copyright holder who places the Program under this License may add an explicit geographical distribution limitation excluding those countries, so that distribution is permitted only in or among countries not thus excluded. In such case, this License incorporates the limitation as if written in the body of this License.
9. The Free Software Foundation may publish revised and/or new versions of the General Public License from time to time. Such new versions will be similar in spirit to the present version, but may differ in detail to address new problems or concerns.
Each version is given a distinguishing version number. If the Program specifies a version number of this License which applies to it and "any later version", you have the option of following the terms and conditions either of that version or of any later version published by the Free Software Foundation. If the Program does not specify a version number of this License, you may choose any version ever published by the Free Software Foundation.
10. If you wish to incorporate parts of the Program into other free programs whose distribution conditions are different, write to the author to ask for permission. For software which is copyrighted by the Free Software Foundation, write to the Free Software Foundation; we sometimes make exceptions for this. Our decision will be guided by the two goals of preserving the free status of all derivatives of our free software and of promoting the sharing and reuse of software generally.
NO WARRANTY
11. BECAUSE THE PROGRAM IS LICENSED FREE OF CHARGE, THERE IS NO WARRANTY FOR THE PROGRAM, TO THE EXTENT PERMITTED BY APPLICABLE LAW. EXCEPT WHEN OTHERWISE STATED IN WRITING THE COPYRIGHT HOLDERS AND/OR OTHER PARTIES PROVIDE THE PROGRAM "AS IS" WITHOUT WARRANTY OF ANY KIND, EITHER EXPRESSED OR IMPLIED, INCLUDING, BUT NOT LIMITED TO, THE IMPLIED WARRANTIES OF MERCHANTABILITY AND FITNESS FOR A PARTICULAR PURPOSE. THE ENTIRE RISK AS TO THE QUALITY AND PERFORMANCE OF THE PROGRAM IS WITH YOU. SHOULD THE PROGRAM PROVE DEFECTIVE, YOU ASSUME THE COST OF ALL NECESSARY SERVICING, REPAIR OR CORRECTION.
12. IN NO EVENT UNLESS REQUIRED BY APPLICABLE LAW OR AGREED TO IN WRITING WILL ANY COPYRIGHT HOLDER, OR ANY OTHER PARTY WHO MAY MODIFY AND/OR REDISTRIBUTE THE PROGRAM AS PERMITTED ABOVE, BE LIABLE TO YOU FOR DAMAGES, INCLUDING ANY GENERAL, SPECIAL, INCIDENTAL OR CONSEQUENTIAL DAMAGES ARISING OUT OF THE USE OR INABILITY TO USE THE PROGRAM (INCLUDING BUT NOT LIMITED TO LOSS OF DATA OR DATA BEING RENDERED INACCURATE OR LOSSES SUSTAINED BY YOU OR THIRD PARTIES OR A FAILURE OF THE PROGRAM TO OPERATE WITH ANY OTHER PROGRAMS), EVEN IF SUCH HOLDER OR OTHER PARTY HAS BEEN ADVISED OF THE POSSIBILITY OF SUCH DAMAGES.
END OF TERMS AND CONDITIONS
How to Apply These Terms to Your New Programs
If you develop a new program, and you want it to be of the greatest possible use to the public, the best way to achieve this is to make it free software which everyone can redistribute and change under these terms.
To do so, attach the following notices to the program. It is safest to attach them to the start of each source file to most effectively convey the exclusion of warranty; and each file should have at least the "copyright" line and a pointer to where the full notice is found.
one line to give the program's name and an idea of what it does.
Copyright (C) yyyy name of author
This program is free software; you can redistribute it and/or modify it under the terms of the GNU General Public License as published by the Free Software Foundation; either version 2 of the License, or (at your option) any later version.
This program is distributed in the hope that it will be useful, but WITHOUT ANY WARRANTY; without even the implied warranty of MERCHANTABILITY or FITNESS FOR A PARTICULAR PURPOSE. See the GNU General Public License for more details.
You should have received a copy of the GNU General Public License along with this program; if not, write to the Free Software Foundation, Inc., 51 Franklin Street, Fifth Floor, Boston, MA 02110-1301, USA.
Also add information on how to contact you by electronic and paper mail.
If the program is interactive, make it output a short notice like this when it starts in an interactive mode:
Gnomovision version 69, Copyright (C) year name of author
Gnomovision comes with ABSOLUTELY NO WARRANTY; for details type `show w'. This is free software, and you are welcome
to redistribute it under certain conditions; type `show c'
for details.
The hypothetical commands `show w' and `show c' should show the appropriate parts of the General Public License. Of course, the commands you use may be called something other than `show w' and `show c'; they could even be mouse-clicks or menu items--whatever suits your program.
You should also get your employer (if you work as a programmer) or your school, if any, to sign a "copyright disclaimer" for the program, if necessary. Here is a sample; alter the names:
Yoyodyne, Inc., hereby disclaims all copyright interest in the program `Gnomovision'
(which makes passes at compilers) written
by James Hacker.
signature of Ty Coon, 1 April 1989
Ty Coon, President of Vice
This General Public License does not permit incorporating your program into proprietary programs. If your program is a subroutine library, you may consider it more useful to permit linking proprietary applications with the library. If this is what you want to do, use the GNU Lesser General Public License instead of this License.
-----
=======
OTHER INFORMATION
The Application may include some software programs that are licensed (or sublicensed) to the user under the GNU General Public License (GPL) or other similar free software licenses which, among other rights, permit the user to copy, modify and redistribute certain programs, or portions thereof, and have access to the source code ("Open Source Software"). If such licenses require that for any software, which is distributed to someone in an executable binary format, that the source code also be made available to those users, then the source code should be made available by sending the request to source@kaspersky.com or the source code is supplied with the Application.
Page top
Trademark notices
Registered trademarks and service marks are the property of their respective owners.
Safari is a trademark of Apple Inc.
Google Chrome is a trademark of Google LLC.
Active Directory, Azure, Microsoft, Office 365, OneDrive and SharePoint are trademarks of the Microsoft group of companies.
Firefox is a trademark of the Mozilla Foundation in the U.S. and other countries.
Page top