Kaspersky Security Integrations for MSP
- Kaspersky Security Integrations for MSP
- What's new
- Kaspersky Security Plug-in for ConnectWise Automate
- Deployment schemas of Kaspersky Security Plug-in for ConnectWise Automate
- Installing and removing Kaspersky Security Plug-in for ConnectWise Automate
- Getting started with Kaspersky Security Plug-in for ConnectWise Automate
- Connecting to Kaspersky Lab solutions
- Viewing information on Kaspersky dashboard
- Running Kaspersky Lab management commands
- Monitoring and alerting
- Deploying Kaspersky Lab security applications from the Control Center
- Plug-in modifications to ConnectWise Automate configuration
- Enabling and disabling tracing
- Glossary
- Contact Technical Support
- AO Kaspersky Lab
- Information about third-party code
- Trademark notices
- Kaspersky Security Integration with ConnectWise Manage
- Deployment schemas of Kaspersky Security Integration with ConnectWise Manage
- Integration scenario
- Installing and removing Kaspersky Security Integration with ConnectWise Manage
- Updating Kaspersky Security Integration with ConnectWise Manage
- Interface of Kaspersky Security Integration with ConnectWise Manage
- Getting started
- Managing integrations
- Configuring integration in Kaspersky Security Integration with ConnectWise Manage
- Configuring integration by using the registry
- Managing administrators
- Enabling and disabling tracing
- Reporting
- Custom fields in ConnectWise Manage
- Glossary
- Contact Technical Support
- AO Kaspersky Lab
- Information about third-party code
- Trademark notices
- Kaspersky Security Integration with Autotask
- Deployment schemas of Kaspersky Security Integration with Autotask
- Integration scenario
- Installing and removing Kaspersky Security Integration with Autotask
- Updating Kaspersky Security Integration with Autotask
- Interface of Kaspersky Security Integration with Autotask
- Getting started
- Managing integrations
- Configuring integration in Kaspersky Security Integration with Autotask
- Configuring integration by using the registry
- Managing administrators
- Enabling and disabling tracing
- Reporting
- User-defined fields in Autotask
- Glossary
- Contact Technical Support
- AO Kaspersky Lab
- Information about third-party code
- Trademark notices
- Kaspersky Security Integration with Tigerpaw
- Integration scenario
- Installing and removing Kaspersky Security Integration with Tigerpaw
- Interface of Kaspersky Security Integration with Tigerpaw
- Getting started
- Managing integrations
- Configuring integration in Kaspersky Security Integration with Tigerpaw
- Mapping accounts and enabling automatic billing
- Setting up service order creation
- Mapping Tigerpaw price book items to security applications
- Viewing accounts not integrated with Kaspersky Lab security applications
- Configuring integration by using the registry
- Managing administrators
- Enabling and disabling tracing
- Custom fields in Tigerpaw
- Glossary
- Contact Technical Support
- AO Kaspersky Lab
- Information about third-party code
- Trademark notices
- Kaspersky Security Integration with SolarWinds N-central
- Prerequisites
- Integration scenario
- Deploying Kaspersky Security Integration with SolarWinds N-central
- Running an automation policy
- Viewing the anti-virus protection status of a device
- Adding a dashboard
- Deploying Kaspersky Lab security applications from SolarWinds N-central
- Glossary
- Contact Technical Support
- AO Kaspersky Lab
- Kaspersky Lab End User License Agreement
- Trademark notices
Kaspersky Security Integrations for MSP > Kaspersky Security Integration with Autotask > Managing integrations > Creating a new integration
Creating a new integration
You can create a new integration in the Kaspersky Security Integration Tool for MSP window.
Creating a new integration
To create a new integration with Autotask:
- At the top of the Kaspersky Security Integration Tool for MSP window, click the name of the current integration.
- In the Integration Settings window that opens, click the New integration button.
A new Integration Settings window opens. The fields for the connection settings are blank.
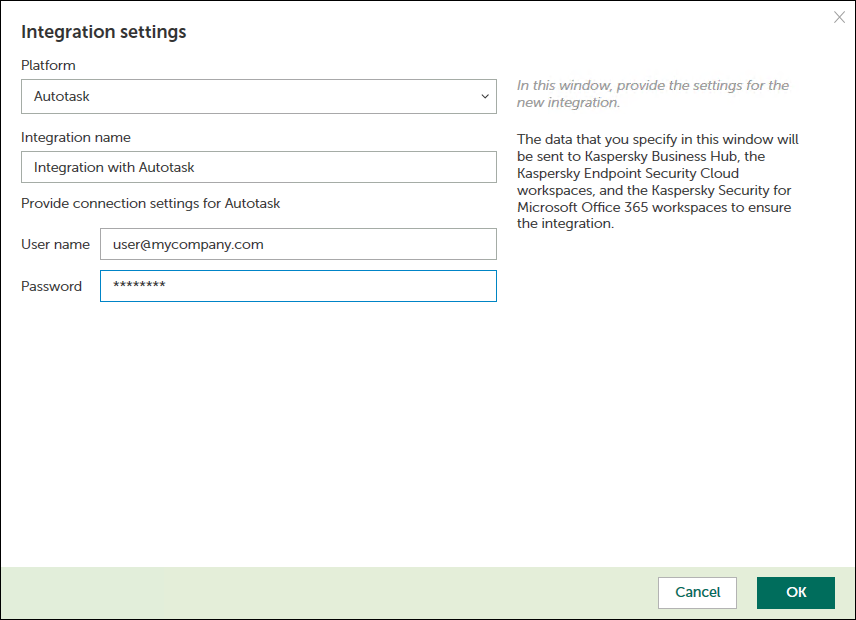
- Specify the values for the following settings of the integration:
- Platform—Select the integration platform from the drop-down list. The list contains the names of all platforms that Kaspersky Security Center or Kaspersky Business Hub can be integrated with. For integration with Autotask, select Autotask.
- Integration name—Name of the new integration. This field cannot be blank. By default, the integration name is Integration with Autotask. The integration name is displayed in the Kaspersky Security Integration Tool for MSP window as a link that allows you to view and access the integration properties.
For an integration with Kaspersky Business Hub, click the View integration ID link under the integration name to view the identifier of the integration. You may have to provide this ID to Kaspersky Lab Technical Support for diagnostics and troubleshooting.
- User name—User name to be used to log in to Autotask.
- Password—Password for the user name to be used to log in to Autotask.
- Click OK when you have finished specifying the integration settings.
The system validates the Autotask integration settings. If the settings you provide are correct, they are saved and then used by Kaspersky Security Integration with Autotask to gain access to Autotask.
A new integration with Autotask is created.
Article ID: 149396, Last review: Feb 18, 2019