Contents
- Kaspersky Endpoint Security for Windows Help
- Kaspersky Endpoint Security for Windows
- Modes of the application: Standard, EDR Agent, Light Agent
- Distribution kit
- Hardware and software requirements
- Comparison of available application features depending on the type of operating system
- Comparison of application functions depending on the management tools
- Compatibility with other applications
- Installing and removing the application
- Deployment through Kaspersky Security Center
- Installing the application locally using the Wizard
- Remotely installing the application using System Center Configuration Manager
- Description of setup.ini file installation settings
- Change application components
- Upgrading from a previous version of the application
- Removing the application
- Application licensing
- About the End User License Agreement
- About the license
- About the license certificate
- About subscription
- About license key
- About activation code
- About the key file
- Comparison of application functionality depending on license type for workstations
- Comparison of application functionality depending on license type for servers
- Activating the application
- Removing a license key
- Viewing license information
- Purchasing a license
- Renewing subscription
- Data provision
- Getting started
- About the Kaspersky Endpoint Security for Windows Management Plug-in
- Special considerations when working with different versions of management plug-ins
- Special considerations when using encrypted protocols for interacting with external services
- Application interface
- Getting started
- Managing policies
- Task management
- Configuring local application settings
- Starting and stopping Kaspersky Endpoint Security
- Pausing and resuming computer protection and control
- Creating and using a configuration file
- Restoring the default application settings
- Malware Scan
- Updating databases and application software modules
- Working with active threats
- Computer protection
- File Threat Protection
- Enabling and disabling File Threat Protection
- Automatic pausing of File Threat Protection
- Changing the action taken on infected files by the File Threat Protection component
- Forming the protection scope of the File Threat Protection component
- Using scan methods
- Using scan technologies in the operation of the File Threat Protection component
- Optimizing file scanning
- Scanning compound files
- Changing the scan mode
- Container Scan
- Web Threat Protection
- Mail Threat Protection
- Enabling and disabling Mail Threat Protection
- Changing the action to take on infected email messages
- Forming the protection scope of the Mail Threat Protection component
- Scanning compound files attached to email messages
- Email messages attachment filtering
- Exporting and importing extensions for attachment filtering
- Scanning emails in Microsoft Office Outlook
- Network Threat Protection
- Firewall
- BadUSB Attack Prevention
- AMSI Protection
- Exploit Prevention
- Behavior Detection
- Enabling and disabling Behavior Detection
- Selecting the action to take on detecting malware activity
- Protection of shared folders against external encryption
- Enabling and disabling protection of shared folders against external encryption
- Configuring the blocking period of an untrusted computer
- Editing the protection scope
- Adding trusted computers for external data encryption
- Exporting and importing a list of exclusions from protection of shared folders against external encryption
- Host Intrusion Prevention
- Remediation Engine
- Kaspersky Security Network
- Encrypted connections scan
- Wipe Data
- File Threat Protection
- Computer control
- Web Control
- Adding a web resource access rule
- Filter by web resource addresses
- Filter by web resource content
- Testing web resource access rules
- Exporting and importing Web Control rules
- Exporting and importing web resource addresses of the Web Control rule
- Monitoring user Internet activity
- Editing templates of Web Control messages
- Editing masks for web resource addresses
- Web Control for virtual machines
- Device Control
- Enabling and disabling Device Control
- About access rules
- Editing a device access rule
- Editing a connection bus access rule
- Managing access to mobile devices
- Managing access to Bluetooth devices
- Control of printing
- Control of Wi-Fi connections
- Monitoring usage of removable drives
- Changing the caching duration
- Actions with trusted devices
- Obtaining access to a blocked device
- Editing templates of Device Control messages
- Anti-Bridging
- Adaptive Anomaly Control
- Enabling and disabling Adaptive Anomaly Control
- Enabling and disabling an Adaptive Anomaly Control rule
- Modifying the action taken when an Adaptive Anomaly Control rule is triggered
- Creating an exclusion for an Adaptive Anomaly Control rule
- Exporting and importing exclusions for Adaptive Anomaly Control rules
- Applying updates for Adaptive Anomaly Control rules
- Editing Adaptive Anomaly Control message templates
- Viewing Adaptive Anomaly Control reports
- Application Control
- Application Control functionality limitations
- Receiving information about the applications that are installed on users' computers
- Enabling and disabling Application Control
- Selecting the Application Control mode
- Managing Application Control rules
- Adding a trigger condition for the Application Control rule
- Adding executable files from the Executable files folder to the application category
- Adding event-related executable files to the application category
- Adding an Application Control rule
- Changing the status of an Application Control rule via Kaspersky Security Center
- Exporting and importing Application Control rules
- Viewing events resulting from operation of the Application Control component
- Viewing a report on blocked applications
- Testing Application Control rules
- Application activity monitor
- Rules for creating name masks for files or folders
- Editing Application Control message templates
- Best practices for implementing a list of allowed applications
- Network ports monitoring
- Log Inspection
- System Integrity Monitoring
- Cloud Discovery
- Web Control
- Trusted zone
- Managing Backup
- Notification service
- Managing reports
- Kaspersky Endpoint Security Self-Defense
- Kaspersky Endpoint Security performance and compatibility with other applications
- Data Encryption
- Encryption functionality limitations
- Changing the length of the encryption key (AES56 / AES256)
- Kaspersky Disk Encryption
- Special features of SSD drive encryption
- Starting Kaspersky Disk Encryption
- Creating a list of hard drives excluded from encryption
- Exporting and importing a list of hard drives excluded from encryption
- Enabling Single Sign-On (SSO) technology
- Managing Authentication Agent accounts
- Using a token and smart card with Authentication Agent
- Hard drive decryption
- Restoring access to a drive protected by Kaspersky Disk Encryption technology
- Signing in with the Authentication Agent service account
- Updating the operating system
- Eliminating errors of encryption functionality update
- Selecting the Authentication Agent tracing level
- Editing Authentication Agent help texts
- Removing leftover objects and data after testing the operation of Authentication Agent
- BitLocker Management
- File Level Encryption on local computer drives
- Encrypting files on local computer drives
- Forming encrypted file access rules for applications
- Encrypting files that are created or modified by specific applications
- Generating a decryption rule
- Decrypting files on local computer drives
- Creating encrypted packages
- Restoring access to encrypted files
- Restoring access to encrypted data after operating system failure
- Editing templates of encrypted file access messages
- Encryption of removable drives
- Viewing data encryption details
- Working with encrypted devices when there is no access to them
- Detection and Response solutions
- MDR and EDR Optimum licensing
- Kaspersky Endpoint Agent
- Endpoint Detection and Response Agent
- Managed Detection and Response
- Endpoint Detection and Response
- Kaspersky Sandbox
- Kaspersky Anti Targeted Attack Platform
- Managing Quarantine
- Kaspersky Unified Monitoring and Analysis Platform (KUMA)
- KSWS to KES Migration Guide
- Correspondence of KSWS and KES components
- Correspondence of KSWS and KES settings
- Migrating KSWS components
- Migrating KSWS tasks and policies
- Migrating KSWS trusted zone
- Migrating KSWS Applications Launch Control rules
- Installing KES instead of KSWS
- Migrating the [KSWS+KEA] configuration to [KES+built-in agent] configuration
- Making sure Kaspersky Security for Windows Server was successfully removed
- Activating KES with a KSWS key
- Special considerations for migrating high-load servers
- Managing the application on a server in Server Core mode
- Migrating from [KSWS+KEA] to [KES+built-in agent]
- Light Agent mode to protect virtual machines
- Managing the application from the command line
- Setup. Installing the application
- Setup /x. Removing the application
- AVP commands
- SCAN. Malware Scan
- UPDATE. Updating databases and application software modules
- ROLLBACK. Last update rollback
- TRACES. Tracing
- START. Starting a profile
- STOP. Stopping a profile
- STATUS. Profile status
- STATISTICS. Profile operation statistics
- RESTORE. Restoring files from Backup
- EXPORT. Exporting application settings
- IMPORT. Importing application settings
- ADDKEY. Applying a key file
- LICENSE. Licensing
- RENEW. Purchasing a license
- PBATESTRESET. Resetting the disk check results before encrypting the disk
- EXIT. Exiting the application
- EXITPOLICY. Disabling policy
- STARTPOLICY. Enabling policy
- DISABLE. Disabling protection
- SPYWARE. Spyware detection
- KSN. Switching between KSN / KPSN
- SERVERBINDINGDISABLE. Disabling the server connection protection
- KESCLI commands
- Scan. Malware Scan
- GetScanState. Scan completion status
- GetLastScanTime. Determining the scan completion time
- GetThreats. Obtaining data on detected threats
- UpdateDefinitions. Updating databases and application software modules
- GetDefinitionState. Determining the release date and time of the databases
- EnableRTP. Enabling protection
- GetRealTimeProtectionState. File Threat Protection status
- GetEncryptionState. Disk encryption status
- Version. Identifying the application version
- Detection and Response management commands
- Light Agent management commands
- Error codes
- Appendix. Application profiles
- Managing the application through the REST API
- Sources of information about the application
- Contacting Technical Support
- Limitations and warnings
- Glossary
- Active key
- Administration group
- Anti-virus databases
- Archive
- Authentication Agent
- Certificate issuer
- Cloud Discovery
- Database of malicious web addresses
- Database of phishing web addresses
- Disinfection
- False alarm
- Infectable file
- Infected file
- Integration Server
- IOC
- IOC file
- License certificate
- Light Agent
- Mask
- Network Agent
- Normalized form of the address of a web resource
- OLE object
- OpenIOC
- Portable File Manager
- Protection scope
- Scan scope
- SVM
- Task
- Trusted Platform Module
- Appendices
- Appendix 1. Application settings
- File Threat Protection
- Web Threat Protection
- Mail Threat Protection
- Network Threat Protection
- Firewall
- BadUSB Attack Prevention
- AMSI Protection
- Exploit Prevention
- Behavior Detection
- Host Intrusion Prevention
- Remediation Engine
- Kaspersky Security Network
- Log Inspection
- Web Control
- Device Control
- Application Control
- Adaptive Anomaly Control
- System Integrity Monitoring
- Endpoint Sensor
- Sandbox
- Managed Detection and Response
- Endpoint Detection and Response
- Endpoint Detection and Response (KATA)
- Network Detection and Response (KATA)
- Full Disk Encryption
- File Level Encryption
- Encryption of removable drives
- Templates (data encryption)
- Exclusions
- Application settings
- Reports and storage
- Network settings
- Interface
- Manage Settings
- Updating databases and application software modules
- Appendix 2. Application trust groups
- Appendix 3. File extensions for quick removable drives scan
- Appendix 4. File Types for the Mail Threat Protection attachment filter
- Appendix 5. Network settings for interaction with external services
- Appendix 6. Application events
- Appendix 7. Supported file extensions for Execution prevention
- Appendix 8. Supported script interpreters for Execution prevention
- Appendix 9. IOC scan scope in the registry (RegistryItem)
- Appendix 10. IOC file requirements
- Appendix 11. User accounts in application component rules
- Appendix 1. Application settings
- Information about third-party code
- Trademark notices
Kaspersky Endpoint Security for Windows Help
 What's new in version 12.8
- Now you can install Kaspersky Endpoint Security in Light Agent mode. This allows you to use the application as part of the Kaspersky Security for Virtualization Light Agent 6.2 solution. The Kaspersky Security for Virtualization Light Agent solution is an integrated solution that provides comprehensive protection of virtual machines against various types of information security threats, network attacks, and phishing attacks.
- The option to scan files in Docker containers has been added.
- What's new in each version of Kaspersky Endpoint Security for Windows
 Getting started
- Deployment of Kaspersky Endpoint Security for Windows
- Initial setup of Kaspersky Endpoint Security for Windows
- Licensing of Kaspersky Endpoint Security for Windows
 Eliminating threats
- On workstations
- On servers
- Reacting to detection of an Indicator of Compromise (Network isolation → Quarantine → Execution prevention)
 Using KES as part of other solutions
 Data provision
What's new
Update 12.8
Kaspersky Endpoint Security 12.8 for Windows offers the following features and improvements:
- The application now supports the Light Agent mode for protecting virtual environments. Now you can deploy the application as Light Agent as part of the Kaspersky Security for Virtualization Light Agent 6.2 solution.
- Interception of file operations in Docker containers on servers is now supported. A container is an isolated environment in which an application can run without directly interacting with the operating system. Kaspersky Endpoint Security scans the files inside containers to which the user gains access. When a threat is detected, the applications blocks this malicious activity and attempts to disinfect the file inside the container. If the file cannot be disinfected, the application stops the container.
- Now you can define a protection scope for the protection of shared folders against external encryption (Behavior Detection component). Now you can specify shared folders which the application must monitor for file activity. You can also exclude files from the protection scope. In previous versions of the application, the Behavior Detection component monitored all shared folders for file activity.
- Now you can configure different sets of components for different types of operating systems in the installation package. Now you can deploy the application to workstations and servers using the same installation package. Components that are not available for a certain operating system type are automatically excluded in installation package properties.
- The option to select predefined scan exclusions and trusted applications has been added. Predefined scan exclusions and trusted applications allow quickly configuring the trusted zone for the application in a virtual environment (Citrix, VMware). Such exclusions comprise, for example, VHD and VHDX virtual machine files. Exclusions can be added when creating an application installation package, creating a policy, or when installing Kaspersky Endpoint Security.
- The EDR telemetry now includes events for operations with USB-connected devices. You can also add these events to exclusions from EDR telemetry.
- The option to block network connections over the obsolete TLS 1.0 protocol has been added. TLS 1.0 has a low security level, so it is recommended to disable this protocol and use newer TLS 1.2 or TLS 1.3 versions. By default, Kaspersky Endpoint Security blocks TLS 1.0 connections. After updating the application version, the operation of third-party services that use the TLS 1.0 protocol may fail. To avoid problems in the operation of third-party services, you can allow the use of the TLS 1.0 protocol in group policy before updating the application version.
- When developing this version of Kaspersky Endpoint Security for Windows, we incorporated the changes included in the following private patches: PF10053, PF10054, PF10360, PF10362, PF10363, PF12120, PF12121, PF12122, PF13115, PF13118, PF13119, PF14061, PF14062, PF14064, PF14065, PF15054, PF15056, PF15058, PF16052, PF16053, PF16055, PF16056, PF17027, PF17029, PF17039, PF17041, PF17043, PF18010, PF18011, PF18014, PF18015, PF18020, PF18021, PF18022, PF18023, PF18024, PF18028, PF19003, PF19016, PF19018.
Update 12.7
Kaspersky Endpoint Security 12.7 for Windows offers the following features and improvements:
- Now you can limit CPU resource usage for Malware Scan tasks. To do so, in application settings, specify the maximum CPU load percentage for all cores that can be utilized while scanning the computer.
- Now you can manually send files for scanning in KATA Sandbox. KATA Sandbox is a component of Kaspersky Anti Targeted Attack Platform that runs files on virtual images of operating systems. Sandbox analyzes object behavior to detect malicious activity and activity characteristic of targeted attacks on the IT infrastructure of the organization. Sandbox analyzes and scans objects on special servers with deployed virtual images of Microsoft Windows operating systems (the Sandbox servers). To send a file for scanning to KATA Sandbox, select the relevant command in the context menu of the file.
- Now you can set up integration with the solution that protects the corporate LAN, Kaspersky Network Detection and Response. Kaspersky Network Detection and Response (NDR) is part of Kaspersky Anti Targeted Attack Platform. You can configure the interaction with NDR in standard mode as well as in the EDR Agent mode.
- Support for Microsoft Office Outlook email client version 2021 has been added to the Mail Threat Protection extension. The extension allows scanning messages at the level of a mail client instead of the protocol level. In addition to messages, the extension lets you scan objects received through the MAPI interface from Microsoft Exchange repositories (for example, objects in the Calendar). This scanning takes place in the mail client.
- When developing this version of Kaspersky Endpoint Security for Windows, we incorporated the changes included in the following private patches: PF10049, PF10355, PF12114, PF13109, PF14056, PF15038, PF15045, PF16037, PF16042, PF16047, PF17014, PF17018, PF17021, PF17024, PF18006, PF18007.
Update 12.6
Kaspersky Endpoint Security 12.6 for Windows offers the following features and improvements:
- The functionality for integration with Kaspersky SIEM solution – Kaspersky Unified Monitoring and Analysis Platform (KUMA) – has been added. It is now possible to send events from Windows event logs to KUMA collector. This allows KUMA to receive Windows events (a limited set of EventIDs is supported) from all computers on which Kaspersky Endpoint Security is installed, without installing KUMA agents on these computers.
- A new System Integrity Monitoring component was added to replace the File Integrity Monitor component. System Integrity Monitoring component includes all functionality of File Integrity Monitor and additionally allows to monitor registry changes and connection of external devices. The System Integrity Monitoring component monitors changes in the operating system that may indicate computer security breaches. When such changes are detected, Kaspersky Endpoint Security generates corresponding events and alerts the administrator. File Integrity Monitor is no longer part of the application. File Integrity Monitor settings automatically migrate to System Integrity Monitoring when you update the application. To ensure correct operation of System Integrity Monitoring, both Kaspersky Endpoint Security application and management plug-in should be updated to version 12.6.
- The status of the installed built-in EDR agent (KATA) has been added to the computer properties in the Kaspersky Security Center console. Now, if you have a built-in EDR agent (KATA) installed, the Endpoint Sensor status column displays the current status of the component (e.g., Running, Stopped, Not supported by license, etc.).
- The option to select predefined scan exclusions and trusted applications has been added. Predefined scan exclusions and trusted applications help to quickly configure the trusted zone when using the application on SQL servers, Microsoft Exchange servers, and System Center Configuration Manager. Such exclusions comprise, for example, MDF and LDF database files. Exclusions can be added when creating a new policy, modifying an existing policy, or when installing Kaspersky Endpoint Security.
- The display of alert details for Kaspersky Endpoint Detection and Response Optimum has been moved from the Kaspersky Endpoint Security management plug-in to a separate Kaspersky Endpoint Detection and Response management plug-in. The EDR management plug-in is a single plugin for working with agents on Windows, Mac and Linux operating systems. Now, when working with EDR Optimum, you will need Kaspersky Endpoint Security management plug-in to create threat response tasks and EDR management plug-in to view alert details.
- Support for Windows 11 24H2.
- When developing this version of Kaspersky Endpoint Security for Windows, we incorporated the changes included in the following private patches: pf10048, pf10353, pf12106, pf12107, pf12108, pf13090, pf13100, pf15031, pf15034, pf15036, pf16021, pf16023, pf16029, pf17002.
Kaspersky Endpoint Security 11.4.0 for Windows offers the following features and improvements:
- New design of the application icon in the taskbar notification area. The new
 is now displayed instead of the old
  icon. If the user is required to perform an action (for example, restart the computer after updating the application), the icon will change to
  . If the protection components of the application are disabled or have malfunctioned, the icon will change to
  or
or  . If you hover over the icon, Kaspersky Endpoint Security will display a description of the problem in computer protection.
 - Kaspersky Endpoint Agent, which is included in the distribution kit, has been updated to version 3.9. Kaspersky Endpoint Agent 3.9 supports integration with new Kaspersky solutions. For more details about the application, please refer to the documentation of Kaspersky solutions that support Kaspersky Endpoint Agent.
- Added the Not supported by license status for Kaspersky Endpoint Security components. You can view the status of components in the component list in the main application window.
- New events from Exploit Prevention have been added to reports.
- Drivers for Kaspersky Disk Encryption technology are now automatically added to the Windows Recovery Environment (WinRE) when drive encryption is started. The previous version of Kaspersky Endpoint Security added drivers when installing the application. Adding drivers to WinRE can improve the stability of the application when restoring the operating system on computers protected by Kaspersky Disk Encryption technology.
The Endpoint Sensor component has been removed from Kaspersky Endpoint Security. You can still configure Endpoint Sensor settings in a policy provided that Kaspersky Endpoint Security version 11.0.0 to 11.3.0 is installed on the computer.
Frequently asked questions
Kaspersky Endpoint Security for Windows
Kaspersky Endpoint Security for Windows (hereinafter also referred to as Kaspersky Endpoint Security) provides comprehensive computer protection against various types of threats, network and phishing attacks.
The application is not intended to be used in technological processes that involve automated control systems. To protect devices in such systems, it is recommended to use Kaspersky Industrial CyberSecurity for Nodes application.
Threat detection technologies
Kaspersky Endpoint Security uses a model based on machine learning. The model is developed by Kaspersky experts. Subsequently, the model is continuously fed with threat data from KSN (model training).
Kaspersky Endpoint Security receives threat data from the Kaspersky Security Network. Kaspersky Security Network (KSN) is an infrastructure of cloud services providing access to the online Kaspersky Knowledge Base that contains information about the reputation of files, web resources, and software.
Kaspersky Endpoint Security uses threat data added by Kaspersky virus analysts. Virus analysts evaluate objects if the reputation of an object cannot be determined automatically. |
Kaspersky Endpoint Security analyzes the activity of an object in real time.
Kaspersky Endpoint Security receives data from the automatic object analysis system. The system processes all objects that are sent to Kaspersky. The system then determines the reputation of the object and adds the data to anti-virus databases. If the system cannot determine the reputation of the object, the system queries Kaspersky virus analysts.
Kaspersky Endpoint Security processes the object in a virtual machine. Kaspersky Sandbox analyzes the behavior of the object and decides on its reputation. This technology is available only if you are using the Kaspersky Sandbox solution.
Kaspersky Endpoint Security scans objects in an isolated environment provided by Kaspersky. Cloud Sandbox technology is permanently enabled and is available to all Kaspersky Security Network users regardless of the type of license they are using. If you have already deployed Endpoint Detection and Response solution, you can enable a separate counter for threats detected by Cloud Sandbox. |
Selection tree
Each type of threat is handled by a dedicated component. Components can be enabled or disabled independently, and their settings can be configured.
Selection tree
Section |
Component |
|---|---|
Essential Threat Protection
|
File Threat Protection The File Threat Protection component lets you prevent infection of the file system of the computer. By default, the File Threat Protection component permanently resides in the computer's RAM. The component scans files on all drives of the computer, as well as on connected drives. The component provides computer protection with the help of anti-virus databases, the Kaspersky Security Network cloud service, and heuristic analysis. Web Threat Protection The Web Threat Protection component prevents downloads of malicious files from the Internet, and also blocks malicious and phishing websites. The component provides computer protection with the help of anti-virus databases, the Kaspersky Security Network cloud service, and heuristic analysis. Mail Threat Protection The Mail Threat Protection component scans the attachments of incoming and outgoing email messages for viruses and other threats. The component provides computer protection with the help of anti-virus databases, the Kaspersky Security Network cloud service, and heuristic analysis. Mail Threat Protection can scan both incoming and outgoing messages. The application supports POP3, SMTP, IMAP, and NNTP in the following mail clients:
To scan traffic in Mozilla Thunderbird, MyOffice Mail and R7-Office Organizer mail clients, you need to add Kaspersky certificate to the certificate store and select the own certificate store. Mail Threat Protection does not support other protocols and mail clients. Mail Threat Protection may not always be able to gain protocol-level access to messages (for example, when using the Microsoft Exchange solution). For this reason, Mail Threat Protection includes an extension for Microsoft Office Outlook. The extension allows scanning messages at the level of the mail client. The Mail Threat Protection extension supports operations with Outlook 2010, 2013, 2016, 2019 and 2021. Network Threat Protection The Network Threat Protection component (also called Intrusion Detection System, IDS) monitors inbound network traffic for activity characteristic of network attacks. When Kaspersky Endpoint Security detects an attempted network attack on the user's computer, it blocks the network connection with the attacking computer. Descriptions of currently known types of network attacks and ways to counteract them are provided in Kaspersky Endpoint Security databases. The list of network attacks that the Network Threat Protection component detects is updated during database and application module updates. Firewall The Firewall blocks unauthorized connections to the computer while working on the Internet or local network. The Firewall also controls the network activity of applications on the computer. This allows you to protect your corporate LAN from identity theft and other attacks. The component provides computer protection with the help of anti-virus databases, the Kaspersky Security Network cloud service, and predefined network rules. BadUSB Attack Prevention The BadUSB Attack Prevention component prevents infected USB devices emulating a keyboard from connecting to the computer. AMSI Protection AMSI Protection component is intended to support Antimalware Scan Interface from Microsoft. The Antimalware Scan Interface (AMSI) allows third-party applications with AMSI support to send objects (for example, PowerShell scripts) to Kaspersky Endpoint Security for an additional scan and then receive the results from scanning these objects. |
Advanced Threat Protection
|
Kaspersky Security Network Kaspersky Security Network (KSN) is an infrastructure of cloud services providing access to the online Kaspersky Knowledge Base that contains information about the reputation of files, web resources, and software. The use of data from Kaspersky Security Network ensures faster responses by Kaspersky Endpoint Security to new threats, improves the performance of some protection components, and reduces the likelihood of false positives. If you are participating in Kaspersky Security Network, KSN services provide Kaspersky Endpoint Security with information about the category and reputation of scanned files, as well as information about the reputation of scanned web addresses. Behavior Detection The Behavior Detection component receives data on the actions of applications on your computer and provides this information to other protection components to improve their performance. The Behavior Detection component utilizes Behavior Stream Signatures (BSS) for applications. If application activity matches a behavior stream signature, Kaspersky Endpoint Security performs the selected responsive action. Kaspersky Endpoint Security functionality based on behavior stream signatures provides proactive defense for the computer. Exploit Prevention The Exploit Prevention component detects program code that takes advantage of vulnerabilities on the computer to exploit administrator privileges or to perform malicious activities. For example, exploits can utilize a buffer overflow attack. To do so, the exploit sends a large amount of data to a vulnerable application. When processing this data, the vulnerable application executes malicious code. As a result of this attack, the exploit can start an unauthorized installation of malware. When there is an attempt to run an executable file from a vulnerable application that was not performed by the user, Kaspersky Endpoint Security blocks this file from running or notifies the user. Host Intrusion Prevention The Host Intrusion Prevention component prevents applications from performing actions that may be dangerous for the operating system, and ensures control over access to operating system resources and personal data. The component provides computer protection with the help of anti-virus databases and the Kaspersky Security Network cloud service. Remediation Engine The Remediation Engine lets Kaspersky Endpoint Security roll back actions that have been performed by malware in the operating system. |
Security Controls
|
Application Control Application Control manages the startup of applications on users' computers. This allows you to implement a corporate security policy when using applications. Application Control also reduces the risk of computer infection by restricting access to applications. Device Control Device Control manages user access to devices that are installed on or connected to the computer (for example, hard drives, cameras, or Wi-Fi modules). This lets you protect the computer from infection when such devices are connected, and prevent loss or leaks of data. Web Control Web Control manages users' access to web resources. This helps reduce traffic and inappropriate use of work time. When a user tries to open a website that is restricted by Web Control, Kaspersky Endpoint Security blocks access or shows a warning. Adaptive Anomaly Control The Adaptive Anomaly Control component monitors and blocks actions that are not typical of the computers in a company's network. Adaptive Anomaly Control uses a set of rules to track non-typical behavior (for example, the Start of Microsoft PowerShell from office application rule). Rules are created by Kaspersky specialists based on typical scenarios of malicious activity. You can configure how Adaptive Anomaly Control handles each rule and, for example, allow the execution of PowerShell scripts that automate certain workflow tasks. Kaspersky Endpoint Security updates the set of rules along with the application databases. Log Inspection Log Inspection monitors the integrity of the protected environment based on the Windows event log analysis. When the application detects signs of atypical behavior in the system, it informs the administrator, as this behavior may indicate an attempted cyber attack. System Integrity Monitoring The System Integrity Monitoring component monitors changes in the operating system that may indicate computer security breaches. When such changes are detected, Kaspersky Endpoint Security generates corresponding events and alerts the administrator. |
Tasks
|
Malware Scan Kaspersky Endpoint Security scans the computer for viruses and other threats. Malware Scan helps to rule out the possibility of spreading malware that was not detected by protection components, for example, due to a low security level. Update of databases and application modules Kaspersky Endpoint Security downloads updated databases and application modules. Updating keeps the computer protected against the latest viruses and other threats. The application is updated automatically by default, but if necessary, you can update the databases and application modules manually. Last update rollback Kaspersky Endpoint Security rolls back the last update of databases and modules. This lets you roll back the databases and application modules to their previous versions when necessary, for example, when the new database version contains an invalid signature that causes Kaspersky Endpoint Security to block a safe application. Application Integrity Check Kaspersky Endpoint Security checks the application modules in the application installation folder for corruption or modifications. If an application module has an incorrect digital signature, the module is considered corrupt. |
Data Encryption
|
File Level Encryption The component allows creating file encryption rules. You can select predefined folders for encryption, select a folder manually, or select individual files by extension. Full Disk Encryption The component allows encrypting the hard disk using Kaspersky Disk Encryption or BitLocker Drive Encryption. Encryption of removable drives The component allows protecting data on removable drives. You can use Full Disk Encryption (FDE) or File Level Encryption (FLE). |
Detection and Response
|
Endpoint Detection and Response Optimum Built-in agent for the Kaspersky Endpoint Detection and Response Optimum solution (hereinafter also "EDR Optimum"). Kaspersky Endpoint Detection and Response is a solution for protecting the corporate IT infrastructure from advanced cyber threats. The functionality of the solution combines automatic detection of threats with the ability to react to these threats to counteract advanced attacks including new exploits, ransomware, fileless attacks, as well as methods using legitimate system tools. For more information about the solution, refer to the Kaspersky Endpoint Detection and Response Optimum Help. Endpoint Detection and Response Expert Built-in agent for the Kaspersky Endpoint Detection and Response Expert solution (hereinafter also "EDR Expert"). EDR Expert offers more threat monitoring and response functionality than EDR Optimum. For more information about the solution, refer to the Kaspersky Endpoint Detection and Response Expert Help. Endpoint Detection and Response (KATA) and Network Detection and Response (KATA) Built-in agents for managing the Endpoint Detection and Response and Network Detection and Response components that are part of the Kaspersky Anti Targeted Attack Platform solution. Kaspersky Anti Targeted Attack Platform is a solution designed for timely detection of sophisticated threats such as targeted attacks, advanced persistent threats (APT), zero-day attacks, and others. Kaspersky Anti Targeted Attack Platform includes three functional units:
You can purchase all functional units or individual functional units separately. For details about the solution, please refer to the Kaspersky Anti Targeted Attack Platform Help. Sandbox Built-in agent for Sandbox. The Sandbox component detects and automatically blocks advanced threats on computers. Sandbox analyzes object behavior to detect malicious activity and activity characteristic of targeted attacks on the IT infrastructure of the organization. Sandbox analyzes and scans objects on special servers with deployed virtual images of Microsoft Windows operating systems (the Sandbox servers). For details about the solution, please refer to the Kaspersky Sandbox Help and Kaspersky Anti Targeted Attack Platform Help. Managed Detection and Response Built-in agent to support the operation of the Kaspersky Managed Detection and Response solution. The Kaspersky Managed Detection and Response (MDR) solution automatically detects and analyzes security incidents in your infrastructure. To do so, MDR uses telemetry data received from endpoints and machine learning. MDR sends incident data to Kaspersky experts. The experts can then process the incident and, for example, add a new entry to Anti-Virus databases. Alternatively, the experts can issue recommendations on processing the incident and, for example, suggest isolating computer from the network. For detailed information about how the solution works, please refer to the Kaspersky Managed Detection and Response Help. |
Modes of the application: Standard, EDR Agent, Light Agent
Kaspersky Endpoint Security for Windows is part of many Kaspersky solutions. Depending on the solution, you need to select a mode for the application.
|
Standard mode This is the main and default mode of the application. You can install the application in this mode as part of Kaspersky EPP (Endpoint Protection Platform) solutions. For example, Kaspersky Endpoint Security in Standard mode is part of the Kaspersky Endpoint Security for Business. Kaspersky Endpoint Security provides comprehensive protection of workstations and servers from various threats, network attacks, and scams. |
|
EDR Agent This mode allows deploying Kaspersky Detection and Response solutions together with third-party EPP solutions. Detection and Response solutions include Kaspersky Managed Detection and Response (MDR) and Kaspersky Anti Targeted Attack Platform (KATA). EDR Agent also supports the Kaspersky SIEM solution, Kaspersky Unified Monitoring and Analysis Platform (KUMA). In this mode, standard protection components such as File Threat Protection or Web Threat Protection are not available. Standard protection of the computer is provided by the third-party EPP solution. EDR Agent continuously monitors processes running on these computers, open network connections, and files being modified, and interacts with Detection and Response solutions. |
|
Light Agent This mode is used to protect virtual environments. Kaspersky Endpoint Security in Light Agent mode is part of the Kaspersky Hybrid Cloud Security solution. Light Agent protects virtual machines with guest operating systems for workstations and servers. The same protection and control components are available in this mode as in Standard mode. The difference is that objects are scanned for viruses and other malware by a special solution component installed on a separate virtual machine, SVM (Secure Virtual Machine). Thus the Light Agent uses the resources of SVM to ensure the security of the infrastructure instead of the resources of the virtual machine. |
Distribution kit
The distribution kit includes the following distribution packages:
- Strong encryption (AES256)
This distribution package contains cryptographic tools that implement the AES (Advanced Encryption Standard) encryption algorithm with an effective key length of 256 bits.
- Lite encryption (AES56)
This distribution package contains cryptographic tools that implement the AES encryption algorithm with an effective key length of 56 bits.
Each distribution package contains the following files:
|
Kaspersky Endpoint Security installation package. |
|
Files that are required for installing the application using any of the available methods. |
|
File for creating installation packages for Kaspersky Endpoint Security. |
|
Installation package for the application management plug-in in the Kaspersky Security Center Administration Console. |
|
Update package files that are used during installation. |
|
Files for removing incompatible software. |
|
File containing the list of software that may cause compatibility issues with Kaspersky Endpoint Security. Kaspersky does not guarantee the compatibility of Kaspersky Endpoint Security with software from the list. |
|
File where you can read through the terms of participation in Kaspersky Security Network. |
|
File where you can read through the End User License Agreement and the Privacy Policy. |
|
File that contains the internal settings of the distribution kit. |
|
Files for the graphical interface of the application. |
|
Files for the AES cryptographic algorithm. |
|
Archive containing the files required for installing the application web plug-in in the Kaspersky Security Center Web Console. |
It is not recommended to change the values of these settings. If you want to change installation options, use the setup.ini file.
Page top
Hardware and software requirements
To ensure proper operation of Kaspersky Endpoint Security, your computer must meet the following requirements:
Minimum general requirements:
- 2 GB of free disk space on the hard drive;
- CPU:
- Workstation: 1 GHz;
- Server: 1.4 GHz;
- SSE2 Instructions support.
Arm architecture is not supported.
- RAM:
- Workstation (x86): 1 GB;
- Workstation (x64): 2 GB;
- Server: 2 GB;
- Server to install the application with a built-in agent for integration with Kaspersky Anti Targeted Attack Platform: 8 GB.
Workstations
Supported operating systems for workstations:
- Windows 7 Home / Professional / Ultimate / Enterprise Service Pack 1 or later;
- Windows 8 Professional / Enterprise;
- Windows 8.1 Professional / Enterprise;
- Windows 10 Home / Pro / Pro for Workstations / Education / Enterprise / Enterprise multi-session;
- Windows 11 Home / Pro / Pro for Workstations / Education / Enterprise.
Kaspersky Endpoint Security cannot be installed on Microsoft Windows 7 without installed operating system updates: KB4490628 (March 12, 2019) and KB4474419 (September 23, 2019). For detailed information, refer to the Technical Support Knowledge Base.
For details about support for the Microsoft Windows 10 operating system, please refer to the Technical Support Knowledge Base.
For details about support for the Microsoft Windows 11 operating system, please refer to the Technical Support Knowledge Base.
Servers
Kaspersky Endpoint Security supports core components of the application on computers running the Windows operating system for servers. You can use Kaspersky Endpoint Security for Windows instead of Kaspersky Security for Windows Server on servers and clusters of your organization (Cluster Mode). The application also supports Server Core mode (see known issues).
Supported operating systems for servers:
- Windows Small Business Server 2011 Essentials / Standard (64-bit);
Microsoft Small Business Server 2011 Standard (64-bit) is supported only if Service Pack 1 for Microsoft Windows Server 2008 R2 is installed.
- Windows MultiPoint Server 2011 (64-bit);
- Windows Server 2008 R2 Foundation / Standard / Enterprise / Datacenter Service Pack 1 or later;
- Windows Web Server 2008 R2 Service Pack 1 or later;
- Windows Server 2012 Foundation / Essentials / Standard / Datacenter (including Server Core mode);
- Windows Server 2012 R2 Foundation / Essentials / Standard / Datacenter (including Server Core mode);
- Windows Server 2016 Essentials / Standard / Datacenter (including Server Core mode);
- Windows Server 2019 Essentials / Standard / Datacenter (including Server Core mode);
- Windows Server 2022 Standard / Datacenter / Datacenter: Azure Edition (including Server Core mode);
- Windows Server 2025 Standard / Datacenter.
Kaspersky Endpoint Security cannot be installed on Microsoft Windows Server 2008 R2 without installed operating system updates: KB4490628 (March 12, 2019) and KB4474419 (September 23, 2019).
For details about support for the Microsoft Windows Server 2016 and Microsoft Windows Server 2019 operating systems, please refer to the Technical Support Knowledge Base.
For details about support for the Microsoft Windows Server 2022 operating system, please refer to the Technical Support Knowledge Base.
Unsupported operating systems for servers:
- Windows Server 2003 Standard / Enterprise / Datacenter SP2 or later;
- Windows Server 2003 R2 Foundation / Standard / Enterprise / Datacenter SP2 or later;
- Windows Server 2008 Standard / Enterprise / Datacenter SP2 or later;
- Windows Server 2008 Core Standard / Enterprise / Datacenter SP2 or later;
- Microsoft Small Business Server 2008 Standard / Premium SP2 or later.
Virtual platforms
Requirements for the virtual machine for application operation in standard mode:
- VMware Workstation 17.6.1;
- VMware ESXi 8.0d;
- Microsoft Hyper-V Server 2022;
- Citrix Virtual Apps and Desktops 7 2402 LTSR;
- Citrix Provisioning 2402 LTSR;
- XenServer 8.
See the Kaspersky Security for Virtualization Light Agent Help for virtual machine requirements to run the application in the Light Agent mode.
Terminal servers
Supported terminal server types:
- Microsoft Remote Desktop Services based on Windows Server 2008 R2 SP1;
- Microsoft Remote Desktop Services based on Windows Server 2012;
- Microsoft Remote Desktop Services based on Windows Server 2012 R2;
- Microsoft Remote Desktop Services based on Windows Server 2016;
- Microsoft Remote Desktop Services based on Windows Server 2019;
- Microsoft Remote Desktop Services based on Windows Server 2022.
Kaspersky Security Center support
Kaspersky Endpoint Security supports operation with the following versions of Kaspersky Security Center:
- Kaspersky Security Center 13
- Kaspersky Security Center 13.1
- Kaspersky Security Center 13.2
- Kaspersky Security Center 13.2.2
- Kaspersky Security Center 14
- Kaspersky Security Center 14.1
- Kaspersky Security Center 14.2
- Kaspersky Security Center Linux 14.2
- Kaspersky Security Center Linux 15
- Kaspersky Security Center Windows 15.1
- Kaspersky Security Center Linux 15.1
- Kaspersky Security Center Linux 15.2
Comparison of available application features depending on the type of operating system
The set of available Kaspersky Endpoint Security features depends on the type of operating system: workstation or server (see the table below).
Starting with Kaspersky Endpoint Security12.8 for Windows, you can configure different sets of components for different operating system types in the instlalation package. That is, you can deploy the application to workstations and servers using the same installation package.
Comparison of Kaspersky Endpoint Security features
Feature |
Workstation |
Server |
Server Core mode |
|---|---|---|---|
Advanced Threat Protection |
|
|
|
Kaspersky Security Network |
|
|
|
Behavior Detection |
|
|
|
Exploit Prevention |
|
|
|
Host Intrusion Prevention |
|
– |
– |
Remediation Engine |
|
|
|
Essential Threat Protection |
|
|
|
File Threat Protection |
|
|
|
Web Threat Protection |
|
|
– |
Mail Threat Protection |
|
|
– |
Firewall |
|
|
|
Network Threat Protection |
|
|
|
BadUSB Attack Prevention |
|
|
– |
AMSI Protection |
|
|
|
Security Controls |
|
|
|
Log Inspection |
– |
|
– |
Application Control |
|
|
|
Device Control |
|
|
|
Web Control |
|
|
– |
Adaptive Anomaly Control |
|
– |
– |
System Integrity Monitoring |
– |
|
– |
Cloud Discovery |
|
– |
– |
Data Encryption |
|
|
|
Kaspersky Disk Encryption |
|
– |
– |
BitLocker Drive Encryption |
|
|
|
File Level Encryption |
|
– |
– |
Encryption of removable drives |
|
– |
– |
Detection and Response |
|
|
|
Endpoint Detection and Response Optimum |
|
|
|
Endpoint Detection and Response Expert |
|
|
|
Endpoint Detection and Response (KATA) |
|
|
|
Network Detection and Response (KATA) |
|
|
|
Sandbox |
|
|
|
Managed Detection and Response (MDR) |
|
|
|
KUMA Integration |
|
|
|
Comparison of application functions depending on the management tools
The set of functions available in Kaspersky Endpoint Security depends on the management tools (see the table below).
You can manage the application using the following consoles of Kaspersky Security Center:
- Administration Console. Microsoft Management Console (MMC) snap-in installed on the administrator's workstation.
- Web Console. Component of Kaspersky Security Center that is installed on the Administration Server. You can work in the Web Console through a browser on any computer that has access to the Administration Server.
You can also manage the application by using the Kaspersky Security Center Cloud Console. The Kaspersky Security Center Cloud Console is the cloud version of Kaspersky Security Center. This means that the Administration Server and other components of Kaspersky Security Center are installed in the cloud infrastructure of Kaspersky. For details on managing the application using the Kaspersky Security Center Cloud Console, refer to the Kaspersky Security Center Cloud Console Help.
Kaspersky Endpoint Security is part of the Kaspersky Next Pro View solution. For more information on the available application features when it works as part of this solution, see Kaspersky Next Help.
Comparison of Kaspersky Endpoint Security features
Feature |
Kaspersky Security Center |
Kaspersky Security Center |
|
|---|---|---|---|
|
Administration Console |
Web Console |
Cloud Console |
Advanced Threat Protection |
|
|
|
Kaspersky Security Network |
|
|
|
Kaspersky Private Security Network |
|
|
– |
Behavior Detection |
|
|
|
Exploit Prevention |
|
|
|
Host Intrusion Prevention |
|
|
|
Remediation Engine |
|
|
|
Essential Threat Protection |
|
|
|
File Threat Protection |
|
|
|
Web Threat Protection |
|
|
|
Mail Threat Protection |
|
|
|
Firewall |
|
|
|
Network Threat Protection |
|
|
|
BadUSB Attack Prevention |
|
|
|
AMSI Protection |
|
|
|
Security Controls |
|
|
|
Log Inspection |
|
|
|
Application Control |
|
|
|
Device Control |
|
|
|
Web Control |
|
|
|
Adaptive Anomaly Control |
|
|
|
System Integrity Monitoring |
|
|
|
Cloud Discovery |
– |
– |
|
Data Encryption |
|
|
|
Kaspersky Disk Encryption |
|
|
– |
BitLocker Drive Encryption |
|
|
|
File Level Encryption |
|
|
– |
Encryption of removable drives |
|
|
– |
Detection and Response |
|
|
|
Endpoint Detection and Response Optimum |
– |
|
|
Endpoint Detection and Response Expert |
– |
– |
|
Endpoint Detection and Response (KATA) |
|
|
– |
Network Detection and Response (KATA) |
|
|
– |
Sandbox |
– |
|
– |
Managed Detection and Response (MDR) |
|
|
|
KUMA Integration |
|
|
|
Tasks |
|
|
|
Add key |
|
|
|
Change application components |
|
|
|
Inventory |
|
|
|
Update |
|
|
|
Update rollback |
|
|
|
Malware Scan |
|
|
|
Application Integrity Check |
|
|
– |
Wipe data |
|
|
|
Manage Authentication Agent accounts (Kaspersky Disk Encryption) |
|
|
– |
IOC Scan (EDR) |
– |
|
|
Move file to Quarantine (EDR) |
– |
|
|
Get file (EDR) |
– |
|
|
Delete file (EDR) |
– |
|
|
Start process (EDR) |
– |
|
|
Terminate process (EDR) |
– |
|
|
Compatibility with other applications
Kaspersky Endpoint Security is incompatible with some Kaspersky applications as well as some third-party applications. Therefore, before installing, Kaspersky Endpoint Security scans the computer to see if any such applications are present.
Compatibility with third-party applications
Kaspersky Endpoint Security is incompatible with applications that are part of third-party endpoint protection systems (Endpoint Protection Platform, EPP). Kaspersky Endpoint Security can also experience compatibility issues with other applications. To determine compatibility, Kaspersky Endpoint Security consults a list of software prepared by Kaspersky. This list is contained in the incompatible.txt file. This file is included in the distribution kit.
Kaspersky does not guarantee the compatibility of Kaspersky Endpoint Security with software from the list. If an application from the list is discovered, the installer stops the deployment of Kaspersky Endpoint Security. The installer may automatically delete some applications from the list. If you are willing to disregard the risks and want to install Kaspersky Endpoint Security and a piece of software from the list on the same computer, you can skip the computer check (see instructions below).
![]() DOWNLOAD THE INCOMPATIBLE.TXT FILE
DOWNLOAD THE INCOMPATIBLE.TXT FILE
Compatibility with Kaspersky applications
Kaspersky Endpoint Security is incompatible with the following Kaspersky applications:
- Kaspersky Standard | Plus | Premium.
- Kaspersky Small Office Security.
- Kaspersky Internet Security.
- Kaspersky Anti-Virus.
- Kaspersky Total Security.
- Kaspersky Safe Kids.
- Kaspersky Free.
- Kaspersky Anti-Ransomware Tool.
- Endpoint Sensor as part of the Kaspersky Anti Targeted Attack Platform and Kaspersky Endpoint Detection and Response solutions.
- Kaspersky Endpoint Agent as part of the Detection and Response solutions from Kaspersky.
Kaspersky is switching all Detection and Response to working with the Kaspersky Endpoint Security built-in agent instead of Kaspersky Endpoint Agent. Starting with version 12.1, the application supports all Detection and Response solutions.
- Kaspersky Security for Virtualization Light Agent.
- Kaspersky Fraud Prevention for Endpoint.
- Kaspersky Security for Windows Server
Starting with Kaspersky Endpoint Security 12.0, you can migrate from Kaspersky Security for Windows Server to Kaspersky Endpoint Security for Windows and use the same solution for protecting workstations and servers.
- Kaspersky Embedded Systems Security.
If Kaspersky applications from this list are installed on the computer, Kaspersky Endpoint Security removes these applications. Please wait for this process to finish before continuing installation of Kaspersky Endpoint Security.
Skipping the check for software that may cause compatibility issues
If Kaspersky Endpoint Security detects software from the incompatible.txt list, the installation of the application will be terminated. To continue the installation, you must remove that application. However, if the vendor of third-party software has indicated in their documentation that their software is compatible with Endpoint Protection Platforms (EPP), you can install Kaspersky Endpoint Security to a computer containing an application from this vendor. For example, the Endpoint Detection and Response (EDR) solution provider may declare their compatibility with third-party EPP systems. If this is the case, you need to start the installation of Kaspersky Endpoint Security without running an installed software check. To do so, pass the following parameters to the installer:
SKIPPRODUCTCHECK=1. Disable the check for installed software. The list of software that may cause compatibility issues is available in the incompatible.txt file that is included in the distribution kit. If no value is set for this parameter and software from the list is detected, the installation of Kaspersky Endpoint Security will be terminated.SKIPPRODUCTUNINSTALL=1. Disable automatic removal of detected software from the incompatible.txt list. If no value is set for this parameter, Kaspersky Endpoint Security attempts to remove the software that may cause compatibility issues.CLEANERSIGNCHECK=0. Disable the digital signature verification of applications found by the check. If this parameter is not set, verification of digital signatures is disabled when deploying the application via Kaspersky Security Center. When the application is installed locally, digital signature verification is enabled by default.
You can pass parameters in the command line when locally installing the application.
Example: C:\KES\setup_kes.exe /pEULA=1 /pPRIVACYPOLICY=1 /pKSN=0 /pSKIPPRODUCTCHECK=1 /pSKIPPRODUCTUNINSTALL=1 /pCLEANERSIGNCHECK=0 /s |
To remotely install Kaspersky Endpoint Security, you need to add the appropriate parameters to the installation package generation file named kes_win.kud in [Setup] (see below). The kes_win.kud file is included in the distribution kit.
kes_win.kud
Installing and removing the application
Kaspersky Endpoint Security can be installed on a computer in the following ways:
- locally, by using the Setup Wizard.
- locally from the command line.
- remotely using Kaspersky Security Center.
- remotely through the Microsoft Windows Group Policy Management Editor (for more details, visit the Microsoft Technical Support website).
- remotely, by using the System Center Configuration Manager.
You can configure the application installation settings in several ways. If you simultaneously use multiple methods for configuring the settings, Kaspersky Endpoint Security applies the settings with the highest priority. Kaspersky Endpoint Security uses the following order of priorities:
- Settings received from the setup.ini file.
- Settings received from the installer.ini file.
- Settings received from the command line.
- Settings received from the configuration file (install.cfg).
We recommend closing all running applications before starting the installation of Kaspersky Endpoint Security (including remote installation).
When installing Kaspersky Endpoint Security, the operating system may show its own messages. Network and Internet connections may also be interrupted when the application is being installed.
When installing, updating or uninstalling Kaspersky Endpoint Security, errors may occur. For more information about solving these errors, please refer to the Technical Support Knowledge Base.
Deployment through Kaspersky Security Center
Kaspersky Endpoint Security can be deployed on computers within a corporate network in several ways. You can choose the most suitable deployment scenario for your organization or combine several deployment scenarios at the same time. Before installing the application, you must make sure the Kaspersky Security Center Network Agent is installed on the computer. Network Agent facilitates interaction between the Administration Server and a client computer.
Kaspersky Security Center supports the following main deployment methods:
- Installing the application using the Protection Deployment Wizard.
Standard installation method is convenient if you are satisfied with the default settings of Kaspersky Endpoint Security and your organization has a simple infrastructure that does not require special configurations.
- Installing the application using the remote installation task.
Universal installation method, which allows to configure Kaspersky Endpoint Security settings and flexibly manage remote installation tasks. Installation of Kaspersky Endpoint Security consists of the following steps:
Kaspersky Security Center also supports other methods of installing Kaspersky Endpoint Security, such as deployment within an operating system image. For details about other deployment methods, refer to Kaspersky Security Center Help.
Standard installation of the application
Kaspersky Security Center provides a Protection Deployment Wizard for installing the application on corporate computers. The Protection Deployment Wizard includes the following main actions:
- Selecting a Kaspersky Endpoint Security installation package.
An installation package is a set of files created for remote installation of a Kaspersky application via Kaspersky Security Center. The installation package contains a range of settings needed to install the application and get it running immediately after installation. The installation package is created using files with the .kpd and .kud extensions included in the application distribution kit. Kaspersky Endpoint Security installation package is common for all supported Windows versions and processor architecture types.
- Creating the Install application remotely task of the Kaspersky Security Center Administration Server.

Kaspersky Endpoint Security deployment
How to run the Protection Deployment Wizard in the Administration Console (MMC)
How to start the Protection Deployment Wizard in the Web Console and Cloud Console
Creating an installation package
An installation package is a set of files created for remote installation of a Kaspersky application via Kaspersky Security Center. The installation package contains a range of settings needed to install the application and get it running immediately after installation. The installation package is created using files with the .kpd and .kud extensions included in the application distribution kit. Kaspersky Endpoint Security installation package is common for all supported Windows versions and processor architecture types.
How to create an installation package in the Administration Console (MMC)
How to create an installation package in the Web Console and Cloud Console
- In the main window of the Web Console, select Discovery & deployment → Deployment & assignment → Installation packages.
This opens a list of installation packages that have been downloaded to Kaspersky Security Center.
- Click Add.
The New Package Wizard starts. Follow the instructions of the Wizard.
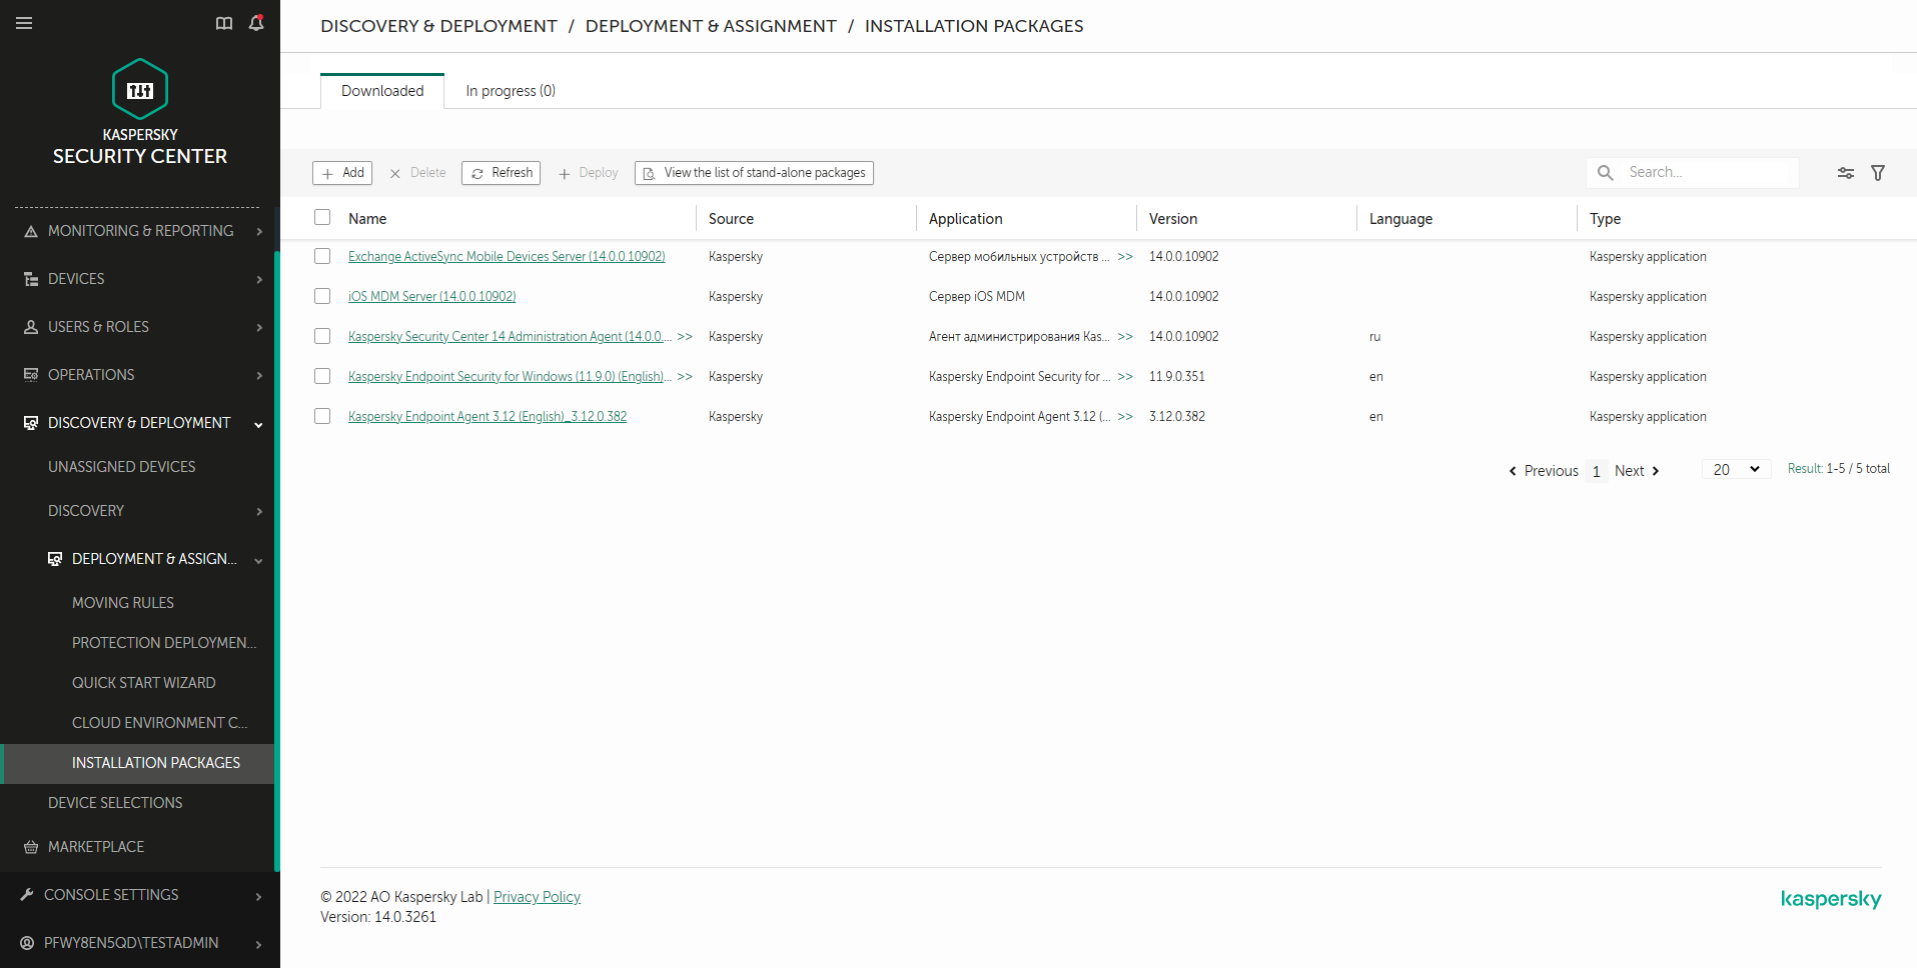
List of installation packages
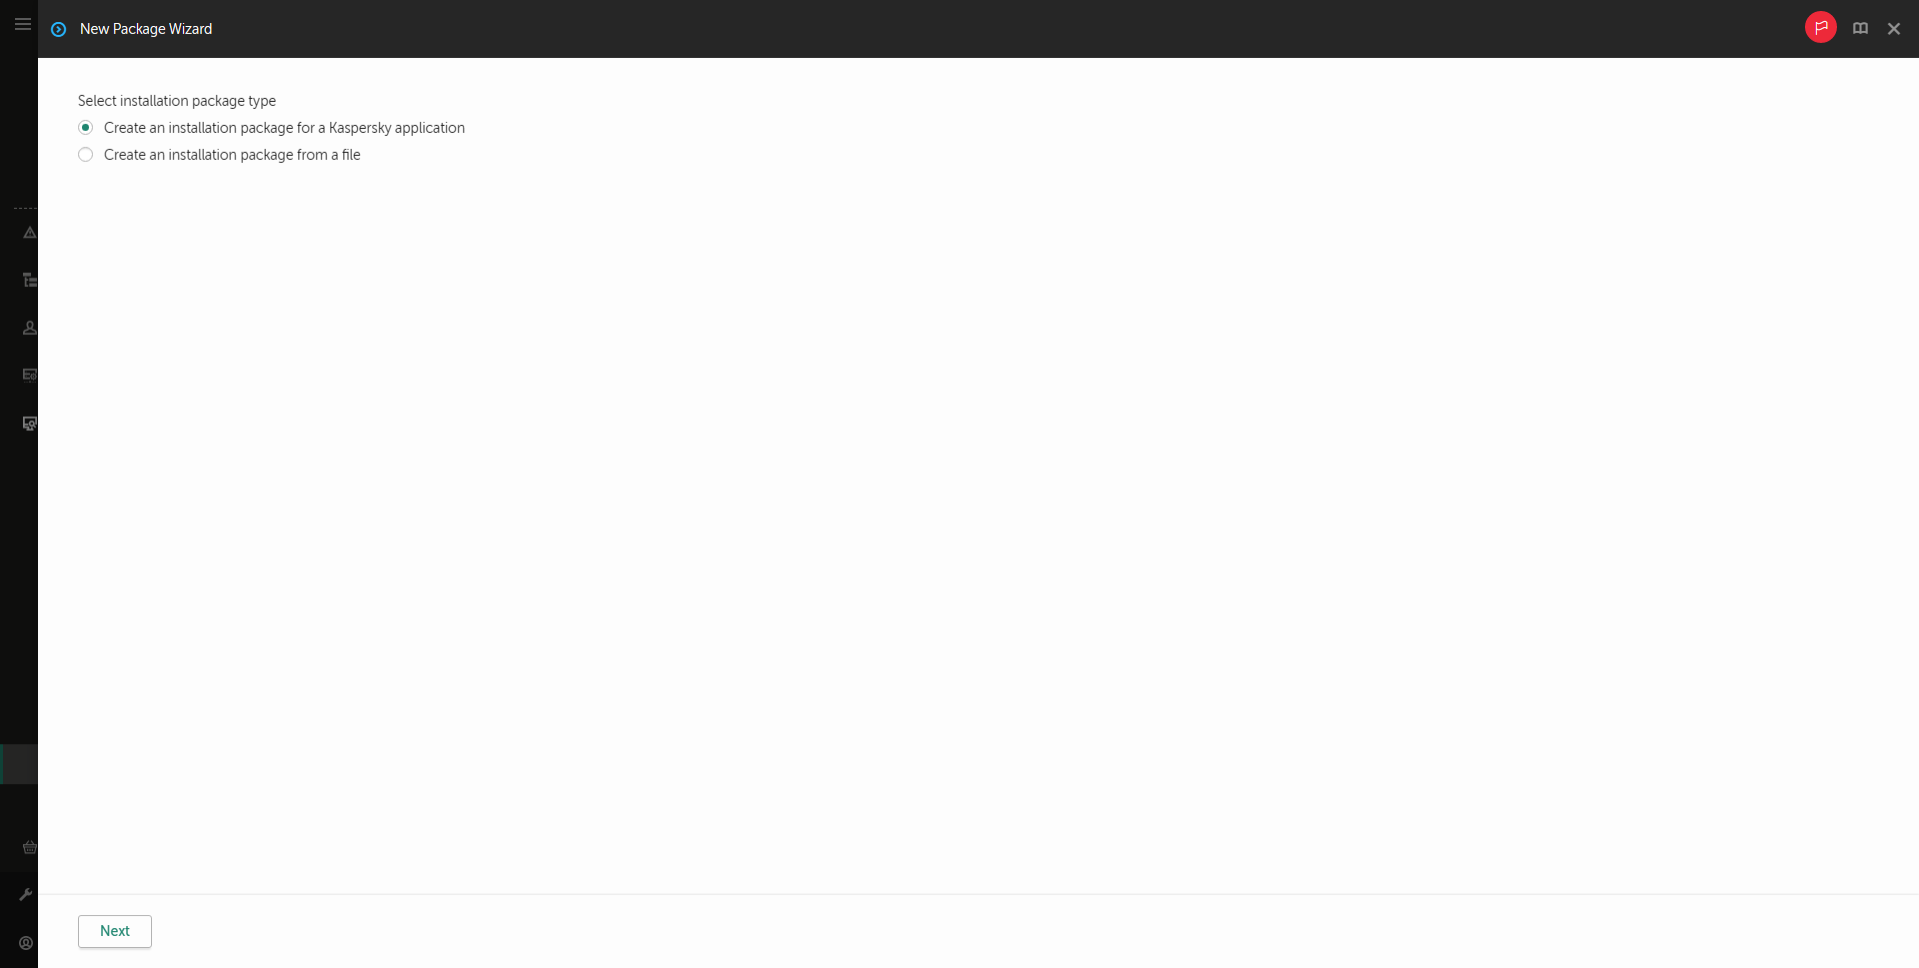
Step 1. Selecting the installation package type
Select the Create an installation package for a Kaspersky application option.
The Wizard will create an installation package from the distribution package residing on Kaspersky servers. The list is updated automatically as new versions of applications are released. It is recommended to select this option for installation of Kaspersky Endpoint Security.
You can also create an installation package from a file.
Types of installation packages
Step 2. Installation packages
Select the Kaspersky Endpoint Security for Windows installation package. The installation package creation process starts. During creation of the installation package, you must accept the terms of the End User License Agreement and Privacy Policy.
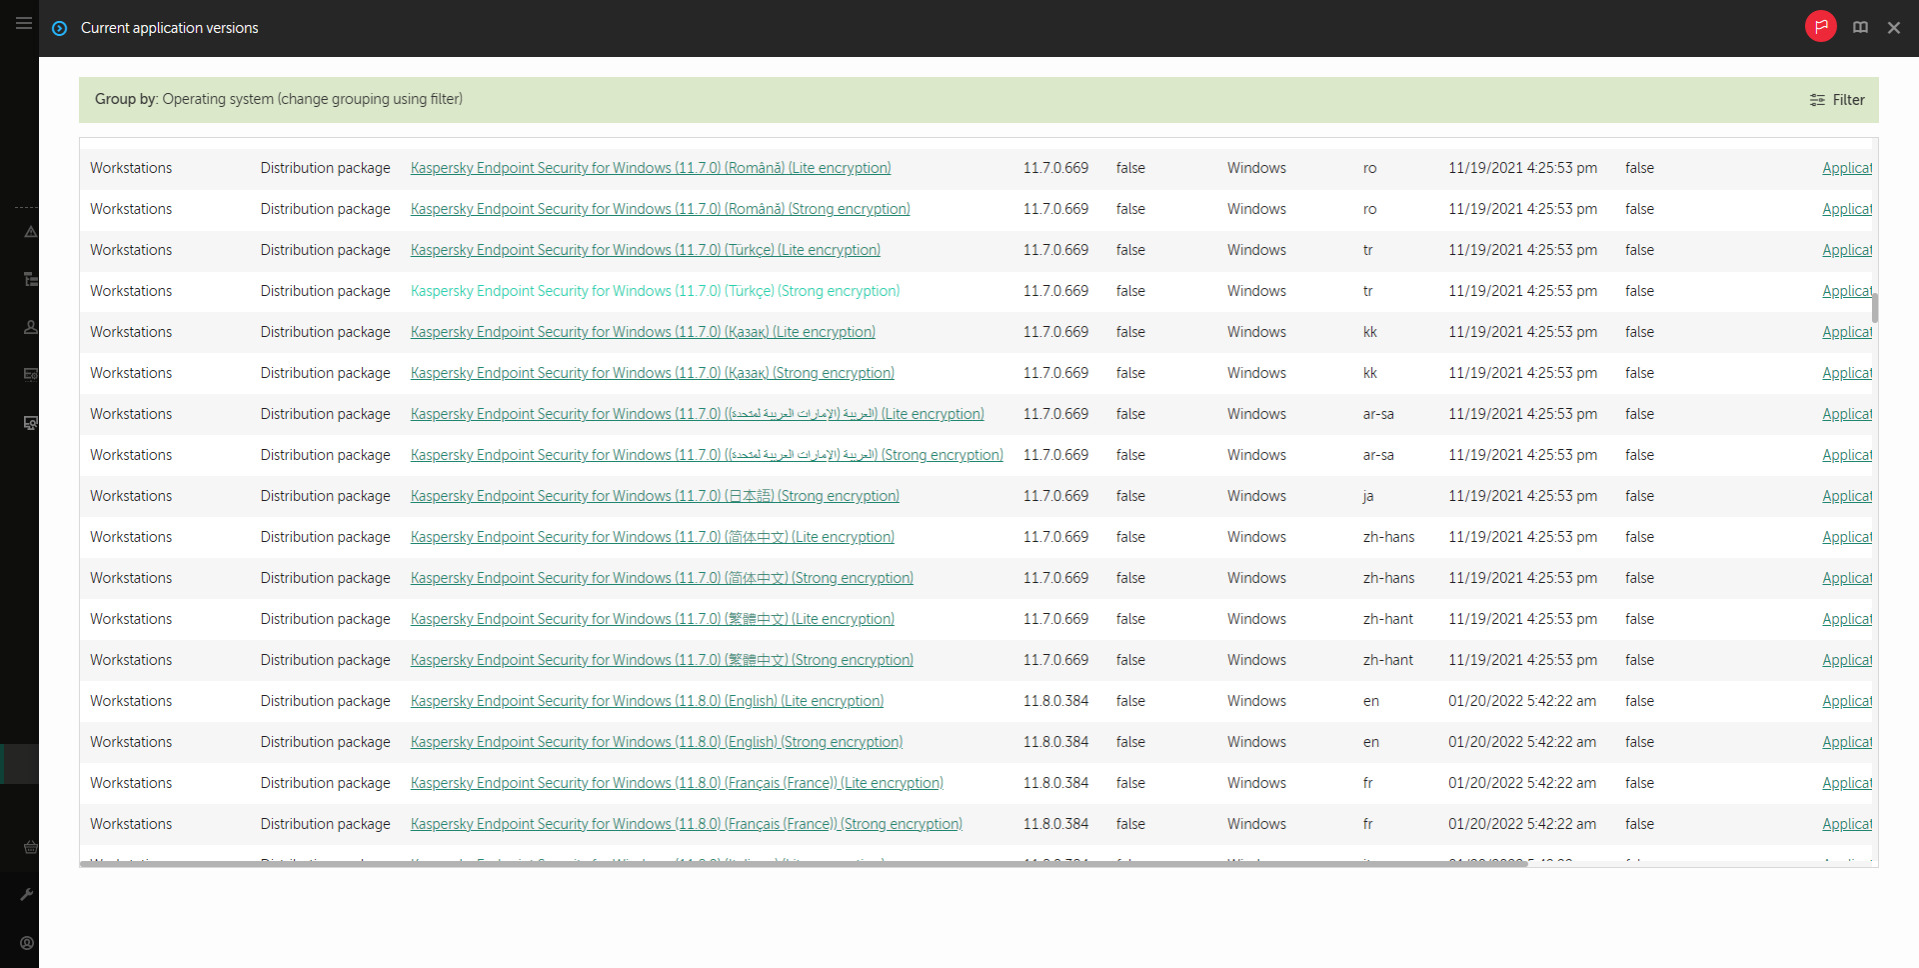
List of installation packages on Kaspersky servers
The installation package will be created and added to Kaspersky Security Center. Using the installation package, you can install Kaspersky Endpoint Security on corporate network computers or update the application version.
In installation package settings, you can select application components for different operating system types. That is, the installation package includes two sets of components: for workstations and for servers. Before deploying the installation package, the installer detects the type of the operating system and installs only those application components that you selected for that operating system type. In this way, you can use the same installation package for workstations and servers.
The installation package contains anti-virus databases from the Administration Server repository. You can update the databases in the installation package to reduce traffic consumption when updating the databases after installing Kaspersky Endpoint Security.

Components included in the installation package
Installation settings of the installation package
Installation package settings
Section |
Description |
|---|---|
Protection components |
Standard mode. The default configuration. This configuration lets you use all components of the application, including components that provide support for Detection and Response solutions. This configuration is used for comprehensive protection of the computer from a variety of threats, network attacks, and fraud. Endpoint Detection and Response Agent. In this configuration, you can only install the components that provide support for Detection and Response solutions: Endpoint Detection and Response (KATA), Managed Detection and Response (MDR), Network Detection and Response (KATA), as well as Kaspersky Unified Monitoring and Analysis Platform (KUMA). This configuration is needed if a third-party Endpoint Protection Platform (EPP) is deployed in your organization alongside a Kaspersky Detection and Response solution. This makes Kaspersky Endpoint Security in the Endpoint Detection and Response Agent configuration compatible with third-party EPP applications. Light Agent to protect virtual environments. This configuration is intended for the application that is used as part of the Kaspersky Security for Virtualization Light Agent solution. Light Agent must be installed on each virtual machine that needs to be protected using the solution. In this configuration, you cannot use Data Encryption components or Adaptive Anomaly Control. If you are installing Light Agent on a virtual machine template that will be used to create nonpersistent virtual machines, select the Protect VDI infrastructure check box (VDI stands for Virtual Desktop Infrastructure). The VDI protection mode helps optimize the performance of Kaspersky Endpoint Security on nonpersistent virtual machines. In this mode, Light Agent declines application updates that require restarting the virtual machine. When receiving application updates that require a restart, Light Agent generates an event about needing to update the template of the protected virtual machines. |
Exclusions |
Starting with Kaspersky Endpoint Security 12.6 for Windows, scan exclusions and trusted applications are added to the trusted zone. Predefined scan exclusions and trusted applications help quickly configure Kaspersky Endpoint Security on SQL servers, Microsoft Exchange servers, and System Center Configuration Manager. This means you do not need to manually set up a trusted zone for the application on servers. Starting with Kaspersky Endpoint Security 12.8 for Windows, you can install the application in Light Agent mode for protecting virtual environments. Predefined scan exclusions and trusted applications can help you quickly configure Kaspersky Endpoint Security in Citrix and VMware virtual environments. You can also configure the trusted zone later in policy properties: scan exclusions and trusted applications. |
Select components to install |
In this section, you can select the application components that will be available. You can change the set of application components at a later time by using the Change application components task. You can create separate sets of components for workstations and servers. Before deploying the installation package, the installer detects the type of the operating system and installs only those application components that you selected for that operating system type. In this way, you can use the same installation package for workstations and servers. The set of available components depends on the configuration of the application: Standard mode The BadUSB Attack Prevention component, Detection and Response component, and data encryption components are not installed by default. These components can be added in the installation package settings. If you need to install Detection and Response components, Kaspersky Endpoint Security supports the following configurations:
Kaspersky Endpoint Security verifies the selection of components before installing the application. If the selected configuration of Detection and Response components is not supported, Kaspersky Endpoint Security cannot be installed. Endpoint Detection and Response Agent In this configuration, only built-in agents for Kaspersky Detection and Response solutions are available. Light Agent to protect virtual environments In this configuration, you can use almost all of the application components that are available in the Standard mode configuration, except data encryption components and Adaptive Anomaly Control. |
License key |
In this section, you can activate the application. To activate the application, you must select a license key. Before you do that, you must add the key to the Administration Server. For more details about adding keys to the Kaspersky Security Center Administration Server, please refer to Kaspersky Security Center Help. |
Incompatible applications |
Carefully read the list of incompatible applications and allow removal of these applications. If incompatible applications are installed on the computer, installation of Kaspersky Endpoint Security ends with an error. |
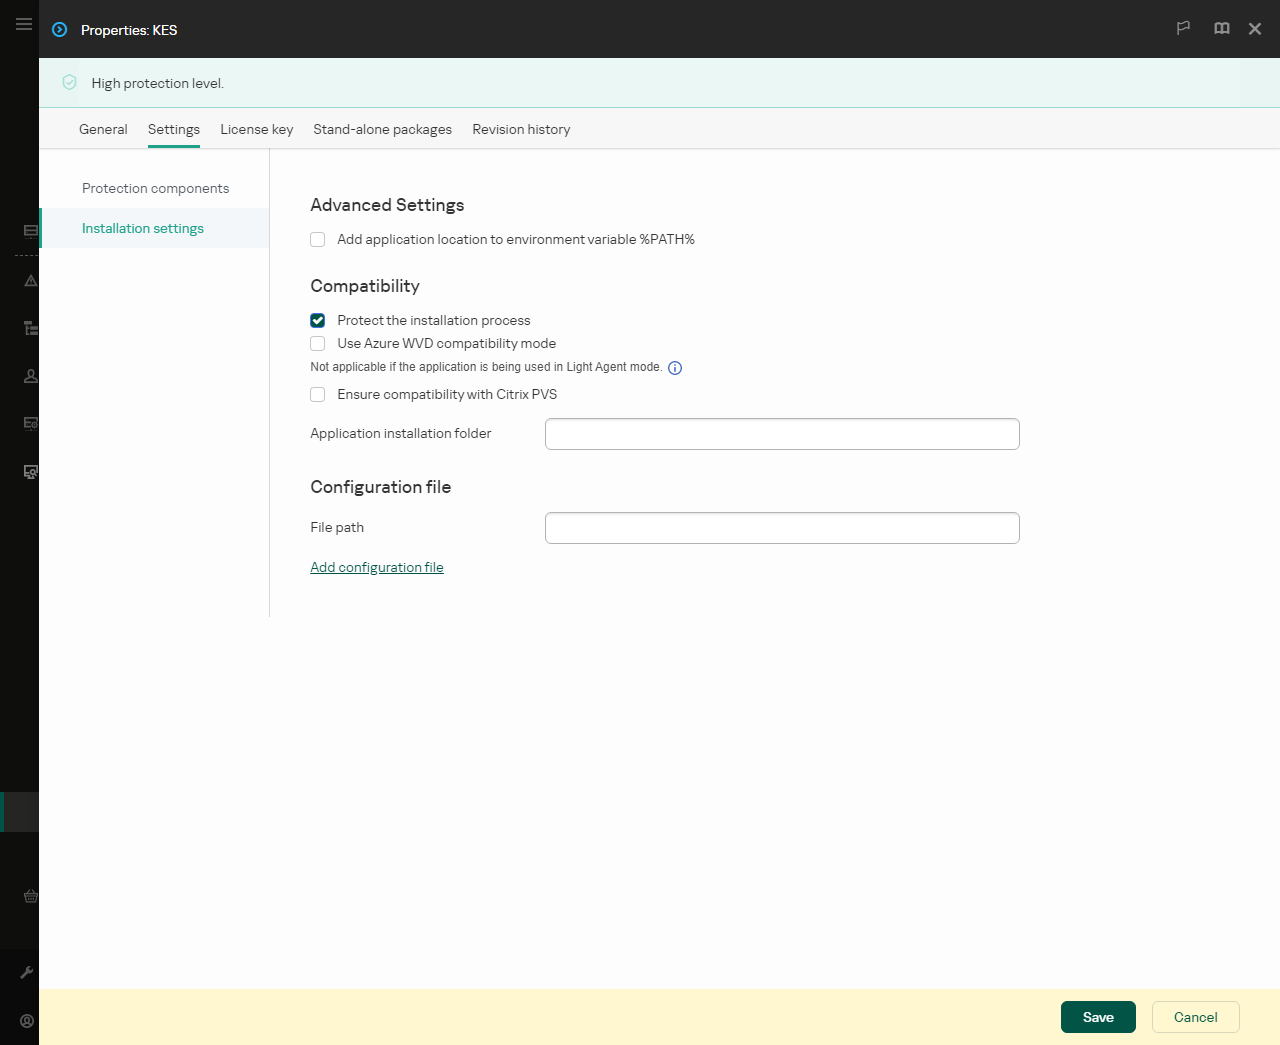
Installation settings |
Add the path to the file avp.com to the system variable %PATH%. You can add the installation path to the %PATH% variable for convenient use of the command line interface. Protect the installation process. Installation protection includes protection against replacement of the distribution package with malicious applications, blocking access to the installation folder of Kaspersky Endpoint Security, and blocking access to the system registry section containing application keys. However, if the application cannot be installed (for example, when performing remote installation with the help of Windows Remote Desktop), you are advised to disable protection of the installation process. Ensure compatibility with Citrix PVS. You can enable support of Citrix Provisioning Services to install Kaspersky Endpoint Security to a virtual machine. Use Azure WVD compatibility mode. This feature allows correctly displaying the state of the Azure virtual machine in the Kaspersky Anti Targeted Attack Platform console. To monitor the performance of the computer, Kaspersky Endpoint Security sends telemetry to KATA servers. Telemetry includes an ID of the computer (Sensor ID). Azure WVD compatibility mode allows assigning a permanent unique Sensor ID to these virtual machines. If the compatibility mode is turned off, the Sensor ID can change after the computer is restarted because of how Azure virtual machines work. This can cause duplicates of virtual machines to appear on the console. Application installation folder. You can change the installation path of Kaspersky Endpoint Security on a client computer. By default, the application is installed in the Configuration file. Installing the application with predefined settings. To do this, you need to upload a file that defines the settings of Kaspersky Endpoint Security. You can create a configuration file in the local interface of the application. |
Updating databases in the installation package
The installation package contains anti-virus databases from the Administration Server repository that are up to date when the installation package is created. After creating the installation package, you can update the anti-virus databases in the installation package. This lets you reduce traffic consumption when updating anti-virus databases after installing Kaspersky Endpoint Security.
To update the anti-virus databases in the Administration Server repository, use the Download updates to the Administration Server repository task of the Administration Server. For more information about updating the anti-virus databases in the Administration Server repository, please refer to the Kaspersky Security Center Help.
You can update the databases in the installation package only in the Administration Console and Kaspersky Security Center Web Console. It is not possible to update the databases in the installation package in the Kaspersky Security Center Cloud Console.
How to update anti-virus databases in an installation package through the Web Console
Page top
Creating a remote installation task
The Install application remotely task is designed for remote installation of Kaspersky Endpoint Security. The Install application remotely task allows you to deploy the installation package of the application to all computers in the organization. Before deploying the installation package, you can update the anti-virus databases inside the package and select the available application components in the properties of the installation package.
How to create a remote installation task in the Administration Console (MMC)
- Open the Kaspersky Security Center Administration Console.
- In the console tree, select Tasks.
The list of tasks opens.
- Click New task.
The Task Wizard starts. Follow the instructions of the Wizard.
Step 1. Selecting task type
Select Kaspersky Security Center Administration Server → Install application remotely.
Step 2. Selecting an installation package
Select Kaspersky Endpoint Security installation package from the list. If the list does not contain the installation package for Kaspersky Endpoint Security, you can create the package in the Wizard.
You can configure the installation package settings in Kaspersky Security Center. For example, you can select the application components that will be installed to a computer.
Network Agent will also be installed together with Kaspersky Endpoint Security. Network Agent facilitates interaction between the Administration Server and a client computer. If Network Agent is already installed on the computer, it is not installed again.
Step 3. Additional
Select the Network Agent installation package. The selected version of Network Agent will be installed together with Kaspersky Endpoint Security.
Step 4. Settings
Configure the following additional application settings:
- Force installation package download. Select the method of application installation:
- Using Network Agent. If Network Agent has not been installed on the computer, first Network Agent will be installed using the tools of the operating system. Then Kaspersky Endpoint Security is installed by the tools of Network Agent.
- Using operating system resources through distribution points. The installation package is delivered to client computers using operating system resources via distribution points. You can select this option if there is at least one distribution point in the network. For more details about distribution points, refer to the Kaspersky Security Center Help.
- Using operating system resources through Administration Server. Files will be delivered to client computers by using operating system resources through the Administration Server. You can select this option if Network Agent is not installed on the client computer, but the client computer is in the same network as the Administration Server.
- Behavior for devices managed through other Administration Servers. Select the Kaspersky Endpoint Security installation method. If the network has more than one Administration Server installed, these Administration Servers may see the same client computers. This may cause, for example, an application to be installed remotely on the same client computer several times through different Administration Servers, or other conflicts.
- Do not re-install application if it is already installed. Clear this check box if you want to install an earlier version of the application, for example.
Step 5. Selecting the operating system restart setting
Select the action to be performed if a computer restart is required. Restart is not required when installing Kaspersky Endpoint Security. Restart is required only if you have to remove incompatible applications prior to installation. Restart may also be required when updating the application version.
Step 6. Selecting the devices to which the task will be assigned
Select the computers for installing Kaspersky Endpoint Security. The following options are available:
- Assign the task to an administration group. In this case, the task is assigned to computers included in a previously created administration group.
- Select computers detected by the Administration Server in the network: unassigned devices. Network Agent is not installed on unassigned devices. In this case, the task is assigned to specific devices. The specific devices can include devices in administration groups as well as unassigned devices.
- Specify device addresses manually, or import addresses from a list. You can specify NetBIOS names, IP addresses, and IP subnets of devices to which you want to assign the task.
Step 7. Selecting the account to run the task
Select the account for installing Network Agent using the tools of the operating system. In this case, administrator rights are required for computer access. You can add multiple accounts. If an account does not have sufficient rights, the Installation Wizard uses the next account. If you install Kaspersky Endpoint Security using Network Agent tools, you do not have to select an account.
Step 8. Configuring a task start schedule
Configure a schedule for starting a task, for example, manually or when the computer is idle.
Step 9. Defining the task name
Enter a name for the task, for example, Install Kaspersky Endpoint Security for Windows 12.8.
Step 10. Finishing task creation
Exit the Wizard. If necessary, select the Run the task after the wizard finishes check box. You can monitor the progress of the task in the task properties. The application will be installed in silent mode. After installation, the ![]() icon will be added to the notification area of the user's computer. If the icon looks like this
icon will be added to the notification area of the user's computer. If the icon looks like this ![]() , make sure that you activated the application.
, make sure that you activated the application.
How to create a remote installation task in the Web Console and Cloud Console
- In the main window of the Web Console, select Assets (Devices) → Tasks.
The list of tasks opens.
- Click Add.
The Task Wizard starts. Follow the instructions of the Wizard.
Step 1. Configuring general task settings
Configure the general task settings:
- In the Application drop-down list, select Kaspersky Security Center.
- In the Task type drop-down list, select Install application remotely.
- In the Task name field, enter a brief description, such as Installation of Kaspersky Endpoint Security for Managers.
- In the Devices to which the task will be assigned block, select the task scope.
Step 2. Selecting computers for installation
At this step, select the computers on which Kaspersky Endpoint Security will be installed according to the selected task scope option.
Step 3. Configuring an installation package
At this step, configure the installation package:
- Select the Kaspersky Endpoint Security for Windows (12.8) installation package.
- Select the Network Agent installation package.
The selected version of Network Agent will be installed together with Kaspersky Endpoint Security. Network Agent facilitates interaction between the Administration Server and a client computer. If Network Agent is already installed on the computer, it is not installed again.
- In the Force installation package download block, select the application installation method:
- Using Network Agent. If Network Agent has not been installed on the computer, first Network Agent will be installed using the tools of the operating system. Then Kaspersky Endpoint Security is installed by the tools of Network Agent.
- Using operating system resources through distribution points. The installation package is delivered to client computers using operating system resources via distribution points. You can select this option if there is at least one distribution point in the network. For more details about distribution points, refer to the Kaspersky Security Center Help.
- Using operating system resources through Administration Server. Files will be delivered to client computers by using operating system resources through the Administration Server. You can select this option if Network Agent is not installed on the client computer, but the client computer is in the same network as the Administration Server.
- In the Maximum number of concurrent downloads field, set a limit on the number of installation package download requests sent to the Administration Server. A limit on the number of requests will help prevent the network from being overload.
- In the Maximum number of installation attempts field, set a limit on the number of attempts to install the application. If installation of Kaspersky Endpoint Security ends with an error, the task will automatically start the installation again.
- If necessary, clear the Do not re-install application if it is already installed check box. It allows, for example, to install one of the previous versions of the application.
- If necessary, clear the Verify operating system type before downloading check box. This lets you avoid downloading an application distribution package if the operating system of the computer does not meet the software requirements. If you are sure that the operating system of the computer meets the software requirements, you can skip this verification.
- If necessary, select the Assign package installation in Active Directory group policies check box. Kaspersky Endpoint Security is installed by means of Network Agent or manually by means of Active Directory. To install Network Agent, the remote installation task must be run with domain administrator privileges.
- If necessary, select the Prompt users to close running applications check box. Installation of Kaspersky Endpoint Security takes up computer resources. For the convenience of the user, the Application Installation Wizard prompts you to close running applications before starting the installation. This helps prevent disruptions in the operation of other applications and prevents possible malfunctions of the computer.
- In the Behavior for devices managed through other Administration Servers block, select the Kaspersky Endpoint Security installation method. If the network has more than one Administration Server installed, these Administration Servers may see the same client computers. This may cause, for example, an application to be installed remotely on the same client computer several times through different Administration Servers, or other conflicts.
Step 4. Selecting the account to run the task
Select the account for installing Network Agent using the tools of the operating system. In this case, administrator rights are required for computer access. You can add multiple accounts. If an account does not have sufficient rights, the Installation Wizard uses the next account. If you install Kaspersky Endpoint Security using Network Agent tools, you do not have to select an account.
Step 5. Completing task creation
Finish the wizard by clicking the Finish button. A new task will be displayed in the list of tasks. To run a task, select the check box opposite the task and click the Start button. The application will be installed in silent mode. After installation, the ![]() icon will be added to the notification area of the user's computer. If the icon looks like this
icon will be added to the notification area of the user's computer. If the icon looks like this ![]() , make sure that you activated the application.
, make sure that you activated the application.
Installing the application locally using the Wizard
The interface of the application Setup Wizard consists of a sequence of windows corresponding to the application installation steps.
To install the application or upgrade the application from a previous version using the Setup Wizard:
- Copy the distribution kit folder to the user's computer.
- Run setup_kes.exe.
The Setup Wizard starts.
Preparing for installation
Before installing Kaspersky Endpoint Security on a computer or upgrading it from a previous version, the following conditions are checked:
- presence of software with which Kaspersky Endpoint Security may have compatibility issues (the list of software is available in the incompatible.txt file that is included in the distribution kit).
- Whether or not the hardware and software requirements are met.
- Whether or not the user has the rights to install the software product.
If any one of the previous requirements is not met, a relevant notification is displayed on the screen. For example, a notification about incompatible software (see the figure below).
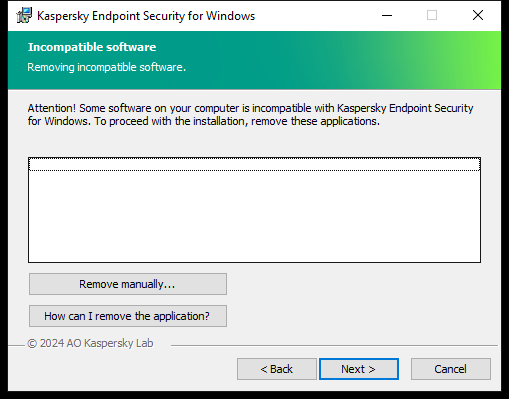
Removing incompatible software
If the computer meets the listed requirements, the Setup Wizard searches for Kaspersky applications that could lead to conflicts when running at the same time as the application being installed. If such applications are found, you are prompted to remove them manually.
If the detected applications include previous versions of Kaspersky Endpoint Security, all data that can be migrated (such as activation data and application settings) is retained and used during installation of Kaspersky Endpoint Security 12.8 for Windows, and the previous version of the application is automatically removed. This applies to the following application versions:
- Kaspersky Endpoint Security 11.10.0 for Windows (build 11.10.0.399).
- Kaspersky Endpoint Security 11.11.0 for Windows (build 11.11.0.452).
- Kaspersky Endpoint Security 12.0 for Windows (build 12.0.0.465).
- Kaspersky Endpoint Security 12.1 for Windows (build 12.1.0.506).
- Kaspersky Endpoint Security 12.2 for Windows (build 12.2.0.462).
- Kaspersky Endpoint Security 12.3 for Windows (build 12.3.0.493).
- Kaspersky Endpoint Security 12.4 for Windows (build 12.4.0.467).
- Kaspersky Endpoint Security 12.5 for Windows (build 12.5.0.539).
- Kaspersky Endpoint Security 12.6 for Windows (build 12.6.0.438).
- Kaspersky Endpoint Security 12.7 for Windows (build 12.7.0.533).
Configuration of Kaspersky Endpoint Security

Choosing the configuration of the application
Standard mode. The default configuration. This configuration lets you use all components of the application, including components that provide support for Detection and Response solutions. This configuration is used for comprehensive protection of the computer from a variety of threats, network attacks, and fraud.
Endpoint Detection and Response Agent. In this configuration, you can only install the components that provide support for Detection and Response solutions: Endpoint Detection and Response (KATA), Managed Detection and Response (MDR), Network Detection and Response (KATA), as well as Kaspersky Unified Monitoring and Analysis Platform (KUMA). This configuration is needed if a third-party Endpoint Protection Platform (EPP) is deployed in your organization alongside a Kaspersky Detection and Response solution. This makes Kaspersky Endpoint Security in the Endpoint Detection and Response Agent configuration compatible with third-party EPP applications.
Light Agent to protect virtual environments. This configuration is intended for the application that is used as part of the Kaspersky Security for Virtualization Light Agent solution. Light Agent must be installed on each virtual machine that needs to be protected using the solution. In this configuration, you cannot use Data Encryption components or Adaptive Anomaly Control. If you are installing Light Agent on a virtual machine template that will be used to create nonpersistent virtual machines, select the Protect VDI infrastructure check box (VDI stands for Virtual Desktop Infrastructure). The VDI protection mode helps optimize the performance of Kaspersky Endpoint Security on nonpersistent virtual machines. In this mode, Light Agent declines application updates that require restarting the virtual machine. When receiving application updates that require a restart, Light Agent generates an event about needing to update the template of the protected virtual machines.
Kaspersky Endpoint Security components
During the installation process, you can select the components of Kaspersky Endpoint Security that you want to install (see the figure below). The File Threat Protection component is a mandatory component that must be installed. You cannot cancel its installation.
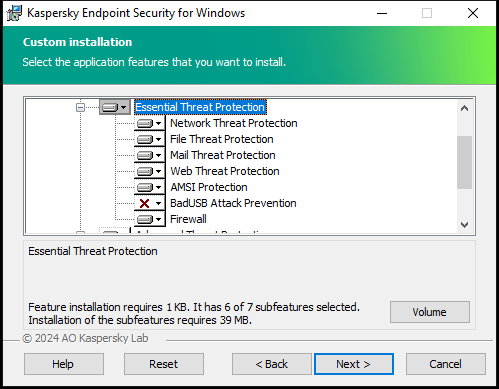
Selecting application components to install
By default, all application components are selected for installation except the following components:
You can change the available application components after the application is installed. To do so, you need to run the Setup Wizard again and choose to change the available components.
If you need to install Detection and Response components, Kaspersky Endpoint Security supports the following configurations:
- Endpoint Detection and Response Optimum only
- Endpoint Detection and Response Expert only
- Endpoint Detection and Response (KATA) only
- Network Detection and Response (KATA) only
- Sandbox only
- Endpoint Detection and Response Optimum and Sandbox
- Endpoint Detection and Response Expert and Sandbox
- Endpoint Detection and Response (KATA) and Sandbox
- Network Detection and Response (KATA) and Endpoint Detection and Response (KATA)
- Network Detection and Response (KATA) and Managed Detection and Response
Kaspersky Endpoint Security verifies the selection of components before installing the application. If the selected configuration of Detection and Response components is not supported, Kaspersky Endpoint Security cannot be installed.
Selecting the folder for installing the application
You can change the installation path of Kaspersky Endpoint Security on a client computer. By default, the application is installed in the %ProgramFiles(x86)%\Kaspersky Lab\KES.12.8 folder.
Configuring the trusted zone
Starting with Kaspersky Endpoint Security 12.6 for Windows, scan exclusions and trusted applications are added to the trusted zone. Predefined scan exclusions and trusted applications help quickly configure Kaspersky Endpoint Security on SQL servers, Microsoft Exchange servers, and System Center Configuration Manager. This means you do not need to manually set up a trusted zone for the application on servers.
Starting with Kaspersky Endpoint Security 12.8 for Windows, you can install the application in Light Agent mode for protecting virtual environments. Predefined scan exclusions and trusted applications can help you quickly configure Kaspersky Endpoint Security in Citrix and VMware virtual environments.
You can also configure the trusted zone later in policy properties: scan exclusions and trusted applications.
Advanced settings
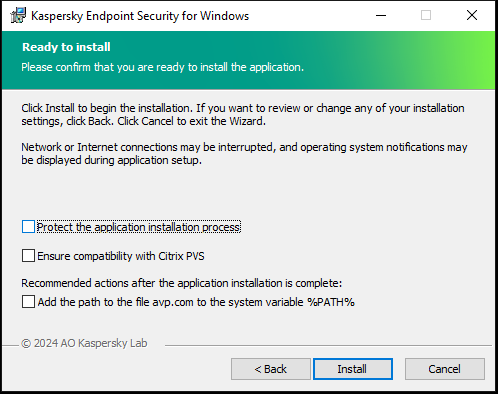
Advanced application installation settings
Protect the application installation process. Installation protection includes protection against replacement of the distribution package with malicious applications, blocking access to the installation folder of Kaspersky Endpoint Security, and blocking access to the system registry section containing application keys. However, if the application cannot be installed (for example, when performing remote installation with the help of Windows Remote Desktop), you are advised to disable protection of the installation process.
Ensure compatibility with Citrix PVS. You can enable support of Citrix Provisioning Services to install Kaspersky Endpoint Security to a virtual machine.
Add the path to the file avp.com to the system variable %PATH%. You can add the installation path to the %PATH% variable for convenient use of the command line interface.
Remotely installing the application using System Center Configuration Manager
These instructions apply to System Center Configuration Manager 2012 R2.
To remotely install an application using System Center Configuration Manager:
- Open the Configuration Manager console.
- In the right part of the console, in the App management block, select Packages.
- In the upper part of the console in the control panel, click the Create package button.
This starts the New Package and Application Wizard.
- In the New Package and Application Wizard:
- In the Package section:
- In the Name field, enter the name of the installation package.
- In the Source folder field, specify the path to the folder containing the distribution package of Kaspersky Endpoint Security.
- In the Application type section, select the Standard program option.
- In the Standard program section:
- In the Name field, enter the unique name for the installation package (for example, the application name including the version).
- In the Command line field, specify the Kaspersky Endpoint Security installation options from the command line.
- Click the Browse button to specify the path to the executable file of the application.
- Make sure that the Run mode list has the Run with administrative rights item selected.
- In the Requirements section:
- Select the Run another program first check box if you want a different application to be started before installing Kaspersky Endpoint Security.
Select the application from the Application drop-down list or specify the path to the executable file of this application by clicking the Browse button.
- Select the This program can run only on specified platforms option in the Platform requirements block if you want the application to be installed only in the specified operating systems.
In the list below, select the check boxes opposite the operating systems in which Kaspersky Endpoint Security will be installed.
This step is optional.
- Select the Run another program first check box if you want a different application to be started before installing Kaspersky Endpoint Security.
- In the Summary section, check all entered values of the settings and click Next.
The created installation package will appear in the Packages section in the list of available installation packages.
- In the Package section:
- In the context menu of the installation package, select Deploy.
This starts the Deployment Wizard.
- In the Deployment Wizard:
- In the General section:
- In the Software field, enter the unique name of the installation package or select the installation package from the list by clicking the Browse button.
- In the Collection field, enter the name of the collection of computers on which the application will be installed, or select the collection by clicking the Browse button.
- In the Contains section, add distribution points (for more detailed information, please refer to the help documentation for System Center Configuration Manager).
- If required, specify the values of other settings in the Deployment Wizard. These settings are optional for remote installation of Kaspersky Endpoint Security.
- In the Summary section, check all entered values of the settings and click Next.
After the Deployment Wizard finishes, a task will be created for remote installation of Kaspersky Endpoint Security.
- In the General section:
Description of setup.ini file installation settings
The setup.ini file is used when installing the application from the command line or when using the Group Policy Editor of Microsoft Windows. To apply settings from the setup.ini file, place this file into the folder containing the Kaspersky Endpoint Security distribution package.
Use the setup.ini file only when installing the application in silent mode.
The setup.ini file consists of the following sections:
[Setup]– general settings of application installation.[Components]– selection of application components to be installed in Standard mode. If none of the components are specified, all components that are available for the operating system are installed. File Threat Protection is a mandatory component and is installed on the computer regardless of which settings are indicated in this section.[Tasks]– selection of tasks to be included in the list of Kaspersky Endpoint Security tasks. If no task is specified, all tasks are included in the task list of Kaspersky Endpoint Security.
The alternatives to the value 1 are the values yes, on, enable, enabled, and true. The alternatives to the value 0 are the values no, off, disable, disabled, and false.
Settings of the setup.ini file
Section |
Parameter |
Description |
|---|---|---|
|
|
Path to the application installation folder. |
|
|
Kaspersky Endpoint Security activation code. |
|
|
Acceptance of the terms of the End User License Agreement. The text of the License Agreement is included in the distribution kit of Kaspersky Endpoint Security. Accepting the terms of the End User License Agreement is necessary for installing the application or upgrading the application version. |
|
|
Acceptance of the Privacy Policy. The text of the Privacy Policy is included in the Kaspersky Endpoint Security distribution kit. To install the application or upgrade the application version, you must accept the Privacy Policy. |
|
|
Agreement or refusal to participate in Kaspersky Security Network (KSN). If no value is set for this parameter, Kaspersky Endpoint Security will prompt to confirm your consent or refusal to participate in KSN when Kaspersky Endpoint Security is first started. Available values:
The Kaspersky Endpoint Security distribution package is optimized for use with Kaspersky Security Network. If you opted not to participate in Kaspersky Security Network, you should update Kaspersky Endpoint Security immediately after the installation is complete. |
|
|
Set the user name for accessing the features and settings of Kaspersky Endpoint Security (the Password protection component). The user name is set together with the |
|
|
Specify a password for accessing Kaspersky Endpoint Security features and settings (the password is specified together with the If you specified a password but did not specify a user name with the |
|
|
Specify the scope of the password for accessing Kaspersky Endpoint Security. When a user attempts to perform an action that is included in this scope, Kaspersky Endpoint Security prompts for the user's account credentials ( Available values:
For example, |
|
|
Enabling or disabling the application installation protection mechanism. Available values:
Installation protection includes protection against replacement of the distribution package with malicious applications, blocking access to the installation folder of Kaspersky Endpoint Security, and blocking access to the system registry section containing application keys. However, if the application cannot be installed (for example, when performing remote installation with the help of Windows Remote Desktop), you are advised to disable protection of the installation process. |
|
|
Enabling or disabling Azure WVD compatibility mode. Available values:
This feature allows correctly displaying the state of the Azure virtual machine in the Kaspersky Anti Targeted Attack Platform console. To monitor the performance of the computer, Kaspersky Endpoint Security sends telemetry to KATA servers. Telemetry includes an ID of the computer (Sensor ID). Azure WVD compatibility mode allows assigning a permanent unique Sensor ID to these virtual machines. If the compatibility mode is turned off, the Sensor ID can change after the computer is restarted because of how Azure virtual machines work. This can cause duplicates of virtual machines to appear on the console. |
|
|
Automatic restart of the computer, if required after installation or upgrade of the application. If no value is set for this parameter, automatic computer restart is blocked. Restart is not required when installing Kaspersky Endpoint Security. Restart is required only if you have to remove incompatible applications prior to installation. Restart may also be required when updating the application version. |
|
|
In the %PATH% system variable, add the path to executable files located in the Kaspersky Endpoint Security setup folder. Available values:
|
|
|
Enables or disables protection of the Kaspersky Endpoint Security processes using AM-PPL technology (Antimalware Protected Process Light). For more details about AM-PPL technology, please visit the Microsoft website. AM-PPL technology is available for Windows 10 version 1703 (RS2) or later, and Windows Server 2019 operating systems. Available values:
|
|
|
Application upgrade mode:
You can upgrade the application without a restart starting with version 11.10.0. To upgrade an earlier version of the application, you must restart the computer. You can also install patches without a restart starting with version 11.11.0. Restart is not required when installing Kaspersky Endpoint Security. So, the upgrade mode of the application will be specified in the application settings. You can change this parameter in the application settings or in the policy. When upgrading already installed application, the priority of the parameter specified in the setup.ini file is higher than that of the parameter specified in the application settings or in the command line. For example, if |
|
|
Installing the application with predefined settings. To do this, you need to upload a file that defines the settings of Kaspersky Endpoint Security. You can create a configuration file in the local interface of the application. |
|
|
Enable writing of registry keys from the setup.reg file to the registry. |
|
|
Enabling or disabling application tracing. After Kaspersky Endpoint Security starts, it saves trace files in the folder
|
|
|
Level of detail of traces. Available values:
|
|
|
Managing the application through the REST API. To manage the application through the REST API, you must specify the user name ( Available values:
To manage the application through the REST API, management using administrative systems must be allowed. To do so, set the |
|
|
User name of the Windows domain account used for managing the application through the REST API. Management of the application through the REST API is available only to this user. Enter the user name in the format Adding a user name is a prerequisite for managing the application through the REST API. |
|
|
Port used for managing the application through the REST API. Port 6782 is used by default. Make sure that the port is free. |
|
|
Certificate for identifying requests (for example, |
|
|
Installing the application in Endpoint Detection and Response Agent (EDR Agent) mode. Endpoint Detection and Response Agent is an application that is installed on individual workstations and servers in the IT infrastructure of the organization to support the Kaspersky Managed Detection and Response and Kaspersky Anti Targeted Attack Platform solutions. EDR Agent is compatible with third-party EPP applications. This lets you use third-party infrastructure security tools alongside Detection and Response by Kaspersky. To install EDR Agent, in the Available values:
|
|
|
Installing the application in Light Agent mode. This configuration is intended for the application that is used as part of the Kaspersky Security for Virtualization Light Agent solution. Light Agent must be installed on each virtual machine that needs to be protected using the solution. Available values:
|
|
|
Enabling the VDI protection mode when installing the application in Light Agent mode ( Available values:
|
|
|
Adding predefined scan exclusions and trusted applications when installing the application on the server. Predefined scan exclusions and trusted applications help quickly configure Kaspersky Endpoint Security on SQL servers, Microsoft Exchange servers, and System Center Configuration Manager. For example, predefined scan exclusions for SQL servers include MDF and LDF database files. This means you do not need to manually set up a trusted zone for the application on servers. Available values:
|
|
|
Adding predefined scan exclusions and trusted applications when installing the application on a virtual machine (Light Agent mode). Predefined scan exclusions and trusted applications can help you quickly configure Kaspersky Endpoint Security in Citrix and VMware virtual environments. Available values:
|
|
|
Creating a unique computer identifier (Sensor ID) during the installation or update of the application. Sensor ID is used in the Kaspersky Anti Targeted Attack Platform solution to identify computers that send telemetry to the server. When creating Sensor ID, the application uses an algorithm that takes into account the computer's configuration, such as the motherboard serial number. In some cases, for example, when using the application in a virtual environment, Sensor ID may be duplicated. As a result, the Kaspersky Anti Targeted Attack Platform cannot identify the computer from which the telemetry is sent. To create a unique Sensor ID, you need to set the parameter By default, the parameter is not set. The application inherits the Sensor ID in the following cases:
As part of application repair, the application attempts to inherit the Sensor ID. If the Sensor ID cannot be restored, the application creates a new Sensor ID. |
|
|
Installation of all components. If the parameter value Because of the way Detection and Response solutions are supported, Endpoint Detection and Response Optimum as well as Kaspersky Sandbox components are installed on the computer. The Endpoint Detection and Response Expert component is not compatible with this configuration. |
|
|
Mail Threat Protection. |
|
|
Web Threat Protection. |
|
|
AMSI Protection. |
|
|
Host Intrusion Prevention. |
|
|
Behavior Detection. |
|
|
Exploit Prevention. |
|
|
Remediation Engine. |
|
|
Firewall. |
|
|
Network Threat Protection. |
|
|
Web Control. |
|
|
Device Control. |
|
|
Application Control. |
|
|
Adaptive Anomaly Control. |
|
|
Cloud Discovery. |
|
|
Log Inspection |
|
|
System Integrity Monitoring. |
|
|
File Level Encryption libraries. |
|
|
Full Disk Encryption libraries. |
|
|
BadUSB Attack Prevention. |
|
|
Endpoint Detection and Response Optimum (EDR Optimum). The component is not compatible with EDR Expert ( |
|
|
Endpoint Detection and Response Expert (EDR Expert). The component is not compatible with EDR Optimum ( |
|
|
Endpoint Detection and Response (KATA). The component is not compatible with EDR Expert ( |
|
|
Kaspersky Sandbox or KATA Sandbox. Kaspersky Sandbox is a standalone Detection and Response solution by Kaspersky. KATA Sandbox is a component of the Kaspersky Anti Targeted Attack Platform solution. |
|
|
Managed Detection and Response. |
|
|
Network Detection and Response (KATA). The component is not compatible with EDR Expert ( |
|
|
Application management using administration systems. Administration systems include, for example, Kaspersky Security Center. In addition to Kaspersky administration systems, you can use third-party solutions. Kaspersky Endpoint Security provides an API for this purpose. Available values:
|
|
|
Integration with KUMA. |
|
|
Installing the application in Endpoint Detection and Response Agent (EDR Agent) mode for integration with Kaspersky Anti Targeted Attack Platform (EDR). |
|
|
Installing the application in the Endpoint Detection and Response Agent (EDR Agent) mode for integration with Kaspersky Managed Detection and Response. |
|
|
Installing the application in Endpoint Detection and Response Agent (EDR Agent) mode for integration with Kaspersky Anti Targeted Attack Platform (NDR). |
|
|
Full Scan task. Available values:
|
|
|
Critical Areas Scan task. Available values:
|
|
|
Update task. Available values:
|
Change application components
During installation of the application, you can select the components that will be available. You can change the available application components in the following ways:
- Locally, by using the Setup Wizard.
Application components are changed by using the normal method for a Windows operating system, which is through the Control Panel. Run the Application Setup Wizard and select the option to change the application components that are available. Follow the instructions on the screen.
This method is not available if the application was installed via Kaspersky Security Center. You can change the selection of application components in the Control Panel only after installing the application locally.
- Remotely using Kaspersky Security Center.
The Change application components task allows you to change the components of Kaspersky Endpoint Security after the application is installed.
Please take into account the following special considerations when changing the application components:
- On computers running Windows Server, you cannot install all components of Kaspersky Endpoint Security (for example, the Adaptive Anomaly Control component is not available).
- If the hard drives on your computer are protected by Full Disk Encryption (FDE), you cannot remove the Full Disk Encryption component. To remove the Full Disk Encryption component, decrypt all the hard drives of the computer.
- If the computer has encrypted files (FLE) or the user uses encrypted removable drives (FDE or FLE), it will be impossible to access the files and removable drives after the Data Encryption components are removed. You can access the files and removable drives by reinstalling the Data Encryption components.
- If the application is installed in Light Agent mode in a VDI infrastructure, changing the set components is not supported.
How to add or remove application components in the Administration Console (MMC)
How to add or remove application components in the Web Console and Cloud Console
When installing, updating or uninstalling Kaspersky Endpoint Security, errors may occur. For more information about solving these errors, please refer to the Technical Support Knowledge Base.
Advanced Settings of the task
Parameter |
Description |
|---|---|
Exclusions |
Starting with Kaspersky Endpoint Security 12.6 for Windows, scan exclusions and trusted applications are added to the trusted zone. Predefined scan exclusions and trusted applications help quickly configure Kaspersky Endpoint Security on SQL servers, Microsoft Exchange servers, and System Center Configuration Manager. This means you do not need to manually set up a trusted zone for the application on servers. Starting with Kaspersky Endpoint Security 12.8 for Windows, you can install the application in Light Agent mode for protecting virtual environments. Predefined scan exclusions and trusted applications can help you quickly configure Kaspersky Endpoint Security in Citrix and VMware virtual environments. You can also configure the trusted zone later in policy properties: scan exclusions and trusted applications. |
Separate mode / Combined mode |
You can create separate sets of components for workstations and servers – Separate mode. Before deploying the installation package, the installer detects the type of the operating system and installs only those application components that you selected for that operating system type. In this way, you can use the same installation package for workstations and servers. Combined mode offers a common list of components for workstation and servers. The availability of individual components depends on the operating system type. In this mode, we recommend creating a separate installation package for workstations and separate installation package for servers. You can configure the common list of components in the installation package only in Standard mode. |
Remove incompatible third-party applications |
Prior to the installation, Kaspersky Endpoint Security checks the computer for the presence of software from the incompatible.txt list. Kaspersky does not guarantee the compatibility of Kaspersky Endpoint Security with software from the list. If an application from the list is discovered, the installer stops the deployment of Kaspersky Endpoint Security. |
Use password for modifying the set of application components |
Administrators typically enable Password protection to restrict access to Kaspersky Endpoint Security. That is, to modify the selection of application components, you must enter credentials of a user that has the Remove / modify / restore the application permission. For example, you can use the KLAdmin account. |
Use Azure WVD compatibility mode |
This feature allows correctly displaying the state of the Azure virtual machine in the Kaspersky Anti Targeted Attack Platform console. To monitor the performance of the computer, Kaspersky Endpoint Security sends telemetry to KATA servers. Telemetry includes an ID of the computer (Sensor ID). Azure WVD compatibility mode allows assigning a permanent unique Sensor ID to these virtual machines. If the compatibility mode is turned off, the Sensor ID can change after the computer is restarted because of how Azure virtual machines work. This can cause duplicates of virtual machines to appear on the console. |
Use the password to uninstall Kaspersky Endpoint Agent and Kaspersky Security for Windows Server |
Administrators typically enable Password protection in settings of these tasks to restrict access to Kaspersky Endpoint Agent (KEA) and Kaspersky Security for Windows Server (KSWS). That is, if you are migrating from the [KES+KEA] configuration to [KES+built-in agent], or if you are migrating from KSWS to KES, you must enter a password to remove these applications. |
Upgrading from a previous version of the application
When you update a previous version of the application to a newer version, consider the following:
- The localization of the new version of Kaspersky Endpoint Security must match the localization of the installed version of the application. If localizations of the applications do not match, the application upgrade will complete with an error.
- We recommend quitting all active applications before starting the update.
- Before updating, Kaspersky Endpoint Security blocks the Full Disk Encryption functionality. If Full Disk Encryption could not be locked, the upgrade installation will not start. After updating the application, the Full Disk Encryption functionality will be restored.
Kaspersky Endpoint Security supports updates for the following versions of the application:
- Kaspersky Endpoint Security 11.10.0 for Windows (build 11.10.0.399).
- Kaspersky Endpoint Security 11.11.0 for Windows (build 11.11.0.452).
- Kaspersky Endpoint Security 12.0 for Windows (build 12.0.0.465).
- Kaspersky Endpoint Security 12.1 for Windows (build 12.1.0.506).
- Kaspersky Endpoint Security 12.2 for Windows (build 12.2.0.462).
- Kaspersky Endpoint Security 12.3 for Windows (build 12.3.0.493).
- Kaspersky Endpoint Security 12.4 for Windows (build 12.4.0.467).
- Kaspersky Endpoint Security 12.5 for Windows (build 12.5.0.539).
- Kaspersky Endpoint Security 12.6 for Windows (build 12.6.0.438).
- Kaspersky Endpoint Security 12.7 for Windows (build 12.7.0.533).
When installing, updating or uninstalling Kaspersky Endpoint Security, errors may occur. For more information about solving these errors, please refer to the Technical Support Knowledge Base.
Application upgrade methods
Kaspersky Endpoint Security can be updated on the computer in the following ways:
- Using the Kaspersky update service (Seamless Update – SMU).
- locally, by using the Setup Wizard.
- locally from the command line.
- remotely using Kaspersky Security Center.
- remotely through the Microsoft Windows Group Policy Management Editor (for more details, visit the Microsoft Technical Support website).
- remotely, by using the System Center Configuration Manager.
If the application that is deployed in the corporate network features a set of components other than the default set, updating the application through the Administration Console (MMC) is different from updating the application through the Web Console and Cloud Console. When you update Kaspersky Endpoint Security, consider the following:
- Kaspersky Security Center Web Console or Kaspersky Security Center Cloud Console.
If you created an installation package for the new version of the application with the default set of components, then the set of components on a user's computer will not be changed. To use Kaspersky Endpoint Security with the default set of components, you need to open the installation package properties, change the set of components, then revert to the original set of components and save the changes.
- Kaspersky Security Center Administration Console.
The set of application components after the update will match the set of components in the installation package. That is, if the new version of the application has the default set of components, then, for example, BadUSB Attack Prevention will be removed from the computer, since this component is excluded from the default set. To continue using the application with the same set of components as before the update, select the required components in the installation package settings.
Upgrading the application without a restart
Upgrading the application without a restart provides uninterrupted server operation when the application version is updated.
Upgrading the application without a restart has the following limitations:
- You can upgrade the application without a restart starting with version 11.10.0. To upgrade an earlier version of the application, you must restart the computer.
- You can install patches without a restart starting with version 11.11.0. To install patches for earlier versions of the application, a computer restart may be required.
- Upgrading the application without a restart is not available on computers with enabled data encryption (Kaspersky encryption (FDE), BitLocker, File Level Encryption (FLE)). To upgrade the application on computers with enabled data encryption, the computer must be restarted.
- The application cannot be upgraded on a virtual machine without a restart. To upgrade the application on a virtual machine, you must restart the virtual machine.
- After changing application components or repairing the application, you must restart the computer.
How to select the application upgrade mode in the Administration Console (MMC)
How to select the application upgrade mode in the Web Console
- In the main window of the Web Console, select Assets (Devices) → Policies & profiles.
- Click the name of the Kaspersky Endpoint Security policy.
The policy properties window opens.
- Select the Application settings tab.
- Go to General settings → Application Settings.
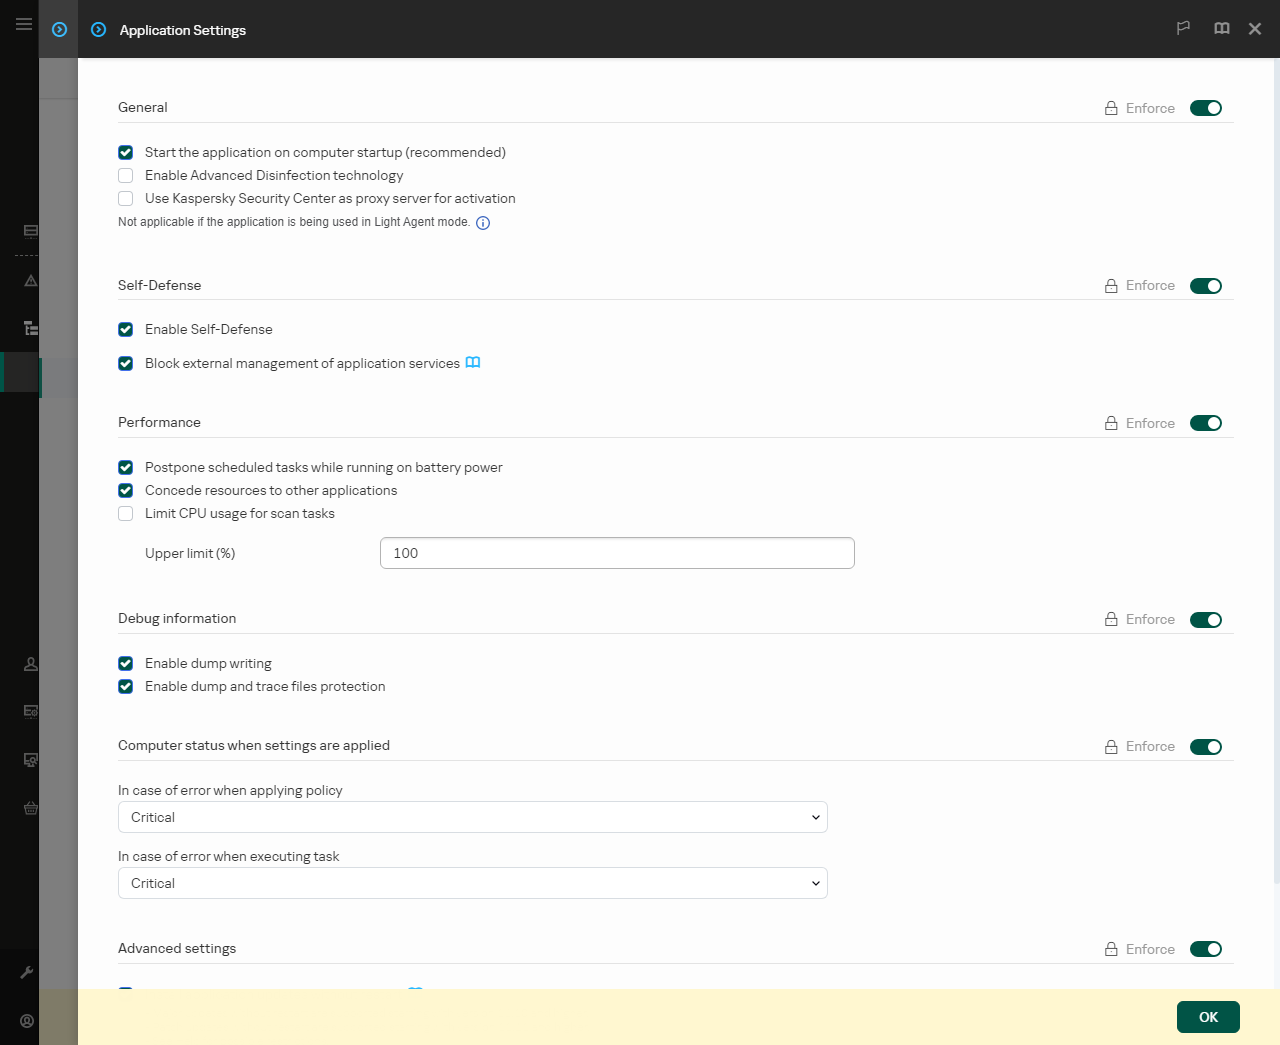
Kaspersky Endpoint Security for Windows settings
- In the Advanced settings block, select or clear the Install application updates without restart check box to configure the application upgrade mode.
- Save your changes.
How to select the application upgrade mode in the application interface
- In the main application window, click the
 button.
 - In the application settings window, select General settings → Application settings.

Kaspersky Endpoint Security for Windows settings
- In the General block, select or clear the Install updates without computer restart check box to configure the application upgrade mode.
- Save your changes.
As a result, after upgrading the application without a restart, two versions of the application will be installed on the computer. The installer installs the new version of the application to separate subfolders in the Program Files and Program Data folders. The installer also creates a separate registry key for the new version of the application. You do not have to manually remove the previous version of the application. The previous version will be removed automatically when the computer is restarted.
You can check the Kaspersky Endpoint Security upgrade using the Kaspersky application version report in the Kaspersky Security Center console.
Page top
SMU update of the application
To update the application using the Kaspersky update service (Seamless Update; SMU), you do not need to run the installer, in contrast to other update methods. Kaspersky Endpoint Security gets the new version of the application alongside anti-virus databases from the same source.
An SMU update allows updating the application on all computers of your organization to the latest version. Before applying an SMU update, we recommend testing the new version of the application on a few computers. To do so, you must update the application on these computers manually (for example, locally using the Setup Wizard). You cannot select individual computers when performing an SMU update.
The update schedule for the application is determined by Kaspersky staff. To make sure the new version of the application is running smoothly, Kaspersky makes updates available on a step by step basis. This means you may get your SMU update up to two months later than a new version is released.
You can manage the SMU update of the application using the Update of databases and application modules task. To have the new version of the application included in the same package as the anti-virus databases, you must allow updating application modules in Update of databases and application modules task settings. Also in Update of databases and application modules task settings, you can allow updating the application without a restart.
Steps of an SMU update of the application
- After a new version of the application is released, Kaspersky distributes the update.
- The user approves the update of the application.
If the computer is connected to the Kaspersky Security Center, the update is available in the Kaspersky Security Center, in the Update of Kaspersky databases and application modules section. For more details on approving updates, refer to the Kaspersky Security Center Help.
If the computer is not connected to the Kaspersky Security Center, the update is available in the notification section of the interface of the application:
 . To approve the update, select a version of the application and accept the terms and conditions of the agreements (see the figure below).
 - Kaspersky Endpoint Security runs the Update of databases and application modules task in accordance with the configured schedule.
As a result, Kaspersky Endpoint Security updates the application in "silent" mode.
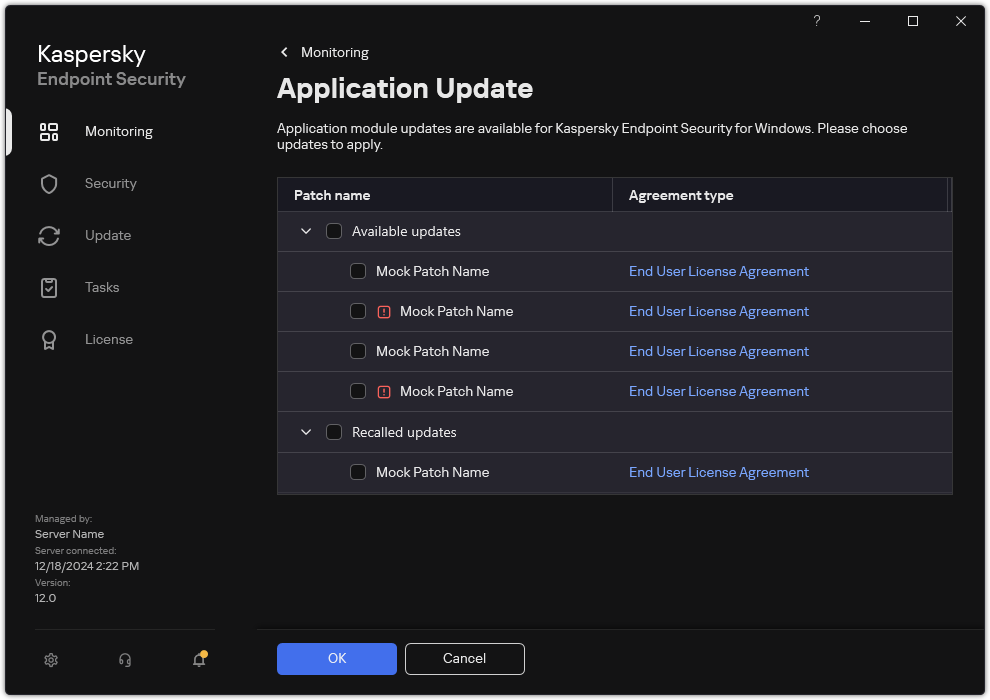
Available application updates
Page top
Removing the application
Removing Kaspersky Endpoint Security leaves the computer and user data unprotected against threats.
When installing, updating or uninstalling Kaspersky Endpoint Security, errors may occur. For more information about solving these errors, please refer to the Technical Support Knowledge Base.
Removing the application remotely using Kaspersky Security Center
You can remotely uninstall the application by using the Uninstall application remotely task. When performing the task, Kaspersky Endpoint Security downloads the application uninstall utility to the user's computer. After completing uninstallation of the application, the utility will be automatically removed.
How to remove the application through the Administration Console (MMC)
How to remove the application through the Web Console and Cloud Console
Restart the computer to complete the uninstallation. To do so, Network Agent displays a pop-up window.
Removing the application remotely using Active Directory
You can remotely uninstall the application using a Microsoft Windows group policy. To uninstall the application, you need to open the Group Policy Management Console (gpmc.msc) and use the Group Policy Editor to create an application removal task (for more details, please visit the Microsoft Technical Support website).
If the application uninstallation operation is password protected, you need to do the following:
- Create a BAT file with the following contents:
msiexec.exe /x<GUID> KLLOGIN=<user name> KLPASSWD=<password> /qn<GUID>is the unique ID of the application. You can find out the GUID of the application by using the following command:wmic product where "Name like '%Kaspersky Endpoint Security%'" get Name, IdentifyingNumberExample:
msiexec.exe /x{6BB76C8F-365E-4345-83ED-6D7AD612AF76} KLLOGIN=KLAdmin KLPASSWD=samplePassword /qn - Create a new Microsoft Windows policy for the computers in the Group Policy Management Console (gpmc.msc).
- Use the new policy to run the created BAT file on the computers.
Removing the application locally
You can remove the application locally using the Setup Wizard. Kaspersky Endpoint Security is removed using the normal method for a Windows operating system, which is through the Control Panel. The Setup Wizard starts. Follow the instructions on the screen.
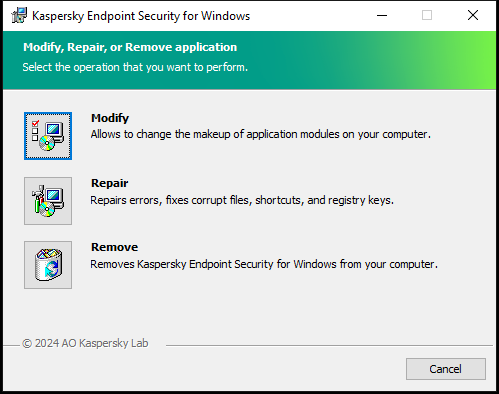
Selecting the application removal operation
You can specify which of the data that is used by the application you want to save for future use, during the next installation of the application (such as when upgrading to a newer version of the application). If you do not specify any data, the application will be completely removed (see the figure below).
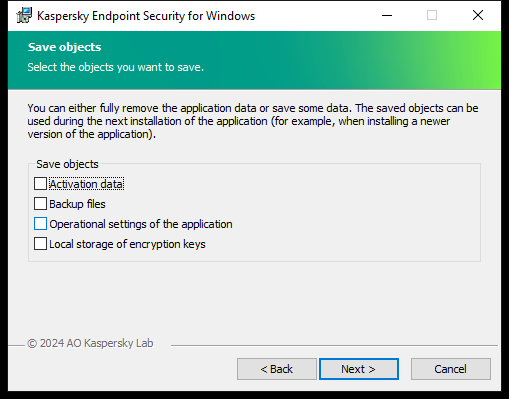
Saving data after removal
You can save the following data:
- Activation data, which lets you avoid having to activate the application again. Kaspersky Endpoint Security automatically adds a license key if the license term has not expired prior to installation.
- Backup files – files that are scanned by the application and placed in Backup.
Backup files that are saved after removal of the application can be accessed only from the same version of the application that was used to save those files.
If you plan to use Backup objects after removal of the application, you must restore those objects before removing the application. However, Kaspersky experts do not recommend restoring objects from Backup because this may harm the computer.
- Operational settings of the application – values of application settings that are selected during application configuration.
- Local storage of encryption keys – data that provides access to files and drives that were encrypted before removal of the application. To ensure access to encrypted files and drives, make sure that you selected data encryption functionality when reinstalling Kaspersky Endpoint Security. No further action is required for access to previously encrypted files and drives.
Kaspersky Endpoint Security saves data in the C:\ProgramData\Kaspersky Lab\KES.21.20\QB folder.
You can also delete the application locally using the command line.
Application licensing
This section provides information about general concepts related to Kaspersky Endpoint Security licensing.
About the End User License Agreement
The End User License Agreement is a binding agreement between you and AO Kaspersky Lab stipulating the terms on which you may use the application.
We recommend carefully reading the terms of the License Agreement before using the application.
You can view the terms of the License Agreement in the following ways:
- When installing Kaspersky Endpoint Security in interactive mode.
- By reading the license.txt file. This document is included in the application distribution kit and is also located in the application installation folder
%ProgramFiles(x86)%\Kaspersky Lab\KES\Doc\<locale>\KES.
By confirming that you agree with the End User License Agreement when installing the application, you signify your acceptance of the terms of the End User License Agreement. If you do not accept the terms of the End User License Agreement, you must abort the installation.
Page top
About the license
A license is a time-limited right to use the application, granted under the End User License Agreement.
The license entitles you to use the application in accordance with the terms of the End User License Agreement, and to receive technical support. The list of available features and application usage term depend on the type of license under which the application was activated.
The following license types are provided:
- Trial – a free license intended for trying out the application.
A trial license usually has a short term. When the trial license expires, all Kaspersky Endpoint Security features become disabled. To continue using the application, you must purchase a commercial license.
You can activate the application under a trial license only once.
- Commercial – a paid license that is provided when you purchase Kaspersky Endpoint Security.
Application functionality available under the commercial license depends on the choice of product. The selected product is indicated in the License Certificate. Information on available products may be found on the Kaspersky website.
When the commercial license expires, key features of the application become disabled. To continue using the application, you must renew your commercial license. If you are not planning to renew your license, you must remove the application from your computer.
About the license certificate
A license certificate is a document transferred to the user together with a key file or activation code.
The license certificate contains the following license information:
- License key or order number.
- Details of the user to whom the license is granted.
- Details of the application that can be activated using the license.
- Limitation on the number of licensed units (for example, the number of devices on which the application can be used under the license).
- License term start date.
- License expiration date or license term.
- License type.
About subscription
A subscription for Kaspersky Endpoint Security is a purchase order for the application with specific parameters (such as the subscription expiry date and number of devices protected). You can order a subscription for Kaspersky Endpoint Security from your service provider (such as your ISP). A subscription can be renewed manually or automatically, or you may cancel your subscription. You can manage your subscription on the website of the service provider.
Subscription can be limited (for one year, for example) or unlimited (without an expiry date). To keep Kaspersky Endpoint Security working after the limited subscription term expires, you need to renew your subscription. Unlimited subscription is renewed automatically if the vendor's services have been prepaid on time.
When a limited subscription expires, you may be provided a subscription renewal grace period during which the application continues to function. The availability and duration of such a grace period is decided by the service provider.
To use Kaspersky Endpoint Security under a subscription, you need to apply the activation code received from the service provider. After the activation code is applied, the active key is added. The active key determines the license for using the application under the subscription. You cannot activate the application under the subscription using a key file. The service provider can only provide an activation code. It is not possible to add a reserve key under a subscription.
Activation codes purchased under subscription may not be used to activate previous versions of Kaspersky Endpoint Security.
Page top
About license key
A license key is a sequence of bits that you can use to activate and then use the application in accordance with the terms of the End User License Agreement.
A license certificate is not provided for a key that is added under a subscription.
You can add a license key to the application by either applying a key file or entering an activation code.
The key can be blocked by Kaspersky if the terms of the End User License Agreement are violated. If the key has been blocked, you need to add a different key to continue using the application.
There are two types of keys: active and reserve.
An active key is a key that is currently used by the application. A trial or commercial license key can be added as the active key. The application cannot have more than one active key.
A reserve key is a key that entitles the user to use the application, but is not currently in use. At the expiry of the active key, a reserve key automatically becomes active. A reserve key can be added only if the active key is available.
A key for a trial license can be added only as an active key. It cannot be added as the reserve key. A trial license key cannot replace the active key to a commercial license.
If a key is added to the list of prohibited keys, the application functionality defined by the license used to activate the application remains available for eight days. The application notifies the user that the key has been added to the list of prohibited keys. After eight days, application functionality becomes limited to the functionality level that is available after license expiry. You can use protection and control components and run a scan using the application databases that were installed before the license expired. The application also continues to encrypt files that had been modified and encrypted before license expiration, but does not encrypt new files. Use of Kaspersky Security Network is not available.
Page top
About activation code
An activation code is a unique sequence of 20 alphanumeric characters. You enter an activation code to add a license key that activates Kaspersky Endpoint Security. You receive an activation code at the email address you specified after purchasing Kaspersky Endpoint Security.
To activate the application with an activation code, Internet access is required to connect to Kaspersky activation servers.
When the application is activated using an activation code, the active key is added. A reserve key can be added only by using an activation code and cannot be added using a key file.
If an activation code is lost after activating the application, you can restore the activation code. You may need an activation code, for example, to register a Kaspersky CompanyAccount. If the activation code was lost after the application activation, contact Kaspersky partner from whom you purchased the license.
Page top
About the key file
A key file is a file with the .key extension that you receive from Kaspersky. The purpose of a key file is to add a license key that activates the application.
You receive a key file at the email address that you provided when you purchased Kaspersky Endpoint Security or ordered the trial version of Kaspersky Endpoint Security.
You do not need to connect to Kaspersky activation servers in order to activate the application with a key file.
You can recover a key file if it has been accidentally deleted. You may need a key file to register a Kaspersky CompanyAccount, for example.
To recover a key file, do one of the following:
- Contact the license seller.
- Obtain a key file on the Kaspersky website based on your existing activation code.
- Get a key file from another Administration Server.
When the application is activated using a key file, an active key is added. A reserve key can be added only by using a key file and cannot be added using an activation code.
Page top
Comparison of application functionality depending on license type for workstations
The set of Kaspersky Endpoint Security functionality available on workstations depends on the license type (see table below).
See also the comparison of application functionality for servers
Comparison of the application functionality depending on Kaspersky Next license type, see in Kaspersky Next Help.
Comparison of Kaspersky Endpoint Security features
Feature |
Kaspersky Endpoint Security for Business Select |
Kaspersky Endpoint Security for Business Advanced |
Kaspersky Total Security |
Kaspersky Endpoint Detection and Response Optimum |
Kaspersky Optimum Security |
Kaspersky Endpoint Detection and Response Expert |
Kaspersky Hybrid Cloud Security Standard |
Kaspersky Hybrid Cloud Security Enterprise |
|---|---|---|---|---|---|---|---|---|
Advanced Threat Protection |
|
|
|
|
|
|
|
|
Kaspersky Security Network |
|
|
|
|
|
|
|
|
Behavior Detection |
|
|
|
|
|
|
|
|
Exploit Prevention |
|
|
|
|
|
|
|
|
Host Intrusion Prevention |
|
|
|
|
|
|
|
|
Remediation Engine |
|
|
|
|
|
|
|
|
Essential Threat Protection |
|
|
|
|
|
|
|
|
File Threat Protection |
|
|
|
|
|
|
|
|
Web Threat Protection |
|
|
|
|
|
|
|
|
Mail Threat Protection |
|
|
|
|
|
|
|
|
Firewall |
|
|
|
|
|
|
|
|
Network Threat Protection |
|
|
|
|
|
|
|
|
BadUSB Attack Prevention |
|
|
|
|
|
|
|
|
AMSI Protection |
|
|
|
|
|
|
|
|
Security Controls |
|
|
|
|
|
|
|
|
Log Inspection |
– |
– |
– |
– |
– |
– |
– |
– |
Application Control |
|
|
|
|
|
|
|
|
Device Control |
|
|
|
|
|
|
|
|
Web Control |
|
|
|
|
|
|
|
|
Adaptive Anomaly Control |
– |
|
|
|
|
|
– |
|
System Integrity Monitoring |
– |
– |
– |
– |
– |
– |
– |
– |
Data Encryption |
|
|
|
|
|
|
|
|
Kaspersky Disk Encryption |
– |
|
|
|
|
|
– |
|
BitLocker Drive Encryption |
– |
|
|
|
|
|
– |
|
File Level Encryption |
– |
|
|
|
|
|
– |
|
Encryption of removable drives |
– |
|
|
|
|
|
– |
|
Detection and Response |
|
|
|
|
|
|
|
|
Endpoint Detection and Response Optimum |
– |
– |
– |
|
|
– |
– |
– |
Endpoint Detection and Response Expert |
– |
– |
– |
– |
– |
|
– |
– |
Kaspersky Sandbox (Kaspersky Sandbox license must be purchased separately) |
|
|
|
|
|
|
|
|
KUMA Integration (license for KUMA Integration must be purchased separately) |
|
|
|
|
|
|
|
|
Comparison of application functionality depending on license type for servers
The set of Kaspersky Endpoint Security functionality available on servers depends on the license type (see table below).
See also the comparison of application functionality for workstations
Comparison of the application functionality depending on Kaspersky Next license type, see in Kaspersky Next Help.
Comparison of Kaspersky Endpoint Security features
Feature |
Kaspersky Endpoint Security for Business Select |
Kaspersky Endpoint Security for Business Advanced |
Kaspersky Total Security |
Kaspersky Endpoint Detection and Response Optimum |
Kaspersky Optimum Security |
Kaspersky Endpoint Detection and Response Expert |
Kaspersky Hybrid Cloud Security Standard |
Kaspersky Hybrid Cloud Security Enterprise |
|---|---|---|---|---|---|---|---|---|
Advanced Threat Protection |
|
|
|
|
|
|
|
|
Kaspersky Security Network |
|
|
|
|
|
|
|
|
Behavior Detection |
|
|
|
|
|
|
|
|
Exploit Prevention |
|
|
|
|
|
|
|
|
Host Intrusion Prevention |
– |
– |
– |
– |
– |
– |
– |
– |
Remediation Engine |
|
|
|
|
|
|
|
|
Essential Threat Protection |
|
|
|
|
|
|
|
|
File Threat Protection |
|
|
|
|
|
|
|
|
Web Threat Protection |
– |
|
|
|
|
|
|
|
Mail Threat Protection |
– |
|
|
|
|
|
|
|
Firewall |
|
|
|
|
|
|
|
|
Network Threat Protection |
|
|
|
|
|
|
|
|
BadUSB Attack Prevention |
|
|
|
|
|
|
|
|
AMSI Protection |
|
|
|
|
|
|
|
|
Security Controls |
|
|
|
|
|
|
|
|
Log Inspection |
– |
– |
– |
– |
– |
– |
– |
|
Application Control |
– |
|
|
|
|
|
– |
|
Device Control |
– |
|
|
|
|
|
|
|
Web Control |
– |
|
|
|
|
|
|
|
Adaptive Anomaly Control |
– |
– |
– |
– |
– |
– |
– |
– |
System Integrity Monitoring |
– |
– |
– |
– |
– |
– |
– |
|
Data Encryption |
|
|
|
|
|
|
|
|
Kaspersky Disk Encryption |
– |
– |
– |
– |
– |
– |
– |
– |
BitLocker Drive Encryption |
– |
|
|
|
|
|
– |
|
File Level Encryption |
– |
– |
– |
– |
– |
– |
– |
– |
Encryption of removable drives |
– |
– |
– |
– |
– |
– |
– |
– |
Detection and Response |
|
|
|
|
|
|
|
|
Endpoint Detection and Response Optimum |
– |
– |
– |
|
|
– |
– |
– |
Endpoint Detection and Response Expert |
– |
– |
– |
– |
– |
|
– |
– |
Kaspersky Sandbox (Kaspersky Sandbox license must be purchased separately) |
|
|
|
|
|
|
|
|
KUMA Integration (license for KUMA Integration must be purchased separately) |
|
|
|
|
|
|
|
|
Activating the application
Activation is the process of activating a license that allows you to use a fully functional version of the application until the license expires. The application activation involves adding a license key.
You can activate the application in one of the following ways:
- Locally from the application interface, by using the Activation Wizard. You can add both the active key and the reserve key in this way.
- Remotely using the Kaspersky Security Center software suit.
- Using the Add key task.
This method lets you add a key to a specific computer or to computers that are part of an administration group. You can add both the active key and the reserve key in this way.
- By distributing a key stored on the Kaspersky Security Center Administration Server to the computers.
This method lets you automatically add a key to computers that are already connected to Kaspersky Security Center, and to new computers. To use this method, you need to first add the key to the Kaspersky Security Center Administration Server. For more details about adding keys to the Kaspersky Security Center Administration Server, please refer to Kaspersky Security Center Help.
The activation code purchased under subscription is distributed in the first place.
- By adding the key to the Kaspersky Endpoint Security installation package.
This method lets you add the key in Installation package properties during Kaspersky Endpoint Security deployment. The application is automatically activated after the installation.
- Using the Add key task.
- Using the command line.
It may take some time for the application to be activated with an activation code (during either remote or non-interactive installation) due to load distribution across activation servers of Kaspersky. If you need to activate the application right away, you may interrupt the ongoing activation process and start activation using the Activation Wizard.
If Kaspersky Endpoint Security is being used in Light Agent mode for protecting virtual environments, you do not need to activate the application separately.
Activating the application
How to activate the application in the Administration Console (MMC)
How to activate the application in the Web Console and Cloud Console
How to activate the application in the application interface
- In the main application window, go to the License section.
- Click Activate the application using a new license.
The Application Activation Wizard starts. Follow the instructions of the Activation Wizard.
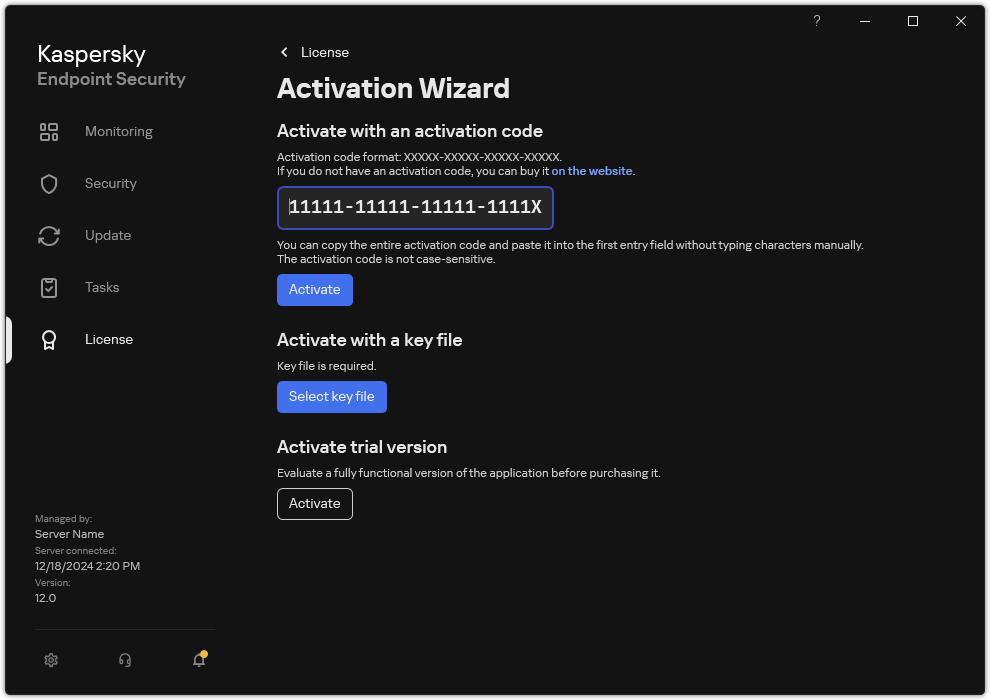
Activating the application
In the properties of the Add key task, you can add a reserve key to the computer. A reserve key becomes active when the active key expires or is deleted. The availability of a reserve key lets you avoid application functionality limitations when a license expires.
How to automatically add a license key to computers through the Administration Console (MMC)
How to automatically add a license key to computers through the Web Console and Cloud Console
If you are activating the application with an activation code, you need internet access to connect to Kaspersky activation servers. If you are activating the application with a key file, internet access is not necessary. If the computers are in an isolated network segment without internet access, to activate the application with a code, you must allow using the Kaspersky Security Center Administration Server as a proxy server. That is, the application can gain access to the activation servers through the Administration Server that has internet access.
- In the main window of the Web Console, select Assets (Devices) → Policies & profiles.
- Click the name of the Kaspersky Endpoint Security policy.
The policy properties window opens.
- Select the Application settings tab.
- Go to General settings → Application Settings.
Kaspersky Endpoint Security for Windows settings
- Select the Use Kaspersky Security Center as proxy server for activation check box.
- Save your changes.
If you cannot activate the application with an activation code, you can try getting a key file using the Kaspersky solution and trying to activate the application again using a different method.
License usage monitoring
You can monitor the use of licenses in the following ways:
- View the Report on usage of license keys for the organization's infrastructure (Monitoring & reporting → Reports).
- View the statuses of computers on the Managed devices → Devices tab. If the application is not activated, the computer will have the
 Application is not activated status.
 - View license information in the computer properties.
- View key properties (Operations → Licensing).
Specifics of activating the application as a part of Kaspersky Security Center Cloud Console
A trial version is provided for Kaspersky Security Center Cloud Console. The trial version is a special version of Kaspersky Security Center Cloud Console designed to familiarize a user with the features of the application. In this version, you can perform actions in a workspace for a period of 30 days. All managed applications are automatically run under a trial license for Kaspersky Security Center Cloud Console, including Kaspersky Endpoint Security. However, you cannot activate Kaspersky Endpoint Security using its own trial license when the trial license for Kaspersky Security Center Cloud Console expires. For detailed information about Kaspersky Security Center licensing, please refer to the Kaspersky Security Center Cloud Console Help.
The trial version of Kaspersky Security Center Cloud Console does not allow you to subsequently switch to a commercial version. Any trial workspace will be automatically deleted with all its contents after the 30-day period expires.
Page top
Removing a license key
To remove a license key, you need to run a special task on your computers. You can remove a license key, for example, to rearrange the licensing units. Also, when the license expires, Kaspersky Endpoint Security notifies you. If you have added a license key with a short term to try out the application (for example, EDR Optimum Add-on), you can remove this license key to get rid of notifications and fix the status of your computer.
The Remove key task allows removing any license keys from the computer. You can remove active license keys as well as reserve license keys. In addition to the Kaspersky Endpoint Security activation license key, you can remove individual license keys of Kaspersky Detection and Response solutions (for example, EDR Optimum Add-on).
How to remove a license key in the Administration Console (MMC)
How to remove a license key in Web Console
How to remove a license key in the application interface
- In the main application window, go to the License section.
- Select the key that you want to delete and click Delete.
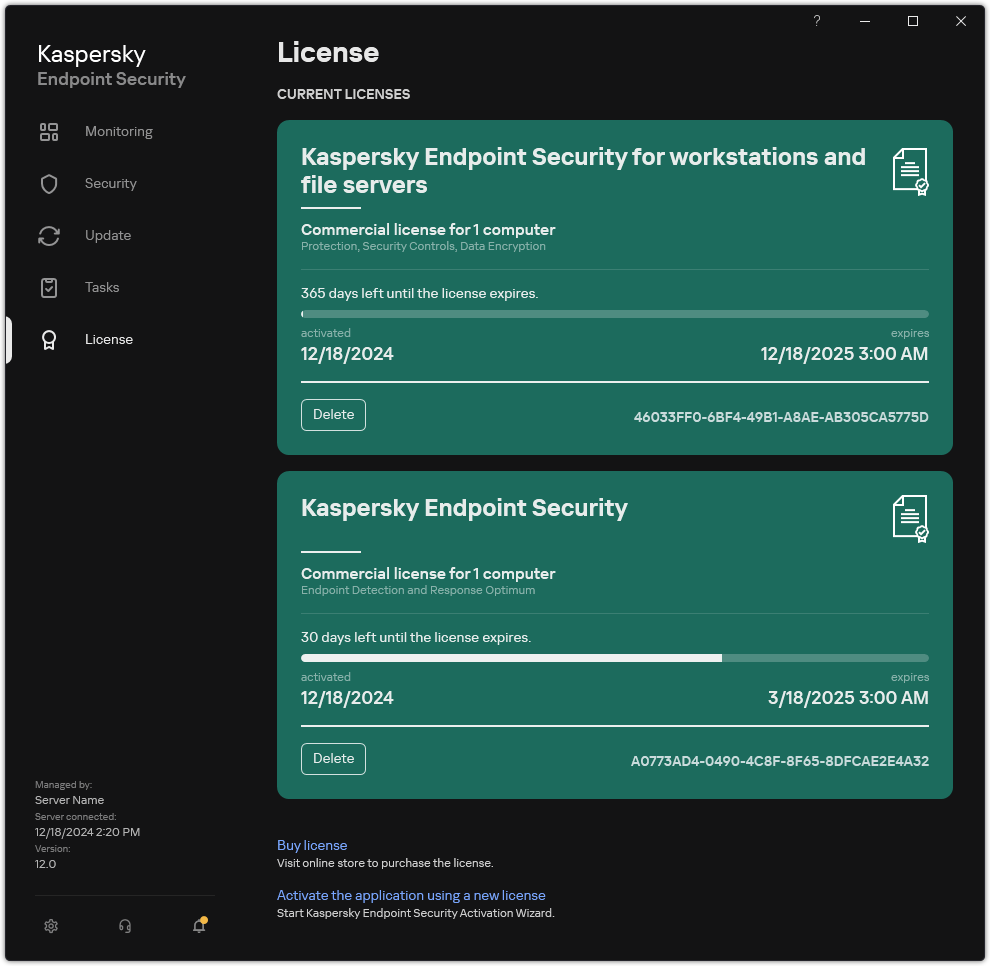
Licensing window
You can also remove a license key on the command line.
Page top
Viewing license information
To view information about a license:
In the main application window, go to the License section (see the figure below).
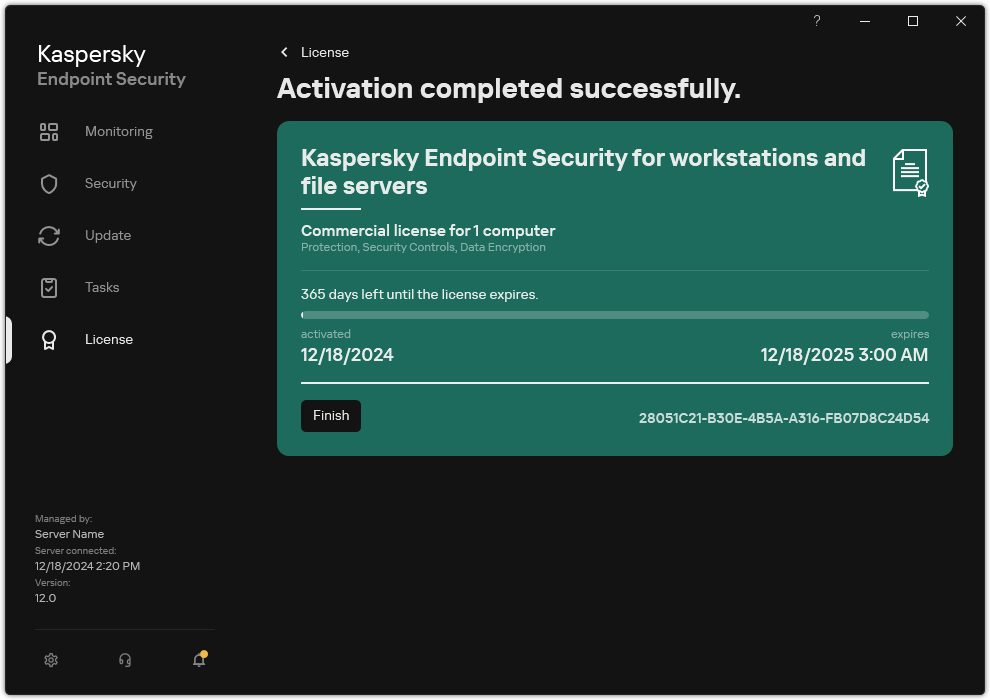
Licensing window
The section displays the following details:
- Key status. Several keys can be stored on a computer. There are two types of keys: active and reserve. The application cannot have more than one active key. A reserve key can become active only after the active key expires or after the active key is deleted by clicking Delete.
- Application name. Full name of the purchased Kaspersky application.
- License type. The following types of licenses are available: trial and commercial.
- Functionality. Application features that are available under your license. Features may include Protection, Security Controls, Data Encryption, and others. The list of available features is also provided in the License Certificate.
- Additional information about the license. Start date and end date of the license term (only for the active key), remaining duration of the license term.
License expiration time is displayed according to the time zone configured in the operating system.
- Key. A key is a unique alphanumeric sequence that is generated from an activation code or a key file.
In the Licensing window, you can also do one of the following:
- Buy license / Renew license. Opens the Kaspersky online store website, where you can purchase or renew a license. To do so, please enter your company information and pay for the order.
- Activate the application using a new license. Starts the Application Activation Wizard. In this Wizard you can add a key using an activation code or a key file. The Application Activation Wizard allows you to add an active key and only one reserve key.
Purchasing a license
You may purchase a license after installing the application. On purchasing a license, you receive an activation code or a key file for activating the application.
To purchase a license:
- In the main application window, go to the License section.
- Do one of the following:
- If no keys have been added or a key for trial license has been added, click the Buy license button.
- If the key for a commercial license is added, click the Renew license button.
A window will open with the website of the Kaspersky online store, where you can purchase a license.
Renewing subscription
When you use the application under subscription, Kaspersky Endpoint Security automatically contacts the activation server at specific intervals until your subscription expires.
If you use the application under unlimited subscription, Kaspersky Endpoint Security automatically checks the activation server for renewed keys in background mode. If a key is available on the activation server, the application adds it by replacing the previous key. In this way, unlimited subscription for Kaspersky Endpoint Security is renewed without user involvement.
If you are using the application under a limited subscription, on the expiration date of the subscription (or on the expiration date of the subscription renewal grace period), Kaspersky Endpoint Security notifies you about this and stops attempting to renew the subscription automatically. In this case, Kaspersky Endpoint Security behaves in the same way as it does when a commercial license for the application expires: the application operates without updates and the Kaspersky Security Network is unavailable.
You can renew subscription on the website of the service provider.
To visit the website of the service provider from the application interface:
- In the main application window, go to the License section.
- Click Contact your subscription provider.
You can update subscription status manually. This may be required if the subscription has been renewed after the grace period and the application has not updated the subscription status automatically.
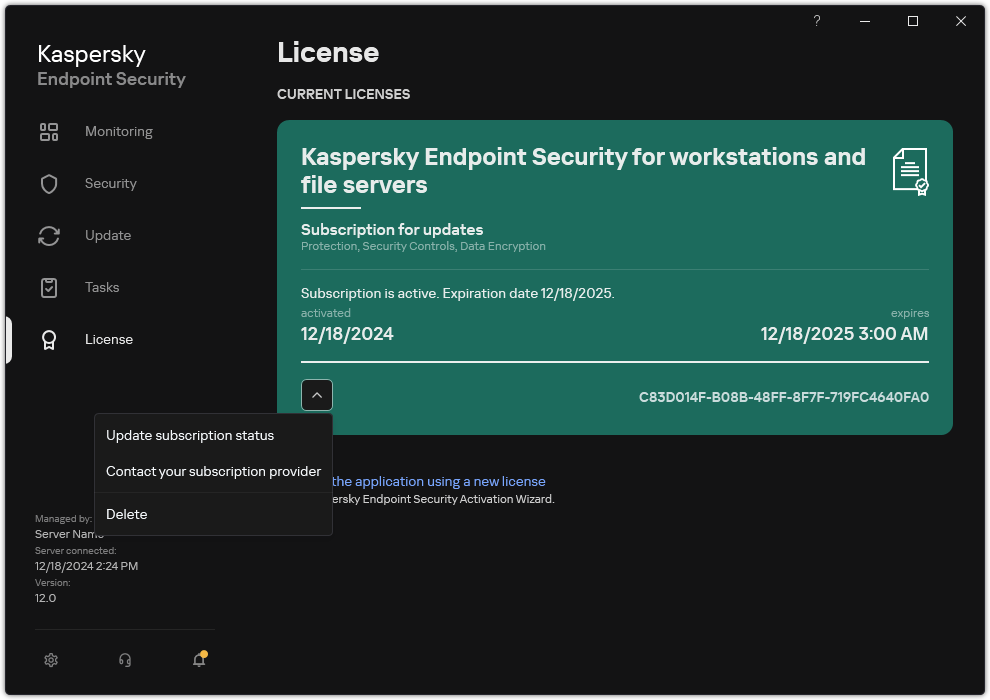
Renewing subscription
Page top
Data provision under the End User License Agreement
If an activation code is applied to activate Kaspersky Endpoint Security, you agree to periodically send Kaspersky the following information automatically for the purposes of verifying correct use of the application:
- type, version, and localization of Kaspersky Endpoint Security;
- versions of installed updates for Kaspersky Endpoint Security;
- ID of the computer and ID of the specific Kaspersky Endpoint Security installation on the computer;
- serial number and active key identifier;
- type, version and bit rate of the operating system, and name of the virtual environment (if Kaspersky Endpoint Security is installed in a virtual environment);
- unique request ID to the Rightholder services;
- IDs of Kaspersky Endpoint Security components that are active when the information is transmitted.
Kaspersky may also use this information to generate statistics on the dissemination and use of Kaspersky software.
By using an activation code, you agree to automatically transmit the data listed above. If you do not agree to transmit this information to Kaspersky, you should use a key file to activate Kaspersky Endpoint Security.
By accepting the terms of the End User License Agreement, you agree to automatically transmit the following information:
- When upgrading Kaspersky Endpoint Security:
- version of Kaspersky Endpoint Security;
- ID of Kaspersky Endpoint Security;
- active key;
- unique ID of the upgrade task start;
- unique ID of the Kaspersky Endpoint Security installation.
- When following links from the Kaspersky Endpoint Security interface:
- version of Kaspersky Endpoint Security;
- version of the operating system;
- Kaspersky Endpoint Security activation date;
- license expiration date;
- key creation date;
- Kaspersky Endpoint Security installation date;
- ID of Kaspersky Endpoint Security;
- ID of the detected vulnerability in the operating system;
- ID of the last update installed for Kaspersky Endpoint Security;
- hash of the detected file with a threat, and the name of this threat according to the Kaspersky classification;
- Kaspersky Endpoint Security activation error category;
- Kaspersky Endpoint Security activation error code;
- number of days until key expiration;
- number of days that have elapsed since the key was added;
- number of days that have elapsed since the license expired;
- number of computers on which the current license is applied;
- active key;
- Kaspersky Endpoint Security license term;
- current status of the license;
- type of current license;
- application type;
- unique ID of the upgrade task start;
- unique ID of the Kaspersky Endpoint Security installation on the computer;
- Kaspersky Endpoint Security interface language.
Received information is protected by Kaspersky in accordance with the law and the requirements and applicable regulations of Kaspersky. Data is transmitted over encrypted communication channels.
Read the End User License Agreement and visit the Kaspersky website to learn more about how we receive, process, store, and destroy information about application usage after you accept the End User License Agreement and consent to the Kaspersky Security Network Statement. The license.txt and ksn_<language ID>.txt files contain the text of the End User License Agreement and Kaspersky Security Network Statement and are included in the application distribution kit.
Page top
Data provision when using Kaspersky Security Network
The set of data that Kaspersky Endpoint Security sends to Kaspersky depends on the type of license and the Kaspersky Security Network usage settings.
Use of KSN under license on no more than 4 computers
By accepting the Kaspersky Security Network Statement, you agree to automatically transmit the following information:
- information about KSN configuration updates: identifier of the active configuration, identifier of the configuration received, error code of the configuration update;
- information about files and URL addresses to be scanned: checksums of the scanned file (MD5, SHA2-256, SHA1) and file patterns (MD5), the size of the pattern, type of the detected threat and its name according to Rightholder's classification, identifier for the anti-virus databases, URL address for which the reputation is being requested, as well as the referrer URL address, the connection's protocol identifier and the number of the port being used;
- ID of the scan task that detected the threat;
- information about digital certificates being used needed to verify their authenticity: the checksums (SHA256) of the certificate used to sign the scanned object and the certificate's public key;
- identifier of the Software component performing the scan;
- IDs of the anti-virus databases and of the records in these anti-virus databases;
- Information about activation of the Software on the Computer: signed header of the ticket from the activation service (identifier of the regional activation center, checksum of the activation code, checksum of the ticket, ticket creation date, unique identifier of the ticket, ticket version, license status, start/end date and time of ticket validity, unique identifier of the license, license version), identifier of the certificate used to sign the ticket header, checksum (MD5) of the key file;
- Information about the Rightholder's Software: full version, type, version of the protocol used to connect to Kaspersky services.
Use of KSN under license on 5 or more computers
By accepting the Kaspersky Security Network Statement, you agree to automatically transmit the following information:
If the Kaspersky Security Network check box is selected and the Enable extended KSN mode check box is cleared, the application sends the following information:
- information about KSN configuration updates: identifier of the active configuration, identifier of the configuration received, error code of the configuration update;
- information about files and URL addresses to be scanned: checksums of the scanned file (MD5, SHA2-256, SHA1) and file patterns (MD5), the size of the pattern, type of the detected threat and its name according to Rightholder's classification, identifier for the anti-virus databases, URL address for which the reputation is being requested, as well as the referrer URL address, the connection's protocol identifier and the number of the port being used;
- ID of the scan task that detected the threat;
- information about digital certificates being used needed to verify their authenticity: the checksums (SHA256) of the certificate used to sign the scanned object and the certificate's public key;
- identifier of the Software component performing the scan;
- IDs of the anti-virus databases and of the records in these anti-virus databases;
- Information about activation of the Software on the Computer: signed header of the ticket from the activation service (identifier of the regional activation center, checksum of the activation code, checksum of the ticket, ticket creation date, unique identifier of the ticket, ticket version, license status, start/end date and time of ticket validity, unique identifier of the license, license version), identifier of the certificate used to sign the ticket header, checksum (MD5) of the key file;
- Information about the Rightholder's Software: full version, type, version of the protocol used to connect to Kaspersky services.
If the Enable extended KSN mode check box is selected in addition to the Kaspersky Security Network check box, the application sends the following information in addition to the information listed above:
- information about the results of categorization of the requested web-resources, which contains the processed URL and IP address of the host, the version of the Software's component that performed the categorization, the method of categorization and set of the categories defined for the web-resource;
- information about the software installed on the Computer: names of the software applications and software vendors, registry keys and their values, information about files of the installed software components (checksums (MD5, SHA2-256, SHA1), name, path to the file on the Computer, size, version and the digital signature);
- information about the state of anti-virus protection of the Computer: the versions and the release timestamps of the anti-virus databases being used, the ID of the task and the ID of Software that performs scanning;
- information about files being downloaded by the End User: the URL and IP addresses of the download and the download pages, download protocol identifier and connection port number, the status of the URLs as malicious or not, file's attributes, size and checksums (MD5, SHA2-256, SHA1), information about the process that downloaded the file (checksums (MD5, SHA2-256, SHA1), creation/build date and time, autoplay status, attributes, names of packers, information about signatures, executable file flag, format identifier, and entropy), file name and its path on the Computer, the file's digital signature and timestamp of its generation, the URL address where detection occurred, the script's number on the page that appears to be suspicious or harmful, information about HTTP requests generated and the response to them;
- information about the running applications and their modules: data about processes running on the system (process ID (PID), process name, information about the account the process was started from, the application and command that started the process, the sign of trusted program or process, the full path to the process's files and their checksums (MD5, SHA2-256, SHA1), and the starting command line, level of the process's integrity, a description of the product that the process belongs to (the name of the product and information about the publisher), as well as digital certificates being used and information needed to verify their authenticity or information about the absence of a file's digital signature), and information about the modules loaded into the processes (their names, sizes, types, creation dates, attributes, checksums (MD5, SHA2-256, SHA1), the paths to them on the Computer), PE-file header information, names of packers (if the file was packed);
- information about all potentially malicious objects and activities: name of the detected object and full path to the object on the computer, checksums of processed files (MD5, SHA2-256, SHA1), detection date and time, names and sizes of infected files and paths to them, path template code, executable file flag, indicator of whether the object is a container, names of the packer (if the file was packed), file type code, file format ID, list of actions performed by malware and the decision made by the software and user in response to them, IDs of the anti-virus databases and of the records in these anti-virus databases that were used to make the decision, indicator of a potentially malicious object, the name of the detected threat according to the Rightholder’s classification, the level of danger, the detection status and detection method, reason for inclusion into the analyzed context and sequence number of the file in the context, checksums (MD5, SHA2-256, SHA1), the name and attributes of the executable file of the application through which the infected message or link was transmitted, depersonalized IP addresses (IPv4 and IPv6) of the host of the blocked object, file entropy, file autorun indicator, time when the file was first detected in the system, the number of times the file has been run since the last statistics were sent, information about the name, checksums (MD5, SHA2-256, SHA1) and size of the mail client through which the malicious object was received, ID of the software task that performed the scan, indicator of whether the file reputation or signature was checked, file processing result, checksum (MD5) of the pattern collected for the object, the size of the pattern in bytes, and the technical specifications of the applied detection technologies;
- information about scanned objects: the assigned trust group to which and/or from which the file has been placed, the reason the file was placed in that category, category identifier, information about the source of the categories and the version of the category database, the file's trusted certificate flag, name of the file's vendor, file version, name and version of the software application which includes the file;
- information about vulnerabilities detected: the vulnerability ID in the database of vulnerabilities, the vulnerability danger class;
- information about emulation of the executable file: file size and its checksums (MD5, SHA2-256, SHA1), the version of the emulation component, emulation depth, an array of properties of logical blocks and functions within logical blocks obtained during the emulation, data from the executable file's PE headers;
- the IP addresses of the attacking computer (IPv4 and IPv6), the number of the port on the Computer that the network attack is directed at, identifier of the protocol of the IP packet containing the attack, the attack's target (organization name, website), flag for the reaction to the attack, the attack's weight, trust level;
- information about attacks associated with spoofed network resources, the DNS and IP addresses (IPv4 and IPv6) of visited websites;
- DNS and IP addresses (IPv4 or IPv6) of the requested web resource, information about the file and web client accessing the web resource, the name, size and checksums (MD5, SHA2-256, SHA1) of the file, full path to the file and path template code, the result of checking its digital signature, and its status in KSN;
- information about rollback of malware actions: data on the file whose activity was rolled back (name of the file, full path to the file, its size and checksums (MD5, SHA2-256, SHA1)), data on successful and unsuccessful actions to delete, rename and copy files and restore the values in the registry (names of registry keys and their values), and information about system files modified by malware, before and after rollback;
- Information about the exclusions set for the Adaptive Anomaly Control component: the ID and status of the rule that was triggered, the action performed by the Software when the rule was triggered, the type of user account under which the process or the thread performs suspicious activity, information about the process that performed or was subject to the suspicious activity (script ID or process file name, full path to the process file, path template code, checksums (MD5, SHA2-256, SHA1) of the process file); information about the object that performed the suspicious actions and about the object that was subject to the suspicious actions (registry key name or file name, full path to the file, path template code, and checksums (MD5, SHA2-256, SHA1) of the file).
- information about loaded software modules: name, size and checksums (MD5, SHA2-256, SHA1) of the module file, full path to it and the path template code, digital signature settings of the module file, data and time of signature creation, name of the subject and organization that signed the module file, ID of the process in which the module was loaded, name of the module supplier, and the sequence number of the module in the loading queue;
- information about the quality of Software interaction with the KSN services: start and end date and time of the period when the statistics were generated, information about the quality of requests and connection to each of the KSN services used (KSN service ID, number of successful requests, number of requests with responses from cache, number of unsuccessful requests (network problems, KSN being disabled in the Software settings, incorrect routing), time spread of the successful requests, time spread of the cancelled requests, time spread of the requests with exceeded time limit, number of connections to KSN taken from cache, number of successful connections to KSN, number of unsuccessful connections to KSN, number of successful transactions, number of unsuccessful transactions, time spread of the successful connections to KSN, time spread of the unsuccessful connections to KSN, time spread of the successful transactions, time spread of the unsuccessful transactions);
- if a potentially malicious object is detected, information is provided about data in the processes' memory: elements of the system object hierarchy (ObjectManager), data in UEFI BIOS memory, names of registry keys and their values;
- information about events in the systems logs: the event's timestamp, the name of the log in which the event was found, type and category of the event, name of the event's source and the event's description;
- information about network connections: version and checksums (MD5, SHA2-256, SHA1) of the file from which process was started that opened the port, the path to the process's file and its digital signature, local and remote IP addresses, numbers of local and remote connection ports, connection state, timestamp of the port's opening;
- information about the date of Software installation and activation on the Computer: the ID of the partner that sold the license, the serial number of the license, the signed header of the ticket from the activation service (the ID of a regional activation center, the checksum of the activation code, the checksum of the ticket, the ticket creation date, the unique ID of the ticket, the ticket version, the license status, the ticket start/end date and time, the unique ID of the license, the license version), the ID of the certificate used to sign the ticket header, the checksum (MD5) of the key file, the unique ID of Software installation on the Computer, the type and ID of the application that gets updated, the ID of the update task;
- information about the set of all installed updates, and the set of most recently installed/removed updates, the type of event that caused the update information to be sent, duration since the installation of last update, information about any currently installed anti-virus databases;
- information about software operation on the computer: data on CPU usage, data on memory usage (Private Bytes, Non-Paged Pool, Paged Pool), number of active threads in the software process and pending threads, and the duration of software operation prior to the error;
- number of software dumps and system dumps (BSOD) since the Software was installed and since the time of the last update, the identifier and version of the Software module that crashed, the memory stack in the Software's process, and information about the anti-virus databases at the time of the crash;
- data on the system dump (BSOD): a flag indicating the occurrence of the BSOD on the Computer, the name of the driver that caused the BSOD, the address and memory stack in the driver, a flag indicating the duration of the OS session before the BSOD occurred, memory stack of driver that crashed, type of stored memory dump, flag for the OS session before BSOD lasted more than 10 minutes, unique identifier of the dump, timestamp of the BSOD;
- information about errors or performance problems that occurred during operation of the Software components: the status ID of the Software, error type, code and cause as well of the time when the error occurred, the IDs of the component, module and process of the product in which the error occurred, the ID of the task or update category during which the error occurred, logs of drivers used by the Software (error code, module name, name of the source file and the line where the error occurred);
- information about updates of anti-virus databases and Software components: the name, date and time of index files downloaded during the last update and being downloaded during the current update;
- information about abnormal termination of the Software operation: the creation timestamp of the dump, its type, the type of event that caused the abnormal termination of the Software operation (unexpected power-off, third-party application crash), date and time of the unexpected power-off;
- information about the compatibility of Software drivers with hardware and Software: information about OS properties that restrict the functionality of Software components (Secure Boot, KPTI, WHQL Enforce, BitLocker, Case Sensitivity), type of download Software installed (UEFI, BIOS), Trusted Platform Module (TPM) identifier, TPM specification version, information about the CPU installed on the Computer, operating mode and parameters of Code Integrity and Device Guard, operating mode of drivers and reason for use of the current mode, version of Software drivers, software and hardware virtualization support status of the Computer;
- information about third-party applications that caused the error: their name, version and localization, the error code and information about the error from the system log of applications, the address of the error and memory stack of the third-party application, a flag indicating the occurrence of the error in the Software component, the length of time the third-party application was in operation before the error occurred, checksums (MD5, SHA2-256, SHA1) of the application process image, in which the error occurred, path to the application process image and template code of the path, information from the system log with a description of the error associated with the application, information about the application module, in which an error occurred (exception identifier, crash memory address as an offset in the application module, name and version of the module, identifier of the application crash in the Rightholder's plug-in and memory stack of the crash, duration of the application session before crash);
- version of the Software updater component, number of crashes of the updater component while running update tasks over the lifetime of the component, ID of the update task type, number of failed attempts of the updater component to complete update tasks;
- information about the operation of the Software system monitoring components: full versions of the components, date and time when the components were started, code of the event that overflowed the event queue and number of such events, the total number of queue overflow events, information about the file of the process of the initiator of the event (file name and its path on the Computer, template code of the file path, checksums (MD5, SHA2-256, SHA1) of the process associated with the file, file version), identifier of the event interception that occurred, the full version of the interception filter, identifier of the type of the intercepted event, size of the event queue and the number of events between the first event in the queue and the current event, number of overdue events in the queue, information about the file of the process of the initiator of the current event (file name and its path on the Computer, template code of the file path, checksums (MD5, SHA2-256, SHA1) of the process associated with the file), duration of the event processing, maximum duration of the event processing, probability of sending statistics, information about OS events for which the processing time limit was exceeded (date and time of the event, number of repeated initializations of anti-virus databases, date and time of the last repeated initialization of anti-virus databases after their update, event processing delay time for each system monitoring component, number of queued events, number of processed events, number of delayed events of the current type, total delay time for the events of the current type, total delay time for all events);
- information from the Windows event tracing tool (Event Tracing for Windows, ETW) in the event of Software performance problems, suppliers of SysConfig / SysConfigEx / WinSATAssessment events from Microsoft: information about the Computer (model, manufacturer, form factor of the housing, version), information about Windows performance metrics (WinSAT assessments, Windows performance index), domain name, information about physical and logical processors (number of physical and logical processors, manufacturer, model, stepping level, number of cores, clock frequency, CPUID, cache characteristics, logic processor characteristics, indicators of supported modes and instructions), information about RAM modules (type, form factor, manufacturer, model, capacity, granularity of memory allocation), information about network interfaces (IP and MAC addresses, name, description, configuration of network interfaces, breakdown of number and size of network packages by type, speed of network exchange, breakdown of number of network errors by type), configuration of IDE controller, IP addresses of DNS servers, information about the video card (model, description, manufacturer, compatibility, video memory capacity, screen permission, number of bits per pixel, BIOS version), information about plug-and-play devices (name, description, device identifier [PnP, ACPI], information about disks and storage devices (number of disks or flash drives, manufacturer, model, disk capacity, number of cylinders, number of tracks per cylinder, number of sectors per track, sector capacity, cache characteristics, sequential number, number of partitions, configuration of SCSI controller), information about logical disks (sequential number, partition capacity, volume capacity, volume letter, partition type, file system type, number of clusters, cluster size, number of sectors per cluster, number of empty and occupied clusters, letter of bootable volume, offset address of partition in relation to the start of the disk), information about BIOS motherboard (manufacturer, release date, version), information about motherboard (manufacturer, model, type), information about physical memory (shared and free capacity), information about operating system services (name, description, status, tag, information about processes [name and PID]), energy consumption parameters for the Computer, configuration of interrupt controller, path to Windows system folders (Windows and System32), information about the OS (version, build, release date, name, type, installation date), size of page file, information about monitors (number, manufacturer, screen permission, resolution capacity, type), information about video card driver (manufacturer, release date, version);
- information from ETW, suppliers of EventTrace / EventMetadata events from Microsoft: information on the sequence of system events (type, time, date, time zone), metadata about the file with tracing results (name, structure, tracing parameters, breakdown of number of trace operations by type), information about the OS (name, type, version, build, release date, start time);
- information from ETW, suppliers of Process / Microsoft Windows Kernel Process / Microsoft Windows Kernel Processor Power events from Microsoft: information about started and completed processes (name, PID, start parameters, command line, return code, power management parameters, start and completion time, access token type, SID, SessionID, number of descriptors installed), information about changes in thread priorities (TID, priority, time), information about disk operations of the process (type, time, capacity, number), history of changes to the structure and capacity of usable memory processes;
- information from ETW, suppliers of StackWalk / Perfinfo events from Microsoft: information about performance counters (performance of individual code sections, sequence of function calls, PID, TID, addresses and attributes of ISRs and DPCs);
- information from ETW, supplier of KernelTraceControl-ImageID events from Microsoft: information on executable files and dynamic libraries (name, image size, full path), information on PDB files (name, identifier), VERSIONINFO resource data for executable files (name, description, creator, localization, application version and identifier, file version and identifier);
- information from ETW, suppliers of FileIo / DiskIo / Image / Windows Kernel Disk events from Microsoft: information on file and disk operations (type, capacity, start time, completion time, duration, completion status, PID, TID, driver function call addresses, I/O Request Packet (IRP), Windows file object attributes), information about files involved in file and disk operations (name, version, size, full path, attributes, offset, image checksum, open and access options);
- information from ETW, supplier of PageFault events from Microsoft: information on memory page access errors (address, time, capacity, PID, TID, attributes of Windows file object, memory allocation parameters);
- information from ETW, supplier of Thread events from Microsoft: information on thread creation/completion, information on threads started (PID, TID, size of stack, priorities and allocation of CPU resources, I/O resources, memory pages between threads, stack address, address of init function, address of Thread Environment Block (TEB), Windows service tag);
- information from ETW, supplier of Microsoft Windows Kernel Memory events from Microsoft: information about memory management operations (completion status, time, quantity, PID), memory allocation structure (type, capacity, SessionID, PID);
- information about Software operation in the event of performance problems: Software installation identifier, type and value of drop in performance, information about the sequence of events within the Software (time, time zone, type, completion status, Software component identifier, Software operating scenario identifier, TID, PID, function call addresses), information about network connections to be checked (URL, direction of the connection, size of network package), information about PDB files (name, identifier, image size of executable file), information about files to be checked (name, full path, checksum), Software performance monitoring parameters;
- information about the last unsuccessful OS restart: the number of unsuccessful restarts since OS installation, data on the system dump (code and parameters of an error, name, version and checksum (CRC32) of the module that caused an error in the OS operation, error address as an offset in the module, checksums (MD5, SHA2-256, SHA1) of the system dump);
- information to verify authenticity of digital certificates being used to sign files: the certificate's fingerprint, the checksum algorithm, the certificate's public key and serial number, the name of the issuer of the certificate, the result of certificate validation and the certificate's database identifier;
- information about the process executing the attack on the Software's self-defense: the name and size of the process file, its checksums (MD5, SHA2-256, SHA1), the full path to the process file and the template code of the file path, the creation/build timestamps, executable file flag, attributes of the process file, information about the certificate used to sign the process file, code of the account used to launch the process, ID of operations performed to access the process, type of resource with which the operation is performed (process, file, registry object, FindWindow search function), name of resource with which the operation is performed, flag indicating success of the operation, the status of the file of the process and its signature according to the KSN;
- information about the Rightholder's Software: full version, type, localization and operation state of Software used, versions of the installed Software components and their operation state, information about the installed Software updates, the value of the TARGET filter, the version of the protocol used to connect to the Rightholder's services;
- information about hardware installed on the Computer: type, name, model name, firmware version, parameters of built-in and connected devices, the unique identifier of the Computer with the installed Software;
- information about the versions of the operating system and installed updates, the word size, edition and parameters of the OS run mode, version and checksums (MD5, SHA2-256, SHA1) of the OS kernel file, and OS startup date and time;
- executable and non-executable files, either entirely or partly;
- portions of the Computer's RAM;
- sectors involved in the process of booting the OS;
- network traffic data packets;
- web pages and emails containing suspicious and malicious objects;
- description of the classes and instances of classes of the WMI repository;
- application activity reports:
- the name, size and version of the file being sent, its description and checksums (MD5, SHA2-256, SHA1), file format identifier, the name of the file's vendor, the name of the product to which the file belongs, full path to the file on the Computer, template code of the path, the creation and modification timestamps of the file;
- start and end date/time of the validity period of the certificate (if the file has a digital signature), the date and the time of the signature, the name of the issuer of the certificate, information about the certificate holder, the fingerprint, the certificate's public key and appropriate algorithms, and the certificate's serial number;
- the name of the account from which the process is running;
- checksums (MD5, SHA2-256, SHA1) of the name of the Computer on which the process is running;
- titles of the process windows;
- Identifier for the anti-virus databases, name of the detected threat according to the Rightholder's classification;
- data about the installed license, its identifier, type and expiration date;
- local time of the Computer at the moment of the provision of information;
- names and paths of the files that were accessed by the process;
- names of registry keys and their values that were accessed by the process;
- URL and IP addresses that were accessed by the process;
- URL and IP addresses from which the running file was downloaded.
Data provision when using Detection and Response solutions
On computers with Kaspersky Endpoint Security installed, data prepared for automatic sending to Kaspersky Endpoint Detection and Response, Kaspersky Sandbox and Kaspersky Anti Targeted Attack Platform servers is stored. Files are stored on computers in plain, non-encrypted form.
The specific set of data depends on the solution within which Kaspersky Endpoint Security is used.
Kaspersky Endpoint Detection and Response
All data that the application stores locally on the computer, is deleted from the computer when Kaspersky Endpoint Security is uninstalled.
Data received as a result of IOC Scan task execution (standard task)
Kaspersky Endpoint Security automatically submits data on the IOC Scan task execution results to Kaspersky Security Center.
The data in the IOC Scan task execution results may contain the following information:
- IP address from the ARP table
- Physical address from the ARP table
- DNS record type and name
- IP address of the protected computer
- Physical address (MAC-address) of the protected computer
- Identifier in the event log entry
- Data source name in the log
- Log name
- Event time
- MD5 and SHA256 hashes of the file
- Full name of the file (including path)
- File size
- Remote IP address and port to which connection was established during scan
- Local adapter IP address
- Port open on the local adapter
- Protocol as a number (in accordance with the IANA standard)
- Process name
- Process arguments
- Path to the process file
- Windows identifier (PID) of the process
- Windows identifier (PID) of the parent process
- User account that started the process
- Date and time when the process was started
- Service name
- Service description
- Path and name of the DLL service (for svchost)
- Path and name of the service executable file
- Windows identifier (PID) of the service
- Service type (for example, a kernel driver or adapter)
- Service status
- Service launch mode
- User account name
- Volume name
- Volume letter
- Volume type
- Windows registry value
- Registry hive value
- Registry key path (without hive and value name)
- Registry setting
- System (environment)
- Name and version of the operating system that is installed on the computer
- Network name of the protected computer
- Domain or group the protected computer belongs to
- Browser name
- Browser version
- Time when the web resource was last accessed
- URL from the HTTP request
- Name of the account used for the HTTP request
- File name of the process that made the HTTP request
- Full path to the file of the process that made the HTTP request
- Windows identifier (PID) of the process that made the HTTP request
- HTTP referer (HTTP request source URL)
- URI of the resource requested over HTTP
- Information about the HTTP user agent (the application that made the HTTP request)
- HTTP request execution time
- Unique identifier of the process that made the HTTP request
Data for creating a threat development chain
Data for creating a threat development chain is stored for seven days by default. The data is automatically sent to Kaspersky Security Center.
Data for creating a threat development chain may contain the following information:
- Incident date and time
- Detection name
- Scan mode
- Status of the last action related to the detection
- Reason why the detection processing failed
- Detected object type
- Detected object name
- Threat status after the object is processed
- Reason why execution of actions on the object failed
- Actions performed to roll back malicious actions
- Information about the processed object:
- Unique identifier of the process
- Unique identifier of the parent process
- Unique identifier of the process file
- Windows process identifier (PID)
- Process command line
- User account that started the process
- Code of the logon session in which the process is running
- Type of the session in which the process is running
- Integrity level of the process being processed
- Membership of the user account that started the process in the privileged local and domain groups
- Identifier of the processed object
- Full name of the processed object
- Identifier of the protected device
- Full name of the object (local file name or downloaded file web address)
- MD5 or SHA256 hash of the processed object
- Type of the processed object
- Creation date of the processed object
- Date when the processed object was last modified
- Size of the processed object
- Attributes of the processed object
- Organization that signed the processed object
- Result of the processed object digital certificate verification
- Security identifier (SID) of the processed object
- Time zone identifier of the processed object
- Web address of the processed object download (only for files on disk)
- Name of the application that downloaded the file
- MD5 and SHA256 hashes of the application that downloaded the file
- Name of the application that last modified the file
- MD5 and SHA256 hashes of the application that last modified the file
- Number of processed object starts
- Date and time when the processed object was first started
- Unique identifiers of the file
- Full name of the file (local file name or downloaded file web address)
- Path to the processed Windows registry variable
- Name of the processed Windows registry variable
- Value of the processed Windows registry variable
- Type of the processed Windows registry variable
- Indicator of the processed registry key membership in the autorun point
- Web address of the processed web request
- Link source of the processed web request
- User agent of the processed web request
- Type of the processed web request (
GETorPOST) - Local IP port of the processed web request
- Remote IP port of the processed web request
- Connection direction (inbound or outbound) of the processed web request
- Identifier of the process into which the malicious code was embedded
Kaspersky Sandbox
All data that the application stores locally on the computer, is deleted from the computer when Kaspersky Endpoint Security is uninstalled.
Service data
Kaspersky Endpoint Security stores the following data processed during automatic response:
- Processed files and data entered by the user during configuration of the built-in agent of Kaspersky Endpoint Security:
- Quarantined files
- Public key of the certificate used for integration with Kaspersky Sandbox
- Cache of the built-in agent of Kaspersky Endpoint Security:
- Time when scan results were written to the cache
- MD5 hash of the scan task
- Scan task identifier
- Scan result for the object
- Queue of object scan requests:
- ID of the object in the queue
- Time when the object was placed in the queue
- Processing status of the object in the queue
- ID of the user session in the operating system where the object scan task was created
- System identifier (SID) of the operating system user whose account was used to create the task
- MD5 hash of the object scan task
- Information about the tasks for which the built-in agent of Kaspersky Endpoint Security is awaiting scan results from Kaspersky Sandbox:
- Time when the object scan task was received
- Object processing status
- ID of the user session in the operating system where the object scan task was created
- Identifier of the object scan task
- MD5 hash of the object scan task
- System identifier (SID) of the operating system user whose account was used to create the task
- XML schema of the automatically created IOC
- MD5 or SHA256 hash of the scanned object
- Processing errors
- Names of the objects for which the task was created
- Scan result for the object
Data in requests to Kaspersky Sandbox
The following data from requests from the built-in agent of Kaspersky Endpoint Security to Kaspersky Sandbox is stored locally on the computer:
- MD5 hash of the scan task
- Scan task identifier
- Scanned object and all related files
Data received as a result of IOC Scan task execution (stand-alone task)
Kaspersky Endpoint Security automatically submits data on the IOC Scan task execution results to Kaspersky Security Center.
The data in the IOC Scan task execution results may contain the following information:
- IP address from the ARP table
- Physical address from the ARP table
- DNS record type and name
- IP address of the protected computer
- Physical address (MAC-address) of the protected computer
- Identifier in the event log entry
- Data source name in the log
- Log name
- Event time
- MD5 and SHA256 hashes of the file
- Full name of the file (including path)
- File size
- Remote IP address and port to which connection was established during scan
- Local adapter IP address
- Port open on the local adapter
- Protocol as a number (in accordance with the IANA standard)
- Process name
- Process arguments
- Path to the process file
- Windows identifier (PID) of the process
- Windows identifier (PID) of the parent process
- User account that started the process
- Date and time when the process was started
- Service name
- Service description
- Path and name of the DLL service (for svchost)
- Path and name of the service executable file
- Windows identifier (PID) of the service
- Service type (for example, a kernel driver or adapter)
- Service status
- Service launch mode
- User account name
- Volume name
- Volume letter
- Volume type
- Windows registry value
- Registry hive value
- Registry key path (without hive and value name)
- Registry setting
- System (environment)
- Name and version of the operating system that is installed on the computer
- Network name of the protected computer
- Domain or group the protected computer belongs to
- Browser name
- Browser version
- Time when the web resource was last accessed
- URL from the HTTP request
- Name of the account used for the HTTP request
- File name of the process that made the HTTP request
- Full path to the file of the process that made the HTTP request
- Windows identifier (PID) of the process that made the HTTP request
- HTTP referer (HTTP request source URL)
- URI of the resource requested over HTTP
- Information about the HTTP user agent (the application that made the HTTP request)
- HTTP request execution time
- Unique identifier of the process that made the HTTP request
Kaspersky Anti Targeted Attack Platform (EDR)
All data that the application stores locally on the computer, is deleted from the computer when Kaspersky Endpoint Security is uninstalled.
Service data
The built-in agent of Kaspersky Endpoint Security stores the following data locally:
- Processed files and data entered by the user during configuration of the built-in agent of Kaspersky Endpoint Security:
- Quarantined files
- Settings of the built-in agent of Kaspersky Endpoint Security:
- Public key of the certificate used for integration with Central Node
- License data
- Data required for integration with Central Node:
- Telemetry event packet queue
- Cache of IOC file identifiers received from Central Node
- Objects to be passed to the server within the Get file task
- The Get forensic task results reports
Data in requests to KATA (EDR)
When integrating with Kaspersky Anti Targeted Attack Platform, the following data is stored locally on the computer:
Data from the built-in agent of Kaspersky Endpoint Security requests to the Central Node component:
- In synchronization requests:
- Unique ID
- Basic part of the server web address
- Computer name
- Computer IP address
- Computer MAC address
- Local time on the computer
- Self-defense status of Kaspersky Endpoint Security
- Name and version of the operating system that is installed on the computer
- Version of Kaspersky Endpoint Security
- Versions of the application settings and task settings
- Task statuses: identifiers of tasks, execution statuses, error codes
- In requests for obtaining files from the server:
- Unique identifiers of files
- Unique Kaspersky Endpoint Security identifier
- Unique identifiers of certificates
- Basic part of the web address of the server with the Central Node component installed
- Host IP address
- In the reports on task execution results:
- Host IP address
- Information about the objects detected during an IOC scan or YARA scan
- Flags of the additional actions performed upon completion of tasks
- Task execution errors and return codes
- Task completion statuses
- Task completion time
- Versions of the settings used for execution of the tasks
- Information about the objects submitted to the server, quarantined objects, and objects restored from quarantine: paths to objects, MD5 and SHA256 hashes, identifiers of quarantined objects
- Information about the processes started or stopped on a computer at the server's request: PID and UniquePID, error code, MD5 and SHA256 hashes of the objects
- Information about the services started or stopped on a computer at the server's request: service name, startup type, error code, MD5 and SHA256 hashes of file images of the services
- Information about the objects for which a memory dump was made for a YARA scan (paths, dump file identifier)
- Files requested by the server
- Telemetry packets
- Data on running processes:
- Executable file name, including full path and extension
- Process autorun parameters
- Process ID
- Login session ID
- Login session name
- Date and time when the process was started
- MD5 and SHA256 hashes of the object
- Data on files:
- File path
- File name
- File size
- File attributes
- Date and time when the file was created
- Date and time when the file was last modified
- File description
- Company name
- MD5 and SHA256 hashes of the object
- Registry key (for autorun points)
- Data in errors that occur when information about objects was retrieved:
- Full name of the object that was processed when an error occurred
- Error code
- Telemetry data:
- Host IP address
- Data type in the registry prior to the committed update operation
- Data in the registry key prior to the committed change operation
- The text of the processed script or a part of it
- Type of the processed object
- Way of passing a command to the command interpreter
Data from requests of the Central Node component to the built-in agent of Kaspersky Endpoint Security:
- Task settings:
- Task type
- Task schedule settings
- Names and passwords of the accounts under which the tasks can be run
- Versions of settings
- Identifiers of quarantined objects
- Paths to the objects
- MD5 and SHA256 hashes of the objects
- Command line to start the process with the arguments
- Flags of the additional actions performed upon completion of tasks
- IOC file identifiers to be retrieved from the server
- IOC files
- Service name
- Service startup type
- Folders for which the results of the Get forensic task must be received
- Masks of the object names and extensions for the Get forensic task
- Network isolation settings:
- Types of settings
- Versions of settings
- Lists of network isolation exclusions and exclusion settings: traffic direction, IP addresses, ports, protocols, and full paths to executable files
- Flags of the additional actions
- Time of automatic isolation disabling
- Execution prevention settings:
- Types of settings
- Versions of settings
- Lists of execution prevention rules and rule settings: paths to objects, types of objects, MD5 and SHA256 hashes of objects
- Flags of the additional actions
- Event filtering settings:
- Module names
- Full paths to objects
- MD5 and SHA256 hashes of the objects
- Identifiers of the entries in Windows event log
- Digital certificate settings
- Traffic direction, IP addresses, ports, protocols, full paths to executable files
- User names
- User logon types
- Types of telemetry events for which filters are applied
Data in YARA scan results
The built-in agent of Kaspersky Endpoint Security automatically transfers YARA scan results to Kaspersky Anti Targeted Attack Platform to build a threat development chain.
The data is temporarily stored locally in the queue for sending task execution results to the Kaspersky Anti Targeted Attack Platform server. The data is deleted from the temporary storage once it has been sent.
YARA scan results contain the following data:
- MD5 and SHA256 hashes of the file
- Full name of the file
- File path
- File size
- Process name
- Process arguments
- Path to the process file
- Windows identifier (PID) of the process
- Windows identifier (PID) of the parent process
- User account that started the process
- Date and time when the process was started
Compliance with European Union legislation (GDPR)
Kaspersky Endpoint Security may transmit data to Kaspersky under the following scenarios:
- Using Kaspersky Security Network.
- Activating the application with an activation code.
- Updating application modules and anti-virus databases.
- Following links in the application interface.
- Dump writing.
Irrespective of the data classification and territory from which the data is received, Kaspersky adheres to high standards for data security and employs various legal, organizational and technical measures to protect the data of users, to guarantee data security and confidentiality, and also to ensure the fulfillment of users' rights as guaranteed by applicable legislation. The text of the Privacy Policy is included in the application distribution kit and is available on the Kaspersky website.
Prior to using Kaspersky Endpoint Security, please carefully read the description of transmitted data in the End User License Agreement and Kaspersky Security Network Statement. If specific data transmitted from Kaspersky Endpoint Security under any of the described scenarios may be classified as personal data according to your local legislation or standard, you must ensure that such data is processed legally and obtain the consent of end users for the collection and transmission of such data.
Read the End User License Agreement and visit the Kaspersky website to learn more about how we receive, process, store, and destroy information about application usage after you accept the End User License Agreement and consent to the Kaspersky Security Network Statement. The license.txt and ksn_<language ID>.txt files contain the text of the End User License Agreement and Kaspersky Security Network Statement and are included in the application distribution kit.
If you do not want to transmit data to Kaspersky, you can disable data provision.
Using Kaspersky Security Network
By using Kaspersky Security Network, you agree to automatically provide the data listed in the Kaspersky Security Network Statement. If you do not agree to provide this data to Kaspersky, use Kaspersky Private Security Network (KPSN) or disable the use of KSN. For more details about KPSN, please refer to the documentation on Kaspersky Private Security Network.
Activating the application with an activation code
By using an activation code, you agree to automatically provide the data listed in the End User License Agreement. If you do not agree to provide this data to Kaspersky, use a key file to activate Kaspersky Endpoint Security.
Updating application modules and anti-virus databases
By using Kaspersky servers, you agree to automatically provide the data listed in the End User License Agreement. Kaspersky requires this information to verify that Kaspersky Endpoint Security is being legitimately used. If you do not agree to provide this information to Kaspersky, use Kaspersky Security Center for database updates or Kaspersky Update Utility.
Following links in the application interface
By using links in the application interface, you agree to automatically provide the data listed in the End User License Agreement. The precise list of data transmitted in each specific link depends on where the link is located in the application interface and which problem it aims to resolve. If you do not agree to provide this data to Kaspersky, use the simplified application interface or hide the application interface.
Dump writing
If you have enabled dump writing, Kaspersky Endpoint Security will create a dump file that will contain all memory data from application processes at the moment when this dump file was created.
Page top
Getting started
After installing Kaspersky Endpoint Security, you can manage the application using the following interfaces:
- Local application interface.
- Kaspersky Security Center Administration Console.
- Kaspersky Security Center Web Console.
- Kaspersky Security Center Cloud Console.
Kaspersky Security Center Administration Console
Kaspersky Security Center lets you remotely install and uninstall, start and stop Kaspersky Endpoint Security, configure application settings, change the set of available application components, add keys, and start and stop update and scan tasks.
The application can be managed via Kaspersky Security Center using the Kaspersky Endpoint Security Management Plug-in.
For more details on managing the application through Kaspersky Security Center, refer to the Kaspersky Security Center Help.
Kaspersky Security Center Web Console and Kaspersky Security Center Cloud Console
Kaspersky Security Center Web Console (hereinafter also referred to as Web Console) is a web application intended for centrally performing the main tasks to manage and maintain the security system of an organization's network. Web Console is a Kaspersky Security Center component that provides a user interface. For detailed information about Kaspersky Security Center Web Console, please refer to the Kaspersky Security Center Help.
Kaspersky Security Center Cloud Console (hereinafter also referred to as the "Cloud Console") is a cloud-based solution for protecting and managing an organization's network. For detailed information about Kaspersky Security Center Cloud Console, please refer to the Kaspersky Security Center Cloud Console Help.
Web Console and Cloud Console let you do the following:
- Monitor the status of your organization's security system.
- Install Kaspersky applications on devices within your network.
- Manage installed applications.
- View reports on the security system status.
Management of Kaspersky Endpoint Security through the Web Console, Cloud Console, and Kaspersky Security Center Administration Console all provide different management capabilities. The available components and tasks also vary for the different Consoles.
About the Kaspersky Endpoint Security for Windows Management Plug-in
The Kaspersky Endpoint Security for Windows Management Plug-in enables interaction between Kaspersky Endpoint Security and Kaspersky Security Center. The Management Plug-in lets you manage Kaspersky Endpoint Security by using policies, tasks, and local application settings. Interaction with Kaspersky Security Center Web Console is provided by the web plug-in.
The version of the Management Plug-in may differ from the version of Kaspersky Endpoint Security application installed on the client computer. If the installed version of the Management Plug-in has less functionality than the installed version of Kaspersky Endpoint Security, the settings of the missing functions are not regulated by the Management Plug-in. These settings can be modified by the user in the local interface of Kaspersky Endpoint Security.
The web plug-in is not installed by default in Kaspersky Security Center Web Console. In contrast to the Management Plug-in for the Kaspersky Security Center Administration Console, which is installed on the administrator workstation, the web plug-in must be installed on a computer that has Kaspersky Security Center Web Console installed. The functionality of the web plug-in is available to all administrators that have access to Web Console in a browser. You can view the list of installed web plug-ins in Web Console interface: Console settings → Web plug-ins. For more details about the compatibility of web plug-in versions and Web Console, refer to the Kaspersky Security Center Help.
If you are using Kaspersky Endpoint Security as part of the Kaspersky Endpoint Detection and Response Optimum solution, you must install the Kaspersky Endpoint Detection and Response management plug-in. You need the management plug-in to display alert details. Alert Details is a tool for viewing the entirety of collected information about a detected threat. Alert details include, for example, the history of files appearing on the computer. Thus, to create threat response tasks, you need the Kaspersky Endpoint Security management plug-in, and to view alert details, you need the EDR management plug-in.
Installing the web plug-in
You can install the web plug-in as follows:
- Install web plug-in using Quick Start Wizard of Kaspersky Security Center Web Console.
Web Console automatically prompts you to run the Quick Start Wizard when connecting Web Console to the Administration Server for the first time. You can also run the Quick Start Wizard in the Web Console interface (Discovery & Deployment → Deployment & Assignment → Quick Start Wizard). The Quick Start Wizard can also check if the installed web plug-ins are up to date and download the necessary updates. For more details on the Quick Start Wizard for Kaspersky Security Center Web Console, please refer to the Kaspersky Security Center Help.
- Install web plug-in from the list of available distribution packages in Web Console.
To install the web plug-in, select the distribution package of the Kaspersky Endpoint Security web plug-in in the Web Console interface: Console settings → Web plug-ins. The list of available distribution packages is updated automatically after new versions of Kaspersky applications are released.
- Download the distribution package to the Web Console from an external source.
To install the web plug-in, add the ZIP-archive of the distribution package for the Kaspersky Endpoint Security web plug-in in the Web Console interface: Console settings → Web plug-ins. The distribution package of the web plug-in can be downloaded on the Kaspersky website, for example.
Updating the Management Plug-in
To update the Kaspersky Endpoint Security for Windows Management Plug-in, download the latest version of the plug-in (included in distribution kit) and run the plug-in installation wizard.
If a new version of the web plug-in becomes available, Web Console will display the notification Updates are available for utilized plug-ins. You can proceed to update the web plug-in version from this Web Console notification. You can also manually check for new web plug-in updates in the Web Console interface (Console settings → Web plug-ins). The previous version of the web plug-in will be automatically removed during the update.
When the web plug-in is updated, already existing items (for example, policies or tasks) are saved. The new settings of items implementing new functions of Kaspersky Endpoint Security will appear in existing items and will have the default values.
You can update the web plug-in as follows:
- Update the web plug-in in the list of web plug-ins in online mode.
To update the web plug-in, you must select the distribution package of the Kaspersky Endpoint Security web plug-in in the Web Console interface (Console settings → Web plug-ins). Web Console checks for available updates on Kaspersky servers and downloads the relevant updates.
- Update the web plug-in from a file.
To update the web plug-in, you must select the ZIP-archive of the distribution package for the Kaspersky Endpoint Security web plug-in in the Web Console interface: Console settings → Web plug-ins. The distribution package of the web plug-in can be downloaded on the Kaspersky website, for example. You can update the Kaspersky Endpoint Security web plug-in only to a more recent version. The web plug-in cannot be updated to an older version.
If any item is opened (such as a policy or task), the web plug-in checks its compatibility information. If the version of the web plug-in is equal to or later than the version specified in the compatibility information, you can change the settings of this item. Otherwise, you cannot use the web plug-in to change the settings of the selected item. It is recommended to update the web plug-in.
Page top
Special considerations when working with different versions of management plug-ins
You can manage Kaspersky Endpoint Security via Kaspersky Security Center only if you have a Management Plug-in whose version is equal to or later than the version specified in the information regarding the compatibility of Kaspersky Endpoint Security with the Management Plug-in. You can view the minimum required version of the Management Plug-in in the installer.ini file included in the distribution kit.
If any item is opened (such as a policy or task), the Management Plug-in checks its compatibility information. If the version of the Management Plug-in is equal to or later than the version specified in the compatibility information, you can change the settings of this item. Otherwise, you cannot use the Management Plug-in to change the settings of the selected item. It is recommended to upgrade the Management Plug-in.
If the Kaspersky Endpoint Security Management Plug-in is installed in the Administration Console, please consider the following when installing a new version of the Management Plug-in:
- The previous version of the Kaspersky Endpoint Security Management Plug-in will be removed.
- The new version of the Kaspersky Endpoint Security Management Plug-in supports management of the previous version of Kaspersky Endpoint Security for Windows on users' computers.
- You can use the new version of the Management Plug-in to change the settings in policies, tasks, and other items created by the previous version of the Management Plug-in.
- For new settings, the new version of the Management Plug-in assigns the default values when a policy, policy profile, or task are saved for the first time.
After the Management Plug-in is upgraded, it is recommended to check and save the values of the new settings in policies and policy profiles. If you do not do this, the new groups of Kaspersky Endpoint Security settings on the user's computer will take the default values and can be edited (the
 attribute). It is recommended to check the settings starting with policies and policy profiles at the top level of the hierarchy. It is also recommended to use the user account that has access rights to all functional areas of Kaspersky Security Center.
To learn about the new capabilities of the application, please refer to the Release Notes or the application help.
- If a new parameter has been added to a group of settings in the new version of the Management Plug-in, the previously defined status of the
 / attribute for this group of settings is not changed.
Special considerations when using encrypted protocols for interacting with external services
Kaspersky Endpoint Security and Kaspersky Security Center uses an encrypted communication channel with TLS (Transport Layer Security) to work with external services of Kaspersky. Kaspersky Endpoint Security uses external services for the following functions:
- updating databases and application software modules;
- activating the application with an activation code (activation 2.0);
- using Kaspersky Security Network.
Use of TLS secures the application by providing the following features:
- Encryption. The contents of messages are confidential and are not disclosed to third-party users.
- Integrity. The message recipient is certain that the message contents have not been modified since the message was forwarded by the sender.
- Authentication. The recipient is certain that communication is established only with a trusted Kaspersky server.
Kaspersky Endpoint Security uses public key certificates for server authentication. A public key infrastructure (PKI) is required for working with certificates. A Certificate Authority is part of a PKI. Kaspersky uses its own Certificate Authority because Kaspersky services are highly technical and not public. In this case, when root certificates of Thawte, VeriSign, GlobalTrust and others are revoked, the Kaspersky PKI remains operational without disruptions.
Environments that have MITM (software and hardware tools that support parsing of the HTTPS protocol) are considered to be unsafe by Kaspersky Endpoint Security. Errors may be encountered when working with Kaspersky services. For example, there may be errors regarding the use of self-signed certificates. These errors may occur because an HTTPS Inspection tool from your environment does not recognize the Kaspersky PKI. To rectify these problems, you must configure exclusions for interacting with external services.
Page top
Application interface
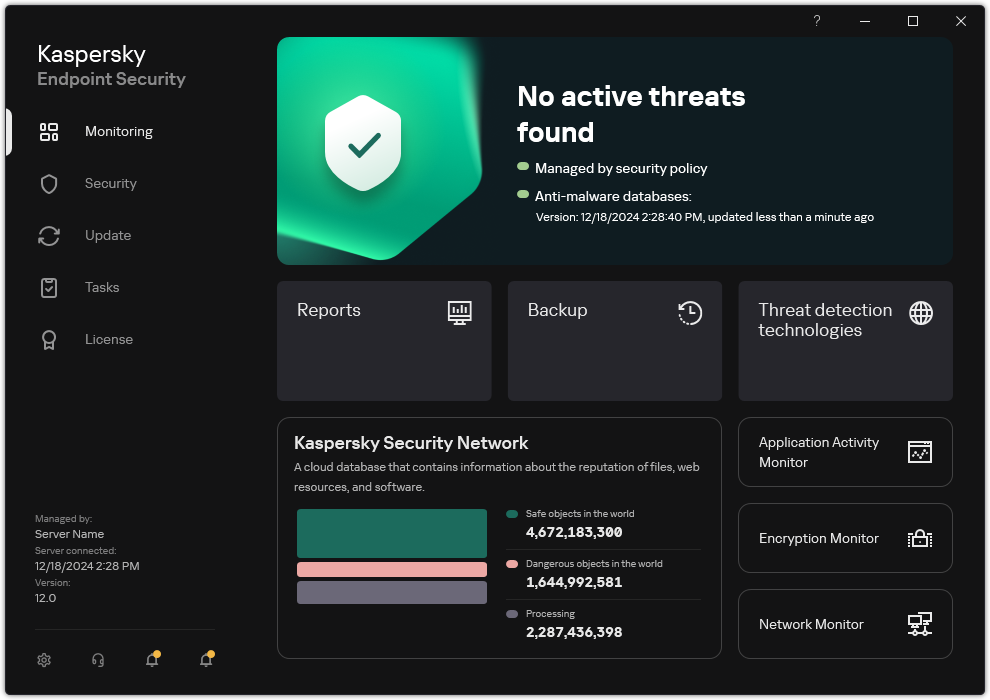
Main application window
Monitoring |
|
Security |
Operating status of installed components. You can also proceed to configuring components or viewing reports. |
Update |
Manage Kaspersky Endpoint Security update tasks. You can update anti-virus databases and application modules and roll back the last update. An administrator can hide the section from the user or restrict task management. |
Tasks |
Manage Kaspersky Endpoint Security scan tasks. You can run a malware scan and application integrity check. An administrator can hide tasks from a user or restrict management of tasks. |
License |
Application licensing. You can purchase a license, activate the application or renew a subscription. You can also view information about the current license. |
|
Configure application settings. An administrator can prohibit changes to settings in Kaspersky Security Center. |
|
Information about the application: current version of Kaspersky Endpoint Security, database release date, key, and other information. You can also proceed to Kaspersky information resources that provide useful information, recommendations, and answers to frequently asked questions on how to purchase, install, and use the application. |
|
Messages containing information about available updates and requests for access to encrypted files and devices. |
Application icon in the taskbar notification area
Immediately after installation of Kaspersky Endpoint Security, the application icon appears in the Microsoft Windows taskbar notification area.
If the application icon in the taskbar notification area is hidden, the administrator has disabled the display of the application interface in the policy.
The icon serves the following purposes:
- It indicates application activity.
- It acts as a shortcut to the context menu and main window of the application.
The following application icon statuses are provided for displaying application operating information:
- The icon signifies that critically important protection components of the application are enabled. Kaspersky Endpoint Security will display a warning if the user is required to perform an action, for example, restart the computer after updating the application.
- The icon signifies that critically important protection components of the application are disabled or have malfunctioned. Protection components may malfunction, for example, if the license has expired or as a result of an application error. Kaspersky Endpoint Security will display a warning with a description of the problem in computer protection.
The context menu of the application icon contains the following items:
- Kaspersky Endpoint Security for Windows. Opens the main application window. In this window, you can adjust the operation of application components and tasks, and view the statistics of processed files and detected threats.
- Pause protection / Resume protection. Pause the operation of all protection and control components that are not marked by a lock () in the policy. Prior to performing this operation, it is recommended to disable the Kaspersky Security Center policy.
Prior to pausing the operation of protection and control components, the application requests the password for accessing Kaspersky Endpoint Security (account password or temporary password). You can then select the pause period: for a specific amount of time, until a restart, or upon user request.
This context menu item is available if Password Protection is enabled. To resume the operation of protection and control components, click Resume protection in the context menu of the application.
Pausing the operation of protection and control components does not affect the performance of update and malware scan tasks. The application also continues using Kaspersky Security Network.
- Disable policy / Enable policy. Disabling Kaspersky Security Center policy on the computer. All Kaspersky Endpoint Security settings are available for configuration, including settings that have a closed lock in the policy (). If the policy is disabled, the application requests the password for accessing Kaspersky Endpoint Security (account password or temporary password). This context menu item is available if Password Protection is enabled. To enable the policy, select Enable policy in the context menu of the application.
- Settings. Opens the application settings window.
- Support. This opens a window containing the information necessary for contacting Kaspersky Technical Support.
- About. This item opens an information window with application details.
- Exit. This item quits Kaspersky Endpoint Security. Clicking this context menu item causes the application to be unloaded from the computer RAM.

Application icon context menu
Simplified application interface
If a Kaspersky Security Center policy configured to display the simplified application interface is applied to a client computer on which Kaspersky Endpoint Security is installed, the main application window is not available on this client computer. Right-click to open the context menu of the Kaspersky Endpoint Security icon (see the figure below) containing the following items:
- Disable policy / Enable policy. Disabling Kaspersky Security Center policy on the computer. All Kaspersky Endpoint Security settings are available for configuration, including settings that have a closed lock in the policy (). If the policy is disabled, the application requests the password for accessing Kaspersky Endpoint Security (account password or temporary password). This context menu item is available if Password Protection is enabled. To enable the policy, select Enable policy in the context menu of the application.
- Tasks. Drop-down list containing the following items:
- Application Integrity Check.
- Rollback of databases to their previous version.
- Full Scan.
- Custom Scan.
- Critical Areas Scan.
- Update.
- Support. This opens a window containing the information necessary for contacting Kaspersky Technical Support.
- Exit. This item quits Kaspersky Endpoint Security. Clicking this context menu item causes the application to be unloaded from the computer RAM.

Context menu of the application icon when displaying the simplified interface
Configuring the display of the application interface
You can configure the application interface display mode for a user. The user can interact with the application in the following ways:
- Display simplified interface. On a client computer, the main application window is inaccessible, and only the icon in the Windows notification area is available. In the context menu of the icon, the user can perform a limited number of operations with Kaspersky Endpoint Security. Kaspersky Endpoint Security also displays notifications above the application icon.
- Display user interface. On a client computer, the main window of Kaspersky Endpoint Security and the icon in the Windows notification area are available. In the context menu of the icon, the user can perform operations with Kaspersky Endpoint Security. Kaspersky Endpoint Security also displays notifications above the application icon.
- Do not display user interface. On a client computer, no signs of Kaspersky Endpoint Security operation are displayed. The icon in the Windows notification area and notifications are not available.
How to configure the application interface display mode in the Administration Console (MMC)
How to configure the application interface display mode in the Web Console and Cloud Console
Page top
Getting started
After deploying the application on client computers, to work with Kaspersky Endpoint Security from Kaspersky Security Center Web Console you need to perform the following actions:
- Create and configure a policy.
You can use policies to apply identical Kaspersky Endpoint Security settings to all client computers within an administration group. The Quick Start Wizard of Kaspersky Security Center automatically creates a policy for Kaspersky Endpoint Security.
- Create the Update of databases and application modules and Malware Scan tasks.
The Update of databases and application modules task is required for keeping computer security up to date. When the task is performed, Kaspersky Endpoint Security updates the anti-virus databases and application modules. The Update of databases and application modules task is created automatically by the Administration Server quick start wizard. To create the Update of databases and application modules task, install the Kaspersky Endpoint Security for Windows Management Plug-in while running the Wizard.
The Malware Scan task is required for the timely detection of viruses and other malware. You need to manually create the Malware Scan task.
How to create a Malware Scan task in the Administration Console (MMC)
How to create a Malware Scan task in the Web Console
Page top
Managing policies
A policy is a collection of application settings that are defined for an administration group. You can configure multiple policies with different values for one application. An application can run under different settings for different administration groups. Each administration group can have its own policy for an application.
Policy settings are sent to client computers by Network Agent during synchronization. By default, the Administration Server performs synchronization immediately after policy settings are changed. UDP port 15000 on the client computer is used for synchronization. The Administration Server performs synchronization every 15 minutes by default. If synchronization fails after policy settings were changed, the next synchronization attempt will be performed according to the configured schedule.
Settings inheritance
Policies, like administration groups, are arranged in a hierarchy. By default, a child policy inherits settings from the parent policy. Child policy is a policy for nested hierarchy levels, that is a policy for nested administration groups and secondary Administration Servers. You can disable the inheritance of settings from the parent policy.
Each policy setting has the ![]() attribute, which indicates if the settings can be modified in the child policies or in the local application settings. The
attribute, which indicates if the settings can be modified in the child policies or in the local application settings. The ![]() attribute is applicable only if inheritance of parent policy settings is enabled for the child policy. Out-of-office policies do not affect other policies through the hierarchy of administration groups.
attribute is applicable only if inheritance of parent policy settings is enabled for the child policy. Out-of-office policies do not affect other policies through the hierarchy of administration groups.
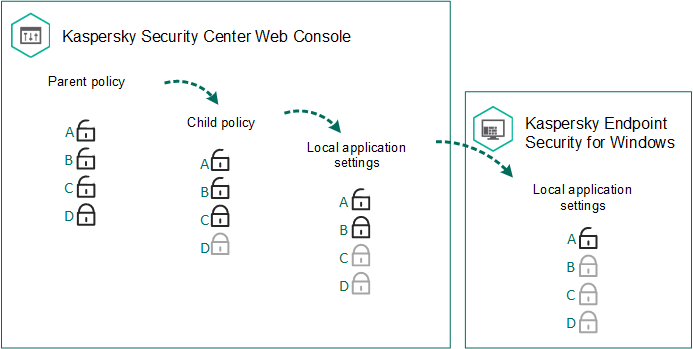
Settings inheritance
The rights to access policy settings (read, write, execute) are specified for each user who has access to the Kaspersky Security Center Administration Server and separately for each functional scope of Kaspersky Endpoint Security. To configure access rights to policy settings, go to the Security section of the properties window of Kaspersky Security Center Administration Server (by default, this section is hidden in the console interface).
Creating a policy
When creating a policy, the wizard suggests settings that are relevant for the selected mode. For example, for Light Agent mode, you must add a Protection Server (SVM). When using the application to protect an SQL server, you must add predefined scan exclusions to make sure the operation of the server is not interfered with. The wizard suggests relevant policy settings after selecting a mode. You can then edit these settings in policy properties.
How to create a policy in the Administration Console (MMC)
How to create a policy in the Web Console and Cloud Console
- In the main window of the Web Console, select Assets (Devices) → Policies & profiles.
- Click Add.
The Policy Wizard starts.
- Select Kaspersky Endpoint Security and click Next.
- Please read and accept the terms of the Kaspersky Security Network (KSN) Statement and click Next.
- Select the mode of the application:
- Standard mode to protect workstations and servers.
- Endpoint Detection and Response Agent to protect against advanced threats and targeted attacks.
If you select this mode, you can create a policy to integrate the computer with Kaspersky Detection and Response solutions. The wizard prompts you to configure the integration for Kaspersky Managed Detection and Response and then Kaspersky Anti Targeted Attack Platform (EDR).
- Light Agent to protect virtual environments.
If you select this mode, at the next step, you must configure the connection to the Protection Server (SVM). These settings are required for the application to work in Light Agent mode.
Kaspersky Endpoint Security provides a common policy for all application modes and OS types. This means that the policy covers the whole set of settings. However, the application may ignore some of the policy settings because Kaspersky Endpoint Security is deployed in a mode in which some functionality is not available. For example, when using the application in Endpoint Detection and Response Agent mode, only settings that are relevant to the integration with Kaspersky Detection and Response solutions and to integration with KUMA are available.
We recommend using different policies for different modes and operating system types.
- Configure the trusted zone. You can add predefined scan exclusions and trusted applications. Predefined scan exclusions and trusted applications help quickly configure Kaspersky Endpoint Security on SQL servers, Microsoft Exchange servers, and System Center Configuration Manager. This means you do not need to manually set up a trusted zone for the application on servers. Predefined scan exclusions and trusted applications can also help you quickly configure Kaspersky Endpoint Security in Light Agent mode in Citrix and VMware virtual environments.
- On the General tab, you can perform the following actions:
- Change the policy name.
- Select the policy status:
- Active. After the next synchronization, the policy will be used as the active policy on the computer.
The settings of an active policy are saved on client computers during synchronization. You cannot simultaneously apply multiple policies to one computer, therefore only one policy may be active in each group.
- Inactive. Backup policy. If necessary, an inactive policy can be switched to active status.
You can create an unlimited number of inactive policies. An inactive policy does not affect application settings on computers in the network. Inactive policies are intended as preparations for emergency situations, such as a virus attack. If there is an attack via flash drives, you can activate a policy that blocks access to flash drives. In this case, the active policy automatically becomes inactive.
- Out-of-office. The policy is activated when a computer leaves the organization network perimeter.
- Active. After the next synchronization, the policy will be used as the active policy on the computer.
- Configure the inheritance of settings:
- Inherit settings from parent policy. If this toggle button is switched on, the policy setting values are inherited from the top-level policy. Policy settings cannot be edited if
 is set for the parent policy.
 - Force inheritance of settings in child policies. If the toggle button is on, the values of the policy settings are propagated to the child policies. In the properties of the child policy, the Inherit settings from parent policy toggle button will be automatically switched on and cannot be switched off. Child policy settings are inherited from the parent policy, except for the settings marked with
 . Child policy settings cannot be edited if is set for the parent policy.
- Inherit settings from parent policy. If this toggle button is switched on, the policy setting values are inherited from the top-level policy. Policy settings cannot be edited if
- On the Application settings tab, you can configure the Kaspersky Endpoint Security policy settings.
- Exit the Wizard.
As a result, Kaspersky Endpoint Security settings will be configured on client computers during the next synchronization. You can view information about the policy that is being applied to the computer in the Kaspersky Endpoint Security interface by clicking the ![]() button on the main screen (for example, the policy name). To do so, in the settings of the Network Agent policy, you need to enable the receipt of extended policy data. For more details about a Network Agent policy, please refer to the Kaspersky Security Center Help.
button on the main screen (for example, the policy name). To do so, in the settings of the Network Agent policy, you need to enable the receipt of extended policy data. For more details about a Network Agent policy, please refer to the Kaspersky Security Center Help.
Security level indicator
The security level indicator is displayed in the upper part of the properties window. The indicator can take one of the following values:
- High protection level. The indicator takes this value and turns green if all components from the following categories are enabled:
- Critical. This category includes the following components:
- Important. This category includes the following components:
- Medium protection level. The indicator takes this value and turns yellow if one of the important components is disabled.
- Low protection level. The indicator takes this value and turns red in one of the following cases:
- One or multiple critical components are disabled.
- Two ore more important components are disabled.
If the indicator has the Medium protection level or Low protection level value, a link that opens the Incidents window appears to the right of the indicator. In this window, you can enable any of the recommended protection components.
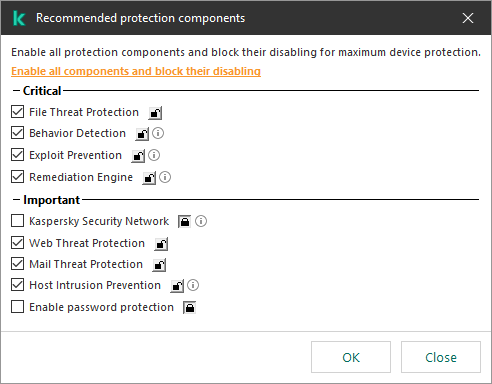
Security level indicator of the policy
Page top
Task management
You can create the following types of tasks to administer Kaspersky Endpoint Security through Kaspersky Security Center:
- Local tasks that are configured for an individual client computer.
- Group tasks that are configured for client computers within administration groups.
- Tasks for a selection of computers.
You can create any number of group tasks, tasks for a selection of computers, or local tasks. For more details about working with administration groups and selections of computers, please refer to Kaspersky Security Center Help.
Kaspersky Endpoint Security supports the following tasks:
- Malware Scan. Kaspersky Endpoint Security scans the computer areas specified in the task settings for viruses and other threats. The Malware Scan task is required for the operation of Kaspersky Endpoint Security and is created during the Quick Start Wizard. It is recommended to schedule the task to run at least once a week.
- Add key. Kaspersky Endpoint Security adds a key for activating applications, including an additional key. Before running the task, make sure that the number of computers, on which the task is to be executed, does not exceed the number of computers allowed by the license.
- Change application components. Kaspersky Endpoint Security installs or removes components on client computers according to the list of components specified in the task settings. The File Threat Protection component cannot be removed. The optimal set of Kaspersky Endpoint Security components helps to conserve computer resources.
- Inventory. Kaspersky Endpoint Security receives information about all application executable files that are stored on computers. The Inventory task is performed by the Application Control component. If the Application Control component is not installed, the task will end with an error.
- Update of databases and application modules. Kaspersky Endpoint Security updates databases and application modules. The Update of databases and application modules task is required for the operation of Kaspersky Endpoint Security and is created during the Quick Start Wizard. It is recommended to configure a schedule that runs the task at least once per day.
- Wipe data. Kaspersky Endpoint Security deletes files and folders from users' computers immediately or if there is no connection with Kaspersky Security Center for a long time.
- Update rollback. Kaspersky Endpoint Security rolls back the last update of databases and application modules. This may be necessary if, for example, new databases contain incorrect data that could cause Kaspersky Endpoint Security to block a safe application.
- Application Integrity Check. Kaspersky Endpoint Security analyzes application files, checks files for corruption or modifications, and verifies the digital signatures of application files.
- Manage Authentication Agent accounts. Kaspersky Endpoint Security configures the Authentication Agent account settings. An Authentication Agent is needed for working with encrypted drives. Before the operating system is loaded, the user needs to complete authentication with the Agent.
If the application is working as part of the Endpoint Detection and Response solution by Kaspersky, you can run additional tasks as detection response actions (responses). For example, you can remotely terminate processes using the Terminate process task.
Tasks are run on a computer only if Kaspersky Endpoint Security is running.
Add a new task
How to create a task in the Administration Console (MMC)
How to create a task in the Web Console and Cloud Console
A new task will be displayed in the list of tasks. The task will have the default settings. To configure the task settings, you need to go to the task properties. To run a task, you need to select the check box opposite the task and click the Start button. After the task has started, you can pause the task and resume it later.
In the list of tasks, you can monitor the task results, which include the task status and the statistics for task performance on computers. You can also create a selection of events to monitor the completion of tasks (Monitoring & reporting → Event selections). For more details on event selection, refer to the Kaspersky Security Center Help. Task execution results are also saved locally in Windows event log and in Kaspersky Endpoint Security reports.
Task access control
The rights to access Kaspersky Endpoint Security tasks (read, write, execute) are defined for each user who has access to Kaspersky Security Center Administration Server, through the settings of access to functional areas of Kaspersky Endpoint Security. To configure access to the functional areas of Kaspersky Endpoint Security, go to the Security section of the properties window of Kaspersky Security Center Administration Server. For more details on task management through Kaspersky Security Center, please refer to the Kaspersky Security Center Help.
You can configure users' rights to access tasks using a policy (task management mode). For example, you can hide group tasks in the Kaspersky Endpoint Security interface.
Task management settings
Parameter |
Description |
|---|---|
Allow use of local tasks |
If the check box is selected, local tasks are displayed in the Kaspersky Endpoint Security local interface. When there are no additional policy restrictions, the user can configure and run tasks. However, configuring task run schedule remains unavailable for the user. The user can run tasks only manually. If the check box is cleared, use of local tasks is stopped. In this mode, local tasks do not run according to schedule. Tasks cannot be started or configured in the local interface of Kaspersky Endpoint Security, or when working with the command line. A user can still start a scan of a file or folder by selecting the Scan for viruses option in the context menu of the file or folder. The scan task is started with the default values of settings for the custom scan task. |
Allow group tasks to be displayed |
If the check box is selected, group tasks are displayed in the Kaspersky Endpoint Security local interface. The user can view the list of all tasks in the application interface. If the check box is cleared, Kaspersky Endpoint Security displays an empty task list. |
Allow management of group tasks |
If the check box is selected, users can start and stop group tasks specified in Kaspersky Security Center. Users can start and stop tasks in the application interface or in the simplified application interface. If the check box is cleared, Kaspersky Endpoint Security starts scheduled tasks automatically, or the administrator starts tasks manually in Kaspersky Security Center. |
Configuring local application settings
In Kaspersky Security Center, you can configure Kaspersky Endpoint Security settings on a particular computer. They are the local application settings. Some settings may be inaccessible for editing. These settings are locked by the ![]() attribute in the policy properties.
attribute in the policy properties.
How to configure the local application settings in the Administration Console (MMC)
How to configure the local application settings in the Web Console and Cloud Console
Page top
Starting and stopping Kaspersky Endpoint Security
After installing Kaspersky Endpoint Security to a user's computer, the application is started automatically. By default, Kaspersky Endpoint Security is started after operating system startup. It is not possible to configure automatic startup of the application in the operating system settings.
Downloading Kaspersky Endpoint Security anti-virus databases after the operating system starts can take up to two minutes depending on the capabilities of the computer. During this time, the level of computer protection is reduced. The downloading of anti-virus databases when Kaspersky Endpoint Security is started on an already started operating system does not cause a reduction in the level of computer protection.
How to configure the startup of Kaspersky Endpoint Security in the Administration Console (MMC)
How to configure the startup of Kaspersky Endpoint Security in the Web Console
- In the main window of the Web Console, select Assets (Devices) → Policies & profiles.
- Click the name of the Kaspersky Endpoint Security policy.
The policy properties window opens.
- Select the Application settings tab.
- Go to General settings → Application Settings.
Kaspersky Endpoint Security for Windows settings
- Use the Start the application on computer startup (recommended) check box to configure the application startup.
- Save your changes.
How to configure the startup of Kaspersky Endpoint Security in the application interface
- In the main application window, click the button.
- In the application settings window, select General settings → Application settings.
Kaspersky Endpoint Security for Windows settings
- Use the Start the application on computer startup (recommended) check box to configure the application startup.
- Save your changes.
Kaspersky experts recommend against manually stopping Kaspersky Endpoint Security because doing so exposes the computer and your personal data to threats. If necessary, you can pause computer protection for as long as you need to, without stopping the application.
You can monitor the application status by using the Protection status widget.
How to start or stop Kaspersky Endpoint Security in the Administration Console (MMC)
- Open the Kaspersky Security Center Administration Console.
- In the Managed devices folder in the Administration Console tree, open the folder with the name of the administration group to which the relevant client computers belong.
- In the workspace, select the Devices tab.
- Double-click to open the computer properties window.
- In the computer properties window, select the Applications section.
- In the list of Kaspersky applications installed on the computer, select Kaspersky Endpoint Security for Windows and double-click to open the application properties.
- Select Kaspersky Endpoint Security.
- Do the following:
- To start the application, click the
 button to the right of the list of Kaspersky applications.
 - To stop the application, click the
 button to the right of the list of Kaspersky applications.
- To start the application, click the
How to start or stop Kaspersky Endpoint Security in the Web Console
How to start or stop Kaspersky Endpoint Security from the command line
- Run the command line interpreter (cmd.exe) as an administrator.
- Go to the folder where the Kaspersky Endpoint Security executable file is located.
You can add path to the executable file to the %PATH% system variable during application installation.
- To start the application from the command line, enter
klpsm.exe start_avp_service. - To stop the application from the command line, enter
klpsm.exe stop_avp_service.To stop the application from the command line, enable external management of system services.

Starting and stopping the application from the command line
Pausing and resuming computer protection and control
Pausing computer protection and control means disabling all protection and control components of Kaspersky Endpoint Security for some time.
The application status is displayed using the application icon in the taskbar notification area.
- The icon signifies that computer protection and control are paused.
- The icon signifies that computer protection and control are enabled.
Pausing or resuming computer protection and control does not affect scan or update tasks.
If any network connections are already established when you pause or resume computer protection and control, a notification about the termination of these network connections is displayed.
To pause computer protection and control:
- Right-click to bring up the context menu of the application icon that is in the taskbar notification area.
- In the context menu, select Pause protection (see the figure below).
This context menu item is available if Password Protection is enabled.
- Select one of the following options:
- Pause for <time period> – computer protection and control will resume after the amount of time that is specified in the drop-down list below.
- Pause until application restart – computer protection and control will resume after you restart the application or restart the operating system. Automatic startup of the application must be enabled to use this option.
- Pause – computer protection and control will resume when you decide to re-enable them.
- Click Pause protection.
Kaspersky Endpoint Security will pause the operation of all protection and control components that are not marked by a lock (![]() ) in the policy. Prior to performing this operation, it is recommended to disable the Kaspersky Security Center policy.
) in the policy. Prior to performing this operation, it is recommended to disable the Kaspersky Security Center policy.
Application icon context menu
To resume computer protection and control:
- Right-click to bring up the context menu of the application icon that is in the taskbar notification area.
- In the context menu, select Resume protection.
You can resume computer protection and control at any time, regardless of the computer protection and control pause option that you selected previously.
Page top
Creating and using a configuration file
A configuration file with Kaspersky Endpoint Security settings lets you accomplish the following tasks:
- Perform local installation of Kaspersky Endpoint Security via the command line with predefined settings.
- Perform remote installation of Kaspersky Endpoint Security via Kaspersky Security Center with predefined settings.
- Migrate Kaspersky Endpoint Security settings from one computer to another (see the instructions below).
Exporting configuration file
To create a configuration file:
- In the main application window, click the button.
- In the application settings window, select General settings → Manage settings.
- Click Export.
- In the window that opens, specify the path to where you want to save the configuration file, and enter its name.
To use the configuration file for local or remote installation of Kaspersky Endpoint Security, you must name it install.cfg.
- Save the file.
Importing configuration file
To import Kaspersky Endpoint Security settings from a configuration file:
- In the main application window, click the button.
- In the application settings window, select General settings → Manage settings.
- Click Import.
- In the window that opens, enter the path to the configuration file.
- Open the file.
All values of Kaspersky Endpoint Security settings will be set according to the selected configuration file.
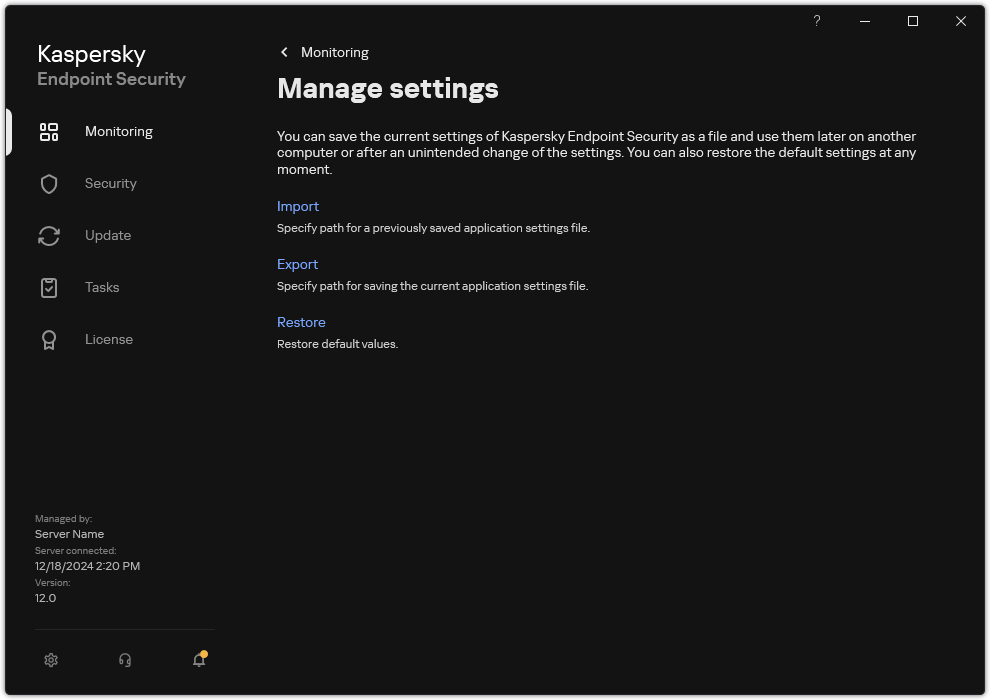
Managing the application settings
Restoring the default application settings
You can restore the application settings recommended by Kaspersky at any time. When the settings are restored, the Recommended security level is set for all protection components.
To restore the default application settings:
- In the main application window, click the button.
- In the application settings window, select General settings → Manage settings.
- Click Restore.
- Save your changes.
Managing the application settings
Malware Scan
Malware scan is vital to computer security. Regularly run malware scans to rule out the possibility of spreading malware that is undetected by protection components due to a low security level setting or for other reasons.
Kaspersky Endpoint Security does not scan files whose contents are located in OneDrive cloud storage, and creates log entries stating that these files have not been scanned.
Full Scan
A thorough scan of the entire computer. Kaspersky Endpoint Security scans the following objects:
- Kernel memory
- Objects that are loaded at startup of the operating system
- Boot sectors
- Operating system backup
- All hard and removable drives
Kaspersky experts recommend that you do not change the scan scope of the Full Scan task.
To conserve computer resources, it is recommended to use a background scan task instead of a full scan task. This will not affect the security level of the computer.
Critical Areas Scan
By default, Kaspersky Endpoint Security scans the kernel memory, running processes, and disk boot sectors.
Kaspersky experts recommend that you do not change the scan scope of the Critical Areas Scan task.
Custom Scan
Kaspersky Endpoint Security scans the objects that are selected by the user. You can scan any object from the following list:
- System memory
- Objects that are loaded at startup of the operating system
- Operating system backup
- Microsoft Outlook mailbox
- Hard, removable, and network drives
- Any selected file
Background Scan
Background Scan is a scan mode of Kaspersky Endpoint Security that does not display notifications for the user. Background scan requires less computer resources than other types of scans (such as a full scan). In this mode, Kaspersky Endpoint Security scans startup objects, the boot sector, system memory, and the system partition.
Application Integrity Check
Kaspersky Endpoint Security checks the application modules for corruption or modifications.
Scanning the computer
A scan is vital to computer security. Regularly run malware scans to rule out the possibility of spreading malware that is undetected by protection components due to a low security level setting or for other reasons. The component provides computer protection with the help of anti-virus databases, the Kaspersky Security Network cloud service, and heuristic analysis.
Kaspersky Endpoint Security has the following standard tasks predefined: Full Scan, Critical Areas Scan, Custom Scan. If your organization has the Kaspersky Security Center administration system deployed, you can create a Malware Scan task and configure the scan. The Background Scan task is also available in Kaspersky Security Center. The background scan cannot be configured.
How to run a scan task in the Administration Console (MMC)
How to run a scan task in the Web Console and Cloud Console
How to run a scan task in the application interface
- In the main application window, go to the Tasks section.
- In the task list, select the scan task and click .
- Configure the scan task (see the table below).
If necessary, configure the scan task schedule.
- Save your changes.
- Run the scan task.
Kaspersky Endpoint Security will start scanning the computer. The application will show the scan progress, the number of scanned files, and the scan time remaining. You can stop the task at any time by clicking the Stop button. If the scan task is not displayed, it means the administrator has prohibited the use of local tasks in the policy.
As a result, Kaspersky Endpoint Security scans the computer and if a threat is detected, executes the action configured in application settings. Typically the application attempts to disinfect infected files. As a result, the infected files can receive the following statuses:
- Postponed. The infected file could not be disinfected. The application deletes the infected file after computer restart.
- Logged. The infected file could not be disinfected. The application adds information about detected infected files to the list of active threats.
- Write not supported or Write error. The infected file could not be disinfected. The application has no write access.
- Already processed. The application detected an infected file earlier. The application disinfects or deletes the infected file after computer restart.
Scan settings
Parameter
Description
Security level
Kaspersky Endpoint Security can use different groups of settings for running a scan. These groups of settings that are stored in the application are called security levels:
- High. Kaspersky Endpoint Security scans all types of files. When scanning compound files, the application also scans mail-format files.
- Recommended. Kaspersky Endpoint Security scans only the specified file formats on all hard drives, network drives, and removable storage media of the computer, and also embedded OLE objects. The application does not scan archives or installation packages.
- Low. Kaspersky Endpoint Security scans only new or modified files with the specified extensions on all hard drives, removable drives, and network drives of the computer. The application does not scan compound files.
You can select one of the preset security levels or manually configure security level settings. If you change the security level settings, you can always revert back to the recommended security level settings.
Action on threat detection
Disinfect, delete if disinfection fails. If this option is selected, the application automatically attempts to disinfect all infected files that are detected. If disinfection fails, the application deletes the files.
Disinfect, block if disinfection fails. If this option is selected, Kaspersky Endpoint Security automatically attempts to disinfect all infected files that are detected. If disinfection is not possible, Kaspersky Endpoint Security adds the information about the infected files that are detected to the list of active threats.
Inform. If this option is selected, Kaspersky Endpoint Security adds the information about infected files to the list of active threats on detection of these files.
Before attempting to disinfect or delete an infected file, the application creates a backup copy of the file in case you need to restore the file or if it can be disinfected in the future.
On detection of infected files that are part of the Windows Store application, Kaspersky Endpoint Security attempts to delete the file.
Run Advanced Disinfection immediately
(available only in the Kaspersky Security Center Console)
Advanced Disinfection during a virus scan task on a computer is performed only if the Advanced Disinfection feature is enabled in the properties of the policy applied to this computer.
If the check box is selected, Kaspersky Endpoint Security disinfects the active infection immediately after it is detected during the execution of the virus scan task. After the active infection is disinfected, Kaspersky Endpoint Security reboots the computer without prompting the user.
If the check box is cleared, Kaspersky Endpoint Security does not disinfect the active infection immediately after it is detected during the execution of the virus scan task. Kaspersky Endpoint Security generates active infection events in local application reports and on the Kaspersky Security Center side. The active infection can be disinfected when the virus scan task is run again with the Advanced Disinfection feature turned on. In this way, the system administrator can choose the appropriate time to do Advanced Disinfection and subsequently reboot the computers automatically.
Scan scope
List of objects that Kaspersky Endpoint Security scans while performing a scan task. Objects within the scan scope can include the kernel memory, running processes, boot sectors, system backup storage, mail databases, hard drive, removable drive or network drive, folder or file.
Scan schedule
Manually. Run mode in which you can start scan manually at a time when it is convenient for you.
By schedule. In this scan task run mode, the application starts the scan task in accordance with the schedule that you create. If this scan task run mode is selected, you can also start the scan task manually.
Postpone running after application startup for N minutes
Postponed start of the scan task after application startup. At operating system startup, many processes are running, therefore it is advantageous to postpone running the scan task instead of running it immediately after Kaspersky Endpoint Security startup.
Run skipped tasks
If the check box is selected, Kaspersky Endpoint Security starts the skipped task as soon as it becomes possible. The task may be skipped, for example, if the computer was off at the scheduled task start time. When the application gets an opportunity to execute missed tasks, it runs the tasks randomly within a certain time interval to distribute the load on the computer.
If the check box is cleared, Kaspersky Endpoint Security does not run skipped tasks. Instead, it carries out the next task in accordance with the current schedule.
Run only when the computer is idle
Postponed start of the scan task when computer resources are busy. Kaspersky Endpoint Security starts the scan task if the computer is locked or if the screen saver is on. If you have interrupted the execution of the task, for example by unlocking the computer, Kaspersky Endpoint Security automatically runs the task, continuing from the point where it was interrupted.
Run scan as
By default the scan task is run in the name of the user with whose rights you are registered in the operating system. The protection scope may include network drives or other objects that require special rights to access. You can specify a user that has the required rights in the application settings and run the scan task under this user's account.
File types
Kaspersky Endpoint Security considers files without an extension as executable ones. The application always scans executable files regardless of the file types that you select for scanning.
All files. If this setting is enabled, Kaspersky Endpoint Security checks all files without exception (all formats and extensions).
Files scanned by format. If this setting is enabled, the application scans
only. Before scanning a file for malicious code, the internal header of the file is analyzed to determine the format of the file (for example, .txt, .doc, or .exe). The scan also looks for files with particular file extensions.Files scanned by extension. If this setting is enabled, the application scans infectable files only. The file format is then determined based on the file's extension.
By default, Kaspersky Endpoint Security scans files by their format. Scanning files by extension is less safe because a malicious file can have an extension that is not on the list of potentially infectable (for example,
.123).Scan only new and modified files
Scans only new files and those files that have been modified since the last time they were scanned. This helps reduce the duration of a scan. This mode applies both to simple and to compound files.
Skip file that is scanned for longer than N seconds
This sets a time limit for scanning a single object. After the specified amount of time, the application stops scanning a file. This helps reduce the duration of a scan.
Do not run multiple scan tasks at the same time
Postponed start of scan tasks if a scan is already running. Kaspersky Endpoint Security will enqueue new scan tasks if the current scan continues. This helps optimize the load on the computer. For example, let's assume that the application has started a Full Scan task according to the schedule. If a user attempts to start a quick scan from the application interface, Kaspersky Endpoint Security will enqueue this quick scan task and then automatically start this task after the Full Scan task is finished.
However, Kaspersky Endpoint Security immediately starts a scan task even if one of the following scan tasks is running:
- Scan of removable drives on connection.
- Scan from Context Menu.
- Critical Areas Scan that was started upon detection of an Indicator of Compromise (IoC).
If this check box is cleared, Kaspersky Endpoint Security lets you run multiple scan tasks at the same time. Running multiple scan tasks requires more computer resources.
Scan archives
Scanning ZIP, GZIP, BZIP, RAR, TAR, ARJ, CAB, LHA, JAR, ICE, and other archives. The application scans archives not only by extension, but also by format. When checking archives, the application performs a recursive unpacking. This allows to detect threats inside multi-level archives (archive within an archive).
Scan distribution packages
This check box enables/disables scanning of third-party distribution packages.
Scan files in Microsoft Office formats
Scans Microsoft Office files (DOC, DOCX, XLS, PPT and other Microsoft extensions). Office format files include OLE objects as well. Kaspersky Endpoint Security scans office format files that are smaller than 1 MB, regardless of whether the check box is selected or not.
Scan email format files
Scanning email format files and the email database. The application scans PST and OST files used by MS Outlook and Windows Mail mail clients as well as EML files.
Kaspersky Endpoint Security does not support the 64-bit version of MS Outlook email client. This means that Kaspersky Endpoint Security does not scan MS Outlook files (PST and OST files) if a 64-bit version of MS Outlook is installed on the computer, even if mail is included in the scan scope.
If the check box is selected, Kaspersky Endpoint Security splits the mail-format file into its components (header, body, attachments) and scans them for threats.
If this check box is cleared, Kaspersky Endpoint Security scans the mail-format file as a single file.
Scan password-protected archives
If the check box is selected, the application scans password-protected archives. Before files in an archive can be scanned, you are prompted to enter the password.
If the check box is cleared, the application skips scanning of password-protected archives.
Do not unpack large compound files
If this check box is selected, the application does not scan compound files if their size exceeds the specified value.
If this check box is cleared, the application scans compound files of all sizes.
The application scans large files that are extracted from archives regardless of whether the check box is selected or not.
Machine learning and signature analysis
The machine learning and signature analysis method uses the Kaspersky Endpoint Security databases that contain descriptions of known threats and ways to neutralize them. Protection that uses this method provides the minimum acceptable security level.
Based on the recommendations of Kaspersky experts, machine learning and signature analysis is always enabled.
Heuristic analysis
The technology was developed for detecting threats that cannot be detected by using the current version of Kaspersky application databases. It detects files that may be infected with an unknown virus or a new variety of a known virus.
When scanning files for malicious code, the heuristic analyzer executes instructions in the executable files. The number of instructions that are executed by the heuristic analyzer depends on the level that is specified for the heuristic analyzer. The heuristic analysis level ensures a balance between the thoroughness of searching for new threats, the load on the resources of the operating system, and the duration of heuristic analysis.
iSwift Technology
(available only in the Administration Console (MMC) and in the Kaspersky Endpoint Security interface)
This technology allows increasing scan speed by excluding certain files from scanning. Files are excluded from scans by using a special algorithm that takes into account the release date of Kaspersky Endpoint Security databases, the date when the file was last scanned, and any modifications to the scan settings. The iSwift technology is an advancement of the iChecker technology for the NTFS file system.
iChecker Technology
(available only in the Administration Console (MMC) and in the Kaspersky Endpoint Security interface)
This technology allows increasing scan speed by excluding certain files from scanning. Files are excluded from scans by using a special algorithm that takes into account the release date of Kaspersky Endpoint Security databases, the date when the file was last scanned, and any modifications to the scan settings. There are limitations to iChecker Technology: it does not work with large files and applies only to files with a structure that the application recognizes (for example, EXE, DLL, LNK, TTF, INF, SYS, COM, CHM, ZIP, and RAR).
Scanning removable drives when they are connected to the computer
Kaspersky Endpoint Security scans all files that you run or copy, even if the file is located on a removable drive (File Threat Protection component). To prevent the spread of viruses and other malware, you can configure automatic scans of removable drives when they are connected to the computer. Kaspersky Endpoint Security automatically attempts to disinfect all infected files that are detected. If disinfection fails, Kaspersky Endpoint Security deletes the files. The component keeps a computer secure by running scans that implement machine learning, heuristic analysis (high level) and signature analysis. Kaspersky Endpoint Security also uses iSwift and iChecker scan optimization technologies. The technologies are always on and cannot be disabled.
How to configure running the Removable drives scan in the Administration Console (MMC)
How to configure running the Removable drives scan in the Web Console and Cloud Console
How to configure running the Removable drives scan in the application interface
- In the main application window, go to the Tasks section.
- In the task list, select the scan task and click .
- Use the Removable Drives Scan toggle to enable or disable scans of removable drives upon connection to the computer.
- Configure advanced options for Removable drives scan (see table below).
- Save your changes.
As a result, Kaspersky Endpoint Security runs a Removable drives scan for removable drives that are not larger than the specified maximum size. If the Removable Drives Scan task is not displayed, it means the administrator has prohibited the use of local tasks in the policy.
Removable drives scan task settings
Parameter |
Description |
|---|---|
Action on a removable drive connection |
Detailed Scan. If this item is selected, when a removable drive is connected, Kaspersky Endpoint Security scans all files on the removable drive, including files nested in compound objects, archives, distribution packages, and files in office formats. Kaspersky Endpoint Security does not scan files in mail formats or password-protected archives. Quick Scan. If this option is selected, after a removable drive is connected Kaspersky Endpoint Security scans only files of specific formats that are most vulnerable to infection, and does not unpack compound objects. |
Maximum removable drive size |
If this check box is selected, Kaspersky Endpoint Security performs the action that is selected in the Action on a removable drive connection drop-down list on removable drives with a size not more than the specified maximum drive size. If the check box is cleared, Kaspersky Endpoint Security performs the action that is selected in the Action on a removable drive connection drop-down list on removable drives of any size. |
Show scan progress |
If the check box is selected, Kaspersky Endpoint Security displays the progress of removable drives scan in a separate window and in the Tasks section. If the check box is cleared, Kaspersky Endpoint Security performs removable drives scan in the background. |
Block the stopping of the scan task |
If this check box is selected, then for the removable drives scan task in the local interface of Kaspersky Endpoint Security, the Stop button in the Tasks section and the Stop button in the removable drives scan window are not available. |
Background scan
Background Scan is a scan mode of Kaspersky Endpoint Security that does not display notifications for the user. Background scan requires less computer resources than other types of scans (such as a full scan). In this mode, Kaspersky Endpoint Security scans startup objects, the boot sector, system memory, and the system partition.
To conserve computer resources, it is recommended to use a background scan task instead of a full scan task. This will not affect the security level of the computer. These tasks have the same scan scope. To optimize the load on the computer, the application does not run a Full Scan task and a Background Scan task at the same time. If you have already ran a Full Scan task, Kaspersky Endpoint Security will not start a Background Scan task for seven days after the Full Scan task is completed.
A background scan is started in the following cases:
- After an anti-virus database update.
- 30 minutes after Kaspersky Endpoint Security is started.
- Every six hours.
- When the computer is idling for five minutes or more (the computer is locked or the screensaver is on).
Background scan when the computer is idling is interrupted when any of the following conditions are true:
- The computer went into active mode.
If the background scan has not been run for more than ten days, the scan is not interrupted.
- The computer (laptop) has switched to battery mode.
When performing a background scan, Kaspersky Endpoint Security does not scan files whose contents are located in OneDrive cloud storage.
How to enable background scanning in the Administration Console (MMC)
How to enable background scanning in the Web Console and Cloud Console
How to enable background scanning in the application interface
- In the main application window, go to the Tasks section.
- In the task list, select the scan task and click .
- Use the Background Scan toggle to enable or disable background scans.
- Save your changes.
If the Background scan is not displayed, it means the administrator has prohibited using local tasks in the policy.
Scan from context menu
Kaspersky Endpoint Security lets you run a scan of individual files for viruses and other malware from the context menu (see the figure below).
When performing a scan from the context menu, Kaspersky Endpoint Security does not scan files whose contents are located in OneDrive cloud storage.
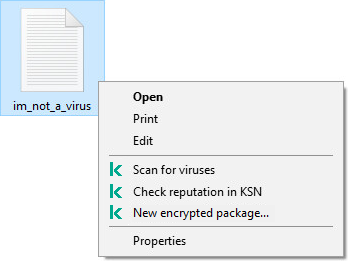
Scan from context menu
How to configure Scan from Context Menu in Administration Console (MMC)
How to configure Scan from Context Menu in the Web Console and Cloud Console
How to configure Scan from Context Menu in the application interface
- In the main application window, go to the Tasks section.
- In the task list, select the scan task and click .
- Configure Scan from Context Menu (see the table below).
- Save your changes.
If the Scan from Context Menu task is not displayed, it means the administrator has prohibited the use of local tasks in the policy.
Scan from Context Menu task settings
Parameter |
Description |
|---|---|
Security level |
Kaspersky Endpoint Security can use different groups of settings for running a scan. These groups of settings that are stored in the application are called security levels:
|
Action on threat detection |
Disinfect, delete if disinfection fails. If this option is selected, the application automatically attempts to disinfect all infected files that are detected. If disinfection fails, the application deletes the files. Disinfect, block if disinfection fails. If this option is selected, Kaspersky Endpoint Security automatically attempts to disinfect all infected files that are detected. If disinfection is not possible, Kaspersky Endpoint Security adds the information about the infected files that are detected to the list of active threats. Inform. If this option is selected, Kaspersky Endpoint Security adds the information about infected files to the list of active threats on detection of these files. |
File types |
Kaspersky Endpoint Security considers files without an extension as executable ones. The application always scans executable files regardless of the file types that you select for scanning. All files. If this setting is enabled, Kaspersky Endpoint Security checks all files without exception (all formats and extensions). Files scanned by format. If this setting is enabled, the application scans infectable files only. Before scanning a file for malicious code, the internal header of the file is analyzed to determine the format of the file (for example, .txt, .doc, or .exe). The scan also looks for files with particular file extensions. Files scanned by extension. If this setting is enabled, the application scans infectable files only. The file format is then determined based on the file's extension. By default, Kaspersky Endpoint Security scans files by their format. Scanning files by extension is less safe because a malicious file can have an extension that is not on the list of potentially infectable (for example, |
Scan only new and modified files |
Scans only new files and those files that have been modified since the last time they were scanned. This helps reduce the duration of a scan. This mode applies both to simple and to compound files. |
Skip file that is scanned for longer than N seconds |
This sets a time limit for scanning a single object. After the specified amount of time, the application stops scanning a file. This helps reduce the duration of a scan. |
Scan archives |
Scanning ZIP, GZIP, BZIP, RAR, TAR, ARJ, CAB, LHA, JAR, ICE, and other archives. The application scans archives not only by extension, but also by format. When checking archives, the application performs a recursive unpacking. This allows to detect threats inside multi-level archives (archive within an archive). |
Scan distribution packages |
The check box enables or disables scanning of distribution packages. |
Scan files in Microsoft Office formats |
Scans Microsoft Office files (DOC, DOCX, XLS, PPT and other Microsoft extensions). Office format files include OLE objects as well. Kaspersky Endpoint Security scans office format files that are smaller than 1 MB, regardless of whether the check box is selected or not. |
Scan email format files |
Scanning email format files and the email database. The application scans PST and OST files used by MS Outlook and Windows Mail mail clients as well as EML files. Kaspersky Endpoint Security does not support the 64-bit version of MS Outlook email client. This means that Kaspersky Endpoint Security does not scan MS Outlook files (PST and OST files) if a 64-bit version of MS Outlook is installed on the computer, even if mail is included in the scan scope. If the check box is selected, Kaspersky Endpoint Security splits the mail-format file into its components (header, body, attachments) and scans them for threats. If this check box is cleared, Kaspersky Endpoint Security scans the mail-format file as a single file. |
Scan password-protected archives |
If the check box is selected, the application scans password-protected archives. Before files in an archive can be scanned, you are prompted to enter the password. If the check box is cleared, the application skips scanning of password-protected archives. |
Do not unpack large compound files |
If this check box is selected, the application does not scan compound files if their size exceeds the specified value. If this check box is cleared, the application scans compound files of all sizes. The application scans large files that are extracted from archives regardless of whether the check box is selected or not. |
Machine learning and signature analysis |
The machine learning and signature analysis method uses the Kaspersky Endpoint Security databases that contain descriptions of known threats and ways to neutralize them. Protection that uses this method provides the minimum acceptable security level. Based on the recommendations of Kaspersky experts, machine learning and signature analysis is always enabled. |
Heuristic analysis |
The technology was developed for detecting threats that cannot be detected by using the current version of Kaspersky application databases. It detects files that may be infected with an unknown virus or a new variety of a known virus. When scanning files for malicious code, the heuristic analyzer executes instructions in the executable files. The number of instructions that are executed by the heuristic analyzer depends on the level that is specified for the heuristic analyzer. The heuristic analysis level ensures a balance between the thoroughness of searching for new threats, the load on the resources of the operating system, and the duration of heuristic analysis. |
iSwift Technology |
This technology allows increasing scan speed by excluding certain files from scanning. Files are excluded from scans by using a special algorithm that takes into account the release date of Kaspersky Endpoint Security databases, the date when the file was last scanned, and any modifications to the scan settings. The iSwift technology is an advancement of the iChecker technology for the NTFS file system. |
iChecker Technology |
This technology allows increasing scan speed by excluding certain files from scanning. Files are excluded from scans by using a special algorithm that takes into account the release date of Kaspersky Endpoint Security databases, the date when the file was last scanned, and any modifications to the scan settings. There are limitations to iChecker Technology: it does not work with large files and applies only to files with a structure that the application recognizes (for example, EXE, DLL, LNK, TTF, INF, SYS, COM, CHM, ZIP, and RAR). |
Application Integrity Check
Kaspersky Endpoint Security checks the application modules for corruption or modifications. For example, if an application library has an incorrect digital signature, the library is considered corrupt. The Application Integrity Check task is intended for checking application files. Run the Application Integrity Check task if Kaspersky Endpoint Security detected a malicious object but did not neutralize it.
You can create the Application Integrity Check task both in the Kaspersky Security Center Web Console and in the Administration Console. It is not possible to create a task in the Kaspersky Security Center Cloud Console.
Application integrity breaches may occur in the following cases:
- A malicious object modified files of Kaspersky Endpoint Security. In this case, perform the procedure for restoring Kaspersky Endpoint Security using the tools of the operating system. After restoration, run a full scan of the computer and repeat the integrity check.
- The digital signature expired. In this case, update Kaspersky Endpoint Security.
How to run an application integrity check through the Administration Console (MMC)
How to run an application integrity check through the Web Console
How to run an integrity check in the application interface
Integrity check task settings
Parameter |
Description |
|---|---|
Scan schedule |
Manually. Run mode in which you can start scan manually at a time when it is convenient for you. By schedule. In this scan task run mode, the application starts the scan task in accordance with the schedule that you create. If this scan task run mode is selected, you can also start the scan task manually. |
Run skipped tasks |
If the check box is selected, Kaspersky Endpoint Security starts the skipped task as soon as it becomes possible. The task may be skipped, for example, if the computer was off at the scheduled task start time. When the application gets an opportunity to execute missed tasks, it runs the tasks randomly within a certain time interval to distribute the load on the computer. If the check box is cleared, Kaspersky Endpoint Security does not run skipped tasks. Instead, it carries out the next task in accordance with the current schedule. |
Run only when the computer is idle |
Postponed start of the scan task when computer resources are busy. Kaspersky Endpoint Security starts the scan task if the computer is locked or if the screen saver is on. If you have interrupted the execution of the task, for example by unlocking the computer, Kaspersky Endpoint Security automatically runs the task, continuing from the point where it was interrupted. |
Editing the scan scope
The Scan scope is a list of paths to folders and paths that Kaspersky Endpoint Security scans when executing the task. Kaspersky Endpoint Security supports environment variables and the * and ? characters when entering a mask.
To edit the scan scope, we recommend using the Custom Scan task. Kaspersky experts recommend that you do not change the scan scope of the Full Scan and Critical Areas Scan tasks.
Kaspersky Endpoint Security has the following predefined objects as part of the scan scope:
- My email.
Files relevant to the Outlook mail client: data files (PST), offline data files (OST).
- System memory.
- Startup Objects.
Memory occupied by processes and application executable files that are run at system startup.
- Disk boot sectors.
Hard disk and removable disk boot sectors.
- System Backup.
Contents of the System Volume Information folder.
- All external devices.
- All hard drives.
- All network drives.
We recommend creating a separate scan task for scanning network drives or shared folders. In the settings of the Malware Scan task, specify a user that has write access to this drive; this is necessary to mitigate detected threats. If the server where the network drive is located has its own security tools, do not run the scan task for that drive. In this way, you can avoid checking object twice and improve the performance of the server.
To exclude folders or files from the scan scope, add the folder or file to the trusted zone.
How to edit a scan scope in the Administration Console (MMC)
How to edit a scan scope in the Web Console and Cloud Console
How to edit a scan scope in the application interface
Page top
Running a scheduled scan
Fully scanning the computer takes some time and resources of the computer. You should choose the optimum time to run a computer scan to avoid adversely impacting the performance of other software. Kaspersky Endpoint Security lets you configure a normal schedule for scanning the computer. This is convenient if your organization has a work schedule. You can configure a computer scan to run at night or on weekends. If it is impossible to run the scan task for any reason (for example, the computer is off at that time), you can configure the skipped task to be run automatically as soon as this becomes possible.
If configuring an optimum scan schedule proves impossible, Kaspersky Endpoint Security lets you run a computer scan when the following special conditions are met:
- After a database update.
Kaspersky Endpoint Security runs the computer scan with the updated signature databases.
- After application startup.
Kaspersky Endpoint Security runs a computer scan when a specified amount of time elapses after application startup. At operating system startup, many processes are running, therefore it is advantageous to postpone running the scan task instead of running it immediately after Kaspersky Endpoint Security startup.
- Wake-on-LAN.
Kaspersky Endpoint Security runs a computer scan on schedule even if the computer is powered off. To do so, the application uses the Wake-on-LAN feature of the operating system. The Wake-on-LAN feature allows remotely powering on the computer by sending a special signal over the local network. To use this feature, you must enable Wake-on-LAN in BIOS settings.
You can configure running the scan using Wake-on-LAN only for the Malware Scan task in Kaspersky Security Center. You cannot enable Wake-on-LAN for scanning the computer in the application interface.
- When the computer is idling.
Kaspersky Endpoint Security runs a computer scan on schedule when the screensaver is active or the screen is locked. If the user unlocks the computer, Kaspersky Endpoint Security pauses the scan. This means that it may take several days for the application to complete a full computer scan.
How to configure the scan schedule in the Administration Console (MMC)
How to configure the scan schedule in the Web Console and Cloud Console
How to configure the scan schedule in the application interface
You can configure the scan schedule only if a policy is not applied to the computer. For computers under policy, you can configure the Malware Scan task schedule in Kaspersky Security Center.
- In the main application window, go to the Tasks section.
- In the task list, select the scan task and click .
You can configure a schedule for running a Full Scan, a Critical Areas Scan, or an Integrity Check. You can only run a Custom Scan manually.
- Click Scan schedule.
- In the window that opens, configure the scan task run schedule.
- Depending on the selected frequency, configure advanced settings that specify the task run schedule (see the table below).
- Save your changes.
Scan schedule settings
Parameter |
Description |
|---|---|
Scan schedule |
Manually. Run mode in which you can start scan manually at a time when it is convenient for you. By schedule. In this scan task run mode, the application starts the scan task in accordance with the schedule that you create. If this scan task run mode is selected, you can also start the scan task manually. |
Postpone running after application startup for N minutes |
Postponed start of the scan task after application startup. At operating system startup, many processes are running, therefore it is advantageous to postpone running the scan task instead of running it immediately after Kaspersky Endpoint Security startup. |
Run skipped tasks |
If the check box is selected, Kaspersky Endpoint Security starts the skipped task as soon as it becomes possible. The task may be skipped, for example, if the computer was off at the scheduled task start time. When the application gets an opportunity to execute missed tasks, it runs the tasks randomly within a certain time interval to distribute the load on the computer. If the check box is cleared, Kaspersky Endpoint Security does not run skipped tasks. Instead, it carries out the next task in accordance with the current schedule. |
Run only when the computer is idle |
Postponed start of the scan task when computer resources are busy. Kaspersky Endpoint Security starts the scan task if the computer is locked or if the screen saver is on. If you have interrupted the execution of the task, for example by unlocking the computer, Kaspersky Endpoint Security automatically runs the task, continuing from the point where it was interrupted. |
Use automatically randomized delay for task starts (available only in the Kaspersky Security Center Console) |
If the check box is selected, the task is not run strictly on schedule, but randomly within a certain interval, that is, the start times of the task are spread out. Randomized start times help avoid a great number of computers simultaneously accessing the Administration Server when the task is run on schedule. The range of randomized start times is automatically calculated when the task is created, depending on the number of computers that have the task assigned. Subsequently, the task is always run at its calculated start time. However, whenever task settings are modified or the task is run manually, the calculated start time changes. If the check box is cleared, the task is run exactly at scheduled time. |
Use randomized delay for task starts within an interval of (min) |
If this check box is selected, the task is run on computers at a random time within a certain time frame. Randomized start times help avoid a great number of computers simultaneously accessing the Administration Server when the task is run on schedule. If the check box is cleared, the task is run exactly at scheduled time. |
Stop the task if it runs longer than (min) (available only in the Kaspersky Security Center Console) |
Limiting the task execution time After the specified amount of time, Kaspersky Endpoint Security stops the task. The task is not marked as completed. Next time Kaspersky Endpoint Security runs the task, it will be run from the beginning and on schedule. To reduce the task execution time, you can, for example, configure the scan scope or optimize the scan. |
Turn on devices by using the Wake-on-LAN function before starting the task (min) (available only in the Kaspersky Security Center Console) |
If the check box is selected, the operating system of the computer is given a specified lead time to complete startup before the task is run. The default lead time is 5 minutes. Select the check box if you want to run the task on all computers including powered off computers. |
Shut down the devices after completing the task (available only in the Kaspersky Security Center Console) |
For example, you can enable this functionality to scan the computer on Fridays after working hours. When the task finishes, the application turns off the computer for the weekend. |
Running a scan as a different user
By default the scan task is run in the name of the user with whose rights you are registered in the operating system. The protection scope may include network drives or other objects that require special rights to access. You can specify a user that has the required rights in the application settings and run the scan task under this user's account.
You can run the following scans as a different user:
- Critical Areas Scan.
- Full Scan.
- Custom Scan.
- Scan from Context Menu.
You cannot configure user rights to run a Removable drives scan, a Background scan, or an Integrity check.
How to run a scan as a different user in the Administration Console (MMC)
How to run a scan as a different user in Web Console or Cloud Console
How to run a scan as a different user in the application interface
- In the main application window, go to the Tasks section.
- In the task list, select the scan task and click .
- In the task properties, select Advanced settings → Run scan as.
- In the window that opens, enter the account credentials of the user whose rights you want to use to run a scan task.
- Save your changes.
If the scan task is not displayed, it means the administrator has prohibited the use of local tasks in the policy.
Scan optimization
You can optimize file scanning: reduce scan time and increase the operating speed of Kaspersky Endpoint Security. This can be achieved by scanning only new files and those files that have been modified since the previous scan. This mode applies both to simple and to compound files. You can also set a limit for scanning a single file. When the specified time interval expires, Kaspersky Endpoint Security excludes the file from the current scan (except archives and objects that include several files).
A common technique of concealing viruses and other malware is to implant them in compound files, such as archives or databases. To detect viruses and other malware that are hidden in this way, the compound file must be unpacked, which may slow down scanning. You can limit the types of compound files to be scanned and thereby speed up scanning.
You can also enable the iChecker and iSwift technologies. The iChecker and iSwift technologies optimize the speed of scanning files, by excluding files that have not been modified since the most recent scan.
How to optimize scanning in the Administration Console (MMC)
How to optimize scanning in the Web Console and Cloud Console
How to optimize scanning in the application interface
- In the main application window, go to the Tasks section.
- In the task list, select the scan task and click .
- Click Advanced settings.
- In the Optimization block, configure the scan settings:
- Scan only new and modified files. Scans only new files and those files that have been modified since the last time they were scanned. This helps reduce the duration of a scan. This mode applies both to simple and to compound files.
You can also configure scanning new files by type. For example, you can scan all distribution packages and scan only new archives and office format files.
- Skip file that is scanned for longer than N seconds. This sets a time limit for scanning a single object. After the specified amount of time, the application stops scanning a file. This helps reduce the duration of a scan.
- Do not run multiple scan tasks at the same time. Postponed start of scan tasks if a scan is already running. Kaspersky Endpoint Security will enqueue new scan tasks if the current scan continues. This helps optimize the load on the computer. For example, let's assume that the application has started a Full Scan task according to the schedule. If a user attempts to start a quick scan from the application interface, Kaspersky Endpoint Security will enqueue this quick scan task and then automatically start this task after the Full Scan task is finished.
- Scan only new and modified files. Scans only new files and those files that have been modified since the last time they were scanned. This helps reduce the duration of a scan. This mode applies both to simple and to compound files.
- In the Size limit block, select the Do not unpack large compound files check box. This sets a time limit for scanning a single object. After the specified amount of time, the application stops scanning a file. This helps reduce the duration of a scan.
Kaspersky Endpoint Security scans large files that are extracted from archives, regardless of whether the Do not unpack large compound files check box is selected.
- In the Scan technologies block, select the check boxes next to the names of technologies that you want to use during a scan:
- iSwift Technology. This technology allows increasing scan speed by excluding certain files from scanning. Files are excluded from scans by using a special algorithm that takes into account the release date of Kaspersky Endpoint Security databases, the date when the file was last scanned, and any modifications to the scan settings. The iSwift technology is an advancement of the iChecker technology for the NTFS file system.
- iChecker Technology. This technology allows increasing scan speed by excluding certain files from scanning. Files are excluded from scans by using a special algorithm that takes into account the release date of Kaspersky Endpoint Security databases, the date when the file was last scanned, and any modifications to the scan settings. There are limitations to iChecker Technology: it does not work with large files and applies only to files with a structure that the application recognizes (for example, EXE, DLL, LNK, TTF, INF, SYS, COM, CHM, ZIP, and RAR).
- Save your changes.
If the scan task is not displayed, it means the administrator has prohibited the use of local tasks in the policy.
Limiting CPU usage while scanning the computer
You can limit CPU usage when running the Malware Scan task. This may increase the time it takes to scan your computer.
How to limit CPU usage when scanning the computer in the Administration Console (MMC)
How to limit CPU usage when scanning the computer in the Web Console and Cloud Console
- In the main window of the Web Console, select Assets (Devices) → Policies & profiles.
- Click the name of the Kaspersky Endpoint Security policy.
The policy properties window opens.
- Select the Application settings tab.
- Go to General settings → Application Settings.
Kaspersky Endpoint Security for Windows settings
- Under Performance, select the Limit CPU usage for scan tasks check box and enter the maximum value of CPU resource consumption in percent.
- Save your changes.
How to limit CPU usage when scanning the computer in the application interface
- In the main application window, click the button.
- In the application settings window, select General settings → Application settings.
Kaspersky Endpoint Security for Windows settings
- Under Performance, select the Limit CPU usage for scan tasks check box and enter the maximum value of CPU resource consumption in percent.
- Save your changes.
Updating databases and application software modules
Updating the databases and application modules of Kaspersky Endpoint Security ensures up-to-date protection on your computer. New viruses and other types of malware appear worldwide on a daily basis. Kaspersky Endpoint Security databases contain information about threats and ways of neutralizing them. To detect threats quickly, you are urged to regularly update the databases and application modules.
Updates functionality (including providing anti-virus signature updates and codebase updates) may not be available in the application in the U.S.
Regular updates require a license in effect. If there is no current license, you will be able to perform an update only once.
Your computer must be connected to the Internet to successfully download the update package from Kaspersky update servers. By default, the Internet connection settings are determined automatically. If you are using a proxy server, you need to configure the proxy server settings.
Updates are downloaded over the HTTPS protocol. They may also be downloaded over the HTTP protocol when it is impossible to download updates over the HTTPS protocol.
While performing an update, the following objects are downloaded and installed on your computer:
- Kaspersky Endpoint Security databases. Computer protection is provided using databases that contain signatures of viruses and other threats and information on ways to neutralize them. Protection components use this information when searching for and neutralizing infected files on your computer. The databases are constantly updated with records of new threats and methods for counteracting them. Therefore, we recommend that you update the databases regularly.
In addition to the Kaspersky Endpoint Security databases, the network drivers that enable the application's components to intercept network traffic are updated.
- Application modules. In addition to the databases of Kaspersky Endpoint Security, you can also update the application modules. Updating the application modules fixes vulnerabilities in Kaspersky Endpoint Security, adds new functions, or enhances existing functions.
While updating, the application modules and databases on your computer are compared against the up-to-date version at the update source. If your current databases and application modules differ from their respective up-to-date versions, the missing portion of the updates is installed on your computer.
If the databases are obsolete, the update package may be large, which may cause additional Internet traffic (up to several dozen MB).
Information about the current state of the Kaspersky Endpoint Security databases is displayed in the main application window or the tooltip that you see when you hover the cursor over the icon of the application in the notification area.
Information on update results and on all events that occur during the performance of the update task is logged in the Kaspersky Endpoint Security report.
If the application is working in Light Agent mode, special considerations are involved in updating application databases and modules.
Database and application module update scenarios
Updating the databases and application modules of Kaspersky Endpoint Security ensures up-to-date protection on your computer. New viruses and other types of malware appear worldwide on a daily basis. Kaspersky Endpoint Security databases contain information about threats and ways of neutralizing them. To detect threats quickly, you are urged to regularly update the databases and application modules.
The following objects are updated on users' computers:
- Anti-virus databases. Anti-virus databases include databases of malware signatures, description of network attacks, databases of malicious and phishing web addresses, databases of banners, spam databases, and other data.
- Application modules. Module updates are intended for eliminating vulnerabilities in the application and to improve computer protection methods. Module updates may change the behavior of application components and add new capabilities.
Kaspersky Endpoint Security supports the following scenarios for updating databases and application modules:
- Update from Kaspersky servers.
Kaspersky update servers are located in various countries throughout the world. This ensures high reliability of updates. If an update cannot be performed from one server, Kaspersky Endpoint Security switches over to the next server.
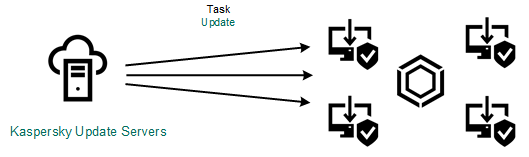
Update from Kaspersky servers
- Centralized update.
Centralized update reduces external Internet traffic, and provides for convenient monitoring of the update.
Centralized update consists of the following steps:
- Download the update package to a repository within the organization's network.
The update package is downloaded to the repository by the Administration Server task named Download updates to the Administration Server repository.
- Download the update package to a shared folder (optional).
You can download the update package to a shared folder by using the following methods:
- Using Kaspersky Endpoint Security Update of databases and application modules task. The task is intended for one of the computers in the local company network.
- Using the Kaspersky Update Utility. For detailed information about using Kaspersky Update Utility, refer to the Kaspersky Knowledge Base.
- Distribute the update package to client computers.
The update package is distributed to client computers by the Kaspersky Endpoint Security Update of databases and application modules task. You can create an unlimited number of update tasks for each administration group.

Updating from a server repository
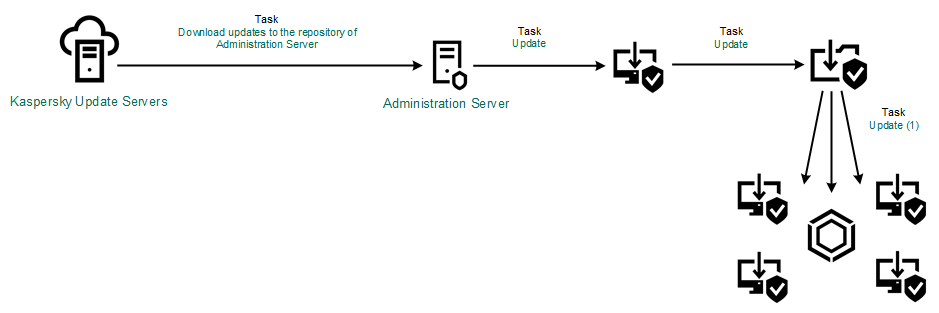
Updating from a shared folder
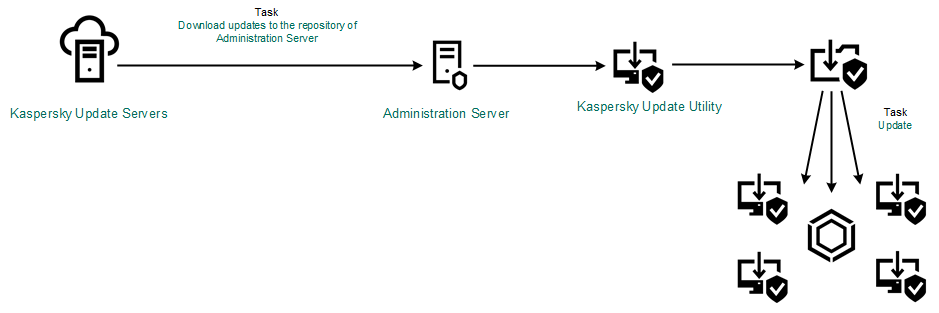
Updating using Kaspersky Update Utility
- Download the update package to a repository within the organization's network.
For Kaspersky Security Center, the default list of update sources contains the Kaspersky Security Center Administration Server and Kaspersky update servers. For the Kaspersky Security Center Cloud Console, the default list of update sources contains distribution points and Kaspersky update servers. For more details about distribution points, refer to the Kaspersky Security Center Cloud Console Help. You can add other update sources to the list. You can specify HTTP/FTP servers and shared folders as update sources. If an update cannot be performed from an update source, Kaspersky Endpoint Security switches over to the next one.
Updates are downloaded from Kaspersky update servers or from other FTP- or HTTP servers over standard network protocols. If connection to a proxy server is required for accessing the update source, specify the proxy server settings in Kaspersky Endpoint Security policy settings.
Updating from a server repository
To conserve Internet traffic, you can configure updates of databases and application modules on computers of the organization's LAN from a server repository. For this purpose, Kaspersky Security Center must download an update package to the repository (FTP- or HTTP server, network or local folder) from Kaspersky update servers. Other computers on the organization's LAN will be able to receive the update package from the server repository.
Configuring database and application module updates from a server repository consists of the following steps:
- Configure download of an update package to the Administration Server repository (the Download updates to the Administration Server repository task).
The Download updates to the Administration Server repository task is created automatically by the Administration Server quick start wizard, and this task may only have one single instance. By default, Kaspersky Security Center copies the update package to folder
\\<server name>\KLSHARE\Updates. For more information about downloading updates to the Administration Server repository, please refer to the Kaspersky Security Center Help. - Configure database and application module updates from the specified server repository to the remaining computers on the organization's LAN (Update of databases and application modules task).
- Open the Kaspersky Security Center Administration Console.
In the console tree, select Tasks.
- Click the Update of databases and application modules task of Kaspersky Endpoint Security.
The task properties window opens.
The Update of databases and application modules task is created automatically by the Administration Server quick start wizard. To create the Update of databases and application modules task, install the Kaspersky Endpoint Security for Windows Management Plug-in while running the Wizard.
- In the task properties window, select the Settings section.
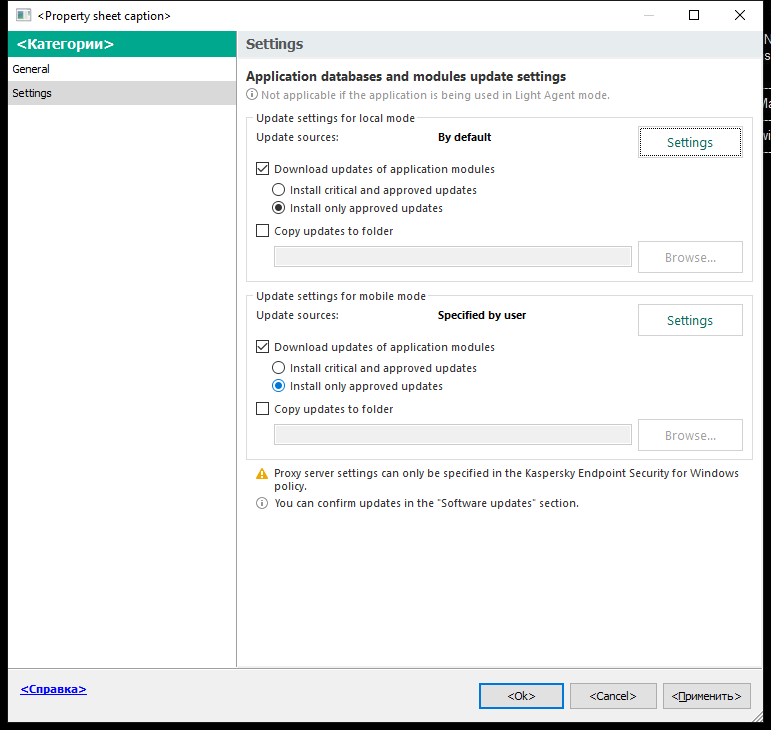
Update of databases and application modules task settings
- In the Update settings for local mode block, click the Settings button.
- In the list of update sources, make sure that the update from the Kaspersky Security Center source is enabled. Additionally, the Kaspersky Security Center source must have the highest priority.
- If necessary, add the update sources:
- In the list of update sources, click the Add button.
- In the Update sources field, specify the address of the FTP- or HTTP server, network folder or local folder where Kaspersky Security Center will copy the update package received from Kaspersky servers.
The address of the update source must match the address you specified in the Folder for storing updates field when you configured download of updates to the server storage (the Download updates to the Administration Server repository task).
- Click OK.
You can exclude the update source without removing it from the list of update sources. To do so, clear the check box next to the object.
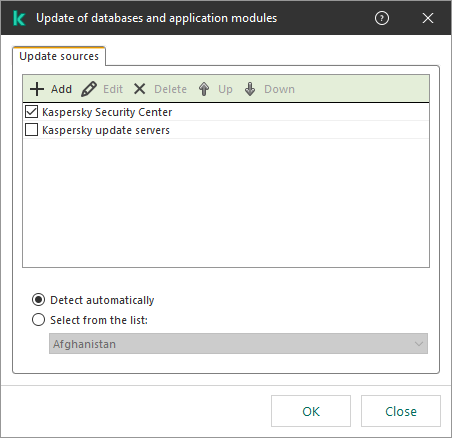
Sources of update
- Configure the priorities of update sources by using the Up and Down buttons.
If an update cannot be performed from the first update source, Kaspersky Endpoint Security automatically switches over to the next source.
- In the task properties window, select the Schedule section and configure the task run mode.
- By default, Kaspersky Endpoint Security runs the task in manual mode.
- Save your changes.
- In the main window of the Web Console, select Assets (Devices) → Tasks.
The list of tasks opens.
- Click the Update task of Kaspersky Endpoint Security.
The task properties window opens.
The Update task is created automatically by the Administration Server quick start wizard. To create the Update task, install the Kaspersky Endpoint Security for Windows Management Plug-in while running the Wizard.
- Select the Application settings → Local mode tab.
- In the list of update sources, make sure that the update from the Kaspersky Security Center source is enabled. Additionally, the Kaspersky Security Center source must have the highest priority.
- If necessary, add the update sources:
- In the list of update sources, click the Add button.
- In the Web address or path to a local or network folder field, specify the address of the FTP- or HTTP server, network folder or local folder where Kaspersky Security Center will copy the update package received from Kaspersky servers.
The address of the update source must match the address you specified in the Folder for storing updates field when you configured download of updates to the server storage (the Download updates to the Administration Server repository task).
- Click OK.
You can exclude the update source without removing it from the list of update sources. To do so, set the toggle switch next to it to the off position.

Sources of update
- Configure the priorities of update sources by using the Up and Down buttons.
If an update cannot be performed from the first update source, Kaspersky Endpoint Security automatically switches over to the next source.
- In the task properties window, select the Schedule section and configure the task run mode.
- By default, Kaspersky Endpoint Security runs the task in manual mode.
- Save your changes.
You cannot configure the Update of databases and application modules group task in the application interface. Only a local update task, Update of databases and application modules, is available to the user. If the Update of databases and application modules task is not displayed, it means the administrator has prohibited the use of local tasks in the policy.
- In the main application window, go to the Update section.
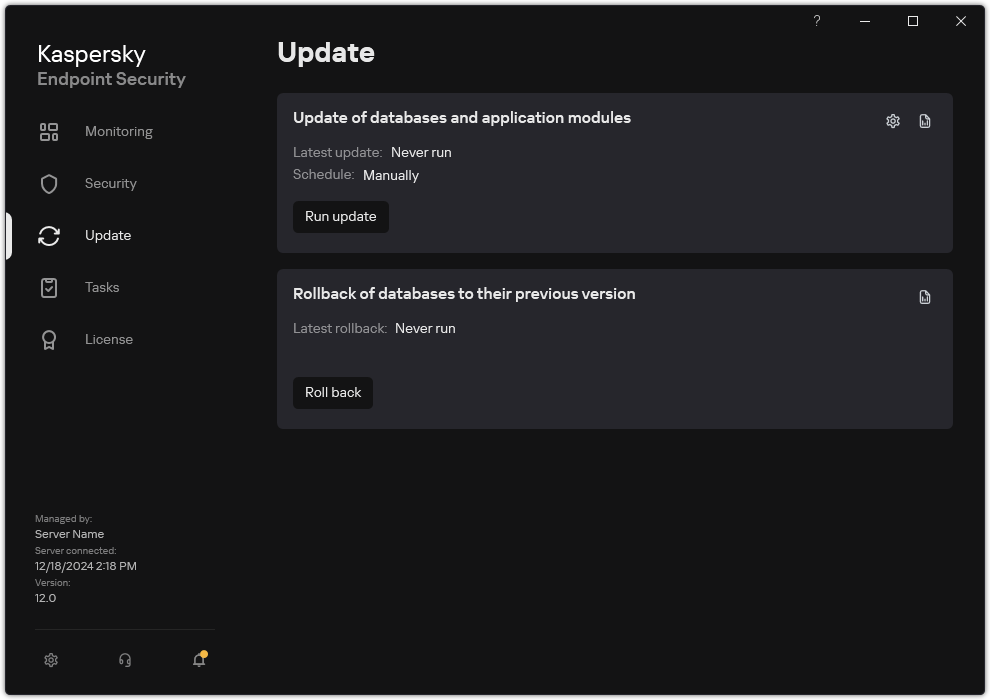
Local update tasks
- This opens the task list; select the Update of databases and application modules task and click .
The task properties window opens.
- In the task properties window, click Select update sources.
- In the list of update sources, make sure that the update from the Kaspersky Security Center source is enabled. Additionally, the Kaspersky Security Center source must have the highest priority.
- If necessary, add the update sources:
- In the list of update sources, click the Add button.
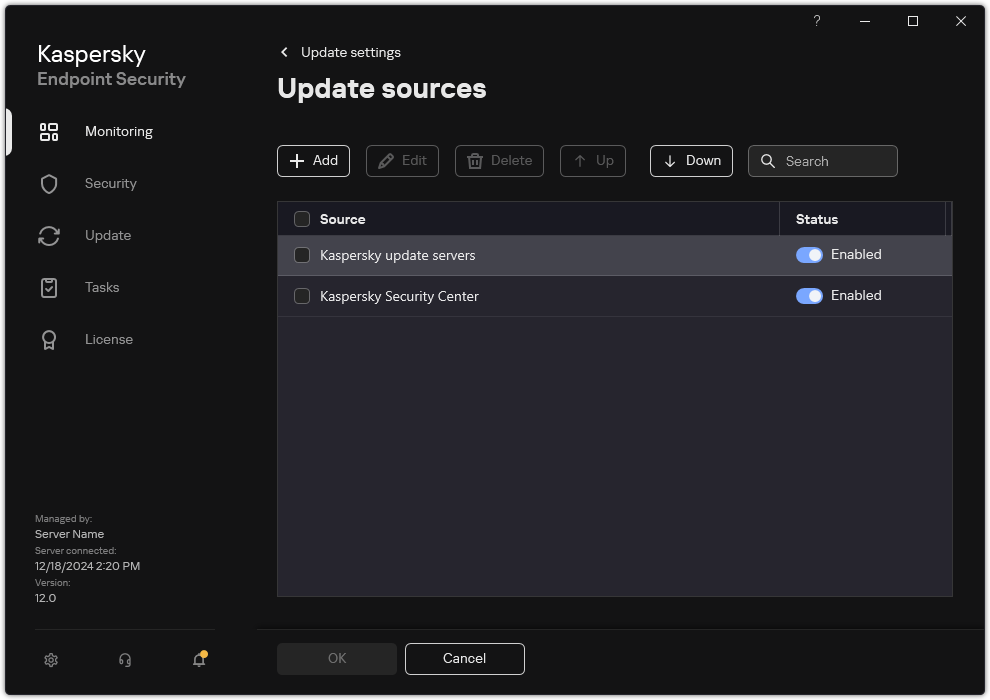
Sources of update
- Specify the address of the FTP- or HTTP server, network folder or local folder where Kaspersky Security Center will copy the update package received from Kaspersky update servers.
The address of the update source must match the address you specified in the Folder for storing updates field when you configured download of updates to the server storage (the Download updates to the Administration Server repository task).
- Click Select.
You can exclude the update source without removing it from the list of update sources. To do so, set the toggle switch next to it to the off position.
- Configure the priorities of update sources by using the Up and Down buttons.
If an update cannot be performed from the first update source, Kaspersky Endpoint Security automatically switches over to the next source.
If a computer is managed by Kaspersky Security Center, it is not possible to configure the run mode for the Update of databases and application modules task. You can only run the task manually.
- Save your changes.
Updating from a server repository
- Open the Kaspersky Security Center Administration Console.
Updating from a shared folder
To conserve Internet traffic, you can configure updates of databases and application modules on computers of the organization's LAN from a shared folder. For this purpose, one of the computers on the organization's LAN must receive update packages from the Kaspersky Security Center Administration Server or from Kaspersky update servers and then copy the received update package to the shared folder. Other computers on the organization's LAN will be able to receive the update package from this shared folder.
The version and localization of the Kaspersky Endpoint Security application that copies the update package to a shared folder must match the version and localization of the application that updates databases from the shared folder. If versions or localizations of the applications do not match, the database update may end with an error.
Configuring database and application module updates from a shared folder consists of the following steps:
- Configuring database and application module updates from a server repository.
- Enabling the copying of an update package to a shared folder on one of the computers on the local area network.
How to enable copying of the update package to the shared folder in the Administration Console (MMC)
- Open the Kaspersky Security Center Administration Console.
- In the console tree, select Tasks.
The Update of databases and application modules task must be assigned for one computer that will serve as the source of updates.
- Click the Update of databases and application modules task of Kaspersky Endpoint Security.
The task properties window opens.
The Update of databases and application modules task is created automatically by the Administration Server quick start wizard. To create the Update of databases and application modules task, install the Kaspersky Endpoint Security for Windows Management Plug-in while running the Wizard.
- In the task properties window, select the Settings section.
Update of databases and application modules task settings
- In the Update settings for local mode block, click the Settings button.
- Configure the sources of updates.
The sources of updates can be Kaspersky update servers, Kaspersky Security Center Administration Server, other FTP- or HTTP servers, local folders, or network folders.
- Select the Copy updates to folder check box.
- In the Folder path field, enter the UNC path to the shared folder (for example,
\\<server name>\KLSHARE\Updates).If the field is left blank, Kaspersky Endpoint Security will copy the update package to the folder
C:\Documents and Settings\All Users\Application Data\Kaspersky Lab\AVP12\Update distribution\. - Save your changes.
How to enable copying of the update package to the shared folder in Web Console and Cloud Console
How to enable copying of the update package to the shared folder in the application interface
You cannot configure the Update of databases and application modules group task in the application interface. Only a local update task, Update of databases and application modules, is available to the user. If the Update of databases and application modules task is not displayed, it means the administrator has prohibited the use of local tasks in the policy.
- In the main application window, go to the Update section.
Local update tasks
- This opens the task list; select the Update of databases and application modules task and click .
The task properties window opens.
- In the Distributing updates block, select the Copy updates to folder check box.
- Enter the UNC path to the shared folder (for example,
\\<server name>\KLSHARE\Updates). - Save your changes.
- Configure database and application module updates from the specified shared folder to the remaining computers on the organization's LAN.
How to configure updates from the shared folder in the Administration Console (MMC)
How to configure updates from the shared folder in Web Console and Cloud Console
How to configure updates from the shared folder in the application interface
You cannot configure the Update of databases and application modules group task in the application interface. Only a local update task, Update of databases and application modules, is available to the user. If the Update of databases and application modules task is not displayed, it means the administrator has prohibited the use of local tasks in the policy.
- In the main application window, go to the Update section.
Local update tasks
- This opens the task list; select the Update of databases and application modules task and click .
The task properties window opens.
- Click Select update sources.
- In the window that opens, click the Add button.
- In the window that opens, enter the path to the shared folder.
The source address must match the address that you previously specified when you configured copying of the update package to the shared folder (see the instructions above).
- Click Select.
- Configure the priorities of update sources by using the Up and Down buttons.
If an update cannot be performed from the first update source, Kaspersky Endpoint Security automatically switches over to the next source.
- Save your changes.
Updating from a shared folder
- In the main application window, go to the Update section.
Updating using Kaspersky Update Utility
To conserve Internet traffic, you can configure updates of databases and application modules on computers of the organization's LAN from a shared folder using the Kaspersky Update Utility. For this purpose, one of the computers on the organization's LAN must receive update packages from the Kaspersky Security Center Administration Server or from Kaspersky update servers and then copy the received update packages to the shared folder using the utility. Other computers on the organization's LAN will be able to receive the update package from this shared folder.
The version and localization of the Kaspersky Endpoint Security application that copies the update package to a shared folder must match the version and localization of the application that updates databases from the shared folder. If versions or localizations of the applications do not match, the database update may end with an error.
Configuring database and application module updates from a shared folder consists of the following steps:
- Configuring database and application module updates from a server repository.
- Install the Kaspersky Update Utility on one of the computers of the organization's LAN.
- Configure copying of the update package to the shared folder in the Kaspersky Update Utility settings.
You can download the Kaspersky Update Utility distribution package from the Kaspersky Technical Support website. After installing the utility, select the update source (for example, the Administration Server repository) and the shared folder to which the Kaspersky Update Utility will copy update packages. For detailed information about using Kaspersky Update Utility, refer to the Kaspersky Knowledge Base.
- Configure database and application module updates from the specified shared folder to the remaining computers on the organization's LAN.
How to configure updates from the shared folder in the Administration Console (MMC)
- Open the Kaspersky Security Center Administration Console.
- In the console tree, select Tasks.
- Click the Update of databases and application modules task of Kaspersky Endpoint Security.
The task properties window opens.
The Update of databases and application modules task is created automatically by the Administration Server quick start wizard. To create the Update of databases and application modules task, install the Kaspersky Endpoint Security for Windows Management Plug-in while running the Wizard.
- In the task properties window, select the Settings section.
Update of databases and application modules task settings
- In the Update settings for local mode block, click the Settings button.
- In the list of update sources, click the Add button.
- In the Update source field, enter the UNC path to the shared folder (for example,
\\<server name>\KLSHARE\Updates).The source address must match the address indicated in the Kaspersky Update Utility settings.
- Click OK.
- Configure the priorities of update sources by using the Up and Down buttons.
If an update cannot be performed from the first update source, Kaspersky Endpoint Security automatically switches over to the next source.
- Save your changes.
How to configure updates from the shared folder in Web Console and Cloud Console
How to configure updates from the shared folder in the application interface
You cannot configure the Update of databases and application modules group task in the application interface. Only a local update task, Update of databases and application modules, is available to the user. If the Update of databases and application modules task is not displayed, it means the administrator has prohibited the use of local tasks in the policy.
- In the main application window, go to the Update section.
Local update tasks
- This opens the task list; select the Update of databases and application modules task and click .
The task properties window opens.
- In the task properties window, click Select update sources.
- In the list of update sources, click the Add button.
Sources of update
- Enter the UNC path to the shared folder (for example,
\\<server name>\KLSHARE\Updates).The source address must match the address indicated in the Kaspersky Update Utility settings.
- Click Select.
- Configure the priorities of update sources by using the Up and Down buttons.
If an update cannot be performed from the first update source, Kaspersky Endpoint Security automatically switches over to the next source.
- Save your changes.
Updating using Kaspersky Update Utility
Updating in mobile mode
Mobile mode is the mode of Kaspersky Endpoint Security operation, when a computer leaves the organization network perimeter (offline computer). For more details about working with offline computers and out-of-office users, refer to the Kaspersky Security Center Help.
An offline computer outside of the organization's network cannot connect to the Administration Server to update databases and application modules. By default, only Kaspersky update servers are used as update source for updating databases and application modules in mobile mode. The use of a proxy server to connect to the Internet is determined by a special out-of-office policy. The out-of-office policy must be created separately. When Kaspersky Endpoint Security is switched to mobile mode, the update task is started every two hours.
How to configure the update settings for mobile mode in the Administration Console (MMC)
- Open the Kaspersky Security Center Administration Console.
- In the console tree, select Tasks.
- Click the Update of databases and application modules task of Kaspersky Endpoint Security.
The task properties window opens.
The Update of databases and application modules task is created automatically by the Administration Server quick start wizard. To create the Update of databases and application modules task, install the Kaspersky Endpoint Security for Windows Management Plug-in while running the Wizard.
- In the task properties window, select the Settings section.
Update of databases and application modules task settings
- In the Update settings for mobile mode block, click the Settings button.
- Configure the sources of updates. The sources of updates can be Kaspersky update servers, other FTP- and HTTP servers, local folders, or network folders.
- Save your changes.
How to configure the update settings for mobile mode in Web Console and Cloud Console
As a result, the databases and application modules will be updated on user computers when they switch to mobile mode.
Page top
Starting and stopping an update task
Regardless of the selected update task run mode, you can start or stop a Kaspersky Endpoint Security update task at any time.
To start or stop an update task:
- In the main application window, go to the Update section.
- In the Update of databases and application modules tile, click the Update button if you want to start the update task.
Kaspersky Endpoint Security will start updating the application modules and databases. The application will display the task progress, the size of the downloaded files, and the update source. You can stop the task at any time by clicking the Stop update button.
To start or stop the update task when the simplified application interface is displayed:
- Right-click to bring up the context menu of the application icon that is in the taskbar notification area.
- In the Tasks drop-down list in the context menu, do one of the following:
- select a non-running update task to start it
- select a running update task to stop it
- select a paused update task to resume or restart it
Starting an update task under the rights of a different user account
By default, the Kaspersky Endpoint Security update task is started on behalf of the user whose account you have used to log in to the operating system. However, Kaspersky Endpoint Security may be updated from an update source that the user cannot access due to a lack of required rights (for example, from a shared folder that contains an update package) or an update source for which proxy server authentication is not configured. In the application settings, you can specify a user that has such rights and start the Kaspersky Endpoint Security update task under that user account.
To start an update task under a different user account:
You cannot configure the Update of databases and application modules group task in the application interface. Only a local update task, Update of databases and application modules, is available to the user. If the Update of databases and application modules task is not displayed, it means the administrator has prohibited the use of local tasks in the policy.
- In the main application window, go to the Update section.
Local update tasks
- This opens the task list; select the Update of databases and application modules task and click .
The task properties window opens.
- Click Run database updates with user rights.
- In the window that opens, select Other user.
- Enter the account credentials of a user with the necessary permissions to access the update source.
- Save your changes.
Selecting the update task run mode
If it is not possible to run the update task for any reason (for example, the computer is not on at that time), you can configure the skipped task to be start automatically as soon as this becomes possible.
You can postpone starting the update task after the application starts if you select the By schedule update task run mode, and if the start time of Kaspersky Endpoint Security matches the update task start schedule. The update task can only be run after the specified time interval elapses after the startup of Kaspersky Endpoint Security.
To select the update task run mode:
You cannot configure the Update of databases and application modules group task in the application interface. Only a local update task, Update of databases and application modules, is available to the user. If the Update of databases and application modules task is not displayed, it means the administrator has prohibited the use of local tasks in the policy.
- In the main application window, go to the Update section.
Local update tasks
- This opens the task list; select the Update of databases and application modules task and click .
The task properties window opens.
- Click Run mode.
- In the window that opens, select the update task run mode:
- If you want Kaspersky Endpoint Security to run the update task depending on whether or not an update package is available from the update source, select Automatically. The frequency of checks by Kaspersky Endpoint Security for update packages increases during virus outbreaks and is less at other times.
- If you want to start an update task manually, select Manually.
- If you want to configure a schedule for running the update task, select other options. Configure the advanced settings for starting the update task:
- In the Postpone running after application startup for N minutes field, enter the time interval by which you want to postpone the start of the update task after the startup of Kaspersky Endpoint Security.
- Select the Run scheduled scan on the next day if computer is turned off if you want Kaspersky Endpoint Security to run missed update tasks at the first opportunity. When the application gets an opportunity to execute missed tasks, it runs the tasks randomly within a certain time interval to distribute the load on the computer.
- Save your changes.
Adding an update source
An update source is a resource that contains updates for databases and application modules of Kaspersky Endpoint Security.
Update sources include the Kaspersky Security Center server, Kaspersky update servers, and network or local folders.
The default list of update sources includes Kaspersky Security Center and Kaspersky update servers. You can add other update sources to the list. You can specify HTTP/FTP servers and shared folders as update sources.
Kaspersky Endpoint Security does not support updates from HTTPS servers unless they are Kaspersky's update servers.
If several resources are selected as update sources, Kaspersky Endpoint Security tries to connect to them one after another, starting from the top of the list, and performs the update task by retrieving the update package from the first available source.
By default, Kaspersky Endpoint Security uses the Kaspersky Security Center server as the first update source. This helps conserve traffic when updating. If a policy is not applied to the computer, Kaspersky servers are selected as the first update source in the settings of the Update of databases and application modules local task because the application may not have access to the Kaspersky Security Center server.
If the application is running in Light Agent mode, a folder on the SVM is selected as the update source.
How to add an update source in the Administration Console (MMC)
- Open the Kaspersky Security Center Administration Console.
In the console tree, select Tasks.
- Click the Update of databases and application modules task of Kaspersky Endpoint Security.
The task properties window opens.
The Update of databases and application modules task is created automatically by the Administration Server quick start wizard. To create the Update of databases and application modules task, install the Kaspersky Endpoint Security for Windows Management Plug-in while running the Wizard.
- In the task properties window, select the Settings section.
Update of databases and application modules task settings
- In the Update settings for local mode block, click the Settings button.
Sources of update
- In the list of update sources, click the Add button.
- In the Update sources field, specify the address of the FTP or HTTP server, network folder or local folder that contains the update package.
The following path format is used for update source:
- For an FTP or HTTP server, enter its web address or IP address.
For example,
http://dnl-01.geo.kaspersky.com/or93.191.13.103.For an FTP server, you can specify the authentication settings within the address in the following format:
ftp://<user name>:<password>@<node>:<port>. - For a network folder, enter the UNC path.
For example,
\\Server\Share\Update distribution. - For a local folder, enter the full path to that folder.
For example,
C:\Documents and Settings\All Users\Application Data\Kaspersky Lab\AVP11\Update distribution\.
You can exclude the update source without removing it from the list of update sources. To do so, clear the check box next to the object.
- For an FTP or HTTP server, enter its web address or IP address.
- Click OK.
- Configure the priorities of update sources by using the Up and Down buttons.
If an update cannot be performed from the first update source, Kaspersky Endpoint Security automatically switches over to the next source.
- If necessary, add an update source for mobile mode. Mobile mode is the mode of Kaspersky Endpoint Security operation, when a computer leaves the organization network perimeter (offline computer).
- Save your changes.
How to add an update source in Web Console and Cloud Console
- In the main window of the Web Console, select Assets (Devices) → Tasks.
The list of tasks opens.
- Click the Update task of Kaspersky Endpoint Security.
The task properties window opens.
The Update task is created automatically by the Administration Server quick start wizard. To create the Update task, install the Kaspersky Endpoint Security for Windows Management Plug-in while running the Wizard.
- Select the Application settings → Local mode tab.
Sources of update
- In the list of update sources, click the Add button.
- In the window that opens, specify the address of the FTP or HTTP server, network folder or local folder that contains the update package.
The following path format is used for update source:
- For an FTP or HTTP server, enter its web address or IP address.
For example,
http://dnl-01.geo.kaspersky.com/or93.191.13.103.For an FTP server, you can specify the authentication settings within the address in the following format:
ftp://<user name>:<password>@<node>:<port>. - For a network folder, enter the UNC path.
For example,
\\Server\Share\Update distribution. - For a local folder, enter the full path to that folder.
For example,
C:\Documents and Settings\All Users\Application Data\Kaspersky Lab\AVP11\Update distribution\.
You can exclude the update source without removing it from the list of update sources. To do so, set the toggle switch next to it to the off position.
- For an FTP or HTTP server, enter its web address or IP address.
- Click OK.
- Configure the priorities of update sources by using the Up and Down buttons.
If an update cannot be performed from the first update source, Kaspersky Endpoint Security automatically switches over to the next source.
- If necessary, add an update source for mobile mode. Mobile mode is the mode of Kaspersky Endpoint Security operation, when a computer leaves the organization network perimeter (offline computer).
- Save your changes.
How to add an update source in the application interface
You cannot configure the Update of databases and application modules group task in the application interface. Only a local update task, Update of databases and application modules, is available to the user. If the Update of databases and application modules task is not displayed, it means the administrator has prohibited the use of local tasks in the policy.
- In the main application window, go to the Update section.
Local update tasks
- This opens the task list; select the Update of databases and application modules task and click .
The task properties window opens.
- Click Select update sources.
- In the window that opens, click the Add button.
Sources of update
- In the window that opens, specify the address of the FTP or HTTP server, network folder or local folder that contains the update package.
The following path format is used for update source:
- For an FTP or HTTP server, enter its web address or IP address.
For example,
http://dnl-01.geo.kaspersky.com/or93.191.13.103.For an FTP server, you can specify the authentication settings within the address in the following format:
ftp://<user name>:<password>@<node>:<port>. - For a network folder, enter the UNC path.
For example,
\\Server\Share\Update distribution. - For a local folder, enter the full path to that folder.
For example,
C:\Documents and Settings\All Users\Application Data\Kaspersky Lab\AVP11\Update distribution\.
- For an FTP or HTTP server, enter its web address or IP address.
- Click Select.
- Configure the priorities of update sources by using the Up and Down buttons.
- Save your changes.
Page top
Updating application modules
Application module updates fix errors, improve performance, and add new features. When a new application module update becomes available, you need to confirm installation of the update. You can confirm installation of an application module update either in the application interface or in Kaspersky Security Center. Whenever an update is available, the application displays a notification in the main window of Kaspersky Endpoint Security: ![]() . If application module updates require reviewing and accepting the terms of the End User License Agreement, the application installs updates after the terms of the End User License Agreement have been accepted.
. If application module updates require reviewing and accepting the terms of the End User License Agreement, the application installs updates after the terms of the End User License Agreement have been accepted.
After installing an application update, you may be required to restart your computer.
How to configure application module updates in the Administration Console (MMC)
- Open the Kaspersky Security Center Administration Console.
- In the console tree, select Tasks.
- Click the Update of databases and application modules task of Kaspersky Endpoint Security.
The task properties window opens.
The Update of databases and application modules task is created automatically by the Administration Server quick start wizard. To create the Update of databases and application modules task, install the Kaspersky Endpoint Security for Windows Management Plug-in while running the Wizard.
- In the task properties window, select the Settings section.
Update of databases and application modules task settings
- In the Update settings for local mode block, select the Download updates of application modules check box.
If you want to prevent application module updates from downloading, clear the Download updates of application modules check box and prohibit the use of local tasks by the user.
- Select the application module updates that you want to install.
- Install critical and approved updates. If this option is selected, when application module updates are available Kaspersky Endpoint Security installs critical updates automatically and all other application module updates only after their installation is approved locally via the application interface or on the side of Kaspersky Security Center.
- Install only approved updates. If this option is selected, when application module updates are available Kaspersky Endpoint Security installs them only after their installation is approved locally via the application interface or on the side of Kaspersky Security Center. This option is selected by default.
- If necessary, configure application module updates for mobile mode. Mobile mode is the mode of Kaspersky Endpoint Security operation, when a computer leaves the organization network perimeter (offline computer).
- Save your changes.
How to configure application module updates in the Web Console and Cloud Console
- In the main window of the Web Console, select Assets (Devices) → Tasks.
The list of tasks opens.
- Click the Update of databases and application modules task of Kaspersky Endpoint Security.
The task properties window opens.
The Update of databases and application modules task is created automatically by the Administration Server quick start wizard. To create the Update of databases and application modules task, install the Kaspersky Endpoint Security for Windows Management Plug-in while running the Wizard.
- Select the Application settings → Local mode tab.
Update of databases and application modules task settings
- Under Update settings, select the application module updates that you want to install:
- Install approved application module updates. If this option is selected, when application module updates are available Kaspersky Endpoint Security installs them only after their installation is approved locally via the application interface or on the side of Kaspersky Security Center. This option is selected by default.
- Automatically install critical application module updates. If this option is selected, when application module updates are available Kaspersky Endpoint Security installs critical updates automatically and all other application module updates only after their installation is approved locally via the application interface or on the side of Kaspersky Security Center.
If you want to prevent application module updates from downloading, clear the Install approved application module updates and Automatically install critical application module updates check boxes and prohibit the use of local tasks by the user.
- If necessary, configure application module updates for mobile mode. Mobile mode is the mode of Kaspersky Endpoint Security operation, when a computer leaves the organization network perimeter (offline computer).
- Save your changes.
How to configure application module updates in the application interface
You cannot configure the Update of databases and application modules group task in the application interface. Only a local update task, Update of databases and application modules, is available to the user. If the Update of databases and application modules task is not displayed, it means the administrator has prohibited the use of local tasks in the policy.
- In the main application window, go to the Update section.
Local update tasks
- This opens the task list; select the Update of databases and application modules task and click .
The task properties window opens.
- In the Downloading and installing updates of application modules block, select the Download updates of application modules check box.
- Select the application module updates that you want to install.
- Install critical and approved updates. If this option is selected, when application module updates are available Kaspersky Endpoint Security installs critical updates automatically and all other application module updates only after their installation is approved locally via the application interface or on the side of Kaspersky Security Center.
- Install only approved updates. If this option is selected, when application module updates are available Kaspersky Endpoint Security installs them only after their installation is approved locally via the application interface or on the side of Kaspersky Security Center. This option is selected by default.
- Save your changes.
Using a proxy server for updates
You may be required to specify proxy server settings to download database and application module updates from the update source. If there are multiple update sources, proxy server settings are applied for all sources. If a proxy server is not needed for some update sources, you can disable use of a proxy server in the policy properties. Kaspersky Endpoint Security will also use a proxy server to access Kaspersky Security Network and activation servers.
To configure a connection to update sources through a proxy server:
- In the main window of the Web Console, click
 .
.The Administration Server properties window opens.
- Go to the Configuring internet access section.
- Select the Use proxy server check box.
- Configure the proxy server connection settings: proxy server address, port, and authentication settings (user name and password).
- Save your changes.
To disable use of a proxy server for a specific administration group:
- In the main window of the Web Console, select Assets (Devices) → Policies & profiles.
- Click the name of the Kaspersky Endpoint Security policy.
The policy properties window opens.
- Select the Application settings tab.
- Go to General settings → Network settings.
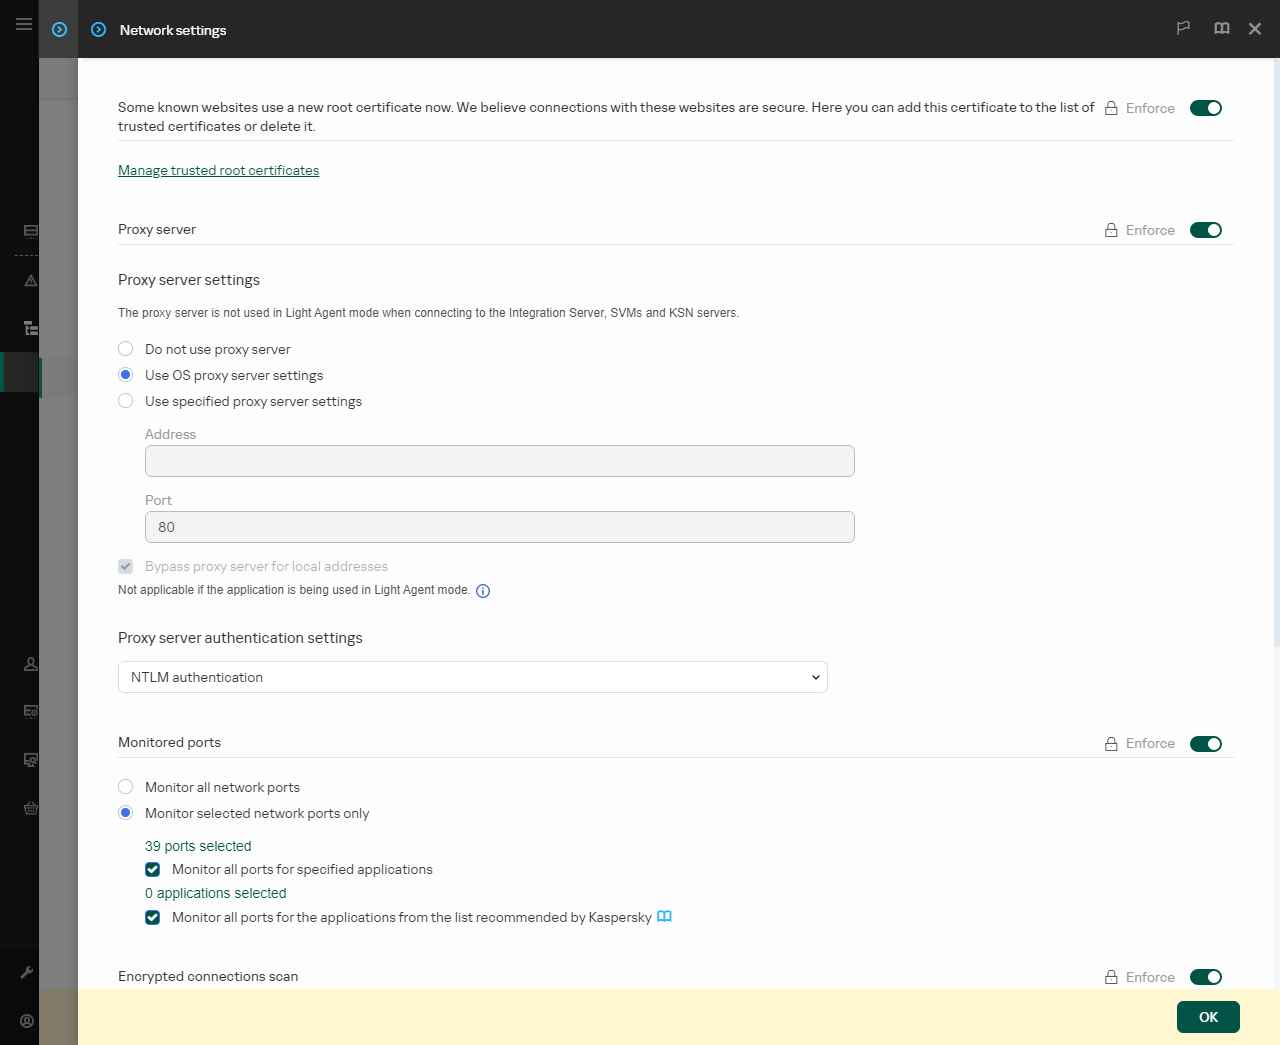
Kaspersky Endpoint Security for Windows network settings.
- In the Proxy server settings block, select Bypass proxy server for local addresses.
- Save your changes.
To configure the proxy server settings in the application interface:
- In the main application window, click the button.
- In the application settings window, select General settings → Network settings.
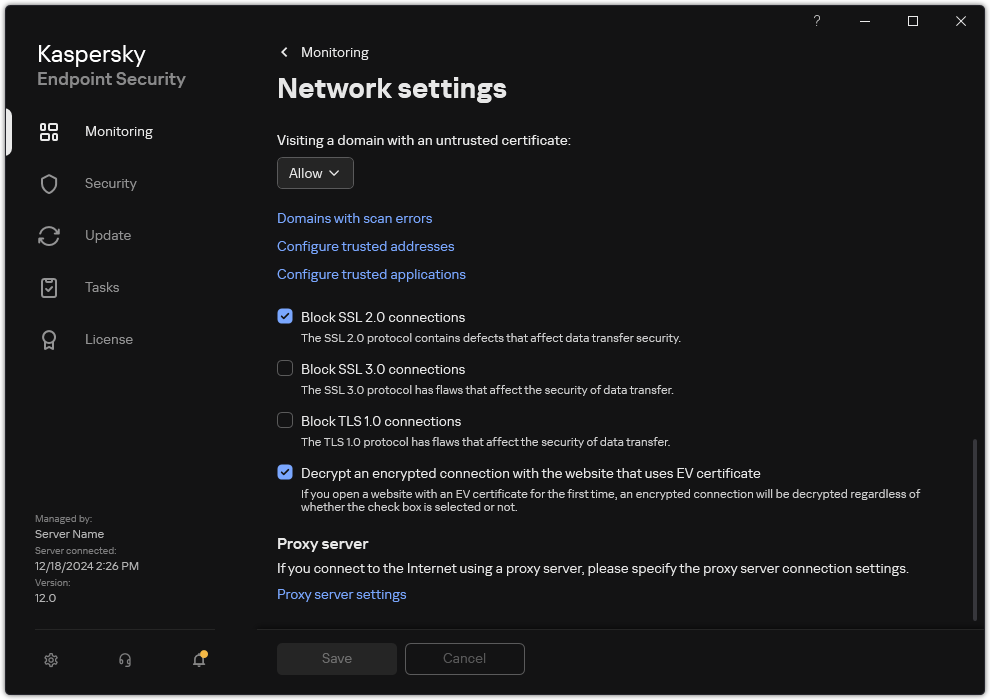
Application network settings
- In the Proxy server block, click the Proxy server settings link.
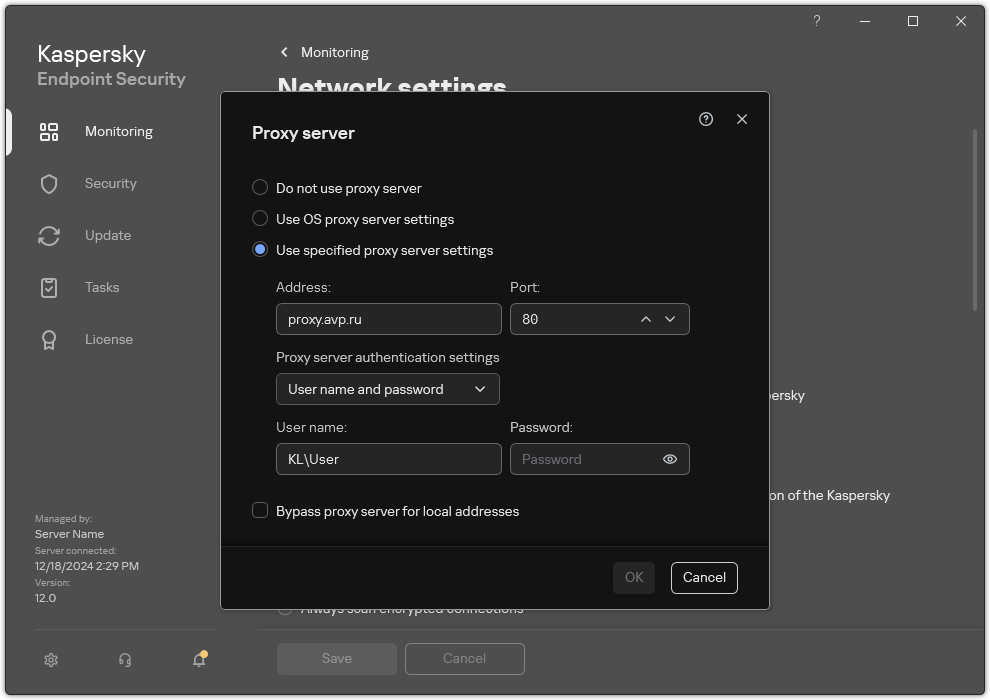
Proxy server connection settings
- In the window that opens, select one of the following options for determining the proxy server address:
- Use OS proxy server settings.
This option is selected by default. Kaspersky Endpoint Security uses the proxy server settings that are defined in the operating system settings.
- Use specified proxy server settings.
If you selected this option, configure the settings for connecting to the proxy server: proxy server address and port.
- Use OS proxy server settings.
- Select how you want the application to authenticate on the proxy server. By default, the application uses domain NTLM authentication of the current user.
- If you want to disable proxy server use when updating databases and application modules from a shared folder, select the Bypass proxy server for local addresses check box.
- Save your changes.
As a result, Kaspersky Endpoint Security will use the proxy server to download application module and database updates. Kaspersky Endpoint Security will also use the proxy server to access KSN servers and Kaspersky activation servers. If authentication is required on the proxy server but the user account credentials were not provided or are incorrect, Kaspersky Endpoint Security will prompt you for the user name and password.
Page top
Last update rollback
After the databases and application modules are updated for the first time, the function of rolling back the databases and application modules to their previous versions becomes available.
Each time that a user starts the update process, Kaspersky Endpoint Security creates a backup copy of the current databases and application modules. This lets you roll back the databases and application modules to their previous versions when necessary. Rolling back the last update is useful, for example, when the new database version contains an invalid signature that causes Kaspersky Endpoint Security to block a safe application.
Kaspersky Endpoint Security in Light Agent mode does not support the Update rollback task.
To roll back the last update:
- In the main application window, go to the Update section.
Local update tasks
- In the Rollback of databases to their previous version tile, click the Roll back button.
Kaspersky Endpoint Security will start rolling back the last database update. The application will display the rollback progress, the size of the downloaded files, and the update source. You can stop the task at any time by clicking the Stop update button.
To start or stop a rollback task when the simplified application interface is displayed:
- Right-click to bring up the context menu of the application icon that is in the taskbar notification area.
- In the Tasks drop-down list in the context menu, do one of the following:
- Select a non-running rollback task to start it.
- Select a running rollback task to stop it.
- Select a paused rollback task to resume or restart it.
Working with active threats
Kaspersky Endpoint Security logs information about files that it has not processed for some reason. This information is recorded in the form of events in the list of active threats (see the figure below). To work with active threats, Kaspersky Endpoint Security uses the Advanced Disinfection technology. Advanced Disinfection works differently for workstations and servers. You can configure advanced disinfection in Malware Scan task settings and in application settings.
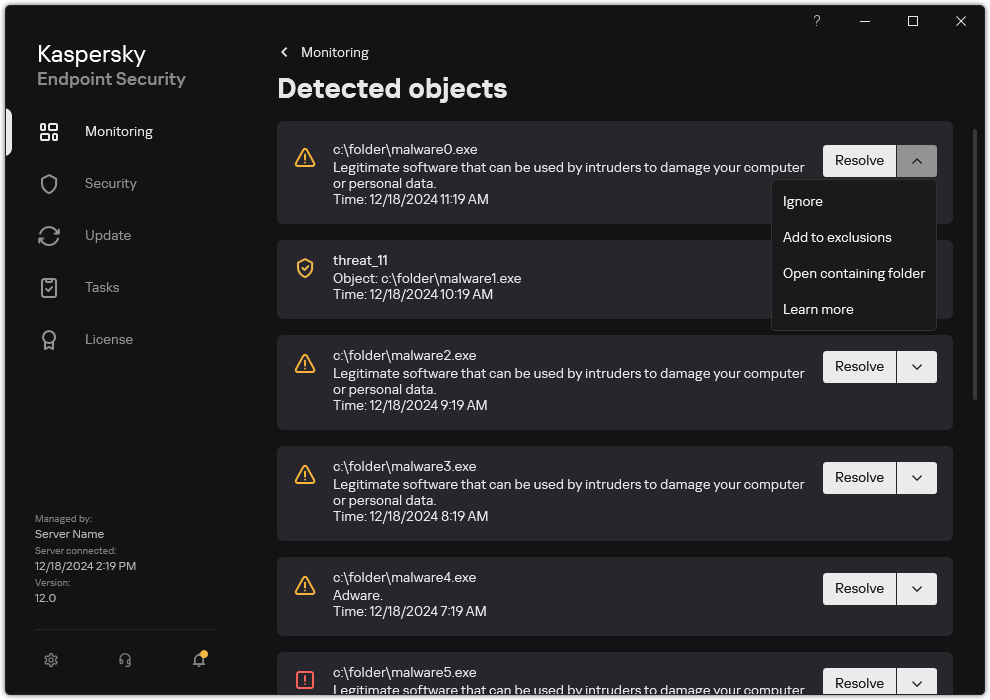
A list of active threats
Disinfection of active threats on workstations
To work with active threats on workstations, enable the Advanced Disinfection technology in the application settings. Next, configure the user experience in the Malware Scan task properties. There is a Run Advanced Disinfection immediately check box in the task properties. If the flag is set, Kaspersky Endpoint Security will perform disinfection without notifying the user. When the disinfection is complete, the computer will be rebooted. If the flag is unset, Kaspersky Endpoint Security will display a notification about active threats (see the figure below). You cannot close this notification without processing the file.
Advanced Disinfection during a virus scan task on a computer is performed only if the Advanced Disinfection feature is enabled in the properties of the policy applied to this computer.
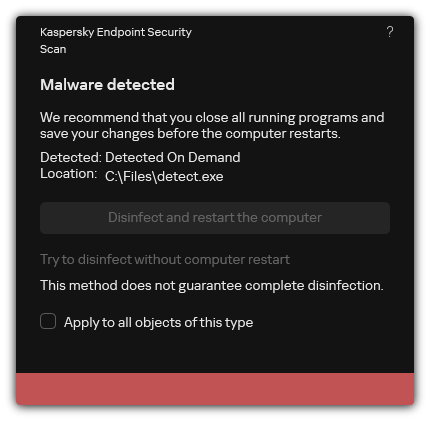
Notification about active threat
Page top
Disinfection of active threats on servers
To work with active threats on servers, you need to do the following:
- enable the Advanced Disinfection technology in the application settings;
- enable immediate Advanced Disinfection in the Malware Scan task properties.
If Kaspersky Endpoint Security is installed on a computer running Windows for Servers, Kaspersky Endpoint Security does not show the notification. Therefore, the user cannot select an action to disinfect an active threat. To disinfect a threat, you need to enable Advanced Disinfection technology in application settings and enable immediate Advanced Disinfection in Malware Scan task settings. Then you need to start a Malware Scan task.
Page top
Enabling or disabling Advanced Disinfection technology
If Kaspersky Endpoint Security cannot halt the execution of a piece of malware, you can use the Advanced Disinfection technology. By default, Advanced Disinfection is disabled because this technology uses a significant amount of computing resources. Therefore, you can enable Advanced Disinfection only when working with active threats.
Advanced Disinfection works differently for workstations and servers. To use the technology on servers, you must enable immediate advanced disinfection in the properties of the Malware Scan task. This prerequisite is not necessary to use the technology on workstations.
How to enable or disable the Advanced Disinfection technology in the Administration Console (MMC)
How to enable or disable the Advanced Disinfection technology in the Web Console and Cloud Console
- In the main window of the Web Console, select Assets (Devices) → Policies & profiles.
- Click the name of the Kaspersky Endpoint Security policy.
The policy properties window opens.
- Select the Application settings tab.
- Select General settings → Application Settings.
Kaspersky Endpoint Security for Windows settings
- In the General block, select or clear the Enable Advanced Disinfection technology check box to enable or disable Advanced Disinfection technology.
- Save your changes.
How to enable or disable the Advanced Disinfection technology in the application interface
- In the main application window, click the button.
- In the application settings window, select General settings → Application settings.
Kaspersky Endpoint Security for Windows settings
- In the General block, select or clear the Use Advanced Disinfection technology (requires considerable computer resources) check box to enable or disable Advanced Disinfection technology.
- Save your changes.
As a result, the user cannot use most operating system features while Advanced Disinfection is in progress. When the disinfection is complete, the computer will be rebooted.
Page top
Processing of active threats
An infected file is considered processed if Kaspersky Endpoint Security disinfected the file or removed the threat as part of scanning the computer for viruses and other malware.
Kaspersky Endpoint Security moves the file to the list of active threats if, for any reason, Kaspersky Endpoint Security failed to perform an action on this file according to the specified application settings while scanning the computer for viruses and other threats.
This situation is possible in the following cases:
- The scanned file is unavailable (for example, it is located on a network drive or on a removable drive without write privileges).
- In the Malware Scan task settings, the action on threat detection is set to Inform. Then, when the infected file notification was displayed on the screen, the user selected Ignore.
If there are any unprocessed threats, Kaspersky Endpoint Security changes the icon to ![]() . In the main application window, the threat notification is displayed (see the figure below). In the Kaspersky Security Center console, the status of the computer is changed to Critical –
. In the main application window, the threat notification is displayed (see the figure below). In the Kaspersky Security Center console, the status of the computer is changed to Critical – ![]() .
.
How to process a threat in the Administration Console (MMC)
How to process a threat in the Web Console and Cloud Console
How to process a threat in the application interface
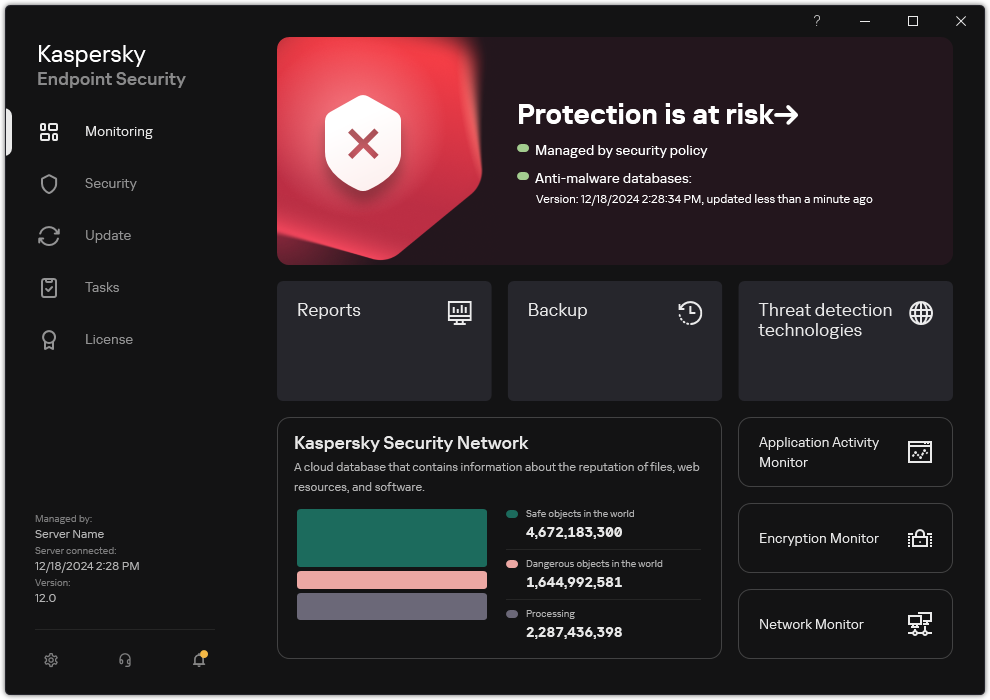
Main application window when a threat is detected
Page top
File Threat Protection
The File Threat Protection component lets you prevent infection of the file system of the computer. By default, the File Threat Protection component permanently resides in the computer's RAM. The component scans files on all drives of the computer, as well as on connected drives. The component provides computer protection with the help of anti-virus databases, the Kaspersky Security Network cloud service, and heuristic analysis.
The component scans the files accessed by the user or application. If a malicious file is detected, Kaspersky Endpoint Security blocks the file operation. The application then disinfects or deletes the malicious file, depending on the settings of the File Threat Protection component.
When attempting to access a file whose contents are stored in the OneDrive cloud, Kaspersky Endpoint Security downloads and scans the file contents.
Enabling and disabling File Threat Protection
By default, the File Threat Protection component is enabled and runs in the mode recommended by Kaspersky experts. For File Threat Protection, Kaspersky Endpoint Security can apply different groups of settings. These groups of settings that are stored in the application are called security levels: High, Recommended, Low. The Recommended security level settings are considered to be the optimal settings recommended by Kaspersky experts (see the table below). You can select one of the preset security levels or manually configure security level settings. If you change the security level settings, you can always revert back to the recommended security level settings.
How to enable or disable the File Threat Protection component in the Administration Console (MMC)
How to enable or disable the File Threat Protection component in the Web Console and Cloud Console
How to enable or disable the File Threat Protection component in the application interface
- In the main application window, click the button.
- In the application settings window, select Essential Threat Protection → File Threat Protection.
- Use the File Threat Protection toggle to enable or disable the component.
- If you enabled the component, do one of the following in the Security level block:
- If you want to apply one of the preset security levels, select it with the slider:
- High. When this file security level is selected, the File Threat Protection component takes the strictest control of all files that are opened, saved, and started. The File Threat Protection component scans all file types on all hard drives, removable drives, and network drives of the computer. It also scans archives, installation packages, and embedded OLE objects.
- Recommended. This file security level is recommended by Kaspersky Lab experts. The File Threat Protection component scans only the specified file formats on all hard drives, removable drives, and network drives of the computer, and embedded OLE objects. The File Threat Protection component does not scan archives or installation packages.
- Low. The settings of this file security level ensure maximum scanning speed. The File Threat Protection component scans only files with specified extensions on all hard drives, removable drives, and network drives of the computer. The File Threat Protection component does not scan compound files.
- If you want to configure a custom security level, click the Advanced Settings button and define your own component settings.
You can restore the values of preset security levels by clicking the Restore recommended security level button.
- If you want to apply one of the preset security levels, select it with the slider:
- In the Action on threat detection block, select the action that Kaspersky Endpoint Security performs on malicious objects:
- Disinfect, delete if disinfection fails. If this option is selected, the application automatically attempts to disinfect all infected files that are detected. If disinfection fails, the application deletes the files.
- Disinfect, block if disinfection fails. If this option is selected, Kaspersky Endpoint Security automatically attempts to disinfect all infected files that are detected. If disinfection is not possible, Kaspersky Endpoint Security adds the information about the infected files that are detected to the list of active threats.
- Block. If this option is selected, the File Threat Protection component automatically blocks all infected files without attempting to disinfect them.
- Inform. If this option is selected, Kaspersky Endpoint Security adds the information about infected files to the list of active threats on detection of these files.
Before attempting to disinfect or delete an infected file, the application creates a backup copy of the file in case you need to restore the file or if it can be disinfected in the future.
- Save your changes.
File Threat Protection settings recommended by Kaspersky experts (recommended security level)
Parameter |
Value |
Description |
|---|---|---|
File types |
Files scanned by format |
If this setting is enabled, the application scans infectable files only. Before scanning a file for malicious code, the internal header of the file is analyzed to determine the format of the file (for example, .txt, .doc, or .exe). The scan also looks for files with particular file extensions. |
Heuristic analysis |
Light scan |
The technology was developed for detecting threats that cannot be detected by using the current version of Kaspersky application databases. It detects files that may be infected with an unknown virus or a new variety of a known virus. When scanning files for malicious code, the heuristic analyzer executes instructions in the executable files. The number of instructions that are executed by the heuristic analyzer depends on the level that is specified for the heuristic analyzer. The heuristic analysis level ensures a balance between the thoroughness of searching for new threats, the load on the resources of the operating system, and the duration of heuristic analysis. |
Scan only new and modified files |
On |
Scans only new files and those files that have been modified since the last time they were scanned. This helps reduce the duration of a scan. This mode applies both to simple and to compound files. |
Use iSwift technology |
On |
This technology allows increasing scan speed by excluding certain files from scanning. Files are excluded from scans by using a special algorithm that takes into account the release date of Kaspersky Endpoint Security databases, the date when the file was last scanned, and any modifications to the scan settings. The iSwift technology is an advancement of the iChecker technology for the NTFS file system. |
Use iChecker technology |
On |
This technology allows increasing scan speed by excluding certain files from scanning. Files are excluded from scans by using a special algorithm that takes into account the release date of Kaspersky Endpoint Security databases, the date when the file was last scanned, and any modifications to the scan settings. There are limitations to iChecker Technology: it does not work with large files and applies only to files with a structure that the application recognizes (for example, EXE, DLL, LNK, TTF, INF, SYS, COM, CHM, ZIP, and RAR). |
Scan files in Microsoft Office formats |
On |
Scans Microsoft Office files (DOC, DOCX, XLS, PPT and other Microsoft extensions). Office format files include OLE objects as well. Kaspersky Endpoint Security scans office format files that are smaller than 1 MB, regardless of whether the check box is selected or not. |
Scan email format files |
On |
Scans email format files. The application scans MSG and EML files. Email format files include OLE objects as well. Kaspersky Endpoint Security scans office format files that are smaller than 1 MB, regardless of whether the check box is selected or not. |
Scan mode |
Smart mode |
In this mode, File Threat Protection scans an object based on an analysis of actions taken on the object. For example, when working with a Microsoft Office document, Kaspersky Endpoint Security scans the file when it is first opened and last closed. Intermediate operations that overwrite the file do not cause it to be scanned. |
Action on threat detection |
Disinfect, delete if disinfection fails |
If this option is selected, the application automatically attempts to disinfect all infected files that are detected. If disinfection fails, the application deletes the files. |
Automatic pausing of File Threat Protection
You can configure File Threat Protection to automatically pause at a specified time or when working with specific applications.
File Threat Protection should be paused only as a last resort when it conflicts with some applications. If any conflicts arise while a component is running, you are advised to contact Kaspersky Technical Support. The support experts will help you set up the File Threat Protection component to run simultaneously with other applications on your computer.
To configure automatic pausing of File Threat Protection:
- In the main application window, click the button.
- In the application settings window, select Essential Threat Protection → File Threat Protection.
- Click Advanced Settings.
- In the Pause File Threat Protection block, click the Pause File Threat Protection link.
- In the window that opens, configure the settings for pausing File Threat Protection:
- Configure a schedule for automatically pausing File Threat Protection.
- Create a list of applications whose operation should cause File Threat Protection to pause its activities.
- Save your changes.
Changing the action taken on infected files by the File Threat Protection component
By default, the File Threat Protection component automatically tries to disinfect all infected files that are detected. If disinfection fails, the File Threat Protection component deletes these files.
To change the action taken on infected files by the File Threat Protection component:
- In the main application window, click the button.
- In the application settings window, select Essential Threat Protection → File Threat Protection.
- In the Action on threat detection block, select the relevant option:
- Disinfect, delete if disinfection fails. If this option is selected, the application automatically attempts to disinfect all infected files that are detected. If disinfection fails, the application deletes the files.
- Disinfect, block if disinfection fails. If this option is selected, Kaspersky Endpoint Security automatically attempts to disinfect all infected files that are detected. If disinfection is not possible, Kaspersky Endpoint Security adds the information about the infected files that are detected to the list of active threats.
- Block. If this option is selected, the File Threat Protection component automatically blocks all infected files without attempting to disinfect them.
Before attempting to disinfect or delete an infected file, the application creates a backup copy of the file in case you need to restore the file or if it can be disinfected in the future.
- Save your changes.
Forming the protection scope of the File Threat Protection component
The protection scope refers to the objects that the component scans when enabled. The protection scopes of different components have different properties. The location and type of files to be scanned are properties of the protection scope of the File Threat Protection component. By default, the File Threat Protection component scans only potentially infectable files that are run from hard drives, removable drives and network drives.
When selecting the type of files to scan, consider the following:
- There is a low probability of introducing malicious code into files of certain formats and its subsequent activation (for example, TXT format). At the same time, there are file formats that contain executable code (such as .exe, .dll). The executable code may also be contained in files of formats that are not intended for this purpose (for example, the DOC format). The risk of intrusion and activation of malicious code in such files is high.
- An intruder may send a virus or another malicious application to your computer in an executable file that has been renamed with the .txt extension. If you select scanning of files by extension, the application skips this file during scanning. If scanning of files by format is selected, Kaspersky Endpoint Security analyzes the file header regardless of its extension. If this analysis reveals that the file has the format of an executable file (for example, EXE), the application scans it.
To create the protection scope:
- In the main application window, click the button.
- In the application settings window, select Essential Threat Protection → File Threat Protection.
- Click Advanced Settings.
- In the File types block, specify the type of files that you want the File Threat Protection component to scan:
- All files. If this setting is enabled, Kaspersky Endpoint Security checks all files without exception (all formats and extensions).
- Files scanned by format. If this setting is enabled, the application scans infectable files only. Before scanning a file for malicious code, the internal header of the file is analyzed to determine the format of the file (for example, .txt, .doc, or .exe). The scan also looks for files with particular file extensions.
- Files scanned by extension. If this setting is enabled, the application scans infectable files only. The file format is then determined based on the file's extension.
- Click the Edit protection scope link.
- In the window that opens, select the objects that you want to add to the protection scope or exclude from it.
You cannot remove or edit objects that are included in the default protection scope.
- If you want to add a new object to the protection scope:
- Click Add.
The folder tree opens.
- Select an object to add to the protection scope.
You can exclude an object from scans without deleting it from the list of objects in the scan scope. To do so, clear the check box next to the object.
- Click Add.
- Save your changes.
Using scan methods
Kaspersky Endpoint Security uses a scanning technique called Machine learning and signature analysis. During signature analysis, Kaspersky Endpoint Security matches the detected object with records in its database. Based on the recommendations of Kaspersky experts, machine learning and signature analysis is always enabled.
To increase the effectiveness of protection, you can use heuristic analysis. When scanning files for malicious code, the heuristic analyzer executes instructions in the executable files. The number of instructions that are executed by the heuristic analyzer depends on the level that is specified for the heuristic analyzer. The heuristic analysis level ensures a balance between the thoroughness of searching for new threats, the load on the resources of the operating system, and the duration of heuristic analysis.
To configure the use of heuristic analysis in the operation of the File Threat Protection component:
- In the main application window, click the button.
- In the application settings window, select Essential Threat Protection → File Threat Protection.
- Click Advanced Settings.
- If you want the application to use heuristic analysis for protection against file threats, select the Heuristic analysis check box in the Scan methods block. Then use the slider to set the heuristic analysis level: Light scan, Medium scan or Deep scan.
- Save your changes.
Using scan technologies in the operation of the File Threat Protection component
To configure the use of scan technologies in the operation of the File Threat Protection component:
- In the main application window, click the button.
- In the application settings window, select Essential Threat Protection → File Threat Protection.
- Click Advanced Settings.
- In the Scan technologies block, select the check boxes next to the names of technologies that you want to use for file threat protection:
- Use iSwift technology. This technology allows increasing scan speed by excluding certain files from scanning. Files are excluded from scans by using a special algorithm that takes into account the release date of Kaspersky Endpoint Security databases, the date when the file was last scanned, and any modifications to the scan settings. The iSwift technology is an advancement of the iChecker technology for the NTFS file system.
- Use iChecker technology. This technology allows increasing scan speed by excluding certain files from scanning. Files are excluded from scans by using a special algorithm that takes into account the release date of Kaspersky Endpoint Security databases, the date when the file was last scanned, and any modifications to the scan settings. There are limitations to iChecker Technology: it does not work with large files and applies only to files with a structure that the application recognizes (for example, EXE, DLL, LNK, TTF, INF, SYS, COM, CHM, ZIP, and RAR).
- Save your changes.
Optimizing file scanning
You can optimize the file scanning that is performed by the File Threat Protection component by reducing the scan time and increasing the operating speed of Kaspersky Endpoint Security. This can be achieved by scanning only new files and those files that have been modified since the previous scan. This mode applies both to simple and to compound files.
You can also enable the use of the iChecker and iSwift technologies that optimize the speed of file scanning by excluding files that have not been modified since the most recent scan.
To optimize file scanning:
- In the main application window, click the button.
- In the application settings window, select Essential Threat Protection → File Threat Protection.
- Click Advanced Settings.
- In the Optimization block, select the Scan only new and modified files check box.
- Save your changes.
Scanning compound files
A common technique of concealing viruses and other malware is to implant them in compound files, such as archives or databases. To detect viruses and other malware that are hidden in this way, the compound file must be unpacked, which may slow down scanning. You can limit the types of compound files to be scanned and thereby speed up scanning.
The method used to process an infected compound file (disinfection or deletion) depends on the type of file.
The File Threat Protection component disinfects compound files in the ZIP, GZIP, BZIP, RAR, TAR, ARJ, CAB, LHA, JAR and ICE formats and deletes files in all other formats (except mail databases).
To configure scanning of compound files:
- In the main application window, click the button.
- In the application settings window, select Essential Threat Protection → File Threat Protection.
- Click Advanced Settings.
- In the Scan of compound files block, specify the types of compound files that you want to scan: archives, distribution packages, mail or office format files.
- If scanning only new and modified files is disabled, configure the settings for scanning each type of compound file: scan all files of this type or only new files.
If scanning only new and modified files is enabled, Kaspersky Endpoint Security scans only new and modified files of all types of compound files.
- Configure the advanced settings for scanning compound files.
- Do not unpack large compound files.
If this check box is selected, Kaspersky Endpoint Security does not scan compound files if their size exceeds the specified value.
If this check box is cleared, Kaspersky Endpoint Security scans compound files of all sizes.
Kaspersky Endpoint Security scans large files that are extracted from archives, regardless of whether the Do not unpack large compound files check box is selected.
- Unpack compound files in the background.
If the check box is selected, Kaspersky Endpoint Security provides access to compound files that are larger than the specified value before these files are scanned. In this case, Kaspersky Endpoint Security unpacks and scans compound files in the background.
Kaspersky Endpoint Security provides access to compound files that are smaller than this value only after unpacking and scanning these files.
If the check box is not selected, Kaspersky Endpoint Security provides access to compound files only after unpacking and scanning files of any size.
- Do not unpack large compound files.
- Save your changes.
Changing the scan mode
Scan mode refers to the condition that triggers file scanning by the File Threat Protection component. By default, Kaspersky Endpoint Security scans files in smart mode. In this file scan mode, the File Threat Protection component decides whether or not to scan files after analyzing operations that are performed with the file by the user, by an application on behalf of the user (under the account that was used to log in or a different user account), or by the operating system. For example, when working with a Microsoft Office Word document, Kaspersky Endpoint Security scans the file when it is first opened and last closed. Intermediate operations that overwrite the file do not cause it to be scanned.
To change the file scan mode:
- In the main application window, click the button.
- In the application settings window, select Essential Threat Protection → File Threat Protection.
- Click Advanced Settings.
- In the Scan mode block, select the required mode:
- Smart mode. In this mode, File Threat Protection scans an object based on an analysis of actions taken on the object. For example, when working with a Microsoft Office document, Kaspersky Endpoint Security scans the file when it is first opened and last closed. Intermediate operations that overwrite the file do not cause it to be scanned.
- On access and modification. In this mode, File Threat Protection scans objects whenever there is an attempt to open or modify them.
- On access. In this mode, File Threat Protection scans objects only upon an attempt to open them.
- On execution. In this mode, File Threat Protection only scans objects upon an attempt to run them.
- Save your changes.
Container Scan
A container is an isolated environment in which an application can run without directly interacting with the operating system. Using containers involves the following risks:
- Hackers may be able to exploit containerization vulnerabilities to compromise applications inside the container.
- Hackers may exploit an insecure configuration of the container environment to gain unauthorized access to data on the computer or to compromise the integrity of the system.
- A successful attack on a container can allow a hacker to gain access to data on the computer.
- Hackers may exploit network vulnerabilities to intercept network traffic.
Kaspersky Endpoint Security scans files not just on disks but also inside containers. That is, Kaspersky Endpoint Security is an external tool for detecting malicious activity inside containers. This allows maintaining the performance of containers and prevents conflicts with other applications inside the container. Installing Kaspersky Endpoint Security inside the container is not supported.
In addition to providing container security, Kaspersky Endpoint Security allows managing applications inside containers using Application Control. Application Control is configured for containers in the same way as for applications installed on the computer. System Integrity Monitoring also supports containers.
Container requirements
- The container must be a Docker container. Other containerization tools are not supported.
- The container must run in process isolation mode. The Hyper-V isolation mode is not supported.
- The container must be placed on a Windows Server 2016, 2019, or 2022 server (Docker Host).
- The container must include a Windows image (Docker Image). Windows 10 and 11 are not supported. Linux images are not supported.
- Scanning containers running in WSL2 mode (Windows Subsystem for Linux v2 (Docker Wine)) is not supported.
Action on threat detection
If a threat is detected inside a container, the application applies the action selected for the File Threat Protection component. Container Scan has additional settings (see the instructions below). If a threat is detected, the application blocks the malicious activity and performs the selected action (for example, attempts to disinfect the object). Kaspersky Endpoint Security can stop the container if the detected object cannot be disinfected. By default, the container stopping functionality is disabled.
How to configure containers scan in the Administration Console (MMC)
How to configure containers scan in the Web Console and Cloud Console
How to configure containers scan in the application interface
- In the main application window, click the button.
- In the application settings window, select Essential Threat Protection → File Threat Protection.
- In the Scan of file operations executed in Windows containers block, configure the containers scan settings:
- Stop the container if disinfection fails. The application may not have sufficient read and write rights for the detected object. In that case, disinfecting or deleting the detected object is impossible. If this check box is selected, the application blocks the detected object and stops the container. If this check box is cleared, the application only blocks the detected object.
- Do not scan file operations executed in Windows containers. If this check box is selected, the application scans the container only when the container is started. If the check box is cleared, the application scans the container continuously in real time.
- Save your changes.
Web Threat Protection
The Web Threat Protection component prevents downloads of malicious files from the Internet, and also blocks malicious and phishing websites. The component provides computer protection with the help of anti-virus databases, the Kaspersky Security Network cloud service, and heuristic analysis.
Kaspersky Endpoint Security scans HTTP-, HTTPS- and FTP-traffic. Kaspersky Endpoint Security scans URLs and IP addresses.
To use Web Threat Protection, you must complete the initial configuration of the application:
- For HTTPS traffic monitoring, you need to enable encrypted connections scan (disabled by default).
- Select the ports that you want Kaspersky Endpoint Security to monitor. By default, the application monitors all ports.
- Select the applications whose traffic you want Kaspersky Endpoint Security to monitor. Most browsers are already present in the list of applications recommended by Kaspersky. If your browser is missing from the list, add it manually.
- We recommend to inject a web page interaction script into web traffic. This script enables registration of Web Control events for the application event log, OS event log, and reports.
When a user tries to open a malicious or phishing website, Kaspersky Endpoint Security will block access and show a warning (see the figure below).
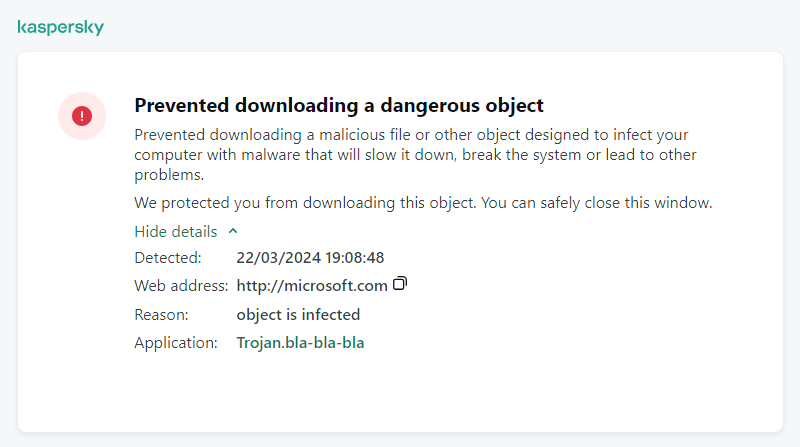
Website access denied message
Enabling and disabling Web Threat Protection
By default, the Web Threat Protection component is enabled and runs in the mode recommended by Kaspersky experts. For Web Threat Protection, the application can apply different groups of settings. These groups of settings that are stored in the application are called security levels: High, Recommended, Low. The Recommended web traffic security level settings are considered to be the optimal settings recommended by Kaspersky experts (see the table below). You can select one of the pre-installed security levels for web traffic that is received or transmitted via the HTTP and FTP protocols, or configure a custom web traffic security level. If you change the web traffic security level settings, you can always revert to the recommended web traffic security level settings.
You can select or configure the security level only in Administration Console (MMC) or the local interface of the application. You cannot select or configure the security level in Web Console or Cloud Console.
How to enable or disable the Web Threat Protection component in the Administration Console (MMC)
How to enable or disable the Web Threat Protection component in the Web Console and Cloud Console
How to enable or disable the Web Threat Protection component
- In the main application window, click the button.
- In the application settings window, select Essential Threat Protection → Web Threat Protection.
- Use the Web Threat Protection toggle to enable or disable the component.
- If you enabled the component, do one of the following in the Security level block:
- If you want to apply one of the preset security levels, select it with the slider:
- High. The security level under which the Web Threat Protection component performs maximum scanning of web traffic that the computer receives over the HTTP and FTP protocols. Web Threat Protection performs detailed scanning of all web traffic objects by using the full set of application databases, and performs the deepest possible heuristic analysis.
- Recommended. The security level that provides the optimal balance between the performance of Kaspersky Endpoint Security and the security of web traffic. The Web Threat Protection component performs heuristic analysis at the medium scan level. This web traffic security level is recommended by Kaspersky specialists. The values of settings for the recommended security level are provided in the table below.
- Low. The settings of this web traffic security level ensure the maximum web traffic scanning speed. The Web Threat Protection component performs heuristic analysis at the light scan level.
- If you want to configure a custom security level, click the Advanced Settings button and define your own component settings.
You can restore the values of preset security levels by clicking the Restore recommended security level button.
- If you want to apply one of the preset security levels, select it with the slider:
- In the Action on threat detection block, select the action that Kaspersky Endpoint Security performs on malicious web traffic objects:
- Block. If this option is selected and an infected object is detected in web traffic, the Web Threat Protection component blocks access to the object and displays a message in the browser.
- Inform. If this option is selected and an infected object is detected in web traffic, Kaspersky Endpoint Security allows this object to be downloaded to the computer but adds information about the infected object to the list of active threats.
- Save your changes.
Web Threat Protection settings recommended by Kaspersky experts (recommended security level)
Parameter |
Value |
Description |
|---|---|---|
Check the web address against the database of malicious web addresses |
On |
Scanning the links to determine whether they are included in the database of malicious web addresses allows you to track websites that have been added to denylist. The database of malicious web addresses is maintained by Kaspersky, included in the application installation package, and updated during Kaspersky Endpoint Security database updates. |
Check the web address against the database of phishing web addresses |
On |
The database of phishing web addresses includes the web addresses of currently known websites that are used to launch phishing attacks. Kaspersky supplements this database of phishing links with addresses obtained from the international organization known as the Anti-Phishing Working Group. The database of phishing addresses is included in the application installation package and supplemented with Kaspersky Endpoint Security database updates. |
Use heuristic analysis (Web Threat Protection) |
Medium scan |
The technology was developed for detecting threats that cannot be detected by using the current version of Kaspersky application databases. It detects files that may be infected with an unknown virus or a new variety of a known virus. When web traffic is scanned for viruses and other applications that present a threat, the heuristic analyzer performs instructions in the executable files. The number of instructions that are executed by the heuristic analyzer depends on the level that is specified for the heuristic analyzer. The heuristic analysis level ensures a balance between the thoroughness of searching for new threats, the load on the resources of the operating system, and the duration of heuristic analysis. |
Use heuristic analysis (Anti-Phishing) |
On |
The technology was developed for detecting threats that cannot be detected by using the current version of Kaspersky application databases. It detects files that may be infected with an unknown virus or a new variety of a known virus. |
Action on threat detection |
Block |
If this option is selected and an infected object is detected in web traffic, the Web Threat Protection component blocks access to the object and displays a message in the browser. |
Page top
Configuring malicious web address detection methods
Web Threat Protection detects malicious web addresses using anti-virus databases, the Kaspersky Security Network cloud service, and heuristic analysis.
You can select malicious web address detection methods only in Administration Console (MMC) or the local interface of the application. You cannot select malicious web address detection methods in Web Console or Cloud Console. The default option is checking web addresses against the database of malicious addresses with heuristic analysis (medium scan).
Scanning using the database of malicious addresses
Scanning the links to determine whether they are included in the database of malicious web addresses allows you to track websites that have been added to denylist. The database of malicious web addresses is maintained by Kaspersky, included in the application installation package, and updated during Kaspersky Endpoint Security database updates.
Kaspersky Endpoint scans all links to determine if they are listed in databases of malicious web addresses. The application's secure connection scan settings do not affect the link scanning functionality. In other words, if encrypted connections scan is disabled, Kaspersky Endpoint Security checks links against databases of malicious web addresses even if network traffic is transmitted over an encrypted connection.
- In the main application window, click the button.
- In the application settings window, select Essential Threat Protection → Web Threat Protection.
- Click Advanced Settings.
- In the Scan methods block, select or clear the Check the web address against the database of malicious web addresses check box to enable or disable the checking of addresses against the database of malicious web addresses.
- Save your changes.
Heuristic analysis
During heuristic analysis, Kaspersky Endpoint Security analyzes the activity of applications in the operating system. Heuristic analysis can detect threats for which there are currently no records in the Kaspersky Endpoint Security databases.
When web traffic is scanned for viruses and other applications that present a threat, the heuristic analyzer performs instructions in the executable files. The number of instructions that are executed by the heuristic analyzer depends on the level that is specified for the heuristic analyzer. The heuristic analysis level ensures a balance between the thoroughness of searching for new threats, the load on the resources of the operating system, and the duration of heuristic analysis.
How to enable or disable the use of heuristic analysis in the Administration Console (MMC)
How to enable or disable the use of heuristic analysis in the application interface
- In the main application window, click the button.
- In the application settings window, select Essential Threat Protection → Web Threat Protection.
- Click Advanced Settings.
- In the Scan methods block, select the Use heuristic analysis check box if you want the application to use heuristic analysis when scanning web traffic for viruses and other malware.
When web traffic is scanned for viruses and other applications that present a threat, the heuristic analyzer performs instructions in the executable files. The number of instructions that are executed by the heuristic analyzer depends on the level that is specified for the heuristic analyzer. The heuristic analysis level ensures a balance between the thoroughness of searching for new threats, the load on the resources of the operating system, and the duration of heuristic analysis.
- Save your changes.
Page top
Anti-Phishing
Web Threat Protection checks links to see if they belong to phishing web addresses. This helps prevent phishing attacks. A phishing attack can be disguised, for example, as an email message supposedly from your bank with a link to the official website of the bank. By clicking the link, you go to an exact copy of the bank's website and can even see its real web address in the browser, even though you are on a counterfeit site. From this point forward, all of your actions on the site are tracked and can be used to steal your money.
Because links to phishing websites may be received not only in an email message but also from other sources such as messengers, the Web Threat Protection component monitors attempts to access a phishing website at the web traffic scan level and blocks access to such websites. Lists of phishing URLs are included with the Kaspersky Endpoint Security distribution kit.
You can configure Anti-Phishing only in Administration Console (MMC) or the local interface of the application. You cannot configure Anti-Phishing in Web Console or Cloud Console. By default, Anti-Phishing with heuristic analysis is enabled.
How to enable or disable Anti-Phishing in the Administration Console (MMC)
How to enable or disable Anti-Phishing in the application interface
- In the main application window, click the button.
- In the application settings window, select Essential Threat Protection → Web Threat Protection.
- Click Advanced Settings.
- If you want the Web Threat Protection component to check links against the databases of phishing web addresses, select the Check the web address against the database of phishing web addresses check box in the Anti-Phishing block. The database of phishing web addresses includes the web addresses of currently known websites that are used to launch phishing attacks. Kaspersky supplements this database of phishing links with addresses obtained from the international organization known as the Anti-Phishing Working Group. The database of phishing addresses is included in the application installation package and supplemented with Kaspersky Endpoint Security database updates.
- Select the Use heuristic analysis check box if you want the application to use heuristic analysis when scanning web pages for phishing links.
During heuristic analysis, Kaspersky Endpoint Security analyzes the activity of applications in the operating system. Heuristic analysis can detect threats for which there are currently no records in the Kaspersky Endpoint Security databases.
To scan links, in addition to anti-virus database and heuristic analysis, you can use Kaspersky Security Network reputation databases.
- Save your changes.
Creating the list of trusted web addresses
In addition to malicious and phishing websites, Web Threat Protection can block other websites. For example, Web Threat Protection blocks HTTP traffic that does not satisfy RFC standards. You can create a list of URLs whose content you trust. The Web Threat Protection component does not analyze information from trusted web addresses to check them for viruses or other threats. This option may be useful, for example, if the Web Threat Protection component interferes with the downloading of a file from a known website.
A URL may be the address of a specific web page or the address of a website.
How to add a trusted web address using Administration Console (MMC)
How to add a trusted web address in the Web Console and Cloud Console
How to add a trusted web address in the application interface
- In the main application window, click the button.
- In the application settings window, select Essential Threat Protection → Web Threat Protection.
- Click Advanced Settings.
- Select the Do not scan web traffic from trusted URLs check box.
If the check box is selected, the Web Threat Protection component does not scan the content of web pages or websites whose addresses are included in the list of trusted web addresses. You can add both the specific address and the address mask of a web page/website to the list of trusted web addresses.
- Create a list of URLs / web pages whose content you trust.
Kaspersky Endpoint Security supports the
*and?characters when entering a mask.You can also import a list of trusted web addresses from an XML file.
- Save your changes.
As a result, Web Threat Protection does not scan traffic of trusted web addresses. The user always can open a trusted website and download a file from that website. If you could not gain access to the website, check the settings of Encrypted connections scan, Web Control, and Network ports monitoring components. If Kaspersky Endpoint Security detects a file downloaded from a trusted website as malicious, you can add this file to exclusions.
You can also create a general list of exclusions for encrypted connections. In this case, Kaspersky Endpoint Security does not scan HTTPS traffic of trusted web addresses when Web Threat Protection, Mail Threat Protection, Web Control components are doing their work.
Page top
Exporting and importing the list of trusted web addresses
You can export the list of trusted web addresses to an XML file. Then you can modify the file to, for example, add a large number of web addresses of the same type. You can also use the export/import function to back up the list of trusted web addresses or to migrate the list to a different server.
How to export and import a list of trusted web addresses in the Administration Console (MMC)
How to export and import a list of trusted web addresses in the Web Console and Cloud Console
Page top
Mail Threat Protection
The Mail Threat Protection component scans the attachments of incoming and outgoing email messages for viruses and other threats. The component provides computer protection with the help of anti-virus databases, the Kaspersky Security Network cloud service, and heuristic analysis.
Mail Threat Protection can scan both incoming and outgoing messages. The application supports POP3, SMTP, IMAP, and NNTP in the following mail clients:
- Microsoft Office Outlook
- Mozilla Thunderbird
- Windows Mail
- MyOffice Mail
- R7-Office Organizer
To scan traffic in Mozilla Thunderbird, MyOffice Mail and R7-Office Organizer mail clients, you need to add Kaspersky certificate to the certificate store and select the own certificate store.
Mail Threat Protection does not support other protocols and mail clients.
Mail Threat Protection may not always be able to gain protocol-level access to messages (for example, when using the Microsoft Exchange solution). For this reason, Mail Threat Protection includes an extension for Microsoft Office Outlook. The extension allows scanning messages at the level of the mail client. The Mail Threat Protection extension supports operations with Outlook 2010, 2013, 2016, 2019 and 2021.
The Mail Threat Protection component does not scan messages if the mail client is open in a browser.
When a malicious file is detected in an attachment, Kaspersky Endpoint Security adds information about the performed action to the message subject, for example, [Message has been processed] <message subject>.
Enabling and disabling Mail Threat Protection
By default, the Mail Threat Protection component is enabled and runs in the mode recommended by Kaspersky experts. For Mail Threat Protection, Kaspersky Endpoint Security applies different groups of settings. These groups of settings that are stored in the application are called security levels: High, Recommended, Low. The Recommended mail security level settings are considered to be the optimal settings recommended by Kaspersky experts (see the table below). You can select one of the pre-installed email security levels or configure a custom email security level. If you have changed the email security level settings, you can always revert to the recommended email security level settings.
When working with the Mozilla Thunderbird mail client, the Mail Threat Protection component does not scan messages that are transmitted via the IMAP protocol for viruses and other threats if filters are used to move messages from the Inbox folder.
How to enable or disable the Mail Threat Protection component in the Administration Console (MMC)
How to enable or disable the Mail Threat Protection component in the Web Console and Cloud Console
How to enable or disable the Mail Threat Protection component in the application interface
- In the main application window, click the button.
- In the application settings window, select Essential Threat Protection → Mail Threat Protection.
- Use the Mail Threat Protection toggle to enable or disable the component.
- If you enabled the component, do one of the following in the Security level block:
- If you want to apply one of the preset security levels, select it with the slider:
- High. When this email security level is selected, the Mail Threat Protection component scans email messages most thoroughly. The Mail Threat Protection component scans incoming and outgoing email messages, and performs deep heuristic analysis. The High mail security level is recommended for high-risk environments. An example of such an environment is a connection to a free email service from a home network that is not guarded by centralized email protection.
- Recommended. The email security level that provides the optimal balance between the performance of Kaspersky Endpoint Security and email security. The Mail Threat Protection component scans incoming and outgoing email messages, and performs medium-level heuristic analysis. This mail traffic security level is recommended by Kaspersky specialists. The values of settings for the recommended security level are provided in the table below.
- Low. When this email security level is selected, the Mail Threat Protection component only scans incoming email messages, performs light heuristic analysis, and does not scan archives that are attached to email messages. At this mail security level, the Mail Threat Protection component scans email messages at maximum speed and uses a minimum of operating system resources. The Low mail security level is recommended for use in a well-protected environment. An example of such an environment might be an enterprise LAN with centralized email security.
- If you want to configure a custom security level, click the Advanced Settings button and define your own component settings.
You can restore the values of preset security levels by clicking the Restore recommended security level button.
- If you want to apply one of the preset security levels, select it with the slider:
- In the Action on threat detection block, select the action that Kaspersky Endpoint Security performs on malicious objects:
- Disinfect, delete if disinfection fails. When an infected object is detected in an inbound or outbound message, Kaspersky Endpoint Security attempts to disinfect the detected object. The user will be able to access the message with a safe attachment. If the object cannot be disinfected, Kaspersky Endpoint Security deletes the infected object. Kaspersky Endpoint Security adds information about the performed action to the message subject, for example, [Message has been processed] <message subject>.
- Disinfect, block if disinfection fails. When an infected object is detected in an inbound message, Kaspersky Endpoint Security attempts to disinfect the detected object. The user will be able to access the message with a safe attachment. If the object cannot be disinfected, Kaspersky Endpoint Security adds a warning to the message subject. The user will be able to access the message with the original attachment. When an infected object is detected in an outbound message, Kaspersky Endpoint Security attempts to disinfect the detected object. If the object cannot be disinfected, Kaspersky Endpoint Security blocks transmission of the message, and the mail client shows an error.
- Block. If an infected object is detected in an inbound message, Kaspersky Endpoint Security adds a warning to the message subject. The user will be able to access the message with the original attachment. If an infected object is detected in an outbound message, Kaspersky Endpoint Security blocks transmission of the message, and the mail client shows an error.
- Save your changes.
Mail Threat Protection settings recommended by Kaspersky experts (recommended security level)
Parameter |
Value |
Description |
|---|---|---|
Protection scope |
Incoming and outgoing messages |
The Protection scope includes objects that the component checks when it is run: incoming and outgoing messages or incoming messages only. In order to protect your computers, you need only scan incoming messages. You can turn on scanning for outgoing messages to prevent infected files from being sent in archives. You can also turn on the scanning of outgoing messages if you want to prevent files in particular formats from being sent, such as audio and video files, for example. |
Connect Microsoft Outlook extension |
On |
If the check box is selected, scanning of email messages transmitted via the POP3, SMTP, NNTP, IMAP protocols is enabled on the side of the extension integrated into Microsoft Outlook. If mail is scanned using the extension for Microsoft Outlook, it is recommended to use Cached Exchange Mode. For more detailed information about Cached Exchange Mode and recommendations on its use, refer to the Microsoft Knowledge Base. |
Scan attached archives |
On |
Scanning ZIP, GZIP, BZIP, RAR, TAR, ARJ, CAB, LHA, JAR, ICE, and other archives. The application scans archives not only by extension, but also by format. When checking archives, the application performs a recursive unpacking. This allows to detect threats inside multi-level archives (archive within an archive). |
Scan attached files of Microsoft Office formats |
On |
Scans Microsoft Office files (DOC, DOCX, XLS, PPT and other Microsoft extensions). Office format files include OLE objects as well. Kaspersky Endpoint Security scans office format files that are smaller than 1 MB, regardless of whether the check box is selected or not. |
Attachment filter |
Rename attachments of selected types |
If this option is selected, the Mail Threat Protection component will replace the last extension character found in the attached files of the specified types with the underscore character (for example, attachment.doc_). Thus, in order to open the file, the user must rename the file. |
Heuristic analysis |
Medium scan |
The technology was developed for detecting threats that cannot be detected by using the current version of Kaspersky application databases. It detects files that may be infected with an unknown virus or a new variety of a known virus. When scanning files for malicious code, the heuristic analyzer executes instructions in the executable files. The number of instructions that are executed by the heuristic analyzer depends on the level that is specified for the heuristic analyzer. The heuristic analysis level ensures a balance between the thoroughness of searching for new threats, the load on the resources of the operating system, and the duration of heuristic analysis. |
Action on threat detection |
Disinfect, delete if disinfection fails |
When an infected object is detected in an inbound or outbound message, Kaspersky Endpoint Security attempts to disinfect the detected object. The user will be able to access the message with a safe attachment. If the object cannot be disinfected, Kaspersky Endpoint Security deletes the infected object. Kaspersky Endpoint Security adds information about the performed action to the message subject, for example, [Message has been processed] <message subject>. |
Page top
Changing the action to take on infected email messages
By default, the Mail Threat Protection component automatically attempts to disinfect all infected email messages that are detected. If disinfection fails, the Mail Threat Protection component deletes the infected email messages.
To change the action to take on infected email messages:
- In the main application window, click the button.
- In the application settings window, select Essential Threat Protection → Mail Threat Protection.
- In the Action on threat detection block, select the action for Kaspersky Endpoint Security to perform when an infected message is detected:
- Disinfect, delete if disinfection fails. When an infected object is detected in an inbound or outbound message, Kaspersky Endpoint Security attempts to disinfect the detected object. The user will be able to access the message with a safe attachment. If the object cannot be disinfected, Kaspersky Endpoint Security deletes the infected object. Kaspersky Endpoint Security adds information about the performed action to the message subject, for example, [Message has been processed] <message subject>.
- Disinfect, block if disinfection fails. When an infected object is detected in an inbound message, Kaspersky Endpoint Security attempts to disinfect the detected object. The user will be able to access the message with a safe attachment. If the object cannot be disinfected, Kaspersky Endpoint Security adds a warning to the message subject. The user will be able to access the message with the original attachment. When an infected object is detected in an outbound message, Kaspersky Endpoint Security attempts to disinfect the detected object. If the object cannot be disinfected, Kaspersky Endpoint Security blocks transmission of the message, and the mail client shows an error.
- Block. If an infected object is detected in an inbound message, Kaspersky Endpoint Security adds a warning to the message subject. The user will be able to access the message with the original attachment. If an infected object is detected in an outbound message, Kaspersky Endpoint Security blocks transmission of the message, and the mail client shows an error.
- Save your changes.
Forming the protection scope of the Mail Threat Protection component
Protection scope refers to the objects that are scanned by the component when it is active. The protection scopes of different components have different properties. The properties of the protection scope of the Mail Threat Protection component include the settings for integrating the Mail Threat Protection component into mail clients, and the type of email messages and email protocols whose traffic is scanned by the Mail Threat Protection component. By default, Kaspersky Endpoint Security scans both incoming and outgoing email messages and traffic of the POP3, SMTP, NNTP, and IMAP protocols, and is integrated into the Microsoft Office Outlook mail client.
To form the protection scope of the Mail Threat Protection component:
- In the main application window, click the button.
- In the application settings window, select Essential Threat Protection → Mail Threat Protection.
- Click Advanced Settings.
- In the Protection scope block, select the messages to scan:
- Incoming and outgoing messages.
- Incoming messages only.
In order to protect your computers, you need only scan incoming messages. You can turn on scanning for outgoing messages to prevent infected files from being sent in archives. You can also turn on the scanning of outgoing messages if you want to prevent files in particular formats from being sent, such as audio and video files, for example.
If you choose to scan only incoming messages, it is recommended that you perform a one-time scan of all outgoing messages because there is a chance that your computer has email worms that are being spread over email. This helps to avoid problems resulting from unmonitored mass emailing of infected messages from your computer.
- In the Connectivity block, do the following:
- If you want the Mail Threat Protection component to scan messages that are transmitted via the POP3, SMTP, NNTP, and IMAP protocols before they are received on the user's computer, select the Scan POP3, SMTP, NNTP, and IMAP traffic check box.
If you do not want the Mail Threat Protection component to scan messages that are transmitted via the POP3, SMTP, NNTP, and IMAP protocols before they arrive on the user's computer, clear the Scan POP3, SMTP, NNTP, and IMAP traffic check box. In this case, messages are scanned by the Mail Threat Protection extension embedded in the Microsoft Office Outlook mail client after they are received on the user computer if the Connect Microsoft Outlook extension check box is selected.
If you use a mail client other than Microsoft Office Outlook, the Mail Threat Protection component does not scan messages that are transmitted via the POP3, SMTP, NNTP, and IMAP protocols, when the Scan POP3, SMTP, NNTP, and IMAP traffic check box is cleared.
- If you want to allow access to Mail Threat Protection component settings from Microsoft Office Outlook and enable scanning of messages that are transmitted via the POP3, SMTP, NNTP, IMAP, and MAPI protocols after they arrive on the computer using the extension that is embedded into Microsoft Office Outlook, select the Connect Microsoft Outlook extension check box.
If you want to block access to Mail Threat Protection component settings from Microsoft Office Outlook and disable scanning of messages that are transmitted via the POP3, SMTP, NNTP, IMAP, and MAPI protocols after they arrive on the computer using the extension that is embedded into Microsoft Office Outlook, clear the Connect Microsoft Outlook extension check box.
The Mail Threat Protection extension is embedded in the Microsoft Office Outlook mail client during installation of Kaspersky Endpoint Security.
- If you want the Mail Threat Protection component to scan messages that are transmitted via the POP3, SMTP, NNTP, and IMAP protocols before they are received on the user's computer, select the Scan POP3, SMTP, NNTP, and IMAP traffic check box.
- Save your changes.
Scanning compound files attached to email messages
You can enable or disable scanning of message attachments, limit the maximum size of message attachments to be scanned, and limit the maximum message attachment scan duration.
To configure scanning of compound files attached to email messages:
- In the main application window, click the button.
- In the application settings window, select Essential Threat Protection → Mail Threat Protection.
- Click Advanced Settings.
- In the Scan of compound files block, configure the scan settings:
- Scan attached files of Microsoft Office formats. Scans Microsoft Office files (DOC, DOCX, XLS, PPT and other Microsoft extensions). Office format files include OLE objects as well. Kaspersky Endpoint Security scans office format files that are smaller than 1 MB, regardless of whether the check box is selected or not.
- Scan attached archives. Scanning ZIP, GZIP, BZIP, RAR, TAR, ARJ, CAB, LHA, JAR, ICE, and other archives. The application scans archives not only by extension, but also by format. When checking archives, the application performs a recursive unpacking. This allows to detect threats inside multi-level archives (archive within an archive).
If during the scan, Kaspersky Endpoint Security detects a password for an archive in the text of the message, this password will be used to scan the content of the archive for malicious applications. In this case, the password is not saved. An archive is unpacked during scan. If an application error occurs during the unpacking process, you can manually delete the unpacked files that are saved to the following path: %systemroot%\temp. The files have the PR prefix.
- Do not scan archives larger than N MB (from 1 to 9999). If this check box is selected, the Mail Threat Protection component excludes archives attached to email messages from scanning if their size exceeds the specified value. If the check box is cleared, the Mail Threat Protection component scans email attachment archives of any size.
- Limit the time for checking archives to N sec (from 1 to 9999). If the check box is selected, the time that is allocated for scanning archives attached to email messages is limited to the specified period.
- Save your changes.
Email messages attachment filtering
The attachment filtering functionality is not applied to outgoing email messages.
Malicious applications can be distributed in the form of attachments in email messages. You can configure filtering based on the type of message attachments so that files of the specified types are automatically renamed or deleted. By renaming an attachment of a certain type, Kaspersky Endpoint Security can protect your computer against automatic execution of a malicious application.
To configure filtering of attachments:
- In the main application window, click the button.
- In the application settings window, select Essential Threat Protection → Mail Threat Protection.
- Click Advanced Settings.
- In the Attachment filter block, do one of the following:
- Disable filtering. If this option is selected, the Mail Threat Protection component does not filter files that are attached to email messages.
- Rename attachments of selected types. If this option is selected, the Mail Threat Protection component will replace the last extension character found in the attached files of the specified types with the underscore character (for example, attachment.doc_). Thus, in order to open the file, the user must rename the file.
- Delete attachments of selected types. If this option is selected, the Mail Threat Protection component deletes attached files of the specified types from email messages.
- If you selected the Rename attachments of selected types option or the Delete attachments of selected types option during the previous step, select the check boxes opposite the relevant types of files.
- Save your changes.
Exporting and importing extensions for attachment filtering
You can export the list of attachment filter extensions to an XML file. You can use the export/import function to back up the list of extensions or to migrate the list to a different server.
How to export and import a list of attachment filter extensions in the Administration Console (MMC)
How to export and import a list of attachment filter extensions in the Web Console and Cloud Console
Page top
Scanning emails in Microsoft Office Outlook
During installation of Kaspersky Endpoint Security, the Mail Threat Protection extension is embedded into Microsoft Office Outlook (hereinafter also referred to as Outlook). The extension allows scanning messages at the level of a mail client instead of the protocol level. In addition to messages, the extension lets you scan objects received through the MAPI interface from Microsoft Exchange repositories (for example, objects in the Calendar). This scanning takes place in the mail client.
You can open the Mail Threat Protection component settings from within Outlook, and specify when email messages are to be scanned for viruses and other threats.
The Mail Threat Protection extension supports operations with Outlook 2010, 2013, 2016, 2019 and 2021.
In Outlook, incoming messages are first scanned by the Mail Threat Protection component (if the Scan POP3, SMTP, NNTP, and IMAP traffic check box is selected in the interface of Kaspersky Endpoint Security) and then by the Mail Threat Protection extension for Outlook. If the Mail Threat Protection component detects a malicious object in a message, it notifies you about this event.
The Mail Threat Protection component settings can be configured directly in Outlook if the Microsoft Outlook extension is connected in the Kaspersky Endpoint Security interface (see the figure below).
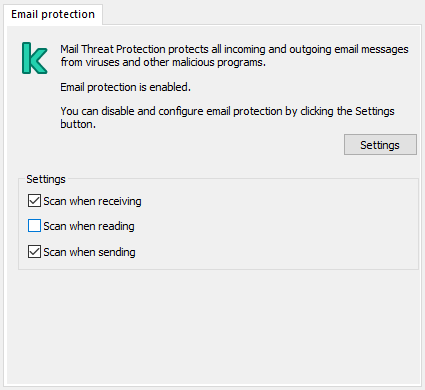
Mail Threat Protection component settings in Outlook
Outgoing messages are first scanned by the Mail Threat Protection extension for Outlook, and are then scanned by the Mail Threat Protection component.
If mail is scanned using the Mail Threat Protection extension for Outlook, it is recommended to use Cached Exchange Mode. For more detailed information about Cached Exchange Mode and recommendations on its use, refer to the Microsoft Knowledge Base.
To configure the operating mode of the Mail Threat Protection extension for Outlook:
- Open the Kaspersky Security Center Administration Console.
- In the console tree, select Policies.
- Select the necessary policy and double-click to open the policy properties.
- In the policy window, select Essential Threat Protection → Mail Threat Protection.
- In the Security level block, click the Settings button.
- In the window that opens, in the Connectivity block, click the Settings button.
- In the Email protection window, do the following:
- Select the Scan when receiving check box if you want the Mail Threat Protection extension for Outlook to scan incoming messages as they arrive to the mailbox.
- Select the Scan when reading check box if you want the Mail Threat Protection extension for Outlook to scan incoming messages when the user opens them.
- Select the Scan when sending check box if you want the Mail Threat Protection extension for Outlook to scan outgoing messages as they are sent.
- Save your changes.
Network Threat Protection
The Network Threat Protection component (also called Intrusion Detection System, IDS) monitors inbound network traffic for activity characteristic of network attacks. When Kaspersky Endpoint Security detects an attempted network attack on the user's computer, it blocks the network connection with the attacking computer. Descriptions of currently known types of network attacks and ways to counteract them are provided in Kaspersky Endpoint Security databases. The list of network attacks that the Network Threat Protection component detects is updated during database and application module updates.
Enabling and disabling Network Threat Protection
By default, Network Threat Protection is enabled and running in the optimal mode. Kaspersky Endpoint Security monitors inbound network traffic for activity characteristic of network attacks and blocks the attacks.
How to enable or disable Network Threat Protection in the Administration Console (MMC)
How to enable or disable Network Threat Protection in the Web Console and Cloud Console
How to enable or disable Network Threat Protection in the application interface
- In the main application window, click the button.
- In the application settings window, select Essential Threat Protection → Network Threat Protection.
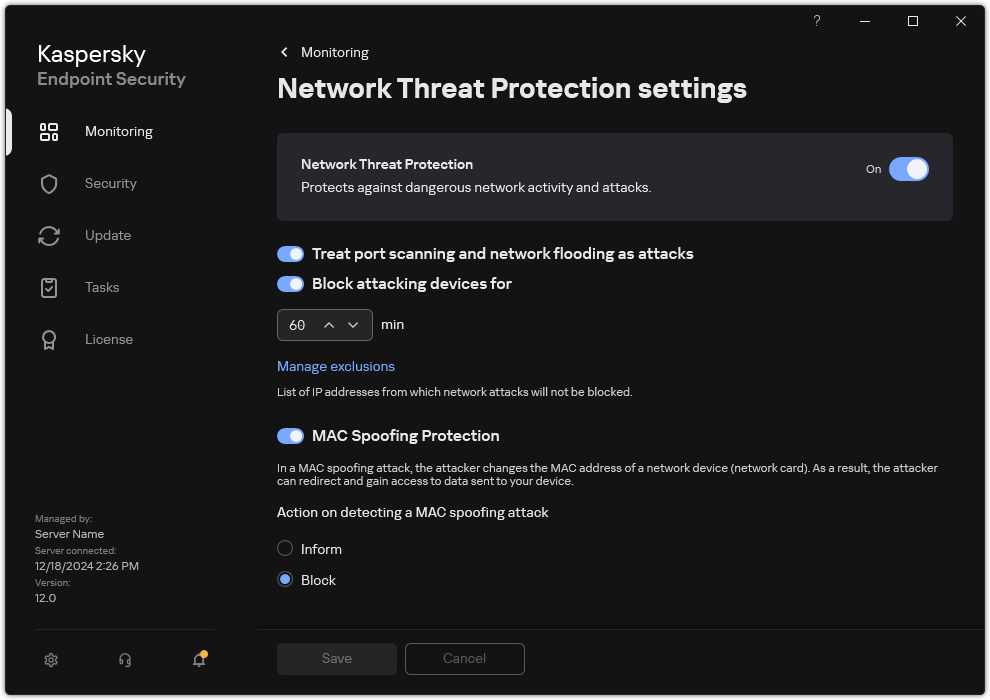
Network Threat Protection settings
- Use the Network Threat Protection toggle to enable or disable the component.
- Save your changes.
Blocking an attacking computer
If the Network Threat Protection component is enabled, Kaspersky Endpoint Security automatically blocks network threats. Additionally, the application can block the attacking computer and restrict the sending of network packets for a certain length of time. By default, Kaspersky Endpoint Security blocks the computer for one hour.
How to block an attacking computer in Administration Console (MMC)
How to block an attacking computer in Web Console and Cloud Console
How to block an attacking computer in the user interface of the application
- In the main application window, click the button.
- In the application settings window, select Essential Threat Protection → Network Threat Protection.
Network Threat Protection settings
- Turn on the Block attacking devices for N min toggle.
If the option is enabled, the Network Threat Protection component adds the attacking computer to the blocked list. This means that the Network Threat Protection component blocks the network connection with the attacking computer after the first network attack attempt for the specified amount of time. This block automatically protects the user's computer against possible future network attacks from the same address. The minimum time an attacking computer must spend in the block list is one minute. The maximum time is 999 minutes.
- Set a different blocking duration for an attacking computer in the field below the Block attacking devices for N min toggle switch.
- Save your changes.
As a result, when Kaspersky Endpoint Security detects an attempted network attack launched against the user's computer, it will block all connections with the attacking computer. Kaspersky Endpoint Security creates the Network attack detected event. The event contains information about the attacking computer: IP and MAC addresses.
You can view the MAC address of the attacking computer in the user interface of the application or in the Kaspersky Security Center console version 15.1 or later.
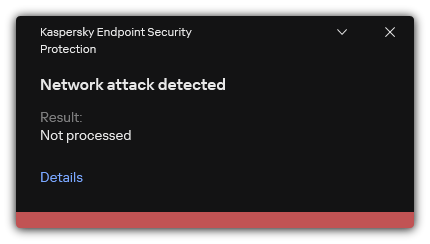
Notification about network attack detection
Kaspersky Endpoint Security unblocks the computer when the specified time runs out. The Kaspersky Security Center console does not provide tools for monitoring blocked computers other than Network attack detected events in the report. You can only view a list of blocked computers in the interface of the application. This functionality is provided by the Network Monitor tool. You can also use the Network Monitor tool to unblock a computer.
To unblock a computer:
- In the main application window, in the Monitoring section, click the Network Monitor tile.
- Select the Blocked computers tab.
This opens a list of blocked computer (see figure below).
Kaspersky Endpoint Security clears the block list when the application is restarted and when the Network Threat Protection settings are changed.
- Select the computer that you want to unblock and click Unblock.
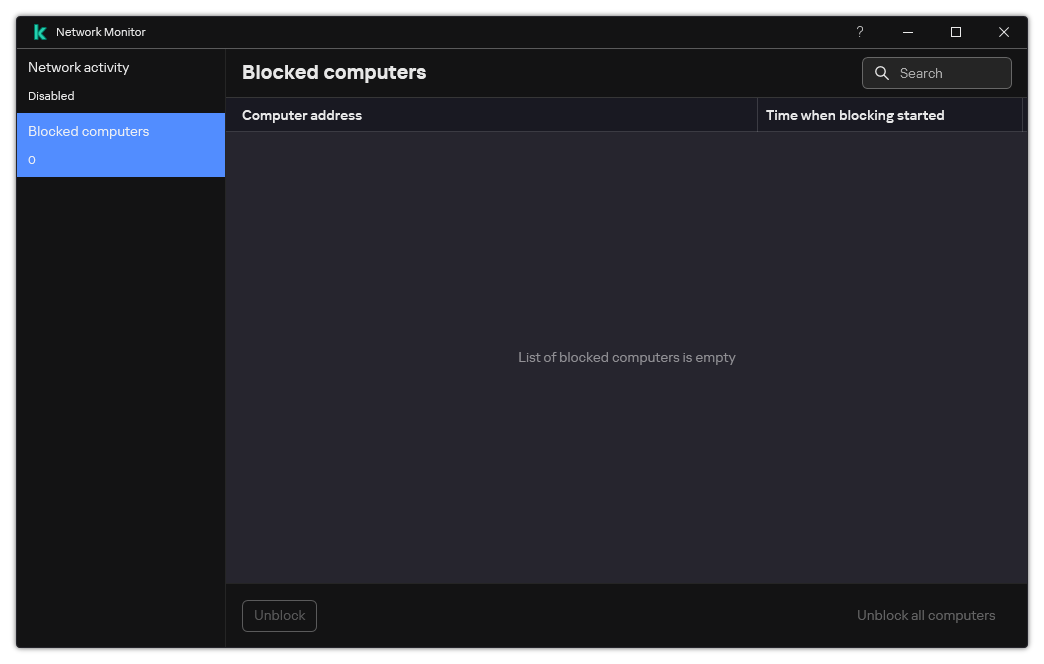
List of blocked computers
Configuring addresses of exclusions from blocking
Kaspersky Endpoint Security can recognize a network attack and block an unsecured network connection that is transmitting a large number of packets (for example, from surveillance cameras). To work with trusted devices, you can add the IP addresses of these devices to the list of exclusions. You can also select the protocol and port that are used for communication and allow specific network activities.
The ability to select protocols and ports for exclusions was added in Kaspersky Endpoint Security 12.2. Make sure the application and the management plug-in are updated to version 12.2 or later. If you are using an earlier version of the application or the management plug-in, Kaspersky Endpoint Security can allow network activities only by IP address.
How to configure addresses of exclusions from blocking in Administration Console (MMC)
How to configure addresses of exclusions from blocking in Web Console and Cloud Console
How to configure addresses of exclusions from blocking in the user interface of the application
- In the main application window, click the button.
- In the application settings window, select Essential Threat Protection → Network Threat Protection.
Network Threat Protection settings
- Click the Manage exclusions link.
- In the window that opens, click the Add button.
- Enter the IP address of the computer from which network attacks must not be blocked.
If required, select the protocol and ports through which data is transmitted.
- Save your changes.
Exporting and importing the list of exclusions from blocking
You can export the list of exclusions to an XML file. Then you can modify the file to, for example, add a large number of addresses of the same type. You can also use the export/import function to back up the list of exclusions or to migrate the list to a different server.
How to export and import a list of exclusions in the Administration Console (MMC)
How to export and import a list of exclusions in the Web Console and Cloud Console
Page top
Configuring protection against network attacks by type
Kaspersky Endpoint Security lets you manage protection against the following types of network attacks:
- Network Flooding is an attack on network resources of an organization (such as web servers). This attack consists of sending a large number of requests to overload the bandwidth of network resources. When this happens, users are unable to access the network resources of the organization.
- A Port Scanning attack consists of scanning UDP ports, TCP ports, and network services on the computer. This attack allows the attacker to identify the degree of vulnerability of the computer before conducting more dangerous types of network attacks. Port Scanning also enables the attacker to identify the operating system on the computer and select the appropriate network attacks for this operating system.
- A MAC spoofing attack consists of changing the MAC address of a network device (network card). As a result, an attacker can redirect data sent to a device to another device and gain access to this data. Kaspersky Endpoint Security lets you block MAC Spoofing attacks and receive notifications about the attacks.
You can disable detection of these types of attacks in case some of your allowed applications perform operations that are typical for these types of attacks. This will help avoid false alarms.
By default, Kaspersky Endpoint Security does not monitor Network Flooding, Port Scanning, and MAC spoofing attacks.
How to configure network threat protection by type in Administration Console (MMC)
How to configure network threat protection by type in Web Console and Cloud Console
How to configure network threat protection by type in the application interface
- In the main application window, click the button.
- In the application settings window, select Essential Threat Protection → Network Threat Protection.
Network Threat Protection settings
- Use the toggle Treat port scanning and network flooding as attacks to enable or disable the detection of these attacks.
If this functionality is enabled, Kaspersky Endpoint Security monitors network traffic for port scanning and network flooding. If such behavior is detected, the application notifies the user and sends the corresponding event to Kaspersky Security Center. The application provides information about the computer that is making the requests. This information is necessary for a timely response. However, Kaspersky Endpoint Security does not block the computer that is making the requests because such traffic may be a normal occurrence on the corporate network.
- Use the toggle MAC Spoofing Protection to enable or disable the detection of these attacks.
- In the Action on detecting a MAC spoofing attack block, select one of the following options:
- Inform.
- Block.
- Save your changes.
Firewall
The Firewall blocks unauthorized connections to the computer while working on the Internet or local network. The Firewall also controls the network activity of applications on the computer. This allows you to protect your corporate LAN from identity theft and other attacks. The component provides computer protection with the help of anti-virus databases, the Kaspersky Security Network cloud service, and predefined network rules.
Network Agent is used for interaction with Kaspersky Security Center. Firewall automatically creates network rules required for the application and the Network Agent to work. As a result, the Firewall opens several ports on the computer. Which ports are opened depends on computer's role (for example, distribution point). To learn more about the ports that will be opened on the computer, refer to the Kaspersky Security Center Help.
Network rules
You can configure network rules at the following levels:
- Network packet rules. Network packet rules impose restrictions on network packets, regardless of the application. Such rules restrict inbound and outbound network traffic through specific ports of the selected data protocol. Kaspersky Endpoint Security has predefined network packet rules with permissions recommended by Kaspersky experts.
- Application network rules. Application network rules impose restrictions on the network activity of a specific application. They factor in not only the characteristics of the network packet, but also the specific application to which this network packet is addressed or which issued this network packet.
Controlled access of applications to operating system resources, processes and personal data is provided by the Host Intrusion Prevention component by using application rights.
During the first startup of the application, the Firewall performs the following actions:
- Checks the security of the application using downloaded anti-virus databases.
- Checks the security of the application in Kaspersky Security Network.
You are advised to participate in Kaspersky Security Network to help the Firewall work more effectively.
- Places the application in one of the trust groups: Trusted, Low Restricted, High Restricted, Untrusted.
A trust group defines the rights that Kaspersky Endpoint Security refers to when controlling application activity. Kaspersky Endpoint Security places an application in a trust group depending on the level of danger that this application may pose to the computer.
Kaspersky Endpoint Security places an application in a trust group for the Firewall and Host Intrusion Prevention components. You cannot change the trust group only for the Firewall or Host Intrusion Prevention.
If you refused to participate in KSN or there is no network, Kaspersky Endpoint Security places the application in a trust group depending on the settings of the Host Intrusion Prevention component. After receiving the reputation of the application from KSN, the trust group can be changed automatically.
- It blocks network activity of the application depending on the trust group. For example, applications in the High Restricted trust group are not allowed to use any network connections.
The next time the application is started, Kaspersky Endpoint Security checks the integrity of the application. If the application is unchanged, the component uses the current network rules for it. If the application has been modified, Kaspersky Endpoint Security analyzes the application as if it were being started for the first time.
Network Rule Priorities
Each rule has a priority. The higher a rule is on the list, the higher its priority. If network activity is added to several rules, the Firewall regulates network activity according to the rule with the highest priority.
Network packet rules have a higher priority than network rules for applications. If both network packet rules and network rules for applications are specified for the same type of network activity, the network activity is handled according to the network packet rules.
Network rules for applications work in a particular way. Network rule for applications includes access rules based on the network status: Public network, Local network, Trusted network. For example, applications in the High Restricted trust group are not allowed any network activity in networks of all statuses by default. If a network rule is specified for an individual application (parent application), then the child processes of other applications will run according to the network rule of the parent application. If there is no network rule for the application, the child processes will run according to network access rule of the application's trust group.
For example, you have prohibited any network activity in networks of all statuses for all applications, except browser X. If you start browser Y installation (child process) from browser X (parent application), then browser Y installer will access the network and download the necessary files. After installation, browser Y will be denied any network connections according to the Firewall settings. To prohibit network activity of browser Y installer as a child process, you must add a network rule for the installer of browser Y.
Network connection types
The Firewall allows you to control network activity depending on the type of the network connection. Kaspersky Endpoint Security receives the network connection type from the computer's operating system. The type of the network connection in the operating system is set by the user when setting up the connection. You can change the type of the network connection in the Kaspersky Endpoint Security settings. The Firewall will monitor network activity depending on the network type, specified in the Kaspersky Endpoint Security settings, and not in the operating system.
The following network connection types are available:
- Public network. The network is not protected by antivirus applications, firewalls, or filters (such as Wi-Fi in a cafe). When the user operates a computer that is connected to such a network, Firewall blocks access to files and printers of this computer. External users are also unable to access data through shared folders and remote access to the desktop of this computer. Firewall filters the network activity of each application according to the network rules that are set for it.
Firewall assigns Public network type to the Internet by default. You cannot change the type of the Internet.
- Local network. Network for users with restricted access to files and printers on this computer (such as for a corporate LAN or home network).
- Trusted network. Safe network in which the computer is not exposed to attacks or unauthorized data access attempts. Firewall permits any network activity within networks with this status.
Enabling or disabling Firewall
By default, Firewall is enabled and functions in the optimal mode.
How to enable or disable the Firewall in the Administration Console (MMC)
How to enable or disable the Firewall in the Web Console and Cloud Console
How to enable or disable the Firewall in the application interface
- In the main application window, click the button.
- In the application settings window, select Essential Threat Protection → Firewall.
- Use the Firewall toggle to enable or disable the component.
- Save your changes.
As a result, if the Firewall is enabled, Kaspersky Endpoint Security controls network activity and blocks unauthorized network connections to your computer, as well as blocks unauthorized network activity of applications on your computer. Network activity is also controlled by the Network Threat Protection component. The Network Threat Protection component (also called Intrusion Detection System, IDS) monitors inbound network traffic for activity characteristic of network attacks.
Kaspersky Endpoint Security logs network attack events in its reports irrespective of the Firewall settings. Even if the Firewall blocks the network connection using rules and thus prevents a network attack, the Network Threat Protection component registers network attack events. It is required to generate statistical information about network attacks on the computers in your organization.
Page top
Changing the network connection type
Firewall assigns Public network type to the Internet by default. You cannot change the type of the Internet.
To change the network connection type:
- In the main application window, click the button.
- In the application settings window, select Essential Threat Protection → Firewall.
- Click Available networks.
- Select the network connection whose type you want to change.
- In the Network type column, select the type of the network connection:
- Public network. The network is not protected by antivirus applications, firewalls, or filters (such as Wi-Fi in a cafe). When the user operates a computer that is connected to such a network, Firewall blocks access to files and printers of this computer. External users are also unable to access data through shared folders and remote access to the desktop of this computer. Firewall filters the network activity of each application according to the network rules that are set for it.
- Local network. Network for users with restricted access to files and printers on this computer (such as for a corporate LAN or home network).
- Trusted network. Safe network in which the computer is not exposed to attacks or unauthorized data access attempts. Firewall permits any network activity within networks with this status.
- Save your changes.
Managing network packet rules
You can perform the following actions while managing network packet rules:
- Create a new network packet rule.
You can create a new network packet rule by creating a set of conditions and actions that is applied to network packets and data streams.
- Enable or disable a network packet rule.
All network packet rules that are created by Firewall by default have Enabled status. When a network packet rule is enabled, Firewall applies this rule.
You can disable any network packet rule that is selected in the list of network packet rules. When a network packet rule is disabled, Firewall temporarily does not apply this rule.
A new custom network packet rule is added to the list of network packet rules by default with Enabled status.
- Edit the settings of an existing network packet rule.
After you create a new network packet rule, you can always return to editing its settings and modify them as needed.
- Change the Firewall action for a network packet rule.
In the list of network packet rules, you can edit the action that is taken by Firewall on detecting network activity that matches a specific network packet rule.
- Change the priority of a network packet rule.
You can raise or lower the priority of a network packet rule that is selected in the list.
- Remove a network packet rule.
You can remove a network packet rule to stop Firewall from applying this rule on detecting network activity and to stop this rule from showing in the list of network packet rules with Disabled status.
Creating a network packet rule
You can create a network packet rule in the following ways:
- Use the Network Monitor tool.
Network Monitor is a tool designed for viewing information about the network activity of a user's computer in real time. This is convenient because you do not need to configure all the rule settings. Some Firewall settings will be inserted automatically from Network Monitor data. Network Monitor is available only in the application interface.
- Configure the Firewall settings.
This lets you fine-tune the Firewall settings. You can create rules for any network activity, even if there is no network activity at the current time.
When creating network packet rules, remember that they have priority over network rules for applications.
How to use the Network Monitor tool to create a network packet rule in the application interface
How to use Firewall settings to create a network packet rule in the application interface
- In the main application window, click the button.
- In the application settings window, select Essential Threat Protection → Firewall.
- Click Packet rules.
This opens the list of default network rules that are set by the Firewall.
- Using the Add drop-down list, select the location of the rule in the list: at the top of the list, at the bottom of the list, or next to the selected rule.
The position of the rule in the list determines the priority of the rule. The rule at the top of the list has the highest priority.
- Set the Active status for the packet rule.
- Manually enter the name of the network service in the Name field.
- Configure the network rule settings (see the table below).
You can select a predefined rule template by clicking the Network rule template link. Rule templates describe the most frequently used network connections.
All network rule settings will be filled in automatically.
- If you want the actions of the network rule to be reflected in the report, select the Log events check box.
- Click Save.
The new network rule will be added to the list.
- Use the Up / Down buttons to set the priority of the network rule.
- Save your changes.
How to create a network packet rule in the Administration Console (MMC)
- Open the Kaspersky Security Center Administration Console.
- In the console tree, select Policies.
- Select the necessary policy and double-click to open the policy properties.
- In the policy window, select Essential Threat Protection → Firewall.
- In the Firewall settings block, click the Settings button.
This opens the list of network packet rules and the list of application network rules.
- Select the Network packet rules tab.
This opens the list of default network rules that are set by the Firewall.
- Using the Add drop-down list, select the location of the rule in the list: at the top of the list, at the bottom of the list, or next to the selected rule.
The position of the rule in the list determines the priority of the rule. The rule at the top of the list has the highest priority.
- Manually enter the name of the network service in the Name field.
- Configure the network rule settings (see the table below).
You can select a predefined rule template by clicking the
 button. Rule templates describe the most frequently used network connections.
All network rule settings will be filled in automatically.
- If you want the actions of the network rule to be reflected in the report, select the Log events check box.
- Save the new network rule.
- Use the Up / Down buttons to set the priority of the network rule.
- Save your changes.
The Firewall will control network packets according to the rule. You can disable a packet rule from Firewall operation without deleting it from the list. To do so, clear the check box next to the object.
How to create a network packet rule in the Web Console and Cloud Console
Network packet rule settings
Parameter |
Description |
|---|---|
Action |
Allow. Block. By application rules. If this option is selected, Firewall applies the application network rules to the network connection. |
Protocol |
Control network activity over the selected protocol: TCP, UDP, ICMP, ICMPv6, IGMP and GRE. If ICMP or ICMPv6 is selected as the protocol, you can define the ICMP packet type and code. If TCP or UDP is selected as the protocol type, you can specify the comma-delimited port numbers of the local and remote computers between which the connection is to be monitored. |
Direction |
Inbound (packet). Firewall applies the network rule to all inbound network packets. Inbound. Firewall applies the network rule to all network packets sent via a connection that was initiated by a remote computer. Inbound / Outbound. Firewall applies the network rule to both inbound and outbound network packets, regardless of whether the user's computer or a remote computer initiated the network connection. Outbound (packet). Firewall applies the network rule to all outbound network packets. Outbound. Firewall applies the network rule to all network packets sent via a connection that was initiated by the user's computer. |
Network adapters |
Network adapters that can send and/or receive network packets. Specifying the settings of network adapters makes it possible to differentiate between network packets sent or received by network adapters with identical IP addresses. |
Time to live (TTL) |
Limiting the control of network packets by their lifetime (Time to Live, TTL). |
Remote address |
Network addresses of remote computers that can send and receive network packets. Firewall applies the network rule to the specified range of remote network addresses. You can include all IP addresses in a network rule, create a separate list of IP addresses, specify a range of IP addresses, or select a subnet (Trusted networks, Local networks, Public networks). You can also specify a DNS name of a computer instead of its IP address. You should use DNS names only for LAN computers or internal services. Interaction with cloud services (such as Microsoft Azure) and other Internet resources should be handled by the Web Control component. If in the network packet rule, you added a DNS name for which the IP address could not be determined, Kaspersky Endpoint Security will display a warning. In the list of network packet rules in Web Console, a Warning column is added with a description of the error. In Administration Console (MMC), the error description is not available. Such packet rules are highlighted in color. |
Local address |
Network addresses of computers that can send and receive network packets. Firewall applies a network rule to the specified range of local network addresses. You can include all IP addresses in a network rule, create a separate list of IP addresses, or specify a range of IP addresses. Sometimes the local address cannot be obtained for applications. If this is the case, this parameter is ignored. |
Enabling or disabling a network packet rule
To enable or disable a network packet rule:
- In the main application window, click the button.
- In the application settings window, select Essential Threat Protection → Firewall.
- Click Packet rules.
This opens a list of default network packet rules that are set by Firewall.
- Select the necessary network packet rule in the list.
- Use the toggle in the Status column to enable or disable the rule.
- Save your changes.
Changing the Firewall action for a network packet rule
To change the Firewall action that is applied to a network packet rule:
- In the main application window, click the button.
- In the application settings window, select Essential Threat Protection → Firewall.
- Click Packet rules.
This opens a list of default network packet rules that are set by Firewall.
- Select it in the list of network packet rules and click the Edit button.
- In the Action drop-down list, select the action to be performed by Firewall on detecting this kind of network activity:
- Allow.
- Block.
- By application rules. If this option is selected, Firewall applies the application network rules to the network connection.
- Save your changes.
Changing the priority of a network packet rule
The priority of a network packet rule is determined by its position in the list of network packet rules. The topmost network packet rule in the list of network packet rules has the highest priority.
Every manually created network packet rule is added to the end of the list of network packet rules and is of the lowest priority.
Firewall executes rules in the order in which they appear in the list of network packet rules, from top to bottom. According to each processed network packet rule that applies to a particular network connection, Firewall either allows or blocks network access to the address and port that are specified in the settings of this network connection.
To change the network packet rule priority:
- In the main application window, click the button.
- In the application settings window, select Essential Threat Protection → Firewall.
- Click Packet rules.
This opens a list of default network packet rules that are set by Firewall.
- In the list, select the network packet rule whose priority you want to change.
- Use the Up / Down buttons to set the priority of the network rule.
- Save your changes.
Exporting and importing network packet rules
You can export the list of network packet rules to an XML file. Then you can modify the file to, for example, add a large number of rules of the same type. You can use the export/import function to back up the list of network packet rules or to migrate the list to a different server.
How to export and import a list of network packet rules in the Administration Console (MMC)
How to export and import a list of network packet rules in the Web Console and Cloud Console
Page top
Defining network packet rules in XML
Firewall allows exporting network packet rules in XML format. Then you can modify the file to, for example, add a large number of rules of the same type.
The XML file contains two main nodes: Rules and Resources. The Rules node lists network packet rules. This node contains rules configured by default (predefined rules) as well as rules added by the user (custom rules).
Network packet rule markup
Network packet rule settings in XML format
Parameter |
Description |
Value |
|---|---|---|
|
Priority of the rule. The lower the value, the higher the priority. |
Integer The priority value must consist of 4 digits. The nodes in the XML file must be arranged by priority value, starting with |
|
ID of the rule. |
|
|
Status of the rule. |
|
|
ID of the rule type. |
|
|
ID of the application to which the network packet rule belongs. |
If the rule does not belong to any application, the value is |
|
Main ID of the resource with rule settings. You can use this identifier to locate a block with rule settings in the |
Integer |
|
ID of the network type. |
|
|
Value of the Action parameter. |
|
|
|
|
The Resources node contains network packet rule settings. Custom network packet rule settings are listed in the <key name="0004"> block.
Custom network packet rule markup
Custom network packet rule settings
Parameter |
Description |
Value |
|---|---|---|
|
ID of the parameter block. |
Integer |
|
Value of the Remote ports parameter. |
List of remote port ranges. |
|
Value of the Local ports parameter. |
List of local port ranges. |
|
Value of the Network adapters parameter. |
|
|
Internal ID of the structure. |
Integer It is recommended to leave this parameter unchanged. |
|
Value of the Protocol parameter. |
|
|
Value of the Direction parameter. |
|
|
Value of the ICMP type parameter. |
|
|
Value of the ICMP code parameter. |
|
|
Structure attribute pointer. |
Integer It is recommended to leave this parameter unchanged. |
|
Value of the Time to live (TTL) parameter. |
Value in seconds. If disabled, the value is |
|
|
|
|
Main ID of the resource (see the |
Integer |
|
ID of the parent group. |
Integer It is recommended to leave this parameter unchanged. |
|
Status of the rule. |
|
|
Name of the network packet rule. |
String |
Managing application network rules
By default, Kaspersky Endpoint Security groups all applications that are installed on the computer by the name of the vendor of the software whose file or network activity it monitors. Application groups are in turn categorized into trust groups. All applications and application groups inherit properties from their parent group: application control rules, application network rules, and their execution priority.
Like the Host Intrusion Prevention component, by default the Firewall component applies the network rules for an application group when filtering the network activity of all applications within the group. The application group network rules define the rights of applications within the group to access different network connections.
By default, Firewall creates a set of network rules for each application group that is detected by Kaspersky Endpoint Security on the computer. You can change the Firewall action that is applied to the application group network rules that are created by default. You cannot edit, remove, disable, or change the priority of application group network rules that are created by default.
You can also create a network rule for an individual application. Such a rule will have a higher priority than the network rule of the group to which the application belongs.
Creating an application network rule
By default, application activity is controlled by network rules that are defined for the trust group to which Kaspersky Endpoint Security assigned the application when it started the first time. If necessary, you can create network rules for an entire trust group, for an individual application, or for a group of applications that are within a trust group.
Manually defined network rules have a higher priority than network rules that were determined for a trust group. In other words, if manually defined application rules differ from the application rules determined for a trust group, Firewall controls application activity according to the manually defined rules for applications.
By default, Firewall creates the following network rules for each application:
- Any network activity in Trusted networks.
- Any network activity in Local networks.
- Any network activity in Public networks.
Kaspersky Endpoint Security controls the network activity of applications according to predefined network rules as follows:
- Trusted and Low Restricted: all network activity is allowed.
- High Restricted and Untrusted: all network activity is blocked.
Predefined application rules cannot be edited or deleted.
You can create an application network rule in the following ways:
- Use the Network Monitor tool.
Network Monitor is a tool designed for viewing information about the network activity of a user's computer in real time. This is convenient because you do not need to configure all the rule settings. Some Firewall settings will be inserted automatically from Network Monitor data. Network Monitor is available only in the application interface.
- Configure the Firewall settings.
This lets you fine-tune the Firewall settings. You can create rules for any network activity, even if there is no network activity at the current time.
When creating network rules for applications, remember that network packet rules have priority over application network rules.
How to use Firewall settings to create an application network rule in the application interface
- In the main application window, click the button.
- In the application settings window, select Essential Threat Protection → Firewall.
- Click Rules for applications.
This opens the list of default network rules that are set by the Firewall.
- In the list of applications, select the application or application group for which you want to create a network rule.
- Right-click to open the context menu and select Details and rules.
The application rules and properties window opens.
- Select the Network rules tab.
- Click Add.
This opens the network rule properties.
- Manually enter the name of the network service in the Name field.
- Configure the network rule settings (see the table below).
You can select a predefined rule template by clicking the Network rule template link. Rule templates describe the most frequently used network connections.
All network rule settings will be filled in automatically.
- If you want the actions of the network rule to be reflected in the report, select the Log events check box.
- Click Save.
The new network rule will be added to the list.
- Use the Up / Down buttons to set the priority of the network rule.
- Save your changes.
How to create an application network rule in the Administration Console (MMC)
- Open the Kaspersky Security Center Administration Console.
- In the console tree, select Policies.
- Select the necessary policy and double-click to open the policy properties.
- In the policy window, select Essential Threat Protection → Firewall.
- In the Firewall settings block, click the Settings button.
This opens the list of network packet rules and the list of application network rules.
- Select the Application network rules tab.
- Click Add.
- In the window that opens, enter criteria to search for the application for which you want to create a network rule.
You can enter the name of the application or the name of the vendor. Kaspersky Endpoint Security supports environment variables and the
*and?characters when entering a mask. - Click Refresh.
Kaspersky Endpoint Security will search for the application in the consolidated list of applications installed on managed computers. Kaspersky Endpoint Security will show a list of applications that satisfy your search criteria.
- Select the necessary application.
- In the Add selected application to the trust group drop-down list, select Default groups and click OK.
The application will be added to the default group.
- Select the relevant application and then select Application rights from the context menu of the application.
The application rules and properties window opens.
- Select the Network rules tab.
This opens the list of default network rules that are set by the Firewall.
- Click Add.
This opens the network rule properties.
- Manually enter the name of the network service in the Name field.
- Configure the network rule settings (see the table below).
You can select a predefined rule template by clicking the
button. Rule templates describe the most frequently used network connections.All network rule settings will be filled in automatically.
- If you want the actions of the network rule to be reflected in the report, select the Log events check box.
- Save the new network rule.
- Use the Up / Down buttons to set the priority of the network rule.
- Save your changes.
How to create an application network rule in the Web Console and Cloud Console
Application network rule settings
Parameter |
Description |
|---|---|
Action |
Allow. Block. |
Protocol |
Control network activity over the selected protocol: TCP, UDP, ICMP, ICMPv6, IGMP and GRE. If ICMP or ICMPv6 is selected as the protocol, you can define the ICMP packet type and code. If TCP or UDP is selected as the protocol type, you can specify the comma-delimited port numbers of the local and remote computers between which the connection is to be monitored. |
Direction |
Inbound. Inbound / Outbound. Outbound. |
Remote address |
Network addresses of remote computers that can send and receive network packets. Firewall applies the network rule to the specified range of remote network addresses. You can include all IP addresses in a network rule, create a separate list of IP addresses, specify a range of IP addresses, or select a subnet (Trusted networks, Local networks, Public networks). You can also specify a DNS name of a computer instead of its IP address. You should use DNS names only for LAN computers or internal services. Interaction with cloud services (such as Microsoft Azure) and other Internet resources should be handled by the Web Control component. If in the network packet rule, you added a DNS name for which the IP address could not be determined, Kaspersky Endpoint Security will display a warning. In the list of network packet rules in Web Console, a Warning column is added with a description of the error. In Administration Console (MMC), the error description is not available. Such packet rules are highlighted in color. |
Local address |
Network addresses of computers that can send and receive network packets. Firewall applies a network rule to the specified range of local network addresses. You can include all IP addresses in a network rule, create a separate list of IP addresses, or specify a range of IP addresses. Sometimes the local address cannot be obtained for applications. If this is the case, this parameter is ignored. |
Enabling and disabling an application network rule
To enable or disable an application network rule:
- In the main application window, click the button.
- In the application settings window, select Essential Threat Protection → Firewall.
- Click Rules for applications.
This opens the list of application rules.
- In the list of applications, select the application or group of applications for which you want to create or edit a network rule.
- Right-click to open the context menu and select Details and rules.
The application rules and properties window opens.
- Select the Network rules tab.
- In the list of network rules for an application group, select the relevant network rule.
The network rule properties window opens.
- Set the Active or Inactive status of the network rule.
You cannot disable an application group network rule that is created by Firewall by default.
- Save your changes.
Changing the Firewall action for an application network rule
You can change the Firewall action that is applied to all network rules for an application or application group that were created by default, and change the Firewall action for a single custom network rule for an application or application group.
To change the Firewall action for all network rules for an application or group of applications:
- In the main application window, click the button.
- In the application settings window, select Essential Threat Protection → Firewall.
- Click Rules for applications.
This opens the list of application rules.
- If you want to change the Firewall action that is applied to all network rules that are created by default, select an application or group of applications in the list. Manually created network rules are left unchanged.
- Right-click to open the context menu, select Network rules, then select the action that you want to assign:
- Inherit.
- Allow.
- Block.
- Save your changes.
To change the Firewall response for one network rule for an application or application group:
- In the main application window, click the button.
- In the application settings window, select Essential Threat Protection → Firewall.
- Click Rules for applications.
This opens the list of application rules.
- In the list, select the application or group of applications for which you want to change the action for one network rule.
- Right-click to open the context menu and select Details and rules.
The application rules and properties window opens.
- Select the Network rules tab.
- Select the network rule for which you want to change the Firewall action.
- In the Permission column, right-click to bring up the context menu and select the action that you want to assign:
- Inherit.
- Allow.
- Deny.
- Log events.
- Save your changes.
Changing the priority of an application network rule
The priority of a network rule is determined by its position in the list of network rules. Firewall executes the rules in the order in which they appear in the list of network rules, from top to bottom. According to each processed network rule that applies to a particular network connection, Firewall either allows or blocks network access to the address and port that are indicated in the settings of this network connection.
Manually created network rules have a higher priority than default network rules.
You cannot change the priority of application group network rules that are created by default.
To change the priority of a network rule:
- In the main application window, click the button.
- In the application settings window, select Essential Threat Protection → Firewall.
- Click Rules for applications.
This opens the list of application rules.
- In the list of applications, select the application or group of applications for which you want to change the priority of a network rule.
- Right-click to open the context menu and select Details and rules.
The application rules and properties window opens.
- Select the Network rules tab.
- Select the network rule whose priority you want to change.
- Use the Up / Down buttons to set the priority of the network rule.
- Save your changes.
Network Monitor
Network Monitor is a tool designed for viewing information about the network activity of a user's computer in real time.
To start Network Monitor:
In the main application window, in the Monitoring section, click the Network Monitor tile.
The Network Monitor window opens. In this window, information about the network activity of the computer is shown on four tabs:
- The Network activity tab shows all currently active network connections with the computer. Both outbound and inbound network connections are displayed. On this tab, you can also create network packet rules for Firewall operation.
- The Open ports tab lists all open network ports of the computer. On this tab, you can also create network packet rules and application rules for Firewall operation.
- The Network traffic tab shows the volume of inbound and outbound network traffic between the user's computer and other computers in the network to which the user is currently connected.
- The Blocked computers tab lists the IP addresses of remote computers whose network activity has been blocked by the Network Threat Protection component after detecting network attack attempts from such IP addresses.
BadUSB Attack Prevention
Some viruses modify the firmware of USB devices to trick the operating system into detecting the USB device as a keyboard. As a result, the virus may execute commands under your user account to download malware, for example.
The BadUSB Attack Prevention component prevents infected USB devices emulating a keyboard from connecting to the computer.
When a USB device is connected to the computer and identified as a keyboard by the operating system, the application prompts the user to enter a numerical code generated by the application from this keyboard or using On-Screen Keyboard if available (see the figure below). This procedure is known as keyboard authorization.
If the code has been entered correctly, the application saves the identification parameters – VID/PID of the keyboard and the number of the port to which it has been connected – in the list of authorized keyboards. Keyboard authorization does not need to be repeated when the keyboard is reconnected or after the operating system is restarted.
When the authorized keyboard is connected to a different USB port of the computer, the application shows a prompt for authorization of this keyboard again.
If the numerical code has been entered incorrectly, the application generates a new code. You can configure the number of attempts for entering the numerical code. If the numerical code is entered incorrectly several times or the keyboard authorization window is closed (see figure below), the application blocks input from this keyboard. When the USB device blocking time elapses or the operating system is restarted, the application prompts the user to perform keyboard authorization again.
The application allows use of an authorized keyboard and blocks a keyboard that has not been authorized.
The BadUSB Attack Prevention component is not installed by default. If you need the BadUSB Attack Prevention component, you can add the component in the properties of the installation package before installing the application or change the available application components after installing the application.
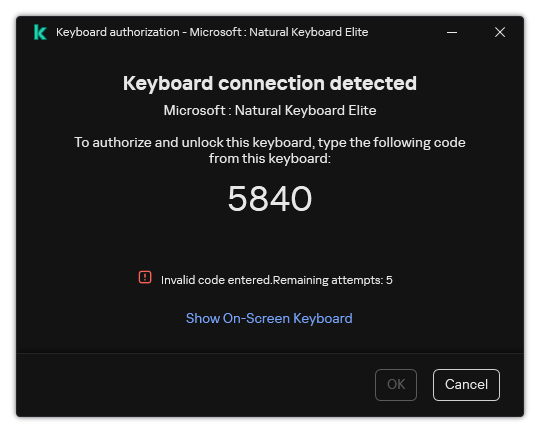
Keyboard authorization
Enabling and disabling BadUSB Attack Prevention
USB devices identified by the operating system as keyboards and connected to the computer before installation of the BadUSB Attack Prevention component are considered authorized after installation of the component.
To enable or disable BadUSB Attack Prevention:
- In the main application window, click the button.
- In the application settings window, select Essential Threat Protection → BadUSB Attack Prevention.
- Use the BadUSB Attack Prevention toggle to enable or disable the component.
- In the USB keyboard authorization upon connection block, adjust security settings for entering the authorization code:
- Maximum number of USB device authorization attempts. Automatically blocking the USB device if the authorization code is entered incorrectly the specified number of times. Valid values are 1 to 10. For example, if you allow 5 attempts to enter the authorization code, the USB device is blocked after the fifth failed attempt. Kaspersky Endpoint Security displays the blocking duration for the USB device. After this time elapses, you can have 5 attempts to enter the authorization code.
- Timeout when reaching the maximum number of attempts. Blocking duration of the USB device after the specified number of failed attempts to enter the authorization code. Valid values are 1 to 180 (minutes).
- Save your changes.
As a result, if BadUSB Attack Prevention is enabled, Kaspersky Endpoint Security requires authorization of a connected USB device identified as a keyboard by the operating system. The user cannot use an unauthorized keyboard until it is authorized.
Page top
Using On-Screen Keyboard for authorization of USB devices
On-Screen Keyboard should be used only for authorization of USB devices that do not support the input of random characters (e.g. bar code scanners). It is not recommended to use On-Screen Keyboard for authorization of unknown USB devices.
To allow or prohibit the use of On-Screen Keyboard for authorization:
- In the main application window, click the button.
- In the application settings window, select Essential Threat Protection → BadUSB Attack Prevention.
- Use the Prohibit use of On-Screen Keyboard for authorization of USB devices check box to block or allow use of the On-Screen Keyboard for authorization.
- Save your changes.
AMSI Protection
AMSI Protection component is intended to support Antimalware Scan Interface from Microsoft. The Antimalware Scan Interface (AMSI) allows third-party applications with AMSI support to send objects (for example, PowerShell scripts) to Kaspersky Endpoint Security for an additional scan and then receive the results from scanning these objects. Third-party applications may include, for example, Microsoft Office applications (see the figure below). For details on AMSI, please refer to the Microsoft documentation.
The AMSI Protection can only detect a threat and notify a third-party application about the detected threat. Third-party application after receiving a notification of a threat does not allow to perform malicious actions (for example, terminates).
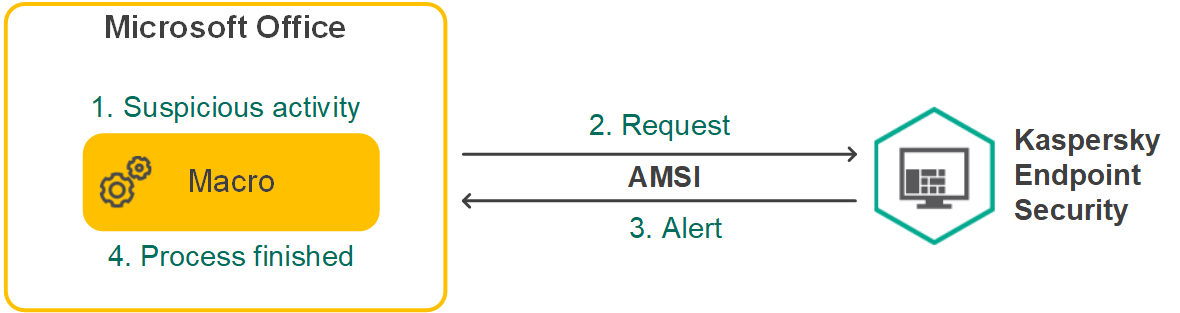
AMSI operation example
AMSI Protection component may decline a request from a third-party application, for example, if this application exceeds maximum number of requests within a specified interval. Kaspersky Endpoint Security sends information about a rejected request from a third-party application to the Administration Server. The AMSI Protection component does not deny requests from those third-party applications for which continuous integration with the AMSI Protection component is enabled.
AMSI Protection is available for the following operating systems for workstations and servers:
- Windows 10 Home / Pro / Pro for Workstations / Education / Enterprise / Enterprise multi-session;
- Windows 11 Home / Pro / Pro for Workstations / Education / Enterprise;
- Windows Server 2016 Essentials / Standard / Datacenter (including Server Core mode);
- Windows Server 2019 Essentials / Standard / Datacenter (including Server Core mode);
- Windows Server 2022 Standard / Datacenter / Datacenter: Azure Edition (including Server Core mode).
Enabling and disabling the AMSI Protection
By default, the AMSI Protection is enabled.
To enable or disable the AMSI Protection:
- In the main application window, click the button.
- In the application settings window, select Essential Threat Protection → AMSI Protection.
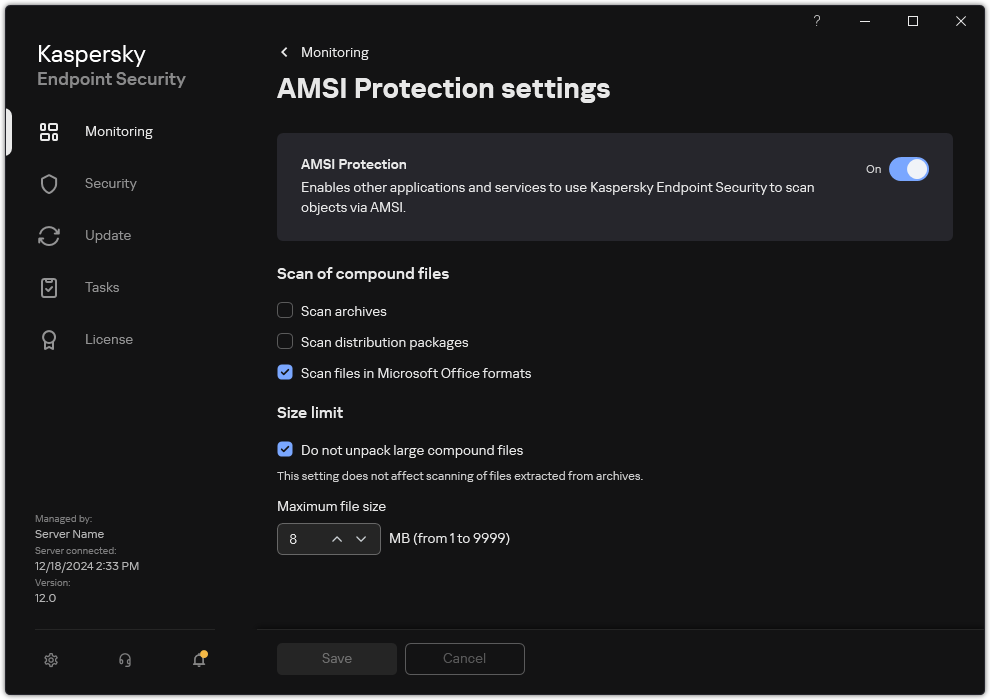
AMSI Protection settings
- Use the AMSI Protection toggle to enable or disable the component.
- Save your changes.
Using AMSI Protection to scan compound files
A common technique for concealing viruses and other malware is to embed them in compound files such as archives. To detect viruses and other malware that are hidden in this way, the compound file must be unpacked, which may slow down scanning. You can limit the types of compound files to be scanned and thereby speed up scanning.
To configure AMSI Protection scans of compound files:
- In the main application window, click the button.
- In the application settings window, select Essential Threat Protection → AMSI Protection.
AMSI Protection settings
- In the Scan of compound files block, specify the types of compound files that you want to scan: archives, distribution package, or files in office formats.
- In the Size limit block, do one of the following:
- To block the AMSI Protection component from unpacking large compound files, select the Do not unpack large compound files check box and specify the required value in the Maximum file size field. The AMSI Protection component will not unpack compound files that are larger than the specified size.
- To allow the AMSI Protection component to unpack large compound files, clear the Do not unpack large compound files check box.
The AMSI Protection component scans large files that are extracted from archives, regardless of whether the Do not unpack large compound files check box is selected.
- Save your changes.
Exploit Prevention
The Exploit Prevention component detects program code that takes advantage of vulnerabilities on the computer to exploit administrator privileges or to perform malicious activities. For example, exploits can utilize a buffer overflow attack. To do so, the exploit sends a large amount of data to a vulnerable application. When processing this data, the vulnerable application executes malicious code. As a result of this attack, the exploit can start an unauthorized installation of malware. When there is an attempt to run an executable file from a vulnerable application that was not performed by the user, Kaspersky Endpoint Security blocks this file from running or notifies the user.
Enabling and disabling Exploit Prevention
By default, Exploit Prevention is enabled and functions in the optimal mode. Kaspersky Endpoint Security monitors executable files being run by vulnerable applications. If Kaspersky Endpoint Security detects that an executable file from a vulnerable application was run by something other than the user, Kaspersky Endpoint Security will perform the selected action (for example, will block the operation).
How to enable or disable Exploit Prevention in the Administration Console (MMC)
- Open the Kaspersky Security Center Administration Console.
- In the console tree, select Policies.
- Select the necessary policy and double-click to open the policy properties.
- In the policy window, select Advanced Threat Protection → Exploit Prevention.
- Use the Exploit Prevention check box to enable or disable the component.
- Select the relevant action in the On detecting exploit block:
- Block. If this item is selected, on detecting an exploit, Kaspersky Endpoint Security blocks the operations of this exploit and makes a log entry with information about this exploit.
- Inform. If this item is selected, when Kaspersky Endpoint Security detects an exploit it logs an entry containing information about the exploit and adds information about this exploit to the list of active threats.

Notification about active threat
- Save your changes.
How to enable or disable Exploit Prevention in the Web Console and Cloud Console
- In the main window of the Web Console, select Assets (Devices) → Policies & profiles.
- Click the name of the Kaspersky Endpoint Security policy.
The policy properties window opens.
- Select the Application settings tab.
- Go to Advanced Threat Protection → Exploit Prevention.
- Use the Exploit Prevention toggle to enable or disable the component.
- Select the relevant action in the On detecting exploit block:
- Block. If this item is selected, on detecting an exploit, Kaspersky Endpoint Security blocks the operations of this exploit and makes a log entry with information about this exploit.
- Inform. If this item is selected, when Kaspersky Endpoint Security detects an exploit it logs an entry containing information about the exploit and adds information about this exploit to the list of active threats.
Notification about active threat
- Save your changes.
How to enable or disable Exploit Prevention in the application interface
- In the main application window, click the button.
- In the application settings window, select Advanced Threat Protection → Exploit Prevention.
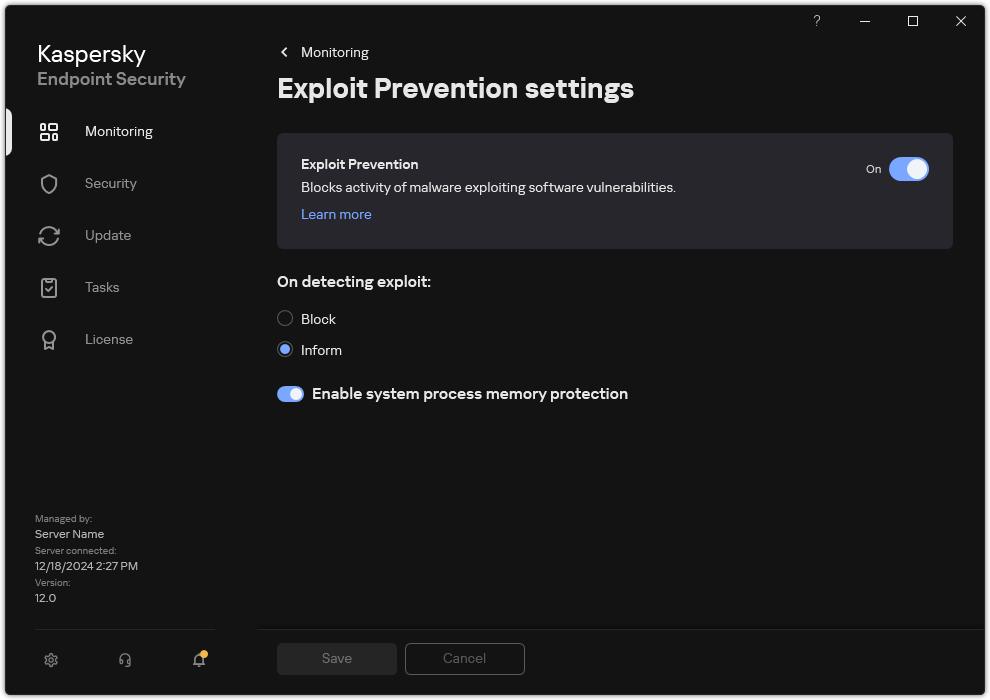
Exploit Prevention settings
- Use the Exploit Prevention toggle to enable or disable the component.
- Select the relevant action in the On detecting exploit block:
- Block. If this item is selected, on detecting an exploit, Kaspersky Endpoint Security blocks the operations of this exploit and makes a log entry with information about this exploit.
- Inform. If this item is selected, when Kaspersky Endpoint Security detects an exploit it logs an entry containing information about the exploit and adds information about this exploit to the list of active threats.
- Save your changes.
System processes memory protection
By default, protection of system process memory is enabled. Kaspersky Endpoint Security blocks external processes that attempt to gain access to system processes.
How to enable or disable the system process memory protection in the Administration Console (MMC)
How to enable or disable the system process memory protection in the Web Console and Cloud Console
How to enable or disable the system process memory protection in the application interface
- In the main application window, click the button.
- In the application settings window, select Advanced Threat Protection → Exploit Prevention.
Exploit Prevention settings
- Use the Enable system process memory protection toggle to enable or disable this feature.
- Save your changes.
Behavior Detection
The Behavior Detection component receives data on the actions of applications on your computer and provides this information to other protection components to improve their performance. The Behavior Detection component utilizes Behavior Stream Signatures (BSS) for applications. If application activity matches a behavior stream signature, Kaspersky Endpoint Security performs the selected responsive action. Kaspersky Endpoint Security functionality based on behavior stream signatures provides proactive defense for the computer.
Enabling and disabling Behavior Detection
By default, Behavior Detection is enabled and runs in the mode recommended by Kaspersky experts. You can disable Behavior Detection if necessary.
It is not recommended to disable Behavior Detection unless absolutely necessary because doing so would reduce the effectiveness of the protection components. The protection components may request data collected by the Behavior Detection component to detect threats.
To enable or disable Behavior Detection:
- In the main application window, click the button.
- In the application settings window, select Advanced Threat Protection → Behavior Detection.
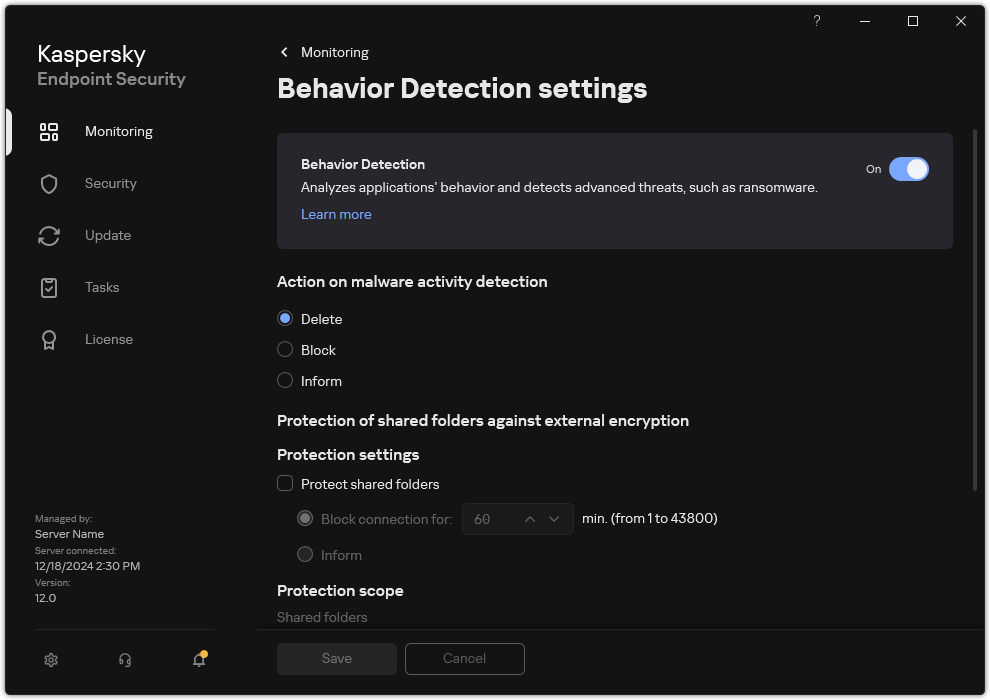
Behavior Detection settings
- Use the Behavior Detection toggle to enable or disable the component.
- Save your changes.
As a result, if Behavior Detection is enabled, Kaspersky Endpoint Security will use behavior stream signatures to analyze the activity of applications in the operating system.
Page top
Selecting the action to take on detecting malware activity
In order to choose what to do if an application engages in malicious activity, perform the following steps:
- In the main application window, click the button.
- In the application settings window, select Advanced Threat Protection → Behavior Detection.
Behavior Detection settings
- Select the relevant action in the Action on malware activity detection block:
- Delete. If this item is selected, on detecting malicious activity Kaspersky Endpoint Security deletes the executable file of the malicious application and creates a backup copy of the file in Backup.
- Block. If this item is selected, on detecting malicious activity Kaspersky Endpoint Security terminates this application.
- Inform. If this item is selected and malware activity of an application is detected, Kaspersky Endpoint Security adds information about the malware activity of the application to the list of active threats.
- Save your changes.
Protection of shared folders against external encryption
The component monitors operations performed only with those files that are stored on mass storage devices with the NTFS file system and that are not encrypted with EFS.
Protection of shared folders against external encryption provides for analysis of activity in shared folders. If this activity matches a behavior stream signature that is typical for external encryption, Kaspersky Endpoint Security performs the selected action.
If Kaspersky Endpoint Security detects an attempt to modify files in shared folders, it takes the following actions:
- Blocks access to file modification for the session that initiated the malicious activity (the file will be read-only).
- Creates backup copies of files that are being modified.
- Adds an entry to local application interface reports and sends information about the detected malicious activity to Kaspersky Security Center.
- Also, if the Remediation Engine component is enabled, the modified files are restored from backup copies.
Enabling and disabling protection of shared folders against external encryption
By default, protection of shared folders against external encryption is enabled and working as recommended by Kaspersky experts. To configure this functionality, you can create a protection scope and configure exclusions, if necessary. By default, the application automatically identifies shared folders and monitors file activity in all folders. When an attempt to externally encrypt files in shared folders is detected, Kaspersky Endpoint Security blocks the session of the remote user for one hour (by default).
After Kaspersky Endpoint Security is installed, the protection of shared folders against external encryption will be limited until the computer is restarted.
- In the main application window, click the button.
- In the application settings window, select Advanced Threat Protection → Behavior Detection.
Behavior Detection settings
- Use the Protect shared folders check box to enable or disable detection of activity that is typical of external encryption.
- Use the Protect shared folders check box to enable or disable detection of activity that is typical of external encryption.
- Select the relevant action the application will take when an attempt to modify files in shared folders is detected:
- Block connection for N min. If this option is selected, when Kaspersky Endpoint Security detects an attempt to modify files in shared folders, it blocks access to file modification (read only) for the session that initiated the malicious activity and creates backup copies of the modified files.
If the Remediation Engine component is enabled and the Block connection for N min option is selected, modified files are restored from backup copies.
- Inform. If this option is selected, on detecting an attempt to modify files in shared folders, Kaspersky Endpoint Security adds information about this attempt to modify files in shared folders to the list of active threats, adds an entry to local application interface reports and sends information about the detected malicious activity to Kaspersky Security Center.
- Block connection for N min. If this option is selected, when Kaspersky Endpoint Security detects an attempt to modify files in shared folders, it blocks access to file modification (read only) for the session that initiated the malicious activity and creates backup copies of the modified files.
- If necessary, edit a protection scope and define exclusions.
- Save your changes.
Configuring the blocking period of an untrusted computer
An untrusted computer is a remote computer that is engaging in malicious activity or data encryption. By default, Kaspersky Endpoint Security blocks the session of the remote user for one hour. When the blocking period expires, Kaspersky Endpoint Security removes the computer from the block list and restores access to the shared folder.
How to configure the blocking period of an untrusted computer in the Administration Console (MMC)
How to configure the blocking period of an untrusted computer in the Web Console and Cloud Console
How to configure the blocking period of an untrusted computer in the application interface
- In the main application window, click the button.
- In the application settings window, select Advanced Threat Protection → Behavior Detection.
Behavior Detection settings
- Under Protection of shared folders against external encryption, configure the blocking period of an untrusted computer that is engaging in malicious activity or data encryption.
- Save your changes.
As a result, the remote computer will be locked. To unlock the remote computer, you can restart Kaspersky Endpoint Security.
Page top
Editing the protection scope
The protection scope is a list of paths to shared folders in which Kaspersky Endpoint Security monitors file activity. Kaspersky Endpoint Security supports environment variables and the * and ? characters when entering a mask. By default, the application automatically identifies shared folders and monitors file activity in all folders.
Excluding a folder from the protection scope can reduce the amount of false positives if your organization uses data encryption when exchanging files using shared folders. For example, Behavior Detection can raise false positives when the user works with files with the ENC extension in a shared folder. Such activity matches a behavioral pattern that is typical for external encryption. If you have encrypted files in a shared folder to protect data, add that folder to exclusions.
You can also exclude computers from which external encryption attempts must not be handled.
How to edit a protection scope in the Administration Console (MMC)
How to edit a protection scope in the Web Console and Cloud Console
How to edit a protection scope in the application interface
- In the main application window, click the button.
- In the application settings window, select General settings → Exclusions and types of detected objects.
- In the Exclusions block, click the Manage exclusions link.
- Click Add.
- Click Browse and select the shared folder.
You can also enter the path manually. Kaspersky Endpoint Security supports the
*and?characters when entering a mask:- The
*(asterisk) character, which takes the place of any set of characters, except the\and/characters (delimiters of the names of files and folders in paths to files and folders). For example, the maskC:\*\*.txtwill include all paths to files with the TXT extension located in folders on the C: drive, but not in subfolders. - Two consecutive
*characters take the place of any set of characters (including an empty set) in the file or folder name, including the\and/characters (delimiters of the names of files and folders in paths to files and folders). For example, the maskC:\Folder\**\*.txtwill include all paths to files with the TXT extension located in folders nested within theFolder, except theFolderitself. The mask must include at least one nesting level. The maskC:\**\*.txtis not a valid mask. - The
?(question mark) character, which takes the place of any single character, except the\and/characters (delimiters of the names of files and folders in paths to files and folders). For example, the maskC:\Folder\???.txtwill include paths to all files residing in the folder namedFolderthat have the TXT extension and a name consisting of three characters.
You can use masks at the beginning, in the middle or at the end of the file path. For example, if you want to add a folder for all users to exclusions, enter the
?:\Users\*\Folder\mask. - The
- In the Protection components block, select the Behavior Detection component.
- If necessary, in the Comment field, enter a brief comment on the scan exclusion that you are creating.
- Select the Active status for the exclusion.
You can use the toggle to stop an exclusion at any time.
- Save your changes.
- In the main application window, click the button.
- In the application settings window, select Advanced Threat Protection → Behavior Detection.
Behavior Detection settings
- In the Protection scope block, click the Shared folders link.
- In the window that opens, select the Only specified shared folders mode.
- In the list of folders, click Add.
- This opens a window; in that window, enter the path to the shared folder that you want to include in the protection scope (for example,
C:\Share).To add a shared folder to the protection scope, use a local path.
- Click OK.
- If necessary, define protection scope exclusions:
- In the Exclusions block, click the Exclusions by mask link.
- In the window that opens, click the Add button.
- In the displayed window, specify a file extension in the
*.<file extension>format or a folder path. Kaspersky Endpoint Security supports the*and?characters when entering a mask.The application does not support some exclusion file extensions. Thus, you can specify an exclusion as
*.docxor**\Folder\**.
- You can exclude an object from scans without removing it from the list of objects in the protection scope. To do so, clear the check box next to the object.
- Save your changes.
Adding trusted computers for external data encryption
If your organization uses external data encryption in its file exchange workflow, you must create a list of trusted computers. Kaspersky Endpoint Security does not monitor data encryption by trusted computers.
The Audit Logon service must be enabled to enable exclusions of addresses from protection of shared folders against external encryption. By default, the Audit Logon service is disabled (for detailed information about enabling the Audit Logon service, please visit the Microsoft website).
The functionality for excluding addresses from shared folder protection does not work on a remote computer if the remote computer was turned on before Kaspersky Endpoint Security was started. You can restart this remote computer after Kaspersky Endpoint Security is started to ensure that the functionality for excluding addresses from shared folder protection works on this remote computer.
How to add a trusted computer for external data encryption in the Administration Console (MMC)
How to add a trusted computer for external data encryption in the Web Console and Cloud Console
How to add a trusted computer for external data encryption in the application interface
- In the main application window, click the button.
- In the application settings window, select Advanced Threat Protection → Behavior Detection.
Behavior Detection settings
- In the Exclusions block, click the Exclusions by name or IP address link.
- In the window that opens, click the Add button.
- Enter IP addresses, IP address range, or names of computers from which external encryption attempts must not be handled.
Examples:
192.168.0.0 - 192.168.255.255192.168.0.0/24192.168.2-3.0-1282001:db8:fd0c::/642001:db8:fd0c:: - 2001:db8:fd0c:ffff:ffff:ffff:ffff:ffff
- Save your changes.
Exporting and importing a list of exclusions from protection of shared folders against external encryption
You can export the list of exclusions to an XML file. Then you can modify the file to, for example, add a large number of addresses of the same type. You can also use the export/import function to back up the list of exclusions or to migrate the list to a different server.
How to export and import a list of exclusions in the Administration Console (MMC)
How to export and import a list of exclusions in the Web Console and Cloud Console
Page top
Host Intrusion Prevention
This component is available if Kaspersky Endpoint Security is installed on a computer that runs on Windows for workstations. This component is unavailable if Kaspersky Endpoint Security is installed on a computer that runs on Windows for servers.
The Host Intrusion Prevention component prevents applications from performing actions that may be dangerous for the operating system, and ensures control over access to operating system resources and personal data. The component provides computer protection with the help of anti-virus databases and the Kaspersky Security Network cloud service.
The component controls the operation of applications by using application rights. Application rights include the following access parameters:
- Access to operating system resources (for example, automatic startup options, registry keys)
- Access to personal data (such as files and applications)
Network activity of applications is controlled by the Firewall using network rules.
During the first startup of the application, the Host Intrusion Prevention component performs the following actions:
- Checks the security of the application using downloaded anti-virus databases.
- Checks the security of the application in Kaspersky Security Network.
You are advised to participate in Kaspersky Security Network to help the Host Intrusion Prevention component work more effectively.
- Places the application in one of the trust groups: Trusted, Low Restricted, High Restricted, Untrusted.
A trust group defines the rights that Kaspersky Endpoint Security refers to when controlling application activity. Kaspersky Endpoint Security places an application in a trust group depending on the level of danger that this application may pose to the computer.
Kaspersky Endpoint Security places an application in a trust group for the Firewall and Host Intrusion Prevention components. You cannot change the trust group only for the Firewall or Host Intrusion Prevention.
If you refused to participate in KSN or there is no network, Kaspersky Endpoint Security places the application in a trust group depending on the settings of the Host Intrusion Prevention component. After receiving the reputation of the application from KSN, the trust group can be changed automatically.
- Blocks application actions depending on the trust group. For example, applications from the High Restricted trust group are denied access to the operating system modules.
The next time the application is started, Kaspersky Endpoint Security checks the integrity of the application. If the application is unchanged, the component uses the current application rights for it. If the application has been modified, Kaspersky Endpoint Security analyzes the application as if it were being started for the first time.
Enabling and disabling Host Intrusion Prevention
By default, the Host Intrusion Prevention component is enabled and runs in the mode recommended by Kaspersky experts.
How to enable or disable the Host Intrusion Prevention component in the Administration Console (MMC)
- Open the Kaspersky Security Center Administration Console.
- In the console tree, select Policies.
- Select the necessary policy and double-click to open the policy properties.
- In the policy window, select Advanced Threat Protection → Host Intrusion Prevention.
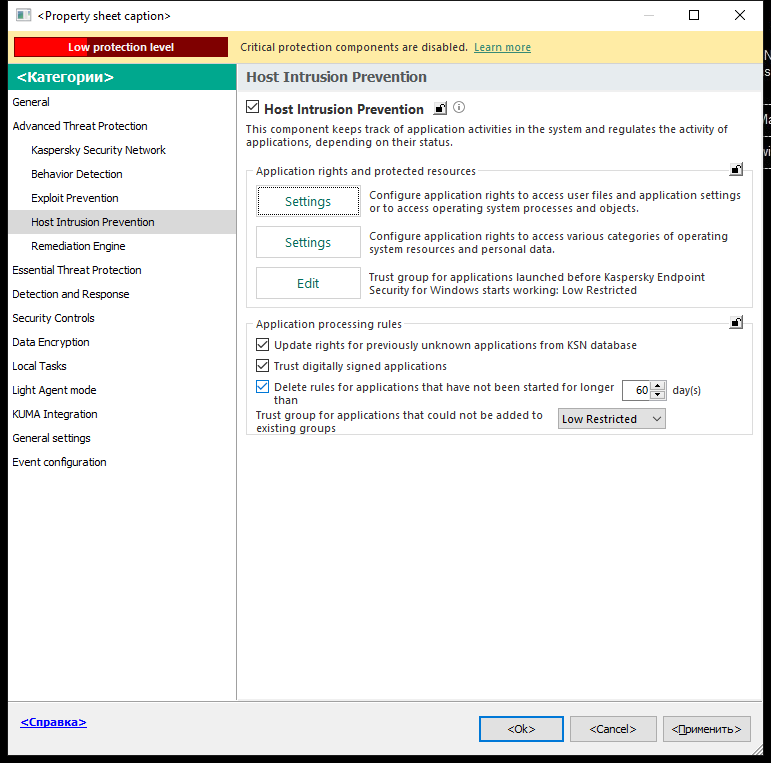
Intrusion Prevention settings
- Use the Host Intrusion Prevention check box to enable or disable the component.
- Save your changes.
- In the main window of the Web Console, select Assets (Devices) → Policies & profiles.
- Click the name of the Kaspersky Endpoint Security policy.
The policy properties window opens.
- Select the Application settings tab.
- Go to Advanced Threat Protection → Host Intrusion Prevention.
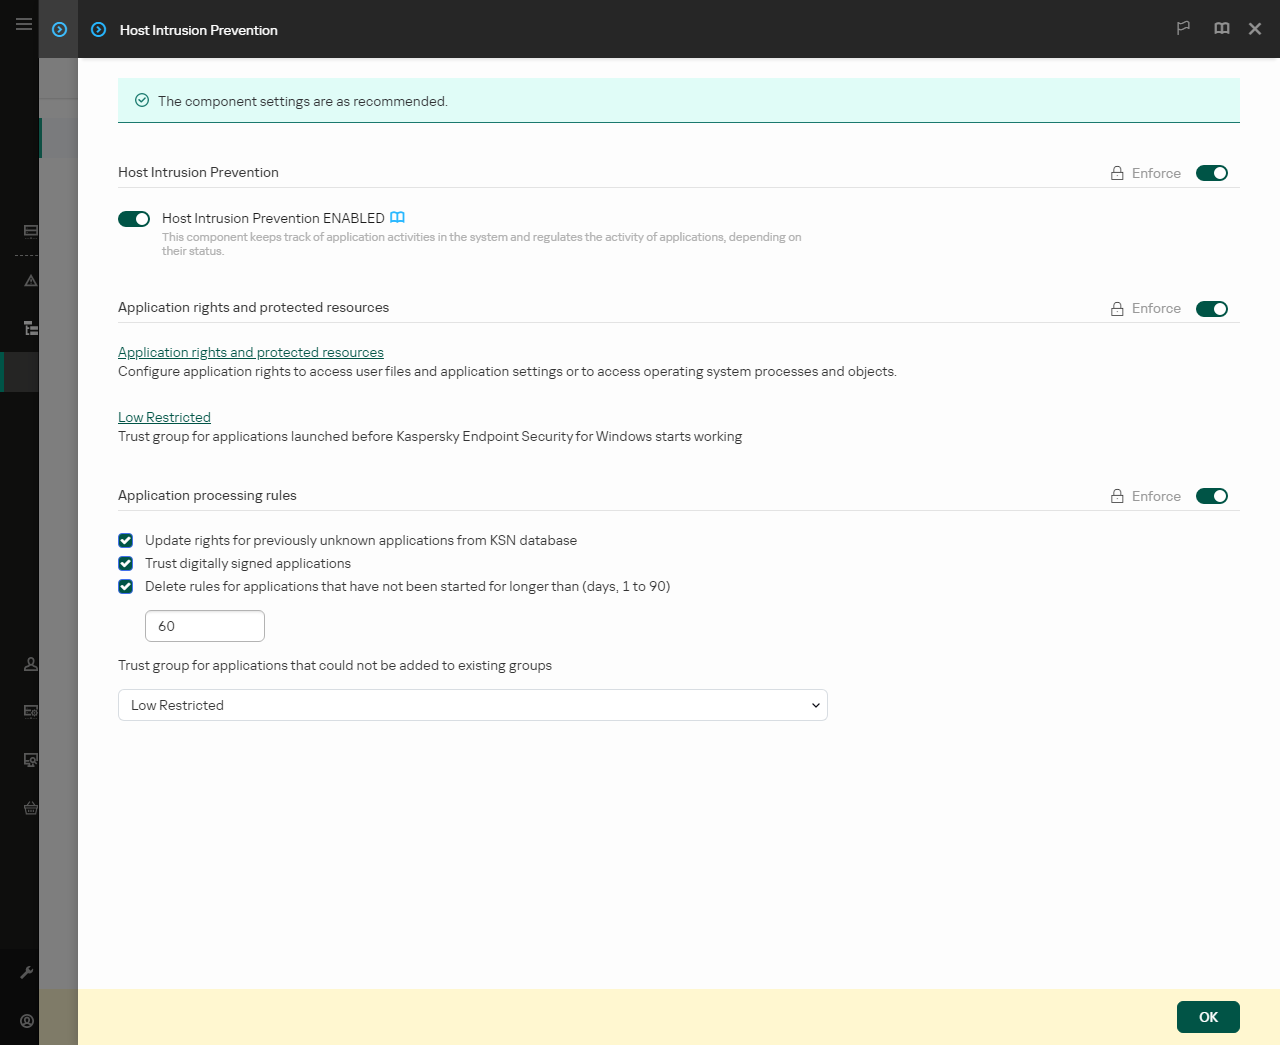
Intrusion Prevention settings
- Use the Host Intrusion Prevention toggle to enable or disable the component.
- Save your changes.
How to enable or disable the Host Intrusion Prevention component in the application interface
- In the main application window, click the button.
- In the application settings window, select Advanced Threat Protection → Host Intrusion Prevention.
- Use the Host Intrusion Prevention toggle to enable or disable the component.
- Save your changes.
If the Host Intrusion Prevention component is enabled, Kaspersky Endpoint Security will place an application in a trust group depending on the level of danger that this application may pose to the computer. Kaspersky Endpoint Security will then block the actions of the application depending on the trust group.
Page top
Managing application trust groups
When each application is started for the first time, the Host Intrusion Prevention component checks the security of the application and places the application into one of the trust groups.
At the first stage of the application scan, Kaspersky Endpoint Security searches the internal database of known applications for a matching entry and at the same time sends a request to the Kaspersky Security Network database (if an Internet connection is available). Based on the results of the search in the internal database and the Kaspersky Security Network database, the application is placed into a trust group. Each time the application is subsequently started, Kaspersky Endpoint Security sends a new query to the KSN database and places the application into a different trust group if the reputation of the application in the KSN database has changed.
You can select a trust group to which Kaspersky Endpoint Security must automatically assign all unknown applications. Applications that were started before Kaspersky Endpoint Security are automatically moved to the trust group defined in Host Intrusion Prevention component settings.
For applications that were started before Kaspersky Endpoint Security, only network activity is controlled. Control is performed according to the network rules defined in the Firewall settings.
Changing the trust group of an application
When each application is started for the first time, the Host Intrusion Prevention component checks the security of the application and places the application into one of the trust groups.
Kaspersky specialists do not recommend moving applications from the automatically assigned trust group to a different trust group. Instead, you can modify rights for an individual application if necessary.
How to change the trust group of an application in the Administration Console (MMC)
- Open the Kaspersky Security Center Administration Console.
- In the console tree, select Policies.
- Select the necessary policy and double-click to open the policy properties.
- In the policy window, select Advanced Threat Protection → Host Intrusion Prevention.
Intrusion Prevention settings
- In the Application rights and protected resources block, click the Settings button.
This opens the application rights configuration window and the list of protected resources.
- Select the Application rights tab.
- Click Add.
- In the window that opens, enter criteria to search for the application whose trust group you want to change.
You can enter the name of the application or the name of the vendor. Kaspersky Endpoint Security supports environment variables and the
*and?characters when entering a mask. - Click Refresh.
Kaspersky Endpoint Security will search for the application in the consolidated list of applications installed on managed computers. Kaspersky Endpoint Security will show a list of applications that satisfy your search criteria.
- Select the necessary application.
- In the Add selected application to the trust group drop-down list, select the necessary trust group for the application.
- Save your changes.
How to change the trust group of an application in the Web Console and Cloud Console
- In the main window of the Web Console, select Assets (Devices) → Policies & profiles.
- Click the name of the Kaspersky Endpoint Security policy.
The policy properties window opens.
- Select the Application settings tab.
- Go to Advanced Threat Protection → Host Intrusion Prevention.
Intrusion Prevention settings
- In the Application rights and protected resources block, click the Application rights and protected resources link.
This opens the application rights configuration window and the list of protected resources.
- Select the Application rights tab.
You will see a list of trust groups on the left side of the window and their properties on the right side.
- Click Add.
This starts the Wizard for adding an application to a trust group.
- Select the relevant trust group for the application.
- Select the Application type. Go to the next step.
If you want to change the trust group for multiple applications, select the Group type and define a name for the application group.
- In the opened list of applications, select the applications whose trust group you want to change.
Use a filter. You can enter the name of the application or the name of the vendor. Kaspersky Endpoint Security supports environment variables and the
*and?characters when entering a mask. - Exit the Wizard.
The application will be added to the trust group.
- Save your changes.
How to change the trust group of an application in the application interface
- In the main application window, click the button.
- In the application settings window, select Advanced Threat Protection → Host Intrusion Prevention.
- Click Manage applications.
This opens the list of installed applications.
- Select the necessary application.
- In the context menu of the application, click Restrictions → <trust group>.
- Save your changes.
As a result, the application will be put into the other trust group. Kaspersky Endpoint Security will then block the actions of the application depending on the trust group. The ![]() (user-defined) status will be assigned to the application. If the reputation of the application is changed in Kaspersky Security Network, the Host Intrusion Prevention component will leave this application's trust group unchanged.
(user-defined) status will be assigned to the application. If the reputation of the application is changed in Kaspersky Security Network, the Host Intrusion Prevention component will leave this application's trust group unchanged.
Configuring trust group rights
The optimal application rights are created for different trust groups by default. The settings of rights for application groups that are in a trust group inherit values from the settings of the trust group rights.
How to change trust group rights in the Administration Console (MMC)
- Open the Kaspersky Security Center Administration Console.
- In the console tree, select Policies.
- Select the necessary policy and double-click to open the policy properties.
- In the policy window, select Advanced Threat Protection → Host Intrusion Prevention.
Intrusion Prevention settings
- In the Application rights and protected resources block, click the Settings button.
This opens the application rights configuration window and the list of protected resources.
- Select the Application rights tab.
- Select the necessary trust group.
- In the context menu of the trust group, select Group rights.
This opens the trust group properties.
- Do one of the following:
- If you want to edit trust group rights that regulate operations with the operating system registry, user files, and application settings, select the Files and system registry tab.
- If you want to edit trust group rights that regulate access to operating system processes and objects, select the Rights tab.
Network activity of applications is controlled by the Firewall using network rules.
- For the relevant resource, in the column of the corresponding action, right-click to open the context menu and select the necessary option: Inherit, Allow (
 ) or Block (
 ).
). - If you want to monitor the use of computer resources, select Log events (
 /
/  ).
).Kaspersky Endpoint Security will record information about the operation of the Host Intrusion Prevention component. Reports contain information about operations with computer resources performed by the application (allowed or forbidden). Reports also contain information about the applications that utilize each resource.
- Save your changes.
How to change trust group rights in the Web Console and Cloud Console
- In the main window of the Web Console, select Assets (Devices) → Policies & profiles.
- Click the name of the Kaspersky Endpoint Security policy.
The policy properties window opens.
- Select the Application settings tab.
- Go to Advanced Threat Protection → Host Intrusion Prevention.
Intrusion Prevention settings
- In the Application rights and protected resources block, click the Application rights and protected resources link.
This opens the application rights configuration window and the list of protected resources.
- Select the Application rights tab.
You will see a list of trust groups on the left side of the window and their properties on the right side.
- In the left part of the window, select the relevant trust group.
- In the right part of the window, in the drop-down list, do one of the following:
- If you want to edit trust group rights that regulate operations with the operating system registry, user files, and application settings, select Files and system registry.
- If you want to edit trust group rights that regulate access to operating system processes and objects, select Rights.
Network activity of applications is controlled by the Firewall using network rules.
- For the relevant resource, in the column of the corresponding action, select the necessary option: Inherit, Allow (
 ), Block (
 ).
). - If you want to monitor the use of computer resources, select Log events (
 /
/  ).
).Kaspersky Endpoint Security will record information about the operation of the Host Intrusion Prevention component. Reports contain information about operations with computer resources performed by the application (allowed or forbidden). Reports also contain information about the applications that utilize each resource.
- Save your changes.
How to change trust group rights in the application interface
- In the main application window, click the button.
- In the application settings window, select Advanced Threat Protection → Host Intrusion Prevention.
- Click Manage applications.
This opens the list of installed applications.
- Select the necessary trust group.
- In the context menu of the trust group, select Details and rules.
This opens the trust group properties.
- Do one of the following:
- If you want to edit trust group rights that regulate operations with the operating system registry, user files, and application settings, select the Files and system registry tab.
- If you want to edit trust group rights that regulate access to operating system processes and objects, select the Rights tab.
Network activity of applications is controlled by the Firewall using network rules.
- For the relevant resource, in the column of the corresponding action, right-click to open the context menu and select the necessary option: Inherit, Allow (
 ) or Deny (
 ).
). - If you want to monitor the use of computer resources, select Log events (
 ).
).Kaspersky Endpoint Security will record information about the operation of the Host Intrusion Prevention component. Reports contain information about operations with computer resources performed by the application (allowed or forbidden). Reports also contain information about the applications that utilize each resource.
- Save your changes.
The trust group rights will be changed. Kaspersky Endpoint Security will then block the actions of the application depending on the trust group. The ![]() status (Custom settings) will be assigned to the trust group.
status (Custom settings) will be assigned to the trust group.
Selecting a trust group for applications started before Kaspersky Endpoint Security
For applications that were started before Kaspersky Endpoint Security, only network activity is controlled. Control is performed according to the network rules defined in the Firewall settings. To specify which network rules must be applied to network activity monitoring for such applications, you must select a trust group.
- Open the Kaspersky Security Center Administration Console.
- In the console tree, select Policies.
- Select the necessary policy and double-click to open the policy properties.
- In the policy window, select Advanced Threat Protection → Host Intrusion Prevention.
Intrusion Prevention settings
- In the Application rights and protected resources block, click the Edit button.
- For the Trust group for applications launched before Kaspersky Endpoint Security starts working setting, select the appropriate trust group.
- Save your changes.
- In the main window of the Web Console, select Assets (Devices) → Policies & profiles.
- Click the name of the Kaspersky Endpoint Security policy.
The policy properties window opens.
- Select the Application settings tab.
- Go to Advanced Threat Protection → Host Intrusion Prevention.
Intrusion Prevention settings
- For the Trust group for applications launched before Kaspersky Endpoint Security starts working setting, select the appropriate trust group.
- Save your changes.
- In the main application window, click the button.
- In the application settings window, select Advanced Threat Protection → Host Intrusion Prevention.
- In the Trust group for applications started before startup of Kaspersky Endpoint Security block, select the appropriate trust group.
- Save your changes.
As a result, an application that is started before Kaspersky Endpoint Security will be put into the other trust group. Kaspersky Endpoint Security will then block the actions of the application depending on the trust group.
Page top
Selecting a trust group for unknown applications
During the first startup of an application, the Host Intrusion Prevention component determines the trust group for the application. If you do not have Internet access or if Kaspersky Security Network has no information about this application, Kaspersky Endpoint Security will place the application into the Low Restricted group by default. When information about a previously unknown application is detected in KSN, Kaspersky Endpoint Security will update the rights of this application. You can then manually edit the application rights.
How to select a trust group for unknown applications in the Administration Console (MMC)
- Open the Kaspersky Security Center Administration Console.
- In the console tree, select Policies.
- Select the necessary policy and double-click to open the policy properties.
- In the policy window, select Advanced Threat Protection → Host Intrusion Prevention.
Intrusion Prevention settings
- In the Application processing rules block, use the Trust group for applications that could not be added to existing groups drop-down list to select the necessary trust group.
If participation in Kaspersky Security Network is enabled, Kaspersky Endpoint Security sends KSN a request for the reputation of an application each time the application is started. Based on the received response, the application may be moved to a trust group that is different from the one specified in the Host Intrusion Prevention component settings.
- Use the Update rights for previously unknown applications from KSN database check box to configure automatic update of the rights of unknown applications.
- Save your changes.
How to select a trust group for unknown applications in the Web Console and Cloud Console
- In the main window of the Web Console, select Assets (Devices) → Policies & profiles.
- Click the name of the Kaspersky Endpoint Security policy.
The policy properties window opens.
- Select the Application settings tab.
- Go to Advanced Threat Protection → Host Intrusion Prevention.
Intrusion Prevention settings
- In the Application processing rules block, use the Trust group for applications that could not be added to existing groups drop-down list to select the necessary trust group.
If participation in Kaspersky Security Network is enabled, Kaspersky Endpoint Security sends KSN a request for the reputation of an application each time the application is started. Based on the received response, the application may be moved to a trust group that is different from the one specified in the Host Intrusion Prevention component settings.
- Use the Update rights for previously unknown applications from KSN database check box to configure automatic update of the rights of unknown applications.
- Save your changes.
How to select a trust group for unknown applications in the application interface
- In the main application window, click the button.
- In the application settings window, select Advanced Threat Protection → Host Intrusion Prevention.
- In the Application processing rules block, select the appropriate trust group.
If participation in Kaspersky Security Network is enabled, Kaspersky Endpoint Security sends KSN a request for the reputation of an application each time the application is started. Based on the received response, the application may be moved to a trust group that is different from the one specified in the Host Intrusion Prevention component settings.
- Use the Update rules for previously unknown applications from KSN check box to configure automatic update of the rights of unknown applications.
- Save your changes.
Selecting a trust group for digitally signed applications
Kaspersky Endpoint Security always places applications signed by Microsoft certificates or Kaspersky certificates into the Trusted group.
How to select a trust group for digitally signed applications in the Administration Console (MMC)
- Open the Kaspersky Security Center Administration Console.
- In the console tree, select Policies.
- Select the necessary policy and double-click to open the policy properties.
- In the policy window, select Advanced Threat Protection → Host Intrusion Prevention.
Intrusion Prevention settings
- In the Application processing rules block, use the Trust digitally signed applications check box to enable or disable automatic assignment to the Trusted group for applications containing the digital signature of trusted vendors.
Trusted vendors are those software vendors that are included in the trusted group by Kaspersky. You can also add vendor certificate to the trusted system certificate store manually.
If this check box is cleared, the Host Intrusion Prevention component does not consider digitally signed applications to be trusted, and uses other parameters to determine their trust group.
- Save your changes.
How to select a trust group for digitally signed applications in the Web Console and Cloud Console
- In the main window of the Web Console, select Assets (Devices) → Policies & profiles.
- Click the name of the Kaspersky Endpoint Security policy.
The policy properties window opens.
- Select the Application settings tab.
- Go to Advanced Threat Protection → Host Intrusion Prevention.
Intrusion Prevention settings
- In the Application processing rules block, use the Trust digitally signed applications check box to enable or disable automatic assignment to the Trusted group for applications containing the digital signature of trusted vendors.
Trusted vendors are those software vendors that are included in the trusted group by Kaspersky. You can also add vendor certificate to the trusted system certificate store manually.
If this check box is cleared, the Host Intrusion Prevention component does not consider digitally signed applications to be trusted, and uses other parameters to determine their trust group.
- Save your changes.
How to select a trust group for digitally signed applications in the application interface
- In the main application window, click the button.
- In the application settings window, select Advanced Threat Protection → Host Intrusion Prevention.
- In the Application processing rules block, use the Trust digitally signed applications check box to enable or disable automatic assignment to the Trusted group for applications containing the digital signature of trusted vendors.
Trusted vendors are those software vendors that are included in the trusted group by Kaspersky. You can also add vendor certificate to the trusted system certificate store manually.
If this check box is cleared, the Host Intrusion Prevention component does not consider digitally signed applications to be trusted, and uses other parameters to determine their trust group.
- Save your changes.
Managing application rights
By default, application activity is controlled based on the application rights that are defined for the specific trust group that Kaspersky Endpoint Security assigned to the application when it started for the first time. If necessary, you can edit the application rights for an entire trust group, for an individual application, or for a group of applications within a trust group.
Manually defined application rights have a higher priority than application rights that were defined for a trust group. In other words, if manually defined application rights differ from the application rights defined for a trust group, the Host Intrusion Prevention component controls application activity according to the manually defined application rights.
The rules that you create for applications are inherited by child applications. For example, if you deny all network activity for cmd.exe, all network activity will also be denied for notepad.exe if it is started using cmd.exe. When an application is not a child of the application it runs from, rules are not inherited.
How to change application rights in the Administration Console (MMC)
- Open the Kaspersky Security Center Administration Console.
- In the console tree, select Policies.
- Select the necessary policy and double-click to open the policy properties.
- In the policy window, select Advanced Threat Protection → Host Intrusion Prevention.
Intrusion Prevention settings
- In the Application rights and protected resources block, click the Settings button.
This opens the application rights configuration window and the list of protected resources.
- Select the Application rights tab.
- Click Add.
- In the window that opens, enter criteria to search for the application whose application rights you want to change.
You can enter the name of the application or the name of the vendor. Kaspersky Endpoint Security supports environment variables and the
*and?characters when entering a mask. - Click Refresh.
Kaspersky Endpoint Security will search for the application in the consolidated list of applications installed on managed computers. Kaspersky Endpoint Security will show a list of applications that satisfy your search criteria.
- Select the necessary application.
- In the Add selected application to the trust group drop-down list, select Default groups and click OK.
The application will be added to the default group.
- Select the relevant application and then select Application rights from the context menu of the application.
This opens the application properties.
- Do one of the following:
- If you want to edit trust group rights that regulate operations with the operating system registry, user files, and application settings, select the Files and system registry tab.
- If you want to edit trust group rights that regulate access to operating system processes and objects, select the Rights tab.
Network activity of applications is controlled by the Firewall using network rules.
- For the relevant resource, in the column of the corresponding action, right-click to open the context menu and select the necessary option: Inherit, Allow () or Block ().
- If you want to monitor the use of computer resources, select Log events ( / ).
Kaspersky Endpoint Security will record information about the operation of the Host Intrusion Prevention component. Reports contain information about operations with computer resources performed by the application (allowed or forbidden). Reports also contain information about the applications that utilize each resource.
- Save your changes.
How to change application rights in the Web Console and Cloud Console
- In the main window of the Web Console, select Assets (Devices) → Policies & profiles.
- Click the name of the Kaspersky Endpoint Security policy.
The policy properties window opens.
- Select the Application settings tab.
- Go to Advanced Threat Protection → Host Intrusion Prevention.
Intrusion Prevention settings
- In the Application rights and protected resources block, click the Application rights and protected resources link.
This opens the application rights configuration window and the list of protected resources.
- Select the Application rights tab.
You will see a list of trust groups on the left side of the window and their properties on the right side.
- Click Add.
This starts the Wizard for adding an application to a trust group.
- Select the relevant trust group for the application.
- Select the Application type. Go to the next step.
If you want to change the trust group for multiple applications, select the Group type and define a name for the application group.
- In the opened list of applications, select the applications whose application rights you want to change.
Use a filter. You can enter the name of the application or the name of the vendor. Kaspersky Endpoint Security supports environment variables and the
*and?characters when entering a mask. - Exit the Wizard.
The application will be added to the trust group.
- In the left part of the window, select the relevant application.
- In the right part of the window, in the drop-down list, do one of the following:
- If you want to edit trust group rights that regulate operations with the operating system registry, user files, and application settings, select Files and system registry.
- If you want to edit trust group rights that regulate access to operating system processes and objects, select Rights.
Network activity of applications is controlled by the Firewall using network rules.
- For the relevant resource, in the column of the corresponding action, select the necessary option: Inherit, Allow (), Block ().
- If you want to monitor the use of computer resources, select Log events ( / ).
Kaspersky Endpoint Security will record information about the operation of the Host Intrusion Prevention component. Reports contain information about operations with computer resources performed by the application (allowed or forbidden). Reports also contain information about the applications that utilize each resource.
- Save your changes.
How to change application rights in the application interface
- In the main application window, click the button.
- In the application settings window, select Advanced Threat Protection → Host Intrusion Prevention.
- Click Manage applications.
This opens the list of installed applications.
- Select the necessary application.
- In the context menu of the application, select Details and rules.
This opens the application properties.
- Do one of the following:
- If you want to edit trust group rights that regulate operations with the operating system registry, user files, and application settings, select the Files and system registry tab.
- If you want to edit trust group rights that regulate access to operating system processes and objects, select the Rights tab.
- For the relevant resource, in the column of the corresponding action, right-click to open the context menu and select the necessary option: Inherit, Allow () or Deny ().
- If you want to monitor the use of computer resources, select Log events ().
Kaspersky Endpoint Security will record information about the operation of the Host Intrusion Prevention component. Reports contain information about operations with computer resources performed by the application (allowed or forbidden). Reports also contain information about the applications that utilize each resource.
- Select the Exclusions tab and configure the advanced settings of the application (see the table below).
- Save your changes.
Advanced Settings of the application
Parameter
Description
Do not scan files before opening
All files that are opened by the application are excluded from scans by Kaspersky Endpoint Security. For example, if you are using applications to back up files, this feature helps reduce the consumption of resources by Kaspersky Endpoint Security.
Do not monitor application activity
Kaspersky Endpoint Security will not monitor the application's file- and network activity in the operating system. You can configure application activity monitoring for different components of Kaspersky Endpoint Security:
- Do not monitor for protection and control components. Application activity is monitored by the following components: Behavior Detection, Exploit Prevention, Host Intrusion Prevention, Remediation Engine and Firewall.
- Do not monitor for Managed Detection and Response and Endpoint Detection and Response. Application activity is monitored by built-in MDR agent and built-in EDR (KATA) agent.
- Do not intercept console interactive input for Endpoint Detection and Response. Kaspersky Endpoint Security does not send telemetry data about managing the application on the console. Telemetry data is used by Kaspersky Anti Targeted Attack Platform (EDR).
Do not inherit restrictions from the parent process (application)
The restrictions configured for the parent process will not be applied by Kaspersky Endpoint Security to a child process. The parent process is started by an application for which application rights (Host Intrusion Prevention) and application network rules (Firewall) are configured.
Do not monitor child application activity
Kaspersky Endpoint Security will not monitor the file activity or network activity of applications that are started by this application. You can apply the exclusion recursively. So that the application does not monitor the activity of the entire chain of child applications.
Allow interaction with the Kaspersky Endpoint Security interface
Kaspersky Endpoint Security Self-Defense blocks all attempts to manage application services from a remote computer. If the check box is selected, the remote access application is allowed to manage Kaspersky Endpoint Security settings through the Kaspersky Endpoint Security interface.
Do not scan encrypted traffic / Do not scan all traffic
Network traffic initiated by the application will be excluded from scans by Kaspersky Endpoint Security. You can exclude either all traffic or only encrypted traffic from scans. You can also exclude individual IP addresses and port numbers from scans.
Protecting operating system resources and personal data
The Host Intrusion Prevention component manages the rights of applications to take actions on various categories of operating system resources and personal data. Kaspersky specialists have established preset categories of protected resources. For example, the Operating system category has a Startup settings subcategory that lists all the registry keys associated with autorun of applications. You cannot edit or delete the preset categories of protected resources or the protected resources that are within these categories.
How to add a protected resource in the Administration Console (MMC)
- Open the Kaspersky Security Center Administration Console.
- In the console tree, select Policies.
- Select the necessary policy and double-click to open the policy properties.
- In the policy window, select Advanced Threat Protection → Host Intrusion Prevention.
Intrusion Prevention settings
- In the Application rights and protected resources block, click the Settings button.
This opens the application rights configuration window and the list of protected resources.
- Select the Protected resources tab.
You will see a list of protected resources in the left part of the window and the corresponding rights for accessing those resources depending on the specific trust group.
- Select the category of protected resources to which you want to add a new protected resource.
If you want to add a subcategory, click Add → Category.
- Click the Add button. In the drop-down list, select the type of resource that you want to add: File or folder or Registry key.
- In the window that opens, select a file, folder, or registry key.
You can view applications' rights to access the added resources. To do so, select an added resource in the left part of the window and Kaspersky Endpoint Security will show the access rights for each trust group. You can also disable control of application activity with resources by using the check box next to a new resource.
- Save your changes.
How to add a protected resource in the Web Console and Cloud Console
- In the main window of the Web Console, select Assets (Devices) → Policies & profiles.
- Click the name of the Kaspersky Endpoint Security policy.
The policy properties window opens.
- Select the Application settings tab.
- Go to Advanced Threat Protection → Host Intrusion Prevention.
Intrusion Prevention settings
- In the Application rights and protected resources block, click the Application rights and protected resources link.
This opens the application rights configuration window and the list of protected resources.
- Select the Protected resources tab.
You will see a list of protected resources in the left part of the window and the corresponding rights for accessing those resources depending on the specific trust group.
- Click Add.
The New Resource Wizard starts.
- Click the Group name link to select the category of protected resources to which you want to add a new protected resource.
If you want to add a subcategory, select the Category of protected resources option.
- Select the type of resource that you want to add: File or folder or Registry key.
- Select a file, folder, or registry key.
- Exit the Wizard.
You can view applications' rights to access the added resources. To do so, select an added resource in the left part of the window and Kaspersky Endpoint Security will show the access rights for each trust group. You can also use the check box in the Status column to disable control of application activity with resources.
- Save your changes.
How to add a protected resource in the application interface
- In the main application window, click the button.
- In the application settings window, select Advanced Threat Protection → Host Intrusion Prevention.
- Click Manage resources.
The list of protected resources opens.
- Select the category of protected resources to which you want to add a new protected resource.
If you want to add a subcategory, click Add → Category.
- Click the Add button. In the drop-down list, select the type of resource that you want to add: File or folder or Registry key.
- In the window that opens, select a file, folder, or registry key.
You can view applications' rights to access the added resources. To do so, select an added resource in the left part of the window and Kaspersky Endpoint Security will show a list of applications and the access rights for each application. You can also disable control of application activity with resources by using the
 Enable control button in the Status column.
 - Save your changes.
Kaspersky Endpoint Security will control access to the added operating system resources and to personal data. Kaspersky Endpoint Security controls an application's access to resources based on the trust group assigned to the application. You can also change the trust group of an application.
Page top
Deleting information about unused applications
Kaspersky Endpoint Security uses application rights to control the activities of applications. Application rights are determined by their trust group. Kaspersky Endpoint Security puts an application into a trust group when the application is started for the first time. You can manually change the trust group of an application. You can also manually configure the rights of an individual application. Kaspersky Endpoint Security stores the following information about an application: trust group of the application, and rights of the application.
Kaspersky Endpoint Security automatically deletes information about unused applications to save computer resources. Kaspersky Endpoint Security deletes application information according to the following rules:
- If the trust group and rights of an application were determined automatically, Kaspersky Endpoint Security deletes information about this application after 30 days. It is not possible to change the storage term for application information or turn off automatic deletion.
- If you manually put an application into a trust group or configured its access rights, Kaspersky Endpoint Security deletes information about this application after 60 days (default storage term). You can change the storage term for application information, or turn off automatic deletion (see the instructions below).
When you start an application whose information has been deleted, Kaspersky Endpoint Security analyzes the application as if it were starting for the first time.
- Open the Kaspersky Security Center Administration Console.
- In the console tree, select Policies.
- Select the necessary policy and double-click to open the policy properties.
- In the policy window, select Advanced Threat Protection → Host Intrusion Prevention.
Intrusion Prevention settings
- In the Application processing rules block, do one of the following:
- If you want to configure automatic deletion, select the Delete rules for applications that have not been started for longer than N day(s) check box and enter the number of days.
Information about the applications that you manually put into a trust group or whose access rights you manually configured will be deleted by Kaspersky Endpoint Security after the defined number of days. Information about applications whose trust group and application rights were automatically determined will also be deleted by Kaspersky Endpoint Security after 30 days.
- If you want to turn off automatic deletion, clear the Delete rules for applications that have not been started for longer than N day(s) check box.
Information about the applications that you manually put into a trust group or whose access rights you manually configured will be stored by Kaspersky Endpoint Security indefinitely, without any storage term limits. Kaspersky Endpoint Security will only delete information about applications whose trust group and application rights were automatically determined after 30 days.
- If you want to configure automatic deletion, select the Delete rules for applications that have not been started for longer than N day(s) check box and enter the number of days.
- Save your changes.
- In the main window of the Web Console, select Assets (Devices) → Policies & profiles.
- Click the name of the Kaspersky Endpoint Security policy.
The policy properties window opens.
- Select the Application settings tab.
- Go to Advanced Threat Protection → Host Intrusion Prevention.
Intrusion Prevention settings
- In the Application processing rules block, do one of the following:
- If you want to configure automatic deletion, select the Delete rules for applications that have not been started for longer than N day(s) check box and enter the number of days.
Information about the applications that you manually put into a trust group or whose access rights you manually configured will be deleted by Kaspersky Endpoint Security after the defined number of days. Information about applications whose trust group and application rights were automatically determined will also be deleted by Kaspersky Endpoint Security after 30 days.
- If you want to turn off automatic deletion, clear the Delete rules for applications that have not been started for longer than N day(s) check box.
Information about the applications that you manually put into a trust group or whose access rights you manually configured will be stored by Kaspersky Endpoint Security indefinitely, without any storage term limits. Kaspersky Endpoint Security will only delete information about applications whose trust group and application rights were automatically determined after 30 days.
- If you want to configure automatic deletion, select the Delete rules for applications that have not been started for longer than N day(s) check box and enter the number of days.
- Save your changes.
- In the main application window, click the button.
- In the application settings window, select Advanced Threat Protection → Host Intrusion Prevention.
- In the Application processing rules block, do one of the following:
- If you want to configure automatic deletion, select the Delete rules for applications that have not been started for longer than N day(s) check box and enter the number of days.
Information about the applications that you manually put into a trust group or whose access rights you manually configured will be deleted by Kaspersky Endpoint Security after the defined number of days. Information about applications whose trust group and application rights were automatically determined will also be deleted by Kaspersky Endpoint Security after 30 days.
- If you want to turn off automatic deletion, clear the Delete rules for applications that have not been started for longer than N day(s) check box.
Information about the applications that you manually put into a trust group or whose access rights you manually configured will be stored by Kaspersky Endpoint Security indefinitely, without any storage term limits. Kaspersky Endpoint Security will only delete information about applications whose trust group and application rights were automatically determined after 30 days.
- If you want to configure automatic deletion, select the Delete rules for applications that have not been started for longer than N day(s) check box and enter the number of days.
- Save your changes.
Page top
Monitoring Host Intrusion Prevention
You can receive reports on the operation of the Host Intrusion Prevention component. Reports contain information about operations with computer resources performed by the application (allowed or forbidden). Reports also contain information about the applications that utilize each resource.
To monitor Host Intrusion Prevention operations, you need to enable report writing. For example, you can enable forwarding of reports for individual applications in the Host Intrusion Prevention component settings.
When configuring Host Intrusion Prevention monitoring, take into account the potential network load when forwarding events to Kaspersky Security Center. You can also enable saving of reports only in the local log of Kaspersky Endpoint Security.
Page top
Protecting access to audio and video
Cybercriminals can use special programs to try to gain access to devices that record audio and video (such as microphones or webcams). Kaspersky Endpoint Security controls when applications receive an audio stream or video stream and protects data against unauthorized interception.
By default, Kaspersky Endpoint Security allows receiving audio and video streams only for applications from the Trusted group. The applications from Low Restricted, High Restricted and Untrusted groups are not allowed to receive the audio stream and video stream from devices. You can manually allow applications to receive the audio stream and video stream.
Special features of audio stream protection
Audio stream protection has the following special characteristics:
- The Host Intrusion Prevention component must be enabled for this functionality to work.
- If the application started receiving the audio stream before the Host Intrusion Prevention component was started, Kaspersky Endpoint Security allows the application to receive the audio stream and does not show any notifications.
- If you moved the application to the Untrusted group or High Restricted group after the application began receiving the audio stream, Kaspersky Endpoint Security allows the application to receive the audio stream and does not show any notifications.
- After the settings for the application's access to sound recording devices have been changed (for example, if the application has been blocked from receiving the audio stream), this application must be restarted to stop it from receiving the audio stream.
- Control of access to the audio stream from sound recording devices does not depend on an application's webcam access settings.
- Kaspersky Endpoint Security protects access to only built-in microphones and external microphones. Other audio streaming devices are not supported.
- Kaspersky Endpoint Security cannot guarantee the protection of an audio stream from such devices as DSLR cameras, portable video cameras, and action cameras.
- When you run audio and video recording or playback applications for the first time since installation of Kaspersky Endpoint Security, audio and video playback or recording may be interrupted. This is necessary in order to enable the functionality that controls access to sound recording devices by applications. The system service that controls audio hardware will be restarted when Kaspersky Endpoint Security is run for the first time.
Special features of application webcam access protection
Webcam access protection functionality has the following special considerations and limitations:
- The application controls video and still images derived from the processing of webcam data.
- The application controls the audio stream if it is part of the video stream received from the webcam.
- The application controls only webcams connected via USB or IEEE1394 that are displayed as Imaging Devices in the Windows Device Manager.
- Kaspersky Endpoint Security supports the following webcams:
- Logitech HD Webcam C270
- Logitech HD Webcam C310
- Logitech Webcam C210
- Logitech Webcam Pro 9000
- Logitech HD Webcam C525
- Microsoft LifeCam VX-1000
- Microsoft LifeCam VX-2000
- Microsoft LifeCam VX-3000
- Microsoft LifeCam VX-800
- Microsoft LifeCam Cinema.
Kaspersky cannot guarantee support for webcams that are not specified in this list.
Remediation Engine
The Remediation Engine lets Kaspersky Endpoint Security roll back actions that have been performed by malware in the operating system.
When rolling back malware activity in the operating system, Kaspersky Endpoint Security handles the following types of malware activity:
- File activity
Kaspersky Endpoint Security performs the following actions:
- Deletes executable files that were created by malware (on all media except network drives).
- Deletes executable files that were created by programs that have been infiltrated by malware.
- Restores files that have been modified or deleted by malware.
The file recovery feature has a number of limitations.
- Registry activity
Kaspersky Endpoint Security performs the following actions:
- Deletes registry keys that were created by malware.
- Does not restore registry keys that have been modified or deleted by malware.
- System activity
Kaspersky Endpoint Security performs the following actions:
- Terminates processes that have been initiated by malware.
- Terminates processes into which a malicious application has penetrated.
- Does not resume processes that have been halted by malware.
- Network activity
Kaspersky Endpoint Security performs the following actions:
- Blocks the network activity of malware.
- Blocks the network activity of processes that have been infiltrated by malware.
A rollback of malware actions can be started by the File Threat Protection or Behavior Detection component, or during a malware scan.
Rolling back malware operations affects a strictly defined set of data. Rollback has no adverse effects on the operating system or on the integrity of your computer data.
How to enable or disable the Remediation Engine component in the Administration Console (MMC)
How to enable or disable the Remediation Engine component in the Web Console and Cloud Console
How to enable or disable the Remediation Engine component in the application interface
- In the main application window, click the button.
- In the application settings window, select Advanced Threat Protection → Remediation Engine.
- Use the Remediation Engine toggle to enable or disable the component.
- Save your changes.
As a result, if Remediation Engine is enabled, Kaspersky Endpoint Security will roll back the actions taken by malicious applications in the operating system.
Page top
Kaspersky Security Network
To protect your computer more effectively, Kaspersky Endpoint Security uses data that is received from users around the globe. Kaspersky Security Network is designed for obtaining this data.
KSN functionality may not be available in the application in the U.S.
Kaspersky Security Network (KSN) is an infrastructure of cloud services providing access to the online Kaspersky Knowledge Base that contains information about the reputation of files, web resources, and software. The use of data from Kaspersky Security Network ensures faster responses by Kaspersky Endpoint Security to new threats, improves the performance of some protection components, and reduces the likelihood of false positives. If you are participating in Kaspersky Security Network, KSN services provide Kaspersky Endpoint Security with information about the category and reputation of scanned files, as well as information about the reputation of scanned web addresses.
Use of Kaspersky Security Network is voluntary. The application prompts you to use KSN during initial configuration of the application. Users can begin or discontinue participation in KSN at any time.
For more detailed information about sending Kaspersky statistical information that is generated during participation in KSN, and about the storage and destruction of such information, please refer to the Kaspersky Security Network Statement and the Kaspersky website. The ksn_<language ID>.txt file with the text of the Kaspersky Security Network Statement is included in the application distribution kit.
The infrastructure of Kaspersky reputation databases
Kaspersky Endpoint Security supports the following infrastructure solutions for working with Kaspersky reputation databases:
- Kaspersky Security Network (KSN) is the solution that is used by most Kaspersky applications. KSN participants receive information from Kaspersky and send Kaspersky information about objects detected on the user's computer to be analyzed additionally by Kaspersky analysts and to be included in the reputation and statistical databases.
- Kaspersky Private Security Network (KPSN) is a solution that enables users of computers hosting Kaspersky Endpoint Security or other Kaspersky applications to obtain access to Kaspersky reputation databases, and to other statistical data without sending data to Kaspersky from their own computers. KPSN is designed for corporate customers who are unable to participate in Kaspersky Security Network for any of the following reasons:
- Local workstations are not connected to the Internet.
- Transmission of any data outside the country or outside the corporate LAN is prohibited by law or restricted by corporate security policies.
By default, Kaspersky Security Center uses KSN. You can configure the use of KPSN in the Administration Console (MMC), in the Kaspersky Security Center Web Console, and in the command line. It is not possible to configure the use of KPSN in the Kaspersky Security Center Cloud Console.
For more details about KPSN, please refer to the documentation on Kaspersky Private Security Network.
Enabling and disabling the usage of Kaspersky Security Network
To enable or disable the usage of Kaspersky Security Network:
- In the main application window, click the button.
- In the application settings window, select Advanced Threat Protection → Kaspersky Security Network.
- Use the Kaspersky Security Network toggle to enable or disable the component.
If you enabled the use of KSN, Kaspersky Endpoint Security will display the Kaspersky Security Network Statement. Please read and accept the Kaspersky Security Network (KSN) Statement terms of use if you agree to them.
By default, Kaspersky Endpoint Security uses the Extended KSN mode. Extended KSN mode is a mode in which Kaspersky Endpoint Security sends additional data to Kaspersky.
- If required, flip the Enable extended KSN mode toggle off.
- Save your changes.
As a result, if use of KSN is enabled, Kaspersky Endpoint Security uses information about the reputation of files, web resources, and applications received from Kaspersky Security Network.
Page top
Limitations of Kaspersky Private Security Network
Kaspersky Private Security Network (KPSN) is a solution that enables users of computers hosting Kaspersky Endpoint Security or other Kaspersky applications to obtain access to Kaspersky reputation databases, and to other statistical data without sending data to Kaspersky from their own computers. Kaspersky Private Security Network lets you use your own local reputation database to check the reputation of objects (files or web addresses). The reputation of an object added to the local reputation database has a higher priority than one added to KSN/KPSN. For example, imagine that Kaspersky Endpoint Security is scanning a computer and requests the reputation of a file in KSN/KPSN. If the file has an Untrusted reputation in the local reputation database but has a Trusted reputation in KSN/KPSN, Kaspersky Endpoint Security will detect the file as Untrusted and will take the action defined for detected threats.
However, in some cases Kaspersky Endpoint Security might not request the reputation of an object in KSN/KPSN. If this is the case, Kaspersky Endpoint Security will not receive data from the local reputation database of KPSN. Kaspersky Endpoint Security might not request the reputation of an object in KSN/KPSN for the following reasons:
- Kaspersky applications are using offline reputation databases. Offline reputation databases are designed to optimize resources during operation of Kaspersky applications and to protect critically important objects on the computer. Offline reputation databases are created by Kaspersky experts based on data from Kaspersky Security Network. Kaspersky applications update offline reputation databases with anti-virus databases of the specific application. If offline reputation databases contain information about an object being scanned, the application does not request the reputation of this object from KSN/KPSN.
- Scan exclusions (trusted zone) are configured in the application settings. If this is the case, the application does not take into account the reputation of the object in the local reputation database.
- The application uses scan optimization technologies, such as iSwift or iChecker, or is caching reputation requests to KSN / KPSN. If this is the case, the application might not request the reputation of previously scanned objects.
- To optimize its workload, the application scans files of a certain format and size. The list of relevant formats and size limits are determined by Kaspersky experts. This list is updated with the application's anti-virus databases. You can also configure scan optimization settings in the application interface, for example, for the File Threat Protection component.
- Kaspersky Endpoint Security in Light Agent mode communicates with KSN servers through a KSN proxy server. Direct communication with KSN is not supported.
Enabling and disabling cloud mode for protection components
Cloud mode refers to the application operating mode in which Kaspersky Endpoint Security uses a light version of anti-virus databases. Kaspersky Security Network supports the operation of the application when light anti-virus databases are being used. The light version of anti-virus databases lets you use approximately half of the computer RAM that would otherwise be used with the usual databases. If you do not participate in Kaspersky Security Network or if cloud mode is disabled, Kaspersky Endpoint Security downloads the full version of anti-virus databases from Kaspersky servers.
When using Kaspersky Private Security Network, cloud mode functionality is available starting with Kaspersky Private Security Network version 3.0.
If the application is working in Light Agent mode, Cloud mode is not available.
To enable or disable cloud mode for protection components:
- In the main application window, click the button.
- In the application settings window, select Advanced Threat Protection → Kaspersky Security Network.
- Use the Enable cloud mode toggle to enable or disable the component.
- Save your changes.
As a result, Kaspersky Endpoint Security downloads a light version or full version of anti-virus databases during the next update.
If the light version of anti-virus databases is not available for use, Kaspersky Endpoint Security automatically switches to the premium version of anti-virus databases.
Page top
KSN Proxy settings
User computers managed by Kaspersky Security Center Administration Server can interact with KSN via the KSN Proxy service.
If the application is running in Light Agent mode, direct communication with KSN is not supported. Kaspersky Endpoint Security communicates with KSN servers through a KSN proxy server.
The KSN Proxy service provides the following capabilities:
- The user's computer can query KSN and submit information to KSN even without direct access to the Internet.
- The KSN Proxy service caches processed data, thereby reducing the load on the external network communication channel and speeding up receipt of the information that is requested by the user's computer.
By default, after KSN is enabled and the KSN Statement is accepted, the application uses a proxy server to connect to Kaspersky Security Network. The proxy server used by the application is the Kaspersky Security Center Administration Server via TCP port 13111. Therefore, if KSN Proxy is not available, you need to verify the following:
- The ksnproxy service is running on the Administration Server.
- The Firewall on the computer is not blocking port 13111.
You can configure the use of KSN Proxy as follows: enable or disable KSN Proxy, and configure the port for the connection. To do so, you need to open the Administration Server properties. For details on KSN Proxy configuration, please refer to the Kaspersky Security Center Help. You can also enable or disable KSN Proxy for individual computers in the Kaspersky Endpoint Security policy.
How to enable or disable KSN Proxy in the Administration Console (MMC)
How to enable or disable KSN Proxy in the Web Console
The KSN Proxy address matches the Administration Server address. When the Administration Server domain name is changed, you need to manually update the KSN Proxy address.
To configure the KSN Proxy address:
- Open the Kaspersky Security Center Administration Console.
- In the console tree, select the Advanced → Remote installation → Installation packages folder.
- In the context menu of the Installation packages folder, select Properties.
- On the General tab in the opened window, specify the new address of the KSN proxy server.
- Save your changes.
Checking the reputation of a file in Kaspersky Security Network
If you are doubtful of the security of a file, you can check its reputation in Kaspersky Security Network.
You can check the reputation of a file if you have accepted the terms of the Kaspersky Security Network Statement.
To check the reputation of a file in Kaspersky Security Network:
Open the file context menu and select the Check reputation in KSN option (see the figure below).
File context menu
Kaspersky Endpoint Security displays the file reputation:
![]() Trusted (Kaspersky Security Network). The application considers a file trusted if one or more of the following conditions are met:
Trusted (Kaspersky Security Network). The application considers a file trusted if one or more of the following conditions are met:
- the file is digitally signed by a trusted vendor;
- the file has a trusted reputation in Kaspersky Security Network;
- the user has placed the file in the Trusted group.
![]() Legitimate software that can be used by intruders to damage your computer or personal data. Although they do not have any malicious functions, such applications can be exploited by intruders. For details on legitimate software that could be used by criminals to harm the computer or personal data of a user, please refer to the Kaspersky IT Encyclopedia website. You can add these applications to the trusted list.
Legitimate software that can be used by intruders to damage your computer or personal data. Although they do not have any malicious functions, such applications can be exploited by intruders. For details on legitimate software that could be used by criminals to harm the computer or personal data of a user, please refer to the Kaspersky IT Encyclopedia website. You can add these applications to the trusted list.
![]() Untrusted (Kaspersky Security Network). A virus or other application that poses a threat.
Untrusted (Kaspersky Security Network). A virus or other application that poses a threat.
![]() Unknown (Kaspersky Security Network). Kaspersky Security Network does not have any information about the file. You can scan a file using anti-virus databases (the Scan for viruses option in the context menu).
Unknown (Kaspersky Security Network). Kaspersky Security Network does not have any information about the file. You can scan a file using anti-virus databases (the Scan for viruses option in the context menu).
Kaspersky Endpoint Security displays the KSN solution that was used to determine the reputation of the file: Kaspersky Security Network or Kaspersky Private Security Network.
Kaspersky Endpoint Security also displays additional information about the file (see the figure below).
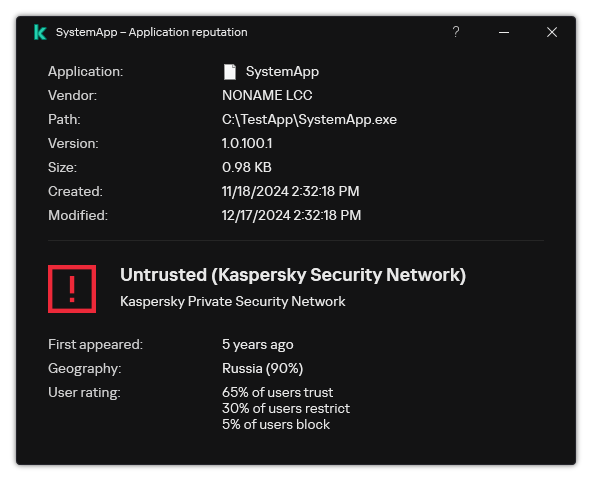
Reputation of a file in Kaspersky Security Network
Page top
Encrypted connections scan
After installation, Kaspersky Endpoint Security adds a Kaspersky certificate to the system storage for trusted certificates (Windows certificate store). Kaspersky Endpoint Security uses this certificate to scan encrypted connections. Kaspersky Endpoint Security also includes the use of system storage of trusted certificates in Firefox and Thunderbird to scan the traffic of these applications.
The Web Control, Mail Threat Protection, Web Threat Protection components can decrypt and scan network traffic transmitted over encrypted connections using the following protocols:
- SSL 3.0.
- TLS 1.0, TLS 1.1, TLS 1.2, TLS 1.3.
Enabling encrypted connections scan
To enable the scanning of encrypted connections:
- In the main application window, click the button.
- In the application settings window, select General settings → Network settings.

Encrypted connections scan settings
- In the Encrypted connections scan block, select the encrypted connection scanning mode:
- Do not scan encrypted connections. Kaspersky Endpoint Security will not have access to the contents of websites whose addresses begin with
https://. - Scan encrypted connections upon request from protection components. Kaspersky Endpoint Security will scan encrypted traffic only when requested by the Web Threat Protection, Mail Threat Protection, and Web Control components.
- Always scan encrypted connections. Kaspersky Endpoint Security will scan encrypted network traffic even if protection components are disabled.
Kaspersky Endpoint Security does not scan encrypted connections that were established by trusted applications for which traffic scanning is disabled. Kaspersky Endpoint Security does not scan encrypted connections from the predefined list of trusted websites. The predefined list of trusted websites is created by Kaspersky experts. This list is updated with the application's anti-virus databases. You can view the predefined list of trusted websites only in the Kaspersky Endpoint Security interface. You cannot view the list in the Kaspersky Security Center Console.
- Do not scan encrypted connections. Kaspersky Endpoint Security will not have access to the contents of websites whose addresses begin with
- If necessary, add scan exclusions: trusted addresses and applications.
- Configure the settings for scanning encrypted connections (see the table below).
Additional settings for scanning encrypted connections
- Save your changes.
Encrypted connections scan settings
Parameter
Description
Trusted root certificates
List of trusted root certificates. Kaspersky Endpoint Security lets you install trusted root certificates on user computers if, for example, you need to deploy a new certification center. The application lets you add a certificate to a special Kaspersky Endpoint Security certificate store. In this case, the certificate is considered trusted only for the Kaspersky Endpoint Security application. In other words, the user can gain access to a website with the new certificate in the browser. If another application tries to gain access to the website, you can get a connection error because of a certificate issue. To add to the system certificate store, you can use Active Directory group policies.
Visiting a domain with an untrusted certificate
- Allow. When visiting a domain with an untrusted certificate, Kaspersky Endpoint Security allows the network connection.
When opening a domain with an untrusted certificate in a browser, Kaspersky Endpoint Security displays an HTML page showing a warning and the reason why visiting that domain is not recommended. A user can click the link from the HTML warning page to obtain access to the requested web resource.
If a third-party application or service establishes a connection with a domain with an untrusted certificate, Kaspersky Endpoint Security creates its own certificate to scan traffic. The new certificate has the Untrusted status. This is necessary to warn the third-party application about the untrusted connection because the HTML page cannot be shown in this case and the connection can be established in background mode.
- Block. When visiting a domain with an untrusted certificate, Kaspersky Endpoint Security blocks the network connection. When opening a domain with an untrusted certificate in a browser, Kaspersky Endpoint Security displays an HTML page showing the reason why that domain is blocked.
Visiting a domain with an encrypted connections scan error
- Block. If this item is selected, when an encrypted connection scan error occurs, Kaspersky Endpoint Security blocks the network connection.
- Allow and add domain to exclusions. If this item is selected, when an encrypted connection scan error occurs, Kaspersky Endpoint Security adds the domain that resulted in the error to the list of domains with scan errors and does not monitor encrypted network traffic when this domain is visited. You can view a list of domains with encrypted connections scan errors only in the local interface of the application. To clear the list contents, you need to select Block. Kaspersky Endpoint Security also generates an event for the encrypted connection scan error.
Block SSL 2.0 connections
If the check box is selected, the application blocks network connections established over the SSL 2.0 protocol.
If the check box is cleared, the application does not block network connections established over the SSL 2.0 protocol and does not monitor network traffic transmitted over these connections.
Decrypt an encrypted connection with the website that uses EV certificate
EV certificates (Extended Validation Certificate) confirm the authenticity of websites and enhance the security of the connection. Browsers use a lock icon in their address bar to indicate that a website has an EV certificate. Browsers may also fully or partially color the address bar in green.
If the check box is selected, the application decrypts and monitors encrypted connections with websites that use an EV certificate.
If the check box is cleared, the application does not have access to the contents of HTTPS traffic. For this reason, the application monitors HTTPS traffic only based on the website address, for example,
https://bing.com.If you are opening a website with an EV certificate for the first time, the encrypted connection will be decrypted regardless of whether or not the check box is selected.
- Allow. When visiting a domain with an untrusted certificate, Kaspersky Endpoint Security allows the network connection.
Installing trusted root certificates
Kaspersky Endpoint Security lets you install trusted root certificates on user computers if, for example, you need to deploy a new certification center. The application lets you add a certificate to a special Kaspersky Endpoint Security certificate store. In this case, the certificate is considered trusted only for the Kaspersky Endpoint Security application. In other words, the user can gain access to a website with the new certificate in the browser. If another application tries to gain access to the website, you can get a connection error because of a certificate issue. To add to the system certificate store, you can use Active Directory group policies.
How to install trusted root certificates in the Administration Console (MMC)
How to install trusted root certificates in Web Console and Cloud Console
How to install trusted root certificates in the application interface
- In the main application window, click the button.
- In the application settings window, select General settings → Network settings.
- In the Encrypted connections scan block, click the Show certificates button.
- This opens a window; in that window, click Add and select a trusted root certificate.
Kaspersky Endpoint Security supports certificates with PEM, DER, and CRT extensions.
- Save your changes.
As a result, when scanning traffic, in addition to the system certificate store, Kaspersky Endpoint Security uses its own certificate store.
Page top
Scanning encrypted connections with an untrusted certificate
After installation, Kaspersky Endpoint Security adds a Kaspersky certificate to the system storage for trusted certificates (Windows certificate store). Kaspersky Endpoint Security uses this certificate to scan encrypted connections. When visiting a domain with an untrusted certificate, you can allow or deny user access to that domain (see the instructions below).
If you have allowed the user to visit domains with untrusted certificates, Kaspersky Endpoint Security performs the following actions:
- When visiting a domain with an untrusted certificate in the browser, Kaspersky Endpoint Security uses the Kaspersky certificate to scan traffic. Kaspersky Endpoint Security displays a HTML page with a warning and information about the reason why it is not recommended to visit the relevant domain (see the figure below). A user can click the link from the HTML warning page to obtain access to the requested web resource. After following this link, during the next hour Kaspersky Endpoint Security will not display warnings about an untrusted certificate when visiting other resources on this same domain. Kaspersky Endpoint Security also generates an event about establishing an encrypted connection with an untrusted certificate.
In some cases, Kaspersky Endpoint Security cannot technically display an HTML page with a warning in the browser (see figure below). For example, if a web resource uses an outdated version of a network protocol and a non-standard port. In these cases, Kaspersky Endpoint Security blocks access to this domain and the browser will show the standard
ERR_CONNECTION_RESETwindow. To access a web resource, you can add domain to exclusions or use a trusted certificate. - If a third-party application or service establishes a connection with a domain with an untrusted certificate, Kaspersky Endpoint Security creates its own certificate to scan traffic. The new certificate has the Untrusted status. This is necessary to warn the third-party application about the untrusted connection because the HTML page cannot be shown in this case and the connection can be established in background mode. Therefore, if a third-party application has built-in certificate verification tools, the connection may be terminated. In that case, you must contact the owner of the domain and set up a trusted connection. If setting up a trusted connection is impossible, you can add that third-party application to the list of trusted applications. Kaspersky Endpoint Security also generates an event about establishing an encrypted connection with an untrusted certificate.
- In the main application window, click the button.
- In the application settings window, select General settings → Network settings.
- In the Encrypted connections scan block, select the application operating mode when visiting a domain with an untrusted certificate: Allow or Block.
- Save your changes.
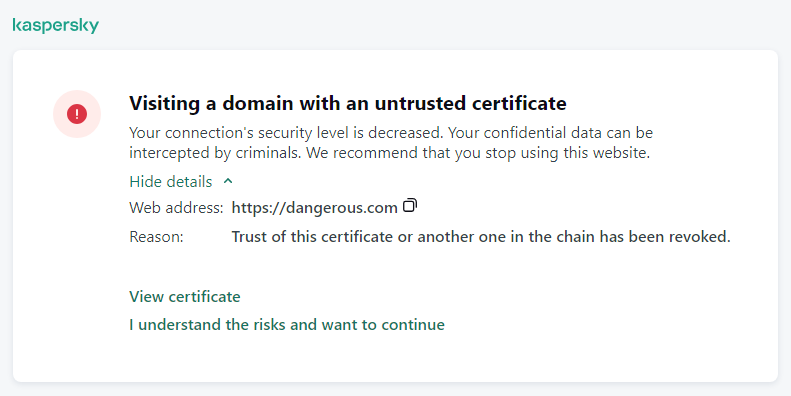
Warning about visiting a domain with an untrusted certificate
Page top
Adding Kaspersky certificate to the own certificate store
Browsers and mail clients use the certificate to verify the security and authenticity of web resources. The certificate also provides data encryption between web resources and the user. Most browsers and mail clients use the trusted certificate store (Windows certificate store). For example, Google Chrome. Some browsers and mail clients use their own certificate store by default instead of the Windows certificate store. For example, Firefox and Thunderbird.
After installation, Kaspersky Endpoint Security adds a Kaspersky certificate to the system storage for trusted certificates (Windows certificate store). If Kaspersky Security Center is deployed in your organization and a policy is being applied to a computer, Kaspersky Endpoint Security automatically enables the use of Windows certificate store in browsers and mail clients to scan the traffic of these applications. If a policy is not being applied to the computer, you can choose the certificate store that will be used by browsers and mail clients. If you selected the own certificate store, add the Kaspersky certificate to the store manually. This will help avoid errors when working with HTTPS traffic.
To scan traffic in the Mozilla Firefox browser and the Thunderbird mail client, you must enable the Encrypted Connections Scan. If Encrypted Connections Scan is disabled, the application does not scan traffic in the Mozilla Firefox browser and Thunderbird mail client. Encrypted connections scan should also be enabled to scan traffic in MyOffice Mail and R7-Office Organizer mail clients.
Before you add a certificate to the browser's or the mail agent's own certificate store, export the Kaspersky certificate from the Windows Control Panel (Internet properties). For details about exporting the Kaspersky certificate, please refer to the Technical Support Knowledge Base. You can learn more about adding a certificate to the store, for example, on the Mozilla technical support website.
You can choose the certificate store only in the local interface of the application.
To choose a certificate store for scanning encrypted connections in browsers and mail clients:
- In the main application window, click the button.
- In the application settings window, select General settings → Network settings.
- In the Encrypted connections scan block, select the To scan encrypted connections in applications with their own certificate store, use check box.
- Select a certificate store:
- Windows certificate store (recommended). The Kaspersky root certificate is added to this store during installation of Kaspersky Endpoint Security.
- Own certificate store. Mozilla Firefox and Thunderbird use their own certificate stores. If the Mozilla certificate store is selected, you need to manually add the Kaspersky root certificate to this store through the browser properties.
MyOffice Mail and R7-Office Organizer mail clients also use their own certificate store.
- Save your changes.
Excluding encrypted connections from scanning
Most web resources use encrypted connections. Kaspersky experts recommend that you enable Encrypted connections scan. If encrypted connections scan interferes with work-related activity, you can add a website to exclusions referred to as trusted addresses. In this case, Kaspersky Endpoint Security does not scan HTTPS traffic of trusted web addresses when Web Threat Protection, Mail Threat Protection, Web Control components are doing their work.
If a trusted application uses an encrypted connection, you can disable encrypted connections scan for this application. For example, you can disable encrypted connections scan for cloud storage applications that use two-factor authentication with their own certificate.
How to exclude a web address from encrypted connection scans in the Administration Console (MMC)
How to exclude a web address from encrypted connection scans in Web Console and Cloud Console
How to exclude a web address from encrypted connection scans in the application interface
- In the main application window, click the button.
- In the application settings window, select General settings → Network settings.
Application network settings
- In the Encrypted connections scan block, click the Configure trusted addresses button.
- Click Add.
- Enter a domain name or an IP address if you do not want Kaspersky Endpoint Security to scan encrypted connections established when visiting that domain.
Kaspersky Endpoint Security supports the
*character for entering a mask in the domain name.Kaspersky Endpoint Security does not support the
*symbol for IP addresses. You can select a range of IP addresses using a subnet mask (for example, 198.51.100.0/24).Examples:
domain.com– the record is inclusive of the following addresses:https://domain.com,https://www.domain.com,https://domain.com/page123. The record is exclusive of subdomains (for example,subdomain.domain.com).subdomain.domain.com– the record is inclusive of the following addresses:https://subdomain.domain.com,https://subdomain.domain.com/page123. The record is exclusive of thedomain.comdomain.*.domain.com– the record is inclusive of the following addresses:https://movies.domain.com,https://images.domain.com/page123. The record is exclusive of thedomain.comdomain.
- Save your changes.
By default, Kaspersky Endpoint Security does not scan encrypted connections when errors occur and adds the website to a special list of Domains with scan errors. Kaspersky Endpoint Security compiles a separate list for each user and does not send data to Kaspersky Security Center. You can enable blocking the connection when a scan error occurs. You can view a list of domains with encrypted connections scan errors only in the local interface of the application.
To view the list of domains with scan errors:
- In the main application window, click the button.
- In the application settings window, select General settings → Network settings.
- In the Encrypted connections scan block, click the Domains with scan errors button.
A list of domains with scan errors opens. To reset the list, enable blocking connection when scan errors occur in the policy, apply the policy, then reset the parameter to its initial value and apply the policy again.
Kaspersky specialists make a list of global exceptions — trusted websites that Kaspersky Endpoint Security does not check regardless of the application settings.
To view the global exclusions from encrypted traffic scans:
- In the main application window, click the button.
- In the application settings window, select General settings → Network settings.
- In the Encrypted connections scan block, click the list of trusted websites link.
This opens a list of websites compiled by Kaspersky experts. Kaspersky Endpoint Security does not scan protected connections for websites on the list. The list may be updated when Kaspersky Endpoint Security databases and modules are updated.
Page top
Wipe Data
Kaspersky Endpoint Security lets you use a task to remotely delete data from users' computers.
Kaspersky Endpoint Security deletes data as follows:
- In silent mode;
- On hard drives and removable drives;
- For all user accounts on the computer.
Kaspersky Endpoint Security performs the Wipe data task no matter which licensing type is being used, even after the license has expired.
Data Wipe modes
This task enables you to delete data in the following modes:
- Immediate data deletion.
In this mode, you can, for example, delete outdated data to free up disk space.
- Postponed data deletion.
This mode is intended, for example, to protect data on a laptop in case it is lost or stolen. You can configure automatic data deletion if the laptop goes outside the boundaries of the corporate network and has not been synchronized with Kaspersky Security Center in a long time.
It is not possible to set a schedule for deleting data in task properties. You can only delete data immediately after starting the task manually, or configure delayed data deletion if there is no connection with Kaspersky Security Center.
Limitations
Data Wipe has the following limitations:
- Only a Kaspersky Security Center administrator can manage the Wipe data task. You cannot configure or start a task in the local interface of Kaspersky Endpoint Security.
- For the NTFS file system, Kaspersky Endpoint Security deletes only the names of the main data streams. Alternate data stream names cannot be deleted.
- When you delete a symbolic link file, Kaspersky Endpoint Security also deletes the files whose paths are specified in the symbolic link.
Creating a Wipe data task
To delete data on users' computers:
- In the main window of the Web Console, select Assets (Devices) → Tasks.
The list of tasks opens.
- Click Add.
The Task Wizard starts.
- Configure the task settings:
- In the Application drop-down list, select Kaspersky Endpoint Security for Windows (12.8.0).
- In the Task type drop-down list, select Wipe data.
- In the Task name field, enter a brief description, for example, Wipe data (Anti-Theft).
- In the Devices to which the task will be assigned block, select the task scope.
- Select devices according to the selected task scope option. Go to the next step.
If new computers are added to an administration group within the task scope, the immediate data deletion task is run on the new computers only if the task is completed within 5 minutes of the addition of the new computers.
- Exit the Wizard.
A new task will be displayed in the list of tasks.
- Click the Wipe data task of Kaspersky Endpoint Security.
The task properties window opens.
- Select the Application settings tab.
- Select the data deletion method:
- Delete by means of the operating system. Kaspersky Endpoint Security uses the operating system resources to delete files without sending them to the recycle bin.
- Delete completely, no recovery possible. Kaspersky Endpoint Security overwrites files with random data. It is practically impossible to restore data after it is deleted.
- If you want to postpone data deletion, select the Automatically wipe data when there is no connection to Kaspersky Security Center for more than N days check box. Define the number of days.
The postponed data deletion task will be performed each time that a connection with Kaspersky Security Center is absent for the defined period of time.
When configuring postponed data deletion, bear in mind that employees may turn off their computer before going on vacation. In this case, the absent connection term may be exceeded and data will be deleted. Also consider the work schedule of offline users. For more details about working with offline computers and out-of-office users, refer to the Kaspersky Security Center Help.
If the check box is cleared, the task will be performed immediately after synchronization with Kaspersky Security Center.
- Create a list of objects to delete:
- Folders. Kaspersky Endpoint Security deletes all files in the folder, and its subfolders. Kaspersky Endpoint Security does not support masks and environment variables for entering a folder path.
- Files by extension. Kaspersky Endpoint Security searches for files with the specified extensions on all computer drives, including removable drives. Use the "
;" or "," characters to specify multiple extensions. - Predefined scope. Kaspersky Endpoint Security will delete files from the following areas:
- Documents. Files in the standard Documents folder of the operating system, and its subfolders.
- Cookies. Files in which the browser saves data from the websites visited by the user (such as user authorization data).
- Desktop. Files in the standard Desktop folder of the operating system, and its subfolders.
- Temporary Internet Explorer files. Temporary files related to the operation of Internet Explorer, such as copies of web pages, images, and media files.
- Temporary files. Temporary files related to the operation of applications installed on the computer. For example, Microsoft Office applications create temporary files containing backup copies of documents.
- Outlook files. Files related to the operation of the Outlook mail client: data files (PST), offline data files (OST), offline address book files (OAB), and personal address book files (PAB).
- User profile. Set of files and folders that store operating system settings for the local user account.
You can create a list of objects to delete on each tab. Kaspersky Endpoint Security will create a consolidated list and delete files from this list when a task is complete.
You cannot delete files that are required for operation of Kaspersky Endpoint Security.
- Save your changes.
- Select the check box next to the task.
- Click Start.
As a result, data on users' computers will be deleted according to the selected mode: immediate or when a connection is absent. If Kaspersky Endpoint Security cannot delete a file, such as when a user is currently using a file, the application does not attempt to delete it again. To complete data deletion, run the task again.
Page top
Web Control
Web Control manages users' access to web resources. This helps reduce traffic and inappropriate use of work time. When a user tries to open a website that is restricted by Web Control, Kaspersky Endpoint Security will block access or show a warning (see the figure below).
To use Web Control, you must configure the application as follows:
- For HTTPS traffic monitoring, enable encrypted connections scan (disabled by default).
- Select HTTP and HTTPS ports that you want Kaspersky Endpoint Security to monitor (by default, port monitoring is enabled).
- Select the applications whose traffic you want Kaspersky Endpoint Security to monitor. Most browsers are already present in the list of applications recommended by Kaspersky (by default, monitoring is enabled for these browsers). If your browser is missing from the list, add it manually.
- We recommend to inject a web page interaction script into web traffic (by default, script injection is disabled). This script enables registration of Web Control events for the application event log, OS event log, and reports.
Methods for managing access to websites
Web Control lets you configure access to websites by using the following methods:
- Website category. Websites are categorized according to the Kaspersky Security Network cloud service, heuristic analysis, and the database of known websites (included in application databases). For example, you can restrict user access to the Social networks category or to other categories.
- Data type. You can restrict users' access to data on a website, and hide images, for example. Kaspersky Endpoint Security determines the data type based on the file format and not based on its extension.
Kaspersky Endpoint Security does not scan files within archives. For example, if image files were placed in an archive, Kaspersky Endpoint Security identifies the Archives data type and not Graphics.
- Individual address. You can enter a web address or use masks.
You can simultaneously use multiple methods for regulating access to websites. For example, you can restrict access to the "Office files" data type just for the Web-based email website category.
Website access rules
Web Control manages users' access to websites by using access rules. You can configure the following advanced settings for a website access rule:
- Users to which the rule applies.
For example, you can restrict Internet access through a browser for all users of the company except the IT department.
- Rule schedule.
For example, you can restrict Internet access through a browser during working hours only.
Access rule priorities
Each rule has a priority. The higher a rule is on the list, the higher its priority. If a website has been added to multiple rules, Web Control regulates access to the website based on the rule with the highest priority. For example, Kaspersky Endpoint Security may identify a corporate portal as a social network. To restrict access to social networks and provide access to the corporate web portal, create two rules: one block rule for the Social networks website category and one allow rule for the corporate web portal. The access rule for the corporate web portal must have a higher priority than the access rule for social networks.
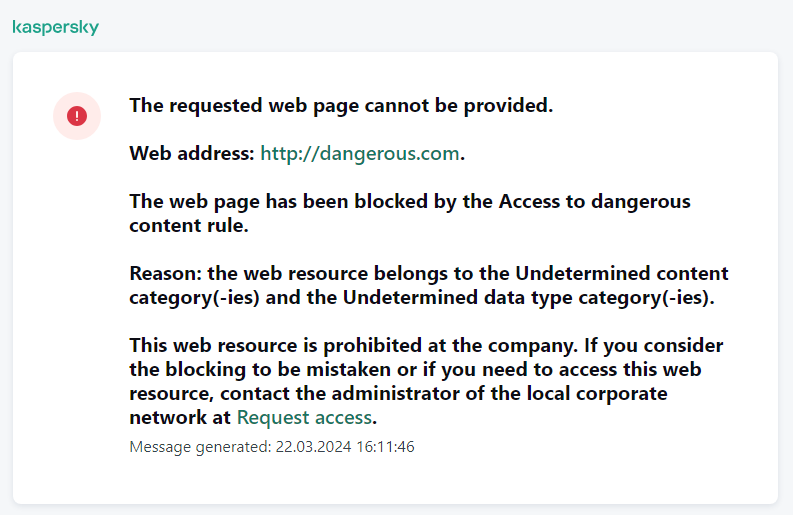
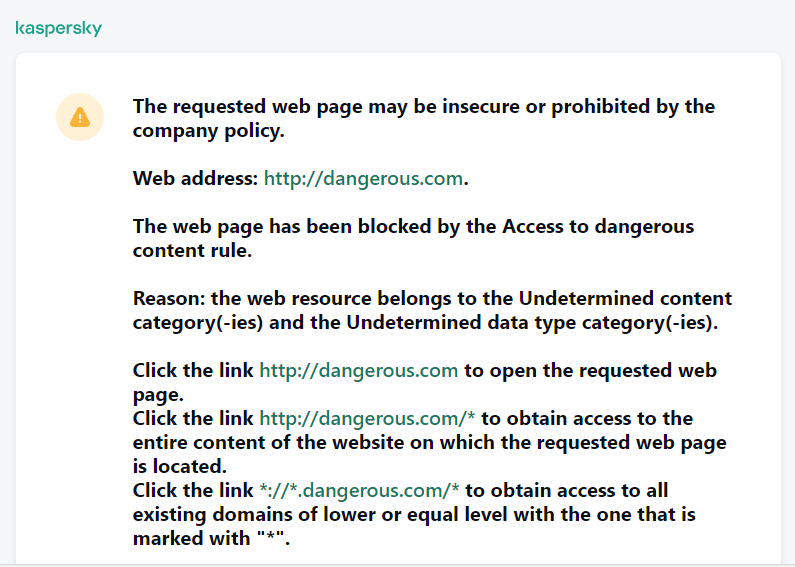
Web Control messages
Adding a web resource access rule
A web resource access rule is a set of filters and actions that Kaspersky Endpoint Security applies when users visit web resources. Access rules can include a rule schedule.
It is not recommended to create more than 1000 rules of access to web resources, as this can cause the system to become unstable.
A web resource access rule is a set of filters and actions that Kaspersky Endpoint Security performs when the user visits web resources that are described in the rule during the time span that is indicated in the rule schedule. Filters allow you to precisely specify a pool of web resources to which access is controlled by the Web Control component.
The following filters are available:
- Filter by content. Web Control categorizes web resources by content and data type. You can control user access to web resources with content and data falling into the types defined by these categories. When the users visit web resources that belong to the selected content category and / or data type category, Kaspersky Endpoint Security performs the action that is specified in the rule.
- Filter by web resource addresses. You can control user access to all web resource addresses or to individual web resource addresses and / or groups of web resource addresses.
If filtering by content and filtering by web resource addresses are specified, and the specified web resource addresses and / or groups of web resource addresses belong to the selected content categories or data type categories, Kaspersky Endpoint Security does not control access to all web resources in the selected content categories and / or data type categories. Instead, the application controls access only to the specified web resource addresses and / or groups of web resource addresses.
- Filter by names of users and user groups. You can specify the names of users and / or groups of users for which access to web resources is controlled according to the rule.
- Rule schedule. You can specify the rule schedule. The rule schedule determines the time span during which Kaspersky Endpoint Security monitors access to web resources covered by the rule.
After Kaspersky Endpoint Security is installed, the list of rules of the Web Control component is not empty. The Default rule is preset. This rule is applied to any web resources that are not covered by other rules, and allows or blocks access to these web resources for all users.
Each rule has a priority. The higher a rule is on the list, the higher its priority. If a website has been added to multiple rules, Web Control regulates access to the website based on the rule with the highest priority. For example, Kaspersky Endpoint Security may identify a corporate portal as a social network. To restrict access to social networks and provide access to the corporate web portal, create two rules: one block rule for the Social networks website category and one allow rule for the corporate web portal. The access rule for the corporate web portal must have a higher priority than the access rule for social networks.
How to add a web resource access rule in Administration Console (MMC)
How to add a web resource access rule in Web Console and Cloud Console
How to add a web resource access rule in the application interface
- In the main application window, click the button.
- In the application settings window, select Security Controls → Web Control.
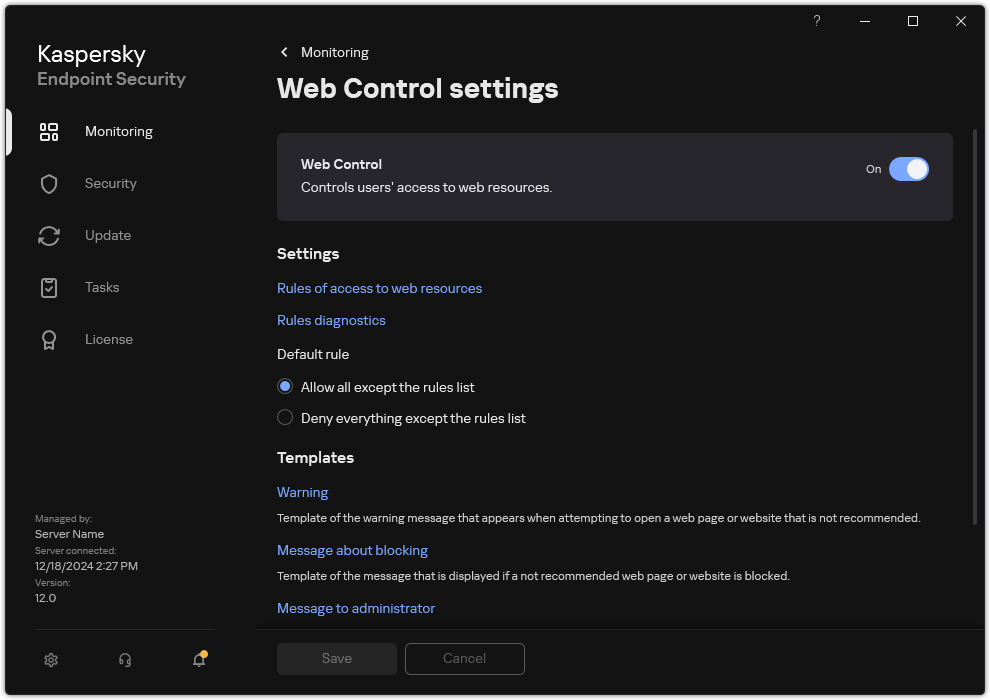
Web Control settings
- Turn on the Web Control toggle.
- In the Settings block, click the Rules of access to web resources button.
- In the window that opens, click the Add button.
The Rule of access to web resources window opens.
- Configure the web resource access rule (see the table below).
- Save your changes.
As a result, the new Web Control rule is added to the list. If necessary, change the priority of the Web Control rule. You can also use the toggle switch to disable the web resource access rule at any time without removing it from the list.
Web Control rule parameters
Parameter |
Description |
|---|---|
Rule name |
Name of the Web Control rule. |
State |
You can use the toggle to disable the web resource access rule at any time. |
Action |
|
Content of the filter |
|
Addresses |
If Encrypted Connections Scan is disabled, for the HTTPS protocol you can only filter by the server name. |
Users |
|
Rule schedule |
The rule schedule determines the time span during which Kaspersky Endpoint Security monitors access to web resources covered by the rule. For example, you can restrict Internet access through a browser during working hours only. |
Filter by web resource addresses
To control access to individual web resources, you must create a Web Control rule, create a list of web addresses, and select a Web Control action. When creating a web address list, you can enter URL addresses or use masks.
Rules may include a rule schedule and a list of users to which the rule applies. For example, you can restrict access to websites during working hours only, or allow visiting websites to users in certain groups.
How to enable a web resource address filter in Administration Console (MMC)
How to enable a web resource address filter in Web Console and Cloud Console
How to enable a web resource address filter in the application interface
- In the main application window, click the button.
- In the application settings window, select Security Controls → Web Control.
Web Control settings
- In the Settings block, click the Rules of access to web resources button.
- In the window that opens, click the Add button.
The Rule of access to web resources window opens.
- In the Rule name field, enter the name of the rule.
- Select the On status for the web resource access rule.
You can use the toggle to disable the web resource access rule at any time.
- In the Action block, select the relevant option:
- Allow. Web Control allows access to web resources that match the parameters of the rule.
- Block. Web Control blocks access to web resources that match the parameters of the rule and displays a website access denied message.
- Warn. When the user attempts to gain access to a web resource that matches the rule, Web Control displays a warning that visiting the web resource is inadvisable. By using links from the warning message, the user can obtain access to the requested web resource.
- Under Addresses, select To individual addresses.
Create a list of web resource addresses. You can enter a web address or use masks. You can also export a list of web resource addresses from a TXT file.
If Encrypted Connections Scan is disabled, for the HTTPS protocol you can only filter by the server name.
- In the Users block, select the relevant filter for users:
- To all users. Web Control will not filter web resources for specific users.
- To individual users and / or groups. Web Control will filter only web resource addresses from the list. You can enter a web address or use masks. You can also export a list of web resource addresses from a TXT file. You can select users in Active Directory, in the list of accounts in Kaspersky Security Center, or by entering a local user name manually. Kaspersky recommends using local user accounts only in special cases when it is not possible to use domain user accounts.
- In the Rule schedule drop-down list, select a schedule or create a new schedule.
- Save your changes.
As a result, the new Web Control rule is added to the list. If necessary, change the priority of the Web Control rule. You can also use the toggle switch to disable the web resource access rule at any time without removing it from the list.
Page top
Filter by web resource content
To control access by web resource content, Web Control provides a category filter and a data type filter.
Websites are categorized according to the Kaspersky Security Network cloud service, heuristic analysis, and the database of known websites (included in application databases). For example, you can restrict user access to the Social networks category or to other categories.
You can restrict user access to a website based on data type, for example, to hide images. Kaspersky Endpoint Security determines the data type based on the file format and not based on its extension. Web Control distinguishes the following data types:
- Video
- Sound
- Office applications files
- Executable files
- Archives
- Graphics
- Scripts.
Kaspersky Endpoint Security does not scan files within archives. For example, if image files were placed in an archive, Kaspersky Endpoint Security identifies the Archives data type and not Graphics.
Rules may include a rule schedule and a list of users to which the rule applies. For example, you can restrict access to websites during working hours only, or allow visiting websites to users in certain groups.
How to enable a web resource content filter in Administration Console (MMC)
How to enable a web resource content filter in Web Console and Cloud Console
How to enable a web resource content filter in the application interface
- In the main application window, click the button.
- In the application settings window, select Security Controls → Web Control.
Web Control settings
- In the Settings block, click the Rules of access to web resources button.
- In the window that opens, click the Add button.
The Rule of access to web resources window opens.
- In the Rule name field, enter the name of the rule.
- Select the On status for the web resource access rule.
You can use the toggle to disable the web resource access rule at any time.
- In the Action block, select the relevant option:
- Allow. Web Control allows access to web resources that match the parameters of the rule.
- Block. Web Control blocks access to web resources that match the parameters of the rule and displays a website access denied message.
- Warn. When the user attempts to gain access to a web resource that matches the rule, Web Control displays a warning that visiting the web resource is inadvisable. By using links from the warning message, the user can obtain access to the requested web resource.
- In the Content of the filter block, select the relevant content filter:
- By content categories. You can control user access to web resources by category (for example, the Social networks category).
- By types of data. You can control user access to web resources based on the specific data type of its published data (for example, Graphics).
To configure the content filter:
- Click the Settings link.
- Select the check boxes next to the names of the required categories of content and/or data types.
Selecting the check box next to the name of a content category and/or data type means that Kaspersky Endpoint Security applies the rule to control access to web resources that belong to the selected categories of content and/or data types.
- Return to the window for configuring the web resource access rule.
- In the Users block, select the relevant filter for users:
- To all users. Web Control will not filter web resources by address.
- To individual users and / or groups. Web Control will filter only web resource addresses from the list. You can enter a web address or use masks. You can also export a list of web resource addresses from a TXT file. You can select users in Active Directory, in the list of accounts in Kaspersky Security Center, or by entering a local user name manually. Kaspersky recommends using local user accounts only in special cases when it is not possible to use domain user accounts. To create a list of users to whom you want to apply the rule:
- Click Add.
- In the window that opens, select the users or groups of users to which you want to apply the web resource access rule.
- Return to the window for configuring the web resource access rule.
- In the Rule schedule drop-down list, select the name of the necessary schedule or generate a new schedule based on the selected rule schedule. To do so:
- Click Edit or add new.
- In the window that opens, click the Add button.
- In the window that opens, enter the rule schedule name.
- Configure the web resource access schedule for users.
- Return to the window for configuring the web resource access rule.
- Save your changes.
As a result, the new Web Control rule is added to the list. If necessary, change the priority of the Web Control rule. You can also use the toggle switch to disable the web resource access rule at any time without removing it from the list.
Page top
Testing web resource access rules
When configuring Web Control, you might inadvertently block access to web resources that users need for their work. To find out which Web Control rule is blocking access to web resources, you can use the Web Control Rules diagnostics tool. Web Control Rules diagnostics is only available in the interface of Kaspersky Endpoint Security. In the Kaspersky Security Center console, you cannot find out which Web Control rule includes a given resource.
If the user believes that the web resource is blocked by mistake, the user may click the link in the web resource block notification message to send a pre-generated message to the local corporate network administrator.
To test the web resource access rules:
- In the main application window, click the button.
- In the application settings window, select Security Controls → Web Control.
Web Control settings
- In the Settings block, click the Rules diagnostics link.
The Rules diagnostics window opens.
- If you want to test the rules that Kaspersky Endpoint Security uses to control access to a specific web resource, select the Specify address check box. Enter the address of the web resource in the field below.
- If you want to test the rules that Kaspersky Endpoint Security uses to control access to web resources for specified users and / or groups of users, specify a list of users and / or groups of users.
- If you want to test the rules that Kaspersky Endpoint Security uses to control access to web resources of certain content categories and/or data type categories, select the Filter content check box and choose the relevant option from the drop-down list (By content categories, By types of data, or By content categories and types of data).
- If you want to test the rules with account of the time and day of the week when an attempt is made to access the web resources that are specified in the rule diagnostics conditions, select the Include time of access attempt check box. Then specify the day of the week and the time.
- Click Scan.
Test completion is followed by a message with information about the action that is taken by Kaspersky Endpoint Security, according to the first rule that is triggered on the attempt to access the specified web resource (allow, block, or warning). The first rule to be triggered is the one with a rank on the list of Web Control rules which is higher than that of other rules meeting the diagnostics conditions. The message is displayed on the right of the Scan button. The following table lists the remaining triggered rules, specifying the action taken by Kaspersky Endpoint Security. The rules are listed in the order of declining priority.
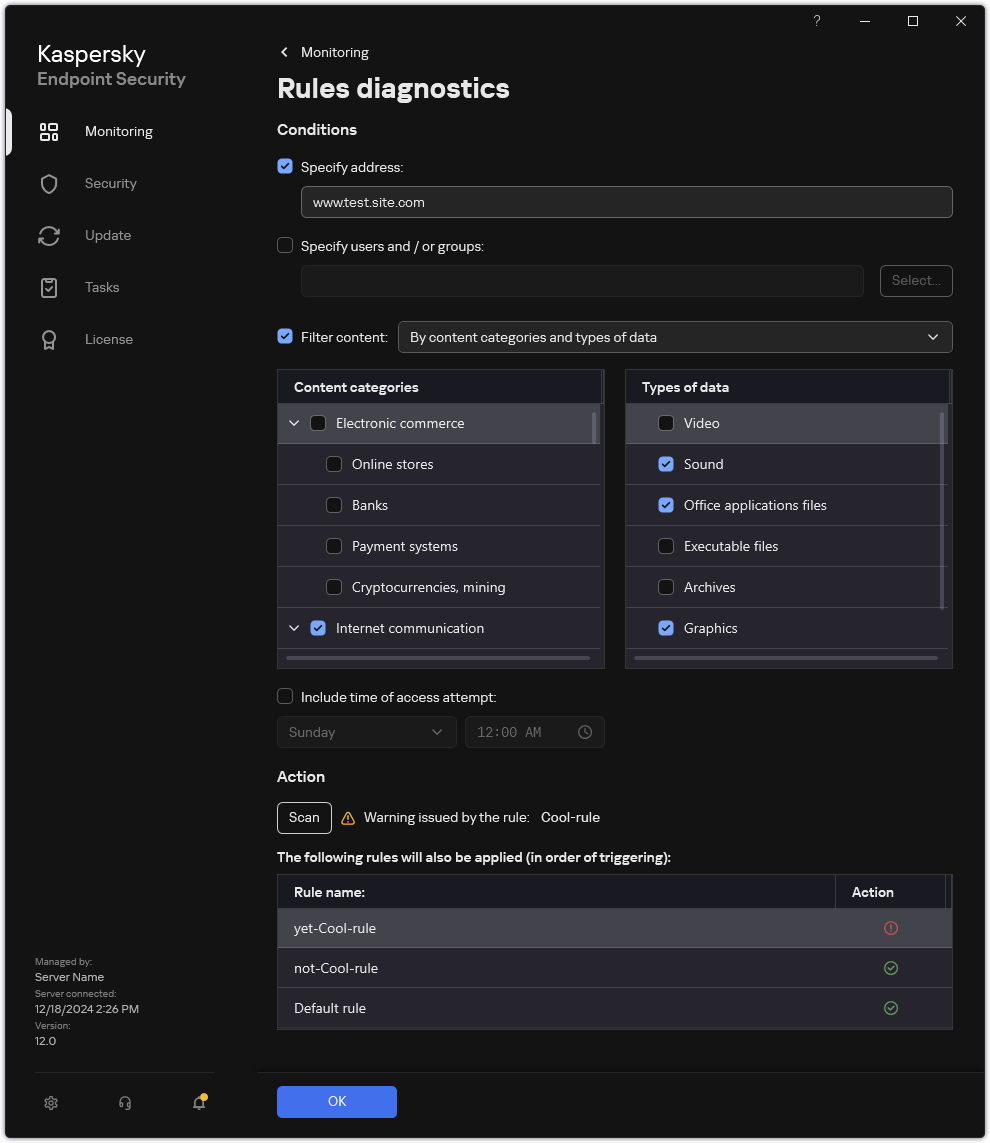
Web resource access test result
Page top
Exporting and importing Web Control rules
You can export the list of Web Control rules to an XML file. Then you can modify the file to, for example, add a large number of addresses of the same type. You can use the export/import function to back up the list of Web Control rules or to migrate the list to a different server.
How to export and import a list of Web Control rules in the Administration Console (MMC)
How to export and import a list of Web Control rules in the Web Console and Cloud Console
Page top
Exporting and importing web resource addresses of the Web Control rule
If you have created a list of web resource addresses in a web resource access rule, you can export it to a .txt file. You can subsequently import the list from this file to avoid creating a new list of web resource addresses manually when configuring an access rule. The option of exporting and importing the list of web resource addresses may be useful if, for example, you create access rules with similar parameters.
You can also export/import all Web Control rules and not just the web resource addresses of an individual rule.
You cannot export/import web resource addresses of a Web Control rule in Web Console or Cloud Console.
- Open the Kaspersky Security Center Administration Console.
- In the console tree, select Policies.
- Select the necessary policy and double-click to open the policy properties.
- In the policy window, select Security Controls → Web Control.
- In the Web Control settings block, select the rule whose list of web resource addresses you want to export or import.
Web Control rule properties are displayed.
- To export the list of web resources, do the following in the address list:
- Select the addresses that you want to export.
If you did not select any address, Kaspersky Endpoint Security will export all addresses.
- Click the
 button.
 - In the window that opens, enter the name of the TXT file to which you want to export the list of web resource addresses, and select the folder in which you want to save this file.
- Save the file.
Kaspersky Endpoint Security exports the list of web resource addresses to a TXT file.
- Select the addresses that you want to export.
- To import the list of web resources, do the following in the address list:
- Click the
 button.
In the window that opens, select the TXT file from which you want to import the list of web resources.
- Open the file.
If the computer already has a list of addresses, Kaspersky Endpoint Security will prompt you to delete the existing list or add new entries to it from the TXT file.
- Click the
- Save your changes.
How to export / import web resource addresses of the Web Control rule in the application interface
- In the main application window, click the button.
- In the application settings window, select Security Controls → Web Control.
Web Control settings
- In the Settings block, click the Rules of access to web resources button.
- Select the rule whose list of web resource addresses you want to export or import.
- To export the list of trusted web addresses, do the following in the Addresses block:
- Select the addresses that you want to export.
If you did not select any address, Kaspersky Endpoint Security will export all addresses.
- Click Export.
- In the window that opens, enter the name of the TXT file to which you want to export the list of web resource addresses, and select the folder in which you want to save this file.
- Save the file.
Kaspersky Endpoint Security exports the list of web resource addresses to a TXT file.
- Select the addresses that you want to export.
- To import the list of web resources, do the following in the Addresses block:
- Click Import.
In the window that opens, select the TXT file from which you want to import the list of web resources.
- Open the file.
If the computer already has a list of addresses, Kaspersky Endpoint Security will prompt you to delete the existing list or add new entries to it from the TXT file.
- Click Import.
- Save your changes.
Monitoring user Internet activity
Kaspersky Endpoint Security lets you log data on user visits to all websites, including allowed websites. This enables you to obtain the complete history of browser views. Kaspersky Endpoint Security sends user activity events to Kaspersky Security Center, to the local log of Kaspersky Endpoint Security, and to the Windows Event log. To receive events in Kaspersky Security Center, you need to configure the settings of events in a policy in the Administration Console or Web Console. You can also configure the transmission of Web Control events by email and the display of on-screen notifications on the user's computer.
Browsers that support the monitoring function: Microsoft Edge, Microsoft Internet Explorer, Google Chrome, Yandex Browser, Mozilla Firefox. User activity monitoring does not work in other browsers.
Kaspersky Endpoint Security creates the following user Internet activity events:
- Block the website (Critical status
 ).
). - Visit to a non-recommended website (Warning status
 ).
). - Visit to an allowed website (Info status
 ).
).
Prior to enabling user Internet activity monitoring, you must do the following:
- Inject a web page interaction script into web traffic (see the instructions below). The script enables registration of Web Control events.
- For HTTPS traffic monitoring, you need to enable encrypted connections scan.
Injecting a web page interaction script
How to inject a web page interaction script into web traffic in the Administration Console (MMC)
How to inject a web page interaction script into web traffic in the Web Console and Cloud Console
How to inject a web page interaction script into web traffic in the application interface
- In the main application window, click the button.
- In the application settings window, select General settings → Network settings.
Application network settings
- In the Traffic processing block, select the Inject script into web traffic to interact with web pages check box.
- Save your changes.
As a result, Kaspersky Endpoint Security will inject a web page interaction script into web traffic. This script enables registration of Web Control events for the application event log, OS event log, and reports.
Configuring logging of Web Control events
To configure logging of Web Control events on the user's computer:
- In the main application window, click the button.
- In the application settings window, select General settings → Interface.
- In the Notifications block, click the Configure notifications button.
- In the window that opens, select the Web Control section.
This opens the table of Web Control events and notification methods.
- Configure the notification method for each event: Save in local report or Save in Windows Event Log.
To log allowed website visit events, you need to also configure Web Control (see the instructions below).
In the events table, you can also enable an on-screen notification and an email notification. To send notifications by email, you need to configure the SMTP server settings. For more details about sending notifications by email, please refer to the Kaspersky Security Center Help.
- Save your changes.
As a result, Kaspersky Endpoint Security begins logging user Internet activity events.
Web Control sends user activity events to Kaspersky Security Center as follows:
- If you are using Kaspersky Security Center, Web Control sends events for all the objects that make up the web page. For this reason, multiple events may be created when one web page is blocked. For example, when blocking the web page http://www.example.com, Kaspersky Endpoint Security may relay events for the following objects: http://www.example.com, http://www.example.com/icon.ico, http://www.example.com/file.js, etc.
- If you are using the Kaspersky Security Center Cloud Console, Web Control groups events and sends only the protocol and domain of the website. For instance, if a user visits non-recommended web pages http://www.example.com/main, http://www.example.com/contact, http://www.example.com/gallery, Kaspersky Endpoint Security will send only one event with the http://www.example.com object.
Logging events when visiting allowed websites
To enable logging of events when visiting allowed websites:
- In the main application window, click the button.
- In the application settings window, select Security Controls → Web Control.
Web Control settings
- In the Additional block, click the Advanced Settings button.
- In the window that opens, select the Log the opening of allowed pages check box.
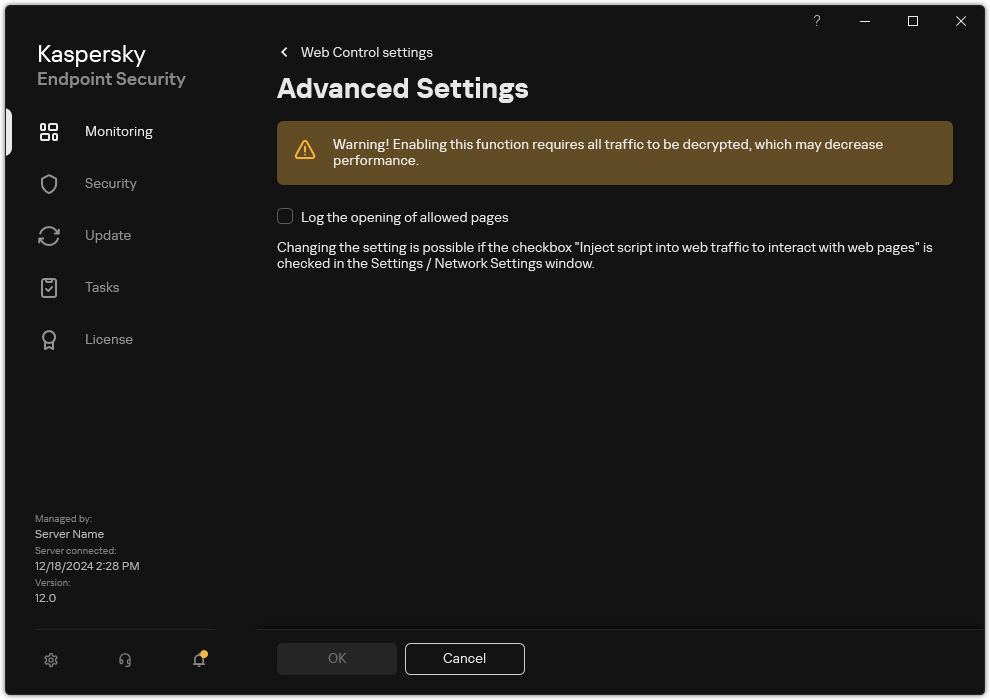
Web Control advanced settings
- Save your changes.
As a result, you will be able to view the full browser history.
Page top
Editing templates of Web Control messages
Depending on the type of action that is specified in the properties of Web Control rules, Kaspersky Endpoint Security displays a message of one of the following types when users attempt to access Internet resources (the application substitutes an HTML page with a message for the HTTP server response):
- Warning message. This message warns the user that visiting the web resource is not recommended and/or violates the corporate security policy. Kaspersky Endpoint Security displays a warning message if the Warn option is selected in the settings of the rule that describes this web resource.
If the user believes that the warning is mistaken, the user may click the link from the warning to send a pre-generated message to the local corporate network administrator.
- Message informing of blocking of a web resource. Kaspersky Endpoint Security displays a message informing that a web resource is blocked (see figure below) if the Block option is selected in the settings of the rule that describes this web resource.
If the user believes that the web resource is blocked by mistake, the user may click the link in the web resource block notification message to send a pre-generated message to the local corporate network administrator.
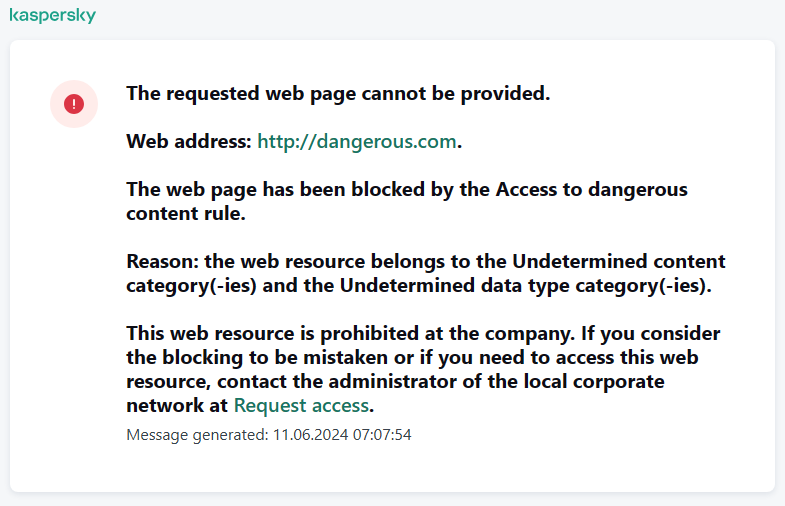
Message about web resource blocking
Special templates are provided for the warning message, the message informing that a web resource is blocked, and the message sent to the LAN administrator. You can modify their content.
How to change the Web Control message template in the Administration Console (MMC)
How to change the Web Control message template in the Web Console and Cloud Console
How to change the Web Control message template in the application interface
- In the main application window, click the button.
- In the application settings window, select Security Controls → Web Control.
Web Control settings
- In the Templates block, configure the templates for Web Control messages:
- Warning. The entry field consists of a template of the message that is displayed if a rule for warning about attempts to access an unwanted web resource is triggered.
- Message about blocking. The entry field contains the template of the message that appears if a rule which blocks access to a web resource is triggered.
- Message to administrator. Template of the message to be sent to the LAN administrator if the user considers the block to be a mistake. After the user requests to provide access, Kaspersky Endpoint Security sends an event to Kaspersky Security Center: Web page access blockage message to administrator. The event description contains a message to administrator with substituted variables. You can view these events in the Kaspersky Security Center console using the predefined event selection User requests. If your organization does not have Kaspersky Security Center deployed or there is no connection to the Administration Server, the application will send a message to administrator to the specified email address.
- Save your changes.
Editing masks for web resource addresses
Using a web resource address mask (also referred to as "address mask") may be useful if you need to enter numerous similar web resource addresses when creating a web resource access rule. If crafted well, one address mask can replace a large number of web resource addresses.
When creating an address mask, follow these rules:
- The
*character replaces any sequence that contains zero or more characters.For example, if you enter the
*abc*address mask, the access rule is applied to all web resources that contain the sequenceabc. Example:http://www.example.com/page_0-9abcdef.html. - A sequence of
*.characters (known as a domain mask) lets you select all domains of an address. The*.domain mask represents any domain name, subdomain name, or a blank line.Example: the
*.example.commask represents the following addresses:http://pictures.example.com. The domain mask*.representspictures.http://user.pictures.example.com. The domain mask*.representspictures.anduser.http://example.com. The domain mask*.is interpreted as a blank line
- The
www.character sequence at the start of the address mask is interpreted as a*.sequence.Example: the address mask
www.example.comis interpreted as*.example.com. This mask covers the addresseswww2.example.comandwww.pictures.example.com. - If an address mask does not start with the
*character, the content of the address mask is equivalent to the same content with the*.prefix. - If an address mask ends with a character other than
/or*, the content of the address mask is equivalent to the same content with the/*postfix.Example: the address mask
http://www.example.comcovers such addresses ashttp://www.example.com/abc, wherea,b, andcare any characters. - If an address mask ends with the
/character, the content of the address mask is equivalent to the same content with the/*postfix. - The character sequence
/*at the end of an address mask is interpreted as/*or an empty string. - Web resource addresses are verified against an address mask, taking into account the protocol (http or https):
- If the address mask contains no network protocol, this address mask covers addresses with any network protocol.
Example: the address mask
example.comcovers the addresseshttp://example.comandhttps://example.com. - If the address mask contains a network protocol, this address mask only covers addresses with the same network protocol as that of the address mask.
Example: the address mask
http://*.example.comcovers the addresshttp://www.example.combut does not coverhttps://www.example.com.
- If the address mask contains no network protocol, this address mask covers addresses with any network protocol.
- An address mask that is in double quotes is treated without considering any additional replacements, except the
*character if it has been initially included in the address mask. Rules 5 and 7 do not apply to address masks enclosed in double quotation marks (see examples 14 – 18 in the table below). - The user name and password, connection port, and character case are not taken into account during comparison with the address mask of a web resource.
Examples of how to use rules for creating address masks
No.
Address mask
Address of web resource to verify
Is the address covered by the address mask
Comment
1
*.example.com
http://www.123example.com
No
See rule 1.
2
*.example.com
http://www.123.example.com
Yes
See rule 2.
3
*example.com
http://www.123example.com
Yes
See rule 1.
4
*example.com
http://www.123.example.com
Yes
See rule 1.
5
http://www.*.example.com
http://www.123example.com
No
See rule 1.
6
www.example.com
http://www.example.com
Yes
See rules 3, 2, 1.
7
www.example.com
https://www.example.com
Yes
See rules 3, 2, 1.
8
http://www.*.example.com
http://123.example.com
Yes
See rules 3, 4, 1.
9
www.example.com
http://www.example.com/abc
Yes
See rules 3, 5, 1.
10
example.com
http://www.example.com
Yes
See rules 3, 1.
11
http://example.com/
http://example.com/abc
Yes
See rule 6.
12
http://example.com/*
http://example.com
Yes
See rule 7.
13
http://example.com
https://example.com
No
See rule 8.
14
"example.com"
http://www.example.com
No
See rule 9.
15
"http://www.example.com"
http://www.example.com/abc
No
See rule 9.
16
"*.example.com"
http://www.example.com
Yes
See rules 1, 9.
17
"http://www.example.com/*"
http://www.example.com/abc
Yes
See rules 1, 9.
18
"www.example.com"
http://www.example.com; https://www.example.com
Yes
See rules 9, 8.
19
www.example.com/abc/123
http://www.example.com/abc
No
An address mask contains more information than the address of a web resource.
Web Control for virtual machines
Web Control controls traffic on the computer as well as on a virtual machine that is locally deployed on the computer. This works without having to install the Kaspersky Endpoint Security application on the local virtual machine. This means that if the user tries to open a website that is blocked by a Web Control rule in a browser on the virtual machine, the application installed on the host operating system of the computer denies access to that website.
Web Control works differently on different virtual machines.
Oracle VM VirtualBox
Kaspersky Endpoint Security supports Web Control rules on Oracle VM VirtualBox virtual machines without limitations. The application can control all traffic of the virtual machine. If a filter by user is configured in Web Control rules, the application works correctly because all processes of the virtual machines are started by the local user.
VMware Workstation
Kaspersky Endpoint Security supports Web Control rules on VMware Workstation virtual machines with limitations. The application does not support rules with a filter by user configured. Virtual machine processes are running under the system user (SYSTEM). This makes it impossible to identify the user that is trying to open the website on the virtual machine.
Microsoft Hyper-V
Kaspersky Endpoint Security does not support Web Control rules on Microsoft Hyper-V virtual machines.
Page top
Device Control
Device Control manages user access to devices that are installed on or connected to the computer (for example, hard drives, cameras, or Wi-Fi modules). This lets you protect the computer from infection when such devices are connected, and prevent loss or leaks of data.
Device access levels
Device Control controls access at the following levels:
- Device type. For example, printers, removable drives, and CD/DVD drives.
You can configure device access as follows:
- Allow – .
- Block – .
- By rules (printers and portable devices only) –
 .
. - Depends on connection bus (except Wi-Fi) –
 .
. - Block with exceptions (Wi-Fi only) – .
- Allow –
- Connection bus. A connection bus is an interface used for connecting devices to the computer (for example, USB or FireWire). If Depends on connection bus mode is selected for the device type, the application allows or denies access to the device depending on the connection interface (e.g. USB).
You can configure device access as follows:
- Allow – .
- Block – .
- Allow –
- Trusted devices. Trusted devices are devices to which users that are specified in the trusted device settings have full access at all times.
You can add trusted devices based on the following data:
- Devices by ID. Each device has a unique identifier (Hardware ID, or HWID). You can view the ID in the device properties by using operating system tools. Example of a device ID:
SCSI\CDROM&VEN_NECVMWAR&PROD_VMWARE_SATA_CD00\5&354AE4D7&0&000000. Adding devices by ID is convenient if you want to add several specific devices. - Devices by model. Each device has a vendor ID (VID) and a product ID (PID). You can view the IDs in the device properties by using operating system tools. Template for entering the VID and PID:
VID_1234&PID_5678. Adding devices by model is convenient if you use devices of a certain model in your organization. This way, you can add all devices of this model. - Devices by ID mask. If you are using multiple devices with similar IDs, you can add devices to the trusted list by using masks. The
*character replaces any set of characters. Kaspersky Endpoint Security does not support the?character when entering a mask. For example,WDC_C*. - Devices by model mask. If you are using multiple devices with similar VIDs or PIDs (for example, devices from the same manufacturer), you can add devices to the trusted list by using masks. The
*character replaces any set of characters. Kaspersky Endpoint Security does not support the?character when entering a mask. For example,VID_05AC&PID_*.
- Devices by ID. Each device has a unique identifier (Hardware ID, or HWID). You can view the ID in the device properties by using operating system tools. Example of a device ID:
Device Control regulates user access to devices by using access rules. Device Control also lets you save device connection/disconnection events. To save events, you need to configure the registration of events in a policy.
If access to a device depends on the connection bus (the ![]() status), Kaspersky Endpoint Security does not save device connection/disconnection events. To enable Kaspersky Endpoint Security to save device connection/disconnection events, allow access to the corresponding type of device (the
status), Kaspersky Endpoint Security does not save device connection/disconnection events. To enable Kaspersky Endpoint Security to save device connection/disconnection events, allow access to the corresponding type of device (the ![]() status) or add the device to the trusted list.
status) or add the device to the trusted list.
When a device that is blocked by Device Control is connected to the computer, Kaspersky Endpoint Security will block access and show a notification (see the figure below).
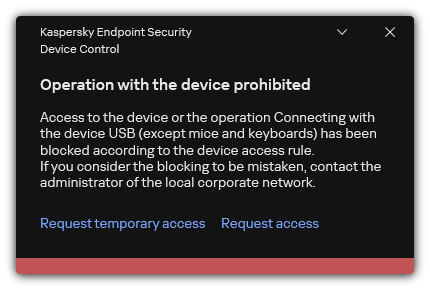
Device Control notification
Device Control operating algorithm
Kaspersky Endpoint Security makes a decision on whether to allow access to a device after the user connects the device to the computer (see the figure below).
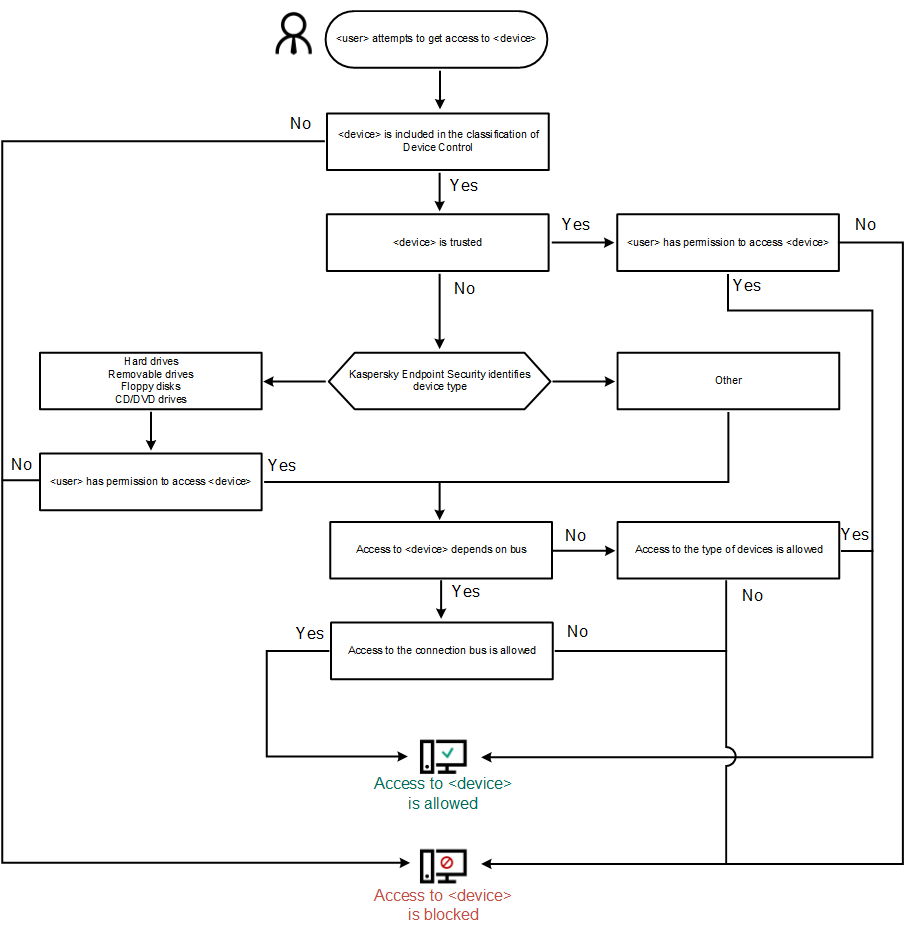
Device Control operating algorithm
If a device is connected and access is allowed, you can edit the access rule and block access. In this case, the next time someone attempts to access the device (such as to view the folder tree, or perform read or write operations), Kaspersky Endpoint Security blocks access. A device without a file system is blocked only the next time that the device is connected.
If a user of the computer with Kaspersky Endpoint Security installed must request access to a device that the user believes was blocked by mistake, send the user the request access instructions.
Enabling and disabling Device Control
By default, Device Control is enabled.
To enable or disable Device Control:
- In the main application window, click the button.
- In the application settings window, select Security Controls → Device Control.
- Use the Device Control toggle to enable or disable the component.
- Save your changes.
As a result, if Device Control is enabled, the application relays information about connected devices to Kaspersky Security Center. You can view the list of connected devices in Kaspersky Security Center in the Advanced → Repositories → Hardware folder.
Page top
About access rules
A device access rule is a group of settings that determine how users can access devices that are installed or connected to the computer. These settings include access to a specific device, an access schedule, and read or write permissions. You cannot add a device that is outside of Device Control classification. Access to such devices is allowed for all users.
Device Access Rules
The group of settings for an access rule differs depending on the type of device (see the table below).
Access rule settings
Devices |
Access control |
Schedule for access to a device |
Assignment of users and/or a group of users |
Priority |
Read/write permission |
|---|---|---|---|---|---|
Hard drives |
|
|
|
|
|
Removable drives (including USB flash drives) |
|
|
|
|
|
Floppy disks |
|
|
|
|
|
CD/DVD drives |
|
|
|
|
|
Portable devices (MTP) |
|
|
|
|
|
Local printers |
|
– |
|
|
– |
Network printers |
|
– |
|
|
– |
Modems |
|
– |
– |
– |
– |
Tape devices |
|
– |
– |
– |
– |
Multifunctional devices |
|
– |
– |
– |
– |
Smart card readers |
|
– |
– |
– |
– |
Windows CE USB ActiveSync devices |
|
– |
– |
– |
– |
External network adapters |
|
– |
– |
– |
– |
Bluetooth |
|
– |
– |
– |
– |
Cameras and scanners |
|
– |
– |
– |
– |
Access rules for Wi-Fi networks
A Wi-Fi network access rule determines whether the use of Wi-Fi networks is allowed (the ![]() status) or forbidden (the
status) or forbidden (the ![]() status). You can add a trusted Wi-Fi network (the
status). You can add a trusted Wi-Fi network (the ![]() status) to a rule. Use of a trusted Wi-Fi network is allowed without limitations. By default, a Wi-Fi network access rule allows access to any Wi-Fi network.
status) to a rule. Use of a trusted Wi-Fi network is allowed without limitations. By default, a Wi-Fi network access rule allows access to any Wi-Fi network.
Connection bus access rules
If Depends on connection bus value is selected for the access rule by device type, the application allows or denies access to the device depending on the connection interface. Rules that allow access to buses are created by default for all connection buses that are present in the classification of the Device Control component.
Connection bus access rules determine whether the connection of devices is allowed (the ![]() status) or forbidden (the
status) or forbidden (the ![]() status). The priority of device type access rules is higher than the priority of connection bus access rules.
status). The priority of device type access rules is higher than the priority of connection bus access rules.
Keyboard and mouse cannot be locked using Device Control. If you prohibit access to the USB connection bus, the user will continue to work with a keyboard and mouse connected via USB. The BadUSB Attack Prevention component is designed to prevent infected USB devices imitating keyboards from connecting to the computer.
Page top
Editing a device access rule
A device access rule is a group of settings that determine how users can access devices that are installed or connected to the computer. These settings include access to a specific device, an access schedule, and read or write permissions. You cannot add a device that is outside of Device Control classification. Access to such devices is allowed for all users.
To edit a device access rule:
- In the main application window, click the button.
- In the application settings window, select Security Controls → Device Control.
- In the Access settings block, click the Devices and Wi-Fi networks button.
The opened window shows access rules for all devices that are included in the Device Control component classification.

Types of devices in the Device Control component
- In the Access To Storage Devices block, select the access rule that you want to edit. The block contains devices that have a file system for which you can configure additional access settings. By default, a device access rule grants all users full access to the specified type of devices at any time.
Be careful when configuring access to devices of the Hard drives type. If you block access to the system disk, the application may cause a crash (BSOD) when booting the operating system.
- In the Access column, select the appropriate device access option:
- Allow.
- Block.
- Depends on connection bus.
To block or allow access to a device, configure access to the connection bus.
- By rules.
This option lets you configure user rights, permissions, and a schedule for device access.
- In the Users' rights block, click the Add button.
This opens a window for adding a new device access rule.
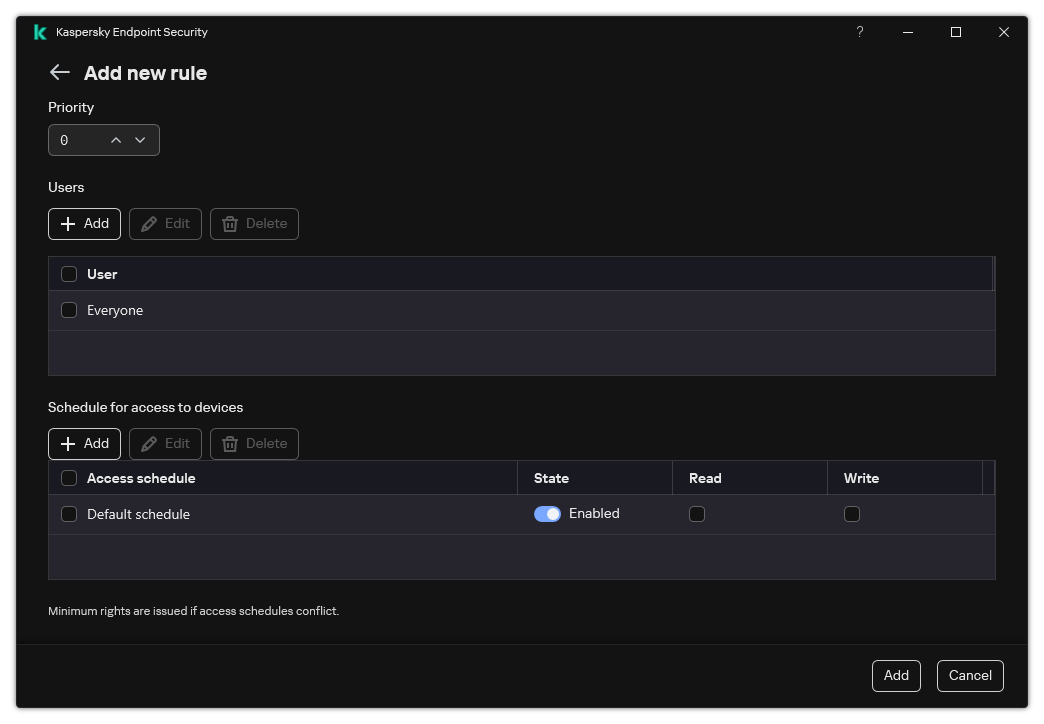
Device Control rule settings
- Assign a priority to the rule entry. A rule includes the following attributes: user account, schedule, permissions (read/write), and priority.
A rule has a specific priority. If a user has been added to multiple groups, Kaspersky Endpoint Security regulates device access based on the rule with the highest priority. Kaspersky Endpoint Security allows to assign priority from 0 to 10,000. The higher the value, the higher the priority. In other words, an entry with the value of 0 has the lowest priority.
For example, you can grant read-only permissions to the Everyone group and grant read/write permissions to the administrators group. To do so, assign a priority of 1 for the administrators group and assign a priority of 0 for the Everyone group.
The priority of a block rule is higher than the priority of an allow rule. In other words, if a user has been added to multiple groups and the priority of all rules are the same, Kaspersky Endpoint Security regulates device access based on any existing block rule.
- Set the Enabled status for the device access rule.
- Configure users' device access permissions: read and/or write.
You can select users in Active Directory, in the list of accounts in Kaspersky Security Center, or by entering a local user name manually. Kaspersky recommends using local user accounts only in special cases when it is not possible to use domain user accounts.
- Configure a device access schedule for users.
- Click Add.
- In the Access column, select the appropriate device access option:
- In the Access To External Devices block, select the rule and configure access: Allow, Block, or Depends on connection bus. If necessary, configure access to the connection bus.
- In the Access to Wi-Fi networks block, click the Wi-Fi link and configure access: Allow, Block, or Block with exceptions. If necessary, add Wi-Fi networks to the trusted list.

Wi-Fi access settings
- Save your changes.
Editing a connection bus access rule
To edit a connection bus access rule:
- In the main application window, click the button.
- In the application settings window, select Security Controls → Device Control.
- In the Access settings block, click the Connection buses button.
The opened window shows access rules for all connection buses that are included in the Device Control component classification.
- Select the access rule that you want to edit.
- In the Access column, select whether or not to allow access to the connection bus: Allow or Block.
If you have changed access to the connection bus Serial Port (COM) or Parallel Port (LPT), you must restart the computer to activate the access rule.
- Save your changes.
Managing access to mobile devices
Kaspersky Endpoint Security allows you to control access to data on mobile devices running Android and iOS. Mobile devices belong to the category of portable devices (MTP). Therefore, to configure data access on mobile devices, you need to edit the access settings for portable devices (MTP).
When a mobile device is connected to the computer, the operating system determines the device type. If Android Debug Bridge (ADB), iTunes or their equivalent applications are installed on the computer, the operating system identifies mobile devices as ADB or iTunes devices. In all other cases, the operating system may identify the mobile device type as a portable device (MTP) for file transfer, a PTP device (camera) for image transfer, or another device. The device type depends on the model of the mobile device and the selected USB connection mode. Kaspersky Endpoint Security lets you configure individual access permissions for data on mobile devices in ADB applications, iTunes, or the file manager. In all other cases, Device Control allows access to mobile devices in accordance with portable devices (MTP) access rules.
Access to mobile devices
Mobile devices belong to the category of portable devices (MTP), therefore the settings for them are the same. You can select one of the following modes of access to mobile devices:
- Allow . Kaspersky Endpoint Security allows full access to mobile devices. You can open, create, modify, copy, or delete files on mobile devices using the file manager or ADB and iTunes applications. You can also charge the battery of the device by connecting the mobile device to a USB port of the computer.
- Block . Kaspersky Endpoint Security restricts access to mobile devices in the file manager and ADB and iTunes applications. The application allows access only to trusted mobile devices. You can also charge the battery of the device by connecting the mobile device to a USB port of the computer.
- Depends on connection bus . Kaspersky Endpoint Security allows connecting to mobile devices in accordance with the USB connection status (Allow or Block ).
- By rules . Kaspersky Endpoint Security restricts access to mobile devices in accordance with rules. In the rules, you can configure access rights (read / write), select users or a group of users that can have access to mobile devices, and configure an access schedule for mobile devices. You can also restrict access to data on mobile devices through the ADB and iTunes applications.
Configuring mobile device access rules
Access rules for portable devices (MTP), ADB devices, and iTunes devices are configured differently. For portable devices (MTP) and ADB devices, you can configure rules for individual users or groups of users and create a schedule for when the rules will apply. For iTunes devices, you cannot do that. You can only allow or deny access to data through the iTunes application for all users.
How to configure mobile device access rules in Administration Console (MMC)
- Open the Kaspersky Security Center Administration Console.
- In the console tree, select Policies.
- Select the necessary policy and double-click to open the policy properties.
- In the policy window, select Security Controls → Device Control.
- Under Device Control settings, select the Types of devices tab.
The table lists access rules for all devices that are present in the classification of the Device Control component.
- In the context menu for the Portable devices (MTP) device type, configure the mobile device access mode: Allow , Block , or Depends on connection bus .
- To configure mobile device access rules, double-click to open the list of rules.
- Configure the mobile device access rule:
- In the Access rules block, click the Add button.
This opens a window for adding a new mobile device access rule.
- In the Priority field, set the rule write priority. A rule includes the following attributes: user account, schedule, permissions (read / write / ADB access), and priority.
A rule has a specific priority. If a user has been added to multiple groups, Kaspersky Endpoint Security regulates device access based on the rule with the highest priority. Kaspersky Endpoint Security allows to assign priority from 0 to 10,000. The higher the value, the higher the priority. In other words, an entry with the value of 0 has the lowest priority.
For example, you can grant read-only permissions to the Everyone group and grant read/write permissions to the administrators group. To do so, assign a priority of 1 for the administrators group and assign a priority of 0 for the Everyone group.
The priority of a block rule is higher than the priority of an allow rule. In other words, if a user has been added to multiple groups and the priority of all rules are the same, Kaspersky Endpoint Security regulates device access based on any existing block rule.
- Under Rule for users and groups, select users or groups of users. You can select users in Active Directory, in the list of accounts in Kaspersky Security Center, or by entering a local user name manually. Kaspersky recommends using local user accounts only in special cases when it is not possible to use domain user accounts.
- Click OK.
- In the Access rules block, click the Add button.
- Under Schedules for the selected access rule, configure a mobile device access schedule for users.
Configuring a separate access schedule for ADB devices is not possible. You can configure a common access schedule for ADB devices and portable devices (MTP).
- Configure users' access permissions to mobile devices in the file manager (Read / Write).
- Configure the access to data on a mobile device through the ADB application using the Access via ADB check box.
If the check box is cleared, when the mobile device is connected, the ADB application is prevented from detecting the device.
- Under Access via iTunes, configure access to data on the mobile device through the iTunes application.
Kaspersky Endpoint Security applies the settings for mobile device access through the iTunes application for all users. Configuring a separate access schedule for iTunes devices is not possible.
- Save your changes.
How to configure mobile device access rules in Web Console and Cloud Console
How to configure mobile device access rules in the application interface
- In the main application window, click the button.
- In the application settings window, select Security Controls → Device Control.
- In the Access settings block, click the Devices and Wi-Fi networks button.
The opened window shows access rules for all devices that are included in the Device Control component classification.
Types of devices in the Device Control component
- In the Access To Storage Devices block, click the Portable devices (MTP) link.
This opens a window containing the portable devices (MTP) access rules.
- Under Access, configure the mobile devices access mode: Allow, Block, Depends on connection bus, or By rules.
- If you select the By rules mode, you must add access rules for devices:
- In the Users' rights block, click the Add button.
This opens a window for adding a new mobile device access rule.
- In the Priority field, set the rule write priority. A rule includes the following attributes: user account, schedule, permissions (read / write / ADB access), and priority.
A rule has a specific priority. If a user has been added to multiple groups, Kaspersky Endpoint Security regulates device access based on the rule with the highest priority. Kaspersky Endpoint Security allows to assign priority from 0 to 10,000. The higher the value, the higher the priority. In other words, an entry with the value of 0 has the lowest priority.
For example, you can grant read-only permissions to the Everyone group and grant read/write permissions to the administrators group. To do so, assign a priority of 1 for the administrators group and assign a priority of 0 for the Everyone group.
The priority of a block rule is higher than the priority of an allow rule. In other words, if a user has been added to multiple groups and the priority of all rules are the same, Kaspersky Endpoint Security regulates device access based on any existing block rule.
- Under State, turn on the mobile device access rule.
- Under Access rules, configure mobile device access permissions for users.
- Configure users' access permissions to mobile devices in the file manager (Read / Write).
- Configure the access to data on a mobile device through the ADB application using the Access via ADB check box.
If the check box is cleared, when the mobile device is connected, the ADB application is prevented from detecting the device.
- Under Users, select users or groups of users for access to mobile devices. You can select users in Active Directory, in the list of accounts in Kaspersky Security Center, or by entering a local user name manually. Kaspersky recommends using local user accounts only in special cases when it is not possible to use domain user accounts.
- Under Schedule for access to devices, configure a device access schedule for users.
Configuring a separate access schedule for ADB devices is not possible. You can configure a common access schedule for ADB devices and portable devices (MTP).
- Under Access via iTunes, configure access to data on the mobile device through the iTunes application.
Kaspersky Endpoint Security applies the settings for mobile device access through the iTunes application for all users. Configuring a separate access schedule for iTunes devices is not possible.
- In the Users' rights block, click the Add button.
- Save your changes.
As a result, user access to mobile devices is restricted in accordance with rules. If you have prohibited access to mobile devices in the ADB and iTunes applications, when you connect a mobile devices, the ADB and iTunes applications are prevented from detecting the mobile device.
Trusted mobile devices
Trusted devices are devices to which users that are specified in the trusted device settings have full access at all times.
The procedure for adding a trusted mobile device is exactly the same as for other types of trusted devices. You can add a mobile device by ID or by device model.
To add a trusted mobile device by ID, you will need a unique ID (Hardware ID – HWID). You can find the ID in device properties by using operating system tools (see figure below). The Device Manager tool lets you do this. IDs of portable devices (MTP) and ADB, iTunes devices are different even for the same mobile device. The ID of a portable device (MTP) may look like this: 15131JECB07440. The ID of an ADB device may look like this: 6&370DEC2A&0&0001. Adding devices by ID is convenient if you want to add several specific devices. You can also use masks.
If you installed the ADB or iTunes applications after connecting a device to the computer, the unique ID of the device may be reset. This means that Kaspersky Endpoint Security will identify this device as a new device. If a device is trusted, add the device to the trusted list again.
To add a trusted mobile device by device model, you will need its Vendor ID (VID) and Product ID (PID). You can find the IDs in device properties by using operating system tools (see figure below). Template for entering the VID and PID: VID_18D1&PID_4EE5. Adding devices by model is convenient if you use devices of a certain model in your organization. This way, you can add all devices of this model.

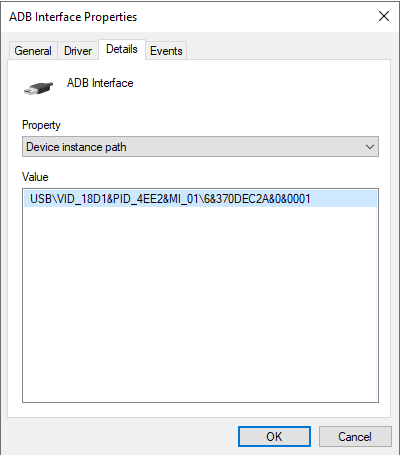
Device ID in Device Manager
Page top
Managing access to Bluetooth devices
Kaspersky Endpoint Security allows managing access to Bluetooth devices. Bluetooth devices include wireless keyboards, mice, headsets, printers, etc. You can also uses Bluetooth for communication e.g. with a mobile device.
When Bluetooth devices are connected or disconnected, the application may create multiple events about the device. The reason is that the operating system may detect a Bluetooth device as multiple devices of different types. Kaspersky Endpoint Security also manages the Bluetooth adapter through which the device is connected as a separate device. That is why the application creates an event for each of the detected devices.
You can select one of the following modes of access to Bluetooth devices:
- Allow and do not log
 . Kaspersky Endpoint Security allows connecting any Bluetooth devices and does not save information about the connection in the event log. You can connect Bluetooth input devices (keyboards, mice, etc), send data over Bluetooth, manage other Bluetooth devices (headset, headphones, etc).
 - Allow . Kaspersky Endpoint Security allows connecting any Bluetooth devices. You can connect Bluetooth input devices (keyboards, mice, etc), send data over Bluetooth, manage other Bluetooth devices (headset, headphones, etc).
- Block . Kaspersky Endpoint Security restricts access to Bluetooth devices. You can allow connecting only Bluetooth input devices (the Human Interface Devices class). These devices include keyboards, mice, joysticks, etc.
It is not possible to create a list of trusted Bluetooth devices. If you have restricted access to Bluetooth devices, you can only connection of Bluetooth input devices.
You can allow connecting input devices only in the user interface of the application or in Web Console. You cannot allow connecting input devices in Administration Console (MMC).
How to configure Bluetooth device access rules in Administration Console (MMC)
- Open the Kaspersky Security Center Administration Console.
- In the console tree, select Policies.
- Select the necessary policy and double-click to open the policy properties.
- In the policy window, select Security Controls → Device Control.
- Under Device Control settings, select the Types of devices tab.
The table lists access rules for all devices that are present in the classification of the Device Control component.
- In the context menu for the Bluetooth device type, configure the Bluetooth device access mode: Allow , Block , Allow and do not log .
If you blocked access to Bluetooth devices, you can allow connecting only input devices (keyboards, mice, etc) in the user interface of the application or in Web Console. You cannot allow connecting input devices in Administration Console (MMC).
- Save your changes.
How to configure Bluetooth device access rules in Web Console and Cloud Console
How to configure Bluetooth device access rules in the application interface
- In the main application window, click the button.
- In the application settings window, select Security Controls → Device Control.
- In the Access settings block, click the Devices and Wi-Fi networks button.
The opened window shows access rules for all devices that are included in the Device Control component classification.
Types of devices in the Device Control component
- In the Access To External Devices block, click the Bluetooth link.
This opens the Bluetooth device access settings.
- Under Access, configure the Bluetooth device access mode: Allow, Block, Allow and do not log.
- If you select the Block mode, you can allow connecting only Bluetooth input devices (keyboards, mice, etc). To do so, under Exclusions, select the Input devices (mice and keyboards) check box.
- Save your changes.
Control of printing
You can use Control of printing to configure user access to local and network printers.
Local printer control
Kaspersky Endpoint Security allows configuring access to local printers on two levels: connecting and printing.
Kaspersky Endpoint Security controls local printer connection over the following buses: USB, Serial Port (COM), Parallel Port (LPT).
Kaspersky Endpoint Security controls the connection of local printers to COM and LPT ports only on the level of the bus. Thus, to prevent printer connections via COM and LPT ports, you need to select the Depends on connection bus access mode for local printers and prohibit connections to COM and LPT buses.
For printers connected to USB, the application exercises control on two levels: device type (local printers) and connection bus (USB).
You can select one of the following access modes to local printers via USB:
- Allow . Kaspersky Endpoint Security grants full access to local printers to all users. Users can connect printers and print documents using the means that the operating system provides.
- Block . Kaspersky Endpoint Security blocks the connection of local printers. The application allows connecting only trusted printers.
- Depends on connection bus . Kaspersky Endpoint Security allows connecting to local printers in accordance with the USB bus connection status (Allow or Block ).
- By rules . To control printing, you must add printing rules. In the rules, you can select users or a group of users for which you want to allow or block access to printing documents on local printers.
Network printer control
Kaspersky Endpoint Security allows configuring access to printing on network printers. You can select one of the following access modes to network printers:
- Allow and do not log . Kaspersky Endpoint Security does not control printing on network printers. The application grants access to printing to all users and does not save information about printing to the event log.
- Allow . Kaspersky Endpoint Security grants access to printing on network printers to all users.
- Block . Kaspersky Endpoint Security restricts access to network printers for all users. The application allows access only to trusted printers.
- By rules . Kaspersky Endpoint Security grants access to printing in accordance with printing rules. In the rules, you can select users or a group of users that will be allowed or prevented from printing documents on network printer.
Adding printing rules for printers
How to add printing rules in the Administration Console (MMC)
- Open the Kaspersky Security Center Administration Console.
- In the console tree, select Policies.
- Select the necessary policy and double-click to open the policy properties.
- In the policy window, select Security Controls → Device Control.
- Under Device Control settings, select the Types of devices tab.
The table lists access rules for all devices that are present in the classification of the Device Control component.
- In the context menu for the Local printers and Network printers device types, configure the access mode for the relevant printers: Allow , Block , Allow and do not log (for network printers only), or Depends on connection bus (for local printers only).
- To configure printing rules on local and network printers, double-click the rule lists to open them.
- Select By rules as the printer access mode.
- Select the users or groups of users to which you want to apply the printing rule.
- Click Add.
This opens a window for adding a new printing rule.
- Assign a priority to the rule entry. A rule entry includes the following attributes: user account, action (allow/block), and priority.
A rule has a specific priority. If a user has been added to multiple groups, Kaspersky Endpoint Security regulates device access based on the rule with the highest priority. Kaspersky Endpoint Security allows to assign priority from 0 to 10,000. The higher the value, the higher the priority. In other words, an entry with the value of 0 has the lowest priority.
For example, you can grant read-only permissions to the Everyone group and grant read/write permissions to the administrators group. To do so, assign a priority of 1 for the administrators group and assign a priority of 0 for the Everyone group.
The priority of a block rule is higher than the priority of an allow rule. In other words, if a user has been added to multiple groups and the priority of all rules are the same, Kaspersky Endpoint Security regulates device access based on any existing block rule.
- Under Action, configure user access to printing on the printer.
- Click Users and groups and select users or groups of users for access to printing. You can select users in Active Directory, in the list of accounts in Kaspersky Security Center, or by entering a local user name manually. Kaspersky recommends using local user accounts only in special cases when it is not possible to use domain user accounts.
- Click OK.
- Click Add.
- Save your changes.
How to add printing rules in Web Console and Cloud Console
How to add printing rules in the application interface
- In the main application window, click the button.
- In the application settings window, select Security Controls → Device Control.
- In the Access settings block, click the Devices and Wi-Fi networks button.
The opened window shows access rules for all devices that are included in the Device Control component classification.
Types of devices in the Device Control component
- Under Access To External Devices, click Local printers or Network printers.
This opens a window with printer access rules.
- Under Access to local printers or Access to network printers, configure the access mode for printers: Allow, Block, Allow and do not log (for network printers only), Depends on connection bus (for local printers only), or By rules.
- If you select the By rules mode, you must add printing rules for printers. Select the users or groups of users to which you want to apply the printing rule.
- Click Add.
This opens a window for adding a new printing rule.
- Assign a priority to the rule entry. A rule entry includes the following attributes: user account, permissions (allow/block), and priority.
A rule has a specific priority. If a user has been added to multiple groups, Kaspersky Endpoint Security regulates device access based on the rule with the highest priority. Kaspersky Endpoint Security allows to assign priority from 0 to 10,000. The higher the value, the higher the priority. In other words, an entry with the value of 0 has the lowest priority.
For example, you can grant read-only permissions to the Everyone group and grant read/write permissions to the administrators group. To do so, assign a priority of 1 for the administrators group and assign a priority of 0 for the Everyone group.
The priority of a block rule is higher than the priority of an allow rule. In other words, if a user has been added to multiple groups and the priority of all rules are the same, Kaspersky Endpoint Security regulates device access based on any existing block rule.
- Under Action, configure user permissions for access to printing.
- Under Users and groups, select users or groups of users for access to printing. You can select users in Active Directory, in the list of accounts in Kaspersky Security Center, or by entering a local user name manually. Kaspersky recommends using local user accounts only in special cases when it is not possible to use domain user accounts.
- Click Add.
- Save your changes.
Trusted printers
Trusted devices are devices to which users that are specified in the trusted device settings have full access at all times.
The procedure for adding trusted printers is exactly the same as for other types of trusted devices. You can add local printers by ID or device model. You can only add network printers by device ID.
To add a trusted local printer by ID, you will need a unique ID (Hardware ID – HWID). You can find the ID in device properties by using operating system tools (see figure below). The Device Manager tool lets you do this. The ID of a local printer may look like this: 6&2D09F5AF&1&C000. Adding devices by ID is convenient if you want to add several specific devices. You can also use masks.
To add a trusted local printer by device model, you will need its Vendor ID (VID) and Product ID (PID). You can find the IDs in device properties by using operating system tools (see figure below). Template for entering the VID and PID: VID_04A9&PID_27FD. Adding devices by model is convenient if you use devices of a certain model in your organization. This way, you can add all devices of this model.

Device ID in Device Manager
To add a trusted network printer, you will need its device ID. For network printers, the device ID can be the network name of the printer (name of the shared printer), the IP address of the printer, or the URL of the printer.
Page top
Control of Wi-Fi connections
Device Control allows managing the Wi-Fi connection of the computer (laptop). Public Wi-Fi networks may be insecure, and using such networks can result in data loss. Device Control lets you block a user from connecting to Wi-Fi or allow connecting only to trusted networks. For example, you can allow connecting only to the corporate Wi-Fi network that is sufficiently secure. Device Control will block access to all Wi-Fi networks except those specified in the trusted list.
On computers running Windows 11, you need to enable Location services in order to control Wi-Fi connections. To do this, you need to enable the Location services switch in the operating system settings (Settings → Privacy & security → Location). If Location services are disabled, Kaspersky Endpoint Security does not control connections to Wi-Fi networks.
How to restrict Wi-Fi connections in the Administration Console (MMC)
- Open the Kaspersky Security Center Administration Console.
- In the console tree, select Policies.
- Select the necessary policy and double-click to open the policy properties.
- In the policy window, select Security Controls → Device Control.
- Under Device Control settings, select the Types of devices tab.
The table lists access rules for all devices that are present in the classification of the Device Control component.
- In the context menu for the Wi-Fi device type, select the Device Control action that is taken when connecting to Wi-Fi: Allow (), Block (), or Block with exceptions ().
- If you selected the Block with exceptions option, create a list of trusted Wi-Fi networks:
- Double-click to open the list of trusted Wi-Fi networks.
- In the Trusted Wi-Fi networks block, click the Add button.
- This opens a window; in that window, configure the trusted Wi-Fi network (see figure below):
- Network name. Name or SSID (Service Set Identifier) of the Wi-Fi network.
- Authentication type. Authentication type used when connecting to the Wi-Fi network.
Starting with Kaspersky Endpoint Security for Windows version 12.0, the WPA3 protocol support has been added to the application. If a Kaspersky Endpoint Security version 12.2 policy is applied on a computer, the WPA2 protocol is selected on computers with Kaspersky Endpoint Security version 11.11.0 and earlier; WPA2 / WPA3 is selected for versions 12.0 to 12.1; WPA3 is selected for versions 12.2 and later.
- Encryption type. Encryption type used to protect the Wi-Fi traffic.
- Comment. Further info about the added Wi-Fi network.
You can view the settings of the trusted Wi-Fi network in router settings.
A Wi-Fi network is considered trusted if its settings match all settings specified in the rule.
- Save your changes.
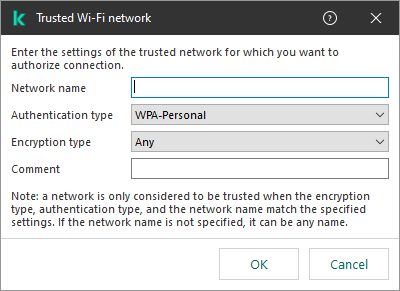
Trusted Wi-Fi network settings
How to restrict Wi-Fi connections in Web Console and Cloud Console
- In the main window of the Web Console, select Assets (Devices) → Policies & profiles.
- Click the name of the Kaspersky Endpoint Security policy.
The policy properties window opens.
- Select the Application settings tab.
- Go to Security Controls → Device Control.
- In the Device Control Settings block, click the Access rules for devices and Wi-Fi networks link.
The table lists access rules for all devices that are present in the classification of the Device Control component.
- In the Access to Wi-Fi networks block, click the Wi-Fi link.
- Under Access to Wi-Fi networks, select the Device Control action taken when connecting to Wi-Fi: Allow, Block, or Block with exceptions.
- If you selected the Block with exceptions option, create a list of trusted Wi-Fi networks:
- Double-click to open the list of trusted Wi-Fi networks.
- In the Trusted Wi-Fi networks block, click the Add button.
- This opens a window; in that window, configure the trusted Wi-Fi network (see figure below):
- Network name. Name or SSID (Service Set Identifier) of the Wi-Fi network.
- Authentication type. Authentication type used when connecting to the Wi-Fi network.
Starting with Kaspersky Endpoint Security for Windows version 12.0, the WPA3 protocol support has been added to the application. If a Kaspersky Endpoint Security version 12.2 policy is applied on a computer, the WPA2 protocol is selected on computers with Kaspersky Endpoint Security version 11.11.0 and earlier; WPA2 / WPA3 is selected for versions 12.0 to 12.1; WPA3 is selected for versions 12.2 and later.
- Encryption type. Encryption type used to protect the Wi-Fi traffic.
- Comment. Further info about the added Wi-Fi network.
You can view the settings of the trusted Wi-Fi network in router settings.
A Wi-Fi network is considered trusted if its settings match all settings specified in the rule.
- Save your changes.
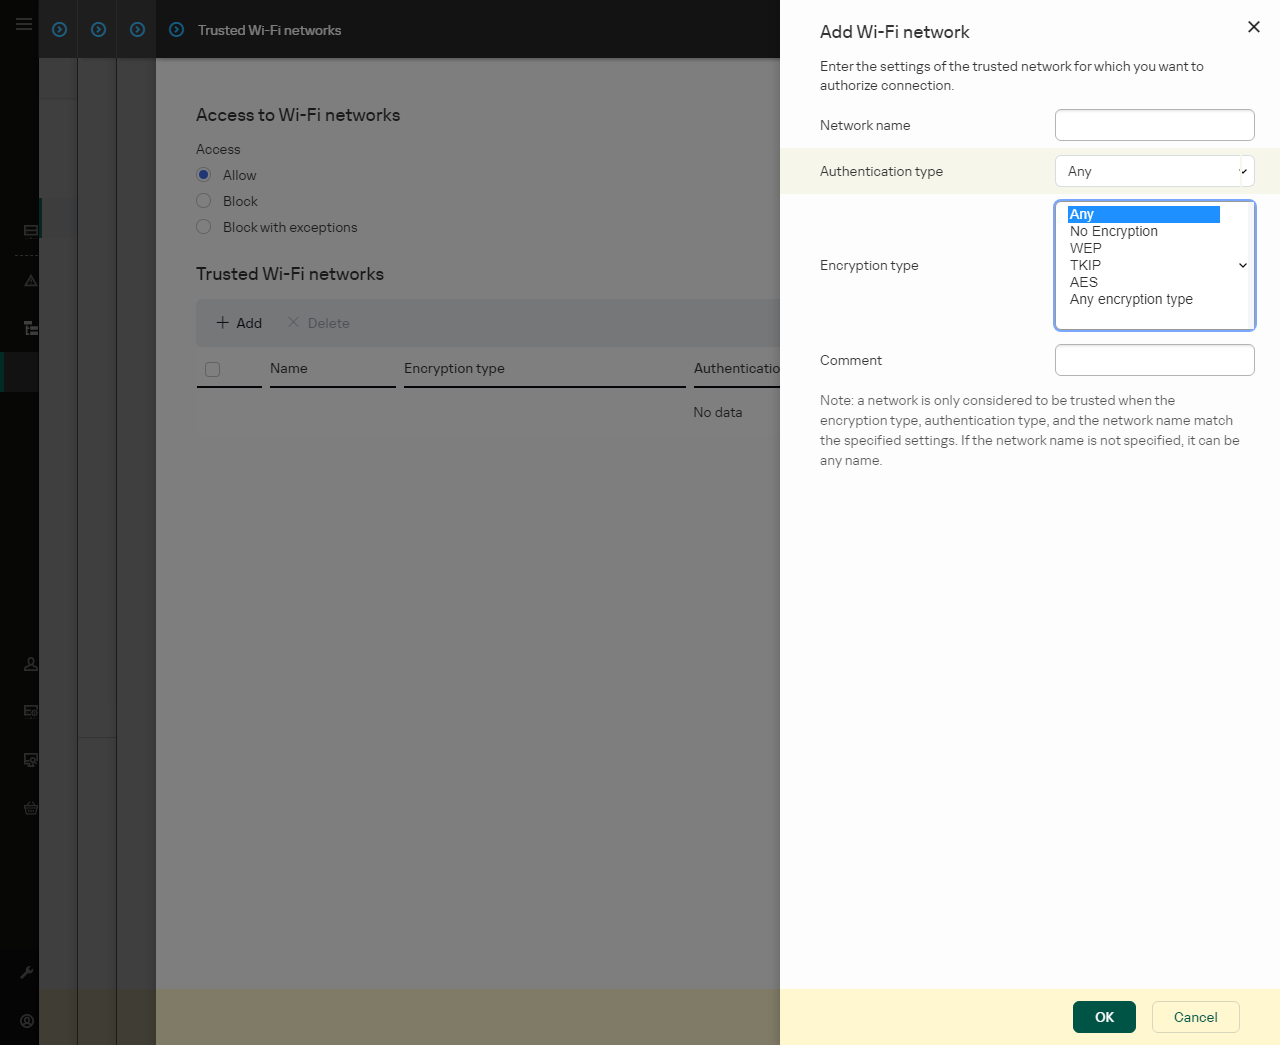
Trusted Wi-Fi network settings
How to restrict Wi-Fi connections in the application interface
- In the main application window, click the button.
- In the application settings window, select Security Controls → Device Control.
- In the Access settings block, click the Devices and Wi-Fi networks button.
The opened window shows access rules for all devices that are included in the Device Control component classification.
- In the Access to Wi-Fi networks block, click the Wi-Fi link.
The opened window shows the Wi-Fi network access rules.
Wi-Fi access settings
- Under Access, select the Device Control action taken when connecting to Wi-Fi: Allow, Block, or Block with exceptions.
- If you selected the Block with exceptions option, create a list of trusted Wi-Fi networks:
- In the Trusted Wi-Fi networks block, click the Add button.
- This opens a window; in that window, configure the trusted Wi-Fi network (see figure below):
- Network name. Name or SSID (Service Set Identifier) of the Wi-Fi network.
- Authentication type. Authentication type used when connecting to the Wi-Fi network.
Starting with Kaspersky Endpoint Security for Windows version 12.0, the WPA3 protocol support has been added to the application. If a Kaspersky Endpoint Security version 12.2 policy is applied on a computer, the WPA2 protocol is selected on computers with Kaspersky Endpoint Security version 11.11.0 and earlier; WPA2 / WPA3 is selected for versions 12.0 to 12.1; WPA3 is selected for versions 12.2 and later.
- Encryption type. Encryption type used to protect the Wi-Fi traffic.
- Comment. Further info about the added Wi-Fi network.
You can view the settings of the trusted Wi-Fi network in router settings.
A Wi-Fi network is considered trusted if its settings match all settings specified in the rule.
- Save your changes.
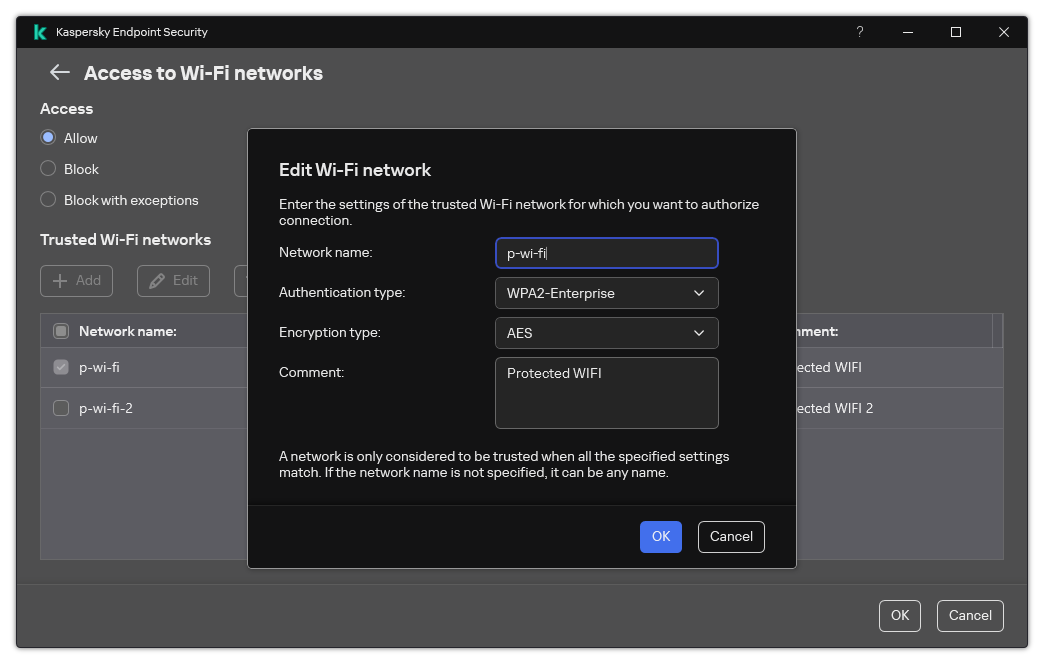
Trusted Wi-Fi network settings
As a result, when a user tries connecting to a Wi-Fi network that is not listed as trusted, the application blocks the connection and displays a notification (see figure below).
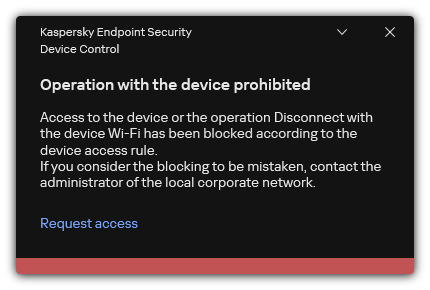
Device Control notification
Page top
Monitoring usage of removable drives
Monitoring usage of removable drives includes:
- Monitoring operations on files on removable drives.
- Monitoring connection and disconnection of trusted removable drives.
Kaspersky Endpoint Security allows monitoring connection and disconnection of all trusted devices and not only removable drives. You can turn on event logging in notification settings for the Device Control component. Events have the Informational severity level.
To enable monitoring of removable drive usage:
- In the main application window, click the button.
- In the application settings window, select Security Controls → Device Control.
- In the Access settings block, click the Devices and Wi-Fi networks button.
The opened window shows access rules for all devices that are included in the Device Control component classification.
Types of devices in the Device Control component
- In the Access To Storage Devices block, select Removable drives.
- In the window that opens, select the Logging tab.
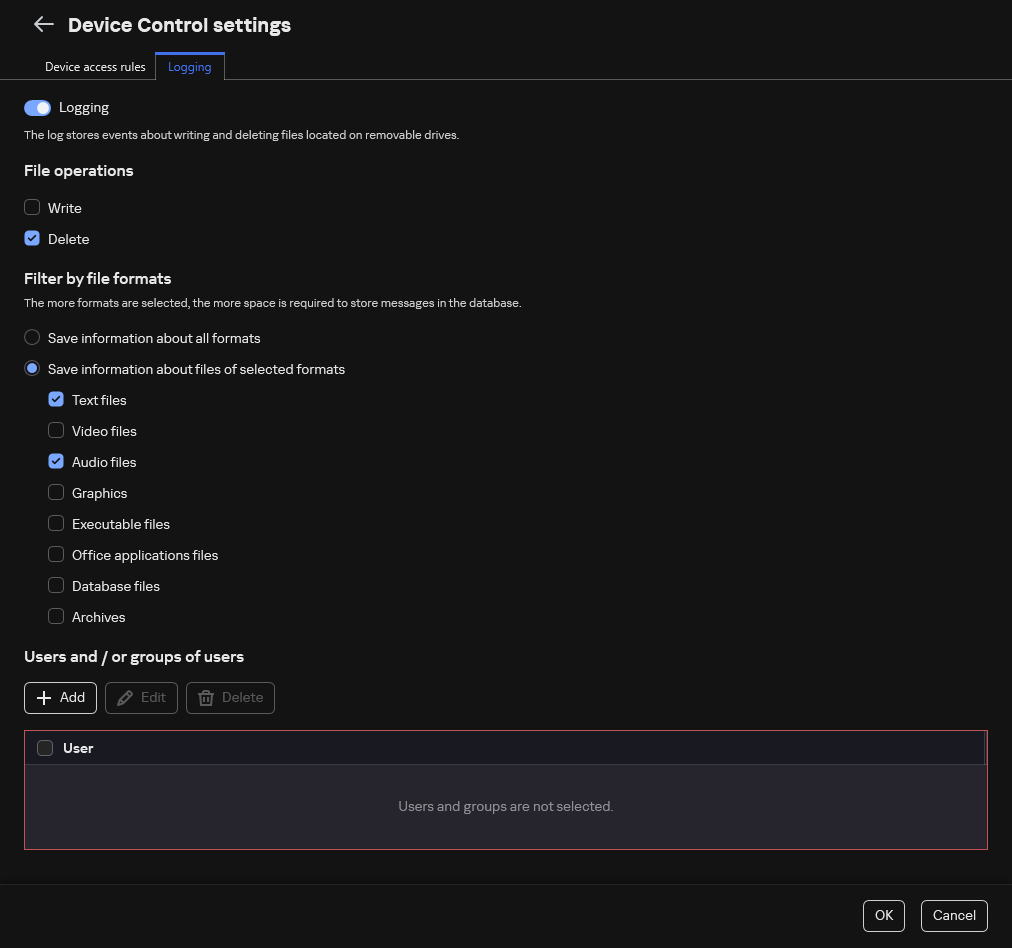
The settings of removable drive usage monitoring
- Turn on the Logging toggle.
- In the File operations block, select the operations that you want to monitor: Write, Delete.
- In the Filter by file formats block, select the formats of files whose associated operations should be logged by Device Control.
- Select the users or group of users whose use of removable drives you want to monitor.
- Save your changes.
As a result, when users write to files located on removable drives or delete files from removable drives, Kaspersky Endpoint Security will save information about such operations to the event log and send events to Kaspersky Security Center. You can view events associated with files on removable drives in the Kaspersky Security Center Administration Console in the workspace of the Administration Server node on the Events tab. For events to be displayed in the local Kaspersky Endpoint Security event log, you must select the File operation performed check box in the notifications settings for the Device Control component.
Page top
Changing the caching duration
The Device Control component registers events related to monitored devices, such as connection and disconnection of a device, reading a file from a device, writing a file to a device, and other events. Device Control then either allows or blocks the action according to the Kaspersky Endpoint Security settings.
Device Control saves information about events for a specific period of time called the caching period. If information about an event is cached and this event is repeated, there is no need to notify Kaspersky Endpoint Security about it or to show another prompt for granting access to the corresponding action, such as connecting a device. This makes it more convenient to work with a device.
An event is considered a duplicate event if all of the following event settings match the record in the cache:
- device ID
- SID of the user account attempting access
- Device category
- Action taken with the device
- Application permission for this action: allowed or denied
- Path to the process used to take the action
- File that is being accessed
Prior to changing the caching period, disable Kaspersky Endpoint Security Self-Defense. After changing the caching period, enable Self-Defense.
To change the caching period:
- Open the registry editor on the computer.
- In the registry editor, go to the following section:
- For 64-bit operating systems:
[HKEY_LOCAL_MACHINE\SOFTWARE\WOW6432Node\KasperskyLab\protected\KES\environment] - For 32-bit operating systems:
[HKEY_LOCAL_MACHINE\SOFTWARE\KasperskyLab\protected\KES\environment]
- For 64-bit operating systems:
- Open
DeviceControlEventsCachePeriodfor editing. - Define the number of minutes that Device Control must save information about an event before this information is deleted.
Actions with trusted devices
Trusted devices are devices to which users that are specified in the trusted device settings have full access at all times.
To work with trusted devices, you can grant access to an individual user, to a group of users, or to all users of the organization.
For example, if your organization does not allow the use of removable drives but administrators use removable drives in their work, you can allow removable drives only for a group of administrators. To do so, add removable drives to the trusted list and configure user access permissions.
It is not recommended to add more than 1000 trusted devices, as this can cause system instability.
Kaspersky Endpoint Security allows you to add a device to the trusted list in the following ways:
- If Kaspersky Security Center is not deployed in your organization, you can connect the device to the computer and add it to the trusted list in the application settings. To distribute the list of trusted devices to all computers in your organization, you can enable merging the lists of trusted devices in a policy or use the export / import procedure.
- If Kaspersky Security Center is deployed in your organization, you can detect all connected devices remotely and create a list of trusted devices in the policy. The list of trusted devices will be available on all computers to which the policy is applied.
Kaspersky Endpoint Security allows controlling the use of trusted devices (connection and disconnection). You can turn on event logging in notification settings for the Device Control component. Events have the Informational severity level.
Adding a device to the Trusted list from the application interface
By default, when a device is added to the list of trusted devices, access to the device is granted to all users (the Everyone group of users).
To add a device to the Trusted list from the application interface:
- In the main application window, click the button.
- In the application settings window, select Security Controls → Device Control.
- In the Access settings block, click the Trusted devices button.
This opens the list of trusted devices.
- Click Select.
This opens the list of connected devices. The list of devices depends on the value that is selected in the Display connected devices drop-down list.
- In the list of devices, select the device that you want to add to the trusted list.
- In the Comment field, you can provide any relevant information about the trusted device.
- Select the users or groups of users to which you want to allow access to trusted devices.
You can select users in Active Directory, in the list of accounts in Kaspersky Security Center, or by entering a local user name manually. Kaspersky recommends using local user accounts only in special cases when it is not possible to use domain user accounts.
- Save your changes.
Adding a device to the Trusted list from Kaspersky Security Center
Kaspersky Security Center receives information about devices if Kaspersky Endpoint Security is installed on the computers and Device Control is enabled. It is not possible to add a device to the trusted list unless information about that device is available in Kaspersky Security Center.
You can add a device to the trusted list according to the following data:
- Devices by ID. Each device has a unique identifier (Hardware ID, or HWID). You can view the ID in the device properties by using operating system tools. Example of a device ID:
SCSI\CDROM&VEN_NECVMWAR&PROD_VMWARE_SATA_CD00\5&354AE4D7&0&000000. Adding devices by ID is convenient if you want to add several specific devices. - Devices by model. Each device has a vendor ID (VID) and a product ID (PID). You can view the IDs in the device properties by using operating system tools. Template for entering the VID and PID:
VID_1234&PID_5678. Adding devices by model is convenient if you use devices of a certain model in your organization. This way, you can add all devices of this model. - Devices by ID mask. If you are using multiple devices with similar IDs, you can add devices to the trusted list by using masks. The
*character replaces any set of characters. Kaspersky Endpoint Security does not support the?character when entering a mask. For example,WDC_C*. - Devices by model mask. If you are using multiple devices with similar VIDs or PIDs (for example, devices from the same manufacturer), you can add devices to the trusted list by using masks. The
*character replaces any set of characters. Kaspersky Endpoint Security does not support the?character when entering a mask. For example,VID_05AC&PID_*.
To add devices to the list of trusted devices:
- Open the Kaspersky Security Center Administration Console.
- In the console tree, select Policies.
- Select the necessary policy and double-click to open the policy properties.
- In the policy window, select Security Controls → Device Control.
- In the right part of the window, select the Trusted devices tab.
- Select the Merge values when inheriting check box if you want to create a consolidated list of trusted devices for all computers in the company.
The lists of trusted devices in the parent and child policies will be merged. The lists will be merged provided that merging values when inheriting is enabled. Trusted devices from the parent policy are displayed in child policies in a read-only view. Changing or deleting trusted devices of the parent policy is not possible.
- Click the Add button and select a method for adding a device to the trusted list.
- To filter devices, select a device type from the Device type drop-down list (for example, Removable drives).
- In the Name / Model field, enter the device ID, model (VID and PID) or mask, depending on the selected addition method.
Adding devices by model mask (VID and PID) works as follows: if you enter a model mask that does not match any model, Kaspersky Endpoint Security checks if the device ID (HWID) matches the mask. Kaspersky Endpoint Security checks only the part of the device ID that determines the manufacturer and the type of the device (
SCSI\CDROM&VEN_NECVMWAR&PROD_VMWARE_SATA_CD00\5&354AE4D7&0&000000). If the model mask matches this part of the device ID, the devices that match the mask will be added to the list of trusted devices on the computer. At the same time, the list of devices in Kaspersky Security Center remains empty when you click the Refresh button. To display the list of devices correctly, you can add devices by device ID mask. - To filter devices, in the Computer field, enter the computer name or a mask for the name of the computer to which the device is connected.
The
*character replaces any set of characters. The?character replaces any single character. - Click the Refresh button.
The table displays a list of devices that satisfy the defined filtering criteria.
- Select the check boxes next to the names of devices that you want to add to the trusted list.
- In the Comment field, enter a description of the reason for adding devices to the trusted list.
- Click the Select button to the right of the Allow to users and / or groups of users field.
- You can select users in Active Directory, in the list of accounts in Kaspersky Security Center, or by entering a local user name manually. Kaspersky recommends using local user accounts only in special cases when it is not possible to use domain user accounts.
By default, access to trusted devices is allowed for the Everyone group.
- Save your changes.
When a device is connected, Kaspersky Endpoint Security checks the list of trusted devices for an authorized user. If the device is trusted, Kaspersky Endpoint Security allows access to the device with all permissions, even if access to the device type or connection bus is denied. If the device is untrusted and access is denied, you can request access to the locked device.
Page top
Exporting and importing the list of trusted devices
To distribute the list of trusted devices to all computers in your organization, you can use the export/import procedure.
For example, if you need to distribute a list of trusted removable drives, you need to do the following:
- Sequentially connect removable drives to your computer.
- In the Kaspersky Endpoint Security settings, add the removable drives to the trusted list. If required, configure user access permissions. For example, allow only administrators to access removable drives.
- Export the list of trusted devices in the Kaspersky Endpoint Security settings (see the instructions below).
- Distribute the trusted device list file to other computers in your organization. For example, place the file in a shared folder.
- Import the list of trusted devices in the Kaspersky Endpoint Security settings on other computers in the organization (see the instructions below).
To import or export the list of trusted devices:
- In the main application window, click the button.
- In the application settings window, select Security Controls → Device Control.
- In the Access settings block, click the Trusted devices button.
This opens the list of trusted devices.
- To export the list of trusted devices:
- Select the trusted devices that you want to export.
- Click Export.
- In the window that opens, specify the name of the XML file to which you want to export the list of trusted devices, and select the folder in which you want to save this file.
- Save the file.
Kaspersky Endpoint Security exports the entire list of trusted devices to the XML file.
- To import the list of trusted devices:
- In the Import drop-down list, select the relevant action: Import and add to existing or Import and replace existing.
- In the window that opens, select the XML file from which you want to import the list of trusted devices.
- Open the file.
If the computer already has a list of trusted devices, Kaspersky Endpoint Security will prompt you to delete the existing list or add new entries to it from the XML file.
- Save your changes.
When a device is connected, Kaspersky Endpoint Security checks the list of trusted devices for an authorized user. If the device is trusted, Kaspersky Endpoint Security allows access to the device with all permissions, even if access to the device type or connection bus is denied.
Page top
Obtaining access to a blocked device
When configuring Device Control, you can accidentally block access to a device that is necessary for work.
If Kaspersky Security Center is not deployed in your organization, you can provide access to a device in the settings of Kaspersky Endpoint Security. For example, you can add the device to the trusted list or temporarily disable Device Control.
If Kaspersky Security Center is deployed in your organization and a policy has been applied to computers, you can provide access to a device in the Administration Console.
Online mode for granting access
You can grant access to a blocked device in online mode only if Kaspersky Security Center is deployed in the organization and a policy has been applied to the computer. The computer must have the capability to establish a connection with the Administration Server.
Granting access in online mode consists of the following steps:
- The user sends the administrator a message containing an access request.
- The administrator receives a message with the request in the Kaspersky Security Center console.
The Kaspersky Security Center console has a preset event selection User requests for easy tracking of messages from users.
- The administrator adds the device to the trusted list.
You can add a trusted device in a policy for the administration group or in the local application settings for an individual computer.
- The administrator updates the settings of Kaspersky Endpoint Security on the user's computer.
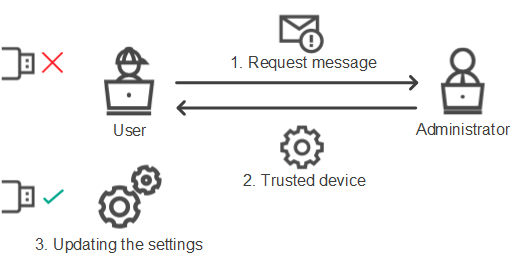
Schematic for granting access to a device in online mode
Offline mode for granting access
You can grant access to a blocked device in offline mode only if Kaspersky Security Center is deployed in the organization and a policy has been applied to the computer. In the policy settings, in the Device Control section, the Allow requests for temporary access check box must be selected.
If you need to grant temporary access to a blocked device but you cannot add the device to the trusted list, you can grant access to the device in offline mode. This way, you can grant access to a blocked device even if the computer does not have network access or if the computer is outside of the corporate network.
Granting access in offline mode consists of the following steps:
- The user creates a request access file and sends it to the administrator.
- The administrator creates an access key from the request access file and sends it to the user.
- The user activates the access key.
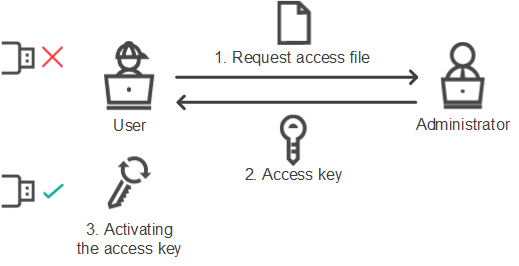
Schematic for granting access to a device in offline mode
Online mode for granting access
You can grant access to a blocked device in online mode only if Kaspersky Security Center is deployed in the organization and a policy has been applied to the computer. The computer must have the capability to establish a connection with the Administration Server.
A user requests access to a blocked device as follows:
- Connect the device to the computer.
Kaspersky Endpoint Security will show a notification stating that access to the device is blocked (see the figure below).
- Click the Request access link.
This opens a window with a message for the administrator. This message contains information about the blocked device.
- Click Send.
Device Control notification
Next, the administrator in the Kaspersky Security Center console receives the Device access blockage message to administrator event. The event includes the user name, computer name, details of the device to which the user is trying to gain access, and other information. You can configure how the administrator is notified about such events and, for example, select email notifications. The Kaspersky Security Center console has a preset event selection User requests for easy tracking of messages from users.
To allow access, you must add the device to the trusted list. After you update Kaspersky Endpoint Security settings on the computer, the user can gain access to the device.
Page top
Offline mode for granting access
You can grant access to a blocked device in offline mode only if Kaspersky Security Center is deployed in the organization and a policy has been applied to the computer. In the policy settings, in the Device Control section, the Allow requests for temporary access check box must be selected.
A user requests access to a blocked device as follows:
- Connect the device to the computer.
Kaspersky Endpoint Security will show a notification stating that access to the device is blocked (see the figure below).
- Click the Request temporary access link.
This opens a window containing a list of connected devices.
- In the list of connected devices, select the device to which you want to gain access.
- Click Generate request access file.
- In the Access duration field, specify the period of time for which you want to have access to the device.
- Save the file to computer memory.
As a result, a request access file with the *.akey extension will be downloaded to computer memory. Use any available method to send the device request access file to the corporate LAN administrator.
Device Control notification
- In the main window of the Web Console, select Assets (Devices) → Managed devices.
- In the list of client computers, select the computer whose user needs to be granted temporary access to the blocked device.
- Click the ellipsis button (
 ) above the list of computers and then click the Grant access to the device in offline mode button.
 - In the window that opens, select the Device Control section.
- Click the Browse button and download the request access file received from the user.
You will see information about the blocked device to which the user has requested access.
- If necessary, change the value of the Access duration (hours) setting.
By default, the Access duration (hours) setting takes the value that was indicated by the user when creating the access request file.
- Specify the time period during which the access key can be activated on the device.
This setting defines the time period during which the user can activate access to the blocked device by using the provided access key.
- Save the access key file to computer memory.
As a result, the blocked device access key will be downloaded to computer memory. An access key file has the *.acode extension. Use any available method to send the blocked device access key to the user.
The user activates the access key as follows:
- In the main application window, click the button.
- In the application settings window, select Security Controls → Device Control.
- In the Access request block, click the Request access to device button.
- In the window that opens, click the Activate access key button.
- In the window that opens, select the file with the device access key received from the corporate LAN administrator.
This opens a window containing information about access provision.
- Click OK.
As a result, the user receives access to the device for the time period set by the administrator. The user receives the full set of rights for accessing the device (read and write). When the key expires, access to the device will be blocked. If the user requires permanent access to the device, add the device to the trusted list.
Page top
Editing templates of Device Control messages
When the user attempts to access a blocked device, Kaspersky Endpoint Security displays a message stating that access to the device is blocked or that an operation with the device contents is forbidden. Kaspersky experts provide a template of a message to the user describing the reasons why access to the device was blocked (see the figure below). You can use the default rule or edit the message template. Special variables are provided for managing the message template (for example, Device name or User name). Variables allow creating a single message template that can be used for all users.
Device Control notification
If the user believes that access to the device was mistakenly blocked or that an operation with device contents was forbidden by mistake, the user can send a message to the local corporate network administrator by clicking the link in the displayed message about the blocked action. To do so, the user must click Request access or Request temporary access buttons and send a message to the administrator describing the situation. You can also prepare a template of the message to the administrator, adding to it data that may inform your decision to allow or block access to the device. After the user requests to provide access, Kaspersky Endpoint Security sends an event to Kaspersky Security Center: Device access blockage message to administrator. The event description contains a message to administrator with substituted variables. You can view these events in the Kaspersky Security Center console using the predefined event selection User requests. If your organization does not have Kaspersky Security Center deployed or there is no connection to the Administration Server, the application will send a message to administrator to the specified email address.
How to change the Device Control message templates in the Administration Console (MMC)
How to change the Device Control message templates in the Web Console and Cloud Console
How to change the Device Control message templates in the application interface
- In the main application window, click the button.
- In the application settings window, select Security Controls → Application Control.
- In the Message templates block, configure templates for Application Control messages:
- Message about blocking. Template of the message that appears when a user attempts to access a blocked device. This message also appears when a user attempts to perform an operation on the device contents that was blocked for this user.
- Message to administrator. A template of the message that is sent to the LAN administrator when the user believes that access to the device is blocked or an operation with device content is forbidden by mistake.
- Save your changes.
Anti-Bridging
Anti-Bridging inhibits the creation of network bridges by preventing the simultaneous establishment of multiple network connections for a computer. This lets you protect a corporate network from attacks over unprotected, unauthorized networks.
Anti-Bridging regulates the establishment of network connections by using connection rules.
Connection rules are created for the following predefined types of devices:
- Network adapters;
- Wi-Fi adapters;
- Modems.
If a connection rule is enabled, Kaspersky Endpoint Security:
- Blocks the active connection when establishing a new connection, if the device type specified in the rule is used for both connections;
- Blocks connections that are established using the types of devices for which lower-priority rules are used.
Enabling Anti-Bridging
Anti-Bridging is disabled by default.
To enable Anti-Bridging:
- In the main application window, click the button.
- In the application settings window, select Security Controls → Device Control.
- In the Access settings block, click the Anti-Bridging button.
- Use the Enable Anti-Bridging toggle to enable or disable this feature.
- Save your changes.
After Anti-Bridging is enabled, Kaspersky Endpoint Security blocks already established connections according to the connection rules.
Page top
Changing the status of a connection rule
To change the status of a connection rule:
- In the main application window, click the button.
- In the application settings window, select Security Controls → Device Control.
- In the Access settings block, click the Anti-Bridging button.
- In the Rules for devices block, select the rule whose status you want to change.
- Use the toggles in the Control column to enable or disable the rule.
- Save your changes.
Change the priority of a connection rule
To change the priority of a connection rule:
- In the main application window, click the button.
- In the application settings window, select Security Controls → Device Control.
- In the Access settings block, click the Anti-Bridging button.
- In the Rules for devices block, select the rule whose priority you want to change.
- Use the Up / Down buttons to set the priority of the connection rule.
The higher a rule is positioned in the table of rules, the higher its priority. Anti-Bridging blocks all connections except one connection established using the type of device for which the highest-priority rule is used.
- Save your changes.
Adaptive Anomaly Control
This component is available if Kaspersky Endpoint Security is installed on a computer that runs on Windows for workstations. This component is unavailable if Kaspersky Endpoint Security is installed on a computer that runs on Windows for servers.
The Adaptive Anomaly Control component monitors and blocks actions that are not typical of the computers in a company's network. Adaptive Anomaly Control uses a set of rules to track non-typical behavior (for example, the Start of Microsoft PowerShell from office application rule). Rules are created by Kaspersky specialists based on typical scenarios of malicious activity. You can configure how Adaptive Anomaly Control handles each rule and, for example, allow the execution of PowerShell scripts that automate certain workflow tasks. Kaspersky Endpoint Security updates the set of rules along with the application databases. Updates to the sets of rules must be confirmed manually.
Adaptive Anomaly Control settings
Configuring Adaptive anomaly control consists of the following steps:
- Training Adaptive Anomaly Control.
After you enable Adaptive Anomaly Control, its rules work in training mode. During the training, Adaptive Anomaly Control monitors rule triggering and sends triggering events to Kaspersky Security Center. Each rule has its own duration of the training mode. The duration of the training mode is set by Kaspersky experts. Normally, the training mode is active for two weeks.
If a rule is not triggered at all during the training, Adaptive Anomaly Control will consider the actions associated with this rule as non-typical. Kaspersky Endpoint Security will block all actions associated with that rule.
If a rule was triggered during training, Kaspersky Endpoint Security logs events in the rule triggering report and the Triggering of rules in Smart Training state repository.
- Analyzing the rule triggering report.
The administrator analyzes the rule triggering report or the contents of the Triggering of rules in Smart Training state repository. Then the administrator can select the behavior of Adaptive Anomaly Control when the rule is triggered: either block or allow. The administrator can also continue to monitor how the rule works and extend the duration of the training mode. If the administrator does not take any action, the application will also continue to work in training mode. The training mode term is restarted.
Adaptive Anomaly Control is configured in real time. Adaptive Anomaly Control is configured via the following channels:
- Adaptive Anomaly Control automatically starts to block the actions associated with the rules that were never triggered in training mode.
- Kaspersky Endpoint Security adds new rules or removes obsolete ones.
- The administrator configures the operation of the Adaptive Anomaly Control after reviewing the rule triggering report and the contents of the Triggering of rules in Smart Training state repository. It is recommended to check the rule triggering report and the contents of the Triggering of rules in Smart Training state repository.
When a malicious application attempts to perform an action, Kaspersky Endpoint Security will block the action and display a notification (see figure below).

Adaptive Anomaly Control notification
Adaptive Anomaly Control operating algorithm
Kaspersky Endpoint Security decides whether to allow or block an action that is associated with a rule based on the following algorithm (see the figure below).

Adaptive Anomaly Control operating algorithm
Enabling and disabling Adaptive Anomaly Control
Adaptive Anomaly Control is enabled by default.
To enable or disable Adaptive Anomaly Control:
- In the main application window, click the button.
- In the application settings window, select Security Controls → Adaptive Anomaly Control.
- Use the Adaptive Anomaly Control toggle to enable or disable the component.
- Save your changes.
As a result, the Adaptive Anomaly Control will switch to the training mode. During training, Adaptive Anomaly Control monitors rule triggering. When training is complete, Adaptive Anomaly Control starts to block actions that are not typical of the computers in a company's network.
If your organization has started to use some new tools, and Adaptive Anomaly Control blocks the actions of those tools, you can reset the results of the training mode and repeat the training. To do this, you need to change the action that is taken when the rule is triggered (for example, set it to Inform). Then you need to re-enable the training mode (set the Smart value).
Page top
Enabling and disabling an Adaptive Anomaly Control rule
To enable or disable an Adaptive Anomaly Control rule:
- In the main application window, click the button.
- In the application settings window, select Security Controls → Adaptive Anomaly Control.
- In the Rules block, click the Edit rules button.
The Adaptive Anomaly Control rule list opens.
- In the table, select a set of rules (for example, Activity of office applications) and expand the set.
- Select a rule (for example, Start of Microsoft PowerShell from office application).
- Use the toggle switch in the State column to enable or disable the Adaptive Anomaly Control rule.
- Save your changes.
Modifying the action taken when an Adaptive Anomaly Control rule is triggered
To edit the action that is taken when an Adaptive Anomaly Control rule is triggered:
- In the main application window, click the button.
- In the application settings window, select Security Controls → Adaptive Anomaly Control.
- In the Rules block, click the Edit rules button.
The Adaptive Anomaly Control rule list opens.
- Select a rule in the table.
- Click Edit.
The Adaptive Anomaly Control rule properties window opens.
- In the Action block, select one of the following options:
- Smart. If this option is selected, the Adaptive Anomaly Control rule works in Smart training state for a period of time defined by Kaspersky experts. In this mode, when an Adaptive Anomaly Control rule is triggered, Kaspersky Endpoint Security allows the activity covered by the rule and logs an entry in the Triggering of rules in Smart Training state storage of the Kaspersky Security Center Administration Server. When the time period set for working in Smart Training state ends, Kaspersky Endpoint Security blocks the activity covered by an Adaptive Anomaly Control rule and logs an entry containing information about the activity.
- Block. If this action is selected, when an Adaptive Anomaly Control rule is triggered Kaspersky Endpoint Security blocks the activity covered by the rule and logs an entry containing information about the activity.
- Inform. If this action is selected, when an Adaptive Anomaly Control rule is triggered Kaspersky Endpoint Security allows the activity covered by the rule and logs an entry containing information about the activity.
- Save your changes.
Creating an exclusion for an Adaptive Anomaly Control rule
You cannot create more than 1,000 exclusions for Adaptive Anomaly Control rules. It is not recommended to create more than 200 exclusions. To reduce the number of exclusions used, it is recommended to use masks in the settings of exclusions.
An exclusion for an Adaptive Anomaly Control rule includes a description of the source and target objects. The source object is the object performing the actions. The target object is the object on which the actions are being performed. For example, you have opened a file named file.xlsx. As a result, a library file with the DLL extension is loaded into the computer memory. This library is used by a browser (executable file named browser.exe). In this example, file.xlsx is the source object, Excel is the source process, browser.exe is the target object, and Browser is the target process.
To create an exclusion for an Adaptive Anomaly Control rule:
- In the main application window, click the button.
- In the application settings window, select Security Controls → Adaptive Anomaly Control.
- In the Rules block, click the Edit rules button.
The Adaptive Anomaly Control rule list opens.
- Select a rule in the table.
- Click Edit.
The Adaptive Anomaly Control rule properties window opens.
- In the Exclusions block, click the Add button.
The exclusion properties window opens.
- Select the user for which you want to configure an exclusion.
You can select users in Active Directory, in the list of accounts in Kaspersky Security Center, or by entering a local user name manually. Kaspersky recommends using local user accounts only in special cases when it is not possible to use domain user accounts.
Adaptive Anomaly Control does not support exclusions for user groups. If you select a user group, Kaspersky Endpoint Security does not apply the exclusion.
- In the Description field, enter a description of the exclusion.
- Define the settings of the source object or source process started by the object:
- Source process. Path or mask of the path to the file or folder containing files (for example,
C:\Dir\File.exeorDir\*.exe). - Source process hash. File hash code.
- Source object. Path or mask of the path to the file or folder containing files (for example,
C:\Dir\File.exeorDir\*.exe). For example, file pathdocument.docm, which uses a script or macro to start the target processes.You can also specify other objects to exclude, such as a web address, macro, command in the command line, registry path, or others. Specify the object according to the following template:
object://<object>, where<object>refers to the name of the object, for example,object://web.site.example.com,object://VBA,object://ipconfig,object://HKEY_USERS. You can also use masks, for example,object://*C:\Windows\temp\*. - Source object hash. File hash code.
The Adaptive Anomaly Control rule is not applied to actions performed by the object, or to processes started by the object.
- Source process. Path or mask of the path to the file or folder containing files (for example,
- Specify the settings of the target object or target processes started on the object.
- Target process. Path or mask of the path to the file or folder containing files (for example,
C:\Dir\File.exeorDir\*.exe). - Target process hash. File hash code.
- Target object. The command to start the target process. Specify the command using the following pattern
object://<command>, for example,object://cmdline:powershell -Command "$result = 'C:\Windows\temp\result_local_users_pwdage.txt'". You can also use masks, for example,object://*C:\Windows\temp\*. - Target object hash. File hash code.
The Adaptive Anomaly Control rule is not applied to actions taken on the object, or to processes started on the object.
- Target process. Path or mask of the path to the file or folder containing files (for example,
- Save your changes.
Exporting and importing exclusions for Adaptive Anomaly Control rules
To export or import the list of exclusions for selected rules:
- In the main application window, click the button.
- In the application settings window, select Security Controls → Adaptive Anomaly Control.
- In the Rules block, click the Edit rules button.
The Adaptive Anomaly Control rule list opens.
- To export the list of rules:
- Select the rules whose exceptions you want to export.
- Click Export.
- In the window that opens, specify the name of the XML file to which you want to export the list of exclusions, and select the folder in which you want to save this file.
- Confirm that you want to export only the selected exclusions, or export the entire list of exclusions.
- Save the file.
- To import the list of rules:
- Click Import.
- In the window that opens, select the XML file from which you want to import the list of exclusions.
- Open the file.
If the computer already has a list of exclusions, Kaspersky Endpoint Security will prompt you to delete the existing list or add new entries to it from the XML file.
- Save your changes.
Applying updates for Adaptive Anomaly Control rules
New Adaptive Anomaly Control rules may be added to the table of rules and existing Adaptive Anomaly Control rules may be deleted from the table of rules when anti-virus databases are updated. Kaspersky Endpoint Security distinguishes Adaptive Anomaly Control rules that are to be deleted or added to the table, if an update for these rules has not been applied.
Until the update is applied, Kaspersky Endpoint Security displays the Adaptive Anomaly Control rules set to be deleted by the update in the table of rules and assigns the Disabled status to them. It is not possible to change the settings of these rules.
To apply updates for Adaptive Anomaly Control rules:
- In the main application window, click the button.
- In the application settings window, select Security Controls → Adaptive Anomaly Control.
- In the Rules block, click the Edit rules button.
The Adaptive Anomaly Control rule list opens.
- In the window that opens, click the Approve updates button.
The Approve updates button is available if an update for Adaptive Anomaly Control rules is available.
- Save your changes.
Editing Adaptive Anomaly Control message templates
When a user tries to do an action, blocked by Adaptive Anomaly Control rules, Kaspersky Endpoint Security displays a message that potentially harmful actions are blocked. If the user believes that an action was mistakenly blocked, the user can use the link in the message text to send a message to the local corporate network administrator.
Special templates are available for the message about blocking potentially harmful actions and for the message to be sent to the administrator. You can modify the message templates.
To edit a message template:
- In the main application window, click the button.
- In the application settings window, select Security Controls → Adaptive Anomaly Control.
- In the Templates block, configure the templates for Adaptive Anomaly Control messages:
- Message about blocking. Template of the message that is displayed to a user when an Adaptive Anomaly Control rule that blocks a non-typical action is triggered.
- Message to administrator. Template of the message that a user can be sent to the local corporate network administrator if the user considers the blocking to be a mistake. After the user requests to provide access, Kaspersky Endpoint Security sends an event to Kaspersky Security Center: Application activity blockage message to administrator. The event description contains a message to administrator with substituted variables. You can view these events in the Kaspersky Security Center console using the predefined event selection User requests. If your organization does not have Kaspersky Security Center deployed or there is no connection to the Administration Server, the application will send a message to administrator to the specified email address.
- Save your changes.
Viewing Adaptive Anomaly Control reports
To view Adaptive Anomaly Control reports:
- Open the Kaspersky Security Center Administration Console.
- In the console tree, select Policies.
- Select the necessary policy and double-click to open the policy properties.
- In the policy window, select Security Controls → Adaptive Anomaly Control.
The settings of the Adaptive Anomaly Control component are displayed in the right part of the window.
- Do one of the following:
- If you want to view the report on Adaptive Anomaly Control rules state, click Report on Adaptive Anomaly Control rules state.
- If you want to view the report on triggered Adaptive Anomaly Control rules, click Report on triggered Adaptive Anomaly Control rules.
- The report generation process starts.
The report is displayed in a new window.
Page top
Application Control
Application Control manages the startup of applications on users' computers. This allows you to implement a corporate security policy when using applications. Application Control also reduces the risk of computer infection by restricting access to applications.
Configuring Application Control consists of the following steps:
- Creating application categories.
The administrator creates categories of applications that the administrator wants to manage. Categories of applications are intended for all computers in the corporate network, regardless of administration groups. To create a category, you can use the following criteria: KL category (for example, Browsers), file hash, application vendor, and other criteria.
- Creating Application Control rules.
The administrator creates Application Control rules in the policy for the administration group. The rule includes the categories of applications and the startup status of applications from these categories: blocked or allowed.
- Selecting the Application Control mode.
The administrator chooses the mode for working with applications that are not included in any of the rules (application denylist and allowlist).
When a user attempts to start a prohibited application, Kaspersky Endpoint Security will block the application from starting and will display a notification (see the figure below).
A test mode is provided to check the configuration of Application Control. In this mode, Kaspersky Endpoint Security does the following:
- Allows the startup of applications, including prohibited ones.
- Shows a notification about the startup of a prohibited application and adds information to the report on the user's computer.
- Sends data about the startup of prohibited applications to Kaspersky Security Center.
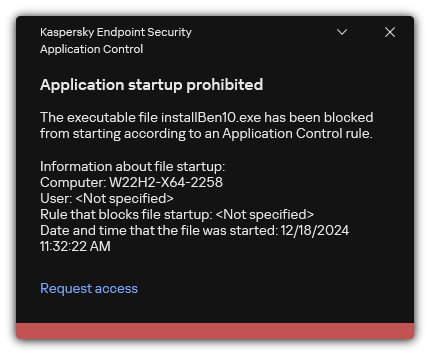
Application Control notification
Application Control operating modes
The Application Control component operates in two modes:
- Denylist. In this mode, Application Control allows users to start all applications except for applications that are prohibited in Application Control rules.
This mode of Application Control is enabled by default.
- Allowlist. In this mode, Application Control blocks users from starting any applications except for applications that are allowed and not prohibited in Application Control rules.
If the allow rules of Application Control are fully configured, the component blocks the startup of all new applications that have not been verified by the LAN administrator, while allowing the operation of the operating system and of trusted applications that users rely on in their work.
You can read the recommendations on configuring Application Control rules in allowlist mode.
Application Control can be configured to operate in these modes both by using the Kaspersky Endpoint Security local interface and by using Kaspersky Security Center.
However, Kaspersky Security Center offers tools that are not available in the Kaspersky Endpoint Security local interface, such as the tools that are needed for the following tasks:
- Creating application categories.
Application Control rules created in the Kaspersky Security Center Administration Console are based on your custom application categories and not on inclusion and exclusion conditions as is the case in the Kaspersky Endpoint Security local interface.
- Receiving information about applications that are installed on corporate LAN computers.
This is why it is recommended to use Kaspersky Security Center to configure the operation of the Application Control component.
Application Control operating algorithm
Kaspersky Endpoint Security uses an algorithm to make a decision about starting an application (see the figure below).
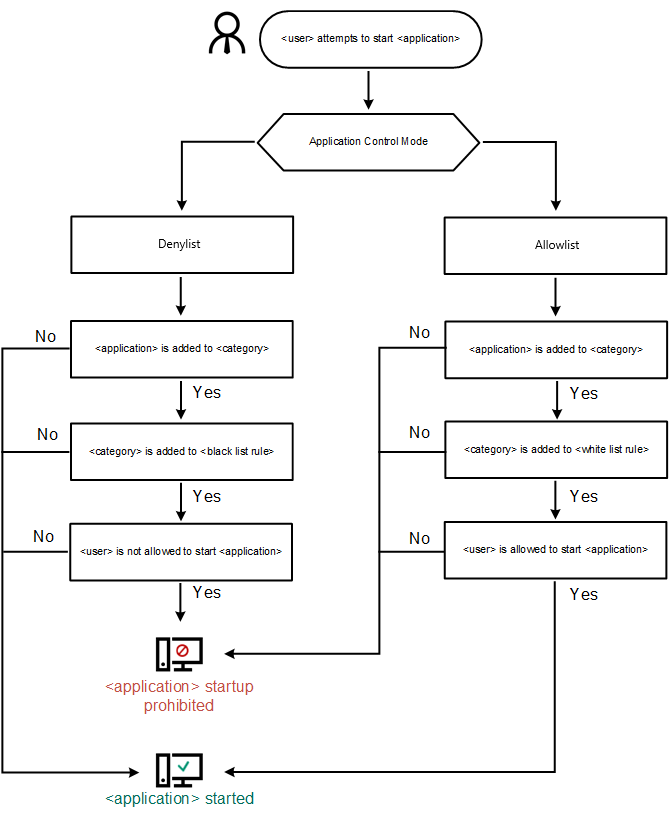
Application Control operating algorithm
Application Control functionality limitations
Operation of the Application Control component is limited in the following cases:
- When the application version is upgraded, importing Application Control component settings is not supported.
- If there is no connection with KSN servers, Kaspersky Endpoint Security receives information about the reputation of applications and their modules only from local databases.
The list of applications that Kaspersky Endpoint Security designates as KL category Other applications \ Applications, trusted according to reputation in KSN may differ depending on whether or not a connection to KSN servers is available.
- At the Kaspersky Security Center database, information on 150,000 processed files may be stored. Once this number of records has been achieved, new files will not be processed. To resume inventory operations, you must delete the files that were previously inventoried in the Kaspersky Security Center database from the computer on which Kaspersky Endpoint Security is installed.
- The component does not control the startup of scripts unless the script is sent to the interpreter via the command line.
If the startup of an interpreter is allowed by Application Control rules, the component will not block a script started from this interpreter.
If at least one of the scripts specified in the interpreter command line is blocked from start by Application control rules, the component blocks all the scripts, specified in the interpreter command line.
- The component does not control the startup of scripts from interpreters that are not supported by Kaspersky Endpoint Security.
Kaspersky Endpoint Security supports the following interpreters:
- Java
- PowerShell
The following types of interpreters are supported:
- %ComSpec%;
- %SystemRoot%\\system32\\regedit.exe;
- %SystemRoot%\\regedit.exe;
- %SystemRoot%\\system32\\regedt32.exe;
- %SystemRoot%\\system32\\cscript.exe;
- %SystemRoot%\\system32\\wscript.exe;
- %SystemRoot%\\system32\\msiexec.exe;
- %SystemRoot%\\system32\\mshta.exe;
- %SystemRoot%\\system32\\rundll32.exe;
- %SystemRoot%\\system32\\wwahost.exe;
- %SystemRoot%\\syswow64\\cmd.exe;
- %SystemRoot%\\syswow64\\regedit.exe;
- %SystemRoot%\\syswow64\\regedt32.exe;
- %SystemRoot%\\syswow64\\cscript.exe;
- %SystemRoot%\\syswow64\\wscript.exe;
- %SystemRoot%\\syswow64\\msiexec.exe;
- %SystemRoot%\\syswow64\\mshta.exe;
- %SystemRoot%\\syswow64\\rundll32.exe;
- %SystemRoot%\\syswow64\\wwahost.exe.
Receiving information about the applications that are installed on users' computers
To create optimal Application Control rules, it is recommended to first get a picture of the applications that are used on computers on the corporate LAN. To do this, you can obtain the following information:
- Vendors, versions, and localizations of applications used on the corporate LAN.
- Frequency of application updates.
- Application usage policies adopted in the company (this may be security policies or administrative policies).
- Storage location of application distribution packages.
Information about installed applications is provided by Kaspersky Security Center Network Agent (the Applications registry folder). You can also get a list of executable files using the Inventory task (Executable files folder).
Viewing application information
Information about applications that are used on corporate LAN computers is available in the Applications registry folder and in the Executable files folder.
To open the application properties window in the Applications registry folder:
- Open the Kaspersky Security Center Administration Console.
- In the Administration Console tree, select Advanced → Application management → Applications registry.
- Select an application.
- In the context menu of the application, select Properties.
To open the properties window for an executable file in the Executable files folder:
- Open the Kaspersky Security Center Administration Console.
- In the Administration Console tree, select Advanced → Application management → Executable files.
- Select an executable file.
- In the context menu of the executable file, select Properties.
To view general information about the application and its executable files, and the list of computers on which an application is installed, open the properties window of an application that is selected in the Applications registry folder or in the Executable files folder.
Updating the information about installed applications and executable files
Starting with Kaspersky Endpoint Security 12.3 for Windows, the operation of Application Control component with the database of executable files is optimized. Kaspersky Endpoint Security 12.3 for Windows automatically updates the database after the file is deleted from the computer. This allows keeping the database up to date and saving Kaspersky Security Center resources.
To keep the database of installed applications up to date, the sending of application information to the Administration Server must be enabled (it is enabled by default).
How to enable the submission of application information in Administration Console (MMC)
How to enable the submission of application information in Web Console and Cloud Console
- In the main window of the Web Console, select Assets (Devices) → Policies & profiles.
- Click the name of the Kaspersky Endpoint Security policy.
The policy properties window opens.
- Select the Application settings tab.
- Go to General settings → Reports and Storage.
- In the Data transfer to Administration Server block, select the About started applications check box.
- Save your changes.
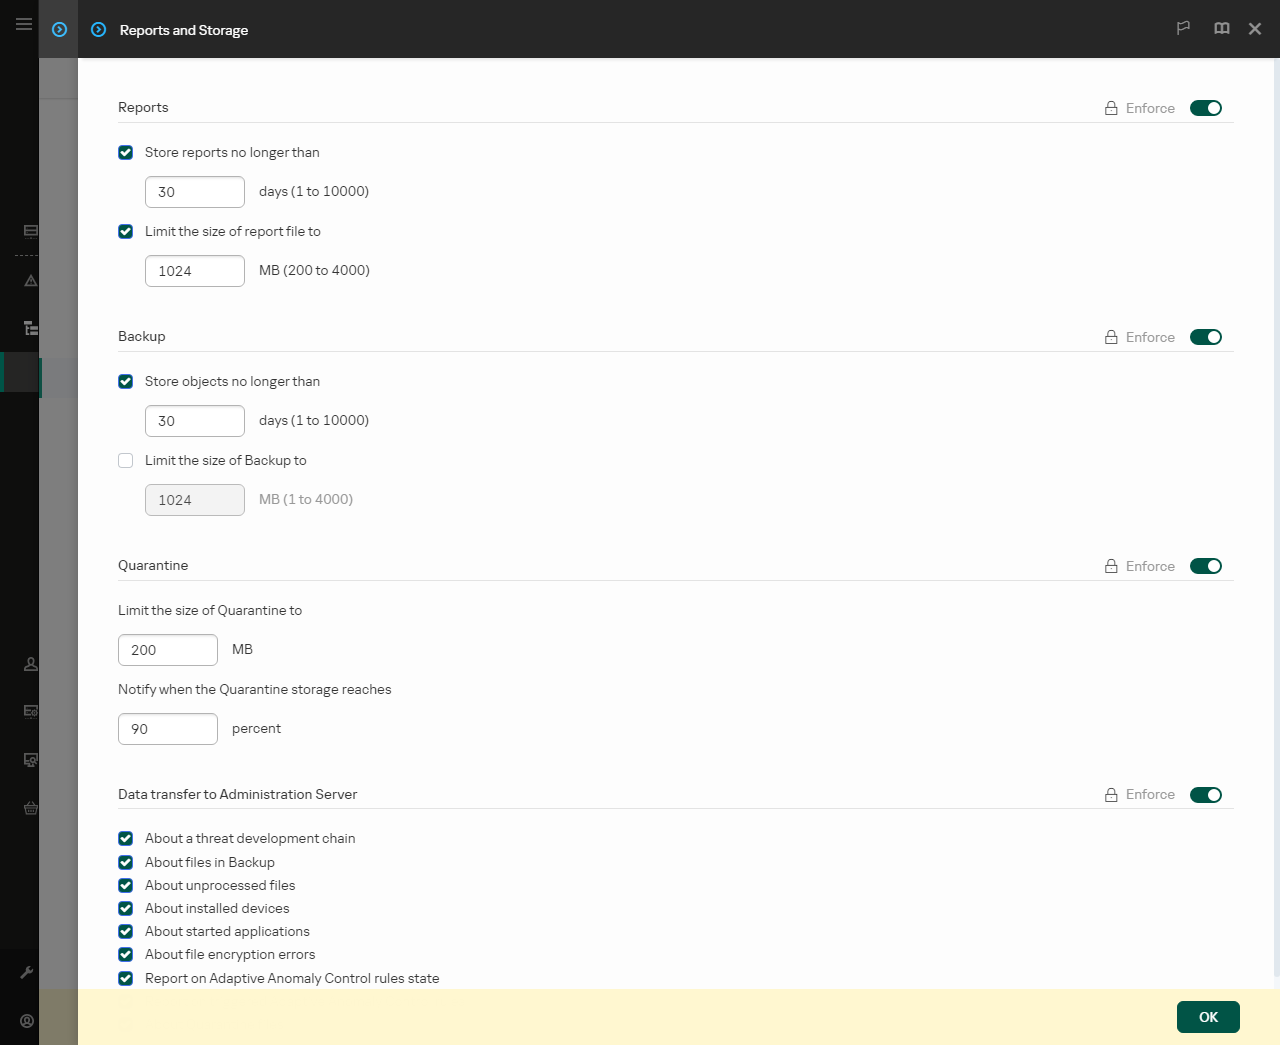
Settings of data transfer to Administration Server
Enabling and disabling Application Control
By default, Application Control is disabled.
To enable or disable Application Control:
- In the main application window, click the button.
- In the application settings window, select Security Controls → Application Control.
- Use the Application Control toggle to enable or disable the component.
- Save your changes.
As a result, if Application Control is enabled, the application forwards information about running executable files to Kaspersky Security Center. You can view the list of running executable files in Kaspersky Security Center in the Executable files folder. To receive information about all executable files instead of only running executable files, run the Inventory task.
Page top
Selecting the Application Control mode
To select the Application Control mode:
- In the main application window, click the button.
- In the application settings window, select Security Controls → Application Control.
- In the Application Startup Control mode block, select one of the following options:
- Blocked applications. If this option is selected, Application Control allows all users to start any applications, except in cases that satisfy the conditions of Application Control block rules.
- Allowed applications. If this option is selected, Application Control blocks all users from starting any applications, except in cases that satisfy the conditions of Application Control allow rules.
The Golden Image rule and Trusted Updaters rule are initially defined for Allowlist mode. These Application Control rules correspond to KL categories. The "Golden Image" KL category includes programs that ensure normal operation of the operating system. The "Trusted Updaters" KL category includes updaters for the most reputable software vendors. You cannot delete these rules. The settings of these rules cannot be edited. By default, the Golden Image rule is enabled and the Trusted Updaters rule is disabled. All users are allowed to start applications that match the trigger conditions of these rules.
All rules created during the selected mode are saved after the mode is changed so that the rules can be used again. To revert back to using these rules, all you have to do is select the necessary mode.
- In the Action on starting applications blocked by rules block, select the action to be performed by the component when a user attempts to start an application that is blocked by Application Control rules.
- Select the Monitor loading of DLL modules check box if you want Kaspersky Endpoint Security to monitor the loading of DLL modules when applications are started by users.
Information about the module and the application that loaded the module will be saved to a report.
Kaspersky Endpoint Security monitors only the DLL modules and drivers that have been loaded since the check box was selected. Restart the computer after selecting the check box if you want Kaspersky Endpoint Security to monitor all DLL modules and drivers, including ones that are loaded before Kaspersky Endpoint Security is started.
When enabling control over the loading of DLL modules and drivers, make sure that one of the following rules is enabled in the Application Control settings: the default Golden Image rule or another rule that contains the "Trusted certificates" KL category and ensures that trusted DLL modules and drivers are loaded before Kaspersky Endpoint Security is started. Enabling control of the loading of DLL modules and drivers when the Golden Image rule is disabled may cause instability in the operating system.
We recommend turning on password protection for configuring application settings, so that it is possible to turn off the rules blocking critical DLL modules and drivers form start, without modifying Kaspersky Security Center policy settings.
- Save your changes.
Managing Application Control rules
Kaspersky Endpoint Security controls the startup of applications by users by means of rules. An Application Control rule specifies the triggering conditions and actions performed by the Application Control component when the rule is triggered (allowing or blocking application startup by users).
Rule-triggering conditions
A rule-triggering condition has the following correlation: "condition type - condition criterion - condition value". Based on the rule-triggering conditions, Kaspersky Endpoint Security applies (or does not apply) a rule to an application.
The following types of conditions are used in rules:
- Inclusion conditions. Kaspersky Endpoint Security applies the rule to the application if the application matches at least one of the inclusion conditions.
- Exclusion conditions. Kaspersky Endpoint Security does not apply the rule to the application if the application matches at least one of the exclusion conditions and does not match any of the inclusion conditions.
Rule-triggering conditions are created using criteria. The following criteria are used to create rules in Kaspersky Endpoint Security:
- Path to the folder containing the executable file of the application or path to the executable file of the application.
- Metadata: application executable file name, application executable file version, application name, application version, application vendor.
- Hash of the executable file of the application.
- Certificate: issuer, subject, thumbprint.
- Inclusion of the application in a KL category.
- Location of the application executable file on a removable drive.
The criterion value must be specified for each criterion used in the condition. If the parameters of the application being started match the values of criteria specified in the inclusion condition, the rule is triggered. In this case, Application Control performs the action prescribed in the rule. If application parameters match the values of criteria specified in the exclusion condition, Application Control does not control startup of the application.
If you have selected a certificate as a rule-triggering condition, you need to ensure that this certificate is added to the trusted system storage on the computer, and check the trusted system storage usage settings in the application.
Decisions made by the Application Control component when a rule is triggered
When a rule is triggered, Application Control allows users (or user groups) to start applications or blocks startup according to the rule. You can select individual users or groups of users that are allowed or not allowed to start applications that trigger a rule.
If a rule does not specify those users allowed to start applications satisfying the rule, this rule is called a block rule.
If a rule that does not specify any users who are not allowed to start applications that match the rule, this rule is called an allow rule.
The priority of a block rule is higher than the priority of an allow rule. For example, if an Application Control allow rule has been assigned for a user group while an Application Control block rule has been assigned for one user in this user group, this user will be blocked from starting the application.
Operating status of a rule
Application Control rules can have one of the following operating statuses:
- Enabled. This status means that the rule is used when the Application Control component is running.
- Disabled. This status means that the rule is ignored when the Application Control component is running.
- Test mode. This status signifies that Kaspersky Endpoint Security allows the startup of applications to which the rules apply but logs information about the startup of such applications in the report.
Adding a trigger condition for the Application Control rule
For more convenience when creating Application Control rules, you can create application categories.
It is recommended to create a "Work applications" category that covers the standard set of applications that are used at the company. If different user groups use different sets of applications in their work, a separate application category can be created for each user group.
To create an application category in the Administration Console:
- Open the Kaspersky Security Center Administration Console.
- In the Administration Console tree, select the Advanced → Application management → Application categories folder.
- Click the New category button in the workspace.
The user category creation wizard starts.
- Follow the instructions of the user category creation wizard.
Step 1. Selecting the category type
At this step, select one of the following types of application categories:
- Category with content added manually. If you selected this type of category, at the "Configuring the conditions for including applications in a category" step and the "Configuring the conditions for excluding applications from a category" step, you will be able to define the criteria whereby executable files will be included into the category.
- Category that includes executable files from selected devices. If you selected this type of category, at the "Settings" step you will be able to specify a computer whose executable files will be automatically included in the category.
- Category that includes executable files from a specific folder. If you selected this type of category, at the "Repository folder" step you will be able to specify a folder from which executable files will be automatically included in the category.
When creating a category with content added automatically, Kaspersky Security Center performs inventory on files with the following formats: EXE, COM, DLL, SYS, BAT, PS1, CMD, JS, VBS, REG, MSI, MSC, CPL, HTML, HTM, DRV, OCX, and SCR.
Step 2. Entering a user category name
At this step, specify a name for the application category.
Step 3. Configuring the conditions for including applications in a category
This step is available if you selected the Category with content added manually category type.
At this step, in the Add drop-down list, select the conditions for including applications into the category:
- From the list of executable files. Add applications from the list of executable files on the client device to the custom category.
- From file properties. Specify detailed data of executable files as a condition for adding applications to the custom category.
- Metadata from files in folder. Select a folder on the client device that contains executable files. Kaspersky Security Center will indicate the metadata of these executable files as a condition for adding applications to the custom category.
- Checksums of the files in the folder. Select a folder on the client device that contains executable files. Kaspersky Security Center will indicate the hashes of these executable files as a condition for adding applications to the custom category.
- Certificates for the files from the folder. Select a folder on the client device that contains executable files signed with certificates. Kaspersky Security Center will indicate the certificates of these executable files as a condition for adding applications to the custom category.
It is not recommended to use conditions whose properties do not have the Certificate fingerprint parameter specified.
- MSI installer files metadata. Select the MSI package. Kaspersky Security Center will indicate the metadata of executable files packed in this MSI package as a condition for adding applications to the custom category.
- Checksums of the files from the MSI installer of the application. Select the MSI package. Kaspersky Security Center will indicate the hashes of executable files packed in this MSI package as a condition for adding applications to the custom category.
- From KL category. Specify a KL category as a condition for adding applications to the custom category. A KL category is a list of applications that have shared theme attributes. The list is maintained by Kaspersky experts. For example, the KL category known as "Office applications" includes applications from the Microsoft Office suite, Adobe Acrobat, and others.
You can select all KL categories to generate an extended list of trusted applications.
- Specify path to application (masks supported). Select a folder on the client device. Kaspersky Security Center will add executable files from this folder to the custom category.
- Select certificate from repository. Select certificates that were used to sign executable files as a condition for adding applications to the custom category.
It is not recommended to use conditions whose properties do not have the Certificate fingerprint parameter specified.
You can choose the certificate store. By default, Application Control applies rules only for applications signed with a certificate from the trusted system certificate store. This is enabled by the Use strict digital signature verification check box.
- Drive type. Specify the type of storage device (all hard drives and removable drives, or only removable drives) as a condition for adding applications to the custom category.
Step 4. Configuring the conditions for excluding applications from a category
This step is available if you selected the Category with content added manually category type.
Applications specified at this step are excluded from the category even if these applications were specified at the "Configuring the conditions for including applications in a category" step.
At this step, in the Add drop-down list, select conditions for excluding applications from the category:
- From the list of executable files. Add applications from the list of executable files on the client device to the custom category.
- From file properties. Specify detailed data of executable files as a condition for adding applications to the custom category.
- Metadata from files in folder. Select a folder on the client device that contains executable files. Kaspersky Security Center will indicate the metadata of these executable files as a condition for adding applications to the custom category.
- Checksums of the files in the folder. Select a folder on the client device that contains executable files. Kaspersky Security Center will indicate the hashes of these executable files as a condition for adding applications to the custom category.
- Certificates for the files from the folder. Select a folder on the client device that contains executable files signed with certificates. Kaspersky Security Center will indicate the certificates of these executable files as a condition for adding applications to the custom category.
- MSI installer files metadata. Select the MSI package. Kaspersky Security Center will indicate the metadata of executable files packed in this MSI package as a condition for adding applications to the custom category.
- Checksums of the files from the MSI installer of the application. Select the MSI package. Kaspersky Security Center will indicate the hashes of executable files packed in this MSI package as a condition for adding applications to the custom category.
- From KL category. Specify a KL category as a condition for adding applications to the custom category. A KL category is a list of applications that have shared theme attributes. The list is maintained by Kaspersky experts. For example, the KL category known as "Office applications" includes applications from the Microsoft Office suite, Adobe Acrobat, and others.
You can select all KL categories to generate an extended list of trusted applications.
- Specify path to application (masks supported). Select a folder on the client device. Kaspersky Security Center will add executable files from this folder to the custom category.
- Select certificate from repository. Select certificates that were used to sign executable files as a condition for adding applications to the custom category.
- Drive type. Specify the type of storage device (all hard drives and removable drives, or only removable drives) as a condition for adding applications to the custom category.
Step 5. Settings
This step is available if you selected the Category that includes executable files from selected devices category type.
At this step, click the Add button and specify the computers whose executable files will be added to the application category by Kaspersky Security Center. All executable files from the specified computers presented in the Executable files folder will be added to the application category by Kaspersky Security Center.
At this step, you can also configure the following settings:
- Algorithm for hash function calculation. To select an algorithm, you must select at least one of the following check boxes:
- Calculate SHA256 for files in this category (supported by Kaspersky Endpoint Security 10 Service Pack 2 for Windows and later versions).
- Calculate MD5 for files in this category (supported by versions earlier than Kaspersky Endpoint Security 10 Service Pack 2 for Windows).
- The Synchronize data with Administration Server repository check box. Select this check box if you want Kaspersky Security Center to periodically clear the application category and add to it all executable files from the specified computers presented in the Executable files folder.
If the Synchronize data with Administration Server repository check box is cleared, Kaspersky Security Center will not make any modifications to an application category after it is created.
- The Scan interval (1ꟷ168 hours) field. In this field, you can specify the period of time (in hours) after which Kaspersky Security Center clears the application category and adds to it all executable files from the specified computers presented in the Executable files folder.
The field is available if the Synchronize data with Administration Server repository check box is selected.
Step 6. Repository folder
This step is available if you selected the Category that includes executable files from a specific folder category type.
At this step, specify the folder in which Kaspersky Security Center will search for executable files to automatically add applications to the application category.
At this step, you can also configure the following settings:
- The Include dynamic-link libraries (DLL) in this category check box. Select this check box if you want dynamic-link libraries (DLL files) to be included in the application category.
Including DLL files in the application category may reduce the performance of Kaspersky Security Center.
- The Include script data in this category check box. Select this check box if you want scripts to be included in the application category.
Including scripts in the application category may reduce the performance of Kaspersky Security Center.
- Algorithm for hash function calculation. To select an algorithm, you must select at least one of the following check boxes:
- Calculate SHA256 for files in this category (supported by Kaspersky Endpoint Security 10 Service Pack 2 for Windows and later versions).
- Calculate MD5 for files in this category (supported by versions earlier than Kaspersky Endpoint Security 10 Service Pack 2 for Windows).
- The Force folder scan for changes check box. Select this check box if you want Kaspersky Security Center to periodically search for executable files in the folder used for automatically adding to the application category.
If the Force folder scan for changes check box is cleared, Kaspersky Security Center searches for executable files in the folder used for automatically adding to the application category only if changes have been made in the folder, files have been added to it or deleted from it.
- The Scan interval (1ꟷ168 hours) field. In this field, you can specify the time interval (in hours) after which Kaspersky Security Center will search for executable files in the folder used for automatically adding to the application category.
The field is available if the Force folder scan for changes check box is selected.
Step 7. Creating a custom category
Exit the Wizard.
To add a new trigger condition for an Application Control rule in the application interface:
- In the main application window, click the button.
- In the application settings window, select Security Controls → Application Control.
- Click the Blocked applications or Allowed applications button.
This opens the list of Application Control rules.
- Select the rule for which you want to configure a trigger condition.
The Application Control rule properties open.
- Select the Conditions: N tab or Exclusions: N tab and click the Add button.
- Select the trigger conditions for the Application Control rule:
- Conditions from properties of started applications. In the list of running applications, you can select the applications to which the Application Control rule will be applied. Kaspersky Endpoint Security also lists applications that were previously running on the computer. You need to select the criterion that you want to use to create one or multiple rule trigger conditions: File hash, Certificate, KL category, Metadata or Path to file or folder.
- Conditions "KL category". A KL category is a list of applications that have shared theme attributes. The list is maintained by Kaspersky experts. For example, the KL category known as "Office applications" includes applications from the Microsoft Office suite, Adobe Acrobat, and others.
- Custom condition. You can select the application file and select one of the rule trigger conditions: File hash, Certificate, Metadata or Path to file or folder.
- Condition by file drive (removable drive). The Application Control rule is applied only to files that are run on a removable drive.
- Conditions from properties of files in the specified folder. The Application Control rule is applied only to files in the specified folder. You can also include or exclude files from subfolders. You need to select the criterion that you want to use to create one or multiple rule trigger conditions: File hash, Certificate, KL category, Metadata or Path to file or folder.
- Save your changes.
When adding conditions, please take into account the following special considerations for Application Control:
- Kaspersky Endpoint Security supports
*and?characters for entering a mask in metadata: File name, Application name, Vendor. - Kaspersky Endpoint Security does not support an MD5 file hash and does not control startup of applications based on an MD5 hash. An SHA256 hash is used as a rule trigger condition.
- It is not recommended to use only the Issuer and Certificate subject criteria as rule trigger conditions. Use of these criteria is unreliable.
- If you are using a symbolic link in the Path to file or folder field, you are advised to resolve the symbolic link for correct operation of the Application Control rule. To do so, click the Resolve symbolic link button.
Adding executable files from the Executable files folder to the application category
In the Executable files folder the list of executable files detected on computers is displayed. Kaspersky Endpoint Security generates a list of executable files after executing the Inventory task.
To add executable files from the Executable files folder to the application category:
- Open the Kaspersky Security Center Administration Console.
- In the Administration Console tree, select Advanced → Application management → Executable files.
- In the workspace, select the executable files that you want to add to the application category.
- Right-click to open the context menu for the selected executable files and select Add to category.
- In the window that opens, do the following:
- In the upper part of the window, choose one of the following options:
- Add to a new application category. Choose this option if you want to create a new application category and add executable files to it.
- Add to an existing application category. Choose this option if you want to select an existing application category and add executable files to it.
- In the Rule type block, select one of the following options:
- Rules for adding to inclusions. Select this option if you want to create a condition that adds executable files to the application category.
- Rules for adding to exclusions. Select this option if you want to create a condition that excludes executable files from the application category.
- In the Parameter used as a condition block, select one of the following options:
- Certificate details (or SHA-256 hashes for files without a certificate).
- Certificate details (files without a certificate will be skipped).
- Only SHA-256 (files without a hash will be skipped).
- Only MD5 (discontinued mode, only for Kaspersky Endpoint Security 10 Service Pack 1 version).
- In the upper part of the window, choose one of the following options:
- Save your changes.
Adding event-related executable files to the application category
To add executable files related to Application Control events to the application category:
- Open the Kaspersky Security Center Administration Console.
- In the Administration Server node of the Administration Console tree, select the Events tab.
- Choose a selection of events related to operation of the Application Control component (Viewing events resulting from operation of the Application Control component, Viewing events resulting from test operation of the Application Control component) in the Event selections drop-down list.
- Click the Run selection button.
- Select the events whose associated executable files you want to add to the application category.
- Right-click to open the context menu for the selected events and select Add to category.
- In the window that opens, configure the settings of the application category:
- In the upper part of the window, choose one of the following options:
- Add to a new application category. Choose this option if you want to create a new application category and add executable files to it.
- Add to an existing application category. Choose this option if you want to select an existing application category and add executable files to it.
- In the Rule type block, select one of the following options:
- Rules for adding to inclusions. Select this option if you want to create a condition that adds executable files to the application category.
- Rules for adding to exclusions. Select this option if you want to create a condition that excludes executable files from the application category.
- In the Parameter used as a condition block, select one of the following options:
- Certificate details (or SHA-256 hashes for files without a certificate).
- Certificate details (files without a certificate will be skipped).
- Only SHA-256 (files without a hash will be skipped).
- Only MD5 (discontinued mode, only for Kaspersky Endpoint Security 10 Service Pack 1 version).
- In the upper part of the window, choose one of the following options:
- Save your changes.
Adding an Application Control rule
To add an Application Control rule using Kaspersky Security Center:
- Open the Kaspersky Security Center Administration Console.
- In the console tree, select Policies.
- Select the necessary policy and double-click to open the policy properties.
- In the policy window, select Security Controls → Application Control.
In the right part of the window, the settings of the Application Control component are displayed.
- Click Add.
The Application Control rule window opens.
- Do one of the following:
- If you want to create a new category:
- Click Create a category.
The user category creation wizard starts.
- Follow the instructions of the user category creation wizard.
- In the Category drop-down list, select the created application category.
- Click Create a category.
- If you want to edit an existing category:
- In the Category drop-down list, select the created application category that you want to edit.
- Click Properties.
- Modify the settings of the selected application category.
- Save your changes.
- In the Category drop-down list, select the created application category based on which you want to create a rule.
- If you want to create a new category:
- In the Users and their rights table, click the Add button.
You can select users in Active Directory, in the list of accounts in Kaspersky Security Center, or by entering a local user name manually. Kaspersky recommends using local user accounts only in special cases when it is not possible to use domain user accounts.
- In the Users and their rights table, do the following:
- If you want to allow users and/or groups of users to start applications that belong to the selected category, select the Allow check box in the relevant rows.
- If you want to block users and/or groups of users from starting applications that belong to the selected category, select the Block check box in the relevant rows.
- Select the Deny for other users check box if you want all users that do not appear in the User or group column and that are not part of the group of users specified in the User or group column to be blocked from starting applications that belong to the selected category.
- If you want Kaspersky Endpoint Security to consider applications included in the selected application category as trusted updaters allowed to create other executable files that will be subsequently allowed to run, select the Trusted Updaters check box.
When Kaspersky Endpoint Security settings are migrated, the list of executable files created by trusted updaters is migrated as well.
- Save your changes.
To add an Application Control rule:
- In the main application window, click the button.
- In the application settings window, select Security Controls → Application Control.
- Click the Blocked applications or Allowed applications button.
This opens the list of Application Control rules.
- Click Add.
This opens the Application Control rule settings window.
- On the General settings tab, define the main settings of the rule:
- In the Rule name field, enter the name of the rule.
- In the Description field, enter a description of the rule.
- In the Users and their rights table, click the Add button.
You can select users in Active Directory, in the list of accounts in Kaspersky Security Center, or by entering a local user name manually. Kaspersky recommends using local user accounts only in special cases when it is not possible to use domain user accounts.
The rule applies to all users by default.
If there is no user specified in the table, the rule cannot be saved.
- In the Users and their rights table, use the toggle to define the right of users to start applications.
- Select the Deny for other users check box if you want the application to prevent applications that satisfy rule triggering conditions from running for all users that are not listed in the Users and their rights table and are not members of user groups listed in the Users and their rights table.
If the Deny for other users check box is cleared, Kaspersky Endpoint Security does not control the startup of applications by users that are not specified in the Users and their rights table and that do not belong to the groups of users specified in the Users and their rights table.
- Select the Trusted Updaters check box if you want Kaspersky Endpoint Security to consider applications matching the rule trigger conditions as trusted updaters. Trusted Updaters are applications that are allowed to create other executable files that will be allowed to run subsequently.
If an application triggers multiple rules, Kaspersky Endpoint Security sets the Trusted Updaters flag if the following conditions are satisfied:
- All rules allow the application to run.
- At least one rule has the Trusted Updaters check box selected.
- On the Conditions: N tab, create or edit the list of inclusion conditions for triggering the rule.
- On the Exclusions: N tab, create or edit the list of exclusion conditions for triggering the rule.
When Kaspersky Endpoint Security settings are migrated, the list of executable files created by trusted updaters is migrated as well.
- Save your changes.
Changing the status of an Application Control rule via Kaspersky Security Center
To change the status of an Application Control rule in the Administration Console:
- Open the Kaspersky Security Center Administration Console.
- In the console tree, select Policies.
- Select the necessary policy and double-click to open the policy properties.
- In the policy window, select Security Controls → Application Control.
In the right part of the window, the settings of the Application Control component are displayed.
- In the Status column, left-click to display the context menu and select one of the following:
- On. This status means that the rule is used when the Application Control component is running.
- Off. This status means that the rule is ignored when the Application Control component is running.
- Test. This status means that Kaspersky Endpoint Security always allows the startup of applications to which the rule applies but logs information about the startup of such applications in the report.
- Save your changes.
To change the status of an Application Control rule in the application interface:
- In the main application window, click the button.
- In the application settings window, select Security Controls → Application Control.
- Click the Blocked applications or Allowed applications button.
This opens the list of Application Control rules.
- In the Status column, open the context menu and select one of the following:
- Enabled. This status means that the rule is used when the Application Control component is running.
- Disabled. This status means that the rule is ignored when the Application Control component is running.
- Test mode. This status means that Kaspersky Endpoint Security always allows the startup of applications to which this rule applies but logs information about the startup of such applications in the report.
- Save your changes.
Exporting and importing Application Control rules
You can export the list of Application Control rules to an XML file. You can use the export/import function to back up the list of Application Control rules or to migrate the list to a different server.
When exporting and importing Application Control rules, please keep in mind the following special considerations:
- Kaspersky Endpoint Security exports the list of rules only for the active Application Control mode. In other words, if Application Control is operating in denylist mode, Kaspersky Endpoint Security exports rules only for this mode. To export the list of rules for allowlist mode, you need to switch the mode and run the export operation again.
- Kaspersky Endpoint Security uses application categories for Application Control rules to work. When migrating the list of Application Control rules to a different server, you also need to migrate the list of application categories. For more details on exporting or importing application categories, please refer to Kaspersky Security Center Help.
How to export and import a list of Application Control rules in the Administration Console (MMC)
How to export and import a list of Application Control rules in the Web Console and Cloud Console
Page top
Viewing events resulting from operation of the Application Control component
To view events resulting from the operation of the Application Control component received by Kaspersky Security Center:
- Open the Kaspersky Security Center Administration Console.
- In the Administration Server node of the Administration Console tree, select the Events tab.
- Click the Create a selection button.
- In the window that opens, go to the Events section.
- Click the Clear all button.
- In the Events table, select the Application startup prohibited check box.
- Save your changes.
- In the Event selections drop-down list, select the created selection.
- Click the Run selection button.
Viewing a report on blocked applications
To view the report on blocked applications:
- Open the Kaspersky Security Center Administration Console.
- In the Administration Server node of the Administration Console tree, select the Reports tab.
- Click the New report template button.
The New Report Template Wizard starts.
- Follow the instructions of the Report Template Wizard. At the Selecting the report template type step, select Other → Report on prohibited applications.
After you have finished with the New Report Template Wizard, the new report template appears in the table on the Reports tab.
- Open the report by double-clicking it.
The report generation process starts. The report is displayed in a new window.
Page top
Testing Application Control rules
To ensure that Application Control rules do not block applications required for work, it is recommended to enable testing of Application Control rules and analyze their operation after creating new rules. When testing of Application Control rules is enabled, Kaspersky Endpoint Security will not block applications whose startup is forbidden by Application Control, but will instead send notifications about their startup to the Administration Server.
An analysis of the operation of Application Control rules requires a review of the resultant Application Control events that are reported to Kaspersky Security Center. If test mode results in no blocked startup events for all applications required for the work of the computer user, this means that the correct rules were created. Otherwise, you are advised to update the settings of the rules you have created, create additional rules, or delete the existing rules.
By default, Kaspersky Endpoint Security allows the startup of all applications except for applications prohibited by the rules.
Page top
Enabling and disabling Application Control rule testing
To enable or disable testing of Application Control rules in Kaspersky Security Center:
- Open the Kaspersky Security Center Administration Console.
- In the console tree, select Policies.
- Select the necessary policy and double-click to open the policy properties.
- In the policy window, select Security Controls → Application Control.
In the right part of the window, the settings of the Application Control component are displayed.
- In the Control mode drop-down list, select one of the following items:
- Denylist. If this option is selected, Application Control allows all users to start any applications, except in cases that satisfy the conditions of Application Control block rules.
- Allowlist. If this option is selected, Application Control blocks all users from starting any applications, except in cases that satisfy the conditions of Application Control allow rules.
- Do one of the following:
- If you want to enable testing of Application Control rules, select the Test rules option in the Action drop-down list.
- If you want to enable Application Control to manage the startup of applications on user computers, in the drop-down list, select Apply rules.
- Save your changes.
To enable testing of Application Control rules or to select a blocking action for Application Control:
- In the main application window, click the button.
- In the application settings window, select Security Controls → Application Control.
- Click the Blocked applications or Allowed applications button.
This opens the list of Application Control rules.
- In the Status column, select Test mode.
This status means that Kaspersky Endpoint Security always allows the startup of applications to which this rule applies but logs information about the startup of such applications in the report.
- Save your changes.
Kaspersky Endpoint Security will not block applications whose startup is forbidden by the Application Control component, but will send notifications about their startup to the Administration Server. You can also configure the display of notifications about rule testing on the user's computer (see figure below).
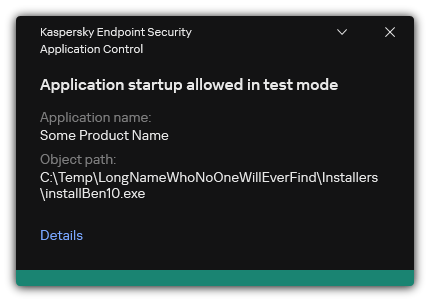
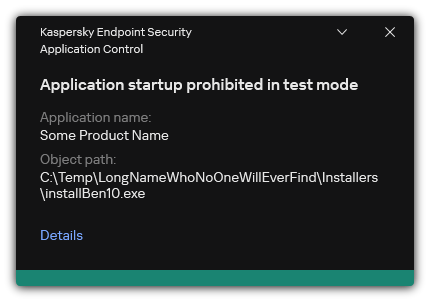
Application Control notifications in test mode
Page top
Viewing a report on blocked applications in test mode
To view the report on blocked applications in test mode:
- Open the Kaspersky Security Center Administration Console.
- In the Administration Server node of the Administration Console tree, select the Reports tab.
- Click New report template.
The New Report Template Wizard starts.
- Follow the instructions of the Report Template Wizard. At the Selecting the report template type step, select Other → Report on prohibited applications in test mode.
After you have finished with the New Report Template Wizard, the new report template appears in the table on the Reports tab.
- Open the report by double-clicking it.
The report generation process starts. The report is displayed in a new window.
Page top
Viewing events resulting from test operation of the Application Control component
To view Application Control testing events received by Kaspersky Security Center:
- Open the Kaspersky Security Center Administration Console.
- In the Administration Server node of the Administration Console tree, select the Events tab.
- Click the Create a selection button.
- In the window that opens, go to the Events section.
- Click the Clear all button.
- In the Events table, select the Application startup prohibited in test mode and Application startup allowed in test mode check boxes.
- Save your changes.
- In the Event selections drop-down list, select the created selection.
- Click the Run selection button.
Application activity monitor
This component is available if Kaspersky Endpoint Security is installed on a computer that runs on Windows for workstations. This component is unavailable if Kaspersky Endpoint Security is installed on a computer that runs on Windows for servers.
Application Activity Monitor is a tool designed for viewing information about the activity of applications on a user's computer in real time.
Using the Application Activity Monitor requires installing the Application Control and Host Intrusion Prevention components. If these components are not installed, the Application Activity Monitor section in the main application window is hidden.
To start Application Activity Monitor:
In the main application window, in the Monitoring section, click the Application Activity Monitor tile.
In this window, information about the activity of applications on the user's computer is presented on three tabs:
- The All applications tab displays information about all applications installed on the computer.
- The Running tab displays information about the computer resource consumption by each application in real time. From this tab, you can also proceed to configure permissions for an individual application.
- The Run at startup tab displays the list of applications that are started when the operating system starts.
If you want to hide application activity information on the user's computer, you can restrict user access to the Application Activity Monitor tool.
Page top
Rules for creating name masks for files or folders
A mask of a file or folder name is a representation of the name of a folder or name and extension of a file using common characters.
You can use the following common characters to create a file or folder name mask:
- The
*(asterisk) character, which takes the place of any set of characters (including an empty set). For example, theC:\*.txtmask will include all paths to files with thetxtextension located in folders and subfolders on the (C:) drive. - The
?(question mark) character, which takes the place of any single character, except the\and/characters (delimiters of the names of files and folders in paths to files and folders). For example, the maskC:\Folder\???.txtwill include paths to all files residing in the folder namedFolderthat have the TXT extension and a name consisting of three characters.
Editing Application Control message templates
When a user attempts to start an application that is blocked by an Application Control rule, Kaspersky Endpoint Security displays a message stating that the application is blocked from starting. Kaspersky experts provide a template of a message to the user describing the reasons why the application was blocked (see the figure below). You can use the default rule or edit the message template. Special variables are provided for managing the message template (for example, Application name or File name). Variables allow creating a single message template that can be used for all users.
Application Control notification
If the user believes that an application was mistakenly blocked from starting, the user can use the link in the message text to send a message to the local corporate network administrator. To do so, the user must click the Request access button and send a message to the administrator describing the situation. You can also prepare a template of the message to the administrator, adding to it data that may inform your decision to allow or block access to the application. After the user requests to provide access, Kaspersky Endpoint Security sends an event to Kaspersky Security Center: Application startup blockage message to administrator. The event description contains a message to administrator with substituted variables. You can view these events in the Kaspersky Security Center console using the predefined event selection User requests. If your organization does not have Kaspersky Security Center deployed or there is no connection to the Administration Server, the application will send a message to administrator to the specified email address.
How to edit the Application Control message template in the Administration Console (MMC)
How to edit the Application Control message template in the Web Console and Cloud Console
How to edit the Application Control message template in the application interface
- In the main application window, click the button.
- In the application settings window, select Security Controls → Application Control.
- In the Templates of messages about application blocking block, configure templates for Application Control messages:
- Message about blocking. Template of the message that is displayed when an Application Control rule that blocks an application from starting is triggered.
You cannot configure message templates for Application Control in test mode. Application Control in test mode displays preset notifications.
- Message to administrator. Template of the message that a user can send to the corporate LAN administrator if the user believes that an application was blocked by mistake.
- Message about blocking. Template of the message that is displayed when an Application Control rule that blocks an application from starting is triggered.
- Save your changes.
Best practices for implementing a list of allowed applications
When planning implementation of a list of allowed applications, it is recommended to perform the following actions:
- Form the following types of groups:
- User groups. Groups of users for whom you need to allow use of various sets of applications.
- Administration groups. One or multiple groups of computers to which Kaspersky Security Center will apply the list of allowed applications. It is necessary to create multiple groups of computers if different allowlist settings are used for those groups.
- Create a list of applications that must be allowed to start.
Prior to creating a list, you are advised to do the following:
- Run the inventory task.
Information about the creation, reconfiguration, and startup of an inventory task is available in the Task management section.
- View the list of executable files.
- Run the inventory task.
Configuring allowlist mode for applications
When configuring the allowlist mode, it is recommended to perform the following actions:
- Create application categories containing the applications that must be allowed to start.
You can select one of the following methods for creating application categories:
- Category with content added manually. You can manually add to this category by using the following conditions:
- File metadata. Kaspersky Security Center adds all executable files accompanied by the specified metadata to the application category.
- File hash code. Kaspersky Security Center adds all executable files with the specified hash to the application category.
Use of this condition excludes the capability to automatically install updates because different versions of files will have a different hash.
- File certificate. Kaspersky Security Center adds all executable files signed with the specified certificate to the application category.
- KL category. Kaspersky Security Center adds all applications that are in the specified KL category to the application category.
- Application folder. Kaspersky Security Center adds all executable files from this folder to the application category.
Use of the Application folder condition may be unsafe because any application from the specified folder will be allowed to start. It is recommended to apply rules that use the application categories with the Application folder condition only to those users for whom the automatic installation of updates must be allowed.
- Category that includes executable files from a specific folder. You can specify a folder from which executable files will be automatically assigned to the created application category.
- Category that includes executable files from selected devices. You can specify a computer for which all executable files will be automatically assigned to the created application category.
When using this method of creating application categories, Kaspersky Security Center receives information about applications on the computer from the Executable files folder.
- Category with content added manually. You can manually add to this category by using the following conditions:
- Select the allowlist mode for the Application Control component.
- Create Application Control rules using the created application categories.
The Golden Image rule and Trusted Updaters rule are initially defined for Allowlist mode. These Application Control rules correspond to KL categories. The "Golden Image" KL category includes programs that ensure normal operation of the operating system. The "Trusted Updaters" KL category includes updaters for the most reputable software vendors. You cannot delete these rules. The settings of these rules cannot be edited. By default, the Golden Image rule is enabled and the Trusted Updaters rule is disabled. All users are allowed to start applications that match the trigger conditions of these rules.
- Determine the applications for which automatic installation of updates must be allowed.
You can allow automatic installation of updates in one of the following ways:
- Specify an extended list of allowed applications by allowing the startup of all applications that belong to any KL category.
- Specify an extended list of allowed applications by allowing the startup of all applications that are signed with certificates.
To allow the startup of all applications signed with certificates, you can create a category with a certificate-based condition that uses only the Subject parameter with the value *.
- For the Application control rule, select the Trusted Updaters parameter. If this check box is selected, Kaspersky Endpoint Security considers the applications included in the rule as Trusted Updaters. Kaspersky Endpoint Security allows the startup of applications that have been installed or updated by applications included in the rule, provided that no blocking rules are applied to those applications.
When Kaspersky Endpoint Security settings are migrated, the list of executable files created by trusted updaters is migrated as well.
- Create a folder and place within it the executable files of applications for which you want to allow automatic installation of updates. Then create an application category with the "Application folder" condition and specify the path to that folder. Then create an allow rule and select this category.
Use of the Application folder condition may be unsafe because any application from the specified folder will be allowed to start. It is recommended to apply rules that use the application categories with the Application folder condition only to those users for whom the automatic installation of updates must be allowed.
Testing the allowlist mode
To ensure that Application Control rules do not block applications required for work, it is recommended to enable testing of Application Control rules and analyze their operation after creating new rules. When testing is enabled, Kaspersky Endpoint Security will not block applications whose startup is forbidden by Application Control rules, but will instead send notifications about their startup to the Administration Server.
When testing the allowlist mode, it is recommended to perform the following actions:
- Determine the testing period (ranging from several days to two months).
- Enable testing of Application Control rules.
- Examine the events resulting from testing the operation of Application Control and reports on blocked applications in test mode to analyze the testing results.
- Based on the analysis results, make changes to the allowlist mode settings.
In particular, based on the test results, you can add executable files related to events to an application category.
Support for allowlist mode
After selecting a blocking action for Application Control, it is recommended to continue supporting allowlist mode by performing the following actions:
- Examine the events resulting from the operation of Application Control and reports on blocked runs to analyze the effectiveness of Application Control.
- Analyze users' requests to access applications.
- Analyze unfamiliar executable files by checking their reputation in Kaspersky Security Network.
- Prior to installing updates for the operating system or for software, install those updates on a test group of computers to check how they will be processed by Application Control rules.
- Add the necessary applications to categories used in Application Control rules.
Network ports monitoring
During the operation of Kaspersky Endpoint Security, the Web Control, Mail Threat Protection and Web Threat Protection components monitor data streams that are transmitted via specific protocols and that pass through specific open TCP and UDP ports on user computer. For example, the Mail Threat Protection component analyzes information transmitted via SMTP, while the Web Threat Protection component analyzes information transmitted via HTTP and FTP.
Kaspersky Endpoint Security divides TCP and UDP ports of the user's computer into several groups, depending on the likelihood of their being compromised. Some network ports are reserved for vulnerable services. You are advised to monitor these ports more thoroughly because they have a greater likelihood of being targeted by a network attack. If you use non-standard services that rely on non-standard network ports, these network ports may also be targeted by an attacking computer. You can specify a list of network ports and a list of applications that request network access. These ports and applications then receive special attention from the Mail Threat Protection and Web Threat Protection components during network traffic monitoring.
Enabling monitoring of all network ports
To enable monitoring of all network ports:
- In the main application window, click the button.
- In the application settings window, select General settings → Network settings.
Network ports monitoring settings
- In the Monitored ports block, select Monitor all network ports.
- Save your changes.
Creating a list of monitored network ports
To create a list of monitored network ports:
- In the main application window, click the button.
- In the application settings window, select General settings → Network settings.
- In the Monitored ports block, select Monitor selected network ports only.
- Click Select.
This opens a list of network ports that are normally used for transmission of email and network traffic. This list of network ports is included in the Kaspersky Endpoint Security package.
- Use the toggle in the Status column to enable or disable network port monitoring.
- If a network port is not shown in the list of network ports, add it by doing the following:
- Click Add.
- In the window that opens, enter the network port number and brief description.
- Set the Active or Inactive status for the network port monitoring.
- Save your changes.
When the FTP protocol runs in passive mode, the connection can be established via a random network port that is not added to the list of monitored network ports. To protect such connections, enable monitoring of all network ports or configure control of network ports for applications that establish FTP connections.
Page top
Creating a list of applications for which all network ports are monitored
You can create a list of applications for which Kaspersky Endpoint Security monitors all network ports.
We recommend including applications that receive or transmit data via the FTP protocol in the list of applications for which Kaspersky Endpoint Security monitors all network ports.
To create a list of applications for which all network ports are monitored:
- In the main application window, click the button.
- In the application settings window, select General settings → Network settings.
- In the Monitored ports block, select Monitor selected network ports only.
- Select the Monitor all ports for the applications from the list recommended by Kaspersky check box.
If this check box is selected, Kaspersky Endpoint Security monitors all ports for the following applications:
- Adobe Acrobat Reader.
- Apple Application Support.
- Google Chrome.
- Microsoft Edge.
- Mozilla Firefox.
- Internet Explorer.
- Java.
- mIRC.
- Opera.
- Pidgin.
- Safari.
- Mail.ru Agent.
- Yandex Browser.
- Select the Monitor all ports for specified applications check box.
- Click Select.
This opens a list of applications for which Kaspersky Endpoint Security monitors network ports.
- Use the toggle in the Status column to enable or disable network port monitoring.
- If an application is not included in the list of applications, add it as follows:
- Click Add.
- In the window that opens, enter the path to the executable file of the application and a brief description.
- Set the Active or Inactive status for network ports monitoring.
- Save your changes.
Exporting and importing lists of monitored ports
Kaspersky Endpoint Security uses the following lists to monitor network ports: list of network ports and list of applications whose ports are monitored by Kaspersky Endpoint Security. You can export lists of monitored ports to an XML file. Then you can modify the file to, for example, add a large number of ports with the same description. You can also use the export/import function to back up the lists of monitored ports or to migrate the lists to a different server.
How to export and import lists of monitored ports in the Administration Console (MMC)
How to export / import lists of monitored ports in the Web Console and Cloud Console
Page top
Log Inspection
This component is available if Kaspersky Endpoint Security is installed on a computer that runs on Windows for servers. This component is unavailable if Kaspersky Endpoint Security is installed on a computer that runs on Windows for workstations.
Starting with version 11.11.0, Kaspersky Endpoint Security for Windows includes the Log Inspection component. Log Inspection monitors the integrity of the protected environment based on the Windows event log analysis. When the application detects signs of atypical behavior in the system, it informs the administrator, as this behavior may indicate an attempted cyber attack.
Kaspersky Endpoint Security analyzes Windows event logs and detects violation in accordance with rules. The component includes predefined rules. Predefined rules are powered by heuristic analysis. You can also add your own rules (custom rules). When a rule triggers, the application creates an event with the Critical status (see figure below).
If you want to use Log Inspection, make sure security the audit policy is configured and the system is logging the relevant events (for details, see the Microsoft technical support website.).
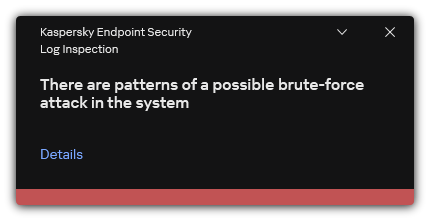
Log Inspection notification
Configuring predefined rules
Predefined rules include templates of abnormal activity on the protected computer. Abnormal activity can signify an attempted attack. Predefined rules are powered by heuristic analysis. Seven predefined rules are available for Log Inspection. You can enable or disable any of the rules. Predefined rules cannot be deleted.
You can configure the triggering criteria for rules that monitor events for the following operations:
- Password brute-force detection
- Network login detection
How to configure predefined rules in Administration Console (MMC)
How to configure predefined rules in the Web Console and Cloud Console
How to configure predefined rules in the application interface.
- In the main application window, click the button.
- In the application settings window, select Security Controls → Log Inspection.
- Make sure the Log Inspection toggle switch is turned on.
- In the Predefined rules block, click the Configure button.
- Select or clear check boxes to configure predefined rules:
- There are patterns of a possible brute-force attack in the system.
- There is an atypical activity detected during a network logon session.
- There are patterns of a possible Windows Event Log abuse.
- Atypical actions detected on behalf of a new service installed.
- Atypical logon that uses explicit credentials detected.
- There are patterns of a possible Kerberos forged PAC (MS14-068) attack in the system.
- Suspicious changes detected in the privileged built-in Administrators group.
- If necessary, configure the There are patterns of a possible brute-force attack in the system rule:
- Click Settings under the rule.
- In the window that opens, specify the number of attempts and a time period within which attempts to enter a password must be performed for the rule to trigger.
- If you selected the There is an atypical activity detected during a network logon session rule, you need to configure its settings:
- Click Settings under the rule.
- In the Network logon detection block, specify the start and the end of the time interval.
Kaspersky Endpoint Security considers logon attempts performed during the defined interval as abnormal activity.
By default, the interval is not set and the application does not monitor logon attempts. For the application to continuously monitor logon attempts, set the interval to 12:00 AM – 11:59 PM. The start and the end of the interval must not coincide. If they are the same, the application does not monitor logon attempts.
- In the Exclusions block, add trusted users and trusted IP addresses (IPv4 and IPv6).
You can select users in Active Directory, in the list of accounts in Kaspersky Security Center, or by entering a local user name manually. Kaspersky recommends using local user accounts only in special cases when it is not possible to use domain user accounts. Kaspersky Endpoint Security does not monitor logon attempts for these users and computers.
- Save your changes.
As a result, when the rule triggers, Kaspersky Endpoint Security creates Critical event.
Page top
Adding custom rules
You can set your own Log Inspection rule triggering criteria. To do so, you must enter an event ID and select an event source. You can look up the event ID on the Microsoft technical support website. You can select an event source from among the standard logs: Application, Security or System. You can also specify the log of a third-party application. You can find out the name of the third-party application log using the Event Viewer tool. Third-party application logs are kept in the Application and Services Logs folder (for example, the Windows PowerShell log).
The application does not check if the specified log is actually present in the Windows event log. If there is a mistake in the name of the log, the application does not monitor events from that log.
The list of custom rules already includes three rules created by Kaspersky experts.
How to add a custom rule in the Administration Console (MMC)
How to add a custom rule in the Web Console and Cloud Console
How to add a custom rule in the application interface
- In the main application window, click the button.
- In the application settings window, select Security Controls → Log Inspection.
- Make sure the Log Inspection toggle switch is turned on.
- In the Custom rules block, click the Configure button.
- In the window that opens, select the check boxes next to the custom rules that you want to enable.
- If necessary, click Add to create your own custom rules.
- This opens a window; in that window, configure the custom rule:
- Rule name.
- Log name. Windows Event Logs. The following logs are available: Application, Security, System.
- Source. Third-party application logs. You can find out the name of the third-party application log using the Event Viewer tool. Third-party application logs are kept in the Application and Services Logs folder (for example, the Windows PowerShell log).
- Event identifier. Event IDs in the Windows Event Log. You can look up the event ID in the Microsoft technical documentation.
- Save your changes.
As a result, when the rule triggers, Kaspersky Endpoint Security creates Critical event.
Page top
System Integrity Monitoring
This component is available if Kaspersky Endpoint Security is installed on a computer that runs on Windows for servers. This component is unavailable if Kaspersky Endpoint Security is installed on a computer that runs on Windows for workstations.
Starting with version 12.6, Kaspersky Endpoint Security for Windows includes the System Integrity Monitoring component instead of the File Integrity Monitor component. System Integrity Monitoring component includes all functionality of File Integrity Monitor and additionally allows to monitor registry changes and connection of external devices.
The System Integrity Monitoring component monitors changes in the operating system that may indicate computer security breaches. When such changes are detected, Kaspersky Endpoint Security generates corresponding events and alerts the administrator. System Integrity Monitoring can operate in real-time mode and can also perform system integrity checks on demand.
Real-Time System Integrity Monitoring
In real-time mode, System Integrity Monitoring tracks changes in objects that you included in the component's scope (the monitoring scope). System Integrity Monitoring also allows blocking unauthorized access to such objects in real time.
On-Demand System Integrity Check
On-Demand System Integrity Check is a task that you can run manually or on a schedule. To run the System Integrity Check task, you must configure the scope of the component (the monitoring scope) and create a baseline. A baseline is a recorded state of objects in the system, which the application uses as reference when comparing to the current state.
Migrating File Integrity Monitor settings
When you update Kaspersky Endpoint Security to version 12.6, File Integrity Monitor settings are migrated automatically. As part of the migration, the application moves the monitoring rules to System Integrity Monitoring. File Integrity Monitor rules are also migrated to System Integrity Monitoring when migrating from KSWS to KES.
To ensure correct operation of System Integrity Monitoring, Kaspersky Endpoint Security application and management plug-in should be updated to version 12.6. If you have an earlier version of the management plug-in installed, you cannot configure System Integrity Monitoring because the management plug-in lacks the System Integrity Monitoring section.
About System Integrity Monitoring rules
For System Integrity Monitoring to work, you must add at least one rule. A System Integrity Monitoring rule is a set of criteria that define the access of users to files and the registry. System Integrity Monitoring detects changes in the files and the registry within the specified monitoring scope. The monitoring scope is one of the criteria of a System Integrity Monitoring rule.
System Integrity Monitoring allows monitoring the following objects:
- Files
- Registry
- External devices
Special considerations involved in file monitoring
System Integrity Monitoring monitors changes in files and folders as well as files being added to the monitoring scope or removed from it. These changes may indicate a computer security breach. We recommend adding rarely modified objects or objects that only the administrator has access to. This helps reduce the number of System Integrity Monitoring events.
Kaspersky Endpoint Security monitors the changes of files and folders only on those disks that were connected when Real-Time System Integrity Monitoring began operating. If a disk was not connected when Real-Time System Integrity Monitoring began operating, the application does not monitor the changes of files and folders on that disk even if the files and folders are added to the monitoring scope.
Special considerations involved in registry monitoring
System Integrity Monitoring monitors the registry. These changes may indicate a computer security breach.
System Integrity Monitoring monitors the following root keys of the registry:
HKCRHKLMHKUHKCCHKEY_CLASSES_ROOTHKEY_LOCAL_MACHINEHKEY_USERSHKEY_CURRENT_CONFIG.
System Integrity Monitoring does not support the HKEY_CURRENT_USER key. You can specify a key under HKEY_USERS as HKEY_USERS\<user profile ID>\<key>.
Special considerations involved in external device monitoring
System Integrity Monitoring monitors connection and disconnection of external devices. This is necessary to protect the computer from security threats that can result from file exchange with such devices. System Integrity Monitoring does not monitor access to external devices and does not block file exchange. You can configure access to devices using a different application component, Device Control.
System Integrity Monitoring monitors the connection of the following types of external devices:
- Removable drive (including USB flash drives)
- Hard drive.
- External network adapter.
- CD/DVD/Blu-ray drive.
- Scanner / camera.
Real-Time System Integrity Monitoring
System Integrity Monitoring allows tracking changes in the operating system in real time. You can track changes that may indicate security breaches on the computer. The component allows blocking these changes or merely logging change events.
For System Integrity Monitoring to work, you must add at least one rule. A System Integrity Monitoring rule is a set of criteria that define the access of users to files and the registry. System Integrity Monitoring detects changes in the files and the registry within the specified monitoring scope. The monitoring scope is one of the criteria of a System Integrity Monitoring rule.
Real-Time System Integrity Monitoring modes
To make sure that System Integrity Monitoring rules do not block any actions with resources that are critical for the functioning of the operating system or other services, we recommend enabling Test mode and analyzing how the component affects the system. With Test mode on, Kaspersky Endpoint Security does not block user activity that is forbidden by the rules, instead generating Warning ![]() events.
events.
The Real-Time System Integrity Monitoring component has two modes:
- Block.
In this mode, System Integrity Monitoring tracks changes in the system and performs an action in accordance with the rules: Allow or Block. System Integrity Monitoring also generates a corresponding event and changes the status of the device in the Kaspersky Security Center console.
- Inform.
In this mode, System Integrity Monitoring allows actions with files and registry keys from the monitoring scope. If the action with files or the registry is prohibited, the application generates an event: The prohibited operation was allowed in test mode. To analyze how rules affect the system, you can look at reports.
Enabling Real-Time System Integrity Monitoring
How to enable Real-Time System Integrity Monitoring in the Administration Console (MMC)
- Open the Kaspersky Security Center Administration Console.
- In the console tree, select Policies.
- Select the necessary policy and double-click to open the policy properties.
- In the policy window, select Security Controls → System Integrity Monitoring.
- Select the System Integrity Monitoring check box.
- Under Operating mode for blocking rules, select a mode for Real-Time System Integrity Monitoring:
- Block. In this mode, System Integrity Monitoring blocks actions with files and registry keys from the monitoring scope, and generates a corresponding event.
- Inform. In this mode, System Integrity Monitoring allows actions with files and registry keys from the monitoring scope, and generates a corresponding event.
- In the Real-Time System Integrity Monitoring block, select the Real-Time System Integrity Monitoring check box.
- Configure external device monitoring:
- Select the Monitor devices check box.
- In the Event severity level drop-down list, select the importance level of external device monitoring events: Informational , Warning , Critical .
System Integrity Monitoring records the current connection of external devices. The application begins to monitor connection and disconnection of external devices after the component is enabled in the application settings. Subsequently, when an external device is connected or disconnected, the application generates a corresponding event.
- Configure file and registry monitoring:
- Select the Monitor files and the registry check box.
- Click Settings.
This opens the list of System Integrity Monitoring rules.
- Click Add.
You can also import rules from another source.
- Configure the Real-Time System Integrity Monitoring rule (see the table below).
- Save your changes.
How to enable Real-Time System Integrity Monitoring in the Web Console
- In the main window of the Web Console, select Assets (Devices) → Policies & profiles.
- Click the name of the Kaspersky Endpoint Security policy.
The policy properties window opens.
- Select the Application settings tab.
- Go to Security Controls → System Integrity Monitoring.
- Turn on the System Integrity Monitoring toggle.
- Under Operating mode for blocking rules, select a mode for Real-Time System Integrity Monitoring:
- Block. In this mode, System Integrity Monitoring blocks actions with files and registry keys from the monitoring scope, and generates a corresponding event.
- Inform. In this mode, System Integrity Monitoring allows actions with files and registry keys from the monitoring scope, and generates a corresponding event.
- In the Real-Time System Integrity Monitoring block, select the Use Real-Time System Integrity Monitoring settings check box.
- Configure external device monitoring:
- Select the Monitor devices check box.
- In the Event severity level drop-down list, select the importance level of external device monitoring events: Informational , Warning , Critical .
System Integrity Monitoring records the current connection of external devices. The application begins to monitor connection and disconnection of external devices after the component is enabled in the application settings. Subsequently, when an external device is connected or disconnected, the application generates a corresponding event.
- Configure file and registry monitoring:
- Select the Monitor files and the registry check box.
- Click Configure.
This opens the list of System Integrity Monitoring rules.
- Click Add.
You can also import rules from another source.
- Configure the Real-Time System Integrity Monitoring rule (see the table below).
- Save your changes.
How to enable Real-Time System Integrity Monitoring in the interface of the application
- In the main application window, click the button.
- In the application settings window, select Security Controls → System Integrity Monitoring.
- Turn on the System Integrity Monitoring toggle switch.
- Under Operating mode for blocking rules, select a mode for Real-Time System Integrity Monitoring:
- Block. In this mode, System Integrity Monitoring blocks actions with files and registry keys from the monitoring scope, and generates a corresponding event.
- Inform. In this mode, System Integrity Monitoring allows actions with files and registry keys from the monitoring scope, and generates a corresponding event.
- In the Real-Time System Integrity Monitoring block, select the Real-Time System Integrity Monitoring check box.
- Configure external device monitoring:
- Select the Monitor devices check box.
- In the Event severity level drop-down list, select the importance level of external device monitoring events: Informational , Warning , Critical .
System Integrity Monitoring records the current connection of external devices. The application begins to monitor connection and disconnection of external devices after the component is enabled in the application settings. Subsequently, when an external device is connected or disconnected, the application generates a corresponding event.
- Configure file and registry monitoring:
- Select the Monitor files and the registry check box.
- Click Set up.
This opens the list of System Integrity Monitoring rules.
- Click Add.
You can also import rules from another source.
- Configure the Real-Time System Integrity Monitoring rule (see the table below).
- Save your changes.
Real-Time System Integrity Monitoring rule settings
Parameter |
Description |
|---|---|
Rule name |
Name of the Real-Time System Integrity Monitoring rule |
Operations with files and registry |
|
Event severity level |
Kaspersky Endpoint Security logs file modification events whenever a file or registry key in the monitoring scope is modified. The following event severity levels are available: Informational |
Monitoring scope |
|
Exclusions |
|
Trusted users and / or user groups |
A trusted user is a user that is allowed to perform actions with files and registry keys in the monitoring scope. If Kaspersky Endpoint Security detects an action performed by a trusted user, System Integrity Monitoring generates an Informational You can select users in Active Directory, in the list of accounts in Kaspersky Security Center, or by entering a local user name manually. Kaspersky recommends using local user accounts only in special cases when it is not possible to use domain user accounts. |
File operation markers / Monitored operations |
Markers characterizing the action with files or registry keys that the application will monitor. |
Hashing |
Calculating a file hash on modification. Kaspersky Endpoint Security adds information about the hash of the file when an event is generated. |
On-Demand System Integrity Check
On-Demand System Integrity Check is a task that you can run manually or on a schedule. When running the System Integrity Check task, the application compares the current state of the objects included in the monitoring scope with their baseline state. In contrast to Real-Time System Integrity Monitoring, the System Integrity Check task helps limit the number of events and lets you generate an overall report of changes in the operating system.
For System Integrity Monitoring to work, you must add at least one rule. A System Integrity Monitoring rule is a set of criteria that define the access of users to files and the registry. System Integrity Monitoring detects changes in the files and the registry within the specified monitoring scope. The monitoring scope is one of the criteria of a System Integrity Monitoring rule. You can configure rules to be shared by Real-Time System Integrity Monitoring and the System Integrity Check task or create separate rules for the task. To create a baseline, Kaspersky Endpoint Security applies the monitoring scope from the System Integrity Check task to the Baseline update task.
Creating and updating a baseline
The System Integrity Check task needs a baseline to work. A baseline is a recorded state of objects in the system, which the application uses as reference when comparing to the current state. If the current state of the system is different from the state of the system as recorded in the baseline, Kaspersky Endpoint Security generates the corresponding event. You can create or update a baseline using the Baseline update task.
You can update the baseline in the following modes:
- Full update.
The application updates all objects in the monitoring scope.
- Incremental update.
The application detects and updates only modified or new objects.
How to create or update a baseline in the Administration Console (MMC)
How to create or update a baseline in the Web Console
Configuring the monitoring scope for the System Integrity Check task
By default, the monitoring scope of the System Integrity Check task is the same as the monitoring scope of Real-Time System Integrity Monitoring. You can configure a different monitoring scope for the task.
- Open the Kaspersky Security Center Administration Console.
- In the console tree, select Policies.
- Select the necessary policy and double-click to open the policy properties.
- In the policy window, select Security Controls → System Integrity Monitoring.
- Select the System Integrity Monitoring check box.
- Under System Integrity Check, select the task configuration mode: Custom settings.
- Configure external device monitoring:
- Select the Monitor devices check box.
- In the Event severity level drop-down list, select the importance level of external device monitoring events: Informational , Warning , Critical .
System Integrity Monitoring records information about connected external devices at the time when the baseline is created. Subsequently, when an external device is connected, the application generates a corresponding event. When running the System Integrity Check task, the application does not monitor the disconnection of external devices.
- Configure file and registry monitoring:
- Select the Monitor files and the registry check box.
- Click Settings.
This opens the list of System Integrity Monitoring rules.
- Click Add.
You can also import rules from another source.
- Configure the Real-Time System Integrity Monitoring rule (see the table below).
- Save your changes.
How to configure a different monitoring scope for the System Integrity Check task in the Web Console
- In the main window of the Web Console, select Assets (Devices) → Policies & profiles.
- Click the name of the Kaspersky Endpoint Security policy.
The policy properties window opens.
- Select the Application settings tab.
- Go to Security Controls → System Integrity Monitoring.
- Turn on the System Integrity Monitoring toggle.
- Under System Integrity Check, select the task configuration mode: Custom settings.
- Configure external device monitoring:
- Select the Monitor devices check box.
- In the Event severity level drop-down list, select the importance level of external device monitoring events: Informational , Warning , Critical .
System Integrity Monitoring records information about connected external devices at the time when the baseline is created. Subsequently, when an external device is connected, the application generates a corresponding event. When running the System Integrity Check task, the application does not monitor the disconnection of external devices.
- Configure file and registry monitoring:
- Select the Monitor files and the registry check box.
- Click Configure.
This opens the list of System Integrity Monitoring rules.
- Click Add.
You can also import rules from another source.
- Configure the Real-Time System Integrity Monitoring rule (see the table below).
- Save your changes.
- In the main application window, click the button.
- In the application settings window, select Security Controls → System Integrity Monitoring.
- Turn on the System Integrity Monitoring toggle switch.
- Under System Integrity Check, select the task configuration mode: Custom settings.
- Configure external device monitoring:
- Select the Monitor devices check box.
- In the Event severity level drop-down list, select the importance level of external device monitoring events: Informational , Warning , Critical .
System Integrity Monitoring records information about connected external devices at the time when the baseline is created. Subsequently, when an external device is connected, the application generates a corresponding event. When running the System Integrity Check task, the application does not monitor the disconnection of external devices.
- Configure file and registry monitoring:
- Select the Monitor files and the registry check box.
- Click Set up.
This opens the list of System Integrity Monitoring rules.
- Click Add.
You can also import rules from another source.
- Configure the Real-Time System Integrity Monitoring rule (see the table below).
- Save your changes.
Settings of a System Integrity Check task rule
Parameter |
Description |
|---|---|
Rule name |
Name of the System Integrity Check task rule. |
Event severity level |
Kaspersky Endpoint Security logs file modification events whenever a file or registry key in the monitoring scope is modified. The following event severity levels are available: Informational |
Monitoring scope |
|
Exclusions |
|
Running the System Integrity Check task
The System Integrity Check task allows checking files or registry keys for changes and also checking the connection of external devices. To check files for changes, you can run the System Integrity Check task in the following modes:
- Quick Scan.
When checking files for changes, the applications checks only file attributes. The application does not check the content of files.
- Full Scan.
When checking files for changes, the applications checks all file attributes and the content of files.
The mode the task runs in does not affect the checking of the registry or external devices.
How to run the System Integrity Check task in the Administration Console (MMC)
How to run a System Integrity Check task in the Web Console
For the System Integrity Check task to finish successfully, the monitoring scope of the System Integrity Check task must completely match the baseline. If the monitoring scope is different, the task finishes with an error. To synchronize monitoring scopes, run the Baseline update task with a new monitoring scope.
Page top
Exporting and importing System Integrity Monitoring rules
You can export the list of System Integrity Monitoring rules to an XML file. Then you can modify the file to, for example, add a large number of records of the same type. You can use the export/import function to back up the list of System Integrity Monitoring rules or to migrate the list to a different server.
How to export and import a list of System Integrity Check rules in the Web Console
Page top
Viewing System Integrity Monitoring reports
To analyze the performance of System Integrity Monitoring rules, you can look at reports and events generated by the application. Kaspersky Endpoint Security generates the following reports regarding the component:
- In the application interface:
- The System Integrity Monitoring report
- The System Integrity Check report
- The Baseline update report
The reports contain System Integrity Monitoring events.
- In the Kaspersky Security Center Console:
- Report on computers on which monitoring rules were triggered the greatest number of times
- Report on most frequently triggered monitoring rules
By default, a report is created for the previous 30 days, including the date when the report is created.
How to view System Integrity Monitoring reports in the Administration Console (MMC)
How to view System Integrity Monitoring reports in the Web Console
To view events generated by the application, you can also use event selections in the Kaspersky Security Center console.
System integrity status reset
Computers in the Kaspersky Security Center console have one of the following statuses: OK  , Warning
  , or Critical
  . If System Integrity Monitoring detects modification of files or registry keys in the monitoring scope, the status of the computer changes to Warning or Critical. The status assigned by System Integrity Monitoring is called the system integrity status. You can reset the system integrity status, for example, if analysis convinced you that the detected modification of objects does not affect the security of the computer.
How to reset the system integrity status in the Administration Console (MMC)
How to reset the system integrity status in the Web Console
As a result, if the status of the computer was changed to Warning or Critical because of System Integrity Monitoring events, the status of the computer is reset to OK. If the status of the computer was also changed because of other events, the status of the computer remains unchanged.
Page top
Cloud Discovery
Cloud Discovery is a component of the Cloud Access Security Broker (CASB) solution that protects the cloud infrastructure of an organization. Cloud Discovery manages user access to cloud services. Cloud services include, for example, Microsoft Teams, Salesforce, Microsoft Office 365. Cloud services are grouped in categories, for example, Data exchange, Messengers, Email. Kaspersky experts regularly update the Cloud Discovery categories and cloud services classified in the categories. Kaspersky Endpoint Security updates the set of categories and cloud services with the application databases. This means that Cloud Discovery does not use the Kaspersky Security Network for categorizing cloud services.
Cloud Discovery provides the following functionality:
- Monitoring cloud service usage
- Blocking user access to cloud services
System requirements
Cloud Discovery is available if the following conditions are satisfied:
- The application is installed on a computer running Windows for workstations.
The component is not available for servers.
- Kaspersky Security Center version 15.1 or higher.
The component is not available in the Administration Console (MMC). You can configure Cloud Discovery in Kaspersky Security Center Web Console and Kaspersky Security Center Cloud Console.
- Kaspersky Next license.
- Monitoring of user Internet activity is enabled. Prior to enabling user Internet activity monitoring, you must do the following:
- Inject a web page interaction script into web traffic. The script enables registration of Cloud Discovery events. The script also provides full-featured blocking of access to cloud services. Without the script, the application blocks access only by cloud service domains.
- To get more accurate statistics of cloud services usage, you need to enable logging of data about visits to allowed pages. The functionality includes grouping of events when a user visits web pages that belong to the same domain. In this way, when a user uses a cloud service, Cloud Discovery logs only one event rather than multiple events for each web page.
- For HTTPS traffic monitoring, you need to enable encrypted connections scan.
Monitoring cloud services
When a user begins using a cloud service, Kaspersky Endpoint Security registers that event and creates an entry in the report. Cloud Discovery controls cloud service usage in the browser as well as in corresponding applications. Cloud Discovery controls cloud service usage over HTTP and HTTPS.
How to enable cloud service monitoring in Cloud Console
- In the main window of the Web Console, select Assets (Devices) → Policies & profiles.
- Click the name of the Kaspersky Endpoint Security policy.
The policy properties window opens.
- Select the Application settings tab.
- Go to Security Controls → Cloud Discovery.
- Turn on the Cloud Discovery toggle.

Cloud Discovery settings
- Save your changes.
As a result, the application forwards information about cloud services being used to Kaspersky Security Center. You can view cloud service usage information in reports. If necessary, you can block access to cloud services.
Blocking access to cloud services
The administrator can restrict user access to Cloud Discovery categories or individual cloud services. In this way, the administrator can allow only secure cloud services and avoid data leaks. Risk level information is displayed for each cloud service in Cloud Discovery. The risk level helps detect services that do not satisfy the security requirements of the organization.
The risk level is an estimation and does not imply any statements about the quality of the cloud service or its vendor. The risk level is simply a recommendation of Kaspersky experts.
Risk levels of cloud services are displayed in the Cloud Discovery section of the policy in the list of all controlled cloud service.
Other Kaspersky Endpoint Security components provide protection from threats and tracking of suspicious user activity when using cloud services.
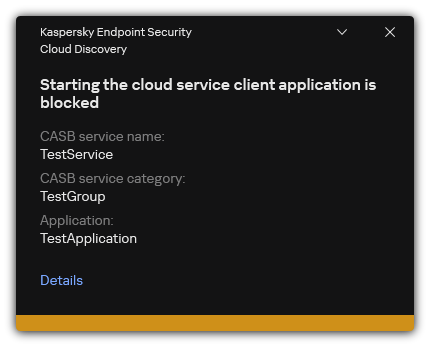
Cloud Discovery notification
Cloud Discovery does not block cloud applications that were started before Kaspersky Endpoint Security.
Blocking access to cloud services is available only for the Kaspersky Next EDR Optimum license. This feature is not available for Kaspersky Next EDR Foundations license.
How to block access to cloud services in Cloud Console
- In the main window of the Web Console, select Assets (Devices) → Policies & profiles.
- Click the name of the Kaspersky Endpoint Security policy.
The policy properties window opens.
- Select the Application settings tab.
- Go to Security Controls → Cloud Discovery.
- Turn on the Cloud Discovery toggle.
A list of all cloud services is displayed. Cloud services are grouped in categories, for example, Data exchange, Messengers, Email. Kaspersky experts regularly update the Cloud Discovery categories and cloud services classified in the categories. Kaspersky Endpoint Security updates the set of categories and cloud services with the application databases.
Cloud Discovery settings
- Use the toggle switch in the Access column to configure access to cloud services.
- Save your changes.
As a result, the application controls cloud service usage in the browser as well as in corresponding applications.
Trusted zone
A trusted zone is a system administrator-configured list of objects and applications that Kaspersky Endpoint Security does not monitor when active.
The administrator forms the trusted zone independently, taking into account the features of the objects that are handled and the applications that are installed on the computer. It may be necessary to include objects and applications in the trusted zone when Kaspersky Endpoint Security blocks access to a certain object or application, if you are sure that the object or application is harmless. An administrator can also allow a user to create their own local trusted zone for a specific computer. This way, users can create their own local lists of exclusions and trusted applications in addition to the general trusted zone in a policy.
Starting with Kaspersky Endpoint Security 12.5 for Windows, you can add EDR telemetry to the trusted zone. This allows to optimize data that the application sends to the Telemetry server for the Kaspersky Anti Targeted Attack Platform (EDR) solution.
Starting with Kaspersky Endpoint Security 12.6 for Windows, scan exclusions and trusted applications are added to the trusted zone. Predefined scan exclusions and trusted applications help quickly configure Kaspersky Endpoint Security on SQL servers, Microsoft Exchange servers, and System Center Configuration Manager. This means you do not need to manually set up a trusted zone for the application on servers.
Starting with Kaspersky Endpoint Security 12.8 for Windows, you can install the application in Light Agent mode for protecting virtual environments. Predefined scan exclusions and trusted applications can help you quickly configure Kaspersky Endpoint Security in Citrix and VMware virtual environments.
Creating a scan exclusion
A scan exclusion is a set of conditions that must be fulfilled so that Kaspersky Endpoint Security will not scan a particular object for viruses and other threats.
Scan exclusions make it possible to safely use legitimate software that can be exploited by criminals to damage the computer or user data. Although they do not have any malicious functions, such applications can be exploited by intruders. For details on legitimate software that could be used by criminals to harm the computer or personal data of a user, please refer to the Kaspersky IT Encyclopedia website.
Such applications may be blocked by Kaspersky Endpoint Security. To prevent them from being blocked, you can configure scan exclusions for the applications in use. To do so, add the name or name mask that is listed in the Kaspersky IT Encyclopedia to the trusted zone. For example, you often use the Radmin application for remote administration of computers. Kaspersky Endpoint Security regards this activity as suspicious and may block it. To prevent the application from being blocked, create a scan exclusion with the name or name mask that is listed in the Kaspersky IT Encyclopedia.
If an application that collects information and sends it to be processed is installed on your computer, Kaspersky Endpoint Security may classify this application as malware. To avoid this, you can exclude the application from scanning by configuring Kaspersky Endpoint Security as described in this document.
Scan exclusions can be used by the following application components and tasks that are configured by the system administrator:
- Behavior Detection.
- Exploit Prevention.
- Host Intrusion Prevention.
- File Threat Protection.
- Web Threat Protection.
- Mail Threat Protection.
- Malware Scan task.
Kaspersky Endpoint Security does not scan an object if the drive or folder containing this object is included in the scan scope at the start of one of the scan tasks. However, the scan exclusion is not applied when a custom scan task is started for this particular object.
How to create a scan exclusion in the Administration Console (MMC)
- Open the Kaspersky Security Center Administration Console.
- In the console tree, select Policies.
- Select the necessary policy and double-click to open the policy properties.
- In the policy window, select General settings → Exclusions and object types.
- In the Scan exclusions and trusted applications → Scan exclusions block, click the Settings button.
This opens a window containing a list of exclusions.
- Select the Merge values when inheriting check box if you want to create a consolidated list of exclusions for all computers in the company. The lists of exclusions in the parent and child policies will be merged. The lists will be merged provided that merging values when inheriting is enabled. Exclusions from the parent policy are displayed in child policies in a read-only view. Changing or deleting exclusions of the parent policy is not possible.
- Select the Allow use of local exclusions check box if you want to enable the user to create a local list of exclusions. This way, a user can create their own local list of exclusions in addition to the general list of exclusions generated in the policy. An administrator can use Kaspersky Security Center to view, add, edit, or delete list items in the computer properties.
If the check box is cleared, the user can access only the general list of exclusions generated in the policy. Also, if this check box is cleared, Kaspersky Endpoint Security hides the consolidated list of scan exclusions in the user interface of the application.
- Click Add and select an action:
- Category. You can group scan exclusions into separate categories. To create a new category, enter the name of the category and add at least one scan exclusion to the category.
- New exclusion. Kaspersky Endpoint Security adds a new scan exclusion to the root of the list.
- Select exclusion from list. To quickly configure Kaspersky Endpoint Security on SQL servers, Microsoft Exchange servers, and System Center Configuration Manager, the application includes predefined scan exclusions. Also predefined scan exclusions have been added to support application set-up in Citrix and VMware virtual environments. You must select predefined scan exclusions depending on the purpose of the protected server.
- New exclusion to selected category. To add a new scan exclusion to a specific category, select a category.
- To exclude a file or folder from scanning:
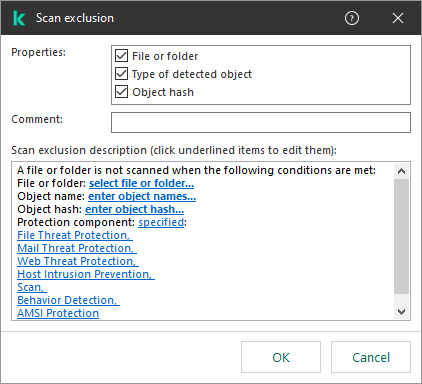
Exclusion settings
- In the Properties block, select the File or folder check box.
- Click the link in the block below to open the Name of file or folder window.
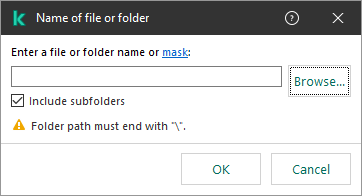
Select file or folder
- Enter the file or folder name or the mask of the file or folder name, or select the file or folder in the folder tree by clicking Browse.
Use masks:
- The
*(asterisk) character, which takes the place of any set of characters, except the\and/characters (delimiters of the names of files and folders in paths to files and folders). For example, the maskC:\*\*.txtwill include all paths to files with the TXT extension located in folders on the C: drive, but not in subfolders. - Two consecutive
*characters take the place of any set of characters (including an empty set) in the file or folder name, including the\and/characters (delimiters of the names of files and folders in paths to files and folders). For example, the maskC:\Folder\**\*.txtwill include all paths to files with the TXT extension located in folders nested within theFolder, except theFolderitself. The mask must include at least one nesting level. The maskC:\**\*.txtis not a valid mask. - The
?(question mark) character, which takes the place of any single character, except the\and/characters (delimiters of the names of files and folders in paths to files and folders). For example, the maskC:\Folder\???.txtwill include paths to all files residing in the folder namedFolderthat have the TXT extension and a name consisting of three characters.
You can use masks at the beginning, in the middle or at the end of the file path. For example, if you want to add a folder for all users to exclusions, enter the
?:\Users\*\Folder\mask.Kaspersky Endpoint Security supports environment variables
You can exclude network folders. To do this, enter the path to the network folder manually (for example,
\\Network Share\*).Kaspersky Endpoint Security does not support the
%userprofile%environment variable when generating a list of exclusions using the Kaspersky Security Center console. To apply the entry to all user accounts, you can use the*character (for example,C:\Users\*\Documents\File.exe). Whenever you add a new environment variable, you need to restart the application. - The
- Save your changes.
- To exclude objects with a specific name from scanning:
- In the Properties block, select the Type of detected object check box.
- Click the link in the block below to open the Type of detected object window.
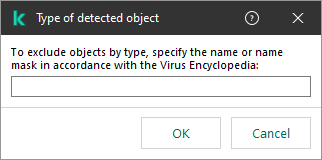
Select object
- Enter the name of the object type according to the classification of the Kaspersky Encyclopedia (for example,
Email-Worm,RootkitorRemoteAdmin).You can use masks with the
?character (replaces any single character) and the*character (replaces any number of characters). For example, if theClient*mask is specified, Kaspersky Endpoint Security excludesClient-IRC,Client-P2PandClient-SMTPobjects from scans. - Save your changes.
- If you want to exclude an individual file from scans:
- In the Properties block, select the Object hash check box.
- Click the link in the block below to open the Object hash window.
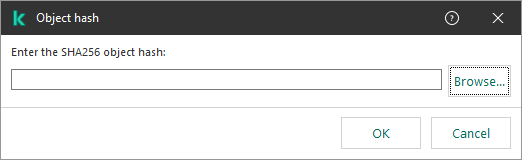
Select file
- Enter the file hash or select the file by clicking the Browse button.
If the file is modified, the file hash will also be modified. If this happens, the modified file will not be added to exclusions.
- Save your changes.
- If necessary, in the Comment field, enter a brief comment on the scan exclusion that you are creating.
- Specify the Kaspersky Endpoint Security components that should use the scan exclusion:
- Click the link in the block below to open the Protection components window.
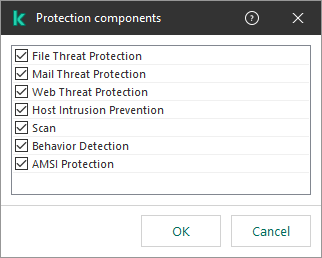
Select protection components
- Select the check boxes opposite the components to which the scan exclusion must be applied.
If the components are specified in the settings of the scan exclusion, this exclusion is applied only during scanning by these components of Kaspersky Endpoint Security.
If the components are not specified in the settings of the scan exclusion, this exclusion is applied during scanning by all components of Kaspersky Endpoint Security.
- Click OK.
The new exclusion will be added to the list. You can disable the exclusion at any time using the check box next to the object.
- Save your changes.
How to create a scan exclusion in the Web Console and Cloud Console
- In the main window of the Web Console, select Assets (Devices) → Policies & profiles.
- Click the name of the Kaspersky Endpoint Security policy.
The policy properties window opens.
- Select the Application settings tab.
- Go to General settings → Exclusions and types of detected objects.
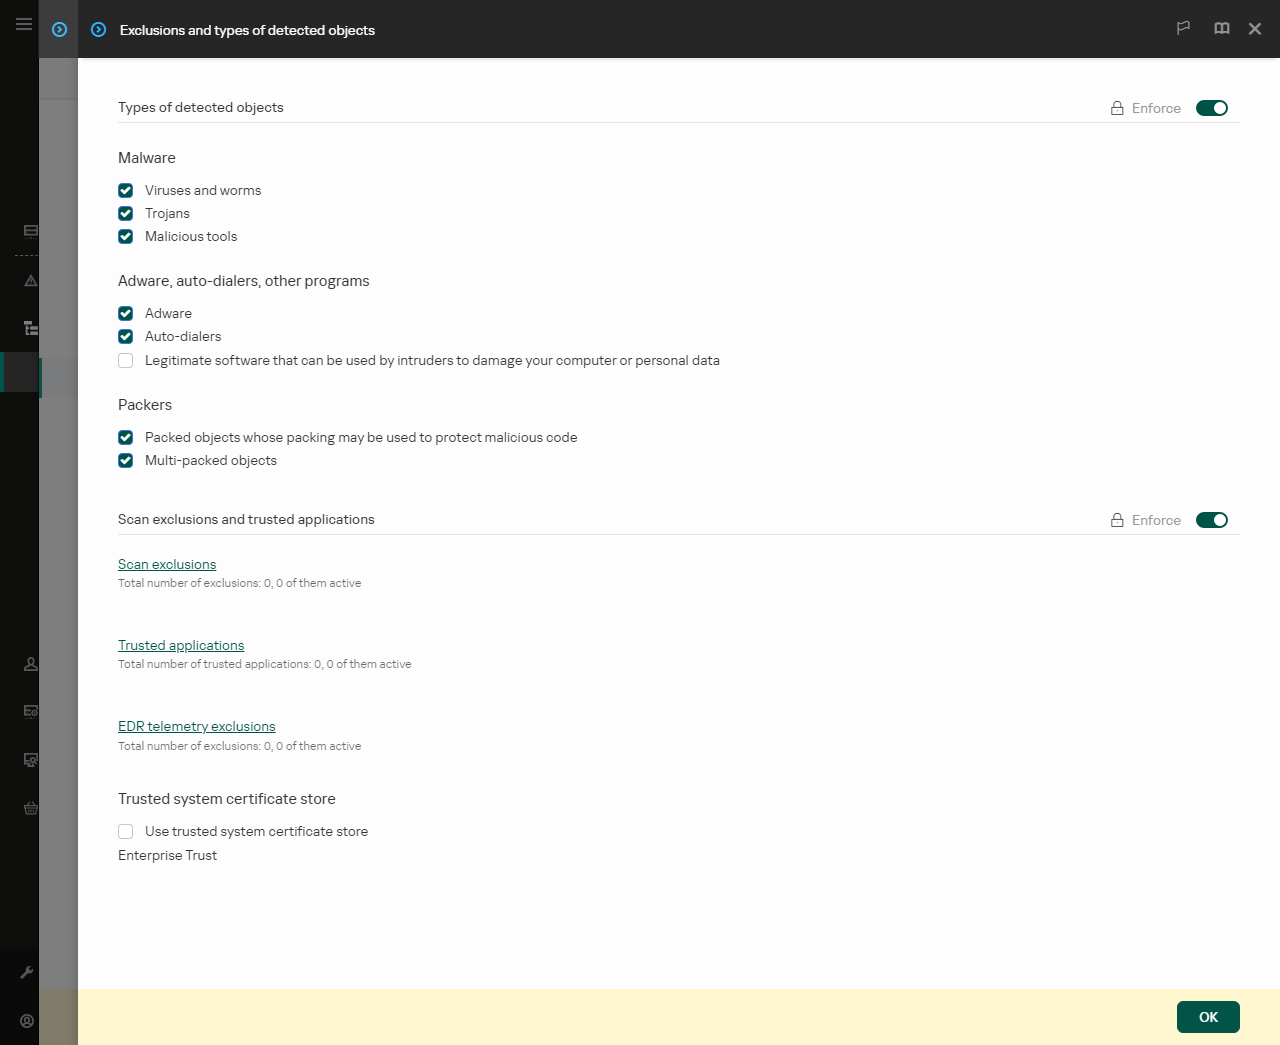
Settings of exclusions
- In the Scan exclusions and trusted applications block, click the Scan exclusions link.
- Select the Merge values when inheriting check box if you want to create a consolidated list of exclusions for all computers in the company. The lists of exclusions in the parent and child policies will be merged. The lists will be merged provided that merging values when inheriting is enabled. Exclusions from the parent policy are displayed in child policies in a read-only view. Changing or deleting exclusions of the parent policy is not possible.
- Select the Allow use of local exclusions check box if you want to enable the user to create a local list of exclusions. This way, a user can create their own local list of exclusions in addition to the general list of exclusions generated in the policy. An administrator can use Kaspersky Security Center to view, add, edit, or delete list items in the computer properties.
If the check box is cleared, the user can access only the general list of exclusions generated in the policy. Also, if this check box is cleared, Kaspersky Endpoint Security hides the consolidated list of scan exclusions in the user interface of the application.
- Click Add and select an action:
- Category. You can group scan exclusions into separate categories. To create a new category, enter the name of the category and add at least one scan exclusion to the category.
- New exclusion. Kaspersky Endpoint Security adds a new scan exclusion to the root of the list.
- Select exclusion from list. To quickly configure Kaspersky Endpoint Security on SQL servers, Microsoft Exchange servers, and System Center Configuration Manager, the application includes predefined scan exclusions. Also predefined scan exclusions have been added to support application set-up in Citrix and VMware virtual environments. You must select predefined scan exclusions depending on the purpose of the protected server.
To add a new scan exclusion to a specific category, select the check box next to that category and select the New exclusion option.
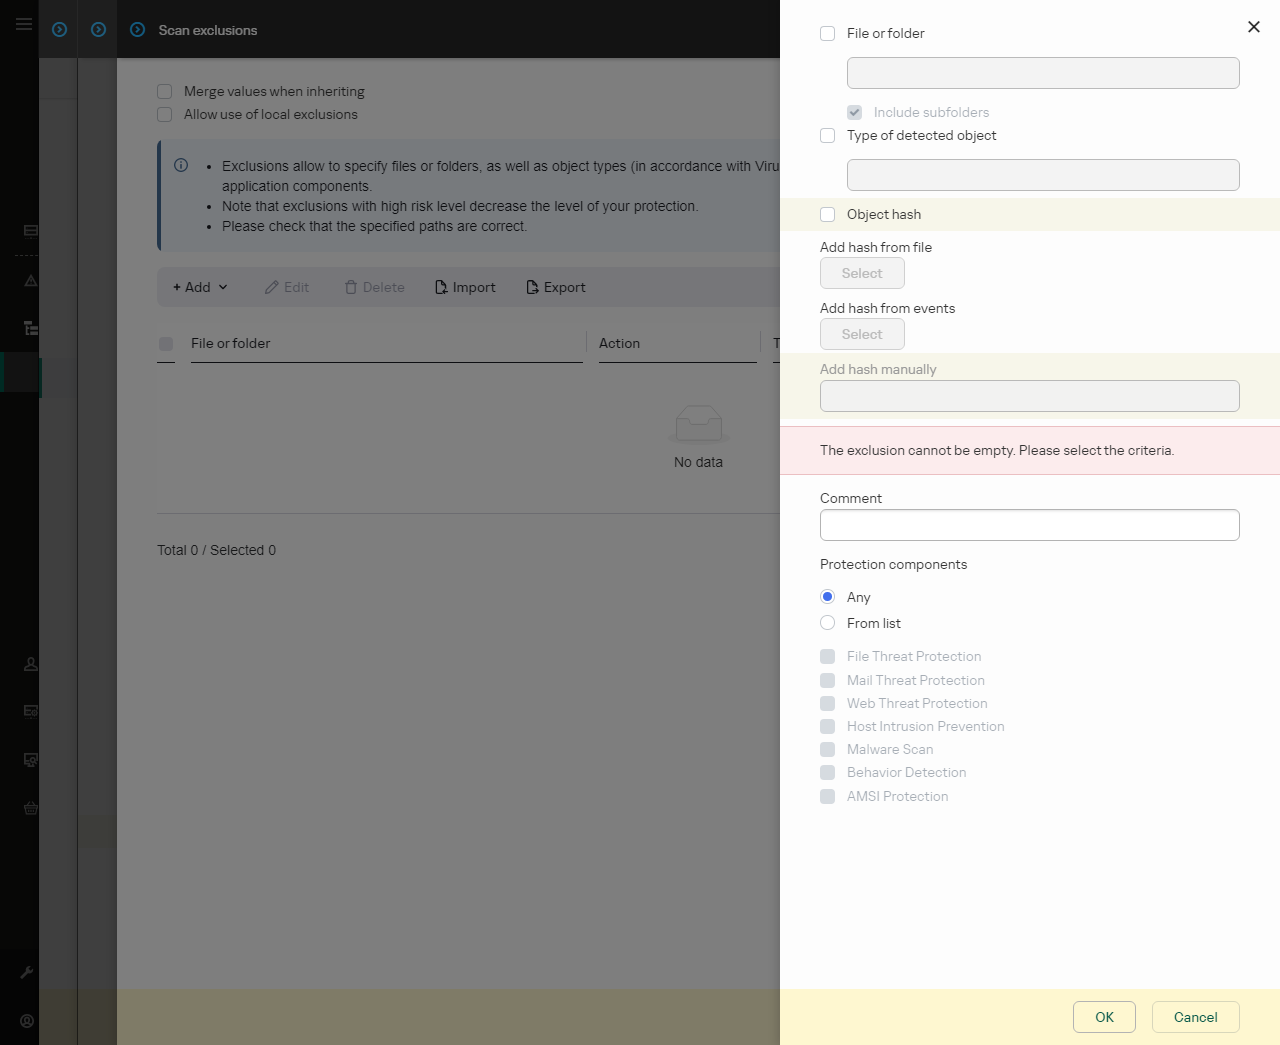
Exclusion settings
- Select how you want to add the exclusion: File or folder, Type of detected object or Object hash.
- To exclude a file or folder from scan, enter the path manually. Kaspersky Endpoint Security supports environment variables and the
*and?characters when entering a mask:- The
*(asterisk) character, which takes the place of any set of characters, except the\and/characters (delimiters of the names of files and folders in paths to files and folders). For example, the maskC:\*\*.txtwill include all paths to files with the TXT extension located in folders on the C: drive, but not in subfolders. - Two consecutive
*characters take the place of any set of characters (including an empty set) in the file or folder name, including the\and/characters (delimiters of the names of files and folders in paths to files and folders). For example, the maskC:\Folder\**\*.txtwill include all paths to files with the TXT extension located in folders nested within theFolder, except theFolderitself. The mask must include at least one nesting level. The maskC:\**\*.txtis not a valid mask. - The
?(question mark) character, which takes the place of any single character, except the\and/characters (delimiters of the names of files and folders in paths to files and folders). For example, the maskC:\Folder\???.txtwill include paths to all files residing in the folder namedFolderthat have the TXT extension and a name consisting of three characters.You can use masks at the beginning, in the middle or at the end of the file path. For example, if you want to add a folder for all users to exclusions, enter the
?:\Users\*\Folder\mask.You can exclude network folders. To do this, enter the path to the network folder manually (for example,
\\Network Share\*).
- The
- If you want to exclude a specific type of object from scans, in the Type of detected object field enter the name of the object type according to the classification of the Kaspersky Encyclopedia (for example,
Email-Worm,RootkitorRemoteAdmin).You can use masks with the
?character (replaces any single character) and the*character (replaces any number of characters). For example, if theClient*mask is specified, Kaspersky Endpoint Security excludesClient-IRC,Client-P2PandClient-SMTPobjects from scans. - If you want to exclude an individual file from scans, enter the file hash in the Object hash field.
If the file is modified, the file hash will also be modified. If this happens, the modified file will not be added to exclusions.
- In the Protection components block, select the components that you want the scan exclusion to apply to.
- If necessary, in the Comment field, enter a brief comment on the scan exclusion that you are creating.
- Click OK.
The new exclusion will be added to the list. You can disable the exclusion at any time using the check box in the Status column.
- Save your changes.
How to create a scan exclusion in the application interface
- In the main application window, click the button.
- In the application settings window, select General settings → Exclusions and types of detected objects.
- In the Exclusions block, click the Manage exclusions link.
Kaspersky Endpoint Security hides the list of scan exclusions in the user interface of the application if configuration of scan exclusions is blocked by the administrator in the console ("closed lock" symbol) and local scan exclusions are prohibited (the Allow use of local exclusions check box is cleared).
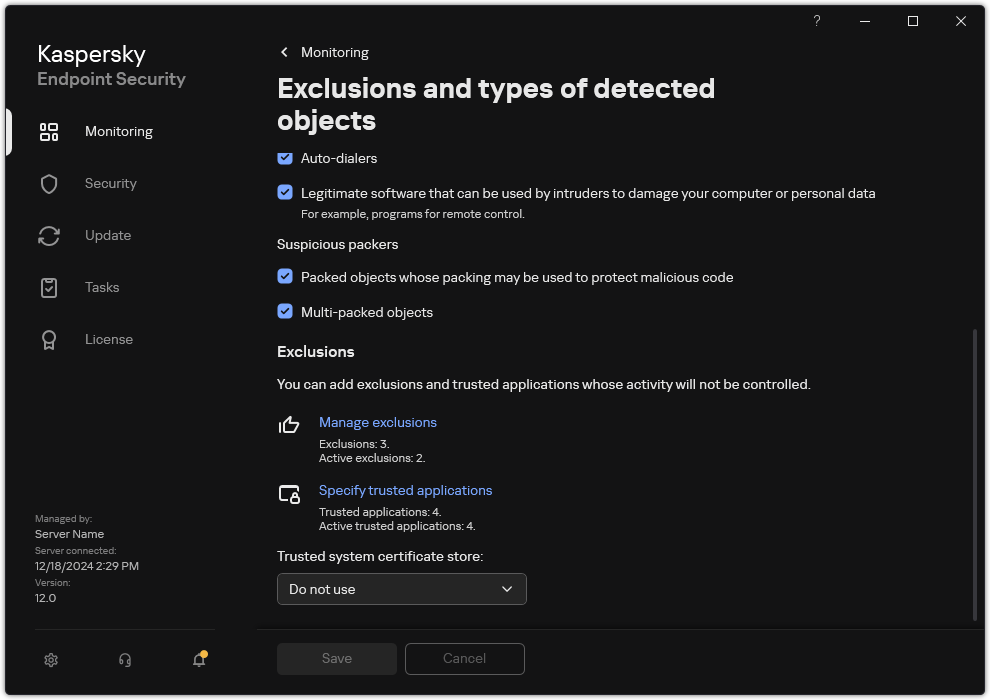
Settings of exclusions
- Click Add and select an action:
- Category. You can group scan exclusions into separate categories. To create a new category, enter the name of the category and add at least one scan exclusion to the category.
- New exclusion. Kaspersky Endpoint Security adds a new scan exclusion to the root of the list.
- Select exclusion from list. To quickly configure Kaspersky Endpoint Security on SQL servers, Microsoft Exchange servers, and System Center Configuration Manager, the application includes predefined scan exclusions. Also predefined scan exclusions have been added to support application set-up in Citrix and VMware virtual environments. You must select predefined scan exclusions depending on the purpose of the protected server.
To add a new scan exclusion to a specific category, select the check box next to that category and select the New exclusion option.
- If you want to exclude a file or folder from scans, select the file or folder by clicking the Browse button.
You can also enter the path manually. Kaspersky Endpoint Security supports environment variables and the
*and?characters when entering a mask:- The
*(asterisk) character, which takes the place of any set of characters, except the\and/characters (delimiters of the names of files and folders in paths to files and folders). For example, the maskC:\*\*.txtwill include all paths to files with the TXT extension located in folders on the C: drive, but not in subfolders. - Two consecutive
*characters take the place of any set of characters (including an empty set) in the file or folder name, including the\and/characters (delimiters of the names of files and folders in paths to files and folders). For example, the maskC:\Folder\**\*.txtwill include all paths to files with the TXT extension located in folders nested within theFolder, except theFolderitself. The mask must include at least one nesting level. The maskC:\**\*.txtis not a valid mask. - The
?(question mark) character, which takes the place of any single character, except the\and/characters (delimiters of the names of files and folders in paths to files and folders). For example, the maskC:\Folder\???.txtwill include paths to all files residing in the folder namedFolderthat have the TXT extension and a name consisting of three characters.You can use masks at the beginning, in the middle or at the end of the file path. For example, if you want to add a folder for all users to exclusions, enter the
?:\Users\*\Folder\mask.You can exclude network folders. To do this, enter the path to the network folder manually (for example,
\\Network Share\*).
- The
- If you want to exclude a specific type of object from scans, in the Type of detected object field enter the name of the object type according to the classification of the Kaspersky Encyclopedia (for example,
Email-Worm,RootkitorRemoteAdmin).You can use masks with the
?character (replaces any single character) and the*character (replaces any number of characters). For example, if theClient*mask is specified, Kaspersky Endpoint Security excludesClient-IRC,Client-P2PandClient-SMTPobjects from scans. - If you want to exclude an individual file from scans, enter the file hash in the Object hash field.
If the file is modified, the file hash will also be modified. If this happens, the modified file will not be added to exclusions.
- In the Protection components block, select the components that you want the scan exclusion to apply to.
- If necessary, in the Comment field, enter a brief comment on the scan exclusion that you are creating.
- Select the Active status for the exclusion.
- Click Add.
The new exclusion will be added to the list. You can disable the exclusion at any time using the check box in the Status column.
- Save your changes.
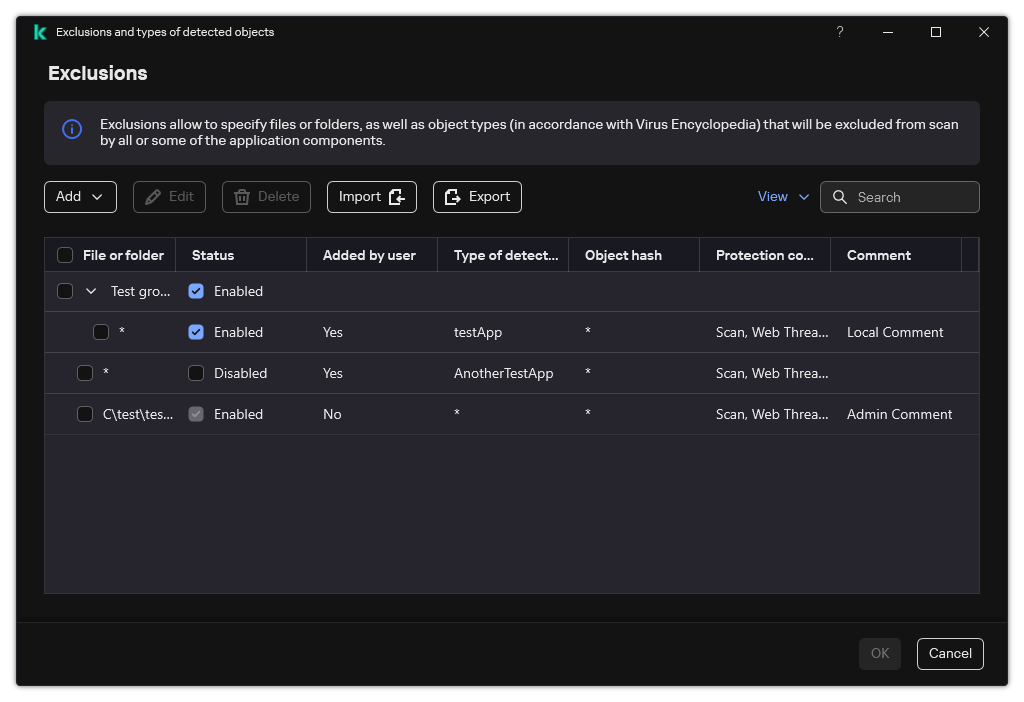
List of exclusions
Path mask examples: Paths to files located in any folder:
Paths to files located in a specified folder:
Paths to files located in all folders with a specified name:
|
Selecting types of detectable objects
To select types of detectable objects:
- In the main application window, click the button.
- In the application settings window, select General settings → Exclusions and types of detected objects.
- In the Types of detected objects block, select check boxes opposite the types of objects that you want Kaspersky Endpoint Security to detect:
- Save your changes.
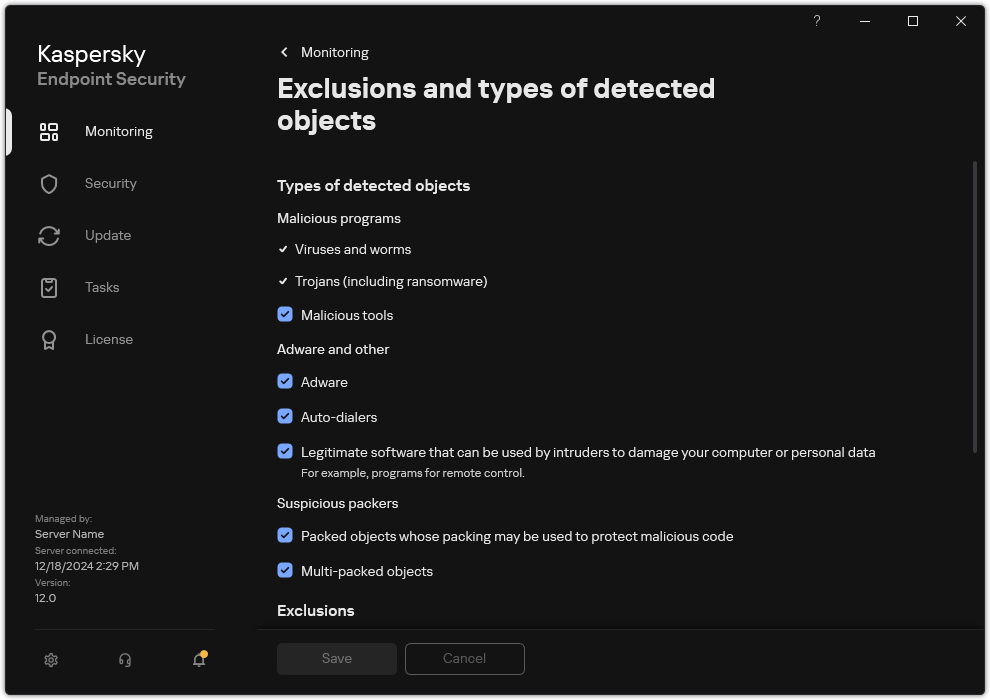
Types of detectable objects
Editing the list of trusted applications
The list of trusted applications is a list of applications whose file and network activity (including malicious activity) and access to the system registry are not monitored by Kaspersky Endpoint Security. By default, Kaspersky Endpoint Security monitors objects that are opened, executed, or saved by any application process and controls the activity of all applications and network traffic that is generated by them. After an application is added to the list of trusted applications, Kaspersky Endpoint Security stops monitoring the application's activity.
The difference between scan exclusions and trusted applications is that for exclusions Kaspersky Endpoint Security does not scan files, while for trusted applications it does not control the initiated processes. If a trusted application creates a malicious file in a folder which is not included in scan exclusions, Kaspersky Endpoint Security will detect the file and eliminate the threat. If the folder is added to exclusions, Kaspersky Endpoint Security will skip this file.
For example, if you consider objects that are used by the standard Microsoft Windows Notepad application to be safe, meaning that you trust this application, you can add Microsoft Windows Notepad to the list of trusted applications so that the objects used by this application are not monitored. This will increase computer performance, which is especially important when using server applications.
In addition, certain actions that are classified by Kaspersky Endpoint Security as suspicious may be safe within the context of the functionality of a number of applications. For example, the interception of text that is typed from the keyboard is a routine process for automatic keyboard layout switchers (such as Punto Switcher). To take account of the specifics of such applications and exclude their activity from monitoring, we recommend that you add such applications to the trusted applications list.
Trusted applications help to avoid compatibility issues between Kaspersky Endpoint Security and other applications (for example, the problem of double-scanning of the network traffic of a third-party computer by Kaspersky Endpoint Security and by another anti-virus application).
At the same time, the executable file and process of the trusted application are still scanned for viruses and other malware. An application can be fully excluded from Kaspersky Endpoint Security scanning by means of scan exclusions.
How to add an application to the trusted list in the Administration Console (MMC)
- Open the Kaspersky Security Center Administration Console.
- In the console tree, select Policies.
- Select the necessary policy and double-click to open the policy properties.
- In the policy window, select General settings → Exclusions and object types.
- In the Scan exclusions and trusted applications block, click the Settings button.
- In the window that opens, select the Trusted applications tab.
This opens a window containing a list of trusted applications.
- Select the Merge values when inheriting check box if you want to create a consolidated list of trusted applications for all computers in the company. The lists of trusted applications in the parent and child policies will be merged. The lists will be merged provided that merging values when inheriting is enabled. Trusted applications from the parent policy are displayed in child policies in a read-only view. Changing or deleting trusted applications of the parent policy is not possible.
- Select the Allow use of local trusted applications check box if you want to enable the user to create a local list of trusted applications. This way, a user can create their own local list of trusted applications in addition to the general list of trusted applications generated in the policy. An administrator can use Kaspersky Security Center to view, add, edit, or delete list items in the computer properties.
If the check box is cleared, the user can access only the general list of trusted applications generated in the policy. Also, if this check box is cleared, Kaspersky Endpoint Security hides the consolidated list of trusted applications in the user interface of the application.
- Click Add and select an action:
- Category. You can group trusted applications into separate categories. To create a new category, enter the name of the category and add at least one trusted application to the category.
- New exclusion. Kaspersky Endpoint Security adds a new trusted application to the root of the list.
- Select exclusion from list. To quickly configure Kaspersky Endpoint Security on SQL servers, Microsoft Exchange servers, and System Center Configuration Manager, the application includes predefined trusted applications. Also predefined trusted applications have been added to support application set-up in Citrix and VMware virtual environments. You must select predefined trusted applications depending on the purpose of the protected server.
- New exclusion to selected category. To add a new trusted application to a specific category, select a category.
- In the window that opens, enter the path to the executable file of the trusted application (see the figure below).
Kaspersky Endpoint Security supports environment variables and the
*and?characters when entering a mask.Kaspersky Endpoint Security does not support the
%userprofile%environment variable when generating a list of trusted applications in the Kaspersky Security Center console. To apply the entry to all user accounts, you can use the * character (for example,C:\Users\*\Documents\File.exe). Whenever you add a new environment variable, you need to restart the application.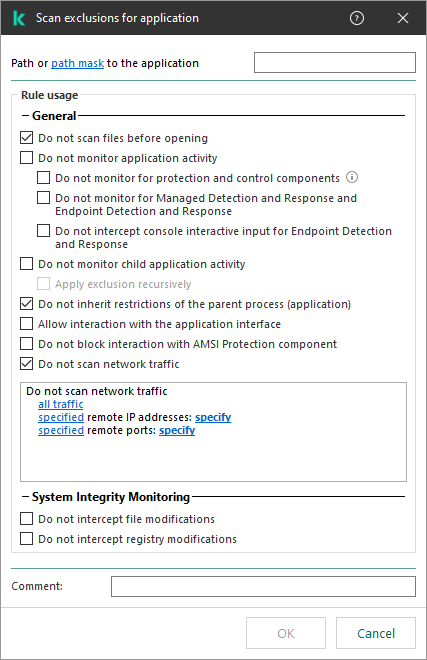
Trusted application settings
- Configure the advanced settings for the trusted application (see the table below).
- Click OK.
The new trusted application will be added to the list. You can exclude an application from the trusted zone at any time using the check box next to the object.
- Save your changes.
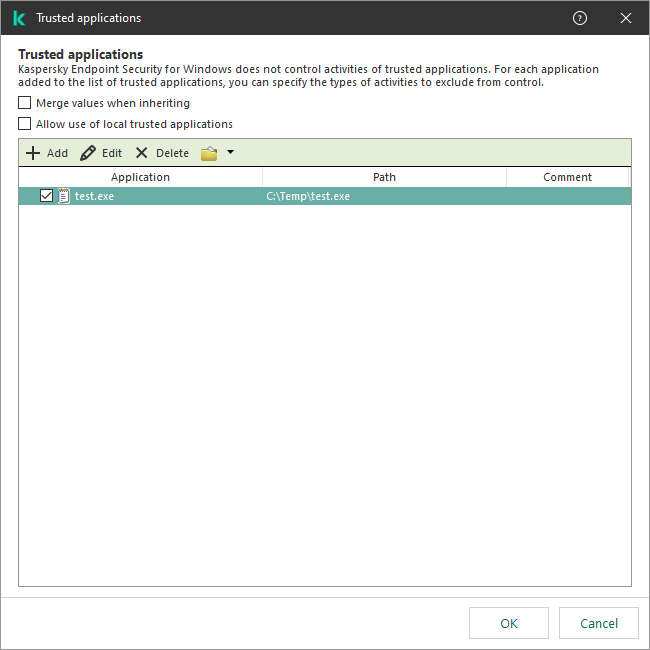
List of trusted applications
How to add an application to the trusted list in the Web Console and Cloud Console
- In the main window of the Web Console, select Assets (Devices) → Policies & profiles.
- Click the name of the Kaspersky Endpoint Security policy.
The policy properties window opens.
- Select the Application settings tab.
- Go to General settings → Exclusions and types of detected objects.
Settings of exclusions
- In the Scan exclusions and trusted applications block, click the Trusted applications link.
This opens a window containing a list of trusted applications.
- Select the Merge values when inheriting check box if you want to create a consolidated list of trusted applications for all computers in the company. The lists of trusted applications in the parent and child policies will be merged. The lists will be merged provided that merging values when inheriting is enabled. Trusted applications from the parent policy are displayed in child policies in a read-only view. Changing or deleting trusted applications of the parent policy is not possible.
- Select the Allow use of local trusted applications check box if you want to enable the user to create a local list of trusted applications. This way, a user can create their own local list of trusted applications in addition to the general list of trusted applications generated in the policy. An administrator can use Kaspersky Security Center to view, add, edit, or delete list items in the computer properties.
If the check box is cleared, the user can access only the general list of trusted applications generated in the policy. Also, if this check box is cleared, Kaspersky Endpoint Security hides the consolidated list of trusted applications in the user interface of the application.
- Click Add and select an action:
- Category. You can group trusted applications into separate categories. To create a new category, enter the name of the category and add at least one trusted application to the category.
- New exclusion. Kaspersky Endpoint Security adds a new trusted application to the root of the list.
- Select exclusion from list. To quickly configure Kaspersky Endpoint Security on SQL servers, Microsoft Exchange servers, and System Center Configuration Manager, the application includes predefined trusted applications. Also predefined trusted applications have been added to support application set-up in Citrix and VMware virtual environments. You must select predefined trusted applications depending on the purpose of the protected server.
To add a new trusted application to a specific category, select the check box next to that category and select the New exclusion option.
- In the window that opens, enter the path to the executable file of the trusted application (see the figure below).
Kaspersky Endpoint Security supports environment variables and the
*and?characters when entering a mask.Kaspersky Endpoint Security does not support the
%userprofile%environment variable when generating a list of trusted applications in the Kaspersky Security Center console. To apply the entry to all user accounts, you can use the * character (for example,C:\Users\*\Documents\File.exe). Whenever you add a new environment variable, you need to restart the application.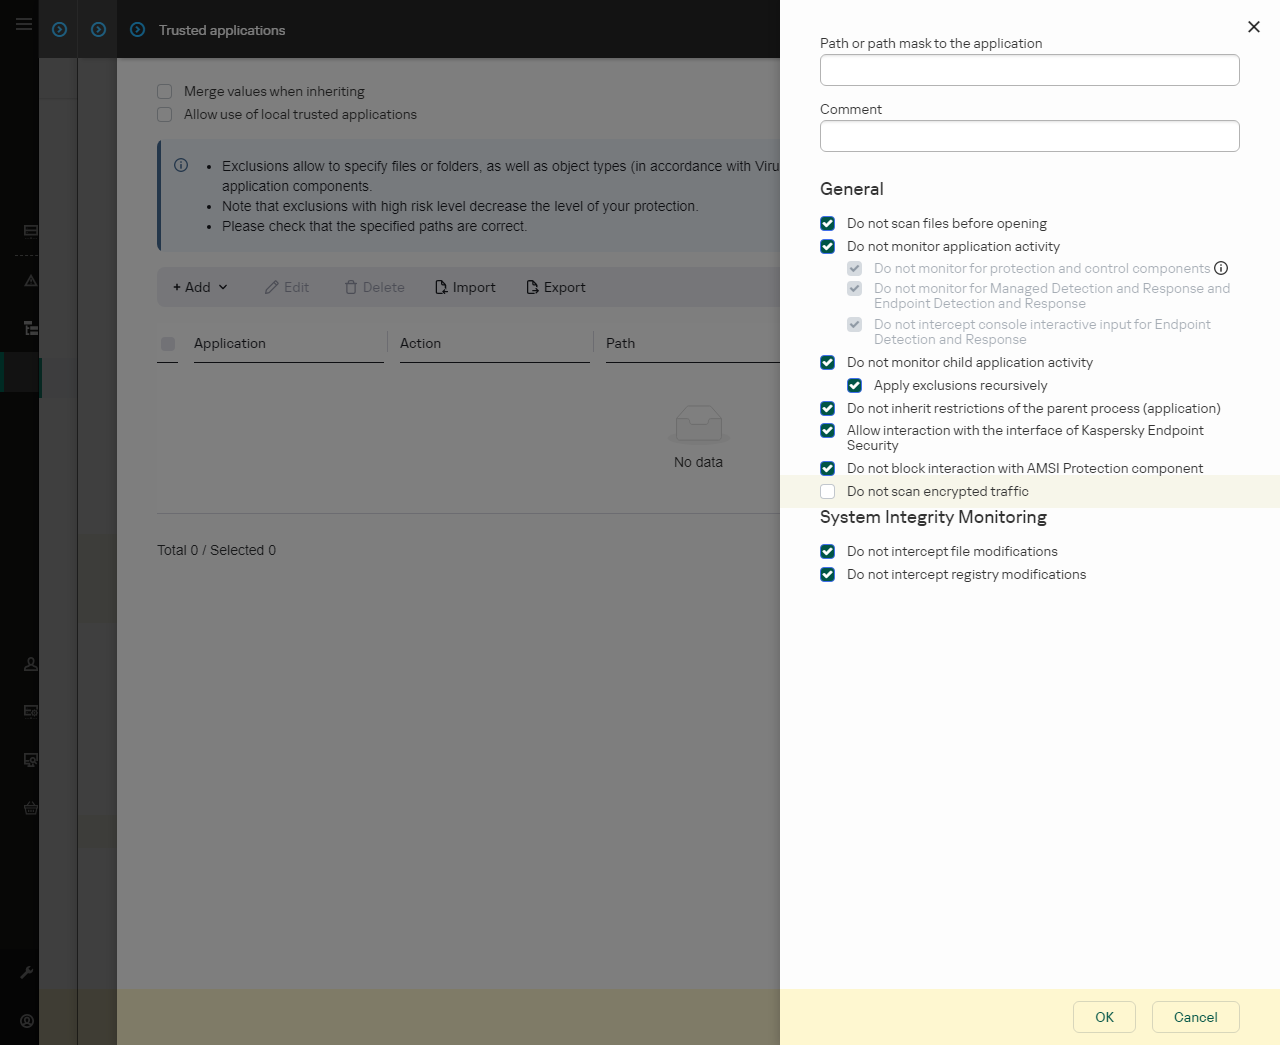
Trusted application settings
- Configure the advanced settings for the trusted application (see the table below).
- Click OK.
The new trusted application will be added to the list. You can exclude an application from the trusted zone at any time using the check box in the Action column.
- Save your changes.
How to add an application to the trusted list in the application interface
- In the main application window, click the button.
- In the application settings window, select General settings → Exclusions and types of detected objects.
- In the Exclusions block, click the Specify trusted applications link.
Kaspersky Endpoint Security hides the consolidated list of trusted applications in the user interface of the application if configuration of trusted applications is blocked by the administrator in the console ("closed lock" symbol) and local trusted applications are prohibited (the Allow use of local trusted applications check box is cleared).
Settings of exclusions
- Click Add and select an action:
- Category. You can group trusted applications into separate categories. To create a new category, enter the name of the category and add at least one trusted application to the category.
- New exclusion. Kaspersky Endpoint Security adds a new trusted application to the root of the list.
- Select exclusion from list. To quickly configure Kaspersky Endpoint Security on SQL servers, Microsoft Exchange servers, and System Center Configuration Manager, the application includes predefined trusted applications. Also predefined trusted applications have been added to support application set-up in Citrix and VMware virtual environments. You must select predefined trusted applications depending on the purpose of the protected server.
To add a new trusted application to a specific category, select the check box next to that category and select the New exclusion option.
- In the window that opens, enter the path to the executable file of the trusted application (see the figure below).
Kaspersky Endpoint Security supports environment variables and the
*and?characters when entering a mask.Kaspersky Endpoint Security supports environment variables and converts the path in the local interface of the application. In other words, if you enter the file path
%userprofile%\Documents\File.exe, aC:\Users\Fred123\Documents\File.exerecord is added in local interface of the application for user Fred123. Accordingly, Kaspersky Endpoint Security ignores theFile.exetrusted program for other users. To apply the entry to all user accounts, you can use the*character (for example,C:\Users\*\Documents\File.exe).Whenever you add a new environment variable, you need to restart the application.
- In the trusted application properties window, configure the advanced settings.
- Click OK.
The new trusted application will be added to the list. You can exclude an application from the trusted zone at any time using the check box in the Status column.
- Save your changes.
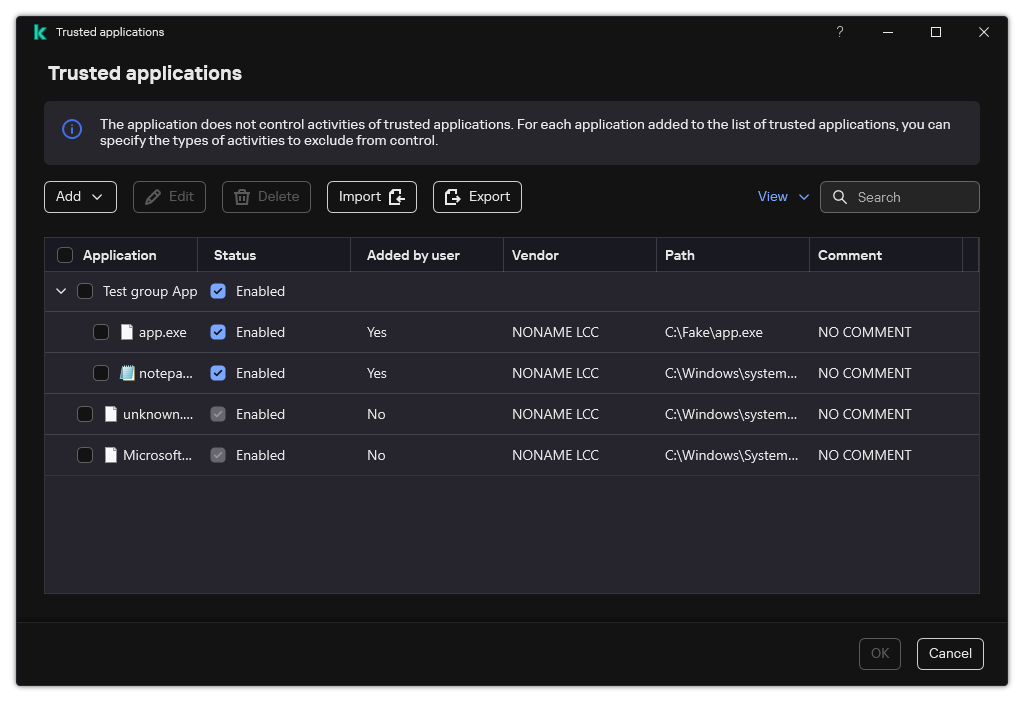
List of trusted applications
Trusted application settings
Parameter |
Description |
|---|---|
Do not scan files before opening |
All files that are opened by the application are excluded from scans by Kaspersky Endpoint Security. For example, if you are using applications to back up files, this feature helps reduce the consumption of resources by Kaspersky Endpoint Security. |
Do not monitor application activity |
Kaspersky Endpoint Security will not monitor the application's file- and network activity in the operating system. You can configure application activity monitoring for different components of Kaspersky Endpoint Security:
|
Do not inherit restrictions from the parent process (application) |
The restrictions configured for the parent process will not be applied by Kaspersky Endpoint Security to a child process. The parent process is started by an application for which application rights (Host Intrusion Prevention) and application network rules (Firewall) are configured. |
Do not monitor child application activity |
Kaspersky Endpoint Security will not monitor the file activity or network activity of applications that are started by this application. You can apply the exclusion recursively. So that the application does not monitor the activity of the entire chain of child applications. |
Allow interaction with the application interface |
Kaspersky Endpoint Security Self-Defense blocks all attempts to manage application services from a remote computer. If the check box is selected, the remote access application is allowed to manage Kaspersky Endpoint Security settings through the Kaspersky Endpoint Security interface. |
Do not block interaction with AMSI Protection component |
Kaspersky Endpoint Security will not monitor the trusted application's requests for objects to be scanned by the AMSI Protection component. |
Do not scan network traffic |
Network traffic initiated by the application will be excluded from scans by Kaspersky Endpoint Security. You can exclude either all traffic or only encrypted traffic from scans. You can also exclude individual IP addresses and port numbers from scans. |
Comment |
If necessary, you can provide a brief comment for the trusted application. Comments help simplify searches and sorting of trusted applications. |
Status |
Status of the trusted application:
|
Creating a local trusted zone
The user now can create their own local trusted zone for a specific computer. This way, the user can create their own local lists of scan exclusions and trusted applications in addition to the general trusted zone in a policy. An administrator can allow or block the use of local exclusions or local trusted applications in policy settings. To do so, use the Allow use of local exclusions and Allow use of local trusted applications check boxes in the Exclusions section of the policy.
If creating a local trusted zone is allowed by an administrator, the user can add their own scan exclusions and trusted applications in the user interface of the application. At the same time, the user does not have permissions to modify or delete objects from the trusted zone configured in the policy. The administrator can also view, add, modify, or delete list items in the Kaspersky Security Center console if exclusions need to be added for an individual computer.
Kaspersky Endpoint Security hides the lists of scan exclusions and trusted applications in the user interface of the application if configuration of the trusted zone is blocked by the administrator in the console ("closed lock" symbol) and local scan exclusions and trusted applications are prohibited.
How to add an object to the local trusted zone in the Administration Console (MMC)
- Open the Kaspersky Security Center Administration Console.
- In the Managed devices folder in the Administration Console tree, open the folder with the name of the administration group to which the relevant client computers belong.
- In the workspace, select the Devices tab.
- Double-click to open the computer properties window.
- In the computer properties window, select the Applications section.
- In the list of Kaspersky applications installed on the computer, select Kaspersky Endpoint Security for Windows and double-click to open the application properties.
- In the application settings window, select General settings → Exclusions and object types.
- In the Scan exclusions and trusted applications → Local scan exclusions block, click the Settings button.
This opens a window containing a list of local exclusions.

Trusted zone settings
- Make a list of local scan exclusions.
The rules for creating local scan exclusions are the same as for general exclusions. Kaspersky Endpoint Security supports environment variables and the
*and?characters when entering a mask. - In the Scan exclusions and trusted applications → Local trusted applications block, click the Settings button.
This opens a window containing a list of local trusted applications.
- Make a list of local trusted applications.
Rules for adding applications to the list of local trusted applications are the same as the rules for adding them to the general list. Kaspersky Endpoint Security supports environment variables and the
*and?characters when entering a mask. - Save your changes.
How to add an object to the local trusted zone in Web Console and Cloud Console
How to create a local scan exclusion in the application interface
- In the main application window, click the button.
- In the application settings window, select General settings → Exclusions and types of detected objects.
- In the Exclusions block, click the Manage exclusions link.
Kaspersky Endpoint Security hides the list of scan exclusions in the user interface of the application if configuration of scan exclusions is blocked by the administrator in the console ("closed lock" symbol) and local scan exclusions are prohibited (the Allow use of local exclusions check box is cleared).
Settings of exclusions
- Click Add and select an action:
- Category. You can group scan exclusions into separate categories. To create a new category, enter the name of the category and add at least one scan exclusion to the category.
- New exclusion. Kaspersky Endpoint Security adds a new scan exclusion to the root of the list.
- Select exclusion from list. To quickly configure Kaspersky Endpoint Security on SQL servers, Microsoft Exchange servers, and System Center Configuration Manager, the application includes predefined scan exclusions. Also predefined scan exclusions have been added to support application set-up in Citrix and VMware virtual environments. You must select predefined scan exclusions depending on the purpose of the protected server.
To add a new scan exclusion to a specific category, select the check box next to that category and select the New exclusion option.
- If you want to exclude a file or folder from scans, select the file or folder by clicking the Browse button.
You can also enter the path manually. Kaspersky Endpoint Security supports environment variables and the
*and?characters when entering a mask:- The
*(asterisk) character, which takes the place of any set of characters, except the\and/characters (delimiters of the names of files and folders in paths to files and folders). For example, the maskC:\*\*.txtwill include all paths to files with the TXT extension located in folders on the C: drive, but not in subfolders. - Two consecutive
*characters take the place of any set of characters (including an empty set) in the file or folder name, including the\and/characters (delimiters of the names of files and folders in paths to files and folders). For example, the maskC:\Folder\**\*.txtwill include all paths to files with the TXT extension located in folders nested within theFolder, except theFolderitself. The mask must include at least one nesting level. The maskC:\**\*.txtis not a valid mask. - The
?(question mark) character, which takes the place of any single character, except the\and/characters (delimiters of the names of files and folders in paths to files and folders). For example, the maskC:\Folder\???.txtwill include paths to all files residing in the folder namedFolderthat have the TXT extension and a name consisting of three characters.You can use masks at the beginning, in the middle or at the end of the file path. For example, if you want to add a folder for all users to exclusions, enter the
?:\Users\*\Folder\mask.You can exclude network folders. To do this, enter the path to the network folder manually (for example,
\\Network Share\*).
- The
- If you want to exclude a specific type of object from scans, in the Type of detected object field enter the name of the object type according to the classification of the Kaspersky Encyclopedia (for example,
Email-Worm,RootkitorRemoteAdmin).You can use masks with the
?character (replaces any single character) and the*character (replaces any number of characters). For example, if theClient*mask is specified, Kaspersky Endpoint Security excludesClient-IRC,Client-P2PandClient-SMTPobjects from scans. - If you want to exclude an individual file from scans, enter the file hash in the Object hash field.
If the file is modified, the file hash will also be modified. If this happens, the modified file will not be added to exclusions.
- In the Protection components block, select the components that you want the scan exclusion to apply to.
- If necessary, in the Comment field, enter a brief comment on the scan exclusion that you are creating.
- Select the Active status for the exclusion.
- Click Add.
The new exclusion will be added to the list. You can disable the exclusion at any time using the check box in the Status column.
- Save your changes.
List of exclusions
How to add an application to the list of local trusted applications in the application interface
- In the main application window, click the button.
- In the application settings window, select General settings → Exclusions and types of detected objects.
- In the Exclusions block, click the Specify trusted applications link.
Kaspersky Endpoint Security hides the consolidated list of trusted applications in the user interface of the application if configuration of trusted applications is blocked by the administrator in the console ("closed lock" symbol) and local trusted applications are prohibited (the Allow use of local trusted applications check box is cleared).
Settings of exclusions
- Click Add and select an action:
- Category. You can group trusted applications into separate categories. To create a new category, enter the name of the category and add at least one trusted application to the category.
- New exclusion. Kaspersky Endpoint Security adds a new trusted application to the root of the list.
- Select exclusion from list. To quickly configure Kaspersky Endpoint Security on SQL servers, Microsoft Exchange servers, and System Center Configuration Manager, the application includes predefined trusted applications. Also predefined trusted applications have been added to support application set-up in Citrix and VMware virtual environments. You must select predefined trusted applications depending on the purpose of the protected server.
To add a new trusted application to a specific category, select the check box next to that category and select the New exclusion option.
- In the window that opens, enter the path to the executable file of the trusted application (see the figure below).
Kaspersky Endpoint Security supports environment variables and the
*and?characters when entering a mask.Kaspersky Endpoint Security supports environment variables and converts the path in the local interface of the application. In other words, if you enter the file path
%userprofile%\Documents\File.exe, aC:\Users\Fred123\Documents\File.exerecord is added in local interface of the application for user Fred123. Accordingly, Kaspersky Endpoint Security ignores theFile.exetrusted program for other users. To apply the entry to all user accounts, you can use the*character (for example,C:\Users\*\Documents\File.exe).Whenever you add a new environment variable, you need to restart the application.
- In the trusted application properties window, configure the advanced settings.
- Click OK.
The new trusted application will be added to the list. You can exclude an application from the trusted zone at any time using the check box in the Status column.
- Save your changes.
List of trusted applications
Exporting and importing the trusted zone
A trusted zone is a system administrator-configured list of objects and applications that Kaspersky Endpoint Security does not monitor when active. The trusted zone consists of the following lists: scan exclusions and trusted applications. You can export these lists to XML files and other formats. Then you can modify the file to, for example, add a large number of exclusions of the same type. You can also use the export/import function to back up the list of exclusions and the list of trusted applications, or to migrate the lists to a different server.
The application uses the following formats for exporting and importing the list of exclusions:
- XML is available in Administration Console (MMC), Web Console, and Cloud Console.
- DAT is available only for import in the Administration Console (MMC). The purpose of this format is to maintain compatibility with older versions of the application. You can convert a DAT file to XML in the Administration Console (MMC) to migrate exclusion lists to Web Console.
- CSV is only available in the local interface of the application.
Kaspersky Endpoint Security uses the XML format for exporting and importing the list of trusted applications.
How to export and import the trusted zone in the Administration Console (MMC)
- Open the Kaspersky Security Center Administration Console.
- In the console tree, select Policies.
- Select the necessary policy and double-click to open the policy properties.
- In the policy window, select General settings → Exclusions and object types.
- In the Scan exclusions and trusted applications block, click the Settings button.
- To export the list of rules:
- Select the Scan exclusions tab.
This opens a window containing a list of exclusions.
- Select the exclusions that you want to export. To select multiple ports, use the CTRL or SHIFT keys.
If you did not select any exclusion, Kaspersky Endpoint Security will export all exclusions.
- Click the Export link.
- In the window that opens, specify the name of the XML file to which you want to export the list of exclusions, and select the folder in which you want to save this file.
- Save the file.
Kaspersky Endpoint Security exports the entire list of exclusions to the XML file. Kaspersky Endpoint Security also supports exporting the list of exclusions to a DAT file.
- Select the Scan exclusions tab.
- To export the list of trusted applications:
- Select the Trusted applications tab.
This opens a window containing a list of trusted applications.
- Select the trusted applications that you want to export. To select multiple ports, use the CTRL or SHIFT keys.
If you do not select any trusted application, Kaspersky Endpoint Security exports all trusted applications.
- Click the Export link.
- This opens a window; in that window, enter the name of the XML file to which you want to export the list of trusted applications, and select the folder in which you want to save this file.
- Save the file.
Kaspersky Endpoint Security exports the list of trusted applications to the XML file.
List of trusted applications
- Select the Trusted applications tab.
- To import the list of exclusions:
- Select the Scan exclusions tab.
This opens a window containing a list of exclusions.
- Click Import.
- In the window that opens, select the XML file from which you want to import the list of exclusions.
- Open the file.
If the computer already has a list of exclusions, Kaspersky Endpoint Security will prompt you to delete the existing list or add new entries to it from the XML file. Kaspersky Endpoint Security also supports importing a list of exclusions from a DAT file.
- Select the Scan exclusions tab.
- To import a list of trusted applications:
- Select the Trusted applications tab.
This opens a window containing a list of trusted applications.
- Click Import.
- This opens a window; in that window, select the XML file from which you want to import the list of trusted applications.
- Open the file.
If the computer already has a list of trusted applications, Kaspersky Endpoint Security will prompt you to delete the existing list or add new entries to it from the XML file.
- Select the Trusted applications tab.
- Save your changes.
How to export or import the trusted zone in Web Console and Cloud Console
- In the main window of the Web Console, select Assets (Devices) → Policies & profiles.
- Click the name of the Kaspersky Endpoint Security policy.
The policy properties window opens.
- Select the Application settings tab.
- Go to General settings → Exclusions and types of detected objects.
Settings of exclusions
- To export the list of rules:
- In the Scan exclusions and trusted applications block, click the Scan exclusions link.
- Select the exclusions that you want to export.
- Click Export.
- Confirm that you want to export only the selected exclusions, or export the entire list of exclusions.
- In the window that opens, specify the name of the XML file to which you want to export the list of exclusions, and select the folder in which you want to save this file.
- Save the file.
- Kaspersky Endpoint Security exports the entire list of exclusions to the XML file.
- To export the list of trusted applications:
- In the Scan exclusions and trusted applications block, click the Trusted applications link.
- Select the exclusions that you want to export.
- Click Export.
- Confirm that you want to export only the selected exclusions, or export the entire list of exclusions.
- In the window that opens, specify the name of the XML file to which you want to export the list of exclusions, and select the folder in which you want to save this file.
- Save the file.
Kaspersky Endpoint Security exports the entire list of exclusions to the XML file.
- To import the list of exclusions:
- Click Import.
- In the window that opens, select the XML file from which you want to import the list of exclusions.
- Open the file.
If the computer already has a list of exclusions, Kaspersky Endpoint Security will prompt you to delete the existing list or add new entries to it from the XML file.
- To import a list of trusted applications:
- In the Scan exclusions and trusted applications block, click the Trusted applications link.
- Click Import.
- This opens a window; in that window, select the XML file from which you want to import the list of trusted applications.
- Open the file.
If the computer already has a list of trusted applications, Kaspersky Endpoint Security will prompt you to delete the existing list or add new entries to it from the XML file.
- Save your changes.
How to export or import the trusted zone in the application interface
- In the main application window, click the button.
- In the application settings window, select General settings → Exclusions and types of detected objects.
Settings of exclusions
- To export the list of rules:
- In the Exclusions block, click the Manage exclusions link.
- Select the exclusions that you want to export.
- Click Export.
- Confirm that you want to export only the selected exclusions, or export the entire list of exclusions.
- In the window that opens, specify the name of the CSV file to which you want to export the list of exclusions, and select the folder in which you want to save this file.
- Save the file.
Kaspersky Endpoint Security exports the entire list of exclusions to the CSV file.
List of exclusions
- To export the list of trusted applications:
- In the Exclusions block, click the Specify trusted applications link.
- Select the trusted applications that you want to export.
- Click Export.
- Confirm that you want to export only the selected trusted applications, or export the entire list.
- This opens a window; in that window, enter the name of the XML file to which you want to export the list of trusted applications, and select the folder in which you want to save this file.
- Save the file.
Kaspersky Endpoint Security exports the entire list of trusted applications to the XML file.
List of trusted applications
- To import the list of exclusions:
- In the Exclusions block, click the Manage exclusions link.
- Click Import.
- In the window that opens, select the CSV file from which you want to import the list of exclusions.
- Open the file.
If the computer already has a list of exclusions, Kaspersky Endpoint Security will prompt you to delete the existing list or add new entries to it from the CSV file.
- To import a list of trusted applications:
- In the Exclusions block, click the Specify trusted applications link.
- Click Import.
- This opens a window; in that window, select the XML file from which you want to import the list of trusted applications.
- Open the file.
If the computer already has a list of trusted applications, Kaspersky Endpoint Security will prompt you to delete the existing list or add new entries to it from the XML file.
- Save your changes.
Using trusted system certificate storage
Use of system certificate storage lets you exclude applications signed by a trusted digital signature from virus scans. Kaspersky Endpoint Security automatically assigns such applications to the Trusted group.
To begin using trusted system certificate storage:
- In the main application window, click the button.
- In the application settings window, select General settings → Exclusions and types of detected objects.
- In the Trusted system certificate store drop-down list, select which system store must be considered as trusted by Kaspersky Endpoint Security.
- Save your changes.
Appendix. Predefined scan exclusions and trusted applications
Starting with Kaspersky Endpoint Security 12.6 for Windows, scan exclusions and trusted applications are added to the trusted zone. Predefined scan exclusions and trusted applications help quickly configure Kaspersky Endpoint Security on SQL servers, Microsoft Exchange servers, and System Center Configuration Manager. This means you do not need to manually set up a trusted zone for the application on servers. Starting with Kaspersky Endpoint Security 12.8 for Windows, you can install the application in Light Agent mode for protecting virtual environments. Predefined scan exclusions and trusted applications can help you quickly configure Kaspersky Endpoint Security in Citrix and VMware virtual environments.
You can select predefined exclusions and trusted applications in the following ways:
- Installing the application.
- Setting the policy.
- New policy wizard
- Policy properties: scan exclusions and trusted applications
SQL server
When installing Kaspersky Endpoint Security on an SQL server, you must create a trusted zone from predefined exclusions and trusted applications to make sure the operation of the server is not interfered with.
Predefined scan exclusions
Path |
SQL version |
|---|---|
|
2012 2014 2016 2017 2019 2022 |
|
2012 |
|
2012 |
|
2012 2014 2016 2017 2019 2022 |
|
2012 |
|
2012 |
|
2012 2014 2016 2017 2019 2022 |
|
2012 2014 2016 2017 2019 2022 |
Microsoft Exchange server
When installing Kaspersky Endpoint Security on a Microsoft Exchange server, you must create a trusted zone from predefined exclusions and trusted applications to make sure the operation of the server is not interfered with.
Predefined scan exclusions
Path |
Microsoft Exchange version |
|---|---|
|
2013 2016 2019 |
|
2013 2016 2019 |
|
2013 2016 2019 |
|
2013 2016 2019 |
|
2013 2016 2019 |
|
2013 2016 2019 |
|
2013 2016 2019 |
|
2013 2016 2019 |
|
2013 2016 2019 |
|
2013 2016 2019 |
|
2013 2016 2019 |
|
2013 2016 2019 |
Predefined trusted applications
Path |
Microsoft Exchange version |
|---|---|
|
2013 2016 2019 |
|
2013 2016 2019 |
System Center Configuration Manager
Predefined scan exclusions
Path |
System Center Configuration Manager version |
|---|---|
|
2012 2012 R2 |
Citrix
When installing Kaspersky Endpoint Security in a Citrix virtual environment, you must create a trusted zone from predefined exclusions and trusted applications to make sure the operation of the server is not interfered with.
Predefined scan exclusions
Path |
Citrix Solution |
|---|---|
|
Virtual Apps and Desktops |
|
Virtual Apps and Desktops |
|
Virtual Apps and Desktops |
|
Virtual Apps and Desktops |
|
Virtual Apps and Desktops |
|
Virtual Apps and Desktops |
|
Virtual Apps and Desktops |
|
Virtual Apps and Desktops |
|
Virtual Apps and Desktops |
|
Virtual Apps and Desktops |
|
Workspace app |
|
Workspace app |
|
Workspace app |
|
Workspace app |
|
Workspace app |
|
Provisioning |
|
Provisioning |
|
Provisioning |
|
Provisioning |
|
Provisioning |
|
Provisioning |
|
Provisioning |
|
Provisioning |
|
Provisioning |
|
Provisioning |
|
Provisioning |
|
StoreFront |
Predefined trusted applications
Path |
Citrix Solution |
|---|---|
|
Virtual Apps and Desktops |
|
Virtual Apps and Desktops |
|
Virtual Apps and Desktops |
|
Virtual Apps and Desktops |
|
Virtual Apps and Desktops |
|
Virtual Apps and Desktops |
|
Virtual Apps and Desktops |
|
Virtual Apps and Desktops |
|
Virtual Apps and Desktops |
|
Virtual Apps and Desktops |
|
Virtual Apps and Desktops |
|
Virtual Apps and Desktops |
|
Virtual Apps and Desktops |
|
Virtual Apps and Desktops |
|
Virtual Apps and Desktops |
|
Virtual Apps and Desktops |
|
Virtual Apps and Desktops |
|
Virtual Apps and Desktops |
|
Virtual Apps and Desktops |
|
Virtual Apps and Desktops |
|
Virtual Apps and Desktops |
|
Virtual Apps and Desktops |
|
Workspace app |
|
Workspace app |
|
Workspace app |
|
Workspace app |
|
Workspace app |
|
Workspace app |
|
Workspace app |
|
Workspace app |
|
Workspace app |
|
Workspace app |
|
Provisioning |
|
Provisioning |
|
Provisioning |
|
Provisioning |
|
Provisioning |
|
Provisioning |
|
Provisioning |
|
Provisioning |
|
Provisioning |
|
Provisioning |
|
Provisioning |
|
Provisioning |
|
Provisioning |
|
Provisioning |
|
Provisioning |
|
Provisioning |
|
Provisioning |
|
Provisioning |
|
Provisioning |
|
StoreFront |
|
StoreFront |
VMware
When installing Kaspersky Endpoint Security in a VMware virtual environment, you must create a trusted zone from predefined trusted applications to make sure the operation of the server is not interfered with.
Predefined trusted applications
Path |
VMware Solution |
|---|---|
|
Horizon |
|
Horizon |
|
Horizon |
|
Horizon |
|
Horizon |
|
Horizon |
|
Horizon |
|
Horizon |
|
Horizon |
|
Horizon |
|
Horizon |
|
Horizon |
|
Horizon |
|
Horizon |
|
Horizon |
|
Horizon |
|
Horizon |
|
Horizon |
|
Horizon |
|
Horizon |
|
Horizon |
|
Horizon |
|
Horizon |
|
Horizon |
|
Horizon |
|
Horizon |
|
Horizon |
|
Horizon |
|
Horizon |
|
Horizon |
|
Horizon |
|
Horizon |
|
Horizon |
|
Horizon |
|
Horizon |
|
Horizon |
|
Horizon |
|
Horizon |
|
Horizon |
|
Horizon |
Managing Backup
Backup stores backup copies of files that were deleted or modified during disinfection. A backup copy is a file copy created before the file was disinfected or deleted. Backup copies of files are stored in a special format and do not pose a threat.
Backup copies of files are stored in the folder C:\ProgramData\Kaspersky Lab\KES.21.20\QB.
Users in the Administrators group are granted full permission to access this folder. Limited access rights to this folder are granted to the user whose account was used to install Kaspersky Endpoint Security.
Kaspersky Endpoint Security does not provide the capability to configure user access permissions to backup copies of files.
Sometimes it is not possible to maintain the integrity of files during disinfection. If you partially or completely lose access to important information in a disinfected file after disinfection, you can attempt to restore the file from its backup copy to its original folder.
If Kaspersky Endpoint Security is running under the management of Kaspersky Security Center, backup copies of files may be transmitted to the Kaspersky Security Center Administration Server. For more details about managing backup copies of files in Kaspersky Security Center, please refer to the Kaspersky Security Center Help system.
Configuring the maximum storage period for files in Backup
The default maximum storage period for copies of files in Backup is 30 days. After expiration of the maximum storage term, Kaspersky Endpoint Security deletes the oldest files from Backup.
To configure the maximum storage period for files in Backup:
- In the main application window, click the button.
- In the application settings window, select General settings → Reports and Storage.

Backup settings
- If you want to limit the storage period for copies of files in Backup, select the Store objects no longer than N days check box in the Backup block. Enter the maximum storage duration for copies of files in Backup.
- Save your changes.
Configuring the maximum size of Backup
You can specify the maximum size of Backup. The size of Backup is unlimited by default. After the maximum size is reached, Kaspersky Endpoint Security automatically deletes the oldest files from Backup.
To configure the maximum size of Backup:
- In the main application window, click the button.
- In the application settings window, select General settings → Reports and Storage.
Backup settings
- In the Backup block, select the Limit the size of Backup to N MB check box. If the check box is selected, the maximum storage size is limited to the defined value. By default, the maximum size is 1024 MB. To avoid exceeding the maximum storage size, Kaspersky Endpoint Security automatically deletes the oldest files from storage when the maximum storage size is reached.
- Save your changes.
Restoring files from Backup
If malicious code is detected in a file, Kaspersky Endpoint Security blocks the file, assigns the Infected status to it, places a copy of it in Backup, and attempts to disinfect it. If file disinfection succeeds, the status of the backup copy of the file changes to Disinfected. The file becomes available in its original folder. If a file cannot be disinfected, Kaspersky Endpoint Security deletes it from its original folder. You can restore the file from its backup copy to its original folder.
Files with the Will be deleted on computer restart status cannot be restored. Restart the computer, and the file status will change to Disinfected or Deleted. You can also restore the file from its backup copy to its original folder.
Upon detecting malicious code in a file that is part of the Windows Store application, Kaspersky Endpoint Security immediately deletes the file without moving a copy of the file to Backup. You can restore the integrity of the Windows Store application by using the appropriate tools of the Microsoft Windows 8 operating system (see the Microsoft Windows 8 help files for details on restoring a Windows Store application).
The set of backup copies of files is presented as a table. For a backup copy of a file, the path to the original folder of the file is displayed. The path to the original folder of the file may contain personal data.
If several files with identical names and different content located in the same folder are moved to Backup, only the file that was last placed in Backup can be restored.
To restore files from Backup:
- In the main application window, in the Monitoring section, click the Backup tile.
- This opens the list of files in Backup; in that list, select the files that you want to restore and click Restore.
Kaspersky Endpoint Security restores files from the selected backup copies to their original folders.
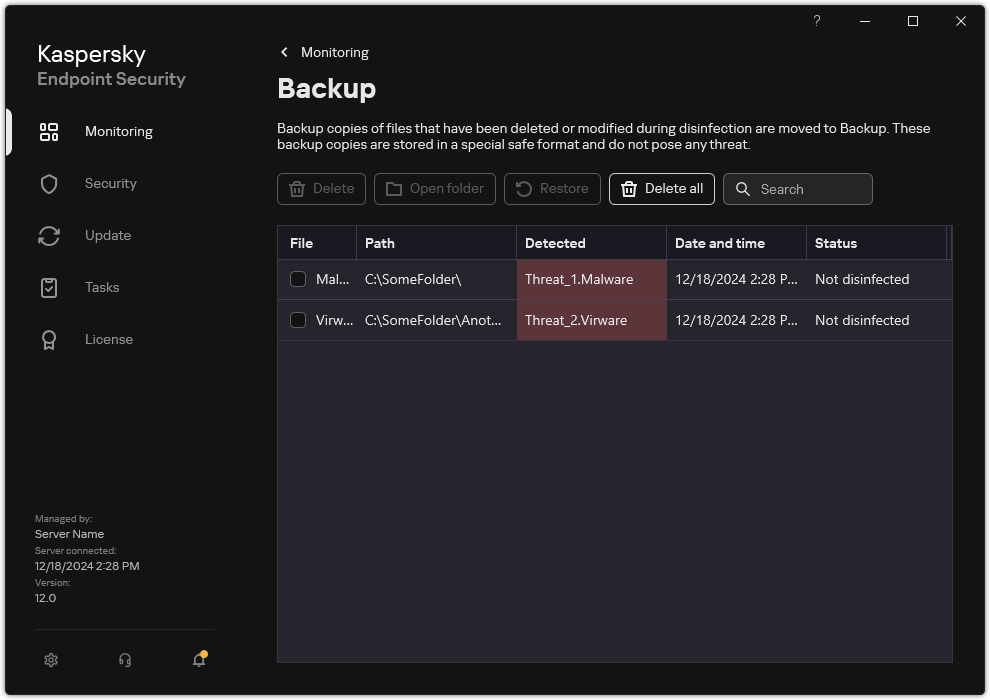
Backup
Page top
Deleting backup copies of files from Backup
Kaspersky Endpoint Security automatically deletes backup copies of files with any status from Backup after the storage term configured in application settings has elapsed. You can also manually delete any copy of a file from Backup.
To delete backup copies of files from Backup:
- In the main application window, in the Monitoring section, click the Backup tile.
- This opens the list of files in Backup; in this list, select files that you want to delete from Backup and click Delete.
Kaspersky Endpoint Security deletes the selected backup copies of files from Backup.
Backup
Page top
Notification service
All sorts of events occur during the operation of Kaspersky Endpoint Security. Notifications of these events can be either be purely informational or contain critical information. For example, notifications may inform of a successful database and application modules update or log component errors that need remedying.
Kaspersky Endpoint Security supports the logging of information about events in the operation of the Microsoft Windows application log and / or the Kaspersky Endpoint Security event log.
Kaspersky Endpoint Security delivers notifications in the following ways:
- using pop-up notifications in the Microsoft Windows taskbar notification area;
- by email.
You can configure the delivery of event notifications. The method of notification delivery is configured for each type of event.
When using the table of events to configure the notification service, you can perform the following actions:
- Filter notification service events by column values or by custom filter conditions.
- Use the search function for notification service events.
- Sort notification service events.
- Change the order and set of columns that are displayed in the list of notification service events.
Configuring event log settings
To configure event log settings:
- In the main application window, click the button.
- In the application settings window, select General settings → Interface.
- In the Notifications block, click the Configure notifications button.
Kaspersky Endpoint Security components and tasks are shown in the left part of the window. The right part of the window lists the events generated for the selected component or task.
Events may contain the following user data:
- Paths to files scanned by Kaspersky Endpoint Security.
- Paths to registry keys modified during the operation of Kaspersky Endpoint Security.
- Microsoft Windows user name.
- Addresses of web pages opened by the user.
- In the left part of the window, select the component or task for which you want to configure the event log settings.
- Select check boxes opposite the relevant events in the Save in local report and Save in Windows Event Log columns.
Events whose check boxes are selected in the Save in local report column are displayed in the application logs. Events that have the check box in the Save in Windows Event Log column selected are displayed in Windows logs in the
Applicationchannel. - Save your changes.
Configuring the display and delivery of notifications
To configure the display and delivery of notifications:
- In the main application window, click the button.
- In the application settings window, select General settings → Interface.
- In the Notifications block, click the Configure notifications button.
Kaspersky Endpoint Security components and tasks are shown in the left part of the window. The right part of the window lists the events generated for the selected component or task.
Events may contain the following user data:
- Paths to files scanned by Kaspersky Endpoint Security.
- Paths to registry keys modified during the operation of Kaspersky Endpoint Security.
- Microsoft Windows user name.
- Addresses of web pages opened by the user.
- In the left part of the window, select the component or task for which you want to configure the delivery of notifications.
- In the Notify on screen column, select check boxes next to relevant events.
Information about the selected events is displayed on the screen as pop-up messages in the Microsoft Windows taskbar notification area.
- In the Notify by email column, select check boxes next to relevant events.
Information about the selected events is delivered by email if the mail notification delivery settings are configured.
- Click OK.
- If you enabled email notifications, configure the settings for email delivery:
- Click Configure email notifications.
- Select the Notify about events check box to enable delivery of information about Kaspersky Endpoint Security events selected in the Notify by email column.
- Specify the email notification delivery settings.
- Click OK.
- Save your changes.
Configuring the display of warnings about the application status in the notification area
To configure the display of application status warnings in the notification area:
- In the main application window, click the button.
- In the application settings window, select General settings → Interface.
- In the Show application's status in notifications area block, select the check boxes opposite those categories of events about which you want to see notifications in the notification area of Microsoft Windows.
- Save your changes.
When events associated with the selected categories occur, the application icon in the notification area will change to ![]() or
or ![]() depending on the severity of the warning.
depending on the severity of the warning.
Messaging between users and the administrator
The Application Control, Device Control, Web Control and Adaptive Anomaly Control components enable LAN users whose computers have Kaspersky Endpoint Security installed to send messages to the administrator.
A user may need to send a message to the local corporate network administrator in the following cases:
- Device Control blocked access to the device.
The message template for a request to access a blocked device is available in the Kaspersky Endpoint Security interface in the Device Control section.
- Application Control blocked the startup of an application.
The message template for a request to allow the startup of a blocked application is available in the Kaspersky Endpoint Security interface in the Application Control section.
- Web Control blocked access to a web resource.
The message template for a request to access a blocked web resource is available in the Kaspersky Endpoint Security interface in the Web Control section.
The method used to send messages and the utilized template depends on whether or not there is an active Kaspersky Security Center policy running on the computer that has Kaspersky Endpoint Security installed, and whether or not there is a connection with the Kaspersky Security Center Administration Server. The following scenarios are possible:
- If a Kaspersky Security Center policy is not running on the computer that has Kaspersky Endpoint Security installed, a user's message is sent to the local area network administrator by email.
The message fields are populated with the values of fields from the template defined in the local interface of Kaspersky Endpoint Security.
- If a Kaspersky Security Center policy is running on the computer that has Kaspersky Endpoint Security installed, the standard message is sent to the Kaspersky Security Center Administration Server.
In this case, user messages are available for viewing in the Kaspersky Security Center event storage (see instruction below). The message fields are populated with the values of fields from the template defined in the Kaspersky Security Center policy.
- If a Kaspersky Security Center out-of-office policy is running on the computer with Kaspersky Endpoint Security installed, the method used to send messages depends on whether or not there is a connection with Kaspersky Security Center.
- If a connection with Kaspersky Security Center is established, Kaspersky Endpoint Security sends the standard message to the Kaspersky Security Center Administration Server.
- If a connection with Kaspersky Security Center is absent, a user's message is sent to the local area network administrator by email.
In both cases, the message fields are populated with the values of fields from the template defined in the Kaspersky Security Center policy.
To view a user message in the Kaspersky Security Center event storage:
- Open the Kaspersky Security Center Administration Console.
- In the Administration Server node of the Administration Console tree, select the Events tab.
The Kaspersky Security Center workspace displays all events occurring during the operation of Kaspersky Endpoint Security, including messages to the administrator that are received from LAN users.
- To configure the event filter, in the Event selections drop-down list, select User requests.
- Select the message sent to the administrator.
- Click the Open event properties window button in the right part of the Administration Console workspace.
Managing reports
Information about the operation of each Kaspersky Endpoint Security component, data encryption events, the performance of each scan task, the update task and integrity check task, and the overall operation of the application is recorded in reports.
Reports are stored in the folder C:\ProgramData\Kaspersky Lab\KES.21.20\Report.
Reports may contain the following user data:
- Paths to files scanned by Kaspersky Endpoint Security.
- Paths to registry keys modified during the operation of Kaspersky Endpoint Security.
- Microsoft Windows user name.
- Addresses of web pages opened by the user.
The data in the report is presented in tabular form. Each table row contains information on a separate event. Event attributes are located in the table columns. Certain columns are compound ones which contain nested columns with additional attributes. To view additional attributes, click the ![]() button next to the name of the column. Events that are logged during the operation of various components or during the performance of various tasks have different sets of attributes.
button next to the name of the column. Events that are logged during the operation of various components or during the performance of various tasks have different sets of attributes.
The following reports are available:
- System audit report. Contains information about events occurring during the interaction between the user and the application and in the course of application operation in general, which are unrelated to any particular Kaspersky Endpoint Security components or tasks.
- Reports on the operation of Kaspersky Endpoint Security components.
- Kaspersky Endpoint Security task reports.
- Data Encryption report. Contains information about events occurring during data encryption and decryption.
Reports use the following event importance levels:
![]() Informational messages. Reference events that normally do not contain important information.
Informational messages. Reference events that normally do not contain important information.
![]() Warnings. Events that need attention because they reflect important situations in the operation of Kaspersky Endpoint Security.
Warnings. Events that need attention because they reflect important situations in the operation of Kaspersky Endpoint Security.
![]() Critical events. Events of critical importance that indicate problems in the operation of Kaspersky Endpoint Security or vulnerabilities in the protection of the user's computer.
Critical events. Events of critical importance that indicate problems in the operation of Kaspersky Endpoint Security or vulnerabilities in the protection of the user's computer.
For convenient processing of reports, you can modify the presentation of data on the screen in the following ways:
- Filter the event list by various criteria.
- Use the search function to find a specific event.
- View the selected event in a separate section.
- Sort the list of events by each report column.
- Display and hide events grouped by the event filter using the
 button.
 - Change the order and arrangement of columns that are shown in the report.
You can save a generated report to a text file, if necessary. You can also delete report information on Kaspersky Endpoint Security components and tasks that are combined into groups.
If Kaspersky Endpoint Security is running under the management of Kaspersky Security Center, information about events may be relayed to the Kaspersky Security Center Administration Server (for more details, please refer to the Kaspersky Security Center Help).
Viewing reports
If a user can view reports, the user can also view all events reflected in the reports.
To view reports:
- In the main application window, in the Monitoring section, click the Reports tile.
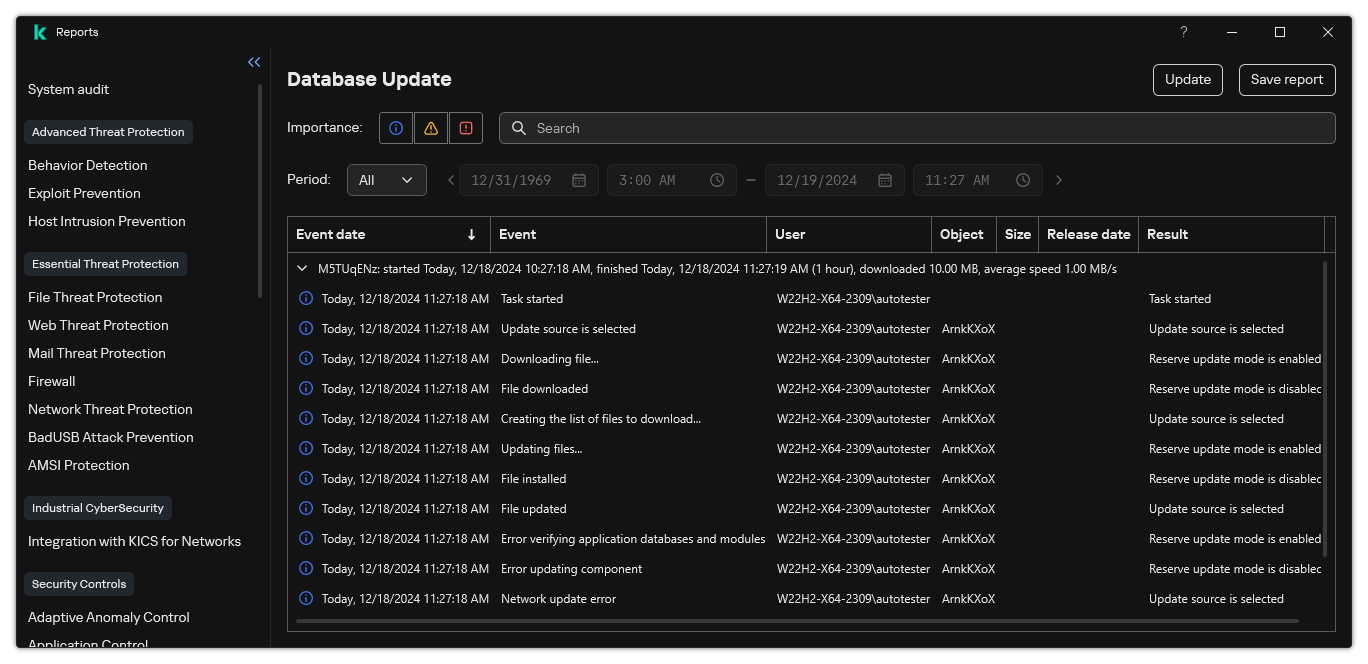
Reports
- In the list of components and tasks, select a component or task.
The right part of the window displays a report containing a list of events resulting from the operation of the selected component or selected task of Kaspersky Endpoint Security. You can sort events in the report based on the values in cells of one of the columns.
- To view detailed information about an event, select the event in the report.
A block with the event summary is displayed in the lower part of the window.
Page top
Configuring the maximum report storage term
The default maximum storage term for reports on events that are logged by Kaspersky Endpoint Security is 30 days. After that period of time, Kaspersky Endpoint Security automatically deletes the oldest entries from the report file.
To modify the report maximum storage term:
- In the main application window, click the button.
- In the application settings window, select General settings → Reports and Storage.
Report settings
- If you want to limit the report storage term, select the Store reports no longer than N days check box in the Reports block. Define the maximum report storage term.
- Save your changes.
Configuring the maximum size of the report file
You can specify the maximum size of the file that contains the report. By default, the maximum report file size is 1024 MB. To avoid exceeding the maximum report file size, Kaspersky Endpoint Security automatically deletes the oldest entries from the report file when the maximum report file size is reached.
To configure the maximum report file size:
- In the main application window, click the button.
- In the application settings window, select General settings → Reports and Storage.
Report settings
- In the Reports block, select the Limit the size of report file to N MB check box if you want to limit the size of a report file. Define the maximum size of the report file.
- Save your changes.
Saving a report to file
The user is personally responsible for ensuring the security of information from a report saved to file, and particularly for controlling and restricting access to this information.
You can save the report that you generate to a file in text format (TXT) or a CSV file.
Kaspersky Endpoint Security logs events in the report in the same way as they are displayed on the screen: in other words, with the same set and sequence of event attributes.
To save a report to file:
- In the main application window, in the Monitoring section, click the Reports tile.
Reports
- This opens a window; in this window, select the component or task.
A report is displayed in the right part of the window, which contains a list of events in the operation of the selected Kaspersky Endpoint Security component or task.
- If necessary, you can modify data presentation in the report by:
- Filtering events
- Running an event search
- Rearranging columns
- Sorting events
- Click the Save report button in the upper right part of the window.
- In the window that opens, specify the destination folder for the report file.
- Enter the name of the report file.
- Select the necessary report file format: TXT or CSV.
- Save your changes.
Clearing reports
To remove information from reports:
- In the main application window, click the button.
- In the application settings window, select General settings → Reports and Storage.
Report settings
- In the Reports block, click the Clear button.
- If Password Protection is enabled, Kaspersky Endpoint Security may prompt you for user account credentials. The application prompts for account credentials if the user does not have the required permission.
Kaspersky Endpoint Security will delete all reports for all application components and tasks.
Page top
Kaspersky Endpoint Security Self-Defense
Self-Defense prevents other applications from performing actions that can interfere with the operation of Kaspersky Endpoint Security and, for example, remove Kaspersky Endpoint Security from the computer. The set of available Self-Defense technologies for Kaspersky Endpoint Security depends on whether the operating system is 32-bit or 64-bit (refer to the table below). Self-Defense also includes Password protection and Administration Server connection protection.
Password protection lets you restrict users' access to Kaspersky Endpoint Security according to the permissions granted to them (for example, permission to exit the application).
Administration Server connection protection prevents unauthorized reconnection of the computer to an untrusted server.
Kaspersky Endpoint Security Self-Defense technologies
Technology |
Description |
x86 computer |
x64 computer |
|---|---|---|---|
Self-Defense mechanism |
The technology blocks access to the following application components:
|
|
|
AM-PPL (Antimalware Protected Process Light) |
The technology protects Kaspersky Endpoint Security processes against malicious actions. For more details about AM-PPL technology, please visit the Microsoft website. AM-PPL technology is available for Windows 10 version 1703 (RS2) or later, and Windows Server 2019 operating systems. |
|
|
External management defense mechanism |
This technology prevents other applications (for example, TeamViewer or RemotelyAnywhere) from gaining access to Kaspersky Endpoint Security. |
|
– (except for Windows 7) |
Enabling and disabling Self-Defense
Kaspersky Endpoint Security prevents alteration or deletion of application files on the hard drive, memory processes, and entries in the system registry.
The technology blocks access to the following application components:
- files in the Kaspersky Endpoint Security installation folder and other files of the application;
- registry keys with records belonging to the application;
- processes that the application runs.
The Self-Defense mechanism of Kaspersky Endpoint Security is enabled by default.
How to enable or disable Self-Defense in the Administration Console (MMC)
How to enable or disable Self-Defense in the Web Console and Cloud Console
- In the main window of the Web Console, select Assets (Devices) → Policies & profiles.
- Click the name of the Kaspersky Endpoint Security policy.
The policy properties window opens.
- Select the Application settings tab.
- Go to General settings → Application Settings.
Kaspersky Endpoint Security for Windows settings
- Use the Enable Self-Defense check box to enable or disable the Self-Defense mechanism.
- Save your changes.
How to enable or disable Self-Defense in the application interface
- In the main application window, click the button.
- In the application settings window, select General settings → Application settings.
Kaspersky Endpoint Security for Windows settings
- Use the Enable Self-Defense check box to enable or disable the Self-Defense mechanism.
- Save your changes.
Enabling and disabling AM-PPL support
Kaspersky Endpoint Security supports Antimalware Protected Process Light technology (hereinafter referred to as "AM-PPL") from Microsoft. AM-PPL protects Kaspersky Endpoint Security processes against malicious actions (for example, terminating the application). AM-PPL allows only trusted processes to run. Kaspersky Endpoint Security processes are signed in accordance with Windows security requirements, and therefore they are trusted. For more details about AM-PPL technology, please visit the Microsoft website. AM-PPL technology is enabled by default.
Kaspersky Endpoint Security also has built-in mechanisms for protecting application processes. AM-PPL support lets you delegate process security functions to the operating system. You can thereby increase the speed of the application and reduce the consumption of computer resources.
AM-PPL technology is available for Windows 10 version 1703 (RS2) or later, and Windows Server 2019 operating systems.
To enable or disable AM-PPL technology:
- Turn off the application's Self-Defense mechanism.
The Self-Defense mechanism prevents modification and deletion of application processes in the computer memory, including changing the AM-PPL status.
- Run the command line interpreter (cmd.exe) as an administrator.
- Go to the folder where the Kaspersky Endpoint Security executable file is located.
You can add path to the executable file to the %PATH% system variable during application installation.
- Type the following in the command line:
klpsm.exe enable– enable support for AM-PPL technology (see the figure below).klpsm.exe disable– disable support for AM-PPL technology.
- Restart Kaspersky Endpoint Security.
- Resume the application's Self-Defense mechanism.
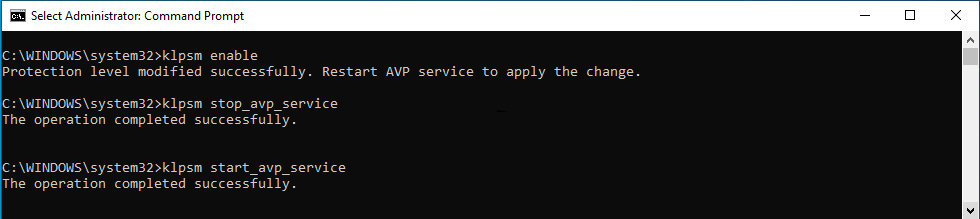
Enabling support for AM-PPL technology
Protection of application services against external management
Protection of application services against external management blocks attempts by users and other applications to stop Kaspersky Endpoint Security services. Protection ensures the operation of the following services:
- Kaspersky Endpoint Security service (AVP.KES.21.20)
- Kaspersky Seamless Update Service (AVPSUS.KES.21.20)
To quit the application from the command line, disable the protection of Kaspersky Endpoint Security services against external management.
You can allow external management of application services only on computers that do not support the AM-PPL technology or on computers that have the technology disabled.
- In the main window of the Web Console, select Assets (Devices) → Policies & profiles.
- Click the name of the Kaspersky Endpoint Security policy.
The policy properties window opens.
- Select the Application settings tab.
- Go to General settings → Application Settings.
Kaspersky Endpoint Security for Windows settings
- Use the Block external management of application services check box to enable or disable the protection of Kaspersky Endpoint Security services against external management.
- Save your changes.
- In the main application window, click the button.
- In the application settings window, select General settings → Application settings.
Kaspersky Endpoint Security for Windows settings
- Use the Block external management of application services check box to enable or disable the protection of Kaspersky Endpoint Security services against external management.
- Save your changes.
As a result, when a user attempts to stop application services, a system window with an error message appears. The user can only manage application services from the Kaspersky Endpoint Security interface.
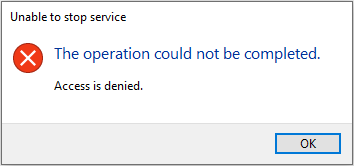
Application services access error
Page top
Supporting remote administration applications
You may occasionally need to use a remote administration application while external management defense is enabled.
To enable the operation of remote administration applications:
- In the main application window, click the button.
- In the application settings window, select General settings → Exclusions and types of detected objects.
- In the Exclusions block, click the Specify trusted applications link.
- In the window that opens, click the Add button.
- Select the executable file of the remote administration application.
You can also enter the path manually. Kaspersky Endpoint Security supports environment variables and the
*and?characters when entering a mask. - Select the Allow interaction with the Kaspersky Endpoint Security interface check box.
- Save your changes.
Password protection
Multiple users with different levels of computer literacy can share a computer. If users have unrestricted access to Kaspersky Endpoint Security and its settings, the overall level of computer protection may be reduced. Password protection lets you restrict users' access to Kaspersky Endpoint Security according to the permissions granted to them (for example, permission to exit the application).
If the user that started the Windows session (session user) has the permission to perform the action, Kaspersky Endpoint Security does not request the user name and password or a temporary password. The user receives access to Kaspersky Endpoint Security in accordance with the granted permissions.
If a session user does not have the permission to perform an action, the user can obtain access to the application in the following ways:
- Enter a user name and password.
This method is suitable for day-to-day operations. To perform a password-protected action, you must enter the domain account credentials of the user with the required permission. In this case, the computer must be in that domain. If the computer is not in the domain, you can use the KLAdmin account or an account added manually.
- Enter a temporary password.
This method is suitable for granting temporary permissions to perform blocked actions (for example, exiting the application) to users outside the corporate network. When a temporary password expires or a session ends, Kaspersky Endpoint Security reverts its settings to their previous state.
When a user attempts to perform a password-protected action, Kaspersky Endpoint Security prompts the user for the user name and password or temporary password (see the figure below).
In the password entry window, you can switch languages only by pressing ALT+SHIFT. Using other shortcuts, even if they are configured in the operating system, do not work for switching languages.
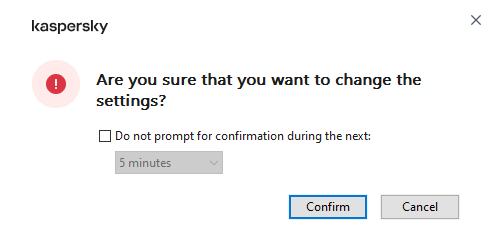
Kaspersky Endpoint Security access password prompt
User name and password
To access Kaspersky Endpoint Security, you should enter account credentials. Password protection supports the following accounts:
- KLAdmin. An Administrator account with unrestricted access to Kaspersky Endpoint Security. The KLAdmin account has the right to perform any action that is password-protected. The permissions for the KLAdmin account cannot be revoked. When you enable password protection, Kaspersky Endpoint Security prompts you to set a password for the KLAdmin account.
- Account added manually. An account outside the Active Directory domain. You can use this service account instead of KLAdmin if you do not want to share the administrator password. You can set any user name and password and configure individual permissions.
- The Everyone group. A built-in Windows group that includes all users within the corporate network. Users in the Everyone group can access the application according to the permissions that are granted to them.
- Individual users or groups. User accounts for which you can configure individual permissions. For example, if an action is blocked for the Everyone group, you can allow this action for an individual user or a group.
- Session user. Account of the user who started the Windows session. You can switch to another session user when prompted for a password (the Save password for current session check box). In this case, Kaspersky Endpoint Security regards the user whose account credentials were entered as the session user instead of the user who started the Windows session.
Temporary password
A temporary password can be used to grant temporary access to Kaspersky Endpoint Security for an individual computer outside of the corporate network. The Administrator generates a temporary password for an individual computer in the computer properties in Kaspersky Security Center. The Administrator selects the actions that will be protected with the temporary password, and specifies the temporary password's validity period.
Password protection operating algorithm
Kaspersky Endpoint Security decides whether to allow or block a password-protected action based on the following algorithm (see the figure below).
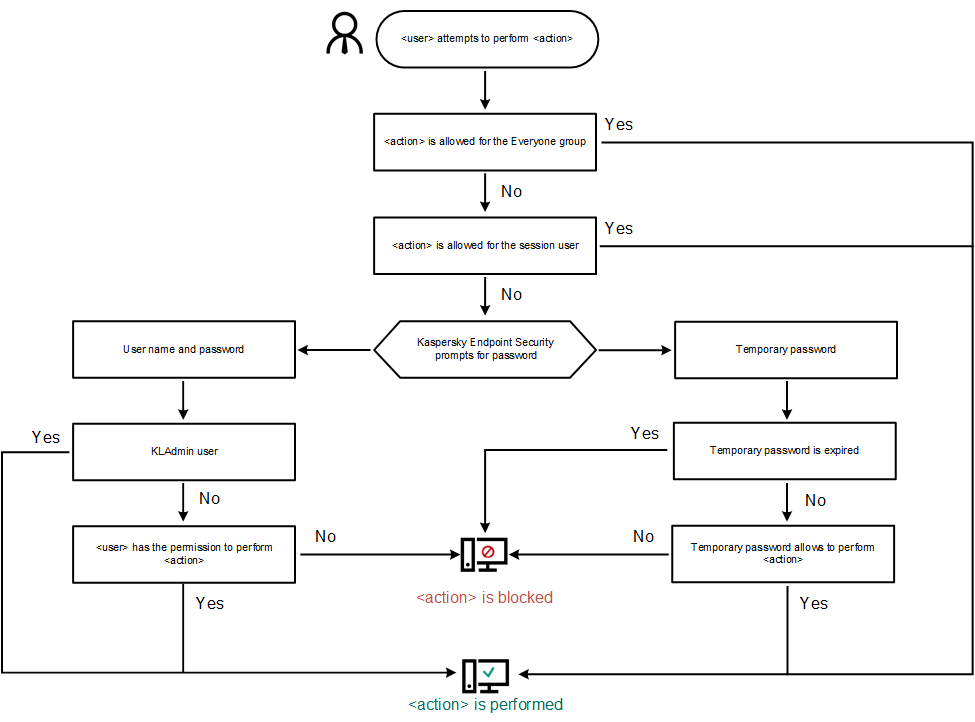
Password protection operating algorithm
Enabling Password protection
Password protection lets you restrict users' access to Kaspersky Endpoint Security according to the permissions granted to them (for example, permission to exit the application).
How to enable Password protection in the Administration Console (MMC)
How to enable Password protection in Web Console and Cloud Console
How to enable Password protection in the application interface
- In the main application window, click the button.
- In the application settings window, select General settings → Interface.
- Use the Password protection toggle to enable or disable the component.
- Specify the password for the KLAdmin account and confirm it.
The KLAdmin account has the right to perform any action that is password-protected.
If a computer is running under a policy, the Administrator can reset the password for the KLAdmin account in the policy properties. If the computer is not connected to Kaspersky Security Center and you have forgotten the password for the KLAdmin account, it is not possible to recover the password.
- Set permissions for all users within the corporate network:
- In the account table, click Edit to open the list of permissions for the Everyone group.
The Everyone group is a built-in Windows group that includes all users within the corporate network.
- Select the check boxes next to the actions that users will be allowed to perform without entering the password.
If a check box is cleared, the users are blocked from performing the action. For example, if the check box next to the Exit the application permission is cleared, you can exit the application only if you are logged in as KLAdmin, or as an individual user who has the required permission, or if you enter a temporary password.
Password protection permissions have some important aspects to consider. Make sure that all conditions for accessing Kaspersky Endpoint Security are fulfilled.
- In the account table, click Edit to open the list of permissions for the Everyone group.
- Save your changes.
When password protection is enabled, the application will restrict users' access to Kaspersky Endpoint Security according to the permissions granted to the Everyone group. You can perform the actions that are blocked for the Everyone group only if you use the KLAdmin account, another account that is granted the required permissions, or if you enter a temporary password.
You can disable Password protection only if you are logged in as KLAdmin. It is not possible to disable password protection if you are using any other user account or a temporary password.
During the password check, you can select the Save password for current session check box. In this case, Kaspersky Endpoint Security will not prompt for a password when a user attempts to perform another password-protected action for the duration of the session.
Page top
Granting permissions to individual users or groups
Password protection allows granting Kaspersky Endpoint Security access to individual Active Directory user accounts and manually added user accounts.
Active Directory user accounts
You can grant Kaspersky Endpoint Security access to individual users or groups within the Active Directory domain. For example, if exiting the application is blocked for the Everyone group, you can grant the Exit the application permission to an individual user. As a result, you can exit the application only if you are logged in as that user or as KLAdmin.
You can use account credentials to access the application only if the computer is in the domain. If the computer is not in the domain, you can use the KLAdmin account or a temporary password.
Manually added user accounts
You can create a user account that is not present in Active Directory and assign individual permissions to that user account. That is, you can create a service user account and use it instead of KLAdmin. This way, you do not need to share your KLAdmin password with other users or create new Active Directory user accounts. You can specify any user name and password. For example, you can grant the View reports permission to the service user account. As a result, if viewing reports is prohibited to the 'All' group, you can open the reports using the service user account or the KLAdmin user account.
Granting permissions to individual users or groups
How to grant permissions to individual users or groups in the Administration Console (MMC)
How to grant permissions to individual users or groups in Web Console and Cloud Console
How to grant permissions to individual users or groups in the user interface of the application
- In the main application window, click the button.
- In the application settings window, select General settings → Interface.
- In the account table, click Add.
- Select the type of the user account that you want to add:
- Select from the list for Active Directory user accounts.
To select a user account, click Select user or group. Select a user or a group in Active Directory and confirm your selection.
- Custom user name and password for a manually added service user account.
To add a service user account, enter a user name and a password (for example, SecureAdmin).
You can reset a service user account password in the policy settings. The service user account password must be reset in the same way as the KLAdmin password. If editing Password protection settings is allowed (the "lock" is open) or no policy is applied on the computer, you can reset the password of the service user account in the application interface. To do so, confirm the changes of the service user account information using the KLAdmin password.
- Select from the list for Active Directory user accounts.
- In the Permissions list, select the check boxes next to the actions that the selected user or group will be allowed to perform without being prompted for a password.
If a check box is cleared, the users are blocked from performing the action. For example, if the check box next to the Exit the application permission is cleared, you can exit the application only if you are logged in as KLAdmin, or as an individual user who has the required permission, or if you enter a temporary password.
Password protection permissions have some important aspects to consider. Make sure that all conditions for accessing Kaspersky Endpoint Security are fulfilled.
- Save your changes.
As a result, if access to the application is restricted for the Everyone group, users will be granted permissions to access Kaspersky Endpoint Security according to the users' individual permissions.
Page top
Using a temporary password to grant permissions
A temporary password can be used to grant temporary access to Kaspersky Endpoint Security for an individual computer outside of the corporate network. This is necessary to allow the user to perform a blocked action without obtaining the KLAdmin account credentials. To use a temporary password, the computer must be added to Kaspersky Security Center.
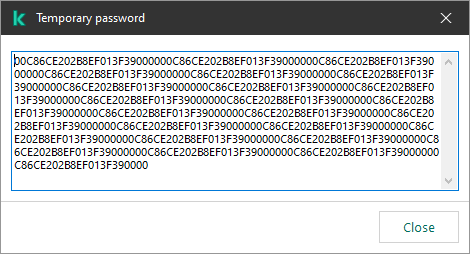
Temporary password
Page top
Special aspects of Password protection permissions
Password protection permissions have some important aspects and limitations to consider.
Configure application settings
If a user's computer is running under a policy, make sure that all the required settings in the policy are available for editing (the ![]() attributes are open).
attributes are open).
Exit the application
There are no special considerations or limitations.
Disable protection components
- It is not possible to grant the permission to disable protection components for the Everyone group. To allow users other than KLAdmin to disable control components, add a user or group that has the Disable protection components permission in the Password Protection settings.
- If a user's computer is running under a policy, make sure that all the required settings in the policy are available for editing (the attributes are open).
- To disable protection components in the application settings, a user must have the Configure application settings permission.
- To disable protection components from the context menu (by using the Pause protection menu item), a user must have the Disable protection components permission in addition to the Disable control components permission.
Disable control components
- It is not possible to grant the permission to disable control components for the Everyone group. To allow users other than KLAdmin to disable control components, add a user or group that has the Disable control components permission in the Password Protection settings.
- If a user's computer is running under a policy, make sure that all the required settings in the policy are available for editing (the attributes are open).
- To disable control components in the application settings, a user must have the Configure application settings permission.
- To disable control components from the context menu (by using the Pause protection menu item), a user must have the Disable control components permission in addition to the Disable protection components permission.
Disable Kaspersky Security Center policy
You cannot grant the "Everyone" group the permission to disable the Kaspersky Security Center policy. To allow users other than KLAdmin to disable the policy, add a user or group that has the Disable Kaspersky Security Center policy permission in the Password Protection settings.
Remove key
There are no special considerations or limitations.
Remove / modify / restore the application
If you have allowed removing, modifying, and restoring the application for the "All" group, Kaspersky Endpoint Security does not request a password when the user attempts to carry out these operations. Therefore, any user including users from outside the domain, can install, modify, or restore the application.
Restore access to data on encrypted drive
You can restore access to data on encrypted drives only if you are logged in as KLAdmin. Permission to perform this action cannot be granted to any other user.
View reports
There are no special considerations or limitations.
Restore from Backup
There are no special considerations or limitations.
Page top
Resetting the KLAdmin password
If you forgot your KLAdmin account password, you can reset the password in policy properties. You cannot reset the password in the application interface.
You can perform password-protected actions using a temporary password. In this case, you do not need to enter KLAdmin credentials.
If the computer is not connected to Kaspersky Security Center and you have forgotten the password for the KLAdmin account, it is not possible to recover the password.
How to reset the KLAdmin account password using the Administration Console (MMC)
How to reset the KLAdmin account password in Web Console and Cloud Console
As a result, the password of your KLAdmin account is updated after the policy is applied.
Page top
Administration Server connection protection
Connecting the computer to the Administration Server is achieved using the Network Agent component of Kaspersky Security Center. If an intruder has sufficient rights to modify server connection settings, a risk exists of connecting the computer to an untrusted server. This would allow the intruder to apply their own group policies and, for example, disable self-defense of the application. Kaspersky Endpoint Security can prevent unauthorized reconnection of a computer to a different server. To protect the server connection, the application suggests setting a password and using the Password-Based Key Derivation Function (PBKDF2). As a result, access to the application without a password is impossible.
To ensure comprehensive protection of Kaspersky Endpoint Security and Network Agent from unauthorized access, we recommend enabling additional protection. For Kaspersky Endpoint Security, we recommend enabling Password protection. To protect Network Agent, we recommend setting an uninstall password. For details about protecting Network Agent from removal, please refer to the Kaspersky Security Center Help.
Managing the connection of the computer to the Administration Server is achieved using the Administration Server connection protection task. The task lets you perform the following actions:
- Set a password to protect the server connection.
- Change the password.
- Reconnect the computer to a different server.
- Disable the server connection protection.
Authentication of the computer when connecting to the Administration Server
After setting a password, the application creates a data array using PBKDF2 transformation of the password. The application then encrypts this data array using the Network Agent key. The application uses the encrypted data array to check rights and privileges of the Administration Server for subsequent connections.
Subsequently, whenever an attempt is made to reconnect the computer to the Administration Server, the application decrypts the data array with the Network Agent key and compares it with the local copy. If they do not match, access to the application is restricted.
Administration Server connection protection
How to set a password for server connection protection in Administration Console (MMC)
How to set a password for server connection protection in Web Console and Cloud Console
Reconnecting the computer to a different Administration Server
Reconnecting the computer to a different Administration Server involves the following steps:
- In the console of the current
[KSC1]server, run the Change Administration Server task for Network Agent.After running the task, the computer is reconnected to the new
[KSC2]server.The computer will be displayed in the
[KSC1]server console with the Critical status. Configuring the application using policies or remotely running tasks on the computer is impossible. - In the console of the new
[KSC2]server, create a new Administration Server connection protection task for Kaspersky Endpoint Security. In task properties, enter the password of the previous server and set a password for the new server.How to set a new password for reconnecting to a new server in Administration Console (MMC)
How to set a new password for reconnecting to a new server in Web Console and Cloud Console
After completing the task, make sure that in the console of the new
[KSC2]server, the computer has the OK status. Test if you can run tasks remotely and configure the application using policies.
Resetting the Administration Server connection password
If you forgot your Administration Server connection password or the password is compromised, you can reset the password in task properties. You can also reset the password and set a new password for a group of computers with different Administration Server connection protection statuses. That is, if some computers have the protection enabled and some have it disabled, the task sets a password for all computers.
You can only reset the Administration Server connection password in the console of the trusted server to which the computer is connected.
How to reset the Administration Server connection password using the Administration Console (MMC)
How to reset the Administration Server connection password in Web Console and Cloud Console
As a result, the Administration Server connection password is reset after the task finishes.
Disabling Administration Server connection protection
You can only remotely disable Administration Server connection protection in the console of the trusted server to which the computer is connected. You can also disable the protection locally on the command line.
How to disable the server connection protection in Administration Console (MMC)
How to disable the server connection protection in Web Console and Cloud Console
How to disable the server connection protection on the command line
Page top
Kaspersky Endpoint Security performance and compatibility with other applications
The performance of Kaspersky Endpoint Security refers to the number of types of objects that can harm the computer that are detectable, as well as energy consumption and use of computer resources.
Selecting types of detectable objects
Kaspersky Endpoint Security lets you fine-tune the protection of your computer and select the types of objects that the application detects during operation. Kaspersky Endpoint Security always scans the operating system for viruses, worms, and Trojans. You cannot disable scanning of these types of objects. Such malware can cause significant harm to the computer. For greater security on your computer, you can expand the range of detectable object types by enabling monitoring of legal software that can be used by criminals to damage your computer or personal data.
Using energy-saving mode
Energy consumption by applications is a key consideration for portable computers. Kaspersky Endpoint Security scheduled tasks usually use up considerable resources. When the computer is running on battery power, you can use energy-saving mode to consume power more sparingly.
In energy-saving mode, the following scheduled tasks are postponed automatically:
- Update task;
- Full Scan task;
- Critical Areas Scan task;
- Custom Scan task;
- Integrity Check task.
Whether or not energy saving mode is enabled, Kaspersky Endpoint Security pauses encryption tasks when a portable computer switches to battery power. The application resumes encryption tasks when the portable computer switches from battery power to mains power.
Conceding computer resources to other applications
Consumption of computer resources when scanning the computer may increase the load on the CPU and hard drive subsystems. To resolve the problem of simultaneous operation during increased load on the CPU and hard drive subsystems, Kaspersky Endpoint Security can concede resources to other applications.
Using advanced disinfection technology
Today's malicious applications can penetrate the lowest levels of an operating system, which makes them virtually impossible to eliminate. After detecting malicious activity in the operating system, Kaspersky Endpoint Security performs an extensive disinfection procedure that uses special advanced disinfection technology. Advanced disinfection technology is aimed at purging the operating system of malicious applications that have already started their processes in RAM and that prevent Kaspersky Endpoint Security from removing them by using other methods. The threat is neutralized as a result. While Advanced Disinfection is in progress, you are advised to refrain from starting new processes or editing the operating system registry. The advanced disinfection technology uses considerable operating system resources, which may slow down other applications.
After the Advanced Disinfection process has been completed on a computer running Microsoft Windows for workstations, Kaspersky Endpoint Security requests the user's permission to reboot the computer. After system reboot, Kaspersky Endpoint Security deletes malware files and starts a "lite" full scan of the computer.
A reboot prompt is impossible on a computer running Microsoft Windows for servers due to the specifics of Kaspersky Endpoint Security. An unplanned reboot of a file server can lead to problems involving temporary unavailability of file server data or loss of unsaved data. It is recommended to reboot a file server strictly according to schedule. This is why Advanced Disinfection technology is disabled by default for file servers.
If active infection is detected on a file server, an event is relayed to Kaspersky Security Center with information that Advanced Disinfection is required. To disinfect an active infection of a server, enable Advanced Disinfection technology for servers and start a Malware Scan group task at a time convenient for server users.
Enabling or disabling energy-saving mode
To enable or disable energy conservation mode:
- In the main application window, click the button.
- In the application settings window, select General settings → Application settings.
Kaspersky Endpoint Security for Windows settings
- In the Performance block, use the Postpone scheduled tasks while running on battery power check box to enable or disable power saving mode.
When energy conservation mode is enabled and the computer is running on battery power, the following tasks are not run even if scheduled:
- Update of databases and application modules
- Full Scan
- Critical Areas Scan
- Custom Scan
- Application Integrity Check
- IOC Scan
- Save your changes.
Enabling or disabling conceding of resources to other applications
Consumption of computer resources by Kaspersky Endpoint Security when scanning the computer may increase the load on the CPU and hard drive subsystems. This may slow down other applications. To optimize the performance, Kaspersky Endpoint Security provides a mode for transferring resources to other applications. In this mode, the operating system can decrease the priority of Kaspersky Endpoint Security scan task threads when the CPU load is high. This allows redistributing operating system resources to other applications. Thus, scan tasks will receive less CPU time. As a result, Kaspersky Endpoint Security will take longer to scan the computer. By default, the application is configured to concede resources to other applications.
- In the main window of the Web Console, select Assets (Devices) → Policies & profiles.
- Click the name of the Kaspersky Endpoint Security policy.
The policy properties window opens.
- Select the Application settings tab.
- Go to General settings → Application Settings.
Kaspersky Endpoint Security for Windows settings
- In the Performance block, use the Concede resources to other applications check box to enable or disable conceding of resources to other applications.
- Save your changes.
How to enable or disable conceding resources to other applications in the application interface
- In the main application window, click the button.
- In the application settings window, select General settings → Application settings.
Kaspersky Endpoint Security for Windows settings
- In the Performance block, use the Concede resources to other applications check box to enable or disable conceding of resources to other applications.
- Save your changes.
Best practices for optimizing Kaspersky Endpoint Security performance
When deploying Kaspersky Endpoint Security for Windows, you can use the following recommendations to configure computer protection and optimize performance. For more information on dealing with computer performance issues, please refer to the Technical Support Knowledge Base.
General
Configure general settings of the application in accordance with the following recommendations:
- Upgrade Kaspersky Endpoint Security to the latest version.
Newer versions of the application have errors fixed, stability improved, and performance optimized.
- Enable protection components with default settings.
Default settings are considered optimal. This settings are recommended by Kaspersky experts. Default settings provide recommended protection level and optimal resource use. If necessary, you can restore the default application settings.
- Enable application performance optimization features.
The application has performance optimization features: energy conservation mode and conceding of resources to other applications. Make sure these options are enabled.
Malware Scan on workstations
Enabling Background scan is recommended for Malware Scan of workstations. Background Scan is a scan mode of Kaspersky Endpoint Security that does not display notifications for the user. Background scan requires less computer resources than other types of scans (such as a full scan). In this mode, Kaspersky Endpoint Security scans startup objects, the boot sector, system memory, and the system partition. Background scan settings are considered optimal. This settings are recommended by Kaspersky experts. Thus for performing a Malware Scan of the computer, you can use just the background scan mode without using other scan tasks.
If background scanning does not suit your needs, configure the Malware Scan task in accordance with the following recommendations:
- Configure the optimal computer scan schedule.
You can configure the task to run when the computer is operating under minimum load. For example, you can configure the task to run at night or on weekends.
If users turn off the computer outside of business hours, you can enable the Wake-on-LAN function. The Wake-on-LAN feature allows remotely powering on the computer by sending a special signal over the local network. To use this feature, you must enable Wake-on-LAN in BIOS settings. You can also have the computer automatically turned off after the scan finishes.
If you could not configure an optimal scan schedule, set tasks to run only when the computer is idle. Kaspersky Endpoint Security starts the scan task if the computer is locked or if the screen saver is on. If you have interrupted the execution of the task, for example by unlocking the computer, Kaspersky Endpoint Security automatically runs the task, continuing from the point where it was interrupted.
- Define a scan scope.
Select the following objects for scanning (minimum set of scan scopes):
- Kernel memory
- Running processes and Startup Objects
- Boot sectors
- %systemroot% (not including subfolders)
- %systemroot%\System (not including subfolders)
- %systemroot%\System32 (not including subfolders)
- %systemroot%\System32\drivers (not including subfolders)
- %systemroot%\SysWOW64 (not including subfolders)
- %systemroot%\SysWOW64\drivers (not including subfolders)
- Turn on iSwift and iChecker technologies.
- iSwift technology.
This technology allows increasing scan speed by excluding certain files from scanning. Files are excluded from scans by using a special algorithm that takes into account the release date of Kaspersky Endpoint Security databases, the date when the file was last scanned, and any modifications to the scan settings. The iSwift technology is an advancement of the iChecker technology for the NTFS file system.
- iChecker technology.
This technology allows increasing scan speed by excluding certain files from scanning. Files are excluded from scans by using a special algorithm that takes into account the release date of Kaspersky Endpoint Security databases, the date when the file was last scanned, and any modifications to the scan settings. There are limitations to iChecker Technology: it does not work with large files and applies only to files with a structure that the application recognizes (for example, EXE, DLL, LNK, TTF, INF, SYS, COM, CHM, ZIP, and RAR).
You can only turn on iSwift and iChecker technologies in the Administration Console (MMC) and Kaspersky Endpoint Security interface. You cannot turn on these technologies in Kaspersky Security Center Web Console.
- iSwift technology.
- Disable the scanning of password-protected archives.
If the scanning of password-protected archives is enabled, a password prompt is displayed before the archive is scanned. Because the task is recommended to be scheduled during out-of-office hours, the user cannot enter the password. You can scan password-protected archives manually.
- Disable simultaneous launch of several scan tasks.
Kaspersky Endpoint Security will enqueue new scan tasks if the current scan continues. This helps optimize the load on the computer.
- Set a limit on CPU resource consumption while scanning the computer.
You can limit CPU usage when running the Malware Scan task. To do so, in application settings, specify the maximum CPU load percentage for all cores that can be utilized while scanning the computer. This may increase the time it takes to scan your computer.
Malware Scan on the servers
Configure the Malware Scan task in accordance with the following recommendations:
- Configure the optimal computer scan schedule.
You can configure the task to run when the computer is operating under minimum load. For example, you can configure the task to run at night or on weekends.
- Turn on iSwift and iChecker technologies.
- iSwift technology.
This technology allows increasing scan speed by excluding certain files from scanning. Files are excluded from scans by using a special algorithm that takes into account the release date of Kaspersky Endpoint Security databases, the date when the file was last scanned, and any modifications to the scan settings. The iSwift technology is an advancement of the iChecker technology for the NTFS file system.
- iChecker technology.
This technology allows increasing scan speed by excluding certain files from scanning. Files are excluded from scans by using a special algorithm that takes into account the release date of Kaspersky Endpoint Security databases, the date when the file was last scanned, and any modifications to the scan settings. There are limitations to iChecker Technology: it does not work with large files and applies only to files with a structure that the application recognizes (for example, EXE, DLL, LNK, TTF, INF, SYS, COM, CHM, ZIP, and RAR).
You can only turn on iSwift and iChecker technologies in the Administration Console (MMC) and Kaspersky Endpoint Security interface. You cannot turn on these technologies in Kaspersky Security Center Web Console.
- iSwift technology.
- Disable the scanning of password-protected archives.
If the scanning of password-protected archives is enabled, a password prompt is displayed before the archive is scanned. Because the task is recommended to be scheduled during out-of-office hours, the user cannot enter the password. You can scan password-protected archives manually.
- Disable simultaneous launch of several scan tasks.
Kaspersky Endpoint Security will enqueue new scan tasks if the current scan continues. This helps optimize the load on the computer.
- Set a limit on CPU resource consumption while scanning the computer.
You can limit CPU usage when running the Malware Scan task. To do so, in application settings, specify the maximum CPU load percentage for all cores that can be utilized while scanning the computer. This may increase the time it takes to scan your computer.
Kaspersky Security Network
To protect your computer more effectively, Kaspersky Endpoint Security uses data that is received from users around the globe. Kaspersky Security Network is designed for obtaining this data.
Kaspersky Security Network (KSN) is an infrastructure of cloud services providing access to the online Kaspersky Knowledge Base that contains information about the reputation of files, web resources, and software. The use of data from Kaspersky Security Network ensures faster responses by Kaspersky Endpoint Security to new threats, improves the performance of some protection components, and reduces the likelihood of false positives. If you are participating in Kaspersky Security Network, KSN services provide Kaspersky Endpoint Security with information about the category and reputation of scanned files, as well as information about the reputation of scanned web addresses.
Edit Kaspersky Security Network settings in accordance with the following recommendations:
- Disable extended KSN mode.
Extended KSN mode is a mode in which Kaspersky Endpoint Security sends additional data to Kaspersky.
- Configure Kaspersky Private Security Network.
Kaspersky Private Security Network (KPSN) is a solution that enables users of computers hosting Kaspersky Endpoint Security or other Kaspersky applications to obtain access to Kaspersky reputation databases, and to other statistical data without sending data to Kaspersky from their own computers.
- Enable Cloud mode.
Cloud mode refers to the application operating mode in which Kaspersky Endpoint Security uses a light version of anti-virus databases. Kaspersky Security Network supports the operation of the application when light anti-virus databases are being used. The light version of anti-virus databases lets you use approximately half of the computer RAM that would otherwise be used with the usual databases. If you do not participate in Kaspersky Security Network or if cloud mode is disabled, Kaspersky Endpoint Security downloads the full version of anti-virus databases from Kaspersky servers.
Data Encryption
Kaspersky Endpoint Security lets you encrypt files and folders that are stored on local and removable drives, or entire removable drives and hard drives. Data encryption minimizes the risk of information leaks that may occur when a portable computer, removable drive or hard drive is lost or stolen, or when data is accessed by unauthorized users or applications. Kaspersky Endpoint Security uses the Advanced Encryption Standard (AES) encryption algorithm.
If the license has expired, the application does not encrypt new data, and old encrypted data remains encrypted and available for use. In this event, encrypting new data requires the application be activated with a new license that permits the use of encryption.
If your license has expired, or the End User License Agreement has been violated, the license key, Kaspersky Endpoint Security, or encryption components has been removed, the encrypted status of previously encrypted files is not guaranteed. This is because some applications, such as Microsoft Office Word, create a temporary copy of files during editing. When the original file is saved, the temporary copy replaces the original file. As a result, on a computer that has no or inaccessible encryption functionality, the file remains unencrypted.
Kaspersky Endpoint Security offers the following aspects of data protection:
- File Level Encryption on local computer drives. You can compile lists of files by extension or group of extensions and lists of folders stored on local computer drives, and create rules for encrypting files that are created by specific applications. After a policy is applied, Kaspersky Endpoint Security encrypts and decrypts the following files:
- files individually added to lists for encryption and decryption;
- files stored in folders added to lists for encryption and decryption;
- files created by separate applications.
- Encryption of removable drives. You can specify a default encryption rule, according to which the application applies the same action to all removable drives, or specify encryption rules for individual removable drives.
The default encryption rule has a lower priority than encryption rules created for individual removable drives. Encryption rules created for removable drives of the specified device model have a lower priority than encryption rules created for removable drives with the specified device ID.
To select an encryption rule for files on a removable drive, Kaspersky Endpoint Security checks whether or not the device model and ID are known. The application then performs one of the following operations:
- If only the device model is known, the application uses the encryption rule (if any) created for removable drives of the specific device model.
- If only the device ID is known, the application uses the encryption rule (if any) created for removable drives with the specific device ID.
- If the device model and ID are known, the application applies the encryption rule (if any) created for removable drives with the specific device ID. If no such rule exists, but there is an encryption rule created for removable drives with the specific device model, the application applies this rule. If no encryption rule is specified for the specific device ID nor for the specific device model, the application applies the default encryption rule.
- If neither the device model nor device ID is known, the application uses the default encryption rule.
The application lets you prepare a removable drive for using encrypted data stored on it in portable mode. After enabling portable mode, you can access encrypted files on removable drives connected to a computer without encryption functionality.
- Managing rules of application access to encrypted files. For any application, you can create an encrypted file access rule that blocks access to encrypted files or allows access to encrypted files only as ciphertext, which is a sequence of characters obtained when encryption is applied.
- Creating encrypted packages. You can create encrypted archives and protect access to such archives with a password. The contents of encrypted archives can be accessed only by entering the passwords with which you protected access to those archives. Such archives can be securely transmitted over networks or on removable drives.
- Full Disk Encryption. You can select an encryption technology: Kaspersky Disk Encryption or BitLocker Drive Encryption (hereinafter also referred to as simply "BitLocker").
BitLocker is a technology that is part of the Windows operating system. If a computer is equipped with a Trusted Platform Module (TPM), BitLocker uses it to store recovery keys that provide access to an encrypted hard drive. When the computer starts, BitLocker requests the hard drive recovery keys from the Trusted Platform Module and unlocks the drive. You can configure the use of a password and/or PIN code for accessing recovery keys.
You can specify the default full disk encryption rule and create a list of hard drives to be excluded from encryption. Kaspersky Endpoint Security performs full disk encryption by sector after the Kaspersky Security Center policy is applied. The application encrypts all logical partitions of hard drives simultaneously.
After the system hard drives have been encrypted, at the next computer startup the user must complete authentication using the
before the hard drives can be accessed and the operating system is loaded. This requires entering the password of the token or smart card connected to the computer, or the user name and password of the Authentication Agent account created by the local area network administrator using the Manage Authentication Agent accounts task. These accounts are based on Microsoft Windows accounts under which users log into the operating system. You can also use Single Sign-On (SSO) technology, which lets you automatically log in to the operating system using the user name and password of the Authentication Agent account.If you back up a computer and then encrypt the computer data, after which you restore the backup copy of the computer and encrypt the computer data again, Kaspersky Endpoint Security creates duplicates of Authentication Agent accounts. To remove the duplicate accounts, you must use the klmover utility with the
dupfixkey. The klmover utility is included in the Kaspersky Security Center build. You can read more about its operation in the Kaspersky Security Center Help.Access to encrypted hard drives is possible only from computers on which Kaspersky Endpoint Security with full disk encryption functionality is installed. This precaution minimizes the risk of data leaks from an encrypted hard drive when an attempt to access it is made outside of the local area network of the company.
To encrypt hard drives and removable drives, you can use the Encrypt used disk space only function. It is recommended you only use this function for new devices that have not been previously used. If you are applying encryption to a device that is already in use, it is recommended you encrypt the entire device. This ensures that all data is protected – even deleted data that might still contain retrievable information.
Before beginning encryption, Kaspersky Endpoint Security obtains the map of file system sectors. The first wave of encryption includes sectors that are occupied by files at the moment when encryption is started. The second wave of encryption includes sectors that were written to after encryption began. After encryption is complete, all sectors containing data are encrypted.
After encryption is complete and a user deletes a file, the sectors that stored the deleted file become available for storing new information at the file system level but remain encrypted. Thus, as files are written to a new device and the device is regularly encrypted with the Encrypt used disk space only function enabled, all sectors will be encrypted after some time.
The data needed to decrypt files is provided by the Kaspersky Security Center Administration Server that controlled the computer at the time of encryption. If the computer with encrypted objects was managed by a different Administration Server for some reason, you can obtain access to the encrypted data in one of the following ways:
- Administration Servers in the same hierarchy:
- You do not need to take any additional actions. The user will retain access to the encrypted objects. Encryption keys are distributed to all Administration Servers.
- Separated Administration Servers:
- Request access to encrypted objects from the LAN administrator.
- Restore data on encrypted devices using the Restore Utility.
- Restore the configuration of the Kaspersky Security Center Administration Server that controlled the computer at the time of encryption from a backup copy and use this configuration on the Administration Server that now controls the computer with encrypted objects.
If there is no access to encrypted data, follow the special instructions for working with encrypted data (Restoring access to encrypted files, Working with encrypted devices when there is no access to them).
Encryption functionality limitations
Data Encryption has the following limitations:
- The application creates service files during encryption. Around 0.5% of non-fragmented free space on the hard drive is required to store them. If there is not enough non-fragmented free space on the hard drive, encryption will not start until enough space is freed up.
- You can manage all data encryption components in the Kaspersky Security Center Administration Console and in the Kaspersky Security Center Web Console. In the Kaspersky Security Center Cloud Console, you can only manage Bitlocker.
- Data encryption is available only when using Kaspersky Endpoint Security with the Kaspersky Security Center administration system or the Kaspersky Security Center Cloud Console (BitLocker only). Data Encryption when using Kaspersky Endpoint Security in offline mode is not possible because Kaspersky Endpoint Security stores encryption keys in Kaspersky Security Center.
- If Kaspersky Endpoint Security is installed on a computer running Microsoft Windows for Servers, only full disk encryption using BitLocker Drive Encryption technology is available. If Kaspersky Endpoint Security is installed on a computer running Windows for Workstations, data encryption functionality is fully available.
Full disk encryption using Kaspersky Disk Encryption technology is unavailable for hard drives that do not meet the hardware and software requirements.
Compatibility between the full disk encryption functionality of Kaspersky Endpoint Security and Kaspersky Anti-Virus for UEFI is not supported. Kaspersky Anti-Virus for UEFI starts before the operating system loads. When using full disk encryption, the application will detect the absence of an installed operating system on the computer. As a result, the operation of Kaspersky Anti-Virus for UEFI will end with an error. File Level Encryption (FLE) does not affect the operation of Kaspersky Anti-Virus for UEFI.
Kaspersky Endpoint Security supports the following configurations:
- HDD, SSD, and USB drives.
Kaspersky Disk Encryption (FDE) technology supports working with SSD while preserving the performance and service life of SSD drives.
- Drives connected via bus: SCSI, ATA, IEEE1934, USB, RAID, SAS, SATA, NVME.
- Non-removable drives connected via SD or MMC bus.
- Drives with 512-byte sectors.
- Drives with 4096-byte sectors that emulate 512 bytes.
- Drives with the following type of partitions: GPT, MBR, and VBR (removable drives).
- Embedded software of the UEFI 64 and Legacy BIOS standard.
- Embedded software of the UEFI standard with Secure Boot support.
Secure Boot is a technology designed to verify digital signatures for UEFI loader applications and drivers. Secure Boot blocks the startup of UEFI applications and drivers that are unsigned or signed by unknown publishers. Kaspersky Disk Encryption (FDE) fully supports Secure Boot. Authentication Agent is signed by a Microsoft Windows UEFI Driver Publisher certificate.
On some devices (for example, Microsoft Surface Pro and Microsoft Surface Pro 2), an out-of-date list of digital signature verification certificates may be installed by default. Prior to encrypting the drive, you need to update the list of certificates.
- Embedded software of the UEFI standard with Fast Boot support.
Fast Boot is a technology that helps the computer start up faster. When Fast Boot technology is enabled, normally the computer loads only the minimum set of UEFI drivers required for starting the operating system. When Fast Boot technology is enabled, USB keyboards, mice, USB tokens, touchpads and touchscreens may not work while Authentication Agent is running.
To use Kaspersky Disk Encryption (FDE), it is recommended to disable Fast Boot technology. You can use the FDE Test Utility to test the operation of Kaspersky Disk Encryption (FDE).
Kaspersky Endpoint Security does not support the following configurations:
- The boot loader is located on one drive while the operating system is on a different drive.
- The system contains embedded software of the UEFI 32 standard.
- The system has Intel Rapid Start Technology and drives that have a hibernation partition even when Intel Rapid Start Technology is disabled.
- Drives in MBR format with more than 10 extended partitions.
- The system has a swap file located on a non-system drive.
- Multiboot system with multiple simultaneously installed operating systems.
- Dynamic partitions (only primary partitions are supported).
- Drives with less than 0.5% free unfragmented disk space.
- Drives with a sector size different from 512 bytes or 4096 bytes that emulate 512 bytes.
- Hybrid drives.
- The system has third-party loaders.
- Drives with compressed NTFS directories.
- Kaspersky Disk Encryption (FDE) technology is incompatible with other full disk encryption technologies (such as BitLocker, McAfee Drive Encryption, and WinMagic SecureDoc).
- Kaspersky Disk Encryption (FDE) technology is incompatible with ExpressCache technology.
- Creating, deleting, and modifying partitions on an encrypted drive is not supported. You could lose data.
- File system formatting is not supported. You could lose data.
If you need to format a drive that was encrypted with Kaspersky Disk Encryption (FDE) technology, format the drive on a computer that does not have Kaspersky Endpoint Security for Windows and use only full disk encryption.
An encrypted drive that is formatted with the quick format option may be mistakenly identified as encrypted the next time it is connected to a computer that has Kaspersky Endpoint Security for Windows installed. User data will be unavailable.
- Authentication Agent supports no more than 100 accounts.
- Single Sign-On technology is incompatible with other technologies of third-party developers.
- Kaspersky Disk Encryption (FDE) technology is not supported on the following models of devices:
- Dell Latitude E6410 (UEFI mode)
- HP Compaq nc8430 (Legacy BIOS mode)
- Lenovo ThinkCentre 8811 (Legacy BIOS mode)
- Authentication Agent does not support working with USB tokens when Legacy USB Support is enabled. Only password-based authentication will be possible on the computer.
- When encrypting a drive in Legacy BIOS mode, you are advised to enable Legacy USB Support on the following models of devices:
- Acer Aspire 5560G
- Acer Aspire 6930
- Acer TravelMate 8572T
- Dell Inspiron 1420
- Dell Inspiron 1545
- Dell Inspiron 1750
- Dell Inspiron N4110
- Dell Latitude E4300
- Dell Studio 1537
- Dell Studio 1569
- Dell Vostro 1310
- Dell Vostro 1320
- Dell Vostro 1510
- Dell Vostro 1720
- Dell Vostro V13
- Dell XPS L502x
- Fujitsu Celsius W370
- Fujitsu LifeBook A555
- HP Compaq dx2450 Microtower PC
- Lenovo G550
- Lenovo ThinkPad L530
- Lenovo ThinkPad T510
- Lenovo ThinkPad W540
- Lenovo ThinkPad X121e
- Lenovo ThinkPad X200s (74665YG)
- Samsung R530
- Toshiba Satellite A350
- Toshiba Satellite U400 10O
- MSI 760GM-E51 (motherboard)
Changing the length of the encryption key (AES56 / AES256)
Kaspersky Endpoint Security uses the Advanced Encryption Standard (AES) encryption algorithm. Kaspersky Endpoint Security supports the AES encryption algorithm with an effective key length of 256 or 56 bits. The data encryption algorithm depends on the AES encryption library that is included in the distribution package: Strong encryption (AES256) or Lite encryption (AES56). The AES encryption library is installed together with the application.
Changing the length of the encryption key is available only for Kaspersky Endpoint Security 11.2.0 or later.
Changing the encryption key length consists of the following steps:
- Decrypt objects that Kaspersky Endpoint Security encrypted before you begin changing the encryption key length:
After the encryption key length is changed, objects that were previously encrypted become unavailable.
- Remove Kaspersky Endpoint Security.
- Install Kaspersky Endpoint Security from the Kaspersky Endpoint Security distribution package containing a different encryption library.
You can also change the encryption key length by upgrading the application. The key length can be changed through an application upgrade only if the following conditions are met:
- Kaspersky Endpoint Security version 10 Service Pack 2 or later is installed on the computer.
- Data encryption components (File Level Encryption, Full Disk Encryption) are not installed on the computer.
By default, data encryption components are not included in Kaspersky Endpoint Security. The BitLocker Management component does not affect the change in the length of the encryption key.
To change the encryption key length, run the kes_win.msi or setup_kes.exe file from the distribution package containing the necessary encryption library. You can also remotely upgrade the application by using the installation package.
It is impossible to change the length of the encryption key using the distribution package of the same version of the application that is installed on your computer without first uninstalling the application.
Page top
Kaspersky Disk Encryption
Kaspersky Disk Encryption is available only for computers running a Windows operating system for workstations. For computers running a Windows operating system for servers, use BitLocker Drive Encryption technology.
Kaspersky Endpoint Security supports full disk encryption in FAT32, NTFS and exFat file systems.
Before starting full disk encryption, the application runs a series of checks to determine if the device can be encrypted, which includes checking the system hard drive for compatibility with Authentication Agent or with BitLocker encryption components. To check for compatibility, the computer must be restarted. After the computer has been rebooted, the application performs all the necessary checks automatically. If the compatibility check is successful, full disk encryption starts after the operating system has loaded and the application has started. If the system hard drive is found to be incompatible with Authentication Agent or with BitLocker encryption components, the computer must be restarted by pressing the Reset hardware button. Kaspersky Endpoint Security logs information about the incompatibility. Based on this information, the application does not start full disk encryption at operating system startup. Information about this event is logged in Kaspersky Security Center reports.
If the hardware configuration of the computer has changed, the incompatibility information logged by the application during the previous check should be deleted in order to check the system hard drive for compatibility with Authentication Agent and BitLocker encryption components. To do so, prior to full disk encryption, type avp pbatestreset in the command line. If the operating system fails to load after the system hard drive has been checked for compatibility with Authentication Agent, you must remove the objects and data remaining after test operation of Authentication Agent by using the Restore Utility and then start Kaspersky Endpoint Security and execute the avp pbatestreset command again.
After full disk encryption has started, Kaspersky Endpoint Security encrypts all data that is written to hard drives.
If the user shuts down or restarts the computer during full disk encryption, Authentication Agent is loaded before the next startup of the operating system. Kaspersky Endpoint Security resumes full disk encryption after successful authentication in Authentication Agent and operating system startup.
If the operating system switches to hibernation mode during full disk encryption, Authentication Agent is loaded when the operating system switches back from hibernation mode. Kaspersky Endpoint Security resumes full disk encryption after successful authentication in Authentication Agent and operating system startup.
If the operating system goes into sleep mode during full disk encryption, Kaspersky Endpoint Security resumes full disk encryption when the operating system comes out of sleep mode without loading Authentication Agent.
User authentication in the Authentication Agent can be performed in two ways:
- Enter the name and password of the Authentication Agent account created by the LAN administrator using Kaspersky Security Center tools.
- Enter the password of a token or smart card connected to the computer.
Use of a token or smart card is available only if the computer hard drives were encrypted using the AES256 encryption algorithm. If the computer hard drives were encrypted using the AES56 encryption algorithm, addition of the electronic certificate file to the command will be denied.
The authentication agent supports keyboard layouts for the following languages:
- English (UK)
- English (USA)
- Arabic (Algeria, Morocco, Tunis; AZERTY layout)
- Spanish (Latin America)
- Italian
- German (Germany and Austria)
- German (Switzerland)
- Portuguese (Brazil, ABNT2 layout)
- Russian (for 105-key IBM / Windows keyboards with the QWERTY layout)
- Turkish (QWERTY layout)
- French (France)
- French (Switzerland)
- French (Belgium, AZERTY layout)
- Japanese (for 106-key keyboards with the QWERTY layout)
A keyboard layout becomes available in the Authentication Agent if this layout has been added in the language and regional standards settings of the operating system and has become available on the welcome screen of Microsoft Windows.
If the Authentication Agent account name contains symbols that cannot be entered using keyboard layouts available in the Authentication Agent, encrypted hard drives can be accessed only after they are restored using the Restore Utility or after the Authentication Agent account name and password are restored.
Special features of SSD drive encryption
The application supports encryption of SSD drives, hybrid SSHD drives, and drives with the Intel Smart Response feature. The application does not support encryption of drives with the Intel Rapid Start feature. Disable the Intel Rapid Start feature prior to encrypting such a drive.
Encryption of SSD drives has the following special features:
- If an SSD drive is new and contains no confidential data, enable encryption of only occupied space. This lets you overwrite the relevant drive sectors.
- If an SSD drive is in use and it has confidential data, select one of the following options:
- Fully wipe the SSD drive (Secure Erase), install the operating system and run encryption of the SSD drive with the option to encrypt only occupied space enabled.
- Run encryption of the SSD drive with the option to encrypt only occupied space disabled.
Encryption of an SSD drive requires 5-10 GB of free space. The free space requirements for storing encryption administration data are provided in the table below.
Free space requirements for storing encryption administration data
SSD drive size (GB) |
Free space on primary partition of SSD drive (MB) |
Free space on secondary partition of SSD drive (MB) |
|---|---|---|
128 |
250 |
64 |
256 |
250 |
640 |
512 |
300 |
128 |
Starting Kaspersky Disk Encryption
Prior to starting full disk encryption, you are advised to make sure that the computer is not infected. To do so, start the Full Scan or Critical Areas Scan task. Performing full disk encryption on a computer that is infected by a rootkit may cause the computer to become inoperable.
Before you start disk encryption, you must check the settings of Authentication Agent accounts. Authentication Agent is needed for working with drives that are protected using Kaspersky Disk Encryption (FDE) technology. Before the operating system is loaded, the user needs to complete authentication with the Agent. Kaspersky Endpoint Security allows you to automatically create Authentication Agent accounts before encrypting a drive. You can enable automatic creation of Authentication Agent accounts in the Full Disk Encryption policy settings (see the instructions below). You can also use Single Sign-On (SSO) technology.
Kaspersky Endpoint Security allows you to automatically create Authentication Agent for the following user groups:
- All accounts on the computer. All accounts on the computer that have been active at any time.
- All domain accounts on the computer. All accounts on the computer that belong to some domain and that have been active at any time.
- All local accounts on the computer. All local accounts on the computer that have been active at any time.
- Service account with a one-time password. The service account is necessary to gain access to the computer, for example, when the user forgets the password. You can also use the service account as a reserve account. You must enter the name of the account (by default,
ServiceAccount). Kaspersky Endpoint Security creates a password automatically. You can find the password in the Kaspersky Security Center console. - Local administrator. Kaspersky Endpoint Security creates an Authentication Agent user account for the local administrator of the computer.
- Computer manager. Kaspersky Endpoint Security creates an Authentication Agent user account for the account of the computer manager. You can see which account has the computer manager role in computer properties in Active Directory. By default, the computer manager role is not defined, that is, it does not correspond to any account.
- Active account. Kaspersky Endpoint Security automatically creates an Authentication Agent account for the account that is active at the time of disk encryption.
The Manage Authentication Agent accounts task is designed for configuring user authentication settings. You can use this task to add new accounts, modify the settings of current accounts, or remove accounts if necessary. You can use local tasks for individual computers as well as group tasks for computers from separate administration groups or a selection of computers.
How to run Kaspersky Disk Encryption through the Administration Console (MMC)
How to run Kaspersky Disk Encryption through the Web Console and Cloud Console
You can use the Encryption Monitor tool to control the disk encryption or decryption process on a user's computer. You can run the Encryption Monitor tool from the main application window.
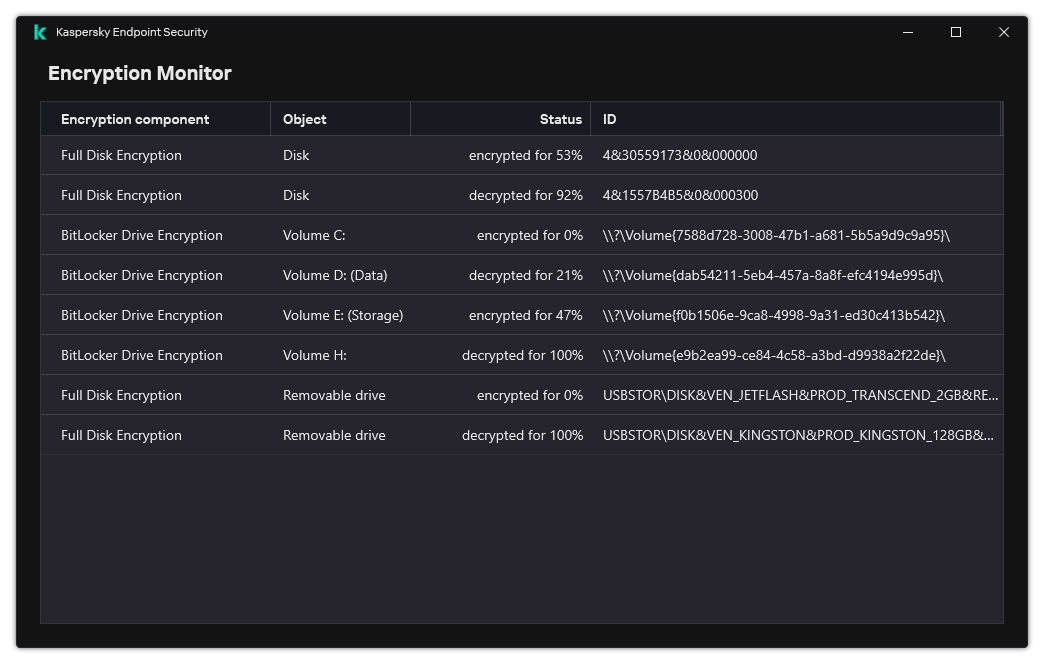
Encryption Monitor
If system hard drives are encrypted, the Authentication Agent loads before startup of the operating system. Use the Authentication Agent to complete authentication for obtaining access to encrypted system hard drives and load the operating system. After successful completion of the authentication procedure, the operating system loads. The authentication process is repeated every time the operating system restarts.
Kaspersky Disk Encryption component settings
Parameter |
Description |
|---|---|
Automatically create Authentication Agent accounts for users during encryption |
If this check box is selected, the application creates Authentication Agent accounts based on the list of Windows user accounts on the computer. By default, Kaspersky Endpoint Security uses all local and domain accounts with which the user logged in to the operating system over the past 30 days. |
Automatically create Authentication Agent accounts for all users of this computer upon sign-in |
If this check box is selected, the application checks information about Windows user accounts on the computer before starting Authentication Agent. If Kaspersky Endpoint Security detects a Windows user account that has no Authentication Agent account, the application will create a new account for accessing encrypted drives. The new Authentication Agent account will have the following default settings: password-protected sign-on only, and password change on first authentication. Therefore, you do not need to manually add Authentication Agent accounts using the Manage Authentication Agent accounts task for computers with already encrypted drives. |
Save user name entered in Authentication Agent |
If the check box is selected, the application saves the name of the Authentication Agent account. You will not be required to enter the account name the next time you attempt to complete authorization in the Authentication Agent under the same account. |
Encrypt used disk space only (reduces encryption time) |
This check box enables / disables the option that limits the encryption area to only occupied hard drive sectors. This limit lets you reduce encryption time. Enabling or disabling the Encrypt used disk space only (reduces encryption time) feature after starting encryption does not modify this setting until the hard drives are decrypted. You must select or clear the check box before starting encryption. If the check box is selected, only portions of the hard drive that are occupied by files are encrypted. Kaspersky Endpoint Security automatically encrypts new data as it is added. If the check box is cleared, the entire hard drive is encrypted, including residual fragments of previously deleted and modified files. This option is recommended for new hard drives whose data has not been modified or deleted. If you are applying encryption on a hard drive that is already in use, it is recommended to encrypt the entire hard drive. This ensures protection of all data, even deleted data that is potentially recoverable. This check box is cleared by default. |
Use Legacy USB Support (not recommended) |
This check box enables/disables the Legacy USB Support function. Legacy USB Support is a BIOS/UEFI function that allows you to use USB devices (such as a security token) during the computer's boot phase before starting the operating system (BIOS mode). Legacy USB Support does not affect support for USB devices after the operating system is started. If the check box is selected, support for USB devices during initial startup of the computer will be enabled. When the Legacy USB Support function is enabled, the Authentication Agent in BIOS mode does not support working with tokens via USB. It is recommended to use this option only when there is a hardware compatibility issue and only for those computers on which the problem occurred. |
Creating a list of hard drives excluded from encryption
You can create a list of exclusions from encryption only for Kaspersky Disk Encryption technology.
To form a list of hard drives excluded from encryption:
- Open the Kaspersky Security Center Administration Console.
- In the console tree, select Policies.
- Select the necessary policy and double-click to open the policy properties.
- In the policy window, select Data Encryption → Full Disk Encryption.
- In the Encryption technology drop-down list, select Kaspersky Disk Encryption.
Entries corresponding to hard drives excluded from encryption appear in the Do not encrypt the following hard drives table. This table is empty if you have not previously formed a list of hard drives excluded from encryption.
- To add hard drives to the list of hard drives excluded from encryption:
- Click Add.
- In the window that opens, specify the values for Device name, Computer, Disk type, Kaspersky Disk Encryption.
- Click Refresh.
- In the Name column, select the check boxes in the table rows corresponding to those hard drives that you want to add to the list of hard drives excluded from encryption.
- Click OK.
The selected hard drives appear in the Do not encrypt the following hard drives table.
- Save your changes.
Exporting and importing a list of hard drives excluded from encryption
You can export the list of hard drive encryption exclusions to an XML file. Then you can modify the file to, for example, add a large number of exclusions of the same type. You can also use the export/import function to back up the list of exclusions or to migrate the exclusions to a different server.
How to export and import a list of hard drive encryption exclusions in the Web Console
Page top
Enabling Single Sign-On (SSO) technology
Single Sign-On (SSO) technology allows you to automatically log into the operating system using the credentials of the Authentication Agent. This means that a user needs to enter a password only once when signing in to Windows (Authentication Agent account password). Single Sign-On technology also lets you automatically update the Authentication Agent account password when the Windows account password is changed.
When using Single Sign-on technology, the Authentication Agent ignores the password strength requirements specified in Kaspersky Security Center. You can set the password strength requirements in the operating system settings.
Enabling Single Sign-On technology
How to enable the use of Single Sign-On technology in the Administration Console (MMC)
How to enable use of Single Sign-On in the Web Console
For Single Sign-On to work, the Windows account password and the password for the Authentication Agent account must match. If the passwords do not match, the user needs to perform the authentication procedure twice: in the interface of the Authentication Agent and before loading the operating system. These actions need to be performed only once to synchronize the passwords. After that, Kaspersky Endpoint Security replaces the password of the Authentication Agent account with the password of the Windows account. When the Windows account password is changed, the application will automatically update the password for the Authentication Agent account.
Third-party credential providers
Kaspersky Endpoint Security 11.10.0 adds support for third-party credential providers.
Kaspersky Endpoint Security supports the third-party credential provider ADSelfService Plus.
When working with third-party credential providers, Authentication Agent intercepts the password before the operating system is loaded. This means that a user needs to enter a password only once when signing in to Windows. After signing in to Windows, the user can utilize the capabilities of a third-party credential provider for authentication in corporate services, for example. Third-party credential providers also allow users to independently reset their own password. In this case, Kaspersky Endpoint Security will automatically update the password for Authentication Agent.
If you are using a third-party credential provider that is not supported by the application, you may encounter some limitations in Single Sign-On technology operation. When signing in to Windows, two profiles will be available to the user: in-system credential provider and third-party credential provider. The icons of these profiles will be identical (see the figure below). The user will have the following options for continuing:
- If the user selects the third-party credential provider, Authentication Agent will not be able to synchronize the password with the Windows account. Therefore, if the user has changed the Windows account password, Kaspersky Endpoint Security cannot update the password for the Authentication Agent account. As a result, the user needs to perform the authentication procedure twice: in the interface of the Authentication Agent and before loading the operating system. In this case, the user can utilize the capabilities of a third-party credential provider for authentication in corporate services, for example.
- If the user selects the in-system credential provider, Authentication Agent will synchronize the passwords with the Windows account. In this case, the user cannot utilize the capabilities of a third-party provider for authentication in corporate services, for example.
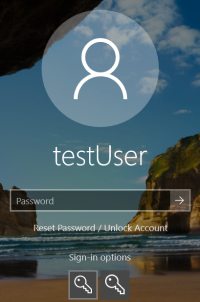
System authentication profile and third-party authentication profile for Windows sign-in
Managing Authentication Agent accounts
Authentication Agent is needed for working with drives that are protected using Kaspersky Disk Encryption (FDE) technology. Before the operating system is loaded, the user needs to complete authentication with the Agent. The Manage Authentication Agent accounts task is designed for configuring user authentication settings. You can use local tasks for individual computers as well as group tasks for computers from separate administration groups or a selection of computers.
You cannot configure a schedule for starting the Manage Authentication Agent accounts task. It is also impossible to forcibly stop a task.
How to create the Manage Authentication Agent accounts task in the Administration Console (MMC)
How to create the Manage Authentication Agent accounts task in the Web Console
To add an Authentication Agent account, you need to add a special command to the Manage Authentication Agent accounts task. It is convenient to use a group task, for example, to add an administrator account to all computers.
Kaspersky Endpoint Security allows you to automatically create Authentication Agent accounts before encrypting a drive. You can enable automatic creation of Authentication Agent accounts in the Full Disk Encryption policy settings. You can also use Single Sign-On (SSO) technology.
How to add an Authentication Agent account through the Administration Console (MMC)
How to add an Authentication Agent account through the Web Console
To change the password and other settings of the Authentication Agent account, you need to add a special command to the Manage Authentication Agent accounts task. It is convenient to use a group task, for example, to replace the administrator token certificate on all computers.
How to change the Authentication Agent account through the Administration Console (MMC)
How to change the Authentication Agent account through the Web Console
To delete an Authentication Agent account, you need to add a special command to the Manage Authentication Agent accounts task. It is convenient to use a group task, for example, to delete the account of a dismissed employee.
How to delete an Authentication Agent account through the Administration Console (MMC)
How to delete an Authentication Agent account through the Web Console
To view the list of users who can complete authentication with the Agent and load the operating system, you need to go to the properties of the managed computer.
How to view the list of Authentication Agent accounts through the Administration Console (MMC)
How to view a list of Authentication Agent accounts through the Web Console
Page top
Using a token and smart card with Authentication Agent
A token or smart card can be used for authentication when accessing encrypted hard drives. To do so, you must add the electronic certificate file of a token or smart card to the Manage Authentication Agent accounts task.
Use of a token or smart card is available only if the computer hard drives were encrypted using the AES256 encryption algorithm. If the computer hard drives were encrypted using the AES56 encryption algorithm, addition of the electronic certificate file to the command will be denied.
Kaspersky Endpoint Security supports the following tokens, smart card readers, and smart cards:
- SafeNet eToken PRO 64K (4.2b);
- SafeNet eToken PRO 72K Java;
- SafeNet eToken 4100-72K Java;
- SafeNet eToken 5100;
- SafeNet eToken 5105;
- SafeNet eToken 7300;
- EMC RSA SID 800;
- Gemalto IDPrime.NET 510;
- Gemalto IDPrime.NET 511;
- Rutoken ECP;
- Rutoken ECP Flash;
- Athena IDProtect Laser;
- SafeNet eToken PRO 72K Java;
- Aladdin-RD JaCarta PKI.
To add the file of a token or smart card electronic certificate to the command for creating an Authentication Agent account, you must first save the file using third-party software for managing certificates.
The token or smart-card certificate must have the following properties:
- The certificate must be compliant with the X.509 standard, and the certificate file must have DER encoding.
- The certificate contains an RSA key with a length of at least 1024 bits.
If the electronic certificate of the token or smart card does not meet these requirements, you cannot load the certificate file into the command for creating an Authentication Agent account.
The KeyUsage parameter of the certificate must have the value keyEncipherment or dataEncipherment. The KeyUsage parameter determines the purpose of the certificate. If the parameter has a different value, Kaspersky Security Center will download the certificate file but will display a warning.
If a user has lost a token or smart card, the administrator must add the file of a token or smart card electronic certificate to the command for creating an Authentication Agent account. Then the user must complete the procedure for receiving access to encrypted devices or restoring data on encrypted devices.
Page top
Hard drive decryption
You can decrypt hard drives even if there is no current license permitting data encryption.
To decrypt hard drives:
- Open the Kaspersky Security Center Administration Console.
- In the console tree, select Policies.
- Select the necessary policy and double-click to open the policy properties.
- In the policy window, select Data Encryption → Full Disk Encryption.
- In the Encryption technology drop-down list, select the technology with which the hard drives were encrypted.
- Do one of the following:
- In the Encryption mode drop-down list, select the Decrypt all hard drives option if you want to decrypt all encrypted hard drives.
- Add the encrypted hard drives that you want to decrypt to the Do not encrypt the following hard drives table.
This option is available only for Kaspersky Disk Encryption technology.
- Save your changes.
You can use the Encryption Monitor tool to control the disk encryption or decryption process on a user's computer. You can run the Encryption Monitor tool from the main application window.
Encryption Monitor
If the user shuts down or restarts the computer during decryption of hard drives that were encrypted using Kaspersky Disk Encryption technology, the Authentication Agent loads before the next startup of the operating system. Kaspersky Endpoint Security resumes hard drive decryption after successful authentication in the authentication agent and operating system startup.
If the operating system switches to hibernation mode during decryption of hard drives that were encrypted using Kaspersky Disk Encryption technology, Authentication Agent loads when the operating system comes out of hibernation mode. Kaspersky Endpoint Security resumes hard drive decryption after successful authentication in the authentication agent and operating system startup. After hard drive decryption, hibernation mode is unavailable until the first reboot of the operating system.
If the operating system goes into sleep mode during hard drive decryption, Kaspersky Endpoint Security resumes hard drive decryption when the operating system comes out of sleep mode without loading the Authentication Agent.
Page top
Restoring access to a drive protected by Kaspersky Disk Encryption technology
If a user has forgotten the password for accessing a hard drive protected by Kaspersky Disk Encryption technology, you need to start the recovery procedure (Request-Response). You can also use the service account to gain access to the hard disk if this feature is enabled in disk encryption settings.
Restoring access to the system hard drive
Restoring access to a system hard drive protected by Kaspersky Disk Encryption technology consists of the following steps:
- The user reports the request blocks to the administrator (see the figure below).
- The administrator enters the request blocks into Kaspersky Security Center, receives the response blocks and reports the response blocks to the user.
- The user enters the response blocks in the Authentication Agent interface and obtains access to the hard drive.
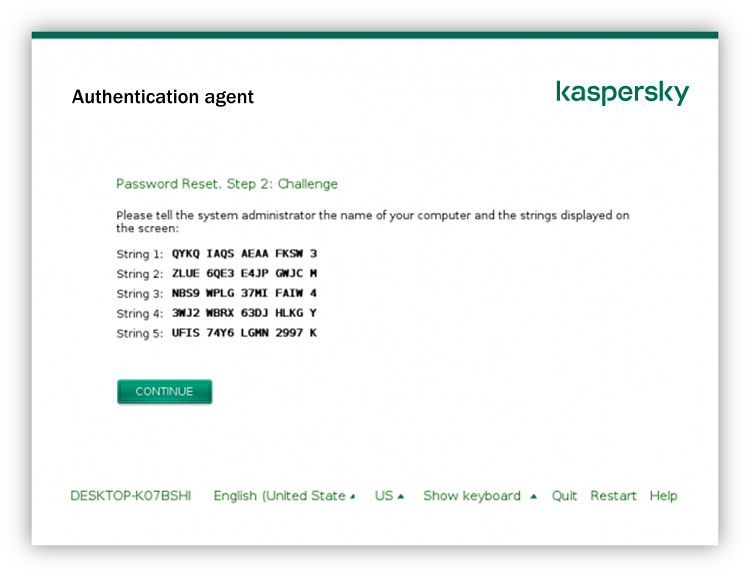
Restoring access to a system hard drive protected by Kaspersky Disk Encryption technology
To start the recovery procedure, the user needs to click the Forgot your password button in the Authentication Agent interface.
- Open the Kaspersky Security Center Administration Console.
- In the console tree, select Devices.
- On the Devices tab, select the computer of the user requesting access to encrypted data and right-click to open the context menu.
- In the context menu, select Grant access in offline mode.
- In the window that opens, select the Authentication Agent tab.
- In the Encryption algorithm in use block, select an encryption algorithm: AES56 or AES256.
The data encryption algorithm depends on the AES encryption library that is included in the distribution package: Strong encryption (AES256) or Lite encryption (AES56). The AES encryption library is installed together with the application.
- In the Account drop-down list, select the name of the Authentication Agent account of the user who requested recovery of access to the drive.
- In the Hard drive drop-down list, select the encrypted hard drive for which you need to recover access.
- In the User request block enter the blocks of request dictated by the user.
As a result, the contents of the blocks of the response to the user's request for recovery of the user name and password of an Authentication Agent account will be displayed in the Access key field. Convey the contents of the response blocks to the user.
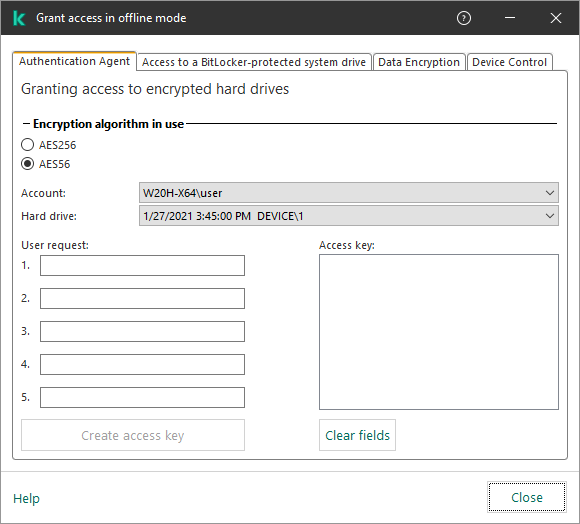
Granting access in offline mode
After completing the recovery procedure, the Authentication Agent will prompt the user to change the password.
Restoring access to a non-system hard drive
Restoring access to a non-system hard drive protected by Kaspersky Disk Encryption technology consists of the following steps:
- The user sends a request access file to the administrator.
- The administrator adds the request access file to Kaspersky Security Center, creates an access key file and sends the file to the user.
- The user adds the access key file to Kaspersky Endpoint Security and obtains access to the hard drive.
To start the recovery procedure, the user needs to attempt to access a hard drive. As a result, Kaspersky Endpoint Security will create a request access file (a file with the KESDC extension), which the user needs to send to the administrator, for example, by email.
- Open the Kaspersky Security Center Administration Console.
- In the console tree, select Devices.
- On the Devices tab, select the computer of the user requesting access to encrypted data and right-click to open the context menu.
- In the context menu, select Grant access in offline mode.
- In the window that opens, select the Data Encryption tab.
- On the Data Encryption tab, click the Browse button.
- In the window for selecting a request access file, specify the path to the file received from the user.
You will see information about the user's request. Kaspersky Security Center generates a key file. Email the generated encrypted data access key file to the user. Or save the access file and use any available method to transfer the file.
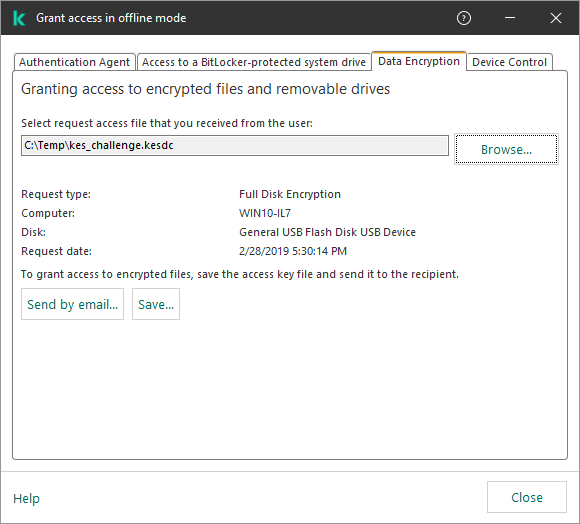
Granting access in offline mode
How to obtain an encrypted non-system hard drive access key file in the Web Console
Page top
Signing in with the Authentication Agent service account
Kaspersky Endpoint Security allows you to add an Authentication Agent service account when encrypting a drive. The service account is necessary to gain access to the computer, for example, when the user forgets the password. You can also use the service account as a reserve account. To add an account, select a service account in disk encryption settings and enter the name of the user account (by default, ServiceAccount). To authenticate using the agent, you will need a one-time password.
How to find out the one-time password in the Administration Console (MMC)
How to find out the one-time password in the Web Console
Kaspersky Endpoint Security automatically updates the password every time a user authenticates with the service account. After authenticating using the agent, you must enter the Windows account password. When signing in with the service account, you cannot use the SSO technology.
Page top
Updating the operating system
There are a number of special considerations for updating the operating system of a computer that is protected by Full Disk Encryption (FDE). Update the operating system as follows: first update the OS on one computer, then update the OS on a small portion of the computers, then update the OS on all computers of the network.
If you are using Kaspersky Disk Encryption technology, Authentication Agent is loaded before the operating system is started. Using Authentication Agent, the user can sign in to the system and receive access to encrypted drives. Then the operating system begins loading.
If you start an update of the operating system on a computer that is protected using Kaspersky Disk Encryption technology, the OS Update Wizard will remove Authentication Agent. As a result, the computer can be locked because the OS loader will not be able to access the encrypted drive.
For details about safely updating the operating system, please refer to the Technical Support Knowledge Base.
Automatic updating of the operating system is available under the following conditions:
- The operating system is updated through WSUS (Windows Server Update Services).
- Windows 10 version 1607 (RS1) or later is installed on the computer.
- Kaspersky Endpoint Security version 11.2.0 or later is installed on the computer.
If all the conditions are met, you can update the operating system in the usual way.
If you are using Kaspersky Disk Encryption (FDE) technology and Kaspersky Endpoint Security for Windows version 11.1.0 or 11.1.1 is installed on the computer, you do not need to decrypt the hard drives to update Windows 10.
To update the operating system, you need to do the following:
- Prior to updating the system, copy the drivers named cm_km.inf, cm_km.sys, klfde.cat, klfde.inf, klfde.sys, klfdefsf.cat, klfdefsf.inf, klfdefsf.sys to a local folder. For example,
C:\fde_drivers. - Run the system update installation with the
/ReflectDriversswitch and specify the folder containing the saved drivers:setup.exe /ReflectDrivers C:\fde_drivers
If you are using BitLocker Drive Encryption technology, you do not need to decrypt the hard drives to update Windows 10. For more details on BitLocker, please visit the Microsoft website.
Page top
Eliminating errors of encryption functionality update
Full Disk Encryption is updated when a previous version of the application is upgraded to Kaspersky Endpoint Security for Windows 12.8.
When starting update of the Full Disk Encryption functionality the following errors may occur:
- Unable to initialize update.
- Device is incompatible with Authentication Agent.
To eliminate errors that occurred when you start update process of the Full Disk Encryption functionality in the new application version:
- Decrypt hard drives.
- Encrypt hard drives once again.
During update of the Full Disk Encryption functionality the following errors may occur:
- Unable to complete the update.
- Full Disk Encryption upgrade rollback completed with an error.
To eliminate errors that occurred during update process of the Full Disk Encryption functionality,
restore access to encrypted devices using Restore Utility.
Page top
Selecting the Authentication Agent tracing level
The application logs service information about the operation of the Authentication Agent and information about the user's operations with the Authentication Agent in the trace file.
To select the Authentication Agent tracing level:
- As soon as a computer with encrypted hard drives starts, press the F3 button to call up a window for configuring Authentication Agent settings.
- Select the tracing level in the Authentication Agent settings window:
- Disable debug logging (default). If this option is selected, the application does not log information about Authentication Agent events in the trace file.
- Enable debug logging. If this option is selected, the application logs information about the operation of the Authentication Agent and the user operations performed with the Authentication Agent in the trace file.
- Enable verbose logging. If this option is selected, the application logs detailed information about the operation of the Authentication Agent and the user operations performed with the Authentication Agent in the trace file.
The level of detail of entries under this option is higher compared to the level of the Enable debug logging option. A high level of detail of entries can slow down the startup of the Authentication Agent and the operating system.
- Enable debug logging and select serial port. If this option is selected, the application logs information about the operation of the Authentication Agent and the user operations performed with the Authentication Agent in the trace file, and relays it via the COM port.
If a computer with encrypted hard drives is connected to another computer via the COM port, Authentication Agent events can be examined from this other computer.
- Enable verbose debug logging and select serial port. If this option is selected, the application logs detailed information about the operation of the Authentication Agent and the user operations performed with the Authentication Agent in the trace file, and relays it via the COM port.
The level of detail of entries under this option is higher compared to the level of the Enable debug logging and select serial port option. A high level of detail of entries can slow down the startup of the Authentication Agent and the operating system.
Data is recorded in the Authentication Agent trace file if there are encrypted hard drives on the computer or during full disk encryption.
The Authentication Agent trace file is not sent to Kaspersky, unlike other trace files of the application. If necessary, you can manually send the Authentication Agent trace file to Kaspersky for analysis.
Page top
Editing Authentication Agent help texts
Before editing help messages of the Authentication Agent, please review the list of supported characters in a preboot environment (see below).
To edit Authentication Agent help messages:
- Open the Kaspersky Security Center Administration Console.
- In the console tree, select Policies.
- Select the necessary policy and double-click to open the policy properties.
- In the policy window, select Data Encryption → Common encryption settings.
- In the Templates block, click the Help button.
- In the window that opens, do the following:
- Select the Authentication tab to edit the help text shown in the Authentication Agent window when account credentials are being entered.
- Select the Change password tab to edit the help text shown in the Authentication Agent window when the password for the Authentication Agent account is being changed.
- Select the Recover password tab to edit the help text shown in the Authentication Agent window when the password for the Authentication Agent account is being recovered.
- Edit help messages.
If you want to restore the original text, click the By default button.
You can enter help text containing 16 lines or less. The maximum length of a line is 64 characters.
- Save your changes.
Limited support for characters in Authentication Agent help messages
In a preboot environment, the following Unicode characters are supported:
- Basic Latin alphabet (0000 - 007F)
- Additional Latin-1 characters (0080 - 00FF)
- Extended Latin-A (0100 - 017F)
- Extended Latin-B (0180 - 024F)
- Uncombined extended ID characters (02B0 - 02FF)
- Combined diacritical marks (0300 - 036F)
- Greek and Coptic alphabets (0370 - 03FF)
- Cyrillic (0400 - 04FF)
- Hebrew (0590 - 05FF)
- Arabic script (0600 - 06FF)
- Additional extended Latin (1E00 - 1EFF)
- Punctuation marks (2000 - 206F)
- Currency symbols (20A0 - 20CF)
- Letter-like symbols (2100 - 214F)
- Geometric figures (25A0 - 25FF)
- Presentation forms of Arabic script-B (FE70 - FEFF)
Characters that are not specified in this list are not supported in a preboot environment. It is not recommended to use such characters in Authentication Agent help messages.
Page top
Removing leftover objects and data after testing the operation of Authentication Agent
During application uninstallation, if Kaspersky Endpoint Security detects objects and data that remained on the system hard drive after test operation of Authentication Agent, application uninstallation is interrupted and becomes impossible until such objects and data are removed.
Objects and data may remain on the system hard drive after test operation of Authentication Agent only in exceptional cases. For example, this can happen if the computer has not been restarted after a Kaspersky Security Center policy with encryption settings was applied, or if the application fails to start after test operation of Authentication Agent.
You can remove objects and data that remained on the system hard drive after test operation of Authentication Agent in the following ways:
- Using the Kaspersky Security Center policy.
- using Restore Utility.
To use a Kaspersky Security Center policy to remove objects and data that remained after test operation of Authentication Agent:
- Apply to the computer a Kaspersky Security Center policy with settings configured to decrypt all computer hard drives.
- Start Kaspersky Endpoint Security.
To remove information about application incompatibility with Authentication Agent,
type the avp pbatestreset command in the command line.
BitLocker Management
BitLocker is an encryption technology built into Windows operating systems. Kaspersky Endpoint Security allows you to control and manage Bitlocker using Kaspersky Security Center. BitLocker encrypts logical volumes. BitLocker cannot be used for encryption of removable drives. For more details on BitLocker, refer to the Microsoft documentation.
BitLocker provides secure storage of access keys using a trusted platform module. A Trusted Platform Module (TPM) is a microchip developed to provide basic functions related to security (for example, to store encryption keys). A Trusted Platform Module is usually installed on the computer motherboard and interacts with all other system components via the hardware bus. Using TPM is the safest way to store BitLocker access keys, since TPM provides pre-startup system integrity verification. You can still encrypt drives on a computer without a TPM. In this case, the access key will be encrypted with a password. BitLocker uses the following authentication methods:
- TPM.
- TPM and PIN.
- Password.
After encrypting a drive, BitLocker creates a master key. Kaspersky Endpoint Security sends the master key to Kaspersky Security Center so that you can restore access to the disk, for example, if a user has forgotten the password.
If a user encrypts a disk using BitLocker, Kaspersky Endpoint Security will send information about disk encryption to Kaspersky Security Center. However, Kaspersky Endpoint Security will not send the master key to Kaspersky Security Center, so it will be impossible to restore access to the disk using Kaspersky Security Center. For BitLocker to work correctly with Kaspersky Security Center, decrypt the drive and re-encrypt the drive using a policy. You can decrypt a drive locally or using a policy.
After encrypting the system hard drive, the user needs to go through BitLocker authentication to boot the operating system. After the authentication procedure, BitLocker will allow for users to log in. BitLocker does not support single sign-on technology (SSO).
If you are using Windows group policies, turn off BitLocker management in the policy settings. Windows policy settings may conflict with Kaspersky Endpoint Security policy settings. When encrypting a drive, errors may occur.
Starting BitLocker Drive Encryption
Prior to starting full disk encryption, you are advised to make sure that the computer is not infected. To do so, start the Full Scan or Critical Areas Scan task. Performing full disk encryption on a computer that is infected by a rootkit may cause the computer to become inoperable.
To use BitLocker Drive Encryption on computers running Windows operating systems for servers, installing the BitLocker Drive Encryption component may be required. Install the component using the operating system tools (Add Roles and Components Wizard). For more information about installing BitLocker Drive Encryption, refer to the Microsoft documentation.
How to run BitLocker Drive Encryption through the Administration Console (MMC)
How to run BitLocker Drive Encryption through the Web Console and Cloud Console
You can use the Encryption Monitor tool to control the disk encryption or decryption process on a user's computer. You can run the Encryption Monitor tool from the main application window.
Encryption Monitor
After the policy is applied, the application will display the following queries, depending on the authentication settings:
- TPM only. No user input required. The disk will be encrypted when the computer restarts.
- TPM + PIN / Password. If a TPM module is available, a PIN code prompt window appears. If a TPM module is not available, you will see a password prompt window for preboot authentication.
- Password only. You will see a password prompt window for preboot authentication.
If the Federal Information Processing standard compatibility mode is enabled for computer operating system, then in Windows 8 and earlier versions of operating system, a request for connecting a storage device is displayed to save the recovery key file. You can save multiple recovery key files on a single storage device.
After setting a password or a PIN, BitLocker will ask you to restart your computer to complete the encryption. Next, the user needs to go through the BitLocker authentication procedure. After the authentication procedure, the user must log on to the system. After the operating system has loaded, BitLocker will complete the encryption.
If there is no access to encryption keys, the user may request the local network administrator to provide a recovery key (if the recovery key was not saved earlier on the storage device or was lost).
BitLocker Drive Encryption component settings
Parameter |
Description |
|---|---|
Enable use of BitLocker authentication requiring pre-boot keyboard input on tablets |
This check box enables / disables the use of authentication requiring data input in a preboot environment, even if the platform does not have the capability for preboot input (for example, with touchscreen keyboards on tablets). The touchscreen of tablet computers is not available in the preboot environment. To complete BitLocker authentication on tablet computers, the user must connect a USB keyboard, for example. If the check box is selected, use of authentication requiring preboot input is allowed. It is recommended to use this setting only for devices that have alternative data input tools in a preboot environment, such as a USB keyboard in addition to touchscreen keyboards. If the check box is cleared, BitLocker Drive Encryption is not possible on tablets. |
Use hardware encryption (Windows 8 and later versions) |
If the check box is selected, the application applies hardware encryption. This lets you increase the speed of encryption and use less computer resources. |
Encrypt used disk space only (reduces encryption time) |
This check box enables / disables the option that limits the encryption area to only occupied hard drive sectors. This limit lets you reduce encryption time. Enabling or disabling the Encrypt used disk space only (reduces encryption time) feature after starting encryption does not modify this setting until the hard drives are decrypted. You must select or clear the check box before starting encryption. If the check box is selected, only portions of the hard drive that are occupied by files are encrypted. Kaspersky Endpoint Security automatically encrypts new data as it is added. If the check box is cleared, the entire hard drive is encrypted, including residual fragments of previously deleted and modified files. This option is recommended for new hard drives whose data has not been modified or deleted. If you are applying encryption on a hard drive that is already in use, it is recommended to encrypt the entire hard drive. This ensures protection of all data, even deleted data that is potentially recoverable. This check box is cleared by default. |
Authentication method |
Only password (Windows 8 and later versions) If this option is selected, Kaspersky Endpoint Security prompts the user for a password when the user attempts to access an encrypted drive. This option can be selected when a Trusted Platform Module (TPM) is not being used. Trusted platform module (TPM) If this option is selected, BitLocker uses a Trusted Platform Module (TPM). A Trusted Platform Module (TPM) is a microchip developed to provide basic functions related to security (for example, to store encryption keys). A Trusted Platform Module is usually installed on the computer motherboard and interacts with all other system components via the hardware bus. For computers running Windows 7 or Windows Server 2008 R2, only encryption using a TPM module is available. If a TPM module is not installed, BitLocker encryption is not possible. Use of a password on these computers is not supported. A device equipped with a Trusted Platform Module can create encryption keys that can be decrypted only with the device. A Trusted Platform Module encrypts encryption keys with its own root storage key. The root storage key is stored within the Trusted Platform Module. This provides an additional level of protection against attempts to hack encryption keys. This action is selected by default. You can set an additional layer of protection for access to the encryption key, and encrypt the key with a password or a PIN:
The selected authentication method must be configured by specifying password or PIN requirements:
|
Automatically recreate recovery key (days) |
Automatically update the password to restore access to a drive protected by BitLocker. If the check box is selected, specify the validity period of the recovery key password. This helps prevent recovery key password reuse. |
Decrypting a hard drive protected by BitLocker
Users can decrypt a disk using the operating system (the Turn Off BitLocker function). After that, Kaspersky Endpoint Security will prompt the user to encrypt the disk again. Kaspersky Endpoint Security will be prompting to encrypt the disk unless you enable disk decryption in the policy.
How to decrypt a hard drive protected by BitLocker through the Administration Console (MMC)
How to decrypt a BitLocker-encrypted hard drive through the Web Console and Cloud Console
You can use the Encryption Monitor tool to control the disk encryption or decryption process on a user's computer. You can run the Encryption Monitor tool from the main application window.
Encryption Monitor
Page top
Restoring access to a drive protected by BitLocker
If a user has forgotten the password for accessing a hard drive encrypted by BitLocker, you need to start the recovery procedure (Request-Response).
If the computer's operating system has Federal Information Processing standard (FIPS) compatibility mode enabled, then in Windows 8 and older the recovery key file is saved to the removable drive before encryption. To restore access to the drive, insert the removable drive and follow the on-screen instructions.
Restoring access to a hard drive encrypted by BitLocker consists of the following steps:
- The user tells the administrator the recovery key ID (see the figure below).
- The administrator verifies the ID of the recovery key in the computer properties in Kaspersky Security Center. The ID that the user provided must match the ID that is displayed in the computer properties.
- If the recovery key IDs match, the administrator provides the user with the recovery key or sends a recovery key file.
A recovery key file is used for computers running the following operating systems:
- Windows 7;
- Windows 8;
- Windows Server 2008;
- Windows Server 2011;
- Windows Server 2012.
For all other operating systems, a recovery key is used.
To prevent the recovery key password reuse, you can configure automatic password update in policy settings.
- The user enters the recovery key and gains access to the hard drive.
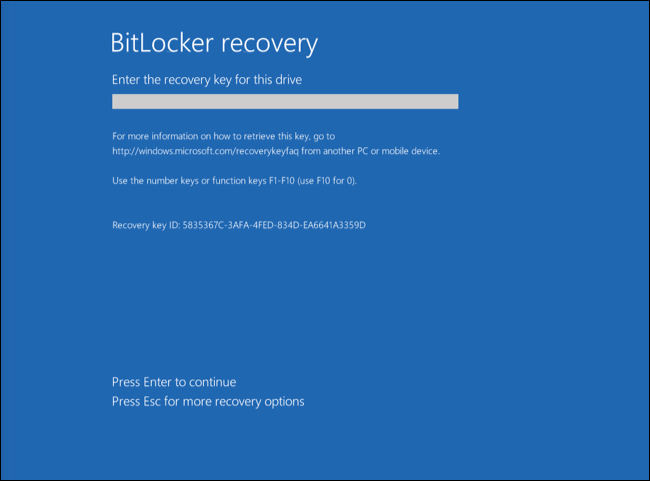
Restoring access to a hard drive encrypted by BitLocker
Restoring access to a system drive
To start the recovery procedure, the user needs to press the Esc key at the pre-boot authentication stage.
- Open the Kaspersky Security Center Administration Console.
- In the console tree, select Managed devices.
- On the Devices tab, select the computer of the user requesting access to encrypted data and right-click to open the context menu.
- In the context menu, select Grant access in offline mode.
- In the window that opens, select the Access to a BitLocker-protected system drive tab.
- Prompt the user for the recovery key ID indicated in the BitLocker password input window, and compare it with the ID in the Recovery key ID field.
If the IDs do not match, this key is not valid for restoring access to the specified system drive. Make sure that the name of the selected computer matches the name of the user's computer.
As a result, you will have access to the recovery key or file of the recovery key, which will need to be transferred to the user.

Restoring access to a drive encrypted with BitLocker
After the operating system is loaded, Kaspersky Endpoint Security prompts the user to change the password or PIN code. After you set a new password or PIN code, BitLocker will create a new master key and send the key to Kaspersky Security Center. As a result, the recovery key and recovery key file will be updated. If the user has not changed the password, you can use the old recovery key the next time the operating system loads.
Windows 7 computers don't allow changing the password or PIN code. After the recovery key is entered and the operating system is loaded, Kaspersky Endpoint Security won't prompt the user to change the password or PIN code. Thus, it is impossible to set a new password or a PIN code. This issue stems from the peculiarities of the operating system. To continue, you need to re-encrypt the hard drive.
Restoring access to a non-system drive
To start the recovery procedure, the user needs to click the Forgot your password link in the window providing access to the drive. After gaining access to the encrypted drive, the user can enable automatic unlocking of the drive during Windows authentication in the BitLocker settings.
- Open the Kaspersky Security Center Administration Console.
- In the Administration Console tree, select the Advanced → Data encryption and protection → Encrypted drives folder.
- In the workspace, select the encrypted device for which you want to create an access key file, then in the context menu of the device, click Get access to the device in Kaspersky Endpoint Security for Windows.
- Prompt the user for the recovery key ID indicated in the BitLocker password input window, and compare it with the ID in the Recovery key ID field.
If the IDs do not match, this key is not valid for restoring access to the specified drive. Make sure that the name of the selected computer matches the name of the user's computer.
- Send the user the key that is indicated in the Recovery key field.
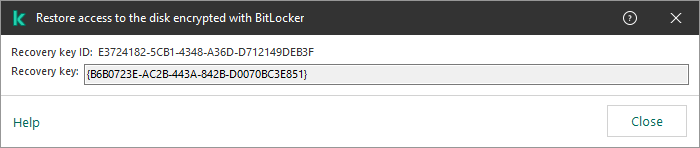
Restoring access to a drive encrypted with BitLocker
Pausing BitLocker protection to update software
There are a number of special considerations for updating the operating system, installing update packages for the operating system, or updating other software with BitLocker protection turned on. Installing updates may require restarting the computer multiple times. After each restart, the user must complete BitLocker authentication. To make sure updates install correctly, you can temporarily turn off BitLocker authentication. In this case the disk stays encrypted and the user has access to data after signing in to the system. To manage BitLocker authentication, you can use the BitLocker Protection Management task. You can use this task to specify the number of computer restarts that do not require BitLocker authentication. In this way, after updates are installed and the BitLocker Protection Management task is complete, BitLocker authentication is automatically enabled. You can enable BitLocker authentication at any time.
How to pause BitLocker protection using the Administration Console (MMC)
How to pause BitLocker protection using Web Console
As a result, when the task is running, after the next restart of the computer, BitLocker does not prompt the user for authentication. After each restart of the computer without BitLocker authentication, Kaspersky Endpoint Security generates a corresponding event and records the number of remaining restarts. Kaspersky Endpoint Security then sends the event to Kaspersky Security Center to be monitored by the administrator. You can also view the number of remaining restarts in the Managed devices folder of Kaspersky Security Center console in the device status description.
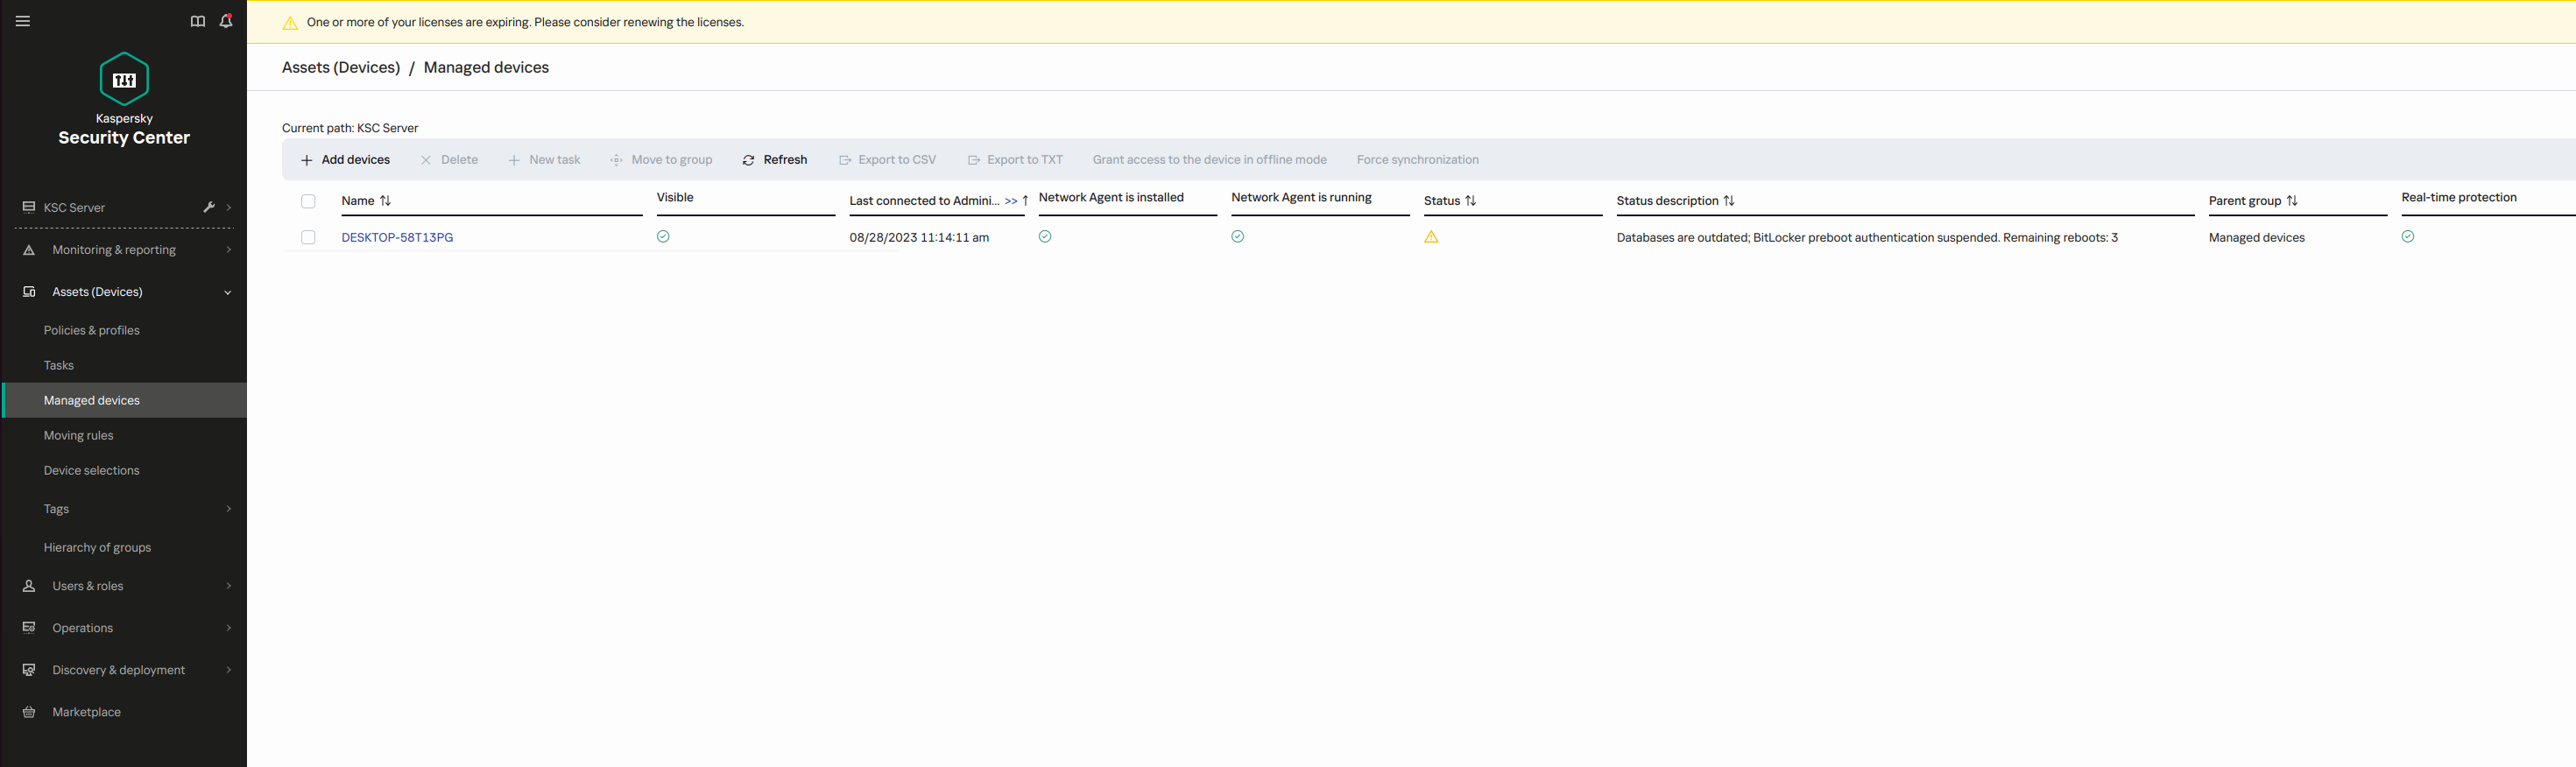
The list of managed devices
When the specified number of restarts or the expiration time of the task is reached, BitLocker authentication is automatically turned on. To gain access to data, the user must complete BitLocker authentication.
On computers running Windows 7, BitLocker cannot count computer restarts. Counting restarts on Windows 7 computers is handled by Kaspersky Endpoint Security. Thus to automatically turn on BitLocker authentication after each restart, Kaspersky Endpoint Security must be started.
To turn on BitLocker authentication ahead of time, open the BitLocker Protection Management task properties and select Request authentication each time in preboot.
Page top
File Level Encryption on local computer drives
This component is available if Kaspersky Endpoint Security is installed on a computer that runs on Windows for workstations. This component is unavailable if Kaspersky Endpoint Security is installed on a computer that runs on Windows for servers.
File encryption has the following special features:
- Kaspersky Endpoint Security encrypts / decrypts files in predefined folders only for local user profiles of the operating system. Kaspersky Endpoint Security does not encrypt or decrypt files in predefined folders of roaming user profiles, mandatory user profiles, temporary user profiles, or redirected folders.
- Kaspersky Endpoint Security does not encrypt files whose modification could harm the operating system and installed applications. For example, the following files and folders with all nested folders are on the list of encryption exclusions:
- %WINDIR%;
- %PROGRAMFILES% and %PROGRAMFILES(X86)%;
- Windows registry files.
The list of encryption exclusions cannot be viewed or edited. While files and folders on the list of encryption exclusions can be added to the encryption list, they will not be encrypted during file encryption.
Encrypting files on local computer drives
Kaspersky Endpoint Security does not encrypt files that are located in OneDrive cloud storage or in other folders that have OneDrive as their name. Kaspersky Endpoint Security also blocks the copying of encrypted files to OneDrive folders if those files are not added to the decryption rule.
To encrypt files on local drives:
- Open the Kaspersky Security Center Administration Console.
- In the console tree, select Policies.
- Select the necessary policy and double-click to open the policy properties.
- In the policy window, select Data Encryption → File Level Encryption.
- In the Encryption mode drop-down list, select According to rules.
- On the Encryption tab, click the Add button, and in the drop-down list select one of the following items:
- Select the Predefined folders item to add files from folders of local user profiles suggested by Kaspersky experts to an encryption rule.
- Documents. Files in the standard Documents folder of the operating system, and its subfolders.
- Favorites. Files in the standard Favorites folder of the operating system, and its subfolders.
- Desktop. Files in the standard Desktop folder of the operating system, and its subfolders.
- Temporary files. Temporary files related to the operation of applications installed on the computer. For example, Microsoft Office applications create temporary files containing backup copies of documents.
It is not recommended to encrypt temporary files, as this can cause data loss. For example, Microsoft Word creates temporary files when processing a document. If temporary files are encrypted, but the original file is not, the user may receive an Access Denied error when trying to save the document. Additionally, Microsoft Word might save the file, but it will not be possible to open the document the next time, i.e. the data will be lost.
- Outlook files. Files related to the operation of the Outlook mail client: data files (PST), offline data files (OST), offline address book files (OAB), and personal address book files (PAB).
- Select the Custom folder item to add a manually entered folder path to an encryption rule.
When adding a folder path, adhere to the following rules:
- Use an environment variable (for example,
%FOLDER%\UserFolder\). You can use an environment variable only once and only at the beginning of the path. - Do not use relative paths.
- Do not use the
*and?characters. - Do not use UNC paths.
- Use
;or,as a separator character.
- Use an environment variable (for example,
- Select the Files by extension item to add individual file extensions to an encryption rule. Kaspersky Endpoint Security encrypts files with the specified extensions on all local drives of the computer.
- Select the Files by groups of extensions item to add groups of file extensions to an encryption rule (for example, Microsoft Office documents). Kaspersky Endpoint Security encrypts files that have the extensions listed in the groups of extensions on all local drives of the computer.
- Select the Predefined folders item to add files from folders of local user profiles suggested by Kaspersky experts to an encryption rule.
- Save your changes.
As soon as the policy is applied, Kaspersky Endpoint Security encrypts the files that are included in the encryption rule and not included in the decryption rule.
File encryption has the following special features:
- If the same file is added to both an encryption rule and a decryption rule, then Kaspersky Endpoint Security performs the following actions:
- If the file is not encrypted, Kaspersky Endpoint Security does not encrypt this file.
- If the file is encrypted, Kaspersky Endpoint Security decrypts this file.
- Kaspersky Endpoint Security continues to encrypt new files if these files meet the criteria of the encryption rule. For example, when you change the properties of an unencrypted file (path or extension), the file then meets the criteria of the encryption rule. Kaspersky Endpoint Security encrypts this file.
- When the user creates a new file whose properties meet the encryption rule criteria, Kaspersky Endpoint Security encrypts the file as soon as it is opened.
- Kaspersky Endpoint Security postpones the encryption of open files until they are closed.
- If you move an encrypted file to another folder on the local drive, the file remains encrypted regardless of whether or not this folder is included in the encryption rule.
- If you decrypt a file and copy it to another local folder that is not included in the decryption rule, a copy of the file may be encrypted. To prevent the copied file from being encrypted, create a decryption rule for the target folder.
Forming encrypted file access rules for applications
To form encrypted file access rules for applications:
- Open the Kaspersky Security Center Administration Console.
- In the console tree, select Policies.
- Select the necessary policy and double-click to open the policy properties.
- In the policy window, select Data Encryption → File Level Encryption.
- In the Encryption mode drop-down list, select According to rules.
Access rules are applied only when in the According to rules mode. After applying access rules in According to rules mode, if you switch to Leave unchanged mode, Kaspersky Endpoint Security will ignore all access rules. All applications will have access to all encrypted files.
- In the right part of the window, select the Rules for applications tab.
- If you want to select applications exclusively from the Kaspersky Security Center list, click the Add button and in the drop-down list select the Applications from Kaspersky Security Center list item.
- Specify the filters to narrow down the list of applications in the table. To do so, specify the values of the Application, Vendor, and Period added parameters, and all check boxes from the Group block.
- Click Refresh.
- The table lists applications that match the applied filters.
- In the Application column, select check boxes opposite the applications for which you want to form encrypted file access rules.
- In the Rule for applications drop-down list, select the rule that will determine the access of applications to encrypted files.
- In the Actions for applications that were selected earlier drop-down list, select the action to be taken by Kaspersky Endpoint Security on encrypted file access rules that were previously formed for such applications.
The details of an encrypted file access rule for applications appear in the table on the Rules for applications tab.
- If you want to manually select applications, click the Add button and in the drop-down list select the Custom applications item.
- In the entry field, type the name or list of names of executable application files, including their extensions.
You can also add the names of executable files of applications from the Kaspersky Security Center list by clicking the Add from Kaspersky Security Center list button.
- If required, in the Description field, enter a description of the list of applications.
- In the Rule for applications drop-down list, select the rule that will determine the access of applications to encrypted files.
The details of an encrypted file access rule for applications appear in the table on the Rules for applications tab.
- In the entry field, type the name or list of names of executable application files, including their extensions.
- Save your changes.
Encrypting files that are created or modified by specific applications
You can create a rule by which Kaspersky Endpoint Security will encrypt all files created or modified by the applications specified in the rule.
Files that were created or modified by the specified applications before the encryption rule was applied will not be encrypted.
To configure encryption of files that are created or modified by specific applications:
- Open the Kaspersky Security Center Administration Console.
- In the console tree, select Policies.
- Select the necessary policy and double-click to open the policy properties.
- In the policy window, select Data Encryption → File Level Encryption.
- In the Encryption mode drop-down list, select According to rules.
Encryption rules are applied only in According to rules mode. After applying encryption rules in According to rules mode, if you switch to Leave unchanged mode, Kaspersky Endpoint Security will ignore all encryption rules. Files that were previously encrypted will remain encrypted.
- In the right part of the window, select the Rules for applications tab.
- If you want to select applications exclusively from the Kaspersky Security Center list, click the Add button and in the drop-down list select the Applications from Kaspersky Security Center list item.
- Specify the filters to narrow down the list of applications in the table. To do so, specify the values of the Application, Vendor, and Period added parameters, and all check boxes from the Group block.
- Click Refresh.
The table lists applications that match the applied filters.
- In the Application column, select the check boxes next to the applications whose created files you want to encrypt.
- In the Rule for applications drop-down list, select Encrypt all created files.
- In the Actions for applications that were selected earlier drop-down list, select the action to be taken by Kaspersky Endpoint Security on file encryption rules that were previously formed for such applications.
Information about the encryption rule for files created or modified by selected applications is displayed in the table on the Rules for applications tab.
- If you want to manually select applications, click the Add button and in the drop-down list select the Custom applications item.
- In the entry field, type the name or list of names of executable application files, including their extensions.
You can also add the names of executable files of applications from the Kaspersky Security Center list by clicking the Add from Kaspersky Security Center list button.
- If required, in the Description field, enter a description of the list of applications.
- In the Rule for applications drop-down list, select Encrypt all created files.
Information about the encryption rule for files created or modified by selected applications is displayed in the table on the Rules for applications tab.
- In the entry field, type the name or list of names of executable application files, including their extensions.
- Save your changes.
Generating a decryption rule
To generate a decryption rule:
- Open the Kaspersky Security Center Administration Console.
- In the console tree, select Policies.
- Select the necessary policy and double-click to open the policy properties.
- In the policy window, select Data Encryption → File Level Encryption.
- In the Encryption mode drop-down list, select According to rules.
- On the Decryption tab, click the Add button, and in the drop-down list select one of the following items:
- Select the Predefined folders item to add files from folders of local user profiles suggested by Kaspersky experts to a decryption rule.
- Select the Custom folder item to add a manually entered folder path to a decryption rule.
- Select the Files by extension item to add individual file extensions to a decryption rule. Kaspersky Endpoint Security does not encrypt files with the specified extensions on all local drives of the computer.
- Select the Files by groups of extensions item to add groups of file extensions to a decryption rule (for example, Microsoft Office documents). Kaspersky Endpoint Security does not encrypt files that have the extensions listed in the groups of extensions on all local drives of the computer.
- Save your changes.
If the same file has been added to the encryption rule and the decryption rule, Kaspersky Endpoint Security does not encrypt this file if it is not encrypted, and decrypts the file if it is encrypted.
Page top
Decrypting files on local computer drives
To decrypt files on local drives:
- Open the Kaspersky Security Center Administration Console.
- In the console tree, select Policies.
- Select the necessary policy and double-click to open the policy properties.
- In the policy window, select Data Encryption → File Level Encryption.
- In the right part of the window, select the Encryption tab.
- Remove files and folders that you want to decrypt from the encryption list. To do so, select files and select the Delete rule and decrypt files item in the context menu of the Delete button.
Files and folders removed from the encryption list are automatically added to the decryption list.
- Form a file decryption list.
- Save your changes.
As soon as the policy is applied, Kaspersky Endpoint Security decrypts encrypted files that are added to the decryption list.
Kaspersky Endpoint Security decrypts encrypted files if their parameters (file path / file name / file extension) change to match the parameters of objects added to the decryption list.
Kaspersky Endpoint Security postpones the decryption of open files until they are closed.
Page top
Creating encrypted packages
To protect your data when sending files to users outside the corporate network, you can use encrypted packages. Encrypted packages can be convenient for transferring large files on removable drives, as email clients have file size restrictions.
Before creating encrypted packages, Kaspersky Endpoint Security will prompt the user for a password. To reliably protect the data, you can enable password strength check and specify password strength requirements. This will prevent users from using short and simple passwords, for example, 1234.
How to enable password strength check when creating encrypted archives in the Web Console
You can create encrypted packages on computers with Kaspersky Endpoint Security installed with File Level Encryption available.
When adding a file to the encrypted package whose contents reside in OneDrive cloud storage, Kaspersky Endpoint Security downloads the contents of the file and performs encryption.
To create an encrypted package:
- In any file manager, select the files or folders that you want to add to the encrypted package. Right-click to open their context menu.
- In the context menu, select New encrypted package (see figure below).
Creating an encrypted package
- In the window that opens, specify the password and confirm it.
The password must meet the complexity criteria specified in the policy.
- Click Create.
The encrypted package creation process starts. Kaspersky Endpoint Security does not perform file compression when it creates an encrypted package. When the process finishes, a self-extracting password-protected encrypted package (an executable file with .exe extension – ![]() ) is created in the selected destination folder.
) is created in the selected destination folder.
To access files in an encrypted package, double-click it to start the Unpacking Wizard, then enter the password. If you forgot or lost your password, it is not possible to recover it and access the files in the encrypted package. You can recreate the encrypted package.
Page top
Restoring access to encrypted files
When files are encrypted, Kaspersky Endpoint Security receives an encryption key required for directly accessing the encrypted files. Using this encryption key, a user working under any Windows user account that was active during file encryption can directly access the encrypted files. Users working under Windows accounts that were inactive during file encryption must connect to Kaspersky Security Center in order to access the encrypted files.
Encrypted files may be inaccessible under the following circumstances:
- The user's computer stores encryption keys, but there is no connection with Kaspersky Security Center for managing them. In this case, the user must request access to encrypted files from the LAN administrator.
If access to Kaspersky Security Center does not exist, you must:
- request an access key for access to encrypted files on computer hard drives;
- to access encrypted files that are stored on removable drives, request separate access keys for encrypted files on each removable drive.
- Encryption components are deleted from the user's computer. In this event, the user may open encrypted files on local and removable disks but the contents of those files will appear encrypted.
The user may work with encrypted files under the following circumstances:
- Files are placed inside encrypted packages created on a computer with Kaspersky Endpoint Security installed.
- Files are stored on removable drives on which portable mode has been allowed.
To gain access to encrypted files, the user needs to start the recovery procedure (Request-Response).
Recovering access to encrypted files consists of the following steps:
- The user sends a request access file to the administrator (see the figure below).
- The administrator adds the request access file to Kaspersky Security Center, creates an access key file and sends the file to the user.
- The user adds the access key file to Kaspersky Endpoint Security and gains access to the files.
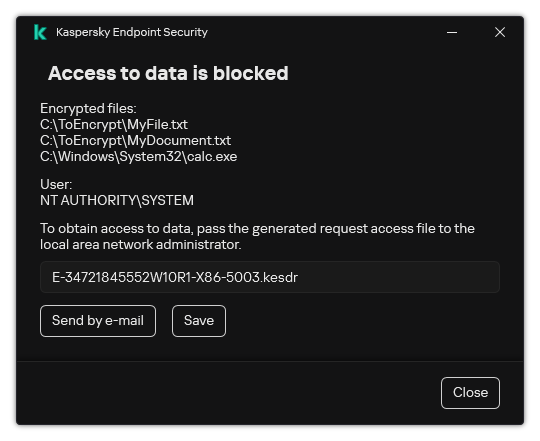
Restoring access to encrypted files
To start the recovery procedure, the user needs to attempt to access a file. As a result, Kaspersky Endpoint Security will create a request access file (a file with the KESDC extension), which the user needs to send to the administrator, for example, by email.
Kaspersky Endpoint Security generates a request access file for access to all encrypted files stored on the computer's drive (local drive or removable drive).
How to obtain an encrypted data access key file in the Administration Console (MMC)
- Open the Kaspersky Security Center Administration Console.
- In the console tree, select Devices.
- On the Devices tab, select the computer of the user requesting access to encrypted data and right-click to open the context menu.
- In the context menu, select Grant access in offline mode.
- In the window that opens, select the Data Encryption tab.
- On the Data Encryption tab, click the Browse button.
- In the window for selecting a request access file, specify the path to the file received from the user.
You will see information about the user's request. Kaspersky Security Center generates a key file. Email the generated encrypted data access key file to the user. Or save the access file and use any available method to transfer the file.
Granting access in offline mode
How to obtain an encrypted data access key file in the Web Console
After receiving the encrypted data access key file, the user needs to run the file by double-clicking it. As a result, Kaspersky Endpoint Security will grant access to all encrypted files stored on the drive. To access encrypted files that are stored on other drives, you must obtain a separate access key file for each drive.
Page top
Restoring access to encrypted data after operating system failure
You can restore access to data after operating system failure only for file level encryption (FLE). You cannot restore access to data if full disk encryption (FDE) is used.
To restore access to encrypted data after operating system failure:
- Reinstall the operating system without formatting the hard drive.
- Install Kaspersky Endpoint Security.
- Establish a connection between the computer and the Kaspersky Security Center Administration Server that controlled the computer when the data was encrypted.
Access to encrypted data will be granted under the same conditions that applied before operating system failure.
Page top
Editing templates of encrypted file access messages
To edit templates of encrypted file access messages:
- Open the Kaspersky Security Center Administration Console.
- In the console tree, select Policies.
- Select the necessary policy and double-click to open the policy properties.
- In the policy window, select Data Encryption → Common encryption settings.
- In the Templates block, click the Templates button.
- In the window that opens, do the following:
- If you want to edit the user message template, select the User's message tab. The following window opens when the user attempts to access an encrypted file while there is no key available on the computer for access to encrypted files (see figure below). Clicking the Send by e-mail button automatically creates a user message. This message is sent to the corporate LAN administrator along with the file requesting access to encrypted files.
- If you want to edit the administrator message template, select the Administrator's message tab. The user receives this message after access to encrypted files is granted.
- Edit the message templates.
- Save your changes.
Restoring access to encrypted files
Encryption of removable drives
This component is available if Kaspersky Endpoint Security is installed on a computer that runs on Windows for workstations. This component is unavailable if Kaspersky Endpoint Security is installed on a computer that runs on Windows for servers.
Kaspersky Endpoint Security supports encryption of files in FAT32 and NTFS file systems. If a removable drive with an unsupported file system is connected to the computer, the encryption task for this removable drive ends with an error and Kaspersky Endpoint Security assigns the read-only status to the removable drive.
To protect data on removable drives, you can use the following types of encryption:
- Full Disk Encryption (FDE).
Encryption of the entire removable drive, including the file system.
It is not possible to access encrypted data outside the corporate network. It is also impossible to access encrypted data inside the corporate network if the computer is not connected to Kaspersky Security Center (e.g. on a guest computer).
- File Level Encryption (FLE).
Encryption of only files on a removable drive. The file system remains unchanged.
Encryption of files on removable drives provides the capability to access data outside the corporate network using a special mode called portable mode.
During encryption, Kaspersky Endpoint Security creates a master key. Kaspersky Endpoint Security saves the master key in the following repositories:
- Kaspersky Security Center.
- User's computer.
The master key is encrypted with the user's secret key.
- Removable drive.
The master key is encrypted with the public key of Kaspersky Security Center.
After encryption is complete, the data on the removable drive can be accessed within the corporate network as if was on an ordinary unencrypted removable drive.
Accessing encrypted data
When a removable drive with encrypted data is connected, Kaspersky Endpoint Security performs the following actions:
- Checks for a master key in the local storage on the user's computer.
If the master key is found, the user gains access to the data on the removable drive.
If the master key is not found, Kaspersky Endpoint Security performs the following actions:
- Sends a request to Kaspersky Security Center.
After receiving the request, Kaspersky Security Center sends a response that contains the master key.
- Kaspersky Endpoint Security saves the master key in the local storage on the user's computer for subsequent operations with the encrypted removable drive.
- Sends a request to Kaspersky Security Center.
- Decrypts the data.
Special features of removable drive encryption
Encryption of removable drives has the following special features:
- The policy with preset settings for removable drive encryption is formed for a specific group of managed computers. Therefore, the result of applying the Kaspersky Security Center policy configured for encryption / decryption of removable drives depends on the computer to which the removable drive is connected.
- Kaspersky Endpoint Security does not encrypt / decrypt read-only files that are stored on removable drives.
- The following device types are supported as removable drives:
- Data media connected via the USB bus
- hard drives connected via USB and FireWire buses
- SSD drives connected via USB and FireWire buses
Starting encryption of removable drives
You can use a policy to decrypt a removable drive. A policy with defined settings for removable drive encryption is generated for a specific administration group. Therefore, the result of data decryption on removable drives depends on the computer to which the removable drive is connected.
Kaspersky Endpoint Security supports encryption of files in FAT32 and NTFS file systems. If a removable drive with an unsupported file system is connected to the computer, the encryption task for this removable drive ends with an error and Kaspersky Endpoint Security assigns the read-only status to the removable drive.
Before encrypting files on a removable drive, make sure it is formatted and there are no hidden partitions (such as an EFI system partition). If the drive contains unformatted or hidden partitions, file encryption may fail with an error.
To encrypt removable drives:
- Open the Kaspersky Security Center Administration Console.
- In the console tree, select Policies.
- Select the necessary policy and double-click to open the policy properties.
- In the policy window, select Data Encryption → Encryption of removable drives.
- In the Encryption mode drop-down list, select the default action that you want Kaspersky Endpoint Security to perform on removable drives:
- Encrypt entire removable drive (FDE). Kaspersky Endpoint Security encrypts the contents of a removable drive sector by sector. As a result, the application encrypts not only the files stored on the removable drive but also its file systems, including the file names and folder structures on the removable drive.
- Encrypt all files (FLE). Kaspersky Endpoint Security encrypts all files that are stored on removable drives. The application does not encrypt the file systems of removable drives, including the names of files and folder structures.
- Encrypt new files only (FLE). Kaspersky Endpoint Security encrypts only those files that have been added to removable drives or that were stored on removable drives and have been modified after the Kaspersky Security Center policy was last applied.
Kaspersky Endpoint Security does not encrypt a removable drive that is already encrypted.
- If you want to use portable mode for encryption of removable drives, select the Portable mode check box.
Portable mode is a mode of file encryption (FLE) on removable drives that provides the ability to access data outside of a corporate network. Portable mode also lets you work with encrypted data on computers that do not have Kaspersky Endpoint Security installed.
- If you want to encrypt a new removable drive, it is recommended to select the Encrypt used disk space only check box. If the check box is cleared, Kaspersky Endpoint Security will encrypt all files, including the residual fragments of deleted or modified files.
- If you want to configure encryption for individual removable drives, define encryption rules.
- If you want to use full disk encryption of removable drives in offline mode, select the Allow encryption of removable drives in offline mode check box.
Offline encryption mode refers to encryption of removable drives (FDE) when there is no connection to Kaspersky Security Center. During encryption, Kaspersky Endpoint Security saves the master key only on the user's computer. Kaspersky Endpoint Security will send the master key to Kaspersky Security Center during the next synchronization.
If the computer on which the master key is saved is corrupted and data is not sent to Kaspersky Security Center, it is not possible to obtain access to the removable drive.
If the Allow encryption of removable drives in offline mode check box is cleared and there is no connection to Kaspersky Security Center, removable drive encryption is not possible.
- Save your changes.
After the policy is applied, when the user connects a removable drive or if a removable drive is already connected, Kaspersky Endpoint Security prompts the user for confirmation to perform the encryption operation (see the figure below).
The application lets you perform the following actions:
- If the user confirms the encryption request, Kaspersky Endpoint Security encrypts the data.
- If the user declines the encryption request, Kaspersky Endpoint Security leaves the data unchanged and assigns read-only access for this removable drive.
- If the user does not respond to the encryption request, Kaspersky Endpoint Security leaves the data unchanged and assigns read-only access for this removable drive. The application prompts for confirmation again when subsequently applying a policy or the next time this removable drive is connected.
If the user initiates safe removal of a removable drive during data encryption, Kaspersky Endpoint Security interrupts the data encryption process and allows removal of the removable drive before the encryption process has finished. Data encryption will be continued the next time the removable drive is connected to this computer.
If encryption of a removable drive failed, view the Data Encryption report in the Kaspersky Endpoint Security interface. Access to files may be blocked by another application. In this case, try unplugging the removable drive from the computer and connecting it again.
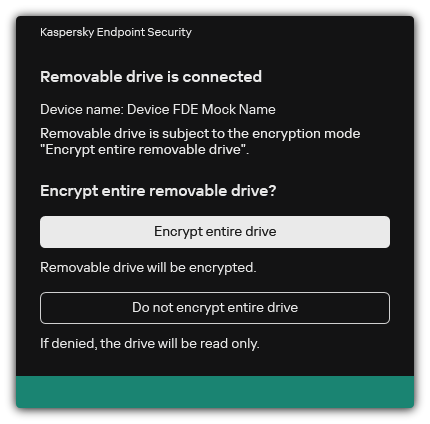
Removable drive encryption request
Page top
Adding an encryption rule for removable drives
To add an encryption rule for removable drives:
- Open the Kaspersky Security Center Administration Console.
- In the console tree, select Policies.
- Select the necessary policy and double-click to open the policy properties.
- In the policy window, select Data Encryption → Encryption of removable drives.
- Click the Add button, and in the drop-down list select one of the following items:
- If you want to add encryption rules for removable drives that are in the list of trusted devices of the Device Control component, select From list of trusted devices of this policy.
- If you want to add encryption rules for removable drives that are in the Kaspersky Security Center list, select From Kaspersky Security Center list of devices.
- In the Encryption mode for selected devices drop-down list, select the action to be performed by Kaspersky Endpoint Security on files stored on the selected removable drives.
- Select the Portable mode check box if you want Kaspersky Endpoint Security to prepare removable drives before encryption, making it possible to use encrypted files stored on them in portable mode.
Portable mode lets you use encrypted files stored on removable drives that are connected to computers without encryption functionality.
- Select the Encrypt used disk space only check box if you want Kaspersky Endpoint Security to encrypt only those disk sectors that are occupied by files.
If you are applying encryption on a drive that is already in use, it is recommended to encrypt the entire drive. This ensures that all data is protected – even deleted data that might still contain retrievable information. The Encrypt used disk space only function is recommended for new drives that have not been previously used.
If a device was previously encrypted using the Encrypt used disk space only function, after applying a policy in Encrypt entire removable drive mode, sectors that are not occupied by files will still not be encrypted.
- In the Actions for devices that were selected earlier drop-down list, select the action to be performed by Kaspersky Endpoint Security according to encryption rules that had been previously defined for removable drives:
- If you want the previously created encryption rule for the removable drive to remain unchanged, select Skip.
- If you want the previously created encryption rule for the removable drive to be replaced by the new rule, select Refresh.
- Save your changes.
The added encryption rules for removable drives will be applied to removable drives connected to any computers in the organization.
Page top
Exporting and importing a list of encryption rules for removable drives
You can export the list of removable drive encryption rules to an XML file. Then you can modify the file to, for example, add a large number of rules for the same type of removable drives. You can also use the export/import function to back up the list of rules or to migrate the rules to a different server.
How to export and import a list of removable drive encryption rules in the Web Console
Page top
Portable mode for accessing encrypted files on removable drives
Portable mode is a mode of file encryption (FLE) on removable drives that provides the ability to access data outside of a corporate network. Portable mode also lets you work with encrypted data on computers that do not have Kaspersky Endpoint Security installed.
Portable mode is convenient to use in the following cases:
- There is no connection between the computer and the Kaspersky Security Center Administration Server.
- The infrastructure has changed with the change of the Kaspersky Security Center Administration Server.
- Kaspersky Endpoint Security is not installed on the computer.
Portable File Manager
To work in portable mode, Kaspersky Endpoint Security installs a special encryption module named Portable File Manager on a removable drive. The Portable File Manager provides an interface for working with encrypted data if Kaspersky Endpoint Security is not installed on the computer (see the figure below). If Kaspersky Endpoint Security is installed on your computer, you can work with encrypted removable drives using your usual file manager (for example, Explorer).
The Portable File Manager stores a key to encrypt files on a removable drive. The key is encrypted with the user password. The user sets a password before encrypting files on a removable drive.
The Portable File Manager starts automatically when a removable drive is connected to a computer on which Kaspersky Endpoint Security is not installed. If automatic startup of applications is disabled on the computer, manually start the Portable File Manager. To do so, run the file named pmv.exe that is stored on the removable drive.
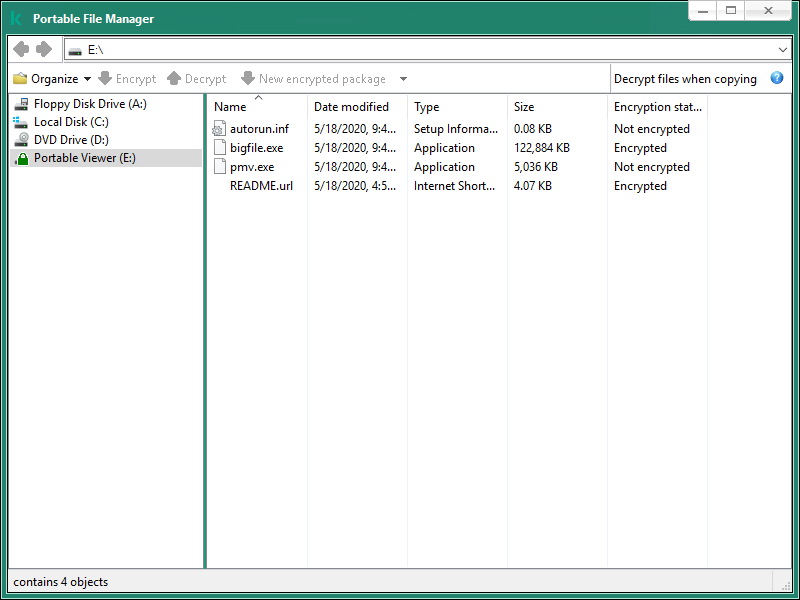
Portable File Manager
Support for portable mode for working with encrypted files
- Open the Kaspersky Security Center Administration Console.
- In the console tree, select Policies.
- Select the necessary policy and double-click to open the policy properties.
- In the policy window, select Data Encryption → Encryption of removable drives.
- In the Encryption mode for selected devices drop-down list, select Encrypt all files or Encrypt new files only.
Portable mode is available only with File Level Encryption (FLE). It is not possible to enable portable mode support for Full Disk Encryption (FDE).
- Select the Portable mode check box.
- If necessary, add encryption rules for individual removable drives.
- Save your changes.
- After applying the policy, connect the removable drive to the computer.
- Confirm the removable drive encryption operation.
This opens a window in which you can create a password for Portable File Manager.
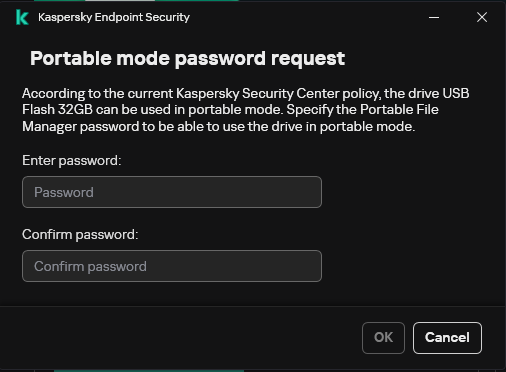
Portable mode password request
- Specify a password that meets the strength requirements and confirm it.
- Save your changes.
- In the main window of the Web Console, select Assets (Devices) → Policies & profiles.
- Click the name of the Kaspersky Endpoint Security policy.
The policy properties window opens.
- Select the Application settings tab.
- Go to Data Encryption → Encryption of removable drives.
- In the Manage encryption block, select Encrypt all files or Encrypt new files only.
Portable mode is available only with File Level Encryption (FLE). It is not possible to enable portable mode support for Full Disk Encryption (FDE).
- Select the Portable mode check box.
- If necessary, add encryption rules for individual removable drives.
- Save your changes.
- After applying the policy, connect the removable drive to the computer.
- Confirm the removable drive encryption operation.
This opens a window in which you can create a password for Portable File Manager.
Portable mode password request
- Specify a password that meets the strength requirements and confirm it.
- Save your changes.
Kaspersky Endpoint Security will encrypt files on the removable drive. The Portable File Manager used for working with encrypted files will also be added to the removable drive. If there are already encrypted files on the removable drive, Kaspersky Endpoint Security will encrypt them again using its own key. This allows the user to access all files on the removable drive in portable mode.
Accessing encrypted files on a removable drive
After encrypting files on a removable drive with portable mode support, the following file access methods are available:
- If Kaspersky Endpoint Security is not installed on the computer, the Portable File Manager will prompt you to enter a password. You will need to enter the password each time you restart the computer or reconnect the removable drive.
- If the computer is located outside the corporate network and Kaspersky Endpoint Security is installed on the computer, the application will prompt you to enter the password or send the administrator a request to access the files. After gaining access to files on a removable drive, Kaspersky Endpoint Security will save the secret key in the computer's key storage. This will allow access to files in the future without entering a password or asking the administrator (see figure below).
- If the computer is located inside the corporate network and Kaspersky Endpoint Security is installed on the computer, you will get access to the device without entering a password. Kaspersky Endpoint Security will receive the secret key from the Kaspersky Security Center Administration Server to which the computer is connected.
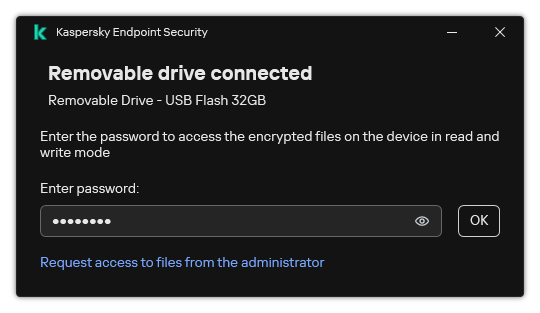
Accessing encrypted files on a removable drive
Recovering the password for working in portable mode
If you have forgotten the password for working in portable mode, you need to connect the removable drive to a computer with Kaspersky Endpoint Security installed inside the corporate network. You will get access to the files because the secret key is stored in the computer's key storage or on the Administration Server. Decrypt and re-encrypt files with a new password.
Features of portable mode when connecting a removable drive to a computer from another network
If the computer is located outside the corporate network and Kaspersky Endpoint Security is installed on the computer, you can access the files in the following ways:
- Password-based access
After entering the password, you will be able to view, modify, and save files on the removable drive (transparent access). Kaspersky Endpoint Security can set a read-only access right for a removable drive if the following parameters are configured in the policy settings for encryption of removable drives:
- Portable mode support is disabled.
- The Encrypt all files or Encrypt new files only mode is selected.
In all other cases, you will get full access to the removable drive (read/write permission). You will be able to add and delete files.
You can change the removable drive access permissions even while the removable drive is connected to the computer. If the removable drive access permissions are changed, Kaspersky Endpoint Security will block access to the files and prompt you for the password again.
After entering the password, you cannot apply encryption policy settings for the removable drive. In this case, it is impossible to decrypt or re-encrypt files on the removable drive.
- Ask the administrator for access to files
If you have forgotten the password for working in portable mode, ask the administrator for access to files. To access the files, the user needs to send the administrator a request access file (a file with the KESDC extension). The user can send the request access file by email, for example. The administrator will send an encrypted data access file (a file with the KESDR extension).
After you complete the Request-Response password recovery procedure, you will receive transparent access to files on the removable drive, and full access to the removable drive (read/write permission).
You can apply a removable drive encryption policy, and decrypt files, for example. After recovering the password or when the policy is updated, Kaspersky Endpoint Security will prompt you to confirm the changes.
How to obtain an encrypted data access file in the Administration Console (MMC)
- Open the Kaspersky Security Center Administration Console.
- In the console tree, select Devices.
- On the Devices tab, select the computer of the user requesting access to encrypted data and right-click to open the context menu.
- In the context menu, select Grant access in offline mode.
- In the window that opens, select the Data Encryption tab.
- On the Data Encryption tab, click the Browse button.
- In the window for selecting a request access file, specify the path to the file received from the user.
You will see information about the user's request. Kaspersky Security Center generates a key file. Email the generated encrypted data access key file to the user. Or save the access file and use any available method to transfer the file.
Granting access in offline mode
How to obtain an encrypted data access file in the Web Console
Decryption of removable drives
You can use a policy to decrypt a removable drive. A policy with defined settings for removable drive encryption is generated for a specific administration group. Therefore, the result of data decryption on removable drives depends on the computer to which the removable drive is connected.
To decrypt removable drives:
- Open the Kaspersky Security Center Administration Console.
- In the console tree, select Policies.
- Select the necessary policy and double-click to open the policy properties.
- In the policy window, select Data Encryption → Encryption of removable drives.
- If you want to decrypt all encrypted files that are stored on removable drives, in the Encryption mode drop-down list select Decrypt entire removable drive.
- To decrypt data that is stored on individual removable drives, edit the encryption rules for removable drives whose data you want to decrypt. To do so:
- In the list of removable drives for which encryption rules have been configured, select an entry corresponding to the removable drive you need.
- Click the Set a rule button to edit the encryption rule for the selected removable drive.
- In the context menu of the Set a rule button, select the Decrypt entire removable drive item.
- Save your changes.
As a result, if a user connects a removable drive or if it is already connected, Kaspersky Endpoint Security decrypts the removable drive. The application warns the user that the decryption process may take some time. If the user initiates safe removal of a removable drive during data decryption, Kaspersky Endpoint Security interrupts the data decryption process and allows removal of the removable drive before the decryption operation has finished. Data decryption will be continued the next time the removable drive is connected to the computer.
If decryption of a removable drive failed, view the Data Encryption report in the Kaspersky Endpoint Security interface. Access to files may be blocked by another application. In this case, try unplugging the removable drive from the computer and connecting it again.
Page top
Viewing data encryption details
While encryption or decryption in progress, Kaspersky Endpoint Security relays information about the status of encryption parameters applied to client computers to Kaspersky Security Center.
Viewing the encryption status
You can look at the status to monitor data encryption. Kaspersky Endpoint Security assigns the following encryption statuses:
- Does not meet the policy; canceled by user. The user has canceled data encryption.
- Does not meet the policy due to an error. Data encryption error, for example, a license is missing.
- Applying the policy; restart is required. Data encryption is in progress on the computer. Restart the computer to complete data encryption.
- No encryption policy specified. Data encryption is turned off in policy settings.
- Not supported. Data encryption components are not installed on the computer.
- Applying the policy. Data encryption and / or decryption is in progress on the computer.
To view the encryption status of computer data:
- Open the Kaspersky Security Center Administration Console.
- In the console tree, select Managed devices.
- On the Devices tab in the workspace, slide the scroll bar all the way to the right. If the Encryption status column is not displayed, add this column in Kaspersky Security Center console settings.
The Encryption status column shows the encryption status of data on computers in the selected administration group. This status is formed based on information about file encryption on local drives of the computer, and about full disk encryption.
- If the status of data encryption for the computer is Applying policy, you can monitor the encryption progress panel:
- Open the properties of the computer with the Applying policy status by double-clicking it.
- In the computer properties window, select the Applications section.
- In the list of Kaspersky applications installed on the computer, select Kaspersky Endpoint Security for Windows.
- Click Statistics.
- Under Encryption of devices you can see the current progress of data encryption as a percentage.
Viewing encryption statistics on Kaspersky Security Center dashboards
To view the encryption status on Kaspersky Security Center dashboards:
- Open the Kaspersky Security Center Administration Console.
- In the console tree, select the Administration Server node.
- In the workspace to the right of the Administration Console tree, select the Statistics tab.
- Create a new page with details panes containing data encryption statistics. To do so:
- On the Statistics tab, click the Customize view button.
- In the window that opens, click the Add button.
- This opens a window; in that window, in the General section, enter the name of the page.
- In the Information panels section, click the Add button.
- In the window that opens in the Protection status group, select the Encryption of devices item.
- Click OK.
- If necessary, edit the settings of the details pane. To do so, use the View and Devices sections.
- Click OK.
- Repeat steps d – h of the instructions, selecting the Encryption of removable drives item in the Protection status section.
The details panes added appear in the Information panels list.
- Click OK.
The name of the page with details panes created at the previous steps appears in the Pages list.
- Click the Close button.
- On the Statistics tab, open the page that was created during the previous steps of the instructions.
The details panes appear, showing the encryption status of computers and removable drives.
Page top
Viewing file encryption errors on local computer drives
To view the file encryption errors on local computer drives:
- Open the Kaspersky Security Center Administration Console.
- In the console tree, select Managed devices.
- On the Devices tab, select the name of the computer in the list and right-click it to open the context menu.
- In the context menu of the computer, select the Properties item. In the window that opens, select the Protection section.
- Click the View data encryption errors link to open the Data encryption errors window.
This window shows the details of file encryption errors on local computer drives. When an error is corrected, Kaspersky Security Center removes the error details from the Data encryption errors window.
Page top
Viewing the data encryption report
Kaspersky Security Center allows you to create data encryption reports:
- Report on encryption status of managed devices. The report includes information on whether the encryption status of the computer complies with the encryption policy.
- Report on encryption status of mass storage devices. The report includes information about the encryption status of external devices and storage devices.
- Report on rights to access encrypted drives. The report includes information about the status of accounts that have access to encrypted drives.
- Report on file encryption errors. The report includes information about errors that occurred during the execution of data encryption or decryption tasks on computers.
- Report on blockage of access to encrypted files. The report includes information about applications being blocked from gaining access to encrypted files.
To view the data encryption report:
- Open the Kaspersky Security Center Administration Console.
- In the Administration Server node of the Administration Console tree, select the Reports tab.
- Click the New report template button.
The New Report Template Wizard starts.
- Follow the instructions of the Report Template Wizard. In the Selecting the report template type window in the Other section, select one of the data encryption reports.
After you have finished with the New Report Template Wizard, the new report template appears in the table on the Reports tab.
- Select the report template that was created at the previous steps of the instructions.
- In the context menu of the template, select Show report.
The report generation process starts. The report is displayed in a new window.
Page top
Working with encrypted devices when there is no access to them
Obtaining access to encrypted devices
A user may be required to request access to encrypted devices in the following cases:
- The hard drive was encrypted on a different computer.
- The encryption key for a device is not on the computer (for example, upon the first attempt to access the encrypted removable drive on the computer), and the computer is not connected to Kaspersky Security Center.
After the user has applied the access key to the encrypted device, Kaspersky Endpoint Security saves the encryption key on the user's computer and allows access to this device upon subsequent access attempts even if there is no connection to Kaspersky Security Center.
Access to encrypted devices can be obtained as follows:
- The user uses the Kaspersky Endpoint Security application interface to create a request access file with the kesdc extension and sends it to the corporate LAN administrator.
- The administrator uses the Kaspersky Security Center Administration Console to create an access key file with the kesdr extension and sends it to the user.
- The user applies the access key.
Restoring data on encrypted devices
A user can use the Encrypted Device Restore Utility (hereinafter referred to as the Restore Utility) to work with encrypted devices. This may be required in the following cases:
- The procedure for using an access key to obtain access was unsuccessful.
- Encryption components have not been installed on the computer with the encrypted device.
The data needed to restore access to encrypted devices using the Restore Utility resides in the memory of the user's computer in unencrypted form for some time. To reduce the risk of unauthorized access to such data, you are advised to restore access to encrypted devices on trusted computers.
Data on encrypted devices can be restored as follows:
- The user uses the Restore Utility to create a request access file with the fdertc extension and sends it to the corporate LAN administrator.
- The administrator uses the Kaspersky Security Center Administration Console to create an access key file with the fdertr extension and sends it to the user.
- The user applies the access key.
To restore data on encrypted system hard drives, the user can also specify the Authentication Agent account credentials in the Restore Utility. If the metadata of the Authentication Agent account has been corrupted, the user must complete the restoration procedure using a request access file.
Before restoring data on encrypted devices, it is recommended to cancel the Kaspersky Security Center policy or disable encryption in the Kaspersky Security Center policy settings on the computer where the procedure will be performed. This prevents the device from being encrypted again.
Recovering data by using the FDERT Restore Utility
If the hard drive fails, the file system may be corrupt. If this is the case, data protected by Kaspersky Disk Encryption technology will be unavailable. You can decrypt the data and copy the data to a new drive.
Data recovery on a drive protected by Kaspersky Disk Encryption technology consists of the following steps:
- Create a stand-alone Restore Utility (see the figure below).
- Connect a drive to a computer that does not have Kaspersky Endpoint Security encryption components installed.
- Run the Restore Utility and diagnose the hard drive.
- Access data on the drive. To do so, enter the credentials of the Authentication Agent or start the recovery procedure (Request-Response).
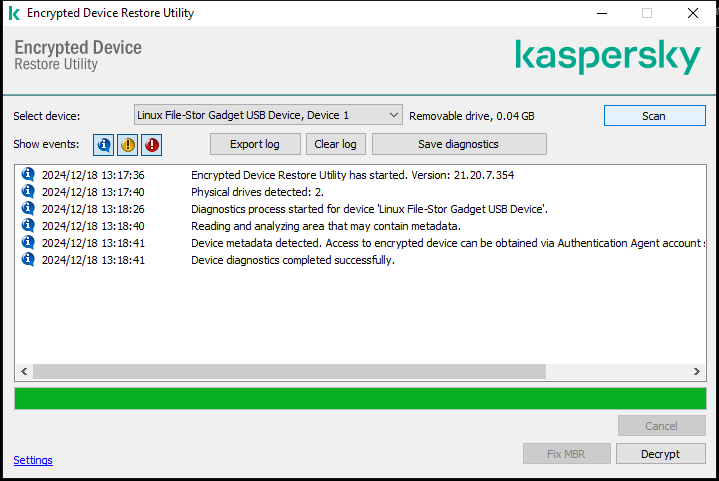
FDERT Restore Utility
Creating a standalone restore utility
To create the executable file of Restore Utility:
- In the main application window, click the
 button.
 - In the window that opens, click the Restore encrypted device button.
Encrypted device Restore Utility starts.
- Click the Create Stand-alone Restore Utility button in the window of Restore Utility.
- Save the stand-alone Restore Utility to computer memory.
As a result, the executable file of the Restore Utility (fdert.exe) will be saved in the specified folder. Copy the Restore Utility to a computer that does not have Kaspersky Endpoint Security encryption components. This prevents the drive from being encrypted again.
The data needed to restore access to encrypted devices using the Restore Utility resides in the memory of the user's computer in unencrypted form for some time. To reduce the risk of unauthorized access to such data, you are advised to restore access to encrypted devices on trusted computers.
Recovering data on a hard drive
To restore access to an encrypted device using the Restore Utility:
- Run the file named fdert.exe, which is the executable file of the Restore Utility. This file is created by Kaspersky Endpoint Security.
- In the Restore Utility window, select the encrypted device to which you want to restore access.
- Click the Scan button to allow the utility to define which of the actions should be taken on the device: whether it should be unlocked or decrypted.
If the computer has access to Kaspersky Endpoint Security encryption functionality, the Restore Utility prompts you to unlock the device. While unlocking the device does not decrypt it, the device becomes directly accessible as a result of being unlocked. If the computer does not have access to Kaspersky Endpoint Security encryption functionality, the Restore Utility prompts you to decrypt the device.
- If you want to import diagnostic information, click the Save diagnostics button.
The utility will save an archive with files containing diagnostic information.
- Click the Fix MBR button if diagnostics of the encrypted system hard drive has returned a message about problems involving the master boot record (MBR) of the device.
Fixing the master boot record of the device can speed up the process of obtaining information that is needed for unlocking or decrypting the device.
- Click the Unlock or Decrypt button depending on the results of diagnostics.
- If you want to restore data using an Authentication Agent account, select the Use Authentication Agent account settings option and enter the credentials of the Authentication Agent.
This method is possible only when restoring data on a system hard drive. If the system hard drive was corrupted and Authentication Agent account data has been lost, you must obtain an access key from the corporate LAN administrator to restore data on an encrypted device.
- If you want to start the recovery procedure, do the following:
- Select the Specify device access key manually option.
- Click the Receive access key button and save the request access file to computer memory (a file with the FDERTC extension).
- Send the request access file to the corporate LAN administrator.
Do not close the Receive device access key window until you have received the access key. When this window is opened again, you will not be able to apply the access key that was previously created by the administrator.
- Receive and save the access file (a file with the FDERTR extension) created and sent to you by the corporate LAN administrator (see the instructions below).
- Download the access file in the Receive device access key window.
- If you are decrypting a device, you must configure additional decryption settings:
- Specify area to decrypt:
- If you want to decrypt the entire device, select the Decrypt entire device option.
- If you want to decrypt a portion of the data on a device, select the Decrypt individual device areas option and specify the decryption area boundaries.
- Select the location for writing the decrypted data:
- If you want the data on the original device to be rewritten with the decrypted data, clear the Decrypt to a disk image file check box.
- If you want to save decrypted data separately from the original encrypted data, select the Decrypt to a disk image file check box and use the Browse button to specify the path where to save the VHD file.
- Specify area to decrypt:
- Click OK.
The device unlocking / decryption process starts.
How to create an encrypted data access file in the Administration Console (MMC)
How to create an encrypted data access file in the Web Console
Page top
Creating an operating system rescue disk
The operating system rescue disk can be useful when an encrypted hard drive cannot be accessed for some reason and the operating system cannot load.
You can load an image of the Windows operating system using the rescue disk and restore access to the encrypted hard drive using Restore Utility included in the operating system image.
To create an operating system rescue disk:
- Create an executable file for the Encrypted Device Restore Utility.
- Create a custom image of the Windows pre-boot environment. While creating the custom image of the Windows pre-boot environment, add the executable file of Restore Utility to the image.
- Save the custom image of the Windows pre-installation environment to bootable media such as a CD or removable drive.
Refer to Microsoft help files for instructions on creating a custom image of the Windows pre-boot environment (for example, in the Microsoft TechNet resource).
Detection and Response solutions
Kaspersky Detection and Response solutions are security systems for detecting advanced threats and indicators of attack on different levels of an organization's infrastructure. Detection and Response solutions provide information about the detected threat and allow to manage Threat Response actions.
Thus, Detection and Response solution do the following:
- Receive information about the operation of a computer, server, or other devices (telemetry).
- Automatically analyze the information to detect threats.
- Generate alert details as columns of the threat development chain for analysis and choosing Threat Response actions.
- Carry out Threat Response actions (for example, network isolation of the computer).
Kaspersky Endpoint Security supports Detection and Response solutions using a built-in agent. The built-in agent sends telemetry to servers of solutions and carries out Threat Response actions. The built-in agent supports:
- Kaspersky Managed Detection and Response (MDR)
- Kaspersky Endpoint Detection and Response Optimum 2.0 (EDR Optimum)
- Kaspersky Endpoint Detection and Response Expert (EDR Expert)
- Kaspersky Anti Targeted Attack Platform (telemetry only)
- Kaspersky Sandbox 2.0.
You can use Kaspersky Endpoint Security with Detection and Response solution in various configurations, for example, [EDR Optimum+MDR].
MDR and EDR Optimum licensing
Kaspersky Endpoint Security supports the functionality of the Kaspersky Managed Detection and Response (MDR) and Kaspersky Endpoint Detection and Response Optimum (EDR Optimum) solutions. You can use Kaspersky Endpoint Security with these solutions in various configurations and build a custom protection system that satisfies your particular requirements. To do so, you must purchase a license for each of the solutions. The license may cover the right to use a single solution (for example, MDR Add-on only) or several solutions, [EDR Optimum+MDR] Add-on.
MDR and EDR Optimum support the following licensing methods:
- The MDR or EDR Optimum functionality is covered by the Kaspersky Endpoint Security for Windows license.
The functionality is available immediately after the activation of Kaspersky Endpoint Security for Windows. You only need to add one key.
- Separate licenses for MDR or EDR Optimum (MDR Add-on, EDR Optimum Add-on, [EDR Optimum+MDR] Add-on).
The functionality becomes available after adding a separate key for MDR Add-on, EDR Optimum Add-on, or [EDR Optimum+MDR] Add-on. As a result, two keys are added on the computer: a key for Kaspersky Endpoint Security and a key for MDR or EDR Optimum. The Kaspersky Endpoint Security key must be the first to be added.
Kaspersky Endpoint Security allows adding only one active key for MDR and EDR Optimum licensing. Therefore, if you need to activate both of these solutions, you must add one [EDR Optimum+MDR] Add-on key instead of a separate key for each solution. You can also add one reserve key.
If you used a BLOB file when deploying MDR, you do not need a separate key to activate MDR. The BLOB file already contains license information.
Initial licensing of solutions
When first deploying MDR and EDR Optimum, the solutions are activated in the same way as the Kaspersky Endpoint Security application. You can add a key using the Add key task or use the automatic key distribution functionality. The license key is added to the application as a second active key or as a reserve key if you select the relevant check box.
Switching from one license to another
If your organization already has one of these solutions deployed, and the corresponding key has been added to the application, there are some special considerations involved with the licensing of the new configuration. When switching to a different license, the application does not add the new key to the application, instead it replaces the current key with the new key. The reason of this is the restriction that allows the application to add only one key to activate MDR and EDR Optimum.
For example, suppose your organization has the [EDR Optimum+MDR] solution deployed, and you decided to switch to the MDR Add-on configuration. To switch to the new configuration, you must replace the [EDR Optimum+MDR] Add-on key with the MDR Add-on key.
A separate license for EDR Optimum and MDR ([EDR Optimum+MDR] Add-on) is no longer available. If you want to use both of these solutions, you must activate MDR using a BLOB file, and EDR Optimum with a license key.
With the automatic key distribution feature, the application rejects license keys that cover the same number of solutions. That is, if you have an EDR Optimum Add-on key added, you cannot replace this key with a MDR Add-on key. However, you can replace the EDR Optimum Add-on key with an [EDR Optimum+MDR] Add-on key. The application also rejects keys if you try to replace an MDR Add-on key with an EDR Add-on key. To replace a key, you can run the Add key task. The Add key task allows replacing license keys with any number of solutions.
If you have an [EDR Optimum+MDR] Add-on reserve key added, to correctly add an active key for EDR Optimum Add-on or MDR Add-on, you must first replace the reserve key with an EDR Optimum Add-on or MDR Add-on key, or alternatively, remove the reserve key and then replace the active key.
Kaspersky Endpoint Agent
Kaspersky Endpoint Agent supports interaction between the application and other Kaspersky solutions for detecting advanced threats (e.g. Kaspersky Sandbox). Kaspersky solutions are compatible with specific versions of Kaspersky Endpoint Agent.
To use Kaspersky Endpoint Agent as part of Kaspersky solutions, you must activate those solutions with a corresponding license key.
For complete information about the Kaspersky Endpoint Agent included in the software solution you are using, and for complete information about the standalone solution, please refer to the Help Guide of the relevant product:
- Kaspersky Anti Targeted Attack Platform Help
- Kaspersky Sandbox Help
- Kaspersky Endpoint Detection and Response Optimum Help
- Kaspersky Managed Detection and Response Help
Distribution kit for Kaspersky Endpoint Security versions 11.2.0 – 11.8.0 includes Kaspersky Endpoint Agent. You can select Kaspersky Endpoint Agent when installing Kaspersky Endpoint Security for Windows. As a result, two applications will be installed on your computer: KEA and KES. In Kaspersky Endpoint Security 11.9.0 the Kaspersky Endpoint Agent distribution package is no longer part of the Kaspersky Endpoint Security distribution kit.
Correspondence of KEA versions (as part of KES) to KES versions
Kaspersky Endpoint Security for Windows |
Kaspersky Endpoint Agent |
|---|---|
11.8.0 |
3.11.0.216.mr1 |
11.7.0 |
3.11 |
11.6.0 |
3.10 |
11.5.0 |
3.9 |
11.4.0 |
3.9 |
11.3.0 |
3.9 |
11.2.0 |
3.9 |
Kaspersky is switching all Detection and Response to working with the Kaspersky Endpoint Security built-in agent instead of Kaspersky Endpoint Agent. Kaspersky is gradually adding support for these solutions and phasing out Kaspersky Endpoint Agent (see table below). Starting with version 12.1, the application supports all Detection and Response solutions. In addition, starting with version 12.1, the application is no longer compatible with Kaspersky Endpoint Agent, and installing both applications side by side on the same computer is no longer possible.
Deploying the built-in agent to manage Detection and Response solutions
Version of Kaspersky Endpoint Security |
Kaspersky Managed Detection and Response |
Kaspersky Sandbox |
Kaspersky Endpoint Detection and Response Optimum |
Kaspersky Endpoint Detection and Response Expert |
Kaspersky Anti Targeted Attack Platform (Endpoint Detection and Response component) |
Kaspersky Anti Targeted Attack Platform (Network Detection and Response component) |
|---|---|---|---|---|---|---|
11.5.0 |
Kaspersky Endpoint Agent |
Kaspersky Endpoint Agent |
Kaspersky Endpoint Agent |
Kaspersky Endpoint Agent |
Kaspersky Endpoint Agent |
Kaspersky Endpoint Agent |
11.6.0 |
Built-in agent |
Kaspersky Endpoint Agent |
Kaspersky Endpoint Agent |
Kaspersky Endpoint Agent |
Kaspersky Endpoint Agent |
Kaspersky Endpoint Agent |
11.7.0 |
Built-in agent |
Built-in agent |
Built-in agent |
Kaspersky Endpoint Agent |
Kaspersky Endpoint Agent |
Kaspersky Endpoint Agent |
11.8.0 |
Built-in agent |
Built-in agent |
Built-in agent |
Built-in agent |
Kaspersky Endpoint Agent |
Kaspersky Endpoint Agent |
11.9.0 |
Built-in agent |
Built-in agent |
Built-in agent |
Built-in agent |
Kaspersky Endpoint Agent |
Kaspersky Endpoint Agent |
11.10.0 |
Built-in agent |
Built-in agent |
Built-in agent |
Built-in agent |
Kaspersky Endpoint Agent |
Kaspersky Endpoint Agent |
11.11.0 |
Built-in agent |
Built-in agent |
Built-in agent |
Built-in agent |
Kaspersky Endpoint Agent |
Kaspersky Endpoint Agent |
12 |
Built-in agent |
Built-in agent |
Built-in agent |
Built-in agent |
Kaspersky Endpoint Agent |
Kaspersky Endpoint Agent |
12.1 |
Built-in agent |
Built-in agent |
Built-in agent |
Built-in agent |
Built-in agent |
Kaspersky Endpoint Agent |
12.6 |
Built-in agent |
Built-in agent |
Built-in agent |
Built-in agent |
Built-in agent |
Built-in agent |
Migrating the [KES+KEA] configuration to [KES+built-in agent] configuration
Kaspersky Endpoint Security includes built-in agents for working with Detection and Response solutions. You no longer need a separate Kaspersky Endpoint Agent application to work with these solutions. When you deploy Kaspersky Endpoint Security on computers that have Kaspersky Endpoint Agent installed, Detection and Response solutions will continue working with Kaspersky Endpoint Security. In addition, Kaspersky Endpoint Agent will be removed from the computer.
Distribution kit for Kaspersky Endpoint Security versions 11.2.0 – 11.8.0 includes Kaspersky Endpoint Agent. You can select Kaspersky Endpoint Agent when installing Kaspersky Endpoint Security for Windows. As a result, two applications will be installed on your computer: KEA and KES. In Kaspersky Endpoint Security 11.9.0 the Kaspersky Endpoint Agent distribution package is no longer part of the Kaspersky Endpoint Security distribution kit.
Migrating the [KES+KEA] configuration to [KES+built-in agent] involves the following steps:
- Upgrading Kaspersky Security Center
Upgrade all Kaspersky Security Center components to version 13.2 or higher, including Network Agent on user computers and Web Console.
- Upgrading the Kaspersky Endpoint Security web plug-in
In Kaspersky Security Center Web Console, upgrade the Kaspersky Endpoint Security web plug-in to version 11.7.0 or higher. To manage EDR Optimum and Kaspersky Sandbox components, you must use Web Console.
To use Kaspersky Anti Targeted Attack Platform (EDR), you will need a web plug-in for Kaspersky Endpoint Security version 12.1 or later.
To use Kaspersky Anti Targeted Attack Platform (NDR), you will need a web plug-in for Kaspersky Endpoint Security version 12.7 or later.
- Migrating the policy and tasks
Use the Kaspersky Endpoint Agent Policy and Task Migration Wizard to migrate Kaspersky Endpoint Agent settings to Kaspersky Endpoint Security for Windows.
This creates a new Kaspersky Endpoint Security policy. The new policy has the Inactive status. To apply the policy, open policy properties, accept the Kaspersky Security Network Statement and set the status to Active.
- Licensing functionality
If you use a common Kaspersky Endpoint Detection and Response Optimum or Kaspersky Optimum Security license to activate Kaspersky Endpoint Security for Windows and Kaspersky Endpoint Agent, EDR Optimum functionality will be activated automatically after upgrading the application to version 11.7.0. You do not need to do anything else.
If you use a stand-alone Kaspersky Endpoint Detection and Response Optimum Add-on license to activate EDR Optimum functionality, you must make sure that the EDR Optimum Add-on key is added to the Kaspersky Security Center repository and the automatic license key distribution functionality is enabled. After you upgrade the application to version 11.7.0, EDR Optimum functionality is activated automatically.
If you use a Kaspersky Endpoint Detection and Response Optimum or Kaspersky Optimum Security license to activate Kaspersky Endpoint Agent, and a different license to activate Kaspersky Endpoint Security for Windows, you must replace the Kaspersky Endpoint Security for Windows key with the common Kaspersky Endpoint Detection and Response Optimum or Kaspersky Optimum Security key. You can replace the key using the Add key task.
You do not need to activate Kaspersky Sandbox functionality. Kaspersky Sandbox functionality will be available immediately after upgrading and activating Kaspersky Endpoint Security for Windows.
Only the Kaspersky Anti Targeted Attack Platform license can be used to activate Kaspersky Endpoint Security as part of the Kaspersky Anti Targeted Attack Platform solution. After you upgrade the application to version 12.1, EDR (KATA) functionality is activated automatically. You do not need to do anything else.
- Upgrading the Kaspersky Endpoint Security application
To upgrade the application and migrate EDR Optimum and Kaspersky Sandbox functionality, a remote installation task is recommended.
To upgrade the application using a remote installation task, you must edit the following settings:
- Select components for Detection and Response solutions in the settings of the installation package.
- Exclude the Kaspersky Endpoint Agent component in the settings of the installation package (for Kaspersky Endpoint Security for Windows versions 11.2.0 – 11.8.0).
- If Password Protection is enabled to restrict access to Kaspersky Endpoint Agent, enter the application uninstallation password in the settings of the Install application remotely task. You can enter the uninistallation password starting with Kaspersky Security Center Linux 15.1.
You can also upgrade the application using the following methods:
- Using Kaspersky update service (Seamless Update – SMU).
- Locally, by using the Setup Wizard.
Kaspersky Endpoint Security supports automatically selecting components when upgrading the application on a computer with the Kaspersky Endpoint Agent application installed. The automatic selection of components depends on the permissions of the user account that is upgrading the application.
If you are upgrading Kaspersky Endpoint Security using the EXE or MSI file under the system account (SYSTEM), Kaspersky Endpoint Security gains access to current licenses of Kaspersky solutions. Therefore, if the computer has, for example, Kaspersky Endpoint Agent installed and the EDR Optimum solution activated, the Kaspersky Endpoint Security installer automatically configures the set of components and selects the EDR Optimum component. This makes Kaspersky Endpoint Security switch to using the built-in agent and removes Kaspersky Endpoint Agent. Running the MSI installer under the system account (SYSTEM) is usually performed when upgrading via the Kaspersky update service (SMU) or when deploying an installation package via Kaspersky Security Center.
If you are upgrading Kaspersky Endpoint Security using an MSI file under a non-privileged user account, Kaspersky Endpoint Security lacks access to current licenses of Kaspersky solutions. In this case, Kaspersky Endpoint Security automatically selects components based on Kaspersky Endpoint Agent configuration. After that Kaspersky Endpoint Security switches to using the built-in agent and removes Kaspersky Endpoint Agent.
- Computer restart
Restart your computer to finish upgrading the application with the built-in agent. When upgrading the application, the installer removes Kaspersky Endpoint Agent before the computer is restarted. After the computer is restarted, the installer adds the built-in agent. This means that Kaspersky Endpoint Security does not perform the functions of EDR and Kaspersky Sandbox until the computer is restarted.
- Checking the health of Kaspersky Endpoint Detection and Response Optimum and Kaspersky Sandbox
If after the upgrade, the computer has the Critical status in the Kaspersky Security Center console:
- Make sure that the computer has Network Agent version 13.2 or higher installed.
- Check the operating status of the built-in agent by viewing the Report on status of application components. If a component has the Not installed status, install the component using the Change application components task.
- Make sure you accept the Kaspersky Security Network Statement in the new policy of Kaspersky Endpoint Security for Windows.
- Make sure EDR Optimum functionality is activated using the Report on status of application components. If a component has the Not covered by license status, make sure that the automatic license key distribution functionality of EDR Optimum is turned on.
Policy and Task Migration for Kaspersky Endpoint Agent
Kaspersky Endpoint Security for Windows includes a wizard for migrating from Kaspersky Endpoint Agent to Kaspersky Endpoint Security. You can migrate policy and task settings for the following solutions:
- Kaspersky Sandbox
- Kaspersky Endpoint Detection and Response Optimum (EDR Optimum)
- Kaspersky Anti Targeted Attack Platform
A wizard for migrating from Kaspersky Endpoint Agent to Kaspersky Endpoint Security works only in Web Console and Cloud Console. In the Administration Console (MMC), you can only migrate settings for Kaspersky Anti Targeted Attack Platform (EDR) solution using the standard Kaspersky Security Center Policy and Task Migration Wizard.
It is recommended to begin with migrating Kaspersky Endpoint Agent to Kaspersky Endpoint Security on a single computer, then do it on a group of computers, and then complete the migration on all computers of the organization.
To migrate policy and task settings from Kaspersky Endpoint Agent to Kaspersky Endpoint Security,
in the main window of the Web Console, select Operations → Migration from Kaspersky Endpoint Agent.
This runs the policies and tasks migration wizard. Follow the instructions of the Wizard.
Step 1. Policy migration
The Migration Wizard creates a new policy which merges the settings of Kaspersky Endpoint Security and Kaspersky Endpoint Agent policies. In the policy list, select Kaspersky Endpoint Agent policies whose settings you want to merge with the Kaspersky Endpoint Security policy. Click the Kaspersky Endpoint Agent policy in order to select the Kaspersky Endpoint Security policy with which you want to merge settings. Make sure you selected the correct policies and go to the next step.
Step 2. Task migration
The Migration Wizard creates new tasks for Kaspersky Endpoint Security. In the task list, select Kaspersky Endpoint Agent tasks which you want to create for Kaspersky Endpoint Security policy. The Wizard supports tasks for Kaspersky Endpoint Detection and Response and Kaspersky Sandbox. Go to the next step.
Step 3. Wizard completion
Exit the Wizard. As a result, the wizard does the following:
- Creates a new Kaspersky Endpoint Security policy.
The policy merges settings from Kaspersky Endpoint Security and Kaspersky Endpoint Agent. The policy is called <Kaspersky Endpoint Security policy name> & <Kaspersky Endpoint Agent policy name>. The new policy has the Inactive status. To continue, change the statuses of Kaspersky Endpoint Agent and Kaspersky Endpoint Security policies to Inactive and activate the new merged policy.
After migrating from Kaspersky Endpoint Agent to Kaspersky Endpoint Security for Windows, please make sure that the new policy has the functionality for data transfer to the Administration Server (quarantine file data and threat development chain data) set up. Data transfer parameter values are not migrated from a Kaspersky Endpoint Agent policy.
When migrating from Kaspersky Endpoint Agent to Kaspersky Endpoint Security for the Kaspersky Anti Targeted Attack Platform (EDR) solution, you may encounter errors when connecting the computer to Central Node servers. The reason is that the migration wizard in Web Console skips the following policy settings and does not migrate them:
- Settings modification prohibition Settings for connecting to KATA servers ("lock").
By default, settings can be modified (the "lock" is open). Therefore the settings are not applied on the computer. You must prohibit the modification of settings and close the "lock".
- Crypto-container.
If you are using two-way authentication for connecting to Central Node servers, you must re-add the crypto-container. The migration wizard correctly migrates the TLS certificate of the server.
The Policy and Task Migration Wizard in Administration Console (MMC) migrates all settings for the Kaspersky Anti Targeted Attack Platform (EDR) solution.
- Settings modification prohibition Settings for connecting to KATA servers ("lock").
- Creates new Kaspersky Endpoint Security tasks.
New tasks are copies of Kaspersky Endpoint Agent tasks for Kaspersky Endpoint Detection and Response and Kaspersky Sandbox. At the same time, the Wizard leaves Kaspersky Endpoint Agent tasks unchanged.
Endpoint Detection and Response Agent
Starting with Kaspersky Endpoint Security 12.3 for Windows, the application includes the Endpoint Detection and Response Agent (EDR Agent) configuration. Endpoint Detection and Response Agent is an application that is installed on individual workstations and servers in the IT infrastructure of the organization to support the following Detection and Response solutions by Kaspersky:
- Kaspersky Managed Detection and Response
- Kaspersky Anti Targeted Attack Platform (EDR)
- Kaspersky Unified Monitoring and Analysis Platform (KUMA) (starting with version 12.6)
- Kaspersky Anti Targeted Attack Platform (NDR) (starting with version 12.7)
EDR Agent continuously monitors processes running on these computers, open network connections, and files being modified. Protection and control components of the application are not available for EDR Agent.
EDR Agent is compatible with third-party EPP applications. This lets you use third-party infrastructure security tools alongside Detection and Response by Kaspersky.
To deploy EDR Agent, the computer must have the Network Agent installed, and the computer must be added in the Kaspersky Security Center console. To enable the interaction of EDR Agent with Kaspersky Security Center, you must install the Kaspersky Endpoint Security for Windows management plug-in. You can specify EDR Agent settings using a group policy. To integrate EDR Agent, you must configure the integration in appropriate policy sections.
The following Kaspersky applications must be installed on the infrastructure to support Kaspersky Detection and Response solutions:
|
|
Endpoint |
|
|
Kaspersky Endpoint Security for Windows Management Plug-in |
Kaspersky Security Center |
|
|
|
Detection and Response solutions: MDR, KATA (EDR), KATA (NDR) |
|
Installing EDR Agent
Kaspersky Endpoint Security in the Endpoint Detection and Response Agent (EDR Agent) configuration for Kaspersky Detection and Response solutions is installed in the same way.
EDR Agent can be installed on the computer in one of the following ways:
- Remotely using Kaspersky Security Center.
- Locally using the Setup Wizard.
- Locally on the command line (only for KATA (EDR)).
To install EDR Agent, you must select the appropriate configuration in installation package settings or in Setup Wizard.
How to install EDR Agent using the Setup Wizard
- Copy the distribution kit folder to the user's computer.
- Run setup_kes.exe.
The Setup Wizard starts.
Configuration of Kaspersky Endpoint Security
Choosing the configuration of the application
Select the Endpoint Detection and Response Agent configuration. In this configuration, you can only install the components that provide support for Detection and Response solutions: Endpoint Detection and Response (KATA), Managed Detection and Response (MDR), Network Detection and Response (KATA), as well as Kaspersky Unified Monitoring and Analysis Platform (KUMA). This configuration is needed if a third-party Endpoint Protection Platform (EPP) is deployed in your organization alongside a Kaspersky Detection and Response solution. This makes Kaspersky Endpoint Security in the Endpoint Detection and Response Agent configuration compatible with third-party EPP applications.
Kaspersky Endpoint Security components
Select the components that you want to install (see figure below). You can change the available application components after the application is installed. To do so, you need to run the Setup Wizard again and choose to change the available components.
Advanced settings
Advanced application installation settings
Protect the application installation process. Installation protection includes protection against replacement of the distribution package with malicious applications, blocking access to the installation folder of Kaspersky Endpoint Security, and blocking access to the system registry section containing application keys. However, if the application cannot be installed (for example, when performing remote installation with the help of Windows Remote Desktop), you are advised to disable protection of the installation process.
Ensure compatibility with Citrix PVS. You can enable support of Citrix Provisioning Services to install Kaspersky Endpoint Security to a virtual machine.
Add the path to the file avp.com to the system variable %PATH%. You can add the installation path to the %PATH% variable for convenient use of the command line interface.
How to install EDR Agent on the command line (only for KATA (EDR))
How to install EDR Agent using the Administration Console (MMC)
How to install EDR Agent using Web Console
- In the main window of the Web Console, select Discovery & deployment → Deployment & assignment → Installation packages.
This opens a list of installation packages that have been downloaded to Kaspersky Security Center.
List of installation packages
- Open the properties of the installation package.
If necessary, create a new installation package.
- Select the Settings tab.
- Go to the Protection components section.
Components included in the installation package
- Select the Endpoint Detection and Response Agent to protect against advanced threats and targeted attacks configuration. In this configuration, you can only install the components that provide support for Detection and Response solutions: Endpoint Detection and Response (KATA), Managed Detection and Response (MDR), Network Detection and Response (KATA), as well as Kaspersky Unified Monitoring and Analysis Platform (KUMA). This configuration is needed if a third-party Endpoint Protection Platform (EPP) is deployed in your organization alongside a Kaspersky Detection and Response solution. This makes Kaspersky Endpoint Security in the Endpoint Detection and Response Agent configuration compatible with third-party EPP applications.
- Select the components that you want to install.
You can change the available application components after the application is installed.
- Save your changes.
- Create a remote installation task. In task properties, select the installation package you created.
As a result, EDR Agent is installed on the user's computer. You can use the interface of the application and an icon of the application is displayed in the notification area ![]() .
.
In Kaspersky Security Center, the computer with the installed application in the EDR Agent configuration has the Critical status – . The computer has this status because the File Threat Protection component is missing. You do not need to take any action.
If you could not install EDR Agent on a computer with a third-party EPP application because the installer found incompatible software on the computer, you can skip the incompatible software check.
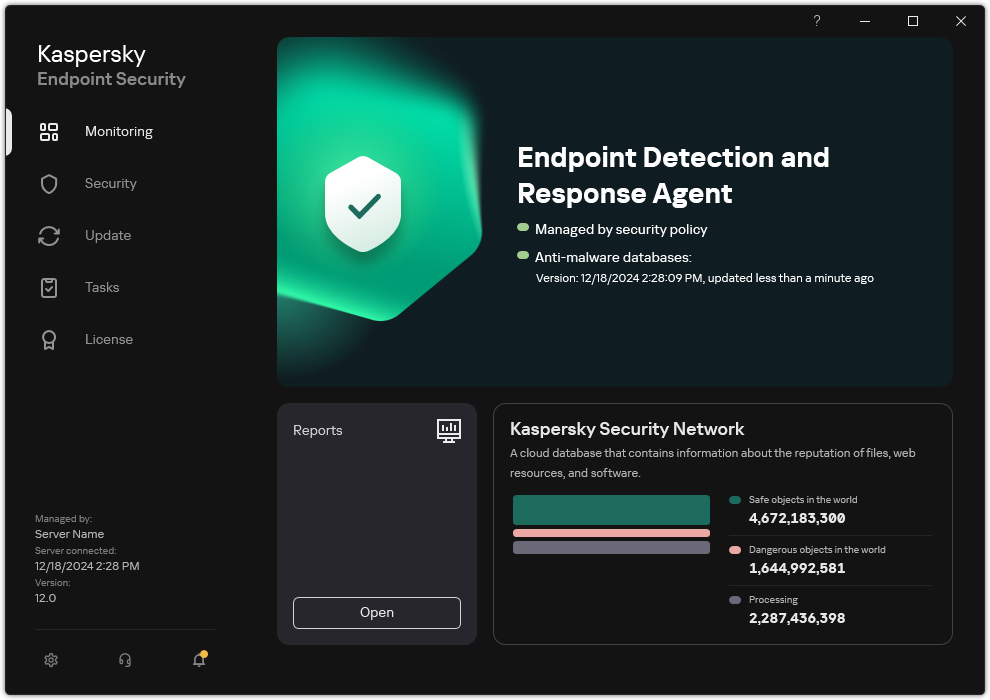
Main window of EDR Agent
Now you must configure the integration with the Kaspersky Managed Detection and Response, Kaspersky Anti Targeted Attack (EDR), or Kaspersky Anti Targeted Attack (NDR) solution. You can also specify advanced settings of the application and, for example, create a trusted zone or hide the interface of the application. Settings in the following sections are available:
- Kaspersky Security Network
- Application Settings
- Network settings
- Exclusions
- Reports
- Interface
- Manage settings
Integrating EDR Agent with MDR
EDR Agent is installed on workstations and servers in the IT infrastructure of the organization. EDR Agent processes data and sends it through Kaspersky Security Network streams to Kaspersky Managed Detection and Response.
To set up integration with Kaspersky Managed Detection and Response, you must enable the Managed Detection and Response component and configure EDR Agent. For Kaspersky Managed Detection and Response to work with Administration Server via Kaspersky Security Center Web Console, you must also establish a new secure connection, a background connection. Kaspersky Managed Detection and Response prompts you to establish a background connection when you deploy the solution. Make sure the background connection is established.
Establishing a background connection in Web Console
Integration with Kaspersky Managed Detection and Response consists of the following steps:
- Installing the Managed Detection and Response component
You can select the MDR component during installation or upgrade, as well as using the Change application components task.
You must restart your computer to finish upgrading the application with the new components.
- Configuring Kaspersky Private Security Network
Skip this step if you are using Kaspersky Security Center Cloud Console. Kaspersky Security Center Cloud Console automatically configures Kaspersky Private Security Network when installing the MDR plug-in.
Kaspersky Private Security Network (KPSN) is a solution that enables users of computers hosting Kaspersky Endpoint Security or other Kaspersky applications to obtain access to Kaspersky reputation databases, and to other statistical data without sending data to Kaspersky from their own computers.
Upload the Kaspersky Security Network configuration file in the Administration Server properties. The Kaspersky Security Network configuration file is located within the ZIP archive of the MDR configuration file. You can obtain the ZIP archive in the Kaspersky Managed Detection and Response Console. For details on configuring Kaspersky Private Security Network, please refer to the Kaspersky Security Center Help. You can also upload a Kaspersky Security Network configuration file to the computer from the command line (see the instructions below).
How to configure Kaspersky Private Security Network from the command line
As a result, Kaspersky Endpoint Security will use Kaspersky Private Security Network to determine the reputation of files, applications, and websites. Kaspersky Security Network section of the policy settings will display the following operating status: Infrastructure: Kaspersky Private Security Network.
You must enable extended KSN mode for Managed Detection and Response to work.
- Activating Kaspersky Managed Detection and Response
To activate the Managed Detection and Response functionality, you must use an activation code. If you are using a key file to activate functionality, you need to contact Technical Support to get an activation code.
- Enabling Managed Detection and Response component
Load the BLOB configuration file in the Kaspersky Endpoint Security policy (see the instructions below). The BLOB file contains the client ID and information about the license for Kaspersky Managed Detection and Response. The BLOB file is located inside the ZIP archive of the MDR configuration file. You can obtain the ZIP archive in the Kaspersky Managed Detection and Response Console. For detailed information about a BLOB file, please refer to the Kaspersky Managed Detection and Response Help.
Starting with Kaspersky Endpoint Security 12.6 for Windows, adding a BLOB file is optional for Kaspersky Managed Detection and Response without tenants if you have a current license.
How to enable Managed Detection and Response component in the Administration Console (MMC)
- Open the Kaspersky Security Center Administration Console.
- In the console tree, select Policies.
- Select the necessary policy and double-click to open the policy properties.
- In the policy window, select Detection and Response → Managed Detection and Response.
- Select the Managed Detection and Response check box.
- In the Settings block, click Upload and select the BLOB file received in the Kaspersky Managed Detection and Response Console. The file has the P7 extension.
By default, the user is allowed to manage application settings (the "padlock" is open
). To apply the policy on computers, close the padlocks . - Save your changes.
How to enable Managed Detection and Response component in the Web Console and Cloud Console
- In the main window of the Web Console, select Assets (Devices) → Policies & profiles.
- Click the name of the Kaspersky Endpoint Security policy.
The policy properties window opens.
- Select the Application settings tab.
- Go to Detection and Response → Managed Detection and Response.
- Turn on the Managed Detection and Response toggle.
- Click Upload and select the BLOB file that was obtained in the Kaspersky Managed Detection and Response Console. The file has the P7 extension.
By default, the user is allowed to manage policy settings (the "padlock" is open
). To apply the policy on computers, close the padlocks . - Save your changes.
How to enable Managed Detection and Response component from the command line
As a result, Kaspersky Endpoint Security will verify the BLOB file. BLOB file verification includes checking the digital signature and the license term. If the BLOB file is successfully verified, Kaspersky Endpoint Security will download the file and send the file to the computer during the next synchronization with Kaspersky Security Center. Check the operating status of the component by viewing the Report on status of application components. You can also view the operating status of a component in reports in the local interface of Kaspersky Endpoint Security. The Managed Detection and Response component will be added to the list of Kaspersky Endpoint Security components.
You need to purchase a separate license for MDR (Kaspersky Managed Detection and Response Add-on).
The feature will be available after you add a separate key for Kaspersky Managed Detection and Response Add-on. Licensing for the stand-alone Managed Detection and Response functionality is the same as the licensing of Kaspersky Endpoint Security.
Make sure that the MDR functionality is included in the license and is working in the local interface of the application.
Integrating EDR Agent with KATA (EDR)
EDR Agent is installed on workstations and servers in the IT infrastructure of the organization. On these computers, EDR Agent continuously monitors processes, open network connections, and files being modified, and sends monitoring data to the server with the Central Node component.
To integrate with EDR (KATA), you must enable the Endpoint Detection and Response (KATA) component and configure EDR Agent.
The following conditions must be fulfilled for Endpoint Detection and Response (KATA) to work:
- Kaspersky Anti Targeted Attack Platform version 5.0 or higher.
- Kaspersky Security Center version 14.2 or higher. In earlier versions of Kaspersky Security Center, it is impossible to activate the Endpoint Detection and Response (KATA) feature.
Integration with Endpoint Detection and Response (KATA) involves the following steps:
- Activating Endpoint Detection and Response (KATA)
You need to purchase a separate license for EDR (KATA) (Kaspersky Endpoint Detection and Response (KATA) Add-on).
The feature will be available after you add a separate key for Kaspersky Endpoint Detection and Response (KATA). Licensing for the stand-alone Endpoint Detection and Response (KATA) functionality is the same as the licensing of Kaspersky Endpoint Security.
Make sure that the EDR (KATA) functionality is included in the license and is running in the local interface of the application.
- Connecting to Central Node
Kaspersky Anti Targeted Attack Platform requires establishing a trusted connection between Kaspersky Endpoint Security and the Central Node component. To configure a trusted connection, you must use a TLS certificate. You can get a TLS certificate in the Kaspersky Anti Targeted Attack Platform console (see instructions in the Kaspersky Anti Targeted Attack Platform Help). Then you must add the TLS certificate to Kaspersky Endpoint Security (see instructions below).
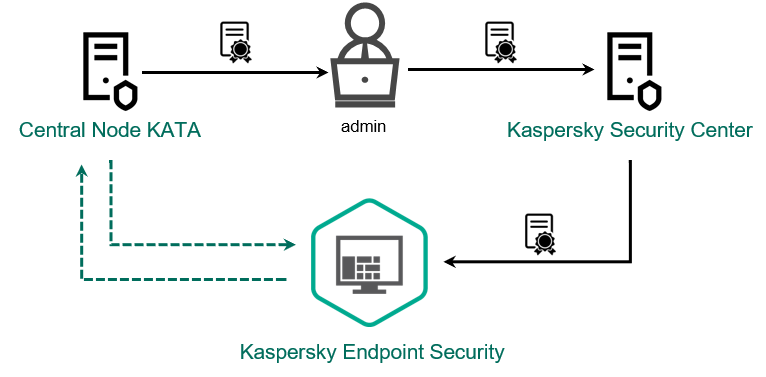
Adding a TLS certificate to Kaspersky Endpoint Security
By default, Kaspersky Endpoint Security only checks the TLS certificate of Central Node. To make the connection more secure, you can additionally enable the verification of the computer on Central Node (two-way authentication). To enable this verification, you must turn on two-way authentication in Central Node and Kaspersky Endpoint Security settings. To use two-way authentication, you will also need a crypto-container. A crypto-container is a PFX archive with a certificate and a private key. You can get a crypto-container in the Kaspersky Anti Targeted Attack Platform console (see instructions in the Kaspersky Anti Targeted Attack Platform Help).
How to connect a Kaspersky Endpoint Security computer to Central Node using the Web Console
As a result, the computer is added on the Kaspersky Anti Targeted Attack Platform console. Check the operating status of the component by viewing the Report on status of application components. You can also view the operating status of a component in reports in the local interface of Kaspersky Endpoint Security. The Endpoint Detection and Response (KATA) component will be added to the list of Kaspersky Endpoint Security components.
Integrating EDR Agent with KATA (NDR)
EDR Agent is installed on workstations and servers in the IT infrastructure of the organization. On these computers, EDR Agent continuously monitors processes, open network connections, and files being modified, and sends monitoring data to the server with the Central Node component.
To integrate with NDR (KATA), you must enable the Network Detection and Response (KATA) component and configure EDR Agent.
The following conditions must be fulfilled for Network Detection and Response (KATA) to work:
- Kaspersky Anti Targeted Attack Platform version 6.0 or higher.
- Kaspersky Security Center version 14.2 or higher. In earlier versions of Kaspersky Security Center, it is impossible to activate the Network Detection and Response (KATA) feature.
Integration with Network Detection and Response (KATA) involves the following steps:
- Activating Network Detection and Response (KATA)
You need to purchase a separate license for NDR (KATA) (Kaspersky Network Detection and Response (KATA) Add-on).
The feature will be available after you add a separate key for Kaspersky Network Detection and Response (KATA). Licensing for the stand-alone Network Detection and Response (KATA) functionality is the same as the licensing of Kaspersky Endpoint Security.
Make sure that the NDR (KATA) functionality is included in the license and is running in the local interface of the application.
- Connecting to Central Node
Kaspersky Anti Targeted Attack Platform requires establishing a trusted connection between Kaspersky Endpoint Security and the Central Node component. To configure a trusted connection, you must use a TLS certificate. You can get a TLS certificate in the Kaspersky Anti Targeted Attack Platform console (see instructions in the Kaspersky Anti Targeted Attack Platform Help). Then you must add the TLS certificate to Kaspersky Endpoint Security (see instructions below).
Adding a TLS certificate to Kaspersky Endpoint Security
By default, Kaspersky Endpoint Security only checks the TLS certificate of Central Node. To make the connection more secure, you can additionally enable the verification of the computer on Central Node (two-way authentication). To enable this verification, you must turn on two-way authentication in Central Node and Kaspersky Endpoint Security settings. To use two-way authentication, you will also need a crypto-container. A crypto-container is a PFX archive with a certificate and a private key. You can get a crypto-container in the Kaspersky Anti Targeted Attack Platform console (see instructions in the Kaspersky Anti Targeted Attack Platform Help).
How to connect a Kaspersky Endpoint Security computer to Central Node using the Web Console
As a result, the computer is added on the Kaspersky Anti Targeted Attack Platform console. Check the operating status of the component by viewing the Report on status of application components. You can also view the operating status of a component in reports in the local interface of Kaspersky Endpoint Security. The Network Detection and Response (KATA) component will be added to the list of Kaspersky Endpoint Security components.
Compatibility with third-party EPP applications
EDR Agent supports the functionality of Kaspersky Detection and Response solutions. Protection and control components are not available for EDR Agent. This configuration allows installing third-party EPP applications and deploying Kaspersky Detection and Response solutions in the infrastructure of the organization. EDR Agent supports working with Kaspersky Managed Detection and Response, Kaspersky Anti Targeted Attack Platform (EDR), and Kaspersky Anti Targeted Attack Platform (NDR).
EDR Agent is compatible with EPP applications from the following vendors:
- Dr.Web
EDR Agent is compatible with Dr.Web for Windows version 13.0 or later (including AV-Desk Agent and Dr.Web Server).
- Dallas Lock
EDR Agent is compatible with Dallas Lock 8.0-C version 8.0.803.2 or later.
For the EDR agent to run on a computer that has the Dallas Lock software installed, you must allow the connection to Kaspersky external services in the settings of the Firewall module.
- Secret Net Studio
EDR Agent is compatible with Secret Net Studio version 8.11 or later.
The application cannot be installed on a computer where Secret Net Studio is deployed with the Antivirus component. To make interoperability possible, you must remove the Antivirus component from Secret Net Studio.
- Trend Micro
EDR Agent is compatible with Trend Micro Apex One version 14.0.12994 or later (including Security Agent).
EDR Agent is compatible with Trend Micro Deep Security version 20.0.1 or later (including Security Agent).
- Windows Defender
- Sophos
EDR Agent is compatible with Sophos Intercept X version 2024.1.2 or later (including Endpoint Agent).
- Bitdefender
EDR Agent is compatible with Bitdefender Endpoint Security Tools version 7.9.16.447 or later.
- ESET
EDR Agent is compatible with ESET Endpoint Antivirus version 11.0.2052.0 or later and ESET Management Agent version 11.2.2076.0 or later.
The applications must be installed in the following order: first, install the EPP application, then Kaspersky Security Center Network Agent, then EDR Agent. This is necessary because the installer of the EPP application may detect EDR Agent and Network Agent as incompatible software and remove them. The operation of EDR Agent and Network Agent should also be checked after updating the third-party EPP application because its installer may re-scan the computer for incompatible software and remove the applications.
If you could not install EDR Agent on a computer with a third-party EPP application because the installer found incompatible software on the computer, you can skip the incompatible software check.
Page top
Managed Detection and Response
|
Kaspersky Endpoint Security for Windows supports integration with the Managed Detection and Response solution. The Kaspersky Managed Detection and Response (MDR) solution automatically detects and analyzes security incidents in your infrastructure. To do so, MDR uses telemetry data received from endpoints and machine learning. MDR sends incident data to Kaspersky experts. The experts can then process the incident and, for example, add a new entry to Anti-Virus databases. Alternatively, the experts can issue recommendations on processing the incident and, for example, suggest isolating computer from the network. For detailed information about how the solution works, please refer to the Kaspersky Managed Detection and Response Help. |
Configurations of Kaspersky Endpoint Security for integrating with MDR
The following configurations can be used to work with MDR:
- [KES+built-in agent]. In this configuration, Kaspersky Endpoint Security acts as both the application that ensures the security of the computer and the application for working with MDR. The built-in agent is available in Kaspersky Endpoint Security 11.6.0 for Windows or later.
- [third-party EPP+EDR Agent]. In this configuration, the security of the IT infrastructure is provided by the third-party Endpoint Protection Platform (EPP). The interaction with MDR is provided by Kaspersky Endpoint Security in the Endpoint Detection Response Agent (EDR Agent) configuration. In this configuration, EDR Agent is compatible with third-party EPP applications. EDR Agent is available in Kaspersky Endpoint Security 12.3 for Windows or later.
Support for previous versions of Kaspersky Endpoint Security
Kaspersky Endpoint Security version 11 and later supports the MDR solution. Kaspersky Endpoint Security versions 11 – 11.5.0 only sends telemetry data to Kaspersky Managed Detection and Response to enable threat detection. Kaspersky Endpoint Security version 11.6.0 has all the functionality of the built-in agent (Kaspersky Endpoint Agent).
If you are using Kaspersky Endpoint Security 11 – 11.5.0, you must update databases to the latest version to work with the MDR solution. You must also install Kaspersky Endpoint Agent.
If you are using Kaspersky Endpoint Security 11.6.0 or higher, you do not need to install Kaspersky Endpoint Agent to use the MDR solution.
If the Kaspersky Endpoint Security policy also applies to computers that do not have Kaspersky Endpoint Security 11 – 11.5.0 installed, you must first create a separate Kaspersky Endpoint Agent policy for those computers. In the new policy, configure integration with Kaspersky Managed Detection and Response.
Integration of the built-in agent with MDR
To set up integration with Kaspersky Managed Detection and Response, you must enable the Managed Detection and Response component and configure Kaspersky Endpoint Security.
You must enable the following components for Managed Detection and Response to work:
Enabling these components is non-optional. Otherwise Kaspersky Managed Detection and Response cannot function because it does not receive required telemetry data.
In addition, Kaspersky Managed Detection and Response uses data received from other application components. Enabling those components is optional. Components that provide additional data include:
For Kaspersky Managed Detection and Response to work with Administration Server via Kaspersky Security Center Web Console, you must also establish a new secure connection, a background connection. Kaspersky Managed Detection and Response prompts you to establish a background connection when you deploy the solution. Make sure the background connection is established.
Establishing a background connection in Web Console
Integration with Kaspersky Managed Detection and Response consists of the following steps:
- Installing the Managed Detection and Response component
You can select the MDR component during installation or upgrade, as well as using the Change application components task.
You must restart your computer to finish upgrading the application with the new components.
- Configuring Kaspersky Private Security Network
Skip this step if you are using Kaspersky Security Center Cloud Console. Kaspersky Security Center Cloud Console automatically configures Kaspersky Private Security Network when installing the MDR plug-in.
Kaspersky Private Security Network (KPSN) is a solution that enables users of computers hosting Kaspersky Endpoint Security or other Kaspersky applications to obtain access to Kaspersky reputation databases, and to other statistical data without sending data to Kaspersky from their own computers.
Upload the Kaspersky Security Network configuration file in the Administration Server properties. The Kaspersky Security Network configuration file is located within the ZIP archive of the MDR configuration file. You can obtain the ZIP archive in the Kaspersky Managed Detection and Response Console. For details on configuring Kaspersky Private Security Network, please refer to the Kaspersky Security Center Help. You can also upload a Kaspersky Security Network configuration file to the computer from the command line (see the instructions below).
How to configure Kaspersky Private Security Network from the command line
As a result, Kaspersky Endpoint Security will use Kaspersky Private Security Network to determine the reputation of files, applications, and websites. Kaspersky Security Network section of the policy settings will display the following operating status: Infrastructure: Kaspersky Private Security Network.
You must enable extended KSN mode for Managed Detection and Response to work.
- Activating Kaspersky Managed Detection and Response
To activate the Managed Detection and Response functionality, you must use an activation code. If you are using a key file to activate functionality, you need to contact Technical Support to get an activation code.
Kaspersky Managed Detection and Response supports the following licensing methods:
- Managed Detection and Response functionality is covered by the Kaspersky Endpoint Security for Windows license.
The feature will be available immediately after activation of Kaspersky Endpoint Security for Windows.
- A separate license for MDR (Kaspersky Managed Detection and Response Add-on) is used.
The feature will be available after you add a separate key for Kaspersky Managed Detection and Response Add-on. As a result, two keys are added on the computer: a key for Kaspersky Endpoint Security and a key for Kaspersky Managed Detection and Response.
Licensing for the stand-alone Managed Detection and Response functionality is the same as the licensing of Kaspersky Endpoint Security.
Make sure that the MDR functionality is included in the license and is working in the local interface of the application.
- Managed Detection and Response functionality is covered by the Kaspersky Endpoint Security for Windows license.
- Enabling Managed Detection and Response component
Load the BLOB configuration file in the Kaspersky Endpoint Security policy (see the instructions below). The BLOB file contains the client ID and information about the license for Kaspersky Managed Detection and Response. The BLOB file is located inside the ZIP archive of the MDR configuration file. You can obtain the ZIP archive in the Kaspersky Managed Detection and Response Console. For detailed information about a BLOB file, please refer to the Kaspersky Managed Detection and Response Help.
Starting with Kaspersky Endpoint Security 12.6 for Windows, adding a BLOB file is optional for Kaspersky Managed Detection and Response without tenants if you have a current license.
How to enable Managed Detection and Response component in the Administration Console (MMC)
- Open the Kaspersky Security Center Administration Console.
- In the console tree, select Policies.
- Select the necessary policy and double-click to open the policy properties.
- In the policy window, select Detection and Response → Managed Detection and Response.
- Select the Managed Detection and Response check box.
- In the Settings block, click Upload and select the BLOB file received in the Kaspersky Managed Detection and Response Console. The file has the P7 extension.
By default, the user is allowed to manage application settings (the "padlock" is open
). To apply the policy on computers, close the padlocks . - Save your changes.
How to enable Managed Detection and Response component in the Web Console and Cloud Console
- In the main window of the Web Console, select Assets (Devices) → Policies & profiles.
- Click the name of the Kaspersky Endpoint Security policy.
The policy properties window opens.
- Select the Application settings tab.
- Go to Detection and Response → Managed Detection and Response.
- Turn on the Managed Detection and Response toggle.
- Click Upload and select the BLOB file that was obtained in the Kaspersky Managed Detection and Response Console. The file has the P7 extension.
By default, the user is allowed to manage policy settings (the "padlock" is open
). To apply the policy on computers, close the padlocks . - Save your changes.
How to enable Managed Detection and Response component from the command line
As a result, Kaspersky Endpoint Security will verify the BLOB file. BLOB file verification includes checking the digital signature and the license term. If the BLOB file is successfully verified, Kaspersky Endpoint Security will download the file and send the file to the computer during the next synchronization with Kaspersky Security Center. Check the operating status of the component by viewing the Report on status of application components. You can also view the operating status of a component in reports in the local interface of Kaspersky Endpoint Security. The Managed Detection and Response component will be added to the list of Kaspersky Endpoint Security components.
KEA to KES Migration Guide for MDR
Kaspersky Endpoint Security for Windows includes a built-in agent for the Kaspersky Managed Detection and Response solution. You no longer need a separate Kaspersky Endpoint Agent application to work with MDR. All functions of Kaspersky Endpoint Agent will be performed by Kaspersky Endpoint Security.
When you deploy Kaspersky Endpoint Security on computers that have Kaspersky Endpoint Agent installed, Kaspersky Managed Detection and Response solution will continue working with Kaspersky Endpoint Security. In addition, Kaspersky Endpoint Agent will be removed from the computer. The same behavior in the system will occur when you update Kaspersky Endpoint Security to version 11.6.0 or higher.
Kaspersky Endpoint Security is not compatible with Kaspersky Endpoint Agent. You cannot install both of these applications on the same computer.
The following conditions must be met for Kaspersky Endpoint Security to work as part of Kaspersky Managed Detection and Response:
- Kaspersky Security Center version 13.2 or higher (including Network Agent). In earlier versions of Kaspersky Security Center, it is impossible to activate the Managed Detection and Response feature.
- A background connection between Kaspersky Security Center Web Console and Administration Server is established. For MDR to work with Administration Server via Kaspersky Security Center Web Console, you must establish a new secure connection, a background connection.
Steps for migrating [KES+KEA] configuration to [KES+built-in agent] for MDR
- Upgrading the Kaspersky Endpoint Security Management Plug-in
MDR component can be managed using the Kaspersky Endpoint Security Management Plug-in version 11.6 or higher. Depending on the type of Kaspersky Security Center console you are using, update the management plug-in in the Administration Console (MMC) or the web plug-in in the Web Console.
- Migrating policies and tasks
Transfer Kaspersky Endpoint Agent settings to Kaspersky Endpoint Security for Windows. The following options are available:
- A wizard for migrating from Kaspersky Endpoint Agent to Kaspersky Endpoint Security. A wizard for migrating from Kaspersky Endpoint Agent to Kaspersky Endpoint Security works only in Web Console
- A standard Policies and tasks batch conversion wizard. The Policies and tasks batch conversion wizard is only available in the Administration Console (MMC). For more details about Policies and tasks batch conversion wizard, please refer to the Kaspersky Security Center Help.
- Licensing the MDR functionality
To activate Kaspersky Endpoint Security as part of the Kaspersky Managed Detection and Response solution, you need a separate license for Kaspersky Managed Detection and Response Add-on. You can add the key using the Add key task. As a result, two keys will be added to the application: Kaspersky Endpoint Security and Kaspersky Managed Detection and Response.
- Installing / Upgrading the Kaspersky Endpoint Security application
To migrate MDR functionality during an application installation or upgrade, it is recommended to use the remote installation task. When creating a remote installation task, you need to select MDR component in the installation package settings.
You can also upgrade the application using the following methods:
- Using the Kaspersky update service.
- Locally, by using the Setup Wizard.
Kaspersky Endpoint Security supports automatically selecting components when upgrading the application on a computer with the Kaspersky Endpoint Agent application installed. The automatic selection of components depends on the permissions of the user account that is upgrading the application.
If you are upgrading Kaspersky Endpoint Security using the EXE or MSI file under the system account (SYSTEM), Kaspersky Endpoint Security gains access to current licenses of Kaspersky solutions. Therefore, if the computer has Kaspersky Endpoint Agent installed and MDR solution activated, the Kaspersky Endpoint Security installer automatically configures the set of components and selects the MDR component. This makes Kaspersky Endpoint Security switch to using the built-in agent and removes Kaspersky Endpoint Agent. Running the MSI installer under the system account (SYSTEM) is usually performed when upgrading via the Kaspersky update service or when deploying an installation package via Kaspersky Security Center.
If you are upgrading Kaspersky Endpoint Security using an MSI file under a non-privileged user account, Kaspersky Endpoint Security lacks access to current licenses of Kaspersky solutions. In this case, Kaspersky Endpoint Security automatically selects components based on a set of components of Kaspersky Endpoint Agent. After that Kaspersky Endpoint Security switches to using the built-in agent and removes Kaspersky Endpoint Agent.
Kaspersky Endpoint Security supports upgrading without computer restart. You can select the application upgrade mode in policy properties.
- Checking the application operation
If after application installation or upgrade, the computer has the Critical status in the Kaspersky Security Center console:
- Make sure that the computer has Network Agent version 13.2 or higher installed.
- Check the operating status of the built-in agent by viewing the Report on status of application components. If a component has the Not installed status, install the component using the Change application components task. If a component has the Not covered by license status, make sure that you have activated the built-in agent functionality.
- Make sure you accept the Kaspersky Security Network Statement in the new policy of Kaspersky Endpoint Security for Windows.
Endpoint Detection and Response
|
Kaspersky Endpoint Security for Windows includes a built-in agent for the Kaspersky Endpoint Detection and Response Optimum solution (hereinafter also "EDR Optimum"). Starting with version 11.8.0, Kaspersky Endpoint Security for Windows includes a built-in agent for the Kaspersky Endpoint Detection and Response Expert solution (hereinafter also "EDR Expert"). Kaspersky Endpoint Detection and Response is a range of solutions for protecting the corporate IT infrastructure from advanced cyber threats. The functionality of the solutions combines automatic detection of threats with the ability to react to these threats to counteract advanced attacks including new exploits, ransomware, fileless attacks, as well as methods using legitimate system tools. EDR Expert offers more threat monitoring and response functionality than EDR Optimum. For details about the solutions, see the Kaspersky Endpoint Detection and Response Optimum Help and the Kaspersky Endpoint Detection and Response Expert Help. |
Threat Intelligence tools
Kaspersky Endpoint Detection and Response uses the following Threat Intelligence tools:
- Integration with Kaspersky Threat Intelligence Portal, which contains and displays information about the reputation of files and web addresses.
- Kaspersky Threats database.
- The Kaspersky Security Network (hereinafter also referred to as "KSN") cloud service infrastructure, which provides access to real-time file, website, and software reputation information from the Kaspersky knowledge base. Using data from Kaspersky Security Network ensures faster responses by Kaspersky applications to threats, improves the performance of some protection components, and reduces the likelihood of false positives. EDR Expert uses the Kaspersky Private Security Network (KPSN) solution, which sends data to regional servers without sending data from devices to the KSN.
- Cloud Sandbox technology that lets you run detected files in an isolated environment and check their reputation.
Principle of operation of the solution
Kaspersky Endpoint Detection and Response reviews and analyses threat development and provides security personnel or the Administrator with information about the potential attack that is necessary for a timely response. Kaspersky Endpoint Detection and Response displays alert details in a separate window. An alert is an event in the corporate IT infrastructure that the application has identified as unusual or suspicious and that can pose a security threat for the corporate IT infrastructure. Alert Details is a tool for viewing the entirety of collected information about a detected threat. Alert details include, for example, the history of files appearing on the computer. For details about managing alert details, refer to the Kaspersky Endpoint Detection and Response Optimum Help and the Kaspersky Endpoint Detection and Response Expert Help.
Support for previous versions of Kaspersky Endpoint Security
If you are using Kaspersky Endpoint Security 11.2.0–11.6.0 for interoperability with Kaspersky Endpoint Detection and Response Optimum, the application includes Kaspersky Endpoint Agent. You can install Kaspersky Endpoint Agent side-by-side with Kaspersky Endpoint Security. In Kaspersky Endpoint Security 11.9.0 the Kaspersky Endpoint Agent distribution package is no longer part of the Kaspersky Endpoint Security distribution kit.
The Kaspersky Endpoint Detection and Response Expert solution does not support interoperability with Kaspersky Endpoint Agent. The Kaspersky Endpoint Detection and Response Expert solution uses Kaspersky Endpoint Security with built-in agent (version 11.8.0 and later).
Integration of the built-in agent with EDR Optimum / EDR Expert
To integrate with Kaspersky Endpoint Detection and Response, you must add the Endpoint Detection and Response Optimum (EDR Optimum) component or the Endpoint Detection and Response Expert (EDR Expert) component, and configure Kaspersky Endpoint Security.
EDR Optimum, EDR Expert and EDR (KATA) components are not compatible with each other.
The following conditions must be fulfilled for Endpoint Detection and Response to work:
- Kaspersky Security Center version 13.2 or higher. In earlier versions of Kaspersky Security Center, it is impossible to activate the Endpoint Detection and Response feature.
- Kaspersky Endpoint Detection and Response management plug-in.
Starting from Kaspersky Endpoint Security version 12.6 the display of alert details has been moved from Kaspersky Endpoint Security management plug-in to EDR management plug-in. The EDR management plug-in is a single plugin for working with agents on Windows, Mac and Linux operating systems. Now, when working with EDR Optimum, you will need Kaspersky Endpoint Security management plug-in to create threat response tasks and EDR management plug-in to view alert details.
- The EDR Optimum component as part of Kaspersky Endpoint Security supports interaction with the Kaspersky Endpoint Detection and Response Optimum 2.0 solution. Interaction with Kaspersky Endpoint Detection and Response Optimum version 1.0 is not supported.
- EDR Optimum can be managed in Kaspersky Security Center Web Console and Kaspersky Security Center Cloud Console.
EDR Expert can be managed only using the Kaspersky Security Center Cloud Console. You cannot manage this functionality using the Administration Console (MMC).
- The application is activated and the functionality is covered by the license.
- The Endpoint Detection and Response component is turned on.
- Application components that Endpoint Detection and Response depends on are enabled and operational. Endpoint Detection and Response depends on the following components:
Integration with Kaspersky Endpoint Detection and Response involves the following steps:
- Installing Endpoint Detection and Response components
You can select the EDR Optimum or EDR Expert component during installation or upgrade, as well as using the Change application components task.
You must restart your computer to finish upgrading the application with the new components.
- Activating Kaspersky Endpoint Detection and Response
You can acquire a license to use Kaspersky Endpoint Detection and Response in the following ways:
- Endpoint Detection and Response functionality is included in the Kaspersky Endpoint Security for Windows license.
The feature will be available immediately after activation of Kaspersky Endpoint Security for Windows.
- Purchasing a separate license for EDR Optimum or EDR Expert (Kaspersky Endpoint Detection and Response Add-on).
The feature will be available after you add a separate key for Kaspersky Endpoint Detection and Response. As a result, two keys are added on the computer: a key for Kaspersky Endpoint Security and a key for Kaspersky Endpoint Detection and Response.
Licensing for the stand-alone Endpoint Detection and Response functionality is the same as the licensing of Kaspersky Endpoint Security.
Make sure that the EDR Optimum or EDR Expert functionality is included in the license and is running in the local interface of the application.
For more information about the EDR Optimum End User License Agreement, refer to the Kaspersky Endpoint Detection and Response Optimum Help.
- Endpoint Detection and Response functionality is included in the Kaspersky Endpoint Security for Windows license.
- Enabling Endpoint Detection and Response components
You can enable or disable the component in Kaspersky Endpoint Security for Windows policy settings.
The Kaspersky Endpoint Detection and Response component is enabled. Check the operating status of the component by viewing the Report on status of application components. You can also view the operating status of a component in reports in the local interface of Kaspersky Endpoint Security. The Endpoint Detection and Response Optimum or Endpoint Detection and Response Expert component is added to the list of Kaspersky Endpoint Security components.
- Enabling data transfer to Administration Server
To enable all the Endpoint Detection and Response features, data transfer must be enabled for the following types of data:
- Quarantine file data.
The data are required to obtain information about files quarantined on a computer through Web Console and Cloud Console. For example, you can download a file from quarantine for analysis in Web Console and Cloud Console.
- Threat development chain data.
The data are required to obtain information about threats detected on a computer in Web Console and Cloud Console. You can view alert details and take response actions in Web Console and Cloud Console.
How to enable data transfer to the Administration Server in Web Console and Cloud Console
- Quarantine file data.
Scan for indicators of compromise (standard task)
An Indicator of Compromise (IOC) is a set of data about an object or activity that indicates unauthorized access to the computer (compromise of data). For example, many unsuccessful attempts to sign in to the system can constitute an Indicator of Compromise. The IOC Scan task allows finding Indicators of Compromise on the computer and taking threat response measures.
Kaspersky Endpoint Security searches for indicators of compromise using IOC files. IOC files are files containing the sets of indicators that the application tries to match to count a detection. IOC files must conform to the OpenIOC standard.
IOC Scan task run mode
Kaspersky Endpoint Detection and Response lets you create standard IOC Scan tasks to detect compromised data. Standard IOC scan task is a group or local task that is created and configured manually in the Web Console. Tasks are run using IOC files prepared by the user. If you want to add an indicator of compromise manually, please read the requirements for IOC files.
The file that you can download by clicking the link below, contains a table with the full list of IOC terms of the OpenIOC standard.
![]() DOWNLOAD THE IOC_TERMS.XLSX FILE
DOWNLOAD THE IOC_TERMS.XLSX FILE
Kaspersky Endpoint Security also supports stand-alone IOC scan tasks when the application is used as part of the Kaspersky Sandbox solution.
Creating an IOC Scan task
You can create IOC Scan tasks manually:
- In alert details (only for EDR Optimum).
Alert Details is a tool for viewing the entirety of collected information about a detected threat. Alert details include, for example, the history of files appearing on the computer. For details about managing alert details, refer to the Kaspersky Endpoint Detection and Response Optimum Help and the Kaspersky Endpoint Detection and Response Expert Help.
- Using the Task Wizard.
You can configure the task for EDR Optimum in Web Console and Cloud Console. Task settings for EDR Expert are available only in Cloud Console.
To create a IOC Scan task:
- In the main window of the Web Console, select Assets (Devices) → Tasks.
The list of tasks opens.
- Click Add.
The Task Wizard starts.
- Configure the task settings:
- In the Application drop-down list, select Kaspersky Endpoint Security for Windows (12.8.0).
- In the Task type drop-down list, select IOC Scan.
- In the Task name field, enter a brief description.
- In the Devices to which the task will be assigned block, select the task scope.
- Select devices according to the selected task scope option. Go to the next step.
- Enter the account credentials of the user whose rights you want to use to run the task. Go to the next step.
By default, Kaspersky Endpoint Security starts the task as the system user account (SYSTEM).
The system account (SYSTEM) does not have permission to perform the IOC Scan task on network drives. If you want to run the task for a network drive, select the account of a user that has access to that drive.
For standalone IOC Scan tasks on network drives, in the task properties you need to manually select the user account that has access to this drive.
- Exit the Wizard.
A new task will be displayed in the list of tasks.
- Click the new task.
The task properties window opens.
- Select the Application settings tab.
- Go to the IOC scan settings section.
- Load the IOC files to search for indicators of compromise.
After loading the IOC files, you can view the list of indicators from IOC files.
Adding or removing IOC files after running the task is not recommended. This can cause the IOC scan results to display incorrectly for prior runs of the task. To search indicators of compromise by new IOC files, it is recommended to add new tasks.
- Configure actions on IOC detection:
- Isolate computer from the network. If this option is selected, Kaspersky Endpoint Security isolates the computer from the network to prevent the threat from spreading. You can configure the duration of the isolation in Endpoint Detection and Response component settings.
- Move copy to Quarantine, delete object. If this option is selected, Kaspersky Endpoint Security deletes the malicious object found on the computer. Before deleting the object, Kaspersky Endpoint Security creates a backup copy in case the object needs to be restored later. Kaspersky Endpoint Security moves the backup copy to Quarantine.
- Run scan of critical areas. If this option is selected, Kaspersky Endpoint Security runs the Critical Areas Scan task. By default, Kaspersky Endpoint Security scans the kernel memory, running processes, and disk boot sectors.
- Go to the Advanced section.
- Select data types (IOC documents) that must be analyzed as part of the task.
Kaspersky Endpoint Security automatically selects data types (IOC documents) for the IOC Scan task in accordance with the content of loaded IOC files. It is not recommended to deselect data types.
You can additionally configure scan scopes for the following data types:
- Files - FileItem. Set an IOC scan scope on the computer using preset scopes.
By default, Kaspersky Endpoint Security scans for IOCs only in important areas of the computer, such as the Downloads folder, the desktop, the folder with temporary operating system files, etc. You can also manually add the scan scope.
- Windows event logs - EventLogItem. Enter the time period when the events were logged. You can also select which Windows event logs must be used for IOC scanning. By default, the following event logs are selected: application event log, system event log, and security event log.
For the Windows registry - RegistryItem data type, Kaspersky Endpoint Security scans a set of registry keys.
- Files - FileItem. Set an IOC scan scope on the computer using preset scopes.
- In the task properties window, select the Schedule tab.
- Configure the task schedule.
Wake-on-LAN is not available for this task. Make sure the computer is turned on to run the task.
- Save your changes.
- Select the check box next to the task.
- Click Start.
As a result, Kaspersky Endpoint Security runs the search for indicators of compromise on the computer. You can view the results of the task in task properties in the Results section. You can view the information about detected indicators of compromise in the task properties: Application settings → IOC Scan Results.
IOC scan results are kept for 30 days. After this period, Kaspersky Endpoint Security automatically deletes the oldest entries.
Page top
Move file to Quarantine
When reacting to threats, Kaspersky Endpoint Detection and Response can create Move file to Quarantine tasks. This is necessary to minimize the consequences of the threat. Quarantine is a special local storage on the computer. The user can quarantine files that the user considers dangerous for the computer. Quarantined files are stored in an encrypted state and do not threaten the security of the device. Kaspersky Endpoint Security uses Quarantine only when working with Detection and Response solutions: EDR Optimum, EDR Expert, KATA (EDR), Kaspersky Sandbox. In other cases Kaspersky Endpoint Security places the relevant file in Backup. For details on managing Quarantine as part of solutions, please refer to the Kaspersky Sandbox Help, Kaspersky Endpoint Detection and Response Optimum Help, and Kaspersky Endpoint Detection and Response Expert Help, Kaspersky Anti Targeted Attack Platform Help.
You can create Move file to Quarantine tasks in the following ways:
- In alert details (only for EDR Optimum).
Alert Details is a tool for viewing the entirety of collected information about a detected threat. Alert details include, for example, the history of files appearing on the computer. For details about managing alert details, refer to the Kaspersky Endpoint Detection and Response Optimum Help and the Kaspersky Endpoint Detection and Response Expert Help.
- Using the Task Wizard.
You must enter the file path or hash (SHA256 or MD5), or both the file path and the file hash.
The Move file to Quarantine task has the following limitations:
- The file size must not exceed 100 MB.
- System Critical Objects (SCO) cannot be quarantined. SCOs are files that the operating system and the Kaspersky Endpoint Security for Windows application require to be able to run.
- You can configure the task for EDR Optimum in Web Console and Cloud Console. Task settings for EDR Expert are available only in Cloud Console.
To create a Move file to Quarantine task:
- In the main window of the Web Console, select Assets (Devices) → Tasks.
The list of tasks opens.
- Click Add.
The Task Wizard starts.
- Configure the task settings:
- In the Application drop-down list, select Kaspersky Endpoint Security for Windows (12.8.0).
- In the Task type drop-down list, select Move file to Quarantine.
- In the Task name field, enter a brief description.
- In the Devices to which the task will be assigned block, select the task scope.
- Select devices according to the selected task scope option. Click Next.
- Enter the account credentials of the user whose rights you want to use to run the task. Click Next.
By default, Kaspersky Endpoint Security starts the task as the system user account (SYSTEM).
- Finish the wizard by clicking the Finish button.
A new task will be displayed in the list of tasks.
- Click the new task.
The task properties window opens.
- Select the Application settings tab.
- In the list of files, click Add.
The file adding wizard starts.
- To add the file, you must enter the full path to the file, or both file hash and the path.
If the file is located on a network drive, enter the file path starting with
\\, and not the drive letter. For example,\\server\shared_folder\file.exe. If the file path contains a network drive letter, you can get a File not found error. - In the task properties window, select the Schedule tab.
- Configure the task schedule.
Wake-on-LAN is not available for this task. Make sure the computer is turned on to run the task.
- Save your changes.
- Select the check box next to the task.
- Click Start.
As a result, Kaspersky Endpoint Security moves the file to Quarantine.
If the file is locked by a different process, the task is displayed as Completed, but the file itself is quarantined only after the computer is restarted. After restarting the computer, confirm that the file is deleted.
The Move file to Quarantine task can finish with the Access denied error if you are trying to quarantine an executable file that is currently running. Create a terminate process task for the file and try again.
The Move file to Quarantine task can finish with the Not enough space in Quarantine storage error if you are trying to quarantine a file that is too large. Empty the Quarantine or make Quarantine larger. Then try again.
You can restore a file from Quarantine or empty the Quarantine using Web Console. You can restore objects locally on the computer using the command line.
Page top
Get file
You can get files from user computers. For example, you can configure getting an event log file created by a third-party application. To get the file, you must create a dedicated task. As a result of the execution of the task, the file is saved in Quarantine. You can download this file from Quarantine to your computer using Web Console. On the user's computer, the file remains in its original folder.
The file size must not exceed 100 MB.
You can configure the task for EDR Optimum in Web Console and Cloud Console. Task settings for EDR Expert are available only in Cloud Console.
To create a Get file task:
- In the main window of the Web Console, select Assets (Devices) → Tasks.
The list of tasks opens.
- Click Add.
The Task Wizard starts.
- Configure the task settings:
- In the Application drop-down list, select Kaspersky Endpoint Security for Windows (12.8.0).
- In the Task type drop-down list, select Get file.
- In the Task name field, enter a brief description.
- In the Devices to which the task will be assigned block, select the task scope.
- Select devices according to the selected task scope option. Click Next.
- Enter the account credentials of the user whose rights you want to use to run the task. Click Next.
By default, Kaspersky Endpoint Security starts the task as the system user account (SYSTEM).
- Finish the wizard by clicking the Finish button.
A new task will be displayed in the list of tasks.
- Click the new task.
The task properties window opens.
- Select the Application settings tab.
- In the list of files, click Add.
The file adding wizard starts.
- To add the file, you must enter the full path to the file, or both file hash and the path.
If the file is located on a network drive, enter the file path starting with
\\, and not the drive letter. For example,\\server\shared_folder\file.exe. If the file path contains a network drive letter, you can get a File not found error. - In the task properties window, select the Schedule tab.
- Configure the task schedule.
Wake-on-LAN is not available for this task. Make sure the computer is turned on to run the task.
- Save your changes.
- Select the check box next to the task.
- Click Start.
As a result, Kaspersky Endpoint Security creates a copy of the file and moves that copy to Quarantine. You can download the file from Quarantine in Web Console.
Page top
Delete file
You can remotely delete files using the Delete file task. For example, you can remotely delete a file when responding to threats.
The Delete file task has the following limitations:
- System Critical Objects (SCO) cannot be deleted. SCOs are files that the operating system and the Kaspersky Endpoint Security for Windows application require to be able to run.
- You can configure the task for EDR Optimum in Web Console and Cloud Console. Task settings for EDR Expert are available only in Cloud Console.
To create a Delete file task:
- In the main window of the Web Console, select Assets (Devices) → Tasks.
The list of tasks opens.
- Click Add.
The Task Wizard starts.
- Configure the task settings:
- In the Application drop-down list, select Kaspersky Endpoint Security for Windows (12.8.0).
- In the Task type drop-down list, select Delete file.
- In the Task name field, enter a brief description.
- In the Devices to which the task will be assigned block, select the task scope.
- Select devices according to the selected task scope option. Click Next.
- Enter the account credentials of the user whose rights you want to use to run the task. Click Next.
By default, Kaspersky Endpoint Security starts the task as the system user account (SYSTEM).
- Finish the wizard by clicking the Finish button.
A new task will be displayed in the list of tasks.
- Click the new task.
The task properties window opens.
- Select the Application settings tab.
- In the list of files, click Add.
The file adding wizard starts.
- To add the file, you must enter the full path to the file, or both file hash and the path.
If the file is located on a network drive, enter the file path starting with
\\, and not the drive letter. For example,\\server\shared_folder\file.exe. If the file path contains a network drive letter, you can get a File not found error. - In the task properties window, select the Schedule tab.
- Configure the task schedule.
Wake-on-LAN is not available for this task. Make sure the computer is turned on to run the task.
- Save your changes.
- Select the check box next to the task.
- Click Start.
As a result, Kaspersky Endpoint Security deletes the file from the computer. If the file is locked by a different process, the task is displayed as Done, but the file itself is deleted only after the computer is restarted. After restarting the computer, confirm that the file is deleted.
The Delete file task can finish with the Access denied error if you are trying to delete an executable file that is currently running. Create a terminate process task for the file and try again.
Page top
Process start
You can remotely run files using the Start process task. For example, you can remotely run an utility that creates the computer configuration file. Next you can use the Get file task to receive the created file in Kaspersky Security Center Web Console.
You can configure the task for EDR Optimum in Web Console and Cloud Console. Task settings for EDR Expert are available only in Cloud Console.
To create a Start process task:
- In the main window of the Web Console, select Assets (Devices) → Tasks.
The list of tasks opens.
- Click Add.
The Task Wizard starts.
- Configure the task settings:
- In the Application drop-down list, select Kaspersky Endpoint Security for Windows (12.8.0).
- In the Task type drop-down list, select Start process.
- In the Task name field, enter a brief description.
- In the Devices to which the task will be assigned block, select the task scope.
- Select devices according to the selected task scope option. Click Next.
- Enter the account credentials of the user whose rights you want to use to run the task. Click Next.
By default, Kaspersky Endpoint Security starts the task as the system user account (SYSTEM).
- Finish the wizard by clicking the Finish button.
A new task will be displayed in the list of tasks.
- Click the new task.
- The task properties window opens.
- Select the Application settings tab.
- Enter the process start command.
Suppose you want to run an utility (
utility.exe) that saves the information about the computer's configuration to a file namedconf.txtin the current folder (by default). The utility is in theC:\Users\admin\Diagnostic\folder. You must save the configuration file in theC:\Users\admin\Documents\Configurationfolder. Enter the following values:- Executable command –
C:\Users\admin\Diagnostic\utility.exe - Command line arguments (optional) –
/R conf.txt - Path to the working folder (optional) –
C:\Users\admin\Documents\Configuration
- Executable command –
- In the task properties window, select the Schedule tab.
- Configure the task schedule.
Wake-on-LAN is not available for this task. Make sure the computer is turned on to run the task.
- Save your changes.
- Select the check box next to the task.
- Click Start.
As a result, Kaspersky Endpoint Security runs the command in silent mode and starts the process. You can view the results of the task in task properties in the Execution results section.
Page top
Terminate process
You can remotely terminate processes using the Terminate process task. For example, you can remotely terminate an Internet speed testing utility that was started using the Run process task.
If you want to prohibit running a file, you can configure the Execution prevention component. You can prohibit the execution of executable files, scripts, office format files.
The Terminate process task has the following limitations:
- Processes of System Critical Objects (SCO) cannot be terminated. SCOs are files that the operating system and the Kaspersky Endpoint Security application require to be able to run.
- You can configure the task for EDR Optimum in Web Console and Cloud Console. Task settings for EDR Expert are available only in Cloud Console.
To create a Terminate process task:
- In the main window of the Web Console, select Assets (Devices) → Tasks.
The list of tasks opens.
- Click Add.
The Task Wizard starts.
- Configure the task settings:
- In the Application drop-down list, select Kaspersky Endpoint Security for Windows (12.8.0).
- In the Task type drop-down list, select Terminate process.
- In the Task name field, enter a brief description.
- In the Devices to which the task will be assigned block, select the task scope.
- Select devices according to the selected task scope option. Click Next.
- Enter the account credentials of the user whose rights you want to use to run the task. Click Next.
By default, Kaspersky Endpoint Security starts the task as the system user account (SYSTEM).
- Finish the wizard by clicking the Finish button.
A new task will be displayed in the list of tasks.
- Click the new task.
The task properties window opens.
- Select the Application settings tab.
- To complete the process, you must select the file that you want to terminate. You can select a file in one of the following ways:
- Enter the full name to the file.
- Enter the hash of the file and the path to the file.
- Enter the PID of the process (only for local tasks).
If the file is located on a network drive, enter the file path starting with
\\, and not the drive letter. For example,\\server\shared_folder\file.exe. If the file path contains a network drive letter, you can get a File not found error. - In the task properties window, select the Schedule tab.
- Configure the task schedule.
Wake-on-LAN is not available for this task. Make sure the computer is turned on to run the task.
- Click Save.
- Select the check box next to the task.
- Click Start.
As a result, Kaspersky Endpoint Security terminates the process on the computer. For example, if a 'GAME' application is running and you terminate the game.exe process, the application is closed without saving data. You can view the results of the task in task properties in the Results section.
Page top
Execution prevention
Execution prevention allows managing the running of executable files and scripts, as well as opening office format files. In this way, you can, for example, prevent the execution of applications that you consider insecure. As a result, the spreading of the threat can be stopped. Execution prevention supports a set of office file extensions and a set of script interpreters.
Execution prevention rule
Execution prevention manages user access to files with execution prevention rules. Execution prevention rule is a set of criteria that the application takes into account when reacting to an object execution, for example when blocking object execution. The application identifies files by their paths or checksums calculated using MD5 and SHA256 hashing algorithms.
You can create Execution prevention rules:
- In alert details (only for EDR Optimum).
Alert Details is a tool for viewing the entirety of collected information about a detected threat. Alert details include, for example, the history of files appearing on the computer. For details about managing alert details, refer to the Kaspersky Endpoint Detection and Response Optimum Help and the Kaspersky Endpoint Detection and Response Expert Help.
- Using a group policy or local application settings.
You must enter the file path or hash (SHA256 or MD5), or both the file path and the file hash.
You can also manage Execution prevention locally using the command line.
Execution prevention has the following limitations:
- Prevention rules do not cover files on CDs or in ISO images. The application does not block execution or opening of these files.
- It is impossible to block the startup of system-critical objects (SCO). SCOs are files that the operating system and the Kaspersky Endpoint Security for Windows application require to be able to run.
- It is not recommended to create more than 5000 run prevention rules, as this can cause system instability.
Execution prevention rule modes
The Execution prevention component can work in two modes:
- Statistics only
In this mode, Kaspersky Endpoint Security publishes an event about attempts to run executable objects or open documents that match prevention rule criteria to the Windows event log and Kaspersky Security Center, but does not block the attempt to run or open the object or document. This mode is selected by default.
- Active
In this mode, the application blocks the execution of objects or opening of documents that match prevention rule criteria. The application also publishes an event about attempts to execute objects or open documents to the Windows event log and Kaspersky Security Center event log.
Managing Execution prevention
You can configure the component settings only in the Web Console.
To prevent execution:
- In the main window of the Web Console, select Assets (Devices) → Policies & profiles.
- Click the name of the Kaspersky Endpoint Security policy.
The policy properties window opens.
- Select the Application settings tab.
- Go to Detection and Response → Endpoint Detection and Response.
- Turn on the Execution Prevention ENABLED toggle.
- In the Action on execution or opening of forbidden object block, select the component operating mode:
- Block and write to report. In this mode, the application blocks the execution of objects or opening of documents that match prevention rule criteria. The application also publishes an event about attempts to execute objects or open documents to the Windows event log and Kaspersky Security Center event log.
- Log only. In this mode, Kaspersky Endpoint Security publishes an event about attempts to run executable objects or open documents that match prevention rule criteria to the Windows event log and Kaspersky Security Center, but does not block the attempt to run or open the object or document. This mode is selected by default.
- Create a list of execution prevention rules:
- Click Add.
- This opens a window; in this window, enter the name of the execution prevention rule (for example, Application A).
- In the Type drop-down list, select the object that you want to block: Executable file, Script, Microsoft Office document.
If you select a wrong object type, Kaspersky Endpoint Security does not block the file or script.
- To add the file, you must enter the hash of the file (SHA256 or MD5), the full path to the file, or both the hash and the path.
If the file is located on a network drive, enter the file path starting with
\\, and not the drive letter. For example,\\server\shared_folder\file.exe. If the file path contains a network drive letter, Kaspersky Endpoint Security does not block the file or script.Execution prevention supports a set of office file extensions and a set of script interpreters.
- Save your changes.
As a result, Kaspersky Endpoint Security blocks the execution of objects: running executable files and scripts, opening office format files. You can, however, for example, open a script file in a text editor even if running the script is prevented. When blocking the execution of an object, Kaspersky Endpoint Security displays a standard notification (see figure below) if notifications are enabled in application settings.
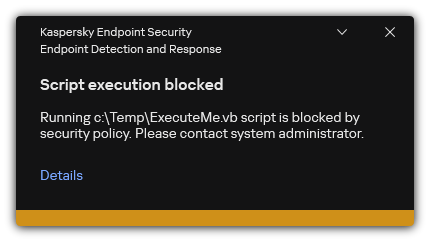
Execution prevention notification
Page top
Computer network isolation
Computer network isolation allows automatically isolating a computer from the network in response to the detection of an indicator of compromise (IOC) – this is the automatic mode. You can turn on Network isolation manually while you are investigating the detected threat – this is the manual mode.
When Network isolation is turned on, the application severs all active connections and blocks all new TCP/IP network connections on the computer except the following connections:
- Connections listed in Network isolation exclusions.
- Connections initiated by Kaspersky Endpoint Security services.
- Connections initiated by the Kaspersky Security Center Network Agent.
- Connections to the SVM and the Integration Server if the application is being used in Light Agent mode.
You can configure the component settings only in the Web Console.
Automatic Network isolation mode
You can configure Network isolation to be turned on automatically in response to an IOC detection. You can configure the automatic Network isolation mode with a group policy.
How to configure Network isolation to be turned on automatically in response to an IOC detection
You can configure Network isolation to be turned off automatically after a specified time elapses. By default, the application turns off Network isolation after 8 hours have passed from the time when it was turned on. You can also turn off Network isolation manually (see the instructions below). After turning off network isolation, the computer can use the Network without restrictions.
How to configure the delay for turning off Network isolation of a computer in automatic mode
Manual Network isolation mode
You can manually turn Network isolation on and off. You can configure the manual Network isolation mode using the computer properties in the Kaspersky Security Center console.
You can turn on Network isolation:
- In alert details (only for EDR Optimum).
Alert Details is a tool for viewing the entirety of collected information about a detected threat. Alert details include, for example, the history of files appearing on the computer. For details about managing alert details, refer to the Kaspersky Endpoint Detection and Response Optimum Help and the Kaspersky Endpoint Detection and Response Expert Help.
- Using local application settings.
How to turn on Network isolation of a computer manually
You can configure Network isolation to be turned off automatically after a specified time elapses. By default, the application turns off Network isolation after 8 hours have passed from the time when it was turned on. After turning off network isolation, the computer can use the Network without restrictions.
How to configure the delay for turning off Network isolation of a computer in manual mode
How to turn off Network isolation of a computer manually
You can also disable Network isolation locally using the command line.
Network isolation exclusions
You can configure Network isolation exclusions. Network connections that match the rules are not blocked on the computer when Network isolation is turned on.
To configure Network isolation exclusions, you can use a list of standard network profiles. By default, exclusions include network profiles containing rules that ensure uninterrupted operation of devices with the DNS/DHCP server and DNS/DHCP client roles. You can also modify the settings of standard network profiles or define exclusions manually (see instructions below).
Exclusions specified in policy properties are applied only if Network isolation is turned on automatically in response to a detected threat. Exclusions specified in computer properties are applied only if Network isolation is turned on manually in computer properties in the Kaspersky Security Center console or in alert details.
An active policy does not prevent applying exclusions from Network isolation configured in computer properties because these parameters have different usage scenarios.
How to add a Network isolation exclusion in automatic mode
How to add a Network isolation exclusion in manual mode
You can also view the Network isolation exclusion list locally using the command line. In this case, the computer must be isolated.
Page top
Cloud Sandbox
Cloud Sandbox is a technology that lets you detect advanced threats on a computer. Kaspersky Endpoint Security automatically forwards detected files to Cloud Sandbox for analysis. Cloud Sandbox runs these files in an isolated environment to identify malicious activity and decides on their reputation. Data on these files is then sent to Kaspersky Security Network. Therefore, if Cloud Sandbox has detected a malicious file, Kaspersky Endpoint Security will perform the appropriate action to eliminate this threat on all computers where this file is detected.
For Cloud Sandbox to operate, you must enable the use of Kaspersky Security Network.
If you are using Kaspersky Private Security Network, Cloud Sandbox technology is not available.
Cloud Sandbox technology is permanently enabled and is available to all Kaspersky Security Network users regardless of the type of license they are using. If you have already deployed Endpoint Detection and Response solution (EDR Optimum or EDR Expert), you can enable a separate counter for threats detected by Cloud Sandbox. You can use this counter to generate statistics during analysis of detected threats.
To enable the Cloud Sandbox counter:
- In the main window of the Web Console, select Assets (Devices) → Policies & profiles.
- Click the name of the Kaspersky Endpoint Security policy.
The policy properties window opens.
- Select the Application settings tab.
- Go to Detection and Response → Endpoint Detection and Response.
- Turn on the Cloud Sandbox toggle.
- Save your changes.
Whenever there is a threat, Kaspersky Endpoint Security activates the counter for threats detected using Cloud Sandbox in the main application window under Threat detection technologies. Kaspersky Endpoint Security will also indicate the Cloud Sandbox threat detection technology in the Report on threats in the Kaspersky Security Center console.
Page top
KEA to KES Migration Guide for EDR Optimum
Kaspersky Endpoint Security for Windows includes a built-in agent for the Kaspersky Endpoint Detection and Response Optimum solution. You no longer need a separate Kaspersky Endpoint Agent application to work with EDR Optimum. All functions of Kaspersky Endpoint Agent will be performed by Kaspersky Endpoint Security.
When you deploy Kaspersky Endpoint Security on computers that have Kaspersky Endpoint Agent installed, Kaspersky Endpoint Detection and Response Optimum solution will continue working with Kaspersky Endpoint Security. In addition, Kaspersky Endpoint Agent will be removed from the computer. The same behavior in the system will occur when you update Kaspersky Endpoint Security to version 11.7.0 or higher.
Kaspersky Endpoint Security is not compatible with Kaspersky Endpoint Agent. You cannot install both of these applications on the same computer.
The following conditions must be met for Kaspersky Endpoint Security to work as part of Kaspersky Endpoint Detection and Response Optimum:
- Kaspersky Endpoint Detection and Response Optimum version 2.0 or higher.
- Kaspersky Security Center version 13.2 or higher (including Network Agent). In earlier versions of Kaspersky Security Center, it is impossible to activate the EDR Optimum feature.
- EDR Optimum can be managed only using the Kaspersky Security Center Web Console.
- Data transfer to Administration Server is enabled. The data are required to obtain information about files quarantined on a computer through Web Console.
- A background connection between Kaspersky Security Center Web Console and Administration Server is established. For EDR Optimum to work with Administration Server via Kaspersky Security Center Web Console, you must establish a new secure connection, a background connection.
Steps for migrating [KES+KEA] configuration to [KES+built-in agent] for EDR Optimum
- Upgrading the Kaspersky Endpoint Security web plug-in
EDR Optimum component can be managed using the Kaspersky Endpoint Security Web Plug-in version 11.7.0 or higher.
- Migrating policies and tasks
Transfer Kaspersky Endpoint Agent settings to Kaspersky Endpoint Security for Windows. To do this, use the wizard for migrating from Kaspersky Endpoint Agent in the Web Console.
- Licensing the EDR Optimum functionality
If you use a common Kaspersky Endpoint Detection and Response Optimum or Kaspersky Optimum Security license to activate Kaspersky Endpoint Security for Windows and Kaspersky Endpoint Agent, EDR Optimum functionality will be activated automatically after upgrading the application to version 11.7.0 or higher. You do not need to do anything else.
If you use a stand-alone Kaspersky Endpoint Detection and Response Optimum Add-on license to activate EDR Optimum functionality, you must make sure that the EDR Optimum key is added to the Kaspersky Security Center repository and the automatic license key distribution functionality is enabled. After you upgrade the application to version 11.7.0 or higher, EDR Optimum functionality is activated automatically.
If you use a Kaspersky Endpoint Detection and Response Optimum or Kaspersky Optimum Security license to activate Kaspersky Endpoint Agent, and a different license to activate Kaspersky Endpoint Security for Windows, you must replace the Kaspersky Endpoint Security for Windows key with the common Kaspersky Endpoint Detection and Response Optimum or Kaspersky Optimum Security key. You can replace the key using the Add key task.
- Installing / Upgrading the Kaspersky Endpoint Security application
To migrate EDR Optimum functionality during an application installation or upgrade, it is recommended to use the remote installation task. When creating a remote installation task, you need to select EDR Optimum component in the installation package settings.
You can also upgrade the application using the following methods:
- Using the Kaspersky update service.
- Locally, by using the Setup Wizard.
Kaspersky Endpoint Security supports automatically selecting components when upgrading the application on a computer with the Kaspersky Endpoint Agent application installed. The automatic selection of components depends on the permissions of the user account that is upgrading the application.
If you are upgrading Kaspersky Endpoint Security using the EXE or MSI file under the system account (SYSTEM), Kaspersky Endpoint Security gains access to current licenses of Kaspersky solutions. Therefore, if the computer has, for example, Kaspersky Endpoint Agent installed and the EDR Optimum solution activated, the Kaspersky Endpoint Security installer automatically configures the set of components and selects the EDR Optimum component. This makes Kaspersky Endpoint Security switch to using the built-in agent and removes Kaspersky Endpoint Agent. Running the MSI installer under the system account (SYSTEM) is usually performed when upgrading via the Kaspersky update service or when deploying an installation package via Kaspersky Security Center.
If you are upgrading Kaspersky Endpoint Security using an MSI file under a non-privileged user account, Kaspersky Endpoint Security lacks access to current licenses of Kaspersky solutions. In this case, Kaspersky Endpoint Security automatically selects components based on Kaspersky Endpoint Agent configuration. After that Kaspersky Endpoint Security switches to using the built-in agent and removes Kaspersky Endpoint Agent.
Kaspersky Endpoint Security supports upgrading without computer restart. You can select the application upgrade mode in policy properties.
- Checking the application operation
If after application installation or upgrade, the computer has the Critical status in the Kaspersky Security Center console:
- Make sure that the computer has Network Agent version 13.2 or higher installed.
- Check the operating status of the built-in agent by viewing the Report on status of application components. If a component has the Not installed status, install the component using the Change application components task. If a component has the Not covered by license status, make sure that you have activated the built-in agent functionality.
- Make sure you accept the Kaspersky Security Network Statement in the new policy of Kaspersky Endpoint Security for Windows.
Kaspersky Sandbox
|
Kaspersky Endpoint Security for Windows includes a built-in agent for integration with Kaspersky Sandbox solution. The Sandbox component detects and automatically blocks advanced threats on computers. Sandbox analyzes object behavior to detect malicious activity and activity characteristic of targeted attacks on the IT infrastructure of the organization. Sandbox analyzes and scans objects on special servers with deployed virtual images of Microsoft Windows operating systems (the Sandbox servers). For details about the solution, please refer to the Kaspersky Sandbox Help and Kaspersky Anti Targeted Attack Platform Help. |
Integration of the built-in agent with Kaspersky Sandbox
Adding the Sandbox component is required for integration with Kaspersky Sandbox. You can select the Sandbox component during installation or upgrade, as well as using the Change application components task.
To use the component, the following conditions must be met:
- Kaspersky Security Center 13.2. Earlier versions of Kaspersky Security Center do not allow the creation of standalone IOC Scan tasks for threat response.
- The component can be managed only using the Web Console. You cannot manage this component using the Administration Console (MMC).
- The application is activated and the functionality is covered by the license.
- Data transfer to Administration Server is enabled.
To use all the features of Kaspersky Sandbox, make sure quarantine file data transfer is enabled. The data are required to obtain information about files quarantined on a computer through Web Console. For example, you can download a file from quarantine for analysis in Web Console.
How to enable data transfer to the Administration Server in Web Console
- In the main window of the Web Console, select Assets (Devices) → Policies & profiles.
- Click the name of the Kaspersky Endpoint Security policy.
The policy properties window opens.
- Select the Application settings tab.
- Go to General settings → Reports and Storage.
- In the Data transfer to Administration Server block, select the About Quarantine files check box.
- Save your changes.
Settings of data transfer to Administration Server
- A background connection between Kaspersky Security Center Web Console and Administration Server is established
For Kaspersky Sandbox to work with Administration Server via Kaspersky Security Center Web Console, you must establish a new secure connection, a background connection. For details about the integration of Kaspersky Security Center with other Kaspersky solutions, refer to the Kaspersky Security Center Help.
Establishing a background connection in Web Console
If a background connection between Kaspersky Security Center Web Console and Administration Server is not established, stand-alone IOC scan tasks cannot be created as part of Threat Response.
- To configure a trusted connection with the Sandbox server, you must prepare a TLS certificate. You must then add the certificate to the computer using a policy. You also need to add the certificate to the Sandbox server.
Two-way authentication using a crypto-container is not available for Kaspersky Sandbox.
You can add a TLS certificate in Web Console or locally using the command line.
- The Kaspersky Sandbox component is enabled.
You can enable or disable the integration with Kaspersky Sandbox in Web Console or locally using the command line.
To enable or disable the integration with Kaspersky Sandbox:
- In the main window of the Web Console, select Assets (Devices) → Policies & profiles.
- Click the name of the Kaspersky Endpoint Security policy.
The policy properties window opens.
- Select the Application settings tab.
- Go to Detection and Response → Sandbox.
- Use the Integration with Sandbox ENABLED toggle to enable or disable the component.
- In the Integration mode block, select the component operating mode: Kaspersky Sandbox (automatic file submission for scanning).
- Click the Server connection settings link.
This opens the Kaspersky Sandbox server connection settings window.
- In the Server TLS certificate block, click Add and select the TLS certificate file.
Kaspersky Endpoint Security can only have one TLS certificate for a Kaspersky Sandbox server. If you have added a TLS certificate before, that certificate is revoked. Only the last added certificate is used.
- Configure advanced connections settings for Kaspersky Sandbox servers:
- Timeout. Connection timeout for the Sandbox server. After the configured timeout elapses, Kaspersky Endpoint Security sends a request to the next server. You can increase the connection timeout for the server if your connection speed is low or if the connection is unstable. The recommended request timeout is 0.5 seconds or less.
- Request queue. Size of the request queue folder. When sending multiple objects for scanning in Sandbox, Kaspersky Endpoint Security creates a request queue. By default, the size of the request queue folder is limited to 100 MB. After the maximum size is reached, Sandbox stops adding new requests to the queue and sends the corresponding event to Kaspersky Security Center. You can configure the size of the request queue folder depending on your server configuration.
- In the Servers block, click the Add button.
- This opens a window; in that window, enter the Sandbox server address (IPv4, IPv6, DNS) and port.
For details about deploying virtual images and configuring Sandbox servers, refer to the Kaspersky Sandbox Help.
- Save your changes.
As a result, Kaspersky Endpoint Security verifies the TLS certificate. If the certificate is successfully verified, Kaspersky Endpoint Security uploads the certificate file to the computer during the next synchronization with Kaspersky Security Center. If you have added two TLS certificates, Kaspersky Sandbox will use the latest certificate to establish a trusted connection. Check the operating status of the component by viewing the Report on status of application components. You can also view the operating status of a component in reports in the local interface of Kaspersky Endpoint Security. The Sandbox component will be added to the list of Kaspersky Endpoint Security components.
Kaspersky Endpoint Security saves information about the functioning of the Kaspersky Sandbox component to a report. The report also contains information about errors. If you get an error with a description fitting the Error code: XXX format (for example, 0xa67b01f4), contact Technical Support.
Scan for indicators of compromise (stand-alone task)
An Indicator of Compromise (IOC) is a set of data about an object or activity that indicates unauthorized access to the computer (compromise of data). For example, many unsuccessful attempts to sign in to the system can constitute an Indicator of Compromise. The IOC Scan task allows finding Indicators of Compromise on the computer and taking threat response measures.
Kaspersky Endpoint Security searches for indicators of compromise using IOC files. IOC files are files containing the sets of indicators that the application tries to match to count a detection. IOC files must conform to the OpenIOC standard. Kaspersky Endpoint Security automatically generates IOC files for Kaspersky Sandbox.
IOC Scan task run mode
The application creates stand-alone IOC scan tasks for Kaspersky Sandbox. Stand-alone IOC scan task is a group task that is automatically created when reacting to a threat detected by Kaspersky Sandbox. Kaspersky Endpoint Security automatically generates the IOC file. Custom IOC files are not supported. Tasks are automatically deleted 30 days after the creation time. For more details about stand-alone IOC scan tasks, refer to the Kaspersky Sandbox Help.
IOC Scan task settings
Kaspersky Sandbox may create and run IOC Scan tasks automatically when reacting to threats.
You can configure the settings only in the Web Console.
You need Kaspersky Security Center 13.2 for stand-alone IOC scan tasks of Kaspersky Sandbox to work.
To change the settings of the IOC Scan task:
- In the main window of the Web Console, select Assets (Devices) → Tasks.
The list of tasks opens.
- Click the IOC Scan task of Kaspersky Endpoint Security.
The task properties window opens.
- Select the Application settings tab.
- Go to the IOC scan settings section.
- Configure actions on IOC detection:
- Move copy to Quarantine, delete object. If this option is selected, Kaspersky Endpoint Security deletes the malicious object found on the computer. Before deleting the object, Kaspersky Endpoint Security creates a backup copy in case the object needs to be restored later. Kaspersky Endpoint Security moves the backup copy to Quarantine.
- Run scan of critical areas. If this option is selected, Kaspersky Endpoint Security runs the Critical Areas Scan task. By default, Kaspersky Endpoint Security scans the kernel memory, running processes, and disk boot sectors.
- Configure the IOC Scan task run mode using the Run only when the computer is idle check box. This check box enables / disables the function that suspends the IOC Scan task when computer resources are limited. Kaspersky Endpoint Security pauses the IOC Scan task if the screensaver is off and the computer is unlocked.
This schedule option lets you conserve computer resources when the computer is being used.
- Save your changes.
You can view the results of the task in task properties in the Results section. You can view the information about detected indicators of compromise in the task properties: Application settings → IOC Scan Results.
IOC scan results are kept for 30 days. After this period, Kaspersky Endpoint Security automatically deletes the oldest entries.
Page top
KEA to KES Migration Guide for Kaspersky Sandbox
Kaspersky Endpoint Security for Windows includes a built-in agent for the Kaspersky Sandbox solution. You no longer need a separate Kaspersky Endpoint Agent application to work with Kaspersky Sandbox. All functions of Kaspersky Endpoint Agent will be performed by Kaspersky Endpoint Security.
When you deploy Kaspersky Endpoint Security on computers that have Kaspersky Endpoint Agent installed, Kaspersky Sandbox solution will continue working with Kaspersky Endpoint Security. In addition, Kaspersky Endpoint Agent will be removed from the computer. The same behavior in the system will occur when you update Kaspersky Endpoint Security to version 11.7.0 or higher.
Kaspersky Endpoint Security is not compatible with Kaspersky Endpoint Agent. You cannot install both of these applications on the same computer.
The following conditions must be met for Kaspersky Endpoint Security to work as part of Kaspersky Sandbox:
- Kaspersky Sandbox version 2.0 or higher.
- Kaspersky Security Center version 13.2 or higher (including Network Agent). In earlier versions of Kaspersky Security Center, it is impossible to activate the Kaspersky Sandbox feature.
- Kaspersky Sandbox can be managed only using the Kaspersky Security Center Web Console.
- Data transfer to Administration Server is enabled. The data are required to obtain information about files quarantined on a computer through Web Console.
- A background connection between Kaspersky Security Center Web Console and Administration Server is established. For Kaspersky Sandbox to work with Administration Server via Kaspersky Security Center Web Console, you must establish a new secure connection, a background connection.
Steps for migrating [KES+KEA] configuration to [KES+built-in agent] for Kaspersky Sandbox
- Upgrading the Kaspersky Endpoint Security web plug-in
Kaspersky Sandbox component can be managed using the Kaspersky Endpoint Security Web Plug-in version 11.7.0 or higher.
- Migrating policies and tasks
Transfer Kaspersky Endpoint Agent settings to Kaspersky Endpoint Security for Windows. To do this, use the wizard for migrating from Kaspersky Endpoint Agent in the Web Console.
- Licensing the Kaspersky Sandbox functionality
To activate Kaspersky Endpoint Security as part of the Kaspersky Sandbox solution, you need a separate license for Kaspersky Sandbox Add-on. You can add the key using the Add key task. As a result, two keys will be added to the application: Kaspersky Endpoint Security and Kaspersky Sandbox.
- Installing / Upgrading the Kaspersky Endpoint Security application
To migrate Kaspersky Sandbox functionality during an application installation or upgrade, it is recommended to use the remote installation task. When creating a remote installation task, you need to select Kaspersky Sandbox component in the installation package settings.
You can also upgrade the application using the following methods:
- Using the Kaspersky update service.
- Locally, by using the Setup Wizard.
Kaspersky Endpoint Security supports automatically selecting components when upgrading the application on a computer with the Kaspersky Endpoint Agent application installed. The automatic selection of components depends on the permissions of the user account that is upgrading the application.
If you are upgrading Kaspersky Endpoint Security using the EXE or MSI file under the system account (SYSTEM), Kaspersky Endpoint Security gains access to current licenses of Kaspersky solutions. Therefore, if the computer has, for example, Kaspersky Endpoint Agent installed and the Kaspersky Sandbox solution activated, the Kaspersky Endpoint Security installer automatically configures the set of components and selects the Kaspersky Sandbox component. This makes Kaspersky Endpoint Security switch to using the built-in agent and removes Kaspersky Endpoint Agent. Running the MSI installer under the system account (SYSTEM) is usually performed when upgrading via the Kaspersky update service or when deploying an installation package via Kaspersky Security Center.
If you are upgrading Kaspersky Endpoint Security using an MSI file under a non-privileged user account, Kaspersky Endpoint Security lacks access to current licenses of Kaspersky solutions. In this case, Kaspersky Endpoint Security automatically selects components based on Kaspersky Endpoint Agent configuration. After that Kaspersky Endpoint Security switches to using the built-in agent and removes Kaspersky Endpoint Agent.
Kaspersky Endpoint Security supports upgrading without computer restart. You can select the application upgrade mode in policy properties.
- Checking the application operation
If after application installation or upgrade, the computer has the Critical status in the Kaspersky Security Center console:
- Make sure that the computer has Network Agent version 13.2 or higher installed.
- Check the operating status of the built-in agent by viewing the Report on status of application components. If a component has the Not installed status, install the component using the Change application components task. If a component has the Not covered by license status, make sure that you have activated the built-in agent functionality.
- Make sure you accept the Kaspersky Security Network Statement in the new policy of Kaspersky Endpoint Security for Windows.
Kaspersky Anti Targeted Attack Platform
|
Kaspersky Endpoint Security for Windows supports working with the Kaspersky Anti Targeted Attack Platform (EDR (KATA)) solution. Kaspersky Anti Targeted Attack Platform is a solution designed for timely detection of sophisticated threats such as targeted attacks, advanced persistent threats (APT), zero-day attacks, and others. Kaspersky Anti Targeted Attack Platform includes three functional units:
You can purchase all functional units or individual functional units separately. For details about the solution, please refer to the Kaspersky Anti Targeted Attack Platform Help. The application includes built-in agents for EDR, NDR components. The application also supports working with the Sandbox component that is part of KATA. |
Threat Intelligence tools
Kaspersky Endpoint Detection and Response uses the following Threat Intelligence tools:
- Integration with Kaspersky Threat Intelligence Portal, which contains and displays information about the reputation of files and web addresses.
- Kaspersky Threats database.
- The Kaspersky Security Network (hereinafter also referred to as "KSN") cloud service infrastructure, which provides access to real-time file, website, and software reputation information from the Kaspersky knowledge base. Using data from Kaspersky Security Network ensures faster responses by Kaspersky applications to threats, improves the performance of some protection components, and reduces the likelihood of false positives.
Principle of operation of the solution
Kaspersky Endpoint Security is installed on individual computers on the corporate IT infrastructure and continuously monitors processes, open network connections, and files being modified. Information about events on the computer (telemetry data) is sent to the Kaspersky Anti Targeted Attack Platform server. In this case, Kaspersky Endpoint Security also sends information to the Kaspersky Anti Targeted Attack Platform server about threats discovered by the application as well as information about processing results for these threats.
The EDR (KATA) and NDR (KATA) integration is configured in the Kaspersky Security Center console. The built-in agent is then managed using the Kaspersky Anti Targeted Attack Platform console, including running tasks, managing quarantined objects, viewing reports, and other actions.
Kaspersky Endpoint Security configurations for working with EDR / NDR (KATA)
The following configurations can be used for working with EDR / NDR (KATA):
- [KES+built-in agent]. In this configuration, Kaspersky Endpoint Security acts as both the application that ensures the security of the computer and the application for working with EDR / NDR (KATA). The built-in agent for EDR (KATA) is available in Kaspersky Endpoint Security 12.1 for Windows or later. The built-in agent for NDR (KATA) is available in Kaspersky Endpoint Security 12.7 for Windows or later.
- [third-party EPP+EDR Agent]. In this configuration, the security of the IT infrastructure is provided by the third-party Endpoint Protection Platform (EPP). The interaction with EDR / NDR (KATA) is provided by Kaspersky Endpoint Security in the Endpoint Detection Response Agent (EDR Agent) configuration. In this configuration, EDR Agent is compatible with third-party EPP applications. EDR Agent for EDR (KATA) is available in Kaspersky Endpoint Security 12.3 for Windows or later. EDR Agent for NDR (KATA) is available in Kaspersky Endpoint Security 12.7 for Windows or later.
Support for previous versions of Kaspersky Endpoint Security
If you are using Kaspersky Endpoint Security 11.2.0 – 11.8.0 for interoperability with Kaspersky Anti Targeted Attack Platform (EDR), the application includes Kaspersky Endpoint Agent. You can install Kaspersky Endpoint Agent side-by-side with Kaspersky Endpoint Security.
If you are using Kaspersky Endpoint Security 11.9.0 – 12.0, you need to install Kaspersky Endpoint Agent separately because starting from Kaspersky Endpoint Security 11.9.0 the Kaspersky Endpoint Agent distribution package is no longer part of the Kaspersky Endpoint Security distribution kit.
Integration of the built-in agent with EDR / NDR (KATA)
For integration with EDR / NDR (KATA), you must add the relevant component: Endpoint Detection and Response (KATA) or Network Detection and Response (KATA). You can select components for integration with EDR / NDR (KATA) when installing or upgrading the application, as well as using the Change application components task.
EDR Optimum, EDR Expert and EDR (KATA) components are not compatible with each other.
To use EDR / NDR (KATA), the following conditions must be met:
- EDR (KATA): Kaspersky Anti Targeted Attack Platform version 5.0 or higher.
- NDR (KATA): Kaspersky Anti Targeted Attack Platform version 6.0 or higher.
- Kaspersky Security Center version 14.2 or higher. In earlier versions of Kaspersky Security Center, it is impossible to activate the EDR / NDR (KATA) functionality.
- The application is activated and the functionality is covered by the license.
- The Endpoint Detection and Response (KATA) and Network Detection and Response (KATA) components are enabled.
- Application components that ensure the operation of EDR / NDR (KATA) are enabled and operational. The following components ensure the operation of EDR / NDR (KATA):
Integration with Endpoint Detection and Response (KATA) involves the following steps:
- Installing the Endpoint Detection and Response (KATA) and Network Detection and Response (KATA) components
You can select EDR (KATA) and NDR (KATA) components during installation or upgrade, as well as using the Change application components task.
You must restart your computer to finish upgrading the application with the new components.
- Activating Endpoint Detection and Response (KATA) and Network Detection and Response (KATA)
You need to purchase a separate license for EDR (KATA) and NDR (KATA) (for example, Kaspersky Endpoint Detection and Response (KATA) Add-on).
The functionality becomes available after adding a separate key that covers EDR (KATA) and NDR (KATA) functionality. As a result, multiple keys are added on the computer: a key for Kaspersky Endpoint Security and keys for Kaspersky Endpoint Detection and Response (KATA) and Network Detection and Response (KATA).
Licensing for the stand-alone EDR (KATA) and NDR (KATA) functionality is the same as the licensing of Kaspersky Endpoint Security.
Make sure that both the EDR (KATA) and the NDR (KATA) functionality is included in the license and is running in the local interface of the application.
- Connecting to Central Node
Kaspersky Anti Targeted Attack Platform requires establishing a trusted connection between Kaspersky Endpoint Security and the Central Node component. To configure a trusted connection, you must use a TLS certificate. You can get a TLS certificate in the Kaspersky Anti Targeted Attack Platform console (see instructions in the Kaspersky Anti Targeted Attack Platform Help). Then you must add the TLS certificate to Kaspersky Endpoint Security (see instructions below).
Adding a TLS certificate to Kaspersky Endpoint Security
By default, Kaspersky Endpoint Security only checks the TLS certificate of Central Node. To make the connection more secure, you can additionally enable the verification of the computer on Central Node (two-way authentication). To enable this verification, you must turn on two-way authentication in Central Node and Kaspersky Endpoint Security settings. To use two-way authentication, you will also need a crypto-container. A crypto-container is a PFX archive with a certificate and a private key. You can get a crypto-container in the Kaspersky Anti Targeted Attack Platform console (see instructions in the Kaspersky Anti Targeted Attack Platform Help).
How to connect a Kaspersky Endpoint Security computer to Central Node using the Web Console
You can also add a TLS certificate locally using the command line.
As a result, the computer is added on the Kaspersky Anti Targeted Attack Platform console. Check the operating status of the components by viewing the Report on status of application components. You can also view the operating status of components in reports in the local interface of Kaspersky Endpoint Security. Endpoint Detection and Response (KATA) and Network Detection and Response (KATA) components will be added to the list of Kaspersky Endpoint Security components.
Starting with Kaspersky Endpoint Security 12.6 for Windows, you can monitor the status of EDR (KATA) component in Kaspersky Security Center Administration Console (MMC). The current status of the component is displayed in computer properties in the Endpoint Sensor status column (Running, Starting, Stopped, Paused, Failed, Unknown). The Web Console does not display the status of the Endpoint Sensor.
Configuring telemetry
Telemetry is a list of events that have occurred on the protected computer. Kaspersky Endpoint Security analyzes telemetry data and sends it to Kaspersky Anti Targeted Attack Platform during synchronization. Telemetry events arrive on the server almost continuously. Kaspersky Endpoint Security initiates synchronization with the server when any of the following conditions are satisfied:
- Synchronization interval has run out.
- The number of events in the buffer exceeds the upper limit.
Therefore, by default, the application synchronizes every 30 seconds or whenever the buffer holds 1024 events. You can configure the synchronization behavior in the Kaspersky Endpoint Security policy and select optimum values to match your network load (see instructions below).
If there is no connection between Kaspersky Endpoint Security and the server, the application queues new events. When the connection is restored, Kaspersky Endpoint Security sends queued events to the server in proper order. To avoid overloading the server, Kaspersky Endpoint Security may skip some events. To enable this, you can optimize event transmission settings, for example, to set a maximum events-per-hour value (see instructions below).
If you are using Kaspersky Anti Targeted Attack Platform together with another solution which also uses telemetry, you can turn off telemetry for KATA (EDR) (see instructions below). This lets you optimize server load for these solutions. For example, if you have the Managed Detection and Response solution and KATA (EDR) deployed, you can use MDR telemetry and create Threat Response tasks in KATA (EDR).
How to configure telemetry in the Administration Console (MMC)
How to configure telemetry in the Web Console
Page top
Telemetry exclusions
To improve performance and optimize data transmission to the Telemetry server, you can configure telemetry exclusions. For example, you can choose not to send network communications data for individual applications.
How to create a telemetry exclusion in the Administration Console (MMC)
How to create a telemetry exclusion in the Web Console and Cloud Console
Telemetry exclusion parameters
Parameter |
Description |
|---|---|
Excluded processes |
Optimize the telemetry size to send. Kaspersky Endpoint Security allows optimizing the amount of transmitted data and excluding events with certain codes from telemetry: code 102 (basic communications) and 8 (network activity of the process) for the Microsoft SMB protocol, the WinRM service, and the klnagent.exe process of the Network Agent, as well as extended information about the types of network packets for all types of network protocols. Kaspersky Endpoint Security combines rule triggering criteria with a logical AND. Process details and Parent process details:
You can also select a file manually, and the application will automatically fill out the fields from the selected file. In 64-bit operating systems, you must manually enter the parameters of the 64-bit version of the executable file of a process from the Use for the following event types:
|
Excluded network communications |
Rule name. Direction. Protocol. Raw socket. Protocol number. TLS certificate. Local port or range. Remote port or range. Local address. The network address of the computer for which Kaspersky Endpoint Security is excluding telemetry from network traffic. Remote address. The network address of the computer for which Kaspersky Endpoint Security is excluding telemetry from network traffic. Only the IPv4 format is supported for IP addresses. Applications. List of executable files of applications for which Kaspersky Endpoint Security is excluding EDR telemetry from network traffic. |
Excluded file operations |
Rule name. File name or mask. Name or mask of a file or folder; Kaspersky Endpoint Security applies the exclusion rule when this file or folder is accessed. Kaspersky Endpoint Security supports the Operation type. Previous path. Kaspersky Endpoint Security combines rule triggering criteria with a logical AND. Process details and Parent process details:
You can also select a file manually, and the application will automatically fill out the fields from the selected file. In 64-bit operating systems, you must manually enter the parameters of the 64-bit version of the executable file of a process from the |
Excluded DNS operations |
Rule name. Kaspersky Endpoint Security combines rule triggering criteria with a logical AND. Process details and Parent process details:
You can also select a file manually, and the application will automatically fill out the fields from the selected file. In 64-bit operating systems, you must manually enter the parameters of the 64-bit version of the executable file of a process from the DNS:
|
Excluded LDAP operations |
Rule name. LDAP search scope. Filter. Distinguished name for LDAP objects search. Object attributes. Kaspersky Endpoint Security combines rule triggering criteria with a logical AND. Process details and Parent process details:
You can also select a file manually, and the application will automatically fill out the fields from the selected file. In 64-bit operating systems, you must manually enter the parameters of the 64-bit version of the executable file of a process from the |
Excluded process access queries |
Rule name. Operation type. Requested access to the process. Call stack trace. Kaspersky Endpoint Security combines rule triggering criteria with a logical AND. Process details, Parent process details, Target process, File of a source process and File of a target process.
You can also select a file manually, and the application will automatically fill out the fields from the selected file. In 64-bit operating systems, you must manually enter the parameters of the 64-bit version of the executable file of a process from the |
Excluded code injections |
Rule name. Access method. Call stack. Modified command line. Injection address. Injected DLL name. Kaspersky Endpoint Security combines rule triggering criteria with a logical AND. Process details and Parent process details:
You can also select a file manually, and the application will automatically fill out the fields from the selected file. In 64-bit operating systems, you must manually enter the parameters of the 64-bit version of the executable file of a process from the |
Excluded WMI queries |
Rule name. WMI operation type. Remote query. Name of a computer that executed a WMI command. WMI user account. Executed WMI command. WMI namespace. WMI event consumer filter. Name of the created WMI event consumer. Source code of a WMI event consumer. Kaspersky Endpoint Security combines rule triggering criteria with a logical AND. Process details and Parent process details:
You can also select a file manually, and the application will automatically fill out the fields from the selected file. In 64-bit operating systems, you must manually enter the parameters of the 64-bit version of the executable file of a process from the |
Excluded pipe operations |
Rule name. Pipe name. Operation type. Kaspersky Endpoint Security combines rule triggering criteria with a logical AND. Process details and Parent process details:
You can also select a file manually, and the application will automatically fill out the fields from the selected file. In 64-bit operating systems, you must manually enter the parameters of the 64-bit version of the executable file of a process from the |
Excluded registry changes |
Rule name. Operation type. Path. Value name. Value. Full name of a registry file. Kaspersky Endpoint Security combines rule triggering criteria with a logical AND. Process details and Parent process details:
You can also select a file manually, and the application will automatically fill out the fields from the selected file. In 64-bit operating systems, you must manually enter the parameters of the 64-bit version of the executable file of a process from the |
Example 1. Excluded processes
To exclude third-party application (process) events from telemetry, open the EDR telemetry exclusions window on the Excluded processes tab and add the executable file of the application.
Kaspersky Endpoint Security combines rule triggering criteria with a logical AND.
Kaspersky Endpoint Security supports environment variables and the * and ? characters when entering a mask. For example:
C:\Program Files\*\notepad++.exe%ProgramFiles(x86)%\Notepad++\notepad++.exe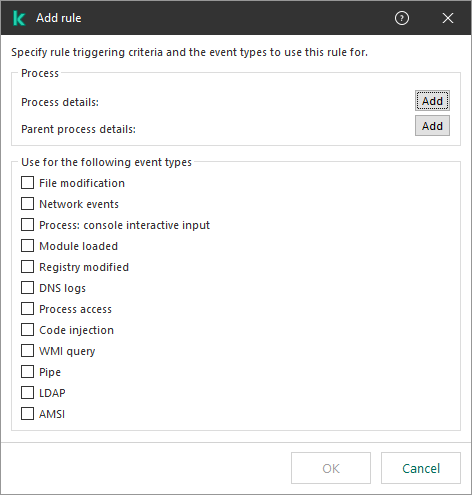
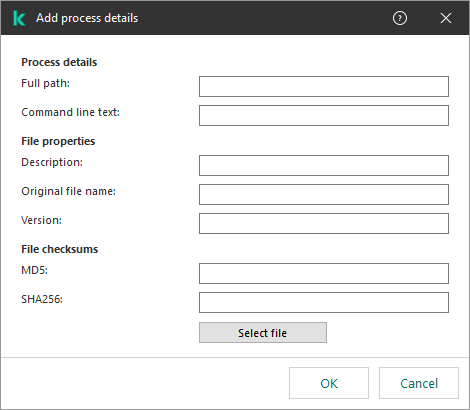
Excluding a process
Example 1. File modification
If you often edit scripts in the Notepad++ application and you want to exclude the modification events for the corresponding scripts, add the Notepad++ executable file to telemetry exclusions.
Specify the settings as follows:
- Full path:
C:\Program Files\Notepad++\notepad++.exe; - SHA256: 64F7A36C01E79CD4B041E8A8607DFF06D5B606D36E3DFF9CFB5FFFA22D14D34;
- Used for the following event types: File modification.
Example 2. Network events
If you use the WinSCP application to manage files on a remote server and you want to exclude network events, add the WinSCP executable file to telemetry exclusions.
Specify the settings as follows:
- Full path:
C:\Program Files (x86)\WinSCP\WinSCP.exe; - SHA256: 47204338f0e092057024c9186f228c02417e917777f3e841d52b58251a956a74 (optional);
- Used for the following event types: Network events.
Example 2. Excluded network communications
To exclude remote service connection events from telemetry, open the EDR telemetry exclusions window on the Excluded network communications tab and add connection settings: protocol, port, direction, IP address, TLS certificate, and others.
Kaspersky Endpoint Security combines rule triggering criteria with a logical AND.
You cannot specify a subnet address (for example, 10.28.0.0/24). The application only allows specifying one IP address (for example, 10.28.0.105).
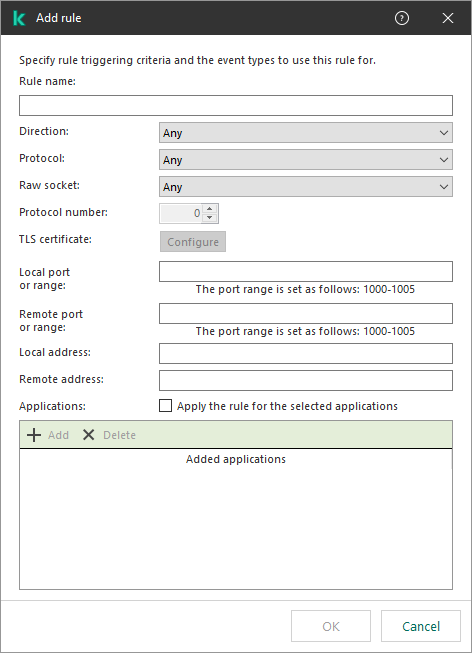
Network communication exclusion
If you use a corporate web server and you want to exclude browser events when connecting to that web server, add the IP address of the sewrver and the executable file of the browser to telemetry exclusions.
Specify the settings as follows:
- Protocol: TCP;
- Remote port or range: 443;
- Remote address: 10.28.0.105;
- Applications:
C:\Program Files (x86)\Google\Chrome\Application\chrome.exe;C:\Program Files (x86)\Microsoft\Edge\Application\msedge.exe.
Example 3. Excluded file operations
To exclude events involving operations with trusted files from telemetry, open the EDR telemetry exclusions window on the Excluded file operations tab and add the trusted file.
Kaspersky Endpoint Security combines rule triggering criteria with a logical AND.

Excluding file operations
If an application writes to a log and you want to exclude log file modification events, add the log file and the executable file of the application from telemetry.
Specify the settings as follows:
- File name or mask:
C:\Apache24\logs\error.log; - Operation type: File modification;
- Full path:
C:\Apache24\bin\httpd.exe; - SHA256: 64F7A36C01E79CD4B041E8A8607DFF06D5B606D36E3DFF9CFB5FFFA22D14D34.
Example 4. Excluded registry modifications
To exclude registry modification events from telemetry, open the EDR telemetry exclusions window on the Excluded registry changes tab and add a registry key.
Kaspersky Endpoint Security combines rule triggering criteria with a logical AND.
If an application frequently modifies its registry values and you want to exclude these registry modification events from telemetry, add the registry key and the executable file of the application to telemetry exclusions.
Specify the settings as follows:
- Operation type: Modify;
- Path: HKEY_LOCAL_MACHINE\SOFTWARE\SimonTatham\PuTTY64;
- Full path:
C:\Program Files\PuTTY\putty.exe; - SHA256: 64F7A36C01E79CD4B041E8A8607DFF06D5B606D36E3DFF9CFB5FFFA22D14D34.
KATA Sandbox
Kaspersky Anti Targeted Attack Platform includes the Sandbox (KATA Sandbox) component. Sandbox is a technology that lets you detect advanced threats on a computer. Sandbox analyzes object behavior to detect malicious activity and activity characteristic of targeted attacks on the IT infrastructure of the organization. Sandbox analyzes and scans objects on special servers with deployed virtual images of Microsoft Windows operating systems (the Sandbox servers). For details about the solution, please refer to the Kaspersky Anti Targeted Attack Platform Help.
KATA Sandbox only allows scanning files manually from the file context menu (Send to Sandbox). When sending a file to Sandbox, the application also scans the file using anti-virus databases. After the file is sent to Sandbox, the file remains accessible to the user. Kaspersky Endpoint Security logs the corresponding event and sends the event to Kaspersky Security Center and the Kaspersky Anti Targeted Attack Platform console. If Sandbox detects malicious activity, Kaspersky Endpoint Security performs a Threat Response action automatically (for example, it deletes the object and initiates a Critical Areas Scan).
KATA Sandbox requires Kaspersky Anti Targeted Attack Platform 7.0 or later to be deployed.
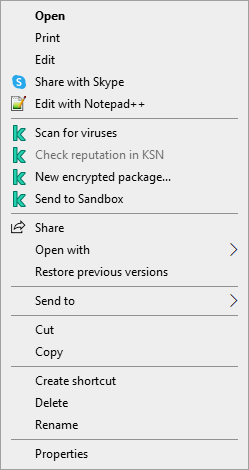
KATA Sandbox scan
Integration of the built-in agent with KATA Sandbox
Adding the Sandbox component is required for integration with KATA Sandbox. You can select the Sandbox component during installation or upgrade, as well as using the Change application components task.
To send files for scanning, you must enable the integration with KATA Sandbox and add a Central Node server that are deployed inside the solution. The component can be managed only using the Kaspersky Security Center Web Console. You cannot manage this component using the Administration Console (MMC).
To enable or disable the integration with KATA Sandbox:
- In the main window of the Web Console, select Assets (Devices) → Policies & profiles.
- Click the name of the Kaspersky Endpoint Security policy.
The policy properties window opens.
- Select the Application settings tab.
- Go to Detection and Response → Sandbox.
- Use the Integration with Sandbox ENABLED toggle to enable or disable the component.
- In the Integration mode block, select the component operating mode: KATA Sandbox (manual file submission for scanning).
- Click the Server connection settings link.
- Configure the Sandbox server connection:
- Timeout. Connection timeout for the Central Node server. After the configured timeout elapses, Kaspersky Endpoint Security sends a request to the next server. You can increase the connection timeout for the server if your connection speed is low or if the connection is unstable. The recommended request timeout is 0.5 seconds or less.
- Request queue. Size of the request queue folder. When sending multiple objects for scanning in Sandbox, Kaspersky Endpoint Security creates a request queue. By default, the size of the request queue folder is limited to 100 MB. After the maximum size is reached, Sandbox stops adding new requests to the queue and sends the corresponding event to Kaspersky Security Center. You can configure the size of the request queue folder depending on your server configuration.
- Server TLS certificate. To configure a trusted connection with the Central Node server, you must prepare a TLS certificate. You must then add the certificate to the computer using a policy. You also need to add the certificate to the Central Node server.
- Use two-way authentication. Two-way authentication when establishing a secure connection between Kaspersky Endpoint Security and the Central Node server. To use two-way authentication, you need to enable two-way authentication in the Central Node server settings, then get a crypto-container and set a password to protect the crypto-container. A crypto-container is a PFX archive with a certificate and a private key. You can get a crypto-container in the Kaspersky Anti Targeted Attack Platform console (see instructions in the Kaspersky Anti Targeted Attack Platform Help). After configuring Sandbox server settings, you need to also enable two-way authentication in Kaspersky Endpoint Security settings and load a password-protected crypto-container.
- In the Servers block, click the Add button.
- This opens a window; in that window, enter the Sandbox server address (IPv4, IPv6, DNS) and port.
For details about deploying virtual images and configuring Sandbox servers, refer to the Kaspersky Anti Targeted Attack Platform Help.
- Save your changes.
As a result, the Sandbox component is enabled. Check the operating status of the component by viewing the Report on status of application components. You can also view the operating status of a component in reports in the local interface of Kaspersky Endpoint Security. The Sandbox component will be added to the list of Kaspersky Endpoint Security components.
Page top
Configuring Threat Response actions
If Sandbox detects malicious activity, Kaspersky Endpoint Security performs a Threat Response action automatically (for example, it deletes the object and initiates a Critical Areas Scan).
To configure Threat Response actions:
- In the main window of the Web Console, select Assets (Devices) → Policies & profiles.
- Click the name of the Kaspersky Endpoint Security policy.
The policy properties window opens.
- Select the Application settings tab.
- Go to Detection and Response → Sandbox.
- Select the relevant action in the Action on threat detection block:
- Move copy to Quarantine, delete object. If this option is selected, Kaspersky Endpoint Security deletes the malicious object found on the computer. Before deleting the object, Kaspersky Endpoint Security creates a backup copy in case the object needs to be restored later. Kaspersky Endpoint Security moves the backup copy to Quarantine.
- Run scan of critical areas. If this option is selected, Kaspersky Endpoint Security runs the Critical Areas Scan task. By default, Kaspersky Endpoint Security scans the kernel memory, running processes, and disk boot sectors.
- Create IOC scan task. If this option is selected, Kaspersky Endpoint Security automatically creates the IOC Scan (autonomous IOC scan task). For this task, you can configure the run mode, scan scope, and action on IOC detection: delete object, run the Critical Areas Scan task. To modify other settings of the IOC Scan task, go to the task settings.
- If necessary, configure the IOC Scan task settings in the IOC scan scope block.
- Critical file areas. If this option is selected, Kaspersky Endpoint Security does an IOC scan only in critical file areas of the computer: kernel memory and boot sectors.
- File areas on system drives of the computer. IF this option is selected, Kaspersky Endpoint Security does an IOC scan on the system drive of the computer.
- If necessary, configure the IOC Scan task settings in the Run IOC scan task block.
- Manually. Run mode in which you can start the IOC Scan task manually at a time when it is convenient for you.
- After threat is detected. Run mode in which Kaspersky Endpoint Security runs the IOC Scan task automatically whenever a threat is detected.
- Run only when the computer is idle. Run mode in which Kaspersky Endpoint Security runs the IOC Scan task if the screensaver is active or the screen is locked. If the user unlocks the computer, Kaspersky Endpoint Security pauses the task. This means that the task can take several days to complete.
- Configure advanced task settings for IOC Scan.
- Save your changes.
KEA to KES Migration Guide for EDR (KATA)
Starting with version 12.1, Kaspersky Endpoint Security for Windows includes a built-in agent for managing the Kaspersky Endpoint Detection and Response component as part of the Kaspersky Anti Targeted Attack Platform solution. You no longer need a separate Kaspersky Endpoint Agent application to work with EDR (KATA). All functions of Kaspersky Endpoint Agent will be performed by Kaspersky Endpoint Security. The load on Kaspersky Anti Targeted Attack Platform servers will remain the same.
When you deploy Kaspersky Endpoint Security on computers that have Kaspersky Endpoint Agent installed, Kaspersky Anti Targeted Attack Platform (EDR) solution will continue working with Kaspersky Endpoint Security. In addition, Kaspersky Endpoint Agent will be removed from the computer. The same behavior in the system will occur when you update Kaspersky Endpoint Security to version 12.1 or higher.
Kaspersky Endpoint Security is not compatible with Kaspersky Endpoint Agent. You cannot install both of these applications on the same computer.
The following conditions must be met for Kaspersky Endpoint Security to work as part of Endpoint Detection and Response (KATA):
- Kaspersky Anti Targeted Attack Platform version 5.0 or higher.
- Kaspersky Security Center version 14.2 or higher (including Network Agent). In earlier versions of Kaspersky Security Center, it is impossible to activate the Endpoint Detection and Response (KATA) feature.
Steps for migrating [KES+KEA] configuration to [KES+built-in agent] for EDR (KATA)
- Upgrading the Kaspersky Endpoint Security Management Plug-in
EDR (KATA) component can be managed using the Kaspersky Endpoint Security Management Plug-in version 12.1 or higher. Depending on the type of Kaspersky Security Center console you are using, update the management plug-in in the Administration Console (MMC) or the web plug-in in the Web Console.
- Migrating policies and tasks
Transfer Kaspersky Endpoint Agent settings to Kaspersky Endpoint Security for Windows. The following options are available:
- A wizard for migrating from Kaspersky Endpoint Agent to Kaspersky Endpoint Security. A wizard for migrating from Kaspersky Endpoint Agent to Kaspersky Endpoint Security works only in Web Console
- A standard Policies and tasks batch conversion wizard. The Policies and tasks batch conversion wizard is only available in the Administration Console (MMC). For more details about Policies and tasks batch conversion wizard, please refer to the Kaspersky Security Center Help.
To make sure Kaspersky Endpoint Security works correctly on servers, it is recommended to add files important for the server's functioning to the trusted zone. For SQL servers, you must add MDF and LDF database files. For Microsoft Exchange servers, you must add CHK, EDB, JRS, LOG, and JSL files. You may use masks, for example,
C:\Program Files (x86)\Microsoft SQL Server\*.mdf.Starting with Kaspersky Endpoint Security 12.6 for Windows, scan exclusions and trusted applications are added to the trusted zone. Predefined scan exclusions and trusted applications help quickly configure Kaspersky Endpoint Security on SQL servers, Microsoft Exchange servers, and System Center Configuration Manager. This means you do not need to manually set up a trusted zone for the application on servers.
EDR telemetry exclusions do not migrate from the Kaspersky Endpoint Agent policy to the Kaspersky Endpoint Security policy. Kaspersky Endpoint Security has its own exclusion tools - trusted applications. The operation of Kaspersky Endpoint Security is optimized so that the absence of individual EDR telemetry exclusions will not cause any additional load on your computer in comparison with Kaspersky Endpoint Agent. Kaspersky Endpoint Security uses telemetry not only for EDR (KATA), but also for the operation of application protection components. Therefore, there is no need to transfer individual EDR telemetry exclusions. If you experience a decrease in computer performance, check the application's operation (see step 7 Checking performance).
- Licensing the EDR (KATA) functionality
To activate Kaspersky Endpoint Security as part of the Kaspersky Anti Targeted Attack Platform solution, you need a separate license for Kaspersky Endpoint Detection and Response (KATA) Add-on. You can add the key using the Add key task. As a result, two keys will be added to the application: Kaspersky Endpoint Security and Kaspersky Endpoint Detection and Response (KATA).
Licensing Kaspersky Endpoint Detection and Response (KATA) Add-on on computers with previously activated EDR Optimum or EDR Expert features involves the following special considerations:
- If you are using a key file for licensing Kaspersky Endpoint Security with EDR Optimum or EDR Expert features, you cannot add a separate key for Kaspersky Endpoint Detection and Response (KATA) Add-on. You can either switch to using an activation code for licensing, or contact your service provider to obtain a new key file for activating Kaspersky Endpoint Security and EDR features. The service provider will provide one or more key files for licensing.
- If you are using a key file for licensing Kaspersky Endpoint Security without EDR Optimum or EDR Expert features, you can add a separate key for Kaspersky Endpoint Detection and Response (KATA) Add-on without having key files reissued.
- If you are using an activation code for licensing, Kaspersky activation server will automatically reissue the keys, and EDR (KATA) features will become available automatically. In this case, EDR Optimum and EDR Expert will be disabled.
- Kaspersky Endpoint Security allows you to add up to two active keys: Kaspersky Endpoint Security key and Add-on type key. You can also add up to two reserve keys. One Kaspersky Endpoint Security reserve key and one Add-on type reserve key.
- Installing / Upgrading the Kaspersky Endpoint Security application
To migrate EDR (KATA) functionality during an application installation or upgrade, it is recommended to use the remote installation task. When creating a remote installation task, you need to select EDR (KATA) component in the installation package settings.
You can also upgrade the application using the following methods:
- Using the Kaspersky update service.
- Locally, by using the Setup Wizard.
Kaspersky Endpoint Security supports automatically selecting components when upgrading the application on a computer with the Kaspersky Endpoint Agent application installed. The automatic selection of components depends on the permissions of the user account that is upgrading the application.
If you are upgrading Kaspersky Endpoint Security using the EXE or MSI file under the system account (SYSTEM), Kaspersky Endpoint Security gains access to current licenses of Kaspersky solutions. Therefore, if the computer has Kaspersky Endpoint Agent installed and EDR (KATA) solution activated, the Kaspersky Endpoint Security installer automatically configures the set of components and selects the EDR (KATA) component. This makes Kaspersky Endpoint Security switch to using the built-in agent and removes Kaspersky Endpoint Agent. Running the MSI installer under the system account (SYSTEM) is usually performed when upgrading via the Kaspersky update service or when deploying an installation package via Kaspersky Security Center.
If you are upgrading Kaspersky Endpoint Security using an MSI file under a non-privileged user account, Kaspersky Endpoint Security lacks access to current licenses of Kaspersky solutions. In this case, Kaspersky Endpoint Security automatically selects components based on a set of components of Kaspersky Endpoint Agent. After that Kaspersky Endpoint Security switches to using the built-in agent and removes Kaspersky Endpoint Agent.
Kaspersky Endpoint Security supports upgrading without computer restart. You can select the application upgrade mode in policy properties.
- Checking the application operation
If after application installation or upgrade, the computer has the Critical status in the Kaspersky Security Center console:
- Make sure that the computer has Network Agent version 13.2 or higher installed.
- Check the operating status of the built-in agent by viewing the Report on status of application components. If a component has the Not installed status, install the component using the Change application components task. If a component has the Not covered by license status, make sure that you have activated the built-in agent functionality.
- Make sure you accept the Kaspersky Security Network Statement in the new policy of Kaspersky Endpoint Security for Windows.
- Checking the connection to Kaspersky Anti Targeted Attack Platform server
Check the connection to Kaspersky Anti Targeted Attack Platform server. To do so:
- Check that you have a valid certificate.
- Check the server connection settings.
- Check the event log.
If a connection to the server is established, the application sends the event Successful connection to the Kaspersky Anti Targeted Attack Platform server. If there is no successful connection event and there are no events with connection errors, check the event log settings and enable event sending for Endpoint Detection and Response (KATA).
The server connection status does not affect the computer status in the Kaspersky Security Center console. Therefore, if there is no connection to the server, the computer can still have the OK status. Check the event log to verify the connection to the server.
- Checking performance
If your computer's performance has slowed down after installing or updating an application, you can optimize data transfer. To do so:
- Disable the EDR (KATA) component and check that the performance degradation is due to EDR (KATA).
- For trusted applications, turn off telemetry collection on console input operations (enabled by default).
- Add applications that reduce computer performance to the list of trusted applications.
- Contact Kaspersky Technical Support. Support experts will help you to configure telemetry filtering in Kaspersky Anti Targeted Attack Platform. This will reduce the amount of traffic. If your computer performance is affected by a certain application, attach the distribution package of that application to the request.
Managing Quarantine
Quarantine is a special local storage on the computer. The user can quarantine files that the user considers dangerous for the computer. Quarantined files are stored in an encrypted state and do not threaten the security of the device. Kaspersky Endpoint Security uses Quarantine only when working with Detection and Response solutions: EDR Optimum, EDR Expert, KATA (EDR), Kaspersky Sandbox. In other cases Kaspersky Endpoint Security places the relevant file in Backup. For details on managing Quarantine as part of solutions, please refer to the Kaspersky Sandbox Help, Kaspersky Endpoint Detection and Response Optimum Help, and Kaspersky Endpoint Detection and Response Expert Help, Kaspersky Anti Targeted Attack Platform Help.
Kaspersky Endpoint Security uses the system account (SYSTEM) to quarantine files.
You can configure quarantine settings only in the Kaspersky Security Center Console. You can also use Kaspersky Security Center Console to manage quarantined objects (restore, delete, add, etc). Locally, on the computer, you can only restore the object using the command line.
Configuring the maximum Quarantine size
By default, the size of the Quarantine is limited to 200 MB. After the maximum size is reached, Kaspersky Endpoint Security automatically deletes the oldest files from the Quarantine.
If the Kaspersky Anti Targeted Attack Platform (EDR) solution is deployed in your organization, we recommend increasing the size of Quarantine. When doing a YARA scan, the application may encounter a large memory dump. If the size of the memory dump exceeds the size of Quarantine, the YARA scan finishes with an error and the memory dump is not quarantined. We recommend setting the size of Quarantine equal to the total size of the RAM on the computer (for example, 8 GB).
How to configure the maximum quarantine size in the Administration Console (MMC)
How to configure the maximum quarantine size in the Web Console and Cloud Console
- In the main window of the Web Console, select Assets (Devices) → Policies & profiles.
- Click the name of the Kaspersky Endpoint Security policy.
The policy properties window opens.
- Select the Application settings tab.
- Go to General settings → Reports and Storage.
- In the Quarantine block configure the Quarantine size:
- Limit the size of Quarantine to N MB. Maximum Quarantine size in MB. For example, you can set the maximum Quarantine size to 200 MB. When Quarantine reaches maximum size, Kaspersky Endpoint Security sends the corresponding event to Kaspersky Security Center and publishes the event in Windows Event Log. Meanwhile the application stops quarantining new objects. You must empty the Quarantine manually.
- Notify when the Quarantine storage reaches N percent. Threshold value of the Quarantine. For example, you can set the Quarantine threshold to 50%. When Quarantine reaches the threshold, Kaspersky Endpoint Security sends the corresponding event to Kaspersky Security Center and publishes the event in Windows Event Log. Meanwhile the application continues quarantining new objects.
- Save your changes.
Quarantine settings
Sending data about quarantined files to Kaspersky Security Center
To perform actions with quarantined objects in Web Console, you must enable the sending of quarantined files data to the Administration Server. For example, you can download a file from quarantine for analysis in Web Console. The sending of quarantined files data must be enabled for all functionality of Kaspersky Sandbox and Kaspersky Endpoint Detection and Response to work.
How to enable the transfer of quarantined files data in the Administration Console (MMC)
How to enable the transfer of quarantined files data in the Web Console
- In the main window of the Web Console, select Assets (Devices) → Policies & profiles.
- Click the name of the Kaspersky Endpoint Security policy.
The policy properties window opens.
- Select the Application settings tab.
- Go to General settings → Reports and Storage.
- In the Data transfer to Administration Server block, select the About Quarantine files check box.
- Save your changes.
Settings of data transfer to Administration Server
As a result, you can view a list of files, quarantined on your computer, in the Kaspersky Security Center Console. You can use Kaspersky Security Center Console to manage quarantined objects (restore, delete, add, etc). For more details about working with Quarantine, refer to the Kaspersky Security Center Help.
Page top
Restoring files from Quarantine
By default, Kaspersky Endpoint Security restores files to their original folder. If the destination folder has been deleted or the user does not have access rights to that folder, the application places the file in the %DataRoot%\QB\Restored folder. Then you must manually move the file to the destination folder.
To restore files from Quarantine:
- In the main window of the Web Console, select Operations → Repositories → Quarantine.
- This opens the list of files in Quarantine; in that list, select the files that you want to restore and click Restore.
Kaspersky Endpoint Security restores the file. If the destination folder already has a file with the same name, the application cancels the restoration of the file. For EDR Optimum and EDR Expert solutions, the application deletes the file after restoration. For other solutions, the applications keeps a copy of the file in Quarantine.
Page top
Kaspersky Unified Monitoring and Analysis Platform (KUMA)
|
Kaspersky Endpoint Security for Windows supports the Kaspersky Unified Monitoring and Analysis Platform solution. Kaspersky Unified Monitoring and Analysis Platform (KUMA) is a security information and event management (SIEM) solution for the IT infrastructure of organizations. KUMA allows detecting, analyzing, and mitigating security threats before they can cause harm. |
Kaspersky Endpoint Security is installed on individual computers on the corporate IT infrastructure and continuously monitors processes, open network connections, and files being modified. Information about events on the computer (telemetry) is sent to the Kaspersky Unified Monitoring and Analysis Platform (KUMA) server. In its console, KUMA displays events as a list without markup, similar to the Windows event log.
Kaspersky Endpoint Security does not provide all functionality of an agent for KUMA. The application only sends events to KUMA without markup. To access all KUMA functionality, you need to purchase a license and deploy the solution in accordance with the KUMA Administrator's guide.
Integration of Kaspersky Endpoint Security with KUMA
To use KUMA, the following conditions must be met:
- Kaspersky Security Center version 14.2 or higher. In earlier versions of Kaspersky Security Center, it is impossible to activate the KUMA integration functionality.
- The application is activated and the functionality is covered by the license.
- The KUMA integration component is enabled.
Setting up KUMA Integration involves the following steps:
- Installing the KUMA integration component
You can select the KUMA integration component when installing or upgrading the application, as well as using the Change application components task.
You must restart your computer to finish upgrading the application with the new component.
- KUMA activation
In addition to a Kaspersky Endpoint Security application license (for example, Kaspersky Endpoint Security for Business Standard), you need a separate license for the integration of Kaspersky Endpoint Security with KUMA (Kaspersky Endpoint Security for Windows KUMA Integration Add-on).
If you are installing the application in EDR Agent mode, you need a license for integrating Kaspersky Endpoint Security with KUMA and a Kaspersky Anti Targeted Attack Platform (KATA) license or a Kaspersky Managed Detection and Response (MDR) license. You cannot deploy EDR Agent for KUMA only.
The functionality becomes available after adding the separate KUMA key. As a result, there will be another active key on the computer for Kaspersky Endpoint Security integration with KUMA.
Licensing for the stand-alone KUMA functionality is the same as the licensing of Kaspersky Endpoint Security.
Make sure that the KUMA functionality is included in the license and is working in the local interface of the application.
- Connecting to KUMA
To connect the computer with the Kaspersky Endpoint Security application to the KUMA solution:
- In the Kaspersky Endpoint Security policy, add KUMA server addresses and specify network settings of the connection.
- In KUMA console, add a collector with connectors of the tcp or udp type and specify the basic network settings of the connection. For details about managing collectors, please refer to the Kaspersky Unified Monitoring and Analysis Platform Help.
You can establish a trusted connection between Kaspersky Endpoint Security and KUMA servers. To configure a trusted connection, you must use a TLS certificate. You can get a TLS certificate on the KUMA Core server (see the settings for the tcp type connector in the Kaspersky Unified Monitoring and Analysis Platform Help). Then you must add the TLS certificate to Kaspersky Endpoint Security (see instructions below).
To make the connection more secure, you can additionally enable the verification of the computer in KUMA (two-way authentication). To enable this verification, you must turn on two-way authentication in KUMA and Kaspersky Endpoint Security settings. To use two-way authentication, you will also need a crypto-container. A crypto-container is a PFX archive with a certificate and a private key. You must generate a certificate with the private key in the PKCS#12 container format in an external certification authority. Then you must add the PFX archive in the KUMA console and in Kaspersky Endpoint Security (see the settings for the tcp type connector in the Kaspersky Unified Monitoring and Analysis Platform Help).
How to connect a Kaspersky Endpoint Security computer to KUMA using the Administration Console (MMC)
How to connect a Kaspersky Endpoint Security computer to KUMA using the Web Console
You can verify that KUMA integration is configured correctly in the KUMA console (for details see Kaspersky Unified Monitoring and Analysis Platform Help). Check the operating status of the component by viewing the Report on status of application components in the Kaspersky Security Center console. You can also view the operating status of a component in reports in the local interface of Kaspersky Endpoint Security. The KUMA Integration component will be added to the list of Kaspersky Endpoint Security components.
Appendix. Windows log events sent to KUMA
Kaspersky Endpoint Security sends a limited subset of Windows log events to the KUMA server.
Windows log events that Kaspersky Endpoint Security sends to KUMA
Event log |
Event ID |
|---|---|
DNS Server |
150 |
DNS Server |
770 |
MSExchange Management |
1 |
Security |
4781 |
Security |
6416 |
Security |
1100 |
Security |
1102 / 517 |
Security |
1104 |
Security |
1108 |
Security |
4610 / 514 |
Security |
4611 |
Security |
4614 / 518 |
Security |
4616 / 520 |
Security |
4622 |
Security |
4624 / 528 / 540 |
Security |
4625 / 529 |
Security |
4648 / 552 |
Security |
4649 |
Security |
4662 |
Security |
4663 |
Security |
4672 / 576 |
Security |
4696 |
Security |
4697 / 601 |
Security |
4698 / 602 |
Security |
4702 |
Security |
4704 / 608 |
Security |
4706 |
Security |
4713/617 |
Security |
4715 |
Security |
4717 / 621 |
Security |
4719 / 612 |
Security |
4720 / 624 |
Security |
4722 / 626 |
Security |
4723 / 627 |
Security |
4724 / 628 |
Security |
4725 / 629 |
Security |
4726 / 630 |
Security |
4727 |
Security |
4728 / 632 |
Security |
4729 / 633 |
Security |
4732 / 636 |
Security |
4733 / 637 |
Security |
4738 / 642 |
Security |
4739/643 |
Security |
4740 / 644 |
Security |
4741 |
Security |
4742 / 646 |
Security |
4756 / 660 |
Security |
4757 / 661 |
Security |
4765 |
Security |
4766 |
Security |
4767 |
Security |
4768 / 672 |
Security |
4769 / 673 |
Security |
4770 |
Security |
4771 / 675 |
Security |
4775 |
Security |
4776 / 680 |
Security |
4778 / 682 |
Security |
4780 / 684 |
Security |
4794 |
Security |
4798 |
Security |
4817 |
Security |
4876 / 4877 |
Security |
4882 |
Security |
4885 |
Security |
4886 |
Security |
4887 |
Security |
4890 |
Security |
4891 |
Security |
4898 |
Security |
4899 |
Security |
4900 |
Security |
4902 |
Security |
4904 |
Security |
4905 |
Security |
4928 |
Security |
4946 |
Security |
4947 |
Security |
4948 |
Security |
4949 |
Security |
4950 |
Security |
4964 |
Security |
5025 |
Security |
5136 |
Security |
5137 |
Security |
5138 |
Security |
5139 |
Security |
5141 |
Security |
5142 |
Security |
5143 |
Security |
5144 |
Security |
5145 |
Security |
5148 |
Security |
5155 |
Security |
5376 |
Security |
5377 |
Security |
5632 |
Security |
5888 |
Security |
5889 |
Security |
5890 |
Security |
676 |
System |
1 |
System |
104 |
System |
1056 |
System |
12 |
System |
13 |
System |
6011 |
System |
7040 |
System |
7045 |
System, Source Netlogon |
5723 |
System, Source Netlogon |
5805 |
Terminal-Services-RemoteConnectionManager |
1149 |
Terminal-Services-RemoteConnectionManager |
1152 |
Terminal-Services-RemoteConnectionManager |
20523 |
Terminal-Services-RemoteConnectionManager |
258 |
Terminal-Services-RemoteConnectionManager |
261 |
Windows PowerShell |
400 |
Windows PowerShell |
500 |
Windows PowerShell |
501 |
Windows PowerShell |
800 |
Application, Source ESENT |
301 |
Application, Source ESENT |
302 |
Application, Source ESENT |
325 |
Application, Source ESENT |
326 |
Application, Source ESENT |
327 |
Application, Source ESENT |
2001 |
Application, Source ESENT |
2003 |
Application, Source ESENT |
2005 |
Application, Source ESENT |
2006 |
Application, Source ESENT |
216 |
Application |
1000 |
Application |
1002 |
Application |
1 / 2 |
KSWS to KES Migration Guide
|
Starting with version 11.8.0, Kaspersky Endpoint Security for Windows supports the basic functionality of the Kaspersky Security for Windows Server (KSWS) solution. Kaspersky Security for Windows Server protects servers running Microsoft Windows operating systems and network attached storages against viruses and other computer security threats which servers and network attached storages are exposed to while exchanging files. For detailed information about how the solution works, please refer to the Kaspersky Security for Windows Server Help. Starting with Kaspersky Endpoint Security 11.8.0, you can migrate from Kaspersky Security for Windows Server to Kaspersky Endpoint Security for Windows and use the same solution for protecting workstations and servers. |
Software requirements
Before you begin the migration from KSWS to KES, make sure your server satisfies the hardware and software requirements of Kaspersky Endpoint Security for Windows. The lists of supported operating system versions are different for KES and KSWS. For example, KES does not support servers running Windows Server 2003.
Minimum software requirements for migrating from KSWS to KES:
- Kaspersky Endpoint Security for Windows 12.0.
- Kaspersky Security 11.0.1 for Windows Server.
If you have an earlier version of Kaspersky Security for Windows Server installed, we recommend upgrading the application to the latest version. The Policies and tasks conversion wizard does not support earlier versions of Kaspersky Security for Windows Server.
- Kaspersky Security Center 14.2
If you have an earlier version of Kaspersky Security Center installed, update it to 14.2 or later. In this version of Kaspersky Security Center, the Policies and tasks batch conversion wizard lets you migrate policies into a profile rather than into a policy. In this version of Kaspersky Security Center, the Policies and tasks batch conversion wizard also lets you migrate a broader range of policy settings.
- Kaspersky Endpoint Agent 3.10.
If you have an earlier version of Kaspersky Endpoint Agent installed, we recommend upgrading the application to the latest version. Kaspersky Endpoint Security supports migrating a [KSWS+KEA] configuration to [KES+built-in agent] starting with Kaspersky Endpoint Agent 3.10.
Migration recommendations
When migrating from KSWS to KES, observe the following recommendations:
- Plan the KSWS to KES migration time in advance. Choose a time when servers are operating under the lightest load, for example, during the weekend.
- After the migration, turn on application components gradually. That is, for example, start by enabling the File Threat Protection component alone, then enable other protection components, then enable control components, and so on. At each step, you must make sure the application is working correctly, and monitor the performance of the server. The architecture of KES differs from KSWS, therefore the operating system may also behave differently.
- Carry out the migration gradually. First migrate a single server, then multiple servers, then carry out the migration on all servers of the organization.
- Migrate different types of servers separately. That is, for example, first migrate database servers, then mail servers, and so on.
- Migration on high-load servers involves some special considerations.
Migration steps
Migration from KSWS to KES is performed semi-automatically. This is necessary because of differing architectures of the applications. To migrate policy settings, you must run the Policies and tasks batch conversion wizard (the migration wizard). After migrating policy settings, you must manually configure settings that the migration wizard cannot migrate automatically (for example, Password protection settings). After the migration, it is also recommended to check if the migration wizard correctly migrated all settings.
Migrate from KSWS to KES in the following order:
- Migrate KSWS tasks and policies
After migrating the policies and tasks, you must perform additional configuration steps. We also recommend to make sure that Kaspersky Endpoint Security provides the necessary level of security after migration from KSWS.
The Policies and tasks batch conversion wizard for Kaspersky Security for Windows Server is only available in the Administration Console (MMC). Policy and task settings cannot be migrated in the Web Console and Kaspersky Security Center Cloud Console.
- Install Kaspersky Endpoint Security
You can install Kaspersky Endpoint Security in the following ways:
- Installing KES after removing KSWS (recommended).
- Installing KES on top of KSWS.
- Activate KES with a KSWS key
- Confirm that the application is in working order after migration
After migrating from KSWS to KES, make sure that the application is operating correctly. Check the status of the server in the console (should be OK). Make sure no errors are reported for the application, also check the time of the last connection to the Administration Server, the time of the last database update and the server protection status.
Pay special attention to the migration of exclusion lists, trusted applications, trusted web addresses, Application Control rules.
Correspondence of KSWS and KES components
When migrating from KSWS to KES, the set of components is migrated only when the application is being installed locally.
Correspondence of Kaspersky Security for Windows Server and Kaspersky Endpoint Security for Windows components
Kaspersky Security for Windows Server component |
Kaspersky Endpoint Security for Windows component |
|---|---|
Basic functionality |
Application kernel |
Log Inspection |
Log Inspection |
Device Control |
Device Control |
Firewall Management |
(not supported) KSWS Firewall functions are performed by the system-level Firewall. In KES, a separate component is responsible for the Firewall functionality. After migration, you can configure the Kaspersky Endpoint Security Firewall. |
File Integrity Monitor |
System Integrity Monitoring |
Exploit Prevention |
Exploit Prevention |
System Tray Icon |
(not supported) You can configure user interaction in the application interface settings. |
Integration with Kaspersky Security Center |
Network Agent Connector |
Endpoint Agent |
(not supported) In Kaspersky Endpoint Security 11.9.0 the Kaspersky Endpoint Agent distribution package is no longer part of the Kaspersky Endpoint Security distribution kit. You must download the Kaspersky Endpoint Agent distribution package separately. |
Network Threat Protection |
Network Threat Protection |
Anti-Cryptor |
Behavior Detection |
Anti-Cryptor for NetApp |
(not supported) |
Traffic Security |
Web Threat Protection Mail Threat Protection Web Control |
On-Demand Scan |
Application kernel |
ICAP Network Storage Protection |
(not supported) Kaspersky Endpoint Security does not support Network-Attached Storages Protection components. If you need these components, you can continue using Kaspersky Security for Windows Server. |
RPC Network Storage Protection |
(not supported) Kaspersky Endpoint Security does not support Network-Attached Storages Protection components. If you need these components, you can continue using Kaspersky Security for Windows Server. |
Real-Time File Protection |
File Threat Protection |
Script Monitoring |
(not supported) Script Monitoring is handled by other components, for example, AMSI Protection. |
KSN Usage |
Kaspersky Security Network |
Applications Launch Control |
Application Control |
Performance counters |
(not supported) |
Correspondence of KSWS and KES settings
When migrating policies and tasks, KES is configured in accordance with KSWS settings. Settings of application components that KSWS does not have are set to default values.
Application settings
Scalability, interface and scanning settings
Supplementary
User permissions for application management
User access permissions for Kaspersky Security Service management
Real-time server protection
Local activity control
Network-Attached Storages Protection
RPC Network Storage Protection
ICAP Network Storage Protection
Network activity control
System Inspection
Logs and notifications
Interaction with Administration Server
Tasks
Baseline File Integrity Monitor
Rollback of Application Database Update
Rule Generator for Applications Launch Control
Rule Generator for Device Control
Page top
Migrating KSWS components
Prior to the local installation, Kaspersky Endpoint Security checks the computer for the presence of Kaspersky applications. If Kaspersky Security for Windows Server is installed on the computer, KES detects the set of KSWS components that are installed and selects the same components for installation.
KES components that KSWS does not have are installed as follows:
- AMSI Protection, Host Intrusion Prevention, Remediation Engine are installed with default settings.
- BadUSB Attack Prevention, Adaptive Anomaly Control, Data Encryption, Detection and Response components are ignored.
When installed remotely, the KES application ignores the set of installed KSWS components. The installer installs components that you select in properties of the installation package. After installing Kaspersky Endpoint Security and migrating policies and tasks, KES settings are configured in accordance with KSWS settings.
Page top
Migrating KSWS tasks and policies
You can migrate KSWS policy and task settings in the following ways:
- Using the Policies and Tasks Batch Conversion Wizard (hereinafter also referred to as the Migration Wizard).
The Migration Wizard for KSWS is available only in the Administration Console (MMC). Policy and task settings cannot be migrated in the Web Console and Cloud Console.
The batch conversion wizard works differently for different versions of Kaspersky Security Center. We recommend upgrading the solution to version 14.2 or higher. In this version of Kaspersky Security Center, the Policies and tasks batch conversion wizard lets you migrate policies into a profile rather than into a policy. In this version of Kaspersky Security Center, the Policies and tasks batch conversion wizard also lets you migrate a broader range of policy settings.
- Using the New Policy Wizard for Kaspersky Endpoint Security for Windows.
The New Policy Wizard lets you create a KES policy based on a KSWS policy.
KSWS policy migration procedures are different when using Migration Wizard and the New Policy Wizard.
Policies and tasks batch conversion wizard
The migration wizard transfers KSWS policy settings into the policy profile instead of KES policy settings. The policy profile is a set of policy settings that is activated on a computer if the computer satisfies the configured activation rules. The UpgradedFromKSWS device tag is selected as the triggering criterion of the policy profile. Kaspersky Security Center automatically adds the UpgradedFromKSWS tag to all computers on which you install KES on top of KSWS using the remote installation task. If you chose a different installation method, you can assign the tag to devices manually.
To add a tag to a device:
- Create a new tag for servers —
UpgradedFromKSWS.For more details about creating tags for devices, refer to the Kaspersky Security Center Help.
- Create a new administration group in the Kaspersky Security Center console and add servers to which you want to assign the tag to this group.
You can group servers using the selection tool. For more details about working with selections, refer to the Kaspersky Security Center Help.
- Select all servers of the administration group in the Kaspersky Security Center console, open the properties of the selected servers and assign the tag.
If you are migrating multiple KSWS policies, each policy is converted to a profile within one overarching policy. If the KSWS policy already contains profiles, these profiles are also migrated as profiles. As a result you will get a single policy that includes profiles corresponding to all KSWS policies.
How to use the Policies and Tasks Batch Conversion Wizard to migrate KSWS policy settings
The new policy profile with KSWS settings will be named UpgradedFromKSWS <Name of the Kaspersky Security for Windows Server policy>. In profile properties, the migration wizard automatically selects the UpgradedFromKSWS device tag as the triggering criterion. Thus the settings from the policy profile are applied to servers automatically.
Wizard for creating a policy based on a KSWS policy
When a KES policy is created based on a KSWS policy, the wizard transfers settings to the new policy accordingly. That is, one KES policy will correspond to one KSWS policy. The wizard does not convert the policy to a profile.
How to use the New Policy Wizard to migrate KSWS policy settings
Additional configuration of policies and tasks after migration
KSWS and KES have different sets of components and policy settings, so after migration you must verify that policy settings satisfy your corporate security requirements.
Check the following basic policy settings:
- Password protection. KSWS Password protection settings are not migrated. Kaspersky Endpoint Security has a built-in Password protection feature. If necessary, turn on Password protection and set a password.
- Trusted zone. The methods used by KSWS and KES for selecting objects differ. When migrating, KES supports exclusions defined as individual files or paths to file / folder. If KSWS has exclusions configured as a predefined area or a script URL, such exclusions are not migrated. After migration, you must add such exclusions manually.
To make sure Kaspersky Endpoint Security works correctly on servers, it is recommended to add files important for the server's functioning to the trusted zone. For SQL servers, you must add MDF and LDF database files. For Microsoft Exchange servers, you must add CHK, EDB, JRS, LOG, and JSL files. You may use masks, for example,
C:\Program Files (x86)\Microsoft SQL Server\*.mdf.Starting with Kaspersky Endpoint Security 12.6 for Windows, scan exclusions and trusted applications are added to the trusted zone. Predefined scan exclusions and trusted applications help quickly configure Kaspersky Endpoint Security on SQL servers, Microsoft Exchange servers, and System Center Configuration Manager. This means you do not need to manually set up a trusted zone for the application on servers.
- Firewall. KSWS Firewall functions are performed by the system-level Firewall. In KES, a separate component is responsible for the Firewall functionality. After migration, you can configure the Kaspersky Endpoint Security Firewall.
- Kaspersky Security Network. Kaspersky Endpoint Security does not support configuring KSN for individual components. Kaspersky Endpoint Security uses KSN for all application components. To use KSN, you must accept the new terms and conditions of the Kaspersky Security Network Statement.
- Web Control. Blocking rules for web traffic category control are migrated to a single blocking rule in Kaspersky Endpoint Security. Kaspersky Endpoint Security ignores allowing rules for category control. Kaspersky Endpoint Security does not support all categories of Kaspersky Security for Windows Server. Categories that do not exist in Kaspersky Endpoint Security are not migrated. Therefore, web resource classification rules with unsupported categories are not migrated. If necessary, add Web Control rules.
- Proxy server. The proxy server connection password is not migrated. Enter the password to be used for connecting to the proxy server manually.
- Schedules of individual components. Kaspersky Endpoint Security does not support configuring schedules for individual components. The components are always on while Kaspersky Endpoint Security is operational.
- Set of components. The set of available Kaspersky Endpoint Security features depends on the type of operating system: workstation or server. For example, out of encryption tools, only BitLocker Drive Encryption is available on servers.
- attribute. The state of the attribute is not migrated. The attribute will have the default value. By default, almost all settings in the new policy have a prohibition applied on modifying settings in child policies and in the local application interface. The attribute has the value for policy settings in the Managed Detection and Response section and in the User support group of settings (Interface section). If necessary, configure the inheritance of settings from the parent policy.
- Working with active threats. Advanced Disinfection works differently for workstations and servers. You can configure advanced disinfection in Malware Scan task settings and in application settings.
- Upgrading the application. To install major updates and patches without restarting, you must change the application upgrade mode. By default, the Install application updates without restart feature is disabled.
- Kaspersky Endpoint Agent. Kaspersky Endpoint Security has a built-in agent for working with Detection and Response solutions. If necessary, transfer Kaspersky Endpoint Agent policy settings to the Kaspersky Endpoint Security policy.
- Update of databases and application modules tasks. Make sure that the settings of the Update of databases and application modules task were migrated correctly. Instead of KSWS's three tasks, KES uses a single KES task. You may optimize the Update of databases and application modules tasks and remove superfluous tasks.
- Other tasks. Application Control, Device Control, and File Integrity Monitor components work differently in KSWS and KES. KES does not use Baseline File Integrity Monitor, Applications Launch Control Generator, Rule Generator for Device Control tasks. Therefore these tasks are not migrated. After migration, you can configure the File Integrity Monitor, Application Control, Device Control components.
Migrating KSWS trusted zone
A trusted zone is a system administrator-configured list of objects and applications that Kaspersky Endpoint Security does not monitor when active. You can migrate trusted zone objects from KSWS to KES using the Policies and Tasks Batch Conversion Wizard or the wizard for creating a new KES policy based on the KSWS policy. KSWS and KES have different sets of components and features, so after migration you must verify that exclusions satisfy your corporate security requirements. The methods of adding exclusions to the trusted zone are also different for KES and KSWS. The Migration Wizard does not have tools to migrate all KSWS exclusions. This means that after the migration, you must manually add some of the KSWS exclusions.
To make sure Kaspersky Endpoint Security works correctly on servers, it is recommended to add files important for the server's functioning to the trusted zone. For SQL servers, you must add MDF and LDF database files. For Microsoft Exchange servers, you must add CHK, EDB, JRS, LOG, and JSL files. You may use masks, for example, C:\Program Files (x86)\Microsoft SQL Server\*.mdf.
Starting with Kaspersky Endpoint Security 12.6 for Windows, scan exclusions and trusted applications are added to the trusted zone. Predefined scan exclusions and trusted applications help quickly configure Kaspersky Endpoint Security on SQL servers, Microsoft Exchange servers, and System Center Configuration Manager. This means you do not need to manually set up a trusted zone for the application on servers.
KES and KSWS trusted zone creation methods.
KSWS |
|
KES |
|---|---|---|
Object to scan |
|
|
|
(does not migrate) |
|
|
→ |
File or folder |
|
→ |
File or folder |
|
(does not migrate) |
|
Detected object |
→ |
Type of detected object |
Trusted processes |
→ |
Trusted applications |
Migration of scanned objects
KSWS exclusions that have the Object to scan method selected in their properties are migrated to KES exclusions that have the File or folder method selected in their properties, with some limitations. The migration of an exclusion depends on the object selection method:
- Predefined scope – does not migrate.
After migration, you must add such exclusions manually. Exclusions as predefined areas must be configured in the Malware Scan task settings.
- Disk, folder or network location – migrate to KES exclusions that have the "File or folder" method selected in properties.
- File – migrate to KES exclusions that have the "File or folder" method selected in properties.
- Script file or web address – does not migrate.
After migration, you must add such exclusions manually. Exclusions as script web addresses must be added to trusted web addresses for Web Threat Protection.
If the Apply also to subfolders check box is selected for the scanned object, this setting is migrated to KES exclusions (the Include subfolders check box).
KES exclusion settings
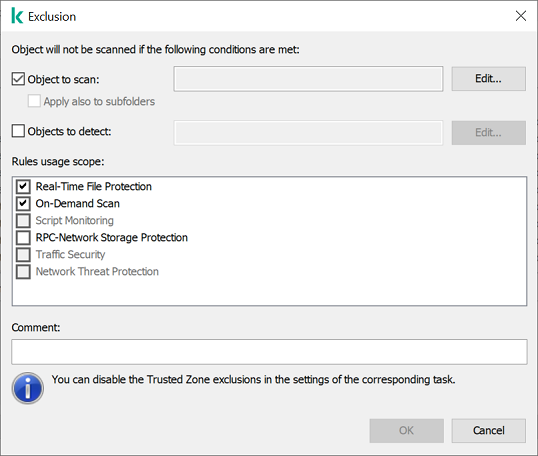
KSWS exclusion settings
Migration of detected objects
KSWS exclusions that have the Detected object method selected in their properties are migrated to KES exclusions that have the Type of detected object method selected in their properties. The name of the detected object corresponds to the classification of the Kaspersky Encyclopedia (for example, Email-Worm, Rootkit, or RemoteAdmin). Kaspersky Endpoint Security supports masks with the question mark ? (matches any single character) and the asterisk * (matches any sequence of characters).
Migration of exclusion usage scope
The usage scope of an exclusion is a set of components to which the exclusion applies. KES and KSWS have different sets of components so the Migration Wizard cannot migrate the exclusion usage scope. Therefore, if at least one component is selected in the KSWS usage scope, KES applies the exclusion to all application components.
You can configure the KSWS usage scope in trusted zone settings and also in the settings of KSWS protection components. To do so, you can select or clear the Apply Trusted Zone check box in the corresponding section of the policy. The settings of KES protection components do not include such a check box. This means the trusted zone status in individual component settings is lost upon migration. After completing the migration, select components to which the exclusion applies in trusted zone settings in the KES policy.
Migrating comments
Comments from the KSWS trusted zone are migrated to KES exclusion comments without modification.
Migrating trusted processes
KSWS trusted processes are migrated to KES trusted processes with some limitations. Migrating trusted processes depends on the object selection method:
- Path to the file on the protected device – migrates to KES trusted applications.
- File hash – does not migrate.
If KSWS has trusted processes configured as a file hash, such trusted processes are not migrated. After migration, you must add such trusted processes manually.
If the Do not check file backup operations check box is selected in trusted process settings, this setting is migrated to KES trusted applications (the Do not monitor application activity check box).
KES trusted application settings
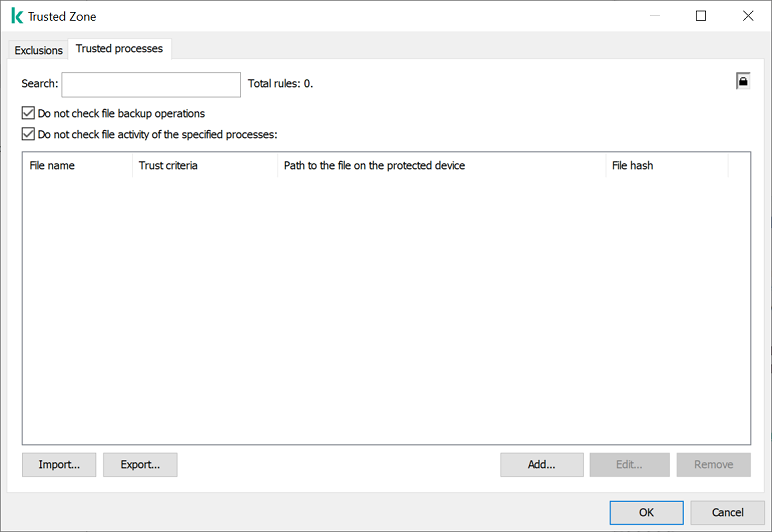
KSWS trusted process settings
Page top
Migrating KSWS Applications Launch Control rules
KSWS Applications Launch Control is block-by-default. That is, Applications Launch Control automatically blocks all applications that are not specified in rules as allowed applications. Therefore the migration wizard for KES Application Control automatically sets the Allowlist control mode, which corresponds to the block-by-default principle.
You can migrate rules from KSWS to KES using the Policies and Tasks Batch Conversion Wizard or the wizard for creating a new KES policy based on the KSWS policy.
Migrating the mode of Applications Launch Control
The mode of KSWS Applications Launch Control migrates to KES Application Control as follows:
- Statistics only → Test rules;
- Active → Apply rules.
Migrating KSWS Applications Launch Control predefined rules
By default, KSWS Applications Launch Control includes two rules:
- Allow scripts and MSI by OS-trusted certificate
- Allow executable by OS-trusted certificate
Predefined rules allow running scripts, MSI packages, and executable files signed by a trusted root certificate. If at least one predefined KSWS rule has the Allow type, the migration wizard creates a new allowing rule, Applications with trusted root certificates. That is, KES Application Control uses a single rule to allow running trusted scripts, MSI packages, and executable files.
If both KSWS predefined rules have the Deny type, KES ignores the predefined rules.
Migrating KSWS Applications Launch Control custom rules
KSWS Applications Launch Control rules regulate the execution of files in accordance with the following criteria:
- signature with a digital certificate;
- SHA256 hash;
- file path.
Rules are created differently in KSWS and KES, therefore the migration wizard creates application categories, which include conditions and exclusions from KSWS rules, and adds these application categories to KES rules. The wizard uses the Certificate, Folder path, and File hash conditions in application categories. New application categories are available in the Kaspersky Security Center Administration Console in the Manage applications → Application categories section.
The migration wizard groups KSWS rules by type and by user. Next, the wizard creates application categories that include conditions and exclusions from KSWS rules, and adds the application categories to new KES rules. The wizard specifies the names of KSWS rules in the Description field of KES rules.
Migrating KSWS Applications Launch Control advanced settings
The principle of operation of KSWS Applications Launch Control and KES Application Control is different so the migration wizard may migrate a subset of settings.
Applications Launch Control settings
Kaspersky Security for Windows Server settings |
Kaspersky Endpoint Security for Windows settings |
|---|---|
Repeat action taken for the first file launch on all the subsequent launches for this file |
(does not migrate) Kaspersky Endpoint Security scans the application every time it attempts to run. |
Deny the command interpreters launch with no command to execute |
(does not migrate) Kaspersky Endpoint Security allows running command interpreters if they are not prohibited by Application Control. |
Apply rules to executable files |
(does not migrate) Rule application scope cannot be configured in KES Application Control settings. KES Application Control applies rules to all types of files: executable files, scripts, and MSI packages. If all file types are included in the rule application scope in KSWS, during migration KES carries over the KSWS rules. If some file type is excluded from the rule application scope in KSWS, during migration KES also carries over KSWS rules, but Test rules is selected as the Application Control action. |
Monitor loading of DLL modules |
Monitor loading of DLL modules (significantly increases the load on the system) |
Apply rules to scripts and MSI packages |
(does not migrate) Rule application scope cannot be configured in KES Application Control settings. KES Application Control applies rules to all types of files: executable files, scripts, and MSI packages. If all file types are included in the rule application scope in KSWS, during migration KES carries over the KSWS rules. If some file type is excluded from the rule application scope in KSWS, during migration KES carries over KSWS rules, but Test rules is selected as the Application Control action. |
Deny applications untrusted by KSN |
(does not migrate) Kaspersky Endpoint Security does not take into account the reputation of applications and allows or denies running applications in accordance with rules. |
Allow applications trusted by KSN |
During the migration, KES adds a new allowing rule. The Other Software → Applications trusted according to reputation in KSN KL category is specified as the rule triggering condition. |
Users and / or user groups allowed to run applications trusted by KSN |
Users and their rights in an Application Control allow rule that includes the KL category Other applications → Applications trusted according to reputation in KSN |
Automatically allow software distribution via applications and packages listed |
Software Distribution Control in KSWS and KES works differently. During the migration, KES adds new allowing rules for applications that have automatic software distribution allowed. The file hash is specified as the rule triggering condition. |
Always allow software distribution via Windows Installer |
Software Distribution Control in KSWS and KES works differently. During the migration, KES adds new allowing rules for applications that have automatic software distribution allowed (Software distribution applications and packages allowed). The file hash is specified as the rule triggering condition. In account properties Trusted Updaters check box is selected. |
Always allow software distribution via SCCM using the Background Intelligent Transfer Service |
(does not migrate) |
Software distribution applications and packages allowed |
Software Distribution Control in KSWS and KES works differently. During the migration, KES adds new allowing rules for applications that have automatic software distribution allowed. The file hash is specified as the rule triggering condition. In account properties Trusted Updaters check box is selected. |
Schedule settings |
(does not migrate) If a schedule is configured for the component in KSWS settings, the Application Control component is enabled upon migration. If a schedule is not configured for the component in KSWS settings, Application Control is disabled upon migration. It is not possible to configure a separate schedule for the component. The component is always on while Kaspersky Endpoint Security is operational. |
Installing KES instead of KSWS
You can install Kaspersky Endpoint Security in the following ways:
- Installing KES after removing KSWS (recommended).
- Installing KES on top of KSWS.
Removing Kaspersky Security for Windows Server
You can remove the application remotely using the Install application remotely task or locally on the server. You may need to restart the server after removing KSWS. If you want to install Kaspersky Endpoint Security without a restart, please make sure that Kaspersky Security for Windows Server is completely removed. If the application is not completely removed, installing Kaspersky Endpoint Security may cause faulty operation of the server. Making sure that the application is completely removed is also recommended if you have used the kavremover utility. The kavremover utility does not support managing KSWS.
If Password Protection is enabled to restrict access to KSWS, enter the uninstallation password in the settings fo the KES installation package.
After removing KSWS, install Kaspersky Endpoint Security for Windows using any available method.
Installing Kaspersky Endpoint Security
When you install KES remotely, components that you have selected in installation package properties are installed on the server. We recommend selecting default components in installation package properties. A restart is not necessary when installing KES on top of KSWS.
Prior to the local installation, Kaspersky Endpoint Security checks the computer for the presence of Kaspersky applications. If Kaspersky Security for Windows Server is installed on the computer, KES detects the set of KSWS components that are installed and selects the same components for installation. A restart is not necessary when installing KES on top of KSWS.
If installing KES on top of KSWS failed, you can roll back the installation. After rolling back the installation, it is recommended to restart the server and try again.
KSWS settings and tasks are not migrated when Kaspersky Endpoint Security for Windows is installed. To migrate settings and tasks, run the Policies and tasks batch conversion wizard.
You can check the list of installed components in the Security section of the application interface, using the status command, or in the Kaspersky Security Center console in computer properties. You can change the set of components after installation by using the Change application components.
Migrating the [KSWS+KEA] configuration to [KES+built-in agent] configuration
To support using Kaspersky Endpoint Security for Windows as part of EDR (KATA), EDR Optimum, EDR Expert, Kaspersky Sandbox, KUMA, and MDR, a built-in agent has been added to the application. You no longer need a separate Kaspersky Endpoint Agent application to work with these solutions.
When migrating from KSWS to KES, the EDR (KATA), EDR Optimum, EDR Expert, Kaspersky Sandbox, KUMA, and MDR solutions continue to work with Kaspersky Endpoint Security built-in agents. In addition, Kaspersky Endpoint Agent will be removed from the computer.
Migrating the [KSWS+KEA] configuration to [KES+built-in agent] involves the following steps:
- Migrating from KSWS to KES
Migrating from KSWS to KES involves installing Kaspersky Endpoint Security instead of Kaspersky Security for Windows Server.
Administrators typically enable Password protection to restrict access to KSWS and KEA. Starting with Kaspersky Security Center Linux 15.1, you can enter the application uninstallation password in the Install application remotely task settings. The task allows entering only one uninstallation password. That is, if the same password is set for KSWS and KEA, the KSWS and KEA applications are removed successfully. If the passwords are different, removal of one of the applications fails with an access error. To complete the migration, you must disable Password Protection for the application whose password you could not enter in the settings of the Install application remotely task.
To carry out the migration, you must select the components needed to support Detection and Response solutions as part of Kaspersky Endpoint Security. After installing the application, Kaspersky Endpoint Security switches to using the built-in agent and removes Kaspersky Endpoint Agent.
- Migrating the policy and tasks
Migrating [KSWS+KEA] policies and tasks to [KES+built-in agent] involves the following steps:
- Migrating policies and tasks from KSWS to KES using the Policies and Tasks Batch Conversion Wizard (only available on the Administration Console (MMC)).
As a result, a policy profile with the UpgradedFromKSWS <Name of the Kaspersky Security for Windows Server policy> name is added to the KES policy. New KES tasks are also created with <KSWS task name> (converted) names.
- Migrating policies and tasks from KEA to KES using the wizard for migration from Kaspersky Endpoint Agent (only available in Web Console and Cloud Console).
As a result, a new policy is created with the name <Name of the Kaspersky Endpoint Security policy> & <Name of the Kaspersky Endpoint Agent policy>. New tasks and KES tasks are also created.
- Migrating policies and tasks from KSWS to KES using the Policies and Tasks Batch Conversion Wizard (only available on the Administration Console (MMC)).
- Licensing functionality
If you use a common Kaspersky Endpoint Detection and Response Optimum or Kaspersky Optimum Security license to activate Kaspersky Endpoint Security for Windows and Kaspersky Endpoint Agent, EDR Optimum functionality will be activated automatically after upgrading the application to version 11.7.0. You do not need to do anything else.
If you use a stand-alone Kaspersky Endpoint Detection and Response Optimum Add-on license to activate EDR Optimum functionality, you must make sure that the EDR Optimum Add-on key is added to the Kaspersky Security Center repository and the automatic license key distribution functionality is enabled. After you upgrade the application to version 11.7.0, EDR Optimum functionality is activated automatically.
If you use a Kaspersky Endpoint Detection and Response Optimum or Kaspersky Optimum Security license to activate Kaspersky Endpoint Agent, and a different license to activate Kaspersky Endpoint Security for Windows, you must replace the Kaspersky Endpoint Security for Windows key with the common Kaspersky Endpoint Detection and Response Optimum or Kaspersky Optimum Security key. You can replace the key using the Add key task.
You do not need to activate Kaspersky Sandbox functionality. Kaspersky Sandbox functionality will be available immediately after upgrading and activating Kaspersky Endpoint Security for Windows.
Only the Kaspersky Anti Targeted Attack Platform license can be used to activate Kaspersky Endpoint Security as part of the Kaspersky Anti Targeted Attack Platform solution. After you upgrade the application to version 12.1, EDR (KATA) functionality is activated automatically. You do not need to do anything else.
- Checking the health of Kaspersky Endpoint Detection and Response Optimum and Kaspersky Sandbox
If after the upgrade, the computer has the Critical status in the Kaspersky Security Center console:
- Make sure that the computer has Network Agent version 13.2 or higher installed.
- Check the operating status of the built-in agent by viewing the Report on status of application components. If a component has the Not installed status, install the component using the Change application components task.
- Make sure you accept the Kaspersky Security Network Statement in the new policy of Kaspersky Endpoint Security for Windows.
Make sure EDR Optimum functionality is activated using the Report on status of application components. If a component has the Not covered by license status, make sure that the automatic license key distribution functionality of EDR Optimum is turned on.
Making sure Kaspersky Security for Windows Server was successfully removed
Make sure Kaspersky Security for Windows Server is completely removed:
- The
%ProgramFiles%\Kaspersky Lab\Kaspersky Security for Windows Server\folder does not exist. - The following services are not present:
- Kaspersky Security Service (KAVFS)
- Kaspersky Security Management (KAVFSGT)
- Kaspersky Security Exploit Prevention (KAVFSSLP)
- Kaspersky Security Script Checker (KAVFSSCS)
You can check running services in Task Manager or by issuing the
sc querycommand (see figure below). - The following drivers are not present:
- klam.sys
- klflt.sys
- klramdisk.sys
- klelaml.sys
- klfltdev.sys
- klips.sys
- klids.sys
- klwtpee
You can check installed drivers in the
C:\Windows\System32\driversfolder or by issuing thesc querycommand. If a service or driver are missing, you will get the following response: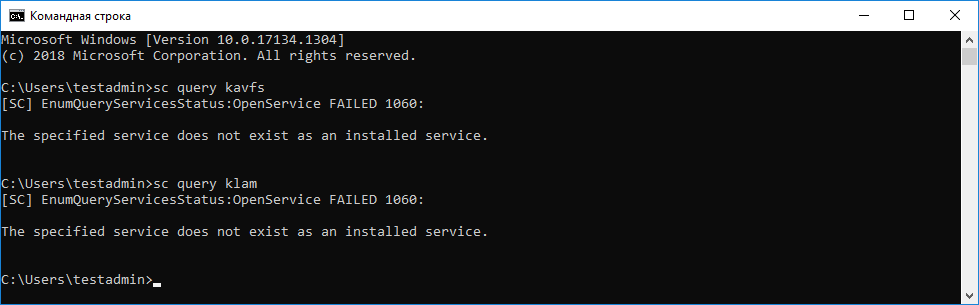
Making sure Kaspersky Security for Windows Server services and drivers were successfully removed
If application or driver files remain on the server, delete the relevant files manually. If Kaspersky Security for Windows Server services are still running on the server, stop (sc stop) and delete (sc delete) the services manually. To stop the klam.sys driver, use the fltmc unload klam command.
Activating KES with a KSWS key
After installing the application, you can activate Kaspersky Endpoint Security for Windows (KES) using a Kaspersky Security for Windows Server (KSWS) license key. The activation process after migration depends on the KSWS activation method (see the table below).
Kaspersky Endpoint Security does not support the Kaspersky Security for Storage license. To work with this license, you need to use Kaspersky Security for Windows Server.
To activate KES with the KSWS key you can use only the activation code. If you are using a key file to activate the application, you need to contact Technical Support for a Kaspersky Endpoint Security key file.
Activating Kaspersky Endpoint Security for Windows with a Kaspersky Security for Windows Server key
Kaspersky Security for Windows Server activation method |
Migrating the key to Kaspersky Endpoint Security for Windows. |
|---|---|
Automatic distribution of the KSWS license key to computers. |
If automatic key distribution is enabled in KSWS license key properties, KES is automatically activated with the KSWS key. |
The KSWS key is added by a task. |
If your KSWS is activated using the task, the KSWS license key is deleted during migration from KSWS. You must activate the application again. For example, you can add a license key to the Kaspersky Endpoint Security for Windows installation package. |
The KSWS key is added locally in the application interface. |
If your KSWS is activated locally using the Application Activation Wizard, the KSWS license key is deleted during migration from KSWS. You must activate the application again. For example, you can add a license key to the Kaspersky Endpoint Security for Windows installation package. |
The KSWS key is added to the installation package. |
If your KSWS is activated using the key from the installation package, the KSWS license key is deleted during migration from KSWS. You must activate the application again. For example, you can add a license key to the Kaspersky Endpoint Security for Windows installation package. |
Paid virtual machine image (Amazon Machine Image – AMI) in Amazon Web Services (AWS). |
If you purchased Kaspersky Security Center as a paid virtual machine image (Amazon Machine Image – AMI) in Amazon Web Services (AWS), activating KES is not required. In this case, Kaspersky Security Center uses the AWS subscription that is already added to the application. |
Ready-made free-of-charge Kaspersky Security Center image with your own license (Bring Your Own License – BYOL model). |
If you are using an out-of-the-box free Kaspersky Security Center image with your own license in a cloud environment (the Bring Your Own License – BYOL model), you must activate the application using any available method. You will need a Kaspersky Hybrid Cloud Security license. |
Special considerations for migrating high-load servers
On high-load servers, it is important to monitor performance and avoid faults. After migration to Kaspersky Endpoint Security for Windows, we recommend temporarily disabling application components that use substantial server resources relative to other components. After you make sure that the server is performing as normal, you can turn the application components back on.
We recommend migrating high-load servers as follows:
- Create a Kaspersky Endpoint Security policy with default settings.
Default settings are considered optimal. This settings are recommended by Kaspersky experts. Default settings provide recommended protection level and optimal resource use.
- In policy settings, turn off the following components: Network Threat Protection, Behavior Detection, Exploit Prevention, Remediation Engine, Application Control.
If your organization has the Kaspersky Managed Detection and Response (MDR) solution deployed, upload the BLOB configuration file to the Kaspersky Endpoint Security policy.
- Remove Kaspersky Security for Windows Server from the server.
- Install Kaspersky Endpoint Security for Windows with the default set of components.
If your organization has Detection and Response solutions deployed, select the relevant components in the properties of the installation package.
- Check the settings of the application:
- The application is activated with the KSWS license key.
- The new policy is applied. Previously selected components are disabled.
- Make sure the server is working. Make sure that Kaspersky Endpoint Security for Windows is not using more than 1% of the server's resources.
- If necessary, create scan exclusions, add trusted applications, create a list of trusted web addresses.
- Turn on Behavior Detection, Exploit Prevention, Remediation Engine components. Make sure that Kaspersky Endpoint Security for Windows is not using more than 1% of the server's resources.
- Turn on the Network Threat Protection component. Make sure that Kaspersky Endpoint Security for Windows is not using more than 2% of the server's resources.
- Turn on the Application Control component in rule testing mode.
- Make sure Application Control is working. If necessary, add new Application Control rules and turn off rule testing mode after confirming that Application Control is working.
After migrating from KSWS to KES, make sure that the application is operating correctly. Check the status of the server in the console (should be OK). Make sure no errors are reported for the application, also check the time of the last connection to the Administration Server, the time of the last database update and the server protection status.
Page top
Managing the application on a server in Server Core mode
A server in Server Core mode does not have a GUI. Therefore you can only manage the application remotely using the Kaspersky Security Center console or locally on the command line.
Managing the application using the Kaspersky Security Center console
Installing the application using the Kaspersky Security Center console is not different from installing it the normal way. When creating an installation package, you can add a license key to activate the application. You can use a Kaspersky Endpoint Security for Windows key or a Kaspersky Security for Windows Server key.
On a server in Server Core mode, the following application components are not available: Web Threat Protection, Mail Threat Protection, Web Control, BadUSB Attack Prevention, File Level Encryption (FLE), Kaspersky Disk Encryption (FDE).
Restart is not required when installing Kaspersky Endpoint Security. Restart is required only if you have to remove incompatible applications prior to installation. Restart may also be required when updating the application version. The application cannot display a window to prompt the user to restart the server. You can learn about the need to restart the server from reports in the Kaspersky Security Center console.
Managing the application on a server in Server Core mode is not different from managing a computer. You can use policies and tasks to configure the application.
Managing the application on a server in Server Core mode involves the following special considerations:
- The server in Server Core mode does not have a GUI, therefore Kaspersky Endpoint Security does not display a warning telling the user that Advanced Disinfection is needed. To disinfect a threat, you need to enable Advanced Disinfection technology in application settings and enable immediate Advanced Disinfection in Malware Scan task settings. Then you need to start a Malware Scan task.
- BitLocker Drive Encryption is only available with a Trusted Platform Module (TPM). A PIN / password cannot be used for encryption because the application is unable to display the password prompt window for preboot authentication. If the operating system has Federal Information Processing standard (FIPS) compatibility mode enabled, connect a removable drive for saving the encryption key before you begin encrypting the drive.
Managing the application from the command line
When you cannot use a GUI, you can manage Kaspersky Endpoint Security from the command line.
To install the application on a server in Server Core mode, run the following command:
setup_kes.exe /pEULA=1 /pPRIVACYPOLICY=1 /s
To activate the application, run the following command:
avp.com license /add <activation code or key file>
To check application profile statuses, run the following command:
avp.com status
To view the list of application management commands, run the following command:
avp.com help
Migrating from [KSWS+KEA] to [KES+built-in agent]
When migrating from Kaspersky Security for Windows Server (KSWS) to Kaspersky Endpoint Security (KES), you can use the follow recommendations to configure server protection and optimize performance. Here we will look at an example of migration for a single organization.
Infrastructure of the organization
The company has the following equipment installed:
- Kaspersky Security Center 14.2
The administrator manages Kaspersky solutions using the Administration Console (MMC). Kaspersky Endpoint Detection and Response Optimum (EDR Optimum) is also deployed
In Kaspersky Security Center, three administration groups are created, containing servers of the organization: two administration groups for SQL servers and an administration group for Microsoft Exchange servers. Each administration group is managed by its own policy. Database Update and On-demand scan tasks are created for all servers in the organization.
The KSWS activation key is added to Kaspersky Security Center. Automatic key distribution is enabled.
- SQL servers with Kaspersky Security for Windows Server 11.0.1 and Kaspersky Endpoint Agent 3.11 installed. The SQL servers are combined into two clusters.
KSWS is managed by SQL_Policy(1) and SQL_Policy(2) policies. Database Update, On-demand scan tasks are also created.
- A Microsoft Exchange server with Kaspersky Security for Windows Server 11.0.1 and Kaspersky Endpoint Agent 3.11 installed.
KSWS is managed by the Exchange_Policy policy. Database Update, On-demand scan tasks are also created.
Planning the migration
The migration involves the following steps:
- Migrating KSWS tasks and policies using the Policies and Tasks Batch Conversion Wizard.
- Migrating the Kaspersky Endpoint Agent policy using the Policies and Tasks Batch Conversion Wizard.
- Using tags to activate policy profiles in the properties of the new policy.
- Installing KES instead of KSWS.
- Activating EDR Optimum.
- Confirming that KES is working.
The migration scenario is initially performed on one of the cluster of SQL servers. Then the migration scenario is performed on the other cluster of SQL servers. Then the migration scenario is performed on the Microsoft Exchange.
Migrating KSWS tasks and policies using the Policies and Tasks Batch Conversion Wizard
To migrate KSWS tasks, you can use the Policies and Tasks Batch Conversion Wizard (the migration wizard). As a result, instead of the SQL_Policy(1), SQL_Policy(2), and Exchange_Policy policies, you will get a single policy with three profiles for SQL and Microsoft Exchange servers respectively. The new policy profile with KSWS settings will be named UpgradedFromKSWS <Name of the Kaspersky Security for Windows Server policy>. In profile properties, the migration wizard automatically selects the UpgradedFromKSWS device tag as the triggering criterion. Thus the settings from the policy profile are applied to servers automatically.
Migrating the Kaspersky Endpoint Agent policy using the Policies and Tasks Batch Conversion Wizard
To migrate Kaspersky Endpoint Agent policies, you can use the Policies and Tasks Batch Conversion Wizard. The Policy and Task Migration Wizard for Kaspersky Endpoint Agent is only available in the Web Console.
Using tags to activate policy profiles in the properties of the new policy
Select the device tag that you assigned earlier as the profile activation condition. Open policy properties and select General rules for policy profile activation as the profile activation condition.
Installing KES instead of KSWS
Before installing KES, you must disable Password protection in KSWS policy properties.
Installing KES involves the following steps:
- Prepare the installation package. In installation package properties, select the Kaspersky Endpoint Security for Windows 12.0 distribution kit and select the default set of components.
- Create an Install application remotely task for one of the SQL server administration groups.
- In task properties, select the installation package and the license key file.
- Wait until the task successfully completes.
- Repeat KES installation for remaining administration groups.
Kaspersky Security Center automatically adds the UpgradedFromKSWS tag to names of computers on the console after the KES installation is complete.
To check the KES installation, you can use the Report on protection deployment. You can also check the device status. To confirm application activation, you can use the Report on usage of license keys.
Activating EDR Optimum
You can activate EDR Optimum functionality using a stand-alone Kaspersky Endpoint Detection and Response Optimum Add-on license. You must confirm that the EDR Optimum key is added to the Kaspersky Security Center repository and the automatic license key distribution functionality is enabled.
To check EDR Optimum activation, you can use the Report on status of application components.
Confirming that KES is working
To confirm that KES is working, you can check and see that no errors are reported. The device status must be OK. Update and malware scan tasks and successfully completed.
Page top
Light Agent mode to protect virtual machines
|
Starting with version 12.8, you can use Kaspersky Endpoint Security for Windows as part of Kaspersky Security for Virtualization Light Agent. Kaspersky Security for Virtualization Light Agent is an integrated solution that provides comprehensive protection of virtual machines against various types of information security threats, network attacks, and phishing attacks. To use this solution, you must install the application in Light Agent mode. You can use Kaspersky Endpoint Security in Light Agent mode as part of Kaspersky Security for Virtualization Light Agent starting with version 6.2. |
When you start Light Agent, it establishes and maintains a connection to the virtual machine SVM (Secure Virtual Machine). A Protection Server is deployed on the SVM. The Protection Server is the Kaspersky Security for Virtualization Light Agent solution component that scans files for viruses and other malware, updates anti-virus databases and manages license keys. Light Agent sends file fragments that need scanning to the SVM. Scan results are available for all virtual machines with Light Agent installed (the SharedCash technology). Thus, the SharedCash technology increases the solution efficiency and provides a faster response to threats.
The infrastructure of the organization may contain many virtual machines with Light Agent installed and many SVMs. The Integration Server component is intended for interaction between the solution components and the virtual infrastructure. Integration Server - a component of the Kaspersky Security for Virtualization Light Agent solution that generates a list of available SVMs and transfers this data to Light Agents, participates in the detection of SVMs by Light Agents, secures the connection between Light Agents and SVMs, and performs other functions.
See the Kaspersky Security for Virtualization Light Agent Help for virtual machine requirements to run the application in the Light Agent mode.
Special considerations for Light Agent mode
You can manage Kaspersky Endpoint Security in Standard mode and Light Agent mode using Kaspersky Endpoint Security policies and tasks. In Light Agent mode, some components and features of the application are not available.
Updating databases and application software modules
Kaspersky Endpoint Security in Light Agent mode uses special malware databases that the application needs when working as part of the Kaspersky Security for Virtualization Light Agent solution. Kaspersky Endpoint Security gets databases and application module updates from the Protection Server.
Databases and modules on protected virtual machines are updated using a special Update of databases and application modules task, in which a folder on the SVM is specified as the update source. Light Agent runs the Update of databases and application modules task automatically. You cannot select a different update source, configure the task schedule, or remove the task.
A rollback of the latest malware database update is also handled on the Protection Server side. After a rollback of a databases and application modules update on the SVM, a special local Update of databases and application modules task is started on the protected virtual machine. This task makes the Light Agent go back to using the previous set of malware databases.
Kaspersky Endpoint Security in Light Agent mode does not support the Update rollback task.
Activating Light Agent
To activate the application, you must add a license key to the SVM to which the Light Agent is connected. You do not need to activate the application separately.
Other special considerations for Light Agent mode
- When creating a policy for the application, we recommend selecting Light Agent mode. In this mode, the New Policy Wizard prompts you to configure the SVM connection. These settings are required for the application to work in Light Agent mode.
- You cannot install Data Encryption components and Adaptive Anomaly Control in Light Agent mode. The set of components also depends on the type of the guest operating system: workstation or server.
- You can manage Light Agent in Administration Console (MMC) and Kaspersky Security Center Web Console. It is not possible to manage Light Agent in the Kaspersky Security Center Cloud Console.
- Changing the set of application components on VDI virtual machines is not supported.
- Kaspersky Endpoint Security communicates with KSN servers through a KSN proxy server. Direct communication with KSN is not supported.
- Cloud mode of Kaspersky Security Network is not supported.
- Using the application proxy server when connecting to the Integration Server (VIIS), the Protection Server (SVM), and KSN servers is not supported.
Preliminary configuration of the virtual machine
You can install Kaspersky Endpoint Security on a virtual machine that uses virtual platform technology. Kaspersky Endpoint Security supports VMware, Microsoft Hyper-V, Citrix virtual platforms. Before the installation, you must perform the preliminary configuration of the virtual machines.
Compatibility with Citrix App Layering technology
If you intend to use the Full User Layer for saving the state of the temporary virtual machines, you must do the following before installing on the virtual machine template:
- Create the C:\Program Files\Unidesk\Uniservice\UserExclusions\KESLA.txt file and add the following exclusions to it:
C:\ProgramData\KasperskyLab\C:\ProgramData\Kaspersky Lab\C:\Program Files (x86)\Kaspersky Lab\
- In the registry of the operating system in the HKEY_LOCAL_MACHINE\System\CurrentControlSet\Services\Unifltr key, create a new DWORD value named MiniFilterBypass and set it to 1.
- In the registry of the operating system in the HKEY_LOCAL_MACHINE\SYSTEM\CurrentControlSet\Services\Unirsd key, create a new MULTI_SZ value named ExcludeKey and set it to \Registry\Machine\SOFTWARE\WOW6432Node\KasperskyLab.
- Restart the virtual machine.
For installation on virtual machines in an infrastructure that uses Citrix App Layering, you must do the following:
- Install the Kaspersky Security Center Administration Agent and Kaspersky Endpoint Security for Windows on the virtual machine template in the Application Layer.
- Create a virtual machine image consisting of multiple layers.
- Deploy the created image on hypervisors that support the Citrix App Layering solution.
- Configure the creation of temporary virtual machines from the created image.
For details about the installation of anti-virus software alongside Citrix App Layering, please refer to the Citrix App Layering documentation.
Page top
Compatibility with Citrix Provisioning (Citrix Provisioning Services) technology
To make sure the application is compatible with the Citrix Provisioning technology (Citrix Provisioning Services):
- If the Citrix Provisioning Target Device software is installed on the virtual machine, you must remove it before installing the Kaspersky Endpoint Security application. After installing the application, you must install Citrix Provisioning Target Device.
- When installing the application using the Setup Wizard or remotely using Kaspersky Security Center, you must select the Ensure compatibility with Citrix PVS check box.
Compatibility with VMware App Volumes technology
Before installing on the virtual machine template, you must create the %SVAgent%\Config\Custom\snapvol.cfg file and add the following exclusions to it:
exclude_path=\ProgramData\Kaspersky Labexclude_path=\ProgramData\KasperskyLabexclude_path=\Program Files\Kaspersky Labexclude_path=\Program Files\Common Files\Kaspersky Labexclude_path=\Program Files\Kaspersky Labexclude_path=\Program Files (x86)\Kaspersky Labexclude_path=\Program Files (x86)\Common Files\Kaspersky Labexclude_process_path=\Program Files (x86)\Kaspersky Labexclude_process_path=\Program Files (x86)\Common Files\Kaspersky Labexclude_process_path=\Program Files\Common Files\Kaspersky Labexclude_process_path=\Program Files\Kaspersky Labexclude_process_name=avp.exeexclude_process_name=klnagent.exeexclude_registry=\REGISTRY\MACHINE\SOFTWARE\Wow6432Node\KasperskyLabexclude_registry=\REGISTRY\MACHINE\SOFTWARE\KasperskyLabexclude_registry=\REGISTRY\MACHINE\SYSTEM\CurrentControlSet\Services\klupd_klif_arkmonexclude_registry=\REGISTRY\MACHINE\SYSTEM\CurrentControlSet\Services\klupd_klif_klarkexclude_registry=\REGISTRY\MACHINE\SYSTEM\CurrentControlSet\Services\klupd_klif_klbgexclude_registry=\REGISTRY\MACHINE\SYSTEM\CurrentControlSet\Services\klupd_klif_markexclude_registry=\REGISTRY\MACHINE\SYSTEM\CurrentControlSet\Services\klupd_klif_swmon
For details, please refer to the VMware documentation.
Page top
Installing Light Agent
Installing the application in Light Agent mode is the same as in Standard mode. Before installing Light Agent on a virtual machine, you must make sure the Kaspersky Security Center Network Agent is installed. Network Agent facilitates interaction between the Administration Server and a virtual machine.
Light Agent can be installed on a virtual machine in one of the following ways:
- Remotely using Kaspersky Security Center.
- Locally using the Setup Wizard.
- Locally using the command line.
To install Light Agent, you must select the appropriate configuration in installation package settings or in Setup Wizard.
When installing Light Agent, we recommend selecting predefined exclusions and trusted applications for the relevant virtual environment. Predefined scan exclusions and trusted applications help you quickly set up the application and avoid virtual environment compatibility problems. You can also configure predefined scan exclusions and trusted applications after the installation, in the policy.
When installing Light Agent on persistent virtual machines, you may need to alter the Sensor ID generation algorithm. Sensor ID is used in the Kaspersky Anti Targeted Attack Platform solution to identify computers that send telemetry to the server. To create a unique Sensor ID, set EnableUniqueSensorID=1 when installing the application on the command line.
How to install Light Agent using the Setup Wizard
- Copy the distribution kit folder to the virtual machine.
- Run setup_kes.exe.
The Setup Wizard starts.
Configuration of Kaspersky Endpoint Security
Choosing the configuration of the application
Select the Light Agent to protect virtual environments configuration. This configuration is intended for the application that is used as part of the Kaspersky Security for Virtualization Light Agent solution. Light Agent must be installed on each virtual machine that needs to be protected using the solution. In this configuration, you cannot use Data Encryption components or Adaptive Anomaly Control. If you are installing Light Agent on a virtual machine template that will be used to create nonpersistent virtual machines, select the Protect VDI infrastructure check box (VDI stands for Virtual Desktop Infrastructure). The VDI protection mode helps optimize the performance of Kaspersky Endpoint Security on nonpersistent virtual machines. In this mode, Light Agent declines application updates that require restarting the virtual machine. When receiving application updates that require a restart, Light Agent generates an event about needing to update the template of the protected virtual machines.
Kaspersky Endpoint Security components
Select the components that you want to install (see figure below). You can change the available application components after the application is installed. To do so, you need to run the Setup Wizard again and choose to change the available components.
Advanced settings
Advanced application installation settings
Protect the application installation process. Installation protection includes protection against replacement of the distribution package with malicious applications, blocking access to the installation folder of Kaspersky Endpoint Security, and blocking access to the system registry section containing application keys. However, if the application cannot be installed (for example, when performing remote installation with the help of Windows Remote Desktop), you are advised to disable protection of the installation process.
Ensure compatibility with Citrix PVS. You can enable support of Citrix Provisioning Services to install Kaspersky Endpoint Security to a virtual machine.
Add the path to the file avp.com to the system variable %PATH%. You can add the installation path to the %PATH% variable for convenient use of the command line interface.
How to install Light Agent using the command line
How to install Light Agent using the Administration Console (MMC)
How to install Light Agent using Web Console
- In the main window of the Web Console, select Discovery & deployment → Deployment & assignment → Installation packages.
This opens a list of installation packages that have been downloaded to Kaspersky Security Center.
List of installation packages
- Open the properties of the Kaspersky Endpoint Security for Windows installation package.
If necessary, create a new installation package.
- Select the Settings tab.
- Go to the Protection components section.
Components included in the installation package
- Select the Light Agent to protect virtual environments configuration. This configuration is intended for the application that is used as part of the Kaspersky Security for Virtualization Light Agent solution. Light Agent must be installed on each virtual machine that needs to be protected using the solution. In this configuration, you cannot use Data Encryption components or Adaptive Anomaly Control. If you are installing Light Agent on a virtual machine template that will be used to create nonpersistent virtual machines, select the Protect VDI infrastructure check box (VDI stands for Virtual Desktop Infrastructure). The VDI protection mode helps optimize the performance of Kaspersky Endpoint Security on nonpersistent virtual machines. In this mode, Light Agent declines application updates that require restarting the virtual machine. When receiving application updates that require a restart, Light Agent generates an event about needing to update the template of the protected virtual machines.
- Select the components that you want to install.
You can change the available application components after the application is installed.
- Configure the trusted zone. Select predefined scan exclusions and trusted applications for the virtual environment in which you are installing the application.
Predefined scan exclusions and trusted applications help you quickly set up the application and avoid virtual environment compatibility problems.
- Save your changes.
- Create a remote installation task. In task properties, select the installation package you created.
As a result, Light Agent is installed on the virtual machine. You can use the interface of the application and an icon of the application is displayed in the notification area ![]() . Now you need to configure the connection of the Light Agent to SVM.
. Now you need to configure the connection of the Light Agent to SVM.
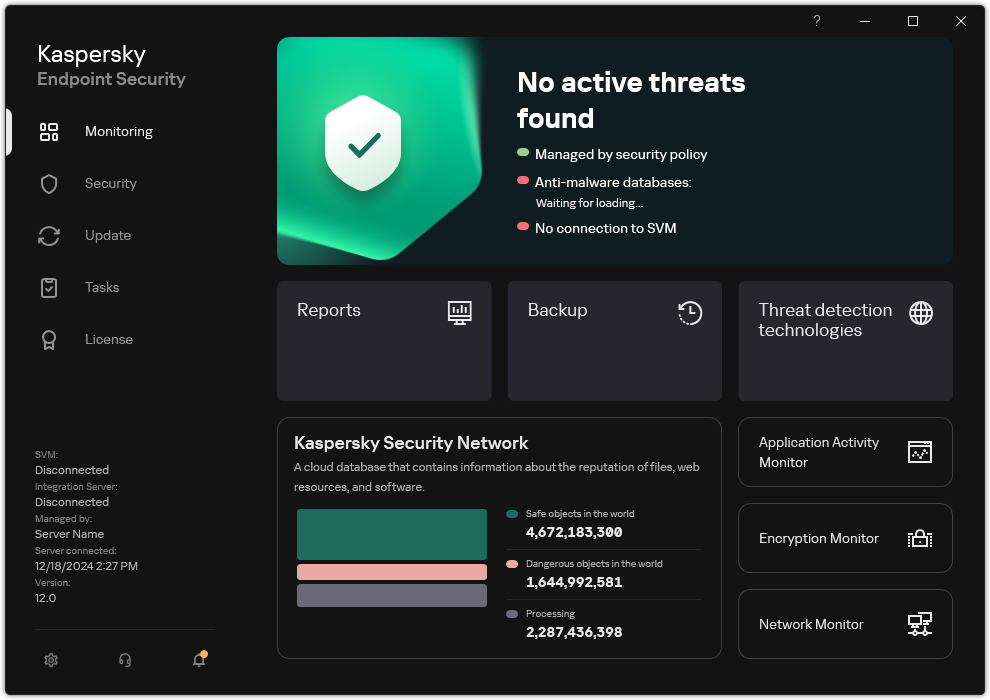
Main window of Light Agent
Page top
Connecting Light Agent to SVM
The Kaspersky Security for Virtualization Light Agent solution requires continuous communication of the Light Agent and SVM. This is necessary to scan files sent by the Light Agent for viruses and other malware. Without an SVM connection, the Light Agent cannot send files for scanning, If the connection cannot be established for over five minutes, the scan finishes with an error.
Connecting a Light Agent to an SVM involves the following steps:
- Light Agent gets the list of available SVMs.
- Light Agent determines an available Protection Server (SVM) that is optimal for connection according to the SVM selection algorithm.
- Light Agent checks additional SVM connection settings: tags, connection protection status, application functionality covered by the license.
- Connecting Light Agent to SVM.
You can get information about the status of the Light Agent's connection to the SVM in the Kaspersky Endpoint Security or using the application command. The application generates an event whenever the Light Agent's SVM connection is lost or established, and sends these events to Kaspersky Security Center. If you are using an Integration Server for SVM discovery, you can get information about the status of the SVM and the number of connected Light Agents in the Integration Server Console. For details about SVM status monitoring, see the Kaspersky Security for Virtualization Light Agent Help.
SVM discovery
You can select one of the SVM discovery methods for the Light Agent:
- Using the Integration Server (VIIS).
Integration Server is the solution component that enables the interaction of Kaspersky Security for Virtualization Light Agent with the virtual infrastructure. The Integration Server maintains a list of SVMs that can be connected to. Light Agent establishes a connection with the Integration Server and gets the list of SVM addresses.
An Integration Server is useful in large-scale virtual infrastructures because the Integration Server automatically balances load among SVMs. The Integration Server gets information about available SVMs, analyzes it and provides Light Agents with a list of Protection Servers (SVM) that are optimal for connection.
For Light Agent to be able to get a list of SVMs, you only need to enter the address of the Integration Server.
- Using the list of SVM addresses.
If you need to specify individual SVMs that you want Light Agent to connect to, you can prepare a list manually.
You need to list addresses of available SVMs that the Light Agent can connect to.
How to configure SVM discovery by Light Agent in the Administration Console (MMC)
How to configure SVM discovery by Light Agent in the Web Console
How to configure SVM discovery by Light Agent in the application interface
- In the main application window, click the button.
- In the application settings window, under Light Agent mode click the SVM discovery settings tile.
- Select an SVM discovery method.
- Use Integration Server. Enter the Integration Server connection settings. Enter the IP address in IPv4 format or fully qualified domain name (FQDN) of the device on which the Integration Server is installed.
- Use a custom list of SVM addresses. Create a list of SVMs that Light Agent can connect to. Specify the IP address in IPv4 format or the fully qualified domain name (FQDN) of SVM. You can enter several IP addresses or full domain names of the SVMs by typing them from a new line.
In the list of SVM addresses, specify only full domain names (FQDN) that are matched by a single IP address. Using a fully qualified domain name that corresponds to multiple IP addresses can lead to errors in the solution.
- Save your changes.
Configuring the SVM selection algorithm for Light Agent
The infrastructure of the organization may have multiple deployed SVMs to which Light Agents can connect. To balance the load on the network and resources of the virtual infrastructure, you need to distribute the Light Agents among the SVMs.
Light Agents can apply one of the following SVM selection algorithms for connection:
- Standard algorithm (by default)
The standard algorithm involves the following steps:
- Light Agent identifies local SVM.
To identify an SVM as local, Light Agent mainly uses the location of the SVM in the virtual infrastructure. If SVMs are located in the same hypervisor as the Light Agent, Light Agent considers such SVMs local. In some virtual infrastructures, you must manually specify local SVMs using a configuration file.
- If Light Agent detects multiple local SVMs, Light Agent selects an SVM with the least number of connected Light Agents. If you could not identify local SVMs, Light Agent selects the SVM with the least number of connected Light Agents in the whole virtual infrastructure.
For details about local SVMs, see the Kaspersky Security for Virtualization Light Agent Help.
- Light Agent identifies local SVM.
- Extended algorithm
The extended algorithm lets you manually specify local SVM selection criteria or disable local SVM discovery. To do so, you need to select the SVM path in the virtual infrastructure: Hypervisor, Cluster, or Data center. That is, you must select the scope in which the local SVMs is to be discovered. If the Light Agent cannot connect to a local SVM in the configured discovery scope, it stops trying to connect. The extended algorithm also allows disabling local SVMs discovery for the Light Agent. In this case, Light Agent selects SVMs with the least number of connected Light Agents in the entire virtual infrastructure.
In addition to SVM connection algorithms, you can regulate the connection of Light Agents to SVMs using tags.
How to configure the SVM selection algorithm for Light Agent in the Administration Console (MMC)
How to configure the SVM selection algorithm for Light Agent in the Web Console
How to configure the SVM selection algorithm for Light Agent in the application interface
- In the main application window, click the button.
- In the application settings window, under Light Agent mode click the SVM discovery settings tile.
- Select the algorithm:
- Use the standard SVM selection algorithm. Light Agent selects SVMs, deployed in the same hypervisor.
- Use the extended SVM selection algorithm. Light Agent selects SVMs deployed in the selected SVM path type (by default, Hypervisor).
- If necessary select SVM path for the extended SVM selection algorithm:
- Hypervisor. Light Agent selects for connection a SVM that matches a particular criterion (depending on type of the virtual infrastructure):
- The SVMs are deployed in the same hypervisor as the virtual machine with the Light Agent installed (in a virtual infrastructure on Microsoft Hyper-V, XenServer, VMware vSphere, KVM, Proxmox VE, Basis (Skala-R), HUAWEI FusionSphere, Nutanix Acropolis, ALT Virtualization Server, Astra Linux, or Numa vServer).
- The SVM is located in the same server group as the virtual machine with the installed Light Agent (in a virtual infrastructure running on the OpenStack platform, VK Cloud platform, or TIONIX Cloud Platform).
If there are no available SVMs on the same hypervisor or in the same server group, where the virtual machine with Light Agent is located, then Light Agent does not connect to SVM.
- Cluster. Light Agent selects for connection a SVM that matches a particular criterion (depending on type of the virtual infrastructure):
- The SVMs are deployed in the same hypervisor cluster as the virtual machine with the Light Agent installed (in a virtual infrastructure on Microsoft Hyper-V, XenServer, VMware vSphere, KVM, Proxmox VE, Basis (Skala-R), HUAWEI FusionSphere, Nutanix Acropolis, ALT Virtualization Server, Astra Linux, or Numa vServer).
- The SVMs are deployed in the same OpenStack project as the virtual machine with the installed Light Agent (in a virtual infrastructure running on the OpenStack platform, VK Cloud platform, or TIONIX Cloud Platform).
If there are no available SVMs on the same hypervisor cluster or within the same OpenStack project, where the virtual machine with Light Agent is located, then Light Agent does not connect to SVM.
- Data center. Light Agent selects for connection a SVM that matches a particular criterion (depending on type of the virtual infrastructure):
- The SVMs are deployed in the same data center as the virtual machine with the Light Agent installed (in a virtual infrastructure on Microsoft Hyper-V, XenServer, VMware vSphere, KVM, Proxmox VE, Basis (Skala-R), HUAWEI FusionSphere, Nutanix Acropolis, ALT Virtualization Server, Astra Linux, or Numa vServer).
- The SVMs are located in the same availability zone as the virtual machine with the installed Light Agent (in a virtual infrastructure running on the OpenStack platform, VK Cloud platform, or TIONIX Cloud Platform).
If there are no SVMs available for connection in the same data center or Availability Zone where the virtual machine with the Light Agent is located, the Light Agent does not connect to the SVM.
- Ignore. Light Agent ignores the SVM path for connecting to the Protection Server. Light Agents takes into account other criteria: tags, the number of Light Agents connected to an SVM, and so on.
- Hypervisor. Light Agent selects for connection a SVM that matches a particular criterion (depending on type of the virtual infrastructure):
- Save your changes.
Distributing the connections of Light Agents to SVMs (tags)
Multiple Light Agents can connect to an SVM. To balance the Light Agent connections, you can specify a separate list of SVMs. If you are using an Integration server for SVM discovery, you can use tags to balance Light Agent connections to SVMs. That is, for a Light Agent, you can assign a list of SVMs for connecting using a tag. To do so, you must assign a tag to the Light Agent and specify this tag in SVM settings. For details about specifying tags in SVM settings, see the Kaspersky Security for Virtualization Light Agent Help.
Example: The Kaspersky Endpoint Detection and Response Optimum solution is deployed in your infrastructure for designated virtual machine hosts. In this case, you can assign the [EDROptimum] tag to the Light Agent to make it connect to the SVMs that has the EDR Optimum (EDR Optimum Add-on) license key added. As a result, you can use EDR Optimum functionality on the virtual machine with the Light Agent. When connecting the Light Agent to an SVM without an EDR Optimum license key, Kaspersky Endpoint Detection and Response Optimum functionality is unavailable.
How to assign an SVM connection tag to a Light Agent in the Administration Console (MMC)
How to assign an SVM connection tag to a Light Agent in the Web Console
How to assign an SVM connection tag to a Light Agent in the application interface
- In the main application window, click the button.
- In the application settings window, under Light Agent mode click the SVM connection tag tile.
- Select the Use connection tag check box and enter SVM connection tag.
For a tag, you can enter a text string up to 255 characters long. You can use any character except the
;character. - Save your changes.
Protecting the connection between a Light Agent and SVM
You can configure encryption of the connection between Light Agents and Protection Server. To do this, you need to enable the encryption of the data channel between Light Agent and the Protection Server in the Protection Server settings on the SVM and in the Light Agent settings.
A Light Agent for which connection protection is enabled can only connect to SVMs for which encryption of the data channel between the Light Agent and the Protection Server is enabled. A Light Agent for which connection protection is disabled can only connect to SVMs for which channel encryption is disabled or an insecure connection between the Protection Server and the Light Agent is allowed.
For details about configuring connection protection on the Protection Server, see the Kaspersky Security for Virtualization Light Agent Help.
Protecting the connection using encryption may impact the performance of Kaspersky Security for Virtualization Light Agent.
How to configure connection protection in a Light Agent in Administration Console (MMC)
How to configure connection protection in a Light Agent in Web Console
How to configure connection protection in a Light Agent in the application interface
- In the main application window, click the button.
- In the application settings window, under Light Agent mode click the Connection protection tile.
- Select the Encrypt data channel between Light Agent and the Protection Server check box.
- Save your changes.
Activating Light Agent
If Kaspersky Endpoint Security is being used in Light Agent mode for protecting virtual environments, you do not need to activate the application separately. To activate the application, you must add a license key to the SVM. You can add a license key using the special task in the Kaspersky Security Center console. You cannot manage license keys in the Light Agent interface, however, you can view license information (see the figure below). You can also view Light Agent licensing information on the command line (see the instructions below). Light Agent gets this information from SVM. For details about activating the solution and managing license keys, see the Kaspersky Security for Virtualization Light Agent Help.
To view Light Agent licensing information:
- Run the command line interpreter (cmd) as an administrator.
- Go to the folder where the Kaspersky Endpoint Security executable file is located.
- Run the following command:
avp.com LICENSE /CHECK
As a result, Kaspersky Endpoint Security displays license information: address of the SVM to which the Light Agent is connected, the number of days until the license expires, and other information.
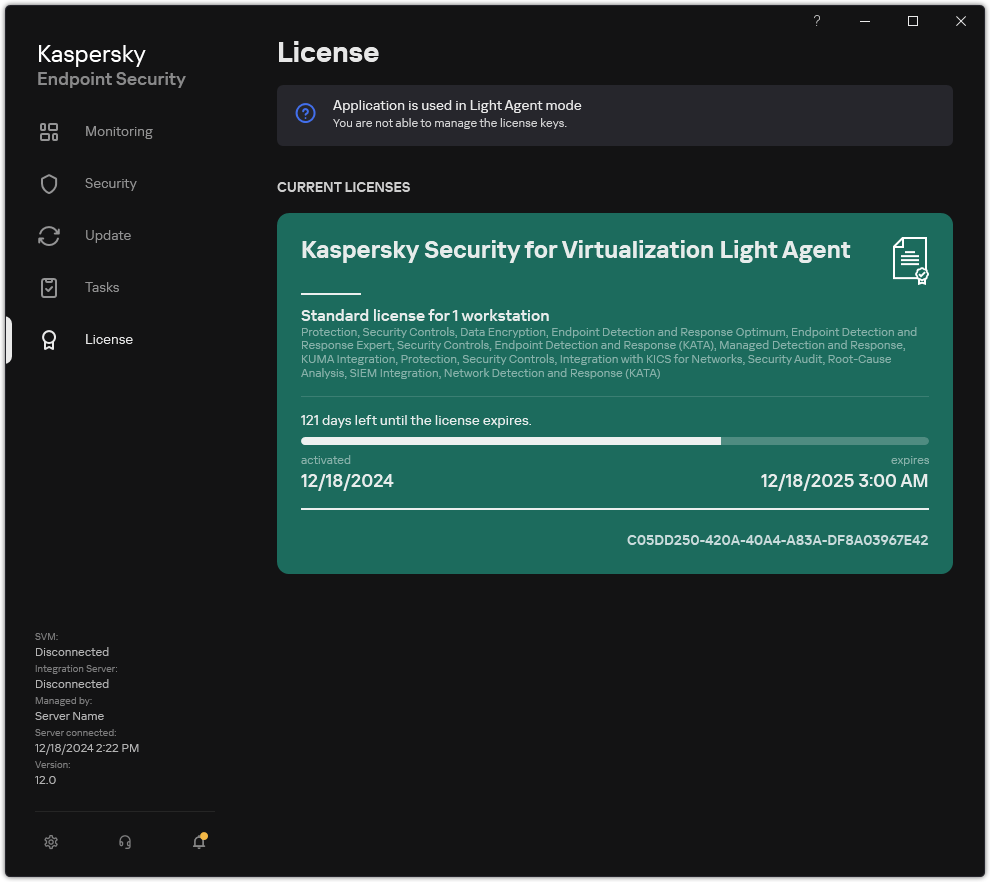
Licensing window
Page top
KSVLA Light Agent to KES Light Agent Migration Guide
Kaspersky Security for Virtualization 5.2 Light Agent includes the Light Agent for Windows 5.2 component (hereinafter also referred to as "KSVLA Light Agent"). In Kaspersky Security for Virtualization Light Agent 6.2, Kaspersky Endpoint Security in Light Agent mode is used as the Light Agent component. To update the solution to version 6.2, you must migrate from KSVLA Light Agent 5.2 to Kaspersky Endpoint Security in Light Agent mode (hereinafter also referred to as "KES Light Agent"). For details about updating the version of the Kaspersky Security for Virtualization Light Agent solution, see the Kaspersky Security for Virtualization Light Agent Help.
Software requirements
Before you begin the migration from KSVLA Light Agent to KES Light Agent, make sure your virtual machine satisfies the hardware and software requirements of Kaspersky Endpoint Security for Windows. The lists of supported operating system versions are different for KES and KSWS. For example, KES does not support servers running Windows Server 2003.
Minimum software requirements for migrating from KSVLA Light Agent to KES Light Agent:
- Kaspersky Endpoint Security for Windows 12.8.
- Kaspersky Security for Virtualization Light Agent 6.2 (including the Protection Server and Integration Server components).
- Kaspersky Security Center 14.2
If you have an earlier version of Kaspersky Security Center installed, update it to 14.2 or later. In this version of Kaspersky Security Center, the Policies and tasks batch conversion wizard lets you migrate policies into a profile rather than into a policy. In this version of Kaspersky Security Center, the Policies and tasks batch conversion wizard also lets you migrate a broader range of policy settings.
Migration steps
Migration from KSVLA Light Agent to KES Light Agent is performed semi-automatically. This is necessary because of differing architectures of the applications.
Migrate from KSVLA Light Agent to KES Light Agent in the following order:
- Migrate KSVLA Light Agent tasks and policies
To migrate policy settings, you must run the Policies and tasks batch conversion wizard (the migration wizard). After migrating policy settings, you must manually configure settings that the migration wizard cannot migrate automatically (for example, database update settings). After the migration, it is also recommended to check if the migration wizard correctly migrated all settings.
If Password protection is enabled to restrict access to KSVLA Light Agent, before installing KES Light Agent, you need to disable Password protection in the policy of KSVLA Light Agent. You cannot enter the uninstallation password in KES Light Agent installation package settings. After completing the installation of KES Light Agent on top of KSVLA Light Agent, you must enable Password protection in the KES policy.
- Install Kaspersky Endpoint Security in Light Agent mode
You can install KES Light Agent in the following ways:
- Installing KES Light Agent after removing KSVLA Light Agent (recommended)
- Installing KES Light Agent on top of KSVLA Light Agent
- Confirm that the application is in working order after migration
After migrating from KSVLA Light Agent to KES Light Agent, make sure that the application is operating correctly. Activate the converted policy. Check the status of the virtual machine in the Kaspersky Security Center console (should be OK). Make sure no errors are reported for the application, also check the time of the last connection to SVM and the virtual machine protection status. You do not need to activate Light Agent because the license key is added to the SVM.
Installing KES Light Agent instead of KSVLA Light Agent
You can install KES Light Agent in the following ways:
- Installing KES Light Agent after removing KSVLA Light Agent (recommended)
- Installing KES Light Agent on top of KSVLA Light Agent
Removing KSVLA Light Agent
You can remove the application remotely using the Install application remotely task, locally on the virtual machine, or in the virtual machine template. After removing KSVLA Light Agent, you may need to restart the virtual machine.
After removing KSVLA Light Agent, install KES Light Agent using any suitable method.
Installing Kaspersky Endpoint Security
If Password protection is enabled to restrict access to KSVLA Light Agent, before installing KES Light Agent, you need to disable Password protection in the policy of KSVLA Light Agent. You cannot enter the uninstallation password in KES Light Agent installation package settings. After completing the installation of KES Light Agent on top of KSVLA Light Agent, you must enable Password protection in the KES policy.
When installing Kaspersky Endpoint Security, you must select the Light Agent to protect virtual environments mode. Before installing KES Light Agent on a virtual machine, the installer detects KSVLA Light Agent as incompatible software and removes it. The migration of KSVLA Light Agent configuration is not supported. That is, when you install KES Light Agent, the set of components to install is determined by your selection in installation package properties or in the installation wizard. After removing KSVLA Light Agent, you must restart the virtual machine.
Settings and tasks of KSVLA Light Agent are not migrated when you install KES Light Agent. To migrate settings and tasks, run the Policies and tasks batch conversion wizard.
You can check the list of installed components in the Security section of the application interface, using the status command, or in the Kaspersky Security Center console in computer properties. You can change the set of components after installation by using the Change application components.
Correspondence of KSVLA Light Agent and KES Light Agent components
The sets of components of KSVLA Light Agent and KES Light Agent are practically the same. KES Light Agent has more settings than KSVLA Light Agent. After migration, the new settings have default values.
Correspondence of KSVLA Light Agent and KES Light Agent components
Light Agent 5.2 |
KES Light Agent |
|---|---|
Scan kernel |
Application kernel |
File Anti-Virus |
File Threat Protection |
Mail Anti-Virus |
Mail Threat Protection |
Web Anti-Virus |
Web Threat Protection |
Firewall |
Firewall |
Network Attack Blocker |
Network Threat Protection |
Application Privilege Control |
Host Intrusion Prevention |
Applications Launch Control |
Application Control |
Web Control |
Web Control |
Device Control |
Device Control |
System Watcher |
In Kaspersky Endpoint Security, this component is divided into the following components:
|
System Integrity Monitoring |
System Integrity Monitoring |
Integration with Kaspersky Endpoint Agent |
(not supported) Starting with Kaspersky Endpoint Security for Windows 11.9.0, the Kaspersky Endpoint Agent distribution package is no longer part of the distribution kit. |
AMSI Protection |
AMSI Protection |
Migrating KSVLA Light Agent tasks and policies
You can migrate the settings of KSVLA Light Agent policies and tasks using the Policies and Tasks Batch Conversion Wizard (hereinafter also referred to as the "Migration Wizard").
The Migration Wizard for KSVLA Light Agent is available only in the Administration Console (MMC). Policy and task settings cannot be migrated in the Web Console and Cloud Console.
The following special considerations are involved in migrating policies and tasks:
- A new policy has the name <Policy> (converted).
- The new policy has the Inactive policy status.
- The prohibition of modifying settings (the "padlock") is not migrated. The Migration Wizard sets default values.
- Policy profiles are not migrated. You must manually add the policy profiles.
- Improved trusted zone management. In KSVLA Light Agent, you could add predefined exclusions only when creating a policy. Subsequently, in policy properties, you could configure previously added predefined exclusions or add exclusions manually. You cannot add predefined exclusions in policy properties. In KES Light Agent, predefined exclusions are available both during policy creation and in the properties of the created policy. You can also select predefined exclusions in the installation package.
- The configuration of application user interface in Kaspersky Endpoint Security was moved from the installer to the policy. If you need, for example, to hide the user interface of the application, manage policy settings.
- The sets of functionality for configuring right-based access control (RBAC) are different in Kaspersky Endpoint Security and KSVLA Light Agent. You must configure user access rights to functional areas from scratch.
After migrating a policy, you must open the properties of the policy, check its settings, and save the policy. If you do not complete these steps, KES Light Agent may ignore the converted policy.
Pay special attention to the migration of Light Agent's SVM connection settings, exclusion lists, trusted applications, trusted web addresses, Application Control rules.
Page top
Migrating [KSVLA Light Agent+KEA] configuration to [KES Light Agent+built-in agent] configuration
To support using Kaspersky Endpoint Security for Windows as part of EDR (KATA), EDR Optimum, Kaspersky Sandbox, a built-in agent has been added to the application. You no longer need a separate Kaspersky Endpoint Agent application to work with these solutions.
When migrating from KSVLA Light Agent to KES Light Agent, the EDR (KATA), EDR Optimum, Kaspersky Sandbox solutions continue to work with Kaspersky Endpoint Security built-in agents. In addition, Kaspersky Endpoint Agent will be removed from the computer.
Before migrating from KSVLA Light Agent to KES Light Agent, you must update all components of Kaspersky Security for Virtualization to version 6.2, including the Protection server and the Integration server. For details about updating the version of the Kaspersky Security for Virtualization Light Agent solution, see the Kaspersky Security for Virtualization Light Agent Help.
Migrating the [KSVLA Light Agent+KEA] configuration to [KES Light Agent+built-in agent] configuration involves the following steps:
- Migrating the policy and tasks
Migrating the [KSVLA Light Agent+KEA] policies and tasks to [KES Light Agent+built-in agent] involves the following steps:
- Migrating policies and tasks from KSVLA Light Agent to KES Light Agent using the Policies and Tasks Batch Conversion Wizard (only available on the Administration Console (MMC)).
As a result, a new policy is created with the name <Policy> (converted). New KES tasks are also created with <Task name> (converted) names.
- Migrating policies and tasks from KEA to KES using the wizard for migration from Kaspersky Endpoint Agent (only available in Web Console and Cloud Console).
As a result, a new policy is created with the name <Name of the Kaspersky Endpoint Security policy> & <Name of the Kaspersky Endpoint Agent policy>. New tasks and KES tasks are also created.
- Migrating policies and tasks from KSVLA Light Agent to KES Light Agent using the Policies and Tasks Batch Conversion Wizard (only available on the Administration Console (MMC)).
- Migrating from KSVLA Light Agent to KES Light Agent
Migrating from KSVLA Light Agent to KES Light Agent involves installing KES Light Agent instead of KSVLA Light Agent.
Administrators typically enable Password protection to restrict access to KSVLA Light Agent and KEA. You can only enter the KEA uninstallation password in the properties of the Install application remotely task. For migration, you must disable Password protection for KSVLA Light Agent.
To carry out the migration, you must select the components needed to support Detection and Response solutions as part of Kaspersky Endpoint Security. After installing the application, Kaspersky Endpoint Security switches to using the built-in agent and removes Kaspersky Endpoint Agent.
- Licensing functionality
If the application is being used in Light Agent mode, you do not need to activate the application. To activate the application, you must add a license key to the SVM. You must also add the license key for activating additional functionality (for example, EDR Optimum) to the SVM. That is, as part of the migration, functionality licensing happens automatically.
- Checking the health of Kaspersky Endpoint Detection and Response Optimum and Kaspersky Sandbox
If after the upgrade, the computer has the Critical status in the Kaspersky Security Center console:
- Make sure that the computer has Network Agent version 13.2 or higher installed.
- Check the operating status of the built-in agent by viewing the Report on status of application components. If a component has the Not installed status, install the component using the Change application components task.
- Make sure you accept the Kaspersky Security Network Statement in the new policy of Kaspersky Endpoint Security for Windows.
- Make sure EDR Optimum functionality is activated using the Report on status of application components. If a component has the Not covered by license status, make sure that the automatic license key distribution functionality of EDR Optimum is turned on.
- Check the status of the connection of the virtual machine to the SVM. You can get information about the status of the Light Agent's connection to the SVM in the Kaspersky Endpoint Security or using the application command.
Managing the application from the command line
You can manage Kaspersky Endpoint Security from the command line. You can view the list of commands for managing the application by running the HELP command. To read about the syntax of a specific command, enter HELP <command>.
Special characters in the command must be escaped. To escape the characters &, |, (, ), <, >, ^, use the ^ character (for example, to use the & character, enter ^&). To escape the % character, enter %%.
The alternatives to the value 1 are the values yes, on, enable, enabled, and true. The alternatives to the value 0 are the values no, off, disable, disabled, and false.
Setup. Installing the application
Kaspersky Endpoint Security can be installed from the command line in one of the following modes:
- In interactive mode by using the Application Setup Wizard.
- In silent mode. After installation is started in silent mode, your involvement in the installation process is not required (silent installation). To install the application in silent mode, use the
/sand/qnkeys.Prior to installing the application in silent mode, please open and read the End User License Agreement and the text of the Privacy Policy. The End User License Agreement and the text of the Privacy Policy are included in the Kaspersky Endpoint Security distribution kit. You may proceed to install the application only if you have fully read, understand, and accept the provisions and terms of the End User License Agreement, you understand and agree that your data will be processed and transmitted (including to third-party countries) in accordance with the Privacy Policy, and you have fully read and understand the Privacy Policy. If you do not accept the provisions and terms of the End User License Agreement and the Privacy Policy, please do not install or use Kaspersky Endpoint Security.
You can view the list of commands for installing the application by running the /h command. To get help on the installation command syntax, type setup_kes.exe /h. As a result, the installer displays a window with a description of command options (see the figure below).
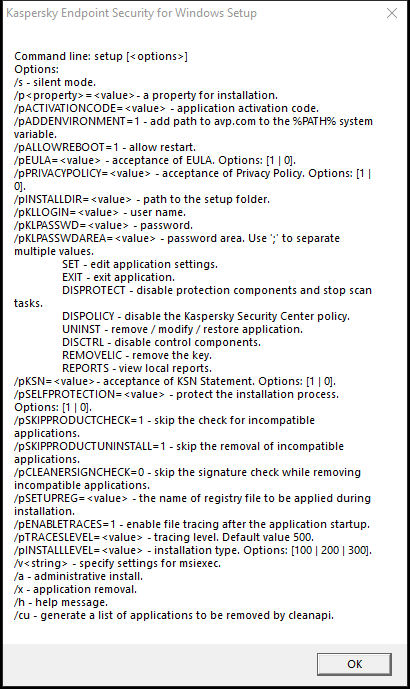
Description of installation command options
To install the application or upgrade a previous version of the application:
- Run the command line interpreter (cmd.exe) as an administrator.
- Go to the folder where the Kaspersky Endpoint Security distribution package is located.
- Run the following command:
setup_kes.exe /pEULA=1 /pPRIVACYPOLICY=1 [/pKSN=1|0] [/pCONFIGPATH=<path to the configuration file>] [/pALLOWREBOOT=1] [/pSKIPPRODUCTCHECK=1] [/pSKIPPRODUCTUNINSTALL=1] [/pKLLOGIN=<user name> /pKLPASSWD=<password> /pKLPASSWDAREA=<password scope>] [/pENABLETRACES=1|0 /pTRACESLEVEL=<tracing level>] [/pSKIPKB5007186CHECK=1] [/s]or
msiexec /i <distribution kit name> EULA=1 PRIVACYPOLICY=1 [KSN=1|0] [CONFIGPATH=<path to the configuration file>] [ALLOWREBOOT=1] [SKIPPRODUCTCHECK=1] [KLLOGIN=<user name> KLPASSWD=<password> KLPASSWDAREA=<password scope>] [ENABLETRACES=1|0 TRACESLEVEL=<tracing level>] [SKIPKB5007186CHECK=1] [/qn]
As a result, the application is installed on the computer. You can confirm that application is installed and check application settings by issuing the status command.
Application installation settings
|
Acceptance of the terms of the End User License Agreement. The text of the License Agreement is included in the distribution kit of Kaspersky Endpoint Security. Accepting the terms of the End User License Agreement is necessary for installing the application or upgrading the application version. |
|
|
Acceptance of the Privacy Policy. The text of the Privacy Policy is included in the Kaspersky Endpoint Security distribution kit. To install the application or upgrade the application version, you must accept the Privacy Policy. |
|
|
Agreement or refusal to participate in Kaspersky Security Network (KSN). If no value is set for this parameter, Kaspersky Endpoint Security will prompt to confirm your consent or refusal to participate in KSN when Kaspersky Endpoint Security is first started. Available values:
The Kaspersky Endpoint Security distribution package is optimized for use with Kaspersky Security Network. If you opted not to participate in Kaspersky Security Network, you should update Kaspersky Endpoint Security immediately after the installation is complete. |
|
|
Installing the application with predefined settings. To do this, you need to upload a file that defines the settings of Kaspersky Endpoint Security. You can create a configuration file in the local interface of the application. |
|
|
Automatic restart of the computer, if required after installation or upgrade of the application. If no value is set for this parameter, automatic computer restart is blocked. Restart is not required when installing Kaspersky Endpoint Security. Restart is required only if you have to remove incompatible applications prior to installation. Restart may also be required when updating the application version. |
|
|
Disable the check for installed software. The list of software that may cause compatibility issues is available in the incompatible.txt file that is included in the distribution kit. If no value is set for this parameter and software from the list is detected, the installation of Kaspersky Endpoint Security will be terminated. |
|
|
Disable automatic removal of detected software from the incompatible.txt list. If no value is set for this parameter, Kaspersky Endpoint Security attempts to remove the software that may cause compatibility issues. Automatic removal of the software cannot be enabled when installing Kaspersky Endpoint Security using the msiexec installer. To automatically remove the software that may cause compatibility issues, use setup_kes.exe file. |
|
|
Verifying digital signatures of the detected software files from the incompatible.txt list. To remove the software, Kaspersky Endpoint Security runs the software installer file. If the installer file does not have a digital signature, Kaspersky Endpoint Security considers the file untrusted and halts the software removal to avoid running potentially malicious code. If the application cannot verify the digital signature of the detected software file, Kaspersky Endpoint Security installation is stopped with an error. The default value is different depending on the software installation method:
|
|
|
Installing the application in the Endpoint Detection and Response Agent (EDR Agent) configuration for integration with the Kaspersky Endpoint Detection and Response (KATA) solution. This configuration is needed if a third-party Endpoint Protection Platform (EPP) is deployed in your organization alongside the Kaspersky Endpoint Detection and Response (KATA) solution. This makes Kaspersky Endpoint Security in the Endpoint Detection and Response Agent configuration compatible with third-party EPP applications. You can also use EDR Agent for integration with the Kaspersky Managed Detection and Response solution. To do so, you must change the selection of application components. |
|
|
Set the user name for accessing the features and settings of Kaspersky Endpoint Security (the Password protection component). The user name is set together with the |
|
|
Specify a password for accessing Kaspersky Endpoint Security features and settings (the password is specified together with the If you specified a password but did not specify a user name with the |
|
|
Specify the scope of the password for accessing Kaspersky Endpoint Security. When a user attempts to perform an action that is included in this scope, Kaspersky Endpoint Security prompts for the user's account credentials (
|
|
|
Enabling or disabling application tracing. After Kaspersky Endpoint Security starts, it saves trace files in the folder
|
|
|
Level of detail of traces. Available values:
|
|
|
Enabling or disabling Azure WVD compatibility mode. Available values:
This feature allows correctly displaying the state of the Azure virtual machine in the Kaspersky Anti Targeted Attack Platform console. To monitor the performance of the computer, Kaspersky Endpoint Security sends telemetry to KATA servers. Telemetry includes an ID of the computer (Sensor ID). Azure WVD compatibility mode allows assigning a permanent unique Sensor ID to these virtual machines. If the compatibility mode is turned off, the Sensor ID can change after the computer is restarted because of how Azure virtual machines work. This can cause duplicates of virtual machines to appear on the console. |
|
|
Enables or disables protection of the Kaspersky Endpoint Security processes using AM-PPL technology (Antimalware Protected Process Light). For more details about AM-PPL technology, please visit the Microsoft website. AM-PPL technology is available for Windows 10 version 1703 (RS2) or later, and Windows Server 2019 operating systems. Available values:
|
|
|
Application upgrade mode:
You can upgrade the application without a restart starting with version 11.10.0. To upgrade an earlier version of the application, you must restart the computer. You can also install patches without a restart starting with version 11.11.0. Restart is not required when installing Kaspersky Endpoint Security. So, the upgrade mode of the application will be specified in the application settings. You can change this parameter in the application settings or in the policy. When upgrading already installed application, the priority of the command line parameter is lower than that of the parameter specified in the application settings or in the setup.ini file. For example, if |
|
|
Managing the application through the REST API. To manage the application through the REST API, you must specify the user name ( Available values:
To manage the application through the REST API, management using administrative systems must be allowed. To do so, set the |
|
|
User name of the Windows domain account used for managing the application through the REST API. Management of the application through the REST API is available only to this user. Enter the user name in the format Adding a user name is a prerequisite for managing the application through the REST API. |
|
|
Port used for managing the application through the REST API. Port 6782 is used by default. Make sure that the port is free. |
|
|
Certificate for identifying requests (for example, |
|
|
Application management using administration systems. Administration systems include, for example, Kaspersky Security Center. In addition to Kaspersky administration systems, you can use third-party solutions. Kaspersky Endpoint Security provides an API for this purpose. Available values:
|
|
|
Creating a unique computer identifier (Sensor ID) during the installation or update of the application. Sensor ID is used in the Kaspersky Anti Targeted Attack Platform solution to identify computers that send telemetry to the server. When creating Sensor ID, the application uses an algorithm that takes into account the computer's configuration, such as the motherboard serial number. In some cases, for example, when using the application in a virtual environment, Sensor ID may be duplicated. As a result, the Kaspersky Anti Targeted Attack Platform cannot identify the computer from which the telemetry is sent. To create a unique Sensor ID, you need to set the parameter By default, the parameter is not set. The application inherits the Sensor ID in the following cases:
As part of application repair, the application attempts to inherit the Sensor ID. If the Sensor ID cannot be restored, the application creates a new Sensor ID. |
|
|
Disabling the check for installed operating system update KB5007186. Before installing the application, the installer checks installed operating system updates. The KB5007186 update is on the list of operating system updates that can cause problems for the application. For detailed information, refer to the Technical Support Knowledge Base. Therefore, the installer aborts the installation if this update is discovered. To proceed with the installation, set |
|
|
|
|
Example:
|
||
After Kaspersky Endpoint Security is installed, the trial license is activated unless you provided an activation code in the setup.ini file. A trial license usually has a short term. When the trial license expires, all Kaspersky Endpoint Security features become disabled. To continue using the application, you need to activate the application with a commercial license by using the Application Activation Wizard or a special command.
When installing the application or upgrading the application version in silent mode, use of the following files is supported:
- setup.ini – general settings of application installation.
To apply settings from the setup.ini file, place this file into the folder containing the Kaspersky Endpoint Security distribution package.
- install.cfg – settings of Kaspersky Endpoint Security operation
To apply settings from install.cfg configuration file, you need to specify the path to the file in the following application installation command:
CONFIGPATH=<path to the configuration file>. - setup.reg – registry keys.
Registry keys from the setup.reg file are written to the registry only if the
setup.regvalue is set for theSetupRegparameter in the setup.ini file. The setup.reg file is generated by Kaspersky experts. It is not recommended to modify the contents of this file. To apply settings from the setup.reg file, place this file into the folder containing the Kaspersky Endpoint Security distribution package. You can also put the setup.reg file in a different folder. If you do so, you need to specify the path to the file in the following application installation command:SETUPREG=<path to the setup.reg file>.
Setup /x. Removing the application
Kaspersky Endpoint Security can be uninstalled from the command line in one of the following ways:
- In interactive mode by using the Application Setup Wizard.
- In silent mode. After uninstallation is started in silent mode, your involvement in the removal process is not required (silent uninstallation). To uninstall the application in silent mode, use the
/sand/qnswitches.
To uninstall the application in silent mode:
- Run the command line interpreter (cmd.exe) as an administrator.
- Go to the folder where the Kaspersky Endpoint Security distribution package is located.
- Run the following command:
- If the removal process is not password protected:
setup_kes.exe /s /xor
msiexec.exe /x <GUID> /qn<GUID>is the unique ID of the application. You can find out the GUID of the application by using the following command:wmic product where "Name like '%Kaspersky Endpoint Security%'" get Name, IdentifyingNumber - If the removal process is password protected:
setup_kes.exe /pKLLOGIN=<user name> /pKLPASSWD=<password> /s /xor
msiexec.exe /x <GUID> KLLOGIN=<user name> KLPASSWD=<password> /qn
You can also use the
SAVEQBparameter to save files scanned by the application and placed in Backup. Backup copies of files are stored in the folderC:\ProgramData\Kaspersky Lab\KES.21.20\QB. By default, saving files in Backup is disabled (SAVEQB=0).Example:
msiexec.exe /x {9A017278-F7F4-4DF9-A482-0B97B70DD7ED} KLLOGIN=KLAdmin KLPASSWD=samplePassword /qn - If the removal process is not password protected:
AVP commands
To manage Kaspersky Endpoint Security from the command line:
- Run the command line interpreter (cmd.exe) as an administrator.
- Go to the folder where the Kaspersky Endpoint Security executable file is located.
You can add path to the executable file to the %PATH% system variable during application installation.
- Use the following template to execute the command:avp.com <command> [options]
As a result, Kaspersky Endpoint Security will execute the command (see figure below).
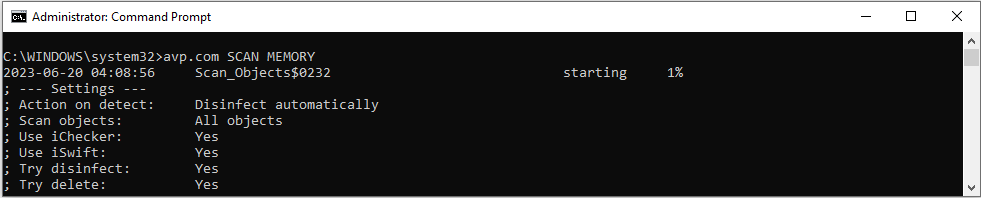
Managing the application from the command line
SCAN. Malware Scan
Running the Malware Scan task.
To run the command, go to the folder where the Kaspersky Endpoint Security executable file is located. You can also add the executable file path to the %PATH% system variable and run the command without navigating to the application folder.
Command syntax
Scan scope |
|
|
A space-separated list of files and folders. Long paths must be enclosed in quotation marks. Short paths (MS-DOS format) do not need to be enclosed in quotation marks. For example:
|
|
Run the Malware Scan task. Kaspersky Endpoint Security scans the following objects:
|
|
Scan the Kernel memory |
|
Scan the Objects that are loaded at startup of the operating system |
|
Scan Outlook mailbox |
|
Scan removable drives. |
|
Scan hard drives. |
|
Scan network drives. |
|
Scan the files in the Kaspersky Endpoint Security Backup. |
|
Scan the files and folders from a list. Each file in the list must be on a new row. Long paths must be enclosed in quotation marks. Short paths (MS-DOS format) do not need to be enclosed in quotation marks. For example:
|
Action on threat detection |
|
|
Inform. If this option is selected, Kaspersky Endpoint Security adds the information about infected files to the list of active threats on detection of these files. |
|
Disinfect, block if disinfection fails. If this option is selected, Kaspersky Endpoint Security automatically attempts to disinfect all infected files that are detected. If disinfection is not possible, Kaspersky Endpoint Security adds the information about the infected files that are detected to the list of active threats. |
|
Disinfect, delete if disinfection fails. If this option is selected, the application automatically attempts to disinfect all infected files that are detected. If disinfection fails, the application deletes the files. This action is selected by default. |
|
Disinfect the infected files that are detected. If disinfection fails, delete the infected files. Also delete compound files (for example, archives) if the infected file cannot be disinfected or deleted. |
|
Delete infected files. Also delete compound files (for example, archives) if the infected file cannot be deleted. |
File types |
|
|
Files scanned by extension. If this setting is enabled, the application scans infectable files only. The file format is then determined based on the file's extension. |
|
Files scanned by format. If this setting is enabled, the application scans infectable files only. Before scanning a file for malicious code, the internal header of the file is analyzed to determine the format of the file (for example, .txt, .doc, or .exe). The scan also looks for files with particular file extensions. |
|
All files. If this setting is enabled, the application checks all files without exception (all formats and extensions). This is the default setting. |
Scan exclusions |
|
|
RAR, ARJ, ZIP, CAB, LHA, JAR, and ICE archives are excluded from the scan scope. |
|
Mail databases, incoming and outgoing e-mails are excluded from the scan scope. |
|
Files that match the file mask are excluded from the scan scope. For example:
|
|
Files that take longer to scan than the specified time limit (in seconds) are excluded from the scan scope. |
|
Files that are larger than the specified size limit (in megabytes) are excluded from the scan scope. |
Saving events to a report file mode (for Scan, Updater and Rollback profiles only) |
|
|
Save only critical events to the report file. |
|
Save all events to a report file. |
Scan technologies |
|
|
This technology allows increasing scan speed by excluding certain files from scanning. Files are excluded from scans by using a special algorithm that takes into account the release date of Kaspersky Endpoint Security databases, the date when the file was last scanned, and any modifications to the scan settings. There are limitations to iChecker Technology: it does not work with large files and applies only to files with a structure that the application recognizes (for example, EXE, DLL, LNK, TTF, INF, SYS, COM, CHM, ZIP, and RAR). |
|
This technology allows increasing scan speed by excluding certain files from scanning. Files are excluded from scans by using a special algorithm that takes into account the release date of Kaspersky Endpoint Security databases, the date when the file was last scanned, and any modifications to the scan settings. The iSwift technology is an advancement of the iChecker technology for the NTFS file system. |
Advanced settings |
|
|
File with the Malware Scan task settings. The file must be created manually and saved in TXT format. The file can have the following contents: |
Example:
|
UPDATE. Updating databases and application software modules
Running the Update of databases and application modules task.
To run the command, go to the folder where the Kaspersky Endpoint Security executable file is located. You can also add the executable file path to the %PATH% system variable and run the command without navigating to the application folder.
Command syntax
Update task settings |
|
|
Start of the Update of databases and application modules task that was created automatically after the application was installed. You can change the settings of the Update of databases and application modules task in the local application interface or in the console of Kaspersky Security Center. If this setting is not configured, Kaspersky Endpoint Security starts the Update of databases and application modules task with the default settings or with the settings specified in the command. You can configure the Update of databases and application modules task settings as follows:
|
Update source |
|
|
Address of a HTTP or FTP server, or of a shared folder with the update package. You can specify only one update source. If the update source is not specified, Kaspersky Endpoint Security uses the default source: Kaspersky update servers. |
Saving events to a report file mode (for Scan, Updater and Rollback profiles only) |
|
|
Save only critical events to the report file. |
|
Save all events to a report file. |
Advanced settings |
|
|
File with the Update of databases and application modules task settings. The file must be created manually and saved in TXT format. The file can have the following contents: |
Example:
|
ROLLBACK. Last update rollback
Rolling back the last anti-virus database update. This lets you roll back the databases and application modules to their previous version when necessary, for example, when the new database version contains an invalid signature that causes Kaspersky Endpoint Security to block a safe application.
To run the command, go to the folder where the Kaspersky Endpoint Security executable file is located. You can also add the executable file path to the %PATH% system variable and run the command without navigating to the application folder.
Command syntax
Saving events to a report file mode (for Scan, Updater and Rollback profiles only) |
|
|
Save only critical events to the report file. |
|
Save all events to a report file. |
Example:
|
TRACES. Tracing
Trace files are stored on the computer as long as the application is in use, and are deleted permanently when the application is removed. Trace files, except trace files of Authentication Agent, are stored in the folder %ProgramData%\Kaspersky Lab\KES.21.20\Traces. By default, tracing is disabled.
To run the command, go to the folder where the Kaspersky Endpoint Security executable file is located. You can also add the executable file path to the %PATH% system variable and run the command without navigating to the application folder.
Command syntax
Tracing level |
|
|
Level of detail of traces. Available values:
|
Advanced settings |
|
|
Run a command with the |
|
Use the OutputDebugString function and save the trace file. The OutputDebugString function sends a character string to the application debugger to display on screen. For details, visit the MSDN website. |
|
Save one trace file (no size limit). |
|
Save traces to a limited number of file sets of limited size and overwrite the older files when the maximum size is reached. |
|
Save traces to dump files. |
Examples:
|
START. Starting a profile
Starting a profile (for example, starting a database update or enabling a protection component).
To run the command, go to the folder where the Kaspersky Endpoint Security executable file is located. You can also add the executable file path to the %PATH% system variable and run the command without navigating to the application folder.
Command syntax
Profile |
|
|
Profile name. A Profile is a Kaspersky Endpoint Security component, task or feature. You can view the list of available profiles by running the |
Saving events to a report file mode (for Scan, Updater and Rollback profiles only) |
|
|
Save only critical events to the report file. |
|
Save all events to a report file. |
Example:
|
STOP. Stopping a profile
Stopping profile execution (for example, stopping a Removable Drives Scan or disabling a protection component).
To execute this command, Password protection must be enabled. The user must have the Disable protection components and Disable control components permissions.
To run the command, go to the folder where the Kaspersky Endpoint Security executable file is located. You can also add the executable file path to the %PATH% system variable and run the command without navigating to the application folder.
Command syntax
Profile |
|
|
Profile name. A Profile is a Kaspersky Endpoint Security component, task or feature. You can view the list of available profiles by running the |
Authentication |
|
|
User account credentials with the required Password protection permissions. |
STATUS. Profile status
Displaying status information for application profiles (for example, running or completed). You can view the list of available profiles by running the HELP STATUS command.
Kaspersky Endpoint Security also displays information about the status of service profiles. Information about the status of service profiles may be required when you are contacting Kaspersky Technical Support.
To run the command, go to the folder where the Kaspersky Endpoint Security executable file is located. You can also add the executable file path to the %PATH% system variable and run the command without navigating to the application folder.
Command syntax
If you enter the command without a profile, Kaspersky Endpoint Security displays the status for all profiles of the application.
Page top
STATISTICS. Profile operation statistics
Displaying statistics for an application profile (for example, scan duration or the number of threats detected). You can view the list of available profiles by running the HELP STATISTICS command.
To run the command, go to the folder where the Kaspersky Endpoint Security executable file is located. You can also add the executable file path to the %PATH% system variable and run the command without navigating to the application folder.
Command syntax
RESTORE. Restoring files from Backup
Restoring a file from Backup to its original folder. If a file with the same name already exists at the specified path, the application will ask for confirmation to replace the file. The file that is being restored is copied keeping its original name.
To execute this command, Password protection must be enabled. The user must have the Restore from Backup permission.
Backup stores backup copies of files that were deleted or modified during disinfection. A backup copy is a file copy created before the file was disinfected or deleted. Backup copies of files are stored in a special format and do not pose a threat.
Backup copies of files are stored in the folder C:\ProgramData\Kaspersky Lab\KES.21.20\QB.
Users in the Administrators group are granted full permission to access this folder. Limited access rights to this folder are granted to the user whose account was used to install Kaspersky Endpoint Security.
Kaspersky Endpoint Security does not provide the capability to configure user access permissions to backup copies of files.
To run the command, go to the folder where the Kaspersky Endpoint Security executable file is located. You can also add the executable file path to the %PATH% system variable and run the command without navigating to the application folder.
Command syntax
Advanced settings |
|
|
Overwrite an existing file. |
|
The name of the file to be restored. |
Authentication |
|
|
User account credentials with the required Password protection permissions. |
Example:
|
EXPORT. Exporting application settings
Exporting Kaspersky Endpoint Security settings to a file. If the command contains only the name of the file to which you want to export settings, the application places the file as follows:
- If the path to avp.com is added to the %PATH% system variable, the application places the file in the
C:\Windows\SysWOW64folder. - If you run the command from the application installation folder, the export will fail because the application's self-protection blocks the creation of a new file in the application folder. To export application settings to a file, enter the file path.
To run the command, go to the folder where the Kaspersky Endpoint Security executable file is located. You can also add the executable file path to the %PATH% system variable and run the command without navigating to the application folder.
Command syntax
Profile |
|
|
Profile name. A Profile is a Kaspersky Endpoint Security component, task or feature. You can view the list of available profiles by running the |
File to export |
|
|
The name of the file to which the application settings will be exported. You can also enter the file path. You can export Kaspersky Endpoint Security settings to a DAT or CFG configuration file, to a TXT text file, or to an XML document. |
Examples:
|
IMPORT. Importing application settings
Importing Kaspersky Endpoint Security settings from a file that was created with the EXPORT command.
To execute this command, Password protection must be enabled. The user must have the Configure application settings permission.
To run the command, go to the folder where the Kaspersky Endpoint Security executable file is located. You can also add the executable file path to the %PATH% system variable and run the command without navigating to the application folder.
Command syntax
File to import |
|
|
The name of the file from which the application settings will be imported. You can import Kaspersky Endpoint Security settings from a DAT or CFG configuration file, a TXT text file, or an XML document. |
Authentication |
|
|
User account credentials with the required Password protection permissions. |
Example:
|
ADDKEY. Applying a key file
Activating Kaspersky Endpoint Security using a key file. If the application is already activated, the key will be added as a reserve one.
To run the command, go to the folder where the Kaspersky Endpoint Security executable file is located. You can also add the executable file path to the %PATH% system variable and run the command without navigating to the application folder.
Command syntax
Key file |
|
|
Key file name. |
Authentication |
|
|
User account credentials. These credentials need to be entered only if Password protection is enabled. |
Example:
|
LICENSE. Licensing
Managing the license keys of Kaspersky Endpoint Security, EDR Optimum, or EDR Expert (Kaspersky Endpoint Detection and Response Add-on).
To execute this command and remove a license key, Password protection must be enabled. The user must have the Remove key permission.
To run the command, go to the folder where the Kaspersky Endpoint Security executable file is located. You can also add the executable file path to the %PATH% system variable and run the command without navigating to the application folder.
Command syntax
Operation |
|
|
Activating Kaspersky Endpoint Security using a key file. If the application is already activated, the key will be added as a reserve one. |
|
Activate Kaspersky Endpoint Security using an activation code. If the application is already activated, the key will be added as a reserve one. |
|
Update the status of the Kaspersky Endpoint Security license. As a result, the application receives up-to-date license status information from Kaspersky activation servers. |
|
Update the status of licenses using license ID. Using this command, you can update the status of EDR Add-on, MDR Add-on, KUMA Add-on or other licenses. You can obtain the license ID from the license certificate. As a result, the application receives up-to-date license status information from Kaspersky activation servers. |
|
Get license information. Kaspersky Endpoint Security displays information about all added license keys including reserve keys, EDR Add-on, MDR Add-on, KUMA Add-on keys, and other keys. Kaspersky Endpoint Security shows the following license information:
|
|
Get license information by ID. You can use this command to get license information. You can obtain the license ID from the license certificate. |
|
Remove the license key of the application. Reserve key will also be removed. |
|
Delete key using license ID. Using this command, you can delete a key from EDR Add-on, MDR Add-on, KUMA Add-on or other licenses. You can obtain the license ID from the license certificate. |
Authentication |
|
|
User account credentials with the required Password protection permissions. |
Example:
|
RENEW. Purchasing a license
Opening the Kaspersky website to purchase or renew your license.
To run the command, go to the folder where the Kaspersky Endpoint Security executable file is located. You can also add the executable file path to the %PATH% system variable and run the command without navigating to the application folder.
Page top
PBATESTRESET. Resetting the disk check results before encrypting the disk
Resetting the compatibility check results for Full Disk Encryption (FDE), including both Kaspersky Disk Encryption and BitLocker Drive Encryption technologies.
Before running Full Disk Encryption, the application performs a number of checks to verify that the computer can be encrypted. If the computer does not support Full Disk Encryption, Kaspersky Endpoint Security logs information about the incompatibility. The next time you try to encrypt, the application does not perform this check and warns you that encryption is not possible. If the hardware configuration of the computer has changed, the compatibility check results previously logged by the application must be reset to re-check the system hard drive for compatibility with Kaspersky Disk Encryption or BitLocker drive encryption technologies.
To run the command, go to the folder where the Kaspersky Endpoint Security executable file is located. You can also add the executable file path to the %PATH% system variable and run the command without navigating to the application folder.
EXIT. Exiting the application
Exiting Kaspersky Endpoint Security. The application will be unloaded from the computer's RAM.
To execute this command, Password protection must be enabled. The user must have the Exit the application permission.
To run the command, go to the folder where the Kaspersky Endpoint Security executable file is located. You can also add the executable file path to the %PATH% system variable and run the command without navigating to the application folder.
Command syntax
EXITPOLICY. Disabling policy
Disabling Kaspersky Security Center policy on the computer. All Kaspersky Endpoint Security settings are available for configuration, including settings that have a closed lock in the policy (![]() ).
).
To execute this command, Password protection must be enabled. The user must have the Disable Kaspersky Security Center policy permission.
To run the command, go to the folder where the Kaspersky Endpoint Security executable file is located. You can also add the executable file path to the %PATH% system variable and run the command without navigating to the application folder.
Command syntax
STARTPOLICY. Enabling policy
Enabling Kaspersky Security Center policy on the computer. The application settings will be configured according to the policy.
To run the command, go to the folder where the Kaspersky Endpoint Security executable file is located. You can also add the executable file path to the %PATH% system variable and run the command without navigating to the application folder.
Page top
DISABLE. Disabling protection
Disabling File Threat Protection on a computer with an expired Kaspersky Endpoint Security license. It is not possible to run this command on a computer that has the application that is not activated or has a valid license.
To run the command, go to the folder where the Kaspersky Endpoint Security executable file is located. You can also add the executable file path to the %PATH% system variable and run the command without navigating to the application folder.
Page top
SPYWARE. Spyware detection
Managing spyware detection. By default, spyware detection is enabled.
To run the command, go to the folder where the Kaspersky Endpoint Security executable file is located. You can also add the executable file path to the %PATH% system variable and run the command without navigating to the application folder.
Command syntax
KSN. Switching between KSN / KPSN
Selecting a Kaspersky solution for determining the reputation of files or websites. Kaspersky Endpoint Security supports the following infrastructure solutions for working with Kaspersky reputation databases:
- Kaspersky Security Network (KSN) is the solution that is used by most Kaspersky applications. KSN participants receive information from Kaspersky and send Kaspersky information about objects detected on the user's computer to be analyzed additionally by Kaspersky analysts and to be included in the reputation and statistical databases.
- Kaspersky Private Security Network (KPSN) is a solution that enables users of computers hosting Kaspersky Endpoint Security or other Kaspersky applications to obtain access to Kaspersky reputation databases, and to other statistical data without sending data to Kaspersky from their own computers. KPSN is designed for corporate customers who are unable to participate in Kaspersky Security Network for any of the following reasons:
- Local workstations are not connected to the Internet.
- Transmission of any data outside the country or outside the corporate LAN is prohibited by law or restricted by corporate security policies.
To run the command, go to the folder where the Kaspersky Endpoint Security executable file is located. You can also add the executable file path to the %PATH% system variable and run the command without navigating to the application folder.
Command syntax
Kaspersky Security Network configuration file |
|
|
|
Name of the configuration file containing Kaspersky Private Security Network settings. This file has the PKCS7 or PEM extension. |
|
Example:
|
||
SERVERBINDINGDISABLE. Disabling the server connection protection
Running the Administration Server connection protection task, which removes the password of the computer's connection to the Administration Server. In this way, the task disables the protection of the Administration Server connection.
To execute this command, Password protection must be enabled.
To run the command, go to the folder where the Kaspersky Endpoint Security executable file is located. You can also add the executable file path to the %PATH% system variable and run the command without navigating to the application folder.
Command syntax
Password |
|
|
The password of the KLAdmin user account or the password from the Administration Server connection protection task. If the parameter is not specified, Kaspersky Endpoint Security prompts you to enter a password on the next line. |
KESCLI commands
KESCLI commands let you receive information about the state of computer protection using the OPSWAT component, and let you perform standard tasks such as Malware Scan and Update of databases and application modules tasks.
You can view the list of KESCLI commands by using the --help command or by using the abbreviated command -h.
To manage Kaspersky Endpoint Security from the command line:
- Run the command line interpreter (cmd.exe) as an administrator.
- Go to the folder where the Kaspersky Endpoint Security executable file is located.
You can add path to the executable file to the %PATH% system variable during application installation.
- Use the following template to execute the command:kescli <command> [options]
As a result, Kaspersky Endpoint Security will execute the command (see figure below).

Managing the application from the command line
Scan. Malware Scan
Running the Malware Scan (Full Scan) task.
To run the task, the administrator must Allow use of local tasks in the policy.
To run the command, go to the folder where the Kaspersky Endpoint Security executable file is located.
Command syntax
You can check the completion status of a Malware Scan task by using the GetScanState command and view the date and time when the scan was last completed by using the GetLastScanTime command.
Scan scope |
|
|
|
Action on threat detection |
|
|
Inform. If this option is selected, Kaspersky Endpoint Security adds the information about infected files to the list of active threats on detection of these files. |
|
Disinfect, delete if disinfection fails. If this option is selected, the application automatically attempts to disinfect all infected files that are detected. If disinfection fails, the application deletes the files. This action is selected by default. |
Example:
|
GetScanState. Scan completion status
Displaying information about the status of the Malware Scan (Full Scan) task completion:
1– the scan is in progress.0– the scan is not running.
To run the command, go to the folder where the Kaspersky Endpoint Security executable file is located.
Command syntax
GetLastScanTime. Determining the scan completion time
Displaying information about the date and time of the last Malware Scan (Full Scan) task completion.
To run the command, go to the folder where the Kaspersky Endpoint Security executable file is located.
Command syntax
GetThreats. Obtaining data on detected threats
Displaying a list of detected threats (Report on threats). This report contains information about threats and virus activity during the last 30 days prior to creating the report.
To run the command, go to the folder where the Kaspersky Endpoint Security executable file is located.
Command syntax
When this command is executed, Kaspersky Endpoint Security will send a response in the following format:
<name of detected object> <type of object> <detection date and time> <path to file> <action on threat detection> <threat danger level>
Managing the application from the command line
Object type |
|
|
Not known ( |
|
Viruses ( |
|
Trojan programs ( |
|
Malicious programs ( |
|
Advertisement programs ( |
|
Auto-dialer programs ( |
|
Applications that could be used by a cybercriminal to harm the user's computer or data ( |
|
Packed objects whose packing method may be used to protect malicious code ( |
|
Unknown objects ( |
|
Known applications ( |
|
Concealed files ( |
|
Applications requiring attention ( |
|
Anomalous behavior ( |
|
Not determined ( |
|
Ad banners ( |
|
Network attack ( |
|
Registry access ( |
|
Suspicious activity ( |
|
Vulnerabilities ( |
|
Phishing ( |
|
Unwanted email attachment ( |
|
Malware detected by Kaspersky Security Network ( |
|
Unknown link ( |
|
Other malware ( |
Action on threat detection |
|
|
Not known ( |
|
Threat was remediated ( |
|
Object was infected and has not been disinfected ( |
|
Object is in an archive and has not been disinfected ( |
|
Object has been disinfected ( |
|
Object has not been disinfected ( |
|
Object was deleted ( |
|
A backup copy of the object was created ( |
|
Object was moved to Backup ( |
|
Object was deleted on computer restart ( |
|
Object was disinfected on computer restart ( |
|
Object was moved to Backup by a user ( |
|
Object was added to exclusions ( |
|
Object was moved to Backup on computer restart ( |
|
False positive ( |
|
Process was terminated ( |
|
Object was not detected ( |
|
Cannot resolve the threat ( |
|
Object was restored ( |
|
Object was created as a result of threat activity ( |
|
Object was restored on computer restart ( |
|
Object was not processed ( |
Threat danger level |
|
|
Unknown |
|
High |
|
Medium scan |
|
Low |
|
Info (less than Low) |
UpdateDefinitions. Updating databases and application software modules
Running the Update of databases and application modules task. Kaspersky Endpoint Security uses the default source: Kaspersky update servers.
To run the task, the administrator must Allow use of local tasks in the policy.
To run the command, go to the folder where the Kaspersky Endpoint Security executable file is located.
Command syntax
You can view the release date and time of the current antivirus databases by using the GetDefinitionsetState command.
GetDefinitionState. Determining the release date and time of the databases
Displaying information about the release date and time of the anti-virus databases being used.
To run the command, go to the folder where the Kaspersky Endpoint Security executable file is located.
Command syntax
EnableRTP. Enabling protection
Enabling Kaspersky Endpoint Security protection components on the computer: File Threat Protection, Web Threat Protection, Mail Threat Protection, Network Threat Protection, Host Intrusion Prevention.
To enable protection components, the administrator must make sure that the relevant policy settings can be modified (![]() attributes are open).
attributes are open).
To run the command, go to the folder where the Kaspersky Endpoint Security executable file is located.
Command syntax
As a result, protection components are enabled even if you have prohibited the modification of application settings with Password protection.
You can check the operating status of File Threat Protection by using the GetRealTimeProtectionState command.
GetRealTimeProtectionState. File Threat Protection status
Displaying information about the status of the File Threat Protection component:
1– the component is enabled.0– the component is disabled.
To run the command, go to the folder where the Kaspersky Endpoint Security executable file is located.
Command syntax
GetEncryptionState. Disk encryption status
Displaying information about the disk encryption status:
1means the disk is protected by Kaspersky or BitLocker disk encryption technology.0means the disk is not encrypted.
To run the command, go to the folder where the Kaspersky Endpoint Security executable file is located.
Command syntax
Version. Identifying the application version
Displaying the version of Kaspersky Endpoint Security for Windows.
To run the command, go to the folder where the Kaspersky Endpoint Security executable file is located.
Command syntax
You can also use the abbreviated command -v.
Detection and Response management commands
You can use the command line to manage built-in functionality of Detection and Response solutions (for example, Kaspersky Sandbox or Kaspersky Endpoint Detection and Response Optimum). You can manage Detection and Response solutions if management using the Kaspersky Security Center console is not possible. You can view the list of commands for managing the application by running the HELP command. To read about the syntax of a specific command, enter HELP <command>.
To manage built-in features of Detection and Response solutions using the command line:
- Run the command line interpreter (cmd.exe) as an administrator.
- Go to the folder where the Kaspersky Endpoint Security executable file is located.
- Use the following template to execute the command:
avp.com <command> [options]
As a result, Kaspersky Endpoint Security will execute the command.
SANDBOX. Managing Sandbox
Commands for managing the Sandbox component:
- Enabling or disabling the Sandbox component.
The Sandbox components provides interaction with the Kaspersky Sandbox solution and the KATA Sandbox component, which is part of the Kaspersky Anti Targeted Attack Platform.
- Configuring the Kaspersky Sandbox component:
- Connecting the computer to Sandbox servers.
The servers use deployed virtual images of Microsoft Windows operating systems to run objects that need to be scanned. You can enter an IP address (IPv4 or IPv6) or a fully qualified domain name. For details about deploying virtual images and configuring Sandbox servers, refer to the Kaspersky Sandbox Help and Kaspersky Anti Targeted Attack Platform Help.
- Configuring the connection timeout for the Sandbox server.
Timeout for receiving a response to an object scanning request from the Sandbox server. After the timeout elapses, Sandbox redirects the request to the next server. The timeout value depends on the speed and stability of the connection. The default value is 5 seconds.
- Configuring a trusted connection between the computer and Sandbox servers.
To configure a trusted connection with the Sandbox server, you must prepare a TLS certificate. You must then add the certificate to the computer using a policy. You also need to add the certificate to the Sandbox server.
- Connecting the computer to Sandbox servers.
- Displaying the current settings of the component.
To run the command, go to the folder where the Kaspersky Endpoint Security executable file is located. You can also add the executable file path to the %PATH% system variable and run the command without navigating to the application folder.
Command syntax
Operation |
|
|
Disable the Sandbox component. |
|
Enable the Sandbox component. |
|
Configure the Sandbox component. You can modify the following settings:
|
|
Display the current settings of the component. You get the following response:
|
Authentication |
|
|
User account credentials with the required Password protection permissions. |
Example:
|
PREVENTION. Managing Execution prevention
Disabling the Execution prevention component or displaying the current settings of the component, including the list of execution prevention rules.
To run the command, go to the folder where the Kaspersky Endpoint Security executable file is located. You can also add the executable file path to the %PATH% system variable and run the command without navigating to the application folder.
Command syntax
Upon executing the prevention /show command, you will get the following response:
prevention.enable=true|false
prevention.mode=audit|prevent
prevention.rules
id: <rule ID>
target: script|process|document
md5: <MD5 hash of the file>
sha256: <SHA256 hash of the file>
pattern: <path to the object>
case-sensitive: true|false
Command return values:
-1means the command is not supported by the version of the application that is installed on the computer.0means the command was executed successfully.1means a mandatory argument was not passed to the command.2means a general error occurred.4means there was a syntax error.9– wrong operation (for example, an attempt to disable the component when it is already disabled).
ISOLATION. Managing Network isolation
Disabling Network isolation of the computer or displaying current settings of the component. Component settings also include a list of network connections added to exclusions.
To run the command, go to the folder where the Kaspersky Endpoint Security executable file is located. You can also add the executable file path to the %PATH% system variable and run the command without navigating to the application folder.
Command syntax:
As a result of running the stat command, you receive the following response: Network isolation on|off.
RESTORE. Restoring files from Quarantine
Restoring a file from Quarantine to its original folder. Quarantine is a special local storage on the computer. The user can quarantine files that the user considers dangerous for the computer. Quarantined files are stored in an encrypted state and do not threaten the security of the device. Kaspersky Endpoint Security uses Quarantine only when working with Detection and Response solutions: EDR Optimum, EDR Expert, KATA (EDR), Kaspersky Sandbox. In other cases Kaspersky Endpoint Security places the relevant file in Backup. For details on managing Quarantine as part of solutions, please refer to the Kaspersky Sandbox Help, Kaspersky Endpoint Detection and Response Optimum Help, and Kaspersky Endpoint Detection and Response Expert Help, Kaspersky Anti Targeted Attack Platform Help.
To execute this command, Password protection must be enabled. The user must have the Restore from Backup permission.
The object is quarantined under the system account (SYSTEM).
Restoring files from Quarantine involves the following special considerations:
- If the destination folder has been deleted or the user does not have access rights to that folder, the application places the file in the
%DataRoot%\QB\Restoredfolder. Then you must manually move the file to the destination folder. - The application treats the name of the file being restored as case sensitive. If you do not observe the case when entering the file name, the application does not restore the file.
- If the destination folder already has a file with the same name, the application cancels the restoration of the file.
- If you are using the KATA (EDR) solution, the application saves a copy of the file in Quarantine after restoring the file. You can clear the Quarantine manually. For EDR Optimum and EDR Expert solutions, the application deletes the file after restoration.
To run the command, go to the folder where the Kaspersky Endpoint Security executable file is located. You can also add the executable file path to the %PATH% system variable and run the command without navigating to the application folder.
Command syntax
Advanced settings |
|
|
Overwrite an existing file. |
|
The name of the file to be restored. |
Authentication |
|
|
User account credentials with the required Password protection permissions. |
Example:
|
Command return values:
-1means the command is not supported by the version of the application that is installed on the computer.0means the command was executed successfully.1means a mandatory argument was not passed to the command.2means a general error occurred.4means there was a syntax error.
IOCSCAN. Scan for indicators of compromise (IOC)
Running the IOC Scan task. An Indicator of Compromise (IOC) is a set of data about an object or activity that indicates unauthorized access to the computer (compromise of data). For example, many unsuccessful attempts to sign in to the system can constitute an Indicator of Compromise. The IOC Scan task allows finding Indicators of Compromise on the computer and taking threat response measures.
To run the command, go to the folder where the Kaspersky Endpoint Security executable file is located. You can also add the executable file path to the %PATH% system variable and run the command without navigating to the application folder.
Command syntax
IOC files |
|
|
Full path to the IOC file that you want to use for scanning. You can specify multiple IOC files separated by spaces. The full path to the IOC file must be entered without the For example, |
|
Path to the folder with IOC files that you want to use for scanning. IOC files are files containing the sets of indicators that the application tries to match to count a detection. IOC files must conform to the OpenIOC standard. For example, |
Data type for IOC scanning |
|
|
Analyze process data when performing the IOC scan (ProcessItem term). If the value of the argument is If the argument is not specified, Kaspersky Endpoint Security analyzes process data only if the ProcessItem IOC document is described in the IOC file that is provided for the scan. |
|
Analyze files data when performing the IOC scan (ProcessItem and FileItem terms). You can select a file in one of the following ways:
|
|
Analyze Windows registry data when performing an IOC scan (RegistryItem term). If the value of the argument is If the argument is not specified, Kaspersky Endpoint Security analyzes the Windows registry only if the RegistryItem IOC document is described in the IOC file that is provided for the scan. For the RegistryItem data type, Kaspersky Endpoint Security scans a set of registry keys. |
|
Analyze the data about records in the local DNS cache when performing the IOC scan (DnsEntryItem term). If the value of the argument is If the argument is not specified, Kaspersky Endpoint Security analyzes the local DNS cache only if the DnsEntryItem IOC document is described in the IOC file that is provided for the scan. |
|
Analyze the data about records in the ARP table when performing the IOC scan (ArpEntryItem term). If the value of the argument is If the argument is not specified, Kaspersky Endpoint Security analyzes the ARP table only if the ArpEntryItem IOC document is described in the IOC file that is provided for the scan. |
|
Analyze data about ports open for listening when performing the IOC scan (PortItem term). If the value of the argument is If the argument is not specified, Kaspersky Endpoint Security analyzes the table of active connections only if the PortItem IOC document is described in the IOC file that is provided for the scan. |
|
Analyze data about services installed on the device when performing the IOC scan (ServiceItem term). If the value of the argument is If the argument is not specified, Kaspersky Endpoint Security analyzes service data only if the ServiceItem IOC document is described in the IOC file that is provided for the scan. |
|
Analyze environment data when performing the IOC scan (SystemInfoItem term). If the value of the argument is If the argument is not specified, Kaspersky Endpoint Security analyzes environment data only if the SystemInfoItem IOC document is described in the IOC file that is provided for the scan. |
|
Analyze data about users when performing the IOC scan (UserItem term). If the value of the argument is If the argument is not specified, Kaspersky Endpoint Security analyzes data about users created in the system only if the UserItem IOC document is described in the IOC file that is provided for the scan. |
|
Analyze data about volumes when performing the IOC scan (VolumeItem term). If the value of the argument is If the argument is not specified, Kaspersky Endpoint Security analyzes volume data only if the VolumeItem IOC document is described in the IOC file that is provided for the scan. |
|
Analyze the data about records in the Windows event log when performing the IOC scan (EventLogItem term). If the value of the argument is If the argument is not specified, Kaspersky Endpoint Security analyzes the Windows event log if the EventLogItem IOC document is described in the IOC file that is provided for the scan. |
|
Take into consideration the date when the event was published in the Windows event log when determining the IOC scan scope for the corresponding IOC document. When performing an IOC scan, Kaspersky Endpoint Security scans Windows event log entries published during the period from the specified time and date to the moment when the task is run. Kaspersky Endpoint Security allows specifying the event publication date as the value of the argument. The scan is performed only for events published in the Windows event log after the specified date and before the scan is run. If the argument is not specified, Kaspersky Endpoint Security scans events with any publication date. The The setting is used only if the EventLogItem IOC document is described in the IOC file provided for the scan. |
|
List of channel (log) names for which you want to perform an IOC scan. If the argument is specified, Kaspersky Endpoint Security scans records published in the specified logs. The IOC document must have the EventLogItem term described. The name of the log is specified as a string in accordance with the name of the log (channel) specified in the properties of the log (the Full Name parameter) or in the event properties (the If the argument is not specified, Kaspersky Endpoint Security scans records for channels |
|
Analyze file data when performing the IOC scan (FileItem term). If the value of the argument is If the argument is not specified, Kaspersky Endpoint Security analyzes file data only if the FileItem IOC document is described in the IOC file that is provided for the scan. |
|
Set IOC scan scope when analyzing data for the FileItem IOC document. You can set the following values for the scan scope:
If the argument is not specified, the scan is performed for critical areas. |
|
Set exclusion scope when analyzing data for the FileItem IOC document. You can specify multiple paths separated by spaces. |
|
User-defined IOC scan scope when analyzing data for the FileItem IOC document ( |
Command return values:
-1means the command is not supported by the version of the application that is installed on the computer.0means the command was executed successfully.1means a mandatory argument was not passed to the command.2means a general error occurred.4means there was a syntax error.
If the command was executed successfully (return value 0) and indicators of compromise were detected along the way, Kaspersky Endpoint Security outputs the following task result information to the command line:
|
ID of the IOC file from the header of the IOC file structure (the |
|
Description of the IOC file from the header of the IOC file structure (the |
|
List of IDs of all matched indicators. |
|
Data for each IOC document for which there was a match. |
MDRLICENSE. MDR activation
Adding the BLOB configuration file to activate Managed Detection and Response. The BLOB file contains the client ID and information about the license for Kaspersky Managed Detection and Response. The BLOB file is located inside the ZIP archive of the MDR configuration file. You can obtain the ZIP archive in the Kaspersky Managed Detection and Response Console. For detailed information about a BLOB file, please refer to the Kaspersky Managed Detection and Response Help.
Administrator privileges are required for performing operations with a BLOB file. Managed Detection and Response settings in the policy must also be available for editing (![]() ).
).
To run the command, go to the folder where the Kaspersky Endpoint Security executable file is located. You can also add the executable file path to the %PATH% system variable and run the command without navigating to the application folder.
Command syntax
Operation |
|
|
Apply the BLOB configuration file for integration with Kaspersky Managed Detection and Response (P7 file format). You can apply only one BLOB file. If a BLOB file was already added to the computer, the file will be replaced. |
|
Delete the BLOB configuration file. |
Authentication |
|
|
User account credentials with the required Password protection permissions. |
Example:
|
EDRKATA. Integration with EDR (KATA)
Commands for managing the Endpoint Detection and Response component (KATA):
- Enabling or disabling the EDR (KATA) component.
The EDR component (KATA) provides interoperability with the Kaspersky Anti Targeted Attack Platform solution.
- Configuring the connection to Kaspersky Anti Targeted Attack Platform servers.
- Displaying the current settings of the component.
To run the command, go to the folder where the Kaspersky Endpoint Security executable file is located. You can also add the executable file path to the %PATH% system variable and run the command without navigating to the application folder.
Command syntax
Operation |
|
|
Disable the EDR (KATA) component. |
|
Enable the EDR (KATA) component. |
|
Configure the EDR (KATA) component. You can modify the following settings:
|
|
Display the current settings of the component. |
Light Agent management commands
You can manage the application in Light Agent mode for protecting virtual environments on the command line. You can manage the application in Light Agent mode if management using the Kaspersky Security Center console is not possible. You can view the list of commands for managing the application by running the HELP command. To read about the syntax of a specific command, enter HELP <command>.
To manage the application in Light Agent mode from the command line:
- Run the command line interpreter (cmd.exe) as an administrator.
- Go to the folder where the Kaspersky Endpoint Security executable file is located.
- Use the following template to execute the command:
avp.com <command> [options]
As a result, Kaspersky Endpoint Security will execute the command.
The application installed in Light Agent mode supports almost all AVP commands of the application installed in Standard mode. In Light Agent mode, anti-virus database update tasks and license key management tasks are limited.
KSVLAINFO. Determining the Light Agent mode
Determining the Light Agent mode.
To run the command, go to the folder where the Kaspersky Endpoint Security executable file is located. You can also add the executable file path to the %PATH% system variable and run the command without navigating to the application folder.
Command syntax
The command outputs the following information to the console:
- Light Agent mode for protecting virtual environments: enabled or disabled.
If Light Agent mode is enabled, the application is used as part of the Kaspersky Security for Virtualization Light Agent solution.
- VDI protection mode: enabled or disabled.
The VDI protection mode helps optimize the performance of Kaspersky Endpoint Security on nonpersistent virtual machines. If VDI protection mode is enabled, updates that require restarting the protected virtual machine are not installed on nonpersistent virtual machines. When receiving updates that require a restart, Light Agent installed on a nonpersistent virtual machine sends a message to Kaspersky Security Center informing it that the protected virtual machine template needs to be updated.
- Type of the protected virtual machine: persistent or nonpersistent.
- Role of the protected virtual machine in the virtual infrastructure: server or workstation.
- Identifier (UUID) of the protected virtual machine.
VIISINFO. Status of the Light Agent connection to the Integration Server
Viewing information about the Light Agent connection to the Integration Server.
To run the command, go to the folder where the Kaspersky Endpoint Security executable file is located. You can also add the executable file path to the %PATH% system variable and run the command without navigating to the application folder.
Command syntax
The command outputs the following information to the console:
- Address and port of the Integration Server to which the Light Agent is connected.
- Integration Server connection status.
- Date and time of the last connection of the Light Agent to the Integration Server.
SVMINFO. Status of the Light Agent connection to the Protection Server
Viewing information about the Light Agent connection to the Protection Server.
To run the command, go to the folder where the Kaspersky Endpoint Security executable file is located. You can also add the executable file path to the %PATH% system variable and run the command without navigating to the application folder.
Command syntax
The command outputs the following information to the console:
- Address of the SVM to which the Light Agent is connected, and the location of the SVM in the virtual infrastructure relative to the Light Agent: local or non-local.
- SVM discovery method that the Light Agent uses: using an Integration Server or using a custom list of SVM addresses.
- List of SVM addresses if the SVM address list is selected as the SVM discovery method.
- Tag for connecting Light Agent to SVM.
- SVM selection algorithm: standard or extended. If the extended SVM selection algorithm is being used, the SVM path type in the virtual infrastructure is also displayed.
- Protection status of the connection between the Light Agent and the Protection Server.
Error codes
Errors may occur when working with the application through the command line. When errors occur, Kaspersky Endpoint Security shows an error message, for example, Error: Cannot start task 'EntAppControl'. Kaspersky Endpoint Security can also show additional information in the form of a code, for example, error=8947906D (see the table below).
Error codes
Error code |
Description |
|---|---|
|
This key is already in use |
|
License expired. Database updates are unavailable |
|
Key not found |
|
Digital signature is either missing or corrupted |
|
Data is corrupted |
|
Key file is corrupted |
|
License expired |
|
Key file is not specified |
|
Invalid key file |
|
Failed to save data |
|
Failed to read data |
|
I/O error |
|
Databases not found |
|
Licensing library not loaded |
|
Databases corrupted or updated manually |
|
Databases are corrupted |
|
Cannot use invalid key file to add a reserve key |
|
System error |
|
Denylist of keys corrupted |
|
File signature does not match the digital signature of Kaspersky |
|
Cannot use a key for trial license as a key for commercial license |
|
The license for beta testing is required to use the beta version of the application |
|
The key file is not compatible with this application. It is impossible to activate Kaspersky Endpoint Security for Windows with a key file for another application. Please check the installed application |
|
License key is blocked by Kaspersky |
|
The application has already been used under a trial license. Cannot add a key for trial license again |
|
Key file is corrupted |
|
Digital signature is missing, corrupted, or does not match the Kaspersky digital signature |
|
Cannot add a key if the corresponding non-commercial license has expired |
|
The date the key file was created or used is invalid. Please check the system date |
|
Cannot add a key for trial license: another key for trial license is already active |
|
Denylist of keys corrupted or missing |
|
Update description missing or corrupted |
|
Key is not suitable for this application |
|
Cannot use invalid key file to add a reserve key |
|
Error sending activation server request. Possible reasons: Internet connection error or temporary problems on the activation server. Try to activate the application later (in 1 to 2 hours) with the activation code. If this error reoccurs, contact your Internet provider |
|
Request contains incorrect activation code |
|
Cannot obtain response status |
|
Error occurred when saving temporary file |
|
Incorrect activation code is entered or invalid system date is set on the computer. Please check the system date on your computer |
|
Key not compatible with this application, or license expired |
|
Failed to receive a key file. Incorrect activation code was entered |
|
Activation server has returned error 400 |
|
Activation server has returned error 401 |
|
Activation server has returned error 403 |
|
Necessary resource is unavailable on the activation server. Activation server has returned error 404. Please check your Internet connection settings |
|
Activation server has returned error 405 |
|
Activation server has returned error 406 |
|
Proxy authentication is required. Please check your network settings |
|
Request timed out |
|
Activation server has returned error 409 |
|
Necessary resource is unavailable on the activation server. Activation server has returned error 410. Please check your Internet connection settings |
|
Activation server has returned error 411 |
|
Activation server has returned error 412 |
|
Activation server has returned error 413 |
|
Activation server has returned error 414 |
|
Activation server has returned error 415 |
|
Internal server error |
|
Functionality not supported |
|
Invalid gateway response. Please check your network settings |
|
Resource temporarily unavailable |
|
Gateway response timed out. Please check your network settings |
|
The protocol is not supported by the server |
|
Unknown HTTP error |
|
Invalid resource ID |
|
Invalid URL |
|
Invalid destination folder |
|
Memory allocation error |
|
Error occurred when converting parameters to ANSI string (URL, folder, agent) |
|
Error occurred when creating worker thread |
|
Worker thread already running |
|
Worker thread not running |
|
Key file is not found on activation server |
|
Key is blocked |
|
Activation server internal error |
|
Not enough data in activation request |
|
The license that corresponds to the added key has already expired |
|
Invalid system date is set on the computer. Please check the system date value |
|
Trial license has expired |
|
Application activation period expired |
|
The limit of application activations has been exceeded for the specified code |
|
Activation procedure completed with system error |
|
Cannot use a key for trial license as a key for commercial license |
|
Activation code is required |
|
Cannot connect to activation server |
|
Activation server is unavailable. Please check your Internet connection settings and retry activation |
|
License expired |
|
Cannot replace the active key with an expired key |
|
Cannot add a reserve key if the corresponding license expires before the current license |
|
Updated subscription key missing |
|
Invalid activation code |
|
Key already active |
|
License types that correspond to active and reserve keys do not match |
|
Component not supported by license |
|
Unable to add subscription key as a reserve key |
|
Transport layer generic error |
|
Failed to connect to activation server |
|
Invalid web address format |
|
Failed to convert proxy server address |
|
Failed to convert server address. Please check Internet connection settings |
|
Server connection attempt failed |
|
Access denied remotely |
|
Operation timed out |
|
Error sending HTTP request |
|
SSL connection error |
|
Operation interrupted by callback |
|
Too many redirects |
|
Recipient check failed |
|
Empty response from server |
|
Error sending data |
|
Error receiving data |
|
SSL certificate related problem |
|
SSL encryption related problem |
|
SSL certification center related problem |
|
Invalid contents of network packet |
|
Account access denied |
|
Invalid SSL certificate file |
|
Cannot shut down SSL connection |
|
Recurring error |
|
Invalid file with revoked certificates |
|
SSL certificate request error |
|
Unknown server error |
|
Internal server error |
|
No key available for the activation code entered |
|
Active key is blocked |
|
Required parameters of activation request are missing |
|
Invalid client number or password |
|
Invalid activation code |
|
The activation code is not compatible with this application. It is impossible to activate Kaspersky Endpoint Security for Windows with an activation code for another application. Please check the installed application |
|
Activation code is required |
|
Activation period expired |
|
Number of activations with this code has been exceeded |
|
Invalid format of request ID |
|
Activation code already in use |
|
Failed to renew activation code |
|
Activation code is invalid for this region |
|
This activation code cannot be used for this localization of the application |
|
The activation code is intended for the new version of this application. Get a different activation code to activate the installed version of the application |
|
Activation server returned error 643 |
|
Activation server returned error 644 |
|
Activation server returned error 645 |
|
Activation server returned error 646 |
|
Activation server version 1.0 is required |
|
Incorrect activation code format |
|
Computer time is out of sync with activation server time |
|
Wrong application version |
|
Subscription has expired |
|
Number of activations exceeded |
|
Invalid ticket signature |
|
Additional data is needed |
|
Data verification failed |
|
Subscription inactive |
|
Activation server is under maintenance |
|
Unexpected error |
|
Invalid parameter transferred. For example, an empty list of activation server addresses |
|
Invalid activation code (invalid hash) |
|
Invalid user ID |
|
Invalid user password |
|
Invalid response from activation server |
|
Activation request has been interrupted |
|
Activation server has returned an empty forwarding list |
Appendix. Application profiles
A Profile is a Kaspersky Endpoint Security component, task or feature. Profiles are used to manage the application from the command line. You can use profiles to execute START, STOP, STATUS, STATISTICS, and EXPORT commands. Using profiles, you can configure application settings (for example, STOP DeviceControl) or run tasks (for example, START Scan_My_Computer).
The following profiles are available:
AdaptiveAnomaliesControl– Adaptive Anomaly Control.AMSI– AMSI Protection.BehaviorDetection– Behavior Detection.DeviceControl– Device control.EntAppControl– Application Control.File_MonitoringorFM– File Threat Protection.FirewallorFW– Firewall.HIPS– Host Intrusion Prevention.IDS– Network Threat Protection.IntegrityCheck– Integrity check.LogInspector– Log Inspection.Mail_MonitoringorEM– Mail Threat Protection.Rollback– update rollback.Scan_ContextScan– Scan from context menu.Scan_IdleScan– Background scan.Scan_Memory– Kernel memory scan.Scan_My_Computer– Full scan.Scan_Objects– Custom scan.Scan_Qscan– Scan objects that are loaded at operation system startup.Scan_Removable_Drive– Removable drives scan.Scan_StartuporSTARTUP– Critical Areas Scan.Updater– Update.Web_MonitoringorWM– Web Threat Protection.WebControl– Web Control.
Kaspersky Endpoint Security also supports service profiles. Service profiles may be required when you are contacting Kaspersky Technical Support.
Page top
Managing the application through the REST API
Kaspersky Endpoint Security lets you configure application settings, run a scan, update the anti-virus databases, and perform other tasks using third-party solutions. Kaspersky Endpoint Security provides an API for this purpose. The Kaspersky Endpoint Security REST API operates over HTTP and consists of a set of request/response methods. In other words, you can manage Kaspersky Endpoint Security through a third-party solution, and not the local application interface or the Kaspersky Security Center Administration Console.
To start using REST API, you need to install Kaspersky Endpoint Security with support for the REST API. The REST client and Kaspersky Endpoint Security must be installed on the same computer.
To ensure safe interaction between Kaspersky Endpoint Security and the REST client:
- Configure REST client's protection from unauthorized access according the recommendations of the REST client developer. Configure REST client folder protection from writing with the help of Discretionary Access Control List – DACL.
- To run REST client, use a separate account with administrator rights. Deny interactive sign-in into the system for this account.
The application is managed through the REST API at http://127.0.0.1 or http://localhost. It is not possible to remotely manage Kaspersky Endpoint Security through the REST API.
![]() OPEN THE REST API DOCUMENTATION
OPEN THE REST API DOCUMENTATION
Installing the application with the REST API
To manage the application through the REST API, you need to install Kaspersky Endpoint Security with support for the REST API. If you manage Kaspersky Endpoint Security through the REST API, you cannot manage the application using Kaspersky Security Center.
Preparing for installing the application with REST API support
Secure interaction of Kaspersky Endpoint Security with the REST client requires configuring request identification. To do so, you must install a certificate and subsequently sign the payload of each request.
To create a certificate, you can use e.g. OpenSSL.
Example:
|
Use the RSA encryption algorithm with a key length of 2048 bits or more.
As a result, you will get a cert.pem certificate and a key.pem private key.
Installing the application with REST API support
To install Kaspersky Endpoint Security with REST API support:
- Run the command line interpreter (cmd.exe) as an administrator.
- Go to the folder that contains the distribution package for Kaspersky Endpoint Security version 11.2.0 or later.
- Install Kaspersky Endpoint Security with the following settings:
RESTAPI=1RESTAPI_User=<user name>User name for managing the application through the REST API. Enter the user name in the format
<DOMAIN>\<UserName>(for example,RESTAPI_User=COMPANY\Administrator). You can manage the application through the REST API only under this account. You can select only one user to work with the REST API.RESTAPI_Port=<port>Port used for managing the application through the REST API. Port 6782 is used by default. Make sure that the port is free. Optional parameter.
RESTAPI_Certificate=<path to certificate>Certificate for identifying requests (for example,
RESTAPI_Certificate=C:\cert.pem).You can install the certificate after installing the application or update the certificate after the certificate expires.
How to install a certificate for REST API request identification
AdminKitConnector=1Application management using administration systems. Management is allowed by default.
You can also use the setup.ini file to define the settings for working with the REST API.
Example:
setup_kes.exe /pEULA=1 /pPRIVACYPOLICY=1 /pKSN=1 /pALLOWREBOOT=1 /pAdminKitConnector=1 /pRESTAPI=1 /pRESTAPI_User=COMPANY\Administrator /pRESTAPI_Certificate=C:\cert.pem /s
As a result, you will be able to manage the application through the REST API. To verify its operation, open the REST API documentation using a GET request.
Example:
|
If you installed the application with REST API support, Kaspersky Endpoint Security automatically creates an allow rule in the Web Control settings for accessing web resources (Service Rule for REST API). This rule is needed to allow the REST client to access Kaspersky Endpoint Security at all times. For example, if you have restricted user access to web resources, this will not affect managing the application through the REST API. We recommend that you do not delete the rule or change the Service Rule for REST API settings. If you deleted the rule, Kaspersky Endpoint Security will restore it after restarting the application.
Page top
Working with the API
It is not possible to restrict access to the application through the REST API using Password Protection. For example, it is not possible to block a user from disabling protection through the REST API. You can configure Password Protection through the REST API and restrict user access to the application through the local interface.
To manage the application through the REST API, you need to run the REST client under the account that you specified when installing the application with REST API support. You can select only one user to work with the REST API.
![]() OPEN THE REST API DOCUMENTATION
OPEN THE REST API DOCUMENTATION
Managing the application through the REST API consists of the following steps:
- Get the current values of the application settings. To do so, send a GET request.
Example:
GET http://localhost:6782/kes/v1/settings/ExploitPrevention - The application will send a response with the structure and values of settings. Kaspersky Endpoint Security supports XML- and JSON formats.
Example:
{"action": 0,"enableSystemProcessesMemoryProtection": true,"enabled": true} - Edit the application settings. Use the settings structure received in response to the GET request.
Example:
{"action": 0,"enableSystemProcessesMemoryProtection": false,"enabled": true} - Save application settings (the payload) in a JSON (payload.json).
- Sign the JSON in the PKCS7 format.
Example:
$ openssl smime -sign -in payload.json -signer cert.pem -inkey key.pem -nodetach -binary -outform pem -out signed_payload.pemAs a result, you get a signed file with the payload of the request (
signed_payload.pem). - Edit the application settings. To do so, send a POST request and attach the signed file with the request payload (
signed_payload.pem).
The application applies the new settings and sends a response containing the application configuration results (the response can be empty). You can verify that the settings are updated using a GET request.
Page top
Sources of information about the application
Kaspersky Endpoint Security page on the Kaspersky website
On the Kaspersky Endpoint Security page, you can view general information about the application and its functions and features.
The Kaspersky Endpoint Security page contains a link to the online store. There you can purchase or renew the application.
Kaspersky Endpoint Security page in the Knowledge Base
Knowledge Base is a section on the Technical Support website.
On the Kaspersky Endpoint Security page in the Knowledge Base, you can read articles that provide useful information, recommendations, and answers to frequently asked questions on how to purchase, install, and use the application.
Knowledge Base articles can answer questions relating to not only Kaspersky Endpoint Security but also to other Kaspersky applications. Articles in the Knowledge Base may also contain news from Technical Support.
Discussion of Kaspersky applications in the Forum
If your question does not require an urgent answer, you can discuss it with Kaspersky experts and other users in our Forum.
In the Forum, you can view existing topics, post your own comments, and create new discussion topics.
Page top
Contacting Technical Support
If you cannot find a solution to your problem in the documentation or in other sources of information about Kaspersky Endpoint Security, we recommend that you contact Technical Support. Technical Support will answer your questions about installing and using Kaspersky Endpoint Security.
Kaspersky provides support for Kaspersky Endpoint Security during the application's life cycle (refer to the application life cycle page). Before contacting Technical Support, please read the support rules.
You can contact Technical Support in one of the following ways:
- By visiting the Technical Support website
- By sending a request to Kaspersky Technical Support through the Kaspersky CompanyAccount portal
After you inform Kaspersky Technical Support specialists about your issue, they may ask you to create a trace file. The trace file allows tracing the process of performing application commands step by step and determining the stage of application operation at which an error occurs.
Technical Support specialists may also require additional information about the operating system, processes that are running on the computer, detailed reports on the operation of application components.
While running diagnostics, Technical Support experts may ask you to change application settings by:
- Activating the functionality for receiving extended diagnostic information.
- Configure individual components of the application by changing special settings that are not accessible through the standard user interface.
- Changing the settings for storage of diagnostic information.
- Configuring the interception and logging of network traffic.
Technical Support experts will provide all the information needed to perform these operations (description of the sequence of steps, settings to be modified, configuration files, scripts, additional command line functionality, debugging modules, special-purpose utilities, etc.) and inform you about the scope of data used for purposes of debugging. The extended diagnostic information is saved on the user's computer. The data is not automatically transmitted to Kaspersky.
The operations listed above should be performed only under the supervision of Technical Support specialists by following their instructions. Changing application settings on your own in ways not described in the Online Help or in Technical Support recommendations can cause slowdowns and crashes of the operating system, reduce the protection level of your computer, and damage the availability and integrity of information being processed.
Contents and storage of trace files
You are personally responsible for the security of the data that is stored on your computer, particularly for monitoring and restricting access to the data until it is submitted to Kaspersky.
Trace files are stored on the computer as long as the application is in use, and are deleted permanently when the application is removed.
Trace files, except trace files of Authentication Agent, are stored in the folder %ProgramData%\Kaspersky Lab\KES.21.20\Traces.
Trace files are named as follows: KES<21.20_dateXX.XX_timeXX.XX_pidXXX.><trace file type>.log.
You can view data saved in trace files.
All trace files contain the following common data:
- Event time
- Number of the thread of execution
The Authentication Agent trace file does not contain this information.
- Application component that caused the event
- Degree of event severity (informational event, warning, critical event, error)
- A description of the event involving command execution by a component of the application and the result of execution of this command.
Kaspersky Endpoint Security saves user passwords to a trace file only in encrypted form.
Contents of SRV.log, GUI.log, and ALL.log trace files
SRV.log, GUI.log and ALL.log trace files may store the following information in addition to general data:
- Personal data, including the last name, first name, and middle name, if such data is included in the path to files on the local computer.
- Data on the hardware installed on the computer (such as BIOS/UEFI firmware data). This data is written to trace files when performing Kaspersky Disk Encryption.
- The user name and password if they were transmitted openly. This data can be recorded in trace files during Internet traffic scanning.
- The user name and password if they are contained in HTTP headers.
- The name of the Microsoft Windows account if the account name is included in a file name.
- Your email address or a web address containing the name of your account and password if they are contained in the name of the object detected.
- Websites that you visit and redirects from these websites. This data is written to trace files when the application scans websites.
- Proxy server address, computer name, port, IP address, and user name used to sign in to the proxy server. This data is written to trace files if the application uses a proxy server.
- Remote IP addresses to which your computer established connections.
- Message subject, ID, sender's name and address of the message sender's web page on a social network. This data is written to trace files if the Web Control component is enabled.
- Network traffic data. This data is written to trace files if traffic monitoring components are enabled (such as Web Control).
- Data received from Kaspersky servers (such as the version of anti-virus databases).
- Statuses of Kaspersky Endpoint Security components and their operating data.
- Data on user activity in the application.
- Operating system events.
Contents of HST.log, BL.log, Dumpwriter.log, WD.log, AVPCon.dll.log trace files
In addition to general data, the HST.log trace file contains information about the execution of a database and application module update task.
In addition to general data, the BL.log trace file contains information about events occurring during operation of the application, as well as data required to troubleshoot application errors. This file is created if the application is started with the avp.exe –bl parameter.
In addition to general data, the Dumpwriter.log trace file contains service information required for troubleshooting errors that occur when the application dump file is written.
In addition to general data, the WD.log trace file contains information about events occurring during operation of the avpsus service, including application module update events.
In addition to general data, the AVPCon.dll.log trace file contains information about events occurring during the operation of the Kaspersky Security Center connectivity module.
Contents of performance trace files
Performance trace files are named as follows: KES<21.20_dateXX.XX_timeXX.XX_pidXXX.>PERF.HAND.etl.
In addition to general data, performance trace files contain information about the load on the processor, information about the loading time of the operating system and applications, and information about running processes.
Contents of the AMSI Protection component trace file
In addition to general data, the AMSI.log trace file contains information about the results of scans performed on requests from third-party applications.
Contents of trace files of the Mail Threat Protection component
The trace file mcou.OUTLOOK.EXE.log may contain parts of email messages, including email addresses, in addition to general data.
Contents of trace files of the Scan from Context Menu component
The shellex.dll.log trace file contains information about completion of the scan task and data required to debug the application, in addition to general information.
Contents of trace files of the application web plug-in
Trace files of the application web plug-in are stored on the computer on which Kaspersky Security Center Web Console is deployed, in the folder Program Files\Kaspersky Lab\Kaspersky Security Center Web Console\logs.
Trace files of the application web plug-in are named as follows: logs-kes_windows-<type of trace file>.DESKTOP-<date of file update>.log. Web Console begins writing data after installation and deletes the trace files after Web Console is removed.
Trace files of the application web plug-in contain the following information in addition to general data:
- KLAdmin user password for unlocking the Kaspersky Endpoint Security interface (Password protection).
- Temporary password for unlocking the Kaspersky Endpoint Security interface (Password protection).
- User name and password for the SMTP mail server (Email notifications).
- User name and password for the Internet proxy server (Proxy server).
- User name and password for the Change application components task.
- Account credentials and paths specified in Kaspersky Endpoint Security tasks and policy properties.
Contents of the Authentication Agent trace file
The Authentication Agent trace file is stored in the System Volume Information folder and is named as follows: KLFDE.{EB2A5993-DFC8-41a1-B050-F0824113A33A}.PBELOG.bin.
In addition to general data, the Authentication Agent trace file contains information about the operation of Authentication Agent and the actions performed by the user with Authentication Agent.
Page top
Application operation tracing
Application tracing is a detailed record of actions performed by the application and of messages about events that occur during operation of the application. During the tracing process, the application creates a set of files with data about the operation of different application components (for example, SRV.log, WD.log, and others).
Application tracing should be performed under the supervision of Kaspersky Technical Support.
To create an application trace file:
- In the main application window, click the button.
- In the window that opens, click the Support Tools button.
- Use the Enable application tracing toggle to enable or disable tracing of application operation.
- In the Tracing drop-down list, select an application tracing mode:
- With size limitation. Save traces to a limited number of file sets of limited size and overwrite the older files when the maximum size is reached. If this mode is selected, you can define the maximum number of file sets for rotation and the maximum size for each set of files.
By default, the application saves five sets of trace files. The size of each set of files is 3072 MB. This way, you need 15 GB of free disk space to save the trace files.
- Without limitations. Save one trace file (no size limit).
- With size limitation. Save traces to a limited number of file sets of limited size and overwrite the older files when the maximum size is reached. If this mode is selected, you can define the maximum number of file sets for rotation and the maximum size for each set of files.
- In the Level drop-down list, select the tracing level.
You are advised to clarify the required tracing level with a Technical Support specialist. In the absence of guidance from Technical Support, set the tracing level to Normal.
- Restart Kaspersky Endpoint Security.
- To stop the tracing process, return to the Support Tools window and disable tracing.
You can also create trace files when installing the application from the command line, including by using the setup.ini file.
As a result, application operation trace files are created in the %ProgramData%\Kaspersky Lab\KES.21.20\Traces folder. After the trace files are created, send the files to Kaspersky Technical Support.
Kaspersky Endpoint Security automatically deletes trace files when the application is removed. You can also delete the files manually. To do so, you must disable tracing and stop the application.
Page top
Application performance tracing
Kaspersky Endpoint Security lets you receive information about computer operating issues during use of the application. For example, you can receive information about delays in operating system loading after the application is installed. To do so, Kaspersky Endpoint Security creates performance trace files. Performance tracing refer to the logging of actions performed by the application for the purpose of diagnosing performance issues of Kaspersky Endpoint Security. To receive information, Kaspersky Endpoint Security uses the Event Tracing for Windows service (ETW). Kaspersky Technical Support is responsible for diagnosing issues of Kaspersky Endpoint Security and establishing the reasons for those issues.
Application tracing should be performed under the supervision of Kaspersky Technical Support.
To create a performance trace file:
- In the main application window, click the button.
- In the window that opens, click the Support Tools button.
- Use the Enable performance tracing toggle to enable or disable tracing of application performance.
- In the Tracing drop-down list, select an application tracing mode:
- With size limitation. Save traces to a limited number of files of limited size and overwrite the older files when the maximum size is reached. If this mode is selected, you can define the maximum size for each file.
- Without limitations. Save one trace file (no size limit).
- In the Level drop-down list, select the tracing level:
- Light. Kaspersky Endpoint Security analyzes the most important operating system processes related to performance.
- Detailed. Kaspersky Endpoint Security analyzes all operating system processes related to performance.
- In the Tracing type drop-down list, select the tracing type:
- Basic information. Kaspersky Endpoint Security analyzes processes while the operating system is running. Use this tracing type if a problem persists after the operating system is loaded, such as a problem accessing the Internet in the browser.
- On restart. Kaspersky Endpoint Security analyzes processes only while the operating system is loading. After the operating system is loaded, Kaspersky Endpoint Security stops tracing. Use this tracing type if the problem is related to delayed loading of the operating system.
- Restart the computer and try to reproduce the problem.
- To stop the tracing process, return to the Support Tools window and disable tracing.
As a result, a performance trace file is created in the %ProgramData%\Kaspersky Lab\KES.21.20\Traces folder. After the trace file is created, send the file to Kaspersky Technical Support.
Dump writing
A dump file contains all information about the working memory of Kaspersky Endpoint Security processes at the moment when the dump file was created.
Saved dump files may contain confidential data. To control access to data, you must independently ensure the security of dump files.
Dump files are stored on the computer as long as the application is in use, and are deleted permanently when the application is removed. Dump files are stored in the folder %ProgramData%\Kaspersky Lab\KES.21.20\Traces.
How to enable dump writing in the Administration Console (MMC)
How to enable dump writing in Web Console and Cloud Console
- In the main window of the Web Console, select Assets (Devices) → Policies & profiles.
- Click the name of the Kaspersky Endpoint Security policy.
The policy properties window opens.
- Select the Application settings tab.
- Go to General settings → Application Settings.
Kaspersky Endpoint Security for Windows settings
- In the Debug information block, use the Enable dump writing check box to enable or disable application dump writing.
- Save your changes.
How to enable dump writing in the application interface
- In the main application window, click the button.
- In the application settings window, select General settings → Application settings.
Kaspersky Endpoint Security for Windows settings
- In the Debug information block, use the Enable dump writing check box to enable or disable application dump writing.
- Save your changes.
Protecting dump files and trace files
Dump files and trace files contain information about the operating system, and may also contain user data. To prevent unauthorized access to such data, you can enable protection of dump files and trace files.
If protection of dump files and trace files is enabled, the files can be accessed by the following users:
- Dump files can be accessed by the system administrator and local administrator, and by the user that enabled the writing of dump files and trace files.
- Trace files can be accessed only by the system administrator and local administrator.
How to enable protection of dump files and trace files in the Administration Console (MMC)
How to enable protection of dump files and trace files in Web Console and Cloud Console
- In the main window of the Web Console, select Assets (Devices) → Policies & profiles.
- Click the name of the Kaspersky Endpoint Security policy.
The policy properties window opens.
- Select the Application settings tab.
- Go to General settings → Application Settings.
Kaspersky Endpoint Security for Windows settings
- In the Debug information block, use the Enable dump and trace files protection check box to enable or disable file protection.
- Save your changes.
How to enable protection of dump files and trace files in the application interface
- In the main application window, click the button.
- In the application settings window, select General settings → Application settings.
Kaspersky Endpoint Security for Windows settings
- In the Debug information block, use the Enable dump and trace files protection check box to enable or disable file protection.
- Save your changes.
Dump files and trace files that were written while protection was active remain protected even after this function is disabled.
Page top
Limitations and warnings
Kaspersky Endpoint Security has a number of limitations that are not critical to operation of the application.
Compatibility with Kaspersky Security Center
Detection and Response (EDR, MDR, Kaspersky Sandbox)
Page topGlossary
Active key
A key that is currently used by the application.
Administration group
A set of devices that share common functions and a set of Kaspersky applications installed on them. Devices are grouped so that they can be managed conveniently as a single unit. A group may include other groups. It is possible to create group policies and group tasks for each installed application in the group.
Anti-virus databases
Databases that contain information about computer security threats known to Kaspersky as of the anti-virus database release date. Anti-virus database signatures help to detect malicious code in scanned objects. Anti-virus databases are created by Kaspersky specialists and updated hourly.
Archive
One or several files packed into a single compressed file. A specialized application called an archiver is required for packing and unpacking data.
Authentication Agent
Interface that lets you complete authentication to access encrypted hard drives and load the operating system after the bootable hard drive has been encrypted.
Certificate issuer
Certification center that issued the certificate.
Cloud Discovery
Cloud Discovery is a component of the Cloud Access Security Broker (CASB) solution that protects the cloud infrastructure of an organization. Cloud Discovery manages user access to cloud services. Cloud services include, for example, Microsoft Teams, Salesforce, Microsoft Office 365. Cloud services are grouped in categories, for example, Data exchange, Messengers, Email.
Database of malicious web addresses
A list of web addresses whose content may be considered to be dangerous. The list is created by Kaspersky specialists. It is regularly updated and is included in the Kaspersky application distribution kit.
Database of phishing web addresses
A list of web addresses which Kaspersky specialists have determined to be phishing-related. The database is regularly updated and is part of the Kaspersky application distribution kit.
Disinfection
A method of processing infected objects that results in complete or partial recovery of data. Not all infected objects can be disinfected.
False alarm
A false alarm occurs when the Kaspersky application reports an uninfected file as infected because the signature of the file is similar to that of a virus.
Infectable file
A file which, due to its structure or format, can be used by intruders as a "container" to store and spread malicious code. As a rule, these are executable files, with such file extensions as .com, .exe, and .dll. There is a fairly high risk of intrusion of malicious code in such files.
Infected file
A file which contains malicious code (code of known malware has been detected when scanning the file). Kaspersky does not recommend using such files, because they may infect your computer.
Integration Server
Kaspersky Endpoint Security for Virtualization Light Agent component. Interacts between Kaspersky Endpoint Security components and the virtual infrastructure.
IOC
Indicator of Compromise. A set of data about a malicious object or activity.
IOC file
A file containing a set of indicators of compromise (IOCs) that the application tries to match to count a detection. The likelihood of detection can be higher if exact matches with multiple IOC files are found for the object as a result of the scan.
License certificate
A document that Kaspersky transfers to the user together with the key file or activation code. It contains information about the license granted to the user.
Light Agent
Kaspersky Endpoint Security for Virtualization Light Agent component. It is installed on each virtual machine that needs to be protected.
Mask
Representation of a file name and extension by using wildcards.
File masks can contain any characters that are allowed in file names, including wildcards:
- The
*(asterisk) character, which takes the place of any set of characters, except the\and/characters (delimiters of the names of files and folders in paths to files and folders). For example, the maskC:\*\*.txtwill include all paths to files with the TXT extension located in folders on the C: drive, but not in subfolders. - Two consecutive
*characters take the place of any set of characters (including an empty set) in the file or folder name, including the\and/characters (delimiters of the names of files and folders in paths to files and folders). For example, the maskC:\Folder\**\*.txtwill include all paths to files with the TXT extension located in folders nested within theFolder, except theFolderitself. The mask must include at least one nesting level. The maskC:\**\*.txtis not a valid mask. The ** mask is available only for creating scan exclusions. - The
?(question mark) character, which takes the place of any single character, except the\and/characters (delimiters of the names of files and folders in paths to files and folders). For example, the maskC:\Folder\???.txtwill include paths to all files residing in the folder namedFolderthat have the TXT extension and a name consisting of three characters.
Network Agent
A Kaspersky Security Center component that enables interaction between the Administration Server and Kaspersky applications that are installed on a specific network node (workstation or server). This component is common for all Kaspersky applications running under Windows. Dedicated versions of Network Agent are intended for applications running under other operating systems.
Normalized form of the address of a web resource
The normalized form of the address of a web resource is a textual representation of a web resource address that is obtained through normalization. Normalization is a process whereby the textual representation of a web resource address changes according to specific rules (for example, exclusion of the user login, password, and connection port from the text representation of the web resource address; additionally, the web resource address is changed from uppercase to lowercase characters).
Regarding the operation of protection components, the purpose of normalization of web resource addresses is to avoid scanning website addresses, which may differ in syntax while being physically equivalent, more than once.
Example: Non-normalized form of an address: www.Example.com\. Normalized form of an address: www.example.com. |
OLE object
An attached file or a file that is embedded in another file. Kaspersky applications allow scanning OLE objects for viruses. For example, if you insert a Microsoft Office Excel table into a Microsoft Office Word document, the table is scanned as an OLE object.
OpenIOC
Open standard of Indicator of Compromise (IOC) descriptions based on XML and including over 500 different Indicators of Compromise.
Portable File Manager
This is an application that provides an interface for working with encrypted files on removable drives when encryption functionality is not available on the computer.
Protection scope
Objects that are constantly being scanned by the Essential Threat Protection component when it is running. The protection scopes of different components have different properties.
Scan scope
Objects that Kaspersky Endpoint Security scans while performing a scan task.
SVM
Secure virtual machine – a special virtual machine on which the scanserver service (Protection Server, a component of Kaspersky Endpoint Security for Virtualization Light Agent) is installed.
Task
Functions performed by the Kaspersky application as tasks, for example: Real-time File Protection, Full Device Scan, Database Update.
Trusted Platform Module
A microchip developed to provide basic functions related to security (for example, for storing encryption keys). A Trusted Platform Module is usually installed on the computer motherboard and interacts with all other system components via the hardware bus.
Page top
Appendix 1. Application settings
You can use a policy, tasks, or the application interface to configure Kaspersky Endpoint Security. Detailed information about application components is provided in the corresponding sections.
File Threat Protection
The File Threat Protection component lets you prevent infection of the file system of the computer. By default, the File Threat Protection component permanently resides in the computer's RAM. The component scans files on all drives of the computer, as well as on connected drives. The component provides computer protection with the help of anti-virus databases, the Kaspersky Security Network cloud service, and heuristic analysis.
The component scans the files accessed by the user or application. If a malicious file is detected, Kaspersky Endpoint Security blocks the file operation. The application then disinfects or deletes the malicious file, depending on the settings of the File Threat Protection component.
When attempting to access a file whose contents are stored in the OneDrive cloud, Kaspersky Endpoint Security downloads and scans the file contents.
File Threat Protection component settings
Parameter |
Description |
|---|---|
Security level (available only in the Administration Console (MMC) and in the Kaspersky Endpoint Security interface) |
For File Threat Protection, Kaspersky Endpoint Security can apply different groups of settings. These groups of settings that are stored in the application are called security levels:
|
File types (available only in the Administration Console (MMC) and in the Kaspersky Endpoint Security interface) |
All files. If this setting is enabled, Kaspersky Endpoint Security checks all files without exception (all formats and extensions). Files scanned by format. If this setting is enabled, the application scans infectable files only. Before scanning a file for malicious code, the internal header of the file is analyzed to determine the format of the file (for example, .txt, .doc, or .exe). The scan also looks for files with particular file extensions. Files scanned by extension. If this setting is enabled, the application scans infectable files only. The file format is then determined based on the file's extension. |
Scan scope |
Contains objects that are scanned by the File Threat Protection component. A scan object may be a hard drive, removable drive, network drive, folder, file, or multiple files defined by a mask. By default, the File Threat Protection component scans files that are started on any hard drives, removable drives, or network drives. The protection scope for these objects cannot be changed or deleted. You can also exclude an object (such as removable drives) from scans. |
Machine learning and signature analysis (available only in the Administration Console (MMC) and in the Kaspersky Endpoint Security interface) |
The machine learning and signature analysis method uses the Kaspersky Endpoint Security databases that contain descriptions of known threats and ways to neutralize them. Protection that uses this method provides the minimum acceptable security level. Based on the recommendations of Kaspersky experts, machine learning and signature analysis is always enabled. |
Heuristic analysis (available only in the Administration Console (MMC) and in the Kaspersky Endpoint Security interface) |
The technology was developed for detecting threats that cannot be detected by using the current version of Kaspersky application databases. It detects files that may be infected with an unknown virus or a new variety of a known virus. When scanning files for malicious code, the heuristic analyzer executes instructions in the executable files. The number of instructions that are executed by the heuristic analyzer depends on the level that is specified for the heuristic analyzer. The heuristic analysis level ensures a balance between the thoroughness of searching for new threats, the load on the resources of the operating system, and the duration of heuristic analysis. |
Action on threat detection |
Disinfect, delete if disinfection fails. If this option is selected, the application automatically attempts to disinfect all infected files that are detected. If disinfection fails, the application deletes the files. Disinfect, block if disinfection fails. If this option is selected, Kaspersky Endpoint Security automatically attempts to disinfect all infected files that are detected. If disinfection is not possible, Kaspersky Endpoint Security adds the information about the infected files that are detected to the list of active threats. Block. If this option is selected, the File Threat Protection component automatically blocks all infected files without attempting to disinfect them. Before attempting to disinfect or delete an infected file, the application creates a backup copy of the file in case you need to restore the file or if it can be disinfected in the future. |
Scan only new and modified files |
Scans only new files and those files that have been modified since the last time they were scanned. This helps reduce the duration of a scan. This mode applies both to simple and to compound files. |
Scan archives |
Scanning ZIP, GZIP, BZIP, RAR, TAR, ARJ, CAB, LHA, JAR, ICE, and other archives. The application scans archives not only by extension, but also by format. When checking archives, the application performs a recursive unpacking. This allows to detect threats inside multi-level archives (archive within an archive). |
Scan distribution packages |
This check box enables/disables scanning of third-party distribution packages. |
Scan files in Microsoft Office formats |
Scans Microsoft Office files (DOC, DOCX, XLS, PPT and other Microsoft extensions). Office format files include OLE objects as well. Kaspersky Endpoint Security scans office format files that are smaller than 1 MB, regardless of whether the check box is selected or not. |
Scan email format files |
Scans email format files. The application scans MSG and EML files. Email format files include OLE objects as well. Kaspersky Endpoint Security scans office format files that are smaller than 1 MB, regardless of whether the check box is selected or not. |
Do not unpack large compound files |
If this check box is selected, the application does not scan compound files if their size exceeds the specified value. If this check box is cleared, the application scans compound files of all sizes. The application scans large files that are extracted from archives regardless of whether the check box is selected or not. |
Unpack compound files in the background |
If the check box is selected, the application provides access to compound files that are larger than the specified value before these files are scanned. In this case, Kaspersky Endpoint Security unpacks and scans compound files in the background. The application provides access to compound files that are smaller than this value only after unpacking and scanning these files. If the check box is not selected, the application provides access to compound files only after unpacking and scanning files of any size. |
Scan mode (available only in the Administration Console (MMC) and in the Kaspersky Endpoint Security interface) |
Kaspersky Endpoint Security scans files accessed by the user, operating system, or an application running under the user's account. Smart mode. In this mode, File Threat Protection scans an object based on an analysis of actions taken on the object. For example, when working with a Microsoft Office document, Kaspersky Endpoint Security scans the file when it is first opened and last closed. Intermediate operations that overwrite the file do not cause it to be scanned. On access and modification. In this mode, File Threat Protection scans objects whenever there is an attempt to open or modify them. On access. In this mode, File Threat Protection scans objects only upon an attempt to open them. On execution. In this mode, File Threat Protection only scans objects upon an attempt to run them. |
Use iSwift technology (available only in the Administration Console (MMC) and in the Kaspersky Endpoint Security interface) |
This technology allows increasing scan speed by excluding certain files from scanning. Files are excluded from scans by using a special algorithm that takes into account the release date of Kaspersky Endpoint Security databases, the date when the file was last scanned, and any modifications to the scan settings. The iSwift technology is an advancement of the iChecker technology for the NTFS file system. |
Use iChecker technology (available only in the Administration Console (MMC) and in the Kaspersky Endpoint Security interface) |
This technology allows increasing scan speed by excluding certain files from scanning. Files are excluded from scans by using a special algorithm that takes into account the release date of Kaspersky Endpoint Security databases, the date when the file was last scanned, and any modifications to the scan settings. There are limitations to iChecker Technology: it does not work with large files and applies only to files with a structure that the application recognizes (for example, EXE, DLL, LNK, TTF, INF, SYS, COM, CHM, ZIP, and RAR). |
Pause File Threat Protection (available only in the Administration Console (MMC) and in the Kaspersky Endpoint Security interface) |
This temporarily and automatically pauses operation of File Threat Protection at the specified time or when working with the specified applications. |
Scan of file operations executed in Windows containers |
If a threat is detected inside a container, the application applies the action selected for the File Threat Protection component. Stop the container if disinfection fails. The application may not have sufficient read and write rights for the detected object. In that case, disinfecting or deleting the detected object is impossible. If this check box is selected, the application blocks the detected object and stops the container. If this check box is cleared, the application only blocks the detected object. Do not scan file operations executed in Windows containers. If this check box is selected, the application scans the container only when the container is started. If the check box is cleared, the application scans the container continuously in real time. |
Web Threat Protection
The Web Threat Protection component prevents downloads of malicious files from the Internet, and also blocks malicious and phishing websites. The component provides computer protection with the help of anti-virus databases, the Kaspersky Security Network cloud service, and heuristic analysis.
Kaspersky Endpoint Security scans HTTP-, HTTPS- and FTP-traffic. Kaspersky Endpoint Security scans URLs and IP addresses.
To use Web Threat Protection, you must complete the initial configuration of the application:
- For HTTPS traffic monitoring, you need to enable encrypted connections scan (disabled by default).
- Select the ports that you want Kaspersky Endpoint Security to monitor. By default, the application monitors all ports.
- Select the applications whose traffic you want Kaspersky Endpoint Security to monitor. Most browsers are already present in the list of applications recommended by Kaspersky. If your browser is missing from the list, add it manually.
- We recommend to inject a web page interaction script into web traffic. This script enables registration of Web Control events for the application event log, OS event log, and reports.
When a user tries to open a malicious or phishing website, Kaspersky Endpoint Security will block access and show a warning (see the figure below).
Website access denied message
Web Threat Protection component settings
Parameter |
Description |
|---|---|
Security level (available only in the Administration Console (MMC) and in the Kaspersky Endpoint Security interface) |
For Web Threat Protection, the application can apply different groups of settings. These groups of settings that are stored in the application are called security levels:
|
Action on threat detection |
Block. If this option is selected and an infected object is detected in web traffic, the Web Threat Protection component blocks access to the object and displays a message in the browser. Inform. If this option is selected and an infected object is detected in web traffic, Kaspersky Endpoint Security allows this object to be downloaded to the computer but adds information about the infected object to the list of active threats. |
Check the web address against the database of malicious web addresses (available only in the Administration Console (MMC) and in the Kaspersky Endpoint Security interface) |
Scanning the links to determine whether they are included in the database of malicious web addresses allows you to track websites that have been added to denylist. The database of malicious web addresses is maintained by Kaspersky, included in the application installation package, and updated during Kaspersky Endpoint Security database updates. |
Use heuristic analysis (available only in the Administration Console (MMC) and in the Kaspersky Endpoint Security interface) |
The technology was developed for detecting threats that cannot be detected by using the current version of Kaspersky application databases. It detects files that may be infected with an unknown virus or a new variety of a known virus. When web traffic is scanned for viruses and other applications that present a threat, the heuristic analyzer performs instructions in the executable files. The number of instructions that are executed by the heuristic analyzer depends on the level that is specified for the heuristic analyzer. The heuristic analysis level ensures a balance between the thoroughness of searching for new threats, the load on the resources of the operating system, and the duration of heuristic analysis. |
Check the web address against the database of phishing web addresses (available only in the Administration Console (MMC) and in the Kaspersky Endpoint Security interface) |
The database of phishing web addresses includes the web addresses of currently known websites that are used to launch phishing attacks. Kaspersky supplements this database of phishing links with addresses obtained from the international organization known as the Anti-Phishing Working Group. The database of phishing addresses is included in the application installation package and supplemented with Kaspersky Endpoint Security database updates. |
Do not scan web traffic from trusted web addresses |
If the check box is selected, the Web Threat Protection component does not scan the content of web pages or websites whose addresses are included in the list of trusted web addresses. You can add both the specific address and the address mask of a web page/website to the list of trusted web addresses. You can also create a general list of exclusions for encrypted connections. In this case, Kaspersky Endpoint Security does not scan HTTPS traffic of trusted web addresses when Web Threat Protection, Mail Threat Protection, Web Control components are doing their work. |
Mail Threat Protection
The Mail Threat Protection component scans the attachments of incoming and outgoing email messages for viruses and other threats. The component provides computer protection with the help of anti-virus databases, the Kaspersky Security Network cloud service, and heuristic analysis.
Mail Threat Protection can scan both incoming and outgoing messages. The application supports POP3, SMTP, IMAP, and NNTP in the following mail clients:
- Microsoft Office Outlook
- Mozilla Thunderbird
- Windows Mail
- MyOffice Mail
- R7-Office Organizer
To scan traffic in Mozilla Thunderbird, MyOffice Mail and R7-Office Organizer mail clients, you need to add Kaspersky certificate to the certificate store and select the own certificate store.
Mail Threat Protection does not support other protocols and mail clients.
Mail Threat Protection may not always be able to gain protocol-level access to messages (for example, when using the Microsoft Exchange solution). For this reason, Mail Threat Protection includes an extension for Microsoft Office Outlook. The extension allows scanning messages at the level of the mail client. The Mail Threat Protection extension supports operations with Outlook 2010, 2013, 2016, 2019 and 2021.
The Mail Threat Protection component does not scan messages if the mail client is open in a browser.
When a malicious file is detected in an attachment, Kaspersky Endpoint Security adds information about the performed action to the message subject, for example, [Message has been processed] <message subject>.
Mail Threat Protection component settings
Parameter |
Description |
|---|---|
Security level (available only in the Administration Console (MMC) and in the Kaspersky Endpoint Security interface) |
For Mail Threat Protection, Kaspersky Endpoint Security applies different groups of settings. These groups of settings that are stored in the application are called security levels:
|
Action on threat detection |
Disinfect, delete if disinfection fails. When an infected object is detected in an inbound or outbound message, Kaspersky Endpoint Security attempts to disinfect the detected object. The user will be able to access the message with a safe attachment. If the object cannot be disinfected, Kaspersky Endpoint Security deletes the infected object. Kaspersky Endpoint Security adds information about the performed action to the message subject, for example, [Message has been processed] <message subject>. Disinfect, block if disinfection fails. When an infected object is detected in an inbound message, Kaspersky Endpoint Security attempts to disinfect the detected object. The user will be able to access the message with a safe attachment. If the object cannot be disinfected, Kaspersky Endpoint Security adds a warning to the message subject. The user will be able to access the message with the original attachment. When an infected object is detected in an outbound message, Kaspersky Endpoint Security attempts to disinfect the detected object. If the object cannot be disinfected, Kaspersky Endpoint Security blocks transmission of the message, and the mail client shows an error. Block. If an infected object is detected in an inbound message, Kaspersky Endpoint Security adds a warning to the message subject. The user will be able to access the message with the original attachment. If an infected object is detected in an outbound message, Kaspersky Endpoint Security blocks transmission of the message, and the mail client shows an error. |
Protection scope (available only in the Administration Console (MMC) and in the Kaspersky Endpoint Security interface) |
The Protection scope includes objects that the component checks when it is run: incoming and outgoing messages or incoming messages only. In order to protect your computers, you need only scan incoming messages. You can turn on scanning for outgoing messages to prevent infected files from being sent in archives. You can also turn on the scanning of outgoing messages if you want to prevent files in particular formats from being sent, such as audio and video files, for example. |
Scan POP3, SMTP, NNTP, and IMAP traffic |
The check box enables / disables scanning by the Mail Threat Protection component of traffic that is transferred via the POP3, SMTP, NNTP, and IMAP protocols. |
Connect Microsoft Outlook extension |
If the check box is selected, scanning of email messages transmitted via the POP3, SMTP, NNTP, IMAP protocols is enabled on the side of the extension integrated into Microsoft Outlook. If mail is scanned using the extension for Microsoft Outlook, it is recommended to use Cached Exchange Mode. For more detailed information about Cached Exchange Mode and recommendations on its use, refer to the Microsoft Knowledge Base. |
Heuristic analysis (available only in the Administration Console (MMC) and in the Kaspersky Endpoint Security interface) |
The technology was developed for detecting threats that cannot be detected by using the current version of Kaspersky application databases. It detects files that may be infected with an unknown virus or a new variety of a known virus. When scanning files for malicious code, the heuristic analyzer executes instructions in the executable files. The number of instructions that are executed by the heuristic analyzer depends on the level that is specified for the heuristic analyzer. The heuristic analysis level ensures a balance between the thoroughness of searching for new threats, the load on the resources of the operating system, and the duration of heuristic analysis. |
Scan attached archives |
Scanning ZIP, GZIP, BZIP, RAR, TAR, ARJ, CAB, LHA, JAR, ICE, and other archives. The application scans archives not only by extension, but also by format. When checking archives, the application performs a recursive unpacking. This allows to detect threats inside multi-level archives (archive within an archive). If during the scan, Kaspersky Endpoint Security detects a password for an archive in the text of the message, this password will be used to scan the content of the archive for malicious applications. In this case, the password is not saved. An archive is unpacked during scan. If an application error occurs during the unpacking process, you can manually delete the unpacked files that are saved to the following path: %systemroot%\temp. The files have the PR prefix. |
Scan attached files of Microsoft Office formats |
Scans Microsoft Office files (DOC, DOCX, XLS, PPT and other Microsoft extensions). Office format files include OLE objects as well. Kaspersky Endpoint Security scans office format files that are smaller than 1 MB, regardless of whether the check box is selected or not. |
Do not scan archives larger than N MB |
If this check box is selected, the Mail Threat Protection component excludes archives attached to email messages from scanning if their size exceeds the specified value. If the check box is cleared, the Mail Threat Protection component scans email attachment archives of any size. |
Limit the time for checking archives to N sec |
If the check box is selected, the time that is allocated for scanning archives attached to email messages is limited to the specified period. |
Attachment filter |
The attachment filter is not applied to outgoing email messages. Disable filtering. If this option is selected, the Mail Threat Protection component does not filter files that are attached to email messages. Rename attachments of selected types. If this option is selected, the Mail Threat Protection component will replace the last extension character found in the attached files of the specified types with the underscore character (for example, attachment.doc_). Thus, in order to open the file, the user must rename the file. Delete attachments of selected types. If this option is selected, the Mail Threat Protection component deletes attached files of the specified types from email messages. In the list of file masks, you can specify the types of attached files to rename or delete from email messages. |
Network Threat Protection
The Network Threat Protection component (also called Intrusion Detection System, IDS) monitors inbound network traffic for activity characteristic of network attacks. When Kaspersky Endpoint Security detects an attempted network attack on the user's computer, it blocks the network connection with the attacking computer. Descriptions of currently known types of network attacks and ways to counteract them are provided in Kaspersky Endpoint Security databases. The list of network attacks that the Network Threat Protection component detects is updated during database and application module updates.
Network Threat Protection component settings
Parameter |
Description |
|---|---|
Treat port scanning and network flooding as attacks |
Network Flooding is an attack on network resources of an organization (such as web servers). This attack consists of sending a large number of requests to overload the bandwidth of network resources. When this happens, users are unable to access the network resources of the organization. A Port Scanning attack consists of scanning UDP ports, TCP ports, and network services on the computer. This attack allows the attacker to identify the degree of vulnerability of the computer before conducting more dangerous types of network attacks. Port Scanning also enables the attacker to identify the operating system on the computer and select the appropriate network attacks for this operating system. If this check box is selected, Kaspersky Endpoint Security monitors network traffic to detect these attacks. If an attack is detected, the application notifies the user and sends the corresponding event to Kaspersky Security Center. The application provides information about the attacking computer, which is required for timely threat response actions. You can disable detection of these types of attacks in case some of your allowed applications perform operations that are typical for these types of attacks. This will help avoid false alarms. |
Block attacking devices for N min |
If the option is enabled, the Network Threat Protection component adds the attacking computer to the blocked list. This means that the Network Threat Protection component blocks the network connection with the attacking computer after the first network attack attempt for the specified amount of time. This block automatically protects the user's computer against possible future network attacks from the same address. The minimum time an attacking computer must spend in the block list is one minute. The maximum time is 999 minutes. You can view the block list in the Network Monitor tool window. Kaspersky Endpoint Security clears the block list when the application is restarted and when the Network Threat Protection settings are changed. |
Exclusions |
The list contains IP addresses from which Network Threat Protection does not block network attacks. You can add an IP address with port and protocol specified. The application does not log information on network attacks from the IP addresses that are in the list of exclusions. |
MAC Spoofing Protection |
A MAC spoofing attack consists of changing the MAC address of a network device (network card). As a result, an attacker can redirect data sent to a device to another device and gain access to this data. Kaspersky Endpoint Security lets you block MAC Spoofing attacks and receive notifications about the attacks. |
Firewall
The Firewall blocks unauthorized connections to the computer while working on the Internet or local network. The Firewall also controls the network activity of applications on the computer. This allows you to protect your corporate LAN from identity theft and other attacks. The component provides computer protection with the help of anti-virus databases, the Kaspersky Security Network cloud service, and predefined network rules.
Network Agent is used for interaction with Kaspersky Security Center. Firewall automatically creates network rules required for the application and the Network Agent to work. As a result, the Firewall opens several ports on the computer. Which ports are opened depends on computer's role (for example, distribution point). To learn more about the ports that will be opened on the computer, refer to the Kaspersky Security Center Help.
Network rules
You can configure network rules at the following levels:
- Network packet rules. Network packet rules impose restrictions on network packets, regardless of the application. Such rules restrict inbound and outbound network traffic through specific ports of the selected data protocol. Kaspersky Endpoint Security has predefined network packet rules with permissions recommended by Kaspersky experts.
- Application network rules. Application network rules impose restrictions on the network activity of a specific application. They factor in not only the characteristics of the network packet, but also the specific application to which this network packet is addressed or which issued this network packet.
Controlled access of applications to operating system resources, processes and personal data is provided by the Host Intrusion Prevention component by using application rights.
During the first startup of the application, the Firewall performs the following actions:
- Checks the security of the application using downloaded anti-virus databases.
- Checks the security of the application in Kaspersky Security Network.
You are advised to participate in Kaspersky Security Network to help the Firewall work more effectively.
- Places the application in one of the trust groups: Trusted, Low Restricted, High Restricted, Untrusted.
A trust group defines the rights that Kaspersky Endpoint Security refers to when controlling application activity. Kaspersky Endpoint Security places an application in a trust group depending on the level of danger that this application may pose to the computer.
Kaspersky Endpoint Security places an application in a trust group for the Firewall and Host Intrusion Prevention components. You cannot change the trust group only for the Firewall or Host Intrusion Prevention.
If you refused to participate in KSN or there is no network, Kaspersky Endpoint Security places the application in a trust group depending on the settings of the Host Intrusion Prevention component. After receiving the reputation of the application from KSN, the trust group can be changed automatically.
- It blocks network activity of the application depending on the trust group. For example, applications in the High Restricted trust group are not allowed to use any network connections.
The next time the application is started, Kaspersky Endpoint Security checks the integrity of the application. If the application is unchanged, the component uses the current network rules for it. If the application has been modified, Kaspersky Endpoint Security analyzes the application as if it were being started for the first time.
Network Rule Priorities
Each rule has a priority. The higher a rule is on the list, the higher its priority. If network activity is added to several rules, the Firewall regulates network activity according to the rule with the highest priority.
Network packet rules have a higher priority than network rules for applications. If both network packet rules and network rules for applications are specified for the same type of network activity, the network activity is handled according to the network packet rules.
Network rules for applications work in a particular way. Network rule for applications includes access rules based on the network status: Public network, Local network, Trusted network. For example, applications in the High Restricted trust group are not allowed any network activity in networks of all statuses by default. If a network rule is specified for an individual application (parent application), then the child processes of other applications will run according to the network rule of the parent application. If there is no network rule for the application, the child processes will run according to network access rule of the application's trust group.
For example, you have prohibited any network activity in networks of all statuses for all applications, except browser X. If you start browser Y installation (child process) from browser X (parent application), then browser Y installer will access the network and download the necessary files. After installation, browser Y will be denied any network connections according to the Firewall settings. To prohibit network activity of browser Y installer as a child process, you must add a network rule for the installer of browser Y.
Network connection types
The Firewall allows you to control network activity depending on the type of the network connection. Kaspersky Endpoint Security receives the network connection type from the computer's operating system. The type of the network connection in the operating system is set by the user when setting up the connection. You can change the type of the network connection in the Kaspersky Endpoint Security settings. The Firewall will monitor network activity depending on the network type, specified in the Kaspersky Endpoint Security settings, and not in the operating system.
The following network connection types are available:
- Public network. The network is not protected by antivirus applications, firewalls, or filters (such as Wi-Fi in a cafe). When the user operates a computer that is connected to such a network, Firewall blocks access to files and printers of this computer. External users are also unable to access data through shared folders and remote access to the desktop of this computer. Firewall filters the network activity of each application according to the network rules that are set for it.
Firewall assigns Public network type to the Internet by default. You cannot change the type of the Internet.
- Local network. Network for users with restricted access to files and printers on this computer (such as for a corporate LAN or home network).
- Trusted network. Safe network in which the computer is not exposed to attacks or unauthorized data access attempts. Firewall permits any network activity within networks with this status.
Firewall component settings
Parameter
Description
Packet rules
Table with a list of network packet rules. Network packet rules serve to impose restrictions on network packets, regardless of the application. Such rules restrict inbound and outbound network traffic through specific ports of the selected data protocol.
The table lists pre-configured network packet rules that are recommended by Kaspersky for optimum protection of the network traffic of computers that run on Microsoft Windows operating systems.
Firewall sets the execution priority of each network packet rule. Firewall processes network packet rules in the order in which they appear in the list of network packet rules, from top to bottom. Firewall locates the topmost network packet rule that is suitable for the network connection and applies it by either allowing or blocking network activity. Firewall then ignores all subsequent network packet rules for the specific network connection.
Network packet rules have a higher priority than network rules for applications.
Available networks
This table contains information about network connections that Firewall detects on the computer.
The Public network status is assigned to the Internet by default. You cannot change the status of the Internet.
Rules for applications
Application
Table of applications that are controlled by the Firewall component. Applications are assigned to trust groups. A trust group defines the rights used by Kaspersky Endpoint Security when controlling network activity of applications.
You can select an application from a single list of all applications installed on computers under the influence of a policy and add the application to a trust group.
Network rules
Table of network rules for applications that are part of a trust group. In accordance with these rules, Firewall regulates the network activity of applications.
The table displays the predefined network rules that are recommended by Kaspersky experts. These network rules have been added to optimally protect the network traffic of computers running Windows operating systems. It is not possible to delete the predefined network rules.
BadUSB Attack Prevention
Some viruses modify the firmware of USB devices to trick the operating system into detecting the USB device as a keyboard. As a result, the virus may execute commands under your user account to download malware, for example.
The BadUSB Attack Prevention component prevents infected USB devices emulating a keyboard from connecting to the computer.
When a USB device is connected to the computer and identified as a keyboard by the operating system, the application prompts the user to enter a numerical code generated by the application from this keyboard or using On-Screen Keyboard if available (see the figure below). This procedure is known as keyboard authorization.
If the code has been entered correctly, the application saves the identification parameters – VID/PID of the keyboard and the number of the port to which it has been connected – in the list of authorized keyboards. Keyboard authorization does not need to be repeated when the keyboard is reconnected or after the operating system is restarted.
When the authorized keyboard is connected to a different USB port of the computer, the application shows a prompt for authorization of this keyboard again.
If the numerical code has been entered incorrectly, the application generates a new code. You can configure the number of attempts for entering the numerical code. If the numerical code is entered incorrectly several times or the keyboard authorization window is closed (see figure below), the application blocks input from this keyboard. When the USB device blocking time elapses or the operating system is restarted, the application prompts the user to perform keyboard authorization again.
The application allows use of an authorized keyboard and blocks a keyboard that has not been authorized.
The BadUSB Attack Prevention component is not installed by default. If you need the BadUSB Attack Prevention component, you can add the component in the properties of the installation package before installing the application or change the available application components after installing the application.
Keyboard authorization
BadUSB Attack Prevention component settings
Parameter |
Description |
|---|---|
Prohibit use of On-Screen Keyboard for authorization of USB devices |
If the check box is selected, the application blocks use of On-Screen Keyboard for authorization of a USB device from which an authorization code cannot be entered. |
Maximum number of USB device authorization attempts |
Automatically blocking the USB device if the authorization code is entered incorrectly the specified number of times. Valid values are 1 to 10. For example, if you allow 5 attempts to enter the authorization code, the USB device is blocked after the fifth failed attempt. Kaspersky Endpoint Security displays the blocking duration for the USB device. After this time elapses, you can have 5 attempts to enter the authorization code. |
Timeout when reaching the maximum number of attempts |
Blocking duration of the USB device after the specified number of failed attempts to enter the authorization code. Valid values are 1 to 180 (minutes). |
AMSI Protection
AMSI Protection component is intended to support Antimalware Scan Interface from Microsoft. The Antimalware Scan Interface (AMSI) allows third-party applications with AMSI support to send objects (for example, PowerShell scripts) to Kaspersky Endpoint Security for an additional scan and then receive the results from scanning these objects. Third-party applications may include, for example, Microsoft Office applications (see the figure below). For details on AMSI, please refer to the Microsoft documentation.
The AMSI Protection can only detect a threat and notify a third-party application about the detected threat. Third-party application after receiving a notification of a threat does not allow to perform malicious actions (for example, terminates).
AMSI operation example
AMSI Protection component may decline a request from a third-party application, for example, if this application exceeds maximum number of requests within a specified interval. Kaspersky Endpoint Security sends information about a rejected request from a third-party application to the Administration Server. The AMSI Protection component does not deny requests from those third-party applications for which continuous integration with the AMSI Protection component is enabled.
AMSI Protection is available for the following operating systems for workstations and servers:
- Windows 10 Home / Pro / Pro for Workstations / Education / Enterprise / Enterprise multi-session;
- Windows 11 Home / Pro / Pro for Workstations / Education / Enterprise;
- Windows Server 2016 Essentials / Standard / Datacenter (including Server Core mode);
- Windows Server 2019 Essentials / Standard / Datacenter (including Server Core mode);
- Windows Server 2022 Standard / Datacenter / Datacenter: Azure Edition (including Server Core mode).
AMSI Protection settings
Parameter
Description
Scan archives
Scanning ZIP, GZIP, BZIP, RAR, TAR, ARJ, CAB, LHA, JAR, ICE, and other archives. The application scans archives not only by extension, but also by format. When checking archives, the application performs a recursive unpacking. This allows to detect threats inside multi-level archives (archive within an archive).
Scan distribution packages
This check box enables/disables scanning of third-party distribution packages.
Scan files in Microsoft Office formats
Scans Microsoft Office files (DOC, DOCX, XLS, PPT and other Microsoft extensions). Office format files include OLE objects as well. Kaspersky Endpoint Security scans office format files that are smaller than 1 MB, regardless of whether the check box is selected or not.
Do not unpack large compound files
If this check box is selected, the application does not scan compound files if their size exceeds the specified value.
If this check box is cleared, the application scans compound files of all sizes.
The application scans large files that are extracted from archives regardless of whether the check box is selected or not.
Exploit Prevention
The Exploit Prevention component detects program code that takes advantage of vulnerabilities on the computer to exploit administrator privileges or to perform malicious activities. For example, exploits can utilize a buffer overflow attack. To do so, the exploit sends a large amount of data to a vulnerable application. When processing this data, the vulnerable application executes malicious code. As a result of this attack, the exploit can start an unauthorized installation of malware. When there is an attempt to run an executable file from a vulnerable application that was not performed by the user, Kaspersky Endpoint Security blocks this file from running or notifies the user.
Exploit Prevention component settings
Parameter |
Description |
|---|---|
On detecting exploit |
Block. If this item is selected, on detecting an exploit, Kaspersky Endpoint Security blocks the operations of this exploit and makes a log entry with information about this exploit. Inform. If this item is selected, when Kaspersky Endpoint Security detects an exploit it logs an entry containing information about the exploit and adds information about this exploit to the list of active threats. |
Enable system process memory protection |
If this toggle button is switched on, Kaspersky Endpoint Security blocks external processes that attempt to access system process memory. |
Behavior Detection
The Behavior Detection component receives data on the actions of applications on your computer and provides this information to other protection components to improve their performance. The Behavior Detection component utilizes Behavior Stream Signatures (BSS) for applications. If application activity matches a behavior stream signature, Kaspersky Endpoint Security performs the selected responsive action. Kaspersky Endpoint Security functionality based on behavior stream signatures provides proactive defense for the computer.
Behavior Detection component settings
Parameter |
Description |
|---|---|
Action on malware activity detection |
Delete. If this option is selected, on detecting malicious activity Kaspersky Endpoint Security deletes the executable file of the malicious application and creates a backup copy of the file in Backup. Block. If this option is selected, on detecting malicious activity Kaspersky Endpoint Security terminates this application. Inform. If this option is selected and malicious activity of an application is detected, Kaspersky Endpoint Security does not terminate this application but adds information about the malicious activity of this application to the list of active threats. |
Protect shared folders |
If the toggle button is switched on, Kaspersky Endpoint Security analyzes activity in shared folders. If this activity matches a behavior stream signature that is typical for external encryption, Kaspersky Endpoint Security performs the selected action. Kaspersky Endpoint Security prevents external encryption of only those files that are located on media that have the NTFS file system and are not encrypted by the EFS system.
If the Remediation Engine component is enabled and the Block connection for N min option is selected, modified files are restored from backup copies. |
Protection scope |
The protection scope is a list of paths to shared folders in which Kaspersky Endpoint Security monitors file activity. Kaspersky Endpoint Security supports environment variables and the |
Exclusions by name or IP address |
Exclusions by name or IP address. List of computers from which attempts to encrypt shared folders will not be monitored. To apply the list of exclusions of computers from protection of shared folders against external encryption, you must enable Audit Logon in the Windows security audit policy. Audit Logon is disabled by default. For more details about a Windows security audit policy, please visit the Microsoft website. Exclusions by mask. Protection scope exclusions. Excluding a folder from the protection scope can reduce the amount of false positives if your organization uses data encryption when exchanging files using shared folders. For example, Behavior Detection can raise false positives when the user works with files with the ENC extension in a shared folder. Such activity matches a behavioral pattern that is typical for external encryption. If you have encrypted files in a shared folder to protect data, add that folder to exclusions. Use masks:
|
Host Intrusion Prevention
The Host Intrusion Prevention component prevents applications from performing actions that may be dangerous for the operating system, and ensures control over access to operating system resources and personal data. The component provides computer protection with the help of anti-virus databases and the Kaspersky Security Network cloud service.
The component controls the operation of applications by using application rights. Application rights include the following access parameters:
- Access to operating system resources (for example, automatic startup options, registry keys)
- Access to personal data (such as files and applications)
Network activity of applications is controlled by the Firewall using network rules.
During the first startup of the application, the Host Intrusion Prevention component performs the following actions:
- Checks the security of the application using downloaded anti-virus databases.
- Checks the security of the application in Kaspersky Security Network.
You are advised to participate in Kaspersky Security Network to help the Host Intrusion Prevention component work more effectively.
- Places the application in one of the trust groups: Trusted, Low Restricted, High Restricted, Untrusted.
A trust group defines the rights that Kaspersky Endpoint Security refers to when controlling application activity. Kaspersky Endpoint Security places an application in a trust group depending on the level of danger that this application may pose to the computer.
Kaspersky Endpoint Security places an application in a trust group for the Firewall and Host Intrusion Prevention components. You cannot change the trust group only for the Firewall or Host Intrusion Prevention.
If you refused to participate in KSN or there is no network, Kaspersky Endpoint Security places the application in a trust group depending on the settings of the Host Intrusion Prevention component. After receiving the reputation of the application from KSN, the trust group can be changed automatically.
- Blocks application actions depending on the trust group. For example, applications from the High Restricted trust group are denied access to the operating system modules.
The next time the application is started, Kaspersky Endpoint Security checks the integrity of the application. If the application is unchanged, the component uses the current application rights for it. If the application has been modified, Kaspersky Endpoint Security analyzes the application as if it were being started for the first time.
Host Intrusion Prevention component settings
Parameter |
Description |
|---|---|
Application rights |
Table of applications that are monitored by the Host Intrusion Prevention component. Applications are assigned to trust groups. A trust group defines the rights that Kaspersky Endpoint Security refers to when controlling application activity. You can select an application from a single list of all applications installed on computers under the influence of a policy and add the application to a trust group. Application access rights are presented in the following tables:
|
Protected resources |
The table contains categorized computer resources. The Host Intrusion Prevention component monitors attempts by other applications to access resources in the table. A resource can be a registry category, file or folder, or registry key. |
Trust group for applications started before Kaspersky Endpoint Security |
A trust group in which Kaspersky Endpoint Security will place applications that are started before Kaspersky Endpoint Security. |
Update rules for previously unknown applications from KSN |
If the check box is selected, the Host Intrusion Prevention component updates rights for previously unknown applications by using the Kaspersky Security Network database. |
Trust digitally signed applications |
If this check box is selected, the Host Intrusion Prevention component places the applications with the digital signature of trusted vendors in the Trusted group. Trusted vendors are those software vendors that are trusted by Kaspersky. You can also add vendor certificate to the trusted certificate store manually. If this check box is cleared, the Host Intrusion Prevention component does not consider such applications to be trusted, and uses other parameters to determine their trust group. |
Delete rules for applications that have not been started for longer than N days (from 1 to 90) |
If the check box is selected, Kaspersky Endpoint Security automatically deletes information about the application (trust group and access rights) if the following conditions are met:
If the trust group and rights of an application were determined automatically, Kaspersky Endpoint Security deletes information about this application after 30 days. It is not possible to change the storage term for application information or turn off automatic deletion. The next time you start this application, Kaspersky Endpoint Security analyzes the application as if it were starting for the first time. |
Trust group for applications that could not be added to existing groups |
Items in this drop-down list determine to which trust group Kaspersky Endpoint Security will assign an unknown application. You can choose one of the following items:
|
Remediation Engine
The Remediation Engine lets Kaspersky Endpoint Security roll back actions that have been performed by malware in the operating system.
When rolling back malware activity in the operating system, Kaspersky Endpoint Security handles the following types of malware activity:
- File activity
Kaspersky Endpoint Security performs the following actions:
- Deletes executable files that were created by malware (on all media except network drives).
- Deletes executable files that were created by programs that have been infiltrated by malware.
- Restores files that have been modified or deleted by malware.
The file recovery feature has a number of limitations.
- Registry activity
Kaspersky Endpoint Security performs the following actions:
- Deletes registry keys that were created by malware.
- Does not restore registry keys that have been modified or deleted by malware.
- System activity
Kaspersky Endpoint Security performs the following actions:
- Terminates processes that have been initiated by malware.
- Terminates processes into which a malicious application has penetrated.
- Does not resume processes that have been halted by malware.
- Network activity
Kaspersky Endpoint Security performs the following actions:
- Blocks the network activity of malware.
- Blocks the network activity of processes that have been infiltrated by malware.
A rollback of malware actions can be started by the File Threat Protection or Behavior Detection component, or during a malware scan.
Rolling back malware operations affects a strictly defined set of data. Rollback has no adverse effects on the operating system or on the integrity of your computer data.
Page top
Kaspersky Security Network
To protect your computer more effectively, Kaspersky Endpoint Security uses data that is received from users around the globe. Kaspersky Security Network is designed for obtaining this data.
KSN functionality may not be available in the application in the U.S.
Kaspersky Security Network (KSN) is an infrastructure of cloud services providing access to the online Kaspersky Knowledge Base that contains information about the reputation of files, web resources, and software. The use of data from Kaspersky Security Network ensures faster responses by Kaspersky Endpoint Security to new threats, improves the performance of some protection components, and reduces the likelihood of false positives. If you are participating in Kaspersky Security Network, KSN services provide Kaspersky Endpoint Security with information about the category and reputation of scanned files, as well as information about the reputation of scanned web addresses.
Use of Kaspersky Security Network is voluntary. The application prompts you to use KSN during initial configuration of the application. Users can begin or discontinue participation in KSN at any time.
For more detailed information about sending Kaspersky statistical information that is generated during participation in KSN, and about the storage and destruction of such information, please refer to the Kaspersky Security Network Statement and the Kaspersky website. The ksn_<language ID>.txt file with the text of the Kaspersky Security Network Statement is included in the application distribution kit.
The infrastructure of Kaspersky reputation databases
Kaspersky Endpoint Security supports the following infrastructure solutions for working with Kaspersky reputation databases:
- Kaspersky Security Network (KSN) is the solution that is used by most Kaspersky applications. KSN participants receive information from Kaspersky and send Kaspersky information about objects detected on the user's computer to be analyzed additionally by Kaspersky analysts and to be included in the reputation and statistical databases.
- Kaspersky Private Security Network (KPSN) is a solution that enables users of computers hosting Kaspersky Endpoint Security or other Kaspersky applications to obtain access to Kaspersky reputation databases, and to other statistical data without sending data to Kaspersky from their own computers. KPSN is designed for corporate customers who are unable to participate in Kaspersky Security Network for any of the following reasons:
- Local workstations are not connected to the Internet.
- Transmission of any data outside the country or outside the corporate LAN is prohibited by law or restricted by corporate security policies.
By default, Kaspersky Security Center uses KSN. You can configure the use of KPSN in the Administration Console (MMC), in the Kaspersky Security Center Web Console, and in the command line. It is not possible to configure the use of KPSN in the Kaspersky Security Center Cloud Console.
For more details about KPSN, please refer to the documentation on Kaspersky Private Security Network.
Kaspersky Security Network settings
Parameter |
Description |
|---|---|
Enable extended KSN mode |
Extended KSN mode is a mode in which Kaspersky Endpoint Security sends additional data to Kaspersky. Kaspersky Endpoint Security uses KSN to detect threats regardless of the toggle position. |
Enable cloud mode |
Cloud mode refers to the application operating mode in which Kaspersky Endpoint Security uses a light version of anti-virus databases. Kaspersky Security Network supports the operation of the application when light anti-virus databases are being used. The light version of anti-virus databases lets you use approximately half of the computer RAM that would otherwise be used with the usual databases. If you do not participate in Kaspersky Security Network or if cloud mode is disabled, Kaspersky Endpoint Security downloads the full version of anti-virus databases from Kaspersky servers. If the toggle button is switched on, Kaspersky Endpoint Security uses the light version of anti-virus databases, which reduces the load on operating system resources. Kaspersky Endpoint Security downloads the light version of anti-virus databases during the next update after the check box was selected. If the toggle button is switched off, Kaspersky Endpoint Security uses the full version of anti-virus databases. Kaspersky Endpoint Security downloads the full version of anti-virus databases during the next update after the check box was cleared. |
Computer status when KSN servers are unavailable (available only in the Kaspersky Security Center Console) |
The items in this drop-down list determine the status of a computer in Kaspersky Security Center when KSN servers are unavailable. |
Use Administration Server as a KSN proxy server (available only in the Kaspersky Security Center Console) |
If the check box is selected, Kaspersky Endpoint Security uses the KSN Proxy service. You can configure the KSN Proxy service settings in the Administration Server properties. |
Use Kaspersky Security Network servers if the KSN proxy server is unavailable (available only in the Kaspersky Security Center Console) |
If the check box is selected, Kaspersky Endpoint Security uses KSN servers when the KSN Proxy service is unavailable. KSN servers may be located both on the side of Kaspersky and on the side of third parties (when Kaspersky Private Security Network is used). |
Log Inspection
This component is available if Kaspersky Endpoint Security is installed on a computer that runs on Windows for servers. This component is unavailable if Kaspersky Endpoint Security is installed on a computer that runs on Windows for workstations.
Starting with version 11.11.0, Kaspersky Endpoint Security for Windows includes the Log Inspection component. Log Inspection monitors the integrity of the protected environment based on the Windows event log analysis. When the application detects signs of atypical behavior in the system, it informs the administrator, as this behavior may indicate an attempted cyber attack.
Kaspersky Endpoint Security analyzes Windows event logs and detects violation in accordance with rules. The component includes predefined rules. Predefined rules are powered by heuristic analysis. You can also add your own rules (custom rules). When a rule triggers, the application creates an event with the Critical status (see figure below).
If you want to use Log Inspection, make sure security the audit policy is configured and the system is logging the relevant events (for details, see the Microsoft technical support website.).
Log Inspection notification
Log Inspection settings
Parameter |
Description |
|---|---|
Predefined rules |
List of Log Inspection rules. Predefined rules include templates of abnormal activity on the protected computer. Abnormal activity can signify an attempted attack. |
Custom rules |
List of Log Inspection rules added by the user. You can set your own Log Inspection rule triggering criteria. To do so, you must enter an event ID and select an event source. You can select an event source from among the standard logs: Application, Security or System. You can also specify the log of a third-party application. |
Web Control
Web Control manages users' access to web resources. This helps reduce traffic and inappropriate use of work time. When a user tries to open a website that is restricted by Web Control, Kaspersky Endpoint Security will block access or show a warning (see the figure below).
To use Web Control, you must configure the application as follows:
- For HTTPS traffic monitoring, enable encrypted connections scan (disabled by default).
- Select HTTP and HTTPS ports that you want Kaspersky Endpoint Security to monitor (by default, port monitoring is enabled).
- Select the applications whose traffic you want Kaspersky Endpoint Security to monitor. Most browsers are already present in the list of applications recommended by Kaspersky (by default, monitoring is enabled for these browsers). If your browser is missing from the list, add it manually.
- We recommend to inject a web page interaction script into web traffic (by default, script injection is disabled). This script enables registration of Web Control events for the application event log, OS event log, and reports.
Methods for managing access to websites
Web Control lets you configure access to websites by using the following methods:
- Website category. Websites are categorized according to the Kaspersky Security Network cloud service, heuristic analysis, and the database of known websites (included in application databases). For example, you can restrict user access to the Social networks category or to other categories.
- Data type. You can restrict users' access to data on a website, and hide images, for example. Kaspersky Endpoint Security determines the data type based on the file format and not based on its extension.
Kaspersky Endpoint Security does not scan files within archives. For example, if image files were placed in an archive, Kaspersky Endpoint Security identifies the Archives data type and not Graphics.
- Individual address. You can enter a web address or use masks.
You can simultaneously use multiple methods for regulating access to websites. For example, you can restrict access to the "Office files" data type just for the Web-based email website category.
Website access rules
Web Control manages users' access to websites by using access rules. You can configure the following advanced settings for a website access rule:
- Users to which the rule applies.
For example, you can restrict Internet access through a browser for all users of the company except the IT department.
- Rule schedule.
For example, you can restrict Internet access through a browser during working hours only.
Access rule priorities
Each rule has a priority. The higher a rule is on the list, the higher its priority. If a website has been added to multiple rules, Web Control regulates access to the website based on the rule with the highest priority. For example, Kaspersky Endpoint Security may identify a corporate portal as a social network. To restrict access to social networks and provide access to the corporate web portal, create two rules: one block rule for the Social networks website category and one allow rule for the corporate web portal. The access rule for the corporate web portal must have a higher priority than the access rule for social networks.
Web Control messages
Web Control component settings
Parameter |
Description |
|---|---|
Rules of access to web resources |
List containing web resource access rules. Each rule has a priority. The higher a rule is on the list, the higher its priority. If a website has been added to multiple rules, Web Control regulates access to the website based on the rule with the highest priority. |
Default rule |
The Default rule is a rule for accessing web resources that are not covered by any other rule. The following options are available:
|
Templates |
Warning. The entry field consists of a template of the message that is displayed if a rule for warning about attempts to access an unwanted web resource is triggered. Message about blocking. The entry field contains the template of the message that appears if a rule which blocks access to a web resource is triggered. Message to administrator. Template of the message to be sent to the LAN administrator if the user considers the block to be a mistake. After the user requests to provide access, Kaspersky Endpoint Security sends an event to Kaspersky Security Center: Web page access blockage message to administrator. The event description contains a message to administrator with substituted variables. You can view these events in the Kaspersky Security Center console using the predefined event selection User requests. If your organization does not have Kaspersky Security Center deployed or there is no connection to the Administration Server, the application will send a message to administrator to the specified email address. |
Log the opening of allowed pages |
Kaspersky Endpoint Security logs data on visits to all websites, including allowed websites. Kaspersky Endpoint Security sends events to Kaspersky Security Center, to the local log of Kaspersky Endpoint Security, and to the Windows Event log. To monitor user Internet activity, you need to configure the settings for saving events. Browsers that support the monitoring function: Microsoft Edge, Microsoft Internet Explorer, Google Chrome, Yandex Browser, Mozilla Firefox. User activity monitoring does not work in other browsers. Monitoring user Internet activity may require more computer resources when decrypting HTTPS traffic. |
Device Control
Device Control manages user access to devices that are installed on or connected to the computer (for example, hard drives, cameras, or Wi-Fi modules). This lets you protect the computer from infection when such devices are connected, and prevent loss or leaks of data.
Device access levels
Device Control controls access at the following levels:
- Device type. For example, printers, removable drives, and CD/DVD drives.
You can configure device access as follows:
- Allow – .
- Block – .
- By rules (printers and portable devices only) – .
- Depends on connection bus (except Wi-Fi) – .
- Block with exceptions (Wi-Fi only) – .
- Allow –
- Connection bus. A connection bus is an interface used for connecting devices to the computer (for example, USB or FireWire). If Depends on connection bus mode is selected for the device type, the application allows or denies access to the device depending on the connection interface (e.g. USB).
You can configure device access as follows:
- Allow – .
- Block – .
- Allow –
- Trusted devices. Trusted devices are devices to which users that are specified in the trusted device settings have full access at all times.
You can add trusted devices based on the following data:
- Devices by ID. Each device has a unique identifier (Hardware ID, or HWID). You can view the ID in the device properties by using operating system tools. Example of a device ID:
SCSI\CDROM&VEN_NECVMWAR&PROD_VMWARE_SATA_CD00\5&354AE4D7&0&000000. Adding devices by ID is convenient if you want to add several specific devices. - Devices by model. Each device has a vendor ID (VID) and a product ID (PID). You can view the IDs in the device properties by using operating system tools. Template for entering the VID and PID:
VID_1234&PID_5678. Adding devices by model is convenient if you use devices of a certain model in your organization. This way, you can add all devices of this model. - Devices by ID mask. If you are using multiple devices with similar IDs, you can add devices to the trusted list by using masks. The
*character replaces any set of characters. Kaspersky Endpoint Security does not support the?character when entering a mask. For example,WDC_C*. - Devices by model mask. If you are using multiple devices with similar VIDs or PIDs (for example, devices from the same manufacturer), you can add devices to the trusted list by using masks. The
*character replaces any set of characters. Kaspersky Endpoint Security does not support the?character when entering a mask. For example,VID_05AC&PID_*.
- Devices by ID. Each device has a unique identifier (Hardware ID, or HWID). You can view the ID in the device properties by using operating system tools. Example of a device ID:
Device Control regulates user access to devices by using access rules. Device Control also lets you save device connection/disconnection events. To save events, you need to configure the registration of events in a policy.
If access to a device depends on the connection bus (the ![]() status), Kaspersky Endpoint Security does not save device connection/disconnection events. To enable Kaspersky Endpoint Security to save device connection/disconnection events, allow access to the corresponding type of device (the
status), Kaspersky Endpoint Security does not save device connection/disconnection events. To enable Kaspersky Endpoint Security to save device connection/disconnection events, allow access to the corresponding type of device (the ![]() status) or add the device to the trusted list.
status) or add the device to the trusted list.
When a device that is blocked by Device Control is connected to the computer, Kaspersky Endpoint Security will block access and show a notification (see the figure below).
Device Control notification
Device Control operating algorithm
Kaspersky Endpoint Security makes a decision on whether to allow access to a device after the user connects the device to the computer (see the figure below).
Device Control operating algorithm
If a device is connected and access is allowed, you can edit the access rule and block access. In this case, the next time someone attempts to access the device (such as to view the folder tree, or perform read or write operations), Kaspersky Endpoint Security blocks access. A device without a file system is blocked only the next time that the device is connected.
If a user of the computer with Kaspersky Endpoint Security installed must request access to a device that the user believes was blocked by mistake, send the user the request access instructions.
Device Control component settings
Parameter |
Description |
|---|---|
Allow requests for temporary access (available only in the Kaspersky Security Center Console) |
If the check box is selected, the Request access button is available through the local interface of Kaspersky Endpoint Security. Using this button, the user can request temporary access to a blocked device. |
Devices and Wi-Fi networks |
This table contains all possible types of devices according to the classification of the Device Control component, including their respective access statuses. |
Connection buses |
A list of all available connection buses according to the Device Control component's classification, including their respective access statuses. Kaspersky Endpoint Security allows or denies access to devices depending on the type of connection bus if Depends on connection bus mode is selected. |
Trusted devices |
List of trusted devices and users who are granted access to these devices. |
Anti-Bridging |
Anti-Bridging inhibits the creation of network bridges by preventing the simultaneous establishment of multiple network connections for a computer. This lets you protect a corporate network from attacks over unprotected, unauthorized networks. Anti-Bridging blocks the establishment of multiple connections according to the priorities of devices. The higher a device is on the list, the higher its priority. If an active connection and a new connection are both of the same type (for example, Wi-Fi), Kaspersky Endpoint Security blocks the active connection and allows establishment of the new connection. If an active connection and a new connection are of different types (for example, a network adapter and Wi-Fi), Kaspersky Endpoint Security blocks the connection with the lower priority and allows the connection with the higher priority. Anti-Bridging supports operation with the following types of devices: network adapter, Wi-Fi, and modem. |
Message templates |
Message about blocking. Template of the message that appears when a user attempts to access a blocked device. This message also appears when a user attempts to perform an operation on the device contents that was blocked for this user. Message to administrator. A template of the message that is sent to the LAN administrator when the user believes that access to the device is blocked or an operation with device content is forbidden by mistake. After the user requests to provide access, Kaspersky Endpoint Security sends an event to Kaspersky Security Center: Device access blockage message to administrator. The event description contains a message to administrator with substituted variables. You can view these events in the Kaspersky Security Center console using the predefined event selection User requests. If your organization does not have Kaspersky Security Center deployed or there is no connection to the Administration Server, the application will send a message to administrator to the specified email address. |
Application Control
Application Control manages the startup of applications on users' computers. This allows you to implement a corporate security policy when using applications. Application Control also reduces the risk of computer infection by restricting access to applications.
Configuring Application Control consists of the following steps:
- Creating application categories.
The administrator creates categories of applications that the administrator wants to manage. Categories of applications are intended for all computers in the corporate network, regardless of administration groups. To create a category, you can use the following criteria: KL category (for example, Browsers), file hash, application vendor, and other criteria.
- Creating Application Control rules.
The administrator creates Application Control rules in the policy for the administration group. The rule includes the categories of applications and the startup status of applications from these categories: blocked or allowed.
- Selecting the Application Control mode.
The administrator chooses the mode for working with applications that are not included in any of the rules (application denylist and allowlist).
When a user attempts to start a prohibited application, Kaspersky Endpoint Security will block the application from starting and will display a notification (see the figure below).
A test mode is provided to check the configuration of Application Control. In this mode, Kaspersky Endpoint Security does the following:
- Allows the startup of applications, including prohibited ones.
- Shows a notification about the startup of a prohibited application and adds information to the report on the user's computer.
- Sends data about the startup of prohibited applications to Kaspersky Security Center.
Application Control notification
Application Control operating modes
The Application Control component operates in two modes:
- Denylist. In this mode, Application Control allows users to start all applications except for applications that are prohibited in Application Control rules.
This mode of Application Control is enabled by default.
- Allowlist. In this mode, Application Control blocks users from starting any applications except for applications that are allowed and not prohibited in Application Control rules.
If the allow rules of Application Control are fully configured, the component blocks the startup of all new applications that have not been verified by the LAN administrator, while allowing the operation of the operating system and of trusted applications that users rely on in their work.
You can read the recommendations on configuring Application Control rules in allowlist mode.
Application Control can be configured to operate in these modes both by using the Kaspersky Endpoint Security local interface and by using Kaspersky Security Center.
However, Kaspersky Security Center offers tools that are not available in the Kaspersky Endpoint Security local interface, such as the tools that are needed for the following tasks:
- Creating application categories.
Application Control rules created in the Kaspersky Security Center Administration Console are based on your custom application categories and not on inclusion and exclusion conditions as is the case in the Kaspersky Endpoint Security local interface.
- Receiving information about applications that are installed on corporate LAN computers.
This is why it is recommended to use Kaspersky Security Center to configure the operation of the Application Control component.
Application Control operating algorithm
Kaspersky Endpoint Security uses an algorithm to make a decision about starting an application (see the figure below).
Application Control operating algorithm
Application Control component settings
Parameter |
Description |
|---|---|
Action on starting applications blocked by rules |
Apply rules. Kaspersky Endpoint Security manages the startup of applications according to the selected mode. Test rules. Kaspersky Endpoint Security allows the startup of an application that is blocked in the current Application Control mode, but logs information about the application startup in the report. |
Application Startup Control mode |
You can choose one of the following options:
When Allowlist mode is selected, two Application Control rules are automatically created:
You cannot edit the settings of or delete automatically created rules. You can enable or disable these rules. |
Monitor loading of DLL modules |
If the check box is selected, Kaspersky Endpoint Security controls the loading of DLL modules when users attempt to start applications. Information about the DLL module and the application that loaded this DLL module is logged in the report. When enabling control over the loading of DLL modules and drivers, make sure that one of the following rules is enabled in the Application Control settings: the default Golden Image rule or another rule that contains the "Trusted certificates" KL category and ensures that trusted DLL modules and drivers are loaded before Kaspersky Endpoint Security is started. Enabling control of the loading of DLL modules and drivers when the Golden Image rule is disabled may cause instability in the operating system. Kaspersky Endpoint Security monitors only the DLL modules and drivers that have been loaded since the check box was selected. After selecting the check box, it is recommended to restart the computer to ensure that the application monitors all DLL modules and drivers, including those loaded before Kaspersky Endpoint Security starts. |
Use strict digital signature verification |
You can select a certificate as a triggering condition for an Application Control rule. If this check box is selected, Kaspersky Endpoint Security applies rules to applications signed with certificates only from the trusted system certificate store. Applications signed with such a certificate are also considered trusted by the protection components, for example, the Malware Scan task. However, if you specify a certificate from a different store in an Application Control rule, Kaspersky Endpoint Security does not apply such a rule. If the check box is cleared, Kaspersky Endpoint Security applies rules to applications signed by a certificate from the Windows Trusted Root Certificate Store. Such applications are not part of the trusted zone. Protection components monitor the activity of such applications. |
Templates of messages about application blocking |
Message about blocking. Template of the message that is displayed when an Application Control rule that blocks an application from starting is triggered. Message to administrator. Template of the message that a user can send to the corporate LAN administrator if the user believes that an application was blocked by mistake. After the user requests to provide access, Kaspersky Endpoint Security sends an event to Kaspersky Security Center: Application startup blockage message to administrator. The event description contains a message to administrator with substituted variables. You can view these events in the Kaspersky Security Center console using the predefined event selection User requests. If your organization does not have Kaspersky Security Center deployed or there is no connection to the Administration Server, the application will send a message to administrator to the specified email address. |
Adaptive Anomaly Control
This component is available if Kaspersky Endpoint Security is installed on a computer that runs on Windows for workstations. This component is unavailable if Kaspersky Endpoint Security is installed on a computer that runs on Windows for servers.
The Adaptive Anomaly Control component monitors and blocks actions that are not typical of the computers in a company's network. Adaptive Anomaly Control uses a set of rules to track non-typical behavior (for example, the Start of Microsoft PowerShell from office application rule). Rules are created by Kaspersky specialists based on typical scenarios of malicious activity. You can configure how Adaptive Anomaly Control handles each rule and, for example, allow the execution of PowerShell scripts that automate certain workflow tasks. Kaspersky Endpoint Security updates the set of rules along with the application databases. Updates to the sets of rules must be confirmed manually.
Adaptive Anomaly Control settings
Configuring Adaptive anomaly control consists of the following steps:
- Training Adaptive Anomaly Control.
After you enable Adaptive Anomaly Control, its rules work in training mode. During the training, Adaptive Anomaly Control monitors rule triggering and sends triggering events to Kaspersky Security Center. Each rule has its own duration of the training mode. The duration of the training mode is set by Kaspersky experts. Normally, the training mode is active for two weeks.
If a rule is not triggered at all during the training, Adaptive Anomaly Control will consider the actions associated with this rule as non-typical. Kaspersky Endpoint Security will block all actions associated with that rule.
If a rule was triggered during training, Kaspersky Endpoint Security logs events in the rule triggering report and the Triggering of rules in Smart Training state repository.
- Analyzing the rule triggering report.
The administrator analyzes the rule triggering report or the contents of the Triggering of rules in Smart Training state repository. Then the administrator can select the behavior of Adaptive Anomaly Control when the rule is triggered: either block or allow. The administrator can also continue to monitor how the rule works and extend the duration of the training mode. If the administrator does not take any action, the application will also continue to work in training mode. The training mode term is restarted.
Adaptive Anomaly Control is configured in real time. Adaptive Anomaly Control is configured via the following channels:
- Adaptive Anomaly Control automatically starts to block the actions associated with the rules that were never triggered in training mode.
- Kaspersky Endpoint Security adds new rules or removes obsolete ones.
- The administrator configures the operation of the Adaptive Anomaly Control after reviewing the rule triggering report and the contents of the Triggering of rules in Smart Training state repository. It is recommended to check the rule triggering report and the contents of the Triggering of rules in Smart Training state repository.
When a malicious application attempts to perform an action, Kaspersky Endpoint Security will block the action and display a notification (see figure below).
Adaptive Anomaly Control notification
Adaptive Anomaly Control operating algorithm
Kaspersky Endpoint Security decides whether to allow or block an action that is associated with a rule based on the following algorithm (see the figure below).
Adaptive Anomaly Control operating algorithm
Adaptive Anomaly Control component settings
Parameter |
Description |
|---|---|
Report on Adaptive Anomaly Control rules state (available only in the Kaspersky Security Center Console) |
This report contains information about the status of Adaptive Anomaly Control detection rules (for example, the Disabled or Block). The report is generated for all administration groups. |
Report on triggered Adaptive Anomaly Control rules (available only in the Kaspersky Security Center Console) |
This report contains information about non-typical actions detected using Adaptive Anomaly Control. The report is generated for all administration groups. |
Rules |
Adaptive Anomaly Control table of rules. Rules are created by Kaspersky specialists based on typical scenarios of potentially malicious activity. |
Templates |
Message about blocking. Template of the message that is displayed to a user when an Adaptive Anomaly Control rule that blocks a non-typical action is triggered. Message to administrator. Template of the message that a user can be sent to the local corporate network administrator if the user considers the blocking to be a mistake. After the user requests to provide access, Kaspersky Endpoint Security sends an event to Kaspersky Security Center: Application activity blockage message to administrator. The event description contains a message to administrator with substituted variables. You can view these events in the Kaspersky Security Center console using the predefined event selection User requests. If your organization does not have Kaspersky Security Center deployed or there is no connection to the Administration Server, the application will send a message to administrator to the specified email address. |
System Integrity Monitoring
This component is available if Kaspersky Endpoint Security is installed on a computer that runs on Windows for servers. This component is unavailable if Kaspersky Endpoint Security is installed on a computer that runs on Windows for workstations.
Starting with version 12.6, Kaspersky Endpoint Security for Windows includes the System Integrity Monitoring component instead of the File Integrity Monitor component. System Integrity Monitoring component includes all functionality of File Integrity Monitor and additionally allows to monitor registry changes and connection of external devices.
The System Integrity Monitoring component monitors changes in the operating system that may indicate computer security breaches. When such changes are detected, Kaspersky Endpoint Security generates corresponding events and alerts the administrator. System Integrity Monitoring can operate in real-time mode and can also perform system integrity checks on demand.
Real-Time System Integrity Monitoring
In real-time mode, System Integrity Monitoring tracks changes in objects that you included in the component's scope (the monitoring scope). System Integrity Monitoring also allows blocking unauthorized access to such objects in real time.
On-Demand System Integrity Check
On-Demand System Integrity Check is a task that you can run manually or on a schedule. To run the System Integrity Check task, you must configure the scope of the component (the monitoring scope) and create a baseline. A baseline is a recorded state of objects in the system, which the application uses as reference when comparing to the current state.
System Integrity Monitoring settings
Parameter |
Description |
|---|---|
Operating mode for blocking rules |
|
Real-Time System Integrity Monitoring |
In real-time mode, System Integrity Monitoring tracks changes in objects that you included in the component's scope (the monitoring scope). System Integrity Monitoring also allows blocking unauthorized access to such objects in real time. |
Monitor devices |
System Integrity Monitoring monitors connection and disconnection of external devices. |
Monitor files and the registry |
System Integrity Monitoring monitors changes to files, folders, and registry. |
System Integrity Check |
On-Demand System Integrity Check is a task that you can run manually or on a schedule. To run the System Integrity Check task, you must configure the scope of the component (the monitoring scope) and create a baseline. A baseline is a recorded state of objects in the system, which the application uses as reference when comparing to the current state. |
Endpoint Sensor
Endpoint Sensor is not included in Kaspersky Endpoint Security 11.4.0.
You can manage the Endpoint Sensor in the Kaspersky Security Center Web Console and in the Kaspersky Security Center Administration Console. It is not possible to manage Endpoint Sensor in the Kaspersky Security Center Cloud Console.
Endpoint Sensor is designed to interact with Kaspersky Anti Targeted Attack Platform. Kaspersky Anti Targeted Attack Platform is a solution designed for timely detection of sophisticated threats such as targeted attacks, advanced persistent threats (APT), zero-day attacks, and others. Kaspersky Anti Targeted Attack Platform includes three functional units:
- Kaspersky Anti Targeted Attack Platform (KATA)
- Kaspersky Endpoint Detection and Response (EDR (KATA))
- Network Detection and Response (NDR (KATA))
You can purchase all functional units or individual functional units separately. For details about the solution, please refer to the Kaspersky Anti Targeted Attack Platform Help.
Managing Endpoint Sensor has the following limitations:
- You can configure Endpoint Sensor settings in a policy provided that Kaspersky Endpoint Security version 11.0.0 to 11.3.0 is installed on the computer. For more information about configuring Endpoint Sensor settings using the policy, refer to the help articles for the previous versions of Kaspersky Endpoint Security.
- If Kaspersky Endpoint Security version 11.4.0 and later is installed on the computer, you cannot configure Endpoint Sensor settings in the policy.
Endpoint Sensor is installed on client computers. On these computers, the component constantly monitors processes, active network connections, and files that are modified. Endpoint Sensor relays information to the KATA server.
The component functionality is available under the following operating systems:
- Windows 7 Service Pack 1 Home / Professional / Enterprise;
- Windows 8.1.1 Professional / Enterprise;
- Windows 10 RS3 Home / Professional / Education / Enterprise;
- Windows 10 RS4 Home / Professional / Education / Enterprise;
- Windows 10 RS5 Home / Professional / Education / Enterprise;
- Windows 10 RS6 Home / Professional / Education / Enterprise;
- Windows Server 2008 R2 Foundation / Standard / Enterprise (64-bit);
- Windows Server 2012 Foundation / Standard / Enterprise (64-bit);
- Windows Server 2012 R2 Foundation / Standard / Enterprise (64-bit);
- Windows Server 2016 Essentials / Standard (64-bit).
For detailed information on KATA operation, refer to the Kaspersky Anti Targeted Attack Platform Help.
Page top
Sandbox
Kaspersky Endpoint Security for Windows includes a built-in agent for integration with Kaspersky Sandbox solution. The Sandbox component detects and automatically blocks advanced threats on computers. Sandbox analyzes object behavior to detect malicious activity and activity characteristic of targeted attacks on the IT infrastructure of the organization. Sandbox analyzes and scans objects on special servers with deployed virtual images of Microsoft Windows operating systems (the Sandbox servers). For details about the solution, please refer to the Kaspersky Sandbox Help and Kaspersky Anti Targeted Attack Platform Help.
Starting with version 12.7, Kaspersky Endpoint Security for Windows supports the Sandbox component that is part of the Kaspersky Anti Targeted Attack Platform solution. In contrast to the Kaspersky Sandbox solution, the KATA Sandbox component only allows scanning files manually from the file context menu.
KATA Sandbox requires Kaspersky Anti Targeted Attack Platform 7.0 or later to be deployed.
The component can be managed only using the Kaspersky Security Center Web Console. You cannot manage this component using the Administration Console (MMC).
Sandbox component settings
Parameter |
Description |
|---|---|
Integration mode |
|
Server TLS certificate |
To configure a trusted connection with the Sandbox server, you must prepare a TLS certificate. You must then add the certificate to the computer using a policy. You also need to add the certificate to the Sandbox server. If you selected the KATA Sandbox (manual file submission for scanning), type, you must add the certificate to the Central Node server. |
Server connection settings |
Timeout. Connection timeout for the Sandbox server. After the configured timeout elapses, Kaspersky Endpoint Security sends a request to the next server. You can increase the connection timeout for the server if your connection speed is low or if the connection is unstable. The recommended request timeout is 0.5 seconds or less. Request queue. Size of the request queue folder. When sending multiple objects for scanning in Sandbox, Kaspersky Endpoint Security creates a request queue. By default, the size of the request queue folder is limited to 100 MB. After the maximum size is reached, Sandbox stops adding new requests to the queue and sends the corresponding event to Kaspersky Security Center. You can configure the size of the request queue folder depending on your server configuration. Server TLS certificate. To configure a trusted connection with the Sandbox server, you must prepare a TLS certificate. You must then add the certificate to the computer using a policy. You also need to add the certificate to the Sandbox server. Use two-way authentication (only for KATA Sandbox). Two-way authentication when establishing a secure connection between Kaspersky Endpoint Security and the Central Node server. To use two-way authentication, you need to enable two-way authentication in the Central Node server settings, then get a crypto-container and set a password to protect the crypto-container. A crypto-container is a PFX archive with a certificate and a private key. You can get a crypto-container in the Kaspersky Anti Targeted Attack Platform console (see instructions in the Kaspersky Anti Targeted Attack Platform Help). After configuring Sandbox server settings, you need to also enable two-way authentication in Kaspersky Endpoint Security settings and load a password-protected crypto-container. |
Servers |
Sandbox server connection settings. The servers use deployed virtual images of Microsoft Windows operating systems to run objects that need to be scanned. You can enter an IP address (IPv4 or IPv6) or a fully qualified domain name. |
Action on threat detection |
Move copy to Quarantine, delete object. If this option is selected, Kaspersky Endpoint Security deletes the malicious object found on the computer. Before deleting the object, Kaspersky Endpoint Security creates a backup copy in case the object needs to be restored later. Kaspersky Endpoint Security moves the backup copy to Quarantine. Run scan of critical areas. If this option is selected, Kaspersky Endpoint Security runs the Critical Areas Scan task. By default, Kaspersky Endpoint Security scans the kernel memory, running processes, and disk boot sectors. Create IOC scan task. If this option is selected, Kaspersky Endpoint Security automatically creates the IOC Scan (autonomous IOC scan task). For this task, you can configure the run mode, scan scope, and action on IOC detection: delete object, run the Critical Areas Scan task. To modify other settings of the IOC Scan task, go to the task settings. |
IOC scan scope |
Critical file areas. If this option is selected, Kaspersky Endpoint Security does an IOC scan only in critical file areas of the computer: kernel memory and boot sectors. File areas on system drives of the computer. IF this option is selected, Kaspersky Endpoint Security does an IOC scan on the system drive of the computer. |
Run IOC scan task |
Manually. Run mode in which you can start the IOC Scan task manually at a time when it is convenient for you. After threat is detected. Run mode in which Kaspersky Endpoint Security runs the IOC Scan task automatically whenever a threat is detected. Run only when the computer is idle. Run mode in which Kaspersky Endpoint Security runs the IOC Scan task if the screensaver is active or the screen is locked. If the user unlocks the computer, Kaspersky Endpoint Security pauses the task. This means that the task can take several days to complete. |
Managed Detection and Response
Kaspersky Endpoint Security for Windows supports integration with the Managed Detection and Response solution. The Kaspersky Managed Detection and Response (MDR) solution automatically detects and analyzes security incidents in your infrastructure. To do so, MDR uses telemetry data received from endpoints and machine learning. MDR sends incident data to Kaspersky experts. The experts can then process the incident and, for example, add a new entry to Anti-Virus databases. Alternatively, the experts can issue recommendations on processing the incident and, for example, suggest isolating computer from the network. For detailed information about how the solution works, please refer to the Kaspersky Managed Detection and Response Help.
Managed Detection and Response settings
Parameter |
Description |
|---|---|
MDR configuration file |
The BLOB file contains the client ID and information about the license for Kaspersky Managed Detection and Response. The BLOB file is located inside the ZIP archive of the MDR configuration file. You can obtain the ZIP archive in the Kaspersky Managed Detection and Response Console. For detailed information about a BLOB file, please refer to the Kaspersky Managed Detection and Response Help. |
Endpoint Detection and Response
Kaspersky Endpoint Security for Windows includes a built-in agent for the Kaspersky Endpoint Detection and Response Optimum solution (hereinafter also "EDR Optimum"). Starting with version 11.8.0, Kaspersky Endpoint Security for Windows includes a built-in agent for the Kaspersky Endpoint Detection and Response Expert solution (hereinafter also "EDR Expert"). Kaspersky Endpoint Detection and Response is a range of solutions for protecting the corporate IT infrastructure from advanced cyber threats. The functionality of the solutions combines automatic detection of threats with the ability to react to these threats to counteract advanced attacks including new exploits, ransomware, fileless attacks, as well as methods using legitimate system tools. EDR Expert offers more threat monitoring and response functionality than EDR Optimum. For details about the solutions, see the Kaspersky Endpoint Detection and Response Optimum Help and the Kaspersky Endpoint Detection and Response Expert Help.
Kaspersky Endpoint Detection and Response reviews and analyses threat development and provides security personnel or the Administrator with information about the potential attack that is necessary for a timely response. Kaspersky Endpoint Detection and Response displays alert details in a separate window. An alert is an event in the corporate IT infrastructure that the application has identified as unusual or suspicious and that can pose a security threat for the corporate IT infrastructure. Alert Details is a tool for viewing the entirety of collected information about a detected threat. Alert details include, for example, the history of files appearing on the computer. For details about managing alert details, refer to the Kaspersky Endpoint Detection and Response Optimum Help and the Kaspersky Endpoint Detection and Response Expert Help.
You can configure the EDR Optimum component in Web Console and Cloud Console. Component settings for EDR Expert are available only in Cloud Console.
Endpoint Detection and Response settings
Parameter |
Description |
|---|---|
Network isolation |
Automatic isolation of the computer from the network in response to detected threats. When network isolation is turned on, the application severs all active connections and blocks all new TCP/IP connections on the computer. The application leaves only the following connections active:
|
Automatically unlock isolated computer in N hours |
Network isolation can be turned off automatically after a specified time or manually. By default, Kaspersky Endpoint Security turns off Network isolation 5 hours after the start of the isolation. |
Network isolation exclusions |
List of rules for exclusions from network isolation. Network connections that match the rules are not blocked on computers when Network isolation is turned on. To configure Network isolation exclusions, you can use a list of standard network profiles. By default, exclusions include network profiles containing rules that ensure uninterrupted operation of devices with the DNS/DHCP server and DNS/DHCP client roles. You can also modify the settings of standard network profiles or define exclusions manually. Exclusions specified in policy properties are applied only if Network isolation is turned on automatically in response to a detected threat. Exclusions specified in computer properties are applied only if Network isolation is turned on manually in computer properties in the Kaspersky Security Center console or in alert details. |
Execution prevention |
Control the execution of executable files and scripts and opening of office format files. For example, you can prevent the execution of applications that are considered insecure on the selected computer. Execution prevention supports a set of office file extensions and a set of script interpreters. To use Execution prevention component, you need to add execution prevention rules. Execution prevention rule is a set of criteria that the application takes into account when reacting to an object execution, for example when blocking object execution. The application identifies files by their paths or checksums calculated using MD5 and SHA256 hashing algorithms. |
Action on execution or opening of forbidden object |
Block and write to report. In this mode, the application blocks the execution of objects or opening of documents that match prevention rule criteria. The application also publishes an event about attempts to execute objects or open documents to the Windows event log and Kaspersky Security Center event log. Log only. In this mode, Kaspersky Endpoint Security publishes an event about attempts to run executable objects or open documents that match prevention rule criteria to the Windows event log and Kaspersky Security Center, but does not block the attempt to run or open the object or document. This mode is selected by default. |
Cloud Sandbox |
Cloud Sandbox is a technology that lets you detect advanced threats on a computer. Kaspersky Endpoint Security automatically forwards detected files to Cloud Sandbox for analysis. Cloud Sandbox runs these files in an isolated environment to identify malicious activity and decides on their reputation. Data on these files is then sent to Kaspersky Security Network. Therefore, if Cloud Sandbox has detected a malicious file, Kaspersky Endpoint Security will perform the appropriate action to eliminate this threat on all computers where this file is detected. Cloud Sandbox technology is permanently enabled and is available to all Kaspersky Security Network users regardless of the type of license they are using. If this check box is selected, Kaspersky Endpoint Security will enable the counter for threats detected using Cloud Sandbox in the main application window under Threat detection technologies. Kaspersky Endpoint Security will also indicate the Cloud Sandbox threat detection technology in application events and in the Report on threats in the Kaspersky Security Center console. |
Endpoint Detection and Response (KATA)
Kaspersky Endpoint Security for Windows supports working with the Kaspersky Endpoint Detection and Response component as part of the Kaspersky Anti Targeted Attack Platform (EDR (KATA)) solution. Kaspersky Anti Targeted Attack Platform is a solution designed for timely detection of sophisticated threats such as targeted attacks, advanced persistent threats (APT), zero-day attacks, and others. Kaspersky Anti Targeted Attack Platform includes three functional units:
- Kaspersky Anti Targeted Attack Platform (KATA)
- Kaspersky Endpoint Detection and Response (EDR (KATA))
- Network Detection and Response (NDR (KATA))
You can purchase all functional units or individual functional units separately. For details about the solution, please refer to the Kaspersky Anti Targeted Attack Platform Help.
Kaspersky Endpoint Security is installed on individual computers on the corporate IT infrastructure and continuously monitors processes, open network connections, and files being modified. Information about events on the computer (telemetry data) is sent to the Kaspersky Anti Targeted Attack Platform server. In this case, Kaspersky Endpoint Security also sends information to the Kaspersky Anti Targeted Attack Platform server about threats discovered by the application as well as information about processing results for these threats.
The EDR (KATA) and NDR (KATA) integration is configured in the Kaspersky Security Center console. The built-in agent is then managed using the Kaspersky Anti Targeted Attack Platform console, including running tasks, managing quarantined objects, viewing reports, and other actions.
Endpoint Detection and Response (KATA) settings
Parameter |
Description |
|---|---|
Settings for connecting to KATA servers |
Timeout (sec). Maximum Central Node server response timeout. When the timeout runs out, Kaspersky Endpoint Security tries to connect to a different Central Node server. Server TLS certificate. TLS certificate for establishing a trusted connection with the Central Node server. You can get a TLS certificate in the Kaspersky Anti Targeted Attack Platform console (see instructions in the Kaspersky Anti Targeted Attack Platform Help). Use two-way authentication. Two-way authentication when establishing a secure connection between Kaspersky Endpoint Security and Central Node. To use two-way authentication, you need to enable two-way authentication in the Central Node settings, then get a crypto-container and set a password to protect the crypto-container. A crypto-container is a PFX archive with a certificate and a private key. You can get a crypto-container in the Kaspersky Anti Targeted Attack Platform console (see instructions in the Kaspersky Anti Targeted Attack Platform Help). After configuring the Central Node settings, you need to also enable two-way authentication in Kaspersky Endpoint Security settings and load a password-protected crypto-container. The crypto-container must be password-protected. It is not possible to add a crypto-container with a blank password. |
KATA servers |
Kaspersky Anti Targeted Attack Platform servers connection settings. You can enter an IP address (IPv4 or IPv6). You can add multiple Central Node server addresses. Kaspersky Endpoint Security makes an attempt to connect to the server at the first IP address. If a connection cannot be established, Kaspersky Endpoint Security tries to connect at the second IP address in the list and so on. |
Send sync request to KATA server every (min) |
Frequency of synchronization requests sent to the server. During synchronization, Kaspersky Endpoint Security sends information about modified application settings and tasks. |
Send telemetry to KATA |
This functionality lets you completely turn off the sending of telemetry to the server. If you are using Kaspersky Anti Targeted Attack Platform together with another solution which also uses telemetry, you can turn off telemetry for KATA (EDR). This lets you optimize server load for these solutions. For example, if you have the Managed Detection and Response solution and KATA (EDR) deployed, you can use MDR telemetry and create Threat Response tasks in KATA (EDR). |
Maximum events transmission delay (sec) |
The application synchronizes with the server to send events after the synchronization interval expires. The default setting is 30 seconds. |
Enable request throttling |
This feature helps optimize the load on the server. If the check box is selected, the application restricts the transmitted events. If the number of events exceeds the configured limits, Kaspersky Endpoint Security stops sending events. |
Maximum number of events per hour |
The application analyzes the telemetry data stream and restricts the sending of events if the event stream exceeds the configured events-per-hour limit. Kaspersky Endpoint Security resumes sending events after an hour. The default setting is 3000 events per hour. If the application is installed on a server, the telemetry data stream is higher. For servers, it is recommended to increase the value to 60 000 events per hour. |
Percentage of event limit excess |
The application sorts events by type (for example, "changes in the registry" events) and restricts transmission of events if the ratio of events of the same type to the total number of events exceeds the configured limit in percent. Kaspersky Endpoint Security resumes sending events when the ratio of other events to the total number of events becomes big enough again. The default setting is 15 %. |
Network Detection and Response (KATA)
Kaspersky Endpoint Security for Windows supports working with the Kaspersky Endpoint Detection and Response component as part of the Kaspersky Anti Targeted Attack Platform (EDR (KATA)) solution. Kaspersky Anti Targeted Attack Platform is a solution designed for timely detection of sophisticated threats such as targeted attacks, advanced persistent threats (APT), zero-day attacks, and others. Kaspersky Anti Targeted Attack Platform includes three functional units:
- Kaspersky Anti Targeted Attack Platform (KATA)
- Kaspersky Endpoint Detection and Response (EDR (KATA))
- Network Detection and Response (NDR (KATA))
You can purchase all functional units or individual functional units separately. For details about the solution, please refer to the Kaspersky Anti Targeted Attack Platform Help.
Kaspersky Endpoint Security is installed on individual computers on the corporate IT infrastructure and continuously monitors processes, open network connections, and files being modified. Information about events on the computer (telemetry data) is sent to the Kaspersky Anti Targeted Attack Platform server. In this case, Kaspersky Endpoint Security also sends information to the Kaspersky Anti Targeted Attack Platform server about threats discovered by the application as well as information about processing results for these threats.
The EDR (KATA) and NDR (KATA) integration is configured in the Kaspersky Security Center console. The built-in agent is then managed using the Kaspersky Anti Targeted Attack Platform console, including running tasks, managing quarantined objects, viewing reports, and other actions.
Network Detection and Response (KATA) parameters
Parameter |
Description |
|---|---|
Server connection settings |
Timeout. Maximum Central Node server response timeout. When the timeout runs out, Kaspersky Endpoint Security tries to connect to a different Central Node server. Server TLS certificate. TLS certificate for establishing a trusted connection with the Central Node server. You can get a TLS certificate in the Kaspersky Anti Targeted Attack Platform console (see instructions in the Kaspersky Anti Targeted Attack Platform Help). Use two-way authentication. Two-way authentication when establishing a secure connection between Kaspersky Endpoint Security and Central Node. To use two-way authentication, you need to enable two-way authentication in the Central Node settings, then get a crypto-container and set a password to protect the crypto-container. A crypto-container is a PFX archive with a certificate and a private key. You can get a crypto-container in the Kaspersky Anti Targeted Attack Platform console (see instructions in the Kaspersky Anti Targeted Attack Platform Help). After configuring the Central Node settings, you need to also enable two-way authentication in Kaspersky Endpoint Security settings and load a password-protected crypto-container. The crypto-container must be password-protected. It is not possible to add a crypto-container with a blank password. |
Address and Port |
Kaspersky Anti Targeted Attack Platform servers connection settings. You can enter an IP address (IPv4 or IPv6). You can add multiple Central Node server addresses. Kaspersky Endpoint Security makes an attempt to connect to the server at the first IP address. If a connection cannot be established, Kaspersky Endpoint Security tries to connect at the second IP address in the list and so on. |
Send sync request to NDR server every (min) |
Frequency of synchronization requests sent to the server. During synchronization, Kaspersky Endpoint Security sends information about modified application settings and tasks. |
Maximum events transmission delay (sec) |
The application synchronizes with the server to send events after the synchronization interval expires. The default setting is 30 seconds. |
Enable request throttling |
This feature helps optimize the load on the server. If the check box is selected, the application restricts the transmitted events. If the number of events exceeds the configured limits, Kaspersky Endpoint Security stops sending events. |
Maximum number of events per hour |
The application analyzes the telemetry data stream and restricts the sending of events if the event stream exceeds the configured events-per-hour limit. Kaspersky Endpoint Security resumes sending events after an hour. The default setting is 3000 events per hour. If the application is installed on a server, the telemetry data stream is higher. For servers, it is recommended to increase the value to 60 000 events per hour. |
Percentage of event limit excess |
The application sorts events by type (for example, "changes in the registry" events) and restricts transmission of events if the ratio of events of the same type to the total number of events exceeds the configured limit in percent. Kaspersky Endpoint Security resumes sending events when the ratio of other events to the total number of events becomes big enough again. The default setting is 15 %. |
Full Disk Encryption
You can select an encryption technology: Kaspersky Disk Encryption or BitLocker Drive Encryption (hereinafter also referred to as simply "BitLocker").
Kaspersky Disk Encryption
After the system hard drives have been encrypted, at the next computer startup the user must complete authentication using the Authentication Agent before the hard drives can be accessed and the operating system is loaded. This requires entering the password of the token or smart card connected to the computer, or the user name and password of the Authentication Agent account created by the local area network administrator using the Manage Authentication Agent accounts task. These accounts are based on Microsoft Windows accounts under which users log into the operating system. You can also use Single Sign-On (SSO) technology, which lets you automatically log in to the operating system using the user name and password of the Authentication Agent account.
User authentication in the Authentication Agent can be performed in two ways:
- Enter the name and password of the Authentication Agent account created by the LAN administrator using Kaspersky Security Center tools.
- Enter the password of a token or smart card connected to the computer.
Use of a token or smart card is available only if the computer hard drives were encrypted using the AES256 encryption algorithm. If the computer hard drives were encrypted using the AES56 encryption algorithm, addition of the electronic certificate file to the command will be denied.
BitLocker Drive Encryption
BitLocker is an encryption technology built into Windows operating systems. Kaspersky Endpoint Security allows you to control and manage Bitlocker using Kaspersky Security Center. BitLocker encrypts logical volumes. BitLocker cannot be used for encryption of removable drives. For more details on BitLocker, refer to the Microsoft documentation.
BitLocker provides secure storage of access keys using a trusted platform module. A Trusted Platform Module (TPM) is a microchip developed to provide basic functions related to security (for example, to store encryption keys). A Trusted Platform Module is usually installed on the computer motherboard and interacts with all other system components via the hardware bus. Using TPM is the safest way to store BitLocker access keys, since TPM provides pre-startup system integrity verification. You can still encrypt drives on a computer without a TPM. In this case, the access key will be encrypted with a password. BitLocker uses the following authentication methods:
- TPM.
- TPM and PIN.
- Password.
After encrypting a drive, BitLocker creates a master key. Kaspersky Endpoint Security sends the master key to Kaspersky Security Center so that you can restore access to the disk, for example, if a user has forgotten the password.
If a user encrypts a disk using BitLocker, Kaspersky Endpoint Security will send information about disk encryption to Kaspersky Security Center. However, Kaspersky Endpoint Security will not send the master key to Kaspersky Security Center, so it will be impossible to restore access to the disk using Kaspersky Security Center. For BitLocker to work correctly with Kaspersky Security Center, decrypt the drive and re-encrypt the drive using a policy. You can decrypt a drive locally or using a policy.
After encrypting the system hard drive, the user needs to go through BitLocker authentication to boot the operating system. After the authentication procedure, BitLocker will allow for users to log in. BitLocker does not support single sign-on technology (SSO).
If you are using Windows group policies, turn off BitLocker management in the policy settings. Windows policy settings may conflict with Kaspersky Endpoint Security policy settings. When encrypting a drive, errors may occur.
Kaspersky Disk Encryption component settings
Parameter |
Description |
|---|---|
Encryption mode |
Encrypt all hard drives. If this item is selected, the application encrypts all hard drives when the policy is applied. If the computer has several operating systems installed, after encryption you will be able to load only the operating system that has the application installed. Decrypt all hard drives. If this item is selected, the application decrypts all previously encrypted hard drives when the policy is applied. Leave unchanged. If this item is selected, the application leaves drives in their previous state when the policy is applied. If the drive was encrypted, it remains encrypted. If the drive was decrypted, it remains decrypted. This item is selected by default. |
During encryption, automatically create Authentication Agent accounts for Windows users |
If this check box is selected, the application creates Authentication Agent accounts based on the list of Windows user accounts on the computer. By default, Kaspersky Endpoint Security uses all local and domain accounts with which the user logged in to the operating system over the past 30 days. |
Authentication Agent account creation settings |
All accounts on the computer. All accounts on the computer that have been active at any time. All domain accounts on the computer. All accounts on the computer that belong to some domain and that have been active at any time. All local accounts on the computer. All local accounts on the computer that have been active at any time. Service account with a one-time password. The service account is necessary to gain access to the computer, for example, when the user forgets the password. You can also use the service account as a reserve account. You must enter the name of the account (by default, Local administrator. Kaspersky Endpoint Security creates an Authentication Agent user account for the local administrator of the computer. Computer manager. Kaspersky Endpoint Security creates an Authentication Agent user account for the account of the computer manager. You can see which account has the computer manager role in computer properties in Active Directory. By default, the computer manager role is not defined, that is, it does not correspond to any account. Active account. Kaspersky Endpoint Security automatically creates an Authentication Agent account for the account that is active at the time of disk encryption. |
Automatically create Authentication Agent accounts for all users of this computer upon sign-in |
If this check box is selected, the application checks information about Windows user accounts on the computer before starting Authentication Agent. If Kaspersky Endpoint Security detects a Windows user account that has no Authentication Agent account, the application will create a new account for accessing encrypted drives. The new Authentication Agent account will have the following default settings: password-protected sign-on only, and password change on first authentication. Therefore, you do not need to manually add Authentication Agent accounts using the Manage Authentication Agent accounts task for computers with already encrypted drives. |
Save user name entered in Authentication Agent |
If the check box is selected, the application saves the name of the Authentication Agent account. You will not be required to enter the account name the next time you attempt to complete authorization in the Authentication Agent under the same account. |
Encrypt used disk space only (reduces encryption time) |
This check box enables / disables the option that limits the encryption area to only occupied hard drive sectors. This limit lets you reduce encryption time. Enabling or disabling the Encrypt used disk space only (reduces encryption time) feature after starting encryption does not modify this setting until the hard drives are decrypted. You must select or clear the check box before starting encryption. If the check box is selected, only portions of the hard drive that are occupied by files are encrypted. Kaspersky Endpoint Security automatically encrypts new data as it is added. If the check box is cleared, the entire hard drive is encrypted, including residual fragments of previously deleted and modified files. This option is recommended for new hard drives whose data has not been modified or deleted. If you are applying encryption on a hard drive that is already in use, it is recommended to encrypt the entire hard drive. This ensures protection of all data, even deleted data that is potentially recoverable. This check box is cleared by default. |
Use Legacy USB Support (not recommended) |
This check box enables/disables the Legacy USB Support function. Legacy USB Support is a BIOS/UEFI function that allows you to use USB devices (such as a security token) during the computer's boot phase before starting the operating system (BIOS mode). Legacy USB Support does not affect support for USB devices after the operating system is started. If the check box is selected, support for USB devices during initial startup of the computer will be enabled. When the Legacy USB Support function is enabled, the Authentication Agent in BIOS mode does not support working with tokens via USB. It is recommended to use this option only when there is a hardware compatibility issue and only for those computers on which the problem occurred. |
Password settings |
Authentication Agent account password strength settings. When using Single Sign-on technology, the Authentication Agent ignores the password strength requirements specified in Kaspersky Security Center. You can set the password strength requirements in the operating system settings. |
Use Single Sign-On (SSO) technology |
SSO technology makes it possible to use the same account credentials to access encrypted hard drives and to sign in to the operating system. If the check box is selected, you must enter the account credentials for accessing encrypted hard drives and then automatically logging in to the operating system. If the check box is cleared, to access encrypted hard drives and subsequently log into the operating system you must separately enter the credentials for accessing encrypted hard drives and the operating system user account credentials. |
Wrap third-party credential providers |
Kaspersky Endpoint Security supports the third-party credential provider ADSelfService Plus. When working with third-party credential providers, Authentication Agent intercepts the password before the operating system is loaded. This means that a user needs to enter a password only once when signing in to Windows. After signing in to Windows, the user can utilize the capabilities of a third-party credential provider for authentication in corporate services, for example. Third-party credential providers also allow users to independently reset their own password. In this case, Kaspersky Endpoint Security will automatically update the password for Authentication Agent. If you are using a third-party credential provider that is not supported by the application, you may encounter some limitations in Single Sign-On technology operation. |
Help |
Authentication. Help text that appears in the Authentication Agent window when entering account credentials. Change password. Help text that appears in the Authentication Agent window when changing the password for the Authentication Agent account. Recover password. Help text that appears in the Authentication Agent window when recovering the password for the Authentication Agent account. |
BitLocker Drive Encryption component settings
Parameter |
Description |
|---|---|
Encryption mode |
Encrypt all hard drives. If this item is selected, the application encrypts all hard drives when the policy is applied. If the computer has several operating systems installed, after encryption you will be able to load only the operating system that has the application installed. Decrypt all hard drives. If this item is selected, the application decrypts all previously encrypted hard drives when the policy is applied. Leave unchanged. If this item is selected, the application leaves drives in their previous state when the policy is applied. If the drive was encrypted, it remains encrypted. If the drive was decrypted, it remains decrypted. This item is selected by default. |
Enable use of BitLocker authentication requiring pre-boot keyboard input on tablets |
This check box enables / disables the use of authentication requiring data input in a preboot environment, even if the platform does not have the capability for preboot input (for example, with touchscreen keyboards on tablets). The touchscreen of tablet computers is not available in the preboot environment. To complete BitLocker authentication on tablet computers, the user must connect a USB keyboard, for example. If the check box is selected, use of authentication requiring preboot input is allowed. It is recommended to use this setting only for devices that have alternative data input tools in a preboot environment, such as a USB keyboard in addition to touchscreen keyboards. If the check box is cleared, BitLocker Drive Encryption is not possible on tablets. |
Use hardware encryption (Windows 8 and later versions) |
If the check box is selected, the application applies hardware encryption. This lets you increase the speed of encryption and use less computer resources. |
Encrypt used disk space only (Windows 8 and later versions) |
This check box enables / disables the option that limits the encryption area to only occupied hard drive sectors. This limit lets you reduce encryption time. Enabling or disabling the Encrypt used disk space only (reduces encryption time) feature after starting encryption does not modify this setting until the hard drives are decrypted. You must select or clear the check box before starting encryption. If the check box is selected, only portions of the hard drive that are occupied by files are encrypted. Kaspersky Endpoint Security automatically encrypts new data as it is added. If the check box is cleared, the entire hard drive is encrypted, including residual fragments of previously deleted and modified files. This option is recommended for new hard drives whose data has not been modified or deleted. If you are applying encryption on a hard drive that is already in use, it is recommended to encrypt the entire hard drive. This ensures protection of all data, even deleted data that is potentially recoverable. This check box is cleared by default. |
Authentication method |
Only password (Windows 8 and later versions) If this option is selected, Kaspersky Endpoint Security prompts the user for a password when the user attempts to access an encrypted drive. This option can be selected when a Trusted Platform Module (TPM) is not being used. Trusted platform module (TPM) If this option is selected, BitLocker uses a Trusted Platform Module (TPM). A Trusted Platform Module (TPM) is a microchip developed to provide basic functions related to security (for example, to store encryption keys). A Trusted Platform Module is usually installed on the computer motherboard and interacts with all other system components via the hardware bus. For computers running Windows 7 or Windows Server 2008 R2, only encryption using a TPM module is available. If a TPM module is not installed, BitLocker encryption is not possible. Use of a password on these computers is not supported. A device equipped with a Trusted Platform Module can create encryption keys that can be decrypted only with the device. A Trusted Platform Module encrypts encryption keys with its own root storage key. The root storage key is stored within the Trusted Platform Module. This provides an additional level of protection against attempts to hack encryption keys. This action is selected by default. You can set an additional layer of protection for access to the encryption key, and encrypt the key with a password or a PIN:
The selected authentication method must be configured by specifying password or PIN requirements:
|
Automatically recreate recovery key (days) |
Automatically update the password to restore access to a drive protected by BitLocker. If the check box is selected, specify the validity period of the recovery key password. This helps prevent recovery key password reuse. |
File Level Encryption
You can compile lists of files by extension or group of extensions and lists of folders stored on local computer drives, and create rules for encrypting files that are created by specific applications. After a policy is applied, Kaspersky Endpoint Security encrypts and decrypts the following files:
- files individually added to lists for encryption and decryption;
- files stored in folders added to lists for encryption and decryption;
- files created by separate applications.
This component is available if Kaspersky Endpoint Security is installed on a computer that runs on Windows for workstations. This component is unavailable if Kaspersky Endpoint Security is installed on a computer that runs on Windows for servers.
File encryption has the following special features:
- Kaspersky Endpoint Security encrypts / decrypts files in predefined folders only for local user profiles of the operating system. Kaspersky Endpoint Security does not encrypt or decrypt files in predefined folders of roaming user profiles, mandatory user profiles, temporary user profiles, or redirected folders.
- Kaspersky Endpoint Security does not encrypt files whose modification could harm the operating system and installed applications. For example, the following files and folders with all nested folders are on the list of encryption exclusions:
- %WINDIR%;
- %PROGRAMFILES% and %PROGRAMFILES(X86)%;
- Windows registry files.
The list of encryption exclusions cannot be viewed or edited. While files and folders on the list of encryption exclusions can be added to the encryption list, they will not be encrypted during file encryption.
File Level Encryption component settings
Parameter
Description
Encryption mode
Leave unchanged. If this item is selected, Kaspersky Endpoint Security leaves the files and folders unchanged without encrypting or decrypting them.
According to rules. If this item is selected, Kaspersky Endpoint Security encrypts the files and folders according to encryption rules, decrypts the files and folders according to decryption rules, and regulates the access of applications to encrypted files according to application rules.
Decrypt all. If this item is selected, Kaspersky Endpoint Security decrypts all encrypted files and folders.
Encryption
This tab shows encryption rules for files stored on local drives. You can add files as follows:
- Predefined folders. Kaspersky Endpoint Security allows you to add the following areas:
Documents. Files in the standard Documents folder of the operating system, and its subfolders.
Favorites. Files in the standard Favorites folder of the operating system, and its subfolders.
Desktop. Files in the standard Desktop folder of the operating system, and its subfolders.
Temporary files. Temporary files related to the operation of applications installed on the computer. For example, Microsoft Office applications create temporary files containing backup copies of documents.
Outlook files. Files related to the operation of the Outlook mail client: data files (PST), offline data files (OST), offline address book files (OAB), and personal address book files (PAB).
- Custom folder. You can type the path to the folder. When adding a folder path, adhere to the following rules:
Use an environment variable (for example,
%FOLDER%\UserFolder\). You can use an environment variable only once and only at the beginning of the path.Do not use relative paths.
Do not use the
*and?characters.Do not use UNC paths.
Use
;or,as a separator character. - Files by extension. You can select extension groups from the list, such as the extension group Archives. You can also manually add the file extension.
Decryption
This tab shows decryption rules for files stored on local drives.
Rules for applications
The tab displays a table containing encrypted file access rules for applications and encryption rules for files that are created or modified by individual applications.
Encrypted packages
Password strength requirements to meet when creating encrypted packages.
Encryption of removable drives
This component is available if Kaspersky Endpoint Security is installed on a computer that runs on Windows for workstations. This component is unavailable if Kaspersky Endpoint Security is installed on a computer that runs on Windows for servers.
Kaspersky Endpoint Security supports encryption of files in FAT32 and NTFS file systems. If a removable drive with an unsupported file system is connected to the computer, the encryption task for this removable drive ends with an error and Kaspersky Endpoint Security assigns the read-only status to the removable drive.
To protect data on removable drives, you can use the following types of encryption:
- Full Disk Encryption (FDE).
Encryption of the entire removable drive, including the file system.
It is not possible to access encrypted data outside the corporate network. It is also impossible to access encrypted data inside the corporate network if the computer is not connected to Kaspersky Security Center (e.g. on a guest computer).
- File Level Encryption (FLE).
Encryption of only files on a removable drive. The file system remains unchanged.
Encryption of files on removable drives provides the capability to access data outside the corporate network using a special mode called portable mode.
During encryption, Kaspersky Endpoint Security creates a master key. Kaspersky Endpoint Security saves the master key in the following repositories:
- Kaspersky Security Center.
- User's computer.
The master key is encrypted with the user's secret key.
- Removable drive.
The master key is encrypted with the public key of Kaspersky Security Center.
After encryption is complete, the data on the removable drive can be accessed within the corporate network as if was on an ordinary unencrypted removable drive.
Accessing encrypted data
When a removable drive with encrypted data is connected, Kaspersky Endpoint Security performs the following actions:
- Checks for a master key in the local storage on the user's computer.
If the master key is found, the user gains access to the data on the removable drive.
If the master key is not found, Kaspersky Endpoint Security performs the following actions:
- Sends a request to Kaspersky Security Center.
After receiving the request, Kaspersky Security Center sends a response that contains the master key.
- Kaspersky Endpoint Security saves the master key in the local storage on the user's computer for subsequent operations with the encrypted removable drive.
- Sends a request to Kaspersky Security Center.
- Decrypts the data.
Special features of removable drive encryption
Encryption of removable drives has the following special features:
- The policy with preset settings for removable drive encryption is formed for a specific group of managed computers. Therefore, the result of applying the Kaspersky Security Center policy configured for encryption / decryption of removable drives depends on the computer to which the removable drive is connected.
- Kaspersky Endpoint Security does not encrypt / decrypt read-only files that are stored on removable drives.
- The following device types are supported as removable drives:
- Data media connected via the USB bus
- hard drives connected via USB and FireWire buses
- SSD drives connected via USB and FireWire buses
Encryption of removable drives component settings
Parameter
Description
Encryption mode
Encrypt entire removable drive. If this item is selected, when applying the policy with the specified encryption settings for removable drives, Kaspersky Endpoint Security encrypts removable drives sector by sector, including their file systems.
Encrypt all files. If this item is selected, when applying the policy with the specified encryption settings for removable drives, Kaspersky Endpoint Security encrypts all files that are stored on removable drives. Kaspersky Endpoint Security does not re-encrypt files that are already encrypted. The contents of the file system of a removable drive, including the folder structure and names of encrypted files, are not encrypted and remain accessible.
Encrypt new files only. If this item is selected, when applying the policy with the specified encryption settings for removable drives, Kaspersky Endpoint Security encrypts only those files that were added or modified on removable drives after the Kaspersky Security Center policy was last applied. This encryption mode is convenient when a removable drive is used for both personal and work purposes. This encryption mode lets you leave all old files unchanged and encrypt only those files that the user creates on a work computer that has Kaspersky Endpoint Security installed and encryption functionality enabled. As a result, access to personal files is always available, regardless of whether or not Kaspersky Endpoint Security is installed on the computer with encryption functionality enabled.
Decrypt entire removable drive. If this item is selected, when applying the policy with the specified encryption settings for removable drives, Kaspersky Endpoint Security decrypts all encrypted files stored on removable drives as well as the file systems of the removable drives if they were previously encrypted.
Leave unchanged. If this item is selected, the application leaves drives in their previous state when the policy is applied. If the drive was encrypted, it remains encrypted. If the drive was decrypted, it remains decrypted. This item is selected by default.
Portable mode
This check box enables / disables the preparation of a removable drive that makes it possible to access files stored on this removable drive on computers outside of the corporate network.
If this check box is selected, Kaspersky Endpoint Security prompts the user to specify a password before encrypting files on a removable drive upon the application of the policy. The password is needed to access files encrypted on a removable drive on computers outside of the corporate network. You can configure the password strength.
Portable mode is available for the Encrypt all files or Encrypt new files only modes.
Encrypt used disk space only
This check box enables / disables the encryption mode in which only occupied disk sectors are encrypted. This mode is recommended for new drives whose data has not been modified or deleted.
If the check box is selected, only portions of the drive that are occupied by files are encrypted. Kaspersky Endpoint Security automatically encrypts new data as it is added.
If the check box is cleared, the entire drive is encrypted, including residual fragments of previously deleted and modified files.
The ability to encrypt only occupied space is available only for the Encrypt entire removable drive mode.
After encryption started, enabling / disabling the Encrypt used disk space only function will not change this setting. You must select or clear the check box before starting encryption.
Custom rules
This table contains devices for which custom encryption rules are defined. You can create encryption rules for individual removable drives in the following ways:
- Add a removable drive from the list of trusted devices for Device Control.
- Manually add a removable drive:
- By device ID (Hardware ID, or HWID)
- By device model: vendor ID (VID) and product ID (PID)
Allow encryption of removable drives in offline mode
If this check box is selected, Kaspersky Endpoint Security encrypts removable drives even when there is no connection to Kaspersky Security Center. In this case, the data required for decrypting removable drives is stored on the hard drive of the computer to which the removable drive is connected, and is not transmitted to Kaspersky Security Center.
If the check box is cleared, Kaspersky Endpoint Security does not encrypt removable drives without a connection to Kaspersky Security Center.
Encryption password settings / Portable File Manager
Password strength settings for the Portable File Manager.
Templates (data encryption)
After data encryption, Kaspersky Endpoint Security may restrict access to data, for example, due to a change in the organization's infrastructure and a change in the Kaspersky Security Center Administration Server. If a user does not have access to encrypted data, the user can ask the administrator for access to the data. In other words, the user needs to send a request access file to the administrator. The user then needs to upload the response file received from the administrator to Kaspersky Endpoint Security. Kaspersky Endpoint Security allows you to request access to data from the administrator via email (see the figure below).
Requesting access to encrypted data
A template is provided for reporting a lack of access to encrypted data. For user convenience, you can fill out the following fields:
- To. Enter the email address of the administrator group with rights to the data encryption features.
- Subject. Enter the subject of the email with your request for access to encrypted files. You can, for example, add tags to filter messages.
- User's message. If necessary, change the contents of the message. You can use variables to get the necessary data (for example,
%USER_NAME%variable).
Exclusions
A trusted zone is a system administrator-configured list of objects and applications that Kaspersky Endpoint Security does not monitor when active.
The administrator forms the trusted zone independently, taking into account the features of the objects that are handled and the applications that are installed on the computer. It may be necessary to include objects and applications in the trusted zone when Kaspersky Endpoint Security blocks access to a certain object or application, if you are sure that the object or application is harmless. An administrator can also allow a user to create their own local trusted zone for a specific computer. This way, users can create their own local lists of exclusions and trusted applications in addition to the general trusted zone in a policy.
Starting with Kaspersky Endpoint Security 12.5 for Windows, you can add EDR telemetry to the trusted zone. This allows to optimize data that the application sends to the Telemetry server for the Kaspersky Anti Targeted Attack Platform (EDR) solution.
Starting with Kaspersky Endpoint Security 12.6 for Windows, scan exclusions and trusted applications are added to the trusted zone. Predefined scan exclusions and trusted applications help quickly configure Kaspersky Endpoint Security on SQL servers, Microsoft Exchange servers, and System Center Configuration Manager. This means you do not need to manually set up a trusted zone for the application on servers.
Starting with Kaspersky Endpoint Security 12.8 for Windows, you can install the application in Light Agent mode for protecting virtual environments. Predefined scan exclusions and trusted applications can help you quickly configure Kaspersky Endpoint Security in Citrix and VMware virtual environments.
Scan exclusions
A scan exclusion is a set of conditions that must be fulfilled so that Kaspersky Endpoint Security will not scan a particular object for viruses and other threats.
Scan exclusions make it possible to safely use legitimate software that can be exploited by criminals to damage the computer or user data. Although they do not have any malicious functions, such applications can be exploited by intruders. For details on legitimate software that could be used by criminals to harm the computer or personal data of a user, please refer to the Kaspersky IT Encyclopedia website.
Such applications may be blocked by Kaspersky Endpoint Security. To prevent them from being blocked, you can configure scan exclusions for the applications in use. To do so, add the name or name mask that is listed in the Kaspersky IT Encyclopedia to the trusted zone. For example, you often use the Radmin application for remote administration of computers. Kaspersky Endpoint Security regards this activity as suspicious and may block it. To prevent the application from being blocked, create a scan exclusion with the name or name mask that is listed in the Kaspersky IT Encyclopedia.
If an application that collects information and sends it to be processed is installed on your computer, Kaspersky Endpoint Security may classify this application as malware. To avoid this, you can exclude the application from scanning by configuring Kaspersky Endpoint Security as described in this document.
Scan exclusions can be used by the following application components and tasks that are configured by the system administrator:
- Behavior Detection.
- Exploit Prevention.
- Host Intrusion Prevention.
- File Threat Protection.
- Web Threat Protection.
- Mail Threat Protection.
- Malware Scan task.
List of trusted applications
The list of trusted applications is a list of applications whose file and network activity (including malicious activity) and access to the system registry are not monitored by Kaspersky Endpoint Security. By default, Kaspersky Endpoint Security monitors objects that are opened, executed, or saved by any application process and controls the activity of all applications and network traffic that is generated by them. After an application is added to the list of trusted applications, Kaspersky Endpoint Security stops monitoring the application's activity.
The difference between scan exclusions and trusted applications is that for exclusions Kaspersky Endpoint Security does not scan files, while for trusted applications it does not control the initiated processes. If a trusted application creates a malicious file in a folder which is not included in scan exclusions, Kaspersky Endpoint Security will detect the file and eliminate the threat. If the folder is added to exclusions, Kaspersky Endpoint Security will skip this file.
For example, if you consider objects that are used by the standard Microsoft Windows Notepad application to be safe, meaning that you trust this application, you can add Microsoft Windows Notepad to the list of trusted applications so that the objects used by this application are not monitored. This will increase computer performance, which is especially important when using server applications.
In addition, certain actions that are classified by Kaspersky Endpoint Security as suspicious may be safe within the context of the functionality of a number of applications. For example, the interception of text that is typed from the keyboard is a routine process for automatic keyboard layout switchers (such as Punto Switcher). To take account of the specifics of such applications and exclude their activity from monitoring, we recommend that you add such applications to the trusted applications list.
Trusted applications help to avoid compatibility issues between Kaspersky Endpoint Security and other applications (for example, the problem of double-scanning of the network traffic of a third-party computer by Kaspersky Endpoint Security and by another anti-virus application).
At the same time, the executable file and process of the trusted application are still scanned for viruses and other malware. An application can be fully excluded from Kaspersky Endpoint Security scanning by means of scan exclusions.
Settings of exclusions
Parameter |
Description |
|---|---|
Types of detected objects |
Regardless of the configured application settings, Kaspersky Endpoint Security always detects and blocks viruses, worms, and Trojans. They can cause significant harm to the computer. |
Exclusions |
This table contains information about scan exclusions. You can exclude objects from scans by using the following methods:
Kaspersky Endpoint Security hides the list of scan exclusions in the user interface of the application if configuration of scan exclusions is blocked by the administrator in the console ("closed lock" symbol) and local scan exclusions are prohibited (the Allow use of local exclusions check box is cleared). |
Trusted applications |
This table lists trusted applications whose activity is not monitored by Kaspersky Endpoint Security during its operation. Kaspersky Endpoint Security supports environment variables and the Kaspersky Endpoint Security does not support the The Application Control component regulates the startup of each of the applications regardless of whether or not the application is included in the table of trusted applications. Kaspersky Endpoint Security hides the consolidated list of trusted applications in the user interface of the application if configuration of trusted applications is blocked by the administrator in the console ("closed lock" symbol) and local trusted applications are prohibited (the Allow use of local trusted applications check box is cleared). |
Merge values when inheriting (available only in the Kaspersky Security Center Console) |
This merges the list of scan exclusions and trusted applications in the parent and child policies of Kaspersky Security Center. To merge lists, the child policy must be configured to inherit the settings of the parent policy of Kaspersky Security Center. If the check box is selected, list items from the Kaspersky Security Center parent policy are displayed in child policies. This way you can, for example, create a consolidated list of trusted applications for the entire organization. Inherited list items in a child policy cannot be deleted or edited. Items on the list of scan exclusions and the list of trusted applications that are merged during inheritance can be deleted and edited only in the parent policy. You can add, edit or delete list items in lower-level policies. If items on lists of the child and parent policy match, these items are displayed as the same item of the parent policy. If the check box is not selected, list items are not merged when inheriting the settings of Kaspersky Security Center policies. |
Allow use of local exclusions / Allow use of local trusted applications (available only in the Kaspersky Security Center Console) |
Local exclusions and local trusted applications (local trusted zone) – user-defined list of objects and applications in Kaspersky Endpoint Security for a specific computer. Kaspersky Endpoint Security does not monitor objects and applications from the local trusted zone. This way, users can create their own local lists of exclusions and trusted applications in addition to the general trusted zone in a policy. If the check box is selected, a user can create a local list of scan exclusions and a local list of trusted applications. An administrator can use Kaspersky Security Center to view, add, edit, or delete list items in the computer properties. If the check box is cleared, a user can access only the general lists of scan exclusions and trusted applications generated in the policy. |
EDR telemetry exclusions (available only in the Kaspersky Security Center Console) |
This table contains information about EDR telemetry exclusions. |
Trusted system certificate store |
If one of the trusted system certificate stores is selected, Kaspersky Endpoint Security excludes applications signed with a trusted digital signature from scans. Kaspersky Endpoint Security automatically assigns such applications to the Trusted group. If Do not use is selected, Kaspersky Endpoint Security scans applications regardless of whether or not they have a digital signature. Kaspersky Endpoint Security places an application in a trust group depending on the level of danger that this application may pose to the computer. |
Application settings
You can configure the following general settings of the application:
- Operating mode
- Self-Defense
- Performance
- Debug information
- Computer status when settings are applied
Application settings
Parameter
Description
Start the application on computer startup (recommended)
When the check box is selected, Kaspersky Endpoint Security is started after the operating system loads, protecting the computer during the entire session.
When the check box is cleared, Kaspersky Endpoint Security is not started after the operating system loads, until the user starts it manually. Computer protection is disabled and user data may be exposed to threats.
Use Advanced Disinfection technology (requires considerable computer resources)
If the check box is selected, a pop-up notification appears on the screen when malicious activity is detected in the operating system. In its notification, Kaspersky Endpoint Security offers the user to perform Advanced Disinfection of the computer. After the user approves this procedure, Kaspersky Endpoint Security neutralizes the threat. After completing the advanced disinfection procedure, Kaspersky Endpoint Security restarts the computer. The advanced disinfection technology uses considerable computing resources, which may slow down other applications.
When the application is in process of detecting an active infection, some operating system functionality can be unavailable. The availability of the operating system is restored when Advanced Disinfection is complete and the computer is restarted.
If Kaspersky Endpoint Security is installed on a computer running Windows for Servers, Kaspersky Endpoint Security does not show the notification. Therefore, the user cannot select an action to disinfect an active threat. To disinfect a threat, you need to enable Advanced Disinfection technology in application settings and enable immediate Advanced Disinfection in Malware Scan task settings. Then you need to start a Malware Scan task.
Use Kaspersky Security Center as proxy server for activation
(available only in the Kaspersky Security Center Console)
If this check box is selected, the application uses the Kaspersky Security Center Administration Server as a proxy server for connecting to activation servers. This is necessary when you are using an activation code to activate the application in an isolated network segment without internet access. If you are activating the application with a key file, internet access is not necessary.
Enable Self-Defense
When this check box is selected, Kaspersky Endpoint Security prevents alteration or deletion of application files on the hard drive, memory processes, and entries in the system registry.
Block external management of application services
If the check box is selected, Kaspersky Endpoint Security does not allow managing application services using third-party applications (such as CMD). When an attempt is made to manage application services using third-party applications, a notification is displayed in the Microsoft Windows taskbar, above the application icon (unless the notification service has been disabled by the user).
You can allow external management of application services only on computers that do not support the AM-PPL technology or on computers that have the technology disabled.
Postpone scheduled tasks while running on battery power
If the check box is selected, energy conservation mode is enabled. Kaspersky Endpoint Security postpones scheduled tasks. You can start scan and update tasks manually, if necessary.
When energy conservation mode is enabled and the computer is running on battery power, the following tasks are not run even if scheduled:
- Update of databases and application modules
- Full Scan
- Critical Areas Scan
- Custom Scan
- Application Integrity Check
- IOC Scan.
Concede resources to other applications
Consumption of computer resources by Kaspersky Endpoint Security when scanning the computer may increase the load on the CPU and hard drive subsystems. This may slow down other applications. To optimize the performance, Kaspersky Endpoint Security provides a mode for transferring resources to other applications. In this mode, the operating system can decrease the priority of Kaspersky Endpoint Security scan task threads when the CPU load is high. This allows redistributing operating system resources to other applications. Thus, scan tasks will receive less CPU time. As a result, Kaspersky Endpoint Security will take longer to scan the computer. By default, the application is configured to concede resources to other applications.
Limit CPU usage for scan tasks
Consumption of computer resources by Kaspersky Endpoint Security when scanning the computer may increase the load on the CPU and hard drive subsystems. This may slow down other applications. To optimize Kaspersky Endpoint Security performance, you can limit CPU usage by the Malware Scan task.
If the check box is selected, the maximum load on all CPU cores from the Malware Scan task shall not exceed the specified value.
This check box is cleared by default.
Enable dump writing
If the check box is selected, Kaspersky Endpoint Security writes dumps when it crashes.
If the check box is cleared, Kaspersky Endpoint Security does not write dumps. The application also deletes existing dump files from the computer hard drive.
Enable dump and trace files protection
If the check box is selected, access to dump files is granted to the system administrator and local administrator as well as to the user who enabled dump writing. Only system and local administrators can access trace files.
If the check box is cleared, any user can access dump files and trace files.
Computer status when settings are applied
(available only in the Kaspersky Security Center Console)
Settings for displaying the statuses of client computers with Kaspersky Endpoint Security installed in the Web Console when errors occur while applying a policy or executing a task. The following statuses are available OK, Warning and Critical.
Install updates without computer restart
Upgrading the application without computer restart allows you to ensure uninterrupted operation of servers.
You can upgrade the application without a restart starting with version 11.10.0. To upgrade an earlier version of the application, you must restart the computer.
Starting with version 11.11.0 you can perform the following actions without restarting a computer:
- install patches
- change the set of application components
- install Kaspersky Endpoint Security over Kaspersky Security for Windows Server
The default value of the parameter varies depending on the type of the operating system. If the application is installed on a workstation, the upgrading the application without a restart option is disabled. If the application is installed on a server, the upgrading the application without a restart option is enabled.
Compatibility with remote administration software
(available only in the Kaspersky Security Center Console)
If using Kaspersky Endpoint Security alongside Remote Administration Tools (RAT) causes problems, you can enable the compatibility mode. The problems may be related to the incompatibility of RATs with the Secure Desktop functionality of the application. This purpose of this functionality is to confirm actions that can potentially lower the security level of the computer. This functionality lets an application display a confirmation dialog that is isolated from other processes. This functionality uses elevated rights to secure the request. In this way, only the user can confirm the action and not the malware.
If the check box is selected, the RAT compatibility mode is enabled. The Secure Desktop functionality for Kaspersky Endpoint Security is disabled. The application displays a confirmation dialog without this functionality. This can reduce the security level of the computer. We do not recommend enabling the compatibility mode if Kaspersky Endpoint Security is not causing problems with your RAT.
If the check box is cleared, the RAT compatibility mode is disabled. The Secure Desktop functionality is enabled. This check box is cleared by default.
Example: When using the browser in RemoteApp mode, Kaspersky Endpoint Security may not display a confirmation window when visiting a website with an untrusted certificate because RemoteApp does not support the Secure Desktop functionality of the application. This can cause the browser to become unresponsive. For the browser to work correctly in RemoteApp mode, you must enable the compatibility mode.
You can also try enabling the compatibility mode if you encounter problems with the Secure Desktop functionality when using other third-party software.
Reports and storage
Reports
Information about the operation of each Kaspersky Endpoint Security component, data encryption events, the performance of each scan task, the update task and integrity check task, and the overall operation of the application is recorded in reports.
Reports are stored in the folder C:\ProgramData\Kaspersky Lab\KES.21.20\Report.
Backup
Backup stores backup copies of files that were deleted or modified during disinfection. A backup copy is a file copy created before the file was disinfected or deleted. Backup copies of files are stored in a special format and do not pose a threat.
Backup copies of files are stored in the folder C:\ProgramData\Kaspersky Lab\KES.21.20\QB.
Users in the Administrators group are granted full permission to access this folder. Limited access rights to this folder are granted to the user whose account was used to install Kaspersky Endpoint Security.
Kaspersky Endpoint Security does not provide the capability to configure user access permissions to backup copies of files.
Quarantine
Quarantine is a special local storage on the computer. The user can quarantine files that the user considers dangerous for the computer. Quarantined files are stored in an encrypted state and do not threaten the security of the device. Kaspersky Endpoint Security uses Quarantine only when working with Detection and Response solutions: EDR Optimum, EDR Expert, KATA (EDR), Kaspersky Sandbox. In other cases Kaspersky Endpoint Security places the relevant file in Backup. For details on managing Quarantine as part of solutions, please refer to the Kaspersky Sandbox Help, Kaspersky Endpoint Detection and Response Optimum Help, and Kaspersky Endpoint Detection and Response Expert Help, Kaspersky Anti Targeted Attack Platform Help.
Quarantine can only be configured using Web Console. You can also use Web Console to manage quarantined objects (restore, delete, add, etc). You can restore objects locally on the computer using the command line.
Kaspersky Endpoint Security uses the system account (SYSTEM) to quarantine files.
Settings of reports and storage
Parameter |
Description |
|---|---|
Store reports no longer than N days |
If the check box is selected, the maximum report storage term is limited to the defined time interval. The default maximum storage term for reports is 30 days. After that period of time, Kaspersky Endpoint Security automatically deletes the oldest entries from the report file. |
Limit the size of report file to N MB |
If the check box is selected, the maximum report file size is limited to the defined value. By default, the maximum file size is 1024 MB. To avoid exceeding the maximum report file size, Kaspersky Endpoint Security automatically deletes the oldest entries from the report file when the maximum report file size is reached. |
Store objects no longer than N days |
If the check box is selected, the maximum file storage term is limited to the defined time interval. The default maximum storage term for files is 30 days. After expiration of the maximum storage term, Kaspersky Endpoint Security deletes the oldest files from Backup. |
Limit the size of Backup to N MB |
If the check box is selected, the maximum storage size is limited to the defined value. By default, the maximum size is 1024 MB. To avoid exceeding the maximum storage size, Kaspersky Endpoint Security automatically deletes the oldest files from storage when the maximum storage size is reached. |
Limit the size of Quarantine to N MB |
Maximum Quarantine size in MB. For example, you can set the maximum Quarantine size to 200 MB. When Quarantine reaches maximum size, Kaspersky Endpoint Security sends the corresponding event to Kaspersky Security Center and publishes the event in Windows Event Log. Meanwhile the application stops quarantining new objects. You must empty the Quarantine manually. |
Notify when the Quarantine storage reaches N percent |
Threshold value of the Quarantine. For example, you can set the Quarantine threshold to 50%. When Quarantine reaches the threshold, Kaspersky Endpoint Security sends the corresponding event to Kaspersky Security Center and publishes the event in Windows Event Log. Meanwhile the application continues quarantining new objects. |
Data transfer to Administration Server (available only in Kaspersky Security Center) |
Categories of events on client computers whose information must be relayed to the Administration Server. |
Network settings
You can configure the proxy server used for connecting to the Internet and updating anti-virus databases, select the network port monitoring mode, and configure encrypted connections scan.
Network options
Parameter |
Description |
|---|---|
Limit traffic on metered connections |
If this check box is selected, the application limits its own network traffic when the Internet connection is limited. Kaspersky Endpoint Security identifies a high-speed mobile Internet connection as a limited connection and identifies a Wi-Fi connection as an unlimited connection. Cost-Aware Networking works on computers running Windows 8 or later. |
Inject script into web traffic to interact with web pages |
If the check box is selected, Kaspersky Endpoint Security injects a web page interaction script into web traffic. This script ensures that the Web Control component can work correctly. The script enables registration of Web Control events. Without this script, you cannot enable user Internet activity monitoring. Kaspersky experts recommend injecting this web page interaction script into traffic to ensure correct operation of Web Control. |
Proxy Server Settings |
Settings of the proxy server used for Internet access of users of client computers. Kaspersky Endpoint Security uses these settings for certain protection components, including for updating databases and application modules. For automatic configuration of a proxy server, Kaspersky Endpoint Security uses the WPAD protocol (Web Proxy Auto-Discovery Protocol). If the IP address of the proxy server cannot be determined by using this protocol, the application uses the proxy server address that is specified in the Microsoft Internet Explorer browser settings. |
Bypass proxy server for local addresses |
If the check box is selected, Kaspersky Endpoint Security does not use a proxy server when performing an update from a shared folder. |
Proxy server authentication settings |
To authenticate the application on the proxy server for internet access, you must enter the credentials of the user. Kaspersky Endpoint Security supports automatic authentication on the proxy server. If automatic authentication failed, the application prompts you to enter the credentials. Do not use authentication. NTLM authentication. Domain authentication with the current user account (default). NTLM authentication with user name and password. Domain authentication with manually specified credentials. User name and password. Authentication with manually specified credentials. Automatic authentication. |
Monitored ports |
Monitor all network ports. In this network port monitoring mode, the protection components (File Threat Protection, Web Threat Protection, Mail Threat Protection) monitor data streams that are transmitted via any open network ports of the computer. Monitor selected network ports only. In this network port monitoring mode, the protection components monitor the selected ports of the computer and the network activity of the selected applications. The list of network ports that are normally used for transmission of email and network traffic is configured according to the recommendations of Kaspersky experts. Monitor all ports for the applications from the list recommended by Kaspersky. This uses a predefined list of applications whose network ports are monitored by Kaspersky Endpoint Security. For example, this list includes Google Chrome, Adobe Reader, Java, and other applications. Monitor all ports for specified applications. This uses a list of applications whose network ports are monitored by Kaspersky Endpoint Security. |
Encrypted connections scan |
Kaspersky Endpoint Security scans encrypted network traffic transmitted over the following protocols:
Kaspersky Endpoint Security supports the following encrypted connection scanning modes:
Kaspersky Endpoint Security does not scan encrypted connections that were established by trusted applications for which traffic scanning is disabled. Kaspersky Endpoint Security does not scan encrypted connections from the predefined list of trusted websites. The predefined list of trusted websites is created by Kaspersky experts. This list is updated with the application's anti-virus databases. You can view the predefined list of trusted websites only in the Kaspersky Endpoint Security interface. You cannot view the list in the Kaspersky Security Center Console. |
Trusted root certificates |
List of trusted root certificates. Kaspersky Endpoint Security lets you install trusted root certificates on user computers if, for example, you need to deploy a new certification center. The application lets you add a certificate to a special Kaspersky Endpoint Security certificate store. In this case, the certificate is considered trusted only for the Kaspersky Endpoint Security application. In other words, the user can gain access to a website with the new certificate in the browser. If another application tries to gain access to the website, you can get a connection error because of a certificate issue. To add to the system certificate store, you can use Active Directory group policies. |
Visiting a domain with an untrusted certificate |
|
Visiting a domain with an encrypted connections scan error |
|
Block SSL 2.0 connections |
If the check box is selected, the application blocks network connections established over the SSL 2.0 protocol. If the check box is cleared, the application does not block network connections established over the SSL 2.0 protocol and does not monitor network traffic transmitted over these connections. |
Block SSL 3.0 connections |
If the check box is selected, the application blocks network connections established over the SSL 3.0 protocol. If the check box is cleared, the application does not block network connections established over the SSL 3.0 protocol and does not monitor network traffic transmitted over these connections. |
Block TLS 1.0 connections |
If the check box is selected, the application blocks network connections established over the TLS 1.0 protocol. If the check box is cleared, the application does not block network connections established over the TLS 1.0 protocol and does not monitor network traffic transmitted over these connections. |
Decrypt an encrypted connection with the website that uses EV certificate |
EV certificates (Extended Validation Certificate) confirm the authenticity of websites and enhance the security of the connection. Browsers use a lock icon in their address bar to indicate that a website has an EV certificate. Browsers may also fully or partially color the address bar in green. If the check box is selected, the application decrypts and monitors encrypted connections with websites that use an EV certificate. If the check box is cleared, the application does not have access to the contents of HTTPS traffic. For this reason, the application monitors HTTPS traffic only based on the website address, for example, If you are opening a website with an EV certificate for the first time, the encrypted connection will be decrypted regardless of whether or not the check box is selected. |
Configure trusted addresses |
This uses a list of web addresses for which Kaspersky Endpoint Security does not scan network connections. In this case, Kaspersky Endpoint Security does not scan HTTPS traffic of trusted web addresses when Web Threat Protection, Mail Threat Protection, Web Control components are doing their work. You can enter a domain name or an IP address. Kaspersky Endpoint Security supports the Kaspersky Endpoint Security does not support the Examples:
|
Configure trusted applications |
List of applications whose activity is not monitored by Kaspersky Endpoint Security during its operation. You can select the types of application activity that Kaspersky Endpoint Security will not monitor (for example, do not scan network traffic). Kaspersky Endpoint Security supports environment variables and the |
To scan encrypted connections in applications with their own certificate store, use (available only in the Kaspersky Endpoint Security interface) |
If this check box is selected, the application scans encrypted traffic in the Mozilla Firefox browser and Thunderbird mail client. Access to some websites via the HTTPS protocol may be blocked. To scan traffic in the Mozilla Firefox browser and the Thunderbird mail client, you must enable the Encrypted Connections Scan. If Encrypted Connections Scan is disabled, the application does not scan traffic in the Mozilla Firefox browser and Thunderbird mail client. The application uses the Kaspersky root certificate to decrypt and analyze encrypted traffic. You can select the certificate store that will contain the Kaspersky root certificate.
|
Interface
You can configure the settings of the application interface.
Interface settings
Parameter |
Description |
|---|---|
Interaction with user (available only in the Kaspersky Security Center Console) |
Display simplified interface. On a client computer, the main application window is inaccessible, and only the icon in the Windows notification area is available. In the context menu of the icon, the user can perform a limited number of operations with Kaspersky Endpoint Security. Kaspersky Endpoint Security also displays notifications above the application icon. Display user interface. On a client computer, the main window of Kaspersky Endpoint Security and the icon in the Windows notification area are available. In the context menu of the icon, the user can perform operations with Kaspersky Endpoint Security. Kaspersky Endpoint Security also displays notifications above the application icon. Hide Application Activity Monitor section. On the client computer, in the main window of Kaspersky Endpoint Security, the Application Activity Monitor button is not available. Application Activity Monitor is a tool designed for viewing information about the activity of applications on a user's computer in real time. Do not display user interface. On a client computer, no signs of Kaspersky Endpoint Security operation are displayed. The icon in the Windows notification area and notifications are not available. |
Configure notifications |
A table with the settings of notifications about events of different importance levels that may occur during the operation of a component, task, or the entire application. Kaspersky Endpoint Security shows notifications about these events on the screen, sends them by email, or logs them. |
Configure email notifications |
SMTP server settings for delivery of notifications about events registered during operation of the application. By default, Kaspersky Endpoint Security uses email notification settings from Kaspersky Security Center. For more details on email notification settings, refer to the Kaspersky Security Center Help. If you need to configure individual email notification, you can edit the following settings:
|
Show application's status in notifications area |
Categories of application events that cause the Kaspersky Endpoint Security icon to change in the Microsoft Windows taskbar notification area ( |
Local anti-malware database status notifications |
Settings of notifications about outdated anti-virus databases used by the application. |
Password protection |
If the toggle button is switched on, Kaspersky Endpoint Security prompts the user for a password when the user attempts to perform an operation that is within the scope of Password Protection. The Password Protection scope includes forbidden operations (such as disabling protection components) and the user accounts to which the Password Protection scope is applied. After Password Protection is enabled, Kaspersky Endpoint Security prompts you to set a password for performing operations. |
User support / Links to web resources (available only in the Kaspersky Security Center Console) |
List of links to web resources containing information about technical support for Kaspersky Endpoint Security. Added links are displayed in the Support window of the Kaspersky Endpoint Security local interface instead of standard links. |
User support / Description (available only in the Kaspersky Security Center Console) |
Message that is displayed in the Support window of the local interface of Kaspersky Endpoint Security. |
Manage Settings
You can save the current Kaspersky Endpoint Security settings to a file and use them to quickly configure the application on a different computer. You can also use a configuration file when deploying the application through Kaspersky Security Center with an installation package. You can restore the default settings at any time.
Application configuration management settings are available only in the Kaspersky Endpoint Security interface.
Application configuration management settings
Settings |
Description |
|---|---|
Import |
Extract application settings from a file in CFG format and apply them. |
Export |
Save the current application settings to a file in CFG format. |
Restore |
You can restore the application settings recommended by Kaspersky at any time. When the settings are restored, the Recommended security level is set for all protection components. |
Updating databases and application software modules
Updating the databases and application modules of Kaspersky Endpoint Security ensures up-to-date protection on your computer. New viruses and other types of malware appear worldwide on a daily basis. Kaspersky Endpoint Security databases contain information about threats and ways of neutralizing them. To detect threats quickly, you are urged to regularly update the databases and application modules.
Updates functionality (including providing anti-virus signature updates and codebase updates) may not be available in the application in the U.S.
Regular updates require a license in effect. If there is no current license, you will be able to perform an update only once.
Your computer must be connected to the Internet to successfully download the update package from Kaspersky update servers. By default, the Internet connection settings are determined automatically. If you are using a proxy server, you need to configure the proxy server settings.
Updates are downloaded over the HTTPS protocol. They may also be downloaded over the HTTP protocol when it is impossible to download updates over the HTTPS protocol.
While performing an update, the following objects are downloaded and installed on your computer:
- Kaspersky Endpoint Security databases. Computer protection is provided using databases that contain signatures of viruses and other threats and information on ways to neutralize them. Protection components use this information when searching for and neutralizing infected files on your computer. The databases are constantly updated with records of new threats and methods for counteracting them. Therefore, we recommend that you update the databases regularly.
In addition to the Kaspersky Endpoint Security databases, the network drivers that enable the application's components to intercept network traffic are updated.
- Application modules. In addition to the databases of Kaspersky Endpoint Security, you can also update the application modules. Updating the application modules fixes vulnerabilities in Kaspersky Endpoint Security, adds new functions, or enhances existing functions.
While updating, the application modules and databases on your computer are compared against the up-to-date version at the update source. If your current databases and application modules differ from their respective up-to-date versions, the missing portion of the updates is installed on your computer.
If the databases are obsolete, the update package may be large, which may cause additional Internet traffic (up to several dozen MB).
Information about the current state of the Kaspersky Endpoint Security databases is displayed in the main application window or the tooltip that you see when you hover the cursor over the icon of the application in the notification area.
Information on update results and on all events that occur during the performance of the update task is logged in the Kaspersky Endpoint Security report.
If the application is working in Light Agent mode, special considerations are involved in updating application databases and modules.
Application module and database update settings
Parameter |
Description |
|---|---|
Databases update schedule |
Automatically. In this mode, the application checks the update source for availability of new update packages with a certain frequency. The frequency of checking for the update package increases during virus outbreaks and decreases when there are none. After detecting a fresh update package, Kaspersky Endpoint Security downloads it and installs updates on your computer. Manually. This update task run mode allows you to manually start the update task. By schedule. In this update task run mode, Kaspersky Endpoint Security runs the update task in accordance with the schedule that you have specified. If this update task run mode is selected, you can also start the Kaspersky Endpoint Security update task manually. |
Run missed tasks |
If the check box is selected, Kaspersky Endpoint Security starts the skipped task as soon as it becomes possible. The task may be skipped, for example, if the computer was off at the scheduled task start time. When the application gets an opportunity to execute missed tasks, it runs the tasks randomly within a certain time interval to distribute the load on the computer. If the check box is cleared, Kaspersky Endpoint Security does not run skipped tasks. Instead, it carries out the next task in accordance with the current schedule. |
Update sources |
An update source is a resource that contains updates for databases and application modules of Kaspersky Endpoint Security. Update sources include the Kaspersky Security Center server, Kaspersky update servers, and network or local folders. The default list of update sources includes Kaspersky Security Center and Kaspersky update servers. You can add other update sources to the list. You can specify HTTP/FTP servers and shared folders as update sources. Kaspersky Endpoint Security does not support updates from HTTPS servers unless they are Kaspersky's update servers. If several resources are selected as update sources, Kaspersky Endpoint Security tries to connect to them one after another, starting from the top of the list, and performs the update task by retrieving the update package from the first available source. By default, Kaspersky Endpoint Security uses the Kaspersky Security Center server as the first update source. This helps conserve traffic when updating. If a policy is not applied to the computer, Kaspersky servers are selected as the first update source in the settings of the Update of databases and application modules local task because the application may not have access to the Kaspersky Security Center server. If the application is running in Light Agent mode, a folder on the SVM is selected as the update source. |
Run database updates as |
By default, the Kaspersky Endpoint Security update task is started on behalf of the user whose account you have used to log in to the operating system. However, Kaspersky Endpoint Security may be updated from an update source that the user cannot access due to a lack of required rights (for example, from a shared folder that contains an update package) or an update source for which proxy server authentication is not configured. In the application settings, you can specify a user that has such rights and start the Kaspersky Endpoint Security update task under that user account. |
Download updates of application modules |
Downloading application module updates with application database updates. If the check box is selected, Kaspersky Endpoint Security notifies the user about available application module updates and includes application module updates in the update package while running the update task. The way application module updates are applied is determined by the following settings:
If application module updates require reviewing and accepting the terms of the End User License Agreement, the application installs updates after the terms of the End User License Agreement have been accepted. This check box is selected by default. |
Copy updates to folder |
If this check box is selected, Kaspersky Endpoint Security copies the update package to the shared folder specified under the check box. After that, other computers on your LAN are able to receive the update package from this shared folder. This reduces Internet traffic because the update package is downloaded only once. The following folder is specified by default: |
Proxy server for updates (available only in the Kaspersky Endpoint Security interface) |
Proxy server settings for Internet access of users of client computers to update application modules and databases. For automatic configuration of a proxy server, Kaspersky Endpoint Security uses the WPAD protocol (Web Proxy Auto-Discovery Protocol). If the IP address of the proxy server cannot be determined by using this protocol, Kaspersky Endpoint Security uses the proxy server address that is specified in the Microsoft Internet Explorer browser settings. |
Bypass proxy server for local addresses (available only in the Kaspersky Endpoint Security interface) |
If the check box is selected, Kaspersky Endpoint Security does not use a proxy server when performing an update from a shared folder. |
Appendix 2. Application trust groups
Kaspersky Endpoint Security categorizes all applications that are started on the computer into trust groups. Applications are categorized into trust groups depending on the level of threat that the applications pose to the operating system.
The trust groups are as follows:
- Trusted. This group includes applications for which one or more of the following conditions are met:
- Applications are digitally signed by trusted vendors.
- Applications are recorded in the trusted applications database of Kaspersky Security Network.
- The user has placed application in the Trusted group.
No operations are prohibited for these applications.
- Low Restricted. This group includes applications for which the following conditions are met:
- Applications are not digitally signed by trusted vendors.
- Applications are not recorded in the trusted applications database of Kaspersky Security Network.
- The user has placed application in the "Low Restricted" group.
Such applications are subject to minimal restrictions on access to operating system resources.
- High Restricted. This group includes applications for which the following conditions are met:
- Applications are not digitally signed by trusted vendors.
- Applications are not recorded in the trusted applications database of Kaspersky Security Network.
- The user has placed application in the High Restricted group.
Such applications are subject to high restrictions on access to operating system resources.
- Untrusted. This group includes applications for which the following conditions are met:
- Applications are not digitally signed by trusted vendors.
- Applications are not recorded in the trusted applications database of Kaspersky Security Network.
- The user has placed application in the Untrusted group.
For such applications, all operations are blocked.
Appendix 3. File extensions for quick removable drives scan
com – executable file of an application no larger than 64 KB
exe – executable file or self-extracting archive
sys – Microsoft Windows system file
prg – program text for dBase, Clipper or Microsoft Visual FoxPro, or a WAVmaker program
bin – binary file
bat – batch file
cmd – command file for Microsoft Windows NT (similar to a bat file for DOS), OS/2
dpl – compressed Borland Delphi library
dll – dynamic link library
scr – Microsoft Windows splash screen
cpl – Microsoft Windows control panel module
ocx – Microsoft OLE (Object Linking and Embedding) object
tsp – program running in split-time mode
drv – device driver
vxd – Microsoft Windows virtual device driver
pif – program information file
lnk – Microsoft Windows link file
reg – Microsoft Windows system registry key file
ini – configuration file which contains configuration data for Microsoft Windows, Windows NT, and some applications
cla – Java class
vbs – Visual Basic script
vbe – BIOS video extension
js, jse – JavaScript source text
htm – hypertext document
htt – Microsoft Windows hypertext header
hta – hypertext program for Microsoft Internet Explorer
asp – Active Server Pages script
chm – compiled HTML file
pht – HTML file with integrated PHP scripts
php – script that is integrated into HTML files
wsh – Microsoft Windows Script Host file
wsf – Microsoft Windows script
the – Microsoft Windows 95 desktop wallpaper file
hlp – Win Help file
msg – Microsoft Mail email message
plg – email message
mbx – saved Microsoft Office Outlook email message
doc* – Microsoft Office Word documents, such as: doc for Microsoft Office Word documents, docx for Microsoft Office Word 2007 documents with XML support, and docm for Microsoft Office Word 2007 documents with macro support
dot* – Microsoft Office Word document templates, such as: dot for Microsoft Office Word document templates, dotx for Microsoft Office Word 2007 document templates, dotm for Microsoft Office Word 2007 document templates with macro support
fpm – database program, Microsoft Visual FoxPro start file
rtf – Rich Text Format document
shs – Windows Shell Scrap Object Handler fragment
dwg – AutoCAD drawing database
msi – Microsoft Windows Installer package
otm – VBA project for Microsoft Office Outlook
pdf – Adobe Acrobat document
swf – Shockwave Flash package object
jpg, jpeg – compressed image graphics format
emf – Enhanced Metafile format file;
ico – object icon file
ov? – Microsoft Office Word executable files
xl* – Microsoft Office Excel documents and files, such as: xla, the extension for Microsoft Office Excel, xlc for diagrams, xlt for document templates, xlsx for Microsoft Office Excel 2007 workbooks, xltm for Microsoft Office Excel 2007 workbooks with macro support, xlsb for Microsoft Office Excel 2007 workbooks in binary (non-XML) format, xltx for Microsoft Office Excel 2007 templates, xlsm for Microsoft Office Excel 2007 templates with macro support, and xlam for Microsoft Office Excel 2007 plug-ins with macro support
pp* – Microsoft Office PowerPoint documents and files, such as: pps for Microsoft Office PowerPoint slides, ppt for presentations, pptx for Microsoft Office PowerPoint 2007 presentations, pptm for Microsoft Office PowerPoint 2007 presentations with macros support, potx for Microsoft Office PowerPoint 2007 presentation templates, potm for Microsoft Office PowerPoint 2007 presentation templates with macro support, ppsx for Microsoft Office PowerPoint 2007 slide shows, ppsm for Microsoft Office PowerPoint 2007 slide shows with macro support, and ppam for Microsoft Office PowerPoint 2007 plug-ins with macro support
md* – Microsoft Office Access documents and files, such as: mda for Microsoft Office Access workgroups and mdb for databases
sldx – a Microsoft PowerPoint 2007 slide
sldm – a Microsoft PowerPoint 2007 slide with macro support
thmx – a Microsoft Office 2007 theme
Page top
Appendix 4. File Types for the Mail Threat Protection attachment filter
Note that the actual format of a file may not match its file name extension.
If you enabled filtering of email attachments, the Mail Threat Protection component may rename or delete files with the following extensions:
com – executable file of an application no larger than 64 KB
exe – executable file or self-extracting archive
sys – Microsoft Windows system file
prg – program text for dBase, Clipper or Microsoft Visual FoxPro, or a WAVmaker program
bin – binary file
bat – batch file
cmd – command file for Microsoft Windows NT (similar to a bat file for DOS), OS/2
dpl – compressed Borland Delphi library
dll – dynamic link library
scr – Microsoft Windows splash screen
cpl – Microsoft Windows control panel module
ocx – Microsoft OLE (Object Linking and Embedding) object
tsp – program running in split-time mode
drv – device driver
vxd – Microsoft Windows virtual device driver
pif – program information file
lnk – Microsoft Windows link file
reg – Microsoft Windows system registry key file
ini – configuration file which contains configuration data for Microsoft Windows, Windows NT, and some applications
cla – Java class
vbs – Visual Basic script
vbe – BIOS video extension
js, jse – JavaScript source text
htm – hypertext document
htt – Microsoft Windows hypertext header
hta – hypertext program for Microsoft Internet Explorer
asp – Active Server Pages script
chm – compiled HTML file
pht – HTML file with integrated PHP scripts
php – script that is integrated into HTML files
wsh – Microsoft Windows Script Host file
wsf – Microsoft Windows script
the – Microsoft Windows 95 desktop wallpaper file
hlp – Win Help file
msg – Microsoft Mail email message
plg – email message
mbx – saved Microsoft Office Outlook email message
doc* – Microsoft Office Word documents, such as: doc for Microsoft Office Word documents, docx for Microsoft Office Word 2007 documents with XML support, and docm for Microsoft Office Word 2007 documents with macro support
dot* – Microsoft Office Word document templates, such as: dot for Microsoft Office Word document templates, dotx for Microsoft Office Word 2007 document templates, dotm for Microsoft Office Word 2007 document templates with macro support
fpm – database program, Microsoft Visual FoxPro start file
rtf – Rich Text Format document
shs – Windows Shell Scrap Object Handler fragment
dwg – AutoCAD drawing database
msi – Microsoft Windows Installer package
otm – VBA project for Microsoft Office Outlook
pdf – Adobe Acrobat document
swf – Shockwave Flash package object
jpg, jpeg – compressed image graphics format
emf – Enhanced Metafile format file;
ico – object icon file
ov? – Microsoft Office Word executable files
xl* – Microsoft Office Excel documents and files, such as: xla, the extension for Microsoft Office Excel, xlc for diagrams, xlt for document templates, xlsx for Microsoft Office Excel 2007 workbooks, xltm for Microsoft Office Excel 2007 workbooks with macro support, xlsb for Microsoft Office Excel 2007 workbooks in binary (non-XML) format, xltx for Microsoft Office Excel 2007 templates, xlsm for Microsoft Office Excel 2007 templates with macro support, and xlam for Microsoft Office Excel 2007 plug-ins with macro support
pp* – Microsoft Office PowerPoint documents and files, such as: pps for Microsoft Office PowerPoint slides, ppt for presentations, pptx for Microsoft Office PowerPoint 2007 presentations, pptm for Microsoft Office PowerPoint 2007 presentations with macros support, potx for Microsoft Office PowerPoint 2007 presentation templates, potm for Microsoft Office PowerPoint 2007 presentation templates with macro support, ppsx for Microsoft Office PowerPoint 2007 slide shows, ppsm for Microsoft Office PowerPoint 2007 slide shows with macro support, and ppam for Microsoft Office PowerPoint 2007 plug-ins with macro support
md* – Microsoft Office Access documents and files, such as: mda for Microsoft Office Access workgroups and mdb for databases
sldx – a Microsoft PowerPoint 2007 slide
sldm – a Microsoft PowerPoint 2007 slide with macro support
thmx – a Microsoft Office 2007 theme
Page top
Appendix 5. Network settings for interaction with external services
Kaspersky Endpoint Security and Kaspersky Security Center uses an encrypted communication channel with TLS (Transport Layer Security) to work with external services of Kaspersky.
Kaspersky Endpoint Security uses the following network settings for interacting with external services.
Network settings
Address |
Description |
|---|---|
Protocol: Port: |
Activating the application. |
Protocol: Port: |
Updating databases and application software modules. |
Protocol: Port: |
Requests emitted by the application may contain addresses of domains and the public IP address of the user because the application establishes a TCP/UDP connection with the DNS server. This information is needed, for example, to validate the certificate of a web resource when using HTTPS. If Kaspersky Endpoint Security is using a public DNS server, data processing is governed by the privacy policy of the relevant service. If you want to prevent Kaspersky Endpoint Security from using a public DNS server, contact Technical Support for a private patch. |
Protocol: |
|
Protocol: Port: |
Updating databases and application software modules. |
Protocol: Port: |
Using Kaspersky Security Network. |
Protocol: Port: |
Using Kaspersky Security Network. |
Protocol: |
Follow links from the interface. |
Settings, used for encryption
Address |
Description |
|---|---|
Protocol: Port: |
Public Key Infrastructure (PKI). |
Appendix 6. Application events
Information about the operation of each Kaspersky Endpoint Security component, data encryption events, the completion of each malware scan task, update task and integrity check task, and the overall operation of the application is recorded in the Kaspersky Security Center event log and Windows event log.
Kaspersky Endpoint Security generates events of the following types: general events and specific events. Specific events are created only by Kaspersky Endpoint Security for Windows. Specific events have a simple ID, such as 000000cb. Specific events contain the following required parameters:
GNRL_EA_DESCRIPTIONis the content of the event.GNRL_EA_IDis the service ID of the event.GNRL_EA_SEVERITYis the status of the event.1– Info, 2– Warning, 3– Functional failure, 4– Critical.EVENT_TYPE_DISPLAY_NAMEis the title of the event.TASK_DISPLAY_NAMEis the name of the application component that initiated the event.
General events can be created by Kaspersky Endpoint Security for Windows as well as other Kaspersky applications (for example, Kaspersky Security for Windows Server). General events have a more complex ID, such as GNRL_EV_VIRUS_FOUND. In addition to required settings, general events contain advanced settings.
Critical
Status |
|
Component |
System Audit |
Windows event ID |
|
Kaspersky Security Center event ID |
|
Windows event log (default) |
|
Kaspersky Security Center event log (default) |
|
Status |
|
Component |
System Audit |
Windows event ID |
|
Kaspersky Security Center event ID |
|
Windows event log (default) |
– |
Kaspersky Security Center event log (default) |
|
Databases are missing or corrupted
Status |
|
Component |
System Audit |
Windows event ID |
|
Kaspersky Security Center event ID |
|
Windows event log (default) |
– |
Kaspersky Security Center event log (default) |
– |
Databases are extremely out of date
Status |
|
Component |
System Audit |
Windows event ID |
|
Kaspersky Security Center event ID |
|
Windows event log (default) |
– |
Kaspersky Security Center event log (default) |
|
Application autorun is disabled
Status |
|
Component |
System Audit |
Windows event ID |
|
Kaspersky Security Center event ID |
|
Windows event log (default) |
– |
Kaspersky Security Center event log (default) |
|
Status |
|
Component |
System Audit |
Windows event ID |
|
Kaspersky Security Center event ID |
– |
Windows event log (default) |
|
Kaspersky Security Center event log (default) |
|
Active threat detected. Advanced Disinfection should be started
Status |
|
Component |
System Audit |
Windows event ID |
|
Kaspersky Security Center event ID |
|
Windows event log (default) |
|
Kaspersky Security Center event log (default) |
|
Status |
|
Component |
System Audit |
Windows event ID |
|
Kaspersky Security Center event ID |
|
Windows event log (default) |
– |
Kaspersky Security Center event log (default) |
|
Not enough space in Quarantine storage
Status |
|
Component |
System Audit |
Windows event ID |
|
Kaspersky Security Center event ID |
|
Windows event log (default) |
|
Kaspersky Security Center event log (default) |
|
Object not restored from Quarantine
Status |
|
Component |
System Audit |
Windows event ID |
|
Kaspersky Security Center event ID |
|
Windows event log (default) |
|
Kaspersky Security Center event log (default) |
|
Object not deleted from Quarantine
Status |
|
Component |
System Audit |
Windows event ID |
|
Kaspersky Security Center event ID |
|
Windows event log (default) |
|
Kaspersky Security Center event log (default) |
|
The application established a connection to a website with an untrusted certificate
Status |
|
Component |
System Audit |
Windows event ID |
|
Kaspersky Security Center event ID |
|
Windows event log (default) |
|
Kaspersky Security Center event log (default) |
|
Failed to verify an encrypted connection. The domain is added to the list of exclusions
Status |
|
Component |
System Audit |
Windows event ID |
|
Kaspersky Security Center event ID |
|
Windows event log (default) |
|
Kaspersky Security Center event log (default) |
|
Malicious object detected (local bases)
Status |
|
Component |
File Threat Protection Web Threat Protection Mail Threat Protection AMSI Protection Host Intrusion Prevention Behavior Detection Exploit Prevention Malware Scan |
Windows event ID |
|
Kaspersky Security Center event ID |
|
Event parameters |
When external encryption of shared folders is detected, the application shows the path to the target file.
|
Windows event log (default) |
|
Kaspersky Security Center event log (default) |
|
Malicious object detected (KSN)
Status |
|
Component |
File Threat Protection Web Threat Protection Mail Threat Protection AMSI Protection Host Intrusion Prevention Behavior Detection Exploit Prevention Malware Scan |
Windows event ID |
|
Kaspersky Security Center event ID |
|
Event parameters |
|
Windows event log (default) |
|
Kaspersky Security Center event log (default) |
|
Status |
|
Component |
File Threat Protection Mail Threat Protection Host Intrusion Prevention Malware Scan |
Windows event ID |
|
Kaspersky Security Center event ID |
|
Event parameters |
|
Windows event log (default) |
|
Kaspersky Security Center event log (default) |
|
Status |
|
Component |
File Threat Protection Host Intrusion Prevention Behavior Detection Malware Scan |
Windows event ID |
|
Kaspersky Security Center event ID |
|
Windows event log (default) |
– |
Kaspersky Security Center event log (default) |
|
Status |
|
Component |
File Threat Protection Web Threat Protection Mail Threat Protection Host Intrusion Prevention AMSI Protection Malware Scan |
Windows event ID |
|
Kaspersky Security Center event ID |
|
Windows event log (default) |
|
Kaspersky Security Center event log (default) |
|
Status |
|
Component |
File Threat Protection Host Intrusion Prevention Behavior Detection Malware Scan |
Windows event ID |
|
Kaspersky Security Center event ID |
|
Windows event log (default) |
– |
Kaspersky Security Center event log (default) |
|
Status |
|
Component |
File Threat Protection Host Intrusion Prevention Behavior Detection Malware Scan |
Windows event ID |
|
Kaspersky Security Center event ID |
|
Windows event log (default) |
– |
Kaspersky Security Center event log (default) |
– |
Status |
|
Component |
Web Threat Protection |
Windows event ID |
|
Kaspersky Security Center event ID |
|
Event parameters |
|
Windows event log (default) |
|
Kaspersky Security Center event log (default) |
|
Status |
|
Component |
Web Threat Protection |
Windows event ID |
|
Kaspersky Security Center event ID |
|
Event parameters |
|
Windows event log (default) |
|
Kaspersky Security Center event log (default) |
|
Previously opened dangerous link detected
Status |
|
Component |
Web Threat Protection |
Windows event ID |
|
Kaspersky Security Center event ID |
|
Event parameters |
|
Windows event log (default) |
|
Kaspersky Security Center event log (default) |
|
Status |
|
Component |
Adaptive Anomaly Control |
Windows event ID |
|
Kaspersky Security Center event ID |
|
Event parameters |
|
Windows event log (default) |
|
Kaspersky Security Center event log (default) |
|
Status |
|
Component |
BadUSB Attack Prevention |
Windows event ID |
|
Kaspersky Security Center event ID |
|
Windows event log (default) |
|
Kaspersky Security Center event log (default) |
|
Status |
|
Component |
AMSI Protection |
Windows event ID |
|
Kaspersky Security Center event ID |
|
Windows event log (default) |
|
Kaspersky Security Center event log (default) |
|
Status |
|
Component |
Firewall |
Windows event ID |
|
Kaspersky Security Center event ID |
|
Windows event log (default) |
|
Kaspersky Security Center event log (default) |
|
Status |
|
Component |
Network Threat Protection |
Windows event ID |
|
Kaspersky Security Center event ID |
|
Event parameters |
|
Windows event log (default) |
|
Kaspersky Security Center event log (default) |
|
Application startup prohibited
Status |
|
Component |
Application Control |
Windows event ID |
|
Kaspersky Security Center event ID |
|
Event parameters |
|
Windows event log (default) |
|
Kaspersky Security Center event log (default) |
|
Prohibited process was started before Kaspersky Endpoint Security startup
Status |
|
Component |
Application Control |
Windows event ID |
|
Kaspersky Security Center event ID |
|
Windows event log (default) |
|
Kaspersky Security Center event log (default) |
|
Status |
|
Component |
Web Control |
Windows event ID |
|
Kaspersky Security Center event ID |
|
Event parameters |
|
Windows event log (default) |
|
Kaspersky Security Center event log (default) |
|
Status |
|
Component |
Web Control |
Windows event ID |
|
Kaspersky Security Center event ID |
|
Event parameters |
|
Windows event log (default) |
|
Kaspersky Security Center event log (default) |
|
Operation with the device prohibited
Status |
|
Component |
Device Control |
Windows event ID |
|
Kaspersky Security Center event ID |
|
Event parameters |
|
Windows event log (default) |
|
Kaspersky Security Center event log (default) |
|
Status |
|
Component |
Device Control |
Windows event ID |
|
Kaspersky Security Center event ID |
|
Windows event log (default) |
|
Kaspersky Security Center event log (default) |
|
Status |
|
Component |
Update |
Windows event ID |
|
Kaspersky Security Center event ID |
|
Windows event log (default) |
|
Kaspersky Security Center event log (default) |
|
Error distributing component updates
Status |
|
Component |
Update |
Windows event ID |
|
Kaspersky Security Center event ID |
|
Windows event log (default) |
|
Kaspersky Security Center event log (default) |
|
Status |
|
Component |
Update |
Windows event ID |
|
Kaspersky Security Center event ID |
|
Windows event log (default) |
|
Kaspersky Security Center event log (default) |
|
Status |
|
Component |
Update |
Windows event ID |
|
Kaspersky Security Center event ID |
|
Windows event log (default) |
|
Kaspersky Security Center event log (default) |
|
Cannot start two tasks at the same time
Status |
|
Component |
Update |
Windows event ID |
|
Kaspersky Security Center event ID |
|
Windows event log (default) |
|
Kaspersky Security Center event log (default) |
|
Error verifying application databases and modules
Status |
|
Component |
Update |
Windows event ID |
|
Kaspersky Security Center event ID |
|
Windows event log (default) |
|
Kaspersky Security Center event log (default) |
|
Error in interaction with Kaspersky Security Center
Status |
|
Component |
Update |
Windows event ID |
|
Kaspersky Security Center event ID |
|
Windows event log (default) |
|
Kaspersky Security Center event log (default) |
|
Not all components were updated
Status |
|
Component |
Update |
Windows event ID |
|
Kaspersky Security Center event ID |
|
Windows event log (default) |
|
Kaspersky Security Center event log (default) |
|
Update completed successfully, update distribution failed
Status |
|
Component |
Update |
Windows event ID |
|
Kaspersky Security Center event ID |
|
Windows event log (default) |
|
Kaspersky Security Center event log (default) |
|
Status |
|
Component |
System Audit |
Windows event ID |
|
Kaspersky Security Center event ID |
|
Windows event log (default) |
|
Kaspersky Security Center event log (default) |
|
Status |
|
Component |
Update |
Windows event ID |
|
Kaspersky Security Center event ID |
|
Windows event log (default) |
|
Kaspersky Security Center event log (default) |
|
Status |
|
Component |
Update |
Windows event ID |
|
Kaspersky Security Center event ID |
|
Windows event log (default) |
|
Kaspersky Security Center event log (default) |
|
Error applying file encryption / decryption rules
Status |
|
Component |
Data Encryption |
Windows event ID |
|
Kaspersky Security Center event ID |
|
Windows event log (default) |
|
Kaspersky Security Center event log (default) |
|
File encryption / decryption error
Status |
|
Component |
Data Encryption |
Windows event ID |
|
Kaspersky Security Center event ID |
|
Event parameters |
|
Windows event log (default) |
|
Kaspersky Security Center event log (default) |
|
Status |
|
Component |
Data Encryption |
Windows event ID |
|
Kaspersky Security Center event ID |
|
Event parameters |
|
Windows event log (default) |
|
Kaspersky Security Center event log (default) |
|
Status |
|
Component |
Data Encryption |
Windows event ID |
|
Kaspersky Security Center event ID |
|
Windows event log (default) |
|
Kaspersky Security Center event log (default) |
|
Status |
|
Component |
Data Encryption |
Windows event ID |
|
Kaspersky Security Center event ID |
|
Windows event log (default) |
|
Kaspersky Security Center event log (default) |
|
Error creating encrypted package
Status |
|
Component |
Data Encryption |
Windows event ID |
|
Kaspersky Security Center event ID |
|
Windows event log (default) |
|
Kaspersky Security Center event log (default) |
|
Error encrypting / decrypting device
Status |
|
Component |
Data Encryption |
Windows event ID |
|
Kaspersky Security Center event ID |
|
Windows event log (default) |
|
Kaspersky Security Center event log (default) |
|
Could not load encryption module
Status |
|
Component |
Data Encryption |
Windows event ID |
|
Kaspersky Security Center event ID |
|
Windows event log (default) |
|
Kaspersky Security Center event log (default) |
|
The task for managing Authentication Agent accounts ended with an error
Status |
|
Component |
Data Encryption |
Windows event ID |
|
Kaspersky Security Center event ID |
|
Windows event log (default) |
|
Kaspersky Security Center event log (default) |
|
Status |
|
Component |
System Audit |
Windows event ID |
|
Kaspersky Security Center event ID |
|
Windows event log (default) |
|
Kaspersky Security Center event log (default) |
|
Status |
|
Component |
Data Encryption |
Windows event ID |
|
Kaspersky Security Center event ID |
|
Windows event log (default) |
|
Kaspersky Security Center event log (default) |
|
Status |
|
Component |
Data Encryption |
Windows event ID |
|
Kaspersky Security Center event ID |
|
Windows event log (default) |
|
Kaspersky Security Center event log (default) |
|
Kaspersky Anti Targeted Attack Platform server unavailable
Status |
|
Component |
Endpoint Sensor |
Windows event ID |
|
Kaspersky Security Center event ID |
|
Windows event log (default) |
– |
Kaspersky Security Center event log (default) |
|
Status |
|
Component |
Sandbox |
Windows event ID |
|
Kaspersky Security Center event ID |
|
Windows event log (default) |
|
Kaspersky Security Center event log (default) |
|
Object not quarantined (Sandbox)
Status |
|
Component |
Sandbox |
Windows event ID |
|
Kaspersky Security Center event ID |
|
Windows event log (default) |
|
Kaspersky Security Center event log (default) |
|
Status |
|
Component |
Sandbox |
Windows event ID |
|
Kaspersky Security Center event ID |
|
Windows event log (default) |
|
Kaspersky Security Center event log (default) |
|
Invalid Sandbox server certificate
Status |
|
Component |
Sandbox |
Windows event ID |
|
Kaspersky Security Center event ID |
|
Windows event log (default) |
|
Kaspersky Security Center event log (default) |
|
The Sandbox node is unavailable
Status |
|
Component |
Sandbox |
Windows event ID |
|
Kaspersky Security Center event ID |
|
Windows event log (default) |
|
Kaspersky Security Center event log (default) |
|
Failed to process the object in Sandbox
Status |
|
Component |
Sandbox |
Windows event ID |
|
Kaspersky Security Center event ID |
|
Windows event log (default) |
|
Kaspersky Security Center event log (default) |
|
Maximum load to Sandbox is exceeded
Status |
|
Component |
Sandbox |
Windows event ID |
|
Kaspersky Security Center event ID |
|
Windows event log (default) |
|
Kaspersky Security Center event log (default) |
|
Status |
|
Component |
Endpoint Detection and Response |
Windows event ID |
|
Kaspersky Security Center event ID |
|
Windows event log (default) |
|
Kaspersky Security Center event log (default) |
|
Sandbox license verification failed
Status |
|
Component |
Sandbox |
Windows event ID |
|
Kaspersky Security Center event ID |
|
Windows event log (default) |
|
Kaspersky Security Center event log (default) |
|
Failed to submit the scan task to Sandbox by a user
Status |
|
Component |
Sandbox |
Windows event ID |
|
Kaspersky Security Center event ID |
|
Windows event log (default) |
|
Kaspersky Security Center event log (default) |
|
Status |
|
Component |
Sandbox |
Windows event ID |
|
Kaspersky Security Center event ID |
|
Windows event log (default) |
|
Kaspersky Security Center event log (default) |
|
Status |
|
Component |
Endpoint Detection and Response |
Windows event ID |
|
Kaspersky Security Center event ID |
|
Windows event log (default) |
|
Kaspersky Security Center event log (default) |
|
Status |
|
Component |
Endpoint Detection and Response |
Windows event ID |
|
Kaspersky Security Center event ID |
|
Windows event log (default) |
|
Kaspersky Security Center event log (default) |
|
Status |
|
Component |
Endpoint Detection and Response |
Windows event ID |
|
Kaspersky Security Center event ID |
|
Windows event log (default) |
|
Kaspersky Security Center event log (default) |
|
Object not quarantined (Endpoint Detection and Response)
Status |
|
Component |
Endpoint Detection and Response |
Windows event ID |
|
Kaspersky Security Center event ID |
|
Windows event log (default) |
|
Kaspersky Security Center event log (default) |
|
Process startup is not blocked
Status |
|
Component |
Endpoint Detection and Response |
Windows event ID |
|
Kaspersky Security Center event ID |
|
Windows event log (default) |
|
Kaspersky Security Center event log (default) |
|
Status |
|
Component |
Endpoint Detection and Response |
Windows event ID |
|
Kaspersky Security Center event ID |
|
Windows event log (default) |
|
Kaspersky Security Center event log (default) |
|
Script execution is not blocked
Status |
|
Component |
Endpoint Detection and Response |
Windows event ID |
|
Kaspersky Security Center event ID |
|
Windows event log (default) |
|
Kaspersky Security Center event log (default) |
|
Error changing application components
Status |
|
Component |
System Audit |
Windows event ID |
|
Kaspersky Security Center event ID |
|
Windows event log (default) |
|
Kaspersky Security Center event log (default) |
|
There are patterns of a possible brute-force attack in the system
Status |
|
Component |
Log Inspection |
Windows event ID |
|
Kaspersky Security Center event ID |
|
Windows event log (default) |
|
Kaspersky Security Center event log (default) |
|
There are patterns of a possible Windows Event Log abuse
Status |
|
Component |
Log Inspection |
Windows event ID |
|
Kaspersky Security Center event ID |
|
Windows event log (default) |
|
Kaspersky Security Center event log (default) |
|
Atypical actions detected on behalf of a new service installed
Status |
|
Component |
Log Inspection |
Windows event ID |
|
Kaspersky Security Center event ID |
|
Windows event log (default) |
|
Kaspersky Security Center event log (default) |
|
Atypical logon that uses explicit credentials detected
Status |
|
Component |
Log Inspection |
Windows event ID |
|
Kaspersky Security Center event ID |
|
Windows event log (default) |
|
Kaspersky Security Center event log (default) |
|
There are patterns of a possible Kerberos forged PAC (MS14-068) attack in the system
Status |
|
Component |
Log Inspection |
Windows event ID |
|
Kaspersky Security Center event ID |
|
Windows event log (default) |
|
Kaspersky Security Center event log (default) |
|
Suspicious changes detected in the privileged built-in Administrators group
Status |
|
Component |
Log Inspection |
Windows event ID |
|
Kaspersky Security Center event ID |
|
Windows event log (default) |
|
Kaspersky Security Center event log (default) |
|
There is an atypical activity detected during a network logon session
Status |
|
Component |
Log Inspection |
Windows event ID |
|
Kaspersky Security Center event ID |
|
Windows event log (default) |
|
Kaspersky Security Center event log (default) |
|
Status |
|
Component |
Log Inspection |
Windows event ID |
|
Kaspersky Security Center event ID |
|
Windows event log (default) |
|
Kaspersky Security Center event log (default) |
|
Atypical event occurs too often. Event aggregation started
Status |
|
Component |
Log Inspection |
Windows event ID |
|
Kaspersky Security Center event ID |
|
Windows event log (default) |
|
Kaspersky Security Center event log (default) |
|
Report on an atypical event for the aggregation period
Status |
|
Component |
Log Inspection |
Windows event ID |
|
Kaspersky Security Center event ID |
|
Windows event log (default) |
|
Kaspersky Security Center event log (default) |
|
Error connecting to the Kaspersky Anti Targeted Attack Platform server
Status |
|
Component |
Endpoint Detection and Response (KATA) |
Windows event ID |
|
Kaspersky Security Center event ID |
|
Windows event log (default) |
|
Kaspersky Security Center event log (default) |
|
Invalid certificate of the Kaspersky Anti Targeted Attack Platform server
Status |
|
Component |
Endpoint Detection and Response (KATA) |
Windows event ID |
|
Kaspersky Security Center event ID |
|
Windows event log (default) |
|
Kaspersky Security Center event log (default) |
|
Invalid certificate of the agent on the Kaspersky Anti Targeted Attack Platform server
Status |
|
Component |
Endpoint Detection and Response (KATA) |
Windows event ID |
|
Kaspersky Security Center event ID |
|
Windows event log (default) |
|
Kaspersky Security Center event log (default) |
|
Status |
|
Component |
Administration Server connection protection |
Windows event ID |
|
Kaspersky Security Center event ID |
|
Windows event log (default) |
– |
Kaspersky Security Center event log (default) |
|
File or folder change was detected
Status |
|
Component |
System Integrity Monitoring |
Windows event ID |
|
Kaspersky Security Center event ID |
|
Windows event log (default) |
– |
Kaspersky Security Center event log (default) |
|
Object changes too often. Event aggregation started
Status |
|
Component |
System Integrity Monitoring |
Windows event ID |
|
Kaspersky Security Center event ID |
|
Windows event log (default) |
– |
Kaspersky Security Center event log (default) |
|
Report on object modification for the aggregation period
Status |
|
Component |
System Integrity Monitoring |
Windows event ID |
|
Kaspersky Security Center event ID |
|
Windows event log (default) |
– |
Kaspersky Security Center event log (default) |
|
Monitoring scope includes incorrect objects
Status |
|
Component |
System Integrity Monitoring |
Windows event ID |
|
Kaspersky Security Center event ID |
|
Windows event log (default) |
– |
Kaspersky Security Center event log (default) |
|
Status |
|
Component |
System Integrity Monitoring |
Windows event ID |
|
Kaspersky Security Center event ID |
|
Windows event log (default) |
– |
Kaspersky Security Center event log (default) |
|
Device connection / disconnection is detected
Status |
|
Component |
System Integrity Monitoring |
Windows event ID |
|
Kaspersky Security Center event ID |
|
Windows event log (default) |
– |
Kaspersky Security Center event log (default) |
|
Attempts to perform the restricted operations with the object is too many. Event aggregation started
Status |
|
Component |
System Integrity Monitoring |
Windows event ID |
|
Kaspersky Security Center event ID |
|
Windows event log (default) |
– |
Kaspersky Security Center event log (default) |
|
An operation with the files of the monitoring scope was blocked
Status |
|
Component |
System Integrity Monitoring |
Windows event ID |
|
Kaspersky Security Center event ID |
|
Windows event log (default) |
– |
Kaspersky Security Center event log (default) |
|
Status |
|
Component |
System Integrity Monitoring |
Windows event ID |
|
Kaspersky Security Center event ID |
|
Windows event log (default) |
– |
Kaspersky Security Center event log (default) |
|
Status |
|
Component |
System Integrity Monitoring |
Windows event ID |
|
Kaspersky Security Center event ID |
|
Windows event log (default) |
– |
Kaspersky Security Center event log (default) |
|
Status |
|
Component |
System Integrity Monitoring |
Windows event ID |
|
Kaspersky Security Center event ID |
|
Windows event log (default) |
– |
Kaspersky Security Center event log (default) |
|
Application Control settings not applied: could not match user name to security ID (SID)
Status |
|
Component |
Application Control |
Windows event ID |
|
Kaspersky Security Center event ID |
|
Windows event log (default) |
– |
Kaspersky Security Center event log (default) |
|
Device Control settings not applied: could not match user name to security ID (SID)
Status |
|
Component |
Device Control |
Windows event ID |
|
Kaspersky Security Center event ID |
|
Windows event log (default) |
– |
Kaspersky Security Center event log (default) |
|
Web Control settings not applied: could not match user name to security ID (SID)
Status |
|
Component |
Web Control |
Windows event ID |
|
Kaspersky Security Center event ID |
|
Windows event log (default) |
– |
Kaspersky Security Center event log (default) |
|
Adaptive Anomaly Control settings not applied: could not match user name to security ID (SID)
Status |
|
Component |
Adaptive Anomaly Control |
Windows event ID |
|
Kaspersky Security Center event ID |
|
Windows event log (default) |
– |
Kaspersky Security Center event log (default) |
|
Log Inspection settings not applied: could not match user name to security ID (SID)
Status |
|
Component |
Log Inspection |
Windows event ID |
|
Kaspersky Security Center event ID |
|
Windows event log (default) |
– |
Kaspersky Security Center event log (default) |
|
Status |
|
Component |
Light Agent |
Windows event ID |
|
Kaspersky Security Center event ID |
|
Windows event log (default) |
– |
Kaspersky Security Center event log (default) |
|
No SVMs are available for connection
Status |
|
Component |
Light Agent |
Windows event ID |
|
Kaspersky Security Center event ID |
|
Windows event log (default) |
– |
Kaspersky Security Center event log (default) |
|
Malicious object detected. Advanced Disinfection should be started on a virtual machine template
Status |
|
Component |
Light Agent |
Windows event ID |
|
Kaspersky Security Center event ID |
|
Windows event log (default) |
– |
Kaspersky Security Center event log (default) |
|
Functional failure
Status |
|
Component |
System Audit |
Windows event ID |
|
Kaspersky Security Center event ID |
|
Windows event log (default) |
– |
Kaspersky Security Center event log (default) |
|
Invalid task settings. Settings not applied
Status |
|
Component |
System Audit |
Windows event ID |
|
Kaspersky Security Center event ID |
|
Windows event log (default) |
– |
Kaspersky Security Center event log (default) |
|
Warning
Application crashed during previous session
Status |
|
Component |
System Audit |
Windows event ID |
|
Kaspersky Security Center event ID |
– |
Windows event log (default) |
|
Kaspersky Security Center event log (default) |
– |
Status |
|
Component |
System Audit |
Windows event ID |
|
Kaspersky Security Center event ID |
|
Windows event log (default) |
– |
Kaspersky Security Center event log (default) |
|
Status |
|
Component |
System Audit |
Windows event ID |
|
Kaspersky Security Center event ID |
|
Windows event log (default) |
|
Kaspersky Security Center event log (default) |
|
Automatic updates are disabled
Status |
|
Component |
System Audit |
Windows event ID |
|
Kaspersky Security Center event ID |
|
Windows event log (default) |
– |
Kaspersky Security Center event log (default) |
|
Status |
|
Component |
System Audit |
Windows event ID |
|
Kaspersky Security Center event ID |
|
Windows event log (default) |
– |
Kaspersky Security Center event log (default) |
|
Protection components are disabled
Status |
|
Component |
System Audit |
Windows event ID |
|
Kaspersky Security Center event ID |
|
Windows event log (default) |
– |
Kaspersky Security Center event log (default) |
|
Computer is running in safe mode
Status |
|
Component |
System Audit |
Windows event ID |
|
Kaspersky Security Center event ID |
|
Windows event log (default) |
– |
Kaspersky Security Center event log (default) |
– |
Status |
|
Component |
System Audit |
Windows event ID |
|
Kaspersky Security Center event ID |
|
Windows event log (default) |
– |
Kaspersky Security Center event log (default) |
|
Status |
|
Component |
System Audit |
Windows event ID |
|
Kaspersky Security Center event ID |
|
Windows event log (default) |
|
Kaspersky Security Center event log (default) |
|
Status |
|
Component |
System Audit |
Windows event ID |
|
Kaspersky Security Center event ID |
|
Windows event log (default) |
– |
Kaspersky Security Center event log (default) |
|
Quit and reopen the application to complete updating
Status |
|
Component |
System Audit |
Windows event ID |
|
Kaspersky Security Center event ID |
|
Windows event log (default) |
– |
Kaspersky Security Center event log (default) |
|
Status |
|
Component |
System Audit |
Windows event ID |
|
Kaspersky Security Center event ID |
|
Windows event log (default) |
|
Kaspersky Security Center event log (default) |
|
The license allows the use of components that have not been installed
Status |
|
Component |
System Audit |
Windows event ID |
|
Kaspersky Security Center event ID |
|
Windows event log (default) |
|
Kaspersky Security Center event log (default) |
|
Status |
|
Component |
System Audit |
Windows event ID |
|
Kaspersky Security Center event ID |
|
Windows event log (default) |
– |
Kaspersky Security Center event log (default) |
|
Advanced Disinfection completed
Status |
|
Component |
System Audit |
Windows event ID |
|
Kaspersky Security Center event ID |
|
Windows event log (default) |
– |
Kaspersky Security Center event log (default) |
|
Status |
|
Component |
System Audit |
Windows event ID |
|
Kaspersky Security Center event ID |
|
Windows event log (default) |
– |
Kaspersky Security Center event log (default) |
|
Status |
|
Component |
System Audit |
Windows event ID |
|
Kaspersky Security Center event ID |
|
Windows event log (default) |
|
Kaspersky Security Center event log (default) |
|
Status |
|
Component |
Behavior Detection Exploit Prevention Web Threat Protection |
Windows event ID |
|
Kaspersky Security Center event ID |
|
Event parameters |
When external encryption of shared folders is detected, the application shows the path to the target file.
|
Windows event log (default) |
|
Kaspersky Security Center event log (default) |
– |
The operating system settings do not allow to control access to Wi-Fi networks
Status |
|
Component |
Device Control |
Windows event ID |
|
Kaspersky Security Center event ID |
|
Windows event log (default) |
|
Kaspersky Security Center event log (default) |
– |
Object not restored from Backup
Status |
|
Component |
System Audit |
Windows event ID |
|
Kaspersky Security Center event ID |
|
Windows event log (default) |
|
Kaspersky Security Center event log (default) |
– |
Suspicious network activity detected
Status |
|
Component |
System Audit |
Windows event ID |
|
Kaspersky Security Center event ID |
|
Windows event log (default) |
– |
Kaspersky Security Center event log (default) |
|
Encrypted connection terminated
Status |
|
Component |
System Audit |
Windows event ID |
|
Kaspersky Security Center event ID |
|
Windows event log (default) |
|
Kaspersky Security Center event log (default) |
|
Status |
|
Component |
System Audit |
Windows event ID |
|
Kaspersky Security Center event ID |
|
Windows event log (default) |
– |
Kaspersky Security Center event log (default) |
|
Processing of some OS functions is disabled
Status |
|
Component |
System Audit |
Windows event ID |
|
Kaspersky Security Center event ID |
|
Windows event log (default) |
|
Kaspersky Security Center event log (default) |
|
Quarantine storage is almost out of space
Status |
|
Component |
System Audit |
Windows event ID |
|
Kaspersky Security Center event ID |
|
Windows event log (default) |
|
Kaspersky Security Center event log (default) |
|
Status |
|
Component |
System Audit |
Windows event ID |
|
Kaspersky Security Center event ID |
|
Windows event log (default) |
|
Kaspersky Security Center event log (default) |
|
Status |
|
Component |
File Threat Protection Mail Threat Protection Host Intrusion Prevention AMSI Protection Malware Scan |
Windows event ID |
|
Kaspersky Security Center event ID |
|
Event parameters |
|
Windows event log (default) |
– |
Kaspersky Security Center event log (default) |
|
Status |
|
Component |
File Threat Protection Behavior Detection Host Intrusion Prevention Malware Scan |
Windows event ID |
|
Kaspersky Security Center event ID |
|
Windows event log (default) |
– |
Kaspersky Security Center event log (default) |
|
Status |
|
Component |
Host Intrusion Prevention |
Windows event ID |
|
Kaspersky Security Center event ID |
|
Windows event log (default) |
– |
Kaspersky Security Center event log (default) |
– |
Status |
|
Component |
File Threat Protection Web Threat Protection Mail Threat Protection AMSI Protection Host Intrusion Prevention Malware Scan |
Windows event ID |
|
Kaspersky Security Center event ID |
|
Windows event log (default) |
– |
Kaspersky Security Center event log (default) |
– |
Status |
|
Component |
File Threat Protection Web Threat Protection Mail Threat Protection Host Intrusion Prevention AMSI Protection Behavior Detection Malware Scan |
Windows event ID |
|
Kaspersky Security Center event ID |
|
Event parameters |
|
Windows event log (default) |
– |
Kaspersky Security Center event log (default) |
|
Status |
|
Component |
File Threat Protection Mail Threat Protection Host Intrusion Prevention Exploit Prevention Behavior Detection Malware Scan |
Windows event ID |
|
Kaspersky Security Center event ID |
|
Event parameters |
|
Windows event log (default) |
– |
Kaspersky Security Center event log (default) |
|
Status |
|
Component |
File Threat Protection Mail Threat Protection Host Intrusion Prevention Malware Scan |
Windows event ID |
|
Kaspersky Security Center event ID |
|
Event parameters |
|
Windows event log (default) |
– |
Kaspersky Security Center event log (default) |
|
Object will be disinfected on restart
Status |
|
Component |
Host Intrusion Prevention File Threat Protection Malware Scan |
Windows event ID |
|
Kaspersky Security Center event ID |
– |
Windows event log (default) |
|
Kaspersky Security Center event log (default) |
– |
Object will be deleted on restart
Status |
|
Component |
Behavior Detection Exploit Prevention Host Intrusion Prevention File Threat Protection Malware Scan |
Windows event ID |
|
Kaspersky Security Center event ID |
– |
Windows event log (default) |
|
Kaspersky Security Center event log (default) |
– |
Object deleted according to settings
Status |
|
Component |
Mail Threat Protection |
Windows event ID |
|
Kaspersky Security Center event ID |
– |
Windows event log (default) |
|
Kaspersky Security Center event log (default) |
– |
Status |
|
Component |
File Threat Protection Behavior Detection Exploit Prevention Malware Scan |
Windows event ID |
|
Kaspersky Security Center event ID |
|
Windows event log (default) |
– |
Kaspersky Security Center event log (default) |
|
Status |
|
Component |
Web Threat Protection |
Windows event ID |
|
Kaspersky Security Center event ID |
|
Event parameters |
|
Windows event log (default) |
– |
Kaspersky Security Center event log (default) |
|
Status |
|
Component |
BadUSB Attack Prevention |
Windows event ID |
|
Kaspersky Security Center event ID |
|
Windows event log (default) |
|
Kaspersky Security Center event log (default) |
|
The object scan result has been sent to a third-party application
Status |
|
Component |
AMSI Protection |
Windows event ID |
|
Kaspersky Security Center event ID |
|
Event parameters |
|
Windows event log (default) |
– |
Kaspersky Security Center event log (default) |
|
Task settings applied successfully
Status |
|
Component |
Application Control |
Windows event ID |
|
Kaspersky Security Center event ID |
|
Windows event log (default) |
– |
Kaspersky Security Center event log (default) |
|
Warning about undesirable content (local bases)
Status |
|
Component |
Web Control |
Windows event ID |
|
Kaspersky Security Center event ID |
|
Event parameters |
|
Windows event log (default) |
– |
Kaspersky Security Center event log (default) |
|
Warning about undesirable content (KSN)
Status |
|
Component |
Web Control |
Windows event ID |
|
Kaspersky Security Center event ID |
|
Event parameters |
|
Windows event log (default) |
– |
Kaspersky Security Center event log (default) |
|
Undesirable content was accessed after a warning
Status |
|
Component |
Web Control |
Windows event ID |
|
Kaspersky Security Center event ID |
|
Windows event log (default) |
– |
Kaspersky Security Center event log (default) |
– |
Temporary access to the device activated
Status |
|
Component |
Device Control |
Windows event ID |
|
Kaspersky Security Center event ID |
|
Windows event log (default) |
|
Kaspersky Security Center event log (default) |
– |
Operation canceled by the user
Status |
|
Component |
Update |
Windows event ID |
|
Kaspersky Security Center event ID |
|
Windows event log (default) |
– |
Kaspersky Security Center event log (default) |
|
User has opted out of the encryption policy
Status |
|
Component |
Data Encryption |
Windows event ID |
|
Kaspersky Security Center event ID |
|
Windows event log (default) |
– |
Kaspersky Security Center event log (default) |
|
Interrupted applying file encryption / decryption rules
Status |
|
Component |
Data Encryption |
Windows event ID |
|
Kaspersky Security Center event ID |
– |
Windows event log (default) |
|
Kaspersky Security Center event log (default) |
– |
File encryption / decryption interrupted
Status |
|
Component |
Data Encryption |
Windows event ID |
|
Kaspersky Security Center event ID |
– |
Windows event log (default) |
|
Kaspersky Security Center event log (default) |
– |
Device encryption / decryption interrupted
Status |
|
Component |
Data Encryption |
Windows event ID |
|
Kaspersky Security Center event ID |
– |
Windows event log (default) |
|
Kaspersky Security Center event log (default) |
– |
Failed to install or upgrade Kaspersky Disk Encryption drivers in the WinRE image
Status |
|
Component |
Data Encryption |
Windows event ID |
|
Kaspersky Security Center event ID |
|
Windows event log (default) |
|
Kaspersky Security Center event log (default) |
|
Status |
|
Component |
System Integrity Check |
Windows event ID |
|
Kaspersky Security Center event ID |
|
Windows event log (default) |
– |
Kaspersky Security Center event log (default) |
|
Application startup was blocked
Status |
|
Component |
Endpoint Sensor |
Windows event ID |
|
Kaspersky Security Center event ID |
|
Windows event log (default) |
|
Kaspersky Security Center event log (default) |
|
Status |
|
Component |
Endpoint Sensor |
Windows event ID |
|
Kaspersky Security Center event ID |
|
Windows event log (default) |
|
Kaspersky Security Center event log (default) |
|
Process was terminated by the Kaspersky Anti Targeted Attack Platform server administrator
Status |
|
Component |
Endpoint Sensor |
Windows event ID |
|
Kaspersky Security Center event ID |
|
Windows event log (default) |
|
Kaspersky Security Center event log (default) |
|
The application was terminated by the Kaspersky Anti Targeted Attack Platform server administrator
Status |
|
Component |
Endpoint Sensor |
Windows event ID |
|
Kaspersky Security Center event ID |
|
Windows event log (default) |
|
Kaspersky Security Center event log (default) |
|
File or stream was deleted by the Kaspersky Anti Targeted Attack Platform server administrator
Status |
|
Component |
Endpoint Sensor |
Windows event ID |
|
Kaspersky Security Center event ID |
|
Windows event log (default) |
|
Kaspersky Security Center event log (default) |
|
Status |
|
Component |
Endpoint Sensor |
Windows event ID |
|
Kaspersky Security Center event ID |
|
Windows event log (default) |
|
Kaspersky Security Center event log (default) |
|
File was quarantined on the Kaspersky Anti Targeted Attack Platform server by the administrator
Status |
|
Component |
Endpoint Sensor |
Windows event ID |
|
Kaspersky Security Center event ID |
|
Windows event log (default) |
|
Kaspersky Security Center event log (default) |
|
Network activity of all third-party applications is blocked
Status |
|
Component |
Endpoint Sensor |
Windows event ID |
|
Kaspersky Security Center event ID |
|
Windows event log (default) |
|
Kaspersky Security Center event log (default) |
|
Network activity of all third-party applications is unblocked
Status |
|
Component |
Endpoint Sensor |
Windows event ID |
|
Kaspersky Security Center event ID |
|
Windows event log (default) |
|
Kaspersky Security Center event log (default) |
|
Object will be deleted after restart (Sandbox)
Status |
|
Component |
Sandbox |
Windows event ID |
|
Kaspersky Security Center event ID |
|
Windows event log (default) |
|
Kaspersky Security Center event log (default) |
|
Total size of scan tasks exceeded the limit
Status |
|
Component |
Sandbox |
Windows event ID |
|
Kaspersky Security Center event ID |
|
Windows event log (default) |
|
Kaspersky Security Center event log (default) |
|
Object startup allowed, event logged
Status |
|
Component |
Endpoint Detection and Response |
Windows event ID |
|
Kaspersky Security Center event ID |
|
Windows event log (default) |
|
Kaspersky Security Center event log (default) |
|
Process startup allowed, event logged
Status |
|
Component |
Endpoint Detection and Response |
Windows event ID |
|
Kaspersky Security Center event ID |
|
Windows event log (default) |
|
Kaspersky Security Center event log (default) |
|
Object will be deleted after restart (Endpoint Detection and Response)
Status |
|
Component |
Endpoint Detection and Response |
Windows event ID |
|
Kaspersky Security Center event ID |
|
Windows event log (default) |
|
Kaspersky Security Center event log (default) |
|
Status |
|
Component |
Endpoint Detection and Response |
Windows event ID |
|
Kaspersky Security Center event ID |
|
Windows event log (default) |
|
Kaspersky Security Center event log (default) |
|
Termination of network isolation
Status |
|
Component |
Endpoint Detection and Response |
Windows event ID |
|
Kaspersky Security Center event ID |
|
Windows event log (default) |
|
Kaspersky Security Center event log (default) |
|
Restart required to complete the task
Status |
|
Component |
System Audit |
Windows event ID |
|
Kaspersky Security Center event ID |
|
Windows event log (default) |
|
Kaspersky Security Center event log (default) |
|
Application startup blockage message to administrator
Status |
|
Component |
Application Control |
Windows event ID |
|
Kaspersky Security Center event ID |
|
Event parameters |
|
Windows event log (default) |
– |
Kaspersky Security Center event log (default) |
|
Device access blockage message to administrator
Status |
|
Component |
Device Control |
Windows event ID |
|
Kaspersky Security Center event ID |
|
Event parameters |
|
Windows event log (default) |
– |
Kaspersky Security Center event log (default) |
|
Web page access blockage message to administrator
Status |
|
Component |
Web Control |
Windows event ID |
|
Kaspersky Security Center event ID |
|
Event parameters |
|
Windows event log (default) |
– |
Kaspersky Security Center event log (default) |
|
Status |
|
Component |
Device Control |
Windows event ID |
|
Kaspersky Security Center event ID |
|
Event parameters |
|
Windows event log (default) |
– |
Kaspersky Security Center event log (default) |
|
Application activity blockage message to administrator
Status |
|
Component |
Adaptive Anomaly Control |
Windows event ID |
|
Kaspersky Security Center event ID |
|
Event parameters |
|
Windows event log (default) |
– |
Kaspersky Security Center event log (default) |
|
File modified (File Integrity Monitor)
Status |
|
Component |
File Integrity Monitor |
Windows event ID |
|
Kaspersky Security Center event ID |
|
Windows event log (default) |
|
Kaspersky Security Center event log (default) |
|
Object changes too often. Event aggregation started (File Integrity Monitor)
Status |
|
Component |
File Integrity Monitor |
Windows event ID |
|
Kaspersky Security Center event ID |
|
Windows event log (default) |
|
Kaspersky Security Center event log (default) |
|
Starting the cloud service client application is blocked
Status |
|
Component |
Cloud Discovery |
Windows event ID |
|
Kaspersky Security Center event ID |
|
Windows event log (default) |
– |
Kaspersky Security Center event log (default) |
|
Access to the cloud service is blocked
Status |
|
Component |
Cloud Discovery |
Windows event ID |
|
Kaspersky Security Center event ID |
|
Windows event log (default) |
– |
Kaspersky Security Center event log (default) |
|
File or folder change was detected
Status |
|
Component |
System Integrity Monitoring |
Windows event ID |
|
Kaspersky Security Center event ID |
|
Windows event log (default) |
– |
Kaspersky Security Center event log (default) |
|
Object changes too often. Event aggregation started
Status |
|
Component |
System Integrity Monitoring |
Windows event ID |
|
Kaspersky Security Center event ID |
|
Windows event log (default) |
– |
Kaspersky Security Center event log (default) |
|
Report on object modification for the aggregation period
Status |
|
Component |
System Integrity Monitoring |
Windows event ID |
|
Kaspersky Security Center event ID |
|
Windows event log (default) |
– |
Kaspersky Security Center event log (default) |
|
Status |
|
Component |
System Integrity Monitoring |
Windows event ID |
|
Kaspersky Security Center event ID |
|
Windows event log (default) |
– |
Kaspersky Security Center event log (default) |
|
Device connection / disconnection is detected
Status |
|
Component |
System Integrity Monitoring |
Windows event ID |
|
Kaspersky Security Center event ID |
|
Windows event log (default) |
– |
Kaspersky Security Center event log (default) |
|
The prohibited operation was allowed in test mode
Status |
|
Component |
System Integrity Monitoring |
Windows event ID |
|
Kaspersky Security Center event ID |
|
Windows event log (default) |
– |
Kaspersky Security Center event log (default) |
|
Status |
|
Component |
Light Agent |
Windows event ID |
|
Kaspersky Security Center event ID |
|
Windows event log (default) |
– |
Kaspersky Security Center event log (default) |
|
Unable to connect to the Integration Server. Check Integration Server status and network settings
Status |
|
Component |
Light Agent |
Windows event ID |
|
Kaspersky Security Center event ID |
|
Windows event log (default) |
– |
Kaspersky Security Center event log (default) |
|
Virtual machine template needs updating
Status |
|
Component |
Light Agent |
Windows event ID |
|
Kaspersky Security Center event ID |
|
Windows event log (default) |
– |
Kaspersky Security Center event log (default) |
|
Changing the license type to Enterprise. Enterprise functionality enabled
Status |
|
Component |
Light Agent |
Windows event ID |
|
Kaspersky Security Center event ID |
|
Windows event log (default) |
– |
Kaspersky Security Center event log (default) |
|
Informational message
Status |
|
Component |
System Audit |
Windows event ID |
|
Kaspersky Security Center event ID |
|
Windows event log (default) |
|
Kaspersky Security Center event log (default) |
– |
Status |
|
Component |
System Audit |
Windows event ID |
|
Kaspersky Security Center event ID |
|
Windows event log (default) |
|
Kaspersky Security Center event log (default) |
– |
Self-Defense restricted access to the protected resource
Status |
|
Component |
System Audit |
Windows event ID |
|
Kaspersky Security Center event ID |
|
Windows event log (default) |
– |
Kaspersky Security Center event log (default) |
|
Status |
|
Component |
System Audit |
Windows event ID |
|
Kaspersky Security Center event ID |
|
Windows event log (default) |
|
Kaspersky Security Center event log (default) |
|
Status |
|
Component |
System Audit |
Windows event ID |
|
Kaspersky Security Center event ID |
|
Windows event log (default) |
– |
Kaspersky Security Center event log (default) |
|
Status |
|
Component |
System Audit |
Windows event ID |
|
Kaspersky Security Center event ID |
|
Windows event log (default) |
– |
Kaspersky Security Center event log (default) |
|
Status |
|
Component |
System Audit |
Windows event ID |
|
Kaspersky Security Center event ID |
|
Windows event log (default) |
– |
Kaspersky Security Center event log (default) |
– |
Subscription settings have changed
Status |
|
Component |
System Audit |
Windows event ID |
|
Kaspersky Security Center event ID |
|
Windows event log (default) |
– |
Kaspersky Security Center event log (default) |
|
Status |
|
Component |
System Audit |
Windows event ID |
|
Kaspersky Security Center event ID |
|
Windows event log (default) |
|
Kaspersky Security Center event log (default) |
|
Status |
|
Component |
System Audit |
Windows event ID |
|
Kaspersky Security Center event ID |
|
Windows event log (default) |
– |
Kaspersky Security Center event log (default) |
|
Status |
|
Component |
System Audit |
Windows event ID |
|
Kaspersky Security Center event ID |
|
Windows event log (default) |
– |
Kaspersky Security Center event log (default) |
|
Status |
|
Component |
System Audit |
Windows event ID |
|
Kaspersky Security Center event ID |
|
Windows event log (default) |
– |
Kaspersky Security Center event log (default) |
|
Status |
|
Component |
System Audit |
Windows event ID |
|
Kaspersky Security Center event ID |
|
Windows event log (default) |
– |
Kaspersky Security Center event log (default) |
|
The application works and processes data under relevant laws and uses the appropriate infrastructure
Status |
|
Component |
System Audit |
Windows event ID |
|
Kaspersky Security Center event ID |
|
Windows event log (default) |
|
Kaspersky Security Center event log (default) |
|
Object restored from Quarantine
Status |
|
Component |
System Audit |
Windows event ID |
|
Kaspersky Security Center event ID |
|
Windows event log (default) |
|
Kaspersky Security Center event log (default) |
|
Object deleted from Quarantine
Status |
|
Component |
System Audit |
Windows event ID |
|
Kaspersky Security Center event ID |
|
Windows event log (default) |
|
Kaspersky Security Center event log (default) |
|
A backup copy of the object was created
Status |
|
Component |
File Threat Protection Mail Threat Protection Behavior Detection Host Intrusion Prevention Sandbox Malware Scan |
Windows event ID |
|
Kaspersky Security Center event ID |
|
Windows event log (default) |
|
Kaspersky Security Center event log (default) |
|
Overwritten by a copy that was disinfected earlier
Status |
|
Component |
File Threat Protection Host Intrusion Prevention Malware Scan |
Windows event ID |
|
Kaspersky Security Center event ID |
|
Windows event log (default) |
– |
Kaspersky Security Center event log (default) |
– |
Password-protected archive detected
Status |
|
Component |
File Threat Protection Web Threat Protection Mail Threat Protection AMSI Protection Host Intrusion Prevention Malware Scan |
Windows event ID |
|
Kaspersky Security Center event ID |
|
Event parameters |
|
Windows event log (default) |
– |
Kaspersky Security Center event log (default) |
|
Information about detected object
Status |
|
Component |
File Threat Protection Web Threat Protection Mail Threat Protection AMSI Protection Host Intrusion Prevention Malware Scan |
Windows event ID |
|
Kaspersky Security Center event ID |
|
Windows event log (default) |
– |
Kaspersky Security Center event log (default) |
|
The object is in the Kaspersky Private Security Network allowlist
Status |
|
Component |
File Threat Protection Web Threat Protection Mail Threat Protection AMSI Protection Host Intrusion Prevention Malware Scan |
Windows event ID |
|
Kaspersky Security Center event ID |
|
Windows event log (default) |
|
Kaspersky Security Center event log (default) |
|
Status |
|
Component |
Mail Threat Protection Exploit Prevention Behavior Detection Malware Scan |
Windows event ID |
|
Kaspersky Security Center event ID |
|
Windows event log (default) |
– |
Kaspersky Security Center event log (default) |
|
Status |
|
Component |
Host Intrusion Prevention File Threat Protection Web Threat Protection Mail Threat Protection Malware Scan |
Windows event ID |
|
Kaspersky Security Center event ID |
|
Windows event log (default) |
|
Kaspersky Security Center event log (default) |
– |
Status |
|
Component |
Host Intrusion Prevention File Threat Protection AMSI Protection Malware Scan |
Windows event ID |
|
Kaspersky Security Center event ID |
|
Windows event log (default) |
|
Kaspersky Security Center event log (default) |
– |
Status |
|
Component |
Host Intrusion Prevention File Threat Protection Web Threat Protection Mail Threat Protection AMSI Protection Malware Scan |
Windows event ID |
|
Kaspersky Security Center event ID |
|
Windows event log (default) |
|
Kaspersky Security Center event log (default) |
– |
Status |
|
Component |
Host Intrusion Prevention File Threat Protection Web Threat Protection Mail Threat Protection AMSI Protection Malware Scan |
Windows event ID |
|
Kaspersky Security Center event ID |
|
Windows event log (default) |
|
Kaspersky Security Center event log (default) |
– |
Status |
|
Component |
Web Threat Protection |
Windows event ID |
|
Kaspersky Security Center event ID |
|
Windows event log (default) |
|
Kaspersky Security Center event log (default) |
– |
Status |
|
Component |
Application Control |
Windows event ID |
|
Kaspersky Security Center event ID |
|
Windows event log (default) |
|
Kaspersky Security Center event log (default) |
– |
Status |
|
Component |
Update |
Windows event ID |
|
Kaspersky Security Center event ID |
|
Windows event log (default) |
|
Kaspersky Security Center event log (default) |
– |
Status |
|
Component |
Update |
Windows event ID |
|
Kaspersky Security Center event ID |
|
Windows event log (default) |
|
Kaspersky Security Center event log (default) |
– |
The link is in the Kaspersky Private Security Network allowlist
Status |
|
Component |
Web Threat Protection |
Windows event ID |
|
Kaspersky Security Center event ID |
|
Windows event log (default) |
|
Kaspersky Security Center event log (default) |
|
Application placed in the trusted group
Status |
|
Component |
Host Intrusion Prevention |
Windows event ID |
|
Kaspersky Security Center event ID |
|
Windows event log (default) |
– |
Kaspersky Security Center event log (default) |
|
Application placed in restricted group
Status |
|
Component |
Host Intrusion Prevention |
Windows event ID |
|
Kaspersky Security Center event ID |
|
Windows event log (default) |
– |
Kaspersky Security Center event log (default) |
|
Host Intrusion Prevention was triggered
Status |
|
Component |
Host Intrusion Prevention |
Windows event ID |
|
Kaspersky Security Center event ID |
|
Windows event log (default) |
– |
Kaspersky Security Center event log (default) |
|
Status |
|
Component |
Behavior Detection Exploit Prevention Host Intrusion Prevention |
Windows event ID |
|
Kaspersky Security Center event ID |
|
Windows event log (default) |
– |
Kaspersky Security Center event log (default) |
|
Status |
|
Component |
Behavior Detection Exploit Prevention |
Windows event ID |
|
Kaspersky Security Center event ID |
|
Windows event log (default) |
– |
Kaspersky Security Center event log (default) |
– |
Status |
|
Component |
Behavior Detection Exploit Prevention |
Windows event ID |
|
Kaspersky Security Center event ID |
|
Windows event log (default) |
– |
Kaspersky Security Center event log (default) |
– |
Status |
|
Component |
Adaptive Anomaly Control |
Windows event ID |
|
Kaspersky Security Center event ID |
|
Event parameters |
|
Windows event log (default) |
– |
Kaspersky Security Center event log (default) |
|
Status |
|
Component |
BadUSB Attack Prevention |
Windows event ID |
|
Kaspersky Security Center event ID |
|
Windows event log (default) |
– |
Kaspersky Security Center event log (default) |
|
Status |
|
Component |
Firewall |
Windows event ID |
|
Kaspersky Security Center event ID |
|
Windows event log (default) |
– |
Kaspersky Security Center event log (default) |
– |
Application startup prohibited in test mode
Status |
|
Component |
Application Control |
Windows event ID |
|
Kaspersky Security Center event ID |
|
Event parameters |
|
Windows event log (default) |
– |
Kaspersky Security Center event log (default) |
|
Application startup allowed in test mode
Status |
|
Component |
Application Control |
Windows event ID |
|
Kaspersky Security Center event ID |
|
Event parameters |
|
Windows event log (default) |
– |
Kaspersky Security Center event log (default) |
– |
A page that is allowed was opened
Status |
|
Component |
Web Control |
Windows event ID |
|
Kaspersky Security Center event ID |
|
Windows event log (default) |
– |
Kaspersky Security Center event log (default) |
– |
Operation with the device allowed
Status |
|
Component |
Device Control |
Windows event ID |
|
Kaspersky Security Center event ID |
|
Windows event log (default) |
– |
Kaspersky Security Center event log (default) |
– |
Status |
|
Component |
Device Control |
Windows event ID |
|
Kaspersky Security Center event ID |
|
Event parameters |
|
Windows event log (default) |
– |
Kaspersky Security Center event log (default) |
– |
Status |
|
Component |
Update |
Windows event ID |
|
Kaspersky Security Center event ID |
|
Windows event log (default) |
– |
Kaspersky Security Center event log (default) |
– |
Update distribution completed successfully
Status |
|
Component |
Update |
Windows event ID |
|
Kaspersky Security Center event ID |
|
Windows event log (default) |
– |
Kaspersky Security Center event log (default) |
– |
Status |
|
Component |
Update |
Windows event ID |
|
Kaspersky Security Center event ID |
|
Windows event log (default) |
|
Kaspersky Security Center event log (default) |
– |
Status |
|
Component |
Update |
Windows event ID |
|
Kaspersky Security Center event ID |
|
Windows event log (default) |
|
Kaspersky Security Center event log (default) |
– |
Status |
|
Component |
Update |
Windows event ID |
|
Kaspersky Security Center event ID |
|
Windows event log (default) |
|
Kaspersky Security Center event log (default) |
– |
Status |
|
Component |
Update |
Windows event ID |
|
Kaspersky Security Center event ID |
|
Windows event log (default) |
|
Kaspersky Security Center event log (default) |
– |
File rolled back due to update error
Status |
|
Component |
Update |
Windows event ID |
|
Kaspersky Security Center event ID |
|
Windows event log (default) |
|
Kaspersky Security Center event log (default) |
– |
Status |
|
Component |
Update |
Windows event ID |
|
Kaspersky Security Center event ID |
|
Windows event log (default) |
|
Kaspersky Security Center event log (default) |
– |
Status |
|
Component |
Update |
Windows event ID |
|
Kaspersky Security Center event ID |
|
Windows event log (default) |
|
Kaspersky Security Center event log (default) |
– |
Status |
|
Component |
Update |
Windows event ID |
|
Kaspersky Security Center event ID |
|
Windows event log (default) |
|
Kaspersky Security Center event log (default) |
– |
Creating the list of files to download
Status |
|
Component |
Update |
Windows event ID |
|
Kaspersky Security Center event ID |
|
Windows event log (default) |
|
Kaspersky Security Center event log (default) |
– |
Status |
|
Component |
Update |
Windows event ID |
|
Kaspersky Security Center event ID |
|
Windows event log (default) |
|
Kaspersky Security Center event log (default) |
– |
Status |
|
Component |
Update |
Windows event ID |
|
Kaspersky Security Center event ID |
|
Windows event log (default) |
|
Kaspersky Security Center event log (default) |
– |
Status |
|
Component |
Update |
Windows event ID |
|
Kaspersky Security Center event ID |
|
Windows event log (default) |
|
Kaspersky Security Center event log (default) |
– |
Status |
|
Component |
Update |
Windows event ID |
|
Kaspersky Security Center event ID |
|
Windows event log (default) |
|
Kaspersky Security Center event log (default) |
– |
Status |
|
Component |
Update |
Windows event ID |
|
Kaspersky Security Center event ID |
|
Windows event log (default) |
|
Kaspersky Security Center event log (default) |
– |
Started applying file encryption / decryption rules
Status |
|
Component |
Data Encryption |
Windows event ID |
|
Kaspersky Security Center event ID |
|
Windows event log (default) |
– |
Kaspersky Security Center event log (default) |
|
Finished applying file encryption / decryption rules
Status |
|
Component |
Data Encryption |
Windows event ID |
|
Kaspersky Security Center event ID |
|
Windows event log (default) |
– |
Kaspersky Security Center event log (default) |
|
Resumed applying file encryption / decryption rules
Status |
|
Component |
Data Encryption |
Windows event ID |
|
Kaspersky Security Center event ID |
|
Windows event log (default) |
|
Kaspersky Security Center event log (default) |
– |
File encryption / decryption started
Status |
|
Component |
Data Encryption |
Windows event ID |
|
Kaspersky Security Center event ID |
|
Windows event log (default) |
|
Kaspersky Security Center event log (default) |
– |
File encryption / decryption completed
Status |
|
Component |
Data Encryption |
Windows event ID |
|
Kaspersky Security Center event ID |
|
Windows event log (default) |
|
Kaspersky Security Center event log (default) |
– |
File has not been encrypted because it is an exclusion
Status |
|
Component |
Data Encryption |
Windows event ID |
|
Kaspersky Security Center event ID |
|
Windows event log (default) |
|
Kaspersky Security Center event log (default) |
– |
Status |
|
Component |
Data Encryption |
Windows event ID |
|
Kaspersky Security Center event ID |
|
Windows event log (default) |
|
Kaspersky Security Center event log (default) |
– |
Status |
|
Component |
Data Encryption |
Windows event ID |
|
Kaspersky Security Center event ID |
|
Windows event log (default) |
|
Kaspersky Security Center event log (default) |
– |
Device encryption / decryption started
Status |
|
Component |
Data Encryption |
Windows event ID |
|
Kaspersky Security Center event ID |
|
Windows event log (default) |
|
Kaspersky Security Center event log (default) |
– |
Device encryption / decryption completed
Status |
|
Component |
Data Encryption |
Windows event ID |
|
Kaspersky Security Center event ID |
|
Windows event log (default) |
|
Kaspersky Security Center event log (default) |
– |
Device encryption / decryption resumed
Status |
|
Component |
Data Encryption |
Windows event ID |
|
Kaspersky Security Center event ID |
|
Windows event log (default) |
|
Kaspersky Security Center event log (default) |
– |
Status |
|
Component |
Data Encryption |
Windows event ID |
|
Kaspersky Security Center event ID |
|
Windows event log (default) |
|
Kaspersky Security Center event log (default) |
– |
Device encryption / decryption process has been switched to active mode
Status |
|
Component |
Data Encryption |
Windows event ID |
|
Kaspersky Security Center event ID |
|
Windows event log (default) |
|
Kaspersky Security Center event log (default) |
– |
Device encryption / decryption process has been switched to passive mode
Status |
|
Component |
Data Encryption |
Windows event ID |
|
Kaspersky Security Center event ID |
|
Windows event log (default) |
|
Kaspersky Security Center event log (default) |
– |
Status |
|
Component |
Data Encryption |
Windows event ID |
|
Kaspersky Security Center event ID |
|
Windows event log (default) |
– |
Kaspersky Security Center event log (default) |
– |
New Authentication Agent account created
Status |
|
Component |
Data Encryption |
Windows event ID |
|
Kaspersky Security Center event ID |
|
Windows event log (default) |
– |
Kaspersky Security Center event log (default) |
– |
Authentication Agent account deleted
Status |
|
Component |
Data Encryption |
Windows event ID |
|
Kaspersky Security Center event ID |
|
Windows event log (default) |
– |
Kaspersky Security Center event log (default) |
– |
Authentication Agent account password changed
Status |
|
Component |
Data Encryption |
Windows event ID |
|
Kaspersky Security Center event ID |
|
Windows event log (default) |
– |
Kaspersky Security Center event log (default) |
– |
Successful Authentication Agent login
Status |
|
Component |
Data Encryption |
Windows event ID |
|
Kaspersky Security Center event ID |
|
Windows event log (default) |
– |
Kaspersky Security Center event log (default) |
– |
Failed Authentication Agent login attempt
Status |
|
Component |
Data Encryption |
Windows event ID |
|
Kaspersky Security Center event ID |
|
Windows event log (default) |
– |
Kaspersky Security Center event log (default) |
– |
Hard drive accessed using the procedure of requesting access to encrypted devices
Status |
|
Component |
Data Encryption |
Windows event ID |
|
Kaspersky Security Center event ID |
|
Windows event log (default) |
– |
Kaspersky Security Center event log (default) |
– |
Status |
|
Component |
Data Encryption |
Windows event ID |
|
Kaspersky Security Center event ID |
|
Windows event log (default) |
– |
Kaspersky Security Center event log (default) |
– |
Account was not added. This account already exists
Status |
|
Component |
Data Encryption |
Windows event ID |
|
Kaspersky Security Center event ID |
|
Windows event log (default) |
– |
Kaspersky Security Center event log (default) |
– |
Account was not modified. This account does not exist
Status |
|
Component |
Data Encryption |
Windows event ID |
|
Kaspersky Security Center event ID |
|
Windows event log (default) |
– |
Kaspersky Security Center event log (default) |
– |
Account was not deleted. This account does not exist
Status |
|
Component |
Data Encryption |
Windows event ID |
|
Kaspersky Security Center event ID |
|
Windows event log (default) |
– |
Kaspersky Security Center event log (default) |
– |
Status |
|
Component |
Data Encryption |
Windows event ID |
|
Kaspersky Security Center event ID |
|
Windows event log (default) |
|
Kaspersky Security Center event log (default) |
|
FDE upgrade rollback successful
Status |
|
Component |
Data Encryption |
Windows event ID |
|
Kaspersky Security Center event ID |
|
Windows event log (default) |
|
Kaspersky Security Center event log (default) |
|
Failed to uninstall Kaspersky Disk Encryption drivers from the WinRE image
Status |
|
Component |
Data Encryption |
Windows event ID |
|
Kaspersky Security Center event ID |
|
Windows event log (default) |
|
Kaspersky Security Center event log (default) |
|
BitLocker recovery key was changed
Status |
|
Component |
Data Encryption |
Windows event ID |
|
Kaspersky Security Center event ID |
|
Windows event log (default) |
|
Kaspersky Security Center event log (default) |
|
BitLocker password / PIN was changed
Status |
|
Component |
Data Encryption |
Windows event ID |
|
Kaspersky Security Center event ID |
|
Windows event log (default) |
|
Kaspersky Security Center event log (default) |
|
BitLocker recovery key was saved to a removable drive
Status |
|
Component |
Data Encryption |
Windows event ID |
|
Kaspersky Security Center event ID |
|
Windows event log (default) |
|
Kaspersky Security Center event log (default) |
|
Processing of tasks from the Kaspersky Anti Targeted Attack Platform server is inactive
Status |
|
Component |
Endpoint Sensor |
Windows event ID |
|
Kaspersky Security Center event ID |
|
Windows event log (default) |
– |
Kaspersky Security Center event log (default) |
|
Endpoint Sensor connected to server
Status |
|
Component |
Endpoint Sensor |
Windows event ID |
|
Kaspersky Security Center event ID |
|
Windows event log (default) |
– |
Kaspersky Security Center event log (default) |
|
Connection to the Kaspersky Anti Targeted Attack Platform server restored
Status |
|
Component |
Endpoint Sensor |
Windows event ID |
|
Kaspersky Security Center event ID |
|
Windows event log (default) |
– |
Kaspersky Security Center event log (default) |
|
Tasks from the Kaspersky Anti Targeted Attack Platform server are being processed
Status |
|
Component |
Endpoint Sensor |
Windows event ID |
|
Kaspersky Security Center event ID |
|
Windows event log (default) |
– |
Kaspersky Security Center event log (default) |
|
Status |
|
Component |
Wipe Data |
Windows event ID |
|
Kaspersky Security Center event ID |
|
Windows event log (default) |
– |
Kaspersky Security Center event log (default) |
– |
Status |
|
Component |
Endpoint Detection and Response (KATA) |
Windows event ID |
|
Kaspersky Security Center event ID |
|
Windows event log (default) |
|
Kaspersky Security Center event log (default) |
|
Status |
|
Component |
Wipe Data |
Windows event ID |
|
Kaspersky Security Center event ID |
|
Windows event log (default) |
– |
Kaspersky Security Center event log (default) |
|
Status |
|
Component |
Sandbox |
Windows event ID |
|
Kaspersky Security Center event ID |
|
Windows event log (default) |
|
Kaspersky Security Center event log (default) |
|
Status |
|
Component |
Sandbox |
Windows event ID |
|
Kaspersky Security Center event ID |
|
Windows event log (default) |
|
Kaspersky Security Center event log (default) |
– |
Status |
|
Component |
Endpoint Detection and Response |
Windows event ID |
|
Kaspersky Security Center event ID |
|
Windows event log (default) |
|
Kaspersky Security Center event log (default) |
|
Status |
|
Component |
Endpoint Detection and Response |
Windows event ID |
|
Kaspersky Security Center event ID |
|
Windows event log (default) |
|
Kaspersky Security Center event log (default) |
|
Object quarantined (Endpoint Detection and Response)
Status |
|
Component |
Endpoint Detection and Response |
Windows event ID |
|
Kaspersky Security Center event ID |
|
Windows event log (default) |
|
Kaspersky Security Center event log (default) |
|
Object deleted (Endpoint Detection and Response)
Status |
|
Component |
Endpoint Detection and Response |
Windows event ID |
|
Kaspersky Security Center event ID |
|
Windows event log (default) |
|
Kaspersky Security Center event log (default) |
|
Application components successfully changed
Status |
|
Component |
System Audit |
Windows event ID |
|
Kaspersky Security Center event ID |
|
Windows event log (default) |
– |
Kaspersky Security Center event log (default) |
|
Status |
|
Component |
Sandbox |
Windows event ID |
|
Kaspersky Security Center event ID |
– |
Windows event log (default) |
|
Kaspersky Security Center event log (default) |
– |
Status |
|
Component |
Sandbox |
Windows event ID |
|
Kaspersky Security Center event ID |
– |
Windows event log (default) |
|
Kaspersky Security Center event log (default) |
– |
Status |
|
Component |
Sandbox |
Windows event ID |
|
Kaspersky Security Center event ID |
– |
Windows event log (default) |
|
Kaspersky Security Center event log (default) |
– |
Status |
|
Component |
Sandbox |
Windows event ID |
|
Kaspersky Security Center event ID |
– |
Windows event log (default) |
|
Kaspersky Security Center event log (default) |
– |
The Administration Server that your device is connected to is set as trusted
Status |
|
Component |
Administration Server connection protection |
Windows event ID |
|
Kaspersky Security Center event ID |
|
Windows event log (default) |
– |
Kaspersky Security Center event log (default) |
|
Your device is connected to a new trusted Administration Server
Status |
|
Component |
Administration Server connection protection |
Windows event ID |
|
Kaspersky Security Center event ID |
|
Windows event log (default) |
– |
Kaspersky Security Center event log (default) |
|
The Administration Server that your device is connected to is no longer set as trusted
Status |
|
Component |
Administration Server connection protection |
Windows event ID |
|
Kaspersky Security Center event ID |
|
Windows event log (default) |
– |
Kaspersky Security Center event log (default) |
|
Asynchronous Sandbox detection
Status |
|
Component |
Sandbox |
Windows event ID |
|
Kaspersky Security Center event ID |
|
Event parameters |
|
Windows event log (default) |
– |
Kaspersky Security Center event log (default) |
|
The scan task has been successfully sent to Sandbox by a user
Status |
|
Component |
Sandbox |
Windows event ID |
|
Kaspersky Security Center event ID |
|
Windows event log (default) |
– |
Kaspersky Security Center event log (default) |
|
Status |
|
Component |
Device Control |
Windows event ID |
|
Kaspersky Security Center event ID |
|
Event parameters |
|
Windows event log (default) |
– |
Kaspersky Security Center event log (default) |
|
Status |
|
Component |
Device Control |
Windows event ID |
|
Kaspersky Security Center event ID |
|
Event parameters |
|
Windows event log (default) |
– |
Kaspersky Security Center event log (default) |
|
Error removing the previous version of the application
Status |
|
Component |
System Audit |
Windows event ID |
|
Kaspersky Security Center event ID |
|
Windows event log (default) |
|
Kaspersky Security Center event log (default) |
|
Successful connection to the Kaspersky Anti Targeted Attack Platform server
Status |
|
Component |
Endpoint Detection and Response (KATA) |
Windows event ID |
|
Kaspersky Security Center event ID |
|
Windows event log (default) |
|
Kaspersky Security Center event log (default) |
|
Starting the cloud service client application is allowed
Status |
|
Component |
Cloud Discovery |
Windows event ID |
|
Kaspersky Security Center event ID |
|
Windows event log (default) |
– |
Kaspersky Security Center event log (default) |
|
Access to the cloud service is allowed
Status |
|
Component |
System Audit |
Windows event ID |
|
Kaspersky Security Center event ID |
|
Windows event log (default) |
|
Kaspersky Security Center event log (default) |
|
Status |
|
Component |
Cloud Discovery |
Windows event ID |
|
Kaspersky Security Center event ID |
|
Windows event log (default) |
– |
Kaspersky Security Center event log (default) |
|
File or folder change was detected
Status |
|
Component |
System Integrity Monitoring |
Windows event ID |
|
Kaspersky Security Center event ID |
|
Windows event log (default) |
– |
Kaspersky Security Center event log (default) |
|
Object changes too often. Event aggregation started
Status |
|
Component |
System Integrity Monitoring |
Windows event ID |
|
Kaspersky Security Center event ID |
|
Windows event log (default) |
– |
Kaspersky Security Center event log (default) |
|
Report on object modification for the aggregation period
Status |
|
Component |
System Integrity Monitoring |
Windows event ID |
|
Kaspersky Security Center event ID |
|
Windows event log (default) |
– |
Kaspersky Security Center event log (default) |
|
Status |
|
Component |
System Integrity Monitoring |
Windows event ID |
|
Kaspersky Security Center event ID |
|
Windows event log (default) |
– |
Kaspersky Security Center event log (default) |
|
Device connection / disconnection is detected
Status |
|
Component |
System Integrity Monitoring |
Windows event ID |
|
Kaspersky Security Center event ID |
|
Windows event log (default) |
– |
Kaspersky Security Center event log (default) |
|
Status |
|
Component |
System Integrity Monitoring |
Windows event ID |
|
Kaspersky Security Center event ID |
|
Windows event log (default) |
– |
Kaspersky Security Center event log (default) |
|
Status |
|
Component |
System Integrity Monitoring |
Windows event ID |
|
Kaspersky Security Center event ID |
|
Windows event log (default) |
– |
Kaspersky Security Center event log (default) |
|
An operation is performed by the trusted user
Status |
|
Component |
System Integrity Monitoring |
Windows event ID |
|
Kaspersky Security Center event ID |
|
Windows event log (default) |
– |
Kaspersky Security Center event log (default) |
|
Status |
|
Component |
Light Agent |
Windows event ID |
|
Kaspersky Security Center event ID |
|
Windows event log (default) |
– |
Kaspersky Security Center event log (default) |
|
Connected to the Integration Server
Status |
|
Component |
Light Agent |
Windows event ID |
|
Kaspersky Security Center event ID |
|
Windows event log (default) |
– |
Kaspersky Security Center event log (default) |
|
Connection to the Integration Server has been restored
Status |
|
Component |
Light Agent |
Windows event ID |
|
Kaspersky Security Center event ID |
|
Windows event log (default) |
– |
Kaspersky Security Center event log (default) |
|
Appendix 7. Supported file extensions for Execution prevention
Kaspersky Endpoint Security supports preventing the opening of office format files in certain applications. The information about supported file extensions and applications is listed in the following table.
Supported file extensions for Execution prevention
Application name |
Executable file |
File extension |
|---|---|---|
Microsoft Word |
winword.exe |
rtf doc dot docm docx dotx dotm docb |
WordPad |
wordpad.exe |
docx rtf |
Microsoft Excel |
excel.exe |
xls xlt xlm xlsx xlsm xltx xltm xlsb xla xlam xll xlw |
Microsoft PowerPoint |
powerpnt.exe |
ppt pot pps pptx pptm potx potm ppam ppsx ppsm sldx sldm |
Adobe Acrobat Foxit PDF Reader STDU Viewer Microsoft Edge Google Chrome Mozilla Firefox Yandex Browser Tor Browser |
acrord32.exe FoxitReader.exe STDUViewerApp.exe MicrosoftEdge.exe chrome.exe firefox.exe browser.exe tor.exe |
Appendix 8. Supported script interpreters for Execution prevention
Execution prevention supports the following script interpreters:
- AutoHotkey.exe
- AutoHotkeyA32.exe
- AutoHotkeyA64.exe
- AutoHotkeyU32.exe
- AutoHotkeyU64.exe
- InstallUtil.exe
- RegAsm.exe
- RegSvcs.exe
- autoit.exe
- cmd.exe
- control.exe
- cscript.exe
- hh.exe
- mmc.exe
- msbuild.exe
- mshta.exe
- msiexec.exe
- perl.exe
- powershell.exe
- python.exe
- reg.exe
- regedit.exe
- regedt32.exe
- regsvr32.exe
- ruby.exe
- rubyw.exe
- rundll32.exe
- runlegacycplelevated.exe
- wscript.exe
- wwahost.exe
Execution prevention supports working with Java applications in the Java runtime environment (java.exe and javaw.exe processes).
Page top
Appendix 9. IOC scan scope in the registry (RegistryItem)
When you add the RegistryItem data type to the IOC scan scope, Kaspersky Endpoint Security scans the following registry keys:
HKEY_CLASSES_ROOT\htafile
HKEY_CLASSES_ROOT\batfile
HKEY_CLASSES_ROOT\exefile
HKEY_CLASSES_ROOT\comfile
HKEY_LOCAL_MACHINE\System\CurrentControlSet\Control\Lsa
HKEY_LOCAL_MACHINE\System\CurrentControlSet\Control\Print\Monitors
HKEY_LOCAL_MACHINE\System\CurrentControlSet\Control\NetworkProvider
HKEY_LOCAL_MACHINE\System\CurrentControlSet\Control\Class
HKEY_LOCAL_MACHINE\System\CurrentControlSet\Control\SecurityProviders
HKEY_LOCAL_MACHINE\System\CurrentControlSet\Control\Terminal Server
HKEY_LOCAL_MACHINE\System\CurrentControlSet\Control\Session Manager
HKEY_LOCAL_MACHINE\System\CurrentControlSet\Services
HKEY_LOCAL_MACHINE\Software\Classes\piffile
HKEY_LOCAL_MACHINE\Software\Classes\htafile
HKEY_LOCAL_MACHINE\Software\Classes\exefile
HKEY_LOCAL_MACHINE\Software\Classes\comfile
HKEY_LOCAL_MACHINE\Software\Classes\CLSID
HKEY_LOCAL_MACHINE\Software\Microsoft\Windows\CurrentVersion\Run
HKEY_LOCAL_MACHINE\Software\Microsoft\Windows\CurrentVersion\ShellServiceObjectDelayLoad
HKEY_LOCAL_MACHINE\Software\Microsoft\Windows\CurrentVersion\Policies\Explorer
HKEY_LOCAL_MACHINE\Software\Wow6432Node\Microsoft\Windows\CurrentVersion\Run
HKEY_LOCAL_MACHINE\SOFTWARE\Microsoft\Active Setup\Installed Components
HKEY_LOCAL_MACHINE\SOFTWARE\Microsoft\Windows NT\CurrentVersion\Windows
HKEY_LOCAL_MACHINE\Software\Microsoft\Windows NT\CurrentVersion\Image File Execution Options
HKEY_LOCAL_MACHINE\Software\Microsoft\Windows NT\CurrentVersion\Aedebug
HKEY_LOCAL_MACHINE\SOFTWARE\Microsoft\Windows NT\CurrentVersion\Winlogon
Appendix 10. IOC file requirements
When creating IOC Scan tasks, consider the following
requirements and limitations:- The application supports IOC files with the IOC and XML extensions in the open standard OpenIOC versions 1.0 and 1.1 for describing indicators of compromise.
- If, when creating an IOC Scan task on the command line, you upload IOC files, some of which are not supported, when the task is run, the application uses only the supported IOC files. If, when creating an IOC Scan task on the command line, all of the IOC files that you upload turn out to be unsupported, the task can still be run, but it will not detect any indicators of compromise. It is not possible to upload unsupported IOC files using Web Console or Cloud Console.
- Semantic errors and unsupported IOC terms and tags in IOC files do not cause task execution to fail. In such sections of IOC files, the application detects no match.
- used in a single IOC Scan task must be unique. If there are IOC files with the same identifier, it might affect the task execution results.
- A single IOC file must not exceed 2 MB in size. Using larger files will cause IOC Scan tasks to terminate with an error. The total size of all files added to the IOC collection should not exceed 10 MB. If the total size of all files exceeds 10 MB, you need to split the IOC collection and create several IOC Scan tasks.
- It is recommended to create one IOC file per threat. This makes it easier to analyze the results of the IOC Scan task.
The file that you can download by clicking the link below, contains a table with the full list of IOC terms of the OpenIOC standard.
![]() DOWNLOAD THE IOC_TERMS.XLSX FILE
DOWNLOAD THE IOC_TERMS.XLSX FILE
Features and limitations of the application’s support for the OpenIOC standard are shown in the following table.
Features and limitations of support for OpenIOC version 1.0 and 1.1.
Supported conditions |
OpenIOC 1.0:
OpenIOC 1.1:
|
Supported condition attributes |
OpenIOC 1.1:
|
Supported operators |
|
Supported data types |
|
Features of data type interpretation |
The The application supports interpretation of the OpenIOC 1.0: Using the
OpenIOC 1.1: Using the Using the The application supports interpretation of the |
Appendix 11. User accounts in application component rules
To configure some application components, you must add special rules. For example, for Web Control, you must add a rule with a list of web addresses that you want the application to block. In application component rules, you can also configure a schedule for the component or select users to which the application must apply the rule.
Rules must be added to configure the following application components:
- Application Control.
- Web Control.
- Device Control.
- Log Inspection.
- Adaptive Anomaly Control.
- System Integrity Monitoring.
Starting with Kaspersky Endpoint Security for Windows 12.5, you can select users not only from Active Directory, but also from the list of users in Kaspersky Security Center. You can also enter local user account data manually. This means you can add users in the following ways:
- Active Directory (recommended)
- List of users in Kaspersky Security Center
- Local user account
In order to correctly employ all user selection methods you need to update Kaspersky Endpoint Security application and management plug-in to version 12.5 or higher.
Kaspersky recommends using local user accounts only in special cases when it is not possible to use domain user accounts. For details about the security risks of using local accounts, see the Microsoft Knowledge Base. You bear full responsibility for the security of a computer if local user accounts are used; in particular this includes the responsibility for controlling and restricting access to Kaspersky Endpoint Security settings.
The application uses the SID (Security Identifier) of the user to identify users. When using user accounts from Active Directory or from the Kaspersky Security Center user list, the application determines the SID on the Administration Server. This means the application does not place extra load on the computer to identify a user. If you added more than 1000 local user accounts to an application rule, the applications contacts the domain controller to identify the user. This means the load on the computer is increased. To optimize the performance impact on the computer, we recommend using user accounts from Active Directory or the Kaspersky Security Center user list.
Page top
Information about third-party code
Information about third-party code is contained in the legal_notices.txt file, located in the application installation folder.
Page top
Trademark notices
Registered trademarks and service marks are the property of their respective owners.
Adobe, Acrobat, Flash, Reader and Shockwave are either registered trademarks or trademarks of Adobe in the United States and/or other countries.
Amazon, Amazon Web Services, AWS are trademarks of Amazon.com, Inc. or its affiliates.
Apple, FireWire, iTunes, Mac and Safari are trademarks of Apple Inc.
Arm is a registered trade mark of Arm Limited (or subsidiaries) in the USA and/or other countries.
AutoCAD is a trademark or registered trademark of Autodesk, Inc., and/or its subsidiaries and/or affiliates in the USA and/or other countries.
The Bluetooth word, mark and logos are owned by Bluetooth SIG, Inc.
Borland is trademark or registered trademark of Borland Software Corporation.
Cisco, Cisco AnyConnect, IOS are registered trademarks or trademarks of Cisco Systems, Inc. and/or its affiliates in the U.S. and certain other countries.
Citrix, Citrix Provisioning, Citrix Provisioning Services, Citrix Virtual Apps and Desktop, XenDesktop, and XenServer are either registered trademarks or trademarks of Cloud Software Group, Inc., and/or its subsidiaries in the United States and/or other countries.
Cloudflare, Cloudflare Workers, and the Cloudflare logo are trademarks and/or registered trademarks of Cloudflare, Inc. in the United States and other jurisdictions.
Core is the trademark of Intel Corporation or its subsidiaries.
dBase is a trademark of dataBased Intelligence, Inc.
Dell Technologies, Dell, EMC and other trademarks are trademarks of Dell Inc. or its subsidiaries.
Docker and the Docker logo are trademarks or registered trademarks of Docker, Inc. in the United States and/or other countries. Docker, Inc. and other parties may also have trademark rights in other terms used herein.
ESET is a trademark or registered trademark of ESET spol. s r.o. or respective ESET entity.
Foxit is a registered trademark of Foxit Corporation.
Radmin is a registered trademark of Famatech.
Google, Android, Google Public DNS, Google Chrome, Chrome are trademarks of Google LLC.
HUAWEI, FusionCompute and FusionSphere are trademarks of Huawei Technologies Co., Ltd.
ICQ is a Trademark and/or Service mark of ICQ LLC.
Intel is the trademark of Intel Corporation or its subsidiaries.
IBM is a trademark of International Business Machines Corporation, registered in many jurisdictions worldwide.
Lenovo and Lenovo ThinkPad are trademarks of Lenovo in the United States and/or elsewhere.
Linux is the registered trademark of Linus Torvalds in the U.S. and other countries.
Logitech is either a registered trademark or trademark of Logitech in the United States and/or other countries.
LogMeIn Pro and Remotely Anywhere are trademarks of LogMeIn, Inc.
Mail.ru is a registered trademark of Mail.Ru, LLC.
McAfee is the trademark or registered trademark of McAfee LLC or its subsidiaries in the US and /or other countries.
Microsoft, Access, Active Directory, ActiveSync, Bing, BitLocker, Excel, Hyper-V, Internet Explorer, JScript, LifeCam Cinema, Microsoft Edge, MSDN, MS-DOS, MultiPoint, Office 365, Outlook, PowerPoint, PowerShell, Skype, SQL Server, Surface, Visual Basic, Visual FoxPro, Windows, Windows Live, Windows PowerShell, Windows Server and Windows Store are trademarks of the Microsoft group of companies.
Mozilla, Firefox and Thunderbird are trademarks of the Mozilla Foundation in the U.S. and other countries.
NetApp is the trademark or the registered trademark of NetApp, Inc. in the United States and/or other countries.
OpenSSL is a trademark owned by the OpenSSL Software Foundation.
OpenStack is a registered trademark of the OpenStack Foundation in the United States and other countries.
Oracle, Java and JavaScript are registered trademarks of Oracle and/or its affiliates.
Python is a trademark or registered trademark of the Python Software Foundation.
Realtek is a trademark of the Realtek Semiconductor Corporation.
SAMSUNG is a trademark of SAMSUNG in the United States or other countries.
Thawte is a trademark or registered trademark of Symantec Corporation or its affiliates in the U.S. and other countries.
Trend Micro is a trademark or registered trademark of Trend Micro Incorporated.
VERISIGN is a registered trademark in the United States and elsewhere or an unregistered trademark of VeriSign, Inc. and its subsidiaries.
VMware, VMware ESXi, VMware Horizon, VMware Workstation, VMware Tools, VMware vSphere are registered trademarks or trademarks of VMware, Inc. in the United States and/or other jurisdictions.
Page top