Step 4. Performing the verification test (Splunk, single-instance integration)
April 11, 2024
ID 166083
This section explains how to check the capabilities of Kaspersky CyberTrace by performing the verification test.
Please make sure you perform the verification test before editing any matching process settings.
About the verification test
The verification test is a procedure that is used to check the capabilities of Kaspersky CyberTrace and to confirm the accuracy of the integration.
During this test you will check whether events from Splunk are received by Kaspersky CyberTrace Service, whether events from Kaspersky CyberTrace Service are received by Splunk, and whether events are correctly parsed by Kaspersky CyberTrace Service using the regular expressions.
This section describes the verification scenario for the default integration scheme (in this scheme, the forwarder, indexer, and search head are installed on a single computer), but you can also use the verification test after changes were made to the configuration parameters to check that Kaspersky CyberTrace and the SIEM solution work correctly.
Verification test file
The %service_dir%/verification/kl_verification_test_cef.txt file is a verification test file. It contains a collection of events with URLs, IP addresses, and hashes.
Verification test scenario (in brief)
To perform the verification test:
- Specify the Splunk Forwarder address in the Log Scanner utility configuration file.
- Send the verification file to Kaspersky CyberTrace Service by using the Log Scanner utility.
- Compare the verification test results with the target numbers displayed on the Kaspersky CyberTrace Matches dashboard.
- Perform the Self-test.
The Self-test is an automatic feed test performed by Kaspersky CyberTrace App.
- Optionally, clear Splunk of events that arrived when the verification test was being performed.
Verification test scenario
The verification test scenario proceeds in stages:
Stage 1. Specifying the Splunk Forwarder address in the Log Scanner configuration file
Specify the address and port that Splunk Forwarder listens on in the Connection element of the Log Scanner configuration file.
Stage 2. Sending the verification file to Splunk Forwarder
You must send the verification file to Splunk Forwarder by using the Log Scanner utility.
Before you send the file, make sure that Kaspersky CyberTrace Service is running.
The following commands send the contents of the kl_verification_test_cef.txt file to Kaspersky CyberTrace Service:
- In Linux:
./log_scanner -p ../verification/kl_verification_test_cef.txt - In Windows:
log_scanner.exe -p ..\verification\kl_verification_test_cef.txt
After receiving data from Log Scanner, Splunk Forwarder sends the test results to CyberTrace. The detected indicators from the verification file will be sent back to Splunk Forwarder. The address of Splunk Forwarder is specified in the Service settings of Kaspersky CyberTrace. Also, this address is specified during the installation or reconfiguration of Kaspersky CyberTrace.
Stage 3. Checking the verification test results
In this step, you must verify that URLs, IP addresses, and hashes are processed correctly by Kaspersky CyberTrace App.
IP addresses from the test records used for verification are not displayed on the Location of matched IPs map. To check that the map works correctly, we recommend using other records from the Kaspersky CyberTrace database. You can get records containing IP addresses on the Indicators tab of Kaspersky CyberTrace web.
To check the verification test results:
- In Kaspersky CyberTrace App, on the navigation bar select Kaspersky CyberTrace Matches.
The Kaspersky CyberTrace Matches Dashboard opens.
- Compare numbers in the Matches by eventName panel to the numbers of the detected objects in the table shown below.
The verification test results depends on the feeds you use. The following table summarizes target numbers for the verification test when all commercial feeds are used.
Verification test results (commercial feeds)
Feed used
eventName value
Detected objects
Malicious URL Data Feed
KL_Malicious_URL
http://fakess123.nu
http://badb86360457963b90faac9ae17578ed.com
Phishing URL Data Feed
KL_Phishing_URL
http://fakess123ap.nu
http://e77716a952f640b42e4371759a661663.com
Botnet C&C URL Data Feed
KL_BotnetCnC_URL
http://fakess123bn.nu
http://a7396d61caffe18a4cffbb3b428c9b60.com
IP Reputation Data Feed
KL_IP_Reputation
192.0.2.0
192.0.2.3
Malicious Hash Data Feed
KL_Malicious_Hash_MD5
FEAF2058298C1E174C2B79AFFC7CF4DF
44D88612FEA8A8F36DE82E1278ABB02F
C912705B4BBB14EC7E78FA8B370532C9
Mobile Malicious Hash Data Feed
KL_Mobile_Malicious_Hash_MD5
60300A92E1D0A55C7FDD360EE40A9DC1
Mobile Botnet C&C URL Data Feed
KL_Mobile_BotnetCnC_Hash_MD5
001F6251169E6916C455495050A3FB8D
Mobile Botnet C&C URL Data Feed
KL_Mobile_BotnetCnC_URL
http://sdfed7233dsfg93acvbhl.su/steallallsms.php
Ransomware URL Data Feed
KL_Ransomware_URL
http://fakess123r.nu
http://fa7830b4811fbef1b187913665e6733c.com
APT URL Data Feed
KL_APT_URL
http://b046f5b25458638f6705d53539c79f62.com
APT Hash Data Feed
KL_APT_Hash_MD5
7A2E65A0F70EE0615EC0CA34240CF082
APT IP Data Feed
KL_APT_IP
192.0.2.4
IoT URL Data Feed
KL_IoT_URL
http://e593461621ee0f9134c632d00bf108fd.com/.i
ICS Hash Data Feed
KL_ICS_Hash_MD5
7A8F30B40C6564EFF95E678F7C43346C
The following table summarizes target numbers for the verification test when only demo feeds are used.
Verification test results (demo feeds)
Feed used | eventName value | Detected objects |
DEMO Botnet_CnC_URL_Data_Feed | KL_BotnetCnC_URL | http://5a015004f9fc05290d87e86d69c4b237.com http://fakess123bn.nu |
DEMO IP_Reputation_Data_Feed | KL_IP_Reputation | 192.0.2.1 192.0.2.3 |
DEMO Malicious_Hash_Data_Feed | KL_Malicious_Hash_MD5 | 776735A8CA96DB15B422879DA599F474 FEAF2058298C1E174C2B79AFFC7CF4DF 44D88612FEA8A8F36DE82E1278ABB02F |
Stage 4. Performing the Self-test
The Self-test is an automatic feed test performed by Kaspersky CyberTrace App using the lookup script. You must verify that results of this test are correct.
To perform a Self-test:
- In Kaspersky CyberTrace App, on the navigation bar select Kaspersky CyberTrace Status.
The Kaspersky CyberTrace Status dashboard opens.
- For all the feeds that you use, check the
statusvalues in the Self-test panel:- If you use only demo feeds, the value for demo feeds must be
OKand values for all other feeds must beFALSE. - If you use commercial feeds, the value for all feeds that you use must be
OK. All other values including values for demo feeds must beFALSE.
- If you use only demo feeds, the value for demo feeds must be
The following figure shows an example of a Self-test results for commercial feeds. In this example, all commercial feeds are used, and demo feeds are not used. The value for demo feeds is FALSE, as expected.
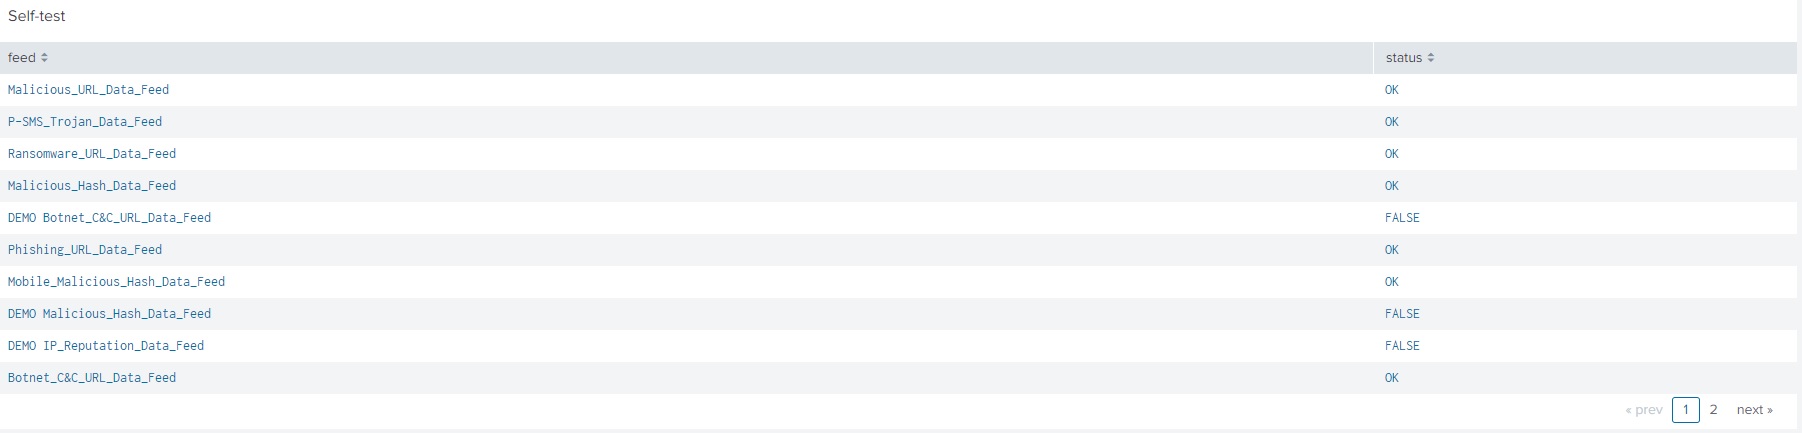
Self-test results
Stage 5 (optional). Clearing Splunk of events received when the verification test was performed
To clear Splunk of events received from Kaspersky CyberTrace when the verification test was performed:
- On the Search dashboard of the Splunk Web, click the Search & Reporting button to run the Search & Reporting app.
- Delete the events from Kaspersky CyberTrace:
Deleting events from the main index can be done only under the user account that has the can_delete role. You can add this role to a user account by selecting Settings > Roles in the Splunk main menu.
- In the Search field, type the following command:
index="main" sourcetype="kl_cybertrace_events" | delete - Click the All time split button next to the Search field.
If the split button has another name, click it and in the drop-down list select All time.
- Click Search (
 ).
).

Search & Reporting app
- In the Search field, type the following command:
