Working with false positives
April 11, 2024
ID 254720
Kaspersky CyberTrace allows you to mark indicators and the related detections as false positives, as well as to display or hide the statistics of false positives on the Dashboard page.
Marking indicators as false positives
You can mark indicators as false positive in the following ways:
- On the Indicators page
- On the page of a certain indicator
To mark indicators as false positives on the Indicators page:
- On the Kaspersky CyberTrace web user interface, select the Indicators tab.
- In the indicators list table, choose the indicators that you want to mark as false positives by doing one of the following:
- Select the checkboxes for the indicators located in the left-most column of the table, and then click the
 button displayed in the bar
  that appears above the table.
 - Click the
 icon in the FP column of the table.
- Select the checkboxes for the indicators located in the left-most column of the table, and then click the
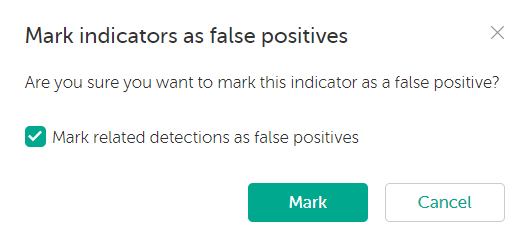
- In the dialog box that opens, confirm your action by clicking the Mark button.
Along with the indicators, you can mark the related detections as false positives by selecting the corresponding checkbox. This checkbox is selected by default.
Marking indicators as false positives
The indicators marked as false positives are displayed with the  icon in the FP column of the indicators table.
To mark an indicator as a false positive on the page of a certain indicator:
- On the Indicators page, click the indicator that you want to mark as false positive.
- On the indicator page that opens, click the Mark as false positive button.
- In the dialog box that opens, select the checkbox for the related detections that you to mark as false positive.
- Click Save.
The indicator is now marked as false positive.
Removing indicators from false positives
You can remove indicators from false positives in the following ways:
- On the Indicators page
- On the page of a certain indicator
To remove indicators from false positives on the Indicators page:
- On the Kaspersky CyberTrace web user interface, select the Indicators tab.
- In the indicators list table, choose the indicators that you want to remove from false positives by doing one of the following:
- Select the checkboxes for the indicators in the left-most column of the table, and then click the
 button displayed in the bar
  that appears above the table.
 - Click the icon in the FP column of the table.
- Select the checkboxes for the indicators in the left-most column of the table, and then click the
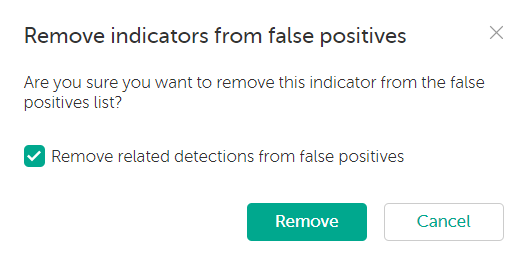
- In the dialog box that opens, confirm your action by clicking the Remove button.
Along with the indicators, you can remove the related detections from false positives by selecting the corresponding checkbox. This checkbox is selected by default.
Removing indicators from false positives
The indicators that are not marked as false positives are displayed with the icon in the FP column of the indicators table.
To remove an indicator from false positives on the page of a certain indicator:
- On the Indicators page, click the indicator that you want to remove from false positives.
- On the indicator page that opens, click the Remove from false positives button.
- In the dialog box that opens, select the checkbox to remove the related detections from false positives if needed.
- Click Save.
The indicator is now not marked as false positive.
Viewing indicators and related detections marked as false positive on the graph
To view on the graph whether the indicator or the related detection is marked or not marked as false positive:
- On the Graph page, double-click the node that you are interested in.
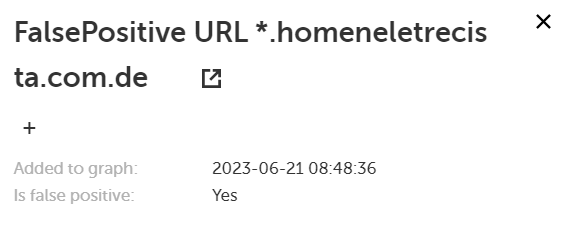
A side panel opens on the right, containing detailed information about the node.
- Check the "Is false positive:" line.
An indicator marked as false positive will have Yes.
An indicator not marked as false positive will have No.
False positives info on graph
Graphically, false positive indicators and the related false positive detections are different from ordinary indicators and detections, and are displayed as shown in the figure below:

False positives graphical view on graph
Filtering false positives on the Indicators page
To filter false positives to be displayed on the Indicators page:
- Click the FP column of the table.
- In the dialog box that appears, select the checkboxes that you need:
- Select all
- False positives
- Not false positives
- Click Apply.
The indicators you have selected are now displayed on the page.
Filtering false positives on the Detections page
To filter detections to be displayed on the Detections page:
- Click the FP column of the table.
- In the dialog box that appears, select the checkboxes you need:
- Select all
- False positive
- Not false positives
- Click Apply.
The detections you have selected are now displayed on the page.
Displaying statistics about false positives on the Dashboard page
To display statistics about false positives on the Dashboard page, turn on the Show false positives toggle switch. The statistics on false positives will be displayed in the Statistics overview section, Supplier statistics section and its donut chart, and the Indicator statistics section and its donut chart.
