Kaspersky CyberTrace
- About Kaspersky CyberTrace
- Installation and integration guides
- Installation and integration overview
- Hardware and software requirements
- Distribution kit contents
- Part 1: Installing Kaspersky CyberTrace
- Part 2: Integrating Kaspersky CyberTrace with an event source
- Integration with Splunk
- Integration steps (Splunk)
- Single-instance integration (Splunk)
- About the single-instance integration scheme
- Step 1. Installing Kaspersky CyberTrace App (single-instance deployment)
- Step 2 (optional). Configuring Kaspersky CyberTrace App (single-instance deployment)
- Step 3 (optional). Configuring the lookup script (single-instance deployment)
- Step 4. Performing the verification test (Splunk, single-instance integration)
- Distributed integration scheme (Splunk)
- About the distributed integration scheme
- Step 1. Installing Forwarder and Search Head apps
- Step 2. Configuring Forwarder and Search Head apps (distributed deployment)
- Step 3 (optional). Configuring the lookup script (distributed deployment)
- Step 4. Performing the verification test (Splunk, distributed integration)
- Integration with ArcSight
- Integration steps (ArcSight)
- Before you begin (ArcSight)
- Standard integration (ArcSight)
- Integration schemes (ArcSight)
- Step 1. Importing the ARB package
- Step 2. Installing ArcSight Forwarding Connector
- Step 2 (alternative). Installing ArcSight Forwarding Connector by using the console
- Step 3. Configuring CyberTrace for interaction with ArcSight
- Step 4. Performing the verification test (ArcSight)
- Integration with QRadar
- Integration steps (QRadar)
- Standard integration (QRadar)
- About the standard integration scheme (QRadar)
- Step 1. Configuring QRadar to receive latest updates
- Step 2. Sending a set of events to QRadar
- Step 3. Forwarding events from QRadar to Feed Service
- Step 4. Performing the verification test (QRadar)
- Step 5. Retrieving custom event properties
- Step 6. Creating a search filter for CyberTrace events
- Step 7 (optional). Displaying events in a dashboard
- Step 8 (optional). Creating notifications about incoming service events
- Step 9 (optional). Installing Kaspersky Threat Feed App
- Step 10 (optional). Enabling the indexes of the added custom event properties
- Step 11 (optional). Configuring Kaspersky Threat Feed App
- Integration with RSA NetWitness
- Integration steps (RSA NetWitness)
- Before you begin (RSA NetWitness)
- Standard integration (RSA NetWitness)
- About the standard integration scheme (RSA NetWitness)
- Step 1. Forwarding events from RSA NetWitness
- Step 2. Sending events from Feed Service to RSA NetWitness
- Step 3 (optional). Importing a meta group for browsing fields filled by Feed Service
- Step 4 (optional). Importing Feed Service rules to RSA NetWitness
- Step 5 (optional). Importing a preconfigured report to RSA NetWitness
- Step 6 (optional). Importing preconfigured charts and a dashboard to RSA NetWitness
- Step 7. Performing the verification test (RSA NetWitness)
- Integration with LogRhythm
- Step 1. Adding a Custom Log Source type
- Step 2. Importing Kaspersky CyberTrace rules and events
- Step 3 (optional). Adding Kaspersky CyberTrace events
- Step 4 (optional). Adding Kaspersky CyberTrace rules
- Step 5. Adding Kaspersky CyberTrace policy
- Step 6. Adding a log source to System Monitor Agent
- Step 7. Configuring log forwarding to Kaspersky CyberTrace
- Step 8 (optional). Performing the verification test
- Step 9 (optional). Creating alerts about incoming Kaspersky CyberTrace service events
- Step 10 (optional). Displaying alert events in LogRhythm
- Integration with KUMA
- Integrating with other SIEM and non-SIEM solutions
- Extra integration scenarios
- Integration with Splunk
- User guides
- Using Kaspersky CyberTrace Web
- Application for Splunk
- Application for QRadar
- Working with events in ArcSight
- Working with events in RSA NetWitness
- Log Scanner Guide
- Administrator guides
- Managing Kaspersky CyberTrace Web
- Working with default credentials
- Service settings
- Feeds settings
- Importing a certificate for Kaspersky Threat Data Feeds
- Specifying the feeds update period
- Enabling and disabling feeds
- Selecting available fields for a feed
- Adding actionable fields to a feed
- Specifying filtering rules for a feed
- Truncating a feed
- Launching a feeds update manually
- About custom, third-party, and Kaspersky feeds
- Adding a custom or third-party feed
- Configuring a custom or third-party feed
- Managing false positives
- Matching process settings
- Event format settings
- User settings
- Logging settings
- Licensing settings
- Tenants settings
- Indicators export settings
- Retrospective scan settings
- Feed Service Guide
- About Feed Service
- Managing Feed Service
- Feed Service configuration reference
- Feed Service logging
- About resending detection events
- Feed Service in ReplyBack mode
- Features of event processing by Feed Service
- Limitations on Feed Service incoming events
- Feed Utility guide
- Using Password Utility
- Choosing the best feeds for your environment
- Upgrading and managing the installation
- Managing the installation on Linux systems
- Managing the installation on Windows systems
- Upgrading Kaspersky CyberTrace from a previous version
- About the upgrade process
- Upgrading automatically from 3.1 to 4.0 (Linux)
- Upgrading automatically from 3.1 to 4.0 (Windows)
- Upgrading Kaspersky CyberTrace integration (QRadar)
- Upgrading Kaspersky CyberTrace integration (Splunk)
- Upgrading Kaspersky CyberTrace integration (ArcSight)
- Upgrading Kaspersky CyberTrace integration (RSA)
- Upgrading Kaspersky CyberTrace integration (LogRhythm)
- Uninstalling Kaspersky CyberTrace
- Adding self-signed SSL certificates for CyberTrace Web
- Watchdog module workflow
- Testing the connection with Feed Service and the availability of feeds
- Managing Kaspersky CyberTrace Web
- Developer guides
- REST API reference
- Troubleshooting
- Risk mitigation
- How to get technical support
- Copyright
- Information about third-party code
- Trademark notices
User guides > Working with events in ArcSight > Creating notifications about incoming service events
Creating notifications about incoming service events
You can create notifications about incoming Kaspersky CyberTrace service events by configuring alert rules.
To create notifications about service events from Kaspersky CyberTrace in ArcSight ESM:
- Run ArcSight Console.
- In the Navigator pane, select Rules in the drop-down-list.
- In the tree view, select the Rules > Shared > All Rules > Public directory.
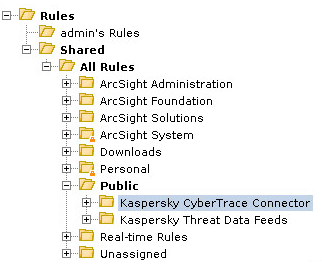
The Rules tree view
- Right-click the filter node in the Kaspersky CyberTrace Connector tree and select New Rule > Standard Rule.
- In the Inspect > Edit pane, specify the following settings:
- In the Name field of the Attributes tab, specify the name of the rule.
You can specify any name.
- On the Conditions tab, specify the following conditions:
Device Product = Kaspersky CyberTrace for ArcSight
Reason = %ServiceEventCode%
Where
%ServiceEventCode%
is a code of a service event that is used for generating notifications.
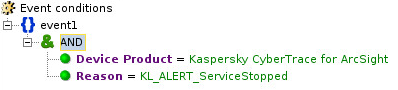
Event conditions
- Right-click the Actions tab, choose On Every Event and then select the following:
- Activate Trigger
- Add
This setting must contain the action that will be performed when a service event that is specified on the Conditions tab is received. For example, Send Notification.
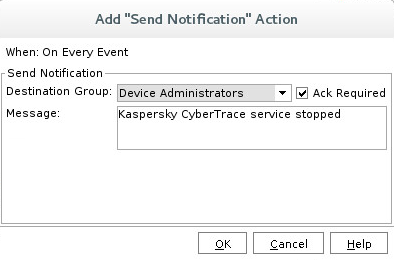
Adding actions
- In the Name field of the Attributes tab, specify the name of the rule.
- Click Apply.
Article ID: 196832, Last review: Apr 14, 2021