Contents
- What's new
- About KasperskyOS Community Edition
- Overview of KasperskyOS
- Getting started
- Development for KasperskyOS
- Starting processes
- File systems and network
- Contents of the VFS component
- Creating an IPC channel to VFS
- Building a VFS executable file
- Merging a client and VFS into one executable file
- Overview: arguments and environment variables of VFS
- Mounting a file system at startup
- Using VFS backends to separate file calls and network calls
- Writing a custom VFS backend
- IPC and transport
- KasperskyOS API
- libkos library
- Overview of the libkos library
- Memory
- Memory allocation
- Threads
- KosThreadCallback()
- KosThreadCallbackRegister()
- KosThreadCallbackUnregister()
- KosThreadCreate()
- KosThreadCurrentId()
- KosThreadExit()
- KosThreadGetStack()
- KosThreadOnce()
- KosThreadResume()
- KosThreadSleep()
- KosThreadSuspend()
- KosThreadTerminate()
- KosThreadTlsGet()
- KosThreadTlsSet()
- KosThreadWait()
- KosThreadYield()
- Handles
- Notifications
- Processes
- Dynamically created channels
- Synchronization primitives
- KosCondvarBroadcast()
- KosCondvarDeinit()
- KosCondvarInit()
- KosCondvarSignal()
- KosCondvarWait()
- KosCondvarWaitTimeout()
- KosEventDeinit()
- KosEventInit()
- KosEventReset()
- KosEventSet()
- KosEventWait()
- KosEventWaitTimeout()
- KosMutexDeinit()
- KosMutexInit()
- KosMutexInitEx()
- KosMutexLock()
- KosMutexLockTimeout()
- KosMutexTryLock()
- KosMutexUnlock()
- KosRWLockDeinit()
- KosRWLockInit()
- KosRWLockRead()
- KosRWLockTryRead()
- KosRWLockTryWrite()
- KosRWLockUnlock()
- KosRWLockWrite()
- KosSemaphoreDeinit()
- KosSemaphoreInit()
- KosSemaphoreSignal()
- KosSemaphoreTryWait()
- KosSemaphoreWait()
- KosSemaphoreWaitTimeout()
- DMA buffers
- IOMMU
- I/O ports
- IoReadIoPort8(), IoReadIoPort16(), IoReadIoPort32()
- IoReadIoPortBuffer8(), IoReadIoPortBuffer16(), IoReadIoPortBuffer32()
- IoWriteIoPort8(), IoWriteIoPort16(), IoWriteIoPort32()
- IoWriteIoPortBuffer8(), IoWriteIoPortBuffer16(), IoWriteIoPortBuffer32()
- KnIoPermitPort()
- KnRegisterPort8(), KnRegisterPort16(), KnRegisterPort32()
- KnRegisterPorts()
- Memory-mapped I/O (MMIO)
- Interrupts
- Deallocating resources
- Time
- Queues
- Memory barriers
- Receiving information about CPU time and memory usage
- Sending and receiving IPC messages
- POSIX support
- MessageBus component
- Return codes
- libkos library
- Building a KasperskyOS-based solution
- Developing security policies
- Formal specifications of KasperskyOS-based solution components
- Describing a security policy for a KasperskyOS-based solution
- General information about a KasperskyOS-based solution security policy description
- PSL language syntax
- Describing the global parameters of a KasperskyOS-based solution security policy
- Including PSL files
- Including EDL files
- Creating security model objects
- Binding methods of security models to security events
- Describing security audit profiles
- Describing and performing tests for a KasperskyOS-based solution security policy
- PSL data types
- Examples of binding security model methods to security events
- Example descriptions of basic security policies for KasperskyOS-based solutions
- Example descriptions of security audit profiles
- Example descriptions of tests for KasperskyOS-based solution security policies
- KasperskyOS Security models
- Pred security model
- Bool security model
- Math security model
- Struct security model
- Base security model
- Regex security model
- HashSet security model
- StaticMap security model
- StaticMap security model object
- StaticMap security model init rule
- StaticMap security model fini rule
- StaticMap security model set rule
- StaticMap security model commit rule
- StaticMap security model rollback rule
- StaticMap security model get expression
- StaticMap security model get_uncommited expression
- Flow security model
- Mic security model
- Methods of KasperskyOS core endpoints
- Virtual memory endpoint
- I/O endpoint
- Threads endpoint
- Handles endpoint
- Processes endpoint
- Synchronization endpoint
- File system endpoints
- Time endpoint
- Hardware abstraction layer endpoint
- XHCI controller management endpoint
- Audit endpoint
- Profiling endpoint
- I/O memory management endpoint
- Connections endpoint
- Power management endpoint
- Notifications endpoint
- Hypervisor endpoint
- Trusted Execution Environment endpoints
- IPC interrupt endpoint
- CPU frequency management endpoint
- Security patterns for development under KasperskyOS
- Appendices
- Additional examples
- hello example
- echo example
- ping example
- net_with_separate_vfs example
- net2_with_separate_vfs example
- embedded_vfs example
- embed_ext2_with_separate_vfs example
- multi_vfs_ntpd example
- multi_vfs_dns_client example
- multi_vfs_dhcpcd example
- mqtt_publisher (Mosquitto) example
- mqtt_subscriber (Mosquitto) example
- gpio_input example
- gpio_output example
- gpio_interrupt example
- gpio_echo example
- koslogger example
- pcre example
- messagebus example
- I2c_ds1307_rtc example
- iperf_separate_vfs example
- Uart example
- spi_check_regs example
- barcode_scanner example
- perfcnt example
- Additional examples
- Licensing the application
- Data provision
- Information about third-party code
- Trademark notices
What's new
KasperskyOS Community Edition 1.1.1 has the following new capabilities and refinements:
- Updated the following third-party libraries and applications:
- FFmpeg
- libxml2
- Eclipse Mosquitto
- opencv
- OpenSSL
- protobuf
- sqlite
- usb
- Added support for the Raspberry Pi 4 Model B hardware platform (Revision 1.5).
KasperskyOS Community Edition 1.1 has the following new capabilities and refinements:
- Added support for working with an I2C bus in master device mode.
- Added support for working with an SPI bus in master device mode.
- Added support for USB HID devices.
- Added support for Symmetric Multiprocessing (SMP).
- Expanded capabilities for device profiling: added iperf library and counters that track system parameters.
- Added PCRE library and usage example.
- Added SPDLOG library and usage example.
- Added MessageBus component and usage example.
- Added dynamic code analysis tools (ASAN, UBSAN).
KasperskyOS Community Edition 1.0 has the following new capabilities and refinements:
- Added support for the Raspberry Pi 4 Model B hardware platform.
- Added SD card support for the Raspberry Pi 4 Model B hardware platform.
- Added Ethernet support for the Raspberry Pi 4 Model B hardware platform.
- Added GPIO port support for the Raspberry Pi 4 Model B hardware platform.
- Added network services for DHCP, DNS, and NTP and usage examples.
- Added library for working with the MQTT protocol and usage examples.
About KasperskyOS Community Edition
KasperskyOS Community Edition (CE) is a publicly available version of KasperskyOS that is designed to help you master the main principles of application development under KasperskyOS. KasperskyOS Community Edition will let you see how the concepts rooted in KasperskyOS actually work in practical applications. KasperskyOS Community Edition includes sample applications with source code, detailed explanations, and instructions and tools for building applications.
KasperskyOS Community Edition will help you:
- Learn the principles and techniques of "secure by design" development based on practical examples.
- Explore KasperskyOS as a potential platform for implementing your own projects.
- Make prototypes of solutions (primarily Embedded/IoT) based on KasperskyOS.
- Port applications/components to KasperskyOS.
- Explore security issues in software development.
KasperskyOS Community Edition lets you develop applications in the C and C++ languages. For more details about setting up the development environment, see "Configuring the development environment".
You can download KasperskyOS Community Edition here.
In addition to this documentation, we also recommend that you explore the materials provided in the specific KasperskyOS website section for developers.
Page top
About this Guide
The KasperskyOS Community Edition Developer's Guide is intended for specialists involved in the development of secure solutions based on KasperskyOS.
The Guide is designed for specialists who know the C/C++ programming languages, have experience developing for POSIX-compatible systems, and are familiar with GNU Binary Utilities (binutils).
You can use the information in this Guide to:
- Install and remove KasperskyOS Community Edition.
- Use KasperskyOS Community Edition.
Distribution kit
The KasperskyOS SDK is a set of software tools for creating KasperskyOS-based solutions.
The distribution kit of KasperskyOS Community Edition includes the following:
- DEB package for installation of KasperskyOS Community Edition, including:
- Image of the KasperskyOS kernel
- Development tools (GCC compiler, LD linker, GDB debugger, binutils toolset, QEMU emulator, and accompanying tools)
- Utilities and scripts (for example, source code generators,
makekssscript for creating the Kaspersky Security Module, andmakeimgscript for creating the solution image) - A set of libraries that provide partial compatibility with the POSIX standard
- Drivers
- System programs (for example, virtual file system)
- Usage examples for components of KasperskyOS Community Edition
- End User License Agreement
- Information about third-party code (Legal Notices)
- KasperskyOS Community Edition Developer's Guide (Online Help)
- Release Notes
The KasperskyOS SDK is installed to a computer running the Debian GNU/Linux operating system.
The following components included in the KasperskyOS Community Edition distribution kit are the Runtime Components as defined by the terms of the License Agreement:
- Image of the KasperskyOS kernel.
All the other components of the distribution kit are not the Runtime Components. Terms and conditions of the use of each component can be additionally defined in the section "Information about third-party code".
Page top
System requirements
To install KasperskyOS Community Edition and run examples on QEMU, the following is required:
- Operating system: Debian GNU/Linux 10 "Buster". A Docker container can be used.
- Processor: x86-64 architecture (support for hardware virtualization is required for higher performance).
- RAM: it is recommended to have at least 4 GB of RAM for convenient use of the build tools.
- Disk space: at least 3 GB of free space in the
/optfolder (depending on the solution being developed).
To run examples on the Raspberry Pi hardware platform, the following is required:
- Raspberry Pi 4 Model B (Revision 1.1, 1.2, 1.4, 1.5) with 2, 4, or 8 GB of RAM
- microSD card with at least 2 GB
- USB-UART converter
Included third-party libraries and applications
To simplify the application development process, KasperskyOS Community Edition also includes the following third-party libraries and applications:
- Automated Testing Framework (ATF) (v.0.20) – set of libraries for writing tests for programs in C, C++ and POSIX shell.
Documentation: https://github.com/jmmv/atf
- Boost (v.1.78.0) is a set of class libraries that utilize C++ language functionality and provide a convenient cross-platform, high-level interface for concise coding of various everyday programming subtasks (such as working with data, algorithms, files, threads, and more).
Documentation: https://www.boost.org/doc/
- Arm Mbed TLS (v.2.28.0) implements the TLS and SSL protocols as well as the corresponding encryption algorithms and necessary support code.
Documentation: https://github.com/Mbed-TLS/mbedtls
- Civetweb (v.1.11) is an easy-to-use, powerful, embeddable web server based on C/C++ with additional support for CGI, SSL and Lua.
Documentation: http://civetweb.github.io/civetweb/UserManual.html
- FFmpeg (v.5.1) – set of libraries with open source code that let you write, convert, and transmit digital audio- and video recordings in various formats.
Documentation: https://ffmpeg.org/ffmpeg.html
- fmt (v.8.1.1) – open-source formatting library.
Documentation: https://fmt.dev/latest/index.html
- GoogleTest (v.1.10.0) – C++ code testing library.
Documentation: https://google.github.io/googletest/
- iperf (v.3.10.1) – network performance testing library.
Documentation: https://software.es.net/iperf/
- libffi (v.3.2.1) – library providing a C interface for calling previously compiled code.
Documentation: https://github.com/libffi/libffi
- libjpeg-turbo (v.2.0.91) – library for working with JPEG images.
Documentation: https://libjpeg-turbo.org/
- jsoncpp (v.1.9.4) – library for working with JSON format.
Documentation: https://github.com/open-source-parsers/jsoncpp
- libpng (v.1.6.38) – library for working with PNG images.
Documentation: http://www.libpng.org/pub/png/libpng.html
- libxml2 (v.2.9.14) – library for working with XML.
Documentation: http://xmlsoft.org/
- Eclipse Mosquitto (v2.0.14) – message broker that implements the MQTT protocol.
Documentation: https://mosquitto.org/documentation/
- nlohmann_json (v.3.9.1) – library for working with JSON format.
Documentation: https://github.com/nlohmann/json
- jsoncpp (v.4.2.8P15) – library for working with the NTP time protocol.
Documentation: http://www.ntp.org/documentation.html
- opencv (v.4.6.0) – open-source computer vision library.
Documentation: https://docs.opencv.org/
- OpenSSL (v.1.1.1q) – full-fledged open-source encryption library.
Documentation: https://www.openssl.org/docs/
- pcre (v.8.44) – library for working with regular expressions.
Documentation: https://www.pcre.org/current/doc/html/
- protobuf (v.3.19.4) – data serialization library.
Documentation: https://developers.google.com/protocol-buffers/docs/overview
- spdlog (v.1.9.2) – logging library.
Documentation: https://github.com/gabime/spdlog
- sqlite (v.3.39.2) – library for working with databases.
Documentation: https://www.sqlite.org/docs.html
- Zlib (v.1.2.12) – data compression library.
Documentation: https://zlib.net/manual.html
- usb (v.13.0.0) – library for working with USB devices.
Documentation: https://github.com/freebsd/freebsd-src/tree/release/13.0.0/sys/dev/usb
- libevdev (v.1.6.0) – library for working with evdev peripheral devices.
Documentation: https://www.freedesktop.org/software/libevdev/doc/latest/
- Lwext4 (v.1.0.0) – library for working with the ext2/3/4 file systems.
Documentation: https://github.com/gkostka/lwext4.git
See also Information about third-party code.
Page top
Limitations and known issues
Because the KasperskyOS Community Edition is intended for educational purposes only, it includes several limitations:
- Dynamically loaded libraries are not supported.
- The maximum supported number of running programs is 32.
- When a program is terminated through any method (for example, "return" from the main thread), the resources allocated by the program are not released, and the program goes to sleep. Programs cannot be started repeatedly.
- You cannot start two or more programs that have the same EDL description.
- The system stops if no running programs remain, or if one of the driver program threads has been terminated, whether normally or abnormally.
Overview of KasperskyOS
KasperskyOS is a specialized operating system based on a separation microkernel and security monitor.
See also:
Overview
Microkernel
KasperskyOS is a microkernel operating system. The kernel provides minimal functionality, including scheduling of program execution, management of memory and input/output. The code of device drivers, file systems, network protocols and other system software is executed in user mode (outside of the kernel context).
Processes and endpoints
Software managed by KasperskyOS is executed as processes. A process is a running program that has the following distinguishing characteristics:
- It can provide endpoints to other processes and/or use the endpoints of other processes via the IPC mechanism.
- It uses core endpoints via the IPC mechanism.
- It is associated with security rules that regulate the interactions of the process with other processes and with the kernel.
An endpoint is a set of logically related methods available via the IPC mechanism (for example, an endpoint for receiving and transmitting data over the network, or an endpoint for handling interrupts).
Implementation of the MILS and FLASK architectural approaches
When developing a KasperskyOS-based system, software is designed as a set of components (programs) whose interactions are regulated by security mechanisms. In terms of security, the degree of trust in each component may be high or low. In other words, the system software includes trusted and untrusted components. Interactions between different components (and between components and the kernel) are controlled by the kernel (see the figure below), which has a high level of trust. This type of system design is based on the architectural approach known as MILS (Multiple Independent Levels of Security), which is employed when developing critical information systems.
A decision on whether to allow or deny a specific interaction is made by the Kaspersky Security Module. (This decision is referred to as the security module decision.) The security module is a kernel module whose trust level is high like the trust level of the kernel. The kernel executes the security module decision. This type of division of interaction management functions is based on the architectural approach known as FLASK (Flux Advanced Security Kernel), which is used in operating systems for flexible application of security policies.
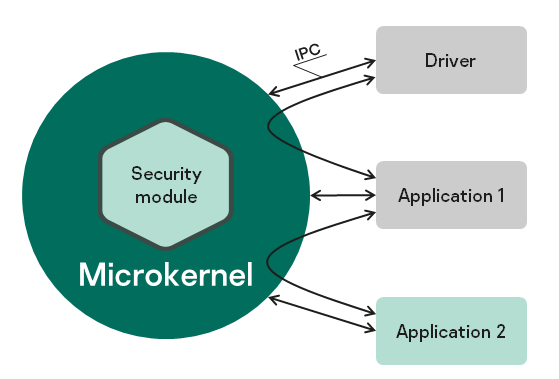
Interaction between different processes and between processes and the kernel in KasperskyOS
KasperskyOS-based solution
A KasperskyOS-based solution (hereinafter also referred to as the solution) consists of system software (including the KasperskyOS kernel and Kaspersky Security Module) and applications integrated to work as part of the software/hardware system. The programs included in a KasperskyOS-based solution are considered to be components of the KasperskyOS-based solution (hereinafter referred to as solution components). Each instance of a solution component is executed in the context of a separate process.
Security policy for a KasperskyOS-based solution
Interactions between the various processes and between processes and the KasperskyOS kernel are allowed or denied according to the KasperskyOS-based solution security policy (hereinafter referred to as the solution security policy or simply the policy). The solution security policy is stored in the Kaspersky Security Module and is used by this module whenever it makes decisions on whether to allow or deny interactions.
The solution security policy can also define the logic for handling queries sent by a process to the security module via the security interface. A process can use the security interface to send some data to the security module (for example, to influence future decisions made by the security module) or to receive a security module decision that is needed by the process to determine its own further actions.
Kaspersky Security System technology
Kaspersky Security System technology lets you implement diverse security policies for solutions. You can also combine multiple security mechanisms and flexibly regulate the interactions between different processes and between processes and the KasperskyOS kernel. A solution security policy is described by a specially developed language known as PSL (Policy Specification Language). A Kaspersky Security Module to be used in a specific solution is created based on the solution security policy description.
Source code generators
Some of the source code of a KasperskyOS-based solution is created by source code generators. Specialized programs generate the source code in C from declarative descriptions. They generate source code of the Kaspersky Security Module, source code of the initializing program (which starts all other programs in the solution and statically defines the topology of interaction between them), and the source code of the methods and types for carrying out IPC (transport code).
Transport code is generated by the nk-gen-c compiler from declarative descriptions in IDL (Interface Definition Language), CDL (Component Definition Language), and EDL (Entity Definition Language), respectively (for details, see Formal specifications of KasperskyOS-based solution components).
Source code of the Kaspersky Security Module is generated by the nk-psl-gen-c compiler from the solution security policy description and the IDL, CDL and EDL descriptions.
Source code of the initializing program is generated by the einit tool from the solution initialization description (in YAML format) and the IDL, CDL and EDL descriptions.
KasperskyOS architecture
The KasperskyOS architecture is presented in the figure below:
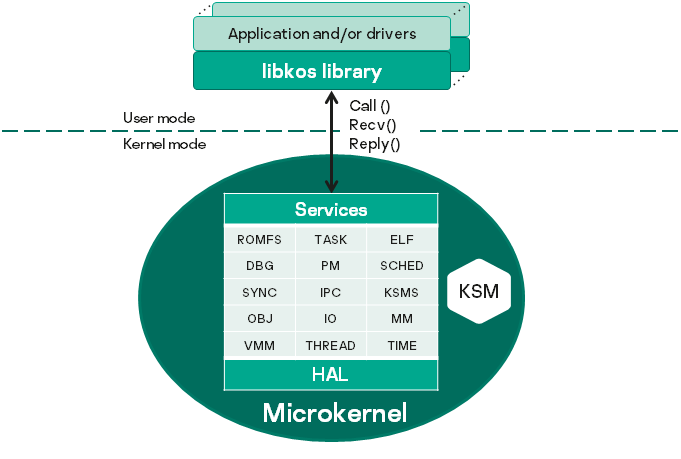
KasperskyOS architecture
In KasperskyOS, applications and drivers interact with each other and with the kernel by using the libkos library, which provides the interfaces for querying core endpoints. (In KasperskyOS, a driver generally operates with the same level of privileges as the application.) The libkos library queries the kernel by executing only three system calls: Call(), Recv() and Reply(). These calls are implemented by the IPC mechanism. Core endpoints are supported by kernel subsystems whose purposes are presented in the table below. Kernel subsystems interact with hardware through the hardware abstraction layer (HAL), which makes it easier to port KasperskyOS to various platforms.
Kernel subsystems and their purpose
Designation |
Name |
Purpose |
|---|---|---|
HAL |
Hardware abstraction subsystem |
Basic hardware support: timers, interrupt controllers, memory management unit (MMU). This subsystem includes UART drivers and low-level means for power management. |
IO |
I/O manager |
Registration and deallocation of hardware platform resources required for the operation of drivers, such as Interrupt ReQuest (IRQ), Memory-Mapped Input-Output (MMIO), I/O ports, and DMA buffers. If hardware has an input–output memory management unit (IOMMU), this subsystem is used to more reliably guarantee memory allocation. |
MM |
Physical memory manager |
Allocation and deallocation of physical memory pages, distribution of physically contiguous page areas. |
VMM |
Virtual memory manager |
Management of physical and virtual memory: reserving, locking, and releasing memory. Working with memory page tables for insulating the address spaces of processes. |
THREAD |
Thread manager |
Thread management: creating, terminating, suspending, and resuming threads. |
TIME |
Real-time clock subsystem |
Getting the time and setting the system clock. Using clocks provided by hardware. |
SCHED |
Scheduler |
Support for three classes of scheduling: real-time threads, general-purpose threads, and IDLE – the state when there is no thread ready for execution. |
SYNC |
Synchronization primitive support subsystem |
Implementation of basic synchronization primitives: spinlock, mutex, event. The kernel supports only one primitive – futex. All other primitives are implemented based on a futex in the user space. |
IPC |
Interprocess communication subsystem |
Implementation of a synchronous IPC mechanism based on the rendezvous principle. |
KSMS |
Security module interaction subsystem |
This subsystem is used for working with the security module. It provides all messages relayed via IPC to the security module so that these messages can be checked. |
OBJ |
Object manager |
Management of the general behavior of all KasperskyOS resources: tracking their life cycle and assigning unique security IDs (for details, see "Resource Access Control"). This subsystem is closely linked to the capability-based access control mechanism (OCap). |
ROMFS |
Immutable file system image startup subsystem |
Operations with files from ROMFS: opening and closing, receiving a list of files and their descriptions, and receiving file characteristics (name, size). |
TASK |
Process management subsystem |
Process management: starting, terminating, suspending and resuming. Receiving the characteristics of running processes (for example, names, paths, and priority) and their exit codes. |
ELF |
Executable file loading subsystem |
Loading executable ELF files from ROMFS into RAM, parsing headers of ELF files. |
DBG |
Debug support subsystem |
Debugging mechanism based on GDB (GNU Debugger). The availability of this subsystem in the kernel is optional. |
PM |
Power manager |
Power management: restart and shutdown. |
IPC mechanism
Exchanging IPC messages
In KasperskyOS, processes interact with each other by exchanging IPC messages (IPC request and IPC response). In an interaction between processes, there are two separate roles: client (the process that initiates the interaction) and server (the process that handles the request). Additionally, a process that acts as a client in one interaction can act as a server in another.
To exchange IPC messages, the client and server use three system calls: Call(), Recv() and Reply() (see the figure below):
- The client sends an IPC request to the server. To do so, one of the client's threads makes the
Call()system call and is locked until an IPC response is received from the server. - The server thread that has made the
Recv()system call waits for IPC requests. When an IPC request is received, this thread is unlocked and handles the request, then sends an IPC response by making theReply()system call. - When an IPC response is received, the client thread is unlocked and continues execution.
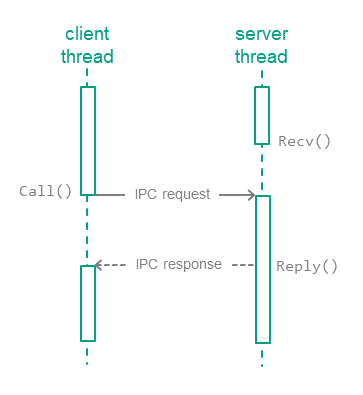
Exchanging IPC messages between a client and a server
Calling methods of server endpoints
IPC requests are sent to the server when the client calls endpoint methods of the server (hereinafter also referred to as interface methods) (see the figure below). The IPC request contains input parameters for the called method, as well as the endpoint ID (RIID) and the called method ID (MID). Upon receiving a request, the server uses these identifiers to find the method's implementation. The server calls the method's implementation while passing in the input parameters from the IPC request. After handling the request, the server sends the client an IPC response that contains the output parameters of the method.
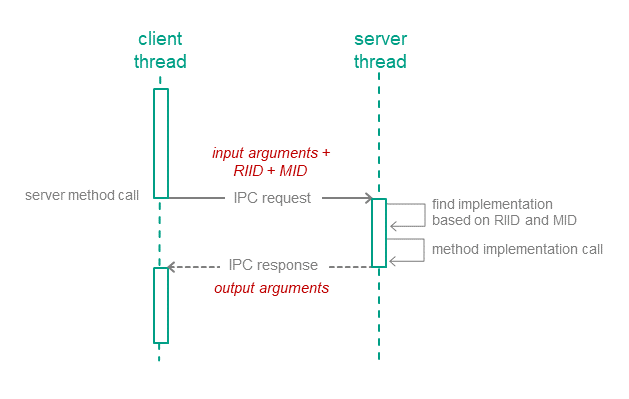
Calling a server endpoint method
IPC channels
To enable two processes to exchange IPC messages, an IPC channel must be established between them. An IPC channel has a client side and a server side. One process can use multiple IPC channels at the same time. A process may act as a server for some IPC channels while acting as a client for other IPC channels.
KasperskyOS has two mechanisms for creating IPC channels:
- The static mechanism involves the creation of IPC channels when the solution is started. IPC channels are created statically by the initializing program.
- The dynamic mechanism allows already running processes to establish IPC channels between each other.
IPC control
The Kaspersky Security Module is integrated into the IPC implementation mechanism. The security module is aware of the contents of IPC messages for all possible interactions because IDL, CDL and EDL descriptions are used to generate the source code of this module. This enables the security module to verify that the interactions between processes comply with the solution security policy.
The KasperskyOS kernel queries the security module each time a process sends an IPC message to another process. The security module operating scenario includes the following steps:
- The security module verifies that the IPC message complies with the called method of the endpoint (the size of the IPC message is verified along with the size and location of certain structural elements).
- If the IPC message is incorrect, the security module makes the "deny" decision and the next step of the scenario is not carried out. If the IPC message is correct, the next step of the scenario is carried out.
- The security module checks whether the security rules allow the requested action. If allowed, the security module makes the "granted" decision. Otherwise it makes the "denied" decision.
The kernel executes the security module decision. In other words, it either delivers the IPC message to the recipient process or rejects its delivery. If delivery of an IPC message is rejected, the sender process receives an error code via the return code of the Call() or Reply() system call.
The security module checks IPC requests as well as IPC responses. The figure below depicts the controlled exchange of IPC messages between a client and a server.
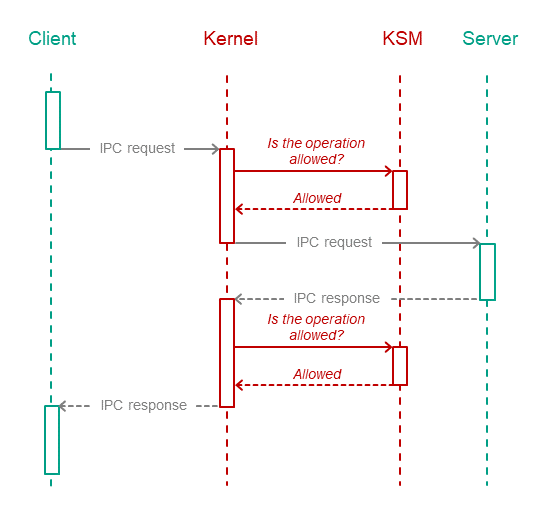
Controlled exchange of IPC messages between a client and a server
Page top
Transport code for IPC
Implementation of interaction between processes requires transport code, which is responsible for properly creating, packing, sending, and unpacking IPC messages. However, developers of KasperskyOS-based solutions do not have to write their own transport code. Instead, you can use special tools and libraries included in the KasperskyOS SDK.
Transport code for developed components of a solution
A developer of a KasperskyOS-based solution component can generate transport code based on IDL, CDL and EDL descriptions related to this component. The KasperskyOS SDK includes the nk-gen-c compiler for this purpose. The nk-gen-c compiler lets you generate transport methods and types for use by both a client and a server.
Transport code for supplied components of a solution
Most components included in the KasperskyOS SDK may be used in a solution both locally (through static linking with other components) as well as via IPC.
To use a supplied component via IPC, the KasperskyOS SDK provides the following transport libraries:
- Solution component's client library, which converts local calls into IPC requests.
- Solution component's server library, which converts IPC requests into local calls.
The client library is linked to the client code (the component code that will use the supplied component). The server library is linked to the implementation of the supplied component (see the figure below).
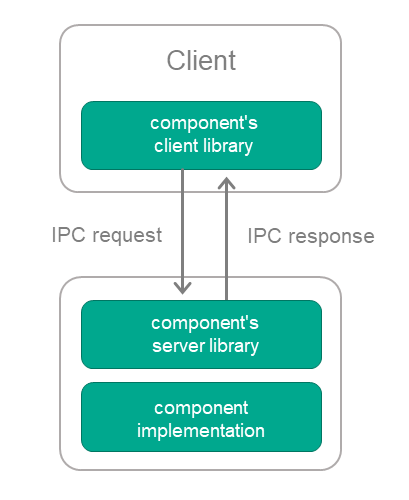
Using a supplied solution component via IPC
Page top
IPC between a process and the kernel
The IPC mechanism is used for interaction between processes and the KasperskyOS kernel. In other words, processes exchange IPC messages with the kernel. The kernel provides endpoints, and processes use those endpoints. Processes query core endpoints by calling functions of the libkos library (directly or via other libraries). The client transport code for interaction between a process and the kernel is included in this library.
A solution developer is not required to create IPC channels between processes and the kernel because these channels are created automatically when processes are created. (To set up interaction between processes, the solution developer has to create IPC channels between them.)
The Kaspersky Security Module makes decisions regarding interaction between processes and the kernel the same way it makes decisions regarding interaction between a process and other processes. (The KasperskyOS SDK has IDL, CDL and EDL descriptions for the kernel that are used to generate source code of the security module.)
Page top
Resource Access Control
Types of resources
KasperskyOS has two types of resources:
- System resources, which are managed by the kernel. Some examples of these include processes, memory regions, and interrupts.
- User resources, which are managed by processes. Examples of user resources: files, input-output devices, data storage.
Handles
Both system resources and user resources are identified by handles. Processes (and the KasperskyOS kernel) can transfer handles to other processes. By receiving a handle, a process obtains access to the resource that is identified by this handle. In other words, the process that receives a handle can request operations to be performed on a resource by specifying its received handle in the request. The same resource can be identified by multiple handles used by different processes.
Security identifiers (SID)
The KasperskyOS kernel assigns security identifiers to system resources and user resources. A security identifier (SID) is a global unique ID of a resource (in other words, a resource can have only one SID but can have multiple handles). The Kaspersky Security Module identifies resources based on their SID.
When transmitting an IPC message containing handles, the kernel modifies the message so that it contains SID values instead of handles when the message is checked by the security module. When the IPC message is delivered to its recipient, it will contain the handles.
The kernel also has an SID like other resources.
Security context
Kaspersky Security System technology lets you employ security mechanisms that receive SID values as inputs. When employing these mechanisms, the Kaspersky Security Module distinguishes resources (and the KasperskyOS kernel) and binds security contexts to them. A security context consists of data that is associated with an SID and used by the security module to make decisions.
The contents of a security context depend on the security mechanisms being used. For example, a security context may contain the state of a resource and the levels of integrity of access subjects and/or access objects. If a security context stores the state of a resource, this lets you allow certain operations to be performed on a resource only if the resource is in a specific state, for example.
The security module can modify a security context when it makes a decision. For example, it can modify information about the state of a resource (the security module used the security context to verify that a file is in the "not in use" state and allowed the file to be opened for write access and wrote a new state called "opened for write access" into the security context of this file).
Resource access control by the KasperskyOS kernel
The KasperskyOS kernel controls access to resources by using two mutually complementary methods at the same time: executing the decisions of the Kaspersky Security Module and implementing a security mechanism based on object capabilities (OCap).
Each handle is associated with access rights to the resource identified by this handle, which means it is a capability in OCap terms. By receiving a handle, a process obtains the access rights to the resource that is identified by this handle. For example, these access rights may consist of read permissions, write permissions, and/or permissions to allow another process to perform operations on the resource (handle transfer permission).
Processes that use the resources provided by the kernel or other processes are referred to as resource consumers. When a resource consumer opens a system resource, the kernel sends the consumer the handle associated with the access rights to this resource. These access rights are assigned by the kernel. Before an operation is performed on a system resource requested by a consumer, the kernel verifies that the consumer has sufficient rights. If the consumer does not have sufficient rights, the kernel rejects the request of the consumer.
In an IPC message, a handle is sent together with its permissions mask. The handle permissions mask is a value whose bits are interpreted as access rights to the resource identified by the handle. A resource consumer can find out their access rights to a system resource from the handle permissions mask of this resource. The kernel uses the handle permissions mask to verify that the consumer is allowed to request the operations to be performed on the system resource.
The security module can verify the permissions masks of handles and use these verifications to either allow or deny interactions between different processes and between processes and the kernel when such interactions are related to resource access.
The kernel prohibits the expansion of access rights when handles are transferred among processes (when a handle is transferred, access rights can only be restricted).
Resource access control by resource providers
Processes that control user resources and access to those resources for other processes are referred to as resource providers. For example, drivers are resource providers. Resource providers control access to resources by using two mutually complementary methods: executing the decisions of the Kaspersky Security Module and using the OCap mechanism that is provided by the KasperskyOS kernel.
If a resource is queried by its name (for example, to open it), the security module cannot be used to control access to the resource without the involvement of the resource provider. This is because the security module identifies a resource by its SID, not by its name. In such cases, the resource provider finds the resource handle based on the resource name and forwards this handle (together with other data, such as the required state of the resource) to the security module via the security interface (the security module receives the SID corresponding to the transferred handle). The security module makes a decision and returns it to the resource provider. The resource provider implements the decision of the security module.
When a resource consumer opens a user resource, the resource provider sends the consumer the handle associated with the access rights to this resource. In addition, the resource provider decides which specific rights for accessing the resource will be granted to the resource consumer. Before an operation is performed on a user resource as requested by a consumer, the resource provider verifies that the consumer has sufficient rights. If the consumer does not have sufficient rights, the resource provider rejects the request of the consumer.
A resource consumer can find out their access rights to a user resource from the permissions mask of the handle of this resource. The resource provider uses the handle permissions mask to verify that the consumer is allowed to request the operations to be performed on the user resource.
Handle permissions mask structure
A handle permissions mask has a size of 32 bits and consists of a general part and a specialized part. The general part describes the general rights that are not specific to any particular resource (the flags of these rights are defined in the services/ocap.h header file). For example, the general part contains the OCAP_HANDLE_TRANSFER flag, which defines the permission to transfer the handle. The specialized part describes the rights that are specific to the particular user resource or system resource. The flags of the specialized part's permissions for system resources are defined in the services/ocap.h header file. The structure of the specialized part for user resources is defined by the resource provider by using the OCAP_HANDLE_SPEC() macro that is defined in the services/ocap.h header file. The resource provider must export the public header files describing the structure of the specialized part.
When the handle of a system resource is created, the permissions mask is defined by the KasperskyOS kernel, which applies permissions masks from the services/ocap.h header file. It applies permissions masks with names such as OCAP_*_FULL (for example, OCAP_IOPORT_FULL, OCAP_TASK_FULL, OCAP_FILE_FULL) and OCAP_IPC_* (for example, OCAP_IPC_SERVER, OCAP_IPC_LISTENER, OCAP_IPC_CLIENT).
When the handle of a user resource is created, the permissions mask is defined by the user.
When a handle is transferred, the permissions mask is defined by the user but the transferred access rights cannot be elevated above the access rights of the process.
Page top
Structure and startup of a KasperskyOS-based solution
Structure of a solution
The image of the KasperskyOS-based solution loaded into hardware contains the following files:
- Image of the KasperskyOS kernel
- File containing the executable code of the Kaspersky Security Module
- Executable file of the initializing program
- Executable files of all other solution components (for example, applications and drivers)
- Files used by programs (for example, files containing settings, fonts, graphical and audio data)
The ROMFS file system is used to save files in the solution image.
Starting a solution
A KasperskyOS-based solution is started as follows:
- The bootloader starts the KasperskyOS kernel.
- The kernel finds and loads the security module (as a kernel module).
- The kernel starts the initializing program.
- The initializing program starts all other programs that are part of the solution.
Getting started
This section tells you what you need to know to start working with KasperskyOS Community Edition.
Using a Docker container
To install and use KasperskyOS Community Edition, you can use a Docker container in which an image of one of the supported operating systems is deployed.
To use a Docker container for installing KasperskyOS Community Edition:
- Make sure that the Docker software is installed and running.
- To download the official Docker image of the Debian "Buster" 10.12 operating system from the public Docker Hub repository, run the following command:
docker pull debian:10.12 - To run the image, run the following command:
docker run --net=host --user root --privileged -it --rm debian:10.12 bash - Copy the DEB package for installation of KasperskyOS Community Edition into the container.
- Install KasperskyOS Community Edition.
- To ensure correct operation of certain examples:
- Add the
/usr/sbindirectory to thePATHenvironment variable within the container by running the following command:export PATH=/usr/sbin:$PATH - Install the
partedprogram within the container. To do so, add the following string to/etc/apt/sources.list:deb http://deb.debian.org/debian bullseye mainAfter this, run the following command:
sudo apt update && sudo apt install parted
- Add the
Installation and removal
Installation
KasperskyOS Community Edition is distributed as a DEB package. It is recommended to use the apt package installer to install KasperskyOS Community Edition.
To deploy the package using apt, run the following command with root privileges:
$ apt install <path-to-deb-package>
The package will be installed in /opt/KasperskyOS-Community-Edition-<version>.
For convenient operation, you can add the path to the KasperskyOS Community Edition tools binaries to the PATH variable. This will allow you to use the tools via the terminal from any folder:
$ export PATH=$PATH:/opt/KasperskyOS-Community-Edition-<version>/toolchain/bin
Removal
To remove KasperskyOS Community Edition, run the following command with root privileges:
$ apt remove --purge kasperskyos-community-edition
All installed files in the /opt/KasperskyOS-Community-Edition-<version> directory will be deleted.
Configuring the development environment
This section provides brief instructions on configuring the development environment and adding the header files included in KasperskyOS Community Edition to a development project.
Configuring the code editor
Before getting started, you should do the following to simplify your development of solutions based on KasperskyOS:
- Install code editor extensions and plugins for your programming language (C and/or C++).
- Add the header files included in KasperskyOS Community Edition to the development project.
The header files are located in the directory:
/opt/KasperskyOS-Community-Edition-<version>/sysroot-aarch64-kos/include.
Example of how to configure Visual Studio Code
For example, during KasperskyOS development, you can work with source code in Visual Studio Code.
To more conveniently navigate the project code, including the system API:
- Create a new workspace or open an existing workspace in Visual Studio Code.
A workspace can be opened implicitly by using the
File>Open foldermenu options. - Make sure the C/C++ for Visual Studio Code extension is installed.
- In the
Viewmenu, select theCommand Paletteitem. - Select the
C/C++: Edit Configurations (UI)item. - In the
Include pathfield, enter/opt/KasperskyOS-Community-Edition-<version>/sysroot-aarch64-kos/include. - Close the
C/C++ Configurationswindow.
Building the examples
The examples are built using the CMake build system that is included in KasperskyOS Community Edition.
The code of the examples and build scripts are available at the following path:
/opt/KasperskyOS-Community-Edition-<version>/examples
Examples must be built in the home directory. For this reason, the directory containing the example that you need to build must be copied from /opt/KasperskyOS-Community-Edition-<version>/examples to the home directory.
Building the examples to run on QEMU
To build an example, go to the directory with the example and run this command:
$ ./cross-build.sh
Running cross-build.sh creates a KasperskyOS-based solution image that includes the example. The kos-qemu-image solution image is located in the <name of example>/build/einit directory.
Building the examples to run on Raspberry Pi 4 B
To build an example:
- Go to the directory with the example.
- Open the
cross-build.shscript file in a text editor. - In the last line of the script file, replace the
make simcommand withmake kos-image. - Save the script file and then run the command:
$ ./cross-build.sh
Running cross-build.sh creates a KasperskyOS-based solution image that includes the example. The kos-image solution image is located in the <name of example>/build/einit directory.
Running examples on QEMU
Running examples on QEMU on Linux with a graphical shell
An example is run on QEMU on Linux with a graphical shell using the cross-build.sh script, which also builds the example. To run the script, go to the folder with the example and run the command:
$ sudo ./cross-build.sh
Additional QEMU parameters must be used to run certain examples. The commands used to run these examples are provided in the descriptions of these examples.
Running examples on QEMU on Linux without a graphical shell
To run an example on QEMU on Linux without a graphical shell, go to the directory with the example, build the example and run the following commands:
$ cd build/einit
# Before running the following command, be sure that the path to
# the directory with the qemu-system-aarch64 executable file is saved in
# the PATH environment variable. If it is not there,
# add it to the PATH variable.
$ qemu-system-aarch64 -m 2048 -machine vexpress-a15,secure=on -cpu cortex-a72 -nographic -monitor none -smp 4 -nic user -serial stdio -kernel kos-qemu-image
Preparing Raspberry Pi 4 B to run examples
Connecting a computer and Raspberry Pi 4 B
To see the output of the examples on the computer:
- Connect the pins of the FT232 USB-UART converter to the corresponding GPIO pins of the Raspberry Pi 4 B (see the figure below).
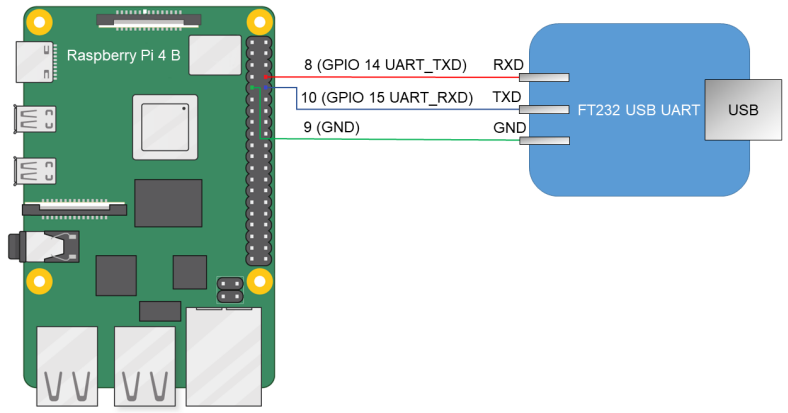
Diagram for connecting the USB-UART converter and Raspberry Pi 4 B
- Connect the computer's USB port to the USB-UART converter.
- Install PuTTY or a similar program for reading data from a COM port. Configure the settings as follows:
bps = 115200,data bits = 8,stop bits = 1,parity = none,flow control = none.
To allow a computer and Raspberry Pi 4 B to interact through Ethernet:
- Connect the network cards of the computer and Raspberry Pi 4 B to a switch or to each other.
- Configure the computer's network card so that its IP address is in the same subnet as the IP address of the Raspberry Pi 4 B network card (the settings of the Raspberry Pi 4 B network card are defined in the
dhcpcd.conffile, which is found at the path<example name>/resources/...).
Preparing a bootable SD card for Raspberry Pi 4 B
A bootable SD card for Raspberry Pi 4 B can be prepared automatically or manually.
To automatically prepare the bootable SD card, connect the SD card to the computer and run the following commands:
# To create a bootable drive image file (*.img),
# run the script corresponding to the revision of your
# Raspberry Pi. Supported revisions: 1.1, 1.2, 1.4 and 1.5.
# For example, if revision 1.1 is used, run:
$ sudo /opt/KasperskyOS-Community-Edition-<version>/examples/rpi4_prepare_fs_image_rev1.1.sh
# In the following command, path_to_img is the path to the image file
# of the bootable drive (this path is displayed upon completion
# of the previous command), [X] is the final character
# in the name of the SD card block device.
$ sudo dd bs=64k if=path_to_img of=/dev/sd[X] conv=fsync
To manually prepare the bootable SD card:
- Build the U-Boot bootloader for ARMv8, which will automatically run the example. To do this, run the following commands:
$ sudo apt install git build-essential libssl-dev bison flex unzip parted gcc-aarch64-linux-gnu xz-utils device-tree-compiler
$ git clone https://github.com/u-boot/u-boot.git u-boot-armv8
# For Raspberry Pi 4 B revisions 1.1 and 1.2 only:
$ cd u-boot-armv8 && git checkout tags/v2020.10
# For Raspberry Pi 4 B revisions 1.4 and 1.5 only:
$ cd u-boot-armv8 && git checkout tags/v2022.01
# For all Raspberry Pi revisions:
$ make ARCH=arm CROSS_COMPILE=aarch64-linux-gnu- rpi_4_defconfig
# In the menu that appears when you run the following command,
# in the 'Boot options' section, change the value in the 'bootcmd value' field to the following:
# fatload mmc 0 ${loadaddr} kos-image; bootelf ${loadaddr},
# and delete the value "usb start;" in the 'preboot default value' field.
# Exit the menu after saving the settings.
$ make ARCH=arm CROSS_COMPILE=aarch64-linux-gnu- menuconfig
$ make ARCH=arm CROSS_COMPILE=aarch64-linux-gnu- u-boot.bin
- Prepare the image containing the file system for the SD card. To do this, connect the SD card to the computer and run the following commands:
# For Raspberry Pi 4 B revisions 1.1 and 1.2 only:
$ wget https://downloads.raspberrypi.org/raspbian_lite/images/raspbian_lite-2020-02-14/2020-02-13-raspbian-buster-lite.zip
$ unzip 2020-02-13-raspbian-buster-lite.zip
$ loop_device=$(sudo losetup --find --show --partscan 2020-02-13-raspbian-buster-lite.img)
# For Raspberry Pi 4 B revision 1.4 only:
$ wget https://downloads.raspberrypi.org/raspios_lite_arm64/images/raspios_lite_arm64-2022-04-07/2022-04-04-raspios-bullseye-arm64-lite.img.xz
$ unxz 2022-04-04-raspios-bullseye-arm64-lite.img.xz
$ loop_device=$(sudo losetup --find --show --partscan 2022-04-04-raspios-bullseye-arm64-lite.img)
# For Raspberry Pi 4 B revision 1.5 only:
$ wget https://downloads.raspberrypi.org/raspios_lite_arm64/images/raspios_lite_arm64-2022-09-07/2022-09-06-raspios-bullseye-arm64-lite.img.xz
$ unxz 2022-09-06-raspios-bullseye-arm64-lite.img.xz
$ loop_device=$(sudo losetup --find --show --partscan 2022-09-06-raspios-bullseye-arm64-lite.img)
# For all Raspberry Pi revisions:
# Image will contain a boot partition of 1 GB in fat32 and 3 partitions of 256 MB each in ext2, ext3 and ext4, respectively:
$ sudo parted ${loop_device} rm 2
$ sudo parted ${loop_device} resizepart 1 1G
$ sudo parted ${loop_device} mkpart primary ext2 1000 1256M
$ sudo parted ${loop_device} mkpart primary ext3 1256 1512M
$ sudo parted ${loop_device} mkpart primary ext4 1512 1768M
$ sudo mkfs.ext2 ${loop_device}p2
$ sudo mkfs.ext3 ${loop_device}p3
$ sudo mkfs.ext4 -O ^64bit,^extent ${loop_device}p4
$ sudo losetup -d ${loop_device}
# In the following command, [X] is the last symbol in the name of the block device
# for the SD card.
$ sudo dd bs=64k if=$(ls *rasp*lite.img) of=/dev/sd[X] conv=fsync
- Copy the U-Boot bootloader to the SD card by running the following commands:
# In the following commands, the path ~/mnt/fat32 is just an example. You
# can use a different path.
$ mkdir -p ~/mnt/fat32
# In the following command, [X] is the last alphabetic character in the name of the block
# device for the partition on the formatted SD card.
$ sudo mount /dev/sd[X]1 ~/mnt/fat32/
$ sudo cp u-boot.bin ~/mnt/fat32/u-boot.bin
# For Raspberry Pi 4 B revision 1.5 only:
# In the following commands, the path ~/tmp_dir is just an example. You
# can use a different path.
$ mkdir -p ~/tmp_dir
$ cp ~/mnt/fat32/bcm2711-rpi-4-b.dtb ~/tmp_dir
$ dtc -I dtb -O dts -o ~/tmp_dir/bcm2711-rpi-4-b.dts ~/tmp_dir/bcm2711-rpi-4-b.dtb && \
$ sed -i -e "0,/emmc2bus = /s/emmc2bus =.*//" ~/tmp_dir/bcm2711-rpi-4-b.dts && \
$ sed -i -e "s/dma-ranges = <0x00 0xc0000000 0x00 0x00 0x40000000>;/dma-ranges = <0x00 0x00 0x00 0x00 0xfc000000>;/" ~/tmp_dir/bcm2711-rpi-4-b.dts && \
$ sed -i -e "s/mmc@7e340000 {/mmc@7e340000 {\n\t\t\tranges = <0x00 0x7e000000 0x00 0xfe000000 0x1800000>;\n dma-ranges = <0x00 0x00 0x00 0x00 0xfc000000>;/" ~/tmp_dir/bcm2711-rpi-4-b.dts && \
$ dtc -I dts -O dtb -o ~/tmp_dir/bcm2711-rpi-4-b.dtb ~/tmp_dir/bcm2711-rpi-4-b.dts
$ sudo cp ~/tmp_dir/bcm2711-rpi-4-b.dtb ~/mnt/fat32/bcm2711-rpi-4-b.dtb
$ sudo rm -rf ~/tmp_dir
- Fill in the configuration file for the U-Boot bootloader on the SD card by using the following commands:
$ echo "[all]" > ~/mnt/fat32/config.txt
$ echo "arm_64bit=1" >> ~/mnt/fat32/config.txt
$ echo "enable_uart=1" >> ~/mnt/fat32/config.txt
$ echo "kernel=u-boot.bin" >> ~/mnt/fat32/config.txt
$ echo "dtparam=i2c_arm=on" >> ~/mnt/fat32/config.txt
$ echo "dtparam=i2c=on" >> ~/mnt/fat32/config.txt
$ echo "dtparam=spi=on" >> ~/mnt/fat32/config.txt
$ sync
$ sudo umount ~/mnt/fat32
Running examples on Raspberry Pi 4 B
To run an example on a Raspberry Pi 4 B:
- Go to the directory with the example and build the example.
- Make sure that Raspberry Pi 4 B and the bootable SD card are prepared to run examples.
- Copy the KasperskyOS-based solution image to the bootable SD card. To do this, connect the bootable SD card to the computer and run the following commands:
# In the following command, [X] is the last alphabetic character in the name of the block
# device for the partition on the bootable SD card.
# In the following commands, the path ~/mnt/fat32 is just an example. You
# can use a different path.
$ sudo mount /dev/sd[X]1 ~/mnt/fat32/
$ sudo cp build/einit/kos-image ~/mnt/fat32/kos-image
$ sync
$ sudo umount ~/mnt/fat32
- Connect the bootable SD card to the Raspberry Pi 4 B.
- Supply power to the Raspberry Pi 4 B and wait for the example to run.
The output displayed on the computer indicates that the example started.
Overview: Einit and init.yaml
Einit initializing program
At startup, the KasperskyOS kernel finds the executable file named Einit (initializing program) in the solution image and runs this executable file. The running process has the Einit class and is normally used to start all other processes that are required when the solution is started.
Generating the C-code of the initializing program
The KasperskyOS Community Edition toolkit includes the einit tool, which lets you generate the C-code of the initializing program based on the init description (the description file is normally named init.yaml). The obtained program uses the KasperskyOS API to do the following:
- Statically create and run processes.
- Statically create IPC channels.
The standard way of using the einit tool is to integrate an einit call into one of the steps of the build script. As a result, the einit tool uses the init.yaml file to generate the einit.c file containing the code of the initializing program. In one of the following steps of the build script, you must compile the einit.c file into the executable file of Einit and include it into the solution image.
You are not required to create static description files for the initializing program. These files are included in the KasperskyOS Community Edition toolkit and are automatically connected during a solution build. However, the Einit process class must be described in the security.psl file.
Syntax of init.yaml
An init description contains data in YAML format. This data identifies the following:
- Processes that are started when KasperskyOS is loaded.
- IPC channels that are used by processes to interact with each other.
This data consists of a dictionary with the entities key containing a list of dictionaries of processes. Process dictionary keys are presented in the table below.
Process dictionary keys in an init description
Key |
Required |
Value |
|---|---|---|
|
Yes |
Process security class |
|
No |
Process name. If this name is not specified, the security class name will be used. Each process must have a unique name. You can start multiple processes of the same security class if they have different names. |
|
No |
Name of the executable file in ROMFS (in the solution image) from which the process will be started. If this name is not specified, the security class name (without prefixes and dots) will be used. For example, processes of the You can start multiple processes from the same executable file. |
|
No |
Process IPC channel dictionaries list. This list defines the statically created IPC channels whose client handles will be owned by the process. The list is empty by default. (In addition to statically created IPC channels, processes can also use dynamically created IPC channels.) |
|
No |
List of arguments passed to the process (the |
|
No |
Dictionary of environment variables passed to the process. The keys in this dictionary are the names of variables mapped to the passed values. The maximum size of a value is 1024 bytes. |
Process IPC channel dictionary keys are presented in the table below.
IPC channel dictionary keys in an init description
Key |
Required |
Value |
|---|---|---|
|
Yes |
IPC channel name, which can be defined as a specific value or as a link such as
|
|
Yes |
Name of the process that will own the server handle of the IPC channel. |
Example init descriptions
This section contains init descriptions that demonstrate various aspects of starting processes.
Examples in KasperskyOS Community Edition may utilize a macro-containing init description format (init.yaml.in).
The file containing an init description is usually named init.yaml, but it can have any name.
Connecting and starting a client process and server process
In the next example, two processes will be started: one process of the Client class and one process of the Server class. The names of the processes are not specified, so they will match the names of their respective process classes. The names of the executable files are not specified either, so they will also match the names of their respective classes. The processes will be connected by an IPC channel named server_connection.
init.yaml
entities:
- name: Client
connections:
- target: Server
id: server_connection
- name: Server
Specifying the executable file to run
The next example will run a Client-class process from the cl executable file, a ClientServer-class process from the csr executable file, and a MainServer-class process from the msr executable file. The names of the processes are not specified, so they will match the names of their respective process classes.
init.yaml
entities:
- name: Client
path: cl
- name: ClientServer
path: csr
- name: MainServer
path: msr
Starting two processes from the same executable file
The next example will run three processes: a Client-class process from the default executable file (Client), and processes of the MainServer and BkServer classes from the srv executable file. The names of the processes are not specified, so they will match the names of their respective process classes.
init.yaml
entities:
- name: Client
- name: MainServer
path: srv
- name: BkServer
path: srv
Starting two processes of the same class
The next example will run one Client-class process (named Client by default) and two Server-class processes named UserServer and PrivilegedServer. The client process is linked to the server processes through IPC channels named server_connection_us and server_connection_ps, respectively. The names of the executable files are not specified, so they will match the names of their respective process classes.
init.yaml
entities:
- name: Client
connections:
- id: server_connection_us
target: UserServer
- id: server_connection_ps
target: PrivilegedServer
- task: UserServer
name: Server
- task: PrivilegedServer
name: Server
Passing environment variables and arguments using the main() function
The next example will run two processes: one VfsFirst-class process (named VfsFirst by default) and one VfsSecond-class process (named VfsSecond by default). At startup, the first process receives the -f /etc/fstab argument and the following environment variables: ROOTFS with the value ramdisk0,0 / ext2 0 and UNMAP_ROMFS with the value 1. At startup, the second process receives the -l devfs /dev devfs 0 argument.
The names of the executable files are not specified, so they will match the names of their respective process classes.
If the Env program is used in a solution, the arguments and environment variables passed through this program redefine the values that were defined through init.yaml.
init.yaml
entities:
- name: VfsFirst
args:
- -f
- /etc/fstab
env:
ROOTFS: ramdisk0,0 / ext2 0
UNMAP_ROMFS: 1
- name: VfsSecond
args:
- -l
- devfs /dev devfs 0
Starting a process using the KasperskyOS API
This example uses the EntityInitEx() and EntityRun() functions to run an executable file from the solution image.
Below is the code of the GpMgrOpenSession() function, which starts the server process, connects it to the client process and initializes IPC transport. The executable file of the new process must be contained in the ROMFS storage of the solution.
/**
* The "classname" parameter defines the class name of the started process,
* the "server" parameter defines a unique name for the process, and the "service" parameter contains the service name
* that is used when dynamically creating a channel.
* Output parameter "transport" contains the initialized transport
* if an IPC channel to the client was successfully created.
*/
Retcode GpMgrOpenSession(const char *classname, const char *server,
const char *service, NkKosTransport *transport)
{
Retcode rc;
Entity *e;
EntityInfo tae_info;
Handle endpoint;
rtl_uint32_t riid;
int count = CONNECT_RETRY;
/* Initializes the process description structure. */
rtl_memset(&tae_info, 0, sizeof(tae_info));
tae_info.eiid = classname;
tae_info.args[0] = server;
tae_info.args[1] = service;
/* Creates a process named "server" with the tae_info description.
* The third parameter is equal to RTL_NULL, therefore the name of the started
* binary file matches the class name from the tae_info description.
* The created process is in the stopped state. */
if ((e = EntityInitEx(&tae_info, server, RTL_NULL)) == NK_NULL)
{
rtl_printf("Cannot init entity '%s'\n", tae_info.eiid);
return rcFail;
}
/* Starts the process. */
if ((rc = EntityRun(e)) != rcOk)
{
rtl_printf("Cannot launch entity %" RTL_PRId32 "\n", rc);
EntityFree(e);
return rc;
}
/* Dynamically creates an IPC channel. */
while ((rc = KnCmConnect(server, service, INFINITE_TIMEOUT, &endpoint, &riid) ==
rcResourceNotFound && count--)
{
KnSleep(CONNECT_DELAY);
}
if (rc != rcOk)
{
rtl_printf("Cannot connect to server %" RTL_PRId32 "\n", rc);
return rc;
}
/* Initializes IPC transport. */
NkKosTransport_Init(transport, endpoint, NK_NULL, 0);
...
return rcOk;
}
To enable a process to start other processes, the solution security policy must allow this process to use the following core endpoints: Handle, Task and VMM (their descriptions are in the directory kl\core\).
Overview: Env program
The Env program is intended for passing arguments and environment variables to started processes. When started, each process automatically sends a request to the Env process and receives the necessary data.
A process query to Env redefines the arguments and environment variables received through Einit.
To use the Env program in your solution, you need to do the following:
1. Develop the code of the Env program by using macros from env/env.h.
2. Build the binary file of the Env program by linking it to the env_server library.
3. In the init description, indicate that the Env process must be started and connected to the selected processes (Env acts a server in this case). The channel name is defined by the ENV_SERVICE_NAME macro declared in the env/env.h file.
4. Include the Env binary file in the solution image.
Env program code
The code of the Env program utilizes the following macros and functions declared in the env/env.h file:
ENV_REGISTER_ARGS(name,argarr)– arguments from theargarrarray are passed to the process namedname(the maximum size of one element is 256 bytes).ENV_REGISTER_VARS(name,envarr)– environment variables from theenvarrarray are passed to the process namedname(the maximum size of one element is 256 bytes).ENV_REGISTER_PROGRAM_ENVIRONMENT(name,argarr,envarr)– arguments and environment variables are passed to the process namedname.envServerRun()– initialize the server part of theEnvprogram so that it can respond to requests.
Passing environment variables and arguments using Env
Example of passing arguments at process startup
Below is the code of the Env program. When the process named NetVfs starts, the program passes three arguments to this process: NetVfs, -l devfs /dev devfs 0 and -l romfs /etc romfs 0:
env.c
int main(int argc, char** argv)
{
const char* NetVfsArgs[] = {
"-l", "devfs /dev devfs 0",
"-l", "romfs /etc romfs 0"
};
ENV_REGISTER_ARGS("NetVfs", NetVfsArgs);
envServerRun();
return EXIT_SUCCESS;
}
Example of passing environment variables at process startup
Below is the code of the Env program. When the process named Vfs3 starts, the program passes two environment variables to this process: ROOTFS=ramdisk0,0 / ext2 0 and UNMAP_ROMFS=1:
env.c
int main(int argc, char** argv)
{
const char* Vfs3Envs[] = {
"ROOTFS=ramdisk0,0 / ext2 0",
"UNMAP_ROMFS=1"
};
ENV_REGISTER_VARS("Vfs3", Vfs3Envs);
envServerRun();
return EXIT_SUCCESS;
}
Contents of the VFS component
The VFS component contains a set of executable files, libraries and description files that let you use file systems and/or a network stack combined into a separate Virtual File System (VFS) process. If necessary, you can build your own VFS implementations.
VFS libraries
The vfs CMake package contains the following libraries:
vfs_fs– contains the defvs, ramfs and romfs implementations, and lets you add implementations of other file systems to VFS.vfs_net– contains the defvs implementation and network stack.vfs_imp– contains the sum of thevfs_fsandvfs_netcomponents.vfs_remote– client transport library that converts local calls into IPC requests to VFS and receives IPC responses.vfs_server– server transport library of VFS that receives IPC requests, converts them into local calls, and sends IPC responses.vfs_local– used for statically linking the client to VFS libraries.
VFS executable files
The precompiled_vfs CMake package contains the following executable files:
VfsRamFsVfsSdCardFsVfsNet
The VfsRamFs and VfsSdCardFs executable files include the vfs_server, vfs_fs, vfat and lwext4 libraries. The VfsNet executable file includes the vfs_server, vfs_imp and dnet_imp libraries.
Each of these executable files have their own default values for arguments and environment variables.
If necessary, you can independently build a VFS executable file with the necessary functionality.
VFS description files
The directory /opt/KasperskyOS-Community-Edition-<version>/sysroot-aarch64-kos/include/kl/ contains the following VFS files:
VfsRamFs.edl,VfsSdCardFs.edl,VfsNet.edlandVfsEntity.edl, and the header files generated from them, including the transport code.Vfs.cdland the generatedVfs.cdl.h.Vfs*.idland the header files generated from them, including the transport code.
Creating an IPC channel to VFS
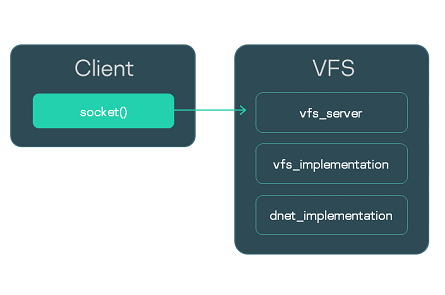
Let's examine a Client program using file systems and Berkeley sockets. To handle its calls, we start one VFS process (named VfsFsnet). Network calls and file calls will be sent to this process. This approach is utilized when there is no need to separate file data streams from network data streams.
To ensure correct interaction between the Client and VfsFsnet processes, the name of the IPC channel between them must be defined by the _VFS_CONNECTION_ID macro declared in the vfs/defs.h file.
Below is a fragment of an init description for connecting the Client and VfsFsnet processes.
init.yaml
- name: Client
connections:
- target: VfsFsnet
id: {var: _VFS_CONNECTION_ID, include: vfs/defs.h}
- name: VfsFsnet
Building a VFS executable file
When building a VFS executable file, you can include whatever specific functionality is required in this file, such as:
- Implementation of a specific file system
- Network stack
- Network driver
For example, you will need to build a "file version" and a "network version" of VFS to separate file calls from network calls. In some cases, you will need to include a network stack and file systems in the VFS ("full version" of VFS).
Building a "file version" of VFS
Let's examine a VFS program containing only an implementation of the lwext4 file system without a network stack. To build this executable file, the file containing the main() function must be linked to the vfs_server, vfs_fs and lwext4 libraries:
CMakeLists.txt
project (vfsfs)
include (platform/nk)
# Set compile flags
project_header_default ("STANDARD_GNU_11:YES" "STRICT_WARNINGS:NO")
add_executable (VfsFs "src/vfs.c")
# Linking with VFS libraries
target_link_libraries (VfsFs
${vfs_SERVER_LIB}
${LWEXT4_LIB}
${vfs_FS_LIB})
# Prepare VFS to connect to the ramdisk driver process
set_target_properties (VfsFs PROPERTIES ${blkdev_ENTITY}_REPLACEMENT ${ramdisk_ENTITY})
A block device driver cannot be linked to VFS and therefore must also be run as a separate process.
Interaction between three processes: client, "file version" of VFS, and block device driver.
Building a "network version" of VFS together with a network driver
Let's examine a VFS program containing a network stack with a driver but without implementations of files systems. To build this executable file, the file containing the main() function must be linked to the vfs_server, vfs_implementation and dnet_implementation libraries.
CMakeLists.txt
project (vfsnet)
include (platform/nk)
# Set compile flags
project_header_default ("STANDARD_GNU_11:YES" "STRICT_WARNINGS:NO")
add_executable (VfsNet "src/vfs.c")
# Linking with VFS libraries
target_link_libraries (VfsNet
${vfs_SERVER_LIB}
${vfs_IMPLEMENTATION_LIB}
${dnet_IMPLEMENTATION_LIB})
# Disconnect the block device driver
set_target_properties (VfsNet PROPERTIES ${blkdev_ENTITY}_REPLACEMENT "")
The dnet_implementation library already includes a network driver, therefore it is not necessary to start a separate driver process.
Interaction between the Client process and the process of the "network version" of VFS
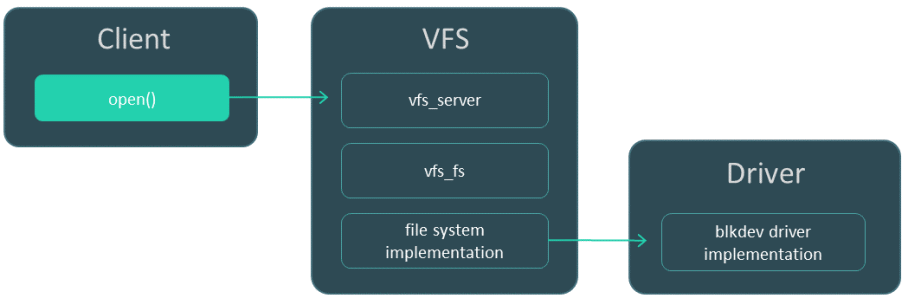
Building a "network version" of VFS with a separate network driver
Another option is to build the "network version" of VFS without a network driver. The network driver will need to be started as a separate process. Interaction with the driver occurs via IPC using the dnet_client library.
In this case, the file containing the main() function must be linked to the vfs_server, vfs_implementation and dnet_client libraries.
CMakeLists.txt
project (vfsnet)
include (platform/nk)
# Set compile flags
project_header_default ("STANDARD_GNU_11:YES" "STRICT_WARNINGS:NO")
add_executable (VfsNet "src/vfs.c")
# Linking with VFS libraries
target_link_libraries (VfsNet
${vfs_SERVER_LIB}
${vfs_IMPLEMENTATION_LIB}
${dnet_CLIENT_LIB})
# Disconnect the block device driver
set_target_properties (VfsNet PROPERTIES ${blkdev_ENTITY}_REPLACEMENT "")
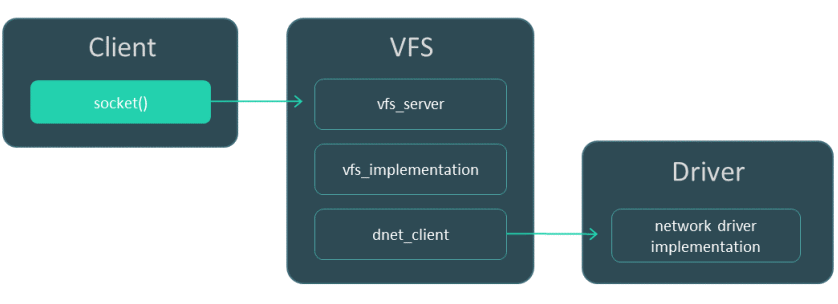
Interaction between three processes: client, "network version" of VFS, and network driver.
Building a "full version" of VFS
If the VFS needs to include a network stack and implementations of file systems, the build should use the vfs_server library, vfs_implementation library, dnet_implementation library (or dnet_client library for a separate network driver), and the libraries for implementing file systems.
Merging a client and VFS into one executable file
Let's examine a Client program using Berkeley sockets. Calls made by the Client must be sent to VFS. The normal path consists of starting a separate VFS process and creating an IPC channel. Alternatively, you can integrate VFS functionality directly into the Client executable file. To do so, when building the Client executable file, you need to link it to the vfs_local library that will receive calls, and link it to the implementation libraries vfs_implementation and dnet_implementation.
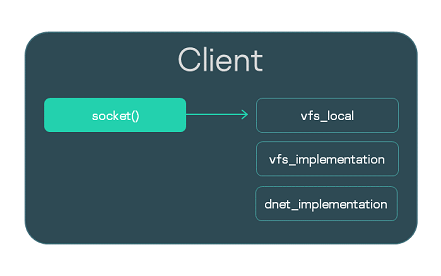
Local linking with VFS is convenient during debugging. In addition, calls for working with the network can be handled much faster due to the exclusion of IPC calls. Nevertheless, insulation of the VFS in a separate process and IPC interaction with it is always recommended as a more secure approach.
Below is a build script for the Client executable file.
CMakeLists.txt
project (client)
include (platform/nk)
# Set compile flags
project_header_default ("STANDARD_GNU_11:YES" "STRICT_WARNINGS:NO")
# Generates the Client.edl.h file
nk_build_edl_files (client_edl_files NK_MODULE "client" EDL "${CMAKE_SOURCE_DIR}/resources/edl/Client.edl")
add_executable (Client "src/client.c")
add_dependencies (Client client_edl_files)
# Linking with VFS libraries
target_link_libraries (Client ${vfs_LOCAL_LIB} ${vfs_IMPLEMENTATION_LIB} ${dnet_IMPLEMENTATION_LIB}
If the Client uses file systems, it must also be linked to the vfs_fs library and to the implementation of the utilized file system in addition to its linking to vfs_local. You also need to add a block device driver to the solution.
Overview: arguments and environment variables of VFS
VFS arguments
-l <entry in fstab format>The
-largument lets you mount the file system.-f <path to fstab file>The
-fargument lets you pass the file containing entries in fstab format for mounting file systems. The ROMFS storage will be searched for the file. If theUMNAP_ROMFSvariable is defined, the file system mounted using theROOTFSvariable will be searched for the file.
Example of using the -l and -f arguments
VFS environment variables
UNMAP_ROMFSIf the
UNMAP_ROMFSvariable is defined, the ROMFS storage will be deleted. This helps conserve memory and change behavior when using the-fargument.ROOTFS = <entry in fstab format>The
ROOTFSvariable lets you mount a file system to the root directory. In combination with theUNMAP_ROMFSvariable and the-fargument, it lets you search for the fstab file in the mounted file system instead of in the ROMFS storage. ROOTFS usage exampleVFS_CLIENT_MAX_THREADSThe
VFS_CLIENT_MAX_THREADSenvironment variable lets you redefine the SDK configuration parameterVFS_CLIENT_MAX_THREADSduring VFS startup.-
_VFS_NETWORK_BACKEND=<backend name>:<name of the IPC channel to VFS>
The _VFS_NETWORK_BACKEND variable defines the backend used for network calls. You can specify the name of a standard backend such as client, server or local, and the name of a custom backend. If the local backend is used, the name of the IPC channel is not specified (_VFS_NETWORK_BACKEND=local:). You can specify two or more IPC channels by separating them with a comma.
_VFS_FILESYSTEM_BACKEND=<backend name>:<name of the IPC channel to VFS>The
_VFS_FILESYSTEM_BACKENDvariable defines the backend used for file calls. The backend name and name of the IPC channel to VFS are defined the same as way as they were for the_VFS_NETWORK_BACKENDvariable.
Default values
For the VfsRamFs executable file:
ROOTFS = ramdisk0,0 / ext4 0
VFS_FILESYSTEM_BACKEND = server:kl.VfsRamFs
For the VfsSdCardFs executable file:
ROOTFS = mmc0,0 / fat32 0
VFS_FILESYSTEM_BACKEND = server:kl.VfsSdCardFs
-l nodev /tmp ramfs 0
-l nodev /var ramfs 0
For the VfsNet executable file:
VFS_NETWORK_BACKEND = server:kl.VfsNet
VFS_FILESYSTEM_BACKEND = server:kl.VfsNet
-l devfs /dev devfs 0
Mounting a file system at startup
When the VFS process starts, only the RAMFS file system is mounted to the root directory by default. If you need to mount other file systems, this can be done not only by using the mount() call after the VFS starts but can also be done immediately when the VFS process starts by passing the necessary arguments and environment variables to it.
Let's examine three examples of mounting file systems at VFS startup. The Env program is used to pass arguments and environment variables to the VFS process.
Mounting with the -l argument
A simple way to mount a file system is to pass the -l <entry in fstab format> argument to the VFS process.
In this example, the devfs and romfs file systems will be mounted when the process named Vfs1 is started.
env.c
int main(int argc, char** argv)
{
const char* Vfs1Args[] = {
"-l", "devfs /dev devfs 0",
"-l", "romfs /etc romfs 0"
};
ENV_REGISTER_ARGS("Vfs1", Vfs1Args);
envServerRun();
return EXIT_SUCCESS;
}
Mounting with fstab from ROMFS
If an fstab file is added when building a solution, the file will be available through the ROMFS storage after startup. It can be used for mounting by passing the -f <path to fstab file> argument to the VFS process.
In this example, the file systems defined via the fstab file that was added during the solution build will be mounted when the process named Vfs2 is started.
env.c
int main(int argc, char** argv)
{
const char* Vfs2Args[] = { "-f", "fstab" };
ENV_REGISTER_ARGS("Vfs2", Vfs2Args);
envServerRun();
return EXIT_SUCCESS;
}
Mounting with an external fstab
Let's assume that the fstab file is located on a drive and not in the ROMFS image of the solution. To use it for mounting, you need to pass the following arguments and environment variables to VFS:
ROOTFS. This variable lets you mount the file system containing the fstab file into the root directory.UNMAP_ROMFS. If this variable is defined, the ROMFS storage is deleted. As a result, the fstab file will be sought in the file system mounted using theROOTFSvariable.-f. This argument is used to define the path to the fstab file.
In the next example, the ext2 file system containing the /etc/fstab file used for mounting additional file systems will be mounted to the root directory when the process named Vfs3 starts. The ROMFS storage will be deleted.
env.c
int main(int argc, char** argv)
{
const char* Vfs3Args[] = { "-f", "/etc/fstab" };
const char* Vfs3Envs[] = {
"ROOTFS=ramdisk0,0 / ext2 0",
"UNMAP_ROMFS=1"
};
ENV_REGISTER_PROGRAM_ENVIRONMENT("Vfs3", Vfs3Args, Vfs3Envs);
envServerRun();
return EXIT_SUCCESS;
}
Using VFS backends to separate file calls and network calls
This example shows a secure development pattern that separates network data streams from file data streams.
Let's examine a Client program using file systems and Berkeley sockets. To handle its calls, we will start not one but two separate VFS processes from the VfsFirst and VfsSecond executable files. We will use environment variables to assign the file backends to work via the channel to VfsFirst and assign the network backends to work via the channel to VfsSecond. We will use the standard backends client and server. This way, we will redirect the file calls of the Client to VfsFirst and redirect the network calls to VfsSecond. To pass the environment variables to processes, we will add the Env program to the solution.
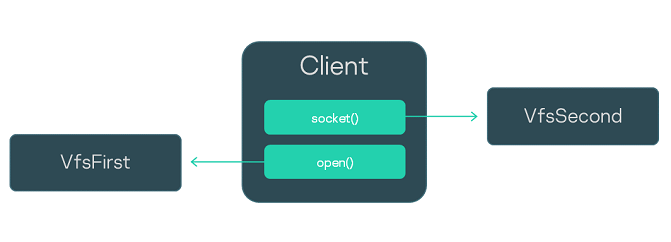
The init description of the solution is provided below. The Client process will be connected to the VfsFirst and VfsSecond processes, and each of the three processes will be connected to the Env process. Please note that the name of the IPC channel to the Env process is defined by using the ENV_SERVICE_NAME variable.
init.yaml
entities:
- name: Env
- name: Client
connections:
- target: Env
id: {var: ENV_SERVICE_NAME, include: env/env.h}
- target: VfsFirst
id: VFS1
- target: VfsSecond
id: VFS2
- name: VfsFirst
connections:
- target: Env
id: {var: ENV_SERVICE_NAME, include: env/env.h}
- name: VfsSecond
connections:
- target: Env
id: {var: ENV_SERVICE_NAME, include: env/env.h}
To send all file calls to VfsFirst, we define the value of the _VFS_FILESYSTEM_BACKEND environment variable as follows:
- For
VfsFirst:_VFS_FILESYSTEM_BACKEND=server:<name of the IPC channel to VfsFirst> - For
Client:_VFS_FILESYSTEM_BACKEND=client:<name of the IPC channel to VfsFirst>
To send network calls to VfsSecond, we use the equivalent _VFS_NETWORK_BACKEND environment variable:
- We define the following for
VfsSecond:_VFS_NETWORK_BACKEND=server:<name of the IPC channel to the VfsSecond> - We define the following for the
Client:_VFS_NETWORK_BACKEND=client: <name of the IPC channel to the VfsSecond>
We define the value of environment variables through the Env program, which is presented below.
env.c
int main(void)
{
const char* vfs_first_envs[] = { "_VFS_FILESYSTEM_BACKEND=server:VFS1" };
ENV_REGISTER_VARS("VfsFirst", vfs_first_envs);
const char* vfs_second_envs[] = { "_VFS_NETWORK_BACKEND=server:VFS2" };
ENV_REGISTER_VARS("VfsSecond", vfs_second_envs);
const char* client_envs[] = { "_VFS_FILESYSTEM_BACKEND=client:VFS1", "_VFS_NETWORK_BACKEND=client:VFS2" };
ENV_REGISTER_VARS("Client", client_envs);
envServerRun();
return EXIT_SUCCESS;
}
Writing a custom VFS backend
This example shows how to change the logic for handling file calls using a special VFS backend.
Let's examine a solution that includes the Client, VfsFirst and VfsSecond processes. Let's assume that the Client process is connected to VfsFirst and VfsSecond using IPC channels.
Our task is to ensure that queries from the Client process to the fat32 file system are handled by the VfsFirst process, and queries to the ext4 file system are handled by the VfsSecond process. To accomplish this task, we can use the VFS backend mechanism and will not even need to change the code of the Client program.
We will write a custom backend named custom_client, which will send calls via the VFS1 or VFS2 channel depending on whether or not the file path begins with /mnt1. To send calls, custom_client will use the standard backends of the client. In other words, it will act as a proxy backend.
We use the -l argument to mount fat32 to the /mnt1 directory for the VfsFirst process and mount ext4 to /mnt2 for the VfsSecond process. (It is assumed that VfsFirst contains a fat32 implementation and VfsSecond contains an ext4 implementation.) We use the _VFS_FILESYSTEM_BACKEND environment variable to define the backends (custom_client and server) and IPC channels (VFS1 and VFS2) to be used by the processes.
Then we use the init description to define the names of the IPC channels: VFS1 and VFS2.
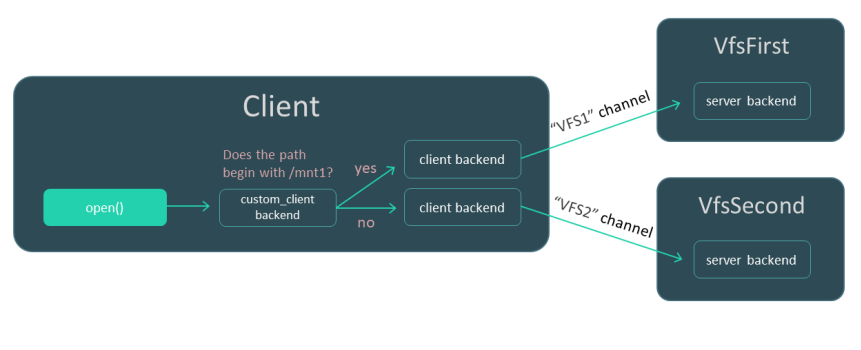
This is examined in more detail below:
- Code of the
custom_clientbackend. - Linking of the
Clientprogram and thecustom_clientbackend. Envprogram code.- Init description.
Writing a custom_client backend
This file contains an implementation of the proxy custom backend that relays calls to one of the two standard client backends. The backend selection logic depends on the utilized path or on the file handle and is managed by additional data structures.
backend.c
/* Code for managing file handles. */
struct entry
{
Handle handle;
bool is_vfat;
};
struct fd_array
{
struct entry entries[MAX_FDS];
int pos;
pthread_rwlock_t lock;
};
struct fd_array fds = { .pos = 0, .lock = PTHREAD_RWLOCK_INITIALIZER };
int insert_entry(Handle fd, bool is_vfat)
{
pthread_rwlock_wrlock(&fds.lock);
if (fds.pos == MAX_FDS)
{
pthread_rwlock_unlock(&fds.lock);
return -1;
}
fds.entries[fds.pos].handle = fd;
fds.entries[fds.pos].is_vfat = is_vfat;
fds.pos++;
pthread_rwlock_unlock(&fds.lock);
return 0;
}
struct entry *find_entry(Handle fd)
{
pthread_rwlock_rdlock(&fds.lock);
for (int i = 0; i < fds.pos; i++)
{
if (fds.entries[i].handle == fd)
{
pthread_rwlock_unlock(&fds.lock);
return &fds.entries[i];
}
}
pthread_rwlock_unlock(&fds.lock);
return NULL;
}
/* Custom backend structure. */
struct context
{
struct vfs wrapper;
pthread_rwlock_t lock;
struct vfs *vfs_vfat;
struct vfs *vfs_ext4;
};
struct context ctx =
{
.wrapper =
{
.dtor = _vfs_backend_dtor,
.disconnect_all_clients = _disconnect_all_clients,
.getstdin = _getstdin,
.getstdout = _getstdout,
.getstderr = _getstderr,
.open = _open,
.read = _read,
.write = _write,
.close = _close,
}
};
/* Implementation of custom backend methods. */
static bool is_vfs_vfat_path(const char *path)
{
char vfat_path[5] = "/mnt1";
if (memcmp(vfat_path, path, sizeof(vfat_path)) != 0)
return false;
return true;
}
static void _vfs_backend_dtor(struct vfs *vfs)
{
ctx.vfs_vfat->dtor(ctx.vfs_vfat);
ctx.vfs_ext4->dtor(ctx.vfs_ext4);
}
static void _disconnect_all_clients(struct vfs *self, int *error)
{
(void)self;
(void)error;
ctx.vfs_vfat->disconnect_all_clients(ctx.vfs_vfat, error);
ctx.vfs_ext4->disconnect_all_clients(ctx.vfs_ext4, error);
}
static Handle _getstdin(struct vfs *self, int *error)
{
(void)self;
Handle handle = ctx.vfs_vfat->getstdin(ctx.vfs_vfat, error);
if (handle != INVALID_HANDLE)
{
if (insert_entry(handle, true))
{
*error = ENOMEM;
return INVALID_HANDLE;
}
}
return handle;
}
static Handle _getstdout(struct vfs *self, int *error)
{
(void)self;
Handle handle = ctx.vfs_vfat->getstdout(ctx.vfs_vfat, error);
if (handle != INVALID_HANDLE)
{
if (insert_entry(handle, true))
{
*error = ENOMEM;
return INVALID_HANDLE;
}
}
return handle;
}
static Handle _getstderr(struct vfs *self, int *error)
{
(void)self;
Handle handle = ctx.vfs_vfat->getstderr(ctx.vfs_vfat, error);
if (handle != INVALID_HANDLE)
{
if (insert_entry(handle, true))
{
*error = ENOMEM;
return INVALID_HANDLE;
}
}
return handle;
}
static Handle _open(struct vfs *self, const char *path, int oflag, mode_t mode, int *error)
{
(void)self;
Handle handle;
bool is_vfat = false;
if (is_vfs_vfat_path(path))
{
handle = ctx.vfs_vfat->open(ctx.vfs_vfat, path, oflag, mode, error);
is_vfat = true;
}
else
handle = ctx.vfs_ext4->open(ctx.vfs_ext4, path, oflag, mode, error);
if (handle == INVALID_HANDLE)
return INVALID_HANDLE;
if (insert_entry(handle, is_vfat))
{
if (is_vfat)
ctx.vfs_vfat->close(ctx.vfs_vfat, handle, error);
*error = ENOMEM;
return INVALID_HANDLE;
}
return handle;
}
static ssize_t _read(struct vfs *self, Handle fd, void *buf, size_t count, bool *nodata, int *error)
{
(void)self;
struct entry *found_entry = find_entry(fd);
if (found_entry != NULL && found_entry->is_vfat)
return ctx.vfs_vfat->read(ctx.vfs_vfat, fd, buf, count, nodata, error);
return ctx.vfs_ext4->read(ctx.vfs_ext4, fd, buf, count, nodata, error);
}
static ssize_t _write(struct vfs *self, Handle fd, const void *buf, size_t count, int *error)
{
(void)self;
struct entry *found_entry = find_entry(fd);
if (found_entry != NULL && found_entry->is_vfat)
return ctx.vfs_vfat->write(ctx.vfs_vfat, fd, buf, count, error);
return ctx.vfs_ext4->write(ctx.vfs_ext4, fd, buf, count, error);
}
static int _close(struct vfs *self, Handle fd, int *error)
{
(void)self;
struct entry *found_entry = find_entry(fd);
if (found_entry != NULL && found_entry->is_vfat)
return ctx.vfs_vfat->close(ctx.vfs_vfat, fd, error);
return ctx.vfs_ext4->close(ctx.vfs_ext4, fd, error);
}
/* Custom backend builder. ctx.vfs_vfat and ctx.vfs_ext4 are initialized
* as standard backends named "client". */
static struct vfs *_vfs_backend_create(Handle client_id, const char *config, int *error)
{
(void)config;
ctx.vfs_vfat = _vfs_init("client", client_id, "VFS1", error);
assert(ctx.vfs_vfat != NULL && "Can't initialize client backend!");
assert(ctx.vfs_vfat->dtor != NULL && "VFS FS backend has not set the destructor!");
ctx.vfs_ext4 = _vfs_init("client", client_id, "VFS2", error);
assert(ctx.vfs_ext4 != NULL && "Can't initialize client backend!");
assert(ctx.vfs_ext4->dtor != NULL && "VFS FS backend has not set the destructor!");
return &ctx.wrapper;
}
/* Registration of the custom backend under the name custom_client. */
static void _vfs_backend(create_vfs_backend_t *ctor, const char **name)
{
*ctor = &_vfs_backend_create;
*name = "custom_client";
}
REGISTER_VFS_BACKEND(_vfs_backend)
Linking of the Client program and the custom_client backend
Compile the written backend into a library:
CMakeLists.txt
add_library (backend_client STATIC "src/backend.c")
Link the prepared backend_client library to the Client program:
CMakeLists.txt (fragment)
add_dependencies (Client vfs_backend_client backend_client)
target_link_libraries (Client
pthread
${vfs_CLIENT_LIB}
"-Wl,--whole-archive" backend_client "-Wl,--no-whole-archive" backend_client
)
Writing the Env program
We use the Env program to pass arguments and environment variables to processes.
env.c
int main(int argc, char** argv)
{
/* Mount fat32 to /mnt1 for the VfsFirst process and mount ext4 to /mnt2 for the VfsSecond process. */
const char* VfsFirstArgs[] = {
"-l", "ahci0 /mnt1 fat32 0"
};
ENV_REGISTER_ARGS("VfsFirst", VfsFirstArgs);
const char* VfsSecondArgs[] = {
"-l", "ahci1 /mnt2 ext4 0"
};
ENV_REGISTER_ARGS("VfsSecond", VfsSecondArgs);
/* Define the file backends. */
const char* vfs_first_args[] = { "_VFS_FILESYSTEM_BACKEND=server:VFS1" };
ENV_REGISTER_VARS("VfsFirst", vfs_first_args);
const char* vfs_second_args[] = { "_VFS_FILESYSTEM_BACKEND=server:VFS2" };
ENV_REGISTER_VARS("VfsSecond", vfs_second_args);
const char* client_fs_envs[] = { "_VFS_FILESYSTEM_BACKEND=custom_client:VFS1,VFS2" };
ENV_REGISTER_VARS("Client", client_fs_envs);
envServerRun();
return EXIT_SUCCESS;
}
Editing init.yaml
For the IPC channels that connect the Client process to the VfsFirst and VfsSecond processes, you must define the same names that you specified in the _VFS_FILESYSTEM_BACKEND environment variable: VFS1 and VFS2.
init.yaml
entities:
- name: vfs_backend.Env
- name: vfs_backend.Client
connections:
- target: vfs_backend.Env
id: {var: ENV_SERVICE_NAME, include: env/env.h}
- target: vfs_backend.VfsFirst
id: VFS1
- target: vfs_backend.VfsSecond
id: VFS2
- name: vfs_backend.VfsFirst
connections:
- target: vfs_backend.Env
id: {var: ENV_SERVICE_NAME, include: env/env.h}
- name: vfs_backend.VfsSecond
connections:
- target: vfs_backend.Env
id: {var: ENV_SERVICE_NAME, include: env/env.h}
Overview: creating IPC channels
There are two methods for creating IPC channels: static and dynamic.
Static creation of IPC channels is simpler to implement because you can use the init description for this purpose.
Dynamic creation of IPC channels lets you change the topology of interaction between processes on the fly. This is necessary if it is unknown which specific server contains the endpoint required by the client. For example, you may not know which specific drive you will need to write data to.
Statically creating an IPC channel
The static method has the following distinguishing characteristics:
- The client and server are in the stopped state when the IPC channel is created.
- Creation of this channel is initiated by the parent process that starts the client and server (this is normally Einit).
- The created IPC channel cannot be deleted.
- To get the IPC handle and endpoint ID (riid) after the IPC channel is created, the client and server must use the endpoint locator interface (
coresrv/sl/sl_api.h).
Dynamically creating an IPC channel
The dynamic method has the following distinguishing characteristics:
- The client and server are already running at the time of creating the IPC channel.
- Creation of the channel is initiated jointly by the client and server.
- The created IPC channel can be deleted.
- The client and server get the IPC handle and endpoint ID (riid) immediately after the IPC channel is successfully created.
Creating IPC channels using init.yaml
This section contains init descriptions that demonstrate the specific features of creating IPC channels. Examples of defining properties and arguments of processes via init descriptions are examined in a separate article.
Examples in KasperskyOS Community Edition may utilize a macro-containing init description format (init.yaml.in).
The file containing an init description is usually named init.yaml, but it can have any name.
Connecting and starting a client process and server process
In the next example, two processes will be started: one process of the Client class and one process of the Server class. The names of the processes are not specified, so they will match the names of their respective process classes. The names of the executable files are not specified either, so they will also match the names of their respective classes. The processes will be connected by an IPC channel named server_connection.
init.yaml
entities:
- name: Client
connections:
- target: Server
id: server_connection
- name: Server
Dynamically created IPC channels
A dynamically created IPC channel uses the following functions:
- Name Server interface
- Connection Manager interface
An IPC channel is dynamically created according to the following scenario:
- The following processes are started: client, server, and name server.
- The server connects to the name server by using the
NsCreate()call and publishes the server name, interface name, and endpoint name by using theNsPublishService()call. - The client uses the
NsCreate()call to connect to the name server and then uses theNsEnumServices()call to search for the server name and endpoint name based on the interface name. - The client uses the
KnCmConnect()call to request access to the endpoint and passes the found server name and endpoint name as arguments. - The server calls the
KnCmListen()function to check for requests to access the endpoint. - The server accepts the client request to access the endpoint by using the
KnCmAccept()call and passes the client name and endpoint name received from theKnCmListen()call as arguments.
Steps 2 and 3 can be skipped if the client already knows the server name and endpoint name in advance.
The server can use the NsUnPublishService() call to unpublish endpoints that were previously published on the name server.
The server can use the KnCmDrop() call to reject requests to access endpoints.
To use a name server, the solution security policy must allow interaction between a process of the kl.core.NameServer class and processes between which IPC channels must be dynamically created.
Adding an endpoint to a solution
To ensure that a Client program can use some specific functionality via the IPC mechanism, the following is required:
- In KasperskyOS Community Edition, find the executable file (we'll call it
Server) that implements the necessary functionality. (The term "functionality" used here refers to one or more endpoints that have their own IPC interfaces) - Inhclude the CMake package containing the
Serverfile and its client library. - Add the
Serverexecutable file to the solution image. - Edit the init description so that when the solution starts, the
Einitprogram starts a new server process from theServerexecutable file and connects it, using an IPC channel, to the process started from theClientfile.You must indicate the correct name of the IPC channel so that the transport libraries can identify this channel and find its IPC handles. The correct name of the IPC channel normally matches the name of the server process class. VFS is an exception in this case.
- Edit the PSL description to allow startup of the server process and IPC interaction between the client and the server.
- In the source code of the
Clientprogram, include the server methods header file. - Link the
Clientprogram with the client library.
Example of adding a GPIO driver to a solution
KasperskyOS Community Edition includes a gpio_hw file that implements GPIO driver functionality.
The following commands connect the gpio CMake package:
.\CMakeLists.txt
...
find_package (gpio REQUIRED COMPONENTS CLIENT_LIB ENTITY)
include_directories (${gpio_INCLUDE})
...
The gpio_hw executable file is added to a solution image by using the gpio_HW_ENTITY variable, whose name can be found in the configuration file of the package at /opt/KasperskyOS-Community-Edition-<version>/sysroot-aarch64-kos/lib/cmake/gpio/gpio-config.cmake:
einit\CMakeLists.txt
...
set (ENTITIES Client ${gpio_HW_ENTITY})
...
The following strings need to be added to the init description:
init.yaml.in
...
- name: client.Client
connections:
- target: kl.drivers.GPIO
id: kl.drivers.GPIO
- name: kl.drivers.GPIO
path: gpio_hw
The following strings need to be added to the PSL description:
security.psl.in
...
execute src=Einit, dst=kl.drivers.GPIO
{
grant()
}
request src=client.Client, dst=kl.drivers.GPIO
{
grant()
}
response src=kl.drivers.GPIO, dst=client.Client
{
grant()
}
...
In the code of the Client program, you need to include the header file in which the GPIO driver methods are declared:
client.c
...
...
Finally, you need to link the Client program with the GPIO client library:
client\CMakeLists.txt
...
target_link_libraries (Client ${gpio_CLIENT_LIB})
...
To ensure correct operation of the GPIO driver, you may need to add the BSP component to the solution. To avoid overcomplicating this example, BSP is not examined here. For more details, see the gpio_output example: /opt/KasperskyOS-Community-Edition-<version>/examples/gpio_output
Overview: IPC message structure
In KasperskyOS, all interactions between processes have statically defined types. The permissible structures of an IPC message are defined by the description of the interfaces of the process that receives the message (server).
A correct IPC message (request and response) contains a constant part and an arena.
Constant part of a message
The constant part of a message contains arguments of a fixed size, and the RIID and MID.
Fixed-size arguments can be arguments of any IDL types except the sequence type.
The RIID and MID identify the interface and method being called:
- The RIID (Runtime Implementation ID) is the number of the process endpoint being called, starting at zero.
- The MID (Method ID) is the number of the method within the interface that contains it, starting at zero.
The type of the constant part of the message is generated by the NK compiler based on the IDL description of the interface. A separate structure is generated for each interface method. Union types are also generated for storing any request to a process, component or interface. For more details, refer to Example generation of transport methods and types.
Arena
The arena is a buffer for storing variable-size arguments (sequence IDL type).
Message structure verification by the security module
Prior to calling message-related rules, the Kaspersky Security Module verifies that the sent message is correct. Requests and responses are both validated. If the message has an incorrect structure, it will be rejected without calling the security model methods associated with it.
Forming a message structure
KasperskyOS Community Edition includes the following tools that make it easier for the developer to create and package an IPC message:
- The
transport-koslibrary for working with NkKosTransport. - The NK compiler that lets you generate special methods and types.
Simple IPC message generation is demonstrated in the echo and ping examples (/opt/KasperskyOS-Community-Edition-<version>/examples/).
Finding an IPC handle
The client and server IPC handles must be found if there are no ready-to-use transport libraries for the utilized endpoint (for example, if you wrote your own endpoint). To independently work with IPC transport, you need to first initialize it by using the NkKosTransport_Init() method and pass the IPC handle of the utilized channel as the second argument.
For more details, see the echo and ping examples (/opt/KasperskyOS-Community-Edition-<version>/examples/)
You do not need to find an IPC handle to utilize services that are implemented in executable files provided in KasperskyOS Community Edition. The provided transport libraries are used to perform all transport operations, including finding IPC handles.
See the gpio_*, net_*, net2_* and multi_vfs_* examples (/opt/KasperskyOS-Community-Edition-<version>/examples/).
Finding an IPC handle when statically creating a channel
When statically creating an IPC channel, both the client and server can find out their IPC handles immediately after startup by using the ServiceLocatorRegister() and ServiceLocatorConnect() methods and specifying the name of the created IPC channel.
For example, if the IPC channel is named server_connection, the following must be called on the client side:
…
Handle handle = ServiceLocatorConnect("server_connection");
The following must be called on the server side:
…
nk_iid_t iid;
Handle handle = ServiceLocatorRegister("server_connection", NULL, 0, &iid);
For more details, see the echo and ping examples (/opt/KasperskyOS-Community-Edition-<version>/examples/), and the header file /opt/KasperskyOS-Community-Edition-<version>/sysroot-aarch64-kos/include/coresrv/sl/sl_api.h.
Finding an IPC handle when dynamically creating a channel
Both the client and server receive their own IPC handles immediately after dynamic creation of an IPC channel is successful.
The client IPC handle is one of the output (out) arguments of the KnCmConnect() method. The server IPC handle is an output argument of the KnCmAccept() method. For more details, see the header file /opt/KasperskyOS-Community-Edition-<version>/sysroot-aarch64-kos/include/coresrv/cm/cm_api.h.
Finding an endpoint ID (riid)
The endpoint ID (riid) must be found on the client side if there are no ready-to-use transport libraries for the utilized endpoint (for example, if you wrote your own endpoint). To call methods of the server, you must first call the proxy object initialization method on the client side and pass the endpoint ID as the third argument. For example, for the Filesystem interface:
Filesystem_proxy_init(&proxy, &transport.base, riid);
For more details, see the echo and ping examples (/opt/KasperskyOS-Community-Edition-<version>/examples/)
You do not need to find the endpoint ID to utilize services that are implemented in executable files provided in KasperskyOS Community Edition. The provided transport libraries are used to perform all transport operations.
See the gpio_*, net_*, net2_* and multi_vfs_* examples (/opt/KasperskyOS-Community-Edition-<version>/examples/).
Finding a service ID when statically creating a channel
When statically creating an IPC channel, the client can find out the ID of the necessary endpoint by using the ServiceLocatorGetRiid() method and specifying the IPC channel handle and the fully qualified name of the endpoint. For example, if the OpsComp component instance contains the FS endpoint, the following must be called on the client side:
…
nk_iid_t riid = ServiceLocatorGetRiid(handle, "OpsComp.FS");
For more details, see the echo and ping examples (/opt/KasperskyOS-Community-Edition-<version>/examples/), and the header file /opt/KasperskyOS-Community-Edition-<version>/sysroot-aarch64-kos/include/coresrv/sl/sl_api.h.
Finding a service ID when dynamically creating a channel
The client receives the endpoint ID immediately after dynamic creation of an IPC channel is successful. The client IPC handle is one of the output (out) arguments of the KnCmConnect() method. For more details, see the header file /opt/KasperskyOS-Community-Edition-<version>/sysroot-aarch64-kos/include/coresrv/cm/cm_api.h.
Example generation of transport methods and types
When building a solution, the NK compiler uses the EDL, CDL and IDL descriptions to generate a set of special methods and types that simplify the creation, forwarding, receipt and processing of IPC messages.
As an example, we will examine the Server process class that provides the FS endpoint, which contains a single Open() method:
Server.edl
entity Server
/* OpsComp is the named instance of the Operations component */
components {
OpsComp: Operations
}
Operations.cdl
component Operations
/* FS is the local name of the endpoint implementing the Filesystem interface */
endpoints {
FS: Filesystem
}
Filesystem.idl
package Filesystem
interface {
Open(in string<256> name, out UInt32 h);
}
These descriptions will be used to generate the files named Server.edl.h, Operations.cdl.h, and Filesystem.idl.h, which contain the following methods and types:
Methods and types that are common to the client and server
- Abstract interfaces containing the pointers to the implementations of the methods included in them.
In our example, one abstract interface (
Filesystem) will be generated:typedef struct Filesystem {
const struct Filesystem_ops *ops;
} Filesystem;
typedef nk_err_t
Filesystem_Open_fn(struct Filesystem *, const
struct Filesystem_Open_req *,
const struct nk_arena *,
struct Filesystem_Open_res *,
struct nk_arena *);
typedef struct Filesystem_ops {
Filesystem_Open_fn *Open;
} Filesystem_ops;
- Set of interface methods.
When calling an interface method, the corresponding values of the RIID and MID are automatically inserted into the request.
In our example, a single
Filesystem_Openinterface method will be generated:nk_err_t Filesystem_Open(struct Filesystem *self,
struct Filesystem_Open_req *req,
const
struct nk_arena *req_arena,
struct Filesystem_Open_res *res,
struct nk_arena *res_arena)
Methods and types used only on the client
- Types of proxy objects.
A proxy object is used as an argument in an interface method. In our example, a single
Filesystem_proxyproxy object type will be generated:typedef struct Filesystem_proxy {
struct Filesystem base;
struct nk_transport *transport;
nk_iid_t iid;
} Filesystem_proxy;
- Functions for initializing proxy objects.
In our example, the single initializing function
Filesystem_proxy_initwill be generated:void Filesystem_proxy_init(struct Filesystem_proxy *self,
struct nk_transport *transport,
nk_iid_t iid)
- Types that define the structure of the constant part of a message for each specific method.
In our example, two such types will be generated:
Filesystem_Open_req(for a request) andFilesystem_Open_res(for a response).typedef struct __nk_packed Filesystem_Open_req {
__nk_alignas(8)
struct nk_message base_;
__nk_alignas(4) nk_ptr_t name;
} Filesystem_Open_req;
typedef struct Filesystem_Open_res {
union {
struct {
__nk_alignas(8)
struct nk_message base_;
__nk_alignas(4) nk_uint32_t h;
};
struct {
__nk_alignas(8)
struct nk_message base_;
__nk_alignas(4) nk_uint32_t h;
} res_;
struct Filesystem_Open_err err_;
};
} Filesystem_Open_res;
Methods and types used only on the server
- Type containing all endpoints of a component, and the initializing function. (For each server component.)
If there are embedded components, this type also contains their instances, and the initializing function takes their corresponding initialized structures. Therefore, if embedded components are present, their initialization must begin with the most deeply embedded component.
In our example, the
Operations_componentstructure andOperations_component_initfunction will be generated:typedef struct Operations_component {
struct Filesystem *FS;
};
void Operations_component_init(struct Operations_component *self,
struct Filesystem *FS)
- Type containing all endpoints provided directly by the server; all instances of components included in the server; and the initializing function.
In our example, the
Server_entitystructure andServer_entity_initfunction will be generated:typedef struct Server_component {
struct : Operations_component *OpsComp;
} Server_component;
void Server_entity_init(struct Server_entity *self,
struct Operations_component *OpsComp)
- Types that define the structure of the constant part of a message for any method of a specific interface.
In our example, two such types will be generated:
Filesystem_req(for a request) andFilesystem_res(for a response).typedef union Filesystem_req {
struct nk_message base_;
struct Filesystem_Open_req Open;
};
typedef union Filesystem_res {
struct nk_message base_;
struct Filesystem_Open_res Open;
};
- Types that define the structure of the constant part of a message for any method of any endpoint of a specific component.
If embedded components are present, these types also contain structures of the constant part of a message for any method of any endpoint included in all embedded components.
In our example, two such types will be generated:
Operations_component_req(for a request) andOperations_component_res(for a response).typedef union Operations_component_req {
struct nk_message base_;
Filesystem_req FS;
} Operations_component_req;
typedef union Operations_component_res {
struct nk_message base_;
Filesystem_res FS;
} Operations_component_res;
- Types that define the structure of the constant part of a message for any method of any endpoint of a specific component whose instance is included in the server.
If embedded components are present, these types also contain structures of the constant part of a message for any method of any endpoint included in all embedded components.
In our example, two such types will be generated:
Server_entity_req(for a request) andServer_entity_res(for a response).typedef union Server_component_req {
struct nk_message base_;
Filesystem_req OpsComp_FS;
} Server_component_req;
typedef union Server_component_res {
struct nk_message base_;
Filesystem_res OpsComp_FS;
} Server_component_res;
- Dispatch methods (dispatchers) for a separate interface, component, or process class.
Dispatchers analyze the received query (the RIID and MID values), call the implementation of the corresponding method, and then save the response in the buffer. In our example, three dispatchers will be generated:
Filesystem_interface_dispatch,Operations_component_dispatch, andServer_entity_dispatch.The process class dispatcher handles the request and calls the methods implemented by this class. If the request contains an incorrect RIID (for example, an RIID for a different endpoint that this process class does not have) or an incorrect MID, the dispatcher returns
NK_EOKorNK_ENOENT.nk_err_t Server_entity_dispatch(struct Server_entity *self,
const
struct nk_message *req,
const
struct nk_arena *req_arena,
struct nk_message *res,
struct nk_arena *res_arena)
In special cases, you can use dispatchers of the interface and the component. They take an additional argument: interface implementation ID (
nk_iid_t). The request will be handled only if the passed argument and RIID from the request match, and if the MID is correct. Otherwise, the dispatchers returnNK_EOKorNK_ENOENT.nk_err_t Operations_component_dispatch(struct Operations_component *self,
nk_iid_t iidOffset,
const
struct nk_message *req,
const
struct nk_arena *req_arena,
struct nk_message *res,
struct nk_arena *res_arena)
nk_err_t Filesystem_interface_dispatch(struct Filesystem *impl,
nk_iid_t iid,
const
struct nk_message *req,
const
struct nk_arena *req_arena,
struct nk_message *res,
struct nk_arena *res_arena)
Overview of the libkos library
The KasperskyOS kernel has a number of endpoints for managing handles, threads, memory, processes, IPC channels, I/O resources, and others. The libkos library is used for accessing endpoints.
libkos library
The libkos library consists of two parts:
- The first part provides the C interface for accessing KasperskyOS core endpoints. It is available through the header files in the
coresrvdirectory. - The second part of the
libkoslibrary provides abstractions of synchronization primitives, objects, and queues. It also contains wrapper functions for simpler memory allocation and thread management. Header files of the second part oflibkosare in thekosdirectory.
The libkos library significantly simplifies the use of core endpoints. The libkos library functions ensure correct packaging of an IPC message and execution of system calls. Other libraries (including libc) interact with the kernel through the libkos library.
To use a KasperskyOS core endpoint, you need to include the libkos library header file corresponding to this endpoint. For example, to access methods of the IO Manager, you need to include the io_api.h file:
Files used by the libkos library
An intrinsic implementation of the libkos library can use the following files exported by the kernel:
- Files in the IDL language (IDL descriptions). They contain descriptions of the interfaces of endpoints. They are used by IPC transport for correct packaging of messages.
- Header files of the kernel. These files are included in the
libkoslibrary.
Example
The I/O Manager is provided for the user in the following files:
coresrv/io/io_api.his a header file of thelibkoslibrary.services/io/IO.idlis the IDL description of the I/O manager.io/io_dma.handio/io_irq.hare header files of the kernel.
Memory states
Each page of virtual memory can be free, reserved, or committed.
The transition from a free state to a reserved state is called allocation. Pre-reserving memory (without committing physical pages) enables an application to mark its address space in advance. The transition from a reserved state back to a free state is referred to as freeing memory.
The assignment of physical memory for a previously reserved page of virtual memory is referred to as committing memory, and the inverse transition from the committed state to the reserved state is called returning memory.
Transitions between memory page states
Page top
KnVmAllocate()
This function is declared in the coresrv/vmm/vmm_api.h file.
void *KnVmAllocate(void *addr, rtl_size_t size, int flags);
Reserves a range of physical pages defined by the addr and size parameters. If the VMM_FLAG_COMMIT flag is indicated, the function reserves and commits pages for one call.
Parameters:
addris the page-aligned base physical address; ifaddris set equal to 0, the system chooses a free area of physical memory.sizeis the size of the memory area in bytes (must be a multiple of the page size).flagsrefers to allocation flags.
Returns the base virtual address of the reserved area. If it is not possible to reserve a memory area, the function returns RTL_NULL.
Allocation flags
In the flags parameter, you can use the following flags (vmm/flags.h):
- VMM_FLAG_RESERVE is a required flag.
- VMM_FLAG_COMMIT lets you reserve and commit memory pages to one
KnVmAllocate()call in so-called "lazy" mode. - VMM_FLAG_LOCKED is used together with VMM_FLAG_COMMIT and lets you immediately commit physical memory pages instead of "lazy" commitment.
- VMM_FLAG_WRITE_BACK, VMM_FLAG_WRITE_THROUGH, VMM_FLAG_WRITE_COMBINE, VMM_FLAG_CACHE_DISABLE and VMM_FLAG_CACHE_MASK manage caching of memory pages.
- VMM_FLAG_READ, VMM_FLAG_WRITE, VMM_FLAG_EXECUTE and VMM_FLAG_RWX_MASK are memory protection attributes.
- VMM_FLAG_LOW_GUARD and VMM_FLAG_HIGH_GUARD add a protective page before and after the allocated memory, respectively.
- VMM_FLAG_GROW_DOWN defines the direction of memory access (from older addresses to newer addresses).
Permissible combinations of memory protection attributes:
- VMM_FLAG_READ allows reading page contents.
- VMM_FLAG_READ | VMM_FLAG_WRITE allows reading and modifying page contents.
- VMM_FLAG_READ | VMM_FLAG_EXECUTE allows reading and executing page contents.
- VMM_FLAG_RWX_MASK or VMM_FLAG_READ | VMM_FLAG_WRITE | VMM_FLAG_EXECUTE refers to full access to page contents (these entries are equivalent).
Example
coredump->base = KnVmAllocate(RTL_NULL, vmaSize,
VMM_FLAG_READ | VMM_FLAG_RESERVE |
VMM_FLAG_WRITE | VMM_FLAG_COMMIT |
VMM_FLAG_LOCKED).
The KnVmProtect() function can be used to modify the defined memory area protection attributes if necessary.
KnVmCommit()
This function is declared in the coresrv/vmm/vmm_api.h file.
Retcode KnVmCommit(void *addr, rtl_size_t size, int flags);
Commits a range of physical pages defined by the "addr" and "size" parameters.
All committed pages must be reserved in advance.
Parameters:
addris the page-aligned base virtual address of the memory area.sizeis the size of the memory area in bytes (must be a multiple of the page size).flagsis an unused parameter (indicate the VMM_FLAG_LOCKED flag in this parameter value to ensure compatibility).
If pages are successfully committed, the function returns rcOk.
Page top
KnVmDecommit()
This function is declared in the coresrv/vmm/vmm_api.h file.
Retcode KnVmDecommit(void *addr, rtl_size_t size);
Frees a range of pages (switches them to the reserved state).
Parameters:
addris the page-aligned base virtual address of the memory area.sizeis the size of the memory area in bytes (must be a multiple of the page size).
If pages are successfully freed, the function returns rcOk.
Page top
KnVmProtect()
This function is declared in the coresrv/vmm/vmm_api.h file.
Retcode KnVmProtect(void *addr, rtl_size_t size, int newFlags);
Modifies the protection attributes of reserved or committed memory pages.
Parameters:
addris the page-aligned base virtual address of the memory area.sizeis the size of the memory area in bytes (must be a multiple of the page size).newFlagsrefers to new protection attributes.
If the protection attributes are successfully changed, the function returns rcOk.
Permissible combinations of memory protection attributes:
- VMM_FLAG_READ allows reading page contents.
- VMM_FLAG_READ | VMM_FLAG_WRITE allows reading and modifying page contents.
- VMM_FLAG_READ | VMM_FLAG_EXECUTE allows reading and executing page contents.
- VMM_FLAG_RWX_MASK or VMM_FLAG_READ | VMM_FLAG_WRITE | VMM_FLAG_EXECUTE refers to full access to page contents (these entries are equivalent).
KnVmUnmap()
This function is declared in the coresrv/vmm/vmm_api.h file.
Retcode KnVmUnmap(void *addr, rtl_size_t size);
Frees the memory area.
Parameters:
addrrefers to the page-aligned address of the memory area.sizerefers to the memory area size.
If pages are successfully freed, the function returns rcOk.
Page top
KosMemAlloc()
This function is declared in the kos/alloc.h file.
void *KosMemAlloc(rtl_size_t size);
This function allocates (reserves and commits) a memory area equal to the specific size of bytes.
This function returns a pointer to the allocated area or RTL_NULL if memory could not be allocated.
Memory allocated by using the KosMemAlloc() function has the following allocation flags: VMM_FLAG_READ | VMM_FLAG_WRITE, VMM_FLAG_RESERVE, VMM_FLAG_COMMIT, VMM_FLAG_LOCKED. To allocate memory with other allocation flags, use the KnVmAllocate() function.
KosMemAllocEx()
This function is declared in the kos/alloc.h file.
void *KosMemAllocEx(rtl_size_t size, rtl_size_t align, int zeroed);
This function is analogous to KosMemAlloc(), but it also has additional parameters:
alignrefers to the alignment of the memory area in bytes (power of two).zeroeddetermines whether or not the memory area needs to be filled with zeros (1 means fill, 0 means do not fill).
KosMemFree()
This function is declared in the kos/alloc.h file.
void KosMemFree(void *ptr);
This function frees a memory area that was allocated using the KosMemAlloc(), KosMemZalloc() or KosMemAllocEx() function.
ptris the pointer to the freed memory area.
KosMemGetSize()
This function is declared in the kos/alloc.h file.
rtl_size_t KosMemGetSize(void *ptr);
This function returns the size (in bytes) of the memory area allocated using the KosMemAlloc(), KosMemZalloc() or KosMemAllocEx() function.
ptris the pointer to the memory area.
KosMemZalloc()
This function is declared in the kos/alloc.h file.
void *KosMemZalloc(rtl_size_t size);
This function is analogous to KosMemAlloc(), but it also fills the allocated memory area with zeros.
KosThreadCallback()
The callback function prototype is declared in the kos/thread.h file.
typedef void KosThreadCallback(KosThreadCallbackReason reason);
/* Callback function argument */
typedef enum KosThreadCallbackReason {
KosThreadCallbackReasonCreate,
KosThreadCallbackReasonDestroy,
} KosThreadCallbackReason;
When a new thread is created, all registered callback functions will be called with the KosThreadCallbackReasonCreate argument. When the thread is terminated, they will be called with the KosThreadCallbackReasonDestroy argument.
KosThreadCallbackRegister()
This function is declared in the kos/thread.h file.
Retcode KosThreadCallbackRegister(KosThreadCallback *callback);
This function registers a custom callback function. When a thread is created and terminated, all registered callback functions will be called.
Page top
KosThreadCallbackUnregister()
This function is declared in the kos/thread.h file.
Retcode KosThreadCallbackUnregister(KosThreadCallback *callback);
This function deregisters the custom callback function (removes it from the list of called functions).
Page top
KosThreadCreate()
This function is declared in the kos/thread.h file.
Retcode KosThreadCreate(Tid *tid,
rtl_uint32_t priority,
rtl_uint32_t stackSize,
ThreadRoutine routine,
void *context,
int suspended);
This function creates a new thread.
Input parameters:
prioritymust be within the interval from 0 to 31; the following priority constants are available:ThreadPriorityLowest(0),ThreadPriorityNormal(15) andThreadPriorityHighest(31).stackSizeis the size of the stack.routineis the function that will be executed in the thread.contextis the argument that will be passed to theroutinefunction.suspendedlets you create a thread in the suspended state (1 means create suspended, 0 means create not suspended).
Output parameters:
tidis the ID of the created thread.
Example
int main(int argc, char **argv)
{
Tid tidB;
Tid tidC;
Retcode rcB;
Retcode rcC;
static ThreadContext threadContext[] = {
{.ddi = "B", .deviceName = "/pci/bus0/dev2/fun0/DDI_B"},
{.ddi = "C", .deviceName = "/pci/bus0/dev2/fun0/DDI_C"},
};
rcB = KosThreadCreate(&tidB, ThreadPriorityNormal,
ThreadStackSizeDefault,
FbHotplugThread,
&threadContext[0], 0);
if (rcB != rcOk)
ERR("Failed to start thread %s", threadContext[0].ddi);
rcC = KosThreadCreate(&tidC, ThreadPriorityNormal,
ThreadStackSizeDefault,
FbHotplugThread,
&threadContext[1], 0);
if (rcC != rcOk)
ERR("Failed to start thread %s", threadContext[1].ddi);
/* Waiting for the threads to complete */
...
}
KosThreadCurrentId()
This function is declared in the kos/thread.h file.
Tid KosThreadCurrentId(void);
This function requests the TID of the calling thread.
If successful, the function returns the thread ID (TID).
Page top
KosThreadExit()
This function is declared in the kos/thread.h file.
void KosThreadExit(rtl_int32_t exitCode);
This function forcibly terminates the current thread with the exitCode.
KosThreadGetStack()
This function is declared in the kos/thread.h file.
void *KosThreadGetStack(Tid tid, rtl_uint32_t *size);
This function gets the stack of the thread with the specific tid.
Output parameter size contains the stack size.
If successful, the function returns the pointer to the beginning of the stack.
Page top
KosThreadOnce()
This function is declared in the kos/thread.h file.
typedef int KosThreadOnceState;
Retcode KosThreadOnce(KosThreadOnceState *onceControl,
void (* initRoutine) (void));
This function lets you call the defined initRoutine procedure precisely one time, even when it is called from multiple threads.
The onceControl parameter is designed to control the one-time call of the procedure.
If the procedure is successfully called, and if it was called previously, the KosThreadOnce() function returns rcOk.
KosThreadResume()
This function is declared in the kos/thread.h file.
Retcode KosThreadResume(Tid tid);
This function resumes the thread with the identifier tid that was created in the suspended state.
If successful, the function returns rcOk.
Page top
KosThreadSleep()
This function is declared in the kos/thread.h file.
Retcode KosThreadSleep(rtl_uint32_t mdelay);
Suspends execution of the current thread for mdelay (in milliseconds).
If successful, the function returns rcOk.
Page top
KosThreadSuspend()
This function is declared in the kos/thread.h file.
Retcode KosThreadSuspend(Tid tid);
Permanently stops the current thread without finishing it.
The tid parameter must be equal to the identifier of the current thread (a limitation of the current implementation).
If successful, the function returns rcOk.
Page top
KosThreadTerminate()
This function is declared in the kos/thread.h file.
Retcode KosThreadTerminate(Tid tid, rtl_int32_t exitCode);
This function terminates the thread of the calling process. The tid parameter defines the ID of the thread.
If the tid points to the current thread, the exitCode parameter defines the thread exit code.
If successful, the function returns rcOk.
Page top
KosThreadTlsGet()
This function is declared in the kos/thread.h file.
void *KosThreadTlsGet(void);
This function returns the pointer to the local storage of the thread (TLS) or RTL_NULL if there is no TLS.
Page top
KosThreadTlsSet()
This function is declared in the kos/thread.h file.
Retcode KosThreadTlsSet(void *tls);
This function defines the address of the local storage for the thread (TLS).
Input argument tls contains the TLS address.
KosThreadWait()
This function is declared in the kos/thread.h file.
int KosThreadWait(rtl_uint32_t tid, rtl_uint32_t timeout);
This function suspends execution of the current thread until termination of the thread with the identifier tid or until the timeout (in milliseconds).
The KosThreadWait() call with a zero value for timeout is analogous to the KosThreadYield() call .
If successful, the function returns rcOk. In case of timeout, it returns rcTimeout.
Page top
KosThreadYield()
This function is declared in the kos/thread.h file.
void KosThreadYield(void);
Passes execution of the thread that called it to the next thread.
The KosThreadYield() call is analogous to the KosThreadSleep() call with a zero value for mdelay.
KnHandleClose()
This function is declared in the coresrv/handle/handle_api.h file.
Retcode KnHandleClose(Handle handle);
Deletes the handle.
If successful, the function returns rcOk, otherwise it returns an error code.
Deleting a handle does not invalidate its ancestors and descendants (in contrast to revoking a handle, which actually invalidates the descendants of the handle – see KnHandleRevoke() and KnHandleRevokeSubtree()). When a handle is deleted, the integrity of the handle inheritance tree is also preserved. The location of a deleted handle is taken over by its parent, which becomes the immediate ancestor of the descendants of the deleted handle.
KnHandleCreateBadge()
This function is declared in the coresrv/handle/handle_api.h file.
Retcode KnHandleCreateBadge(Notice notice, rtl_uintptr_t eventId,
void *context, Handle *handle);
This function creates a resource transfer context object for the specified resource transfer context and configures a notification receiver named notice for receiving notifications about this object. The notification receiver is configured to receive notifications about events that match the EVENT_OBJECT_DESTROYED and EVENT_BADGE_CLOSED flags of the event mask.
Input parameter eventId defines the ID of a "resource–event mask" entry in the notification receiver.
Output parameter handle contains the handle of the resource transfer context object.
If successful, the function returns rcOk, otherwise it returns an error code.
Page top
KnHandleCreateUserObject()
This function is declared in the coresrv/handle/handle_api.h file.
Retcode KnHandleCreateUserObject(rtl_uint32_t type, rtl_uint32_t rights,
void *context, Handle *handle);
Creates the specified handle of the specified type with the rights permissions mask.
The type parameter can take values ranging from HANDLE_TYPE_USER_FIRST to HANDLE_TYPE_USER_LAST.
The HANDLE_TYPE_USER_FIRST and HANDLE_TYPE_USER_LAST macros are defined in the handle/handletype.h header file.
The context parameter defines the context of the user resource. If successful, the function returns rcOk, otherwise it returns an error code.
Example
Retcode ServerPortInit(ServerPort *serverPort)
{
Retcode rc = rcInvalidArgument;
Notice serverEventNotice;
rc = KnHandleCreateUserObject(HANDLE_TYPE_USER_FIRST, OCAP_HANDLE_SET_EVENT | OCAP_HANDLE_GET_EVENT,
serverPort, &serverPort->handle);
if (rc == rcOk) {
KosRefObject(serverPort);
rc = KnNoticeSubscribeToObject(serverEventNotice,
serverPort->handle,
EVENT_OBJECT_DESTROYED,
(rtl_uintptr_t) serverPort);
if (rc != rcOk) {
KosPutObject(serverPort);
KnHandleClose(serverPort->handle);
serverPort->handle = INVALID_HANDLE;
}
}
return rc;
}
KnHandleRevoke()
This function is declared in the coresrv/handle/handle_api.h file.
Retcode KnHandleRevoke(Handle handle);
Deletes the handle and revokes all of its descendants.
If successful, the function returns rcOk, otherwise it returns an error code.
Revoked handles are not deleted. However, you cannot query resources via revoked handles. Any function that accepts a handle will end with the rcHandleRevoked error if this function is called with a revoked handle.
KnHandleRevokeSubtree()
This function is declared in the coresrv/handle/handle_api.h file.
Retcode KnHandleRevokeSubtree(Handle handle, Handle badge);
This function revokes the handles that make up the handle inheritance subtree of the specified handle.
The root node of the inheritance subtree is the handle that was generated by the transfer of the specified handle associated with the badge resource transfer context object.
If successful, the function returns rcOk, otherwise it returns an error code.
Revoked handles are not deleted. However, you cannot query resources via revoked handles. Any function that accepts a handle will end with the rcHandleRevoked error if this function is called with a revoked handle.
nk_get_badge_op()
This function is declared in the nk/types.h file.
static inline
nk_err_t nk_get_badge_op(const nk_handle_desc_t *desc,
nk_rights_t operation,
nk_badge_t *badge);
This function extracts the pointer to the badge resource transfer context from the transport container of desc if the operation flags are set in the permissions mask that is placed in the transport container of desc.
If successful, the function returns NK_EOK, otherwise it returns an error code.
Page top
nk_is_handle_dereferenced()
This function is declared in the nk/types.h file.
static inline
nk_bool_t nk_is_handle_dereferenced(const nk_handle_desc_t *desc);
This function returns a non-zero value if the handle in the transport container of desc was obtained as a result of a handle dereferencing operation.
This function returns zero if the handle in the transport container of desc was obtained as a result of a handle transfer operation.
Managing handles
Handles are managed by using functions of the Handle Manager and Notification Subsystem.
The Handle Manager is provided for the user in the following files:
coresrv/handle/handle_api.his a header file of thelibkoslibrary.services/handle/Handle.idlis an IDL description of the Handle Manager's IPC interface.
The Notification Subsystem is provided for the user in the following files:
coresrv/handle/notice_api.his a header file of thelibkoslibrary.services/handle/Notice.idlis an IDL description of the IPC interface of the Notification Subsystem.
Handle permissions mask
A handle permissions mask has a size of 32 bits and consists of a general part and a specialized part. The general part describes the general rights that are not specific to any particular resource (the flags of these rights are defined in the services/ocap.h header file). For example, the general part contains the OCAP_HANDLE_TRANSFER flag, which defines the permission to transfer the handle. The specialized part describes the rights that are specific to the particular user resource or system resource. The flags of the specialized part's permissions for system resources are defined in the services/ocap.h header file. The structure of the specialized part for user resources is defined by the resource provider by using the OCAP_HANDLE_SPEC() macro that is defined in the services/ocap.h header file. The resource provider must export the public header files describing the structure of the specialized part.
When the handle of a system resource is created, the permissions mask is defined by the KasperskyOS kernel, which applies permissions masks from the services/ocap.h header file. It applies permissions masks with names such as OCAP_*_FULL (for example, OCAP_IOPORT_FULL, OCAP_TASK_FULL, OCAP_FILE_FULL) and OCAP_IPC_* (for example, OCAP_IPC_SERVER, OCAP_IPC_LISTENER, OCAP_IPC_CLIENT).
When the handle of a user resource is created, the permissions mask is defined by the user.
When a handle is transferred, the permissions mask is defined by the user but the transferred access rights cannot be elevated above the access rights of the process.
Page top
Creating handles
The handles of user resources are created by the providers of the resources. The KnHandleCreateUserObject() function declared in the coresrv/handle/handle_api.h header file is used to create handles of user resources.
handle_api.h (fragment)
/**
* Creates the specified handle of the specified type with the rights permissions mask.
* The "type" parameter can take values ranging from HANDLE_TYPE_USER_FIRST to
* HANDLE_TYPE_USER_LAST. The HANDLE_TYPE_USER_FIRST and HANDLE_TYPE_USER_LAST macros
* are defined in the handletype.h header file. The "context" parameter defines the context
* of the user resource.
* If successful, the function returns rcOk, otherwise it returns an error code.
*/
Retcode KnHandleCreateUserObject(rtl_uint32_t type, rtl_uint32_t rights,
void *context, Handle *handle);
The user resource context is the data that allows the resource provider to identify the resource and its state when access to the resource is requested by other programs. This normally consists of a data set with various types of data (structure). For example, the context of a file may include the name, path, and cursor position. The user resource context is used as the resource transfer context or is used together with multiple resource transfer contexts.
The type parameter of the KnHandleCreateUserObject() function is reserved for potential future use and does not affect the behavior of the function, but it must take a value from the interval specified in the function comments.
For details about a handle permissions mask, see "Handle permissions mask".
Page top
Transferring handles
Overview
Handles are transferred between programs so that clients (programs that utilize resources) can obtain access to required resources. Due to the specific locality of handles, a handle transfer initiates the creation of a handle from the handle space of the recipient program. This handle is registered as a descendant of the transferred handle and identifies the same resource.
One handle can be transferred multiple times by one or multiple programs. Each transfer initiates the creation of a new descendant of the transferred handle on the recipient program side. A program can transfer the handles that it received from other programs or from the KasperskyOS kernel (when creating handles of system resources). For this reason, a handle may have multiple generations of descendants. The generation hierarchy of handles for each resource is stored in the KasperskyOS kernel in the form of a handle inheritance tree.
A program can transfer handles for user resources and system resources if the access rights of these handles permit such a transfer. A descendant may have less access rights than an ancestor. For example, a transferring program with read-and-write permissions for a file can transfer read-only permissions. The transferring program can also prohibit the recipient program from further transferring the handle. Access rights are defined in the transferred permissions mask for the handle.
Conditions for transferring handles
For programs to transfer handles to other programs, the following conditions must be met:
- An IPC channel is created between the programs.
- The solution security policy (
security.psl) allows interaction between the programs. - Interface methods are implemented for transferring handles.
- The client program received the endpoint ID (RIID) of the server program that has methods for transferring handles.
Interface methods for transferring handles are declared in the IDL language with input (in) and/or output (out) parameters of the Handle type. Methods with input parameters of the Handle type are intended for transferring handles from the client program to the server program. Methods with output parameters of the Handle type are intended for transferring handles from the server program to the client program. No more than seven input and seven output parameters of the Handle type can be declared for one method.
Example IDL description containing declarations of interface methods for transferring handles:
package IpcTransfer
interface {
PublishResource1(in Handle handle, out UInt32 result);
PublishResource7(in Handle handle1, in Handle handle2,
in Handle handle3, in Handle handle4,
in Handle handle5, in Handle handle6,
in Handle handle7, out UInt32 result);
OpenResource(in UInt32 ID, out Handle handle);
}
For each parameter of the Handle type, the NK compiler generates a field in the *_req request structure and/or *_res response structure of the nk_handle_desc_t type (hereinafter also referred to as the transport container of the handle). This type is declared in the nk/types.h header file and comprises a structure consisting of the following three fields: handle field for the handle, rights field for the handle permissions mask, and the badge field for the resource transfer context.
Resource transfer context
The resource transfer context is the data that allows the server program to identify the resource and its state when access to the resource is requested via descendants of the transferred handle. This normally consists of a data set with various types of data (structure). For example, the transfer context of a file may include the name, path, and cursor position. A server program receives a pointer to the resource transfer context when dereferencing a handle.
Regardless of whether or not a server program is the resource provider, it can associate each handle transfer with a separate resource transfer context. This resource transfer context is bound only to the handle descendants (handle inheritance subtree) that were generated as a result of a specific transfer of the handle. This lets you define the state of a resource in relation to a separate transfer of the handle of this resource. For example, for cases when one file may be accessed multiple times, the file transfer context lets you define which specific opening of this file corresponds to a received request.
If the server program is the resource provider, each transfer of the handle of this resource is associated with the user resource context by default. In other words, the user resource context is used as the resource transfer context for each handle transfer if the particular transfer is not associated with a separate resource transfer context.
A server program that is the resource provider can use the user resource context and the resource transfer context together. For example, the name, path and size of a file is stored in the user resource context while the cursor position can be stored in multiple resource transfer contexts because each client can work with different parts of the file. Technically, joint use of the user resource context and resource transfer contexts is possible because the resource transfer contexts store a pointer to the user resource context.
If the client program uses multiple various-type resources of the server program, the resource transfer contexts (or contexts of user resources if they are used as resource transfer contexts) must be specialized objects of the KosObject type. This is necessary so that the server program can verify that the client program using a resource has sent the interface method the handle of the specific resource that corresponds to this method. This verification is required because the client program could mistakenly send the interface method a resource handle that does not correspond to this method. For example, a client program receives a file handle and sends it to an interface method for working with volumes.
To associate a handle transfer with a resource transfer context, the server program puts the handle of the resource transfer context object into the badge field of the nk_handle_desc_t structure. The resource transfer context object is the object that stores the pointer to the resource transfer context. The resource transfer context object is created by the KnHandleCreateBadge() function, which is declared in the coresrv/handle/handle_api.h header file. This function is bound to the Notification Subsystem regarding the state of resources because a server program needs to know when a resource transfer context object will be closed and terminated. The server program needs this information to free up or re-use memory that was allotted for storing the resource transfer context.
The resource transfer context object will be closed when deleting or revoking the handle descendants (see Deleting handles, Revoking handles) that were generated during its transfer in association with this object. (A transferred handle may be deleted intentionally or unintentionally, such as when a recipient client program is unexpectedly terminated.) After receiving a notification regarding the closure of a resource transfer context object, the server program deletes the handle of this object. After this, the resource transfer context object is terminated. After receiving a notification regarding the termination of the resource transfer context object, the server program frees up or re-uses the memory that was allotted for storing the resource transfer context.
One resource transfer context object can be associated with only one handle transfer.
handle_api.h (fragment)
/**
* Creates a resource transfer context object for
* the resource transfer "context" and configures the
* notification receiver "notice" to receive notifications about
* this object. The notification receiver is configured to
* receive notifications about events that match the
* event mask flags OBJECT_DESTROYED and EVENT_BADGE_CLOSED.
* Input parameter eventId defines the identifier of the
* "resource–event mask" entry in the notification receiver.
* Output parameter handle contains the handle of the
* resource transfer context.
* If successful, the function returns rcOk, otherwise it returns an error code.
*/
Retcode KnHandleCreateBadge(Notice notice, rtl_uintptr_t eventId,
void *context, Handle *handle);
Packaging data into the transport container of a handle
The nk_handle_desc() macro declared in the nk/types.h header file is used to package a handle, handle permissions mask and resource transfer context object handle into a handle transport container. This macro receives a variable number of arguments.
If no argument is passed to the macro, the NK_INVALID_HANDLE value will be written in the handle field of the nk_handle_desc_t structure.
If one argument is passed to the macro, this argument is interpreted as the handle.
If two arguments are passed to the macro, the first argument is interpreted as the handle and the second argument is interpreted as the handle permissions mask.
If three arguments are passed to the macro, the first argument is interpreted as the handle, the second argument is interpreted as the handle permissions mask, and the third argument is interpreted as the resource transfer context object handle.
Extracting data from the transport container of a handle
The nk_get_handle(), nk_get_rights() and nk_get_badge_op() (or nk_get_badge()) functions that are declared in the nk/types.h header file are used to extract the handle, handle permissions mask, and pointer to the resource transfer context, respectively, from the transport container of a handle. The nk_get_badge_op() and nk_get_badge() functions are used only when dereferencing handles.
Handle transfer scenarios
A scenario for transferring handles from a client program to the server program includes the following steps:
- The transferring client program packages the handles and handle permissions masks into the fields of the
*_reqrequests structure of thenk_handle_desc_ttype. - The transferring client program calls the interface method for transferring handles to the server program. This method executes the
Call()system call. - The recipient server program receives the request by executing the
Recv()system call. - The dispatcher on the recipient server program side calls the method corresponding to the request. This method extracts the handles and handle permissions masks from the fields of the
*_reqrequest structure of thenk_handle_desc_ttype.
A scenario for transferring handles from the server program to a client program includes the following steps:
- The recipient client program calls the interface method for receiving handles from the server program. This method executes the
Call()system call. - The transferring server program receives the request by executing the
Recv()system call. - The dispatcher on the transferring server program side calls the method corresponding to the request. This method packages the handles, handle permissions masks and resource transfer context object handles into the fields of the
*_resresponse structure of thenk_handle_desc_ttype. - The transferring server program responds to the request by executing the
Reply()system call. - On the recipient client program side, the interface method returns control. After this, the recipient client program extracts the handles and handle permissions masks from the fields of the
*_resresponse structure of thenk_handle_desc_ttype.
If the transferring program defines more access rights in the transferred handle permissions mask than the access rights defined for the transferred handle (which it owns), the transfer is not completed. In this case, the Call() system call made by the transferring or recipient client program or the Reply() system call made by the transferring server program ends with the rcSecurityDisallow error.
Dereferencing handles
When dereferencing a handle, the client program sends the server program the handle, and the server program receives a pointer to the resource transfer context, the permissions mask of the sent handle, and the ancestor of the handle sent by the client program and already owned by the server program. Dereferencing occurs when a client program that called methods for working with a resource (such as read/write or access closure) sends the server program the handle that was received from this server program when access to the resource was opened.
Dereferencing handles requires fulfillment of the same conditions and utilizes the same mechanisms and data types as when transferring handles. A handle dereferencing scenario includes the following steps:
- The client program packages the handle into a field of the
*_reqrequest structure of thenk_handle_desc_ttype. - The client program calls the interface method for sending the handle to the server program for the purpose of performing operations with the resource. This method executes the
Call()system call. - The server program receives the request by executing the
Recv()system call. - The dispatcher on the server program side calls the method corresponding to the request. This method verifies that the dereferencing operation was specifically executed instead of a handle transfer. Then the called method has the option to verify that the access rights of the dereferenced handle (that was sent by the client program) permit the requested actions with the resource, and extracts the pointer to the resource transfer context from the field of the
*_reqrequest structure of thenk_handle_desc_ttype.
To perform verifications, the server program utilizes the nk_is_handle_dereferenced() and nk_get_badge_op() functions that are declared in the nk/types.h header file.
types.h (fragment)
/**
* Returns a value different from null if
* the handle in the transport container of
* "desc" is received as a result of dereferencing
* the handle. Returns null if the handle
* in the transport container of "desc" is received
* as a result of a handle transfer.
*/
static inline
nk_bool_t nk_is_handle_dereferenced(const nk_handle_desc_t *desc)
/**
* Extracts the pointer to the resource transfer context
* "badge" from the transport container of "desc"
* if the permissions mask that was put in the transport
* container of the desc handle has the operation flags set.
* If successful, the function returns NK_EOK, otherwise it returns an error code.
*/
static inline
nk_err_t nk_get_badge_op(const nk_handle_desc_t *desc,
nk_rights_t operation,
nk_badge_t *badge)
Generally, the server program does not require the handle that was received from dereferencing because the server program normally retains the handles that it owns, for example, within the contexts of user resources. However, the server program can extract this handle from the handle transport container if necessary.
Page top
Revoking handles
A program can revoke descendants of a handle that it owns. Handles are revoked according to the handle inheritance tree.
Revoked handles are not deleted. However, you cannot query resources via revoked handles. Any function that accepts a handle will end with the rcHandleRevoked error if this function is called with a revoked handle.
Handles are revoked by using the KnHandleRevoke() and KnHandleRevokeSubtree() functions declared in the coresrv/handle/handle_api.h header file. The KnHandleRevokeSubtree() function uses the resource transfer context object that is created when transferring handles.
handle_api.h (fragment)
/**
* Deletes the handle and revokes all of its descendants.
* If successful, the function returns rcOk, otherwise it returns an error code.
*/
Retcode KnHandleRevoke(Handle handle);
/**
* Revokes handles that form the
* inheritance subtree of the handle. The root node of the inheritance subtree
* is the handle that is generated by transferring
* the handle associated with the object of the
* "badge" resource transfer context.
* If successful, the function returns rcOk, otherwise it returns an error code.
*/
Retcode KnHandleRevokeSubtree(Handle handle, Handle badge);
Notifying about the state of resources
Programs can track events that occur with resources (system resources as well as user resources), and inform other programs about events involving user resources.
Functions of the Notification Subsystem are declared in the coresrv/handle/notice_api.h header file. The Notification Subsystem provides for the use of event masks.
An event mask is a value whose bits are interpreted as events that should be tracked or that have already occurred. An event mask has a size of 32 bits and consists of a general part and a specialized part. The general part describes the general events that are not specific to any particular resource (the flags of these events are defined in the handle/event_descr.h header file). For example, the general part contains the EVENT_OBJECT_DESTROYED flag, which defines the "resource termination" event. The specialized part describes the events that are specific to a particular user resource. The structure of the specialized part is defined by the resource provider by using the OBJECT_EVENT_SPEC() macro that is defined in the handle/event_descr.h header file. The resource provider must export the public header files describing the structure of the specialized part.
The scenario for receiving notifications about events that occur with a resource consists of the following steps:
- The
KnNoticeCreate()function creates a notification receiver (object that stores notifications). - The
KnNoticeSubscribeToObject()function adds "resource–event mask" entries to the notification receiver to configure it to receive notifications about events that occur with relevant resources. The set of tracked events is defined for each resource by an event mask. - The
KnNoticeGetEvent()function is called to extract notifications from the notification receiver.
The KnNoticeSetObjectEvent() function is used to notify a program about events that occur with a user resource. A call of this function initiates the corresponding notifications in the notification receivers that are configured to track these events that occur with this resource.
notice_api.h (fragment)
/**
* Creates the notification receiver named "notice".
* If successful, the function returns rcOk, otherwise it returns an error code.
*/
Retcode KnNoticeCreate(Notice *notice);
/**
* Adds a "resource–event mask" entry
* to the "notice" notification receiver so that it will receive notifications about
* events that occur with the "object" resource and that match the
* evMask event mask. Input parameter evId defines the identifier
* of the entry that is assigned by the user and used to
* identify the entry in received notifications.
* If successful, the function returns rcOk, otherwise it returns an error code.
*/
Retcode KnNoticeSubscribeToObject(Notice notice,
Handle object,
rtl_uint32_t evMask,
rtl_uintptr_t evId);
/**
* Extracts notifications from the "notice" notification receiver
* while waiting for events to occur within the specific number of milliseconds.
* Input parameter countMax defines the maximum number
* of notifications that can be extracted. Output parameter
* "events" contains a set of extracted notifications of the EventDesc type.
* Output parameter "count" contains the number of notifications that
* were extracted.
* If successful, the function returns rcOk, otherwise it returns an error code.
*/
Retcode KnNoticeGetEvent(Notice notice,
rtl_uint64_t msec,
rtl_size_t countMax,
EventDesc *events,
rtl_size_t *count);
/* Notification structure */
typedef struct {
/* Identifier of the "resource–event mask" entry
* in the notification receiver */
rtl_uintptr_t eventId;
/* Mask of events that occurred. */
rtl_uint32_t eventMask;
} EventDesc;
/**
* Signals that events from event mask
* evMask occurred with the "object" user resource.
* You cannot set flags of the general part of an event mask
* because events from the general part of an event mask can be
*signaled only by the KasperskyOS kernel.
* If successful, the function returns rcOk, otherwise it returns an error code.
*/
Retcode KnNoticeSetObjectEvent(Handle object, rtl_uint32_t evMask);
Deleting handles
A program can delete the handles that it owns. Deleting a handle does not invalidate its ancestors and descendants (in contrast to revoking a handle, which actually invalidates the descendants of the handle). In other words, the ancestors and descendants of a deleted handle can still be used to provide access to the resource that they identify. Also, deleting a handle does not disrupt the handle inheritance tree associated with the resource identified by the particular handle. The place of a deleted handle is occupied by its ancestor. In other words, the ancestor of a deleted handle becomes the direct ancestor of the descendants of the deleted handle.
Handles are deleted by using the KnHandleClose() function, which is declared in the coresrv/handle/handle_api.h header file.
handle_api.h (fragment)
/**
* Deletes the handle.
* If successful, the function returns rcOk, otherwise it returns an error code.
*/
Retcode KnHandleClose(Handle handle);
OCap usage example
This article describes an OCap usage scenario in which the server program provides the following methods for accessing its resources:
OpenResource()– opens access to the resource.UseResource()– uses the resource.CloseResource()– closes access to the resource.
The client program uses these methods.
IDL description of interface methods:
package SimpleOCap
interface {
OpenResource(in UInt32 ID, out Handle handle);
UseResource(in Handle handle, in UInt8 param, out UInt8 result);
CloseResource(in Handle handle);
}
The scenario includes the following steps:
- The resource provider creates the user resource context and calls the
KnHandleCreateUserObject()function to create the resource handle. The resource provider saves the resource handle in the user resource context. - The client calls the
OpenResource()method to open access to the resource.- The resource provider creates the resource transfer context and calls the
KnHandleCreateBadge()function to create a resource transfer context object and configure the notification receiver to receive notifications regarding the closure or termination of the resource transfer context object. The resource provider saves the handle of the resource transfer context object and the pointer to the user resource context in the resource transfer context. - The resource provider uses the
nk_handle_desc()macro to package the resource handle, permissions mask of the handle, and pointer to the resource transfer context object into the handle transport container. - The handle is transferred from the resource provider to the client, which means that the client receives a descendant of the handle owned by the resource provider.
- The
OpenResource()method call completes successfully. The client extracts the handle and permissions mask of the handle from the handle transport container by using thenk_get_handle()andnk_get_rights()functions, respectively. The handle permissions mask is not required by the client to query the resource, but is transferred so that the client can find out its permissions for accessing the resource.
- The resource provider creates the resource transfer context and calls the
- The client calls the
UseResource()method to utilize the resource.- The handle that was received from the resource provider at step 2 is used as an argument of the
UseResource()method. Before calling this method, the client uses thenk_handle_desc()macro to package the handle into the handle transport container. - The handle is dereferenced, after which the resource provider receives the pointer to the resource transfer context.
- The resource provider uses the
nk_is_handle_dereferenced()function to verify that the dereferencing operation was completed instead of a handle transfer. - The resource provider verifies that the access rights of the dereferenced handle (that was sent by the client) allows the requested operation with the resource, and extracts the pointer to the resource transfer context from the handle transport container. To do so, the resource provider uses the
nk_get_badge_op()function, which extracts the pointer to the resource transfer context from the handle transport container if the received permissions mask has the corresponding flags set for the requested operation. - The resource provider uses the resource transfer context and the user resource context to perform the corresponding operation with the resource as requested by the client. Then the resource provider sends the client the results of this operation.
- The
UseResource()method call completes successfully. The client receives the results of the operation performed on the resource.
- The handle that was received from the resource provider at step 2 is used as an argument of the
- The client calls the
CloseResource()method to close access to the resource.- The handle that was received from the resource provider at step 2 is used as an argument of the
CloseResource()method. Before calling this method, the client uses thenk_handle_desc()macro to package the handle into the handle transport container. After theCloseResource()method is called, the client uses theKnHandleClose()function to delete the handle. - The handle is dereferenced, after which the resource provider receives the pointer to the resource transfer context.
- The resource provider uses the
nk_is_handle_dereferenced()function to verify that the dereferencing operation was completed instead of a handle transfer. - The resource provider uses the
nk_get_badge()function to extract the pointer to the resource transfer context from the handle transport container. - The resource provider uses the
KnHandleRevokeSubtree()function to revoke the handle owned by the client. The resource handle owned by the resource provider and the handle of the resource transfer context object are used as arguments of this function. The resource provider obtains access to these handles through the pointer to the resource transfer context. (Technically, the handle owned by the client does not have to be revoked because the client already deleted it. However, the revoke operation is performed in case the resource provider is not sure if the client actually deleted the handle). - The
CloseResource()method call completes successfully.
- The handle that was received from the resource provider at step 2 is used as an argument of the
- The resource provider frees up the memory that was allocated for the resource transfer context and the user resource context.
- The resource provider calls the
KnNoticeGetEvent()function to receive a notification that the resource transfer context object was closed, and uses theKnHandleClose()function to delete the handle of the resource transfer context object. - The resource provider calls the
KnNoticeGetEvent()function to receive a notification that the resource transfer context object has been terminated, and frees up the memory that was allocated for the resource transfer context. - The resource provider uses the
KnHandleClose()function to delete the resource handle and to free up the memory that was allocated for the user resource context.
- The resource provider calls the
Event mask
An event mask is a value whose bits are interpreted as events that should be tracked or that have already occurred. An event mask has a size of 32 bits and consists of a general part and a specialized part. The general part describes the general events that are not specific to any particular resource (the flags of these events are defined in the handle/event_descr.h header file). For example, the general part contains the EVENT_OBJECT_DESTROYED flag, which defines the "resource termination" event. The specialized part describes the events that are specific to a particular user resource. The structure of the specialized part is defined by the resource provider by using the OBJECT_EVENT_SPEC() macro that is defined in the handle/event_descr.h header file. The resource provider must export the public header files describing the structure of the specialized part.
EventDesc
The structure describing the notification is declared in the file coresrv/handle/notice_api.h.
typedef struct {
rtl_uintptr_t eventId;
rtl_uint32_t eventMask;
} EventDesc;
eventId is the ID of the "resource–event mask" entry in the notification receiver.
eventMask is the mask of events that occurred.
KnNoticeCreate()
This function is declared in the file coresrv/handle/notice_api.h.
Retcode KnNoticeCreate(Notice *notice);
This function creates a notification receiver named notice (object that stores notifications).
If successful, the function returns rcOk, otherwise it returns an error code.
Page top
KnNoticeGetEvent()
This function is declared in the file coresrv/handle/notice_api.h.
Retcode KnNoticeGetEvent(Notice notice,
rtl_uint64_t msec,
rtl_size_t countMax,
EventDesc *events,
rtl_size_t *count);
This function extracts notifications from the notice notification receiver while waiting for events to occur within the specific number of milliseconds (msec).
Input parameter countMax defines the maximum number of notifications that can be extracted.
Output parameter events contains a set of extracted notifications of the EventDesc type.
Output parameter count contains the number of notifications that were extracted.
If successful, the function returns rcOk, otherwise it returns an error code.
Example
const int maxEventsPerNoticeCall = 10;
Retcode rc;
EventDesc events[maxEventsPerNoticeCall];
rtl_size_t eventCount;
rc = KnNoticeGetEvent(notice, INFINITE_TIMEOUT, rtl_countof(events),
&events[0], &eventCount);
KnNoticeSetObjectEvent()
This function is declared in the file coresrv/handle/notice_api.h.
Retcode KnNoticeSetObjectEvent(Handle object, rtl_uint32_t evMask);
This function signals that events from the event mask evMask occurred with the object resource.
You cannot set flags of the general part of an event mask because only the KasperskyOS kernel can provide signals regarding events from the general part of an event mask.
If successful, the function returns rcOk, otherwise it returns an error code.
Page top
KnNoticeSubscribeToObject()
This function is declared in the file coresrv/handle/notice_api.h.
Retcode KnNoticeSubscribeToObject(Notice notice,
Handle object,
rtl_uint32_t evMask,
rtl_uintptr_t evId);
This function adds a "resource–event mask" entry to the notice notification receiver so that it can receive notifications about events that occur with the object resource and match the event mask evMask.
Input parameter evId defines the entry ID that is assigned by the user and is used to identify the entry in received notifications.
If successful, the function returns rcOk, otherwise it returns an error code.
For a usage example, see KnHandleCreateUserObject().
EntityConnect()
This function is declared in the header file coresrv/entity/entity_api.h.
Retcode EntityConnect(Entity *cl, Entity *sr);
This function connects processes with an IPC channel. To do so, the function creates IPC handles for the client process cl and the server process sr, and then binds the handles to each other. The created channel will be included into the default group of channels (the name of this group matches the name of the server process). The connected processes must be in the stopped state.
If successful, the function returns rcOk.
Page top
EntityConnectToService()
This function is declared in the header file coresrv/entity/entity_api.h.
Retcode EntityConnectToService(Entity *cl, Entity *sr, const char *name);
This function connects processes with an IPC channel. To do so, the function creates IPC handles for the client process cl and the server process sr, and then binds the handles to each other. The created channel will be added to the group of channels with the specified name. The connected processes must be in the stopped state.
If successful, the function returns rcOk.
Page top
EntityInfo
The EntityInfo structure describing the process is declared in the file named if_connection.h.
typedef struct EntityInfo {
/* process class name */
const char *eiid;
/* maximum number of endpoints */
nk_iid_t max_endpoints;
/* information about the process endpoints */
const EndpointInfo *endpoints;
/* arguments to be passed to the process when it is started */
const char *args[ENTITY_ARGS_MAX + 1];
/* environment variables to be passed to the process when it is started */
const char *envs[ENTITY_ENV_MAX + 1];
/* process flags */
EntityFlags flags;
/* process components tree */
const struct nk_component_node *componentTree;
} EntityInfo;
typedef struct EndpointInfo {
char *name; /* fully qualified name of the endpoint */
nk_iid_t riid; /* endpoint ID */
char *iface_name; /* name of the interface implemented by the endpoint */
} EndpointInfo;
typedef enum {
ENTITY_FLAGS_NONE = 0,
/* the process is reset if an unhandled exception occurs */
ENTITY_FLAG_DUMPABLE = 1,
} EntityFlags;
EntityInit()
This function is declared in the header file coresrv/entity/entity_api.h.
Entity *EntityInit(const EntityInfo *info);
This function creates a process. The info parameter defines the name of the process class and (optionally) its endpoints, arguments and environment variables.
The created process will have the default name (matching the process class name), and the default name for the executable file (also matching the process class name).
If successful, the function returns the structure describing the new process. The created process is in the stopped state.
If an error occurs, the function returns RTL_NULL.
Page top
EntityInitEx()
This function is declared in the header file coresrv/entity/entity_api.h.
Entity *EntityInitEx(const EntityInfo *info, const char *name,
const char *path);
This function creates a process.
The info parameter defines the name of the process class and (optionally) its endpoints, arguments and environment variables.
The name parameter defines the name of the process. If it has the RTL_NULL value, the process class name from the info parameter will be used as the process name.
The path parameter defines the name of the executable file in the solution's ROMFS image. If it has the RTL_NULL value, the process class name from the info parameter will be used as the file name.
If successful, the function returns the structure describing the new process. The created process is in the stopped state.
If an error occurs, the function returns RTL_NULL.
Page top
EntityRun()
This function is declared in the header file coresrv/entity/entity_api.h.
Retcode EntityRun(Entity *entity);
This function starts a process that is in the stopped state. The process is described by the entity structure.
If successful, the function returns rcOk.
Page top
KnCmAccept()
This function is declared in the coresrv/cm/cm_api.h file.
Retcode KnCmAccept(const char *client, const char *service, rtl_uint32_t rsid,
Handle listener, Handle *handle);
This function accepts the client process channel creation request that was previously received using the KnCmListen() call. This function is called by the server process.
Input parameters:
clientis the name of the client process that sent the request to create the channel.serviceis the fully qualified name of the endpoint requested by the client process (for example,blkdev.ata).rsidis the endpoint ID.listeneris the listener handle; if it has the INVALID_HANDLE value, a new listener handle is created and will be used as the server IPC handle of the channel being created.
Output parameter handle contains the server IPC handle of the channel being created.
If successful, the function returns rcOk, otherwise it returns an error code.
Page top
KnCmConnect()
This function is declared in the coresrv/cm/cm_api.h file.
Retcode KnCmConnect(const char *server, const char *service,
rtl_uint32_t msecs, Handle *handle,
rtl_uint32_t *rsid);
This function sends a request to create a channel with the server process. This function is called by the client process.
Input parameters:
serveris the name of the server process that provides the endpoint.serviceis the fully qualified name of the endpoint (for example,blkdev.ata).msecsis the timeout for accepting the request, in milliseconds.
Output parameters:
handleis the client IPC handle.rsidis the endpoint ID.
If successful, the function returns rcOk, otherwise it returns an error code.
Page top
KnCmDrop()
This function is declared in the coresrv/cm/cm_api.h file.
Retcode KnCmDrop(const char *client, const char *service);
This function rejects the client process channel creation request that was previously received using the KnCmListen() call. This function is called by the server process.
Parameters:
clientis the name of the client process that sent the request to create the channel.serviceis the fully qualified name of the endpoint requested by the client process (for example,blkdev.ata).
If successful, the function returns rcOk, otherwise it returns an error code.
Page top
KnCmListen()
This function is declared in the coresrv/cm/cm_api.h file.
Retcode KnCmListen(const char *filter, rtl_uint32_t msecs, char *client,
char *service);
This function checks for channel creation requests from client processes. This function is called by the server process.
Input parameters:
filteris an unused parameter.msecsis the request timeout, in milliseconds.
Output parameters:
clientis the name of the client process.serviceis the fully qualified name of the endpoint requested by the client process (for example,blkdev.ata).
If successful, the function returns rcOk, otherwise it returns an error code.
Page top
NsCreate()
This function is declared in the coresrv/ns/ns_api.h file.
Retcode NsCreate(const char *name, rtl_uint32_t msecs, NsHandle *ns);
This function attempts to connect to name server name for the specified number of milliseconds (msecs). If the name parameter has the RTL_NULL value, the function attempts to connect to name server ns (the default name server).
Output parameter ns contains the handle for the connection with the name server.
If successful, the function returns rcOk, otherwise it returns an error code.
Page top
NsEnumServices()
This function is declared in the coresrv/ns/ns_api.h file.
Retcode NsEnumServices(NsHandle ns, const char *type, unsigned index,
char *server, rtl_size_t serverSize,
char *service, rtl_size_t serviceSize);
This function enumerates the endpoints with the defined interface that are published on the name server.
Input parameters:
nsis the handle of the connection with the name server that was previously received by using theNsCreate()call.typeis the name of the interface implemented by the endpoint (for example,kl.drivers.Block).indexis the index for enumerating endpoints.serverSizeis the maximum size of the buffer for theserveroutput parameter in bytes.serviceSizeis the maximum size of the buffer for theserviceoutput parameter in bytes.
Output parameters:
serveris the name of the server process that provides the endpoint (for example,kl.drivers.Ata).serviceis the fully qualified name of the endpoint (for example,blkdev.ata).
For example, you can receive a full list of server processes that provide an endpoint with the kl.drivers.Block interface as follows.
rc = NsEnumServices(ns, "kl.drivers.Block", 0, outServerName, ServerNameSize, outServiceName, ServiceNameSize);
rc = NsEnumServices(ns, "kl.drivers.Block", 1, outServerName, ServerNameSize, outServiceName, ServiceNameSize);
...
rc = NsEnumServices(ns, "kl.drivers.Block", N, outServerName, ServerNameSize, outServiceName, ServiceNameSize);
Function calls with index incrementation continue until the function returns rcResourceNotFound.
If successful, the function returns rcOk, otherwise it returns an error code.
Page top
NsPublishService()
This function is declared in the coresrv/ns/ns_api.h file.
Retcode NsPublishService(NsHandle ns, const char *type, const char *server,
const char *service);
This function publishes the endpoint with the defined interface on the name server.
Parameters:
nsis the handle of the connection with the name server that was previously received by using theNsCreate()call.typeis the name of the interface implemented by the published endpoint (for example,kl.drivers.Block).serveris the name of the server process (for example,kl.drivers.Ata).serviceis the fully qualified name of the endpoint (for example,blkdev.ata).
If successful, the function returns rcOk, otherwise it returns an error code.
Page top
NsUnPublishService()
This function is declared in the coresrv/ns/ns_api.h file.
Retcode NsUnPublishService( NsHandle ns, const char *type, const char *server,
const char *service);
This function unpublishes the endpoint on the name server.
Parameters:
nsis the handle of the connection with the name server that was previously received by using theNsCreate()call.typeis the name of the interface implemented by the published endpoint (for example,kl.drivers.Block).serveris the name of the server process (for example,kl.drivers.Ata).serviceis the fully qualified name of the endpoint (for example,blkdev.ata).
If successful, the function returns rcOk, otherwise it returns an error code.
Page top
KosCondvarBroadcast()
This function is declared in the kos/condvar.h file.
void KosCondvarBroadcast(KosCondvar *condvar);
This function wakes all threads from the queue of threads that are blocked by the conditional variable condvar.
KosCondvarDeinit()
This function is declared in the kos/condvar.h file.
void KosCondvarDeinit(KosCondvar *condvar);
De-initializes the conditional variable condvar.
KosCondvarInit()
This function is declared in the kos/condvar.h file.
void KosCondvarInit(KosCondvar *condvar);
Initializes the conditional variable condvar.
KosCondvarSignal()
This function is declared in the kos/condvar.h file.
void KosCondvarSignal(KosCondvar *condvar);
This function wakes one thread from the queue of threads that are blocked by the conditional variable condvar.
KosCondvarWait()
This function is declared in the kos/condvar.h file.
Retcode KosCondvarWait(KosCondvar *condvar, KosMutex *mutex);
This function blocks execution of the current thread via the conditional variable condvar until it is awakened using KosCondvarSignal() or KosCondvarBroadcast().
mutex refers to the mutex that will be used for protecting the critical section.
If successful, the function returns rcOk.
Page top
KosCondvarWaitTimeout()
This function is declared in the kos/condvar.h file.
Retcode KosCondvarWaitTimeout(KosCondvar *condvar, KosMutex *mutex,
rtl_uint32_t mdelay);
This function blocks execution of the current thread via the conditional variable condvar until it is awakened using KosCondvarSignal() or KosCondvarBroadcast(). The thread is blocked for no more than mdelay (in milliseconds).
mutexrefers to the mutex that will be used for protecting the critical section.
This function returns rcOk if successful, or rcTimeout if it times out.
Page top
KosEventDeinit()
This function is declared in the kos/event.h file.
void KosEventDeinit(KosEvent *event);
This function frees the resources associated with an event (deletes the event).
KosEventInit()
This function is declared in the kos/event.h file.
void KosEventInit(KosEvent *event);
This function creates an event.
The created event is in a non-signaling state.
Page top
KosEventReset()
This function is declared in the kos/event.h file.
void KosEventReset(KosEvent *event);
This function switches an event to the non-signaling state (resets the event).
KosEventSet()
This function is declared in the kos/event.h file.
void KosEventSet(KosEvent *event);
This function switches an event to the signaling state (signals the event) and thereby wakes all threads that are waiting for it.
KosEventWait()
This function is declared in the kos/event.h file.
void KosEventWait(KosEvent *event, rtl_bool reset);
Waits for the event to switch to signaling state.
The reset parameter indicates whether the event should be automatically reset when the wait successfully ends.
Returns rcOk if successful.
Page top
KosEventWaitTimeout()
This function is declared in the kos/event.h file.
Retcode KosEventWaitTimeout(KosEvent *event, rtl_bool reset,
rtl_uint32_t msec);
Waits for the event to switch to signaling state for a period of msec (milliseconds).
The reset parameter indicates whether the event should be automatically reset when the wait successfully ends.
This function returns rcOk if successful, or rcTimeout if the timeout is exceeded.
Page top
KosMutexDeinit()
This function is declared in the kos/mutex.h file.
void KosMutexDeinit(KosMutex *mutex);
Deletes the specified mutex.
KosMutexInit()
This function is declared in the kos/mutex.h file.
void KosMutexInit(KosMutex *mutex);
Initializes the mutex in an unlocked state.
KosMutexInitEx()
This function is declared in the kos/mutex.h file.
void KosMutexInitEx(KosMutex *mutex, int recursive);
Initializes the mutex in an unlocked state.
To initialize a recursive mutex, you need to pass the value 1 to the recursive parameter.
KosMutexLock()
This function is declared in the kos/mutex.h file.
void KosMutexLock(KosMutex *mutex);
Captures the specified mutex.
If the mutex is already captured, the thread is locked and waits to be unlocked.
Page top
KosMutexLockTimeout()
This function is declared in the kos/mutex.h file.
Retcode KosMutexLockTimeout(KosMutex *mutex, rtl_uint32_t mdelay);
Captures the specified mutex.
If the mutex is already captured, the thread is locked for mdelay and waits to be unlocked.
This function returns rcOk if successful, or rcTimeout if it times out.
Page top
KosMutexTryLock()
This function is declared in the kos/mutex.h file.
Retcode KosMutexTryLock(KosMutex *mutex);
Attempts to capture the specified mutex.
This function returns rcOk if the mutex could be captured, and returns rcBusy if the mutex could not be captured because it is already captured.
Page top
KosMutexUnlock()
This function is declared in the kos/mutex.h file.
void KosMutexUnlock(KosMutex *mutex);
Unlocks the specified mutex.
To unlock a recursive mutex, you need to perform the same amount of KosMutexUnlock() calls to match the amount of times the recursive mutex was locked.
KosRWLockDeinit()
This function is declared in the kos/rwlock.h file.
void KosRWLockDeinit(KosRWLock *rwlock);
De-initializes the read-write lock rwlock.
KosRWLockInit()
This function is declared in the kos/rwlock.h file.
void KosRWLockInit(KosRWLock *rwlock);
Initializes the read-write lock rwlock.
KosRWLockRead()
This function is declared in the kos/rwlock.h file.
void KosRWLockRead(KosRWLock *rwlock);
Locks the read threads.
Page top
KosRWLockTryRead()
This function is declared in the kos/rwlock.h file.
Retcode KosRWLockTryRead(KosRWLock *rwlock);
Attempts to lock the read threads.
If successful, the function returns rcOk.
Page top
KosRWLockTryWrite()
This function is declared in the kos/rwlock.h file.
Retcode KosRWLockTryWrite(KosRWLock *rwlock);
Attempts to lock the write threads.
If successful, the function returns rcOk.
Page top
KosRWLockUnlock()
This function is declared in the kos/rwlock.h file.
void KosRWLockUnlock(KosRWLock *rwlock);
Removes the read-write lock rwlock.
KosRWLockWrite()
This function is declared in the kos/rwlock.h file.
void KosRWLockWrite(KosRWLock *rwlock);
Locks the write threads.
Page top
KosSemaphoreDeinit()
This function is declared in the kos/semaphore.h file.
Retcode KosSemaphoreDeinit(KosSemaphore *semaphore);
This function destroys the specified semaphore that was previously initialized by the KosSemaphoreInit() function.
It is safe to destroy an initialized semaphore on which there are currently no locked threads. There could be an unpredictable effect from destroying a semaphore on which other threads are currently locked.
The function returns the following:
- rcOk if successful;
- rcInvalidArgument, if the
semaphorepoints to an invalid semaphore; - rcFail if there are threads being locked by this semaphore.
KosSemaphoreInit()
This function is declared in the kos/semaphore.h file.
Retcode KosSemaphoreInit(KosSemaphore *semaphore, unsigned count);
Initializes the defined semaphore with the initial count value.
The function returns the following:
- rcOk if successful;
- rcInvalidArgument, if the
semaphorepoints to an invalid semaphore; - rcFail if the
countvalue exceeds KOS_SEMAPHORE_VALUE_MAX.
KosSemaphoreSignal()
This function is declared in the kos/semaphore.h file.
Retcode KosSemaphoreSignal(KosSemaphore *semaphore);
Frees (signals) the defined semaphore.
The function returns the following:
- rcOk if successful;
- rcInvalidArgument, if the
semaphorepoints to an invalid semaphore.
KosSemaphoreTryWait()
This function is declared in the kos/semaphore.h file.
Retcode KosSemaphoreTryWait(KosSemaphore *semaphore);
Attempts to acquire the defined semaphore.
The function returns the following:
- rcOk if successful;
- rcInvalidArgument, if the
semaphorepoints to an invalid semaphore; - rcBusy if the semaphore is already acquired.
KosSemaphoreWait()
This function is declared in the kos/semaphore.h file.
Retcode KosSemaphoreWait(KosSemaphore *semaphore);
Waits for acquisition of the defined semaphore.
The function returns the following:
- rcOk if successful;
- rcInvalidArgument, if the
semaphorepoints to an invalid semaphore.
KosSemaphoreWaitTimeout()
This function is declared in the kos/semaphore.h file.
Retcode KosSemaphoreWaitTimeout(KosSemaphore *semaphore, rtl_uint32_t mdelay);
Waits for acquisition of the defined semaphore for a period of mdelay in milliseconds.
The function returns the following:
- rcOk if successful;
- rcInvalidArgument, if the
semaphorepoints to an invalid semaphore; - rcTimeout if the timeout expired.
DmaInfo
The structure describing the DMA buffer is declared in the io/io_dma.h file.
typedef struct {
/** DMA flags (attributes). */
DmaAttr flags;
/** Minimum order of DMA blocks in the buffer. */
rtl_size_t orderMin;
/** DMA buffer size. */
rtl_size_t size;
/** Number of DMA blocks (less than or equal to DMA_FRAMES_COUNT_MAX).
* It may be equal to 0 if a DMA buffer is not available for the device. */
rtl_size_t count;
/** Array of DMA block descriptors. */
union DmaFrameDescriptor {
struct {
/** Order of the DMA block. The number of pages in a block is equal to two
* to the power of the specified order. */
DmaAddr order: DMA_FRAME_ORDER_BITS;
/** Physical or IOMMU address of the DMA block. */
DmaAddr frame: DMA_FRAME_BASE_BITS;
};
/** DMA block descriptor */
DmaAddr raw;
} descriptors[1];
} DmaInfo;
DMA flags
DMA flags (attributes) are declared in the io/io_dma.h file.
- DMA_DIR_TO_DEVICE allows transactions from the main memory to the device memory.
- DMA_DIR_FROM_DEVICE allows transactions from the device memory to the main memory.
- DMA_DIR_BIDIR allows transactions from the main memory to the device memory, and vice versa.
- DMA_ZONE_DMA32 allows the use of only the first 4 GB of memory for the buffer.
- DMA_ATTR_WRITE_BACK, DMA_ATTR_WRITE_THROUGH, DMA_ATTR_CACHE_DISABLE, and DMA_ATTR_WRITE_COMBINE are for managing the cache of memory pages.
KnIoDmaBegin()
This function is declared in the coresrv/io/dma.h file.
Retcode KnIoDmaBegin(Handle rid, Handle *handle);
Allows the device to access the DMA buffer with the handle rid.
Output parameter handle contains the handle of this permission.
If successful, the function returns rcOk.
For a usage example, see KnIoDmaCreate().
To prevent a device from accessing the DMA buffer, you need to call the KnIoClose() function while passing the specified handle of the permission in this function.
KnIoDmaCreate()
This function is declared in the coresrv/io/dma.h file.
Retcode KnIoDmaCreate(rtl_uint32_t order, rtl_size_t size, DmaAttr flags,
Handle *outRid);
This function registers and allocates a physical DMA buffer.
Input parameters:
orderis the minimum permissible order of DMA block allocation; the actual order of each block in the DMA buffer is chosen by the kernel (but will not be less than the specified order) and is indicated in the block handle; the order of a block determines the number of pages in it. For example, a block with an order of N consists of 2^N pages.sizerefers to the size of the DMA buffer, in bytes (must be a multiple of the page size); the sum of all sizes of allocated DMA blocks will be no less than the specifiedsize.flagsrefers to DMA flags.
Output parameter outRid contains the handle of the allocated DMA buffer.
If successful, the function returns rcOk.
If a DMA buffer is no longer being used, it must be freed by using the KnIoClose() function.
Example
Retcode RegisterDmaMem(rtl_size_t size,
DmaAttr attr,
Handle *handle,
Handle *dmaHandle,
Handle *mappingHandle,
void **addr)
{
Retcode ret;
*handle = INVALID_HANDLE;
*dmaHandle = INVALID_HANDLE;
*mappingHandle = INVALID_HANDLE;
ret = KnIoDmaCreate(rtl_roundup_order(size >> PAGE_SHIFT),
size,
attr,
handle);
if (ret == rcOk) {
ret = KnIoDmaBegin(*handle, dmaHandle);
}
if (ret == rcOk) {
ret = KnIoDmaMap(*handle,
0,
size,
RTL_NULL,
VMM_FLAG_READ | VMM_FLAG_WRITE,
addr,
mappingHandle);
}
if (ret != rcOk) {
if (*mappingHandle != INVALID_HANDLE)
KnHandleClose(*mappingHandle);
if (*dmaHandle != INVALID_HANDLE)
KnHandleClose(*dmaHandle);
if (*handle != INVALID_HANDLE)
KnHandleClose(*handle);
}
return ret;
}
KnIoDmaGetInfo()
This function is declared in the coresrv/io/dma.h file.
Retcode KnIoDmaGetInfo(Handle rid, DmaInfo **outInfo);
This function gets information about the DMA buffer with the handle rid.
Output parameter outInfo contains information about the DMA buffer.
If successful, the function returns rcOk.
In contrast to KnIoDmaGetPhysInfo(), the outInfo parameter contains IOMMU addresses of DMA blocks instead of physical addresses.
KnIoDmaGetPhysInfo()
This function is declared in the coresrv/io/dma.h file.
Retcode KnIoDmaGetPhysInfo(Handle rid, DmaInfo **outInfo);
This function gets information about the DMA buffer with the handle rid.
Output parameter outInfo contains information about the DMA buffer.
If successful, the function returns rcOk.
In contrast to KnIoDmaGetInfo(), the outInfo parameter contains physical addresses of DMA blocks instead of IOMMU addresses.
KnIoDmaMap()
This function is declared in the coresrv/io/dma.h file.
Retcode KnIoDmaMap(Handle rid, rtl_size_t offset, rtl_size_t length, void *hint,
int vmflags, void **addr, Handle *handle);
This function maps a DMA buffer area to the address space of a process.
Input parameters:
ridis the handle of the DMA buffer allocated usingKnIoDmaCreate().offsetrefers to the page-aligned offset of the start of the area from the start of the buffer, indicated in bytes.lengthrefers to the size of the area; it must be a multiple of the page size and must not exceed <buffer size -offset>.hintis the virtual address of the start of mapping; if it is equal to 0, the address is selected by the kernel.vmflagsrefers to allocation flags.
In the vmflags parameter, you can use the following allocation flags (vmm/flags.h):
- VMM_FLAG_READ and VMM_FLAG_WRITE are memory protection attributes.
- VMM_FLAG_LOW_GUARD and VMM_FLAG_HIGH_GUARD add a protective page before and after the allocated memory, respectively.
Permissible combinations of memory protection attributes:
- VMM_FLAG_READ allows reading page contents.
- VMM_FLAG_WRITE allows modification of page contents.
- VMM_FLAG_READ | VMM_FLAG_WRITE allows reading and modifying page contents.
Output parameters:
addris the pointer to the virtual address of the start of the mapped area.handlerefers to the handle of the created mapping.
If successful, the function returns rcOk.
For a usage example, see KnIoDmaCreate().
To delete a created mapping, you must call the KnIoClose() function and pass the specified mapping handle in this function.
KnIommuAttachDevice()
This function is declared in the coresrv/iommu/iommu_api.h file.
Retcode KnIommuAttachDevice(rtl_uint16_t bdf);
This function adds the PCI device with the bdf identifier to the IOMMU group of the calling process (IOMMU domain).
Returns rcOk if successful.
Page top
KnIommuDetachDevice()
This function is declared in the coresrv/iommu/iommu_api.h file.
Retcode KnIommuDetachDevice(rtl_uint16_t bdf);
This function removes the PCI device with the bdf identifier from the IOMMU group of the calling process (IOMMU domain).
If successful, the function returns rcOk.
Page top
IoReadIoPort8(), IoReadIoPort16(), IoReadIoPort32()
These functions are declared in the coresrv/io/ports.h file.
rtl_uint8_t IoReadIoPort8(rtl_size_t port);
rtl_uint16_t IoReadIoPort16(rtl_size_t port);
rtl_uint32_t IoReadIoPort32(rtl_size_t port);
These functions read one, two, or four bytes, respectively, from the specified port and return the read value.
IoReadIoPortBuffer8(), IoReadIoPortBuffer16(), IoReadIoPortBuffer32()
These functions are declared in the coresrv/io/ports.h file.
void IoReadIoPortBuffer8(rtl_size_t port, rtl_uint8_t *dst, rtl_size_t cnt);
void IoReadIoPortBuffer16(rtl_size_t port, rtl_uint16_t *dst, rtl_size_t cnt);
void IoReadIoPortBuffer32(rtl_size_t port, rtl_uint32_t *dst, rtl_size_t cnt);
These functions read the sequence of one-, two-, or four-byte values, respectively, from the specified port and write the values to the dst array.
cnt is the length of sequence.
IoWriteIoPort8(), IoWriteIoPort16(), IoWriteIoPort32()
These functions are declared in the coresrv/io/ports.h file.
void IoWriteIoPort8(rtl_size_t port, rtl_uint8_t data);
void IoWriteIoPort16(rtl_size_t port, rtl_uint16_t data);
void IoWriteIoPort32(rtl_size_t port, rtl_uint32_t data);
The functions write a one-, two-, or four-byte data value to the specified port.
IoWriteIoPortBuffer8(), IoWriteIoPortBuffer16(), IoWriteIoPortBuffer32()
These functions are declared in the coresrv/io/ports.h file.
void IoWriteIoPortBuffer8(rtl_size_t port, const rtl_uint8_t *src,
rtl_size_t cnt);
void IoWriteIoPortBuffer16(rtl_size_t port, const rtl_uint16_t *src,
rtl_size_t cnt);
void IoWriteIoPortBuffer32(rtl_size_t port, const rtl_uint32_t *src,
rtl_size_t cnt);
These functions write the sequence of one-, two-, or four-byte values, respectively, from the src array to the specified port.
cnt is the length of sequence.
KnIoPermitPort()
This function is declared in the coresrv/io/ports.h file.
Retcode KnIoPermitPort(Handle rid, Handle *handle);
This function allows a process to access the port (range of ports) with the handle rid.
Output parameter handle contains the handle of this permission.
Returns rcOk if successful.
Example
static Retcode PortInit(IOPort *resource)
{
Retcode rc = rcFail;
rc = KnRegisterPorts(resource->base,
resource->size,
&resource->handle);
if (rc == rcOk)
rc = KnIoPermitPort(resource->handle, &resource->permitHandle);
resource->addr = (void *) (rtl_uintptr_t) resource->base;
return rc;
}
KnRegisterPort8(), KnRegisterPort16(), KnRegisterPort32()
These functions are declared in the coresrv/io/ports.h file.
Retcode KnRegisterPort8(rtl_uint16_t port, Handle *outRid);
Retcode KnRegisterPort16(rtl_uint16_t port, Handle *outRid);
Retcode KnRegisterPort32(rtl_uint16_t port, Handle *outRid);
These functions register an eight-, sixteen-, or thirty-two-bit port, respectively, with the port address and assign the outRid handle to it.
Return rcOk if the port allocation is successful.
If a port is no longer being used, it must be freed by using the KnIoClose() function.
KnRegisterPorts()
This function is declared in the coresrv/io/ports.h file.
Retcode KnRegisterPorts(rtl_uint16_t port, rtl_size_t size, Handle *outRid);
This function registers a range of ports (memory area) with the base address port and the specified size (in bytes) and assigns the outRid handle to it.
Returns rcOk if allocation of the port range is successful.
For a usage example, see KnIoPermitPort().
If a range of ports is no longer being used, it must be freed by using the KnIoClose() function.
IoReadMmBuffer8(), IoReadMmBuffer16(), IoReadMmBuffer32()
These functions are declared in the coresrv/io/mmio.h file.
void IoReadMmBuffer8(volatile rtl_uint8_t *baseReg, rtl_uint8_t *dst,
rtl_size_t cnt);
void IoReadMmBuffer16(volatile rtl_uint16_t *baseReg, rtl_uint16_t *dst,
rtl_size_t cnt);
void IoReadMmBuffer32(volatile rtl_uint32_t *baseReg, rtl_uint32_t *dst,
rtl_size_t cnt);
These functions read the sequence of one-, two-, or four-byte values, respectively, from the register mapped to the baseReg address and write the values to the dst array. cnt is the length of the sequence.
IoReadMmReg8(), IoReadMmReg16(), IoReadMmReg32()
These functions are declared in the coresrv/io/mmio.h file.
rtl_uint8_t IoReadMmReg8(volatile void *reg);
rtl_uint16_t IoReadMmReg16(volatile void *reg);
rtl_uint32_t IoReadMmReg32(volatile void *reg);
These functions read one, two, or four bytes, respectively, from the register mapped to the reg address and return the read value.
IoWriteMmBuffer8(), IoWriteMmBuffer16(), IoWriteMmBuffer32()
These functions are declared in the coresrv/io/mmio.h file.
void IoWriteMmBuffer8(volatile rtl_uint8_t *baseReg, const rtl_uint8_t *src,
rtl_size_t cnt);
void IoWriteMmBuffer16(volatile rtl_uint16_t *baseReg, const rtl_uint16_t *src,
rtl_size_t cnt);
void IoWriteMmBuffer32(volatile rtl_uint32_t *baseReg, const rtl_uint32_t *src,
rtl_size_t cnt);
These functions write the sequence of one-, two-, or four-byte values, respectively, from the src array to the register mapped to the baseReg address. cnt is the length of the sequence.
IoWriteMmReg8(), IoWriteMmReg16(), IoWriteMmReg32()
These functions are declared in the coresrv/io/mmio.h file.
void IoWriteMmReg8(volatile void *reg, rtl_uint8_t data);
void IoWriteMmReg16(volatile void *reg, rtl_uint16_t data);
void IoWriteMmReg32(volatile void *reg, rtl_uint32_t data);
These functions write a one-, two-, or four-byte data value to the register mapped to the reg address.
KnIoMapMem()
This function is declared in the coresrv/io/mmio.h file.
Retcode KnIoMapMem(Handle rid, rtl_uint32_t prot, rtl_uint32_t attr,
void **addr, Handle *handle);
This function maps the registered memory area that was assigned the handle rid to the address space of the process.
You can use the prot and attr input parameters to change the memory area protection attributes, or to disable caching.
Output parameters:
addris the pointer to the starting address of the virtual memory area.handlerefers to the handle of the virtual memory area.
Returns rcOk if successful.
prot refers to the attributes of memory area protection via MMU, with the following possible values:
- VMM_FLAG_READ – allow read.
- VMM_FLAG_WRITE – allow write.
- VMM_FLAG_READ | VMM_FLAG_WRITE – allow read and write.
- VMM_FLAG_RWX_MASK or VMM_FLAG_READ | VMM_FLAG_WRITE | VMM_FLAG_EXECUTE – full access to the memory area (these entries are equivalent).
attr – memory area attributes. Possible values:
- VMM_FLAG_CACHE_DISABLE – disable caching.
- VMM_FLAG_LOW_GUARD and VMM_FLAG_HIGH_GUARD add a protective page before and after the allocated memory, respectively.
- VMM_FLAG_ALIAS – flag indicates that the memory area may have multiple virtual addresses.
Example
static Retcode MemInit(IOMem *resource)
{
Retcode rc = rcFail;
rc = KnRegisterPhyMem(resource->base,
resource->size,
&resource->handle);
if (rc == rcOk)
rc = KnIoMapMem(resource->handle,
VMM_FLAG_READ | VMM_FLAG_WRITE,
VMM_FLAG_CACHE_DISABLE,
(void **) &resource->addr, &resource->permitHandle);
if (rc == rcOk)
resource->addr = ((rtl_uint8_t *) resource->addr
+ resource->offset);
return rc;
}
KnRegisterPhyMem()
This function is declared in the coresrv/io/mmio.h file.
Retcode KnRegisterPhyMem(rtl_uint64_t addr, rtl_size_t size, Handle *outRid);
This function registers a memory area with the specified size (in bytes) and beginning at the address addr.
If registration is successful, the handle assigned to the memory area will be passed to the outRid parameter, and the function will return rcOk.
The address addr must be page-aligned, and the specified size must be a multiple of the page size.
For a usage example, see KnIoMapMem().
If a memory area is no longer being used, it must be freed by using the KnIoClose() function.
Interrupts
The interface described here is a low-level interface. In most cases, it is recommended to use the interface provided by the kdf library to manage interrupts.
KnIoAttachIrq()
This function is declared in the coresrv/io/irq.h file.
Retcode KnIoAttachIrq(Handle rid, rtl_uint32_t flags, Handle *handle);
This function attaches the calling thread to the interrupt.
Input parameters:
ridis the interrupt handle received by using theKnRegisterIrq()call.flagsrefer to the interrupt flags.
Output parameter handle contains the IPC handle that will be used by the calling thread to wait for the interrupt after making the Recv() call.
If successful, the function returns rcOk, otherwise it returns an error code.
Interrupt flags
- IRQ_LEVEL_LOW indicates low level generation.
- IRQ_LEVEL_HIGH indicates high level generation.
- IRQ_EDGE_RAISE indicates rising edge generation.
- IRQ_EDGE_FALL indicates falling edge generation.
- IRQ_SHARED indicates a shared interrupt.
- IRQ_PRIO_LOW indicates a low-priority interrupt.
- IRQ_PRIO_NORMAL indicates normal priority.
- IRQ_PRIO_HIGH indicates high priority.
- IRQ_PRIO_RT indicates real-time priority.
KnIoDetachIrq()
This function is declared in the coresrv/io/irq.h file.
Retcode KnIoDetachIrq(Handle rid);
This function detaches the calling thread from the interrupt.
rid is the interrupt handle received by using the KnRegisterIrq() call.
If successful, the function returns rcOk, otherwise it returns an error code.
Page top
KnIoDisableIrq()
This function is declared in the coresrv/io/irq.h file.
Retcode KnIoDisableIrq(Handle rid);
Masks (prohibits) the interrupt with the handle rid.
If successful, the function returns rcOk.
Page top
KnIoEnableIrq()
This function is declared in the coresrv/io/irq.h file.
Retcode KnIoEnableIrq(Handle rid);
Unmasks (allows) the interrupt with the handle rid.
If successful, the function returns rcOk.
Page top
KnRegisterIrq()
This function is declared in the coresrv/io/irq.h file.
Retcode KnRegisterIrq(int irq, Handle *outRid);
Registers the interrupt with the number irq.
Output parameter outRid contains the interrupt handle.
If successful, the function returns rcOk.
If an interrupt is no longer being used, it must be freed by using the KnIoClose() function.
KnIoClose()
This function is declared in the coresrv/io/io_api.h file.
Retcode KnIoClose(Handle rid);
This function frees a registered input/output resource (I/O port(s), DMA buffer, interrupt or memory area for MMIO) with the rid handle.
If successfully freed, the function returns rcOk.
For a usage example, see KnIoDmaCreate().
Page top
KnGetMSecSinceStart()
This function is declared in the coresrv/time/time_api.h file.
rtl_size_t KnGetMSecSinceStart(void);
Returns the number of milliseconds that have elapsed since the start of the system.
Page top
KnGetRtcTime()
This function is declared in the coresrv/time/time_api.h file.
Retcode KnGetRtcTime(RtlRtcTime *rt);
This function writes the POSIX system time (in RTC format) to the rt parameter.
If successful, returns rcOk, or returns rcFail if an error occurs.
The RTC time format is defined by the RtlRtcTime structure (declared in the rtl/rtc.h file.):
typedef struct {
rtl_uint32_t msec; /**< milliseconds */
rtl_uint32_t sec; /**< second (0..59) */
rtl_uint32_t min; /**< minute (0..59) */
rtl_uint32_t hour; /**< hour (0..23) */
rtl_uint32_t mday; /**< day (1..31) */
rtl_uint32_t month; /**< month (0..11) */
rtl_int32_t year; /**< year - 1900 */
rtl_uint32_t wday; /**< week day (0..6) */
} RtlRtcTime;
KnGetSystemTime()
This function is declared in the coresrv/time/time_api.h file.
Retcode KnGetSystemTime(RtlTimeSpec *time);
This function lets you get the system time.
Output parameter time contains the POSIX system time in RtlTimeSpec format.
KnSetSystemTime()
This function is declared in the coresrv/time/time_api.h file.
Retcode KnSetSystemTime(RtlTimeSpec *time);
This function lets you set the system time.
The time parameter must contain the POSIX time in RtlTimeSpec format.
It is not recommended to call the KnSetSystemTime() function in the interrupt handler thread.
KnGetSystemTimeRes()
This function is declared in the coresrv/time/time_api.h file.
Retcode KnGetSystemTimeRes(RtlTimeSpec *res);
This function lets you get the resolution of the system time source.
Output parameter res contains the resolution in RtlTimeSpec format.
KnGetUpTime()
This function is declared in the coresrv/time/time_api.h file.
Retcode KnGetUpTime(RtlTimeSpec *time);
This function lets you get the time that has elapsed since the start of the system.
Output parameter time contains the time in RtlTimeSpec format.
KnGetUpTimeRes()
This function is declared in the coresrv/time/time_api.h file.
Retcode KnGetUpTimeRes(RtlTimeSpec *res);
This function receives the resolution of the source of time whose value can be obtained via KnGetUpTime().
Output parameter res contains the resolution in RtlTimeSpec format.
RtlTimeSpec
The timespec time format is defined by the RtlTimeSpec structure (declared in the rtl/rtc.h file).
typedef struct {
rtl_time_t sec; /**< integer number of seconds that have elapsed since the start of the Unix epoch
* or another defined point in time */
rtl_nsecs_t nsec; /**< adjustment in nanoseconds (number of nanoseconds
* that have elapsed since the point in time defined by the number of seconds*/
} RtlTimeSpec;
KosQueueAlloc()
This function is declared in the kos/queue.h file.
void *KosQueueAlloc(KosQueueHandle queue);
Allocates memory for the new object from the queue buffer.
If successful, the function returns the pointer to the memory for this object. If the buffer is full, it returns RTL_NULL.
Page top
KosQueueCreate()
This function is declared in the kos/queue.h file.
KosQueueHandle KosQueueCreate(unsigned objCount,
unsigned objSize,
unsigned objAlign,
void *buffer);
This function creates a queue of objects (fifo) and the buffer associated with this queue.
Parameters:
objCountis the maximum number of objects in the queue.objSizeis the object size (bytes).objAlignis the object alignment in bytes, and must be a power of two.bufferis the pointer to the external buffer for objects; if it is set equal to RTL_NULL, the buffer will be allocated by using theKosMemAlloc()function.
Returns the handle of the created queue and RTL_NULL if there is an error.
Page top
KosQueueDestroy()
This function is declared in the kos/queue.h file.
void KosQueueDestroy(KosQueueHandle queue);
This function deletes the specified queue and frees its allocated buffer.
KosQueueFlush()
This function is declared in the kos/queue.h file.
void KosQueueFlush(KosQueueHandle queue);
This function extracts all objects from the specified queue and frees all the memory occupied by it.
KosQueueFree()
This function is declared in the kos/queue.h file.
void KosQueueFree(KosQueueHandle queue, void *obj);
This function frees the memory occupied by object obj in the buffer of the specified queue.
The obj pointer can be received by calling the KosQueueAlloc() or KosQueuePop() function.
For a usage example, see KosQueuePop().
KosQueuePop()
This function is declared in the kos/queue.h file.
void *KosQueuePop(KosQueueHandle queue, rtl_uint32_t timeout);
This function extracts the object from the start of the specified queue and returns the pointer to it.
The timeout parameter determines the behavior of the function if the queue is empty:
- 0 – immediately return RTL_NULL.
- INFINITE_TIMEOUT – lock and wait for a new object in the queue.
- Any other value of
timeoutmeans that the system is waiting for a new object in the queue for the specifiedtimeoutin milliseconds; when this timeout expires, RTL_NULL is returned.
Example
int GpioEventDispatch(void *context)
{
GpioEvent *event;
GpioDevice *device = context;
rtl_bool proceed = rtl_true;
do {
event = KosQueuePop(device->queue, INFINITE_TIMEOUT);
if (event != RTL_NULL) {
if (event->type == GPIO_EVENT_TYPE_THREAD_ABORT) {
proceed = rtl_false;
} else {
GpioDeliverEvent(device, event);
}
KosQueueFree(device->queue, event);
}
} while (proceed);
KosPutObject(device);
return rcOk;
}
KosQueuePush()
This function is declared in the kos/queue.h file.
void KosQueuePush(KosQueueHandle queue, void *obj);
Adds the obj object to the end of the specified queue.
The obj pointer can be received by calling the KosQueueAlloc() or KosQueuePop() function.
IoReadBarrier()
This function is declared in the coresrv/io/barriers.h file.
void IoReadBarrier(void);
Adds a read memory barrier. Linux equivalent: rmb().
IoReadWriteBarrier()
This function is declared in the coresrv/io/barriers.h file.
void IoReadWriteBarrier(void);
Adds a combined barrier. Linux equivalent: mb().
IoWriteBarrier()
This function is declared in the coresrv/io/barriers.h file.
void IoWriteBarrier(void);
Adds a write memory barrier. Linux equivalent: wmb().
Receiving information about CPU time and memory usage
The libkos library provides an API that lets you receive information about CPU time and memory usage. This API is defined in the header file sysroot-*-kos/include/coresrv/stat/stat_api.h from the KasperskyOS SDK.
To get information about CPU time and memory usage and other statistical data, you need to build a solution with a KasperskyOS kernel version that supports performance counters. For more details, refer to "Image library".
Receiving information about CPU time
CPU uptime is counted from the startup of the KasperskyOS kernel.
To receive information about CPU time, you need to use the KnGroupStatGetParam() and KnTaskStatGetParam() functions. The values provided in the table below need to be passed in the param parameter of these functions.
Information about CPU time
Function |
Value of the |
Obtained value |
|---|---|---|
|
|
CPU uptime in kernel mode |
|
|
CPU uptime in user mode |
|
|
CPU uptime in idle mode |
|
|
CPU uptime spent on process execution |
|
|
CPU uptime spent on process execution in user mode |
The CPU uptime obtained by calling the KnGroupStatGetParam() or KnTaskStatGetParam() function is presented in nanoseconds.
Receiving information about memory usage
To receive information about memory usage, you need to use the KnGroupStatGetParam() and KnTaskStatGetParam() functions. The values provided in the table below need to be passed in the param parameter of these functions.
Information about memory usage
Function |
Value of the |
Obtained value |
|---|---|---|
|
|
Total size of all installed RAM |
|
|
Size of free RAM |
|
|
Size of RAM used by the process |
The memory size obtained by calling the KnGroupStatGetParam() or KnTaskStatGetParam() function is presented as the number of memory pages. The size of a memory page is 4 KB for all hardware platforms supported by KasperskyOS.
The amount of RAM used by a process refers only to the memory allocated directly for this process. For example, if the memory of a process is mapped to an MDL buffer created by another process, the size of this buffer is not included in this value.
Enumerating processes
To get information about CPU time and memory usage by each process, do the following:
- Get the list of processes by calling the
KnGroupStatGetTaskList()function. - Get the number of items on the list of processes by calling the
KnTaskStatGetTasksCount()function. - Iterate through the list of processes, repeating the following steps:
- Get an item from the list of processes by calling the
KnTaskStatEnumTaskList()function. - Get the process name by calling the
KnTaskStatGetName()function.This is necessary to identify the process for which the information about CPU time and memory usage will be received.
- Get information about CPU time and memory usage by calling the
KnTaskStatGetParam()function. - Verify that the process was not terminated. If the process was terminated, do not use the obtained information about CPU time and memory usage by this process.
To verify that the process was not terminated, you need to call the
KnTaskStatGetParam()function, using theparamparameter to pass theTASK_PARAM_STATEvalue. A value other thanTaskStateTerminatedshould be received. - Finish working with the item on the list of processes by calling the
KnTaskStatCloseTask()function.
- Get an item from the list of processes by calling the
- Finish working with the list of processes by calling the
KnTaskStatCloseTaskList()function.
Calculating CPU load
CPU load can be indicated as a percentage of total CPU load or as a percentage of CPU load by each process. These indicators are calculated for a specific time interval, at the start and end of which the information about CPU time utilization was received. (For example, CPU load can be monitored with periodic receipt of information about CPU time utilization.) The values obtained at the start of the interval need to be subtracted from the values obtained at the end of the interval. In other words, the following increments need to be obtained for the interval:
- TK – CPU uptime in kernel mode.
- TU – CPU uptime in user mode.
- TIDLE – CPU uptime in idle mode.
- Ti [i=1,2,...,n] – CPU time spent on execution of the ith process.
The percentage of total CPU load is calculated as follows:
(TK+TU)/(TK+TU+TIDLE).
The percentage of CPU load by the ith process is calculated as follows:
Ti/(TK+TU+TIDLE).
Receiving additional information about processes
In addition to information about CPU time and memory usage, the KnGroupStatGetParam() and KnTaskStatGetParam() functions also let you obtain the following information:
- Number of processes
- Number of threads
- Number of threads in one process
- Parent process ID (PPID)
- Process priority
- Number of handles owned by a process
- Size of virtual memory of a process
The KnTaskStatGetId() function gets the process ID (PID).
Call()
This function is declared in the coresrv/syscalls.h file.
Retcode Call(Handle handle, const SMsgHdr *msgOut, SMsgHdr *msgIn);
This function sends an IPC request to the server process and locks the calling thread until an IPC response or error is received. This function is called by the client process.
Parameters:
handleis the client IPC handle of the utilized channel.msgOutis the buffer containing the IPC request.msgInis the buffer for the IPC response.
Returned value:
- rcOk means that the exchange of IPC messages was successfully completed.
- rcInvalidArgument means that the IPC request and/or IPC response has an invalid structure.
- rcSecurityDisallow means that the Kaspersky Security Module prohibits forwarding of the IPC request or IPC response.
- rcNotConnected means that the server IPC handle of the channel was not found.
Other return codes are available.
Page top
Recv()
This function is declared in the coresrv/syscalls.h file.
Retcode Recv(Handle handle, SMsgHdr *msgIn);
This function locks the calling thread until an IPC request is received. This function is called by the server process.
Parameters:
handleis the server IPC handle of the utilized channel.msgInis the buffer for an IPC request.
Returned value:
- rcOk means that an IPC request was successfully received.
- rcInvalidArgument means that the IPC request has an invalid structure.
- rcSecurityDisallow means that IPC request forwarding is prohibited by the Kaspersky Security Module.
Other return codes are available.
Page top
Reply()
This function is declared in the coresrv/syscalls.h file.
Retcode Reply(Handle handle, const SMsgHdr *msgOut);
This function sends an IPC response and locks the calling thread until the client receives a response or until an error is received. This function is called by the server process.
Parameters:
handleis the server IPC handle of the utilized channel.msgOutis the buffer containing an IPC response.
Returned value:
- rcOk means that an IPC response was successfully received by the client.
- rcInvalidArgument means that the IPC response has an invalid structure.
- rcSecurityDisallow means that IPC response forwarding is prohibited by the Kaspersky Security Module.
Other return codes are available.
Page top
POSIX support limitations
KasperskyOS uses a limited POSIX interface oriented toward the POSIX.1-2008 standard (without XSI support). These limitations are primarily due to security precautions.
Limitations affect the following:
- Interaction between processes
- Interaction between threads via signals
- Standard input/output
- Asynchronous input/output
- Use of robust mutexes
- Terminal operations
- Shell usage
- Management of file handles
Limitations include:
- Unimplemented interfaces
- Interfaces that are implemented with deviations from the POSIX.1-2008 standard
- Stub interfaces that do not perform any operations except assign the
ENOSYSvalue to theerrnovariable and return the value-1
In KasperskyOS, signals cannot interrupt the Call(), Recv(), and Reply() system calls that support the operation of libraries that implement the POSIX interface.
The KasperskyOS kernel does not transmit signals.
Limitations on interaction between processes
Interface |
Purpose |
Implementation |
Header file based on the POSIX.1-2008 standard |
|---|---|---|---|
|
Create a new (child) process. |
Stub |
|
|
Register the handlers that are called before and after the child process is created. |
Not implemented |
|
|
Wait for the child process to stop or complete. |
Stub |
|
|
Wait for the state of the child process to change. |
Not implemented |
|
|
Wait for the child process to stop or complete. |
Stub |
|
|
Run the executable file. |
Stub |
|
|
Run the executable file. |
Stub |
|
|
Run the executable file. |
Stub |
|
|
Run the executable file. |
Stub |
|
|
Run the executable file. |
Stub |
|
|
Run the executable file. |
Stub |
|
|
Run the executable file. |
Stub |
|
|
Move the process to another group or create a group. |
Stub |
|
|
Create a session. |
Not implemented |
|
|
Get the group ID for the calling process. |
Not implemented |
|
|
Get the group ID. |
Stub |
|
|
Get the ID of the parent process. |
Not implemented |
|
|
Get the session ID. |
Stub |
|
|
Get the time values for the process and its descendants. |
Stub |
|
|
Send a signal to the process or group of processes. |
Only the |
|
|
Wait for a signal. |
Not implemented |
|
|
Check for received blocked signals. |
Not implemented |
|
|
Get and change the set of blocked signals. |
Stub |
|
|
Wait for a signal. |
Stub |
|
|
Wait for a signal from the defined set of signals. |
Stub |
|
|
Send a signal to the process. |
Not implemented |
|
|
Wait for a signal from the defined set of signals. |
Not implemented |
|
|
Wait for a signal from the defined set of signals. |
Not implemented |
|
|
Create an unnamed semaphore. |
You cannot create an unnamed semaphore for synchronization between processes. If a non-zero value is passed to the function through the |
|
|
Create/open a named semaphore. |
You cannot open a named semaphore that was created by another process. Named semaphores (like unnamed semaphores) are local, which means that they are accessible only to the process that created them. |
|
|
Define the mutex attribute that allows the mutex to be used by multiple processes. |
You cannot define the mutex attribute that allows the mutex to be used by multiple processes. If the |
|
|
Define the barrier attribute that allows the barrier to be used by multiple processes. |
You cannot define the barrier attribute that allows the barrier to be used by multiple processes. If the |
|
|
Define the conditional variable attribute that allows the conditional variable to be used by multiple processes. |
You cannot define the conditional variable attribute that allows the conditional variable to be used by multiple processes. If the |
|
|
Define the read/write lock object attribute that allows the read/write lock object attribute to be used by multiple processes. |
You cannot define the read/write lock object attribute that allows the read/write lock object attribute to be used by multiple processes. If the |
|
|
Create a spin lock. |
You cannot create a spin lock for synchronization between processes. If the |
|
|
Create or open a shared memory object. |
Not implemented |
|
|
Map to memory. |
You cannot perform memory mapping for interaction between processes. If the |
|
|
Define the memory access permissions. |
This function works as a stub by default. To use this function, define special settings for the KasperskyOS kernel. |
|
|
Create an unnamed channel. |
You cannot use an unnamed channel for data transfer between processes. Unnamed channels are local, which means that they are accessible only to the process that created them. |
|
|
Create a special FIFO file (named channel). |
Stub |
|
|
Create a special FIFO file (named channel). |
Not implemented |
|
Limitations on interaction between threads via signals
Interface |
Purpose |
Implementation |
Header file based on the POSIX.1-2008 standard |
|---|---|---|---|
|
Send a signal to a thread. |
You cannot send a signal to a thread. If a signal number is passed to the function through the |
|
|
Get and change the set of blocked signals. |
Stub |
|
|
Restore the state of the control thread and the signals mask. |
Not implemented |
|
|
Save the state of the control thread and the signals mask. |
Not implemented |
|
Standard input/output limitations
Interface |
Purpose |
Implementation |
Header file based on the POSIX.1-2008 standard |
|---|---|---|---|
|
Formatted print to file. |
Not implemented |
|
|
Use memory as a data stream. |
Not implemented |
|
|
Use dynamically allocated memory as a data stream. |
Not implemented |
|
|
Formatted print to file. |
Not implemented |
|
Asynchronous input/output limitations
Interface |
Purpose |
Implementation |
Header file based on the POSIX.1-2008 standard |
|---|---|---|---|
|
Cancel input/output requests that are waiting to be handled. |
Not implemented |
|
|
Receive an error from an asynchronous input/output operation. |
Not implemented |
|
|
Request the execution of input/output operations. |
Not implemented |
|
|
Request a file read operation. |
Not implemented |
|
|
Get the status of an asynchronous input/output operation. |
Not implemented |
|
|
Wait for the completion of asynchronous input/output operations. |
Not implemented |
|
|
Request a file write operation. |
Not implemented |
|
|
Request execution of a set of input/output operations. |
Not implemented |
|
Limitations on the use of robust mutexes
Interface |
Purpose |
Implementation |
Header file based on the POSIX.1-2008 standard |
|---|---|---|---|
|
Return a robust mutex to a consistent state. |
Not implemented |
|
|
Get a robust mutex attribute. |
Not implemented |
|
|
Define a robust mutex attribute. |
Not implemented |
|
Terminal operation limitations
Interface |
Purpose |
Implementation |
Header file based on the POSIX.1-2008 standard |
|---|---|---|---|
|
Get the path to the file of the control terminal. |
This function only returns or passes an empty string through the |
|
|
Define the terminal settings. |
The input speed, output speed, and other settings specific to hardware terminals are ignored. |
|
|
Wait for output completion. |
This function only returns the value |
|
|
Suspend or resume receipt or transmission of data. |
Suspending output and resuming suspended output are not supported. |
|
|
Clear the input queue or output queue, or both of these queues. |
This function only returns the value |
|
|
Break the connection with the terminal for a set time. |
This function only returns the value |
|
|
Get the path to the terminal file. |
This function only returns a null pointer. |
|
|
Get the path to the terminal file. |
This function only returns an error value. |
|
|
Get the ID of a group of processes using the terminal. |
This function only returns the value |
|
|
Define the ID for a group of processes using the terminal. |
This function only returns the value |
|
|
Get the ID of a group of processes for the leader of the session connected to the terminal. |
This function only returns the value |
|
Shell operation limitations
Interface |
Purpose |
Implementation |
Header file based on the POSIX.1-2008 standard |
|---|---|---|---|
|
Create a child process for command execution and a channel for this process. |
This function only assigns the |
|
|
Close the channel with the child process created by the |
This function cannot be used because its input parameter is the data stream handle returned by the |
|
|
Create a child process for command execution. |
Stub |
|
|
Perform a shell-like expansion of the string. |
Not implemented |
|
|
Free up the memory allocated for the results of calling the |
Not implemented |
|
Limitations on management of file handles
Interface |
Purpose |
Implementation |
Header file based on the POSIX.1-2008 standard |
|---|---|---|---|
|
Make a copy of the handle of an opened file. |
Handles of regular files, standard I/O streams, sockets and channels are supported. There is no guarantee that the lowest available handle will be received. |
|
|
Make a copy of the handle of an opened file. |
Handles of regular files, standard I/O streams, sockets and channels are supported. The handle of an opened file needs to be passed through the |
|
Concurrently using POSIX and other interfaces
Using libkos together with Pthreads
In a thread created using Pthreads, you cannot use the following libkos interfaces:
The following libkos interfaces can be used together with Pthreads (and other POSIX interfaces):
Using POSIX together with libkos threads
POSIX methods cannot be used in threads that were created using libkos threads.
Using IPC together with Pthreads/libkos threads
Methods for IPC can be used in any threads that were created using Pthreads or libkos threads.
Page top
MessageBus component
The MessageBus component implements the message bus that ensures receipt, distribution and delivery of messages between applications running KasperskyOS. This bus is based on the publisher-subscriber model. Use of a message bus lets you avoid having to create a large number of IPC channels to connect each subscriber application to each publisher application.
Messages transmitted through the MessageBus cannot contain data. These messages can be used only to notify subscribers about events. See "Message structure" section below.
The MessageBus component provides an additional level of abstraction over KasperskyOS IPC that helps simplify the development and expansion of application-layer applications. MessageBus is a separate program that is accessed through IPC. However, developers are provided with a MessageBus access library that lets you avoid direct use of IPC calls.
The API of the access library provides the following interfaces:
IProviderFactoryprovides factory methods for obtaining access to instances of all other interfaces.IProviderControlis the interface for registering and deregistering a publisher and subscriber in the bus.IProvider (MessageBus component)is the interface for transferring a message to the bus.ISubscriberis the callback interface for sending a message to a subscriber.IWaiteris the interface for waiting for a callback when the corresponding message appears.
Message structure
Each message contains two parameters:
topicis the identifier of the message subject.idis an additional parameter that identifies a particular message.
The topic and id parameters are unique for each message. The interpretation of topic+id is determined by the contract between the publisher and subscriber. For example, if there are changes to the configuration data used by the publisher and subscriber, the publisher forwards a message regarding the modified data and the id of the specific entry containing the new data. The subscriber uses mechanisms outside of the MessageBus to receive the new data based on the id key.
IProviderFactory interface
The IProviderFactory interface provides factory methods for receiving the interfaces necessary for working with the MessageBus component.
A description of the IProviderFactory interface is provided in the file named messagebus/i_messagebus_control.h.
An instance of the IProviderFactory interface is obtained by using the free InitConnection() function, which receives the name of the IPC connection between the application software and the MessageBus program. The connection name is defined in the init.yaml.in file when describing the solution configuration. If the connection is successful, the output parameter contains a pointer to the IProviderFactory interface.
- The interface for registering and deregistering (see "IProviderControl interface") publishers and subscribers in the message bus is obtained by using the
IProviderFactory::CreateBusControl()method. - The interface containing the methods enabling the publisher to send messages to the bus (see "IProvider interface (MessageBus component)") is obtained by using the
IProviderFactory::CreateBus()method. - The interfaces containing the methods enabling the subscriber to receive messages from the bus (see "ISubscriber, IWaiter and ISubscriberRunner interfaces") are obtained by using the
IProviderFactory::CreateCallbackWaiterandIProviderFactory::CreateSubscriberRunner()methods.It is not recommended to use the
IWaiterinterface, because calling a method of this interface is a locking call.
i_messagebus_control.h (fragment)
class IProviderFactory
{
...
virtual fdn::ResultCode CreateBusControl(IProviderControlPtr& controlPtr) = 0;
virtual fdn::ResultCode CreateBus(IProviderPtr& busPtr) = 0;
virtual fdn::ResultCode CreateCallbackWaiter(IWaiterPtr& waiterPtr) = 0;
virtual fdn::ResultCode CreateSubscriberRunner(ISubscriberRunnerPtr& runnerPtr) = 0;
...
};
...
fdn::ResultCode InitConnection(const std::string& connectionId, IProviderFactoryPtr& busFactoryPtr);
IProviderControl interface
The IProviderControl interface provides the methods for registering and deregistering publishers and subscribers in the message bus.
A description of the IProviderControl interface is provided in the file named messagebus/i_messagebus_control.h.
The IProviderFactory interface is used to obtain an interface instance.
Registering and deregistering a publisher
The IProviderControl::RegisterPublisher() method is used to register the publisher in the message bus. This method receives the message subject and puts the unique ID of the bus client into the output parameter. If the message subject is already registered in the bus, the call will be declined and the client ID will not be filled.
The IProviderControl::UnregisterPublisher() method is used to deregister a publisher in the message bus. This method accepts the bus client ID received during registration. If the indicated ID is not registered as a publisher ID, the call will be declined.
i_messagebus_control.h (fragment)
class IProviderControl
{
...
virtual fdn::ResultCode RegisterPublisher(const Topic& topic, ClientId& id) = 0;
virtual fdn::ResultCode UnregisterPublisher(ClientId id) = 0;
...
};
Registering and deregistering a subscriber
The IProviderControl::RegisterSubscriber() method is used to register the subscriber in the message bus. This method accepts the subscriber name and the list of subjects of messages for the necessary subscription, and puts the unique ID of the bus client into the output parameter.
The IProviderControl::UnregisterSubscriber() method is used to deregister a subscriber in the message bus. This method accepts the bus client ID received during registration. If the indicated ID is not registered as a subscriber ID, the call will be declined.
i_messagebus_control.h (fragment)
class IProviderControl
{
...
virtual fdn::ResultCode RegisterSubscriber(const std::string& subscriberName, const std::set<Topic>& topics, ClientId& id) = 0;
virtual fdn::ResultCode UnregisterSubscriber(ClientId id) = 0;
...
};
IProvider interface (MessageBus component)
The IProvider interface provides the methods enabling the publisher to send messages to the bus.
A description of the IProvider interface is provided in the file named messagebus/i_messagebus.h.
The IProviderFactory interface is used to obtain an interface instance.
Sending a message to the bus
The IProvider::Push() method is used to send a message. This method accepts the bus client ID received during registration and the message ID. If the message queue in the bus is full, the call will be declined.
i_messagebus.h (fragment)
class IProvider
{
public:
...
virtual fdn::ResultCode Push(ClientId id, BundleId dataId) = 0;
...
};
ISubscriber, IWaiter and ISubscriberRunner interfaces
The ISubscriber, IWaiter, and ISubscriberRunner interfaces provide the methods enabling the subscriber to receive messages from the bus and process them.
Descriptions of the ISubscriber, IWaiter and ISubscriberRunner interfaces are provided in the file named messagebus/i_subscriber.h.
The IProviderFactory interface is used to obtain instances of the IWaiter and ISubscriberRunner interfaces. The implementation of the ISubscriber callback interface is provided by the subscriber application.
Receiving a message from the bus
You can use the IWaiter::Wait() or ISubscriberRunner::Run() method to switch a subscriber to standby mode, waiting for a message from the bus. These methods accept the bus client ID and the pointer to the ISubscriber callback interface. If the client ID is not registered, the call will be declined.
It is not recommended to use the IWaiter interface, because calling the IWaiter::Wait() method is a locking call.
The ISubscriber::OnMessage() method will be called when a message is received from the bus. This method accepts the message subject and message ID.
i_subscriber.h (fragment)
class ISubscriber
{
...
virtual fdn::ResultCode OnMessage(const std::string& topic, BundleId id) = 0;
};
...
class IWaiter
{
...
[[deprecated("Use ISubscriberRunner::Run method instead.")]]
virtual fdn::ResultCode Wait(ClientId id, const ISubscriberPtr& subscriberPtr) = 0;
};
...
class ISubscriberRunner
{
...
virtual fdn::ResultCode Run(ClientId id, const ISubscriberPtr& subscriberPtr) = 0;
};
Return codes
Overview
In a KasperskyOS-based solution, the return codes of functions of various APIs (for example, APIs of the libkos and kdf libraries, drivers, transport code, and application software) are 32-bit signed integers. This type is defined in the sysroot-*-kos/include/rtl/retcode.h header file from the KasperskyOS SDK as follows:
typedef __INT32_TYPE__ Retcode;
The set of return codes consists of a success code with a value of 0 and error codes. An error code is interpreted as a data structure whose format is described in the sysroot-*-kos/include/rtl/retcode.h header file from the KasperskyOS SDK. This format provides for multiple fields that contain not only information about the results of a function call, but also the following additional information:
- Flag in the
Customerfield indicating that the error code was defined by the developers of the KasperskyOS-based solution and not by the developers of software from the KasperskyOS SDK.Thanks to the flag in the
Customerfield, developers of a KasperskyOS-based solution and developers of software from the KasperskyOS SDK can define error codes from non-overlapping sets. - Global ID of the error code in the
Spacefield.Global IDs let you define non-overlapping sets of error codes. Error codes can be generic or specific. Generic error codes can be used in the APIs of any solution components and in the APIs of any constituent parts of solution components (for example, a driver or VFS may be a constituent part of a solution component). Specific error codes are used in the APIs of one or more solution components or in the APIs of one or more constituent parts of solution components.
For example, the
RC_SPACE_GENERALID corresponds to generic errors, theRC_SPACE_KERNELID corresponds to error codes of the kernel, and theRC_SPACE_DRIVERSID corresponds to error codes of drivers. - Local ID of the error code in the
Facilityfield.Local IDs let you define non-overlapping subsets of error codes within the set of error codes corresponding to one global ID. For example, the set of error codes with the global ID
RC_SPACE_DRIVERSincludes non-overlapping subsets of error codes with the local IDsRC_FACILITY_I2C,RC_FACILITY_USB, andRC_FACILITY_BLKDEV.
The global and local IDs of specific error codes are assigned by the developers of a KasperskyOS-based solution and by the developers of software from the KasperskyOS SDK independently of each other. In other words, two sets of global IDs are generated. Each global ID has a unique meaning within one set. Each local ID has a unique meaning within a set of local IDs related to one global ID. Generic error codes can be used in any API.
This type of centralized approach helps avoid situations in which the same error codes have various meanings within a KasperskyOS-based solution. This is necessary to eliminate a potential problem transmitting error codes through different APIs. For example, this problem occurs when drivers call kdf library functions, receive error codes, and return these codes through their own APIs. If error codes are generated without a centralized approach, the same error code can have different meanings for the kdf library and for the driver. Under these conditions, drivers return correct error codes only if the error codes of the kdf library are converted into error codes of each driver. In other words, error codes in a KasperskyOS-based solution are assigned in such way that does not require conversion of these codes during their transit through various APIs.
The information about return codes provided here does not apply to functions of a POSIX interface or the APIs of third-party software used in KasperskyOS-based solutions.
Generic return codes
Return codes that are generic for APIs of all solution components and their constituent parts are defined in the sysroot-*-kos/include/rtl/retcode.h header file from the KasperskyOS SDK. Descriptions of generic return codes are provided in the table below.
Generic return codes
Return code |
Description |
|---|---|
|
The function completed successfully. |
|
Invalid function argument. |
|
No connection between the client and server sides of interaction. For example, there is no server IPC handle. |
|
Insufficient memory to perform the operation. |
|
Buffer too small. |
|
The function ended with an internal error related to incorrect logic. Some examples of internal errors include values outside of the permissible limits, and null indicators and values where they are not permitted. |
|
Error sending an IPC message. |
|
Error receiving an IPC message. |
|
IPC message was not transmitted due to the IPC message source. |
|
IPC message was not transmitted due to the IPC message recipient. |
|
IPC was interrupted by another process thread. |
|
Indicates that the function needs to be called again. |
|
The function ended with an error. |
|
The operation cannot be performed on the resource. |
|
Initialization failed. |
|
The function was not implemented. |
|
Buffer too large. |
|
Resource temporarily unavailable. |
|
Resource not found. |
|
Timed out. |
|
The operation was denied by security mechanisms. |
|
The operation will result in a block. |
|
The operation was aborted. |
|
Invalid function called in the interrupt handler. |
|
Set of elements already contains the element being added. |
|
Operation cannot be completed. |
|
Resource access rights were revoked. |
|
Resource quota exceeded. |
|
Device not found. |
Defining error codes
To define an error code, the developer of a KasperskyOS-based solution needs to use the MAKE_RETCODE() macro defined in the sysroot-*-kos/include/rtl/retcode.h header file from the KasperskyOS SDK. The developer must also use the customer parameter to pass the symbolic constant RC_CUSTOMER_TRUE.
Example:
An error description that is passed via the desc parameter is not used by the MAKE_RETCODE() macro. This description is needed to create a database of error codes when building a KasperskyOS-based solution. At present, a mechanism for creating and using such a database has not been implemented.
Reading error code structure fields
The RC_GET_CUSTOMER(), RC_GET_SPACE(), RC_GET_FACILITY() and RC_GET_CODE() macros defined in the sysroot-*-kos/include/rtl/retcode.h header file from the KasperskyOS SDK let you read error code structure fields.
The RETCODE_HR_PARAMS() and RETCODE_HR_FMT() macros defined in the sysroot-*-kos/include/rtl/retcode_hr.h header file from the KasperskyOS SDK are used for formatted display of error details.
Building a KasperskyOS-based solution
This section contains the following information:
- Description of the KasperskyOS-based solution build process.
- Descriptions of the scripts, libraries and build templates provided in KasperskyOS Community Edition.
Building a solution image
A KasperskyOS-based solution consists of system software (including the KasperskyOS kernel and Kaspersky Security Module) and application software integrated for operation within a software/hardware system.
For more details, refer to Structure and startup of the solution image.
System programs and application software
Programs are divided into two types according to their purpose:
- System programs create the infrastructure for application software. For example, they facilitate hardware operations, support the IPC mechanism, and implement file systems and network protocols. System programs are included in KasperskyOS Community Edition. If necessary, you can develop your own system programs.
- Application software is designed for interaction with a solution user and for performing user tasks. Application software is not included in KasperskyOS Community Edition.
Building programs during the solution build process
During a solution build, programs are divided into the following two types:
- System programs provided as executable files in KasperskyOS Community Edition.
- System programs or application software that requires linking to an executable file.
Programs that require linking are divided into the following types:
- System programs that implement an IPC interface whose ready-to-use transport libraries are provided in KasperskyOS Community Edition.
- Application software that implements its own IPC interface. To build this software, transport methods and types need to be generated by using the NK compiler.
- Client programs that do not provide endpoints.
Building a solution image
KasperskyOS Community Edition provides an image of the KasperskyOS kernel and the executable files of some system programs and driver applications that are ready to use in a solution.
A specialized Einit program intended for starting all other programs, and a Kaspersky Security Module are built for each specific solution and are therefore not already provided in KasperskyOS Community Edition. Instead, the toolchain provided in KasperskyOS Community Edition includes the tools for building these resources.
The general step-by-step build scenario is described in the article titled Build process overview. A solution image can be built as follows:
- [Recommended] Using scripts of the
CMakebuild system, which is provided in KasperskyOS Community Edition. - Without CMake: using other automated build systems or manually with scripts and compilers provided in KasperskyOS Community Edition.
Build process overview
To build a solution image, the following is required:
- Prepare EDL, CDL and IDL descriptions of applications, an init description file (
init.yamlby default), and files containing a description of the solution security policy (security.pslby default).When building with
CMake, an EDL description can be generated by using thegenerate_edl_file()command. - Generate *.edl.h files for all programs except the system programs provided in KasperskyOS Community Edition.
- When building with
CMake, thenk_build_edl_files()command is used for this purpose. - When building without
CMake, the NK compiler must be used for this.
- When building with
- For programs that implement their own IPC interface, generate code of the transport methods and types that are used for generating, sending, receiving and processing IPC messages.
- When building with
CMake, thenk_build_idl_files()andnk_build_cdl_files()commands are used for these purposes. - When building without
CMake, the NK compiler must be used for this.
- When building with
- Build all programs that are part of the solution, and link them to the transport libraries of system programs or applications if necessary. To build applications that implement their own IPC interface, you will need the code containing transport methods and types that was generated at step 3.
- When building with
CMake, standard build commands are used for this purpose. The necessary cross-compilation configuration is done automatically. - When building without
CMake, the cross compilers included in KasperskyOS Community Edition must be manually used for this purpose.
- When building with
- Build the Einit initializing program.
- When building with
CMake, theEinitprogram is built during the solution image build process using thebuild_kos_qemu_image()andbuild_kos_hw_image()commands. - When building without
CMake, the einit tool must be used to generate the code of theEinitprogram. Then theEinitapplication must be built using the cross compiler that is provided in KasperskyOS Community Edition.
- When building with
- Build the Kaspersky Security Module.
- When building with
CMake, the security module is built during the solution image build process using thebuild_kos_qemu_image()andbuild_kos_hw_image()commands. - When building without
CMake, themakekssscript must be used for this purpose.
- When building with
- Create the solution image.
- When building with
CMake, thebuild_kos_qemu_image()andbuild_kos_hw_image()commands are used for this purpose. - When building without
CMake, themakeimgscript must be used for this.
- When building with
Example 1
For the basic hello example included in KasperskyOS Community Edition that contains one application that does not provide any services, the build scenario looks as follows:
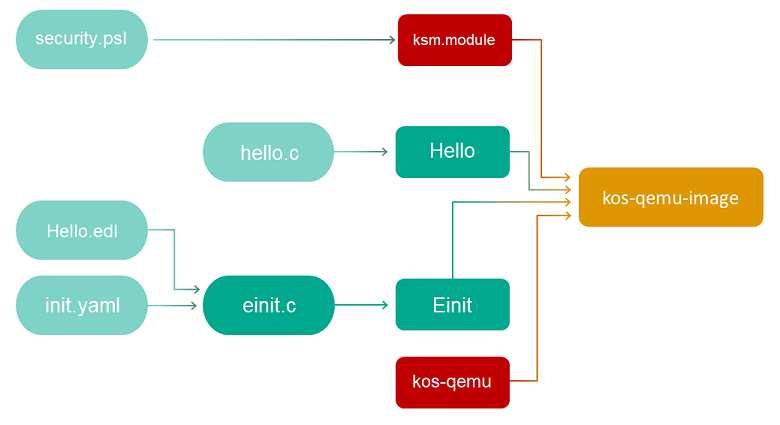
Example 2
The echo example included in KasperskyOS Community Edition describes a basic case of interaction between two programs via an IPC mechanism. To set up this interaction, you will need to implement an interface with the Ping method on a server and put the Ping service into a new component (for example, Ping), and an instance of this component needs to be put into the EDL description of the Server program.
If a solution contains programs that utilize an IPC mechanism, the build scenario looks as follows:
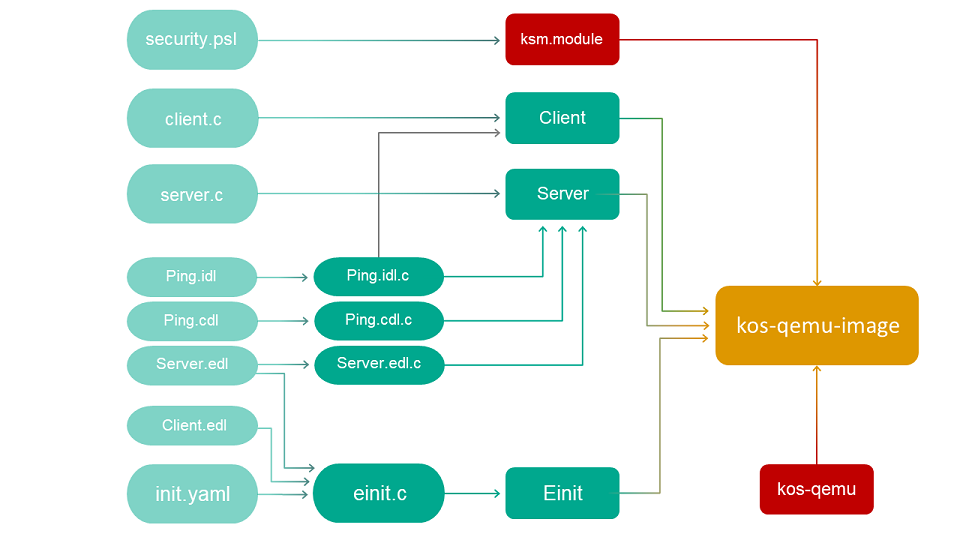
Using CMake from the contents of KasperskyOS Community Edition
To automate the process of preparing the solution image, you need to configure the CMake build system. You can base this system on the build system parameters used in the examples from KasperskyOS Community Edition.
CMakeLists.txt files use the standard CMake syntax, and commands and macros from libraries provided in KasperskyOS Community Edition.
Recommended structure of project directories
When creating a KasperskyOS-based solution, it is recommended to use the following directory structure in a project to simplify the use of CMake scripts:
- In the project root, create a CMakeLists.txt boot file containing the general build instructions for the entire solution.
- The source code of each program being developed should be placed into a separate directory within the
srcsubdirectory. - Create CMakeLists.txt files for building each application in the corresponding directories.
- To generate the source code of the
Einitprogram, you should create a separateeinitdirectory containing thesrcsubdirectory in which you should put the init.yaml.in and security.psl.in templates.Any other files that need to be included in the solution image can also be put into this directory.
- Create a CMakeLists.txt file for building the
Einitprogram in theeinitdirectory. - The files of EDL, CDL and IDL descriptions should be put into the
resourcesdirectory in the project root. - [Optional] Create a
cross-build.shbuild script containing the commands to start generating build files (cmakecommand), to build the solution (makecommand), and to start the solution.
Example structure of project directories
example$ tree
.
├── CMakeLists.txt
├── cross-build.sh
├── hello
│ ├── CMakeLists.txt
│ ├── src
│ │ ├── hello.c
├── einit
│ ├── CMakeLists.txt
│ ├── src
│ │ ├── init.yaml.in
│ │ ├── security.psl.in
│ │ ├── fstab
├── resources
│ ├── Hello.idl
│ ├── Hello.cdl
│ ├── Hello.edl
Building a project
To prepare for a build using the CMake build system, the following is required:
- Prepare a CMakeLists.txt boot file containing the general build instructions for the entire solution.
- Prepare CMakeLists.txt files for each application to be built.
- Prepare a CMakeLists.txt file for the Einit program.
- Prepare the
init.yaml.inandsecurity.psl.intemplates.
To perform cross-compilation using the CMake build automation system, the following is required:
- Create a subdirectory for the build.
BUILD=$PWD/.build
mkdir -p $BUILD && cd $BUILD
- Prior to starting generation of build scripts (
cmakecommand), set the following values for environment variables:export LANG=Cexport PKG_CONFIG=""export SDK_PREFIX="/opt/KasperskyOS-Community-Edition-<version>"export PATH="$SDK_PREFIX/toolchain/bin:$PATH"export INSTALL_PREFIX=$BUILD/../installexport TARGET="aarch64-kos"
- When starting generation of build scripts (
cmakecommand), specify the following:-G "Unix Makefiles"parameter- Path to the file with the build system extension (
toolchain.cmake) in theCMAKE_TOOLCHAIN_FILEvariable.The file with the build system extension is located in the following directory:
/opt/KasperskyOS-Community-Edition-<version>/toolchain/share/toolchain-aarch64-kos.cmake - Value of the
CMAKE_BUILD_TYPE:STRING=Debugvariable - Value of the
CMAKE_INSTALL_PREFIX:STRING=$INSTALL_PREFIXvariable - Path to the CMakeLists.txt boot file
- When starting the build (
makecommand), specify one of the build targets.The target name must match the build target name passed to the solution build command in the CMakeLists.txt file for the Einit program.
Example cross-build.sh build script
cross-build.sh
#!/bin/bash
# Create a subdirectory for the build
BUILD=$PWD/.build
mkdir -p $BUILD && cd $BUILD
# Set the values of environment variables
export LANG=C
export PKG_CONFIG=""
export SDK_PREFIX="/opt/KasperskyOS-Community-Edition-<version>"
export PATH="$SDK_PREFIX/toolchain/bin:$PATH"
export INSTALL_PREFIX=$BUILD/../install
export TARGET="aarch64-kos"
# Start generating files for the build. The current directory is $BUILD,
# so the CMakeLists.txt boot file is in the parent directory
cmake -G "Unix Makefiles" \
-D CMAKE_BUILD_TYPE:STRING=Debug \
-D CMAKE_INSTALL_PREFIX:STRING=$BUILD/../.install \
-D CMAKE_TOOLCHAIN_FILE=$SDK_PREFIX/toolchain/share/toolchain-$TARGET.cmake \
../
# Start the build. Include the VERBOSE flag for Make and redirect the output to the build.log file
VERBOSE=1 make kos-qemu-image 2>&1 | tee build.log
# Run the built solution image in QEMU.
# -kernel $BUILD/einit/kos-qemu-image path to the built kernel image
$SDK_PREFIX/toolchain/bin/qemu-system-aarch64 \
-m 1024 \
-cpu core2duo \
-serial stdio \
-kernel $BUILD/einit/kos-qemu-image
CMakeLists.txt boot file
The CMakeLists.txt boot file contains general build instructions for the entire solution.
The CMakeLists.txt boot file must contain the following commands:
cmake_minimum_required (VERSION 3.12)indicates the minimum supported version ofCMake.For a KasperskyOS-based solution build,
CMakeversion 3.12 or later is required.The required version of
CMakeis provided in KasperskyOS Community Edition and is used by default.include (platform)connects theplatformlibrary ofCMake.initialize_platform()initializes theplatformlibrary.project_header_default("STANDARD_GNU_11:YES" "STRICT_WARNINGS:NO") sets the flags of the compiler and linker.- [Optional] Connect and configure packages for the provided system programs and drivers that need to be included in the solution:
- A package is connected by using the
find_package()command. - After connecting a package, you must add the package-related directories to the list of search directories by using the
include_directories()command. - For some packages, you must also set the values of properties by using the
set_target_properties()command.
CMakedescriptions of system programs and drivers provided in KasperskyOS Community Edition, and descriptions of their exported variables and properties are located in the corresponding files at/opt/KasperskyOS-Community-Edition-<version>/sysroot-aarch64-kos/lib/cmake/<program name>/<program name>-config.cmake - A package is connected by using the
- The
Einitinitializing program must be built using theadd_subdirectory(einit)command. - All applications to be built must be added by using the
add_subdirectory(<program directory name>)command.
Example CMakeLists.txt boot file
CMakeLists.txt
cmake_minimum_required(VERSION 3.12)
project (example)
# Initializes the CMake library for the KasperskyOS SDK.
include (platform)
project_header_default ("STANDARD_GNU_11:YES" "STRICT_WARNINGS:NO")
# Add package importing components for working with Virtual File System.
# Components are imported from the following directory: /opt/KasperskyOS-Community-Edition-<version>/sysroot-aarch64-kos/lib/cmake/vfs/vfs-config.cmake
find_package (vfs REQUIRED COMPONENTS ENTITY CLIENT_LIB)
include_directories (${vfs_INCLUDE})
# Add a package importing components for building an audit program and
# connecting to it.
find_package (klog REQUIRED)
include_directories (${klog_INCLUDE})
# Build the Einit initializing program
add_subdirectory (einit)
# Build the hello application
add_subdirectory (hello)
CMakeLists.txt files for building applications
The CMakeLists.txt file for building an application must contain the following commands:
include (platform/nk)connects theCMakelibrary for working with the NK compiler.project_header_default ("STANDARD_GNU_11:YES" "STRICT_WARNINGS:NO") sets the flags of the compiler and linker.- An EDL description of a process class for a program can be generated by using the
generate_edl_file()command. - If the program provides endpoints using an IPC mechanism, the following transport code must be generated:
- idl.h files are generated by the
nk_build_idl_files()command - cdl.h files are generated by the
nk_build_cdl_files()command - edl.h files are generated by the
nk_build_edl_files()command
- idl.h files are generated by the
add_executable (<program name> "<path to the file containing the program source code>")adds the program build target.add_dependencies (<program name> <name of the edl.h file build target>) adds a program build dependency on edl.h file generation.target_link_libraries (<program name> <list of libraries>)determines the libraries that need to be linked with the program during the build.For example, if the program uses file I/O or network I/O, it must be linked with the
${vfs_CLIENT_LIB}transport library.CMakedescriptions of system programs and drivers provided in KasperskyOS Community Edition, and descriptions of their exported variables and properties are located in the corresponding files at/opt/KasperskyOS-Community-Edition-<version>/sysroot-aarch64-kos/lib/cmake/<program name>/<program name>-config.cmake- To automatically add descriptions of IPC channels to the
init.yamlfile when building a solution, you must define theEXTRA_CONNECTIONSproperty and assign it a value with descriptions of the relevant IPC channels.Example of creating an IPC channel between a
Clientprocess and aServerprocess:set_target_properties (Client PROPERTIES
EXTRA_CONNECTIONS
" - target: Server
id: server_connection")
When building this solution, the description of this IPC channel will be automatically added to the
init.yamlfile when processing macros of the init.yaml.in template. - To automatically add a list of arguments for the
main()function and a dictionary of environment variables to theinit.yamlfile when building a solution, you must define theEXTRA_ARGSandEXTRA_ENVproperties and assign the appropriate values to them.Example of sending the
Clientprogram the"-v"argument of themain()function and the environment variableVAR1set toVALUE1:set_target_properties (Client PROPERTIES
EXTRA_ARGS
" - \"-v\""
EXTRA_ENV
" VAR1: VALUE1")
When building this solution, the description of the
main()function argument and the environment variable value will be automatically added to theinit.yamlfile when processing macros of the init.yaml.in template.
Example CMakeLists.txt file for building a simple application
CMakeLists.txt
project (hello)
# Tools for working with the NK compiler.
include (platform/nk)
# Set compile flags.
project_header_default ("STANDARD_GNU_11:YES" "STRICT_WARNINGS:NO")
# Define the name of the project that includes the program.
set (LOCAL_MODULE_NAME "example")
# Define the application name.
set (ENTITY_NAME "Hello")
# Please note the contents of the init.yaml.in and security.psl.in templates
# They define program names as ${LOCAL_MODULE_NAME}.${ENTITY_NAME}
# Define the targets that will be used to create the generated files of the program.
set (ENTITY_IDL_TARGET ${ENTITY_NAME}_idl)
set (ENTITY_CDL_TARGET ${ENTITY_NAME}_cdl)
set (ENTITY_EDL_TARGET ${ENTITY_NAME}_edl)
# Define the name of the target that will be used to build the program.
set (APP_TARGET ${ENTITY_NAME}_app)
# Add the idl.h file build target.
nk_build_idl_files (${ENTITY_IDL_TARGET}
NK_MODULE ${LOCAL_MODULE_NAME}
IDL "resources/Hello.idl"
)
# Add the cdl.h file build target.
nk_build_cdl_files (${ENTITY_CDL_TARGET}
IDL_TARGET ${ENTITY_IDL_TARGET}
NK_MODULE ${LOCAL_MODULE_NAME}
CDL "resources/Hello.cdl")
# Add the EDL file build target. The EDL_FILE variable is exported
# and contains the path to the generated EDL file.
generate_edl_file ( ${ENTITY_NAME}
PREFIX ${LOCAL_MODULE_NAME}
)
# Add the edl.h file build target.
nk_build_edl_files (${ENTITY_EDL_TARGET}
NK_MODULE ${LOCAL_MODULE_NAME}
EDL ${EDL_FILE}
)
# Define the target for the program build.
add_executable (${APP_TARGET} "src/hello.c")
# The program name in init.yaml and security.psl must match the name of the executable file
set_target_properties (${APP_TARGET} PROPERTIES OUTPUT_NAME ${ENTITY_NAME})
# Libraries that are linked to the program during the build
target_link_libraries ( ${APP_TARGET}
PUBLIC ${vfs_CLIENT_LIB} # The program uses file I/O
# and must be connected as a client to VFS
)
CMakeLists.txt file for building the Einit program
The CMakeLists.txt file for building the Einit initializing program must contain the following commands:
include (platform/image)connects theCMakelibrary that contains the solution image build scripts.project_header_default ("STANDARD_GNU_11:YES" "STRICT_WARNINGS:NO") sets the flags of the compiler and linker.- Configure the packages of system programs and drivers that need to be included in the solution.
- A package is connected by using the
find_package ()command. - For some packages, you must also set the values of properties by using the
set_target_properties ()command.
CMakedescriptions of system programs and drivers provided in KasperskyOS Community Edition, and descriptions of their exported variables and properties are located in the corresponding files at/opt/KasperskyOS-Community-Edition-<version>/sysroot-aarch64-kos/lib/cmake/<program name>/<program name>-config.cmake - A package is connected by using the
- To automatically add descriptions of IPC channels between processes of system programs to the
init.yamlfile when building a solution, you must add these channels to theEXTRA_CONNECTIONSproperty for the corresponding programs.For example, the
VFSprogram does not have a channel for connecting to theEnvprogram by default. To automatically add a description of this channel to the init.yaml file during a solution build, you must add the following call to theCMakeLists.txtfile for building theEinitprogram:set_target_properties (${vfs_ENTITY} PROPERTIES
EXTRA_CONNECTIONS
" - target: env.Env
id: {var: ENV_SERVICE_NAME, include: env/env.h}"
When building this solution, the description of this IPC channel will be automatically added to the
init.yamlfile when processing macros of the init.yaml.in template. - To automatically add a list of arguments for the
main()function and a dictionary of environment variables to theinit.yamlfile when building a solution, you must define theEXTRA_ARGSandEXTRA_ENVproperties and assign the appropriate values to them.
Example of sending the VfsEntity program the "-f fstab" argument of the main() function and the environment variable ROOTFS set to ramdisk0,0 / ext2 0:
set_target_properties (${vfs_ENTITY} PROPERTIES
EXTRA_ARGS
" - \"-f\"
- \"fstab\""
EXTRA_ENV
" ROOTFS: ramdisk0,0 / ext2 0")
When building this solution, the description of the main() function argument and the environment variable value will be automatically added to the init.yaml file when processing macros of the init.yaml.in template.
set(ENTITIES <full list of programs included in the solution>)defines theENTITIESvariable containing a list of executable files of all programs included in the solution.- One or both commands for building the solution image:
- build_kos_hw_image() creates the build target that can then be used to build the image for the hardware platform using
make. - build_kos_qemu_image() creates the build target that can then be used to build the image for running in QEMU using
make.
- build_kos_hw_image() creates the build target that can then be used to build the image for the hardware platform using
Example CMakeLists.txt file for building the Einit program
CMakeLists.txt
project (einit)
# Connect the library containing solution image build scripts.
include (platform/image)
# Set compile flags.
project_header_default ("STANDARD_GNU_11:YES" "STRICT_WARNINGS:NO")
# Configure the VFS program.
# By default, the VFS program is not mapped to a program implementing a block device.
# If you need to use a block device, such as ata from the ata component,
# you must define this device in the variable ${blkdev_ENTITY}_REPLACEMENT
# For more information about exported variables and properties of the VFS program,
# see /opt/KasperskyOS-Community-Edition-<version>/sysroot-aarch64-kos/lib/cmake/vfs/vfs-config.cmake
# find_package(ata)
# set_target_properties (${vfs_ENTITY} PROPERTIES ${blkdev_ENTITY}_REPLACEMENT ${ata_ENTITY})
# In the simplest case, you do not need to interact with a drive.
# For this reason, we set the value of the ${blkdev_ENTITY}_REPLACEMENT variable equal to an empty string
set_target_properties (${vfs_ENTITY} PROPERTIES ${blkdev_ENTITY}_REPLACEMENT "")
# Define the ENTITIES variable with a list of executable files of programs.
# It is important to include all programs that are part of the project, except the Einit program.
# Please note that the name of the executable file of a program must
# match the name of the target indicated in add_executable() in the CMakeLists.txt file for building this program.
set(ENTITIES
${vfs_ENTITY}
Hello_app
)
# Solution image for target hardware platform.
# Create the build target named kos-image that can then be used
# to build the image for the hardware platform using make kos-image.
build_kos_hw_image (kos-image
EINIT_ENTITY EinitHw
CONNECTIONS_CFG "src/init.yaml.in" # template of the init.yaml file
SECURITY_PSL "src/security.psl.in" # template of the security.psl file
IMAGE_FILES ${ENTITIES}
)
# Solution image for the QEMU hardware platform.
# Create the build target named kos-qemu-image that can then be used
# to build a QEMU image using make kos-qemu-image.
build_kos_qemu_image (kos-qemu-image
EINIT_ENTITY EinitQemu
CONNECTIONS_CFG "src/init.yaml.in"
SECURITY_PSL "src/security.psl.in"
IMAGE_FILES ${ENTITIES}
)
init.yaml.in template
The init.yaml.in template is used to automatically generate a part of the init.yaml file prior to building the Einit program using CMake tools.
When using the init.yaml.in template, you do not have to manually add descriptions of system programs and the IPC channels for connecting to them to the init.yaml file.
The init.yaml.in template must contain the following data:
- Root
entitieskey. - List of all applications included in the solution.
- For applications that use an IPC mechanism, you must specify a list of IPC channels that connect this application to other applications.
The IPC channels that connect this application to other applications are either indicated manually or specified in the CMakeLists.txt file for this application using the
EXTRA_CONNECTIONSproperty.To specify a list of IPC channels that connect this application to system programs that are included in KasperskyOS Community Edition, the following macros are used:
@INIT_<program name>_ENTITY_CONNECTIONS@– during the build, this is replaced with the list of IPC channels containing all system programs that are linked to the application. Thetargetandidfields are filled according to theconnect.yamlfiles from KasperskyOS Community Edition located in/opt/KasperskyOS-Community-Edition-<version>/sysroot-aarch64-kos/include/<system program name>).This macro needs to be used if the application does not have connections to other applications but instead connects only to system programs. This macro adds the root
connectionskey.@INIT_<program name>_ENTITY_CONNECTIONS+@– during the build, the list of IPC channels containing all system programs that are linked to the application is added to the manually defined list of IPC channels. This macro does not add the rootconnectionskey.This macro needs to be used if the application has connections to other applications that were manually indicated in the
init.yaml.intemplate.
- The
@INIT_<program name>_ENTITY_CONNECTIONS@and@INIT_<program name>_ENTITY_CONNECTIONS+@macros also add the list of connections for each program defined in theEXTRA_CONNECTIONSproperty when building this program. - If you need to pass
main()function arguments defined in theEXTRA_ARGSproperty to a program when building this program, you need to use the following macros:@INIT_<program name>_ENTITY_ARGS@– during the build, this is replaced with the list of arguments of themain()function defined in theEXTRA_ARGSproperty. This macro adds the rootargskey.@INIT_<program name>_ENTITY_ARGS+@– during the build, this macro adds the list ofmain()function arguments defined in theEXTRA_ARGSproperty to the list of manually defined arguments. This macro does not add the rootargskey.
- If you need to pass the values of environment variables defined in the
EXTRA_ENVproperty to a program when building this program, you need to use the following macros:@INIT_<program name>_ENTITY_ENV@– during the build, this is replaced with the dictionary of environment variables and their values defined in theEXTRA_ENVproperty. This macro adds the rootenvkey.@INIT_<program name>_ENTITY_ENV+@– during the build, this macro adds the dictionary of environment variables and their values defined in theEXTRA_ENVproperty to the manually defined variables. This macro does not add the rootenvkey.
@INIT_EXTERNAL_ENTITIES@– during the build, this macro is replaced with the list of system programs linked to the application and their IPC channels,main()function arguments, and values of environment variables.
Example init.yaml.in template
init.yaml.in
entities:
- name: ping.Client
connections:
# The "Client" program can query the "Server".
- target: ping.Server
id: server_connection
@INIT_Client_ENTITY_CONNECTIONS+@
@INIT_Client_ENTITY_ARGS@
@INIT_Client_ENTITY_ENV@
- name: ping.Server
@INIT_Server_ENTITY_CONNECTIONS@
@INIT_EXTERNAL_ENTITIES@
When building the Einit program from this template, the following init.yaml file will be generated:
init.yaml
entities:
- name: ping.Client
connections:
# The "Client" program can query the "Server"
- target: ping.Server
id: server_connection
- target: kl.VfsEntity
id: {var: _VFS_CONNECTION_ID, include: vfs/defs.h}
args:
- "-v"
env:
VAR1: VALUE1
- name: ping.Server
connections:
- target: kl.VfsEntity
id: {var: _VFS_CONNECTION_ID, include: vfs/defs.h}
- name: kl.VfsEntity
path: VFS
args:
- "-f"
- "fstab"
env:
ROOTFS: ramdisk0,0 / ext2
security.psl.in template
The security.psl.in template is used to automatically generate a part of the security.psl file prior to building the Einit program using CMake tools.
The security.psl file contains part of the solution security policy description.
When using the security.psl.in template, you do not have to manually add EDL descriptions of system programs to the security.psl file.
The security.psl.in template must contain a manually created solution security policy description, including the following declarations:
- Describing the global parameters of a solution security policy
- Including PSL files
- Including EDL files of application software
- Creating security model objects
- Binding methods of security models to security events
- Describing security audit profiles
To automatically include system programs, the @INIT_EXTERNAL_ENTITIES@ macro must be used.
Example security.psl.in template
security.psl.in
execute: kl.core.Execute
use nk.base._
use EDL Einit
use EDL kl.core.Core
use EDL Client
use EDL Server
@INIT_EXTERNAL_ENTITIES@
/* Startup of programs is allowed */
execute {
grant ()
}
/* Sending and receiving requests, responses and errors is allowed. */
request {
grant ()
}
response {
grant ()
}
error {
grant ()
}
/* Queries via the security interface are ignored. */
security {
grant ()
}
CMake libraries in KasperskyOS Community Edition
This section contains a description of the libraries that are provided in KasperskyOS Community Edition for automatically building a KasperskyOS-based solution.
platform library
The platform library contains the following commands:
initialize_platform()is the command for initializing theplatformlibrary.project_header_default()is a command for indicating the linker and compiler flags for the current project.
These commands are used in CMakeLists.txt files for the Einit program and application software.
nk library
This section contains a description of the commands and macros of the CMake library for working with the NK compiler.
generate_edl_file()
This command is declared in the file /opt/KasperskyOS-Community-Edition-<version>toolchain/share/cmake/Modules/platform/nk2.cmake.
generate_edl_file(NAME ...)
This command generates an EDL file containing a description of the process class.
Parameters:
NAMEis the name of the process class. Required parameter.PREFIXis the name of the global module associated with the EDL file. The name of the project must be indicated in this parameter.EDL_COMPONENTSis the name of the component and its instance that will be included in the EDL file. For example:EDL_COMPONENTS "env: kl.Env". To include multiple components, you need to use multipleEDL_COMPONENTSparameters.SECURITYis the qualified name of the security interface method that will be included in the EDL file.OUTPUT_DIRis the directory in which the EDL file will be created. The default directory is${CMAKE_CURRENT_BINARY_DIR}.OUTPUT_FILEis the name of the EDL file being created. The default name is${OUTPUT_DIR}/${NAME}.edl.
This command exports the EDL_FILE variable and sets it equal to the path to the generated EDL file.
Example call:
generate_edl_file(${ENTITY_NAME} EDL_COMPONENTS "env: kl.Env")
For an example of using this command, see the article titled "CMakeLists.txt files for building application software".
Page top
nk_build_idl_files()
This command is declared in the file /opt/KasperskyOS-Community-Edition-<version>toolchain/share/cmake/Modules/platform/nk2.cmake.
nk_build_idl_files(NAME ...)
This command creates a CMake target for generating .idl.h files for one or more defined IDL files using the NK compiler.
Parameters:
NAMEis the name of theCMaketarget for building.idl.hfiles. If a target has not yet been created, it will be created by usingadd_library()with the specified name. Required parameter.NOINSTALL– if this option is specified, files will only be generated in the working directory but will not be installed in global directories:${CMAKE_BINARY_DIR}/_headers_ ${CMAKE_BINARY_DIR}/_headers_/${PROJECT_NAME}.NK_MODULEis the global module associated with the interface. The name of the project must be indicated in this parameter.WORKING_DIRECTORYis the working directory for calling the NK compiler, which by default is the following:${CMAKE_CURRENT_BINARY_DIR}.DEPENDSrefers to the additional build targets on which the IDL file depends.To add multiple targets, you need to use multiple
DEPENDSparameters.IDLis the path to the IDL file for which the idl.h file is being generated. Required parameter.To add multiple IDL files, you need to use multiple
IDLparameters.If one IDL file imports another IDL file, idl.h files need to be generated in the order necessary for compliance with dependencies (with the most deeply nested first).
NK_FLAGSare additional flags for the NK compiler.
Example call:
nk_build_idl_files (echo_idl_files NK_MODULE "echo" IDL "resources/Ping.idl")
For an example of using this command, see the article titled "CMakeLists.txt files for building application software".
Page top
nk_build_cdl_files()
This command is declared in the file /opt/KasperskyOS-Community-Edition-<version>toolchain/share/cmake/Modules/platform/nk2.cmake.
nk_build_cdl_files(NAME ...)
This command creates a CMake target for generating .cdl.h files for one or more defined CDL files using the NK compiler.
Parameters:
NAMEis the name of theCMaketarget for building.cdl.hfiles. If a target has not yet been created, it will be created by usingadd_library()with the specified name. Required parameter.NOINSTALL– if this option is specified, files will only be generated in the working directory but are not installed in global directories:${CMAKE_BINARY_DIR}/_headers_ ${CMAKE_BINARY_DIR}/_headers_/${PROJECT_NAME}.IDL_TARGETis the target when building.idl.hfiles for IDL files containing descriptions of endpoints provided by components described in CDL files.NK_MODULEis the global module associated with the component. The name of the project must be indicated in this parameter.WORKING_DIRECTORYis the working directory for calling the NK compiler, which by default is the following:${CMAKE_CURRENT_BINARY_DIR}.DEPENDSrefers to the additional build targets on which the CDL file depends.To add multiple targets, you need to use multiple
DEPENDSparameters.CDLis the path to the CDL file for which thecdl.hfile is being generated. Required parameter.To add multiple CDL files, you need to use multiple
CDLparameters.NK_FLAGSare additional flags for the NK compiler.
Example call:
nk_build_cdl_files (echo_cdl_files IDL_TARGET echo_idl_files NK_MODULE "echo" CDL "resources/Ping.cdl")
For an example of using this command, see the article titled "CMakeLists.txt files for building application software".
Page top
nk_build_edl_files()
This command is declared in the file /opt/KasperskyOS-Community-Edition-<version>toolchain/share/cmake/Modules/platform/nk2.cmake.
nk_build_edl_files(NAME ...)
This command creates a CMake target for generating an .edl.h file for one defined EDL file using the NK compiler.
Parameters:
NAMEis the name of theCMaketarget for building an.edl.hfile. If a target has not yet been created, it will be created by usingadd_library()with the specified name. Required parameter.NOINSTALL– if this option is specified, files will only be generated in the working directory but are not installed in global directories:${CMAKE_BINARY_DIR}/_headers_ ${CMAKE_BINARY_DIR}/_headers_/${PROJECT_NAME}.CDL_TARGETis the target when building.cdl.hfiles for CDL files containing descriptions of components of the EDL file for which the build is being performed.IDL_TARGETis the target when building .idl.h files for IDL files containing descriptions of interfaces of the EDL file for which the build is being performed.NK_MODULEis the global module associated with the EDL file. The name of the project must be indicated in this parameter.WORKING_DIRECTORYis the working directory for calling the NK compiler, which by default is the following:${CMAKE_CURRENT_BINARY_DIR}.DEPENDSrefers to the additional build targets on which the EDL file depends.To add multiple targets, you need to use multiple
DEPENDSparameters.EDLis the path to the EDL file for which the edl.h file is being generated. Required parameter.NK_FLAGSare additional flags for the NK compiler.
Example calls:
nk_build_edl_files (echo_server_edl_files CDL_TARGET echo_cdl_files NK_MODULE "echo" EDL "resources/Server.edl")
nk_build_edl_files (echo_client_edl_files NK_MODULE "echo" EDL "resources/Client.edl")
For an example of using this command, see the article titled "CMakeLists.txt files for building application software".
Page top
image library
This section contains a description of the commands and macros of the CMake library named image that is included in KasperskyOS Community Edition and contains solution image build scripts.
build_kos_hw_image()
This command is declared in the file /opt/KasperskyOS-Community-Edition-<version>toolchain/share/cmake/Modules/platform/image.cmake.
build_kos_hw_image(NAME ...)
This command creates a CMake target for building a solution image that can then be used to build the image for the hardware platform using make.
Parameters:
NAMEis the name of theCMaketarget for building a solution image. Required parameter.PERFCNT_KERNEL– use the kernel with performance counters if it is available in KasperskyOS Community Edition.EINIT_ENTITYis the name of the executable file that will be used to start theEinitprogram.EXTRA_XDL_DIRrefers to additional directories to include when building theEinitprogram.CONNECTIONS_CFGis the path to the init.yaml file or init.yaml.in template.SECURITY_PSLis the path to the security.psl file or security.psl.in template.KLOG_ENTITYis the target for building theKlogsystem program, which is responsible for the security audit. If the target is not specified, the audit is not performed.IMAGE_BINARY_DIR_BINis the directory for the final image and other artifacts. The default directory isCMAKE_CURRENT_BINARY_DIR.IMAGE_FILESare the executable files of applications and system programs (except theEinitprogram) and any other files to be added to the ROMFS image.To add multiple applications or files, you can use multiple
IMAGE_FILESparameters.<path to files>are free parameters likeIMAGE_FILES.
Example call:
build_kos_hw_image ( kos-image
EINIT_ENTITY EinitHw
CONNECTIONS_CFG "src/init.yaml.in"
SECURITY_CFG "src/security.cfg.in"
IMAGE_FILES ${ENTITIES})
For an example of using this command, see the article titled "CMakeLists.txt files for building the Einit program".
Page top
build_kos_qemu_image()
This command is declared in the file /opt/KasperskyOS-Community-Edition-<version>toolchain/share/cmake/Modules/platform/image.cmake.
build_kos_qemu_image(NAME ...)
This command creates a CMake target for building a solution image that can then be used to build the image for QEMU using make.
Parameters:
NAMEis the name of theCMaketarget for building a solution image. Required parameter.PERFCNT_KERNEL– use the kernel with performance counters if it is available in KasperskyOS Community Edition.EINIT_ENTITYis the name of the executable file that will be used to start theEinitprogram.EXTRA_XDL_DIRrefers to additional directories to include when building theEinitprogram.CONNECTIONS_CFGis the path to theinit.yamlfile or init.yaml.in template.SECURITY_PSLis the path to thesecurity.pslfile or security.psl.in template.KLOG_ENTITYis the target for building theKlogsystem program, which is responsible for the security audit. If the target is not specified, the audit is not performed.QEMU_FLAGSare additional flags for running QEMU.IMAGE_BINARY_DIR_BINis the directory for the final image and other artifacts. It matchesCMAKE_CURRENT_BINARY_DIRby default.IMAGE_FILESare the executable files of applications and system programs (except theEinitprogram) and any other files to be added to the ROMFS image.To add multiple applications or files, you can use multiple
IMAGE_FILESparameters.<path to files>are free parameters likeIMAGE_FILES.
Example call:
build_kos_qemu_image ( kos-qemu-image
EINIT_ENTITY EinitQemu
CONNECTIONS_CFG "src/init.yaml.in"
SECURITY_CFG "src/security.cfg.in"
IMAGE_FILES ${ENTITIES})
For an example of using this command, see the article titled "CMakeLists.txt files for building the Einit program".
Page top
Building without CMake
This section contains a description of the scripts, tools, compilers and build templates provided in KasperskyOS Community Edition.
These tools can be used:
- In other build systems.
- To perform individual steps of the build.
- To analyze the build specifications and write a custom build system.
The general scenario for building a solution image is described in the article titled Build process overview.
Page top
Tools for building a solution
This section contains a description of the scripts, tools, compilers and build templates provided in KasperskyOS Community Edition.
Build scripts and tools
KasperskyOS Community Edition includes the following build scripts and tools:
- nk-gen-c
The NK compiler (
nk-gen-c) generates the set of transport methods and types based on the EDL, CDL and IDL descriptions of applications, components and interfaces. The transport methods and types are needed for generating, sending, receiving and processing IPC messages. - nk-psl-gen-c
The
nk-psl-gen-ccompiler generates the source code of the Kaspersky Security Module based on the solution security policy description (security.psl) and the EDL, CDL and IDL descriptions included in the solution. - einit
The
einittool lets you automate the creation of code for theEinitinitializing program. This program is the first to start when KasperskyOS is loaded. Then it starts all other programs and creates IPC channels between them. - makekss
The
makekssscript creates the Kaspersky Security Module. - makeimg
The
makeimgscript creates the final boot image of the KasperskyOS-based solution with all programs to be started and the Kaspersky Security Module.
nk-gen-c
The NK compiler (nk-gen-c) generates the set of transport methods and types based on the EDL, CDL and IDL descriptions. The transport methods and types are needed for generating, sending, receiving and processing IPC messages.
The NK compiler receives the EDL, CDL or IDL file and creates the following files:
Hfile containing a declaration and implementation of transport methods and types.Dfile that lists the dependencies of the createdCfile. This file can be used for building automation using themaketool.
Syntax for using the NK compiler:
nk-gen-c [-I PATH][-o PATH][--types][--interface][--client][--server][--extended-errors][--enforce-alignment-check][--help][--version] FILE
Parameters:
FILEPath to the EDL, CDL or IDL description for which you need to generate transport methods and types.
-I PATHPath to the folder containing auxiliary files required for generating transport methods and types. By default, these files are located in the directory
/opt/KasperskyOS-Community-Edition-<version>/sysroot-aarch64-kos/include.It may also be used for adding other folders to search for the files required for generating the methods and types.
To indicate more than one folder. you can use several
-Iswitches.-o PATHPath to an existing folder where files containing transport methods and types will be created.
-h, --helpDisplays the Help text.
--versionDisplays the
nk-gen-cversion.--enforce-alignment-checkEnables mandatory alignment checks for queries to memory, even if this check is disabled for the target platform. If these checks are enabled, the NK compiler adds additional alignment checks to the code of the IPC message validators.
By default, memory query alignment check settings are defined for each platform in the file named
system.platform.--extended-errorsEnables extended error handling in the code of transport methods.
Selective generation
To reduce the amount of code generated by the NK compiler, you can use selective generation flags. For example, it is convenient to use the --server flag for programs that implement endpoints, and to use the --client flag for programs that are clients of the endpoints.
If no selective generation flag is specified, the NK compiler will create all transport types and methods that are possible for the specified file.
Selective generation flags for IDL files:
--typesThe compiler will create only the constants and types, including the redefined ones (
typedef), from the input IDL file, and the types from imported IDL files that are used in the types of the input file.However, constants and redefined types from imported IDL files will not be explicitly included in the generated files. If you need to use types from imported files in code, you need to separately generate H files for each such IDL file.
--interfaceThe compiler will generate files created with the
--typesflag, and the structures of request and response messages for all methods of this endpoint.--clientThe compiler will generate files created with the --
interfaceflag, and the client proxy objects and functions of their initialization for all methods of this endpoint.--serverThe compiler will generate files created with the --
interfaceflag, and the types and methods of the dispatcher of this endpoint.
Selective generation flags for CDL files and EDL files:
--typesThe compiler will generate files created with the
--typesflag for all endpoints provided by this component.However, only the types that are used in parameters of interface methods will be explicitly included in the generated files.
--interfaceThe compiler will generate files created with the
--typesflag for this component/process class, and files generated with the--interfaceflag for all services provided by this component.--clientThe compiler will generate files created with the --
interfaceflag, and the client proxy objects and functions of their initialization for all endpoints provided by this component.--serverThe compiler will generate files created with the
--interfaceflag, and the types and methods of the dispatcher of this component/process class and the types and methods of dispatchers for all endpoints provided by this component.
nk-psl-gen-c
The nk-psl-gen-c compiler generates the source code of the Kaspersky Security Module based on the solution security policy description and the EDL, CDL and IDL descriptions included in the solution. This code is used by the makekss script.
The nk-psl-gen-c compiler also lets you generate and run code of tests written in the PAL language for the solution security policy.
Syntax for using the nk-psl-gen-c compiler:
nk-psl-gen-c [-I PATH][-o PATH][--audit PATH][--tests ARG][--help][--version] FILE
Parameters:
FILEPath to the PSL description of the solution security policy (
security.psl)-I,--include-dir PATHPath to the folder containing auxiliary files required for generating transport methods and types. By default, these files are located in the directory
/opt/KasperskyOS-Community-Edition-<version>/sysroot-aarch64-kos/include.The
nk-psl-gen-ccompiler will require access to all EDL, CDL and IDL descriptions. To enable thenk-psl-gen-ccompiler to find these descriptions, you need to pass the paths to these descriptions using the-Iswitch.To indicate more than one folder. you can use several
-Iswitches.-o,--output PATHPath to the created file containing the security module code.
-t, --tests ARGFlag for controlling code generation and starting tests for the solution security policy. Possible values:
skipmeans that the code of tests is not generated. This value is used by default if the--testsflag is not indicated.generatemeans that the code of tests is generated but it is not compiled and is not executed.runmeans that the code of tests is generated, compiled using thegcccompiler, and executed.
-a, --audit PATHPath to the created file containing the code of the audit decoder.
-h, --helpDisplays the Help text.
--versionDisplays the
nk-psl-gen-cversion.
einit
The einit tool lets you automate the creation of code for the Einit initializing program.
The einit tool receives the solution initialization description (the init.yaml file by default) and EDL, CDL and IDL descriptions, and creates a file containing the source code of the Einit initializing program. Then the Einit program must be built using the C-language cross compiler that is provided in KasperskyOS Community Edition.
Syntax for using the einit tool:
einit -I PATH -o PATH [--help] FILE
Parameters:
FILEPath to the
init.yamlfile.-I PATHPath to the directory containing the auxiliary files (including EDL, CDL and IDL descriptions) required for generating the initializing program. By default, these files are located in the directory
/opt/KasperskyOS-Community-Edition-<version>/sysroot-aarch64-kos/include.-o, --out-file PATHPath to the created .c file containing the code of the initializing program.
-h, --helpDisplays the Help text.
makekss
The makekss script creates the Kaspersky Security Module.
The script calls the nk-psl-gen-c compiler to generate the source code of the security module, then compiles the resulting code by calling the C compiler that is provided in KasperskyOS Community Edition.
The script creates the security module from the solution security policy description.
Syntax for using the makekss script:
makekss --target=ARCH --module=PATH --with-nk="PATH" --with-nktype="TYPE" --with-nkflags="FLAGS" [--output="PATH"][--help][--with-cc="PATH"][--with-cflags="FLAGS"] FILE
Parameters:
FILEPath to the top-level file of the solution security policy description.
--target=ARCHProcessor architecture for which the build is intended.
--module=-lPATHPath to the
ksm_ksslibrary. This key is passed to the C compiler for linking to this library.--with-nk=PATHPath to the
nk-psl-gen-ccompiler that will be used to generate the source code of the security module. By default, the compiler is located in/opt/KasperskyOS-Community-Edition-<version>/toolchain/bin/nk-psl-gen-c.--with-nktype="TYPE"Indicates the type of NK compiler that will be used. To use the
nk-psl-gen-ccompiler, indicate thepsltype.--with-nkflags="FLAGS"Parameters used when calling the
nk-psl-gen-ccompiler.The
nk-psl-gen-ccompiler will require access to all EDL, CDL and IDL descriptions. To enable thenk-psl-gen-ccompiler to find these descriptions, you need to pass the paths to these descriptions in the--with-nkflagsparameter by using the-Iswitch of thenk-psl-gen-ccompiler.--output=PATHPath to the created security module file.
--with-cc=PATHPath to the C compiler that will be used to build the security module. The compiler provided in KasperskyOS Community Edition is used by default.
--with-cflags=FLAGSParameters used when calling the C compiler.
-h, --helpDisplays the Help text.
makeimg
The makeimg script creates the final boot image of the KasperskyOS-based solution with all executable files of programs and the Kaspersky Security Module.
The script receives a list of files, including the executable files of all applications that need to be added to ROMFS of the loaded image, and creates the following files:
- Solution image
- Solution image without character tables (
.stripped) - Solution image with debug character tables (
.dbg.syms)
Syntax for using the makeimg script:
makeimg --target=ARCH --sys-root=PATH --with-toolchain=PATH --ldscript=PATH --img-src=PATH --img-dst=PATH --with-init=PATH [--with-extra-asflags=FLAGS][--with-extra-ldflags=FLAGS][--help] FILES
Parameters:
FILESList of paths to files, including the executable files of all applications that need to be added to ROMFS.
The security module (
ksm.module) must be explicitly specified, or else it will not be included in the solution image. TheEinitapplication does not need to be indicated because it will be automatically included in the solution image.--target=ARCHArchitecture for which the build is intended.
--sys-root=PATHPath to the root directory sysroot. By default, this directory is located in
/opt/KasperskyOS-Community-Edition-version/sysroot-aarch64-kos/.--with-toolchain=PATHPath to the set of auxiliary tools required for the solution build. By default, these tools are located in
/opt/KasperskyOS-Community-Edition-<version>/toolchain/.--ldscript=PATHPath to the linker script required for the solution build. By default, this script is located in
/opt/KasperskyOS-Community-Edition-<version>/libexec/aarch64-kos/.--img-src=PATHPath to the precompiled KasperskyOS kernel. By default, the kernel is located in
/opt/KasperskyOS-Community-Edition-<version>/libexec/aarch64-kos/.--img-dst=PATHPath to the created image file.
--with-init=PATHPath to the executable file of the
Einitinitializing program.--with-extra-asflags=FLAGSAdditional flags for the AS Assembler.
--with-extra-ldflags=FLAGSAdditional flags for the LD Linker.
-h, --helpDisplays the Help text.
Cross compilers
Properties of KasperskyOS cross compilers
The cross compilers included in KasperskyOS Community Edition support processors that have the aarch64 architecture.
The KasperskyOS Community Edition toolchain includes the following tools for cross compilation:
- GCC:
aarch64-kos-gccaarch64-kos-g++
- Binutils:
- AS Assembler:
aarch64-kos-as - LD Linker:
aarch64-kos-ld
- AS Assembler:
In addition to standard macros, an additional macro __KOS__=1 is defined in GCC. Using this macro lets you simplify porting of the software code to KasperskyOS, and also simplifies development of platform-independent applications.
To view the list of standard macros of GCC, run the following command:
echo '' | aarch64-kos-gcc -dM -E -
Linker operation specifics
When building the executable file of an application, by default the linker links the following libraries in the specified order:
- libc – standard C library.
- libm – library that implements the mathematical functions of the standard C language library.
- libvfs_stubs – library that contains stubs of I/O functions (for example,
open,socket,read,write). - libkos is the library for accessing the KasperskyOS core endpoints.
- libenv is the library of the subsystem for configuring the environment of applications (environmental variables, arguments of the
mainfunction, and custom configurations). - libsrvtransport-u is the library that supports IPC between processes and the kernel.
Example build without using CMake
Below is an example of a script for building a basic example. This example contains a single application called Hello, which does not provide any endpoints.
The provided script is intended only for demonstrating the build commands being used.
build.sh
#!/bin/sh
# The SDK variable should specify the path to the KasperskyOS Community Edition installation directory.
SDK=/opt/KasperskyOS-Community-Edition-<version>
TOOLCHAIN=$SDK/toolchain
SYSROOT=$SDK/sysroot-aarch64-kos
PATH=$TOOLCHAIN/bin:$PATH
# Create the Hello.edl.h file from Hello.edl
# (The Hello program does not implement any endpoints, so there are no CDL or IDL files.)
nk-gen-c -I $SYSROOT/include Hello.edl
# Compile and build the Hello program
aarch64-kos-gcc -o hello hello.c
# Create the Kaspersky Security Module (ksm.module)
makekss --target=aarch64-kos \
--module=-lksm_kss \
--with-nkflags="-I $SDK/examples/common -I $SYSROOT/include" \
security.psl
# Create code of the Einit initializing program
einit -I $SYSROOT/include -I . init.yaml -o einit.c
# Compile and build the Einit program
aarch64-kos-gcc -I . -o einit einit.c
# Create loadable solution image (kos-qemu-image)
makeimg --target=aarch64-kos \
--sys-root=$SYSROOT \
--with-toolchain=$TOOLCHAIN \
--ldscript=$SDK/libexec/aarch64-kos/kos-qemu.ld \
--img-src=$SDK/libexec/aarch64-kos/kos-qemu \
--img-dst=kos-qemu-image \
Hello ksm.module
# Run solution under QEMU
qemu-system-aarch64 -m 1024 -serial stdio -kernel kos-qemu-image
Creating a bootable drive containing the solution image
To create a bootable drive containing the solution image:
- Connect the drive from which you plan to run the solution image on target devices.
- Find the block device corresponding to the connected drive, for example, by using the following command:
fdisk -l - If required, create a new drive partition on which the solution image will be deployed by using the
fdisktool, for example. - If there is no file system on the partition, create one by using the
mkfstool, for example.You can use any file system that is supported by the GRUB 2 bootloader.
- Mount the drive.
mkdir /mnt/kos_device && mount /dev/sdXY /mnt/kos_deviceHere,
/mnt/kos_deviceis the mount point,/dev/sdXYis the block device name,Xis the letter corresponding to the connected drive, andYis the partition number. - Install the GRUB 2 operating system bootloader on the drive.
To install GRUB 2, run the following command:
grub-install --force --removable \--boot-directory=/mnt/kos_device/boot /dev/sdXHere,
/mnt/kos_deviceis the mount point,/dev/sdXis the block device name, andXis the letter corresponding to the connected drive. - Copy the solution image to the root directory of the mounted drive.
- In the
/mnt/kos_device/boot/grub/grub.cfgfile, add themenuentrysection that points to the solution image.menuentry "KasperskyOS" {multiboot /my_kasperskyos.imgboot} - Unmount the drive.
umount /mnt/kos_deviceHere,
/mnt/kos_deviceis the mount point.
After performing these actions, you can start KasperskyOS from this drive.
Page top
Formal specifications of KasperskyOS-based solution components
Solution development includes the creation of formal specifications for its components that form a global picture for the Kaspersky Security Module. A formal specification of a KasperskyOS-based solution component (hereinafter referred to as the formal specification of the solution component) is comprised of a system of IDL, CDL and EDL descriptions (IDL and CDL descriptions are optional) for this component. These descriptions are used to automatically generate transport code of solution components, and source code of the security module and the initializing program. The formal specifications of solution components are also used as source data for the solution security policy description.
Just like solution components, the KasperskyOS kernel also has a formal specification (for details, see "Methods of KasperskyOS core endpoints").
Each solution component corresponds to an EDL description. In terms of a formal specification, a solution component is a container for components that provide endpoints. Multiple instances of one solution component may be used at the same time, which means that multiple processes can be started from the same executable file. Processes that correspond to the same EDL description are processes of the same class. An EDL description defines the name of a process class and the components for which a process of the defined class serves as a container.
Each component that is part of a solution component corresponds to a CDL description. This description defines the component name, provided endpoints, security interface, and embedded components. Components can simultaneously provide endpoints, support a security interface, and serve as containers for other components. Each component can provide multiple endpoints with one or more interfaces.
Each interface is defined in an IDL description. This description defines the interface name, signatures of interface methods, and data types for the parameters of interface methods. The data comprising signatures of interface methods and definitions of data types for parameters of interface methods is referred to as a package.
Processes that do not contain components may only act as clients. Processes that contain components can act as servers and/or clients. If components from a process provide endpoints, the process can act as a server and a client at the same time. If components from a process do not provide endpoints (and only support a security interface), the process can act only as a client.
The formal specification of a solution component does not define how this component will be implemented. In other words, the presence of components in a formal specification of a solution component does not mean that these components will be present in the architecture of this solution component.
Names of process classes, components, packages and interfaces
Process classes, components, packages and interfaces are identified by their names in IDL, CDL and EDL descriptions. The names of process classes, components and packages form three sets of names within a KasperskyOS-based solution, in which any name is unique within its own set. A set of package names includes a set of interface names.
The name of a process class, component, package or interface is a link to the IDL, CDL or EDL file in which this name is defined. This link is a path to the IDL, CDL or EDL file (without the extension and dot before it) relative to the directory that is included in the set of directories where the source code generators search for IDL, CDL and EDL files. (This set of directories is defined by parameters -I <path to files>.) A dot is used as a separator in a path description.
For example, the kl.core.NameServer process class name is a link to the EDL file named NameServer.edl, which is located in the KasperskyOS SDK at the following path:
sysroot-*-kos/include/kl/core
However, source code generators must be configured to search for IDL, CDL and EDL files in the following directory:
sysroot-*-kos/include
The name of an IDL, CDL or EDL file begins with an uppercase letter and must not contain any underscores _.
EDL description
EDL descriptions are put into separate *.edl files, which contain the following data:
- Process class name. The following declaration is used:
entity <process class name>
- [Optional] List of instances of components. The following declaration is used:
components {
<component instance name : component name>
...
}
Each component instance is indicated in a separate line. The component instance name must not contain any underscores
_. The list can contain multiple instances of one component. Each component instance in the list has a unique name.
The EDL language is case sensitive.
Single-line comments and multi-line comments can be used in an EDL description.
Supported endpoints and the security interface can be defined in an EDL description the same way they are defined in a CDL description. However, this practice is not recommended because EDL descriptions and CDL descriptions are usually created by different participants of the development process for KasperskyOS-based solutions. CDL descriptions are created by developers of system programs and application software. EDL descriptions are created by developers that integrate system programs and application software into a unified solution.
Examples of EDL files
Hello.edl
// Class of processes that do not contain components.
entity Hello
Signald.edl
/* Class of processes that contain
* one instance of one component. */
entity kl.Signald
components {
signals : kl.Signals
}
LIGHTCRAFT.edl
/* Class of processes that contain
* two instances of different components. */
entity kl.drivers.LIGHTCRAFT
components {
KUSB : kl.drivers.KUSB
KIDF : kl.drivers.KIDF
}
CDL description
CDL descriptions are put into separate *.cdl files, which contain the following data:
- The name of the component. The following declaration is used:
component <component name>
- [Optional] Security interface. The following declaration is used:
security <interface name>
- [Optional] List of endpoints. The following declaration is used:
endpoints {
<endpoint name : interface name>
...
}
Each endpoint is indicated in a separate line. The endpoint name must not contain any underscores
_. The list can contain multiple endpoints with the same interface. Each endpoint in the list has a unique name. - [Optional] List of instances of embedded components. The following declaration is used:
components {
<component instance name : component name>
...
}
Each component instance is indicated in a separate line. The component instance name must not contain any underscores
_. The list can contain multiple instances of one component. Each component instance in the list has a unique name.
The CDL language is case sensitive.
Single-line comments and multi-line comments can be used in a CDL description.
At least one optional declaration is used in a CDL description. If a CDL description does not use at least one optional declaration, this description will correspond to an "empty" component that does not provide endpoints, does not contain embedded components, and does not support a security interface.
Examples of CDL files
KscProductEventsProvider.cdl
// Component provides one endpoint.
component kl.KscProductEventsProvider
endpoints {
eventProvider : kl.IKscProductEventsProvider
}
KscConnectorComponent.cdl
// Component provides multiple endpoints.
component kl.KscConnectorComponent
endpoints {
KscConnCommandSender : kl.IKscConnCommandSender
KscConnController : kl.IKscConnController
KscConnSettingsHolder : kl.IKscConnSettingsHolder
KscDataProvider : kl.IKscDataProvider
ProductDataHolder : kl.IProductDataHolder
KscDataNotifier : kl.IKscDataNotifier
KscConnectorStateNotifier : kl.IKscConnectorStateNotifier
}
FsVerifier.cdl
/* Component does not provide endpoints, supports
* a security interface, and contains one instance
* of another component. */
component FsVerifier
security Approve
components {
verifyComp : Verify
}
IDL description
IDL descriptions are put into separate *.idl files, which contain the following data:
- Package name. The following declaration is used:
package <package name>
- [Optional] Packages from which the data types for interface method parameters are imported. The following declaration is used:
import <package name>
- [Optional] Definitions of data types for parameters of interface methods.
- [Optional] Signatures of interface methods. The following declaration is used:
interface {
<interface method name([parameters])>;
...
}
Each method signature is indicated in a separate line. The method name must not contain any underscores
_. Each method in the list has a unique name. The parameters of methods are divided into input parameters (in), output parameters (out), and parameters for transmitting error information (error).Input parameters and output parameters are transmitted in IPC requests and IPC responses, respectively. Error parameters are transmitted in IPC responses if the server cannot correctly handle the corresponding IPC requests.
The server can inform a client about IPC request processing errors via error parameters as well as through output parameters of interface methods. If the server sets the error flag in an IPC response when an error occurs, this IPC response will contain the error parameters without any output parameters. Otherwise this IPC response will contain output parameters just like when requests are correctly processed. (The error flag is set in IPC responses by using the
nk_err_reset()macro defined in thenk/types.hheader file from the KasperskyOS SDK.)An IPC response sent with the error flag set and an IPC response with the error flag not set are considered to be different types of events for the Kaspersky Security Module. When describing a solution security policy, this difference lets you conveniently distinguish between the processing of events associated with the correct execution of IPC requests and the processing of events associated with incorrect execution of IPC requests. If the server does not set the error flag in IPC responses, the security module must check the values of output parameters indicating errors to properly process events related to the incorrect execution of IPC requests. (A client can check the state of the error flag in an IPC response even if the corresponding interface method does not contain error parameters. To do so, the client uses the
nk_msg_check_err()macro defined in thenk/types.hheader file from the KasperskyOS SDK.)Signatures of interface methods cannot be imported from other IDL files.
The IDL language is case sensitive.
Single-line comments and multi-line comments can be used in an IDL description.
At least one optional declaration is used in a IDL description. If an IDL description does not use at least one optional declaration, this description will correspond to an "empty" package that does not assign any interface methods or data types (including from other IDL descriptions).
Some IDL files from the KasperskyOS SDK do not describe interface methods, but instead only contain definitions of data types. These IDL files are used only as exporters of data types.
If a package contains a description of interface methods, the interface name matches the package name.
Examples of IDL files
Env.idl
package kl.Env
// Definitions of data types for interface method parameters
typedef string<128> Name;
typedef string<256> Arg;
typedef sequence<Arg,256> Args;
// Interface includes one method.
interface {
Read(in Name name, out Args args, out Args envs);
}
Kpm.idl
package kl.Kpm
// Import data types for parameters of interface methods
import kl.core.Types
// Definition of data type for parameters of interface methods
typedef string<64> String;
/* Interface includes multiple methods.
* Some methods do not have any parameters. */
interface {
Shutdown();
Reboot();
PowerButtonPressedWait();
TerminationSignalWait(in UInt32 entityId, in String entityName);
EntityTerminated(in UInt32 entityId);
Terminate(in UInt32 callingEntityId);
}
MessageBusSubs.idl
package kl.MessageBusSubs
// Import data types for interface method parameters
import kl.MessageBusTypes
/* Interface includes a method that has
* input and output parameters, and
* an error parameter.*/
interface {
Wait(in ClientId id,
out Message topic,
out BundleId dataId,
error ResultCode result);
}
WaylandTypes.idl
// Package contains only definitions of data types.
package kl.WaylandTypes
typedef UInt32 ClientId;
typedef bytes<8192> Buffer;
typedef string<4096> ConnectionId;
typedef SInt32 SsizeT;
typedef UInt32 SizeT;
typedef SInt32 ShmFd;
typedef SInt32 ShmId;
typedef bytes<16384000> ShmBuffer;
IDL data types
Primitive types
IDL supports the following primitive types:
SInt8,SInt16,SInt32,SInt64(signed integer)UInt8,UInt16,UInt32,UInt64(unsigned integer)Handle(value whose binary representation consists of multiple fields, including a handle field and a handle permissions mask field)bytes<<size in bytes>>(byte buffer)string<<size in bytes>>(string buffer)
A byte buffer is a memory area with a size that does not exceed the defined number of bytes. A string buffer is a byte buffer whose last byte is a terminating zero. The maximum size of a string buffer is a unit larger than the defined size due to the additional byte with the terminating zero. To transfer a byte buffer or string buffer via IPC, the amount of memory that is actually occupied by this buffer will be used.
For numeric types, you can declare named constants by using the reserved word const:
const UInt32 DeviceNameMax = 64;
const UInt32 HandleTypeUserLast = 0x0001FFFF;
Constants are used to avoid problems associated with "magic numbers". For example, if an IDL description defines constants for return codes of an interface method, you can interpret these codes without additional information when describing a policy.
In addition to primitive types, the IDL language supports composite types, such as unions, structures, arrays and sequences. In a definition of composite types, constants of primitive types may be applied as parameters (for example, to assign an array size).
The bytes<<size in bytes>> and string<<size in bytes>> constructs are used in definitions of composite types, signatures of interface methods, and when creating type aliases because they define anonymous types (types without a name).
Unions
A union lets you store different types of data in one memory area. In an IPC message, a union is provided with an additional tag field that lets you define which specific member of the union is used.
The following construct is used to define a union:
union <type name> {
<member type> <member name>;
...
}
Example of a union definition:
union ExitInfo {
UInt32 code;
ExceptionInfo exc;
}
Structures
The following construct is used to define a structure:
struct <type name> {
<field type> <field name>;
...
}
Example of a structure definition:
struct SessionEvqParams {
UInt32 count;
UInt32 align;
UInt32 size;
}
Arrays
The following construct is used to define an array:
array<<type of elements, number of elements>>
This construct is used in definitions of other composite types, signatures of interface methods, and when creating type aliases because it defines an anonymous type.
Sequences
A sequence is a variable-sized array. When defining a sequence, its maximum number of elements is specified. However, you can actually transmit less than this number (via IPC). In this case, only an amount of memory necessary for the transmitted elements will be used.
The following construct is used to define a sequence:
sequence<<type of elements, number of elements>>
This construct is used in definitions of other composite types, signatures of interface methods, and when creating type aliases because it defines an anonymous type.
Types based on composite types
Composite types can be used to define other composite types. The definition of an array or sequence can also be included in the definition of another type:
struct BazInfo {
array<UInt8, 100> a;
sequence<sequence<UInt32, 100>, 200> b;
string<100> c;
bytes<4096> d;
UInt64 e;
}
The definition of a union or structure cannot be included in the definition of another type. However, a previously described definition of a union or structure can be included in a type definition. This is done by indicating the names of the included types in the type definition:
union foo {
UInt32 value1;
UInt8 value2;
}
struct bar {
UInt32 a;
UInt8 b;
}
struct BazInfo {
foo x;
bar y;
}
Creating aliases of types
Type aliases make it more convenient to work with types. For example, type aliases can be used to assign mnemonic names to types that have abstract names. Assigned aliases for anonymous types also let you receive named types.
The following construct is used to create a type alias:
typedef <type name/anonymous type definition> <type alias>
Example of creating mnemonic aliases:
typedef UInt64 ApplicationId;
typedef Handle PortHandle;
Example of creating an alias for an array definition:
typedef array<UInt8, 4> IP4;
Example of creating an alias for a sequence definition:
const UInt32 MaxDevices = 8;
struct Device {
string<32> DeviceName;
UInt8 DeviceID;
}
typedef sequence<Device, MaxDevices> Devices;
Example of creating an alias for a union definition:
union foo {
UInt32 value1;
UInt8 value2;
}
typedef foo bar;
Defining anonymous types in signatures of interface methods
Anonymous types can be defined in signatures of interface methods.
Example of defining a sequence in an interface method signature:
Poll(in Generation generation,
in UInt32 timeout,
out Generation currentGeneration,
out sequence<Report, DeviceMax> report,
out UInt32 count,
out UInt32 rc);
Describing a security policy for a KasperskyOS-based solution
A KasperskyOS-based solution security policy description (hereinafter also referred to as a solution security policy description or policy description) provides a set of interrelated text files with the psl extension that contain declarations in the PSL language. Some files reference other files through an inclusion declaration, which results in a hierarchy of files with one top-level file. The top-level file is specific to the solution. Files of lower and intermediate levels contain parts of the solution security policy description that may be specific to the solution or may be re-used in other solutions.
Some of the files of the lower and intermediate levels are provided in the KasperskyOS SDK. These files contain definitions of the basic data types and formal descriptions of KasperskyOS security models. KasperskyOS security models (hereinafter referred to as security models) serve as the framework for implementing security policies for KasperskyOS-based solutions. Files containing formal descriptions of security models reference a file containing definitions of the basic data types that are used in the descriptions of models.
The other files of lower and intermediate levels are created by the policy description developer if any parts of the policy description need to be re-used in other solutions. A policy description developer can also put parts of the policy description into separate files for convenient editing.
The top-level file references files containing definitions of basic data types and descriptions of security models that are applied in the part of the solution security policy that is described in this file. The top-level file also references all files of the lower and intermediate levels that were created by the policy description developer.
The top-level file is normally named security.psl, but it can have any other name in the *.psl format.
General information about a KasperskyOS-based solution security policy description
In simplified terms, a KasperskyOS-based solution security policy description consists of bindings that associate descriptions of security events with calls of methods provided by security model objects. A security model object is an instance of a class whose definition is a formal description of a security model (in a PSL file). Formal descriptions of security models contain signatures of methods of security models that determine the permissibility of interactions between different processes and between processes and the KasperskyOS kernel. These methods are divided into two types:
- Security model rules are methods of security models that return a "granted" or "denied" result. Security model rules can change security contexts (for information about a security context, see "Resource Access Control").
- Security model expressions are methods of security models that return values that can be used as input data for other methods of security models.
A security model object provides methods that are specific to one security model and stores the parameters used by these methods (for example, the initial state of a finite-state machine or the size of a container for specific data). The same object can be used to work with multiple resources. (In other words, you do not need to create a separate object for each resource.) However, this object will independently use the security contexts of these resources. Likewise, multiple objects of one or more different security models can be used to work with the same resource. In this case, different objects will use the security context of the same resource without any reciprocal influence.
Security events serve as signals indicating the initiation of interaction between different processes and between processes and the KasperskyOS kernel. Security events include the following events:
- Clients send IPC requests.
- Servers or the kernel send IPC responses.
- The kernel or processes initialize the startup of processes.
- The kernel starts.
- Processes query the Kaspersky Security Module via the security interface.
Security events are processed by the security module.
Security models
The KasperskyOS SDK provides PSL files that describe the following security models:
- Base – methods that implement basic logic.
- Pred – methods that implement comparison operations.
- Bool – methods that implement logical operations.
- Math – methods that implement integer arithmetic operations.
- Struct – methods that provide access to structural data elements (for example, access to parameters of interface methods transmitted in IPC messages).
- Regex – methods for text data validation based on regular expressions.
- HashSet – methods for working with one-dimensional tables associated with resources.
- StaticMap – methods for working with two-dimensional "key–value" tables associated with resources.
- Flow – methods for working with finite-state machines associated with resources.
- Mic – methods for implementing Mandatory Integrity Control (MIC).
Security event handling by the Kaspersky Security Module
The Kaspersky Security Module calls all methods (rules and expressions) of security models related to an occurring security event. If all rules returned the "granted" result, the security module returns the "granted" decision. If even one rule returned the "denied" result, the security module returns the "denied" decision.
If even one method related to an occurring security event cannot be correctly performed, the security module returns the "denied" decision.
If no rule is related to an occurring security event, the security module returns the "denied" decision. In other words, all interactions between solution components and between those components and the KasperskyOS kernel are denied by default (Default Deny principle) unless those interactions are explicitly allowed by the solution security policy.
Security audit
A security audit (hereinafter also referred to as an audit) is the following sequence of actions. The Kaspersky Security Module notifies the KasperskyOS kernel about decisions made by this module. Then the kernel forwards this data to the system program Klog, which decodes this data and forwards it to the system program KlogStorage (data is transmitted via IPC). The latter prints the received data via standard output or saves it to a file.
Security audit data (hereinafter referred to as audit data) refers to information about decisions made by the Kaspersky Security Module, which includes the actual decisions ("granted" or "denied"), descriptions of security events, results from calling methods of security models, and data on incorrect IPC messages. Data on calls of security model expressions is included in the audit data just like data on calls of security model rules.
Page top
PSL language syntax
Basic rules
- Declarations can be listed in any sequence in a file.
- One declaration can be written to one or multiple lines. The second and subsequent lines of the declaration must be written with indentations relative to the first line. The closing brace that completes the declaration can be written on the first line.
- A multi-line declaration utilizes different-sized indentations to reflect the nesting of constructs comprising this declaration. The second and subsequent lines of a multi-line construct enclosed in braces must be written with an indentation relative to the first line of this construct. The closing brace of a multi-line construct can be written with an indentation or on the first line of the construct.
- The PSL language is case sensitive.
- Single-line comments and multi-line comments are supported:
/* This is a comment
* And this, too */
// Another comment
Types of declarations
The PSL language has declarations for the following purposes:
- Describing the global parameters of a solution security policy
- Including PSL files
- Including EDL files
- Creating security model objects
- Binding methods of security models to security events
- Describing security audit profiles
- Describing solution security policy tests
Describing the global parameters of a KasperskyOS-based solution security policy
Global parameters include the following parameters of a solution security policy:
- Execute interface used by the KasperskyOS kernel when querying the Kaspersky Security Module to notify it about kernel startup or about initiating the startup of a process by the kernel or by other processes. To assign this interface, use the following declaration:
execute: kl.core.Execute
KasperskyOS currently supports only one execute interface (
Execute) defined in the file namedkl/core/Execute.idl. (This interface consists of onemainmethod, which has no parameters and does not perform any actions. Themainmethod is reserved for potential future use.) - [Optional] Global security audit profile and initial security audit runtime-level. To define these parameters, use the following declaration:
audit default = <security audit profile name> <security audit runtime-level>
Example:
audit default = global 0
The default global profile is the
emptysecurity audit profile described in the file namedtoolchain/include/nk/base.pslfrom the KasperskyOS SDK, and the default security audit runtime-level is 0.
Including PSL files
To include a PSL file, use the following declaration:
use <link to PSL file._>
The link to the PSL file is the file path (without the extension and dot before it) relative to the directory that is included in the set of directories where the nk-psl-gen-c compiler searches for PSL, IDL, CDL, and EDL files. (This set of directories is defined by the parameters -I <path to files> when starting the makekss script or the nk-psl-gen-c compiler.) A dot is used as a separator in a path description. A declaration is ended by the ._ character sequence.
Example:
use policy_parts.flow_part._
This declaration includes the flow_part.psl file, which is located in the policy_parts directory. The policy_parts directory must reside in one of the directories where the nk-psl-gen-c compiler searches for PSL, IDL, CDL, and EDL files. For example, the policy_parts directory may reside in the same directory as the PSL file containing this declaration.
Including a PSL file containing a formal description of a security model
To use the methods of a required security model, you need to include a PSL file containing a formal description of this model. PSL files containing formal descriptions of security models are located in the KasperskyOS SDK at the following path:
toolchain/include/nk
Example:
/* Include the base.psl file containing a formal description of the
* Base security model */
use nk.base._
/* Include the flow.psl file containing a formal description of the
* Flow security model */
use nk.flow._
/* The nk-psl-gen-c compiler must be configured to search for
* PSL, IDL, CDL, and EDL files in the toolchain/include directory. */
Including EDL files
To include an EDL file for the KasperskyOS kernel, use the following declaration:
use EDL kl.core.Core
To include an EDL file for a program (such as a driver or application), use the following declaration:
use EDL <link to EDL file>
The link to the EDL file is the EDL file path (without the extension and dot before it) relative to the directory that is included in the set of directories where the nk-psl-gen-c compiler searches for PSL, IDL, CDL, and EDL files. (This set of directories is defined by the parameters -I <path to files> when starting the makekss script or the nk-psl-gen-c compiler.) A dot is used as a separator in a path description.
Example:
/* Include the UART.edl file, which is located
* in the KasperskyOS SDK at the path sysroot-*-kos/include/kl/drivers. */
use EDL kl.drivers.UART
/* The nk-psl-gen-c compiler must be configured to search for
* PSL, IDL, CDL, and EDL files in the sysroot-*-kos/include directory. */
The nk-psl-gen-c compiler finds IDL and CDL files via EDL files because EDL files contain links to the corresponding CDL files, and the CDL files contain links to the corresponding CDL and IDL files.
Creating security model objects
To call the methods of a required security model, create an object for this security model.
To create a security model object, use the following declaration:
policy object <security model object name : security model name> {
[security model object parameters]
}
The parameters of a security model object are specific to the security model. A description of parameters and examples of creating objects of various security models are provided in the "KasperskyOS security models" section.
Page top
Binding methods of security models to security events
To create an attachment between methods of security models and a security event, use the following declaration:
<security event type> [security event selectors] {
[security audit profile]
<called security model rules>
}
Security event type
The following specifiers are used to define the security event type:
request– sending IPC requests.response– sending IPC responses.error– sending IPC responses containing information about errors.security– processes querying the Kaspersky Security Module via the security interface.execute– initializing the startups of processes or the startup of the KasperskyOS kernel.
When processes interact with the security module, they use a mechanism that is different from IPC. However, when describing a policy, queries sent by processes to the security module can be viewed as the transfer of IPC messages because processes actually transmit messages to the security module (the recipient is not indicated in these messages).
The IPC mechanism is not used to start processes. However, when the startup of a process is initiated, the kernel queries the security module and provides information about the initiator of the startup and the started process. For this reason, the policy description developer can consider the startup of a process to be analogous to sending an IPC message from the startup initiator to the started process. When the kernel is started, this is analogous to the kernel sending an IPC message to itself.
Security event selectors
Security event selectors let you clarify the description of the defined type of security event. The following selectors are used:
src=<kernel/process class name> – processes of the defined class or the KasperskyOS kernel are the sources of IPC messages.dst=<kernel/process class name> – processes of the defined class or the kernel are the recipients of IPC messages.interface=<interface name> – describes the following security events:- Clients attempt to use the endpoints of servers or the kernel with the defined interface.
- Processes query the Kaspersky Security Module via the defined security interface.
- The kernel or servers send clients the results from using the endpoints with the defined interface.
component=<component name> – describes the following security events:- Clients attempt to use the core or server endpoints provided by the defined component.
- The kernel or servers send clients the results from using the endpoints provided by the defined component.
endpoint=<qualified endpoint name> – describes the following security events:- Clients attempt to use the defined core or server endpoints.
- The kernel or servers send clients the results from using the defined endpoint.
method=<method name> – describes the following security events:- Clients attempt to query servers or the kernel by calling the defined method of the endpoint.
- Processes query the security module by calling the defined method of the security interface.
- The kernel or servers send clients the results from calling the defined method of the endpoint.
- The kernel notifies the security module about its startup by calling the defined method of the execute interface.
- The kernel initiates the startup of processes by calling the defined method of the execute interface.
- Processes initiate the startup of other processes, which results in the kernel calling the defined method of the execute interface.
Process classes, components, instances of components, interfaces, endpoints, and methods must be named the same as they are in the IDL, CDL, and EDL descriptions. The kernel must be named kl.core.Core.
The qualified name of the endpoint has the format <path to endpoint.endpoint name>. The path to the endpoint is a sequence of component instance names separated by dots. Among these component instances, each subsequent component instance is embedded into the previous one, and the last one provides the endpoint with the defined name.
For security events, specify the qualified name of the security interface method if you need to use the security interface defined in a CDL description. (If you need to use a security interface defined in an EDL description, it is not necessary to specify the qualified name of the method.) The qualified name of a security interface method is a construct in the format <path to security interface.method name>. The path to the security interface is a sequence of component instance names separated by dots. Among these component instances, each subsequent component instance is embedded into the previous one, and the last one supports the security interface that includes the method with the defined name.
If selectors are not specified, the participants of a security event may be any process and the kernel (except security events in which the kernel cannot participate).
You can use combinations of selectors. Selectors can be separated by commas.
There are restrictions on the use of selectors. The interface, component, and endpoint selectors cannot be used for security events of the execute type. The dst, component, and endpoint selectors cannot be used for security events of the security type.
There are also restrictions on combinations of selectors. For security events of the request, response and error types, the method selector can only be used together with one of the endpoint, interface, or component selectors or a combination of them. (The method, endpoint, interface and component selectors must be coordinated. In other words, the method, endpoint, interface, and component must be interconnected.) For security events of the request type, the endpoint selector can be used only together with the dst selector. For security events of the response and error types, the endpoint selector can be used only together with the src selector.
The type and selectors of a security event make up the security event description. It is recommended to describe security events with maximum precision to allow only the required interactions between different processes and between processes and the kernel. If IPC messages of the same type are always verified when processing the defined event, the description of this event is maximally precise.
To ensure that IPC messages of the same type correspond to a security event description, one of the following conditions must be fulfilled for this description:
- For events of the
request,responseanderrortype, the "interface method-endpoint-server class or kernel" chain is unequivocally defined. For example, the security event descriptionrequest dst=Server endpoint=net.Net method=Sendcorresponds to IPC messages of the same type, and the security event descriptionrequest dst=Servercorresponds to any IPC message sent to theServer. - For
securityevents, the security interface method is specified. - The execute-interface method is indicated for
executeevents.There is currently support for only one fictitious method of the
mainexecute-interface. This method is used by default, so it does not have to be defined through themethodselector. This way, any description of anexecutesecurity event corresponds to IPC messages of the same type.
Security audit profile
A security audit profile is defined by the construct audit <security audit profile name>. If a security audit profile is not defined, the global security audit profile is used.
Called security model rules
Called security model rules are defined by a list from the following type of constructs:
[security model object name.]<security model rule name> <parameter>
Input data for security model rules may be values returned by security model expressions. The following construct is used to call a security model expression:
[security model object name.]<security model expression name> <parameter>
Parameters of interface methods can also be used as input data for methods of security models (rules and expressions). (For details about obtaining access to parameters of interface methods, see "Struct security model"). In addition, input data for methods of security models can also be the SID values of processes and the KasperskyOS kernel that are defined by the src_sid and dst_sid reserved words. The first reserved word refers to the SID of the process (or kernel) that is the source of the IPC message. The second reserved word refers to the SID of the process (or kernel) that is the recipient of the IPC message (dst_sid cannot be used for queries to the Kaspersky Security Module).
For calls of some rules and expressions of security models, you can choose not to indicate the security model object name, and you can use operators. For details about the methods of security models, see KasperskyOS Security models.
Embedded constructs for binding methods of security models to security events
In one declaration, you can bind methods of security models to different security events of the same type. To do so, use the match sections that consist of the following types of constructs:
match <security event selectors> {
[security audit profile]
<called security model rules>
}
Match sections can be embedded into another match section. A match section simultaneously uses its own security event selectors and the security event selectors at the level of the declaration and all match sections in which this match section is "wrapped". By default, a match section applies the security audit profile of its own container (match section of the preceding level or the declaration level), but you can define a separate security audit profile for the match section.
In one declaration, you can define different variants for processing a security event depending on the conditions in which this event occurred (for example, depending on the state of the finite-state machine associated with the resource). To do so, use the conditional sections that are elements of the following construct:
choice <call of the security model expression that verifies fulfillment of conditions> {
"<condition 1>" : [{] // Conditional section 1
[security audit profile]
<called security model rules>
[}]
"<condition 2>" : ... // Conditional section 2
...
_ : ... // Conditional section, if no condition is fulfilled.
}
The choice construct can be used within a match section. A conditional section uses the security event selectors and security audit profile of its own container, but you can define a separate security audit profile for a conditional section.
If multiple conditions described in the choice construct are simultaneously fulfilled when a security event is processed, only the one conditional section corresponding to the first matching condition on the list is triggered.
You can verify the fulfillment of conditions in the choice construct only by using the expressions that are specially intended for this purpose. Some security models contain these expressions (for more details, see KasperskyOS Security models).
Examples of binding security model methods to security events
See "Examples of binding security model methods to security events", "Example descriptions of basic security policies for KasperskyOS-based solutions", and "KasperskyOS security models".
Page top
Describing security audit profiles
To perform a security audit, you need to associate security model objects with security audit profile(s). A security audit profile (hereinafter also referred to as an audit profile) combines security audit configurations (hereinafter also referred to as audit configurations), each of which defines the security model objects covered by the audit, and specifies the conditions for conducting the audit. You can define a global audit profile (for more details, see "Describing the global parameters of a KasperskyOS-based solution security policy") and/or assign audit profile(s) at the level of binding security model methods to security events, and/or assign audit profile(s) at the level of match sections or choice sections (for more details, see "Binding methods of security models to security events").
Regardless of whether or not audit profiles are being used, audit data contains information about "denied" decisions that were made by the Kaspersky Security Module when IPC messages were invalid and when handling security events that are not associated with any security model rule.
To describe a security audit profile, use the following declaration:
audit profile <security audit profile name> =
{ <security audit runtime-level> :
// Description of the security audit configuration
{ <security model object name> :
{ kss: <security audit conditions linked to the results
from calls of security model rules>
[, security audit conditions specific to the security model]
}
[,]...
...
}
[,]...
...
}
Security audit runtime-level
The security audit runtime-level (hereinafter referred to as the audit runtime-level) is a global parameter of a solution security policy and consists of an unsigned integer that defines the active security audit configuration. (The word "runtime-level" here refers to the configuration variant and does not necessarily involve a hierarchy.) The audit runtime-level can be changed during operation of the Kaspersky Security Module. This is done by using a specialized method of the Base security model that is called when processes query the security module via the security interface (for more details, see "Base security model"). The initial audit runtime-level is assigned together with the global audit profile (for more details, see "Describing the global parameters of a KasperskyOS-based solution security policy"). An empty audit profile can be explicitly assigned as the global audit profile.
You can define multiple audit configurations in an audit profile. In different configurations, different security model objects can be covered by the audit and different conditions for conducting the audit can be applied. Audit configurations in a profile correspond to different audit runtime-levels. If a profile does not have an audit configuration corresponding to the current audit runtime-level, the security module will activate the configuration that corresponds to the next-lowest audit runtime-level. If a profile does not have an audit configuration for an audit runtime-level equal to or less than the current level, the security module will not use this profile (in other words, an audit will not be performed for this profile).
Audit runtime-levels can be used to regulate the level of detail of an audit, for example. The higher the audit runtime-level, the higher the level of detail. The higher the level of detail, the more security model objects are covered by the audit and/or the less restrictions are applied in the audit conditions.
Another example of applying audit runtime-levels is the capability to shift the audit from one subsystem to another subsystem (for example, shift an audit related to drivers to an audit related to applications, or shift an audit related to the network subsystem to an audit related to the graphic subsystem).
Name of the security model object
The security model object name is indicated so that the methods provided by this object can be covered by the audit. These methods will be covered by the audit whenever they are called, provided that the conditions for conducting the audit are observed.
Information about the decisions of the Kaspersky Security Module contained in audit data includes the overall decision of the security module as well as the results from calling individual methods of security modules covered by the audit. To ensure that information about a security module decision is included in audit data, at least one method called during security event handling must be covered by the audit.
The names of security model objects and the names of methods provided by these objects are included in the audit data.
Security audit conditions
Security audit conditions are defined separately for each object of a security model.
To define the audit conditions related to the results from calling security model rules, use the following constructs:
["granted"]– the audit is performed if the rules return the "granted" result.["denied"]– the audit is performed if the rules return the "denied" result.["granted", "denied"]– the audit is performed if the rules return the "granted" or "denied" result.[]– the audit is not performed, regardless of the result returned by the rules.
Audit conditions related to results from calling rules are not applied to expressions. These conditions must be defined (by any allowed construct) even if the security model contains only expressions because PSL language syntax requires it.
Audit conditions specific to security models are defined by constructs specific to these models (for more details, see KasperskyOS Security models). These conditions apply to rules and expressions. For example, one of these conditions can be the state of a finite-state machine.
Security audit profile for a security audit route
A security audit route includes the kernel and the Klog and KlogStorage processes, which are connected by IPC channels based on the "kernel – Klog – KlogStorage" scheme. Security model methods that are associated with transmission of audit data via this route must not be covered by the audit. Otherwise, this will lead to an avalanche of audit data because any data transmission will give rise to new data.
To "suppress" an audit that was defined by a profile with a wider scope (for example, by a global profile or a profile at the level of binding security model methods to a security event), you need to assign an empty audit profile at the level of binding security model methods to security events or at the level of the match section or choice section.
Example descriptions of audit profiles
See Example descriptions of security audit profiles.
Page top
Describing and performing tests for a KasperskyOS-based solution security policy
A solution security policy is tested to verify whether or not the policy actually allows what should be allowed and denies what should be denied.
To describe a set of tests for a solution security policy, you need to use the following declaration:
assert "<name of test set>" {
// Constructs in PAL (Policy Assertion Language)
[setup {<initial part of tests>}]
sequence "<test name>" {<main part of test>}
...
[finally {<final part of tests>}]
}
You can describe multiple sets of tests by using several of these declarations.
The test set description can optionally include the initial part of the tests and/or the final part of the tests. The execution of each test from the set begins with whatever is described in the initial part of the test and ends with whatever is described in the final part of the test. This lets you describe the repeated initial and/or final parts of tests in each test.
After completing each test, all modifications in the Kaspersky Security Module related to the execution of this test are rolled back.
Each test includes one or more test cases.
Test cases
A test case associates a security event description and values of interface method parameters with an expected decision of the Kaspersky Security Module. If the actual security module decision matches the expected decision, the test case passes. Otherwise it fails.
When a test is run, the test cases are executed in the same sequence in which they are described. In other words, you can test how the security module handles a sequence of security events.
If all test cases within a test pass, the test passes. If even one test case fails to pass, the test fails. A test is terminated on the first failing test case.
A test case description is created in the PAL language and is comprised of a sequence of values:
[expected decision of security module] ["test example name"] <security event type> <security event selectors> [{interface method parameter values}]
The expected decision of the security module can be indicated as grant ("granted"), deny ("denied") or any ("any decision"). If the expected security module decision is not specified, the "granted" decision is expected. If the any value is specified, the security module decision does not have any influence on whether or not the test case passes. In this case, the test case may fail due to errors that occur when the security module processes an IPC message (for example, when the IPC message has an invalid structure).
For information about the types and selectors of security events, and about the limitations when using selectors, see Binding methods of security models to security events. Selectors must ensure that the security event description corresponds to IPC messages of the same type. (When security model methods are bound to security events, selectors may fail to ensure this.)
In security event descriptions, you need to specify the SID instead of the process class name (and the KasperskyOS kernel). However, this requirement does not apply to execute events for which the SID of the started process (or kernel) is unknown. To save the SID of the process or kernel to a variable, you need to use the <- operator in the test case description in the following format:
<variable name> <- execute dst=<kernel/process class name> ...
The SID value will be assigned to the variable even if startup of the process of the defined class (or kernel) is denied by the tested policy but the "denied" decision is expected.
The PAL language supports abbreviated forms of security event descriptions:
security: <Process SID>!<qualified name of security interface method> corresponds tosecurity src=<process SID>method=<qualified name of security interface method>.request: <client SID>~><kernel/server SID>:<qualified name of endpoint.method name> corresponds torequest src=<client SID>dst=<kernel/server SID>endpoint=<qualified name of endpoint>method=<method name>.response: <client SID><~<kernel/server SID>:<qualified name of endpoint.method name> corresponds toresponse src=<kernel/server SID>dst=<client SID>endpoint=<qualified name of endpoint>method=<method name>.
If an interface method has parameters, their values are defined by comma-separated constructs:
<parameter name> : <value>
The names and types of parameters must comply with the IDL description. The sequence order of parameters is not important.
Example definition of parameter values
{ param1 : 23, param2 : "bar", param3: { collection : [5,7,12], filehandle : 15 }, param4 : { name : ["foo", "baz" } }
In this example, the number is passed through the param1 parameter. The string buffer is passed through the param2 parameter. A structure consisting of two fields is passed through the param3 parameter. The collection field contains an array or sequence of three numeric elements. The filehandle field contains the SID. A union or structure containing one field is passed through the param4 parameter. The name field contains an array or sequence of two string buffers.
Currently, only an SID can be indicated as the value of a Handle parameter, and there is no capability to indicate the SID together with a handle permissions mask. For this reason, it is not possible to properly test a solution security policy when the permissions masks of handles influence the security module decisions.
Example descriptions of policy tests
See "Example descriptions of tests for KasperskyOS-based solution security policies".
Test procedure
Descriptions of tests are placed into PSL files, including those that contain a solution security policy description (for example, into the security.psl file).
To run tests, you need to use the --tests run parameter when starting the nk-psl-gen-c compiler:
$ nk-psl-gen-c --tests run <other parameters> security.psl
You also need to indicate the following data for the nk-psl-gen-c compiler:
- Directories that contain auxiliary files from the KasperskyOS SDK (
common,sysroot-*-kos/include,toolchain/include). This set of directories is defined by the parameters-I, -include-dir<path to files>. - Directories that contain PSL, IDL, CDL, and EDL files related to the solution. This set of directories is defined by the parameters
-I, --include-dir<path to files>. - Path to the file that will save the source code of the Kaspersky Security Module and tests. This path is defined by the parameter
-o, --output<path to file>.
The nk-psl-gen-c compiler generates the source code of the security module and tests in the C language, saves this code to a file, and then runs the compilation of this code using gcc and executes the obtained test program. The test program is run in an environment where the KasperskyOS SDK is installed (on a computer running a Linux operating system). It does not utilize the KasperskyOS kernel, system software or applications of the solution.
To generate the source code of the security module and tests without compiling it, you need to use the --tests generate parameter when starting the nk-psl-gen-c compiler.
Test results are printed to the console. To print the test results to a file, you need to use the --test-output <path to file> parameter when starting the nk-psl-gen-c compiler.
Example test results:
# PAL test run
## Execute (1/2)
* Happy path: FAIL
Step 2/2: ExpectGrant Execute "This should not fail"
component/secure_platform/kss/nk/psl/nk-psl-gen-c/tests/examples/include/router.psl:38:5-40:3
* No rule: PASS
## IPC (2/2)
* Happy path: PASS
* No rule: PASS
## Security (2/2)
* Happy path: PASS
* No rule: PASS
The test results contain information about whether or not each test passed or failed. If a test failed, the results indicate which test case from the specific test did not pass, and provide the location of the description of the failed test case in the PSL file.
Page top
PSL data types
The data types supported in the PSL language are presented in the table below.
PSL data types
Designations of types |
Description of types |
|---|---|
|
Unsigned integer |
|
Signed integer |
|
Boolean type The Boolean type includes two values: |
|
Text type |
|
The |
|
Text literal A text literal includes one immutable text value. Example definitions of text literals:
|
< |
Integer literal An integer literal includes one immutable integer value. Example definitions of integer literals:
|
< |
Variant type A variant type combines two or more types and may perform the role of either of them. Examples of definitions of variant types:
|
|
Dictionary A dictionary consists of one or more types of fields. A dictionary can be empty. Examples of dictionary definitions:
|
|
Tuple A tuple consists of fields of one or more types in the order in which the types are listed. A tuple can be empty. Examples of tuple definitions:
|
|
Set A set includes zero or more unique elements of the same type. Examples of set definitions:
|
|
List A list includes zero or more elements of the same type. Examples of list definitions:
|
|
Associative array An associative array includes zero or more entries of the "key-value" type with unique keys. Example of defining an associative array:
|
|
Array An array includes a defined number of elements of the same type. Example of defining an array:
|
|
Sequence A sequence includes from zero to the defined number of elements of the same type. Example of defining a sequence:
|
Aliases of certain PSL types
The nk/base.psl file from the KasperskyOS SDK defines the data types that are used as the types of parameters (or structural elements of parameters) and returned values for methods of various security models. Aliases and definitions of these types are presented in the table below.
Aliases and definitions of certain data types in PSL
Type alias |
Type definition |
|---|---|
|
Unsigned integer
|
|
Signed integer
|
|
Integer
|
|
Scalar literal
|
|
Literal
|
|
Type of security ID (SID)
|
|
Type of security ID (SID)
|
|
Dictionary containing fields for the SID and handle permissions mask
|
|
Type of data received by expressions of security models called in the
|
|
Type of data defining the conditions for conducting the security audit
|
Mapping IDL types to PSL types
Data types of the IDL language are used to describe the parameters of interface methods. The input data for security model methods have types from the PSL language. The set of data types in the IDL language differs from the set of data types in the PSL language. Parameters of interface methods transmitted in IPC messages can be used as input data for methods of security models, so the policy description developer needs to understand how IDL types are mapped to PSL types.
Integer types of IDL are mapped to integer types of PSL and to variant types of PSL that combine these integer types (including with other types). For example, signed integer types of IDL are mapped to the Signed type in PSL, and integer types of IDL are mapped to the ScalarLiteral type in PSL.
The Handle type in IDL is mapped to the HandleDesc type in PSL.
Unions and structures of IDL are mapped to PSL dictionaries.
Arrays and sequences of IDL are mapped to arrays and sequences of PSL, respectively.
String buffers in IDL are mapped to the text type in PSL.
Byte buffers in IDL are not currently mapped to PSL types, so the data contained in byte buffers cannot be used as inputs for security model methods.
Page top
Examples of binding security model methods to security events
Before analyzing examples, you need to become familiar with the Base security model.
Processing the initiation of process startups
/* The KasperskyOS kernel and any process
* in the solution is allowed to start any
* process. */
execute { grant () }
/* The kernel is allowed to start a process
* of the Einit class. */
execute src=kl.core.Core, dst=Einit { grant () }
/* An Einit-class process is allowed
* to start any process in the solution. */
execute src=Einit { grant () }
Handling the startup of the KasperskyOS kernel
/* The KasperskyOS kernel is allowed to start.
* (This binding is necessary so that the security
* module can be notified of the kernel SID. The kernel starts irrespective
* of whether this is allowed by the solution security policy
* or denied. If the solution security policy denies the
* startup of the kernel, after startup the kernel will terminate its
* execution.) */
execute src=kl.core.Core, dst=kl.core.Core { grant () }
Handling IPC request forwarding
/* Any client in the solution is allowed to query
* any server and the KasperskyOS kernel. */
request { grant () }
/* A client of the Client class is allowed to query
* any server in the solution and the kernel. */
request src=Client { grant () }
/* Any client in the solution is allowed to query
* a server of the Server class. */
request dst=Server { grant () }
/* A client of the Client class is not allowed to
* query a server of the Server class. */
request src=Client dst=Server { deny () }
/* A client of the Client class is allowed to
* query a server of the Server class
* by calling the Ping method of the net.Net endpoint. */
request src=Client dst=Server endpoint=net.Net method=Ping {
grant ()
}
/* Any client in the solution is allowed to query
* a server of the Server class by calling the Send method
* of the endpoint with the MessExch interface. */
request dst=Server interface=MessExch method=Send {
grant ()
}
Handling IPC response forwarding
/* A server of the Server class is allowed to respond to
* queries of a Client-class client that
* calls the Ping method of the net.Net endpoint. */
response src=Server, dst=Client, endpoint=net.Net, method=Ping {
grant ()
}
/* The server containing the kl.drivers.KIDF component
* that provide endpoints with the monitor interface is allowed to
* respond to queries of a DriverManager-class client
* that uses these endpoints. */
response dst=DriverManager component=kl.drivers.KIDF interface=monitor {
grant ()
}
Handling the transmission of IPC responses containing error information
/* A server of the Server class is not allowed to notify a client
* of the Client class regarding errors that occur
* when the client queries the server by calling the
* Ping method of the net.Net endpoint. */
error src=Server, dst=Client, endpoint=net.Net, method=Ping {
deny ()
}
Handling queries sent by processes to the Kaspersky Security Module
/* A process of the Sdcard class will receive the
* "granted" decision from the Kaspersky Security Module
/* by calling the Register method of the security interface.
* (Using the security interface defined
* in the EDL description.) */
security src=Sdcard, method=Register {
grant ()
}
/* A process of the Sdcard class will receive the "denied" decision
* from the security module when calling the Comp.Register method
* of the security interface. (Using the security interface
* defined in the CDL description.) */
security src=Sdcard, method=Comp.Register {
deny ()
}
Using match sections
/* A client of the Client class is allowed to query
* a server of the Server class by calling the Send
* and Receive methods of the net endpoint. */
request src=Client, dst=Server, endpoint=net {
match method=Send { grant () }
match method=Receive { grant () }
}
/* A client of the Client class is allowed to query
* a server of the Server class by calling the Send
* and Receive methods of the sn.Net endpoint and the Write and
* Read methods of the sn.Storage endpoint. */
request src=Client, dst=Server {
match endpoint=sn.Net {
match method=Send { grant () }
match method=Receive { grant () }
}
match endpoint=sn.Storage {
match method=Write { grant () }
match method=Read { grant () }
}
}
Assigning audit profiles
/* Assigning the default global audit profile
* and initial audit runtime-level of 0 */
audit default = global 0
request src=Client, dst=Server {
/* Assigning a parent audit profile at the level of
* binding methods of security models to
* security events */
audit parent
match endpoint=net.Net, method=Send {
/* Assigning a child audit profile at the
* match section level */
audit child
grant ()
}
/* This match section applies a
* parent audit profile. */
match endpoint=net.Net, method=Receive {
grant ()
}
}
/* This binding of the security model method
* to the security event utilizes the
* global audit profile. */
response src=Client, dst=Server {
grant ()
}
Example descriptions of basic security policies for KasperskyOS-based solutions
Before analyzing examples, you need to become familiar with the Struct, Base and Flow security models.
Example 1
The solution security policy in this example allows any interaction between different processes of the Client, Server and Einit classes, and between these processes and the KasperskyOS kernel. The "granted" decision will always be received when these processes query the Kaspersky Security Module. This policy can be used only as a stub during the early stages of development of a KasperskyOS-based solution so that the Kaspersky Security Module does not interfere with interactions. It would be unacceptable to apply such a policy in a real-world KasperskyOS-based solution.
security.psl
execute: kl.core.Execute
use nk.base._
use EDL Einit
use EDL Client
use EDL Server
use EDL kl.core.Core
execute { grant () }
request { grant () }
response { grant () }
error { grant () }
security { grant () }
Example 2
The solution security policy in this example imposes limitations on queries sent from clients of the FsClient class to servers of the FsDriver class. When a client opens a resource controlled by a server of the FsDriver class, a finite-state machine in the unverified state is associated with this resource. A client of the FsClient class is allowed to read data from a resource controlled by a server of the FsDriver class only if the finite-state machine associated with this resource is in the verified state. To switch a resource-associated finite-state machine from the unverified state to the verified state, a process of the FsVerifier class needs to query the Kaspersky Security Module.
In a real-world KasperskyOS-based solution, this policy cannot be applied because it allows an excessive variety of interactions between different processes and between processes and the KasperskyOS kernel.
security.psl
execute: kl.core.Execute
use nk.base._
use nk.flow._
use nk.basic._
policy object file_state : Flow {
type States = "unverified" | "verified"
config = {
states : ["unverified" , "verified"],
initial : "unverified",
transitions : {
"unverified" : ["verified"],
"verified" : []
}
}
}
execute { grant () }
request { grant () }
response { grant () }
use EDL kl.core.Core
use EDL Einit
use EDL FsClient
use EDL FsDriver
use EDL FsVerifier
response src=FsDriver, endpoint=operationsComp.operationsImpl, method=Open {
file_state.init {sid: message.handle.handle}
}
request src=FsClient, dst=FsDriver, endpoint=operationsComp.operationsImpl, method=Read {
file_state.allow {sid: message.handle.handle, states: ["verified"]}
}
security src=FsVerifier, method=Approve {
file_state.enter {sid: message.handle.handle, state: "verified"}
}
Example descriptions of security audit profiles
Before analyzing examples, you need to become familiar with the Base, Regex and Flow security models.
Example 1
// Describing a trace security audit profile
// base – Base security model object
// session – Flow security model object
audit profile trace =
/* If the audit runtime-level is equal to 0, the audit covers
* base object rules when these rules return
* the "denied" result. */
{ 0 :
{ base :
{ kss : ["denied"]
}
}
/* If the audit runtime-level is equal to 1, the audit covers methods
* of the session object in the following cases:
* 1. Rules of the session object return a "granted"
* or "denied" result, and the finite-state machine is in a state
* other than closed.
* 2. A query expression of the session object is called, and the
* finite-state machine is in a state other than closed. */
, 1 :
{ session :
{ kss : ["granted", "denied"]
, omit : ["closed"]
}
}
/* If the audit runtime-level is equal to 2, the audit covers methods
* of the session object in the following cases:
* 1. Rules of the session object return a "granted"
* or "denied" result.
* 2. A query expression of the session object is called. */
, 2 :
{ session :
{ kss : ["granted", "denied"]
}
}
}
Example 2
// Describing a test security audit profile
// base – Base security model object
// re – Regex security model object
audit profile test =
/* If the audit runtime-level is equal to 0, rules of the base object
* and expressions of the re object are not covered by the audit. */
{ 0 :
{ base :
{ kss : []
}
, re :
{ kss : []
, emit : []
}
}
/* If the audit runtime-level is equal to 1, rules of the
* base object are not covered by the audit, and expressions of the
* re object are covered by the audit.*/
, 1 :
{ base :
{ kss : []
}
, re :
{ kss : []
, emit : ["match", "select"]
}
}
/* If the audit runtime-level is equal to 2, rules of the base object
* and expressions of the re object are covered by the audit. Rules
* of the base object are covered by the audit irrespective of the
* result that they return.*/
, 2 :
{ base :
{ kss : ["granted", "denied"]
}
, re :
{ kss : []
, emit : ["match", "select"]
}
}
}
Example descriptions of tests for KasperskyOS-based solution security policies
Example 1
/* Description of a test set that includes only one test. */
assert "some tests" {
/* Description of a test that includes four test cases. */
sequence "first sequence" {
/* It is expected that startup of a Server-class process is allowed.
* If this is true, the s variable will be assigned the SID value
* of the started Server-class process. */
s <- execute dst=Server
/* It is expected that startup of a Client-class process is allowed.
* If this is true, the c variable will be assigned the SID value
* of the started Client-class process. */
c <- execute dst=Client
/* It is expected that a client of the Client class is allowed to query
* a server of the Server class by calling the Ping method of the pingComp.pingImpl endpoint
* with the value parameter equal to 100. */
grant "Client calls Ping" request src=c dst=s endpoint=pingComp.pingImpl
method=Ping { value : 100 }
/* It is expected that a server of the Server class is not allowed to respond to a client
* of the Client class if the client calls the Ping method of the pingComp.pingImpl endpoint.
* (The IPC response does not contain any parameters because the Ping interface method
* has no output parameters.) */
deny "Server cannot respond" response src=s dst=c endpoint=pingComp.pingImpl
method=Ping {}
}
}
Example 2
/* Description of a test set that includes two tests. */
assert "ping tests"{
/* Initial part of each of the two tests */
setup {
s <- execute dst=Server
c <- execute dst=Client
}
/* Description of a test that includes two test cases. */
sequence "ping-ping is denied" {
/* It is expected that a client of the Client class is allowed to query
* a server of the Server class by calling the Ping method of the pingComp.pingImpl endpoint
* with the value parameter equal to 100. */
c ~> s : pingComp.pingImpl.Ping { value : 100 }
/* It is expected that a client of the Client class is not allowed to query
* a server of the Server class by once again calling the Ping method of the pingComp.pingImpl endpoint
* with the value parameter equal to 100. */
deny c ~> s : pingComp.pingImpl.Ping { value : 100 }
}
/* Description of a test that includes two test cases. */
sequence "ping-pong is granted" {
/* It is expected that a client of the Client class is allowed to query
* a server of the Server class by calling the Ping method of the pingComp.pingImpl endpoint
* with the value parameter equal to 100. */
c ~> s : pingComp.pingImpl.Ping { value: 100 }
/* It is expected that a client of the Client class is allowed to query
* a server of the Server class by calling the Pong method of the pingComp.pingImpl endpoint
* with the value parameter equal to 100. */
c ~> s : pingComp.pingImpl.Pong { value: 100 }
}
}
Example 3
/* Description of a test set that includes only one test. */
assert {
/* Description of a test that includes eight test cases. */
sequence {
storage <− execute dst=test.kl.UpdateStorage
manager <− execute dst=test.kl.UpdateManager
deployer <− execute dst=test.kl.UpdateDeployer
downloader <− execute dst=test.kl.UpdateDownloader
grant manager ~>
downloader:UpdateDownloader.Downloader.LoadPackage { url : ”url012345678” }
grant response src=downloader dst=manager endpoint=UpdateDownloader.Downloader
method=LoadPackage { handle : 29, result : 1 }
deny manager ~> deployer:UpdateDeployer.Deployer.Start { handle : 29 }
deny request src=manager dst=deployer endpoint=UpdateDeployer.Deployer
method=Start { handle : 29 }
}
}
Pred security model
The Pred security model lets you perform comparison operations.
A PSL file containing a description of the Pred security model is located in the KasperskyOS SDK at the following path:
toolchain/include/nk/basic.psl
Pred security model object
The basic.psl file contains a declaration that creates a Pred security model object named pred. Consequently, inclusion of the basic.psl file into the solution security policy description will create a Pred security model object by default.
A Pred security model object does not have any parameters and cannot be covered by a security audit.
It is not necessary to create additional Pred security model objects.
Pred security model methods
A Pred security model contains expressions that perform comparison operations and return values of the Boolean type. To call these expressions, use the following comparison operators:
- <
ScalarLiteral>==<ScalarLiteral> – "equals". - <
ScalarLiteral>!=<ScalarLiteral> – "does not equal". - <
Number><<Number> – "is less than". - <
Number><=<Number> – "is less than or equal to". - <
Number>><Number> – "is greater than". - <
Number>>=<Number> – "is greater than or equal to".
The Pred security model also contains the empty expression that lets you determine whether data contains its own structural elements. This expression returns values of the Boolean type. If data does not contain its own structural elements (for example, a set is empty), the expression returns true, otherwise it returns false. To call the expression, use the following construct:
pred.empty <Text | Set | List | Map | ()>
Bool security model
The Bool security model lets you perform logical operations.
A PSL file containing a description of the Bool security model is located in the KasperskyOS SDK at the following path:
toolchain/include/nk/basic.psl
Bool security model object
The basic.psl file contains a declaration that creates a Bool security model object named bool. Consequently, inclusion of the basic.psl file into the solution security policy description will create a Bool security model object by default.
A Bool security model object does not have any parameters and cannot be covered by a security audit.
It is not necessary to create additional Bool security model objects.
Bool security model methods
The Bool security model contains expressions that perform logical operations and return values of the Boolean type. To call these expressions, use the following logical operators:
!<Boolean> – "logical NOT".- <
Boolean>&&<Boolean> – "logical AND". - <
Boolean>||<Boolean> – "logical OR". - <
Boolean>==><Boolean> – "implication" (!<Boolean>||<Boolean>).
The Bool security model also contains the all, any and cond expressions.
The expression all performs a "logical AND" for an arbitrary number of values of Boolean type. It returns values of the Boolean type. It returns true if an empty list of values ([]) is passed via the parameter. To call the expression, use the following construct:
bool.all <List<Boolean>>
The expression any performs a "logical OR" for an arbitrary number of values of Boolean type. It returns values of the Boolean type. It returns false if an empty list of values ([]) is passed via the parameter. To call the expression, use the following construct:
bool.any <List<Boolean>>
cond expression performs a ternary conditional operation. Returns values of the ScalarLiteral type. To call the expression, use the following construct:
bool.cond
{ if : <Boolean> // Condition
, then : <ScalarLiteral> // Value returned when the condition is true
, else : <ScalarLiteral> // Value returned when the condition is false
}
In addition to expressions, the Bool security model includes the assert rule that works the same as the rule of the same name included in the Base security model.
Math security model
The Math security model lets you perform integer arithmetic operations.
A PSL file containing a description of the Math security model is located in the KasperskyOS SDK at the following path:
toolchain/include/nk/basic.psl
Math security model object
The basic.psl file contains a declaration that creates a Math security model object named math. Consequently, inclusion of the basic.psl file into the solution security policy description will create a Math security model object by default.
A Math security model object does not have any parameters and cannot be covered by a security audit.
It is not necessary to create additional Math security model objects.
Math security model methods
The Math security model contains expressions that perform integer arithmetic operations. To call a part of these expressions, use the following arithmetic operators:
- <
Number>+<Number> – "addition". Returns values of theNumbertype. - <
Number>-<Number> – "subtraction". Returns values of theNumbertype. - <
Number>*<Number> – "multiplication". Returns values of theNumbertype.
The other expressions are as follows:
neg<Signed> – "change number sign". Returns values of theSignedtype.abs<Signed> – "get module of number". Returns values of theSignedtype.sum<List<Number>> – "add numbers from list". Returns values of theNumbertype. It returns0if an empty list of values ([]) is passed via the parameter.product<List<Number>> – "multiply numbers from list". Returns values of theNumbertype. It returns1if an empty list of values ([]) is passed via the parameter.
To call these expressions, use the following construct:
math.<expression name> <parameter>
Struct security model
The Struct security model lets you obtain access to structural data elements.
A PSL file containing a description of the Struct security model is located in the KasperskyOS SDK at the following path:
toolchain/include/nk/basic.psl
Struct security model object
The basic.psl file contains a declaration that creates a Struct security model object named struct. Consequently, inclusion of the basic.psl file into the solution security policy description will create a Struct security model object by default.
A Struct security model object does not have any parameters and cannot be covered by a security audit.
It is not necessary to create additional Struct security model objects.
Struct security model methods
The Struct security model contains expressions that provide access to structural data elements. To call these expressions, use the following constructs:
- <
{...}>.<field name> – "get access to dictionary field". the type of returned data corresponds to the type of dictionary field. - <
List | Set | Sequence | Array>.[<element number>]– "get access to data element". The type of returned data corresponds to the type of elements. The numbering of elements starts with zero. When out of bounds of dataset, the expression terminates with an error and the Kaspersky Security Module returns the "denied" decision. - <
HandleDesc>.handle– "get SID". Returns values of theHandletype. (For details on the correlation between handles and SID values, see "Resource Access Control"). - <
HandleDesc>.rights– "get handle permissions mask". Returns values of theUInt32type.
Parameters of interface methods are saved in a special dictionary named message. To obtain access to an interface method parameter, use the following construct:
message.<interface method parameter name>
The parameter name is specified in accordance with the IDL description.
To obtain access to structural elements of parameters, use the constructs corresponding to expressions of the Struct security model.
To use expressions of the Struct security model, the security event description must be sufficiently precise so that it corresponds to IPC messages of the same type (for more details, see "Binding methods of security models to security events"). IPC messages of this type must contain the defined parameters of the interface method, and the interface method parameters must contain the defined structural elements.
Base security model
The Base security model lets you implement basic logic.
A PSL file containing a description of the Base security model is located in the KasperskyOS SDK at the following path:
toolchain/include/nk/base.psl
Base security model object
The base.psl file contains a declaration that creates a Base security model object named base. Consequently, inclusion of the base.psl file into the solution security policy description will create a Base security model object by default. Methods of this object can be called without indicating the object name.
A Base security model object does not have any parameters.
A Base security model object can be covered by a security audit. There are no audit conditions specific to the Base security model.
It is necessary to create additional objects of the Base security model in the following cases:
- You need to configure a security audit differently for different objects of the Base security model (for example, you can apply different audit profiles or different audit configurations of the same profile for different objects).
- You need to distinguish between calls of methods provided by different objects of the Base security model (audit data includes the name of the security model method and the name of the object that provides this method, so you can verify that the method of a specific object was called).
Base security model methods
The Base security model contains the following rules:
grant ()It has a parameter of the
()type. It returns the "granted" result.Example:
/* A client of the foo class is allowed
* to query a server of the bar class. */
request src=foo dst=bar { grant () }
assert<Boolean>It returns the "granted" result if the
truevalue is passed via the parameter. Otherwise it returns the "denied" result.Example:
/* Any client in the solution will be allowed to query a server of the foo class
* by calling the Send method of the net.Net endpoint if the port parameter
* of the Send method will be used to pass a value greater than 80. Otherwise any
* client in the solution will be prohibited from querying a server of the
* foo class by calling the Send method of the net.Net endpoint. */
request dst=foo endpoint=net.Net method=Send { assert (message.port > 80) }
deny<Boolean | ()>It returns the "denied" result if the
trueor()value is passed via the parameter. Otherwise it returns the "granted" result.Example:
/* A server of the foo class is not allowed to
* respond to a client of the bar class. */
response src=foo dst=bar { deny () }
set_level<UInt8>It sets the security audit runtime-level equal to the value passed via this parameter. It returns the "granted" result. (For more details about the security audit runtime-level, see "Describing security audit profiles".)
Example:
/* A process of the foo class will receive the "allowed" decision from the
* Kaspersky Security Module if it calls the
* SetAuditLevel security interface method to change the security audit runtime-level. */
security src=foo method=SetAuditLevel { set_level (message.audit_level) }
Regex security model
The Regex security model lets you implement text data validation based on statically defined regular expressions.
A PSL file containing a description of the Regex security model is located in the KasperskyOS SDK at the following path:
toolchain/include/nk/regex.psl
Regex security model object
The regex.psl file contains a declaration that creates a Regex security model object named re. Consequently, inclusion of the regex.psl file into the solution security policy description will create a Regex security model object by default.
A Regex security model object does not have any parameters.
A Regex security model object can be covered by a security audit. In this case, you also need to define the audit conditions specific to the Regex security model. To do so, use the following constructs in the audit configuration description:
emit : ["match"]– the audit is performed if thematchmethod is called.emit : ["select"]– the audit is performed if theselectmethod is called.emit : ["match", "select"]– the audit is performed if thematchorselectmethod is called.emit : []– the audit is not performed.
It is necessary to create additional objects of the Regex security model in the following cases:
- You need to configure a security audit differently for different objects of the Regex security model (for example, you can apply different audit profiles or different audit configurations of the same profile for different objects).
- You need to distinguish between calls of methods provided by different objects of the Regex security model (audit data includes the name of the security model method and the name of the object that provides this method, so you can verify that the method of a specific object was called).
Regex security model methods
The Regex security model contains the following expressions:
match {text :<Text>, pattern :<Text>}Returns a value of the
Booleantype. If the specifiedtextmatches thepatternregular expression, it returnstrue. Otherwise it returnsfalse.Example:
assert (re.match {text : message.text, pattern : "[0-9]*"})
select {text :<Text>}It is intended to be used as an expression that verifies fulfillment of the conditions in the
choiceconstruct (for details on thechoiceconstruct, see "Binding methods of security models to security events"). It checks whether the specifiedtextmatches regular expressions. Depending on the results of this check, various options for security event handling can be performed.Example:
choice (re.select {text : "hello world"}) {
"hello\ .*": grant ()
".*world" : grant ()
_ : deny ()
}
Syntax of regular expressions of the Regex security model
A regular expression for the match method of the Regex security model can be written in two ways: within the multi-line regex block or as a text literal.
When writing a regular expression as a text literal, all backslash instances must be doubled.
For example, the following two regular expressions are identical:
// Regular expression within the multi-line regex block
{ pattern:
```regex
Hello\ world\!
```
, text: "Hello world!"
}
// Regular expression as a text literal (doubled backslash)
{ pattern: "Hello\\ world\\!"
, text: "Hello world!"
}
Regular expressions for the select method of the Regex security model are written as text literals with a double backslash.
A regular expression is defined as a template string and may contain the following:
- Literals (ordinary characters)
- Metacharacters (characters with special meanings)
- White-space characters
- Character sets
- Character groups
- Operators for working with characters
Regular expressions are case sensitive.
Literals and metacharacters in regular expressions
- A literal can be any ASCII character except the metacharacters
.()*&|!?+[]\and a white-space character. (Unicode characters are not supported.)For example, the regular expression
KasperskyOScorresponds to the textKasperskyOS. - Metacharacters have special meanings that are presented in the table below.
Special meanings of metacharacters
Metacharacter
Special meaning
[]Square brackets (braces) denote the beginning and end of a set of characters.
()Round brackets (parentheses) denote the beginning and end of a group of characters.
*An asterisk denotes an operator indicating that the character preceding it can repeat zero or more times.
+A plus sign denotes an operator indicating that the character preceding it can repeat one or more times.
?A question mark denotes an operator indicating that the character preceding it can repeat zero or one time.
!An exclamation mark denotes an operator excluding the subsequent character from the list of valid characters.
|A vertical line denotes an operator for selection between characters (logically close to the "OR" conjunction).
&An ampersand denotes an operator for overlapping of multiple conditions (logically close to the "AND" conjunction).
.A dot denotes any character.
For example, the regular expression
K.Scorresponds to the sequences of charactersKOS,KoS,KESand a multitude of other sequences consisting of three characters that begin withKand end withS, and in which the second character can be any character: literal, metacharacter, or dot.\\<metaSymbol>A backslash indicates that the metacharacter that follows it will lose its special meaning and instead be interpreted as a literal. A backslash placed before a metacharacter is known as an escape character.
For example, a regular expression that consists of a dot metacharacter (
.) corresponds to any character. However, a regular expression that consists of a backslash with a dot (\.) corresponds to only a dot character.Accordingly, a backslash also escapes another subsequent backslash. For example, the regular expression
C:\\Userscorresponds to the sequence of charactersC:\Users. - The
^and$characters are not used to designate the start and end of a line.
White-space characters in regular expressions
- A space character has an ASCII code of
20in a hexadecimal number system and has an ASCII code of40in an octal number system. Although a space character does not infer any special meaning, it must be escaped to avoid any ambiguous interpretation by the regular expression interpreter.For example, the regular expression
Hello\ worldcorresponds to the sequence of charactersHello world. \rCarriage return character.
\nLine break character.
\tHorizontal tab character.
Definition of a character based on its octal or hexadecimal code in regular expressions
\x{<hex>}Definition of a character using its
hexcode from the ASCII character table. The character code must be less than0x100.For example, the regular expression
Hello\x{20}worldcorresponds to the sequence of charactersHello world.\o{<octal>}Definition of a character using its
octalcode from the ASCII character table. The character code must be less than0o400.For example, the regular expression
\o{75}corresponds to the=character.
Sets of characters in regular expressions
A character set is defined within square brackets [] as a list or range of characters. A character set tells the regular expression interpreter that only one of the characters listed in the set or range of characters can be at this specific location in a sequence of characters. A character set cannot be left blank.
[<BracketSpec>]– character set.One character corresponds to any character from the
BracketSpeccharacter set.For example, the regular expression
K[OE]Scorresponds to the sequences of charactersKOSandKES.[^<BracketSpec>]– inverted character set.One character corresponds to any character that is not in the
BracketSpeccharacter set.For example, the regular expression
K[^OE]Scorresponds to the sequences of charactersKAS,K8Sand any other sequences consisting of three characters that begin withKand end withS, excludingKOSandKES.
The BracketSpec character set can be listed explicitly or can be defined as a range of characters. When defining a range of characters, the first and last character in the set must be separated with a hyphen.
[<Digit1>-<DigitN>]Any number from the range
Digit1,Digit2, ... ,DigitN.For example, the regular expression
[0-9]corresponds to any numerical digit. The regular expressions[0-9]and[0123456789]are identical.Please note that a range is defined by one character before a hyphen and one character after the hyphen. The regular expression
[1-35]corresponds only to the characters1,2,3and5, and does not represent the range of numbers from1to35.[<Letter1>-<LetterN>]Any English letter from the range
Letter1,Letter2, ... ,LetterN(these letters must be in the same case).For example, the regular expression
[a-zA-Z]corresponds to all letters in uppercase and lowercase from the ASCII character table.
The ASCII code for the upper boundary character of a range must be higher than the ASCII code for the lower boundary character of the range.
For example, the regular expressions [5-2] or [z-a] are invalid.
The hyphen (minus) - character is interpreted as a special character only within a set of characters. Outside of a character set, a hyphen is a literal. For this reason, the \ metacharacter does not have to precede a hyphen. To use a hyphen as a literal within a character set, it must be indicated first or last in the set.
Examples:
The regular expressions [-az] and [az-] correspond to the characters a, z and -.
The regular expression [a-z] corresponds to any of the 26 English letters from a to z in lowercase.
The regular expression [-a-z] corresponds to any of the 26 English letters from a to z in lowercase and -.
The circumflex (caret character) ^ is interpreted as a special character only within a character set when it is located directly after an opening square bracket. Outside of a character set, a circumflex is a literal. For this reason, the \ metacharacter does not have to precede a circumflex. To use a circumflex as a literal within a character set, it must be indicated in a location other than first in the set.
Examples:
The regular expression [0^9] correspond to the characters 0, 9 and ^.
The regular expression [^09] corresponds to any character except 0 and 9.
Within a character set, the metacharacters *.&|!?+ lose their special meaning and are instead interpreted as literals. Therefore, they do not have to be preceded by the \ metacharacter. The backslash \ retains its special meaning within a character set.
For example, the regular expressions [a.] and [a\.] are identical and correspond to the character a and a dot interpreted as a literal.
Groups of characters and operators in regular expressions
A character group uses parentheses () to distinguish its portion (subexpression) within a regular expression. Groups are normally used to allocate subexpressions as operands. Groups can be embedded into each other.
Operators are applied to more than one character in a regular expression only if they are immediately before or after the definition of a set or group of characters. If this is the case, the operator is applied to the entire group or set of characters.
The syntax contains definitions of the following operators (listed in descending order of their priority):
!<Expression>, whereExpressioncan be a character, set or group of characters.This operator excludes the
Expressionfrom the list of valid expressions.Examples:
The regular expression
K!OScorresponds to the sequences of charactersKoS,KES, and a multitude of other sequences that consist of three characters and begin withKand end withS, excludingKOS.The regular expression
K!(OS)corresponds to the sequences of charactersKos,KES,KOT, and a multitude of other sequences that consist of three characters and begin withK, excludingKOS.The regular expression
K![OE]Scorresponds to the sequences of charactersKoS,KeS,K;S, and a multitude of other sequences that consist of three characters and begin withKand end withS, excludingKOSandKES.- <
Expression>*, whereExpressioncan be a character, set or group of characters.This operator means that the
Expressionmay occur in the specific position zero or more times.Examples:
The regular expression
0-9*corresponds to the sequences of characters0-,0-9,0-99, ... .The regular expression
(0-9)*corresponds to the empty sequence""and the sequences of characters0-9,0-90-9, ... .The regular expression
[0-9]*corresponds to the empty sequence""and any non-empty sequence of numbers. - <
Expression>+, whereExpressioncan be a character, set or group of characters.This operator means that the
Expressionmay occur in the specific position one or more times.Examples:
The regular expression
0-9+corresponds to the sequences of characters0-9,0-99,0-999, ... .The regular expression
(0-9)+corresponds to the sequences of characters0-9,0-90-9, ... .The regular expression
[0-9]+corresponds to any non-empty sequence of numbers. - <
Expression>?, whereExpressioncan be a character, set or group of characters.This operator means that the
Expressionmay occur in the specific position zero or one time.Examples:
The regular expression
https?://corresponds to the sequences of charactershttp://andhttps://.The regular expression
K(aspersky)?OScorresponds to the sequences of charactersKOSandKasperskyOS. - <
Expression1><Expression2> – concatenation.Expression1andExpression2can be characters, sets or groups of characters.This operator does not have a specific designation. In the resulting expression,
Expression2followsExpression1.For example, concatenation of the sequences of characters
microandkernelwill result in the sequence of charactersmicrokernel. - <
Expression1>|<Expression2> – disjunction.Expression1andExpression2can be characters, sets or groups of characters.This operator selects either
Expression1orExpression2.Examples:
The regular expression
KO|EScorresponds to the sequences of charactersKOandES, but notKOSorKESbecause the concatenation operator has a higher priority than the disjunction operator.The regular expression
Press (OK|Cancel)corresponds to the sequences of charactersPress OKorPress Cancel.The regular expression
[0-9]|()corresponds to numbers from0to9or an empty string. - <
Expression1>&<Expression2> – conjunction.Expression1andExpression2can be characters, sets or groups of characters.This operator intersects the result of
Expression1with the result ofExpression2.Examples:
The regular expression
[0-9]&[^3]corresponds to numbers from0to9, excluding3.The regular expression
[a-zA-Z]&()corresponds to all English letters and an empty string.
HashSet security model
The HashSet security model lets you associate resources with one-dimensional tables of unique values of the same type, add or delete these values, and check whether a defined value is in the table. For example, a process of the network server can be associated with the set of ports that this server is allowed to open. This association can be used to check whether the server is allowed to initiate the opening of a port.
A PSL file containing a description of the HashSet security model is located in the KasperskyOS SDK at the following path:
toolchain/include/nk/hashmap.psl
HashSet security model object
To use the HashSet security model, you need to create an object or objects of this model.
A HashSet security model object contains a pool of one-dimensional tables of the same size intended for storing the values of one type. A resource can be associated with only one table from the tables pool of each HashSet security model object.
A HashSet security model object has the following parameters:
type Entry– type of values in tables (these can be integer types,Booleantype, and dictionaries and tuples based on integer types and theBooleantype).config– configuration of the pool of tables:set_size– size of the table.pool_size– number of tables in the pool.
All parameters of a HashSet security model object are required.
Example:
policy object S : HashSet {
type Entry = UInt32
config =
{ set_size : 5
, pool_size : 2
}
}
A HashSet security model object can be covered by a security audit. There are no audit conditions specific to the HashSet security model.
It is necessary to create multiple objects of the HashSet security model in the following cases:
- You need to configure a security audit differently for different objects of the HashSet security model (for example, you can apply different audit profiles or different audit configurations of the same profile for different objects).
- You need to distinguish between calls of methods provided by different objects of the HashSet security model (audit data includes the name of the security model method and the name of the object that provides this method, so you can verify that the method of a specific object was called).
- You need to use tables of different sizes and/or with different types of values.
HashSet security model init rule
init {sid : <Sid>}
It associates a free table from the tables pool with the sid resource. If the free table contains values after its previous use, these values are deleted.
It returns the "allowed" result if an association was created between the table and the sid resource.
It returns the "denied" result in the following cases:
- There are no free tables in the pool.
- The
sidresource is already associated with a table from the tables pool of the HashSet security model object being used. - The
sidvalue is outside of the permissible range.
Example:
/* A process of the Server class will be allowed to start if,
* at startup initiation, an association will be created
* between this process and the table. Otherwise the startup of a process of the
* Server class will be denied. */
execute dst=Server {
S.init {sid : dst_sid}
}
HashSet security model fini rule
fini {sid : <Sid>}
It deletes the association between the table and the sid resource (the table becomes free).
It returns the "allowed" result if the association between the table and the sid resource was deleted.
It returns the "denied" result in the following cases:
- The
sidresource is not associated with a table from the tables pool of the HashSet security model object being used. - The
sidvalue is outside of the permissible range.
HashSet security model add rule
add {sid : <Sid>, entry : <Entry>}
It adds the entry value to the table associated with the sid resource.
It returns the "allowed" result in the following cases:
- The rule added the
entryvalue to the table associated with thesidresource. - The table associated with the
sidresource already contains theentryvalue.
It returns the "denied" result in the following cases:
- The table associated with the
sidresource is completely full. - The
sidresource is not associated with a table from the tables pool of the HashSet security model object being used. - The
sidvalue is outside of the permissible range.
Example:
/* A process of the Server class will receive the "allowed" decision from
* the Kaspersky Security Module by calling the
* Add security interface method if, when this method is called, the value
* 5 will be added to the table associated with this
* process, or is already in the table. Otherwise
* a process of the Server class will receive the "denied" decision from the
* security module by calling the
* Add security interface method. */
security src=Server, method=Add {
S.add {sid : src_sid, entry : 5}
}
HashSet security model remove rule
remove {sid : <Sid>, entry : <Entry>}
It deletes the entry value from the table associated with the sid resource.
It returns the "allowed" result in the following cases:
- The rule deleted the
entryvalue from the table associated with thesidresource. - The table associated with the
sidresource does not contain theentryvalue.
It returns the "denied" result in the following cases:
- The
sidresource is not associated with a table from the tables pool of the HashSet security model object being used. - The
sidvalue is outside of the permissible range.
HashSet security model contains expression
contains {sid : <Sid>, entry : <Entry>}
It checks whether the entry value is in the table associated with the sid resource.
It returns a value of the Boolean type. If the entry value is in the table associated with the sid resource, it returns true. Otherwise it returns false.
It runs incorrectly in the following cases:
- The
sidresource is not associated with a table from the tables pool of the HashSet security model object being used. - The
sidvalue is outside of the permissible range.
When the expression runs incorrectly, the Kaspersky Security Module returns the "denied" decision.
Example:
/* A process of the Server class will receive the "allowed" decision from
* the Kaspersky Security Module by calling the
* Check security interface method if the value 42 is in the table
* associated with this process. Otherwise a process of the
* Server class will receive the "denied" decision from the security module
/* by calling the Check security interface method. */
security src=Server, method=Check {
assert(S.contains {sid : src_sid, entry : 42})
}
StaticMap security model
The StaticMap security model lets you associate resources with two-dimensional "key–value" tables, read and modify the values of keys. For example, a process of the driver can be associated with the MMIO memory region that this driver is allowed to use. This will require two keys whose values define the starting address and the size of the MMIO memory region. This association can be used to check whether the driver can query the MMIO memory region that it is attempting to access.
Keys in the table have the same type but are unique and immutable. The values of keys in the table have the same type.
There are two simultaneous instances of the table: base instance and working instance. Both instances are initialized by the same data. Changes are made first to the working instance and then can be added to the base instance, or vice versa: the working instance can be changed by using previous values from the base instance. The values of keys can be read from the base instance or working instance of the table.
A PSL file containing a description of the StaticMap security model is located in the KasperskyOS SDK at the following path:
toolchain/include/nk/staticmap.psl
StaticMap security model object
To use the StaticMap security model, you need to create an object or objects of this model.
A StaticMap security model object contains a pool of two-dimensional "key–value" tables that have the same size. A resource can be associated with only one table from the tables pool of each StaticMap security model object.
A StaticMap security model object has the following parameters:
type Value– type of values of keys in tables (integer types are supported).config– configuration of the pool of tables:keys– table containing keys and their default values (keys have theKey = Text | List<UInt8>type).pool_size– number of tables in the pool.
All parameters of a StaticMap security model object are required.
Example:
policy object M : StaticMap {
type Value = UInt16
config =
{ keys:
{ "k1" : 0
, "k2" : 1
}
, pool_size : 2
}
}
A StaticMap security model object can be covered by a security audit. There are no audit conditions specific to the StaticMap security model.
It is necessary to create multiple objects of the StaticMap security model in the following cases:
- You need to configure a security audit differently for different objects of the StaticMap security model (for example, you can apply different audit profiles or different audit configurations of the same profile for different objects).
- You need to distinguish between calls of methods provided by different objects of the StaticMap security model (audit data includes the name of the security model method and the name of the object that provides this method, so you can verify that the method of a specific object was called).
- You need to use tables with different sets of keys and/or different types of key values.
StaticMap security model init rule
init {sid : <Sid>}
It associates a free table from the tables pool with the sid resource. Keys are initialized by the default values.
It returns the "allowed" result if an association was created between the table and the sid resource.
It returns the "denied" result in the following cases:
- There are no free tables in the pool.
- The
sidresource is already associated with a table from the tables pool of the StaticMap security model object being used. - The
sidvalue is outside of the permissible range.
Example:
/* A process of the Server class will be allowed to start if,
* at startup initiation, an association will be created
* between this process and the table. Otherwise the startup of a process of the
* Server class will be denied. */
execute dst=Server {
M.init {sid : dst_sid}
}
StaticMap security model fini rule
fini {sid : <Sid>}
It deletes the association between the table and the sid resource (the table becomes free).
It returns the "allowed" result if the association between the table and the sid resource was deleted.
It returns the "denied" result in the following cases:
- The
sidresource is not associated with a table from the tables pool of the StaticMap security model object being used. - The
sidvalue is outside of the permissible range.
StaticMap security model set rule
set {sid : <Sid>, key : <Key>, value : <Value>}
It assigns the specified value to the specified key in the working instance of the table associated with the sid resource.
It returns the "allowed" result if the specified value was assigned to the specified key in the working instance of the table associated with the sid resource. (The current value of the key will be overwritten even if it is equal to the new value.)
It returns the "denied" result in the following cases:
- The specified
keyis not in the table associated with thesidresource. - The
sidresource is not associated with a table from the tables pool of the StaticMap security model object being used. - The
sidvalue is outside of the permissible range.
Example:
/* A process of the Server class will receive the "allowed" decision from
* the Kaspersky Security Module by calling the
* Set security interface method if, when this method is called, the value 2
* will be assigned to key k1 in the working instance of the table
* associated with this process. Otherwise a process of the
* Server class will receive the "denied" decision from the security module
/* by calling the Set security interface method. */
security src=Server, method=Set {
M.set {sid : src_sid, key : "k1", value : 2}
}
StaticMap security model commit rule
commit {sid : <Sid>}
It copies the values of keys from the working instance to the base instance of the table associated with the sid resource.
It returns the "allowed" result if the values of keys were copied from the working instance to the base instance of the table associated with the sid resource.
It returns the "denied" result in the following cases:
- The
sidresource is not associated with a table from the tables pool of the StaticMap security model object being used. - The
sidvalue is outside of the permissible range.
StaticMap security model rollback rule
rollback {sid : <Sid>}
It copies the values of keys from the base instance to the working instance of the table associated with the sid resource.
It returns the "allowed" result if the values of keys were copied from the base instance to the working instance of the table associated with the sid resource.
It returns the "denied" result in the following cases:
- The
sidresource is not associated with a table from the tables pool of the StaticMap security model object being used. - The
sidvalue is outside of the permissible range.
StaticMap security model get expression
get {sid : <Sid>, key : <Key>}
It returns the value of the specified key from the base instance of the table associated with the sid resource.
It returns a value of the Value type.
It runs incorrectly in the following cases:
- The specified
keyis not in the table associated with thesidresource. - The
sidresource is not associated with a table from the tables pool of the StaticMap security model object being used. - The
sidvalue is outside of the permissible range.
When the expression runs incorrectly, the Kaspersky Security Module returns the "denied" decision.
Example:
/* A process of the Server class will receive the "allowed" decision from
* the Kaspersky Security Module by calling the
* Get security interface method if the value of key k1 in the base
* instance of the table associated with this process
* is not zero. Otherwise a process of the Server class will receive
* the "denied" decision from the security module
* by calling the Get security interface method. */
security src=Server, method=Get {
assert(M.get {sid : src_sid, key : "k1"} != 0)
}
StaticMap security model get_uncommited expression
get_uncommited {sid: <Sid>, key: <Key>}
It returns the value of the specified key from the working instance of the table associated with the sid resource.
It returns a value of the Value type.
It runs incorrectly in the following cases:
- The specified
keyis not in the table associated with thesidresource. - The
sidresource is not associated with a table from the tables pool of the StaticMap security model object being used. - The
sidvalue is outside of the permissible range.
When the expression runs incorrectly, the Kaspersky Security Module returns the "denied" decision.
Page top
Flow security model
The Flow security model lets you associate resources with finite-state machines, receive and modify the states of finite-state machines, and check whether the state of the finite-state machine is within the defined set of states. For example, a process can be associated with a finite-state machine to allow or prohibit this process from using storage and/or the network depending on the state of the finite-state machine.
A PSL file containing a description of the Flow security model is located in the KasperskyOS SDK at the following path:
toolchain/include/nk/flow.psl
Flow security model object
To use the Flow security model, you need to create an object or objects of this model.
One Flow security model object lets you associate a set of resources with a set of finite-state machines that have the same configuration. A resource can be associated with only one finite-state machine of each Flow security model object.
A Flow security model object has the following parameters:
type State– type that determines the set of states of the finite-state machine (variant type that combines text literals).config– configuration of the finite-state machine:states– set of states of the finite-state machine (must match the set of states defined by theStatetype).initial– initial state of the finite-state machine.transitions– description of the permissible transitions between states of the finite-state machine.
All parameters of a Flow security model object are required.
Example:
policy object service_flow : Flow {
type State = "sleep" | "started" | "stopped" | "finished"
config = { states : ["sleep", "started", "stopped", "finished"]
, initial : "sleep"
, transitions : { "sleep" : ["started"]
, "started" : ["stopped", "finished"]
, "stopped" : ["started", "finished"]
}
}
}

Diagram of finite-state machine states in the example
A Flow security model object can be covered by a security audit. You can also define the audit conditions specific to the Flow security model. To do so, use the following construct in the audit configuration description:
omit : [<"state 1">[,] ...] – the audit is not performed if the finite-state machine is in one of the listed states.
It is necessary to create multiple objects of the Flow security model in the following cases:
- You need to configure a security audit differently for different objects of the Flow security model (for example, you can apply different audit profiles or different audit configurations of the same profile for different objects).
- You need to distinguish between calls of methods provided by different objects of the Flow security model (audit data includes the name of the security model method and the name of the object that provides this method, so you can verify that the method of a specific object was called).
- You need to use finite-state machines with different configurations.
Flow security model init rule
init {sid : <Sid>}
It creates a finite-state machine and associates it with the sid resource. The created finite-state machine has the configuration defined in the settings of the Flow security model object being used.
It returns the "granted" result if an association was created between the finite-state machine and the sid resource.
It returns the "denied" result in the following cases:
- The
sidresource is already associated with a finite-state machine of the Flow security model object being used. - The
sidvalue is outside of the permissible range.
Example:
/* A process of the Server class will be allowed to start
* if, at startup initiation, an association will be created
* between this process and the finite-state machine.
* Otherwise the startup of the Server-class process will be denied. */
execute dst=Server {
service_flow.init {sid : dst_sid}
}
Flow security model fini rule
fini {sid : <Sid>}
It deletes the association between the finite-state machine and the sid resource. The finite-state machine that is no longer associated with the resource is destroyed.
It returns the "granted" result if the association between the finite-state machine and the sid resource was deleted.
It returns the "denied" result in the following cases:
- The
sidresource is not associated with a finite-state machine of the Flow security model object being used. - The
sidvalue is outside of the permissible range.
Flow security model enter rule
enter {sid : <Sid>, state : <State>}
It switches the finite-state machine associated with the sid resource to the specified state.
It returns the "granted" result if the finite-state machine associated with the sid resource was switched to the specified state.
It returns the "denied" result in the following cases:
- The transition to the specified
statefrom the current state is not permitted by the configuration of the finite-state machine associated with thesidresource. - The
sidresource is not associated with a finite-state machine of the Flow security model object being used. - The
sidvalue is outside of the permissible range.
Example:
/* Any client in the solution will be allowed to query
* a server of the Server class if the finite-state machine
* associated with this server will be switched to
* the "started" state when initiating the query. Otherwise
* any client in the solution will be denied to query
* a server of the Server class. */
request dst=Server {
service_flow.enter {sid : dst_sid, state : "started"}
}
Flow security model allow rule
allow {sid : <Sid>, states : <Set<State>>}
It verifies that the state of the finite-state machine associated with the sid is in the set of defined states.
It returns the "granted" result if the state of the finite-state machine associated with the sid resource is in the set of defined states.
It returns the "denied" result in the following cases:
- The state of the finite-state machine associated with the
sidresource is not in the set of definedstates. - The
sidresource is not associated with a finite-state machine of the Flow security model object being used. - The
sidvalue is outside of the permissible range.
Example:
/* Any client in the solution is allowed to query a server
* of the Server class if the finite-state machine associated with this server
* is in the started or stopped state. Otherwise any client
* in the solution will be prohibited from querying a server of the Server class. */
request dst=Server {
service_flow.allow {sid : dst_sid, states : ["started", "stopped"]}
}
Flow security model query expression
query {sid : <Sid>}
It is intended to be used as an expression that verifies fulfillment of the conditions in the choice construct (for details on the choice construct, see "Binding methods of security models to security events"). It checks the state of the finite-state machine associated with the sid resource. Depending on the results of this check, various options for security event handling can be performed.
It runs incorrectly in the following cases:
- The
sidresource is not associated with a finite-state machine of the Flow security model object being used. - The
sidvalue is outside of the permissible range.
When the expression runs incorrectly, the Kaspersky Security Module returns the "denied" decision.
Example:
/* Any client in the solution is allowed to query
* a server of the ResourceDriver class if the finite-state machine
* associated with this server is in the
* "started" or "stopped" state. Otherwise any client in the solution
* is prohibited from querying a server of the ResourceDriver class. */
request dst=ResourceDriver {
choice (service_flow.query {sid : dst_sid}) {
"started" : grant ()
"stopped" : grant ()
_ : deny ()
}
}
Mic security model
The Mic security model lets you implement mandatory integrity control. In other words, this security model provides the capability to manage data streams between different processes and between processes and the KasperskyOS kernel by controlling the integrity levels of processes, the kernel, and resources that are used via IPC.
In Mic security model terminology, processes and the kernel are called subjects while resources are called objects. However, the information provided in this section slightly deviates from the terminology of the Mic security model. In this section, the term "object" is not used to refer to a "resource".
Data streams are generated between subjects when the subjects interact via IPC.
The integrity level of a subject/resource is the level of trust afforded to the subject/resource. The degree of trust in a subject depends on whether the subject interacts with untrusted external software/hardware systems or whether the subject has a proven quality level, for example. (The kernel has a high level of integrity.) The degree of trust in a resource depends on whether this resource was created by a trusted subject within a software/hardware system running KasperskyOS or if it was received from an untrusted external software/hardware system, for example.
The Mic security model is characterized by the following provisions:
- By default, data streams from subjects with less integrity to subjects with higher integrity are prohibited. You have the option of permitting such data streams if you can guarantee that the subjects with higher integrity will not be compromised.
- A resource consumer is prohibited from writing data to a resource if the integrity level of the resource is higher than the integrity level of the resource consumer.
- By default, a resource consumer is prohibited from reading data from a resource if the integrity level of the resource is lower than the integrity level of the resource consumer. You have the option to allow the resource consumer to perform such an operation if you can guarantee that the resource consumer will not be compromised.
Methods of the Mic security model let you assign integrity levels to subjects and resources, check the permissibility of data streams based on a comparison of integrity levels, and elevate the integrity levels of resources.
A PSL file containing a description of the Mic security model is located in the KasperskyOS SDK at the following path:
toolchain/include/nk/mic.psl
For an example of using the Mic security model, we can examine a secure software update for a software/hardware system running KasperskyOS. Four processes are involved in the update:
Downloaderis a low-integrity process that downloads a low-integrity update image from a remote server on the Internet.Verifieris a high-integrity process that verifies the digital signature of the low-integrity update image (high-integrity process that can read data from a low-integrity resource).FileSystemis a high-integrity process that manages the file system.Updateris a high-integrity process that applies an update.
A software update is performed according to the following scenario:
- The
Downloaderdownloads an update image and saves it to a file by transferring the contents of the image to theFileSystem. A low integrity level is assigned to this file. - The
Verifierreceives the update image from theFileSystemby reading the high-integrity file, and verifies its digital signature. If the signature is correct, theVerifierqueries theFileSystemso that theFileSystemcreates a copy of the file containing the update image. A high integrity level is assigned to the new file. - The
Updaterreceives the update image from theFileSystemby reading the high-integrity file, and applies the update.
In this example, the Mic security model ensures that the high-integrity Updater process can read data only from a high-integrity update image. As a result, the update can be applied only after the digital signature of the update image is verified.
Mic security model object
To use the Mic security model, you need to create an object or objects of this model. You also need to assign a set of integrity levels for subjects and resources.
A Mic security model object has the following parameters:
configrefers to a set of integrity levels or configuration of a set of integrity levels:degreesrefers to a set of gradations for generating a set of integrity levels.categoriesrefers to a set of categories for generating a set of integrity levels.
Examples:
policy object mic : Mic {
config = ["LOW", "MEDIUM", "HIGH"]
}
policy object mic_po : Mic {
config =
{ degrees : ["low", "high"]
, categories : ["net", "log"]
}
}
A set of integrity levels is a partially ordered set that is linearly ordered or contains incomparable elements. The set {LOW, MEDIUM, HIGH} is linearly ordered because all of its elements are comparable to each other. Incomparable elements arise when a set of integrity levels is defined through a set of gradations and a set of categories. In this case, the set of integrity levels L is a Cartesian product of the Boolean set of categories C multiplied by the set of gradations D:
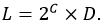
The degrees and categories parameters in this example define the following set:
{
{}/low, {}/high,
{net}/low, {net}/high,
{log}/low, {log}/high,
{net,log}/low, {net,log}/high
}
In this set, {} means an empty set.
The order relation between elements of the set of integrity levels L is defined as follows:
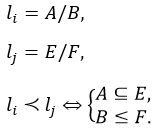
According to this order relation, the jth element exceeds the ith element if the subset of categories E includes the subset of categories A, and gradation F is greater than or equal to gradation A. Examples of comparing elements of the set of integrity levels L:
- The {net,log}/high element exceeds the {log}/low element because the "high" gradation is greater than the "low" gradation, and the subset of categories {net,log} includes the subset of categories {log}.
- The {net,log}/low element exceeds the {log}/low element because the levels of gradations for these elements are equal, and the subset of categories {net,log} includes the subset of categories {log}.
- The {net,log}/high element is the highest because it exceeds all other elements.
- The {}/low element is the lowest because all other elements exceed this element.
- The {net}/low and {log}/high elements are incomparable because the "high" gradation is greater than the "low" gradation but the subset of categories {log} does not include the subset of categories {net}.
- The {net,log}/low and {log}/high elements are incomparable because the "high" gradation is greater than the "low" gradation but the subset of categories {log} does not include the subset of categories {net,log}.
For subjects and resources that have incomparable integrity levels, the Mic security model provides conditions that are analogous to the conditions that the security model provides for subjects and resources that have comparable integrity levels.
By default, data streams between subjects that have incomparable integrity levels are prohibited. However, you have the option to allow such data streams if you can guarantee that the subjects receiving data will not be compromised. A resource consumer is prohibited from writing data to a resource and read data from a resource if the integrity level of the resource is incomparable to the integrity level of the resource consumer. You have the option to allow the resource consumer to read data from a resource if you can guarantee that the resource consumer will not be compromised.
A Mic security model object can be covered by a security audit. There are no audit conditions specific to the Mic security model.
It is necessary to create multiple objects of the Mic security model in the following cases:
- You need to configure a security audit differently for different objects of the Mic security model (for example, you can apply different audit profiles or different audit configurations of the same profile for different objects).
- You need to distinguish between calls of methods provided by different objects of the Mic security model (audit data includes the name of the security model method and the name of the object that provides this method, so you can verify that the method of a specific object was called).
- You need to use multiple variants of mandatory integrity control that may have different sets of integrity levels for subjects and resources, for example.
Mic security model create rule
create { source : <Sid>
, target : <Sid>
, container : <Sid | ()>
, driver : <Sid>
, level : <Level | ... | ()>
}
Assign the specified integrity level to the target resource in the following situation:
- The
sourceprocess initiates creation of thetargetresource. - The
targetresource is managed by thedriversubject, which is the resource provider or the KasperskyOS kernel. - The
containerresource is a container for thetargetresource (for example, a directory is a container for files and/or other directories).
If the container value is not defined (container : ()), the target resource is considered to be the root resource, which means that it has no container.
To define the integrity level, values of the Level type are used:
type Level = LevelFull | LevelNoCategory
type LevelFull =
{ degree : Text | ()
, categories : List<Text> | ()
}
type LevelNoCategory = Text
The rule returns the "granted" result if a specific integrity level was assigned to the target resource.
The rule returns the "denied" result in the following cases:
- The
levelvalue exceeds the integrity level of thesourceprocess,driversubject orcontainerresource. - The
levelvalue is incomparable to the integrity level of thesourceprocess,driversubject orcontainerresource. - An integrity level was not assigned to the
sourceprocess,driversubject, orcontainerresource. - The value of
source,target,containerordriveris outside of the permissible range.
Example:
/* A server of the updater.Realmserv class will be allowed to respond to
* queries of any client in the solution calling the resolve method
* of the realm.Reader endpoint if the resource whose creation is requested
* by the client will be assigned the LOW integrity level during response initiation.
* Otherwise a server of the updater.Realmserv class will be prohibited from responding to
* queries of any client calling the resolve method of the realm.Reader endpoint. */
response src=updater.Realmserv,
endpoint=realm.Reader {
match method=resolve {
mic.create { source : dst_sid
, target : message.handle.handle
, container : ()
, driver : src_sid
, level : "LOW"
}
}
}
Mic security model execute rule
execute <ExecuteImage | ExecuteLevel>
type ExecuteImage =
{ image : Sid
, target : Sid
, level : Level | ... | ()
, levelR : Level | ... | ()
}
type ExecuteLevel =
{ image : Sid | ()
, target : Sid
, level : Level | ...
, levelR : Level | ... | ()
}
This assigns the specified integrity level to the target subject and defines the minimum integrity level of subjects and resources from which this subject can receive data (levelR). The code of the target subject is in the image executable file.
If the level value is not defined (level : ()), the integrity level of the image executable file is assigned to the target subject. If the image value is not defined (image : ()), the level value must be defined.
If the levelR value is not defined (levelR : ()), the value of levelR is equal to level.
To define the integrity level and levelR, values of the Level type are used. For the definition of the Level type, see "Mic security model create rule".
The rule returns the "granted" result if it assigned the specified integrity level to the target subject and defined the minimum integrity level of subjects and resources from which this subject can receive data (levelR).
The rule returns the "denied" result in the following cases:
- The
levelvalue exceeds the integrity level of theimageexecutable file. - The
levelvalue is incomparable to the integrity level of theimageexecutable file. - The value of
levelRexceeds the value oflevel. - The
levelandlevelRvalues are incomparable. - An integrity level was not assigned to the
imageexecutable file. - The
imageortargetvalue is outside of the permissible range.
Example:
/* A process of the updater.Manager class will be allowed to start
* if, at startup initiation, this process will be assigned
* the integrity level LOW, and the minimum
* integrity level will be defined for the processes and resources from which this
* process can received data (LOW). Otherwise the startup of a process
* of the updater.Manager class will be denied. */
execute src=Einit, dst=updater.Manager, method=main {
mic.execute { target : dst_sid
, image : ()
, level : "LOW"
, levelR : "LOW"
}
}
Mic security model upgrade rule
upgrade { source : <Sid>
, target : <Sid>
, container : <Sid | ()>
, driver : <Sid>
, level : <Level | ...>
}
This elevates the previously assigned integrity level of the target resource to the specified level in the following situation:
- The
sourceprocess initiates elevation of the integrity level of thetargetresource. - The
targetresource is managed by thedriversubject, which is the resource provider or the KasperskyOS kernel. - The
containerresource is a container for thetargetresource (for example, a directory is a container for files and/or other directories).
If the container value is not defined (container : ()), the target resource is considered to be the root resource, which means that it has no container.
To define the integrity level, values of the Level type are used. For the definition of the Level type, see "Mic security model create rule".
The rule returns the "granted" result if it elevated the previously assigned integrity level of the target resource to the level value.
The rule returns the "denied" result in the following cases:
- The
levelvalue does not exceed the integrity level of thetargetresource. - The
levelvalue exceeds the integrity level of thesourceprocess,driversubject orcontainerresource. - The integrity level of the
targetresource exceeds the integrity level of thesourceprocess. - An integrity level was not assigned to the
sourceprocess,driversubject, orcontainerresource. - The value of
source,target,containerordriveris outside of the permissible range.
Mic security model call rule
call {source : <Sid>, target : <Sid>}
This verifies the permissibility of data streams from the target subject to the source subject.
It returns the "allowed" result in the following cases:
- The integrity level of the
sourcesubject does not exceed the integrity level of thetargetsubject. - The integrity level of the
sourcesubject exceeds the integrity level of thetargetsubject, but the minimum integrity level of subjects and resources from which thesourcesubject can receive data does not exceed the integrity level of thetargetsubject. - The integrity level of the
sourcesubject is incomparable to the integrity level of thetargetsubject, but the minimum integrity level of subjects and resources from which thesourcesubject can receive data does not exceed the integrity level of thetargetsubject.
It returns the "denied" result in the following cases:
- The integrity level of the
sourcesubject exceeds the integrity level of thetargetsubject, and the minimum integrity level of subjects and resources from which thesourcesubject can receive data exceeds the integrity level of thetargetsubject. - The integrity level of the
sourcesubject exceeds the integrity level of thetargetsubject, and the minimum integrity level of subjects and resources from which thesourcesubject can read data is incomparable to the integrity level of thetargetsubject. - The integrity level of the
sourcesubject is incomparable to the integrity level of thetargetsubject, and the minimum integrity level of subjects and resources from which thesourcesubject can receive data exceeds the integrity level of thetargetsubject. - The integrity level of the
sourcesubject is incomparable to the integrity level of thetargetsubject, and the minimum integrity level of subjects and resources from which thesourcesubject can receive data is incomparable to the integrity level of thetargetsubject. - An integrity level was not assigned to the
sourcesubject or to thetargetsubject. - The
sourceortargetvalue is outside of the permissible range.
Example:
/* Any client in the solution is allowed to query
* any server (kernel) if data streams from
* the server (kernel) to the client are permitted by the
* Mic security model. Otherwise any client in the solution
* is prohibited from querying any server (kernel). */
request {
mic.call { source : src_sid
, target : dst_sid
}
}
Mic security model invoke rule
invoke {source : <Sid>, target : <Sid>}
This verifies the permissibility of data streams from the source subject to the target subject.
It returns the "granted" result if the integrity level of the target subject does not exceed the integrity level of the source subject.
It returns the "denied" result in the following cases:
- The integrity level of the
targetsubject exceeds the integrity level of thesourcesubject. - The integrity level of the
targetsubject is incomparable to the integrity level of thesourcesubject. - An integrity level was not assigned to the
sourcesubject or to thetargetsubject. - The
sourceortargetvalue is outside of the permissible range.
Mic security model read rule
read {source : <Sid>, target : <Sid>}
This verifies that the source resource consumer is allowed to read data from the target resource.
It returns the "allowed" result in the following cases:
- The integrity level of the
sourceresource consumer does not exceed the integrity level of thetargetresource. - The integrity level of the
sourceresource consumer exceeds the integrity level of thetargetresource, but the minimum integrity level of subjects and resources from which thesourceresource consumer can receive data does not exceed the integrity level of thetargetresource. - The integrity level of the
sourceresource consumer is incomparable to the integrity level of thetargetresource, but the minimum integrity level of subjects and resources from which thesourceresource consumer can receive data does not exceed the integrity level of thetargetresource.
It returns the "denied" result in the following cases:
- The integrity level of the
sourceresource consumer exceeds the integrity level of thetargetresource, and the minimum integrity level of subjects and resources from which thesourceresource consumer can receive data exceeds the integrity level of thetargetresource. - The integrity level of the
sourceresource consumer exceeds the integrity level of thetargetresource, and the minimum integrity level of subjects and resources from which thesourceresource consumer can receive data is incomparable to the integrity level of thetargetresource. - The integrity level of the
sourceresource consumer is incomparable to the integrity level of thetargetresource, and the minimum integrity level of subjects and resources from which thesourceresource consumer can receive data exceeds the integrity level of thetargetresource. - The integrity level of the
sourceresource consumer is incomparable to the integrity level of thetargetresource, and the minimum integrity level of subjects and resources from which thesourceresource consumer can receive data is incomparable to the integrity level of thetargetresource. - An integrity level was not assigned to the
sourceresource consumer or to thetargetresource. - The
sourceortargetvalue is outside of the permissible range.
Example:
/* Any client in the solution is allowed to query a server of
* the updater.Realmserv class by calling the read method of the
* realm.Reader service if the Mic security model permits
* this client to read data from the resource needed by
* this client. Otherwise any client in the solution is prohibited from
* querying a server of the updater.Realmserv class by calling
* the read method of the realm.Reader endpoint. */
request dst=updater.Realmserv,
endpoint=realm.Reader {
match method=read {
mic.read { source : src_sid,
, target : message.handle.handle
}
}
}
Mic security model write rule
write {source : <Sid>, target : <Sid>}
This verifies that the source resource consumer is allowed to write data to the target resource.
It returns the "granted" result if the integrity level of the target resource does not exceed the integrity level of the source resource consumer.
It returns the "denied" result in the following cases:
- The integrity level of the
targetresource exceeds the integrity level of thesourceresource consumer. - The integrity level of the
targetresource is incomparable to the integrity level of thesourceresource consumer. - An integrity level was not assigned to the
sourceresource consumer or to thetargetresource. - The
sourceortargetvalue is outside of the permissible range.
Mic security model query_level expression
query_level {source : <Sid>}
It is intended to be used as an expression that verifies fulfillment of the conditions in the choice construct (for details on the choice construct, see "Binding methods of security models to security events"). It checks the integrity level of the source resource or subject. Depending on the results of this check, various options for security event handling can be performed.
It runs incorrectly in the following cases:
- An integrity level was not assigned to the subject or
sourceresource. - The
sourcevalue is outside of the permissible range.
When the expression runs incorrectly, the Kaspersky Security Module returns the "denied" decision.
Page top
Methods of KasperskyOS core endpoints
From the perspective of the Kaspersky Security Module, the KasperskyOS kernel is a container of components that provide endpoints. The list of kernel components is provided in the Core.edl file located in the sysroot-*-kos/include/kl/core directory of the KasperskyOS SDK. This directory also contains the CDL and IDL files for the formal specification of the kernel.
Methods of core endpoints can be divided into secure methods and potentially dangerous methods. Potentially dangerous methods could be used by a cybercriminal in a compromised solution component to cause a denial of service, set up covert data transfer, or hijack an I/O device. Secure methods cannot be used for these purposes.
Access to methods of core endpoints must be restricted as much as possible by the solution security policy (according to the least privilege principle). For that, the following requirements must be fulfilled:
- Access to a secure method must be granted only to the solution components that require this method.
- Access to a potentially dangerous method must be granted only to the trusted solution components that require this method.
- Access to a potentially dangerous method must be granted to untrusted solution components that require this method only if the verifiable access conditions limit the possibilities of malicious use of this method, or if the impact from malicious use of this method is acceptable from a security perspective.
For example, an untrusted component may be allowed to use a limited set of I/O ports that do not allow this component to take control of I/O devices. In another example, covert data transfer between untrusted components may be acceptable from a security perspective.
Virtual memory endpoint
This endpoint is intended for managing virtual memory.
Information about methods of the endpoint is provided in the table below.
Methods of the vmm.VMM endpoint (kl.core.VMM interface)
Method |
Method purpose and parameters |
Potential danger of the method |
|---|---|---|
|
Purpose Allocates a virtual memory region (reserves and optionally maps it to physical memory). Parameters
|
Allows the following:
|
|
Purpose Maps the virtual memory region (or part of it) reserved by the Parameters
|
Lets you exhaust RAM. |
|
Purpose Cancels mapping of the virtual memory region to physical memory. Parameters
|
N/A |
|
Purpose Modifies the access rights to the virtual memory region. Parameters
|
N/A |
|
Purpose Frees up the virtual memory region. Parameters
|
N/A |
|
Purpose Lets you get information about a virtual memory page. Parameters
|
N/A |
|
Purpose Creates an MDL buffer. Parameters
|
Allows the following:
|
|
Purpose Creates an MDL buffer from physical memory that is mapped to the defined virtual memory region and maps the created MDL buffer to this region. Parameters
|
Allows the following:
|
|
Purpose Gets the size of the MDL buffer. Parameters
|
N/A |
|
Purpose Maps an MDL buffer to a virtual memory region. Parameters
|
Allows the following:
|
|
Purpose Creates an MDL buffer based on an existing one. The MDL buffer is created from the same regions of physical memory as the original buffer. Parameters
|
Allows the kernel memory to be used up by creating a multitude of objects within it. |
I/O endpoint
This endpoint is intended for working with I/O ports, MMIO, DMA, and interrupts.
Information about methods of the endpoint is provided in the table below.
Methods of the io.IO endpoint (kl.core.IO interface)
Method |
Method purpose and parameters |
Potential danger of the method |
|---|---|---|
|
Purpose Registers I/O ports. Parameters
|
Allows the following:
|
|
Purpose Registers an MMIO memory region. Parameters
|
Allows the kernel memory to be used up by creating a multitude of objects within it. |
|
Purpose Creates an DMA buffer. Parameters
|
Allows the following:
|
|
Purpose Registers an interrupt. Parameters
|
Allows the kernel memory to be used up by creating a multitude of objects within it. |
|
Purpose Maps an MMIO memory region to a virtual memory region. Parameters
|
Allows the following:
|
|
Purpose Opens access to I/O ports. Parameters
|
Allows the following:
|
|
Purpose Attaches an interrupt to the handle used by the interrupt handler. Parameters
|
Allows the following:
|
|
Purpose Attaches an interrupt to the handle used by the interrupt handler. Parameters
|
Allows the following:
|
|
Purpose Detaches an interrupt from the handle used by the interrupt handler. Parameters
|
N/A |
|
Purpose Resumes interrupt handling. Parameters
|
N/A |
|
Purpose Blocks interrupt handling. Parameters
|
Lets you block interrupt handling in another process. |
|
Purpose Modifies DMA parameters. Parameters
|
N/A |
|
Purpose Maps an DMA buffer to a virtual memory region. Parameters
|
Allows the following:
|
|
Purpose Lets you get information about a DMA buffer. Parameters
|
N/A |
|
Purpose Lets you get information about the physical memory that was used to create a DMA buffer. Parameters
|
N/A |
|
Purpose Opens access to a DMA buffer for a device. Parameters
|
Allows the kernel memory to be used up by creating a multitude of objects within it. |
Threads endpoint
This endpoint is intended for managing threads.
Information about methods of the endpoint is provided in the table below.
Methods of the thread.Thread endpoint (kl.core.Thread interface)
Method |
Method purpose and parameters |
Potential danger of the method |
|---|---|---|
|
Purpose Creates a thread. Parameters
|
Allows the following:
|
|
Purpose Blocks a thread. Parameters
|
Lets you lock a standard thread that has captured the synchronization entity expected by the real-time thread in whose context the interrupt is being handled. This could stop the handling of this interrupt by other processes. |
|
Purpose Resumes a thread. Parameters
|
N/A |
|
Purpose Terminates a thread. Parameters
|
N/A |
|
Purpose Terminates the current thread. Parameters
|
N/A |
|
Purpose Locks the current thread until the defined thread is terminated. Parameters
|
N/A |
|
Purpose Defines the priority of a thread. Parameters
|
Allows the priority of a thread to be elevated to reduce the CPU time available to all other threads, including from other processes. It is recommended to monitor thread priority. |
|
Purpose Allows access to the local memory of the current thread (TLS of the current thread). Parameters
|
N/A |
|
Purpose Defines the base address of the local memory of the current thread (TLS of the current thread). Parameters
|
N/A |
|
Purpose Locks the current thread for the specified duration. Parameters
|
N/A |
|
Purpose Lets you get information about a thread. Parameters
|
N/A |
|
Purpose Detaches the current thread from the interrupt handled in its context. Parameters
|
N/A |
|
Purpose Lets you get a thread affinity mask. Parameters
|
N/A |
|
Purpose Defines a thread affinity mask. Parameters
|
N/A |
|
Purpose Defines the thread scheduler class. Parameters
|
Allows the following:
|
|
Purpose Lets you get information about the thread scheduler class. Parameters
|
N/A |
Handles endpoint
This endpoint is intended for working with handles.
Information about methods of the endpoint is provided in the table below.
Methods of the handle.Handle endpoint (kl.core.Handle interface)
Method |
Method purpose and parameters |
Potential danger of the method |
|---|---|---|
|
Purpose Creates a handle based on an existing one. Parameters
|
Allows the kernel memory to be used up by creating a multitude of objects within it. |
|
Purpose Creates a handle for a user resource. Parameters
|
Allows the kernel memory to be used up by creating a multitude of objects within it. |
|
Purpose Deletes a handle. Parameters
|
N/A |
|
Purpose Creates and connects the client-, server-, and listener IPC handles. Parameters
|
Allows the kernel memory to be used up by creating a multitude of objects within it. |
|
Purpose Disconnects the client- and server IPC handles. Parameters
|
N/A |
|
Purpose Creates a handle and connects it to a security interface. Parameters
|
Allows a multitude of possible kernel process handle values to be used up. |
|
Purpose Disconnects a handle from a security interface. Parameters
|
N/A |
|
Purpose Allocates a unique ID value. This method is used for backward compatibility because handles are currently being used instead of unique IDs. Parameters
|
Allows a multitude of possible unique ID values to be used up. |
|
Purpose Frees the value of a unique ID. (This value must be freed so that it can be available for re-use.) This method is used for backward compatibility because handles are currently being used instead of unique IDs. Parameters
|
Allows a unique ID value used by another process to be freed. |
|
Purpose Lets you receive a security ID (SID) based on a handle. Parameters
|
N/A |
|
Purpose Deletes a handle and revokes its descendants. Parameters
|
N/A |
|
Purpose Revokes the handles that make up the inheritance subtree of the specified handle. Parameters
|
N/A |
|
Purpose Creates a resource transfer context object and configures a notification mechanism for monitoring the life cycle of this object. Parameters
|
Allows the kernel memory to be used up by creating a multitude of objects within it. |
Processes endpoint
This endpoint is intended for managing processes.
Information about methods of the endpoint is provided in the table below.
Methods of the task.Task endpoint (kl.core.Task interface)
Method |
Method purpose and parameters |
Potential danger of the method |
|---|---|---|
|
Purpose Creates a process. Parameters
|
Allows the following:
|
|
Purpose Loads a program image segment into process memory from the MDL buffer. Parameters
|
Allows code to be loaded into process memory for subsequent execution of that code. |
|
Purpose Defines a process entry point. Parameters
|
Creates conditions for executing code loaded into process memory. |
|
Purpose Loads the character table and string table from MDL buffers into process memory. MDL buffers contain a character table and string table from non-loadable segments of the ELF file. These tables are necessary for receiving stack backtrace data (information about call stacks). Parameters
|
N/A |
|
Purpose Loads the parameters of a process into its memory. Parameters
|
Allows the kernel memory to be used up by creating a multitude of objects within it. |
|
Purpose Frees the memory of the current process occupied by parameters that were loaded by the Parameters
|
N/A |
|
Purpose Starts a process. Parameters
|
Allows the following:
|
|
Purpose Terminates the current process. Parameters
|
N/A |
|
Purpose Terminates a process. Parameters
|
Allows another process to be terminated if its handle is available. (The handle permissions mask must allow termination of the process.) |
|
Purpose Lets you get information about a terminated process. Parameters
|
N/A |
|
Purpose Lets you receive the context of a thread that is part of a process that has been frozen due to an unhandled exception. When a process is frozen, execution of the process stops but its resources are not freed. Therefore, data on this process can be collected. Parameters
|
Lets you disrupt isolation of a process that has been frozen due to an unhandled exception. For example, the received thread context can contain the values of variables. |
|
Purpose Lets you get information about the virtual memory region belonging to a process that has been frozen due to an unhandled exception. When a process is frozen, execution of the process stops but its resources are not freed. Therefore, data on this process can be collected. Parameters
|
Lets you disrupt isolation of a process that has been frozen due to an unhandled exception. Process isolation is disrupted due to the opened access to the process memory region. |
|
Purpose Terminates a process that has been frozen due to an unhandled exception. When a process is frozen, execution of the process stops but its resources are not freed. Therefore, data on this process can be collected. A frozen process cannot be restarted. It can only be terminated. Parameters
|
Allows termination of a process that has been frozen due to an unhandled exception. This will not allow collection of data about this process for diagnostic purposes. |
|
Purpose Lets you get the name of the current process. Parameters
|
N/A |
|
Purpose Lets you get the name of the executable file that was used to start the current process. Parameters
|
N/A |
|
Purpose Lets you get the priority of the initial thread of a process. Parameters
|
N/A |
|
Purpose Defines the priority of the initial thread of a process. Parameters
|
Allows the priority of the initial thread of a process to be elevated to reduce the CPU time available to all other threads, including from other processes. It is recommended to monitor the priority of an initial thread. |
|
Purpose Lets you get information about existing processes. Parameters
|
Allows the kernel memory to be used up by creating a multitude of objects within it. |
|
Purpose Defines the scheduler class and priority of the initial thread of a process. Parameters
|
Allows the following:
|
|
Purpose Defines the initial vector in the random number generator for ASLR support. Affects the results from calling the Parameters
|
N/A |
Synchronization endpoint
This endpoint is intended for working with futexes.
Information about methods of the endpoint is provided in the table below.
Methods of the sync.Sync endpoint (kl.core.Sync interface)
Method |
Method purpose and parameters |
Potential danger of the method |
|---|---|---|
|
Purpose Locks execution of the current thread if the futex value is equal to the expected value. Parameters
|
N/A |
|
Purpose Resumes execution of threads that were blocked by a Parameters
|
N/A |
File system endpoints
These endpoints are intended for working with the ROMFS file system used by the KasperskyOS kernel.
Information about methods of endpoints is provided in the tables below.
Methods of the fs.FS endpoint (kl.core.FS interface)
Method |
Method purpose and parameters |
Potential danger of the method |
|---|---|---|
|
Purpose Opens a file. Parameters
|
Allows the kernel memory to be used up by creating a multitude of objects within it. |
|
Purpose Closes a file. Parameters
|
N/A |
|
Purpose Reads data from a file. Parameters
|
N/A |
|
Purpose Lets you get the size of a file. Parameters
|
N/A |
|
Purpose Lets you get the unique ID of a file. Parameters
|
N/A |
|
Purpose Lets you get the number of files in the file system. Parameters
|
N/A |
|
Purpose Lets you get the name and unique ID of a file based on the file index. Parameters
|
N/A |
|
Purpose Lets you get the size of the file system. Parameters
|
N/A |
Methods of the fs.FSUnsafe endpoint (kl.core.FSUnsafe interface)
Method |
Method purpose and parameters |
Potential danger of the method |
|---|---|---|
|
Purpose Changes the file system image. A different ROMFS image loaded into process memory will be used instead of the ROMFS image that was created during the solution build. Parameters
|
Allows the following:
|
Time endpoint
This endpoint is intended for setting the system time.
Information about methods of the endpoint is provided in the table below.
Methods of the time.Time endpoint (kl.core.Time interface)
Method |
Method purpose and parameters |
Potential danger of the method |
|---|---|---|
|
Purpose Sets the system time. Parameters
|
Allows the system time to be set. |
Hardware abstraction layer endpoint
This endpoint is intended for receiving the values of HAL parameters, working with privileged registers, clearing the processor cache, and diagnostic output.
Information about methods of the endpoint is provided in the table below.
Methods of the hal.HAL endpoint (kl.core.HAL interface)
Method |
Method purpose and parameters |
Potential danger of the method |
|---|---|---|
|
Purpose Lets you get the value of a HAL parameter. Parameters
|
Lets you get values of HAL parameters that could contain critical system information. |
|
Purpose Lets you get the value of a privileged register. Parameters
|
Lets you set up a data transfer channel with a process that has access to the It is recommended to monitor the name of a register. |
|
Purpose Sets the value of a privileged register. Parameters
|
Allows the following:
It is recommended to monitor the name of a register. |
|
Purpose Lets you get the value of a privileged register. Parameters
|
Lets you set up a data transfer channel with a process that has access to the It is recommended to monitor the name of the registers range and the register offset in this range. |
|
Purpose Sets the value of a privileged register. Parameters
|
Allows the following:
It is recommended to monitor the name of the registers range and the register offset in this range. |
|
Purpose Clears the processor cache. Parameters
|
Allows the processor cache to be cleared. |
|
Purpose Puts data into the diagnostic output that is written, for example, to a COM port or USB port (version 3.0 or later, with DbC support). Parameters
|
Lets you populate diagnostic output with fictitious (uninformative) data. |
XHCI controller management endpoint
This endpoint is intended for disabling and re-enabling debug mode for the XHCI controller (with DbC support) when it is restarted.
Information about methods of the endpoint is provided in the table below.
Methods of the xhcidbg.XHCIDBG endpoint (kl.core.XHCIDBG interface)
Method |
Method purpose and parameters |
Potential danger of the method |
|---|---|---|
|
Purpose Enables debug mode of the XHCI controller. Parameters
|
Lets you configure the XHCI controller to send diagnostic output through a USB port (version 3.0 or later). |
|
Purpose Disables debug mode of the XHCI controller. Parameters
|
Lets you configure the XHCI controller to not send diagnostic output through a USB port (version 3.0 or later). |
Audit endpoint
This endpoint is intended for reading messages from KasperskyOS kernel logs. There are two kernel logs: kss and core. The kss log contains security audit data. The core log contains diagnostic output. (Diagnostic output includes kernel output and the output of programs.)
Information about methods of the endpoint is provided in the table below.
Methods of the audit.Audit endpoint (kl.core.Audit interface)
Method |
Method purpose and parameters |
Potential danger of the method |
|---|---|---|
|
Purpose Opens the kernel log to read data from it. Parameters
|
N/A |
|
Purpose Closes the kernel log. Parameters
|
N/A |
|
Purpose Lets you receive a message from a kernel log. Parameters
|
Lets you extract messages from the kernel log so that these messages are not received by another process. |
Profiling endpoint
This endpoint is intended for profiling user code and kernel code, receiving information about coverage of kernel code and user code, and receiving values of performance counters.
Information about methods of the endpoint is provided in the table below.
Methods of the profiler.Profiler endpoint (kl.core.Profiler interface)
Method |
Method purpose and parameters |
Potential danger of the method |
|---|---|---|
|
Purpose Assigns user code profiling. Profiling generates statistics on the execution of user code in the context of the defined thread. These statistics show how many times the user code from different sections of the defined virtual address range was triggered during the profiling period. Parameters
|
Allows the kernel memory to be used up by creating a multitude of objects within it. |
|
Purpose Cancels user code profiling. Parameters
|
N/A |
|
Purpose Assigns kernel code profiling. Profiling results in statistics on kernel code execution. These statistics show how many times the kernel code was triggered from different sections of the memory address range of the process that called this method. The range of virtual addresses occupied by kernel code are identical for all processes. Kernel code execution statistics are gathered in the aggregate and not within the context of one process or thread. Parameters
|
N/A |
|
Purpose Cancels kernel code profiling. Parameters
|
N/A |
|
Purpose Starts kernel code profiling. Parameters
|
N/A |
|
Purpose Stops kernel code profiling. Parameters
|
N/A |
|
Purpose Lets you get data containing the kernel code execution statistics received during profiling. Parameters
|
N/A |
|
Purpose Lets you get information about kernel code coverage. Parameters
|
N/A |
|
Purpose Output of data on kernel code coverage in Parameters
|
N/A |
|
Purpose Output of data on code coverage in Parameters
|
N/A |
|
Purpose Lets you get the values of performance counters. Parameters
|
N/A |
I/O memory management endpoint
This endpoint is intended for managing the isolation of physical memory regions used by devices on a PCIe bus. (Isolation is provided by the IOMMU.)
Information about methods of the endpoint is provided in the table below.
Methods of the iommu.IOMMU endpoint (kl.core.IOMMU interface)
Method |
Method purpose and parameters |
Potential danger of the method |
|---|---|---|
|
Purpose Attaches a device on a PCIe bus to the IOMMU domain associated with the current process. Parameters
|
Lets you attach a device on a PCIe bus managed by another process to an IOMMU domain associated with the current process, which leads to failure of the device. It is recommended to monitor the address of a device on a PCIe bus. |
|
Purpose Detaches the device on a PCIe bus from the IOMMU domain associated with the current process. Parameters
|
N/A |
Connections endpoint
This endpoint is intended for dynamic creation of IPC channels.
Information about methods of the endpoint is provided in the table below.
Methods of the cm.CM endpoint (kl.core.CM interface)
Method |
Method purpose and parameters |
Potential danger of the method |
|---|---|---|
|
Purpose Requests to create an IPC channel with a server for use of the defined endpoint. Parameters
|
Lets you create a load on a server by sending a large number of requests to create an IPC channel. |
|
Purpose Checks for a client request to create an IPC channel for use of an endpoint. Parameters
|
N/A |
|
Purpose Rejects a client request to create an IPC channel for use of the defined endpoint. Parameters
|
N/A |
|
Purpose Accepts a client request to create an IPC channel for use of the defined endpoint. Parameters
|
N/A |
Power management endpoint
This endpoint is intended for changing the power management mode of a computer (for example, shutting down or restarting the computer), and for enabling and disabling processors (processor cores).
Information about methods of the endpoint is provided in the table below.
Methods of the pm.PM endpoint (kl.core.PM interface)
Method |
Method purpose and parameters |
Potential danger of the method |
|---|---|---|
|
Purpose Requests to change the power mode of a computer. Parameters
|
Allows the computer power mode to be changed. |
|
Purpose Requests to enable and/or disable processors. Parameters
|
Lets you disable and enable processors. |
|
Purpose Lets you get information regarding which processors are in the active state. Parameters
|
N/A |
Notifications endpoint
This endpoint is intended for working with notifications about events that occur with resources.
Information about methods of the endpoint is provided in the table below.
Methods of the notice.Notice endpoint (kl.core.Notice interface)
Method |
Method purpose and parameters |
Potential danger of the method |
|---|---|---|
|
Purpose Creates a notification receiver. Parameters
|
Allows the kernel memory to be used up by creating a multitude of objects within it. |
|
Purpose Adds a "resource–event mask" entry to the notification receiver so that it can receive notifications about events that occur with the defined resource and match the defined event mask. Parameters
|
Allows the kernel memory to be used up by creating a multitude of objects within it. |
|
Purpose Deletes notifications matching a "resource–event mask" entry with the defined ID from the notification receiver. Parameters
|
N/A |
|
Purpose Deletes notifications matching the defined resource from the notification receiver. Parameters
|
N/A |
|
Purpose Extracts notifications from the receiver. Parameters
|
N/A |
|
Purpose Deletes all "resource–event mask" entries from the defined notification receiver, resumes execution of all threads awaiting an event associated with the defined notification receiver, and (optionally) prohibits the addition of "resource–event mask" entries to the defined notification receiver. Parameters
|
N/A |
|
Purpose Signals that events from the defined event mask occurred with the defined user resource. Parameters
|
N/A |
Hypervisor endpoint
This endpoint is intended for working with a hypervisor.
Methods of the hypervisor.Hypervisor endpoint (kl.core.Hypervisor interface) are potentially dangerous. Access to these methods can be granted only to the specialized vmapp program.
Trusted Execution Environment endpoints
These endpoints are intended for transferring data between a Trusted Execution Environment (TEE) and a Rich Execution Environment (REE), and for obtaining access to the physical memory of the REE from the TEE.
Information about methods of endpoints is provided in the tables below.
Methods of the tee.TEE endpoint (kl.core.TEE interface)
Method |
Method purpose and parameters |
Potential danger of the method |
|---|---|---|
|
Purpose Sends and receives messages transferred between a TEE and a REE. This method is used in the TEE and in the REE. Parameters
|
Allows a process in a REE to receive a response from a TEE regarding a request from another process in the REE. |
|
Purpose Frees the values of unique IDs of messages transferred between a TEE and a REE. (These values must be freed so that they can become available for re-use.) This method is used in REE. Parameters
|
Lets you free the values used by other processes in a REE as unique IDs of messages transferred between a TEE and a REE. |
Methods of the tee.TEEVMM endpoint (kl.core.TEEVMM interface)
Method |
Method purpose and parameters |
Potential danger of the method |
|---|---|---|
|
Purpose Creates a blank MDL buffer so that physical memory from an REE can be subsequently added to it. This method is used in TEE. Parameters
|
Allows the kernel memory to be used up by creating a multitude of objects within it. |
|
Purpose Adds a REE physical memory region to the blank MDL buffer created by the This method is used in TEE. Parameters
|
Allows access to an arbitrary region of the physical memory of a REE from a TEE. |
IPC interrupt endpoint
This endpoint is intended for interrupting the Call() and Recv() locking system calls. (For example, this may be required to correctly terminate a process.)
Information about methods of the endpoint is provided in the table below.
Methods of the ipc.IPC endpoint (kl.core.IPC interface)
Method |
Method purpose and parameters |
Potential danger of the method |
|---|---|---|
|
Purpose Creates an IPC synchronization object. An IPC synchronization object is used to interrupt The handle of an IPC synchronization object cannot be transferred to another process because the necessary flag for this operation is not set in the permissions mask of this handle. Parameters
|
Allows the kernel memory to be used up by creating a multitude of objects within it. |
|
Purpose Switches the defined IPC synchronization object to a state in which the Parameters
|
N/A |
|
Purpose Switches the defined IPC synchronization object to a state in which the Parameters
|
N/A |
CPU frequency management endpoint
This endpoint is intended for changing the frequency of processors (processor cores).
Information about methods of the endpoint is provided in the table below.
Methods of the cpufreq.CpuFreq endpoint (kl.core.CpuFreq interface)
Method |
Method purpose and parameters |
Potential danger of the method |
|---|---|---|
|
Purpose Allows you to receive information about processor groups. Processor group information lists the existing processor groups while indicating the possible values of the performance parameter for each of them. This parameter is a combination of the matching frequency and voltage (Operating Performance Point, or OPP). The frequency is indicated in kiloherz (kHz) and the voltage is indicated in microvolts (µV). Parameters
|
N/A |
|
Purpose Lets you get the index of the current OPP for the defined processor group. Parameters
|
N/A |
|
Purpose Sets the defined OPP for the defined processor group. Parameters
|
Lets you change the frequency of a processor group. |
Security patterns for development under KasperskyOS
Each KasperskyOS-based solution has specific usage scenarios and is designed to counteract specific security threats. Nonetheless, there are some typical scenarios and threats encountered in many different solutions. This section describes the typical risks and threats, and contains a description of architectural patterns that can be employed to increase the security of a solution.
A security pattern (or template) describes a specific recurring security issue that arises in certain known contexts, and provides a well-proven, general scheme for resolving this kind of security issue. A pattern is not a finished project that can be converted directly into code. Instead, it is a solution to a general problem encountered in various projects.
A security pattern system is a set of security patterns together with instructions on their implementation, combination, and practical use when designing secure software systems.
Security patterns resolve security issues at different levels, beginning with patterns at the architectural level, including high-level design of the system, and ending with implementation-level patterns that contain recommendations on how to implement functions or methods.
This section describes the set of security patterns whose implementation examples are provided in KasperskyOS Community Edition.
Security patterns are described in a multitude of information security resources. Each pattern is accompanied by a list of the resources that were used to prepare its description.
Distrustful Decomposition pattern
Description
When using a monolithic application, a single process must be granted all the privileges necessary for the application to operate. This issue is resolved by the Distrustful Decomposition pattern.
The purpose of the Distrustful Decomposition pattern is to divide application functionality among individual processes that require different levels of privileges, and to control the interaction between these processes instead of creating a monolithic application.
Using the Distrustful Decomposition pattern reduces the following:
- Attack surface for each process.
- Functionality and data that a hacker will be able to access if one of the processes is compromised.
Alternate names
Privilege Reduction.
Context
Different functions of an application require different levels of privileges.
Problem
An unsophisticated implementation of an application combines many functions requiring different privileges into one component. This component would need to be run with the maximum level of privileges required for any one of these many functions.
Solution
The Distrustful Decomposition pattern divides functionality among individual processes and isolates potential vulnerabilities within a small subset of the system. A cybercriminal who conducts a successful attack will be able to use only the functionality and data of a single compromised component instead of the entire application.
Structure
This pattern divides one monolithic application into multiple applications that are run as individual processes that could potentially have different privileges. Each process implements a small, clearly defined set of functions of the application. Processes use interprocess communication mechanism to exchange data.
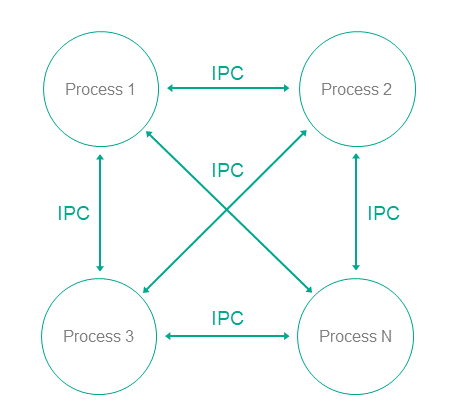
Operation
- In KasperskyOS, an application is divided into processes.
- Processes can exchange messages via IPC.
- A user or remote system connects to the process that provides the necessary functionality with the level of privileges sufficient to perform the requested functions.
Implementation recommendations
Interaction between processes can be unidirectional or bidirectional. It is recommended to always use unidirectional interaction whenever possible. Otherwise, the potential attack surface of individual components increases, which reduces the overall security of the entire system. If bidirectional IPC is used, processes should not trust bidirectional data exchange. For example, if a file system is used for IPC, file contents cannot be trusted.
Specialized implementation in KasperskyOS
In universal operating systems such as Linux or Windows, this pattern does not use anything except the standard process/privileges model that already exists in these operating systems. Each program is run in its own process space with potentially different privileges of the specific user in each process. However, an attack on the OS kernel would reduce the effectiveness of this pattern.
Use of this pattern when developing for KasperskyOS means that control over processes and IPC is entrusted to the microkernel, which is difficult to successfully attack. The Kaspersky Security Module is used for IPC control.
Use of KasperskyOS mechanisms ensures a high level of reliability of the software system with the same or less effort required from the developer when compared to the use of this pattern in programs running under universal operating systems.
In addition, KasperskyOS provides the capability for flexible configuration of security policies. Moreover, the process of defining and editing security policies is potentially independent of the process of developing the applications.
Linked patterns
Use of the Distrustful Decomposition pattern involves use of the Defer to Kernel and Policy Decision Point patterns.
Implementation examples
Examples of an implementation of the Distrustful Decomposition pattern:
Sources of information
The Distrustful Decomposition pattern is described in detail in the following resources:
- Chad Dougherty, Kirk Sayre, Robert C. Seacord, David Svoboda, Kazuya Togashi (JPCERT/CC), "Secure Design Patterns" (March-October 2009). Software Engineering Institute. https://resources.sei.cmu.edu/asset_files/TechnicalReport/2009_005_001_15110.pdf
- Dangler, Jeremiah Y., "Categorization of Security Design Patterns" (2013). Electronic Theses and Dissertations. Paper 1119. https://dc.etsu.edu/etd/1119
Secure Logger example
The Secure Logger example demonstrates use of the Distrustful Decomposition pattern for separating event log read/write functionality.
Example architecture
The security goal of the Secure Logger example is to prevent any possibility of distortion or deletion of information from the event log. This example utilizes the capabilities provided by KasperskyOS to achieve this security goal.
A logging system can be examined by distinguishing the following functional steps:
- Generate information to be written to the log.
- Save information to the log.
- Read entries from the log.
- Provide entries in a convenient format for the consumer.
Accordingly, the logging subsystem can be divided into four processes depending on the required functional capabilities of each process.
For this purpose, the Secure Logger example contains the following four programs: Application, Logger, Reader and LogViewer.
- The
Applicationprogram initiates the creation of entries in the event log maintained by theLoggerprogram. - The
Loggerprogram creates entries in the log and writes them to the disk. - The
Readerprogram reads entries from the disk to send them to theLogViewerprogram. - The
LogViewerprogram sends entries to the user.
The IPC interface provided by the Logger program is intended only for writing to storage. The IPC interface of the Reader program is intended only for reading from storage. The example architecture looks as follows:
- The
Applicationprogram uses the interface of theLoggerprogram to save log entries. - The
LogViewerprogram uses the interface of theReaderprogram to read the log entries and present them to a user.
The LogViewer program normally has external channels for interacting with a user (for example, to receive data write commands and to provide data to a user). Naturally, this program is an untrusted component of the system, and therefore could potentially be used to conduct an attack. However, even if a successful attack results in the infiltration of unauthorized executable code into the LogViewer program, information in the log cannot be distorted through this program. This is because the program can only utilize the data read interface, which cannot actually be used to distort or delete data. Moreover, the LogViewer program does not have the capability to gain access to other interfaces because this access is controlled by the security module.
A security policy in the Secure Logger example has the following characteristics:
- The
Applicationprogram has the capability to query theLoggerprogram to create a new entry in the event log. - The
LogViewerprogram has the capability to query theReaderprogram to read entries from the event log. - The
Applicationprogram does not have the capability to query theReaderprogram to read entries from the event log. - The
LogViewerprogram does not have the capability to query theLoggerprogram to create a new entry in the event log.
Example files
The code of the example and build scripts are available at the following path:
/opt/KasperskyOS-Community-Edition-<version>/examples/secure_logger
Building and running example
See Building and running examples section.
Page top
Separate Storage example
The Separate Storage example demonstrates use of the Distrustful Decomposition pattern to separate data storage for trusted and untrusted applications.
Example architecture
The Separate Storage example contains two user programs: UserManager and CertificateManager.
These programs work with data located in the corresponding files:
- The
UserManagerprogram works with data from theuserlist.txtfile. - The
CertificateManagerprogram works with data from thecertificate.cerfile.
Each of these programs uses its own instance of the VFS program to access a separate file system. Each VFS program includes a block device driver linked to an individual logical drive partition. The UserManager program does not have access to the file system of the CertificateManager program, and vice versa.
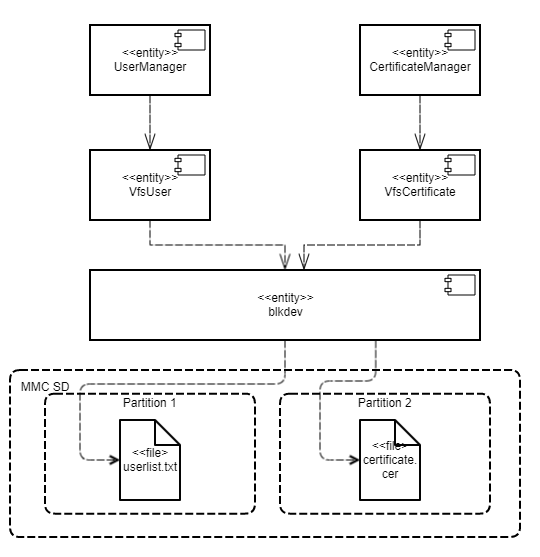
This architecture guarantees that if there is an attack or error in any of the UserManager or CertificateManager programs, this program will not be able to access any file that was not intended for the specific program's operations.
A security policy in the Separate Storage example has the following characteristics:
- The
UserManagerprogram has access to the file system only through theVfsUserprogram. - The
CertificateManagerprogram has access to the file system only through theVfsCertificateprogram.
Example files
The code of the example and build scripts are available at the following path:
/opt/KasperskyOS-Community-Edition-<version>/examples/separate_storage
Building and running example
To run an example on QEMU, go to the directory containing the example, build the example and run the following commands:
$ cd build/einit
# Before running the following command, be sure that the path to
# the directory with the qemu-system-aarch64 executable file is saved in
# the PATH environment variable. If it is not there,
# add it to the PATH variable.
$ qemu-system-aarch64 -m 2048 -machine vexpress-a15 -nographic -monitor none -sd hdd.img -kernel kos-qemu-image
See also Building and running examples section.
Preparing an SD card to run on Raspberry Pi 4 B
To run the Separate Storage example on Raspberry Pi 4 B, the following additional actions are necessary:
- The SD card must contain both a bootable partition with the solution image as well as 2 additional partitions with the
ext2orext3file systems. - The first additional partition must contain the
userlist.txtfile from the./resources/files/directory. - The second additional partition must contain the
certificate.cerfile from the./resources/files/directory.
To run the Separate Storage example on Raspberry Pi 4 B, you can use an SD card prepared for running the embed_ext2_with_separate_vfs example on Raspberry Pi 4 B, after copying the userlist.txt and certificate.cer files to the appropriate partitions.
Defer to Kernel pattern
Description
The Defer to Kernel pattern lets you take advantage of permission control at the OS kernel level.
The purpose of this pattern is to utilize mechanisms available at the OS kernel level to clearly separate the functionality requiring elevated privileges from the functionality that does not require elevated privileges. By using kernel mechanisms, we do not have to implement new tools for arbitrating security decisions at the user level.
Alternate names
Policy Enforcement Point (PEP), Protected System, Enclave.
Context
The Defer to Kernel pattern is applicable if the system has the following characteristics:
- The system has processes that run without elevated privileges, including user processes.
- Some system functions require elevated privileges that must be verified before processes are granted access to data.
- You need to verify not only the privileges of the requesting process, but also the overall permissibility of the requested operation within the operational context of the entire system and its overall security.
Problem
When functionality is divided among various processes with different levels of privileges, these privileges must be verified when a request is made from one process to another. These verifications must be carried out and their resulting permissions must be granted by trusted code that has a minimal risk of being compromised. The trustworthiness of application code is almost always questionable due to its sheer volume and due to its primary orientation toward implementation of functional requirements.
Solution
Clearly separate privileged functionality and data from non-privileged functionality and data at the process level, and give the OS kernel control of interprocess communication (IPC), including verification of access rights when there is a request for functionality or data requiring elevated privileges, and verification of the overall state of the system and the states of individual processes at the time of the request.
Structure
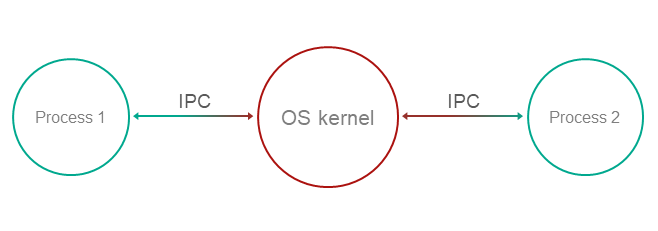
Operation
- Functionality and management of data with various privileges are compartmentalized among processes.
- The OS kernel ensures isolation of processes.
Process-1wants to request privileged functionality or data fromProcess-2using IPC.- The kernel controls IPC and allows or denies communication based on security policies and based on the available information regarding the operational context and state of
Process-1.
Implementation recommendations
To ensure that a specific implementation of a pattern operates securely and reliably, the following is required:
- Isolation
Complete and guaranteed isolation of processes must be ensured.
- Inability to bypass the kernel
Absolutely all IPC interactions must be controlled by the kernel.
- Kernel self-defense
The trustworthiness of the kernel must be ensured through its own means of protection against compromise.
- Provability
The kernel requires a certain level of guaranteed security and reliability.
- Capability for external computation of access permissions
Access permissions must be computed at the OS level, and must not be implemented in application code.
For this purpose, tools must be provided for describing access policies so that security policies are detached from the business logic.
Specialized implementation in KasperskyOS
The KasperskyOS kernel guarantees isolation of processes and serves as a Policy Enforcement Point (PEP).
Linked patterns
The Defer to Kernel pattern is a special case of the Distrustful Decomposition and Policy Decision Point patterns. The Policy Decision Point pattern defines the abstraction process that intercepts all requests to resources and verifies that they comply with the defined security policy. The distinctive feature of the Defer to Kernel pattern is that the verification process is performed by the OS kernel, which is a more reliable and portable solution that reduces the time spent on development and testing.
Impacts
By making the OS kernel responsible for applying the access policy, you separate the security policy from the business logic (which may be very complicated) and thereby simplify development and improve portability through the use of OS kernel functions.
This also makes it possible to prove the overall security of a solution by simply demonstrating that the kernel is operating correctly. The difficulty in proving correct execution of code grows nonlinearly as the size of the code increases. The Defer to Kernel pattern minimizes the amount of trusted code, provided that the OS kernel itself is not too large.
Implementation examples
Example of a Defer to Kernel pattern implementation: Defer to Kernel example.
Sources of information
The Defer to Kernel pattern is described in detail in the following resources:
- Chad Dougherty, Kirk Sayre, Robert C. Seacord, David Svoboda, Kazuya Togashi (JPCERT/CC), "Secure Design Patterns" (March-October 2009). Software Engineering Institute. https://resources.sei.cmu.edu/asset_files/TechnicalReport/2009_005_001_15110.pdf
- Dangler, Jeremiah Y., "Categorization of Security Design Patterns" (2013). Electronic Theses and Dissertations. Paper 1119. https://dc.etsu.edu/etd/1119
- Schumacher, Markus, Fernandez-Buglioni, Eduardo, Hybertson, Duane, Buschmann, Frank, and Sommerlad, Peter. "Security Patterns: Integrating Security and Systems Engineering" (2006).
Defer to Kernel example
The Defer to Kernel example demonstrates the use of Defer to Kernel and Policy Decision Point patterns.
The Defer to Kernel example contains three user programs: PictureManager, ValidPictureClient and NonValidPictureClient.
In this example, the ValidPictureClient and NonValidPictureClient programs query the PictureManager program to receive information.
Only the ValidPictureClient program is allowed to interact with the PictureManager program.
The KasperskyOS kernel guarantees isolation of running programs (processes).
Control of interaction between programs in KasperskyOS is delegated to the Kaspersky Security Module. The subsystem analyzes each sent request and response and decides whether to allow or deny delivery based on the defined security policy.
A security policy in the Defer to Kernel example has the following characteristics:
- The
ValidPictureClientprogram is explicitly allowed to interact with thePictureManagerprogram. - The
NonValidPictureClientprogram is explicitly not allowed to interact with thePictureManagerprogram. This means that this interaction is denied (based on the Default Deny principle).
Dynamically created IPC channels
The example also demonstrates the capability to dynamically create IPC channels between processes. IPC channels are dynamically created by using a name server, which is a special kernel service provided by the NameServer program. The capability to dynamically create IPC channels allows you to change the topology of interaction between programs on the fly.
Any program that is allowed to interact with NameServer via IPC can register its own interfaces in the name server. Another program can request the registered interfaces from the name server, and then connect to the relevant interface.
The security module is used to control interactions via IPC (even those that were created dynamically).
Example files
The code of the example and build scripts are available at the following path:
/opt/KasperskyOS-Community-Edition-<version>/examples/defer_to_kernel
Building and running example
See Building and running examples section.
Page top
Policy Decision Point pattern
Description
The Policy Decision Point pattern encapsulates the computation of decisions based on security model methods into a separate system component that ensures that these security methods are performed in their full scope and correct sequence.
Alternate names
Check Point, Access Decision Function.
Context
The system has functions with different levels of privileges, and the security policy is complex (contains many security model methods bound to security events).
Problem
If security policy checks are divided among different system components, the following issues arise:
- You have to carefully make sure that all necessary checks are performed in all required cases.
- It is difficult to ensure that all checks are performed in the correct order.
- It is difficult to prove that the verification system is operating correctly, has no conflicts, and its integrity has not been compromised.
- The security policy is linked to the business logic. This means that any modification of the security policy requires changes to the business logic, which complicates support and increases the likelihood of errors.
Solution
All verifications of security policy compliance are conducted in a separate component called a Policy Decision Point (PDP). This component is responsible for ensuring that verifications are conducted in their correct sequence and scope. Policy checks are separated from the code that implements the business logic.
Structure
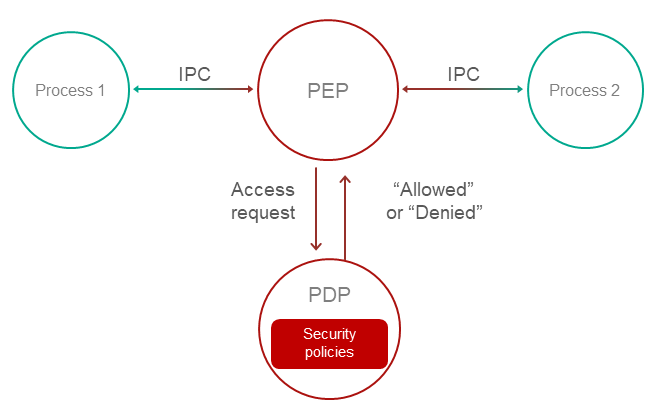
Operation
- A Policy Enforcement Point (PEP) receives a request to access functionality or data.
For example, the PEP may be the OS kernel. For more details, refer to Defer to Kernel pattern.
- The PEP gathers the request attributes required for making decisions on access control.
- The PEP requests an access control decision from the Policy Decision Point (PDP).
- The PDP computes a decision on whether to grant access based on the security policy and based on the information received in the request from the PEP.
- The PEP denies or allows interaction based on the decision of the PDP.
Implementation recommendations
Implementations must take into account the problem of "Verification time vs. Usage time". For example, if a security policy depends on the quickly changing status of a specific system object, a computed decision loses its relevance as quickly as the status changes. In a system that utilizes the Policy Decision Point pattern, you must take care to minimize the time interval between the access decision and the time when the request based on this decision is fulfilled.
Specialized implementation in KasperskyOS
The KasperskyOS kernel guarantees isolation of processes and serves as a Policy Enforcement Point (PEP).
Control of interaction between processes in KasperskyOS is delegated to the Kaspersky Security Module. This module analyzes each sent request and response and decides whether to allow or deny delivery based on the defined security policy. Therefore, the Kaspersky Security Module performs the role of the Policy Decision Point (PDP).
Impacts
This pattern lets you configure a security policy without making any modifications to the code that implements the business logic, and delegate system support involving information security.
Linked patterns
Use of the Policy Decision Point pattern involves use of the Distrustful Decomposition and Defer to Kernel patterns.
Implementation examples
Example of a Policy Decision Point pattern implementation: Defer to Kernel example.
Sources of information
The Policy Decision Point pattern is described in detail in the following resources:
- Chad Dougherty, Kirk Sayre, Robert C. Seacord, David Svoboda, Kazuya Togashi (JPCERT/CC), "Secure Design Patterns" (March-October 2009). Software Engineering Institute. https://resources.sei.cmu.edu/asset_files/TechnicalReport/2009_005_001_15110.pdf
- Dangler, Jeremiah Y., "Categorization of Security Design Patterns" (2013). Electronic Theses and Dissertations. Paper 1119. https://dc.etsu.edu/etd/1119
- Schumacher, Markus, Fernandez-Buglioni, Eduardo, Hybertson, Duane, Buschmann, Frank, and Sommerlad, Peter. "Security Patterns: Integrating Security and Systems Engineering" (2006).
- Bob Blakley, Craig Heath, and members of The Open Group Security Forum. "Security Design Patterns" (April 2004). The Open Group. https://pubs.opengroup.org/onlinepubs/9299969899/toc.pdf
Privilege Separation pattern
Description
The Privilege Separation pattern involves the use of non-privileged isolated system modules for interaction with clients (other modules or users) that do not have any privileges. The purpose of the Privilege Separation pattern is to reduce the amount of code that is executed with special privileges without impacting or restricting application functionality.
The Privilege Separation pattern is a special case of the Distrustful Decomposition pattern.
Example
An unauthenticated user connects to a system that has functions requiring elevated privileges.
Context
The system has components with a large attack surface due to their high number of connections with unsafe sources and/or a complicated, potentially error-prone implementation.
Problem
When a client with unknown privileges interacts with a privileged component of the system, there are risks that the data and functionality accessible to that component could be compromised.
Solution
Interactions with unsafe clients must be conducted only through specially allocated components that have no privileges. The Privilege Separation pattern does not modify system functionality. Instead, it merely separates functionality into components with different privileges.
Operation
Pattern operations can be divided into two phases:
- Pre-Authentication. The client is not yet authenticated. It sends a request to a privileged master process. The master process creates a child process with no privileges (and no access to the file system). This child process performs client authentication.
- Post-Authentication. The client is authenticated and authorized. The privileged master process creates a new child process that has privileges corresponding to the permissions of the client. This process is responsible for all subsequent interaction with the client.
Recommendations on implementation in KasperskyOS
At the Pre-Authentication phase, the master process can save the state of each non-privileged process in the form of a finite-state machine and change the state of the finite-state machine during authentication.
Requests from child processes to the master process are performed using standard IPC mechanisms. However, interaction control is conducted using the Kaspersky Security Module.
Impacts
If attackers gain control of a non-privileged process, they will not gain access to any privileged functions or data. If attackers gain control of an authorized process, they will obtain only the privileges of this process.
In addition, code that is organized in this manner is easier to check and test. You just have to pay special attention to the functionality that operates with elevated privileges.
Implementation examples
Example of a Privilege Separation pattern implementation: Device Access example.
Sources of information
The Privilege Separation pattern is described in detail in the following resources:
- Chad Dougherty, Kirk Sayre, Robert C. Seacord, David Svoboda, Kazuya Togashi (JPCERT/CC), "Secure Design Patterns" (March-October 2009). Software Engineering Institute. https://resources.sei.cmu.edu/asset_files/TechnicalReport/2009_005_001_15110.pdf
- Dangler, Jeremiah Y., "Categorization of Security Design Patterns" (2013). Electronic Theses and Dissertations. Paper 1119. https://dc.etsu.edu/etd/1119
Device Access example
The Device Access example demonstrates use of the Privilege Separation pattern.
Example architecture
The example contains the following three programs: Device, LoginManager and Storage.
In this example, the Device program queries the Storage program to receive information and queries the LoginManager program for authorization.
The Device program obtains access to the Storage program after successful authorization.

This example demonstrates the capability to separate the authorization logic and the data access logic into independent components. This separation guarantees that data access can be opened only after successful authorization. The security module monitors whether authorization was successfully completed. This architecture also enables independent development and testing of the authorization logic and the data access provision logic.
A security policy in the Device Access example has the following characteristics:
- The
Deviceprogram has the capability to query theLoginManagerprogram for authorization. - Calls of the
GetInfo()method of theStorageprogram are managed by methods of the Flow security model:- The finite-state machine described in the
sessionobject configuration has two states:unauthenticatedandauthenticated. - The initial state is
unauthenticated. - Only transitions from
unauthenticatedtoauthenticatedand vice versa are allowed. - The
sessionobject is created when theDeviceprogram is started. - When the
Deviceprogram successfully calls theLogin()method of theLoginManagerprogram, the state of thesessionobject changes toauthenticated. - When the
Deviceprogram successfully calls theLogout()method of theLoginManagerprogram, the state of thesessionobject changes tounauthenticated. - When the
Deviceprogram calls theGetInfo()method of theStorageprogram, the current state of thesessionobject is verified. The call is allowed only if the current state of the object isauthenticated.
- The finite-state machine described in the
Example files
The code of the example and build scripts are available at the following path:
/opt/KasperskyOS-Community-Edition-<version>/examples/device_access
Building and running example
See Building and running examples section.
Page top
Information Obscurity pattern
Description
The purpose of the Information Obscurity pattern is to encrypt confidential data in otherwise unsafe environments and thereby protect against data theft.
Context
This pattern should be used when data is frequently transferred between parts of a system and/or between the system and other (external) systems.
Problem
Confidential data may be transmitted through an untrusted environment within one system (through untrusted components) or between different systems (through untrusted networks). If this environment is compromised, confidential data could be intercepted by a cybercriminal.
Solution
The security policy must separate individual data based on its specific level of confidentiality so that you can determine which data should be encrypted and which encryption algorithms should be used. Encryption and decryption may take a lot of time, therefore their use should be limited whenever possible. The Information Obscurity pattern resolves this issue by utilizing a specific confidentiality level to determine what exactly must be concealed with encryption.
Implementation examples
Example of an Information Obscurity pattern implementation: Secure Login example.
Sources of information
The Information Obscurity pattern is described in detail in the following resources:
- Dangler, Jeremiah Y., "Categorization of Security Design Patterns" (2013). Electronic Theses and Dissertations. Paper 1119. https://dc.etsu.edu/etd/1119
- Schumacher, Markus, Fernandez-Buglioni, Eduardo, Hybertson, Duane, Buschmann, Frank, and Sommerlad, Peter. "Security Patterns: Integrating Security and Systems Engineering" (2006).
Secure Login (Civetweb, TLS-terminator) example
The Secure Login example demonstrates use of the Information Obscurity pattern. This example demonstrates the capability to transmit critical system information through an untrusted environment.
Example architecture
This example simulates the acquisition of remote access to an IoT device by sending user account credentials (user name and password) to this device. The untrusted environment within the IoT device is the web server that responds to requests from users. Practical experience has shown that this kind of web server is easy to detect and frequently attacked successfully because IoT devices do not have built-in tools for protection against intrusion and other attacks. Users also gain access to the IoT device through an untrusted network. Obviously, encryption algorithms must be used in these types of conditions to protect user account credentials from being compromised.
In terms of the architecture in these systems, the following objects can be distinguished:
- Data source: user's browser.
- Point of communication with the device: web server.
- Subsystem for processing information from the user: authentication subsystem.
To employ cryptographic protection, the following steps must be completed:
- Configure interaction between the data source and the device over the HTTPS protocol. This helps prevent unauthorized surveillance of HTTP traffic and MITM (man-in-the-middle) attacks.
- Generate a shared secret between the data source and the information processing subsystem.
- Use this secret to encrypt information on the data source side and to decrypt the information on the information processing subsystem side. This helps prevent data within the device from being compromised (at the point of communication).
The Secure Login example includes the following components:
Civetwebweb server (untrusted component,WebServerprogram).- User authentication subsystem (trusted component,
AuthServiceprogram). - TLS terminator (trusted component,
TlsEntityprogram). This component supports the TLS (transport layer security) mechanism. Together with the web server, the TLS terminator supports the HTTPS protocol on the device side (the web server interacts with the browser through the TLS terminator).
The user authentication process occurs as follows:
- Using their browser, the user opens the page at
https://localhost:1106(when running the example on QEMU) or athttps://<Raspberry Pi IP address>:1106(when running the example on Raspberry Pi 4 B). HTTP traffic between the browser and TLS terminator will be transmitted in encrypted form, but the web server will work only with unencrypted HTTP traffic.This example uses a self-signed certificate, so most up-to-date browsers will warn you that the connection is not secure. You need to agree to use this "insecure" connection, which will actually be encrypted despite the warning. In some browsers, you may encounter the message
"TLS: Error performing handshake: -30592: errno = Success". - The
Civetwebweb server running in theWebServerprogram displays theindex.htmlpage containing an authentication prompt. - The user clicks the
Log inbutton. - The
WebServerprogram queries theAuthServiceprogram via IPC to get the page containing the user name and password input form. - The
AuthServiceprogram performs the following actions:- Generates a private key and public settings, and calculates the public key based on the Diffie-Hellman algorithm.
- Creates the
auth.htmlpage containing the user name and password input form (the page code contains the public settings and the public key). - Transfers the received page to the
WebServerprogram via IPC.
- The
Civetwebweb server running in theWebServerprogram displays theauth.htmlpage containing the user name and password input form. - The user completes the form and clicks the
Submitbutton (correct data for authentication is contained in the filesecure_login/auth_service/src/authservice.cpp). - The
auth.htmlpage code executed by the browser performs the following actions:- Generates a private key and calculates the public key and shared secret key based on the Diffie-Hellman algorithm.
- Encrypts the password by using the
XORoperation with the shared secret key. - Transmits the user name, encrypted password and public key to the web server.
- The
WebServerprogram queries theAuthServiceprogram via IPC to get the page containing the authentication result by transmitting the user name, encrypted password and public key. - The
AuthServiceprogram performs the following actions:- Calculates the shared secret key based on the Diffie-Hellman algorithm.
- Decrypts the password by using the shared secret key.
- Returns the
result_err.htmlpage orresult_ok.htmlpage depending on the authentication result.
- The
Civetwebweb server running in theWebServerprogram displays theresult_err.htmlpage or theresult_ok.htmlpage.
This way, confidential data is transmitted only in encrypted form through the network and web server. In addition, all HTTP traffic is transmitted through the network in encrypted form. Data is transferred between components via IPC interactions controlled by the Kaspersky Security Module.
Unit testing using the GoogleTest framework
In addition to the Information Obscurity pattern, the Secure Login example demonstrates use of the GoogleTest framework to conduct unit testing of applications developed for KasperskyOS (this framework is provided in KasperskyOS Community Edition).
The source code of the tests is located at the following path:
/opt/KasperskyOS-Community-Edition-<version>/examples/secure_login/tests
These unit tests are designed for verification of certain CPP modules of the authentication subsystem and web server.
To start testing:
- Go to the directory with the
Secure Loginexample. - Delete the
builddirectory containing the results of the previous build by running the following command:sudo rm -rf build/
- Open the
cross-build.shscript file in a text editor. - Add the
-D RUN_TESTS="y" \build flag to the script (for example, after the-D CMAKE_BUILD_TYPE:STRING=Release \build flag). - Save the script file and then run the command:
$ sudo ./cross-build.sh
Tests are conducted in the TestEntity program. The AuthService and WebServer programs are not started in this case. Therefore, the example cannot be used to demonstrate the Information Obscurity pattern when testing is being conducted.
After testing is finished, the results of the tests are displayed.
Example files
The code of the example and build scripts are available at the following path:
/opt/KasperskyOS-Community-Edition-<version>/examples/secure_login
Building and running example
To run an example on QEMU, go to the directory containing the example, build the example and run the following commands:
$ cd build/einit
# Before running the following command, be sure that the path to
# the directory with the qemu-system-aarch64 executable file is saved in
# the PATH environment variable. If it is not there,
# add it to the PATH variable.
$ qemu-system-aarch64 -m 2048 -machine vexpress-a15 -nographic -monitor none -net nic,macaddr=52:54:00:12:34:56 -net user,hostfwd=tcp::1106-:1106 -sd sdcard0.img -kernel kos-qemu-image
See also Building and running examples section.
Page top
Appendices
This section provides additional information to supplement the primary text of the document.
Additional examples
This section provides descriptions of additional examples that are included in KasperskyOS Community Edition.
See also the descriptions of security pattern implementation examples:
- Secure Logger example
- Separate Storage example
- Defer to Kernel example
- Device Access example
- Secure Login (Civetweb, TLS-terminator) example
hello example
The hello.c code looks familiar and simple to a developer that uses C, and is fully compatible with POSIX:
hello.c
int main(int argc, const char *argv[])
{
fprintf(stderr,"Hello world!\n");
return EXIT_SUCCESS;
}
Compile this code using aarch64-kos-gcc, which is included in the development tools of KasperskyOS Community Edition:
aarch64-kos-gcc -o hello hello.c
The program name (and, consequently, the name of the executable file) must begin with an uppercase letter.
EDL description of the Hello process class
A static description of the Hello program consists of a single file named Hello.edl that must indicate the name of the process class:
Hello.edl
/* The process class name follows the reserved word "entity". */
entity Hello
The process class name must begin with an uppercase letter. The name of an EDL file must match the name of the class that it describes.
Creating the Einit initializing program
When KasperskyOS is loaded, the kernel starts a program named Einit. The Einit program starts all other programs included in the solution, which means that it serves as the initializing program.
The KasperskyOS Community Edition toolkit includes the einit tool, which lets you generate the code of the initializing program (einit.c) based on the init description. In the example provided below, the file containing the init description is named init.yaml, but it can have any name.
For more details, refer to "Starting processes".
If you want the Hello application to start after the operating system is loaded, all you need to do is specify its name in the init.yaml file and build an Einit application from it.
init.yaml
entities:
# Start the "Hello" application.
- name: Hello
Building the security module
The hello example contains a basic solution security policy (security.psl) that allows all interactions.
The security module (ksm.module) is built based on security.psl.
Example files
The code of the example and build scripts are available at the following path:
/opt/KasperskyOS-Community-Edition-<version>/examples/hello
Building and running example
See Building and running examples section.
The general build scheme for the hello example looks as follows:
echo example
The echo example demonstrates the use of IPC transport.
It shows how to use the main tools that let you implement interaction between programs.
The echo example describes a basic case of interaction between two programs:
- The
Clientprogram sends a number (value) to theServerprogram. - The
Serverprogram modifies this number and sends the new number (result) to theClientprogram. - The
Clientprogram prints theresultnumber to the screen.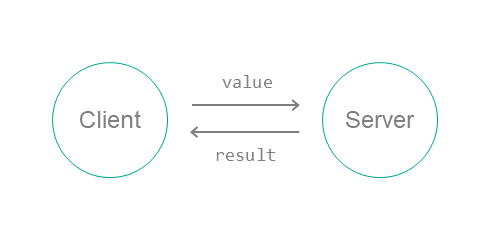
To set up this interaction between programs:
- Connect the
ClientandServerprograms by using the init description. - On the server, implement an interface with a single
Pingmethod that has one input argument (the original number (value)) and one output argument (the modified number (result)).Description of the
Pingmethod in the IDL language:Ping(in UInt32 value, out UInt32 result);
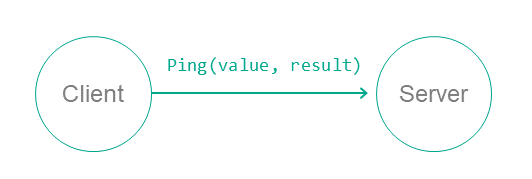
- Create static description files in the EDL, CDL and IDL languages. Use the NK compiler to generate files containing transport methods and types (proxy object, dispatchers, etc.).
- In the code of the
Clientprogram, initialize all required objects (transport, proxy object, request structure, etc.) and call the interface method. - In the code of the
Serverprogram, prepare all the required objects (transport, component dispatcher and program dispatcher, etc.), accept the request from the client, process it and send a response.
Example files
The code of the example and build scripts are available at the following path:
/opt/KasperskyOS-Community-Edition-<version>/examples/echo
The echo example consists of the following source files:
client/src/client.c– implementation of theClientprogram.server/src/server.c– implementation of theServerprogram.resources/Server.edl,resources/Client.edl,resources/Ping.cdl,resources/Ping.idl– static descriptions.init.yaml– init description.
Building and running example
See Building and running examples section.
The build scheme for the echo example looks as follows:
ping example
The ping example demonstrates the use of a solution security policy to control interactions between programs.
The ping example includes two programs: Client and Server.
The Server program provides two identical Ping and Pong methods that receive a number and return a modified number:
Ping(in UInt32 value, out UInt32 result);
Pong(in UInt32 value, out UInt32 result);
The Client program calls both of these methods in a different sequence. If the method call is denied by the solution security policy, the Failed to call... message is displayed.
The transport part of the ping example is virtually identical to its counterpart in the echo example. The only difference is that the ping example uses two methods (Ping and Pong) instead of one.
Solution security policy in the ping example
The solution security policy in this example allows you to start all programs, and allows any program to query the Core and Server programs. Queries to the Server program are managed by methods of the Flow security model.
The finite-state machine described in the configuration of the request_state Flow security model object has two states: ping_next and pong_next. The initial state is ping_next. Only transitions from ping_next to pong_next and the reverse are allowed.
When the Ping and Pong methods are called, the current state of the request_state object is checked. In the ping_next state, only a Ping call is allowed, in which case the state changes to pong_next. Likewise, in the pong_next state, only a Pong call is allowed, in which case the state changes to ping_next.
Therefore, the Ping and Pong methods can be called only in succession.
security.psl
/* Solution security policy for demonstrating use of the
* Flow security model in the ping example */
/* Include PSL files containing formal representations of
* Base and Flow security models */
use nk.base._
use nk.flow._
/* Create Flow security model object */
policy object request_state : Flow {
type States = "ping_next" | "pong_next"
config = {
states : ["ping_next" , "pong_next"],
initial : "ping_next",
transitions : {
"ping_next" : ["pong_next"],
"pong_next" : ["ping_next"]
}
}
}
/* Startup of all programs is allowed. */
execute {
grant ()
}
/* All requests are allowed. */
request {
grant ()
}
/* All responses are allowed. */
response {
grant ()
}
/* Including EDL files */
use EDL kl.core.Core
use EDL ping.Client
use EDL ping.Server
use EDL Einit
/* When the Server program is started, initiate this program with the finite-state machine */
execute dst=ping.Server {
request_state.init {sid: dst_sid}
}
/* When the Ping method is called, verify that the finite-state machine is in the ping_next state.
If it is, allow the Ping method call and switch the finite-state machine to the pong_next state. */
request dst=ping.Server, endpoint=controlimpl.connectionimpl, method=Ping {
request_state.allow {sid: dst_sid, states: ["ping_next"]}
request_state.enter {sid: dst_sid, state: "pong_next"}
}
/* When the Pong method is called, verify that the finite-state machine is in the pong_next state.
If it is, allow the Pong method call and switch the finite-state machine to the ping_next state. */
request dst=ping.Server, endpoint=controlimpl.connectionimpl, method=Pong {
request_state.allow {sid: dst_sid, states: ["pong_next"]}
request_state.enter {sid: dst_sid, state: "ping_next"}
}
Example files
The code of the example and build scripts are available at the following path:
/opt/KasperskyOS-Community-Edition-<version>/examples/ping
Building and running example
See Building and running examples section.
Page top
net_with_separate_vfs example
This example presents a basic case of network interaction using Berkeley sockets.
The example consists of Client and Server programs linked by a TCP socket using a loopback interface. Standard POSIX functions are used in the code of the programs.
To connect programs using a socket through a loopback, they must use the same network stack instance. This means that they must interact with a "shared" VFS program (in this example, this program is called NetVfs).
The CMake system, which is included with KasperskyOS Community Edition, is used to build and run the example.
Example files
The code of the example and build scripts are available at the following path:
/opt/KasperskyOS-Community-Edition-<version>/examples/net_with_separate_vfs
Building and running example
See Building and running examples section.
Page top
net2_with_separate_vfs example
This example demonstrates the special features of a solution in which a program uses standard POSIX functions to interact with an external server.
The net2_with_separate_vfs example is a modified net_with_separate_vfs example. In contrast to the net_with_separate_vfs example, in this example a program interacts over the network with an external server rather than another program running in KasperskyOS.
This example consists of the Client program running in KasperskyOS on QEMU or Raspberry Pi and the Server program running in a Linux host operating system. The Client program and Server program are bound by a TCP socket. Standard POSIX functions are used in the code of the Client program.
To connect the Client program and the Server program using a socket, the Client program must interact with the NetVfs program. During the build, the NetVfs program is linked to a network driver that supports interaction with the Server program running in Linux.
The CMake system, which is included with KasperskyOS Community Edition, is used to build and run the example.
Example files
The code of the example and build scripts are available at the following path:
/opt/KasperskyOS-Community-Edition-<version>/examples/net2_with_separate_vfs
Building and running example
See Building and running examples section.
To ensure that an example runs correctly, you must run the Server program in a Linux host operating system or on a computer connected to Raspberry Pi.
After performing the build, the server executable file of the Server program is located in the following directory:
/opt/KasperskyOS-Community-Edition-<version>/examples/net2_with_separate_vfs/build/host/server/
To independently build the executable file of the Server program, you need to run the following commands:
$ cd net2_with_separate_vfs/server/src/
$ gcc -o server server.c
embedded_vfs example
This example demonstrates how to embed the virtual file system (VFS) provided in KasperskyOS Community Edition into a program being developed.
In this example, the Client program fully encapsulates the VFS implementation from KasperskyOS Community Edition. This lets you eliminate the use of IPC for all the standard I/O functions (stdio.h, socket.h, etc.) for debugging or performance improvement purposes, for example.
The Client program tests the following operations:
- Create a folder.
- Create and delete a file.
- Read from a file and write to a file.
Supplied resources
The example includes the hdd.img image of a hard drive with the FAT32 file system.
This example does not contain an implementation of drivers of block devices used by the Client. These drivers (the ATA and SDCard programs) are provided in KasperskyOS Community Edition and are added in the build file ./CMakeLists.txt.
Example files
The code of the example and build scripts are available at the following path:
/opt/KasperskyOS-Community-Edition-<version>/examples/embedded_vfs
Building and running example
To run an example on QEMU, go to the directory containing the example, build the example and run the following commands:
$ cd build/einit
# Before running the following command, be sure that the path to
# the directory with the qemu-system-aarch64 executable file is saved in
# the PATH environment variable. If it is not there,
# add it to the PATH variable.
$ qemu-system-aarch64 -m 2048 -machine vexpress-a15 -nographic -monitor none -sd hdd.img -kernel kos-qemu-image
See also Building and running examples section.
Page top
embed_ext2_with_separate_vfs example
This example shows how to embed a new file system into the virtual file system (VFS) that is provided in KasperskyOS Community Edition.
In this example, the Client program tests the operation of file systems (ext2, ext3, ext4) on block devices. To do so, the Client queries the virtual file system (the FileVfs program) via IPC, and FileVfs in turn queries the block device via IPC.
The ext2 and ext3 file systems work with the default settings. The ext4 file system works if you disable extent (mkfs.ext4 -O ^64bit,^extent /dev/foo).
Example files
The code of the example and build scripts are available at the following path:
/opt/KasperskyOS-Community-Edition-<version>/examples/embed_ext2_with_separate_vfs
Building and running example
To run an example on QEMU, go to the directory containing the example, build the example and run the following commands:
$ cd build/einit
# Before running the following command, be sure that the path to
# the directory with the qemu-system-aarch64 executable file is saved in
# the PATH environment variable. If it is not there,
# add it to the PATH variable.
$ qemu-system-aarch64 -m 2048 -machine vexpress-a15 -nographic -monitor none -sd hdd.img -kernel kos-qemu-image
See also Building and running examples section.
Preparing an SD card to run on Raspberry Pi 4 B
To run the embed_ext2_with_separate_vfs example on Raspberry Pi 4 B, the SD card needs to have both a bootable partition with the solution image as well as 3 additional partitions with the ext2, ext3 and ext4 file systems, respectively.
multi_vfs_ntpd example
This example shows how to use an external NTP server in KasperskyOS. The kl.Ntpd program is included in KasperskyOS Community Edition and is an implementation of an NTP client, which gets time parameters from external NTP servers in the background and passes them to the KasperskyOS kernel.
The example also demonstrates the use of various virtual file systems (VFS) in a single solution. The example uses different VFS to access the functions for working with the file system and functions for working with the network:
- The
VfsNetprogram is used for working with the network. - The
VfsRamfsandVfsSdCardFsprograms are used for working with the file system.
The Client program uses standard libc library functions for getting time data. These functions are converted into queries to the VFS program via IPC.
The CMake system, which is included with KasperskyOS Community Edition, is used to build and run the example.
Supplied resources
The following configuration files are included in the example:
./resources/include/config.h.incontains a description of the backend file system that will be used in the solution:sdcardorramfs.A separate VFS program (
VfsSdCardFsorVfsRamfs, respectively) is used for each backend in the solution.- The
./resources/ramfs/etcand/resources/sdcard/etcdirectories contain configuration files for the VFS andNtpdprograms. The standardntpd.confsyntax is used for thentpdprogram configuration.
Example files
The code of the example and build scripts are available at the following path:
/opt/KasperskyOS-Community-Edition-<version>/examples/multi_vfs_ntpd
Building and running example
To run an example on QEMU, go to the directory containing the example, build the example and run the following commands:
$ cd build/einit
# Before running the following command, be sure that the path to
# the directory with the qemu-system-aarch64 executable file is saved in
# the PATH environment variable. If it is not there,
# add it to the PATH variable.
$ qemu-system-aarch64 -m 2048 -machine vexpress-a15 -nographic -monitor none -sd sdcard0.img -kernel kos-qemu-image
See also Building and running examples section.
Page top
multi_vfs_dns_client example
This example shows how to use an external DNS server in KasperskyOS.
The example also demonstrates the use of various virtual file systems (VFS) in a single solution. The example uses different VFS to access the functions for working with the file system and functions for working with the network:
- The
VfsNetprogram is used for working with the network. - The
VfsRamfsandVfsSdCardFsprograms are used for working with the file system.
The Client program uses standard libc library functions for contacting an external DNS service. These functions are converted into queries to the VfsNet program via IPC.
The CMake system, which is included with KasperskyOS Community Edition, is used to build and run the example.
Supplied resources
The following configuration files are included in the example:
./resources/include/config.h.incontains a description of the backend file system that will be used in the solution:sdcardorramfs.A separate VFS program (
VfsSdCardFsorVfsRamfs, respectively) is used for each backend in the solution.- The
./resources/ramfs/etcand/resources/sdcard/etcdirectories contain configuration files for the VFS program.
Example files
The code of the example and build scripts are available at the following path:
/opt/KasperskyOS-Community-Edition-<version>/examples/multi_vfs_dns_client
Building and running example
To run an example on QEMU, go to the directory containing the example, build the example and run the following commands:
$ cd build/einit
# Before running the following command, be sure that the path to
# the directory with the qemu-system-aarch64 executable file is saved in
# the PATH environment variable. If it is not there,
# add it to the PATH variable.
$ qemu-system-aarch64 -m 2048 -machine vexpress-a15 -nographic -monitor none -sd sdcard0.img -kernel kos-qemu-image
See also Building and running examples section.
Page top
multi_vfs_dhcpcd example
Example use of the kl.rump.Dhcpcd program.
The Dhcpcd program is an implementation of a DHCP client, which gets network interface parameters from an external DHCP server in the background and passes them to a virtual file system (hereinafter referred to as a VFS).
The example also demonstrates the use of different VFSes in a single solution. The example uses different VFS to access the functions for working with the file system and functions for working with the network:
- The
VfsNetprogram is used for working with the network. - The
VfsRamfsandVfsSdCardFsprograms are used for working with the file system.
The Client program uses standard libc library functions for getting information on network interfaces (ioctl). These functions are converted into queries to the VFS program via IPC.
The CMake system, which is included with KasperskyOS Community Edition, is used to build and run the example.
Supplied resources
The following configuration files are included in the example:
./resources/include/config.h.incontains a description of the backend file system that will be used in the solution:sdcardorramfs.A separate VFS program (
VfsSdCardFsorVfsRamfs, respectively) is used for each backend in the solution.- The
./resources/ramfs/etcand/resources/sdcard/etcdirectories contain configuration files for the VFS andDhcpcdprograms. The standarddhcpcd.confsyntax is used for thedhcpcdprogram configuration.
Example files
The code of the example and build scripts are available at the following path:
/opt/KasperskyOS-Community-Edition-<version>/examples/multi_vfs_dhcpcd
Building and running example
To run an example on QEMU, go to the directory containing the example, build the example and run the following commands:
$ cd build/einit
# Before running the following command, be sure that the path to
# the directory with the qemu-system-aarch64 executable file is saved in
# the PATH environment variable. If it is not there,
# add it to the PATH variable.
$ qemu-system-aarch64 -m 2048 -machine vexpress-a15 -nographic -monitor none -sd sdcard0.img -kernel kos-qemu-image
See also Building and running examples section.
Page top
mqtt_publisher (Mosquitto) example
Example use of the MQTT protocol in KasperskyOS.
In this example, an MQTT subscriber must be started on the host operating system, and an MQTT publisher must be started on KasperskyOS. The Publisher program is an implementation of an MQTT publisher that publishes the current time with a 5-second interval.
When the example starts and runs successfully, an MQTT subscriber started on the host operating system prints a "received PUBLISH" message with a "datetime" topic.
The example also demonstrates the use of various virtual file systems (VFS) in a single solution. The example uses different VFS to access the functions for working with the file system and functions for working with the network:
- The
VfsNetprogram is used for working with the network. - The
VfsRamfsandVfsSdCardFsprograms are used for working with the file system.
The CMake system, which is included with KasperskyOS Community Edition, is used to build and run the example.
Starting Mosquitto
To run this example, a Mosquitto MQTT broker must be installed and started on the host system. To install and start Mosquitto, run the following commands:
$ sudo apt install mosquitto mosquitto-clients
$ sudo /etc/init.d/mosquitto start
To start an MQTT subscriber on the host system, run the following command:
$ mosquitto_sub -d -t "datetime"
Supplied resources
The following configuration files are included in the example:
./resources/include/config.h.incontains a description of the backend file system that will be used in the solution:sdcardorramfs.A separate VFS program (
VfsSdCardFsorVfsRamfs, respectively) is used for each backend in the solution.- The
./resources/ramfs/etcand/resources/sdcard/etcdirectories contain configuration files for theVFS,DhcpcdandNtpdprograms.
Example files
The code of the example and build scripts are available at the following path:
/opt/KasperskyOS-Community-Edition-<version>/examples/mqtt_publisher
Building and running example
To run an example on QEMU, go to the directory containing the example, build the example and run the following commands:
$ cd build/einit
# Before running the following command, be sure that the path to
# the directory with the qemu-system-aarch64 executable file is saved in
# the PATH environment variable. If it is not there,
# add it to the PATH variable.
$ qemu-system-aarch64 -m 2048 -machine vexpress-a15 -nographic -monitor none -sd sdcard0.img -kernel kos-qemu-image
See also Building and running examples section.
Page top
mqtt_subscriber (Mosquitto) example
Example use of the MQTT protocol in KasperskyOS.
In this example, an MQTT publisher must be started on the host operating system, and an MQTT subscriber must be started on KasperskyOS. The Subscriber program is an implementation of an MQTT subscriber.
When the example starts and runs successfully, an MQTT subscriber started on KasperskyOS prints a "Got message with topic: my/awesome/topic, payload: hello" message.
The example also demonstrates the use of various virtual file systems (VFS) in a single solution. The example uses different VFS to access the functions for working with the file system and functions for working with the network:
- The
VfsNetprogram is used for working with the network. - The
VfsRamfsandVfsSdCardFsprograms are used for working with the file system.
The CMake system, which is included with KasperskyOS Community Edition, is used to build and run the example.
Starting Mosquitto
To run this example, a Mosquitto MQTT broker must be installed and started on the host system. To install and start Mosquitto, run the following commands:
$ sudo apt install mosquitto mosquitto-clients
$ sudo /etc/init.d/mosquitto start
To start an MQTT publisher on the host system, run the following command:
$ mosquitto_pub -t "my/awesome/topic" -m "hello"
Supplied resources
The following configuration files are included in the example:
./resources/include/config.h.incontains a description of the backend file system that will be used in the solution:sdcardorramfs.A separate VFS program (
VfsSdCardFsorVfsRamfs, respectively) is used for each backend in the solution.- The
./resources/ramfs/etcand/resources/sdcard/etcdirectories contain configuration files for theVFS,DhcpcdandNtpdprograms.
Example files
The code of the example and build scripts are available at the following path:
/opt/KasperskyOS-Community-Edition-<version>/examples/mqtt_subscriber
Building and running example
To run an example on QEMU, go to the directory containing the example, build the example and run the following commands:
$ cd build/einit
# Before running the following command, be sure that the path to
# the directory with the qemu-system-aarch64 executable file is saved in
# the PATH environment variable. If it is not there,
# add it to the PATH variable.
$ qemu-system-aarch64 -m 2048 -machine vexpress-a15 -nographic -monitor none -sd sdcard0.img -kernel kos-qemu-image
See also Building and running examples section.
Page top
gpio_input example
Example use of the GPIO driver.
This example lets you verify the functionality of GPIO input pins. The "gpio0" port is used. All pins except those indicated in exceptionPinArr array are set for input by default. The voltage on the pins corresponds to the state of the registers of the pull-up resistors. The state of all pins, starting from GPIO0 (accounting for the pins indicated in the exceptionPinArr array), will be read in succession. Messages about the state of the pins will be displayed on the console. The delay between the readings of adjacent pins is determined by the DELAY_S macro (the time is indicated in seconds).
exceptionPinArr is an array of GPIO pin numbers that need to be excluded from the example. This may be necessary if some pins are already being used for other functions, e.g. if pins are being used for a UART connection during debugging.
If you build and run this example on QEMU, an error will occur. This is the expected behavior, because there is no GPIO driver for QEMU.
If you build and run this example on Raspberry Pi 4 B, an error will occur.
Example files
The code of the example and build scripts are available at the following path:
/opt/KasperskyOS-Community-Edition-<version>/examples/gpio_input
Building and running example
See Building and running examples section.
Page top
gpio_output example
Example use of the GPIO driver.
This example lets you verify the functionality of GPIO output pins. The "gpio0" port is used. The initial state of all GPIO pins should correspond to a logical zero (no voltage on the pin). All pins other than those indicated in the exceptionPinArr array are configured for output. Each pin, starting with GPIO0 (accounting for those indicated in the exceptionPinArr array), will be sequentially changed to a logical one (voltage on the pin) and then to a logical zero. The delay between the changes of pin state is determined by the DELAY_S macro (the time is indicated in seconds). The pins are turned on/off from GPIO0 to GPIO27 and then back against to GPIO0.
exceptionPinArr is an array of GPIO pin numbers that need to be excluded from the example. This may be necessary if some pins are already being used for other functions, e.g. if pins are being used for a UART connection during debugging.
If you build and run this example on QEMU, an error will occur. This is the expected behavior, because there is no GPIO driver for QEMU.
If you build and run this example on Raspberry Pi 4 B, an error will occur.
Example files
The code of the example and build scripts are available at the following path:
/opt/KasperskyOS-Community-Edition-<version>/examples/gpio_output
Building and running example
See Building and running examples section.
Page top
gpio_interrupt example
Example use of the GPIO driver.
This example lets you verify the functionality of GPIO pin interrupts. The "gpio0" port is used. In the pinsBitmap bitmask of the CallBackContext interrupt context, the pins from exceptionPinArr array are marked as handled so that the example can properly terminate later. All pins other than those indicated in the exceptionPinArr array are switched to the PINS_MODE state. An interrupt handler will be registered for all pins other than those indicated in the exceptionPinArr array.
In an endless loop, the example checks whether the pinsBitmap bitmask from the CallBackContext interrupt context is equal to the DONE_BITMASK bitmask (which corresponds to the condition when an interrupt has occurred on each GPIO pin). Additionally, the handler function for the latest interrupted pin is removed in the loop. When a pin is interrupted for the first time, the handler function is called, which marks the corresponding pin in the pinsBitmap bitmask in the CallBackContext interrupt context. The handler function for this pin is removed later.
Keep in mind how the example may be affected by the initial state of the registers of pull-up resistors for each pin.
Interrupts for the GPIO_EVENT_LOW_LEVEL and GPIO_EVENT_HIGH_LEVEL events are not supported.
exceptionPinArr is an array of GPIO pin numbers that need to be excluded from the example. This may be necessary if some pins are already being used for other functions, e.g. if pins are being used for a UART connection during debugging.
If you build and run this example on QEMU, an error will occur. This is the expected behavior, because there is no GPIO driver for QEMU.
If you build and run this example on Raspberry Pi 4 B, an error will occur.
Example files
The code of the example and build scripts are available at the following path:
/opt/KasperskyOS-Community-Edition-<version>/examples/gpio_interrupt
Building and running example
See Building and running examples section.
gpio_echo example
Example use of the GPIO driver.
This example makes it possible to verify the functionality of GPIO pins as well as the operation of GPIO interrupts. The "gpio0" port is used. The output pin (GPIO_PIN_OUT) should be connected to the input pin (GPIO_PIN_IN). The output pin (the pin number is defined in the GPIO_PIN_OUT macro) as well as the input pin (GPIO_PIN_IN) are configured. Use of the input pin is configured in the IN_MODE macro. The interrupt handler for the input pin is registered. The state of the output pin changes several times. If the example works correctly, then when the state of the output pin changes the interrupt handler will be called and will display the state of the input pin. What's more, the state of the output pin and the input pin must match.
If you build and run this example on QEMU, an error will occur. This is the expected behavior, because there is no GPIO driver for QEMU.
If you build and run this example on Raspberry Pi 4 B, an error will occur.
Example files
The code of the example and build scripts are available at the following path:
/opt/KasperskyOS-Community-Edition-<version>/examples/gpio_echo
Building and running example
See Building and running examples section.
Page top
koslogger example
This example demonstrates use of the spdlog library in KasperskyOS using the KOSLogger wrapper library.
In this example, the Client program creates log entries that are saved on an SD card (when running the example on Raspberry Pi) or in the image file named build/einit/sdcard0.img (when running the example in QEMU).
The example also demonstrates the use of various virtual file systems (VFS) in a single solution. The example uses different VFS to access the functions for working with the file system and functions for working with the network:
- The
VfsNetprogram is used for working with the network. - The
VfsRamfsandVfsSdCardFsprograms are used for working with the file system.
The kl.Ntpd program is included in KasperskyOS Community Edition and is an implementation of an NTP client, which gets time parameters from external NTP servers in the background and passes them to the KasperskyOS kernel.
The kl.rump.Dhcpcd program is included in KasperskyOS Community Edition and is an implementation of a DHCP client, which gets the parameters of network interfaces from an external DHCP server in the background and passes them to the virtual file system.
The CMake system, which is included with KasperskyOS Community Edition, is used to build and run the example.
Example files
The code of the example and build scripts are available at the following path:
/opt/KasperskyOS-Community-Edition-<version>/examples/koslogger
Building and running example
See Building and running examples section.
Page top
pcre example
This example demonstrates use of the pcre library in KasperskyOS.
In this example, the Client program uses the pcre library and prints the results to the console.
The CMake system, which is included with KasperskyOS Community Edition, is used to build and run the example.
Example files
The code of the example and build scripts are available at the following path:
/opt/KasperskyOS-Community-Edition-<version>/examples/pcre
Building and running example
See Building and running examples section.
Page top
messagebus example
This example demonstrates use of the MessageBus component in KasperskyOS.
In this example, the Publisher, SubscriberA and SubscriberB programs use the MessageBus component to exchange messages.
The MessageBus component implements the message bus. The Publisher program is the publisher that transfers messages to the bus. The SubscriberA and SubscriberB programs are the subscribers that receive messages from the bus.
The example also demonstrates the use of various virtual file systems (VFS) in a single solution. The example uses different VFS to access the functions for working with the file system and functions for working with the network:
- The
VfsNetprogram is used for working with the network. - The
VfsRamfsandVfsSdCardFsprograms are used for working with the file system.
The kl.Ntpd program is included in KasperskyOS Community Edition and is an implementation of an NTP client, which gets time parameters from external NTP servers in the background and passes them to the KasperskyOS kernel.
The kl.rump.Dhcpcd program is included in KasperskyOS Community Edition and is an implementation of a DHCP client, which gets the parameters of network interfaces from an external DHCP server in the background and passes them to the virtual file system.
The CMake system, which is included with KasperskyOS Community Edition, is used to build and run the example.
Example files
The code of the example and build scripts are available at the following path:
/opt/KasperskyOS-Community-Edition-<version>/examples/messagebus
Building and running example
See Building and running examples section.
Page top
I2c_ds1307_rtc example
This example demonstrates use of the i2c driver (Inter-Integrated Circuit) in KasperskyOS.
In this example, the I2cClient program uses the i2c driver interface.
The client library of the i2c driver is statically linked to the I2cClient program. The i2c driver implementation uses a BSP (Board Support Platform) subsystem for configuring clock frequencies (Clocks) and pins multiplexing (PinMux). Therefore, to ensure correct operation of the driver, you need to do the following:
- Link the
I2cClientprogram to thei2c_CLIENT_LIBclient library. - Link the
I2cClientprogram to thebsp_CLIENT_LIBclient library. - Create an IPC channel between the
I2cClientprogram and thekl.drivers.I2Cdriver. - Create an IPC channel between the
I2cClientprogram and thekl.drivers.BSPdriver.
The CMake system, which is included with KasperskyOS Community Edition, is used to build and run the example.
Example files
The code of the example and build scripts are available at the following path:
/opt/KasperskyOS-Community-Edition-<version>/examples/i2c_ds1307_rtc
Building and running example
This example is intended to run only on Raspberry Pi. For the example to work correctly, you must connect a DS1307Z real-time clock module to the i2c port.
See Building and running examples section.
Page top
iperf_separate_vfs example
This example demonstrates use of the iperf library in KasperskyOS.
In this example, the Server program uses the iperf library.
By default, the example uses network software emulation (SLIRP) in QEMU. If you configured TAP interfaces for QEMU, you need to change the network settings for starting QEMU (QEMU_NET_FLAGS variable) in the einit/CMakeLists.txt file to make sure that the example works correctly (for more details, see the comments in the file).
The example does not use DHCP, therefore the IP address of the network interface must be manually indicated in the code of the Server program (server/src/main.cpp). SLIRP uses the default values.
The iperf library in the example is used in server mode. To connect to this server, install the iperf3 program on the host machine and run it by using the iperf3 -c localhost command. If you configured TAP interfaces, indicate the current IP address instead of localhost.
The first startup of the example may take a long time because the iperf client uses /dev/urandom to fill packets with random data. To avoid this, run the iperf client with the --repeating-payload parameter.
The CMake system, which is included with KasperskyOS Community Edition, is used to build and run the example.
Example files
The code of the example and build scripts are available at the following path:
/opt/KasperskyOS-Community-Edition-<version>/examples/iperf_separate_vfs
Building and running example
See Building and running examples section.
Page top
Uart example
Example use of the UART driver.
This example shows how to print "Hello World!" to the appropriate port using the UART driver.
When running the example simulation in QEMU, -serial stdio is indicated in the QEMU flags. This means that the first UART port will be printed only to the standard stream of the host machine.
A full description of the UART driver interface is provided in the file /opt/KasperskyOS-Community-Edition-<version>/sysroot-aarch64-kos/include/uart/uart.h.
Example files
The code of the example and build scripts are available at the following path:
/opt/KasperskyOS-Community-Edition-<version>/examples/uart
Building and running example
See Building and running examples section.
Page top
spi_check_regs example
This example demonstrates use of the SPI (Serial Peripheral Interface) driver in KasperskyOS.
The example shows how to work with the SPI interface on the Sense HAT add-on board for Raspberry Pi. In this example, the Client program uses the SPI driver interface. The program opens an SPI channel, displays its parameters and sets the necessary operating mode. Then the program sends a data sequence over this channel and waits to receive the ID of the ATTiny controller installed on the Sense HAT board.
The client library of the SPI driver is statically linked to the Client program. The Client program also uses the gpio driver to set the controller operating mode and the BSP (Board Support Platform) subsystem for configuring clock frequencies (Clocks) and pins multiplexing (PinMux).
The CMake system, which is included with KasperskyOS Community Edition, is used to build and run the example.
Example files
The code of the example and build scripts are available at the following path:
/opt/KasperskyOS-Community-Edition-<version>/examples/spi_check_regs
Building and running example
This example is intended to run only on Raspberry Pi. For the example to work correctly, you must connect the Sense HAT module to the SPI port.
See Building and running examples section.
Page top
barcode_scanner example
This example demonstrates use of a USB (Universal Serial Bus) driver in KasperskyOS using the libevdev library.
In this example, the BarcodeScanner program uses the libevdev library for interaction with a barcode scanner connected to the USB port of Raspberry Pi.
The program waits for signals from the barcode scanner and prints the obtained data to stderr.
The CMake system, which is included with KasperskyOS Community Edition, is used to build and run the example.
Example files
The code of the example and build scripts are available at the following path:
/opt/KasperskyOS-Community-Edition-<version>/examples/barcode_scanner
Building and running example
This example is intended to run only on Raspberry Pi. For the example to work correctly, you must connect a barcode scanner running in keyboard emulation mode (such as Zebra Symbol LS2208) to the USB port.
See Building and running examples section.
Page top
perfcnt example
This example demonstrates use of the performance counters in KasperskyOS.
The example includes two programs: Worker and Monitor.
The Worker program performs computations in a loop by periodically loading the processor and utilizing memory.
The Monitor program uses the KnProfilerGetCounter() function of the libkos library to get the values of performance counters for the Worker program and prints them to the console.
The CMake system, which is included with KasperskyOS Community Edition, is used to build and run the example.
If you build and run this example on QEMU, some performance counters may not function correctly.
Example files
The code of the example and build scripts are available at the following path:
/opt/KasperskyOS-Community-Edition-<version>/examples/perfcnt
Building and running example
See Building and running examples section.
Page top
Licensing the application
The terms of use of the application are set out in the End User License Agreement or a similar document under which the application is used.
Page top
Data provision
KasperskyOS Community Edition does not save, process, or ask you for any personal information or any other information whatsoever.
Page top
Information about third-party code
Information about third-party code is contained in the file named legal_notices.txt in the application installation folder.
Page top
Trademark notices
Registered trademarks and endpoint marks are the property of their respective owners.
Arm and Mbed are registered trademarks or trademarks of Arm Limited (or its subsidiaries) in the US and/or elsewhere.
CentOS is a trademark or registered trademark of Red Hat, Inc. or its subsidiaries in the United States and other countries.
Debian is a registered trademark of Software in the Public Interest, Inc.
Docker and the Docker logo are trademarks or registered trademarks of Docker, Inc. in the United States and/or other countries. Docker, Inc. and other parties may also have trademark rights in other terms used herein.
Eclipse Mosquitto is a trademark of Eclipse Foundation, Inc.
GoogleTest is a trademark of Google LLC.
Intel and Core are trademarks of Intel Corporation in the U.S. and/or other countries.
Linux is the registered trademark of Linus Torvalds in the U.S. and other countries.
Raspberry Pi is a trademark of the Raspberry Pi Foundation.
Ubuntu is a registered trademark of Canonical Ltd.
Visual Studio and Windows are trademarks of the Microsoft group of companies.
Page top